

CD Pipeline
After your CI pipeline is ready, you can start building your CD pipeline. Devtron enables you to design your CD pipeline in a way that fully automates your deployments. Images from CI stage can be deployed to one or more environments through dedicated CD pipelines.
Creating CD Pipeline
Click the '+' sign on CI Pipeline to attach a CD Pipeline to it.
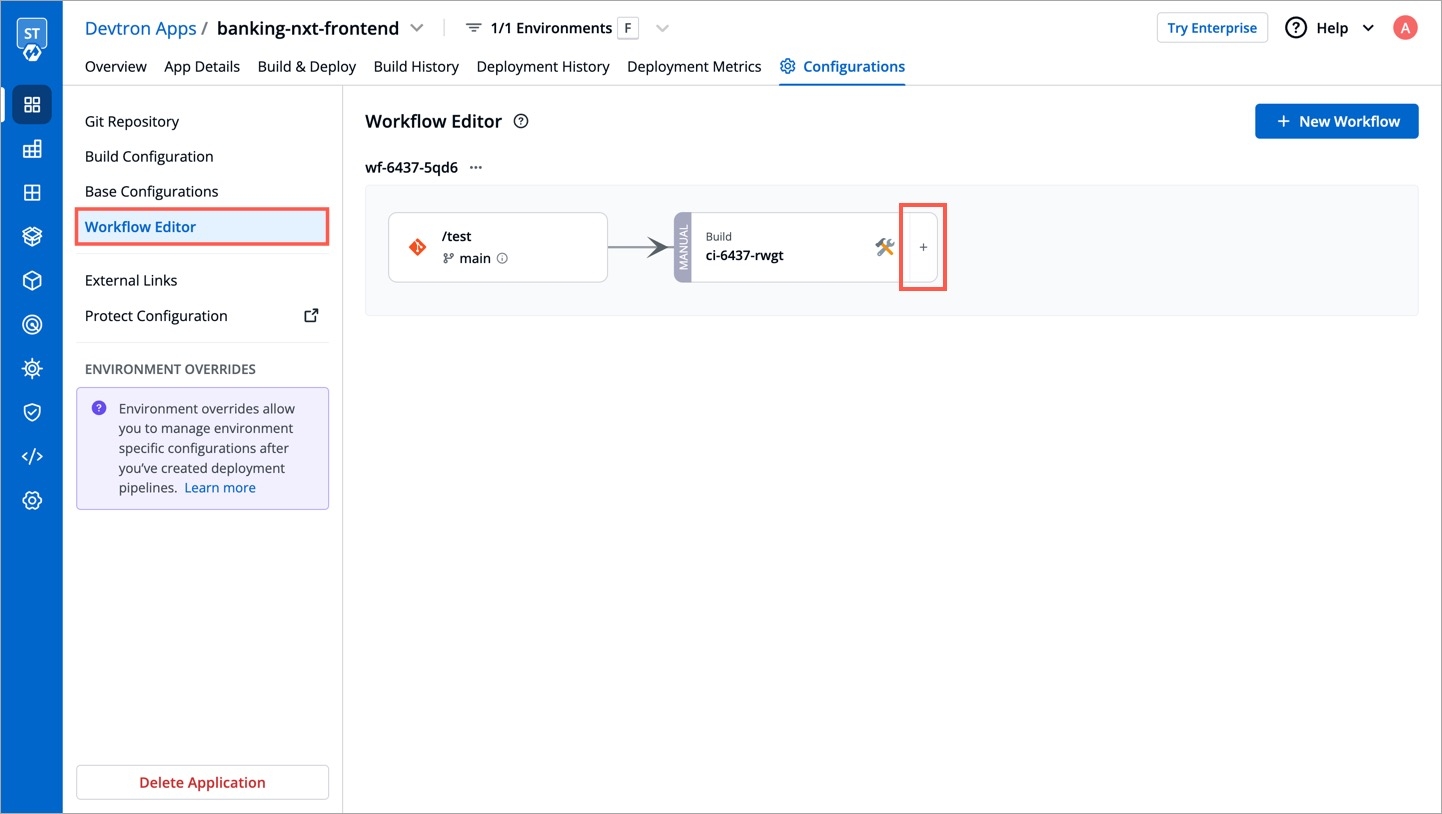
A basic Create deployment pipeline window will pop up.
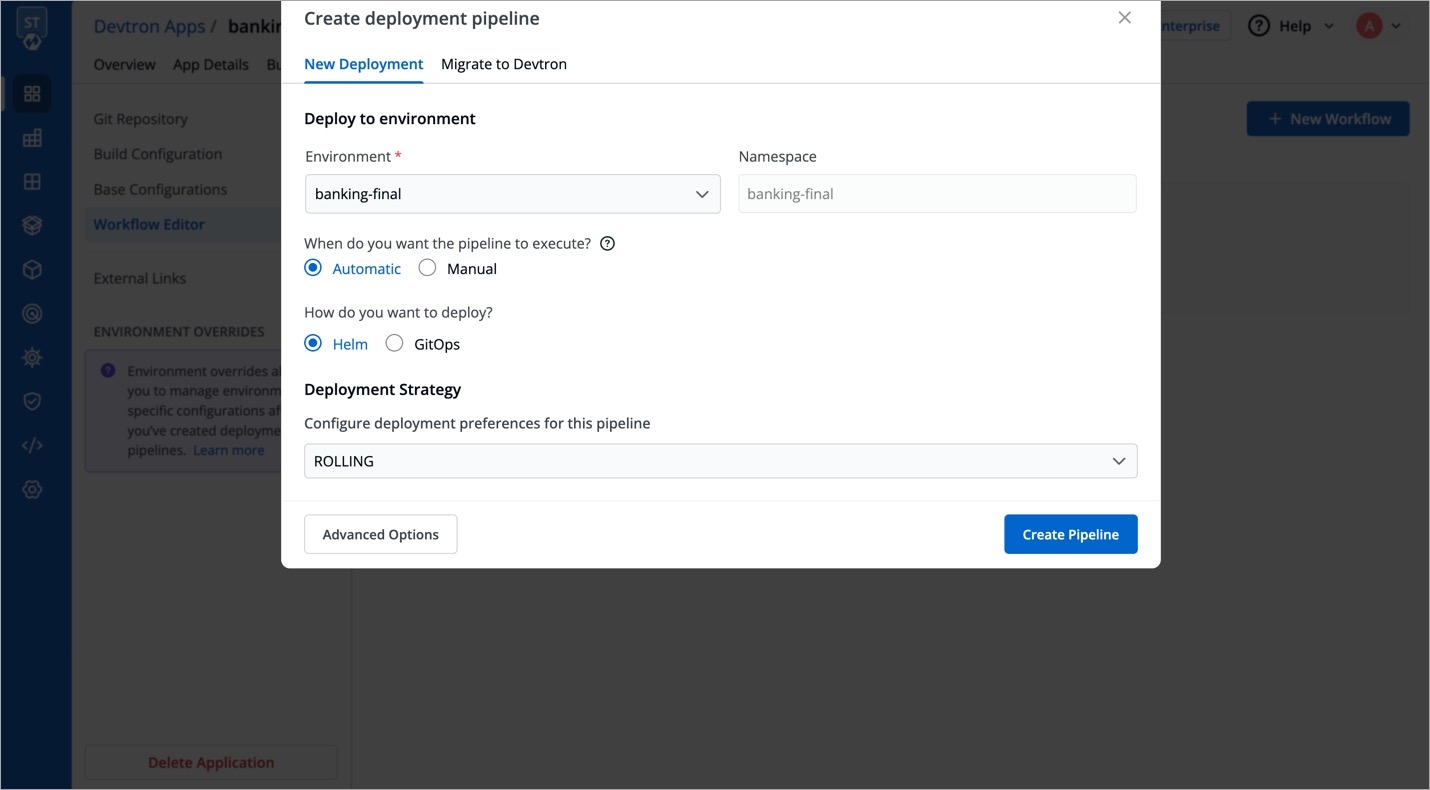
Here, you get two tabs:
New Deployment - Use this option to create new Helm/GitOps deployment.
Migrate to Devtron - Use this option if you wish to migrate your existing Helm Release/Argo CD Apps to Devtron.
New Deployment
The New Deployment tab displays the following sections:
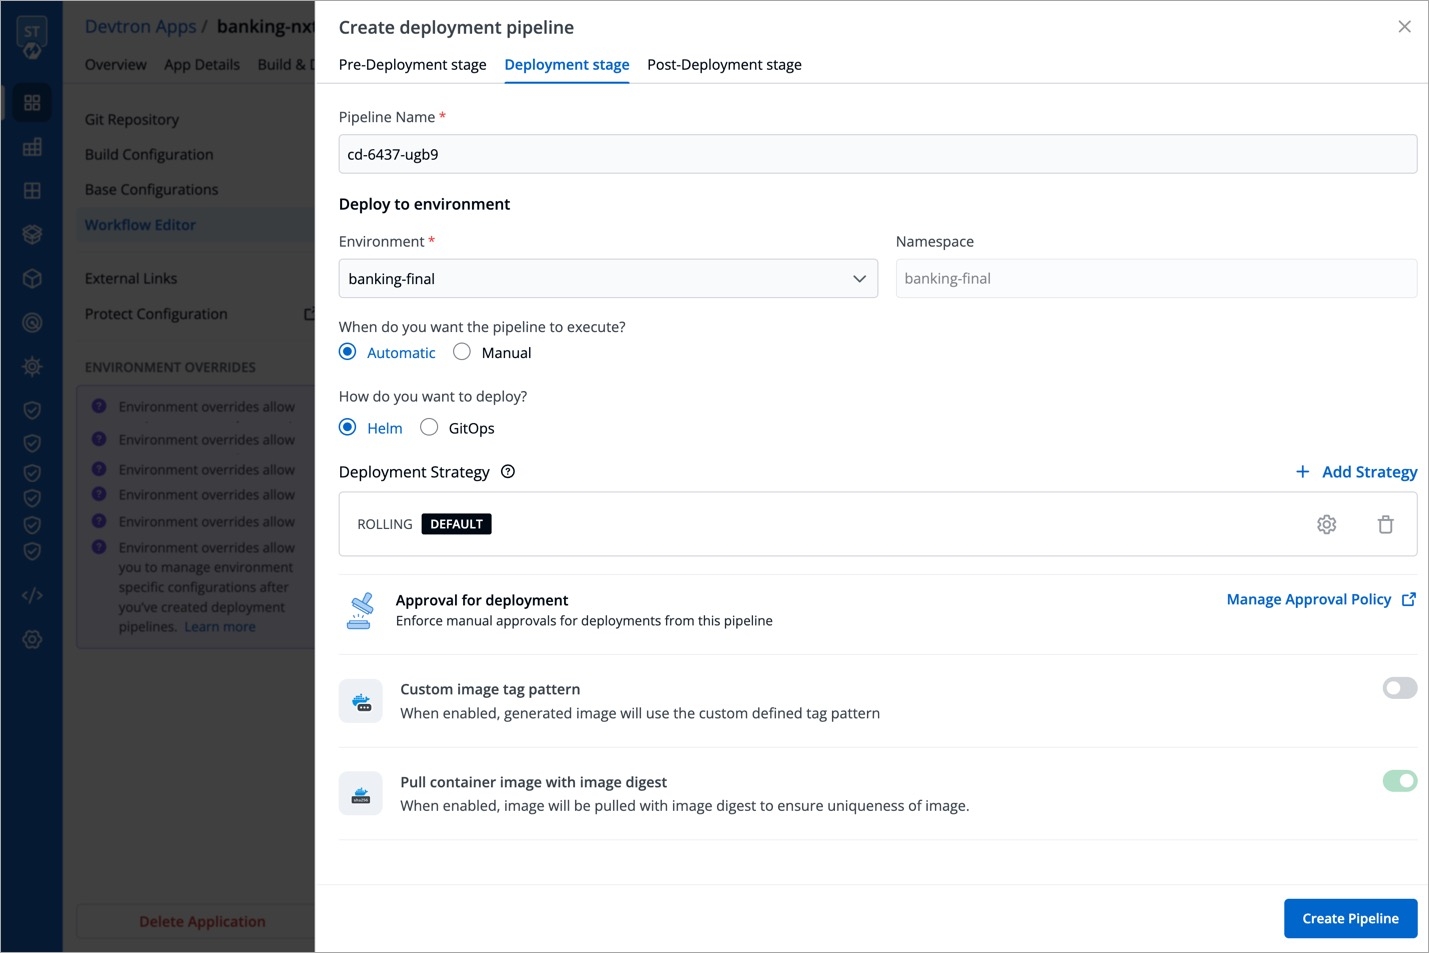
Deploy to Environment
This section expects four inputs from you:
Environment
Select the environment where you want to deploy your application
(List of available environments)
Namespace
Automatically populated based on the selected environment
Not Applicable
Trigger
When to execute the deployment pipeline
Automatic: Deployment triggers automatically when a new image completes the previous stage (build pipeline or another deployment pipeline) Manual: Deployment is not initiated automatically. You can trigger deployment with a desired image.
Deploying to an Isolated Environment?
In case you are choosing an isolated environment for deployment, you will get two additional options to choose from in the 'Deploy to Environment' window (check snapshot):
Do not push - A link to download the helm package will be available after the deployment. However, it will not push the helm package to the OCI registry.
Push to registry - This will generate and push the helm package to the OCI registry. Upon selecting this option, you will get two more fields:
Registry - Choose the OCI registry to which the helm chart package must be pushed. Only those registries that have
Push helm packagesenabled will be shown in the dropdown.Repository - Enter the repository name. You can find the username from your registry provider account (e.g., Docker Hub).
Deployment Strategy
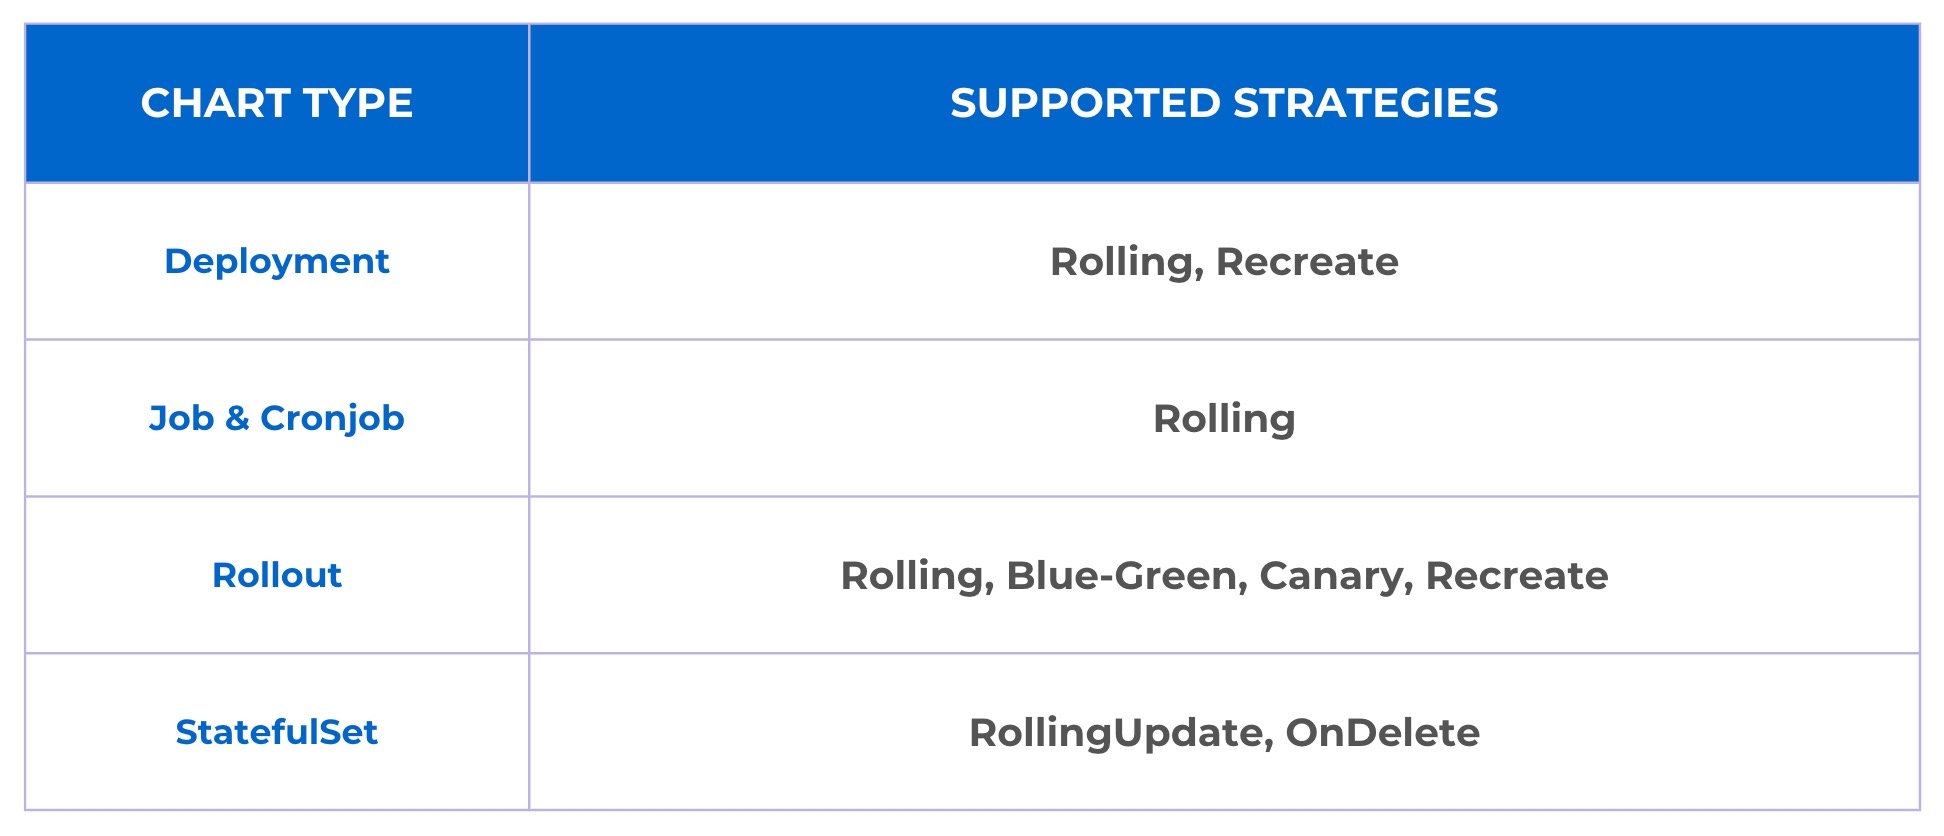
Devtron supports multiple deployment strategies depending on the deployment chart type.
Refer Deployment Strategies to know more about each strategy in depth.
The next section is Advanced Options and it comes with additional capabilities. This option is available at the bottom of the Create deployment pipeline window. However, if you don't need them, you may proceed with a basic CD pipeline and click Create Pipeline.
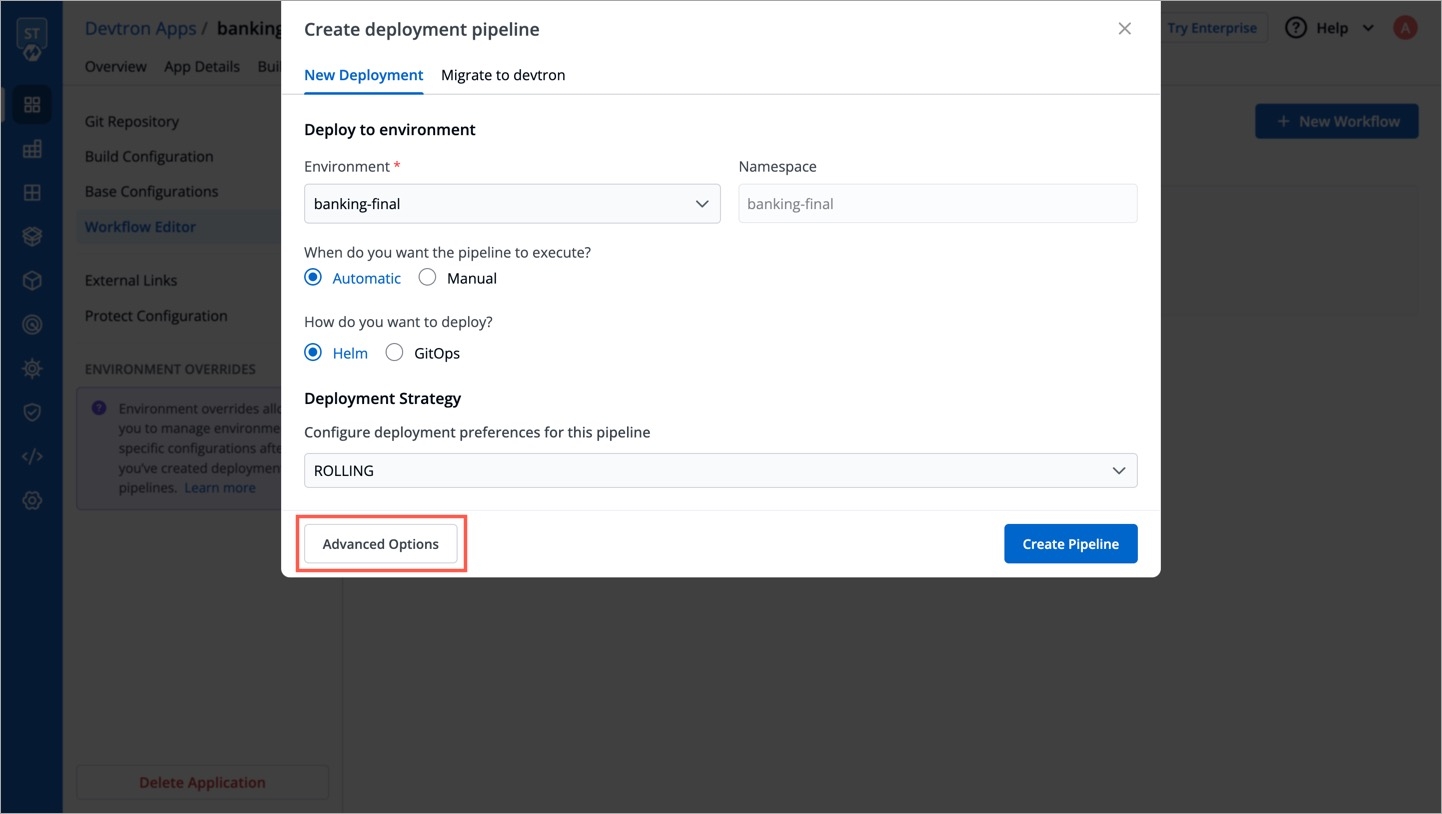
Now, the window will have 3 distinct tabs, and you will see the following additions:
Pre-Deployment Stage
If your deployment requires prior actions like DB migration, code quality check (QC), etc., you can use the Pre-deployment stage to configure such tasks.
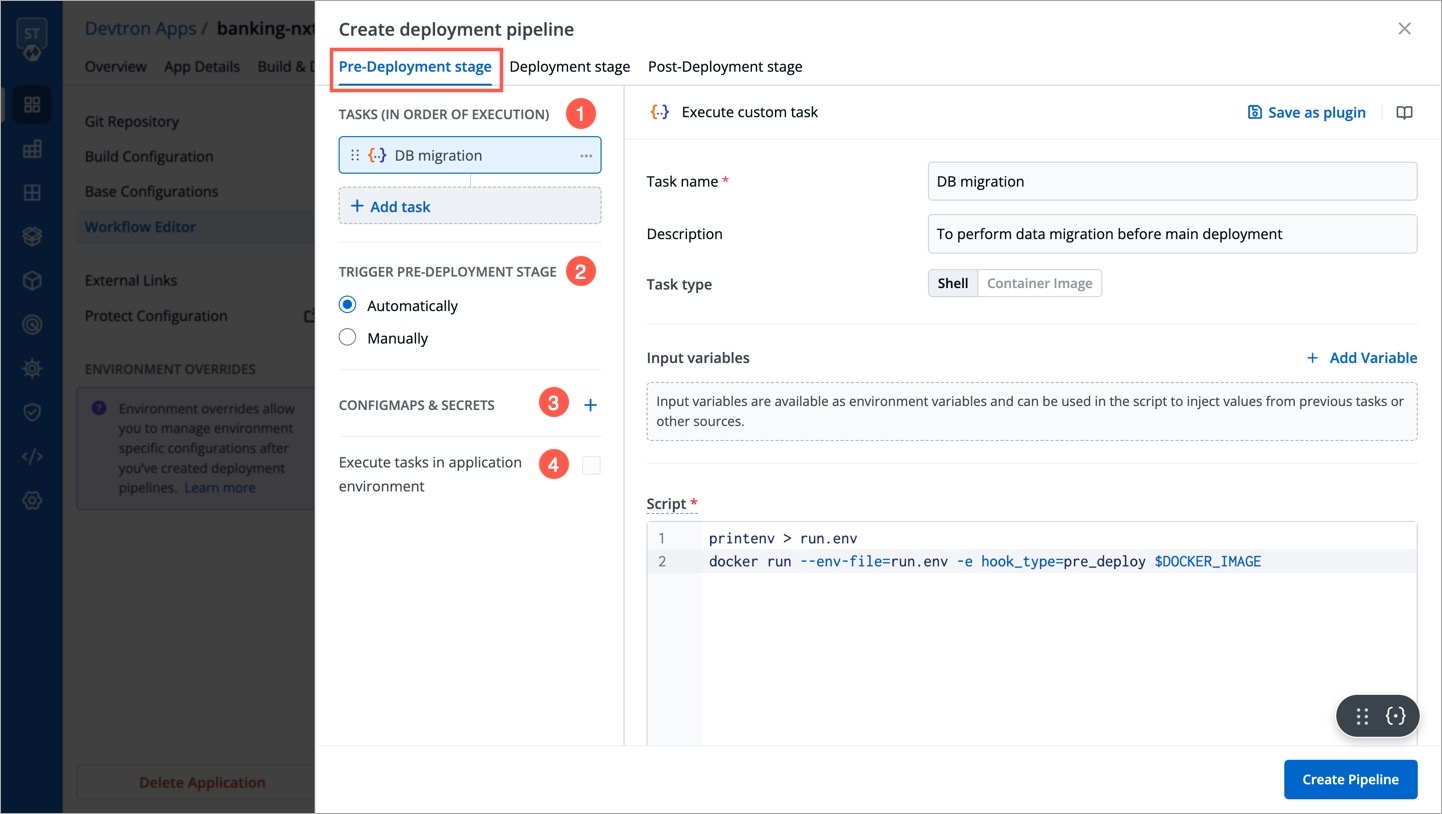
Tasks
Here you can add one or more tasks. The tasks can be re-arranged using drag-and-drop and they will be executed sequentially.
Trigger Pre-Deployment Stage
Refer the trigger types from here.
ConfigMaps & Secrets
Prerequisites
Make sure you have added ConfigMaps and Secrets in App Configuration.
If you want to use some configuration files and secrets in pre-deployment stages or post-deployment stages, then you can use the ConfigMaps & Secrets options. You will get them as a drop-down in the pre-deployment stage.
Execute tasks in application environment
These Pre-deployment CD / Post-deployment CD pods can be created in your deployment cluster or the devtron build cluster. If your scripts/tasks has some dependency on the deployment environment, you may run these pods in the deployment cluster. Thus, your scripts (if any) can interact with the cluster services that may not be publicly exposed.
Some tasks require extra permissions for the node where Devtron is installed. However, if the node already has the necessary permissions for deploying applications, there is no need to assign them again. Instead, you can enable the Execute tasks in application environment option for the pre-CD or post-CD steps. By default, this option is disabled.
To enable the Execute tasks in application environment option, follow these steps:
Go to the chart store and search for the devtron-in-clustercd chart.

Figure 7: 'devtron-in-clustercd' Chart Configure the chart according to your requirements and deploy it in the target cluster.
After the deployment, edit the devtron-cm configmap and add the following key-value pair:
ORCH_HOST: <host_url>/orchestrator/webhook/msg/nats Example: ORCH_HOST: http://xyz.devtron.com/orchestrator/webhook/msg/natsORCH_HOSTvalue should be same as ofCD_EXTERNAL_LISTENER_URLvalue which is passed in values.yaml.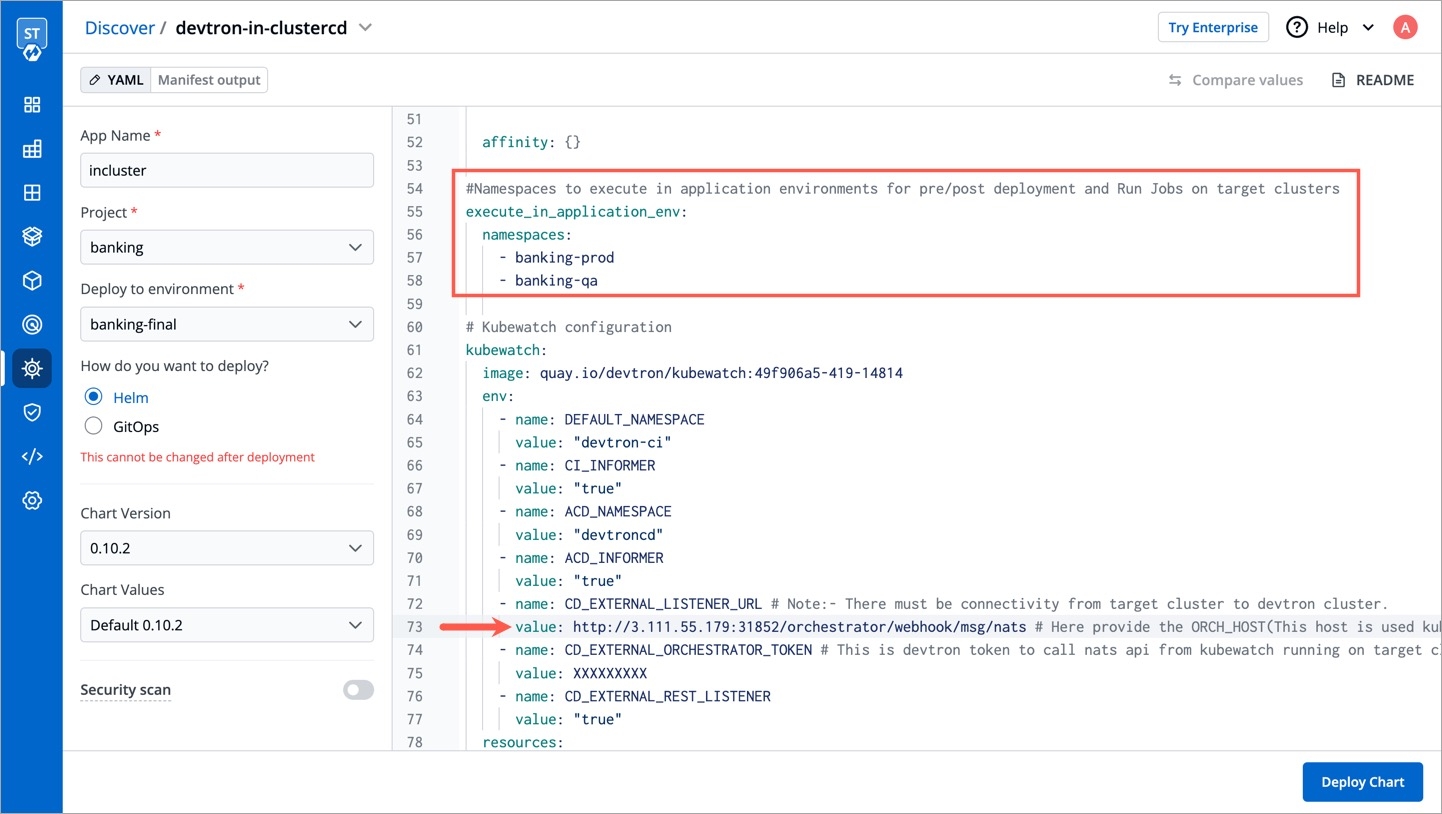
Figure 8: Configuration Delete the Devtron pod using the following command:
kubectl delete pod -l app=devtron -n devtroncdAgain navigate to the chart store and search for the "migration-incluster-cd" chart.
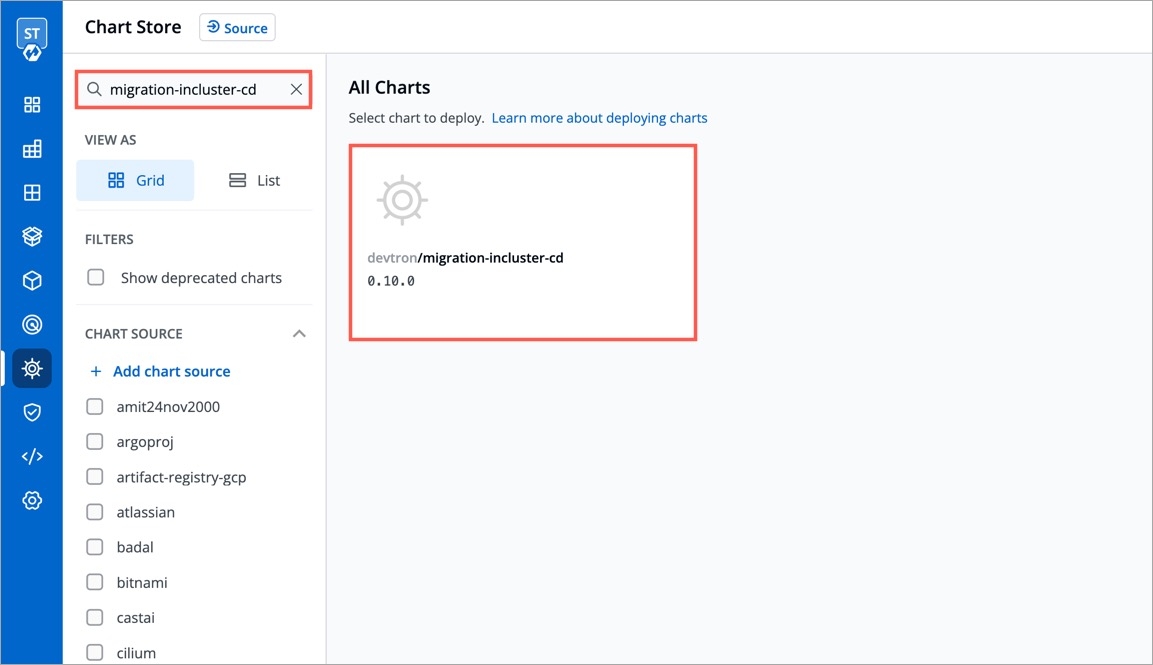
Figure 9: 'migration-incluster-cd' chart Edit the
cluster-nameandsecret namevalues within the chart. Thecluster namerefers to the name used when adding the cluster in the global configuration and for which you are going to enableExecute tasks in application environmentoption.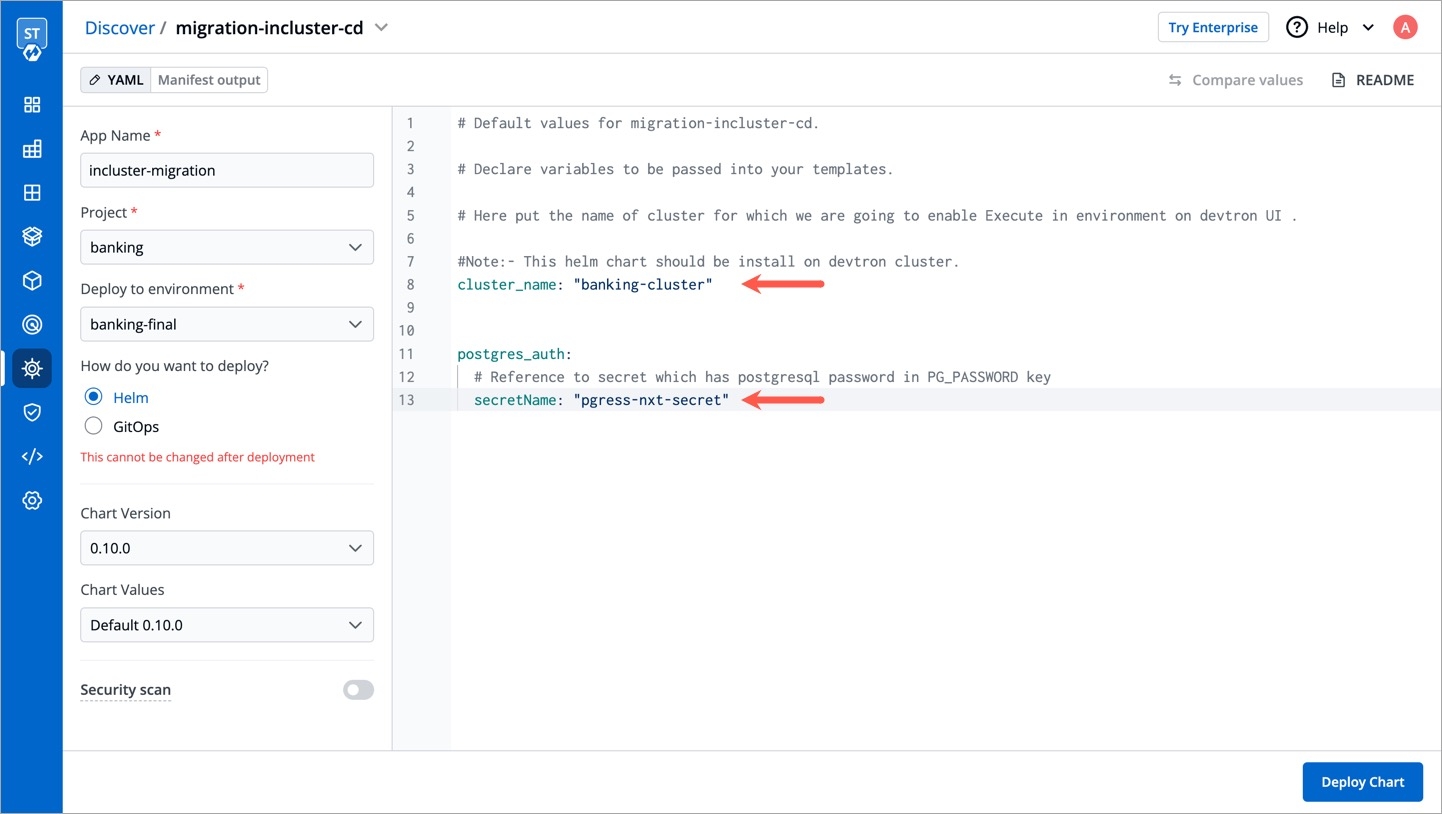
Figure 10: Configuration Deploy the chart in any environment within the Devtron cluster. Now you should be able to enable
Execute tasks in application environmentoption for an environment of target cluster.
Deployment Stage
Pipeline Name
Pipeline name will be auto-generated; however, you are free to modify the name as per your requirement.
Deployment Strategies
A deployment strategy is a method of updating, downgrading, or creating new versions of an application. The options you see under deployment strategy depend on the selected chart type (see Fig 3). Below are some deployment configuration-based strategies.
Blue-Green Strategy
Blue-green deployments involve running two versions of an application at the same time and moving traffic from the in-production version (the green version) to the newer version (the blue version).
blueGreen:
  autoPromotionSeconds: 30
  scaleDownDelaySeconds: 30
  previewReplicaCount: 1
autoPromotionEnabled: falseautoPromotionSeconds
It will make the rollout automatically promote the new ReplicaSet to active Service after this time has passed
scaleDownDelaySeconds
It is used to delay scaling down the old ReplicaSet after the active Service is switched to the new ReplicaSet
previewReplicaCount
It will indicate the number of replicas that the new version of an application should run
autoPromotionEnabled
It will make the rollout automatically promote the new ReplicaSet to the active service
Rolling Strategy
A rolling deployment slowly replaces instances of the previous version of an application with instances of the new version of the application. Rolling deployment typically waits for new pods to become ready via a readiness check before scaling down the old components. If a significant issue occurs, the rolling deployment can be aborted.
rolling:
  maxSurge: "25%"
maxUnavailable: 1maxSurge
No. of replicas allowed above the scheduled quantity
maxUnavailable
Maximum number of pods allowed to be unavailable
Canary Strategy
Canary deployments are a pattern for rolling out releases to a subset of users or servers. The idea is to first deploy the change to a small subset of servers, test it, and then roll the change out to the rest of the servers. The canary deployment serves as an early warning indicator with less impact on downtime: if the canary deployment fails, the rest of the servers aren't impacted.
canary:
  maxSurge: "25%"
  maxUnavailable: 1
  steps:
    - setWeight: 25
    - pause:
        duration: 15 # 15 sec
    - setWeight: 50
    - pause:
        duration: 1m # 1 min
    - setWeight: 75
    - pause:
duration: 1m # 1 minmaxSurge
It defines the maximum number of replicas the rollout can create to move to the correct ratio set by the last setWeight
maxUnavailable
The maximum number of pods that can be unavailable during the update
setWeight
It is the required percent of pods to move to the next step
duration
It is used to set the duration to wait to move to the next step
Recreate Strategy
The recreate strategy is a dummy deployment that consists of shutting down version 'A' and then deploying version 'B' after version 'A' is turned off.
A recreate deployment incurs downtime because, for a brief period, no instances of your application are running. However, your old code and new code do not run at the same time. It terminates the old version and releases the new one.
recreate:Unlike other strategies mentioned above, 'Recreate' strategy doesn't contain keys for you to configure.
Configure Deployment Strategies
To configure the CD pipeline for different deployment strategies, follow the steps below:
Select Add Strategy and select the deployment strategies you want to add.
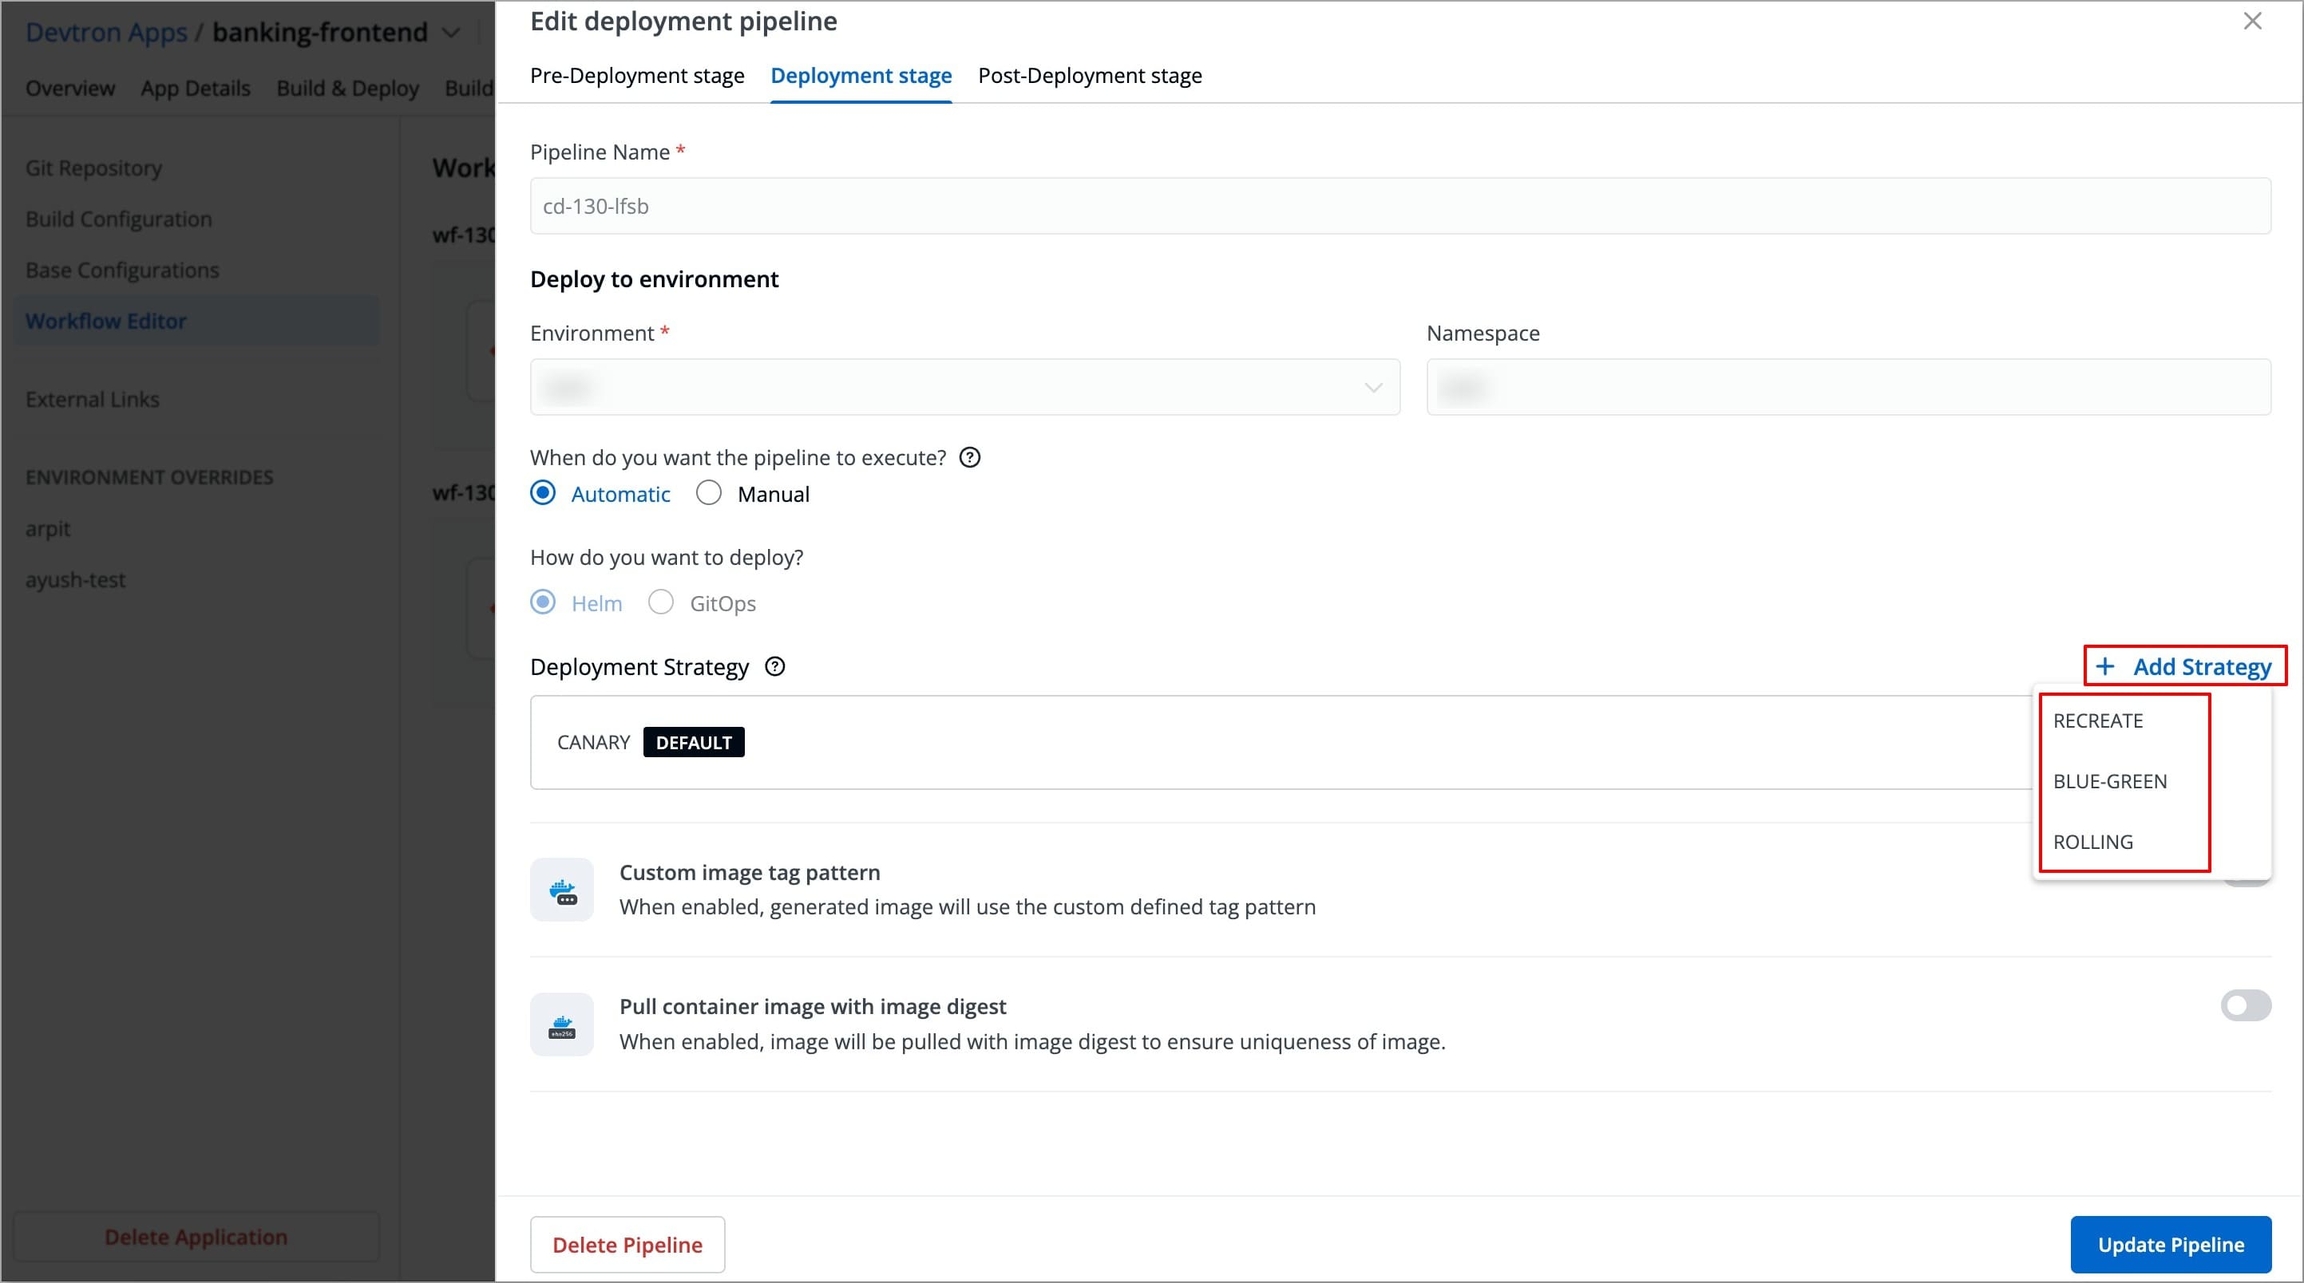
Figure 11: Adding Deployment Strategy
In case, you have multiple deployment strategies, you have to choose a default deployment strategy which are configured for the pipeline.

Figure 12: Selecting Default Deployment Strategy If in any scenario such as deploying a hotfix, if you need to use a different deployment strategy other than the default, you can change it from Build & Deploy section while triggering the deployment.
Note: You can only select the deployment strategies which are configured for that pipeline.
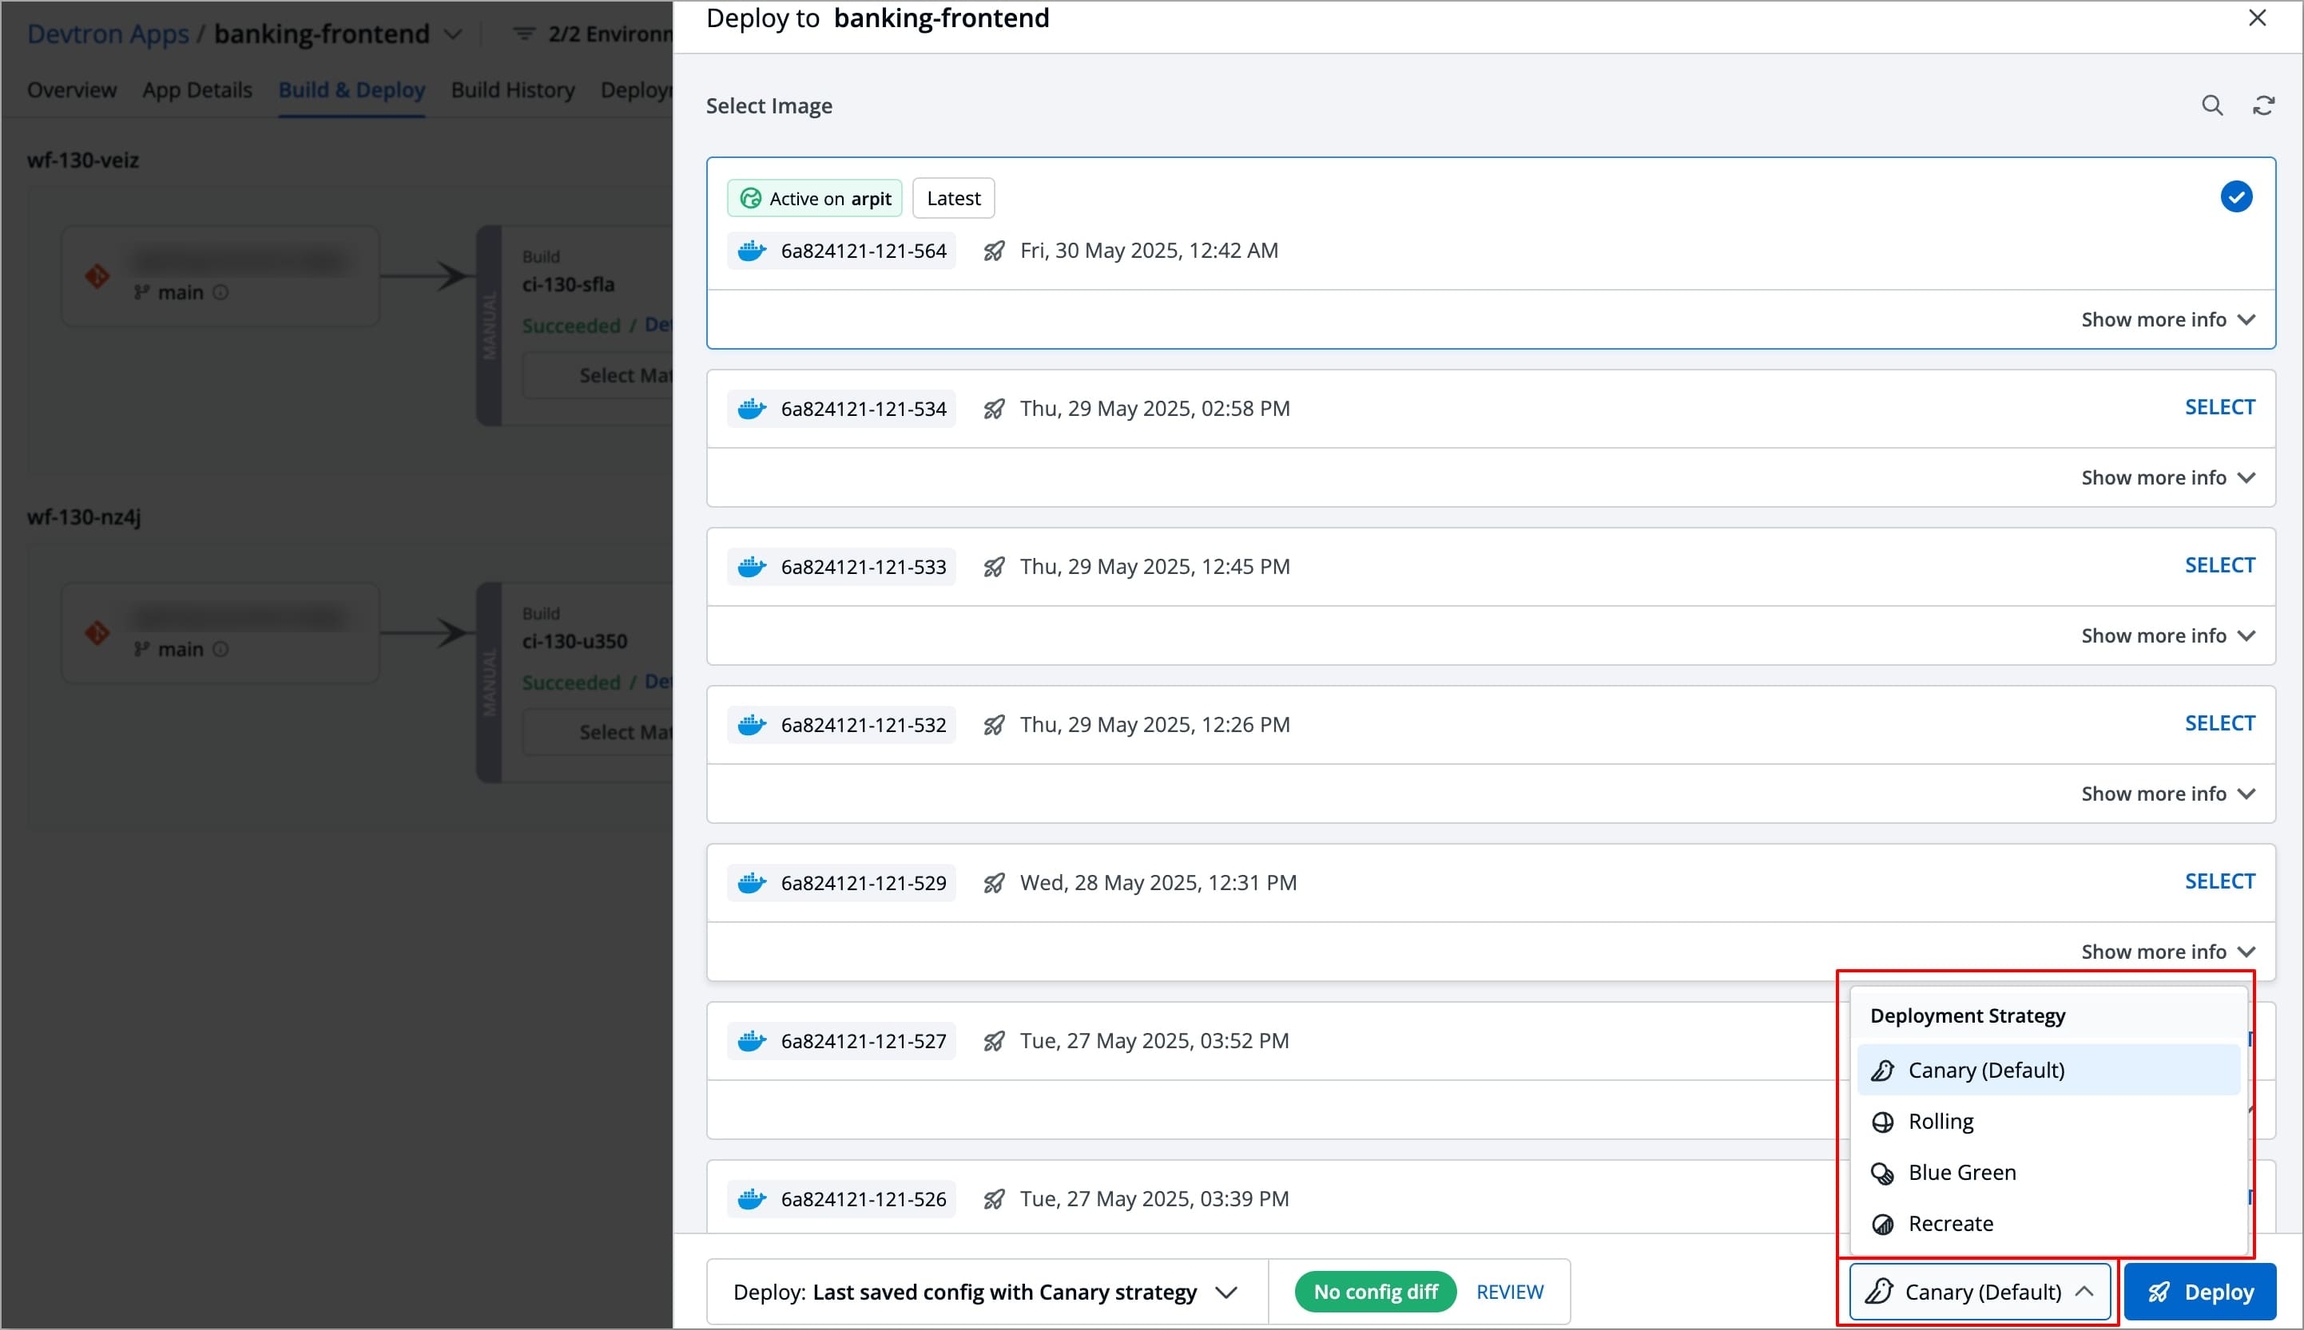
Figure 13: Selecting Deployment Strategy
Configure the deployment strategy by selecting the Settings icon next to it to edit the strategy template according to your use case.
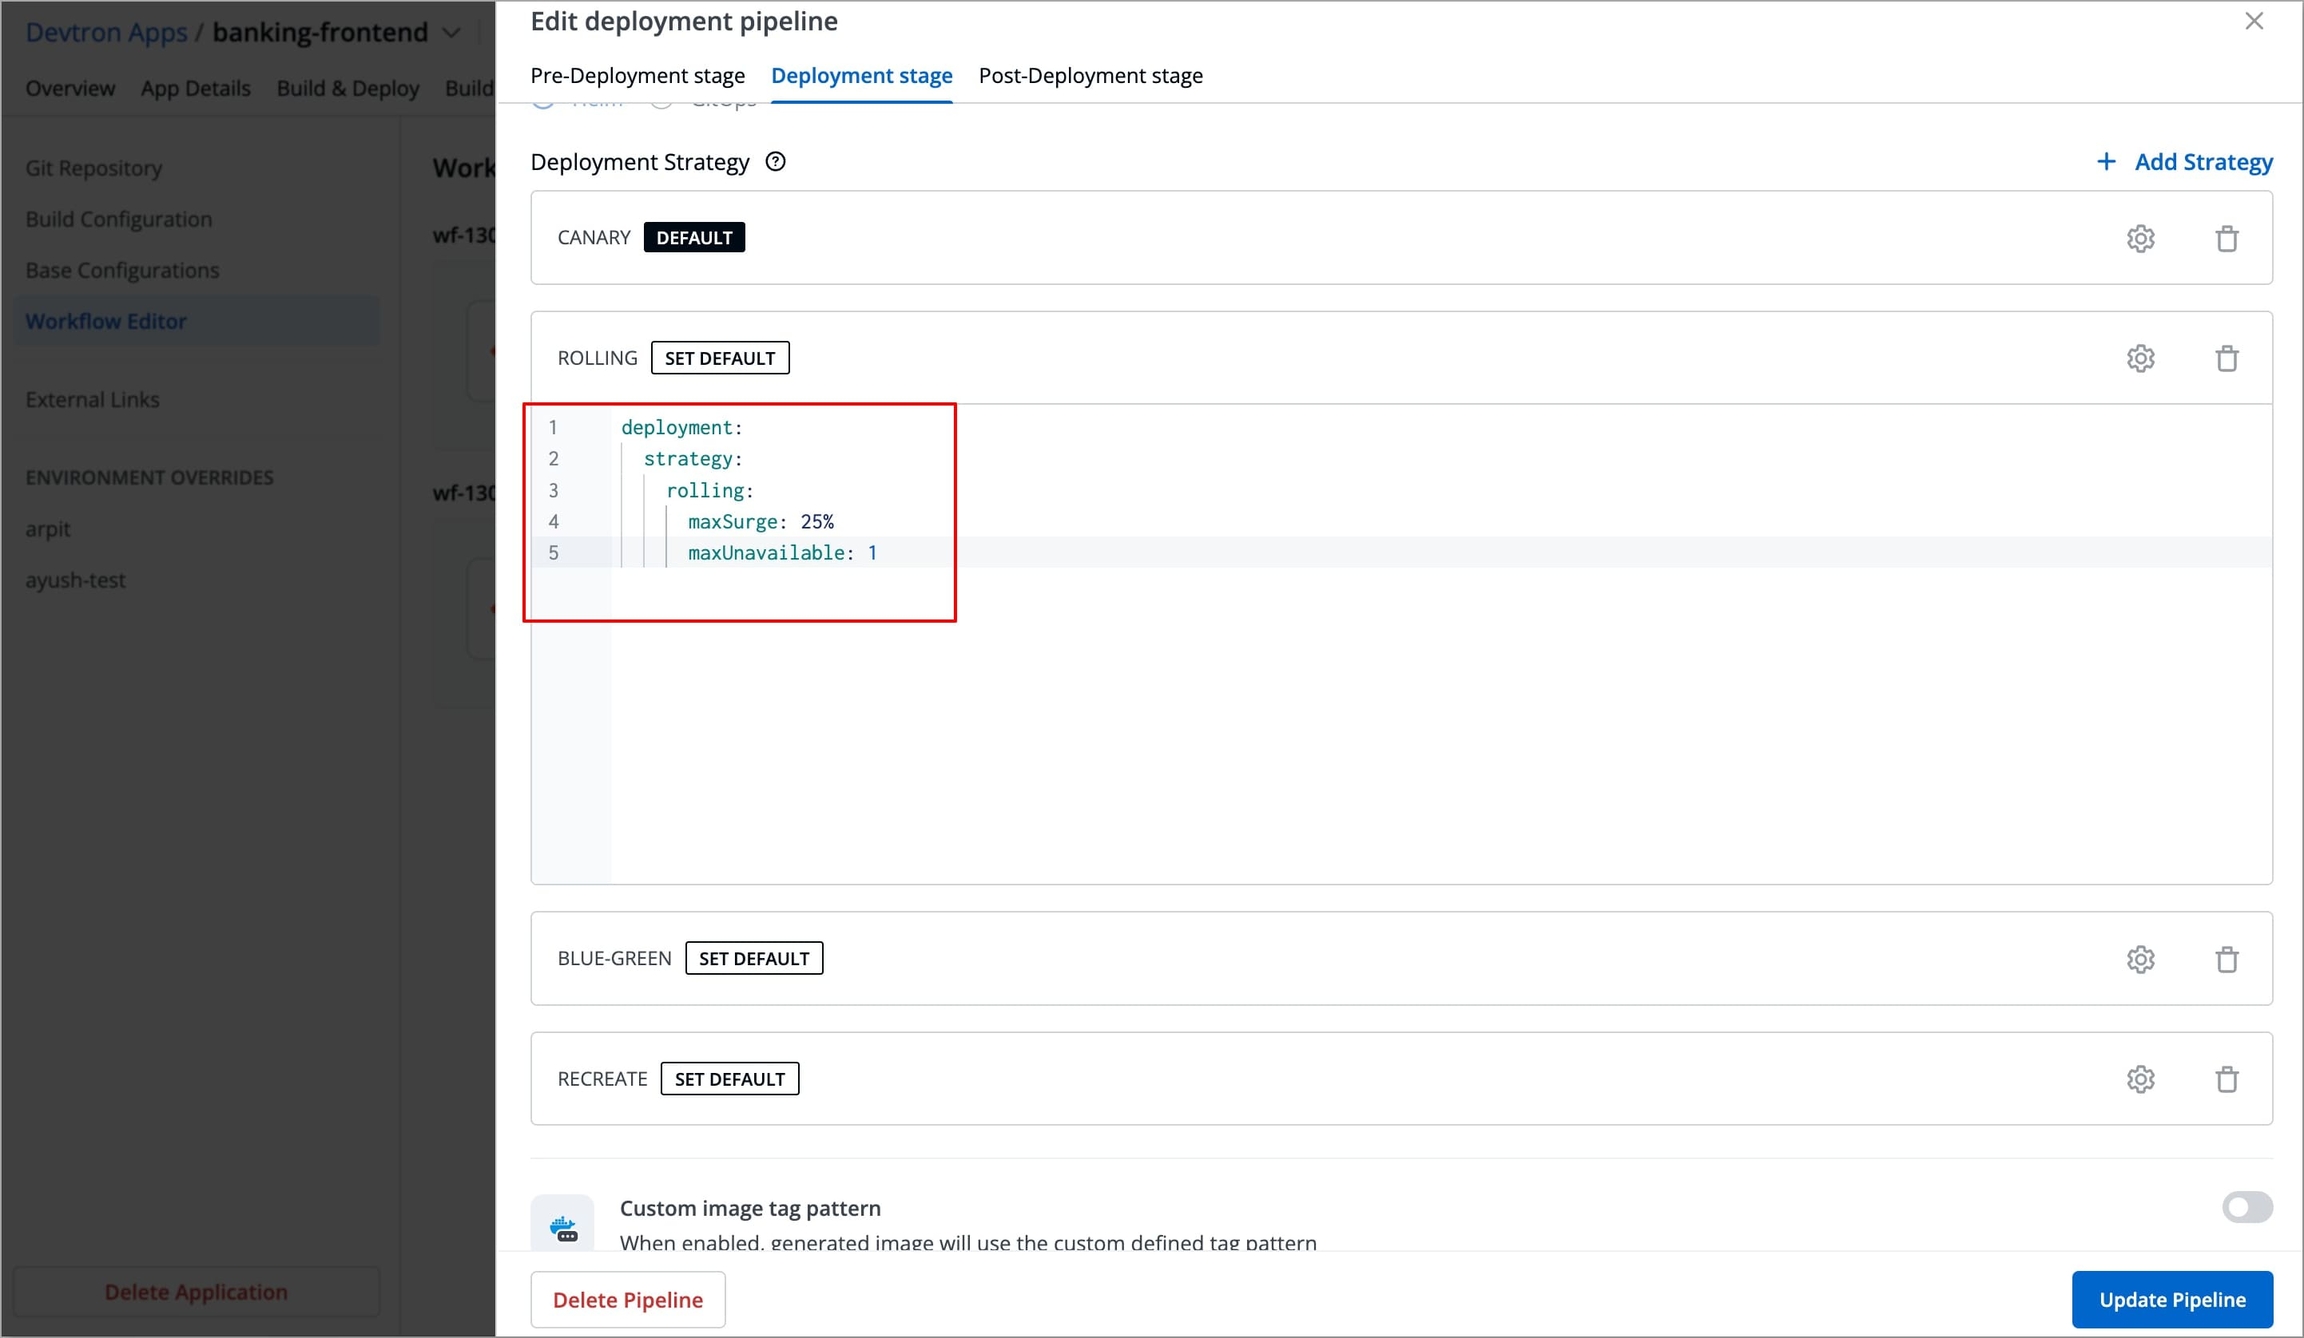
Figure 14a: Editing Blue Green Strategy Template 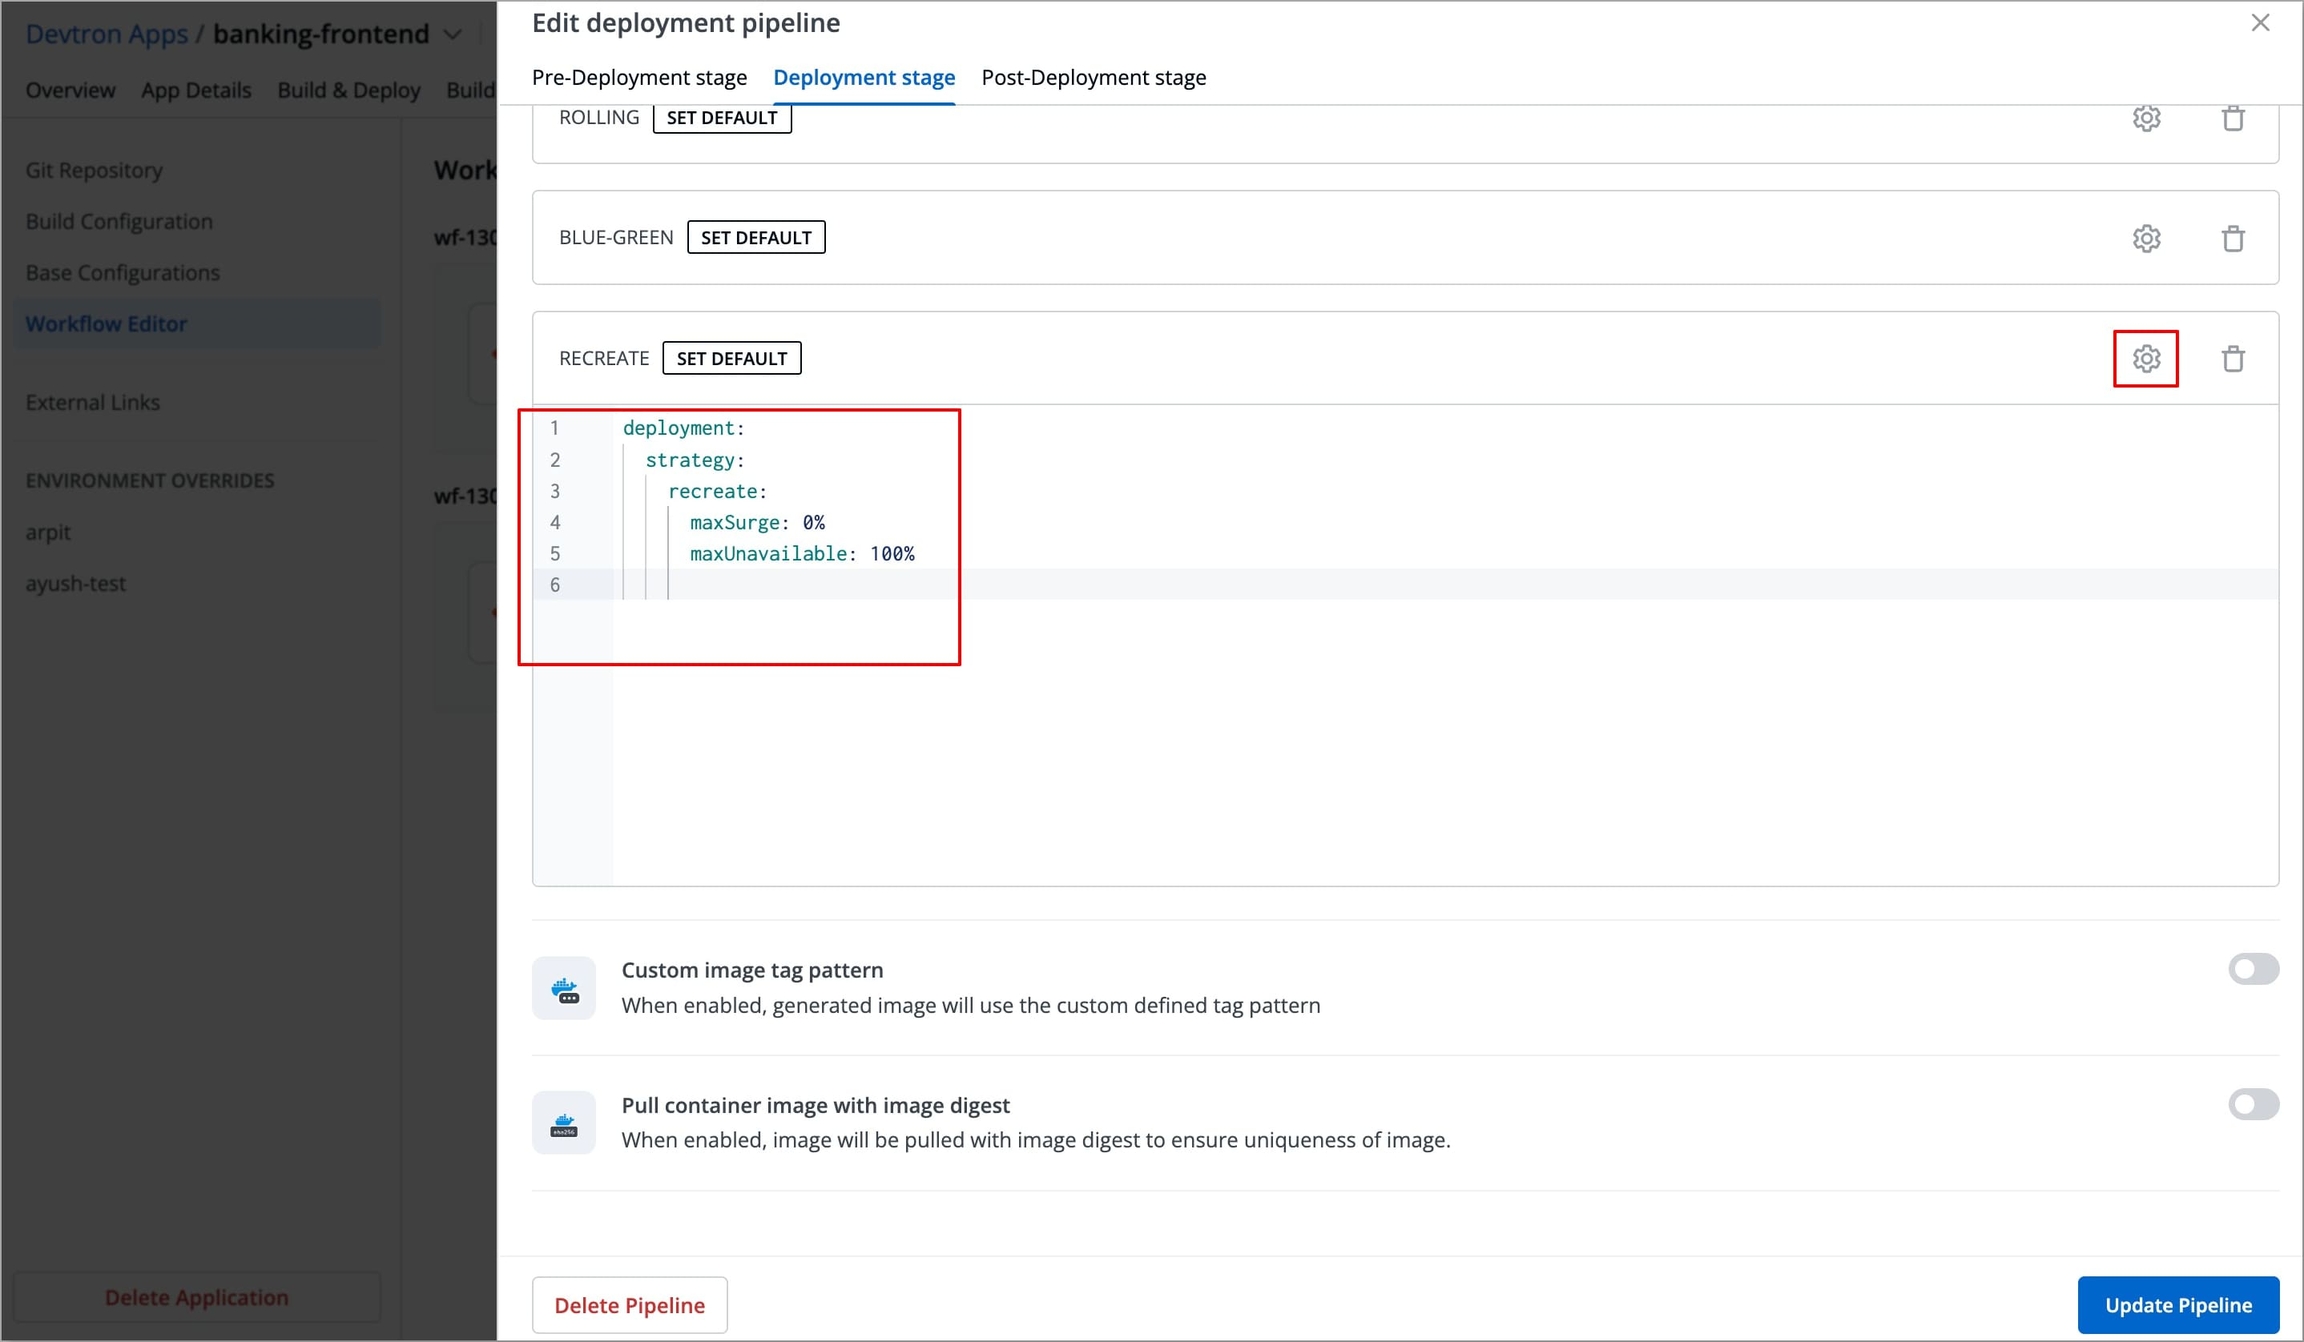
Figure 14b: Editing Blue Green Strategy Template 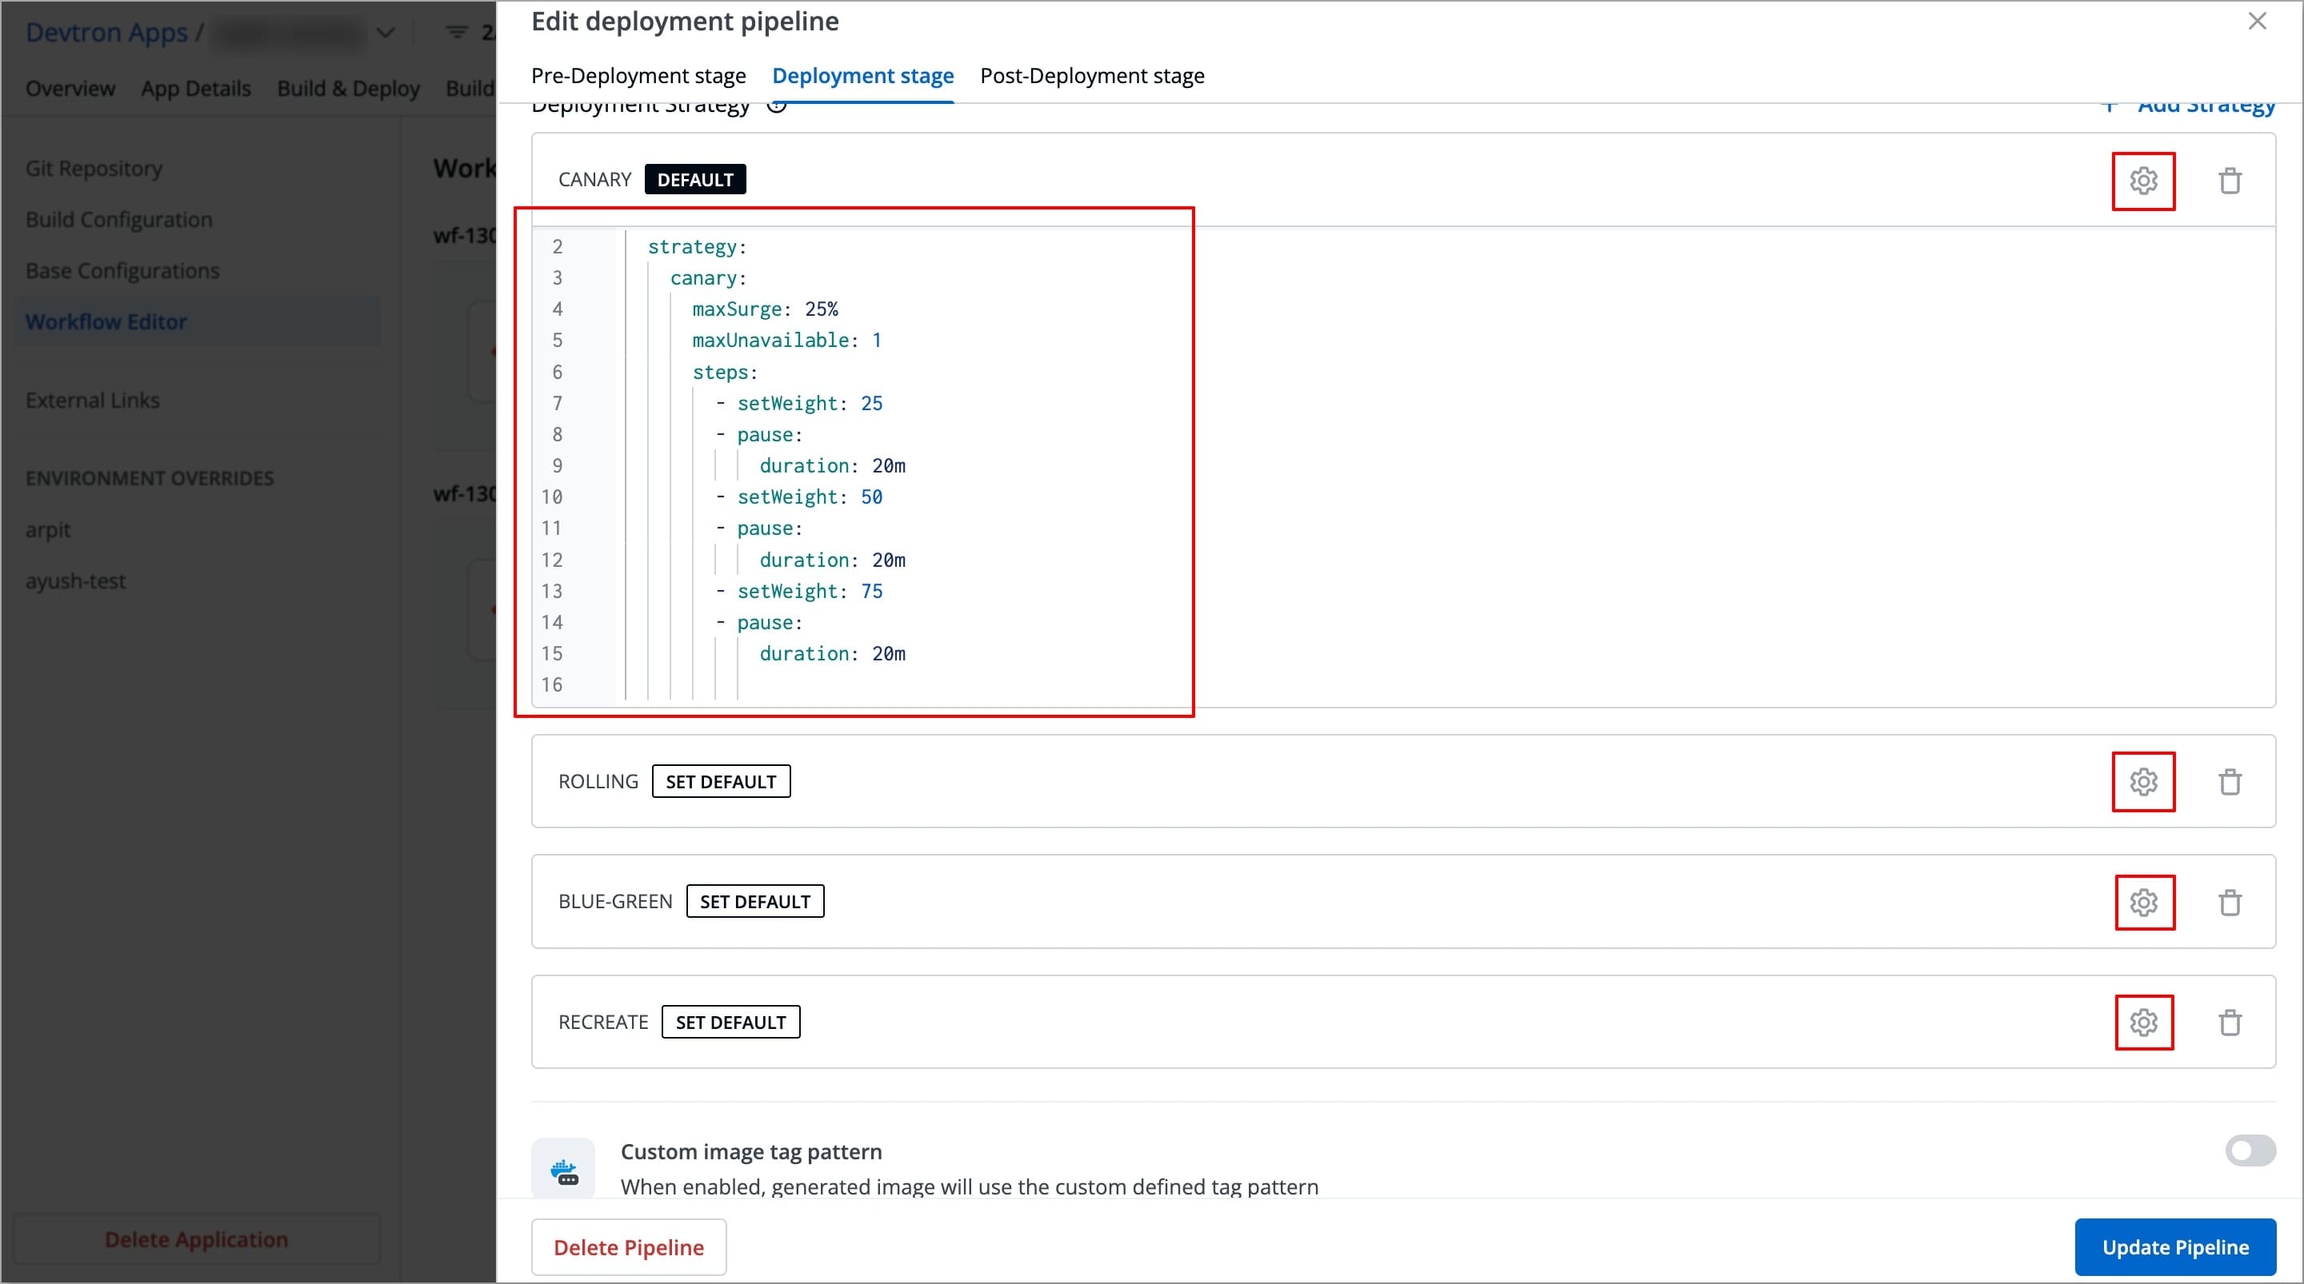
Figure 14c: Editing Canary Strategy Template 
Figure 14d: Editing Blue Green Strategy Template Select Update Pipeline to save the configurations.
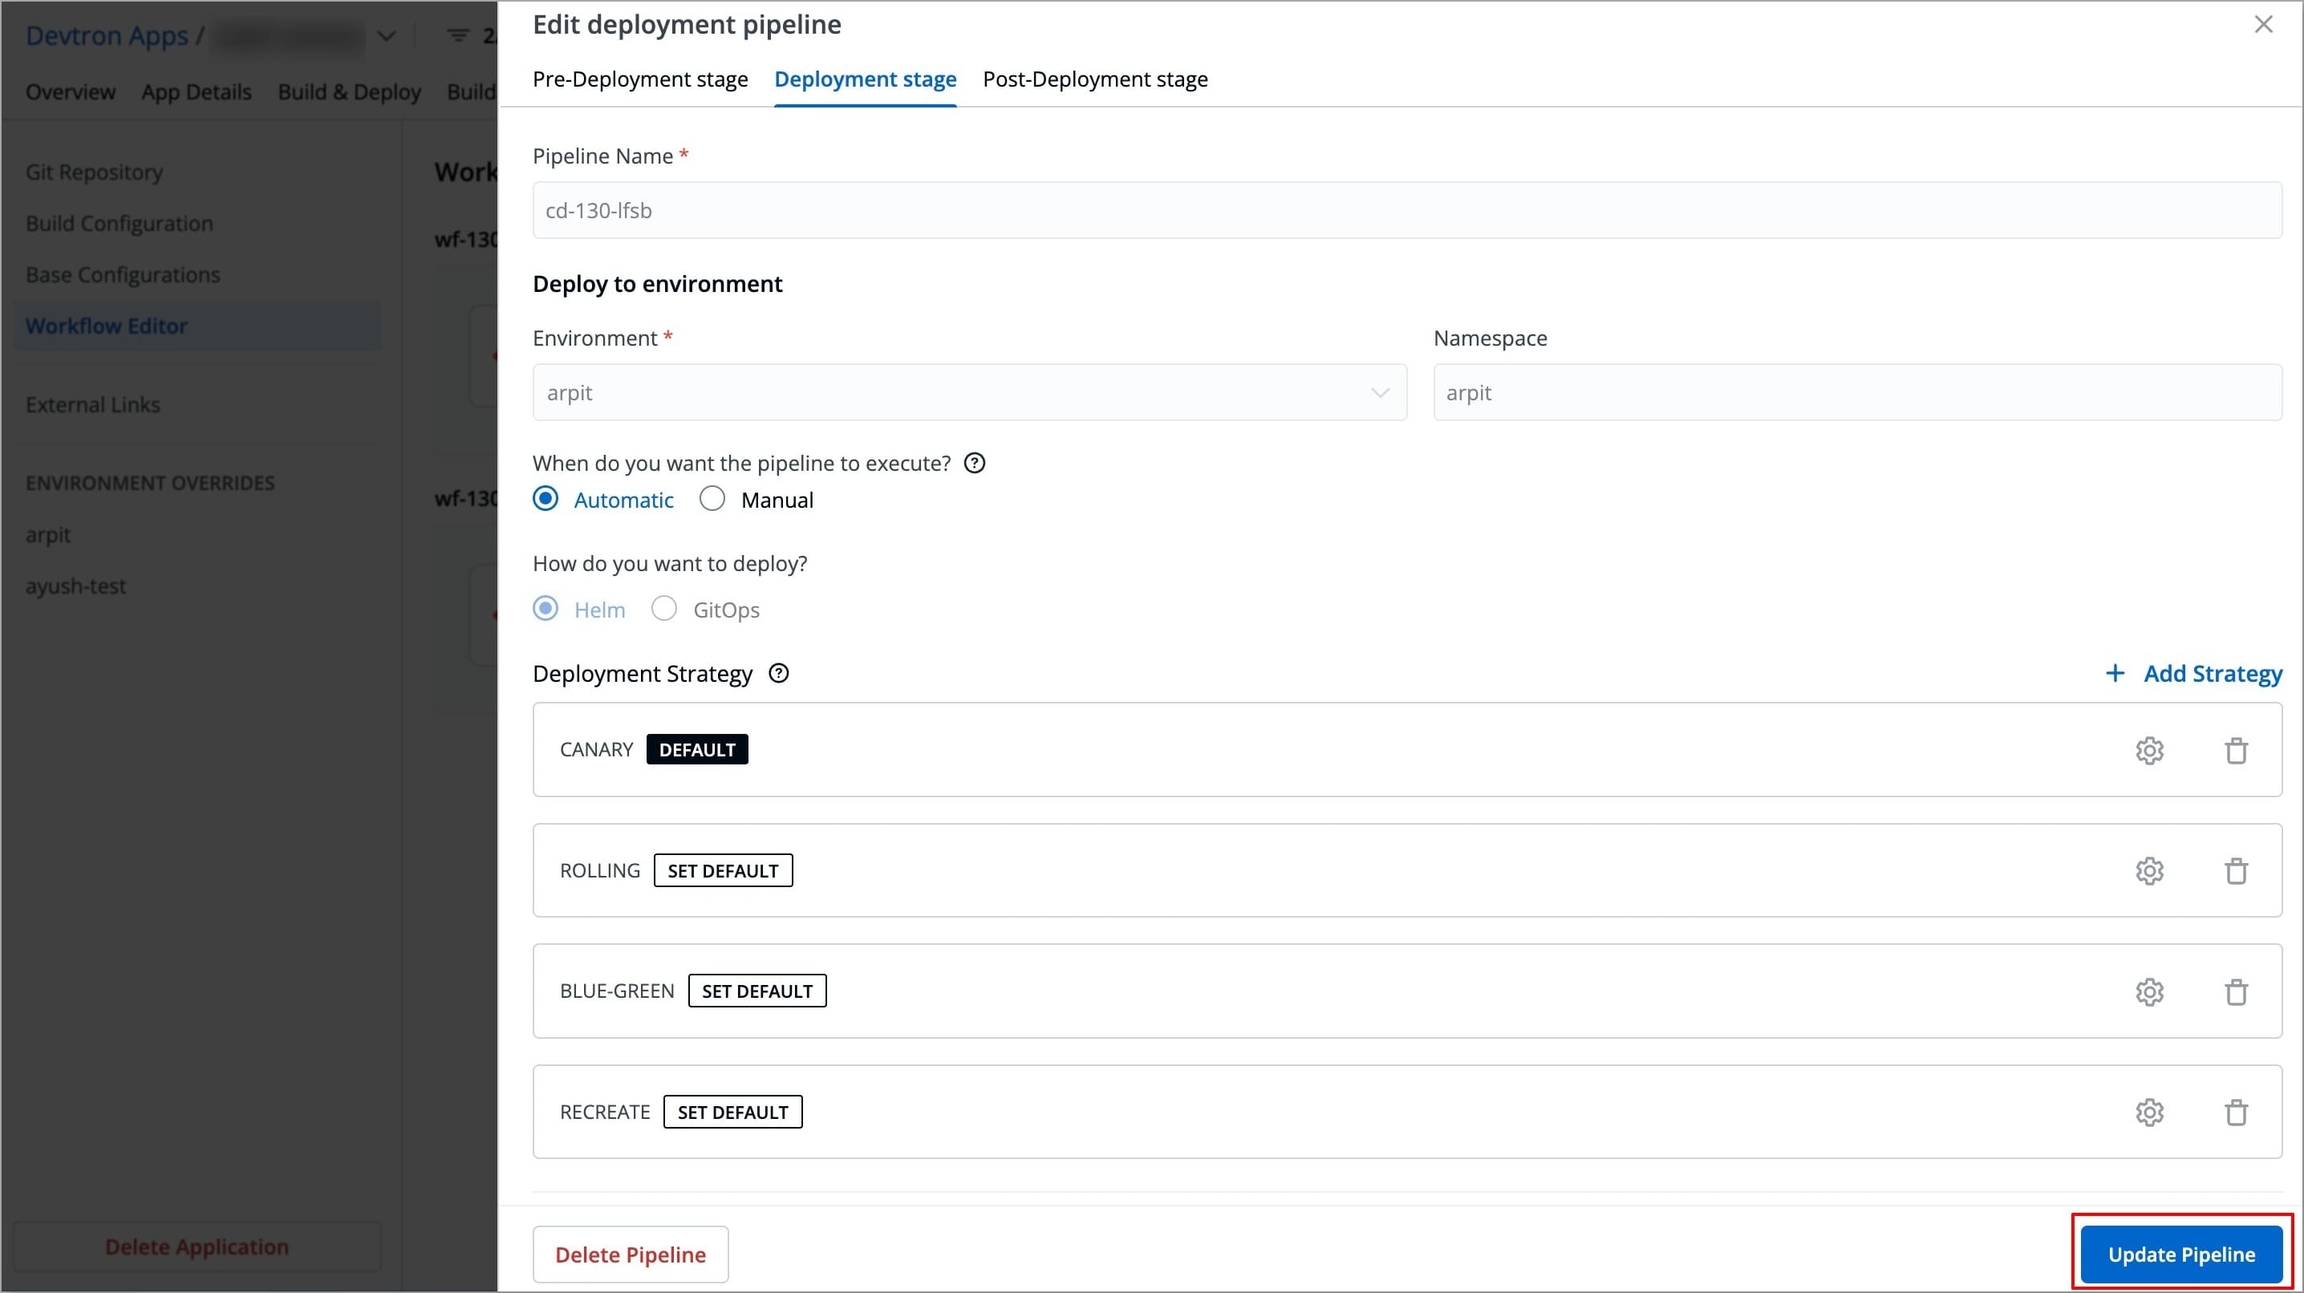
Figure 15: Selecting Update Pipeline
Custom Image Tag Pattern
This will be utilized only when an existing container image is copied to another repository using the Copy Container Image Plugin. The image will be copied with the tag generated by the Image Tag Pattern you defined.
Enable the toggle button as shown below.
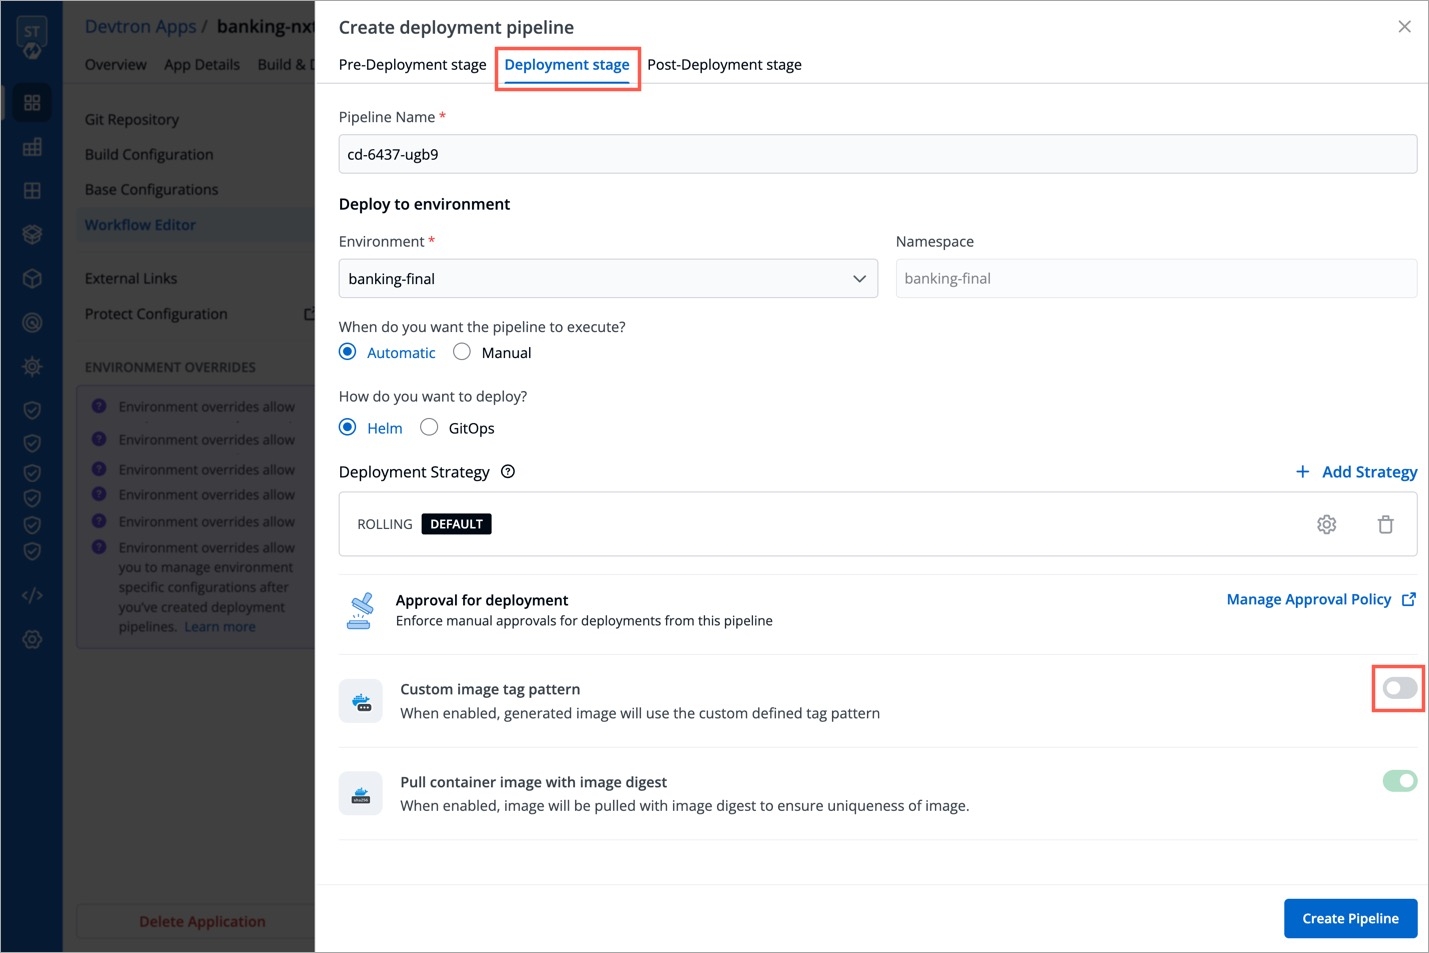
Figure 16: Enabling Custom Image Tag Pattern Click the edit icon.
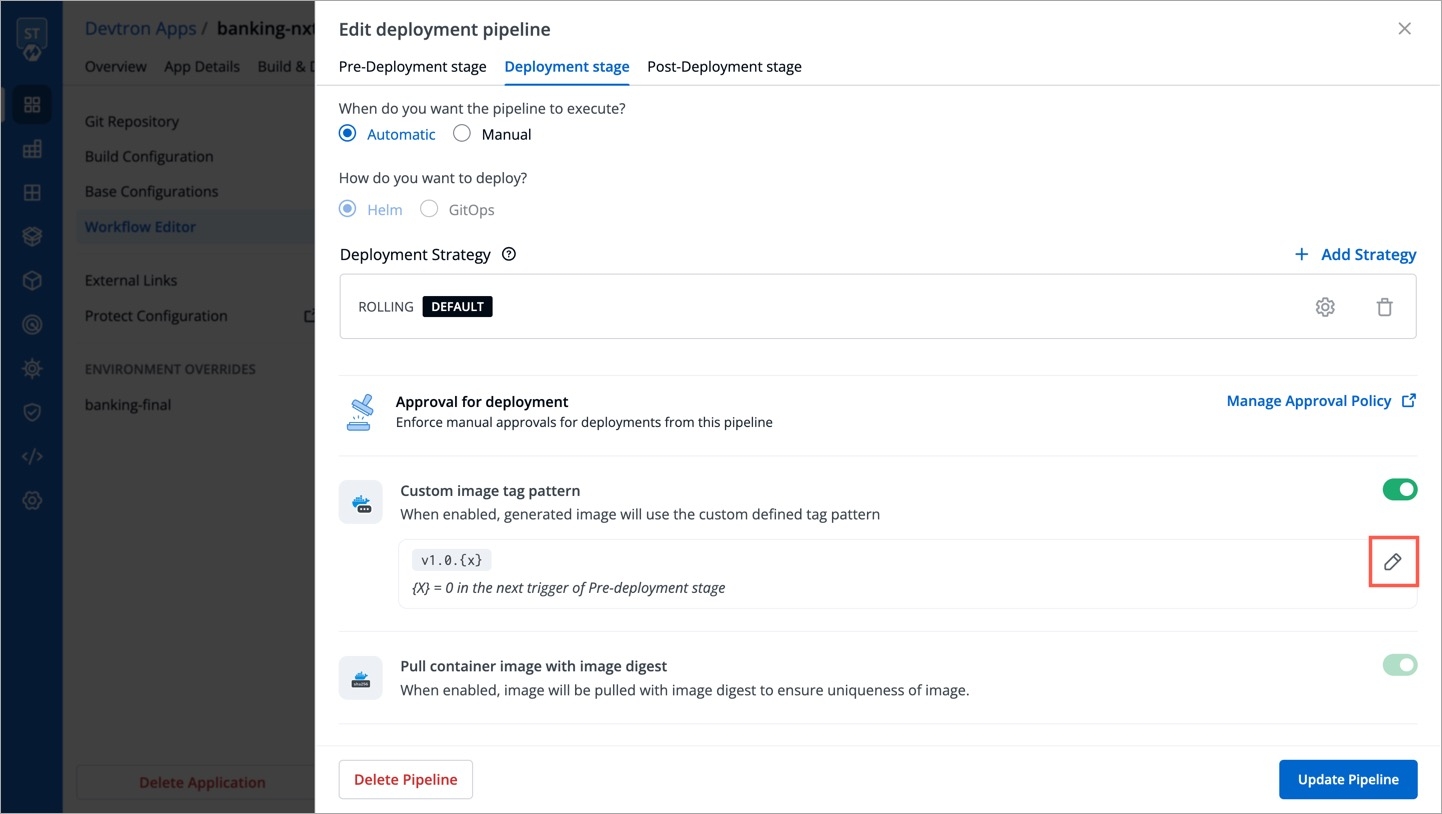
Figure 17: Edit Icon You can write an alphanumeric pattern for your image tag, e.g., prod-v1.0.{x}. Here, 'x' is a mandatory variable whose value will incrementally increase with every pre or post deployment trigger (that option is also available to you). You can also define the value of 'x' for the next trigger in case you want to change it.
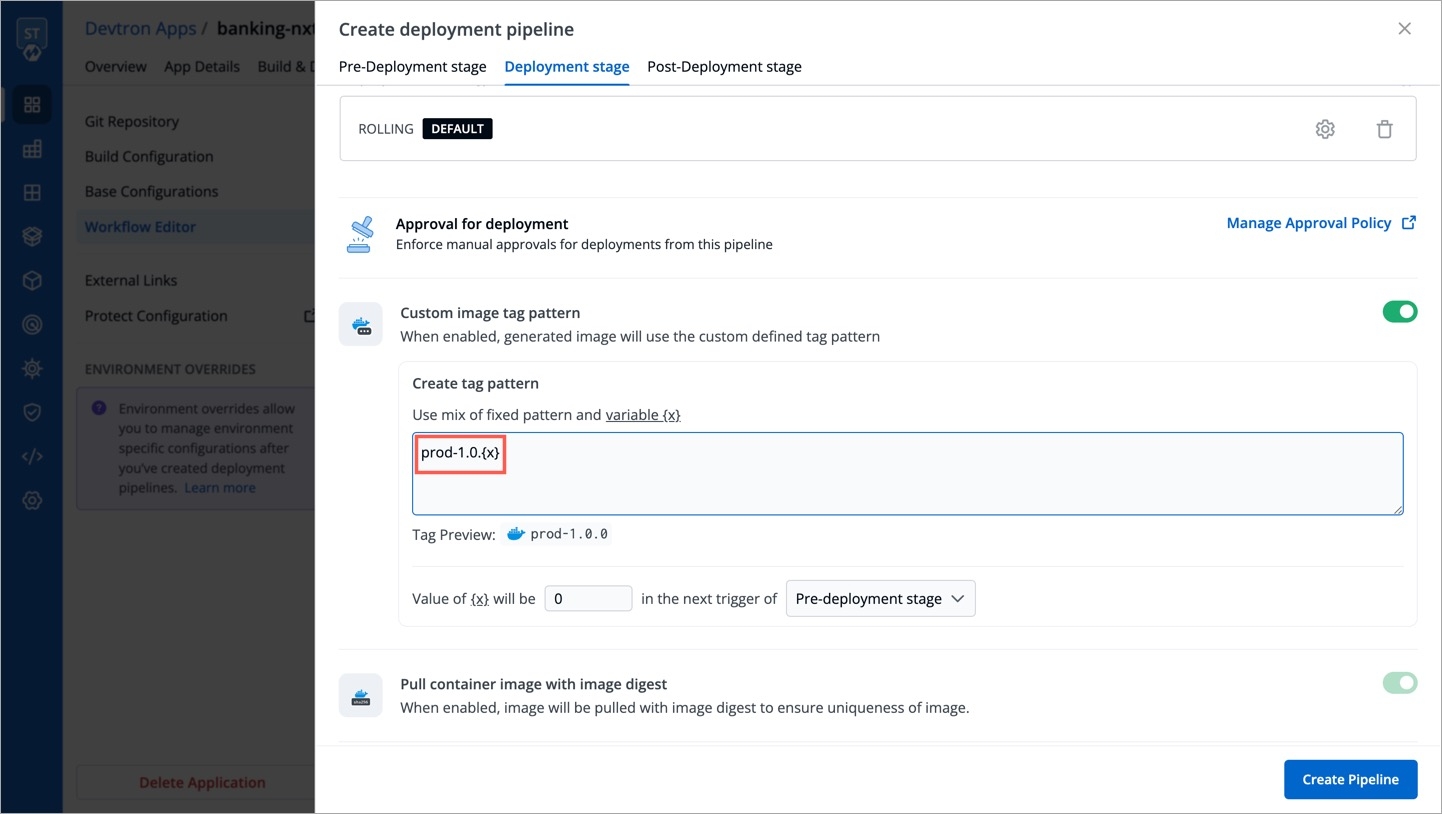
Figure 18: Defining Tag Pattern {% hint style="warning" %} Ensure your custom tag do not start or end with a period (.) or comma (,) {% endhint %}
Click Update Pipeline.
To know how and where this image tag would appear, refer Copy Container Image Plugin
Pull Container Image with Image Digest
Although Devtron ensures that image tags remain unique, the same cannot be said if images are pushed with the same tag to the same container registry from outside Devtron.
Therefore, to eliminate the possibility of pulling an unintended image, Devtron offers the option to pull container images using digest and image tag.
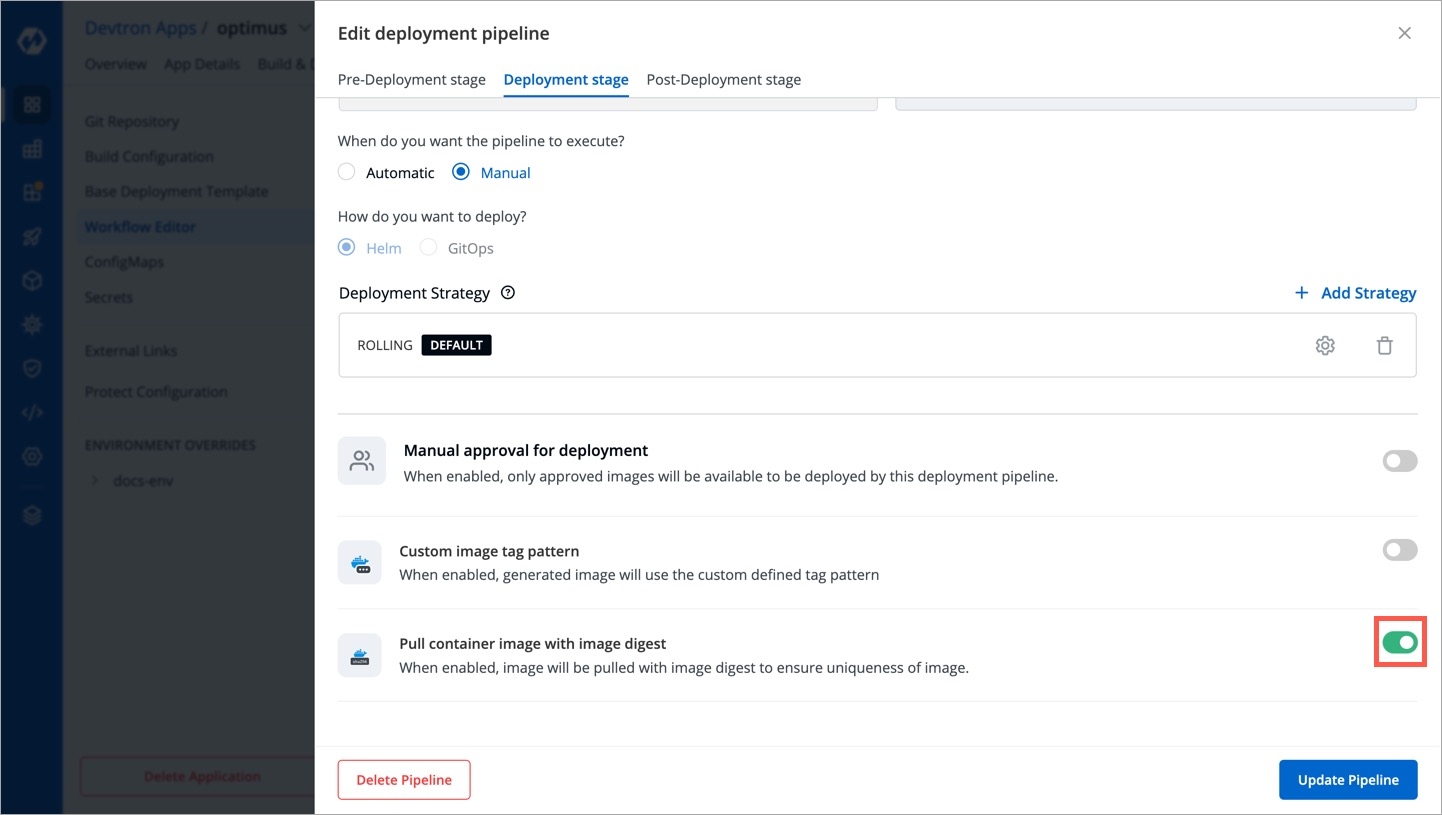
An image digest is a unique and immutable SHA-256 string returned by the container registry when you push an image. So the image referenced by the digest will never change.

Who Can Perform This Action?
Users need to have Admin permission or above (along with access to the environment and application) to enable this option. However, this option will be non-editable in case the super-admin has enabled pull image digest in Global Configurations.
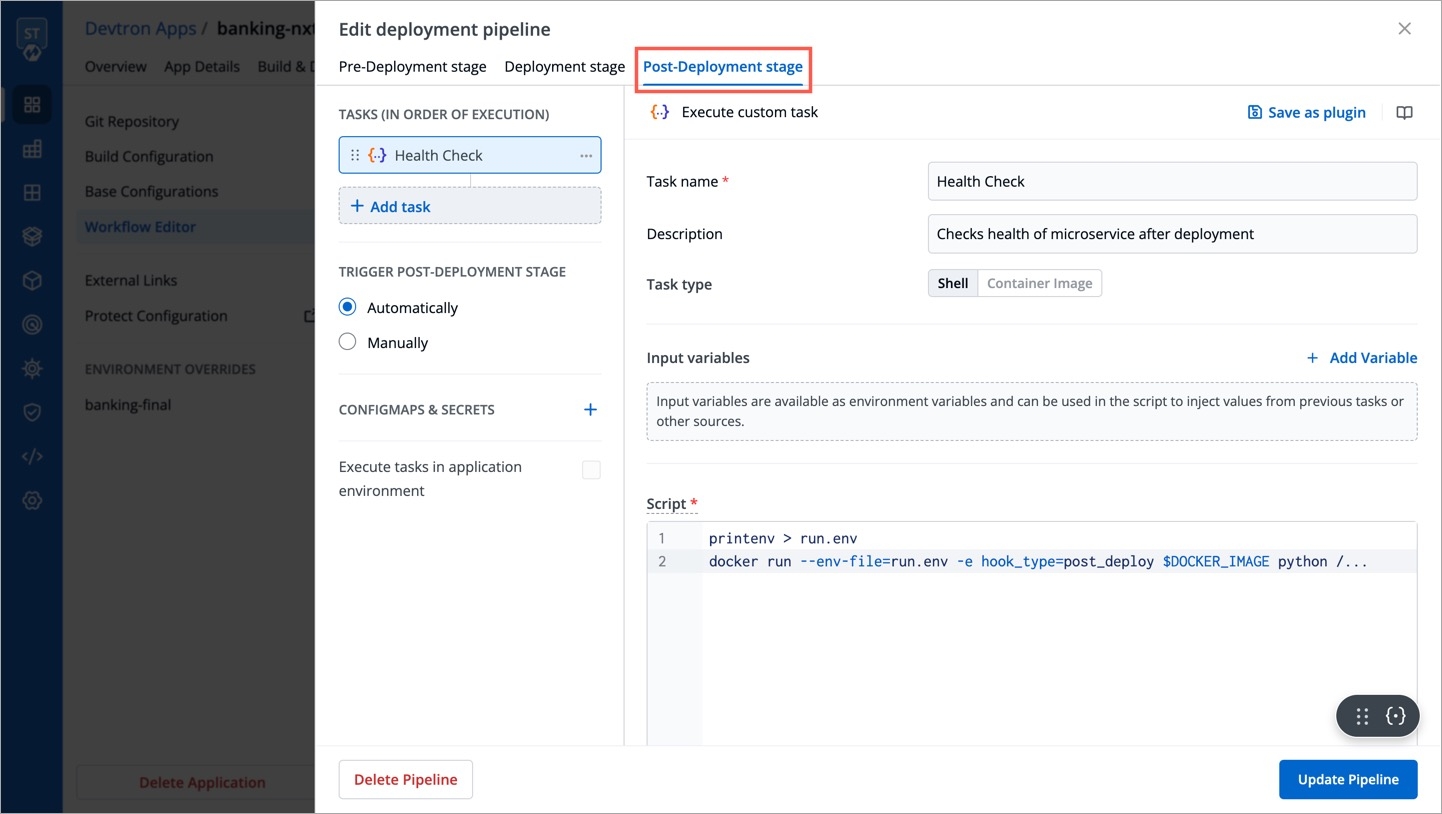
Post-Deployment Stage
If you need to run any actions for e.g., closure of Jira ticket, load testing or performance testing, you can configure such actions in the post-deployment stages.
Post-deployment stages are similar to pre-deployment stages. The difference is, pre-deployment executes before the deployment, while post-deployment occurs after.
You can use ConfigMap and Secrets in post deployments as well. The option to execute tasks in application environment is available too.
Migrate to Devtron
When can I see this option?
This option will be available only during the creation of CD pipeline in your workflow. Existing CD pipelines will not have this option.
Who Can Perform This Action?
Only superadmins can migrate existing Helm releases or Argo apps to Devtron
If you already use external Helm or Argo CD for deployment and wish to try out Devtron, this feature helps you onboard and manage your external applications using Devtron’s CI/CD capabilities, offering the following benefits:
No hassle of manually migrating your existing applications
No need to set up a parallel Argo CD instance
No risk of losing your existing configurations
Use build pipeline in your workflow
Execute pre-deployment and post-deployment tasks
Scan your apps for vulnerabilities
Hibernate or restart your app
View config diff, deployment history, and all the capabilities that come with Devtron Apps. Check the full list of features.
Migrate Helm Release
Prerequisites
Add your external cluster (containing your Helm Apps) in Clusters & Environments.
Your Helm release must use the same chart type as your application. If needed, you can upload or select the appropriate chart in Global Configurations → Deployment Charts, then save the chart type at base configuration of your application.
You can not only view your external Helm apps, but also manage their deployments using Devtron's CI/CD.
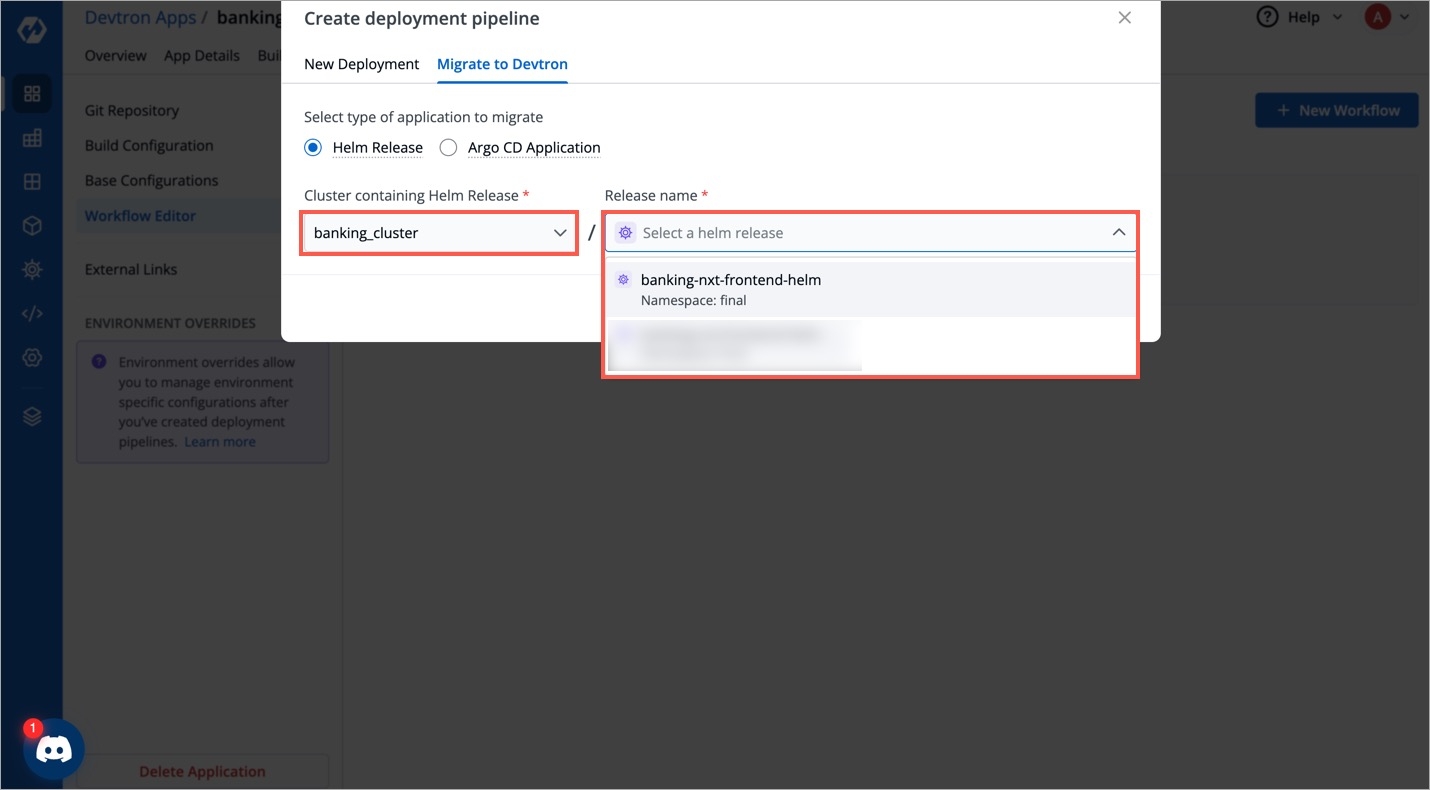
Click Helm Release in 'Select type of application to migrate'.
Select the external cluster containing your Helm releases, and select the Helm release you wish to migrate.
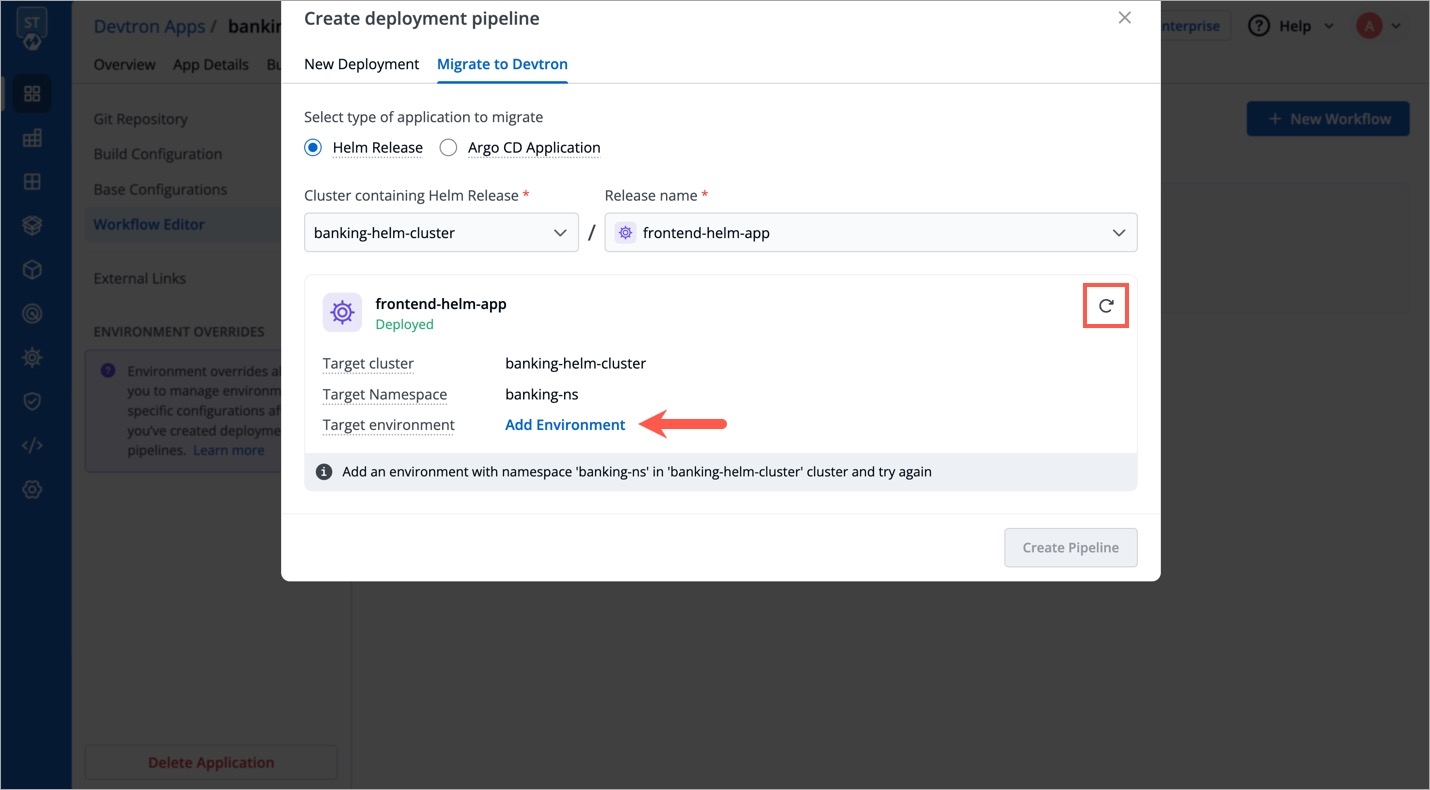
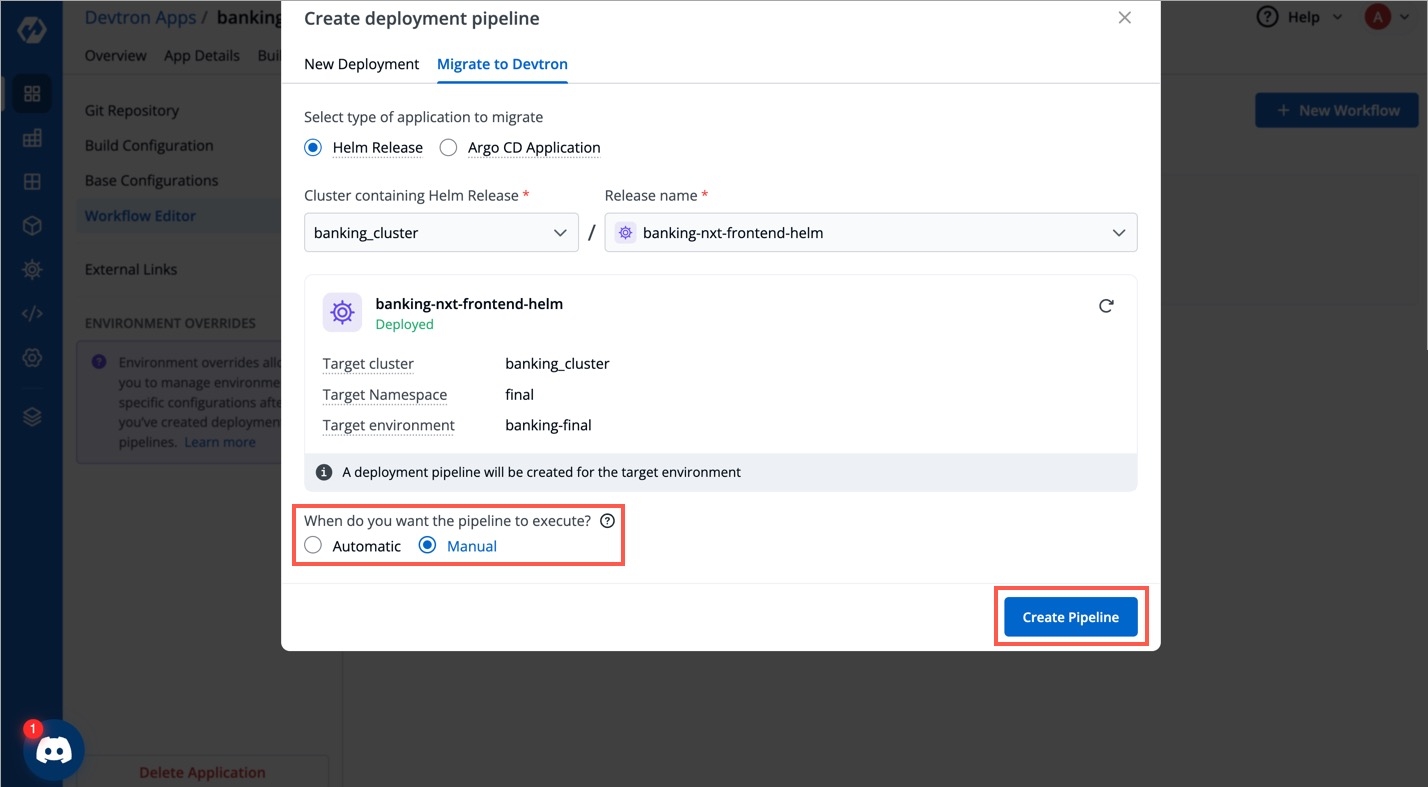
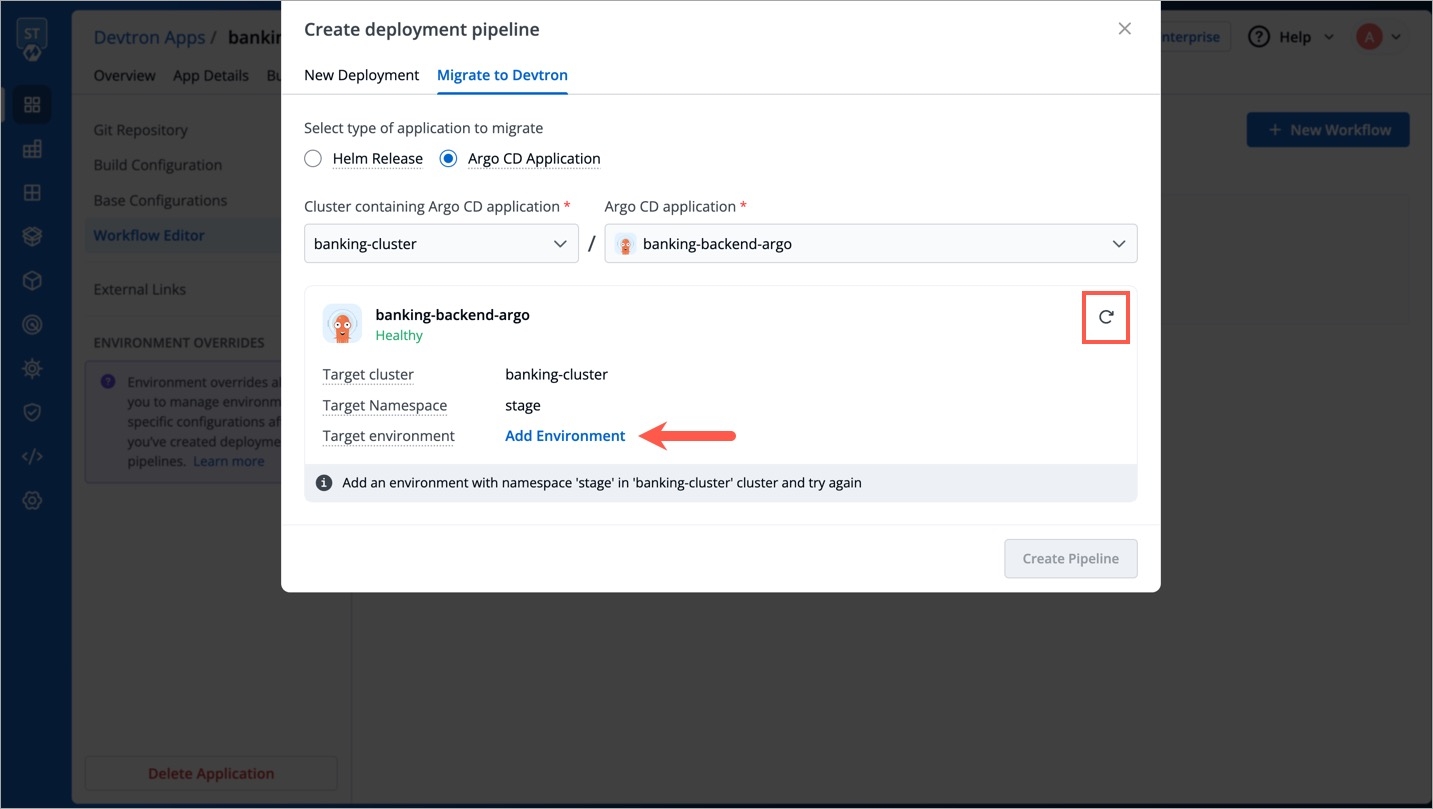
The target cluster, its namespace, and environment would be visible. If the environment is not available, click Add Environment. This will open a new tab. Once you have added the environment to your cluster, return and click the refresh button.
Select the trigger (Automatic/Manual) and click Create Pipeline.
Once the pipeline is created, you may go to Build & Deploy to trigger the pipelines. Your Helm release would be deployed using Devtron.
Limitations
This feature comes with certain mentioned limitations and expectations. If your use case doesn't fit and goes beyond, feel free to open a feature request.
Apps deployed using Helm + manual kubectl, kubectl, kustomize + helm are not supported.
By default, Devtron detects and uses
app-values.yamlas the values file. If your Helm app contains multiple values files, you must consolidate it into a singleapp-values.yaml.Once an app is onboarded to Devtron, the user should only use Devtron to manage that application and not make manual changes on that onboarded Helm release. This is because Devtron might not monitor or reconcile the manual changes you make outside Devtron.
Migrate Argo CD Application
You can not only view your external Argo CD apps, but also manage their deployments using Devtron's CI/CD.
Prerequisites
Your app should be an Argo Helm app (read about supported tools).
It must have a single Git source and a single values file. By default, Devtron expects
app-values.yamlso make sure it is committed to Git.GitOps credentials required to commit in the Git repo should be configured in Global Configurations.
The cluster containing your external Argo applications should be added to Devtron. Refer Clusters & Environments.
The target deployment cluster, its namespace, and its environment should be added to Devtron.
Your Argo CD app must use the same chart type as your application. If needed, you can upload or select the appropriate chart in Global Configurations → Deployment Charts. Then save the chart type at base configuration of your application.
The external Argo CD should have auto-sync enabled or an alternative syncing mechanism, as Devtron does not perform manual syncs.
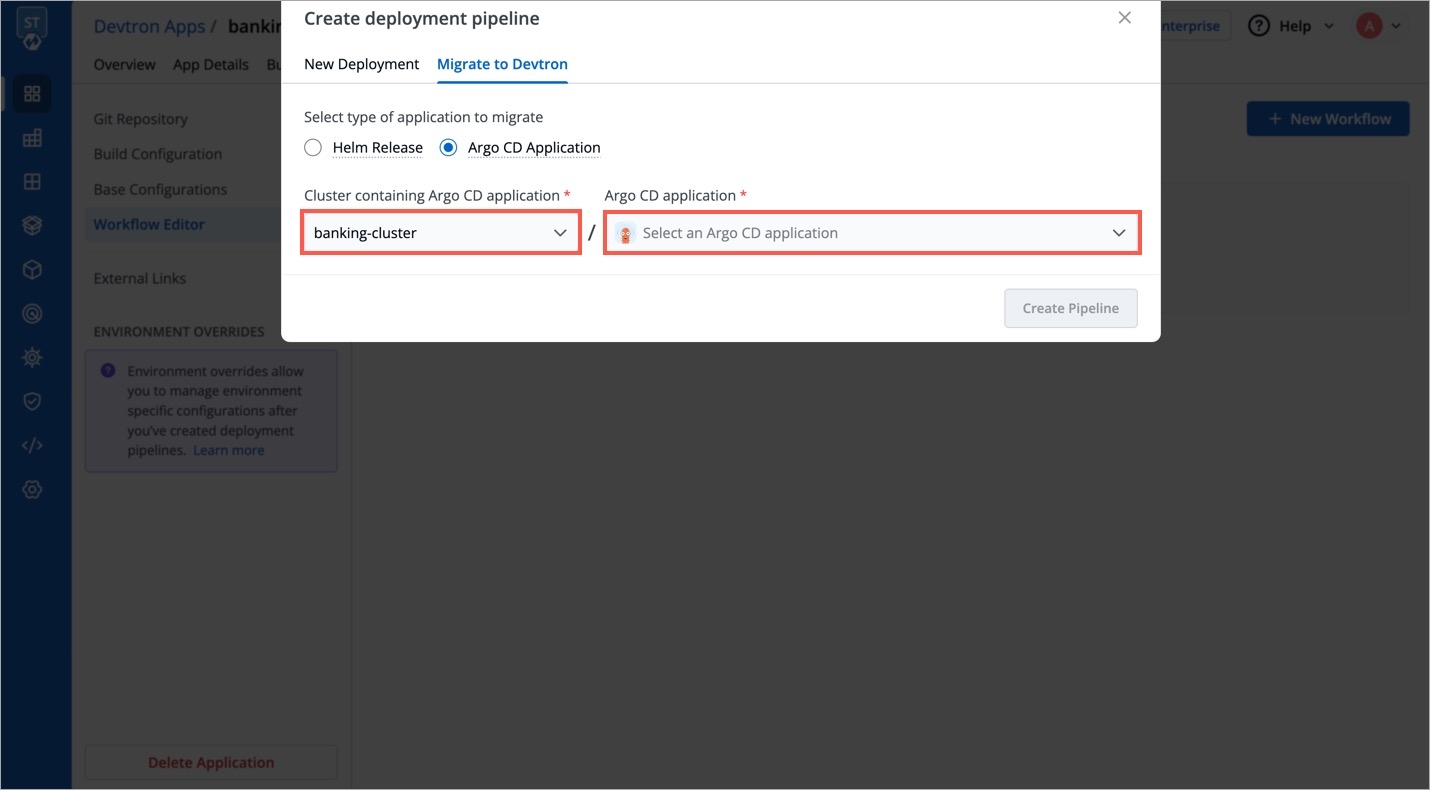
Click Argo CD Application in 'Select type of application to migrate'.
Select the external cluster containing your Argo apps, and select the Argo CD application you wish to migrate.
The target cluster, its namespace, and environment would be visible. If the environment is not available, click Add Environment. This will open a new tab. Once you have added the environment to your cluster, return and click the refresh button.
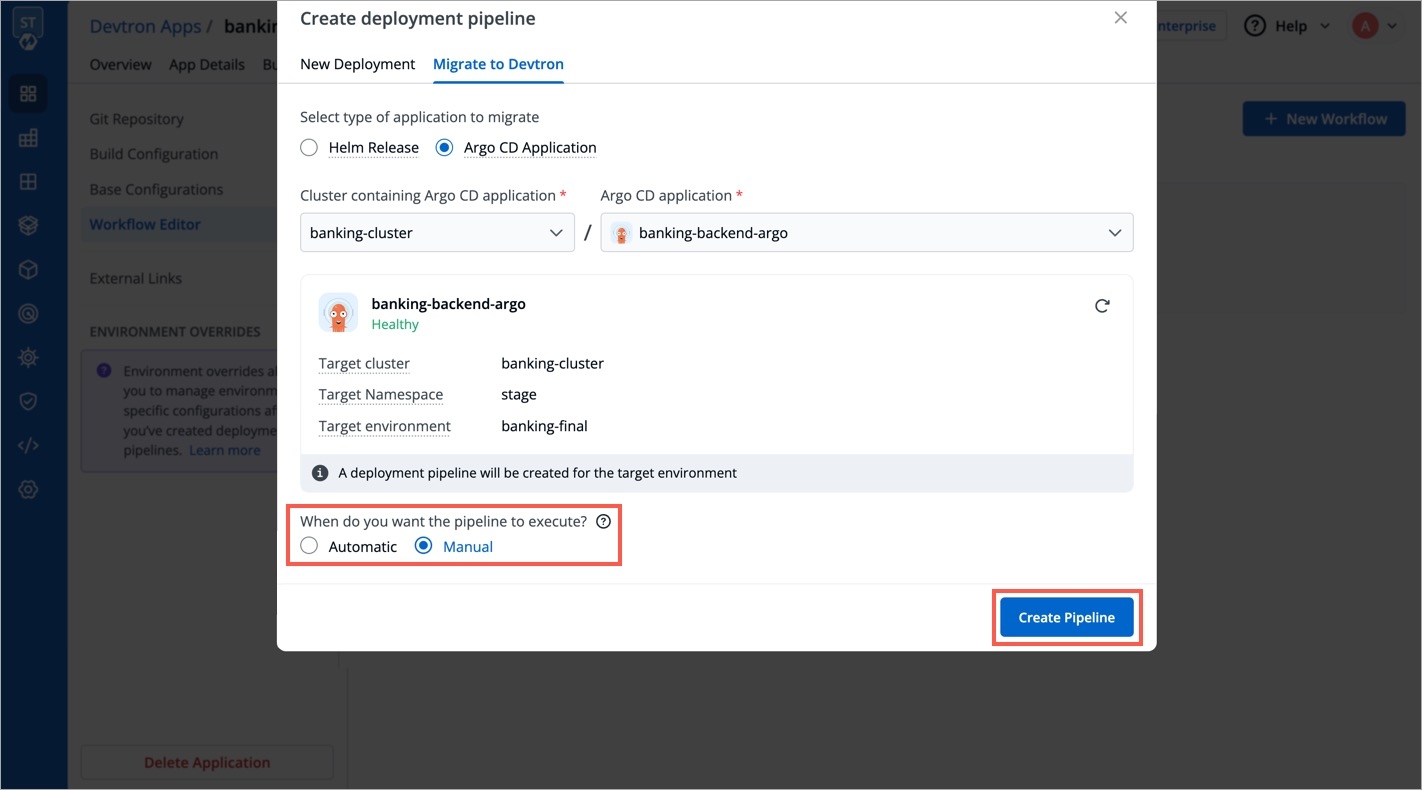
Select the trigger (Automatic/Manual) and click Create Pipeline.
Once the pipeline is created, you may go to Build & Deploy to trigger the pipelines. Your Argo CD app would be deployed using Devtron.
Limitations
This feature comes with certain mentioned limitations and expectations. If your use case doesn't fit and goes beyond, feel free to open a feature request.
The Git source type should be branch HEAD.
The target deployment cluster’s endpoint in Devtron must be the same as the one configured in Argo CD.
Once onboarded to Devtron, users should manage the application only through Devtron and avoid making changes directly in Git or Argo CD. This is because Devtron might not monitor or reconcile the manual changes you make outside Devtron.
Note
If you have configured GitOps for your external Argo apps in Devtron, and later install the GitOps (ArgoCD) module from Devtron Stack Manager to deploy your Devtron apps/Helm apps via GitOps, you must once again save your GitOps and Cluster configurations after installation. This might prevent potential errors and ensure your GitOps deployments are functional.
Updating CD Pipeline
You can update the deployment stages and the deployment strategy of the CD Pipeline whenever you require it. However, you cannot change the name of a CD Pipeline or its Deployment Environment. If you want a new CD pipeline for the same environment, first delete the previous CD pipeline.
To update a CD Pipeline, go to the App Configurations section, Click on Workflow editor and then click on the CD Pipeline you want to Update.
Make changes as needed and click on Update Pipeline to update this CD Pipeline.
Deleting CD Pipeline
If you no longer require the CD Pipeline, you can also delete the Pipeline.
To delete a CD Pipeline, go to the App Configurations and then click on the Workflow editor. Now click on the pipeline you wish to delete. A pop-up having the CD details will appear. Verify the name and the details to ensure that you are not accidentally deleting the wrong CD pipeline and then click Delete Pipeline to delete it.
Deleting a CD pipeline also deletes all the K8s resources associated with it and will bring a disruption in the deployed micro-service. Before deleting a CD pipeline, please ensure that the associated resources are not being used in any production workload.
Extras
Creating Sequential Pipelines
Devtron supports attaching multiple deployment pipelines to a single build pipeline, in its workflow editor. This feature lets you deploy an image first to stage, run tests and then deploy the same image to production.
Please follow the steps mentioned below to create sequential pipelines:
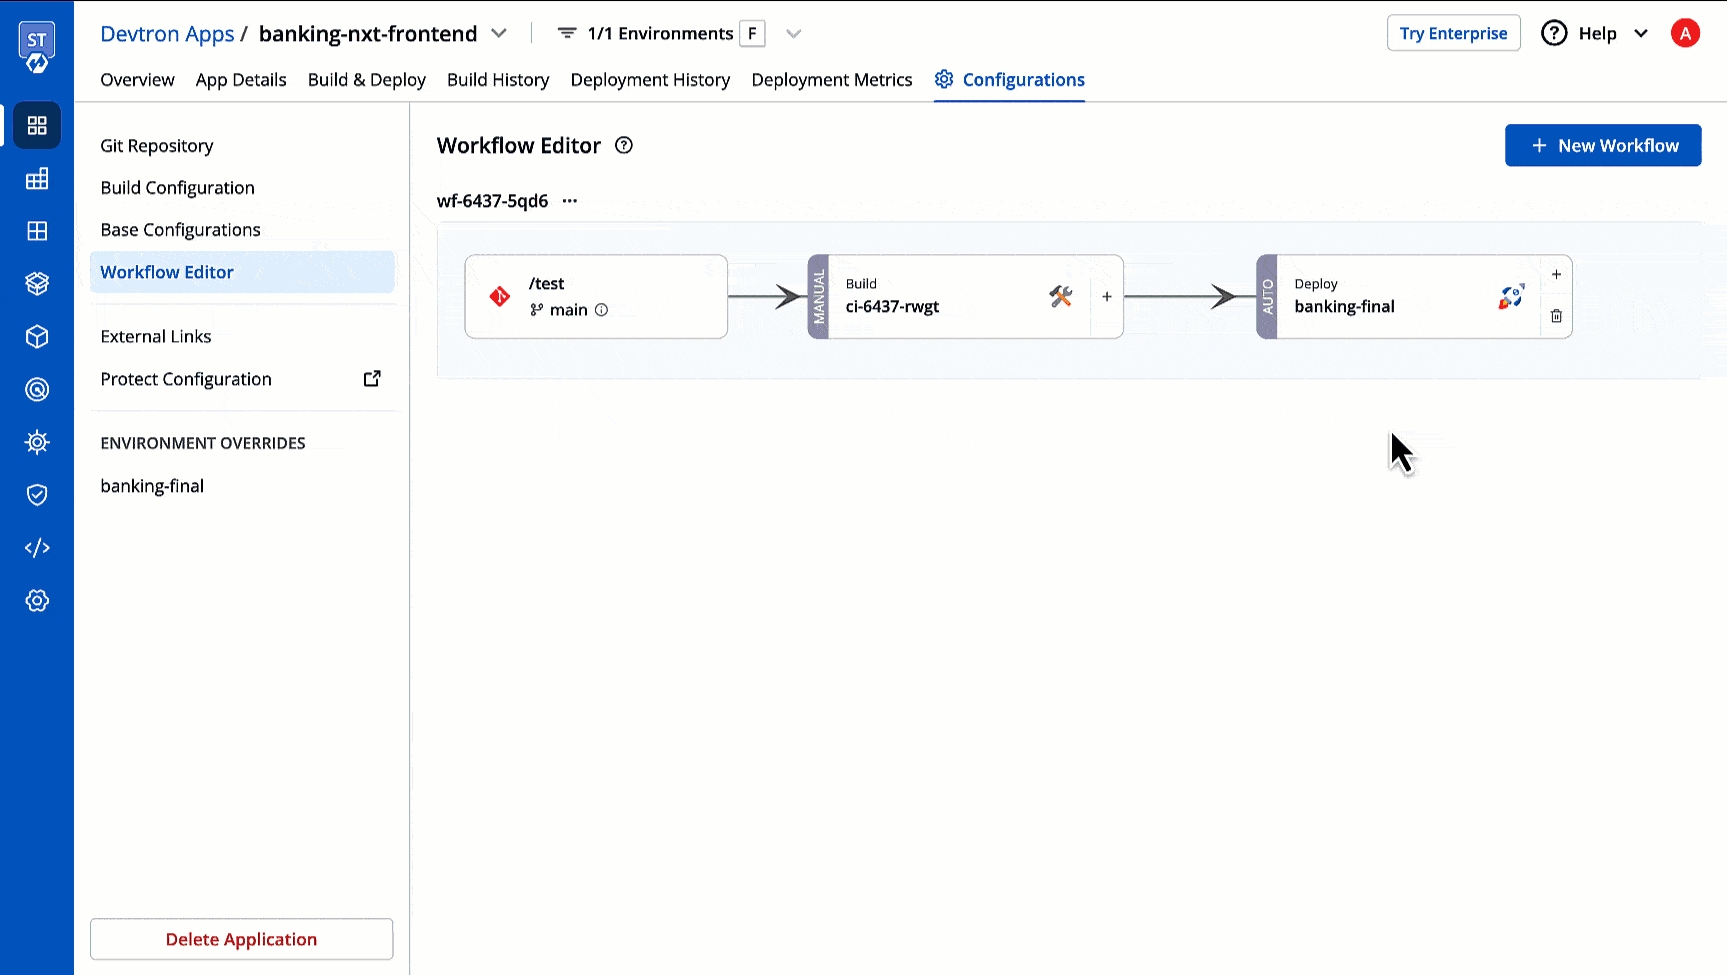
After creating CI/build pipeline, create a CD pipeline by clicking on the
+sign on CI pipeline and configure the CD pipeline as per your requirements.To add another CD Pipeline sequentially after previous one, again click on + sign on the last CD pipeline.
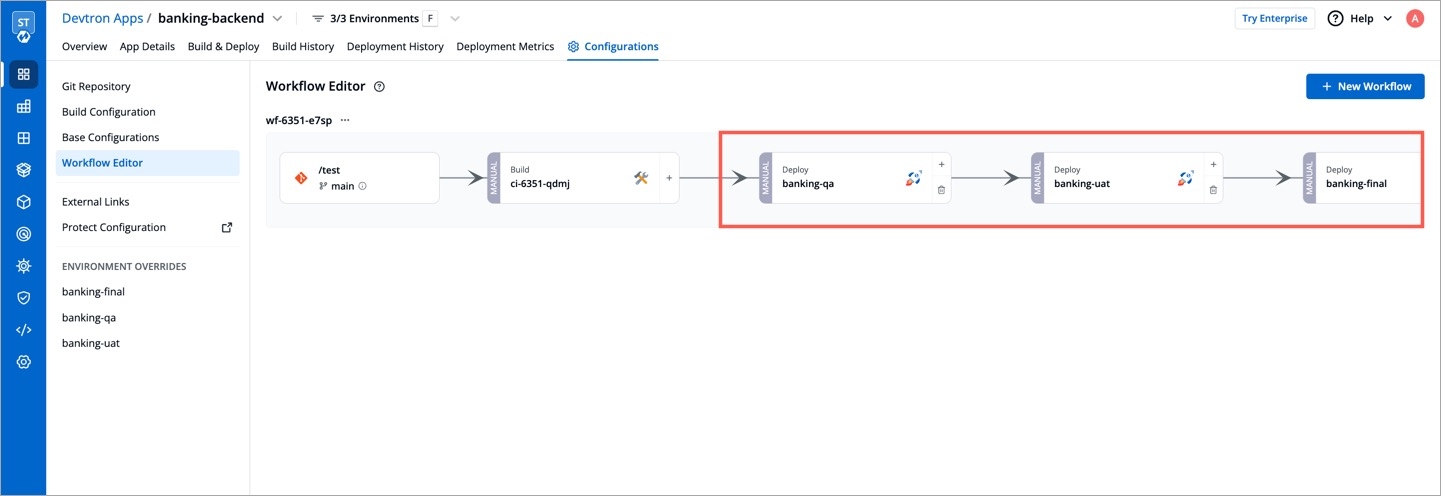
Similarly, you can add multiple CD pipelines by clicking + sign of the last CD pipeline, each deploying in different environments.
Tip
If you have multiple applications that already have an existing pipeline (for a given environment) in their workflow, you may clone the same pipeline and its configurations for new environments instead of recreating them in each application. Refer Clone Pipeline Config to know more.
Last updated
Was this helpful?