

Notifications
Introduction
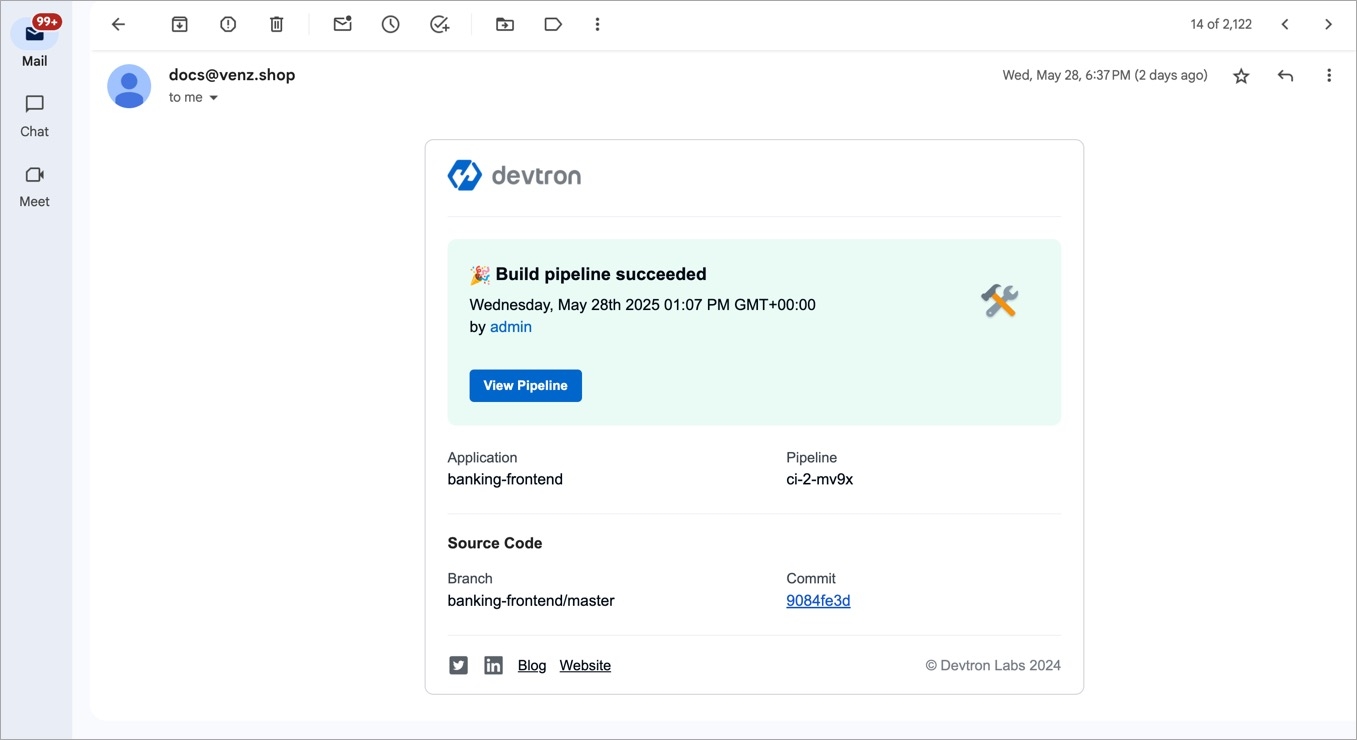
Monitoring updates of your CI/CD pipelines, such as their triggers, successes, and failures, can be challenging without a proper notification system in place.
The Notifications module in Devtron helps you solve this problem by sending you timely updates about your CI/CD pipelines through various mediums such as Email, Slack, Discord, and much more - ensuring you stay informed at all times.
Initial Prerequisites
Build and Deploy (CI/CD) integration installed in your Devtron instance.
Notifications module integration installed in your Devtron instance.
For OSS users: The Notifications page won't appear in Global Configurations unless you install the Notifications module from Devtron Stack Manager (Average installation time: ~ 5–6 minutes).
For Enterprise users: This module comes installed by default.
Configurations
The Notifications page allows you to configure and manage notifications for your CI/CD pipeline(s). To access the Notifications page, navigate to Global Configurations → Notifications.

The Notifications page has the following two tabs:
Configurations - Allows you to configure the way (Email SES, Email SMTP, Slack, Webhook) through which the notifications will be delivered.
Notifications - Allows you to define the recipients and the events (e.g., CI/CD success, failure, trigger) for which the notifications must be sent out.
You can configure notifications in Devtron in the following four ways:
Email SES Configuration
Who Can Perform This Action?
Only Super-Admins can create and manage SES configurations.
Prerequisites
AWS access key and secret key - When obtaining access key and secret access key from AWS SES, make sure to generate them from the Security credentials page (Profile → Security credentials → Access keys → Create access key).
Verified domain/email identities on AWS SES - To know more, visit Creating and Verifying Identities in Amazon SES.
Email (SES) Tutorial
Steps
Navigate to the Global Configurations → Notifications → Configurations → Email (SES) → Add SES.
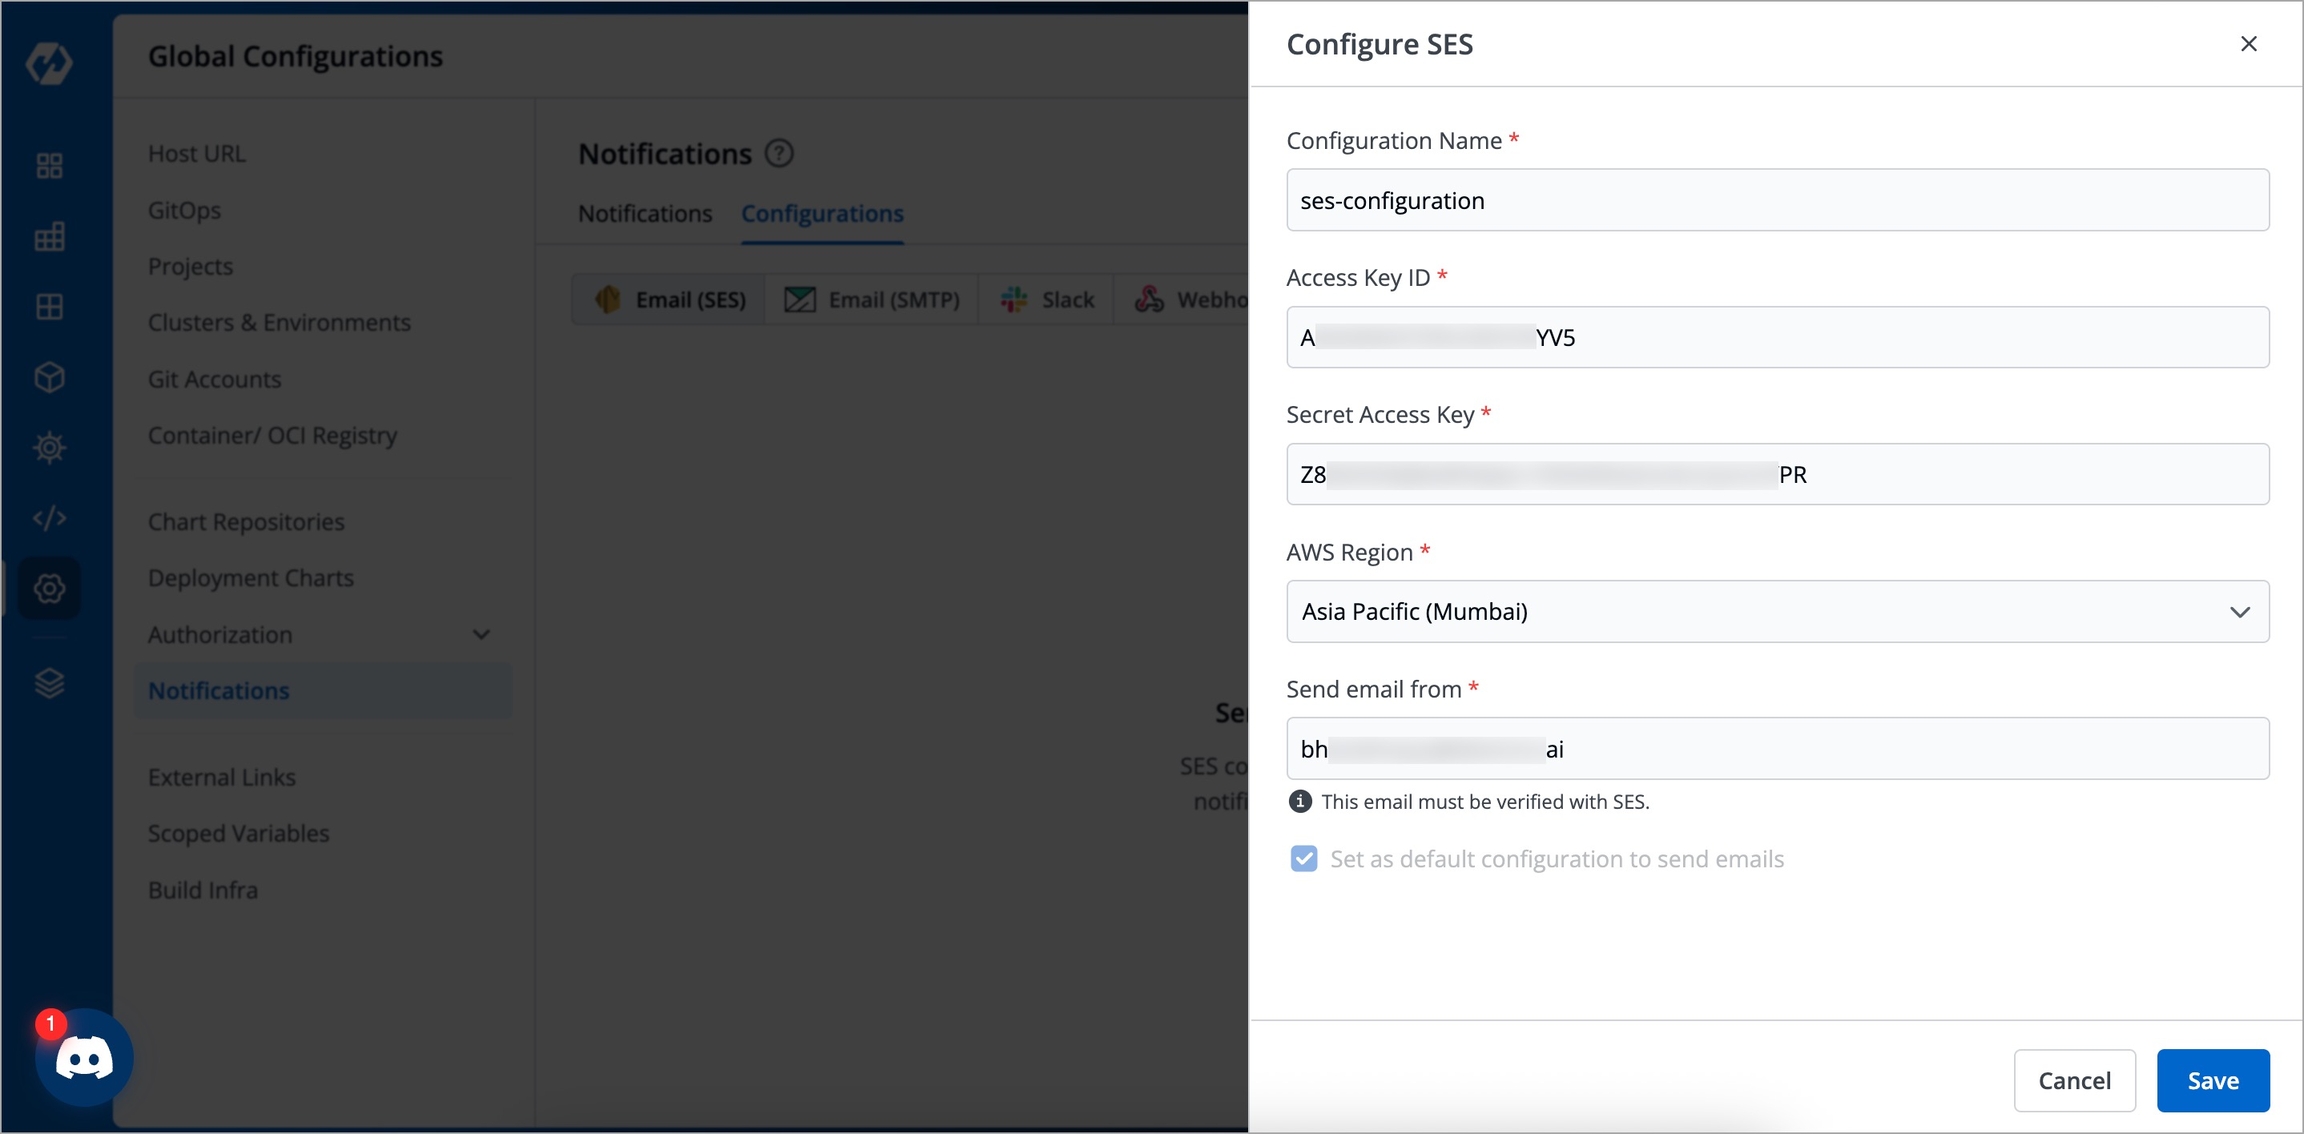
Figure 3: Configure SES Enter the following details in the Configure SES page:
KeyDescriptionConfiguration Name
Give a name to your SES Configuration, e.g.,
qa-sesAccess Key ID
Valid access key from your AWS Security credentials page, e.g.,
AKIAWEAVHF123ABCD123Secret Access Key
Secret access key from your AWS Security credentials page
AWS Region
The AWS region you used while setting up SES, e.g.,
United States (Ohio)Send email from
The sender email address verified by SES for sending emails
Enable the Set as default configuration to send emails check box (optional) if you wish to keep this configuration as the default one for sending emails.
Click Save.
Now that the Email (SES) configuration is set up, you can proceed to Add Notifications.
Email SMTP Configuration
Who Can Perform This Action?
Only Super-Admins can create and manage SMTP configurations.
Prerequisite
SMTP credentials (username and password) from your SMTP provider.
Additional Resources:
Email SMTP Tutorial
Steps
Navigate to the Global Configurations → Notifications → Configurations → Email (SMTP) → Add SMTP.
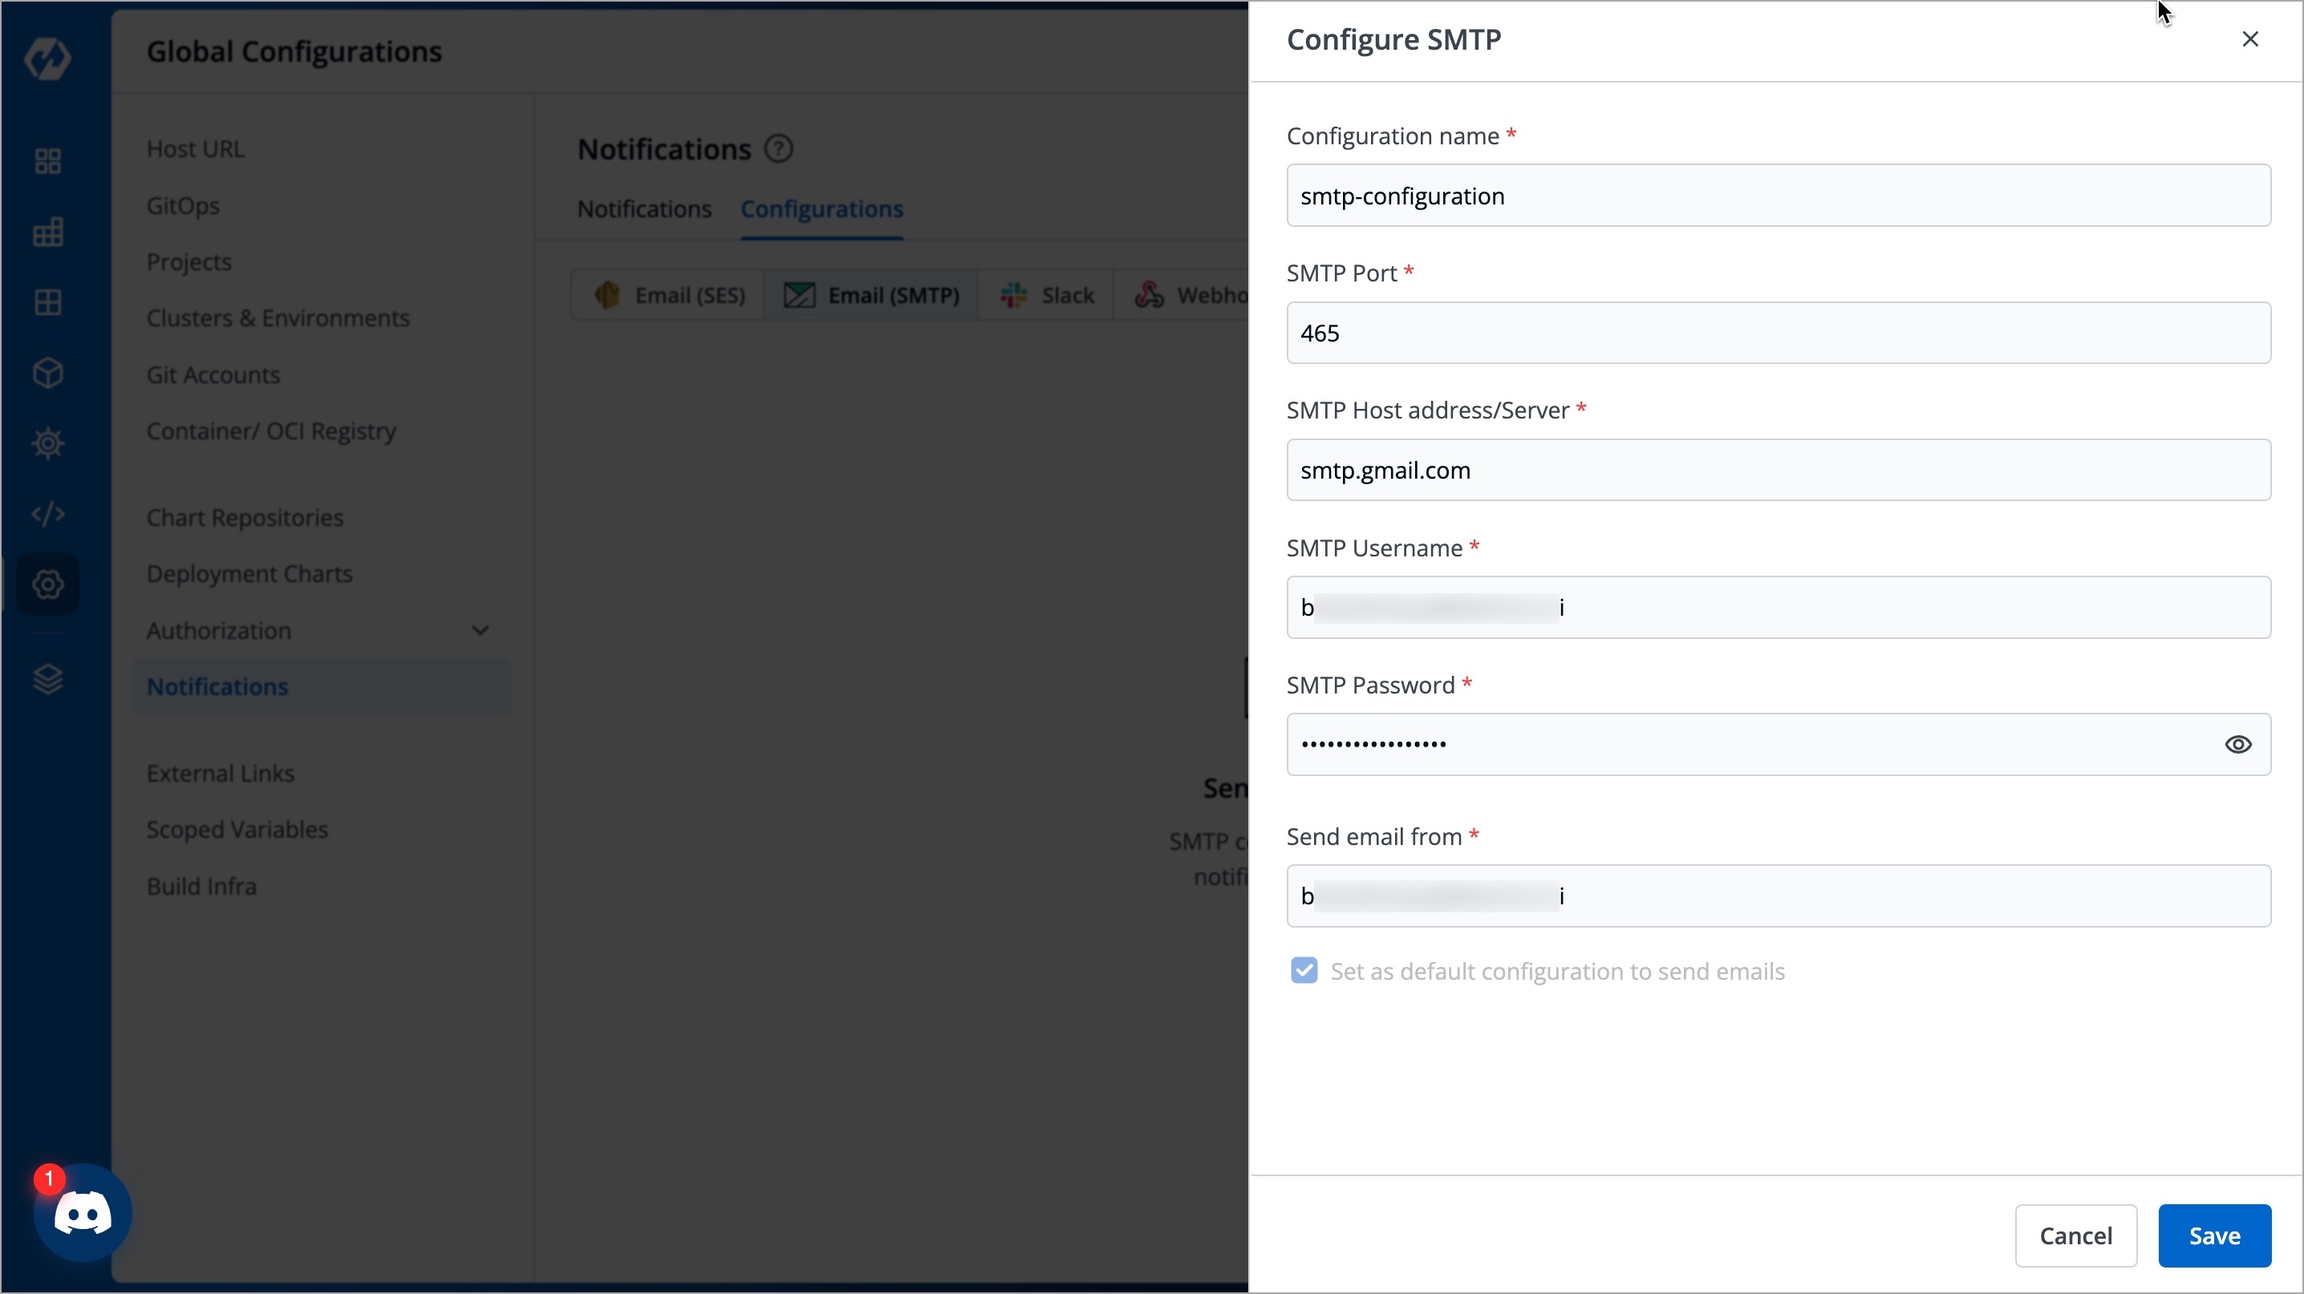
Figure 4: Configure SMTP Enter the following details in the Configure SMTP page:
KeyDescriptionConfiguration Name
Give a name to your SMTP Configuration, e.g.,
qa-smtpSMTP Port
The port number available in your SMTP settings, e.g.,
587SMTP Host address/Server
The SMTP endpoint available in your SMTP settings, e.g.,
smtp.gmail.comSMTP Username
A valid username created with your SMTP provider, e.g.,
AKIAWEAVHF123ABCD123in case of AWS SMTP and[email protected]in case of Gmail SMTP.SMTP Password
The password generated by your SMTP provider
Send email from
The sender email address verified by your SMTP provider for sending emails
Enable the Set as default configuration to send emails check box (optional) if you wish to keep this configuration as the default one for sending emails.
Click Save.
Now that the Email (SMTP) configuration is set up, you can proceed to Add Notifications.
Slack Configuration
Who Can Perform This Action?
Only Super-Admins can create and manage Slack configurations.
Prerequisite
A Slack account, a Slack channel, and an Incoming Webhook URL.
Slack Tutorial
Steps
Navigate to the Global Configurations → Notifications → Configurations → Slack → Add Slack.
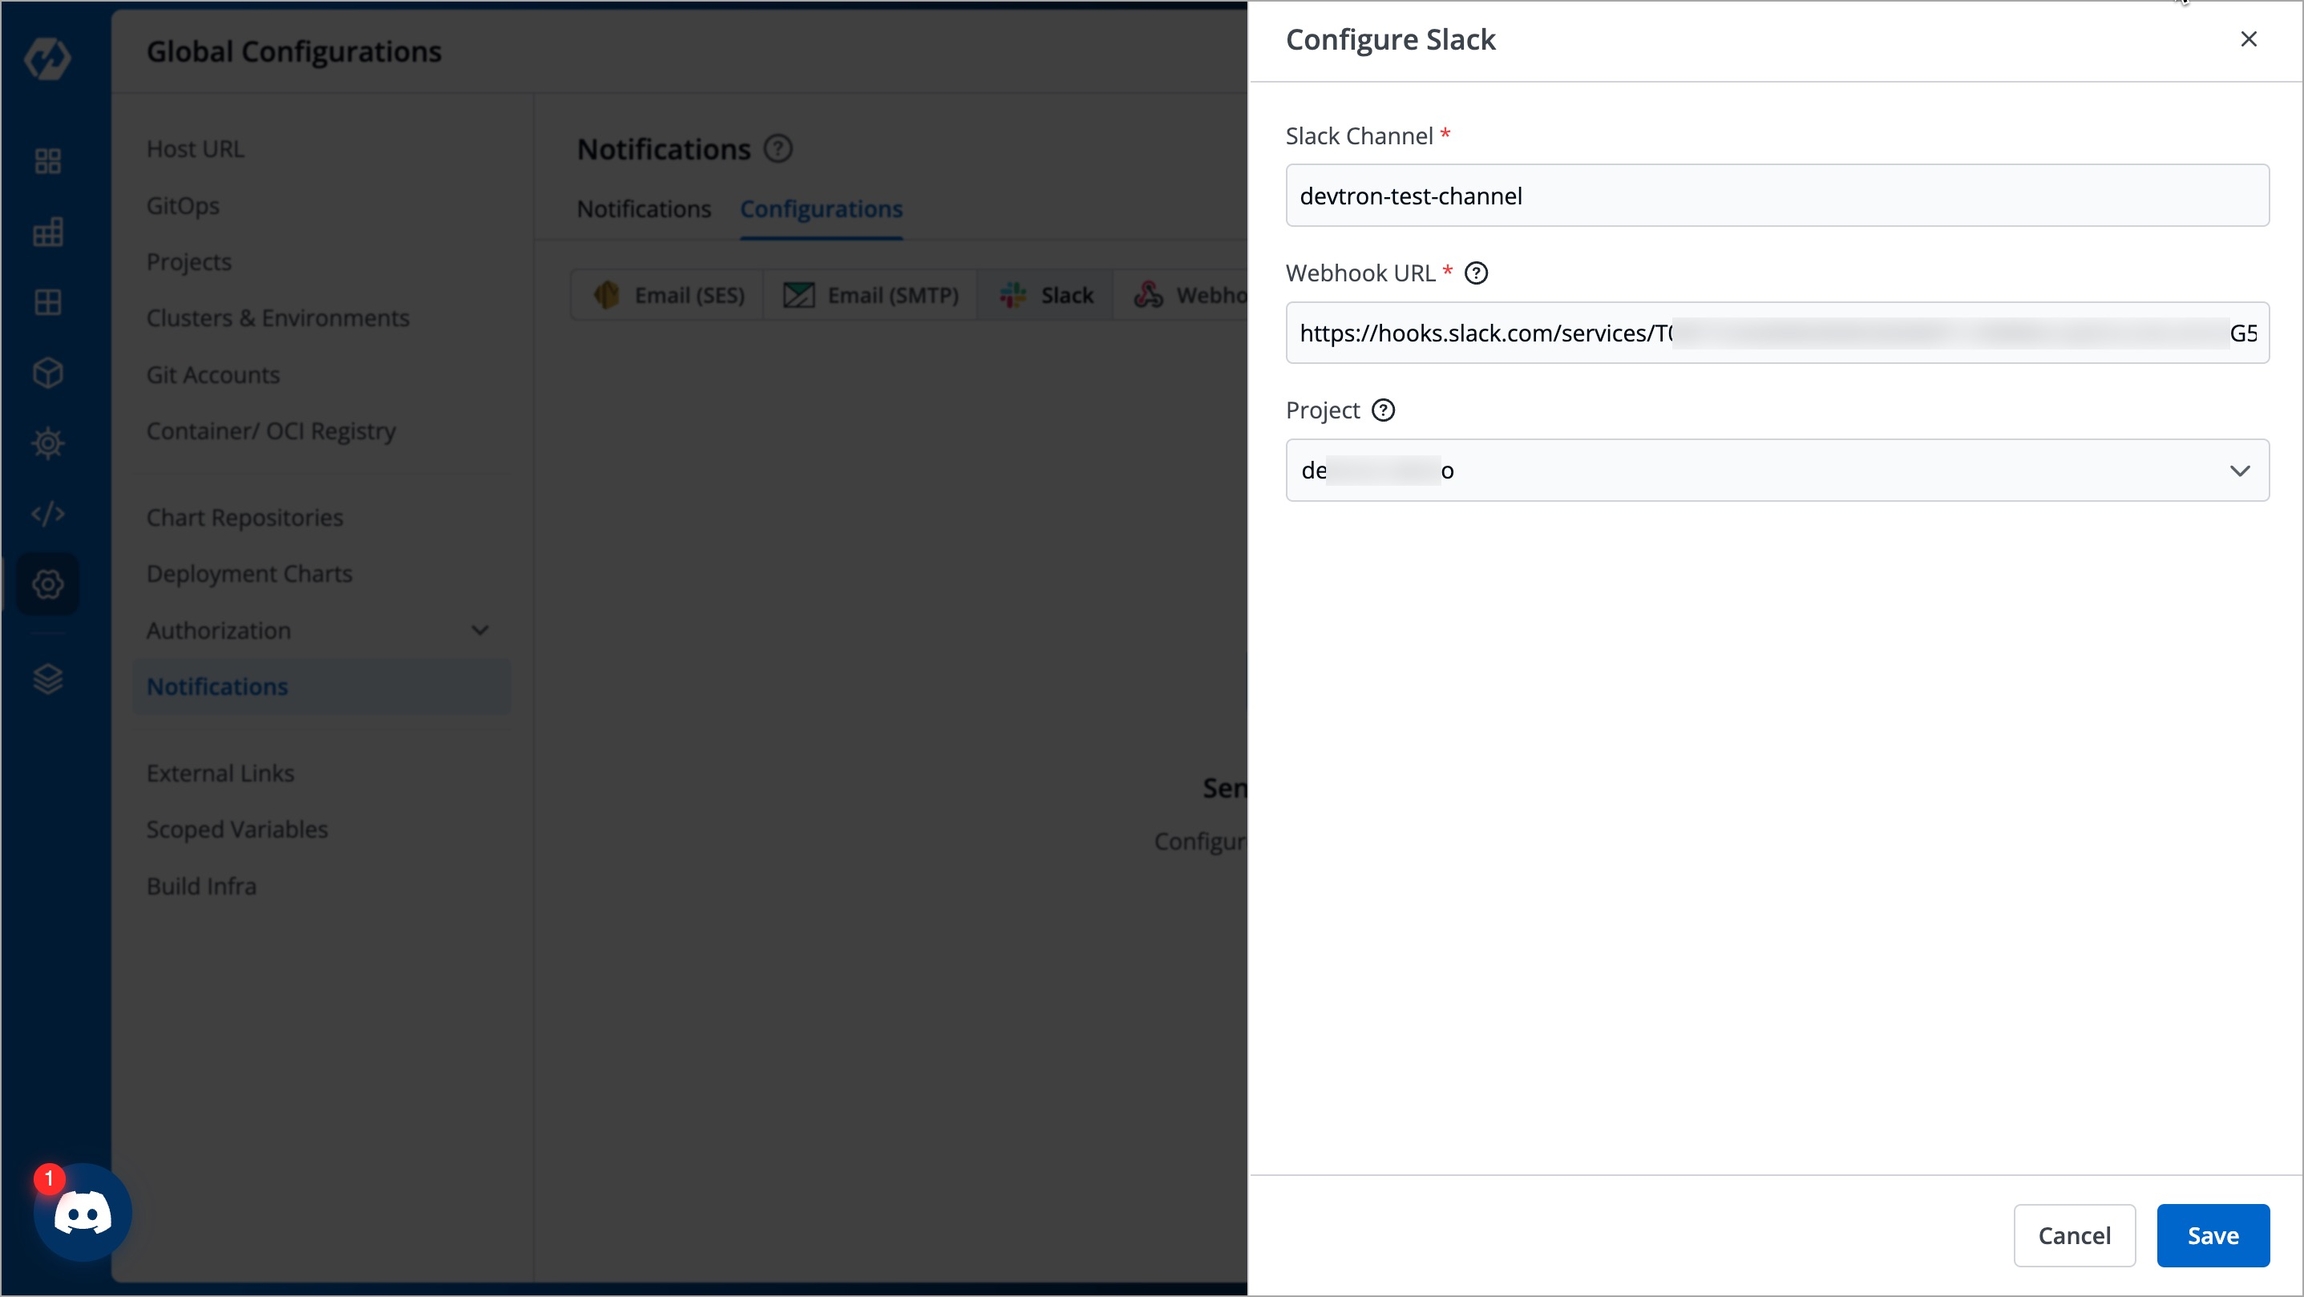
Figure 5: Configure Slack Enter the following details in the Configure Slack page:
KeyDescriptionSlack Channel
Name of the Slack channel on which you wish to receive notifications, e.g.,
qa-slack-channelWebhook URL
Enter a valid incoming webhook URL
Project
Select the project name to control user access. Apps outside your selected project cannot use this configuration, e.g.,
qa-demoClick Save.
Now that the Slack configuration is set up, you can proceed to Add Notifications.
Webhook Configuration
Who Can Perform This Action?
Only Super-Admins can create and manage Webhook configurations.
Prerequisite
A Webhook URL to receive notifications (e.g., Microsoft Teams Webhook URL, Discord Webhook URL).
Webhook Tutorial
Steps
Navigate to the Global Configurations → Notifications → Configurations → Webhook → Add Webhook.
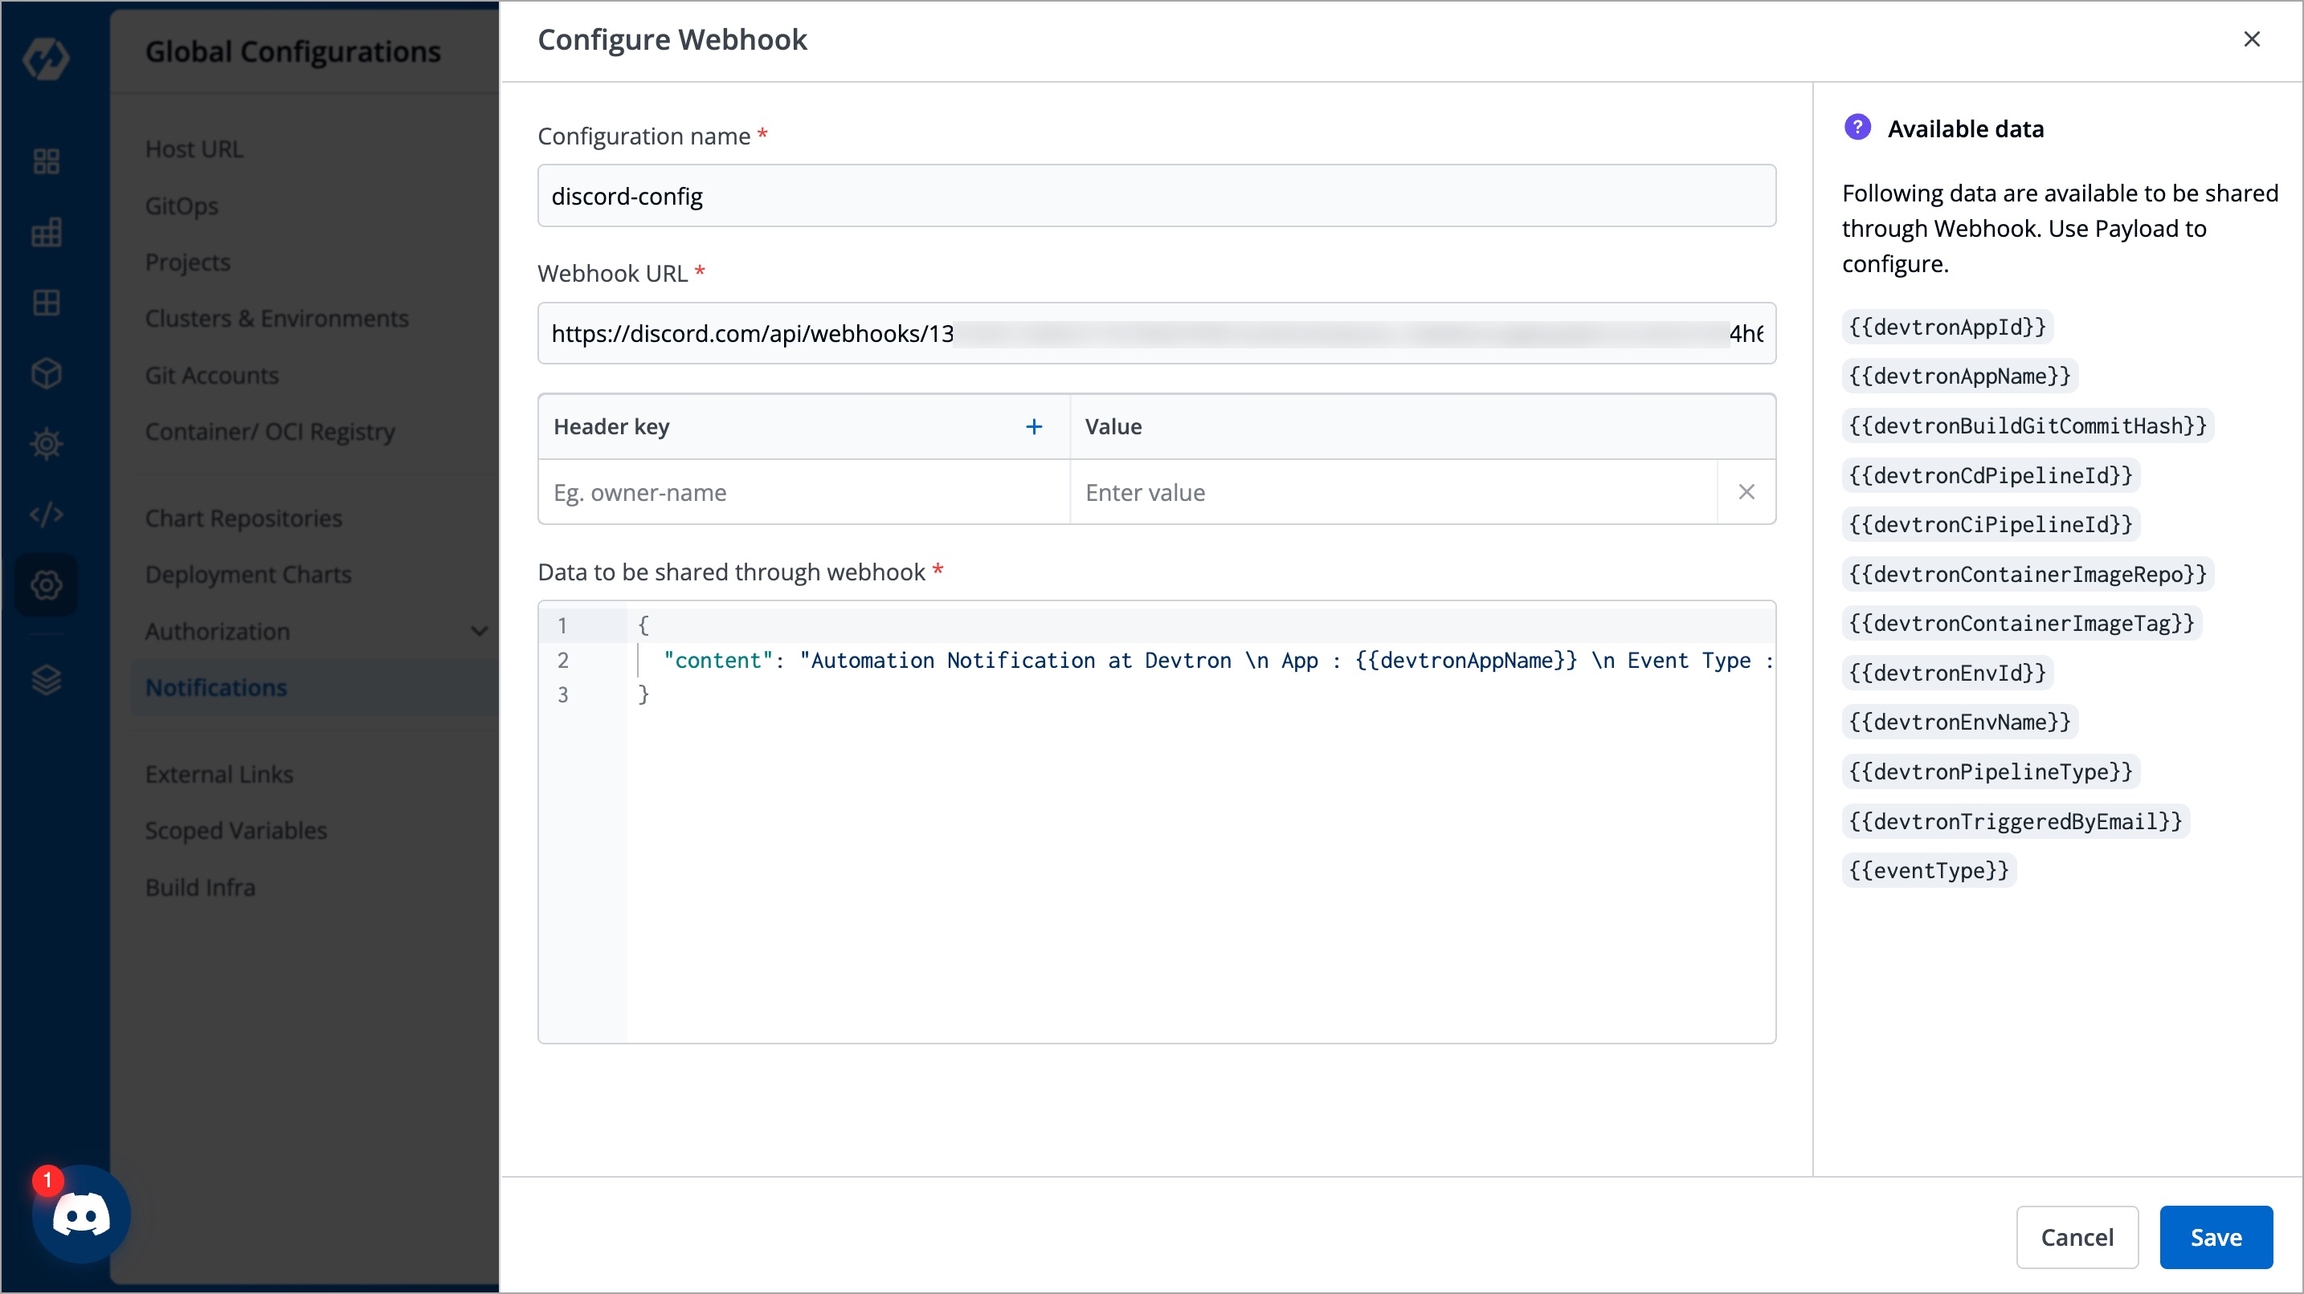
Figure 6: Configure Webhook Enter the following details in the Configure Webhook page:
KeyDescriptionConfiguration name
Give a name to your webhook configuration, e.g.,
qa-webhookWebhook URL
Enter a valid Webhook URL link
Headers
Add optional key-value pairs, e.g.
Content-Type: application/jsonData to be shared through webhook
Write the payload content of the notification in a JSON format. Refer:
Click Save.
Now that the Webhook configuration is set up, you can proceed to Add Notifications.
Notifications
Add Notifications
Once you have configured the notifications in the Configuration tab, you can then add, edit, and delete notifications in the Notifications tab. To create a new notification, follow the below instructions:
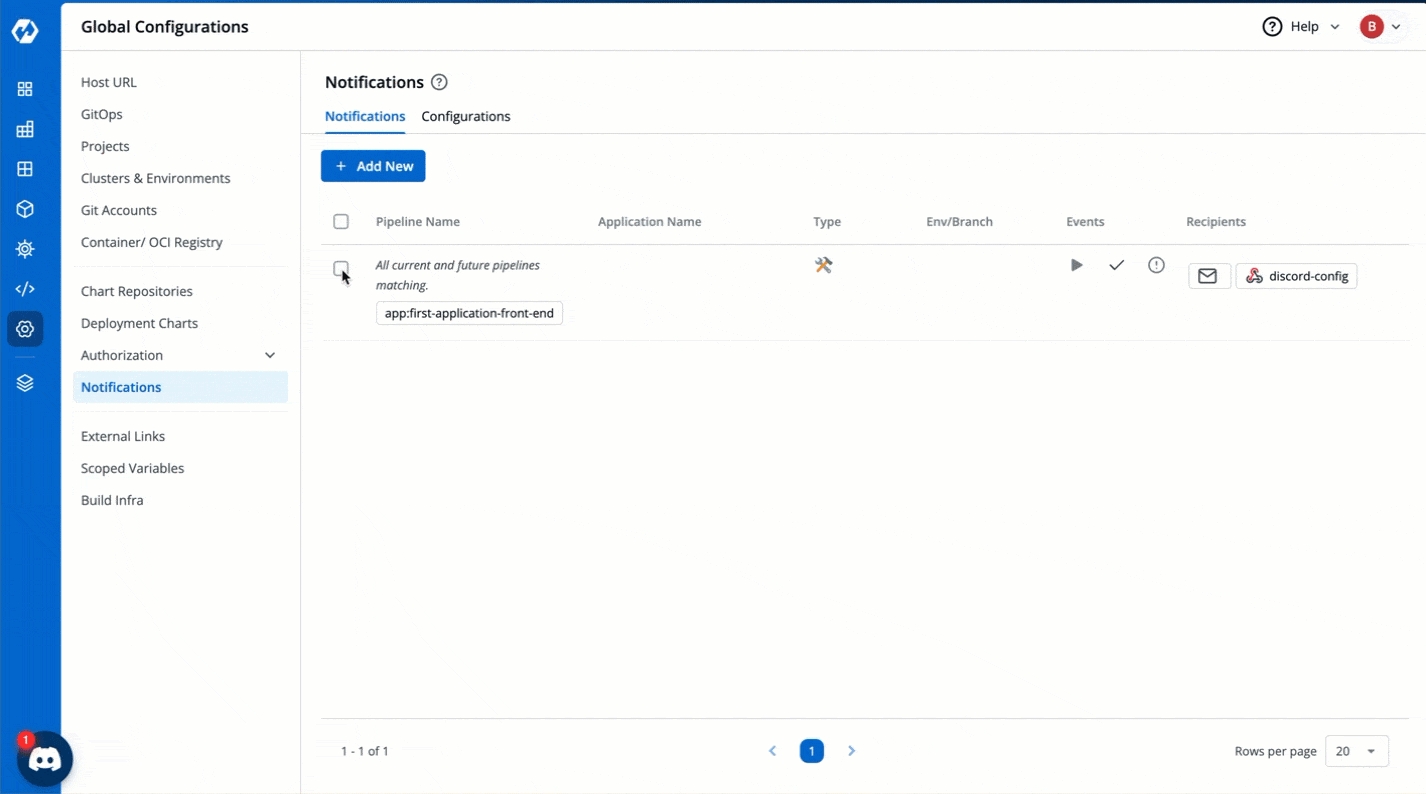
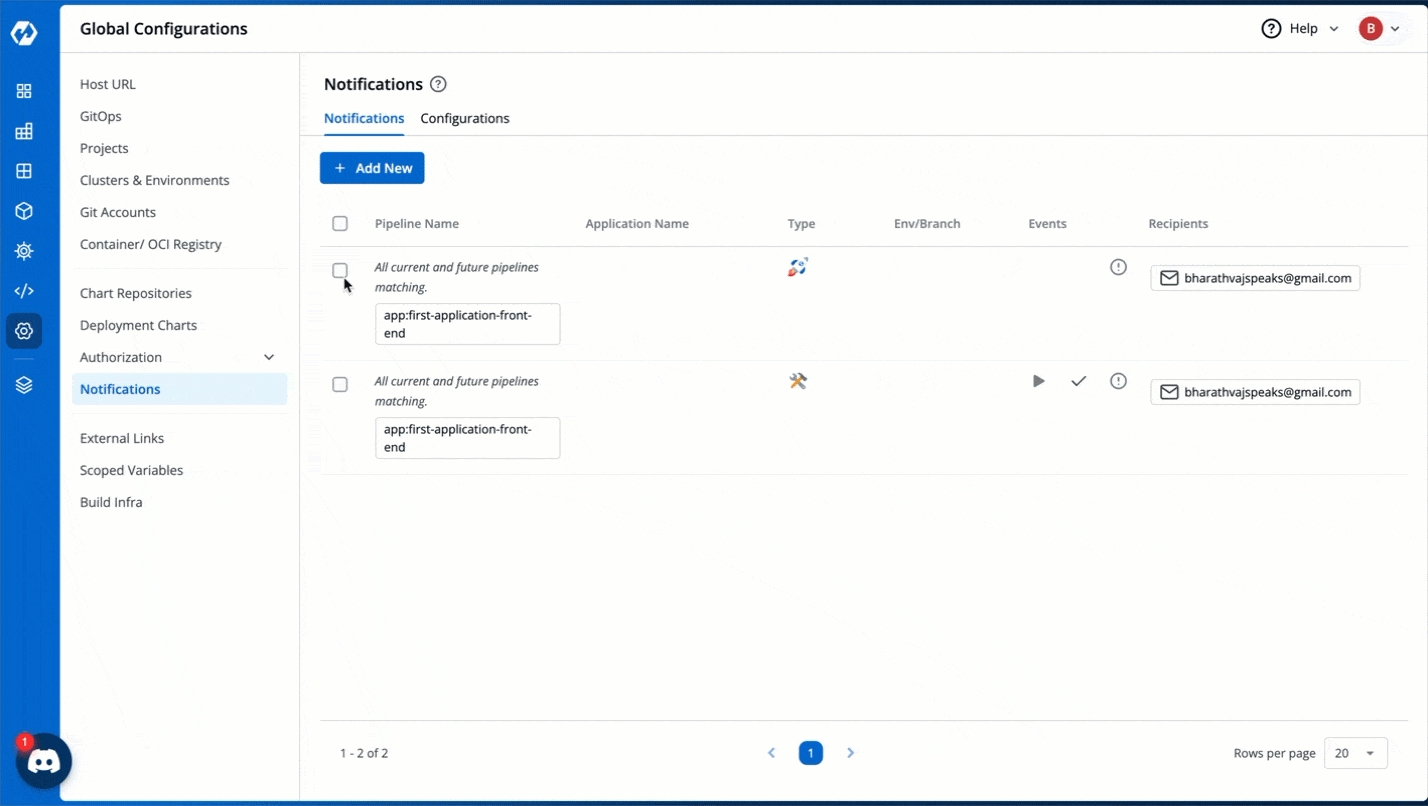
Navigate back to the Notifications tab.
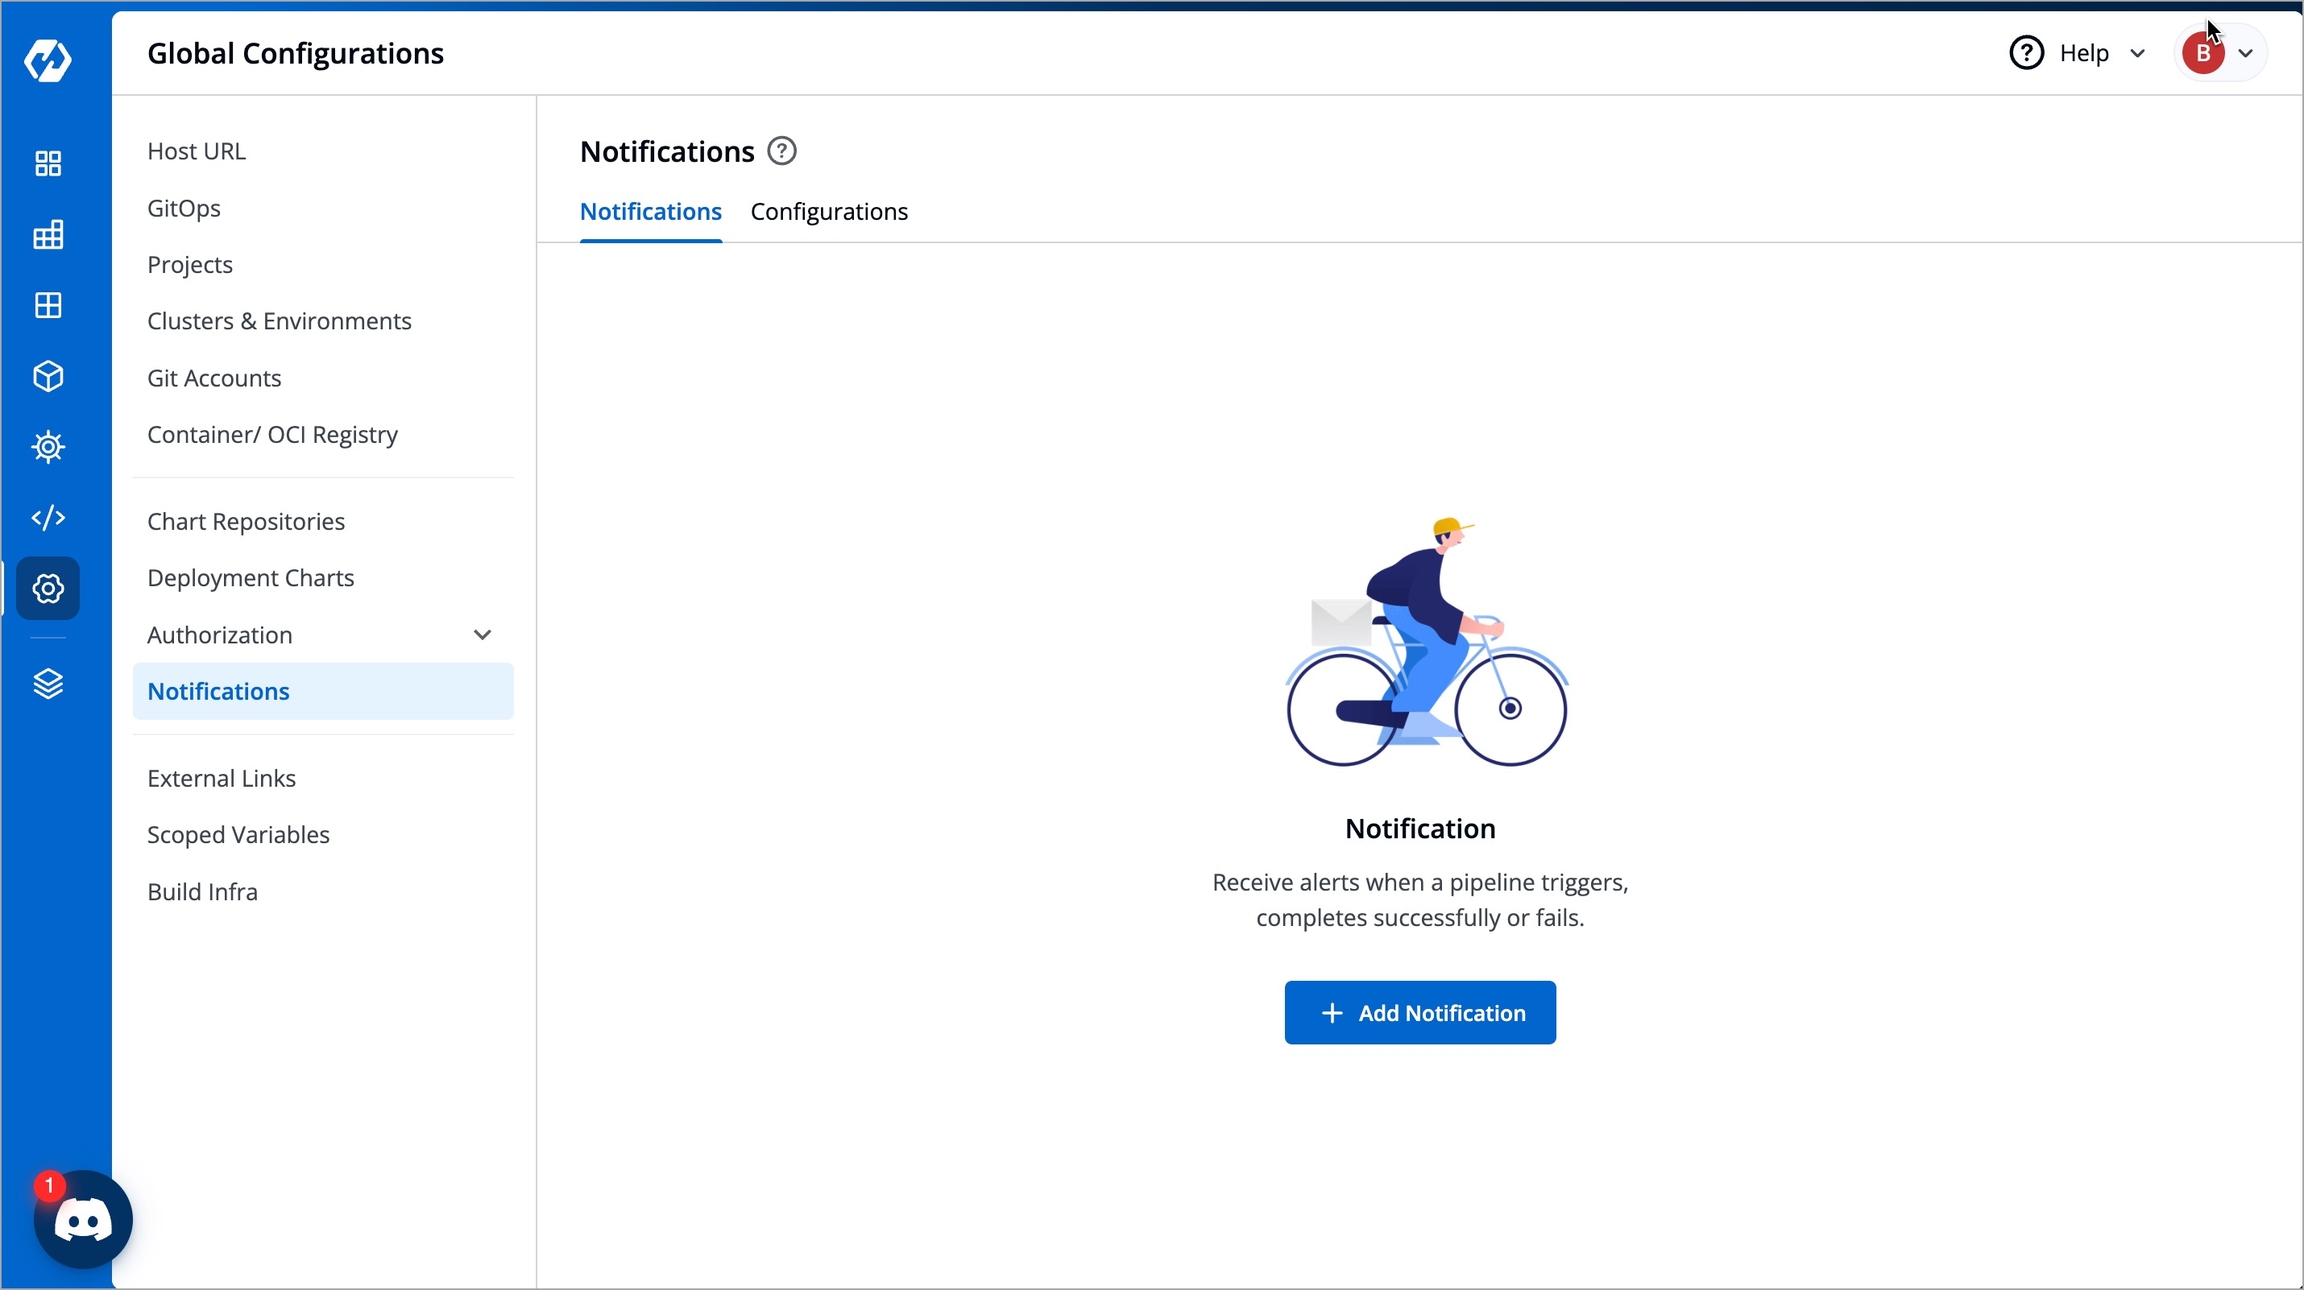
Figure 7: Notifications Tab Click the Add Notification button. The Add Notifications page is displayed.
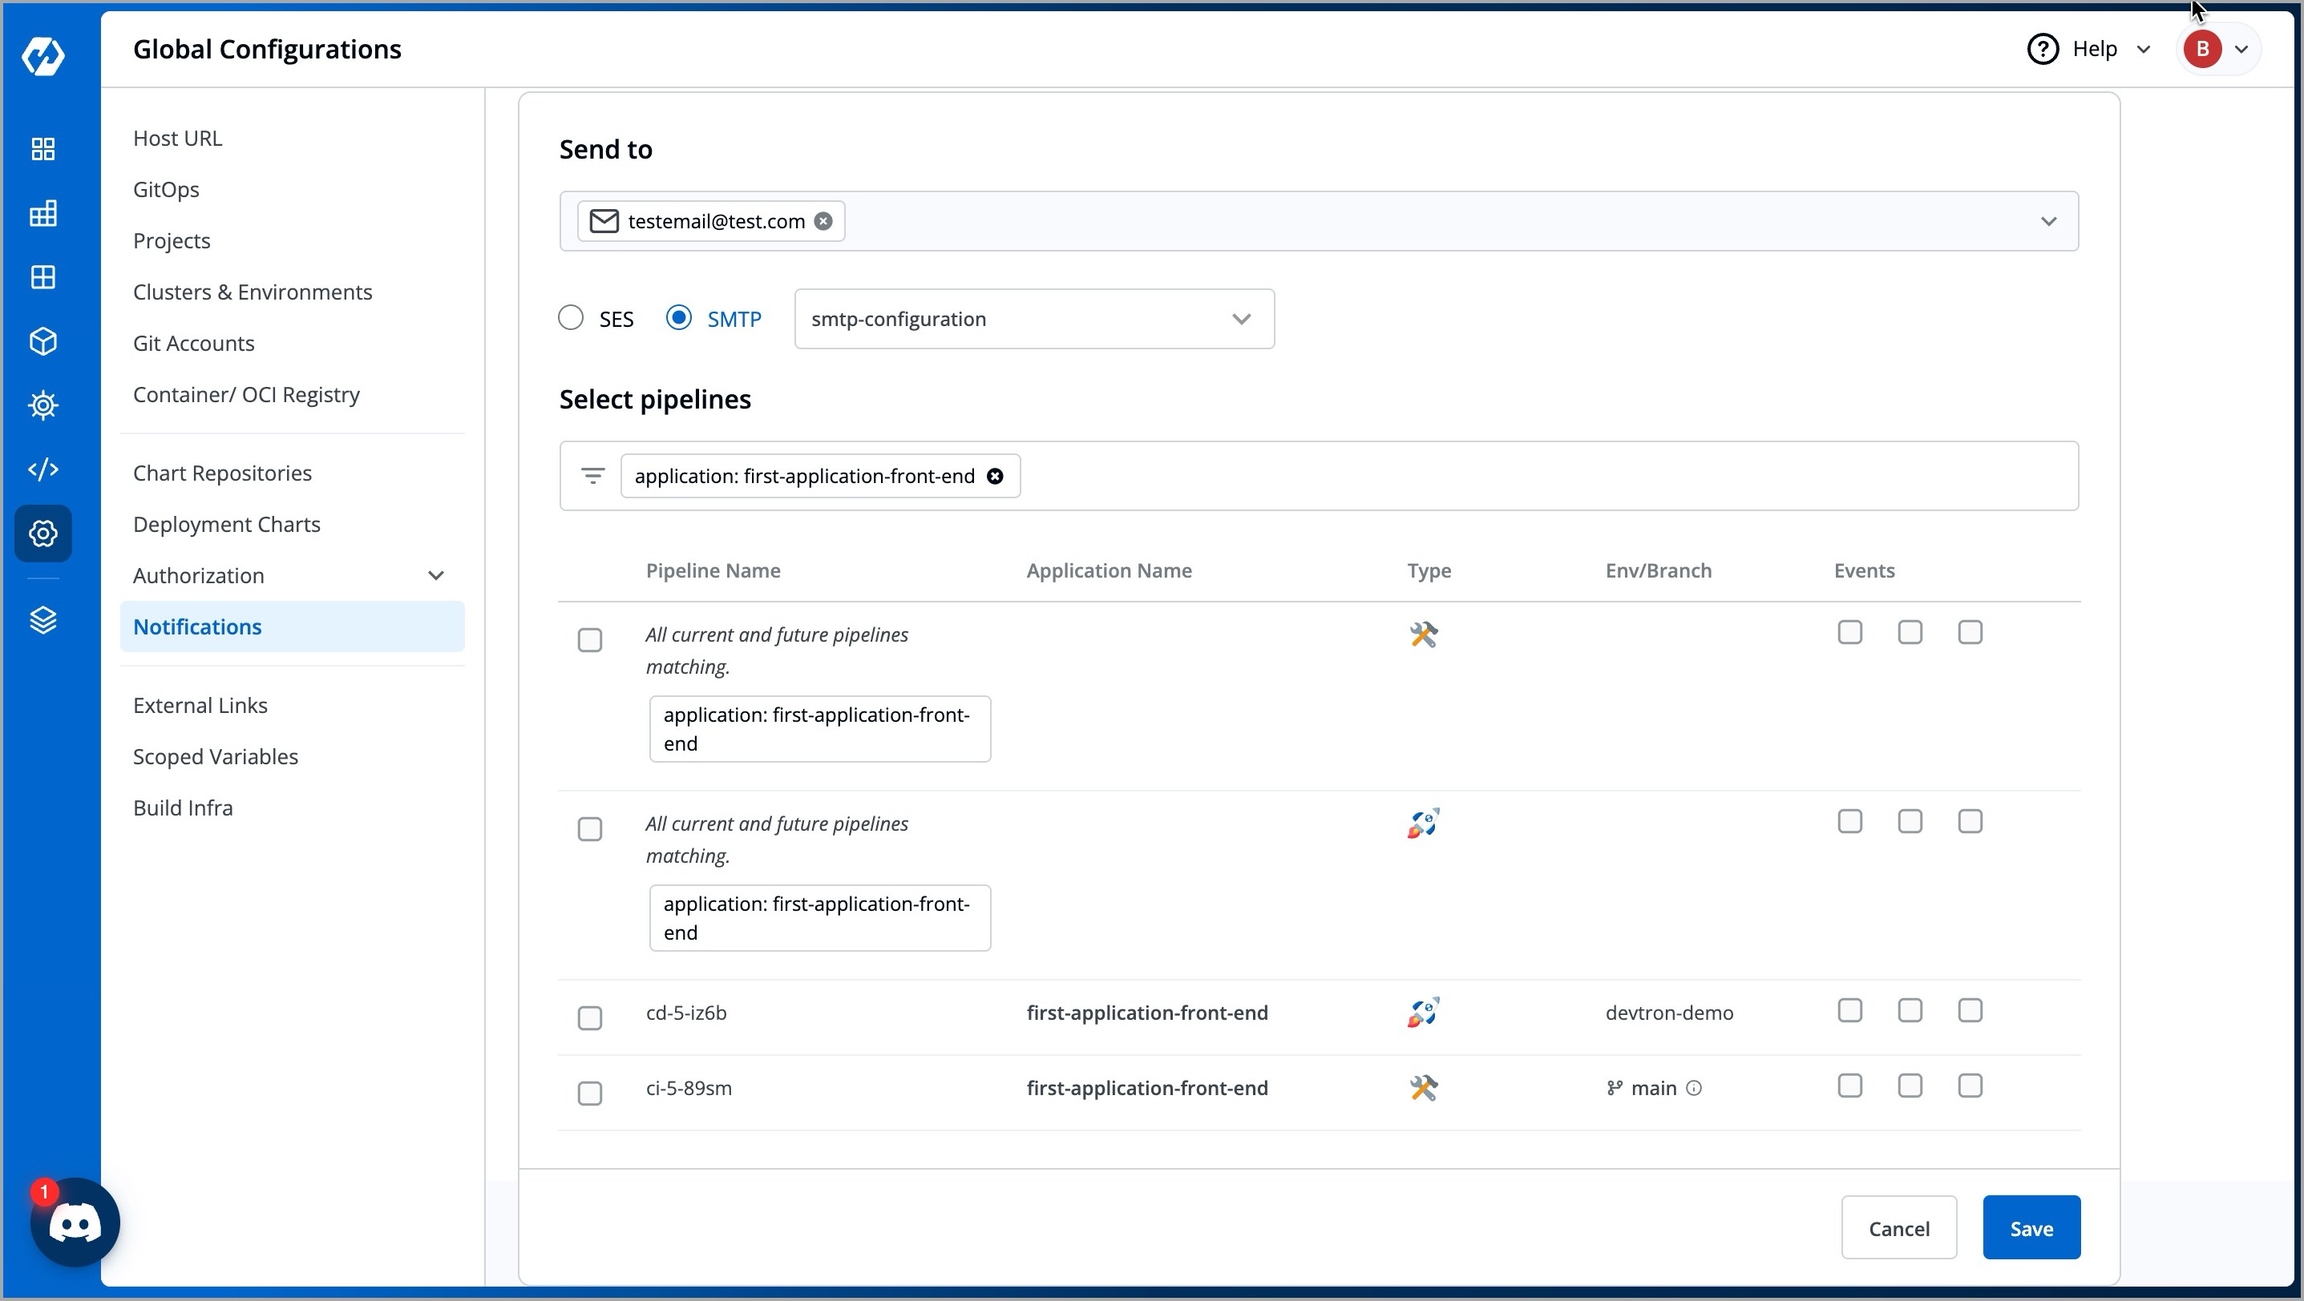
Figure 8: Add Notifications Page Enter your preferred recipient in the Send to drop-down box. You can add one or more recipients in the Send to drop-down box and the recipients can be any or all of the following:
a. A verified email address (by SES/SMTP)
b. A Slack channel
c. A Webhook
Select your preferred filter type from the following in the Select pipelines field:
a. Application - Select Application, if you specifically know for which application(s) you need notifications for.
b. Project - Select Project, if you want notifications for one or more applications within specific project(s).
c. Environment - Select Environment, if you want notifications for applications deployed in specific environment(s) (e.g., production).
d. Cluster - Select Cluster, if you want notifications for applications in a specific cluster(s).
Once you have selected your preferred filter type, a list of CI/CD pipelines are displayed as filter results.
 indicates that it is a CI (Build) pipeline.
 indicates that it is a CD (Deployment) pipeline.
You can also choose to receive notifications for any CI or CD pipelines that do not exist currently but may exist in future by enabling the All current and future pipelines matching pipeline in the Pipeline Name column.
Select your preferred events for which a notification must be sent out in the Events column. The labels are displayed when you hover over the check boxes. You can enable one or more events as per your requirements.
a. Trigger - Enable this if you wish to receive notification whenever the pipeline is triggered.
b. Success - Enable this if you wish to receive notification upon a successful build or deploy.
c. Failure - Enable this if you wish to receive notification upon a failed build or deploy.
Click Save. The notification is now successfully added. You can now build and deploy your application to get notifications of its CI/CD events.
Modify Notifications
You can always edit existing notifications instead of deleting them and creating new ones from scratch. For example, if you initially created notifications for Trigger and Failure events of your CI/CD pipelines, you can perform removal/addition of events anytime by modifying them.
To modify the events, follow the below steps:
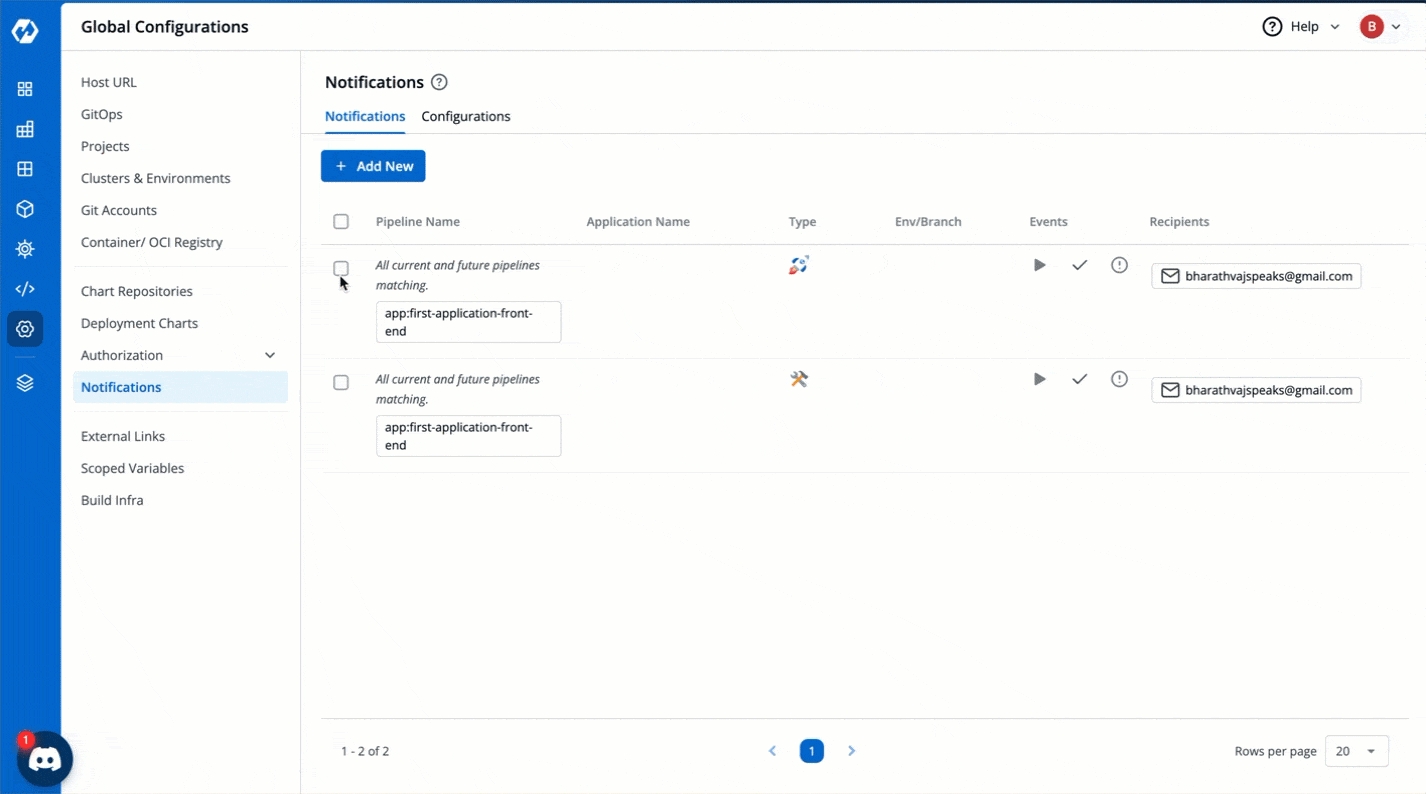
Navigate to the Notifications tab.
Select your preferred notification.
Check the check box in the left side of the notification to select it.
Click Modify Events to modify the events. Check or uncheck the events based on your requirements.
Click Apply.
When creating notifications, if you previously added a recipient but now no longer want them to receive the CI/CD notifications, or if you want to add a new recipient or remove a specific communication medium (e.g., Slack), you can do so by modifying the recipients.
To modify the recipients, follow the below steps:
Navigate to the Notifications tab.
Select your preferred notification.
Check the check box in the left side of the notification to select it.
Click Modify Recipients to modify the recipients. Add or remove the recipients based on your requirements.
Click Save Changes.
Delete Notifications
If you no longer wish to receive CI/CD notifications for an application, you can delete the corresponding notification from the Notifications tab.
Important Note
If you are currently receiving CI/CD notifications for a specific application, deleting its associated notification(s) in Devtron will stop the notifications for all events and recipients mentioned in those deleted notification(s).
To delete a notification, follow the below steps:
Navigate to the Notifications tab.
Select your preferred notification.
Check the check box in the left side of the notification to select it.
Click Delete to delete the notification.
Sample Payloads
For Microsoft Teams
{
    "type": "message",
    "attachments": [
        {
            "contentType": "application/vnd.microsoft.card.adaptive",
            "contentUrl": null,
            "content": {
                "$schema": "http://adaptivecards.io/schemas/adaptive-card.json",
                "type": "AdaptiveCard",
                "version": "1.2",
                "body": [
                    {
                        "type": "TextBlock",
                        "text": "Automation Notification for Devtron \n *App* : {{devtronAppName}} \n *Event Type* : {{eventType}}"
                    }
                ]
            }
        }
    ]
}
For Slack
{
    "text": "CI Triggered",
    "blocks": [
        {
            "type": "section",
            "text": {
                "type": "mrkdwn",
                "text": "Automation Notification for Devtron \n *App* : {{devtronAppName}} \n *Event Type* : {{eventType}}"
            },
            "accessory": {
                "type": "image",
                "image_url": "https://awsmp-logos.s3.amazonaws.com/3ec35b66-ca90-4ed0-8c9e-146fa65e1037/f3966518a472c0e5f51c57f5efb20da7.png",
                "alt_text": "Devtron Logo"
            }
        }
    ]
}
For Discord
{
    "content": "Automation Notification at Devtron \n App : {{devtronAppName}} \n Event Type : {{eventType}}"
}
For RingCentral
{
    "activity": "CI Triggered",
    "attachments": [
    {
        "$schema": "http://adaptivecards.io/schemas/adaptive-card.json",
        "type": "AdaptiveCard",
        "version": "1.0",
        "body": [
        {
            "type": "TextBlock",
            "text": "Automation Notification at Devtron \n App: {{devtronAppName}} \n Event Type: {{eventType}}",
            "weight": "bolder",
            "size": "medium",
            "wrap": true
        },
        {
            "type": "ColumnSet",
            "columns": [
            {
                "type": "Column",
                "width": "auto",
                "items": [
                {
                    "type": "Image",
                    "url": "https://awsmp-logos.s3.amazonaws.com/3ec35b66-ca90-4ed0-8c9e-146fa65e1037/f3966518a472c0e5f51c57f5efb20da7.png",
                    "size": "small",
                    "style": "person"
                }
                ]
            },
            {
                "type": "Column",
                "width": "stretch",
                "items": [
                {
                    "type": "TextBlock",
                    "text": "Container Image Repo: {{devtronContainerImageRepo}} \n Container Image Tag: {{devtronContainerImageTag}}",
                    "weight": "bolder",
                    "wrap": true
                },
                {
                    "type": "TextBlock",
                    "spacing": "none",
                    "text": "Triggered by: {{devtronTriggeredByEmail}}",
                    "isSubtle": true,
                    "wrap": true
                }
                ]
            }
            ]
        },
        ]
    }
    ]
}Last updated
Was this helpful?