

Trivy
Prerequisite
For OSS users: Please ensure that Build and Deploy (CI/CD) integration is installed.
For Enterprise Users: Build and Deploy (CI/CD) integration is installed by default.
Trivy integration enables you to scan the vulnerabilities for images, code, and manifests during the execution of build and deployment pipelines. Refer to Vulnerability Scanning to know more about Trivy.
Install Trivy Integration
For Enterprise Users
To enable Trivy integration for Devtron Enterprise (managed by Devtron), contact your Devtron representative.
In case you are self-managing the Devtron Enterprise, refer to the steps mentioned in For OSS and Self-Managed Devtron Enterprise Users to enable Trivy.
For OSS and Self-Managed Devtron Enterprise Users
To install Trivy integration, follow the steps:
On the Devtron Stack Manager → Discover page, click the Vulnerability Scanning (Trivy).
On the Discover Integrations/Vulnerability Scanning (Trivy) page, click Install.
Note: In case, Clair is already installed, you also need to enable Trivy integration after installation.
The installation status may be one of the following:
Install
The integration is not yet installed.
Initializing
The installation is being initialized.
Installing
The installation is in progress. The logs are available to track the progress.
Failed
Installation failed, and the logs are available to troubleshoot. You can retry the installation or contact support.
Installed
The integration is successfully installed and available on the Installed page.
Request timed out
The request to install has hit the maximum number of retries. You may retry the installation or contact support for further assistance.
A list of installed integrations can be viewed on the Devtron Stack Manager > Installed page.
To update an installed integration, please update Devtron.
Using Trivy
In Devtron, Trivy can be used to scan vulnerabilities across various types of applications such as Devtron Apps, Helm Apps, ArgoCD Apps, and FluxCD Apps
Trivy can provide 3 types of scans based on the type of the application, i.e., Image scan, Kubernetes Manifest Scan, and Code Scan.
Image Scan
Scans build images for
Vulnerabilities
License Risks
Manifest Scan 
Code Scan
(requires Code Scan Plugin)
The Code Scan plugin of Devtron uses Trivy to scan your source code for
Vulnerabilities
License Risks
Misconfigurations
Exposed Secrets
Refer to the table below to see which type of scans are supported across different application types in Devtron.
Application Type
Image Scan
Code Scan (Requires Plugin)
Manifest Scan
Devtron Apps
✅
✅
✅
Helm Apps
✅
Not Applicable
✅
ArgoCD Apps
✅
Not Applicable
❌
FluxCD Apps
✅
Not Applicable
❌
Devtron Apps
Where to Initiate the Scan for Devtron Apps
For Devtron Apps, you can enable scanning in 2 ways.
Scan for vulnerabilities
Image scan
Kubernetes Manifest scan
Enables scanning for build Images and Kubernetes Manifests before deployment.
Code Scan (Plugin)
Code Scan
The Code Scan plugin of Devtron allows you to perform code scanning using Trivy.
Enable 'Scan for vulnerabilities' option
Who Can Perform This Action?
Users need to have Admin permission or above (along with access to the environment and application) to enable the Scan for vulnerabilities option.
Devtron's CI pipeline provides a Scan for vulnerabilities option as shown below. Once you enable this option, it will automatically scan the image and Kubernetes manifests for vulnerabilities.
Follow the steps below to enable the Scan for vulnerabilities option.

Navigate to Configurations → Workflow Editor of your Devtron App.
Select the specific build pipeline for which you want to enable scanning, and a Edit deployment pipeline modal window will appear.
Enable the Scan for vulnerabilities toggle in the Build stage.
Select Update pipeline to save the configuration.
Trigger the next CI pipeline build to scan for vulnerabilities.
To access the scan results after the build, navigate to the Build History page of your Devtron App. Refer to the From Build History Page section to learn more.
After the build image (artifact) is deployed, you can also access the scan results from the App Details page. Refer to the Accessing the scan results section to learn more.
Enable Code Scan Plugin
To enable code scan for Devtron Apps, you can configure the code scan plugin as a pre-build task in your Devtron App
To configure Code Scan as a pre-build task, follow the steps below:
Navigate to Configurations → Workflow Editor of your Devtron App.
Select the specific build pipeline for which you want to enable scanning, and a Edit deployment pipeline modal window will appear.
Navigate to Pre-build stage, and select Add task from the left side panel.
Search for
Code Scanin the Search Plugin bar and select Code Scan from the list of plugins. The Code Scan plugin does not require any additional configuration. If you want, you can change the Task Name and Description. Refer to the Code Scan Plugin documentation to know more.Select Update Pipeline and the code scan plugin is now configured and will scan the code when the next build is triggered.
Accessing the scan's results
The table below shows the locations where the scan results will be available after enabling the above scans.
App Details
✅
✅
✅
Select Image Artifact
✅
✅ (Not in summary)
❌
CI History (Job/Build)
✅
✅
❌
Security
✅
✅
❌
App Details
To access the scan results
Navigate to the App details page of your Devtron App.
In App Details, scan results are available at two places:
Security Card: You can view overall scan results by selecting the Security card
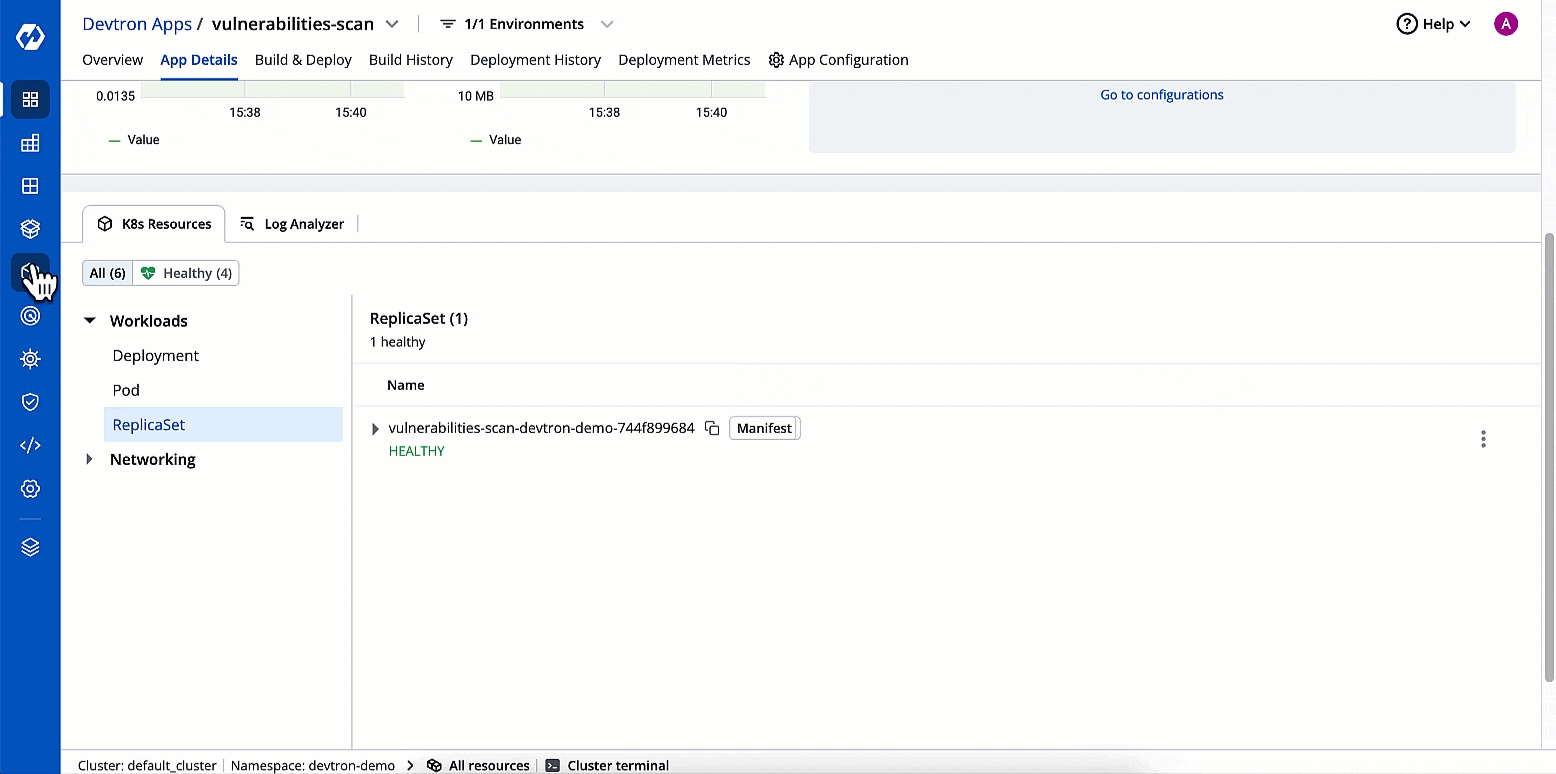
K8s Resources Sub Tab: You can view the scan results for specific workloads (Pods, Deployments, ReplicaSets) under K8s Resources Sub Tab.
Accessing Scan Results from 'Security'
After clicking on the Security card, a Security modal window will appear showing you all the enabled scan results sorted according to their severity in reverse chronological order, such as Image Scan, Code Scan, and Kubernetes Manifest Scan.
You can inspect each type of scan to view the specific type of vulnerabilities that the scan supports. Refer to the video below
K8s Resources Sub Tab
By clicking on the Security card you can access the Image scan results for the latest build image that is deployed, but if you want to inspect Image scan results for specific K8s resources (Deployments, ReplicaSet and Pods), then you can inspect them in Workloads dropdown under K8s Resources.
Note
In case you have enabled the vulnerability scanning after the application has already been built and deployed, you can still initiate the image scan for existing Kubernetes resources.
To access or initiate Image scan results for specific resources, follow the steps below
Select the resource type (Deployment, Pod, or ReplicaSet) from the left-side menu in the Workloads under K8s Resources sub tab.
After selecting the resource type, on the right side, a list of all resources of the selected type will appear.
On the right-hand side, select the kebab menu (⋮) for the particular resource from the list and select Check Vulnerabilities.
A Security modal window will appear, displaying the scan results for the image used to build that resource.
Select the image in the Security modal window to view the list of vulnerabilities.
From Resource Browser
Navigate to Resource Browser.
Select a cluster.
Click a workload within the Workloads dropdown.
Select the Check vulnerabilities option from the kebab menu (⋮) to access the scan results.
From 'Build & Deploy' Page
You can access the build image scan results while selecting the image before triggering the deployment. To do so, follow the steps below
Navigate to Build & Deploy tab of your application.
Click the Select Image button in the deploy pipeline, and choose the build image you want to deploy.
Click Show more info, which expands the selected image dialog box to display additional information about the selected image.
Go to the Security tab for the selected image to access the scan results.
Click on the scan to open a new Security modal window, which will display the scan results in detail.
From 'Build History' Page
You can access the scan results in Build History under the Security tab. To do so, follow the steps below:
Navigate to Build History for you application.
Go to Security tab in the Build History to access the scan results.
Click on the specific scan to open a new Security modal window, which will display the scan results in detail.
Vulnerability Scanning in Helm Apps
Where to Initiate the Scan for Helm Apps
To enable scanning for Helm Apps, follow the steps below:
Navigate to Configure tab of your Helm App.
Enable the Security Scan option to enable vulnerability scanning.
Accessing the scan's results
The table below shows the locations where the scan results will be available after enabling the Security scan.
App Details
✅
✅
Deployment History
✅
✅
From 'App Details' Page
To access the scan results
Navigate to App Details tab of your Helm App
Scan results can be found by selecting the Security card and under K8s resources for specific workloads.
Accessing Scan Results from 'Security' Card.
After clicking on the Security card, a Security modal window will appear showing you all the enabled scan results, such as Image Scan and Kubernetes Manifest Scan.
You can inspect each type of scan to view the specific type of vulnerabilities that the scan supports. Refer to the video below
K8s Resources Sub Tab
Note
In case you have enabled the vulnerability scanning after the application has already been built and deployed, you can still initiate the image scan for existing Kubernetes resources.
To access or initiate Image scan for specific resources, follow the steps below
Select the resource type (Deployment, Pod, or ReplicaSet) from the Workloads dropdown under K8s Resources sub tab.
On the right-hand side, select Check vulnerabilities from the kebab menu (⋮) to access security scans.
From 'Deployment History' Page
You can access the scan results in Deployment History under the Security tab. To do so, follow the steps below:
Navigate to Deployment History for you application.
Go to Security tab in the Deployment History to access the scan results.
Click on the specific scan to open a new Security modal window, which will display the scan results in detail.
ArgoCD and FluxCD Apps
Where to Initiate the Scan for Helm Apps
For ArgoCD and FluxCD apps, you do not need to enable the scan anywhere; the scan will be initiated when you check the scan results for the first time.
The table below shows the locations where the scan results will be available after enabling the scan.
App Details
✅
From 'App Details' Page
To access the scan results
Navigate to ArgoCD Apps or FluxCD Apps.
Select your application for which you want to inspect the scan results.
Under App Details scan results can be found under K8s resources for specific workloads.
K8s Resources Sub Tab
Note
In case you have enabled the vulnerability scanning after the application has already been built and deployed, you can still initiate the image scan for existing Kubernetes resources.
To access or initiate Image scan for specific resources, follow the steps below
Select the resource type (Deployment, Pod, or ReplicaSet) from the Workloads dropdown under K8s Resources sub tab.
On the right-hand side, select Check vulnerabilities from the kebab menu (⋮) to access security scans.
Security Policies
Devtron allows you to define security policies based on the severity of the vulnerabilities (Critical, High, Medium, Low). Users have the flexibility to set policies that either block the deployment of container images with vulnerabilities or allow their deployment.
With this feature, users can specify their desired actions for each severity level. For example, they can choose to block any container image with Critical vulnerabilities, while allowing container images with Moderate or Low vulnerabilities to be deployed.
For in-depth instructions, refer to the Security Policies.
Last updated
Was this helpful?