CI Pipeline
Last updated
Last updated
For Devtron version older than v0.4.0, please refer the CI Pipeline (legacy) page.
A CI Workflow can be created in one of the following ways:
Sync with Environment
Create a Job
Each method has different use-cases that can be tailored according the needs of the organization.
Build and Deploy from Source Code workflow allows you to build the container image from a source code repository.
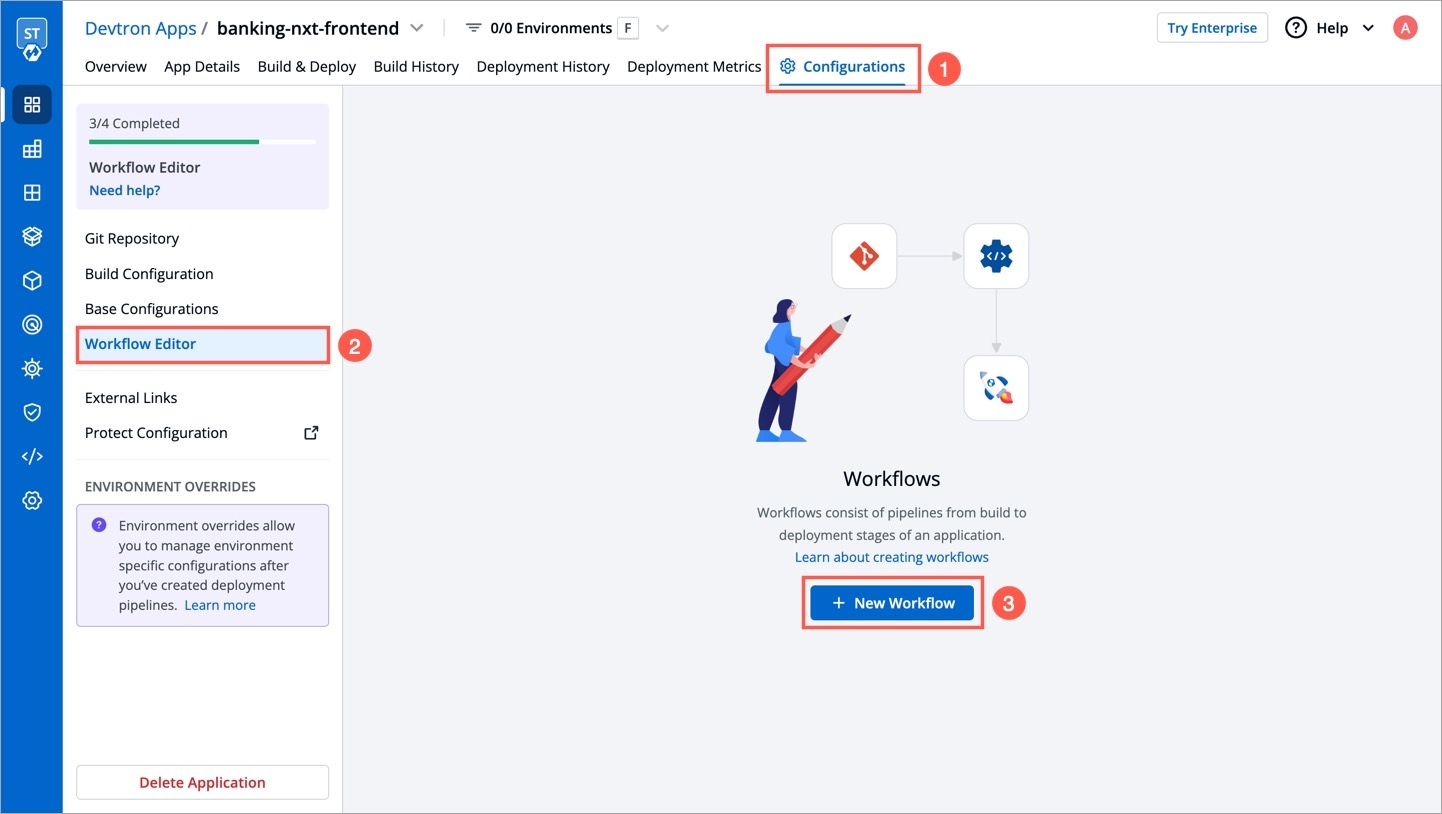
From the Applications menu, select your application.
On the App Configuration page, select Workflow Editor.
Select + New Workflow.
Select Build and Deploy from Source Code.
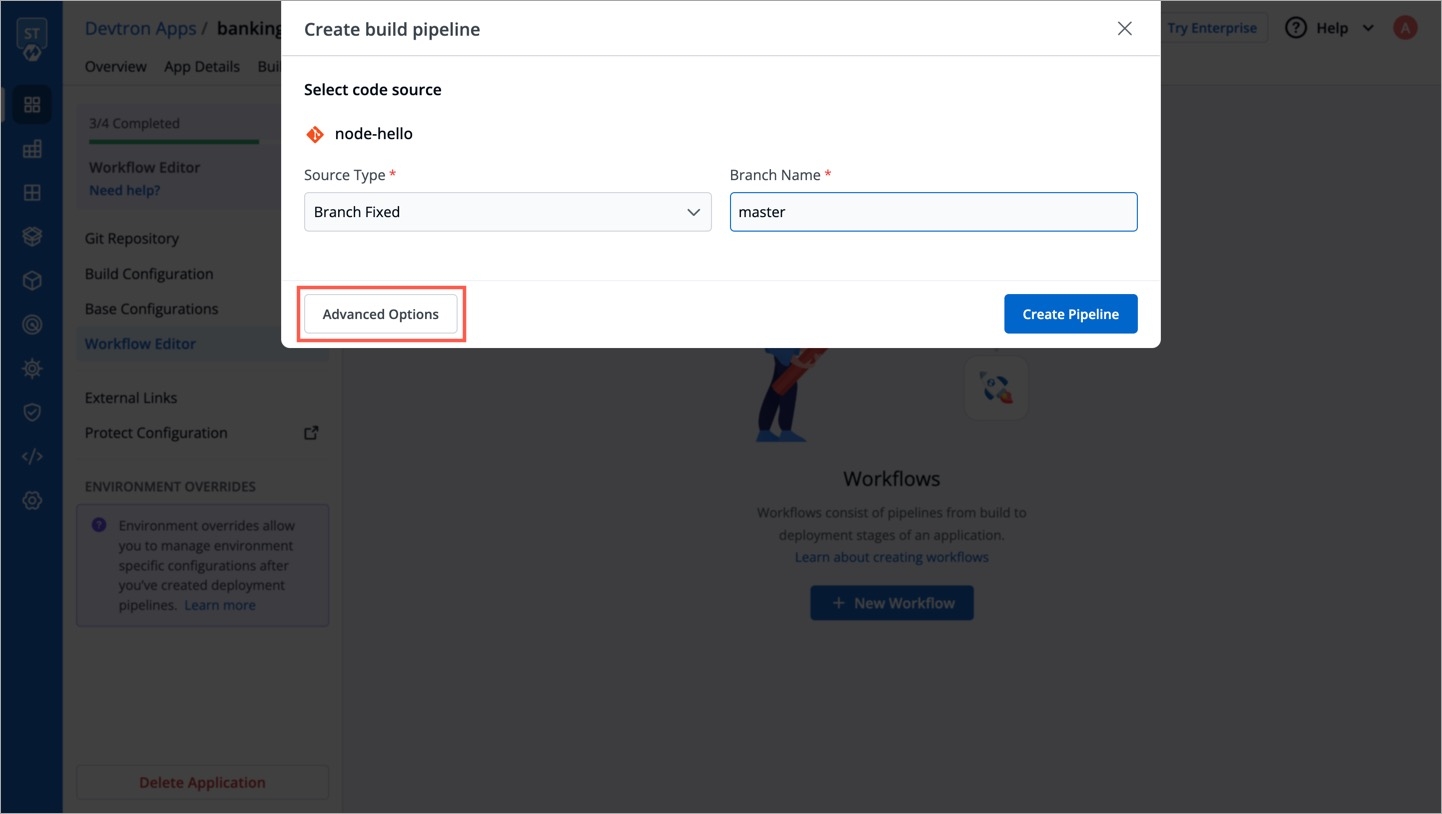
Enter the following fields on the Create build pipeline window:
Source type
Required
Source type to trigger the CI. Available options: Branch Fixed | Branch Regex |Pull Request | Tag Creation
Branch Name
Required
Branch that triggers the CI build
Advanced Options
Optional
Create Pre-Build, Build, and Post-Build tasks
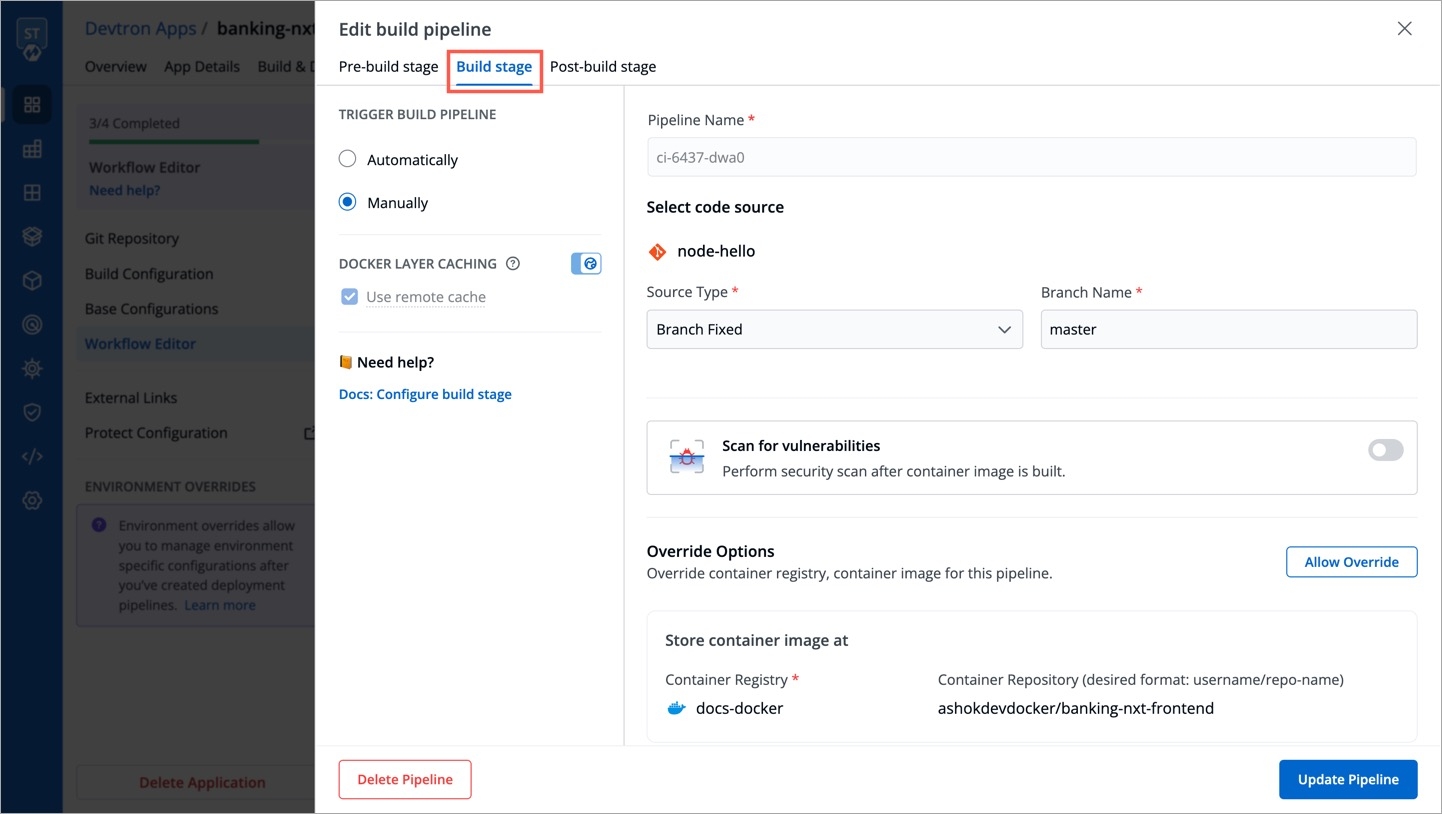
The Advanced CI Pipeline includes the following stages:
Pre-build stage: The tasks in this stage are executed before the image is built.
Build stage: In this stage, the build is triggered from the source code that you provide.
Post-build stage: The tasks in this stage will be triggered once the build is complete.
The Pre-build and Post-build stages allow you to create Pre/Post-Build CI tasks as explained here.
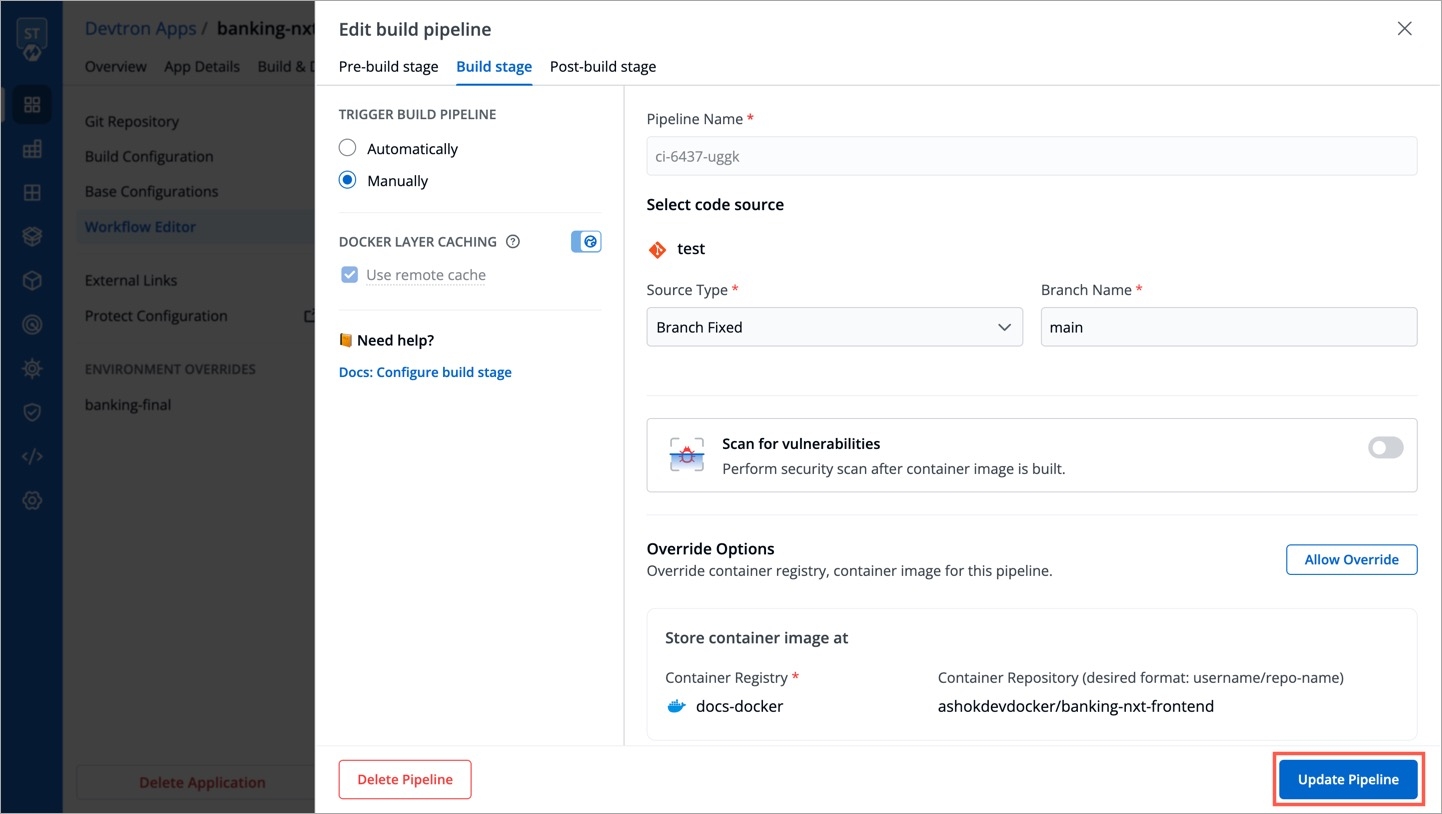
Go to the Build stage tab.
TRIGGER BUILD PIPELINE
Required
The build execution may be set to:
Automatically (default): Build is triggered automatically as the Git source code changes.
Manually: Build is triggered manually.
Pipeline Name
Required
A name for the pipeline
Source type
Required
Select the source type to build the CI pipeline: Branch Fixed | Branch Regex | Pull Request | Tag Creation
Branch Name
Required
Branch that triggers the CI build
Docker build arguments
Optional
Override docker build configurations for this pipeline.
Key: Field name
Value: Field value
Source type
Branch Fixed
This allows you to trigger a CI build whenever there is a code change on the specified branch.
Enter the Branch Name of your code repository.
Branch Regex
Branch Regex allows users to easily switch between branches matching the configured Regex before triggering the build pipeline. In case of Branch Fixed, users cannot change the branch name in ci-pipeline unless they have admin access for the app. So, if users with Build and Deploy access should be allowed to switch branch name before triggering ci-pipeline, Branch Regex should be selected as source type by a user with Admin access.
For example if the user sets the Branch Regex as feature-*, then users can trigger from branches such as feature-1450, feature-hot-fix etc.
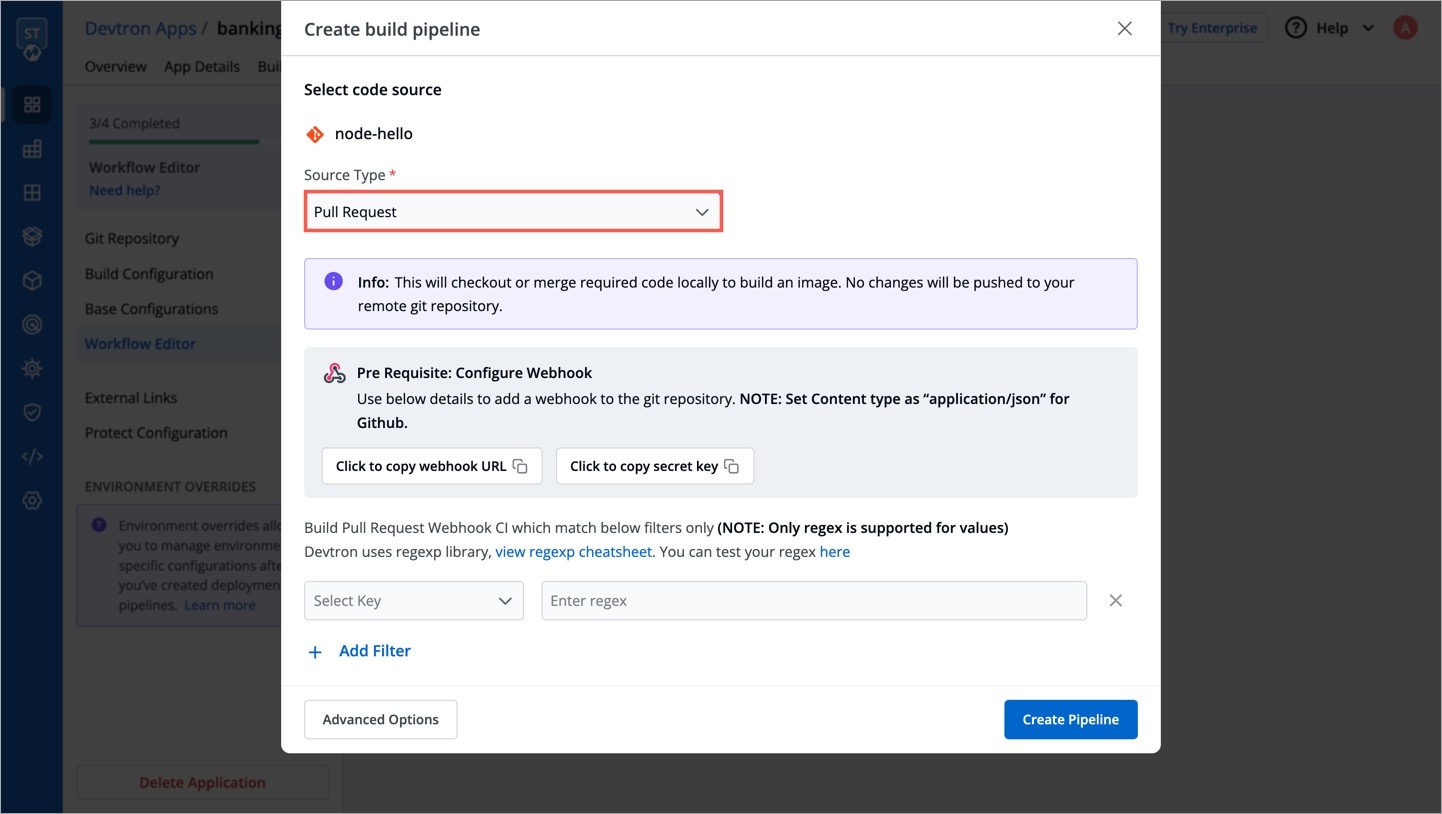
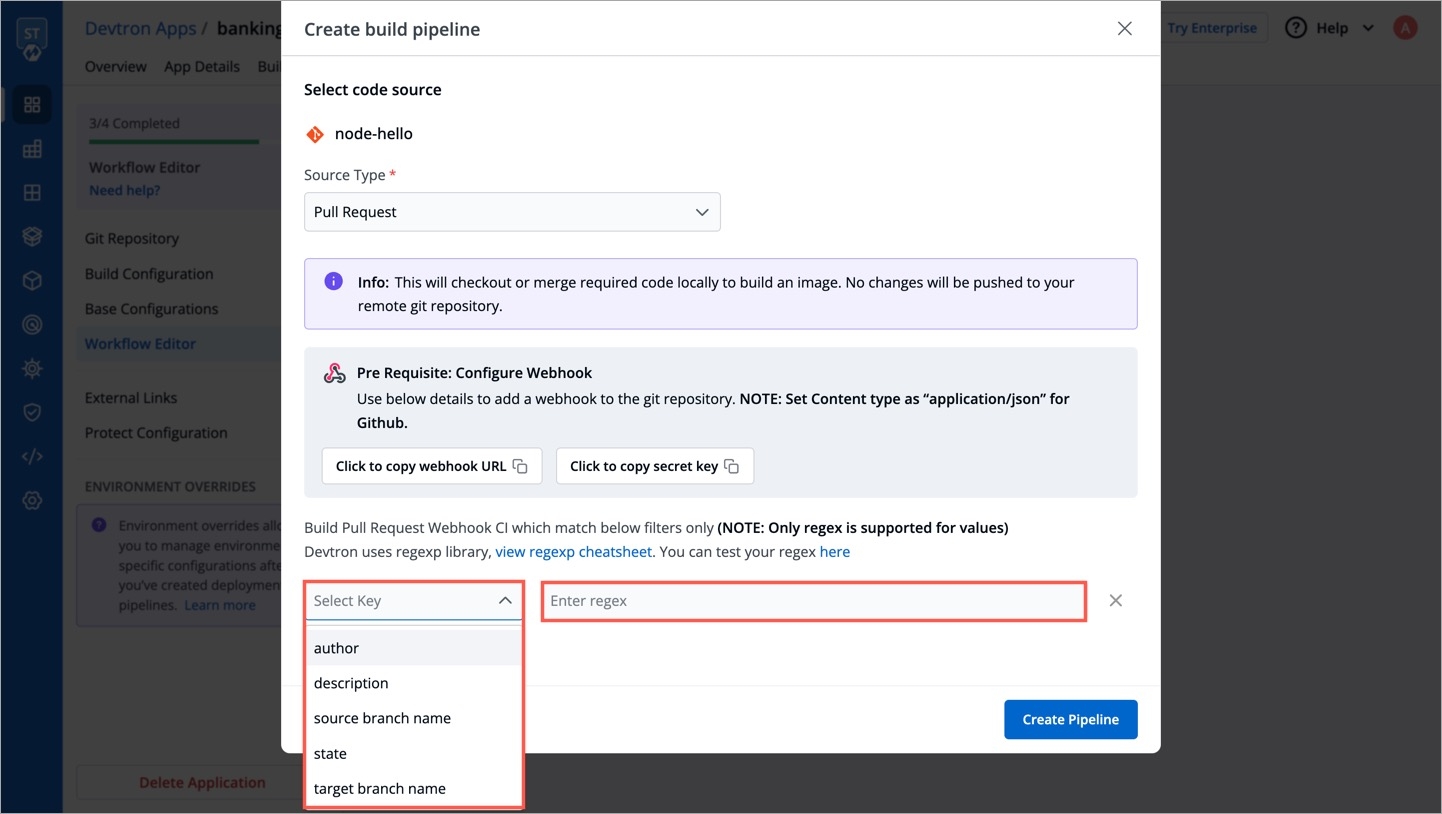
Pull Request
This allows you to trigger the CI build when a pull request is created in your repository.
Prerequisites
Configure the webhook for either GitHub or Bitbucket.
The Pull Request source type feature only works for the host GitHub or Bitbucket Cloud for now. To request support for a different Git host, please create a GitHub issue here.
To trigger the build from specific PRs, you can filter the PRs based on the following keys:
Author
Author of the PR
Source branch name
Branch from which the Pull Request is generated
Target branch name
Branch to which the Pull request will be merged
Title
Title of the Pull Request
State
State of the PR. Default is "open" and cannot be changed
Select the appropriate filter and pass the matching condition as a regular expression (regex).
Devtron uses regexp library, view regexp cheatsheet. You can test your custom regex from here.
Select Create Pipeline.
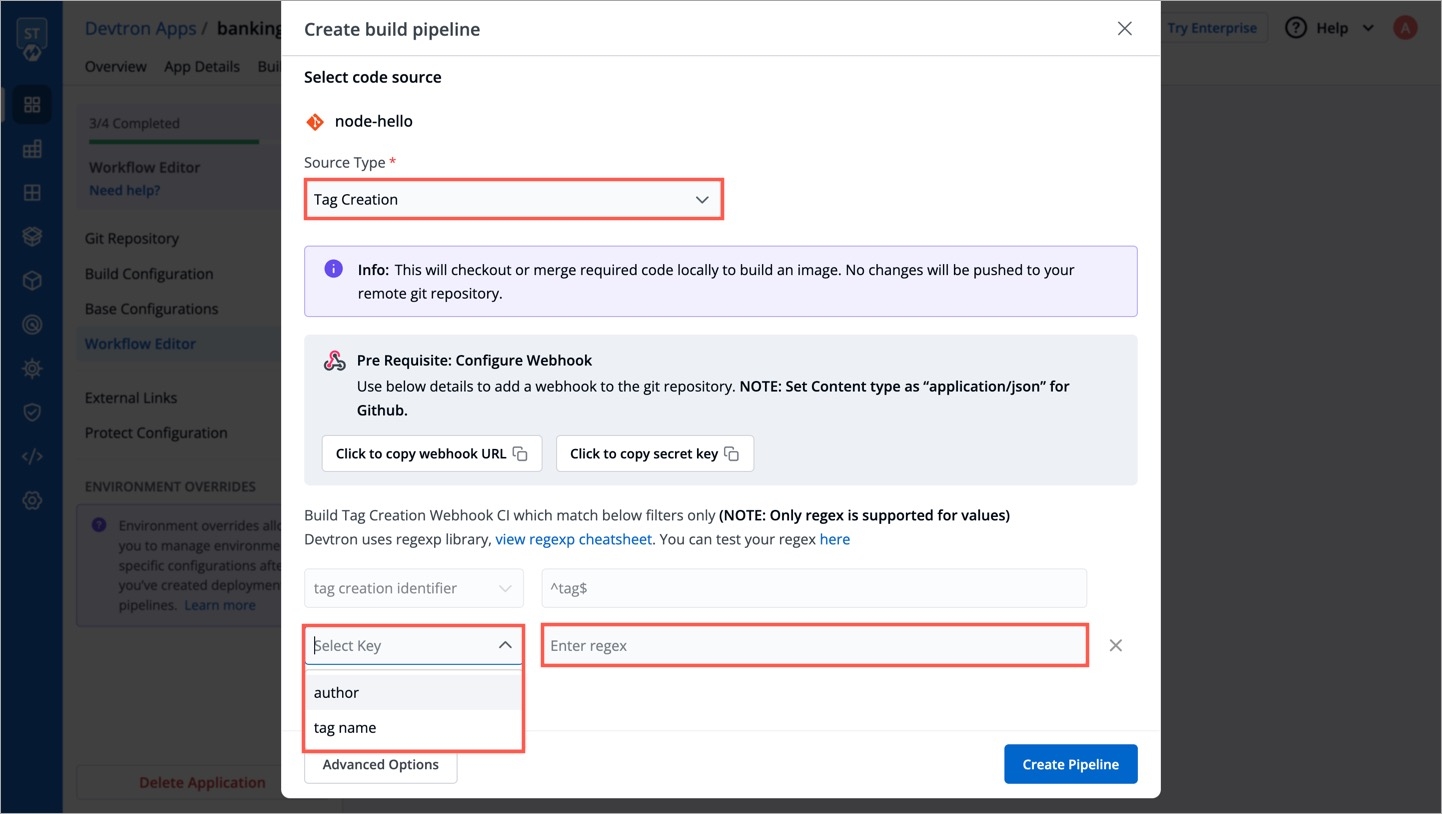
Tag Creation
This allows you to trigger the CI build whenever a new tag is created.
Prerequisites
Configure the webhook for either GitHub or Bitbucket.
To trigger the build from specific tags, you can filter the tags based on the author and/or the tag name.
Author
The one who created the tag
Tag name
Name of the tag for which the webhook will be triggered
Select the appropriate filter and pass the matching condition as a regular expression (regex).
Select Create Pipeline.
The total timeout for the execution of the CI pipeline is by default set as 3600 seconds. This default timeout is configurable according to the use case (refer Build Infra).
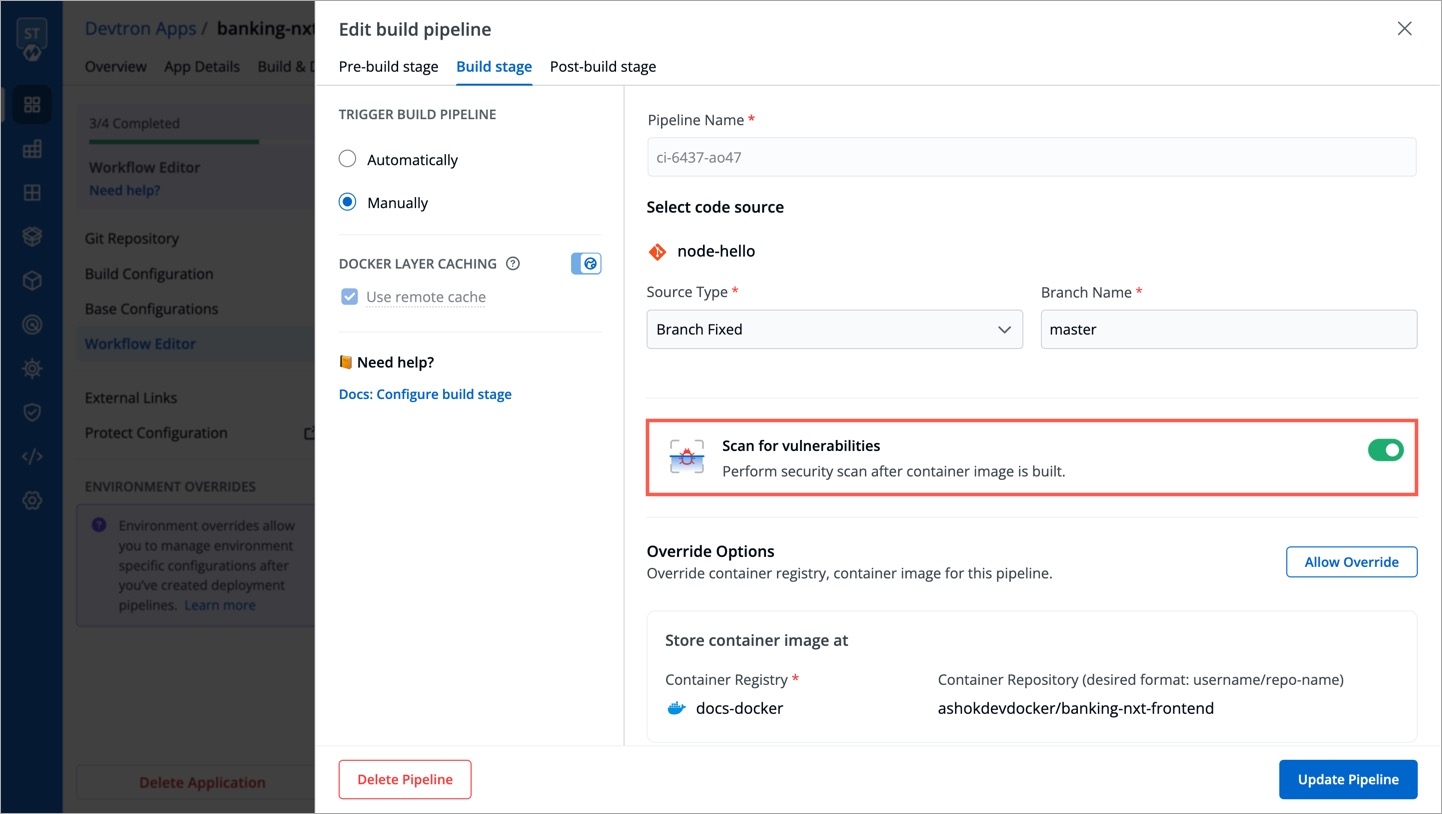
Scan for Vulnerabilities
To perform the security scan after the container image is built, enable the Scan for vulnerabilities toggle in the build stage. Refer Security features to know more.
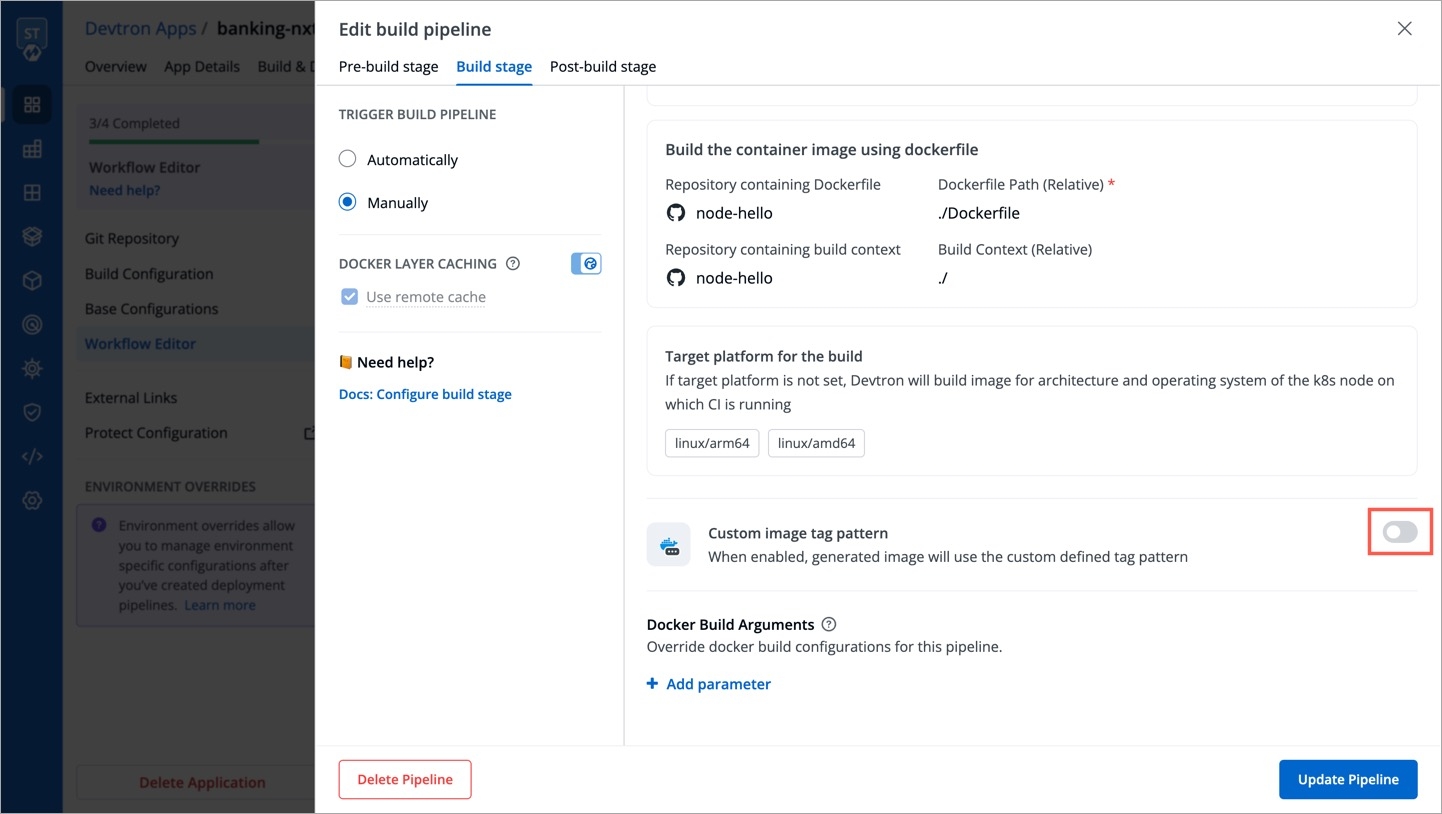
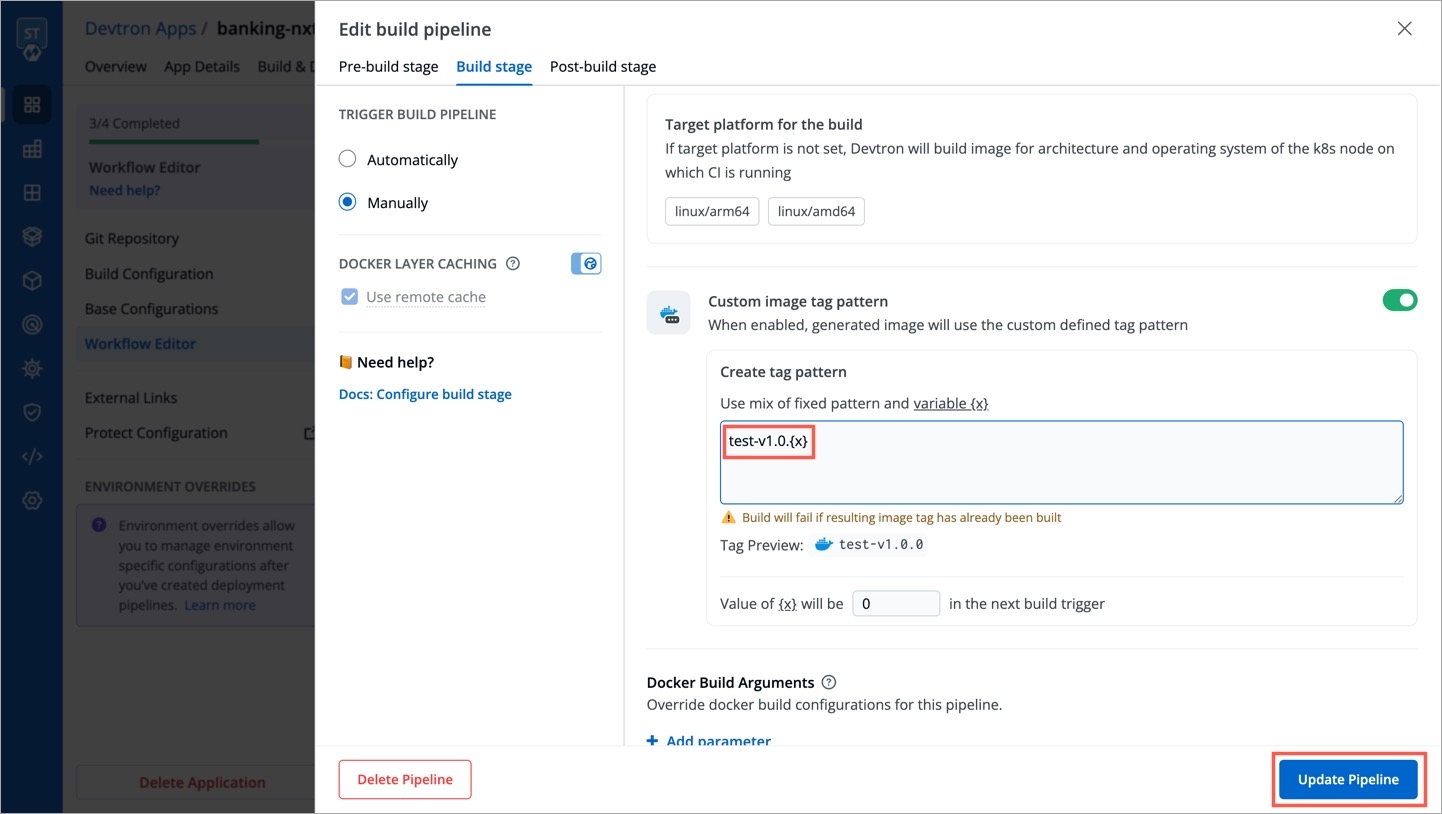
Custom Image Tag Pattern
This feature helps you apply custom tags (e.g., v1.0.0) to readily distinguish container images within your repository.
Enable the toggle button as shown below.
You can write an alphanumeric pattern for your image tag, e.g., test-v1.0.{x}. Here, 'x' is a mandatory variable whose value will incrementally increase with every build. You can also define the value of 'x' for the next build trigger in case you want to change it.
Click Update Pipeline.
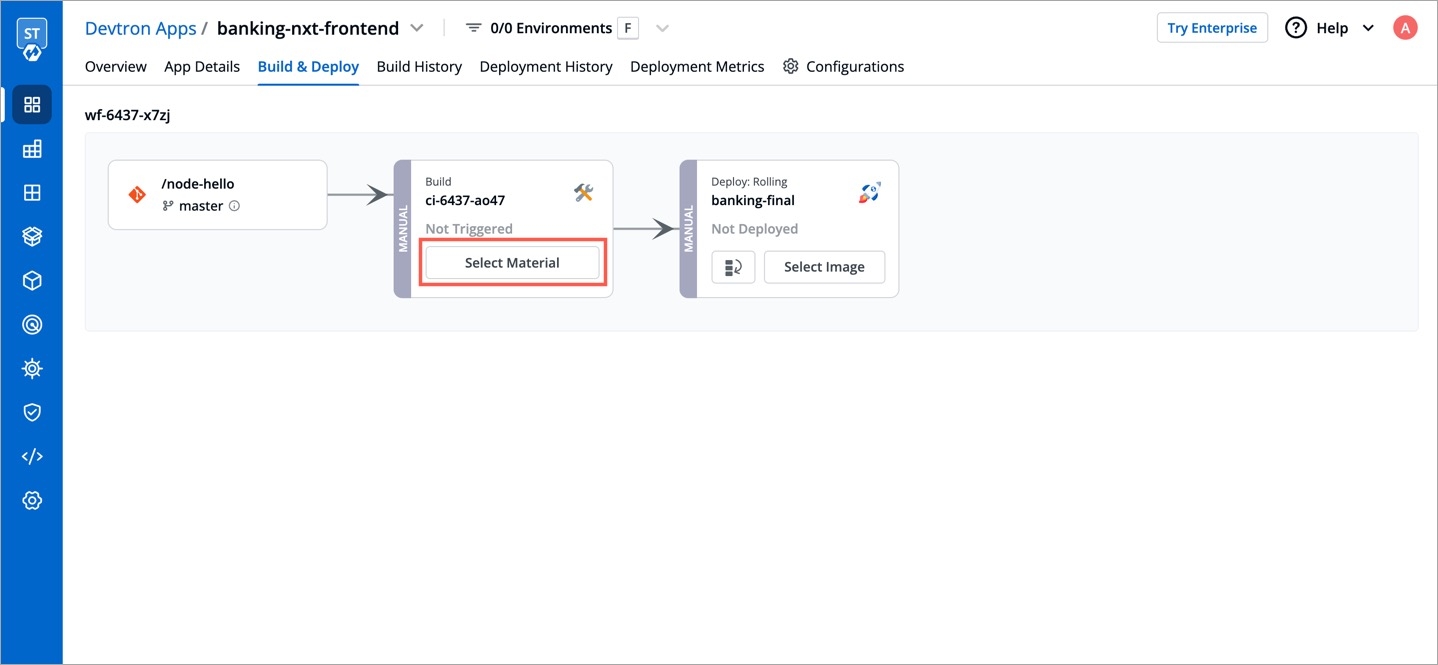
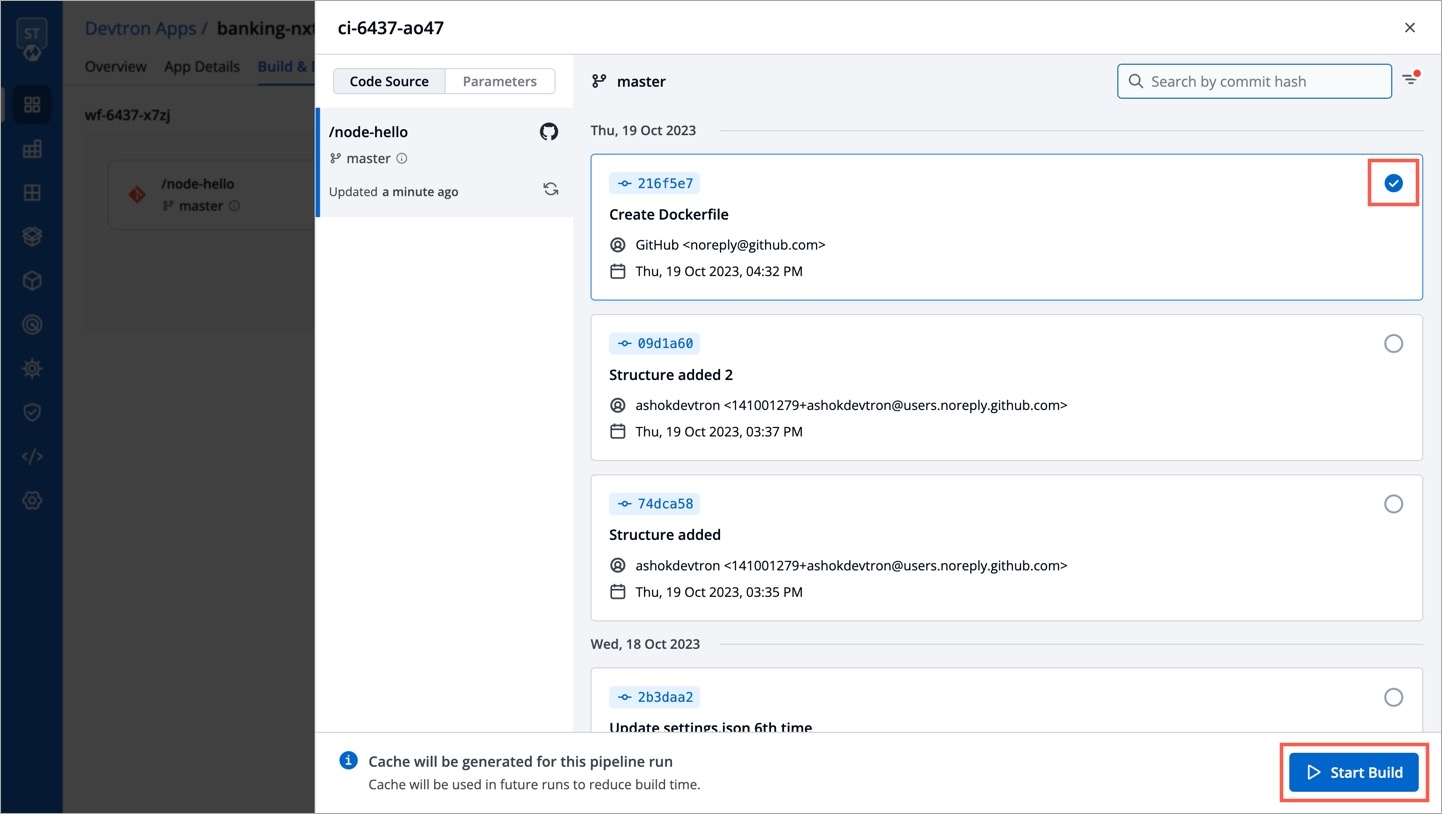
Now, go to Build & Deploy tab of your application, and click Select Material in the CI pipeline.
Choose the git commit you wish to use for building the container image. Click Start Build.
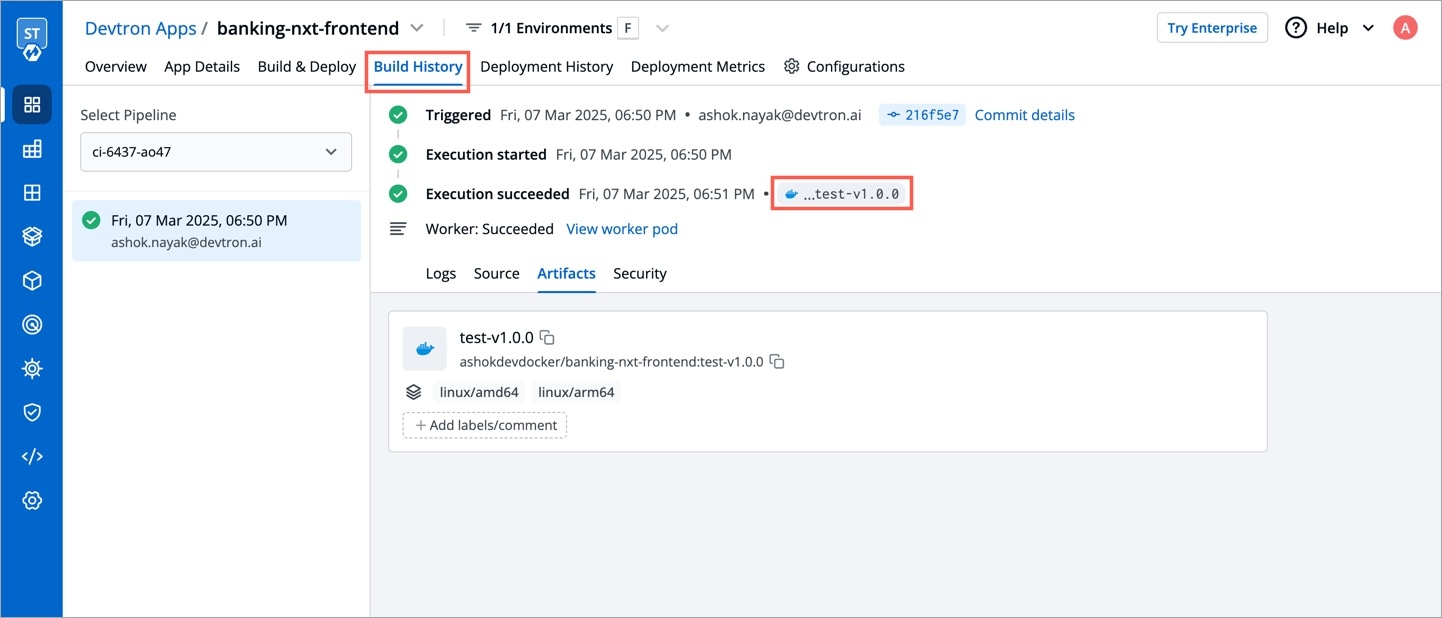
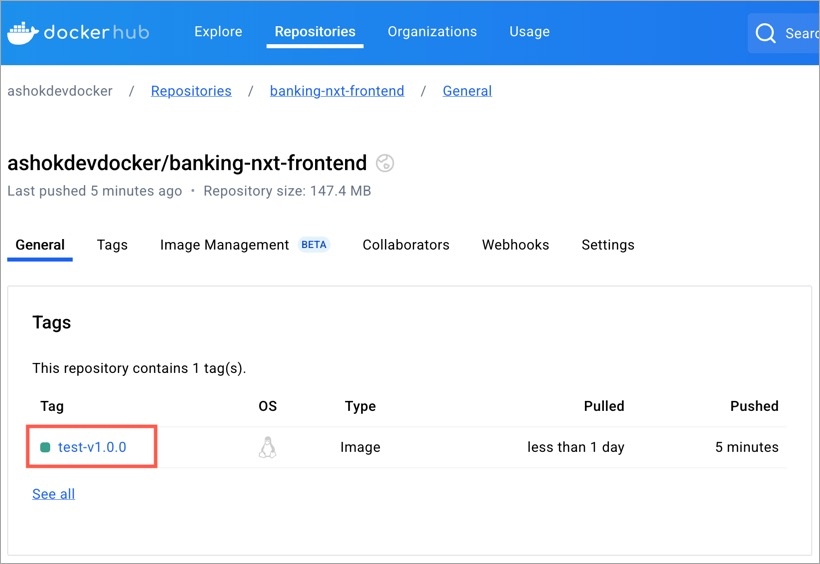
The build will initiate and once it is successful the image tag would reflect at all relevant screens:
Build History
Docker Registry
CD Pipeline (Image Selection)
Build will fail if the resulting image tag has already been built in the past. This means if there is an existing image with tag test-v1.0.0, you cannot build another image having the same tag test-v1.0.0 in the same CI pipeline. This error might occur when you reset the value of the variable x or when you disable/enable the toggle button for Custom image tag pattern.
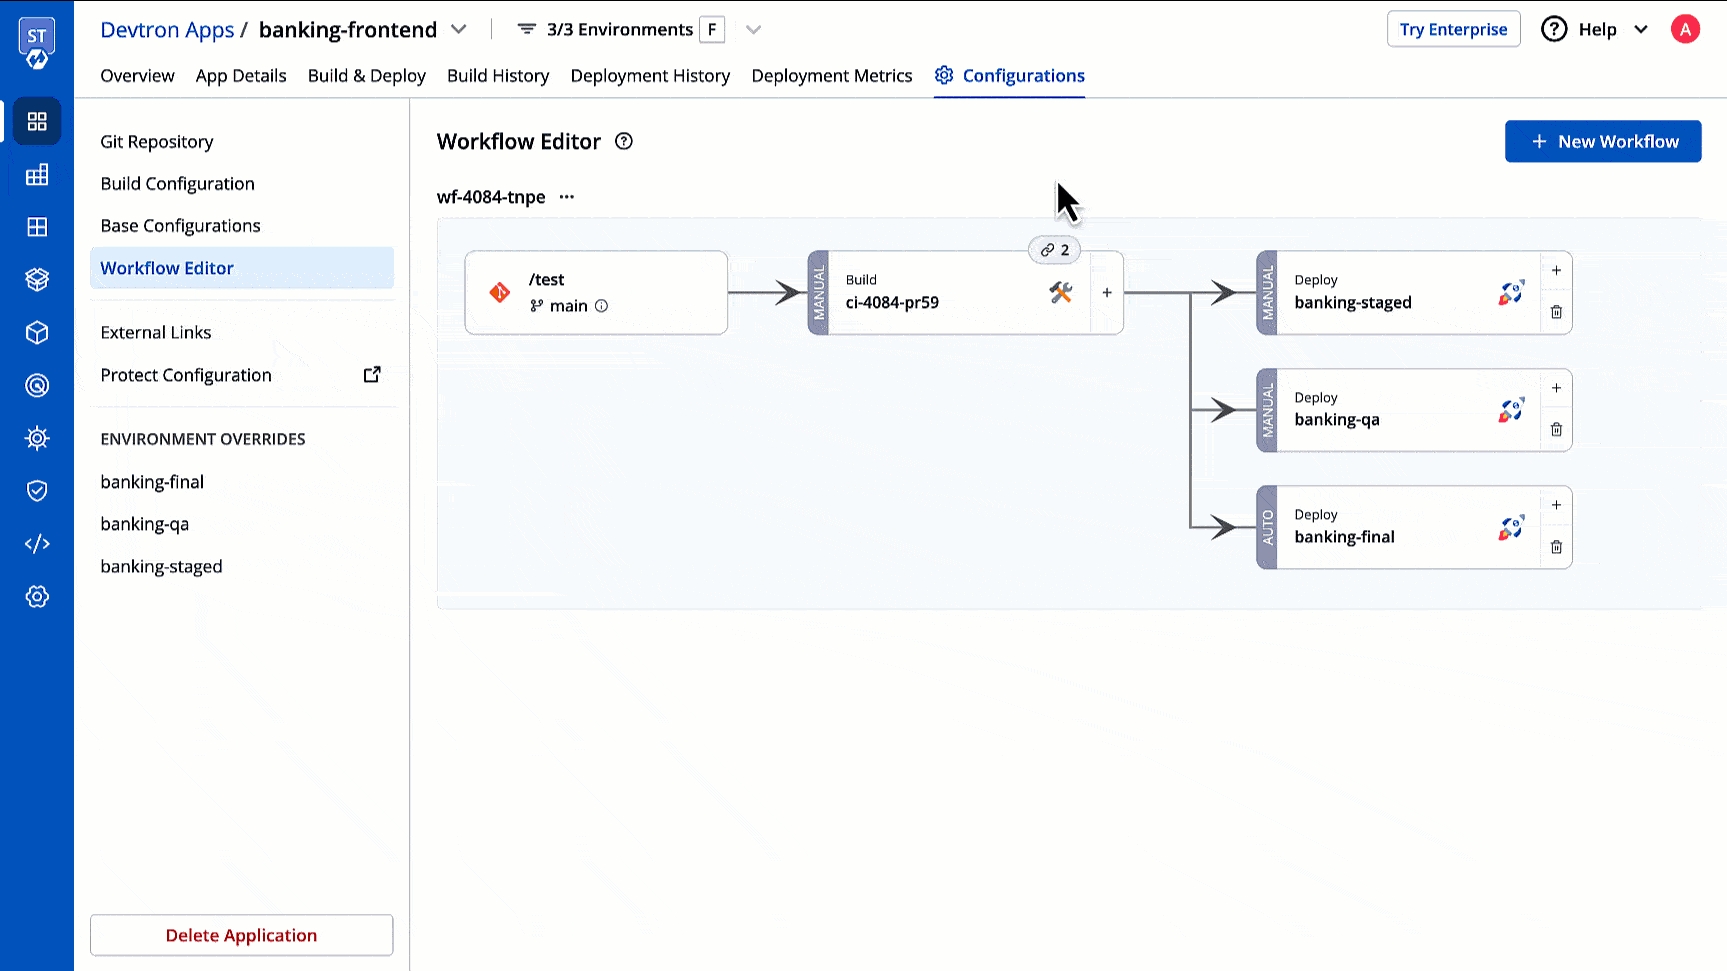
If one code is shared across multiple applications, Linked Build Pipeline can be used, and only one image will be built for multiple applications because if there is only one build, it is not advisable to create multiple CI Pipelines.
From the Applications menu, select your application.
On the App Configuration page, select Workflow Editor.
Select + New Workflow.
Select Linked Build Pipeline.
On the Create linked build pipeline screen:
Search for the application in which the source CI pipeline is present.
Select the source CI pipeline from the application that you selected above.
Enter a new name for the linked CI pipeline.
Click Create Linked CI Pipeline.
Thereafter, the source CI pipeline will indicate the number of Linked CI pipelines. Upon clicking it, it will display the child information as shown below. It reveals the applications and environments where Linked CI is used for deployment.
After creating a linked CI pipeline, you can create a CD pipeline.
Linked CI pipelines can't trigger builds. They rely on the source CI pipeline to build images. Trigger a build in the source CI pipeline to see the images available for deployment in the linked CI pipeline's CD stage.
For CI pipeline, you can receive container images from an external services via webhook API.
You can use Devtron for deployments on Kubernetes while using an external CI tool such as Jenkins or CircleCI. External CI feature can be used when the CI tool is hosted outside the Devtron platform. However, by using an external CI, you will not be able to use some of the Devtron features such as Image scanning and security policies, configuring pre-post CI stages etc.
To configure Git Repository, you can add any Git repository account (e.g., dummy account) and click Next.
To configure the Container Registry and Container Repository, you can leave the fields blank or simply add any test repository and click Save & Next.
On the Base Deployment Template page, select the Chart type from the drop-down list and configure as per your requirements and click Save & Next.
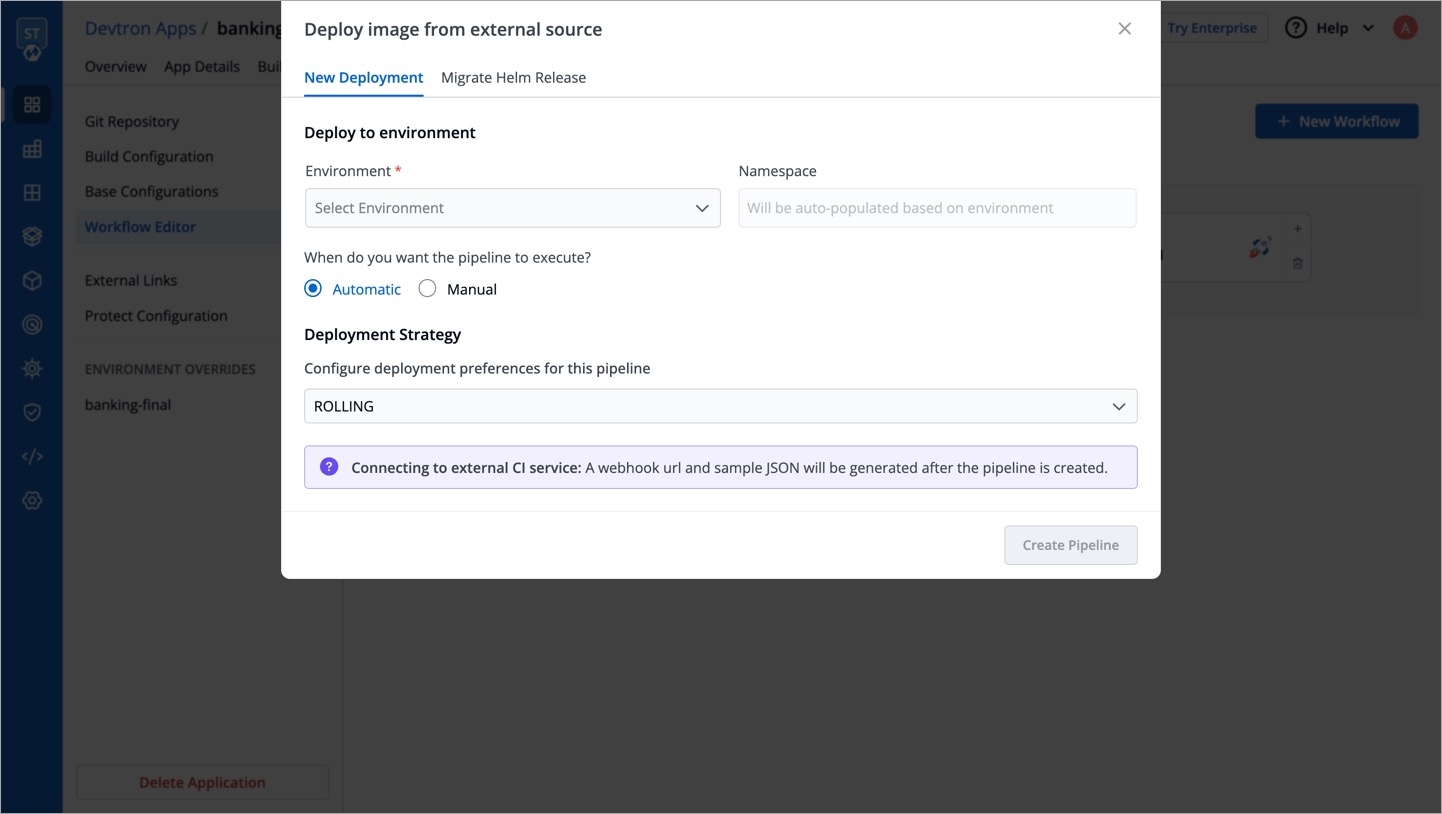
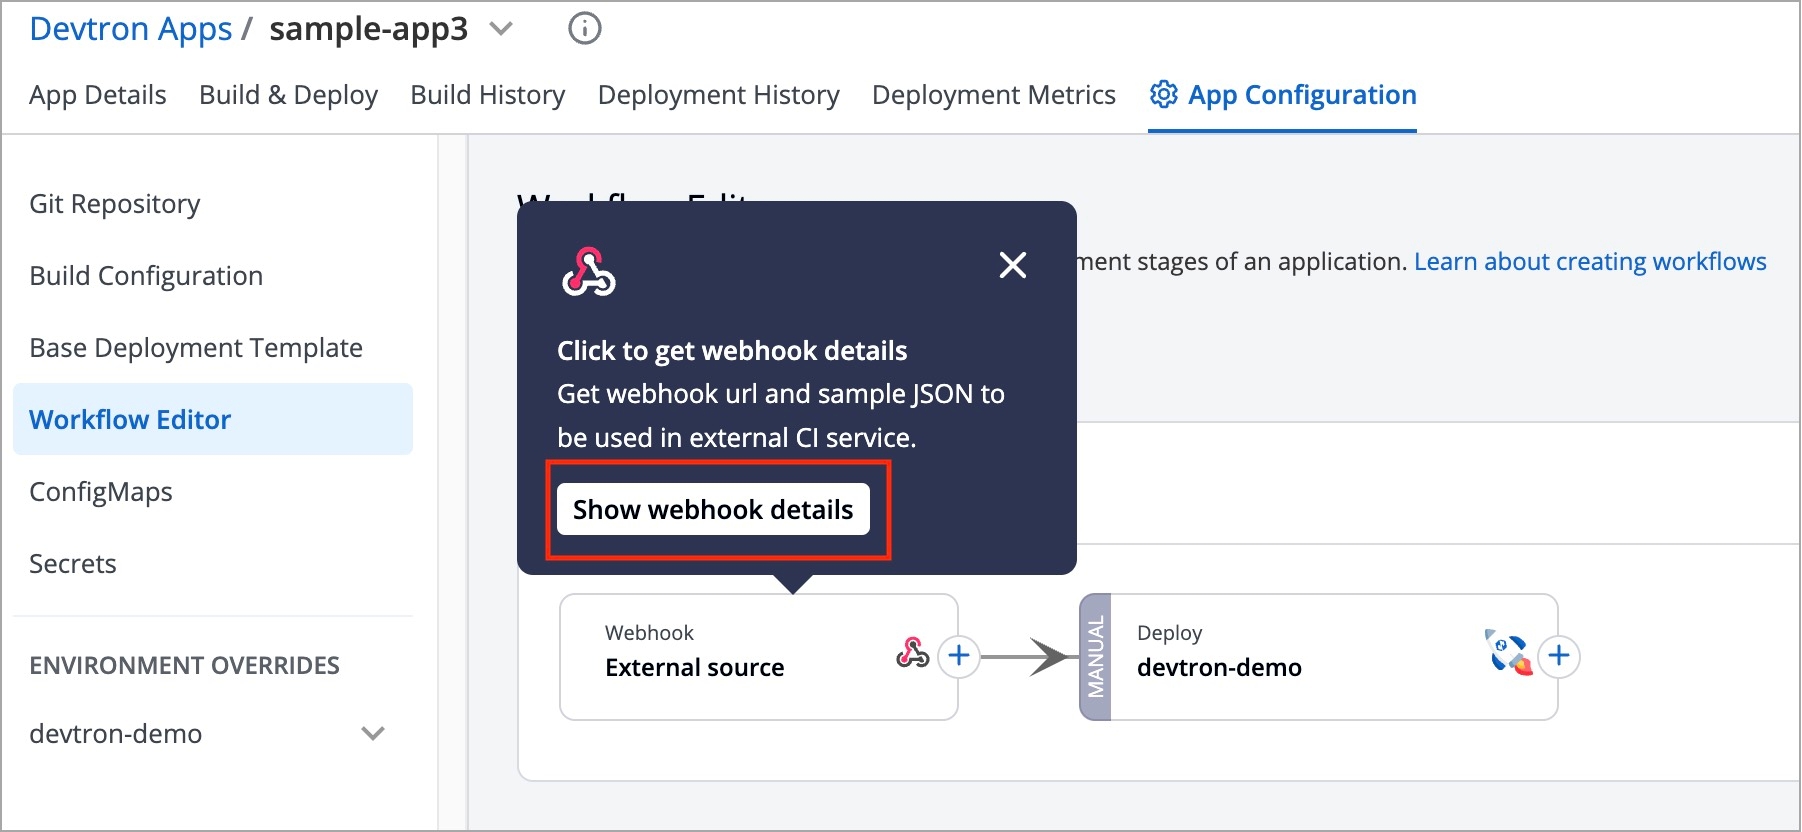
On the Workflow Editor page, click New Workflow and select Deploy image from external service.
On the Deploy image from external source page, provide the information in the following fields:
Deploy to environment
Environment: Provide the name of the environment.
Namespace: Provide the namespace.
When do you want to deploy
You can deploy either in one of the following ways:
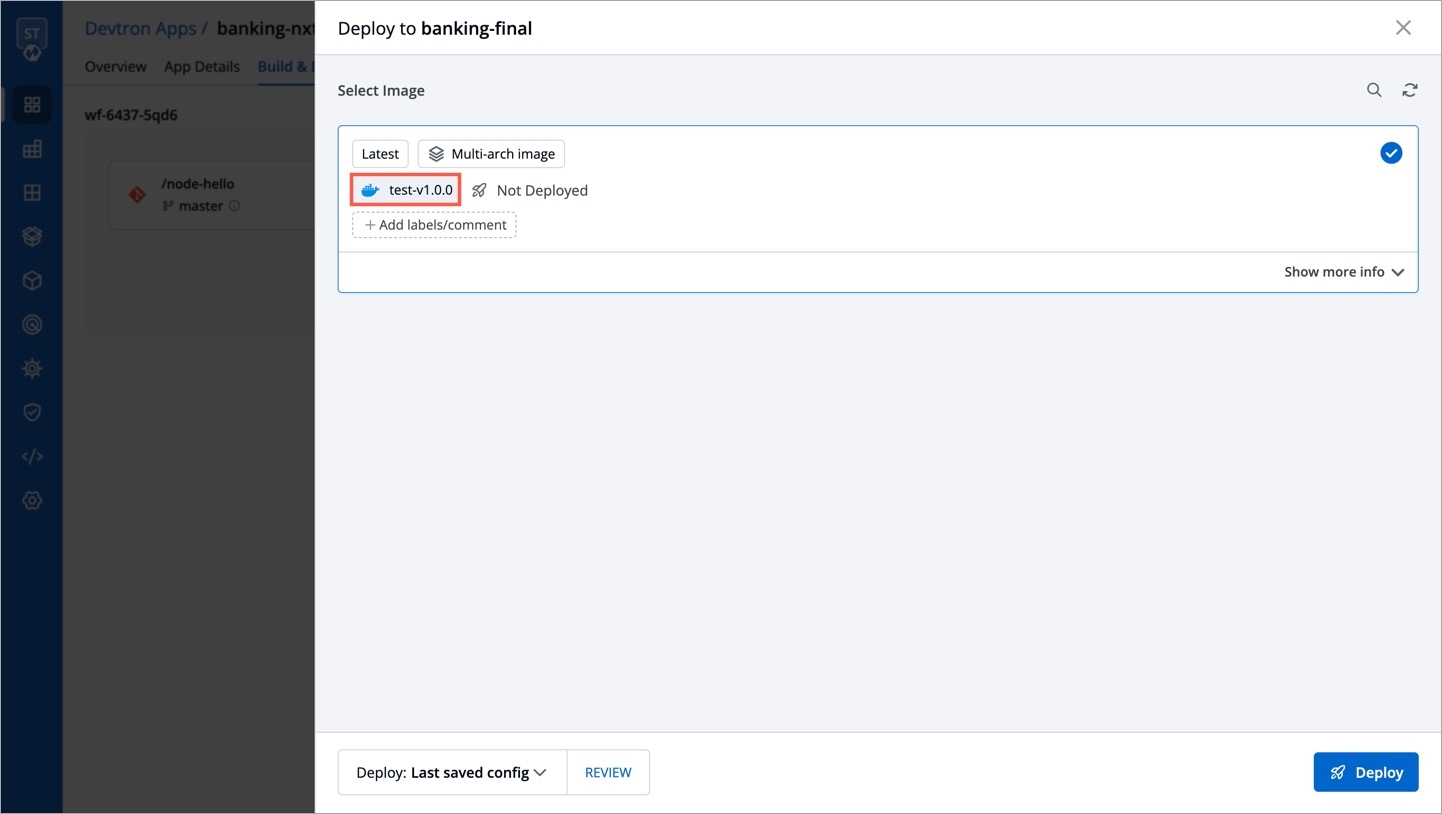
Automatic: If you select automatic, your application will be deployed automatically everytime a new image is received.
Manual: In case of manual, you have to select the image and deploy manually.
Deployment Strategy
Configure the deployment preferences for this pipeline.
Click Create Pipeline. A new CI pipeline will be created for the external source. To get the webhook URL and JSON sample payload to be used in external CI pipeline, click Show webhook details.
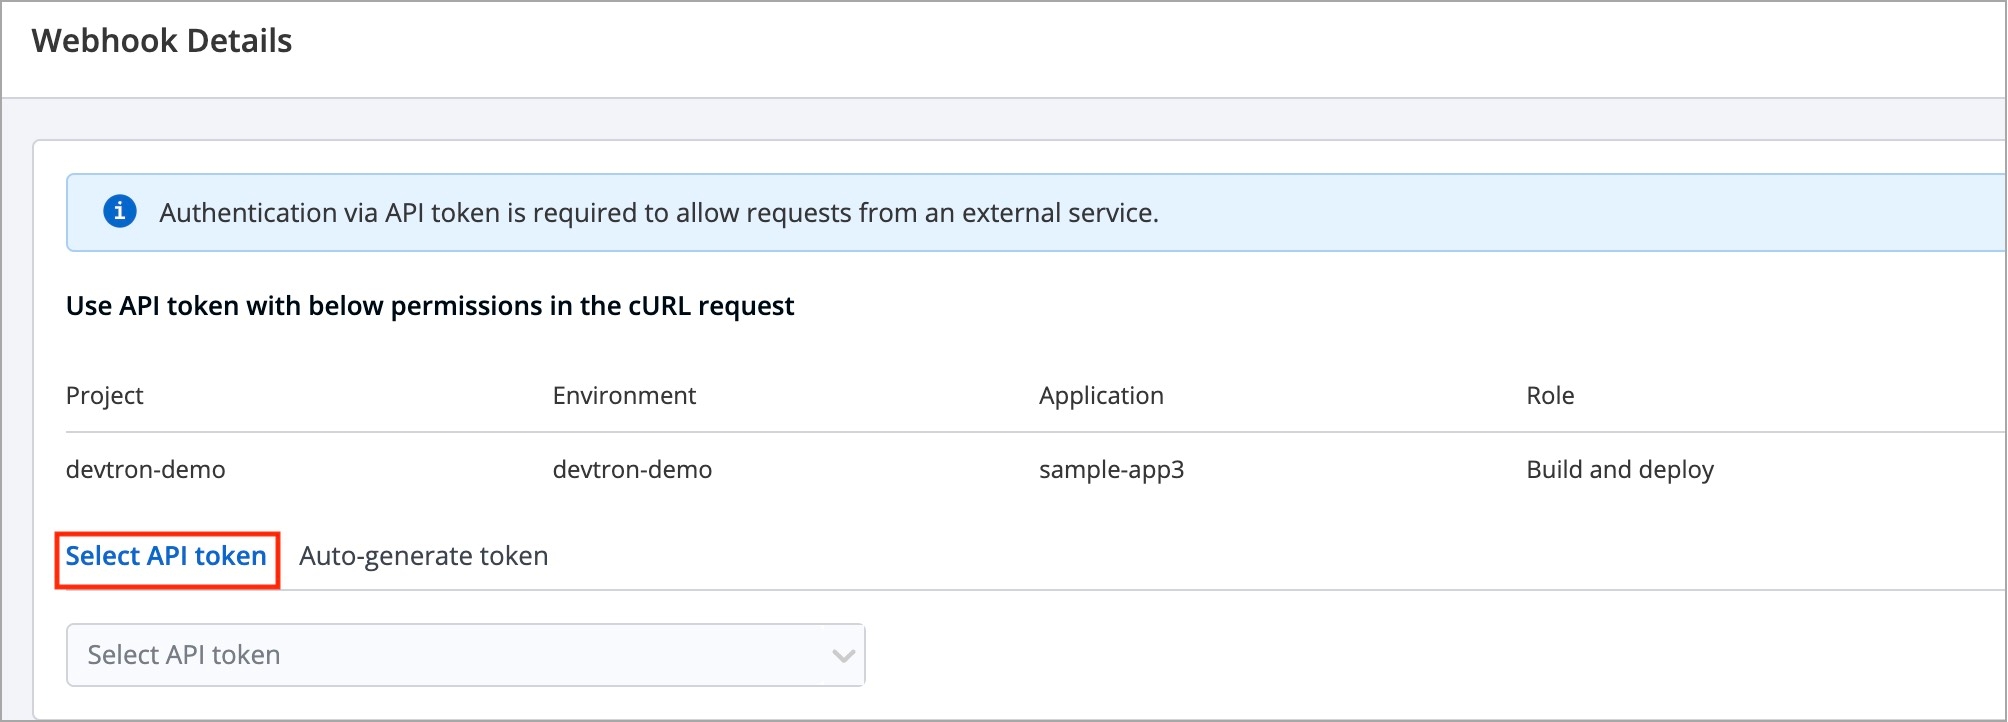
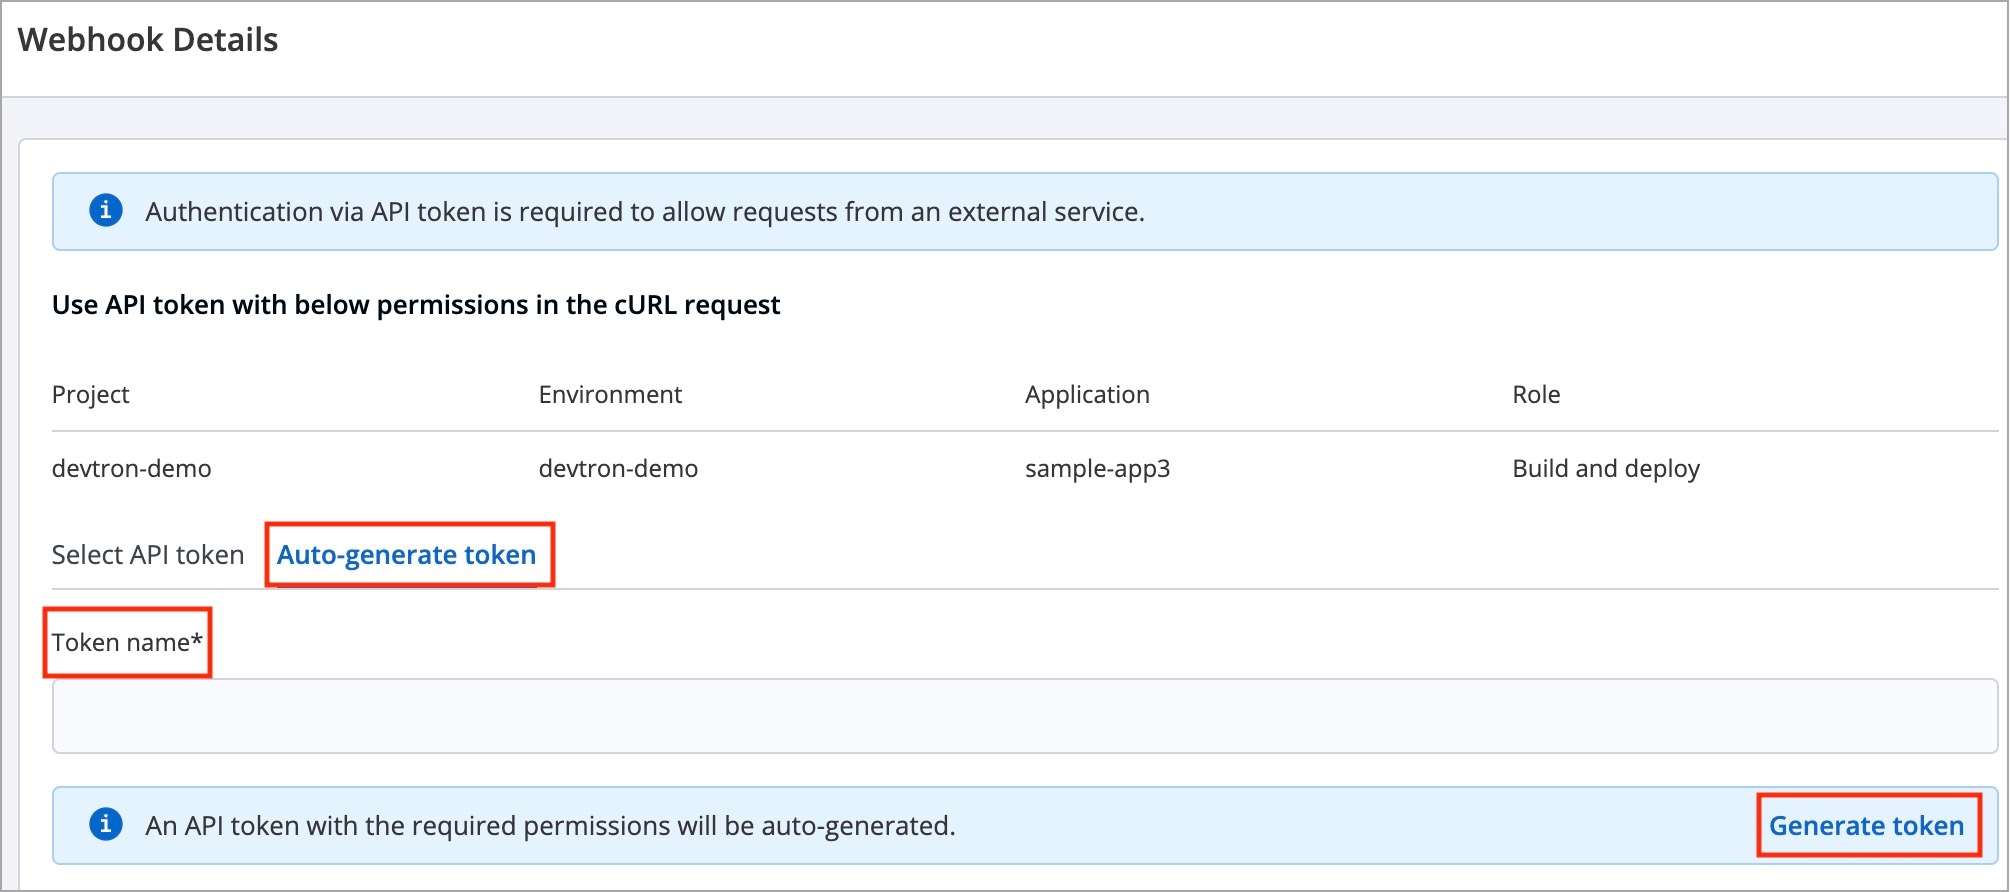
On the Webhook Details page, you have to authenticate via API token to allow requests from an external service (e.g. Jenkins or CircleCI).
For authentication, only users with super-admin permissions can select or generate an API token:
You can either use Select API Token if you have generated an API Token under Global Configurations.
Or use Auto-generate token to generate the API token with the required permissions. Make sure to enter the token name in the Token name field.
To allow requests from the external source, you can request the API by using:
Webhook URL
cURL Request
HTTP Method: POST
API Endpoint: https://{domain-name}/orchestrator/webhook/ext-ci/{pipeline-id}
JSON Payload:
You can also select metadata to send to Devtron. Sample JSON will be generated accordingly. You can send the Payload script to your CI tools such as Jenkins and Devtron will receive the build image every time the CI pipeline is triggered or you can use the Webhook URL, which will build an image every time CI pipeline is triggered using Devtron Dashboard.
200
app detail page url
400
Bad request
401
Unauthorized
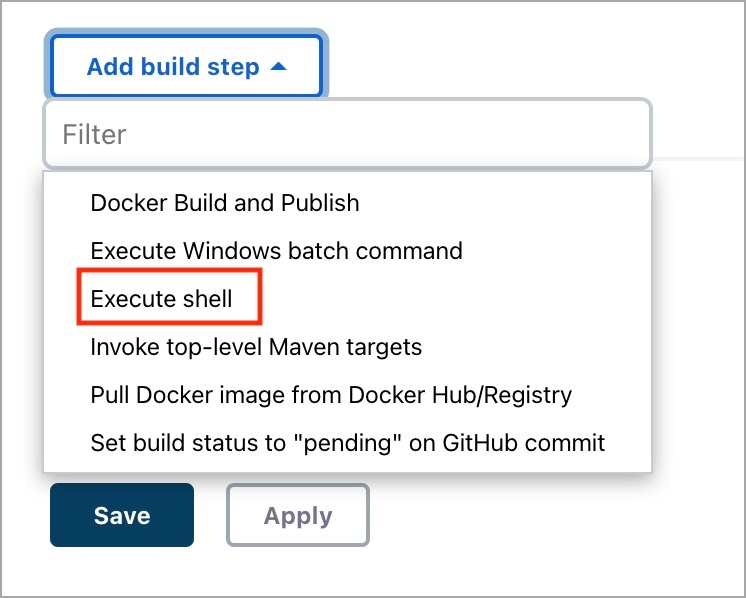
On the Jenkins dashboard, select the Jenkins job which you want to integrate with the Devtron dashboard.
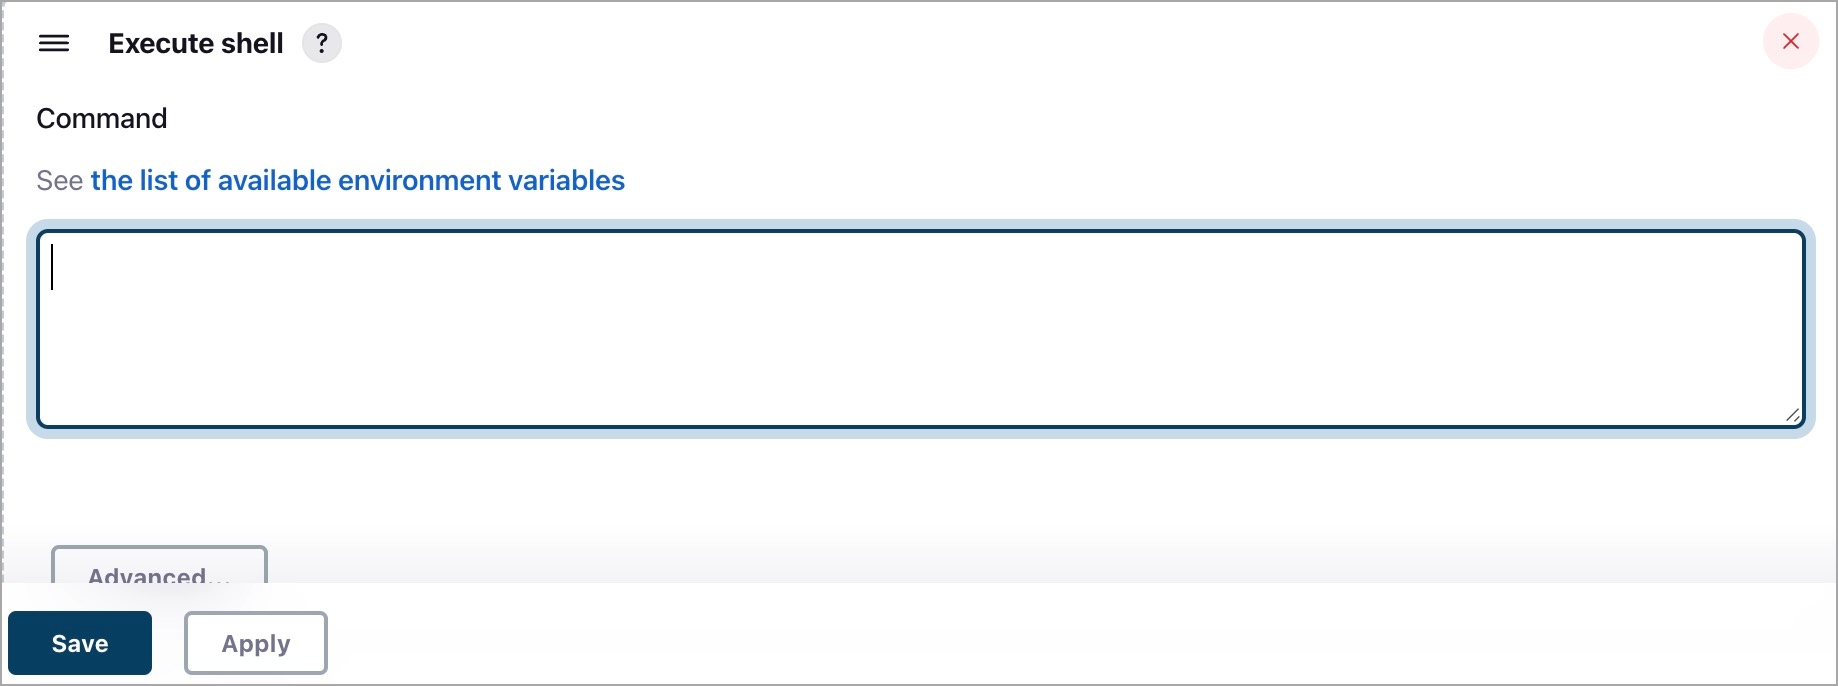
Go to the Configuration > Build Steps, click Add build step, and then click Execute Shell.
Enter the cURL request command.
Make sure to enter the API token and dockerImage in your cURL command and click Save.
Now, you can access the images on the Devtron dashboard and deploy manually. In case, if you select Automatic deployment option, then your application will be deployed automatically everytime a new image is received.
Similarly, you can also integrate with external source such as CircleCI by:
Select the job on the CircleCI dashboard and click Configuration File.
On the respective job, enter the cURL command and update the API token and dockerImage in your cURL command.
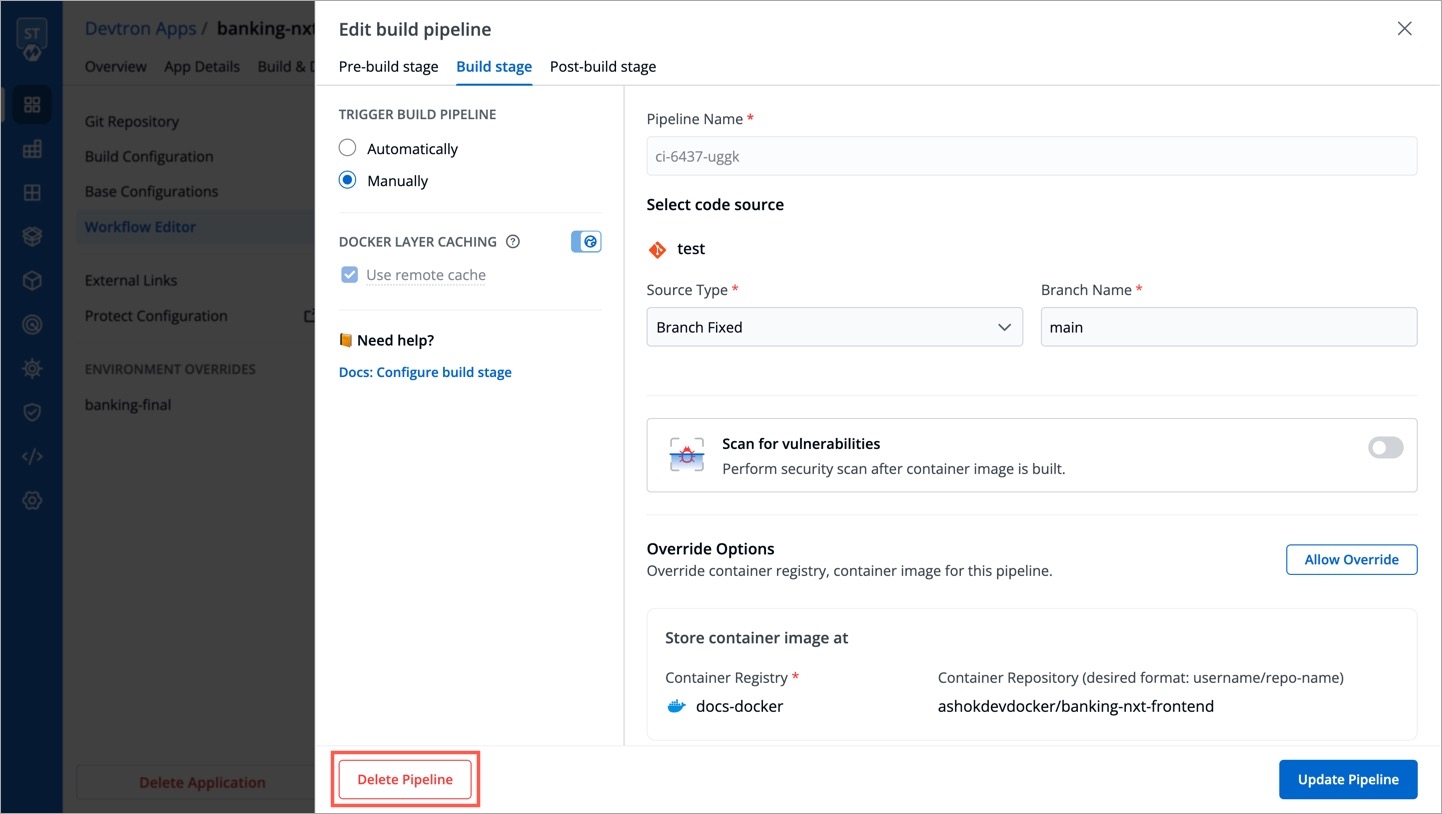
You can update the configurations of an existing CI Pipeline except for the pipeline's name. To update a pipeline, select your CI pipeline. In the Edit build pipeline window, edit the required stages and select Update Pipeline.
You can only delete a CI pipeline if there is no CD pipeline created in your workflow.
To delete a CI pipeline, go to App Configurations > Workflow Editor and select Delete Pipeline.
If you choose Pull Request or Tag Creation as the source type, you must first configure the Webhook for GitHub/Bitbucket as a prerequisite step.
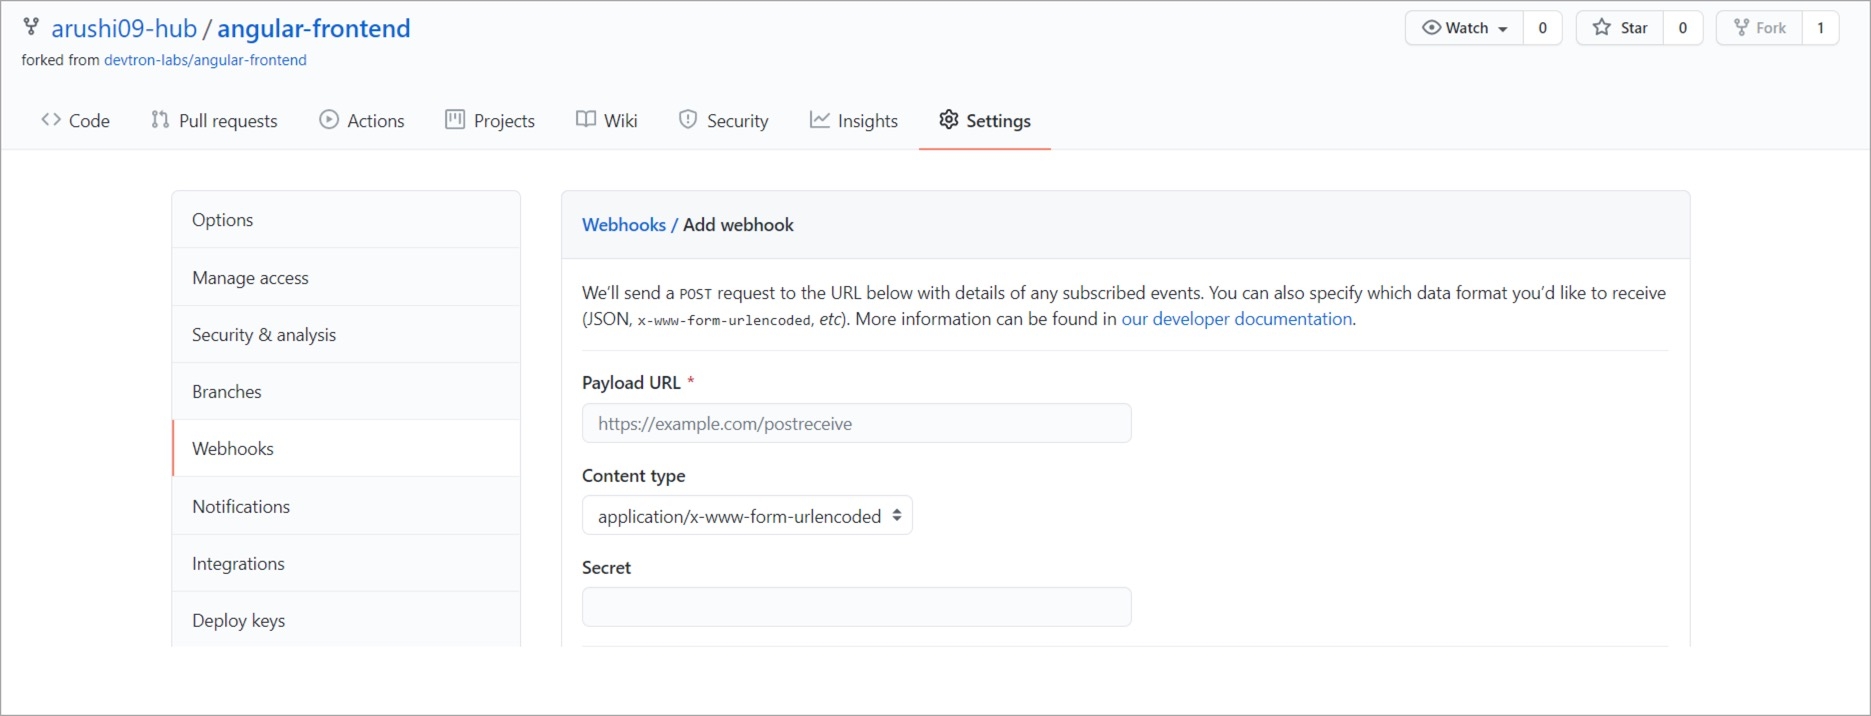
Go to the Settings page of your repository and select Webhooks.
Select Add webhook.
In the Payload URL field, enter the Webhook URL that you get on selecting the source type as "Pull Request" or "Tag Creation" in Devtron the dashboard.
Change the Content-type to application/json.
In the Secret field, enter the secret from Devtron the dashboard when you select the source type as "Pull Request" or "Tag Creation".
Under Which events would you like to trigger this webhook?, select Let me select individual events. to trigger the webhook to build CI Pipeline.
Select Branch or tag creation and Pull Requests.
Select Add webhook.
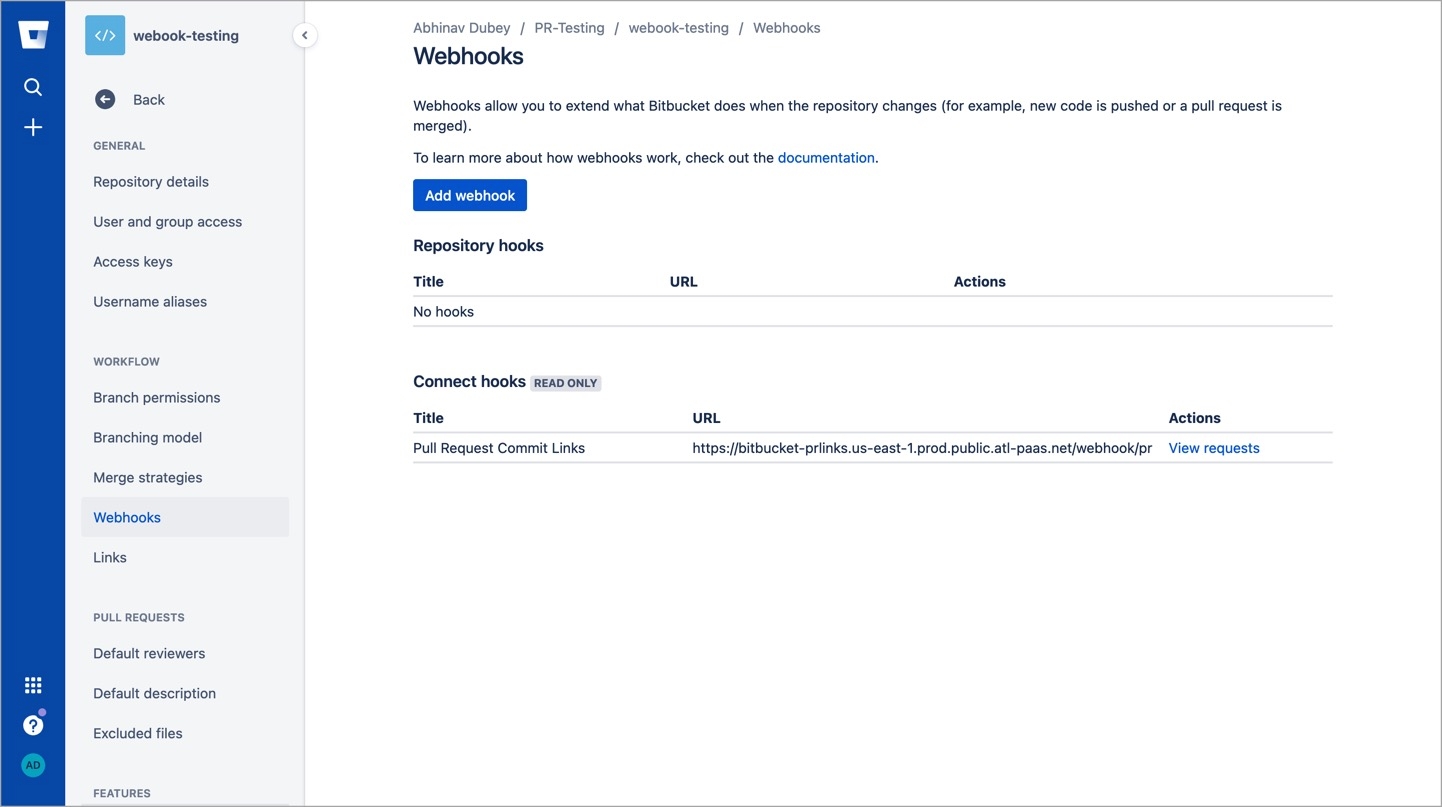
Go to the Repository settings page of your Bitbucket repository.
Select Webhooks and then select Add webhook.
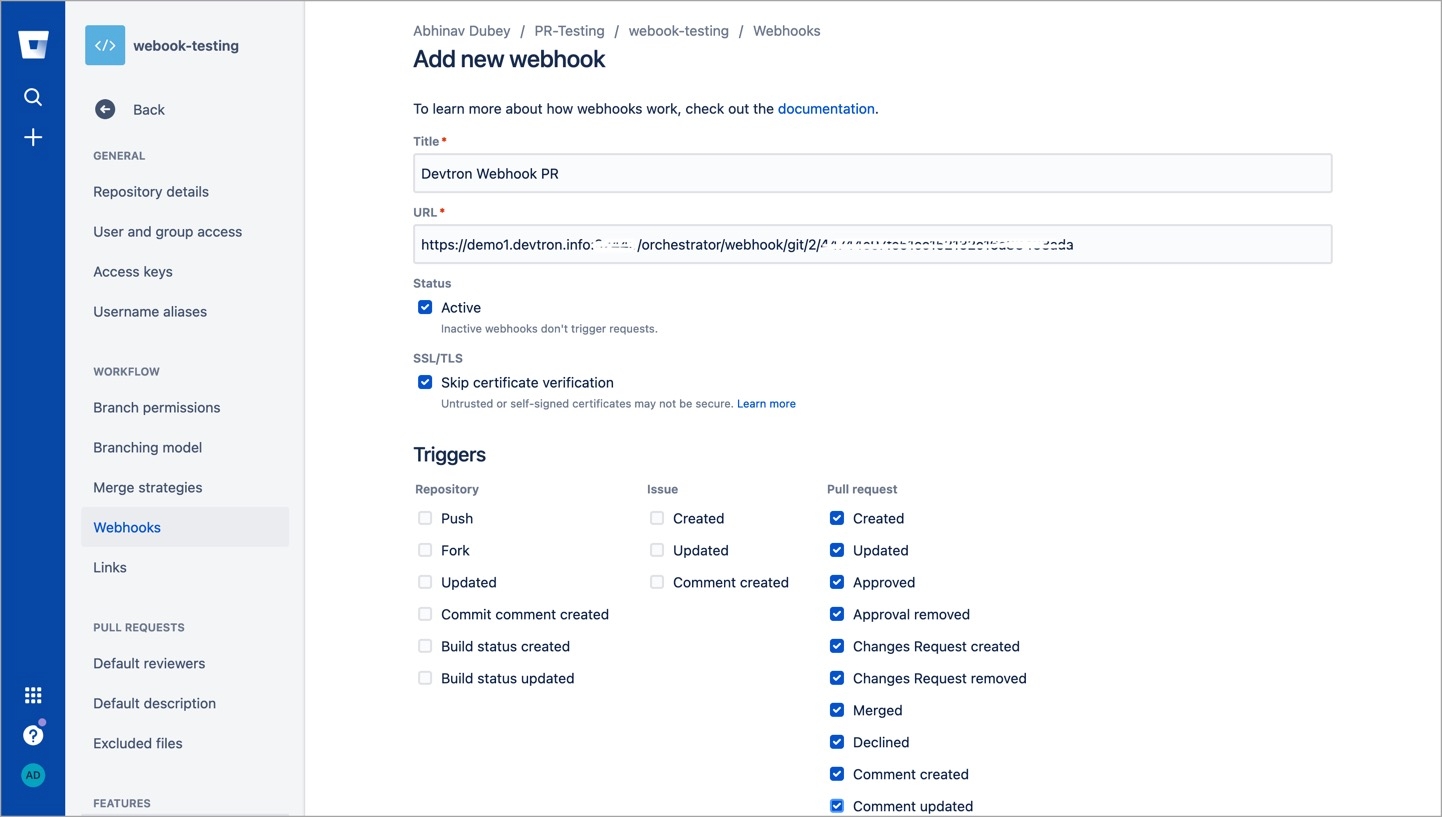
Enter a Title for the webhook.
In the URL field, enter the Webhook URL that you get on selecting the source type as "Pull Request" or "Tag Creation" in the Devtron dashboard.
Select the event triggers for which you want to trigger the webhook.
Select Save to save your configurations.