Pre/Post Stages
The build and deployment pipelines also include a pre stage and a post stage:
- Pre Stage - Tasks to be executed before the build/deployment pipeline triggers.
- Post Stage - Tasks to be executed only after the successful execution of the build/deployment pipeline.
Examples: Tasks like code analysis, Jira Issue updation, load testing, security scanning, etc.
- Build Stage includes Pre-build stage and Post-build stage.
- Deployment Stage includes Pre-deployment and Post-deployment.
In Devtron, a task is a step within a CI/CD pipeline that runs a specific operation, such as executing a script or running a container image. Tasks can be created using preset plugins or custom scripts, and are executed in sequence to complete the process.
Preset plugins are extensions that allow you to enhance and refine the CI/CD workflow of your application by adding new features, integrating with external tools, and automating tasks. Unlike custom scripts, preset plugins come bundled with specific variables and conditions that help you make the plugins work seamlessly with your CI/CD pipeline.
Some plugins are specific to build pipelines (used in Pre-Build and Post-Build stages), and some plugins are specific to deployment pipelines (used in Pre-Deployment and Post-Deployment stages), and some plugins are versatile and can be used in both build and deployment pipelines, depending on your use case.
Before you begin
Before you start adding Pre or Post tasks, make sure you have already setup your Build pipeline or Deployment pipeline.
Creating Pre/Post Tasks
Each Pre/Post task in the build or deployment stage is executed as a series of events called tasks and includes custom scripts.
You can create one or more tasks. Tasks can be dependent on each other for execution. In other words, the output variable of one task can be used as an input for the next task. Tasks will execute in the order they are arranged and can be rearranged by drag-and-drop; however, the order of passing the variables must be followed.
You can create a task either by selecting one of the available preset plugins or by creating a custom script.
To create a pre/post task, follow the steps below:
-
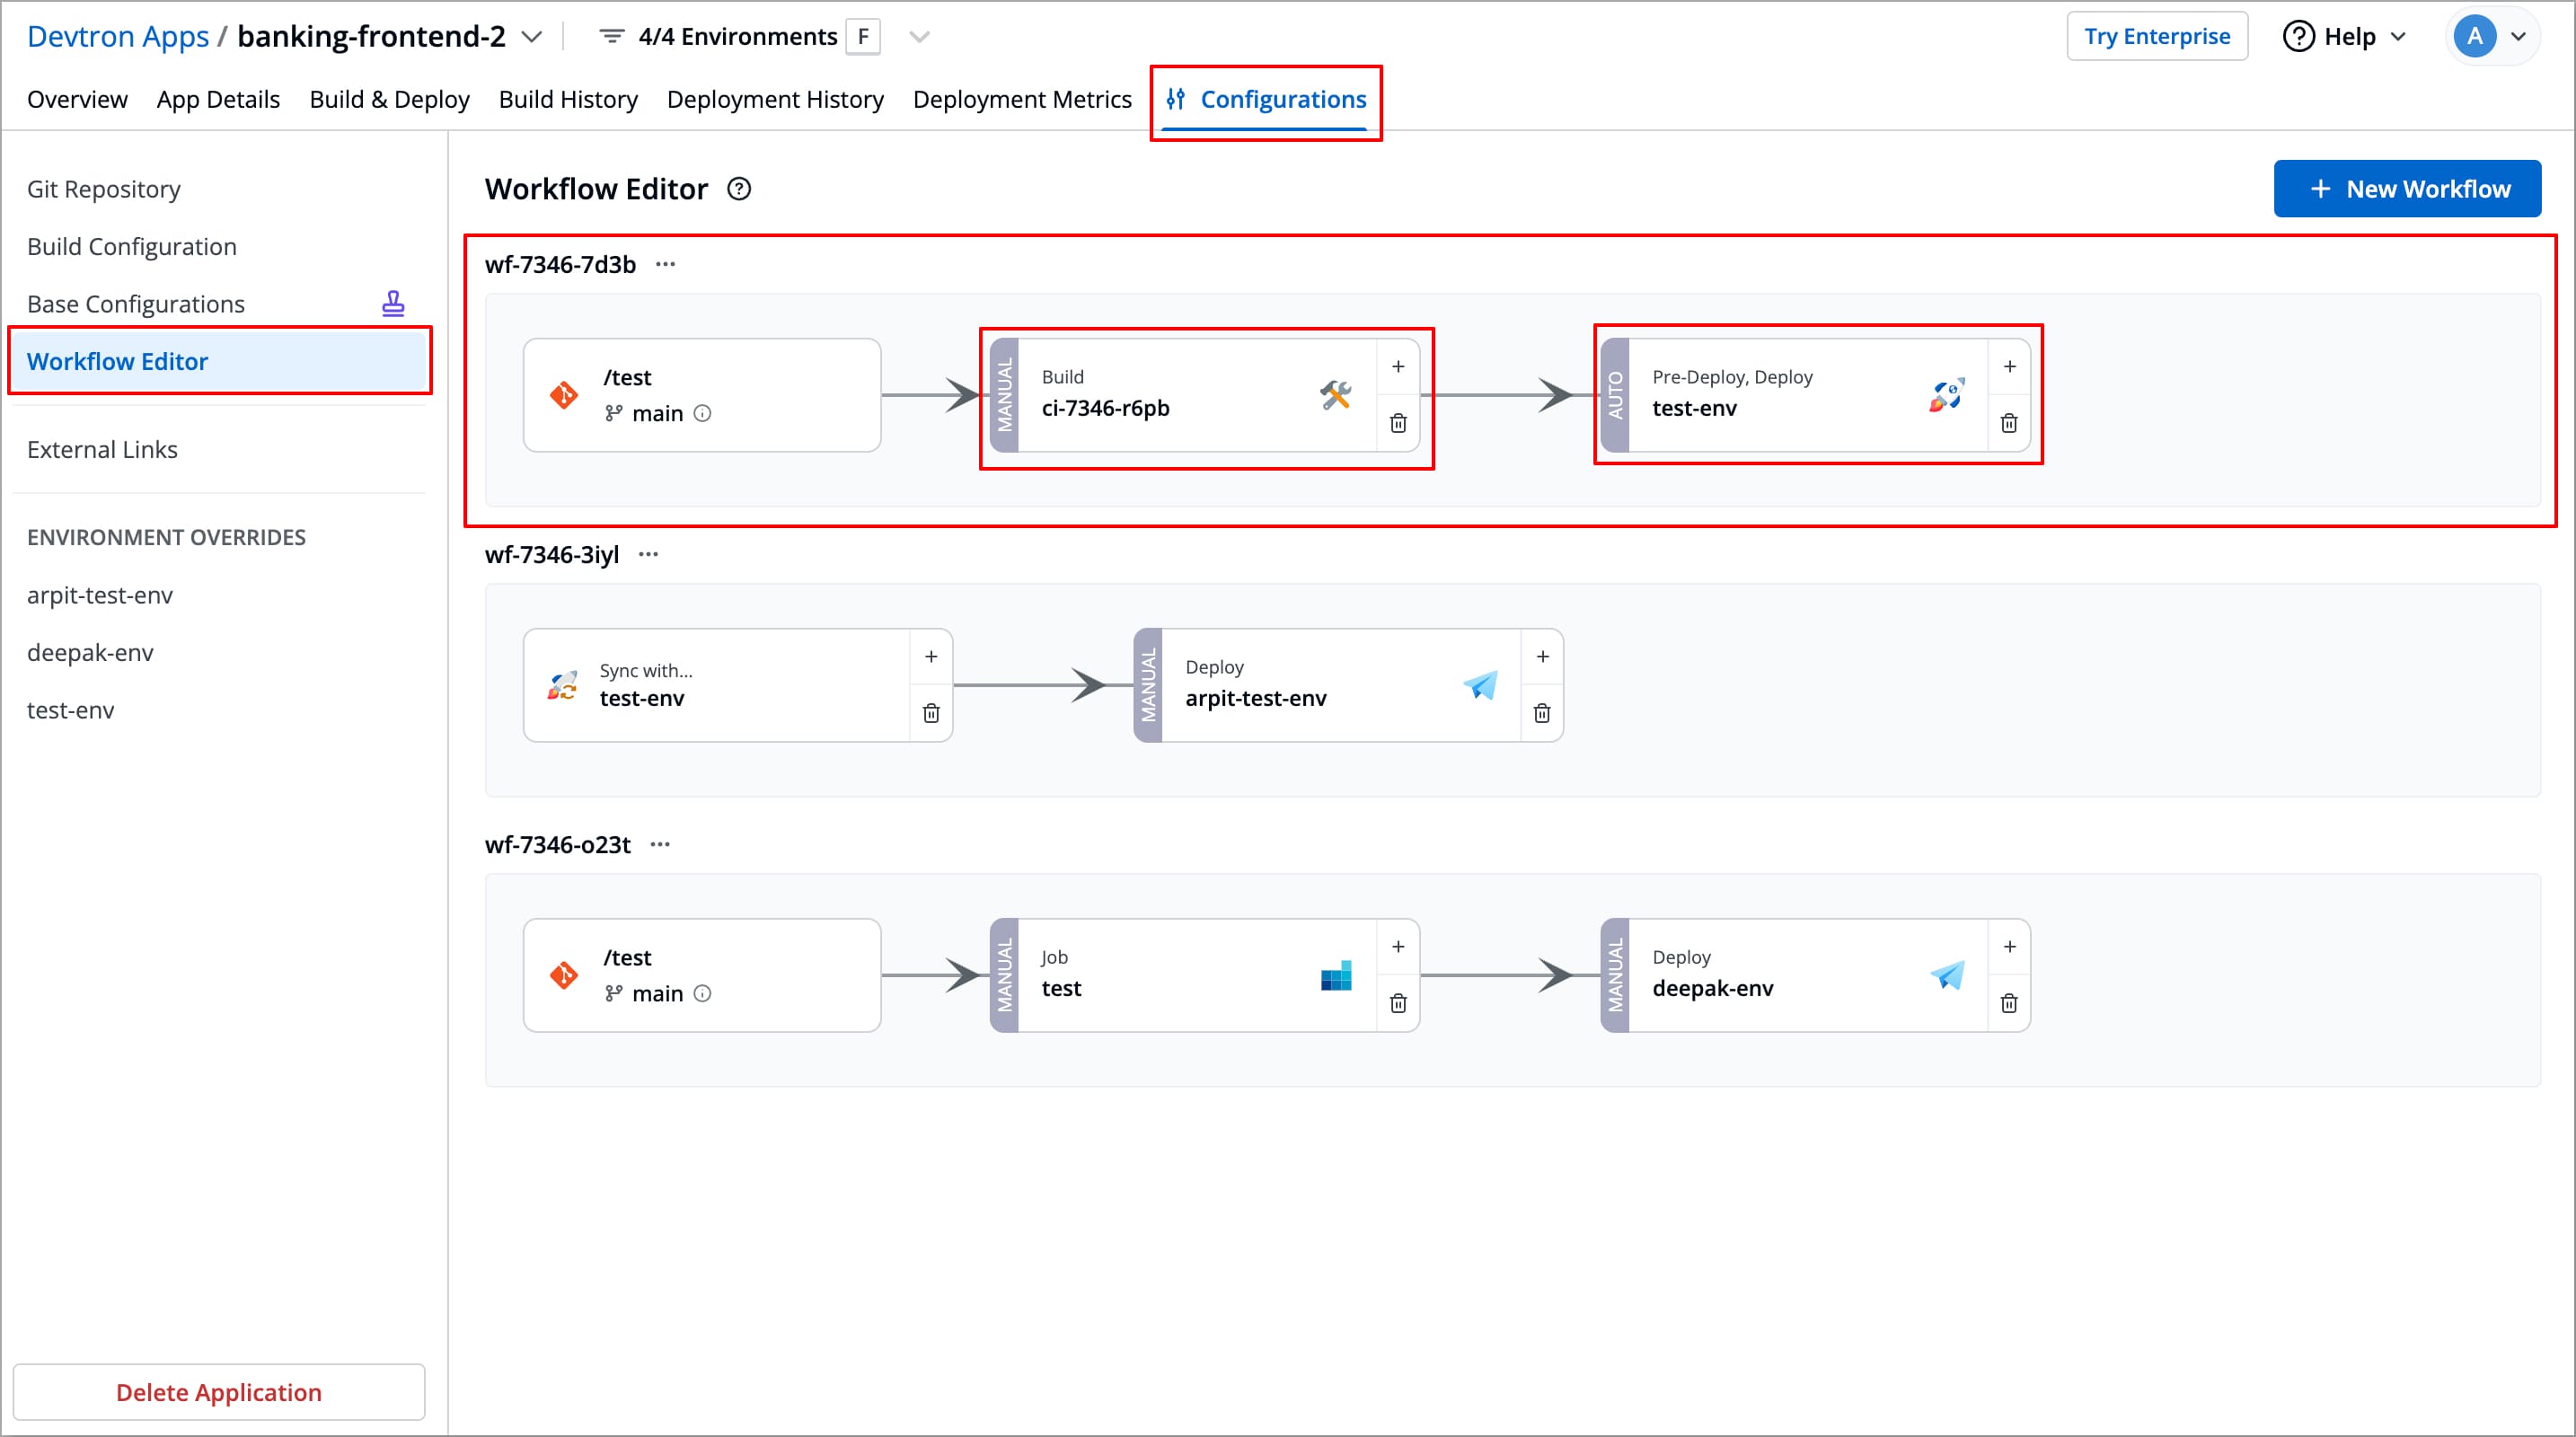
Navigate to Configurations (tab) → Workflow Editor of your Devtron App.
-
Select the Build or Deployment pipeline for configuring the pre/post tasks.
-
Based on the pipeline you are editing, follow the steps below to add a task:
-
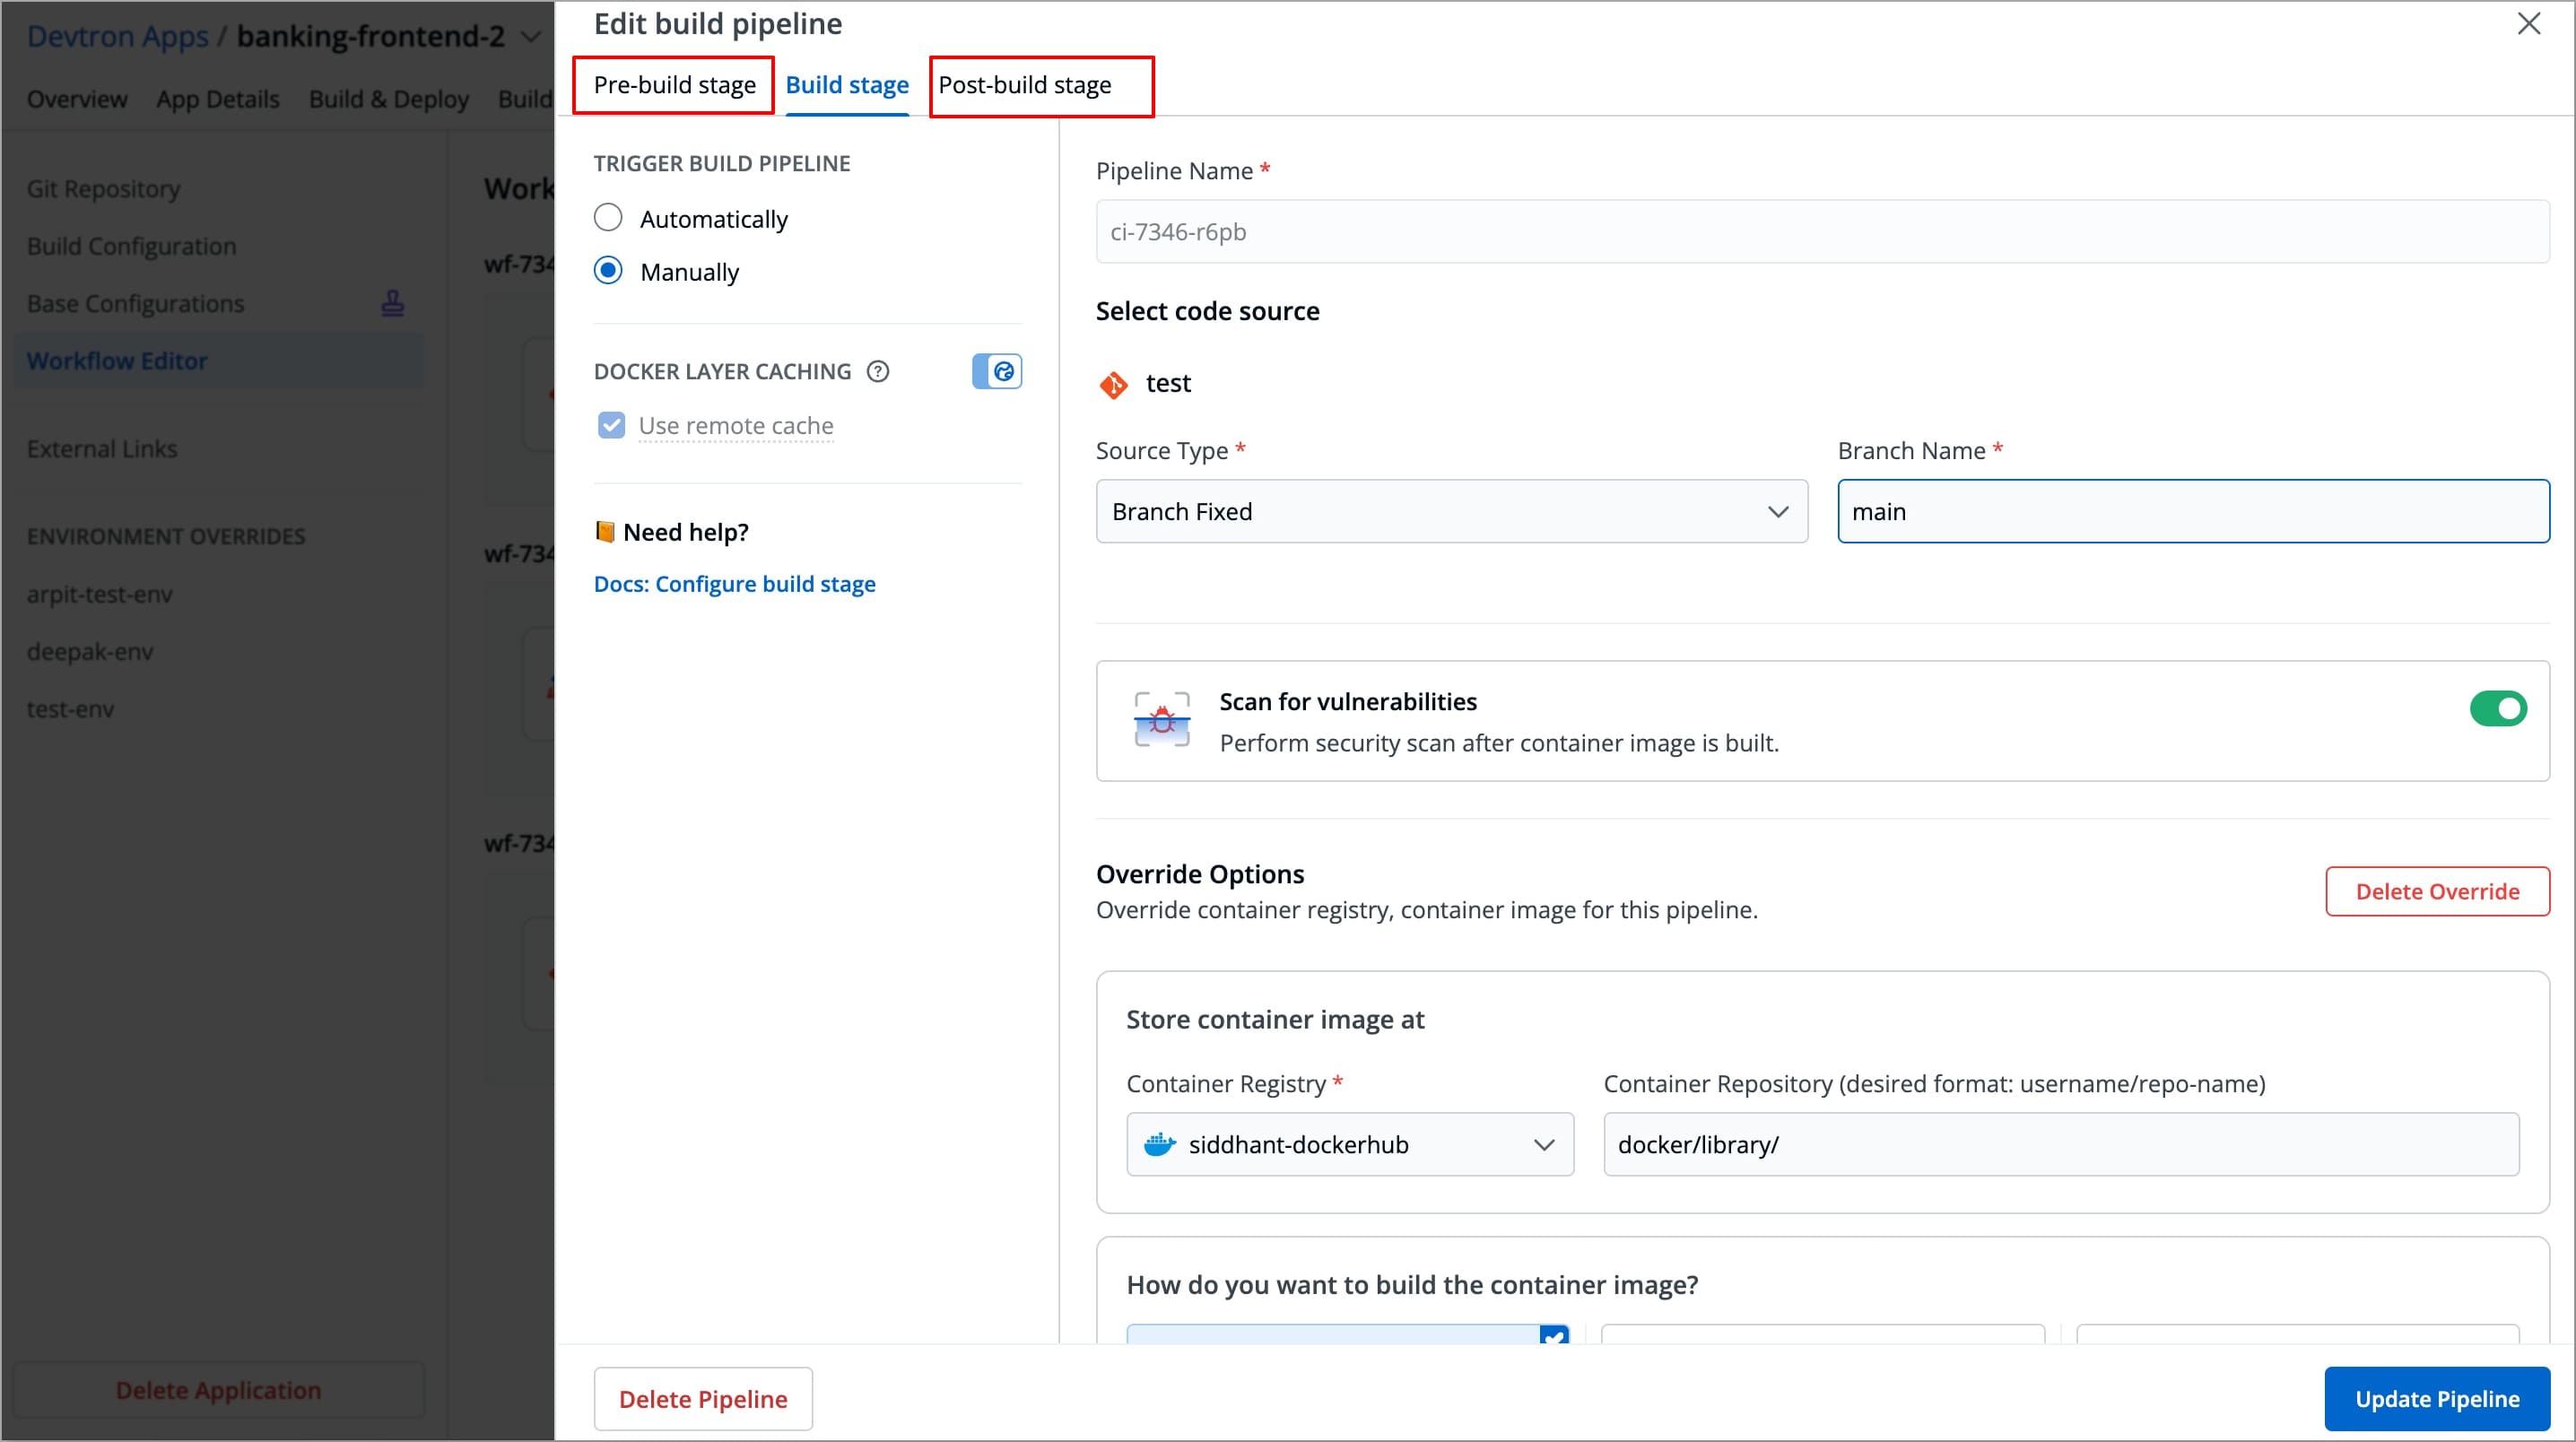
Build pipelines: On the Edit build pipeline window, select the Pre-Build stage or Post-Build stage tab.
-
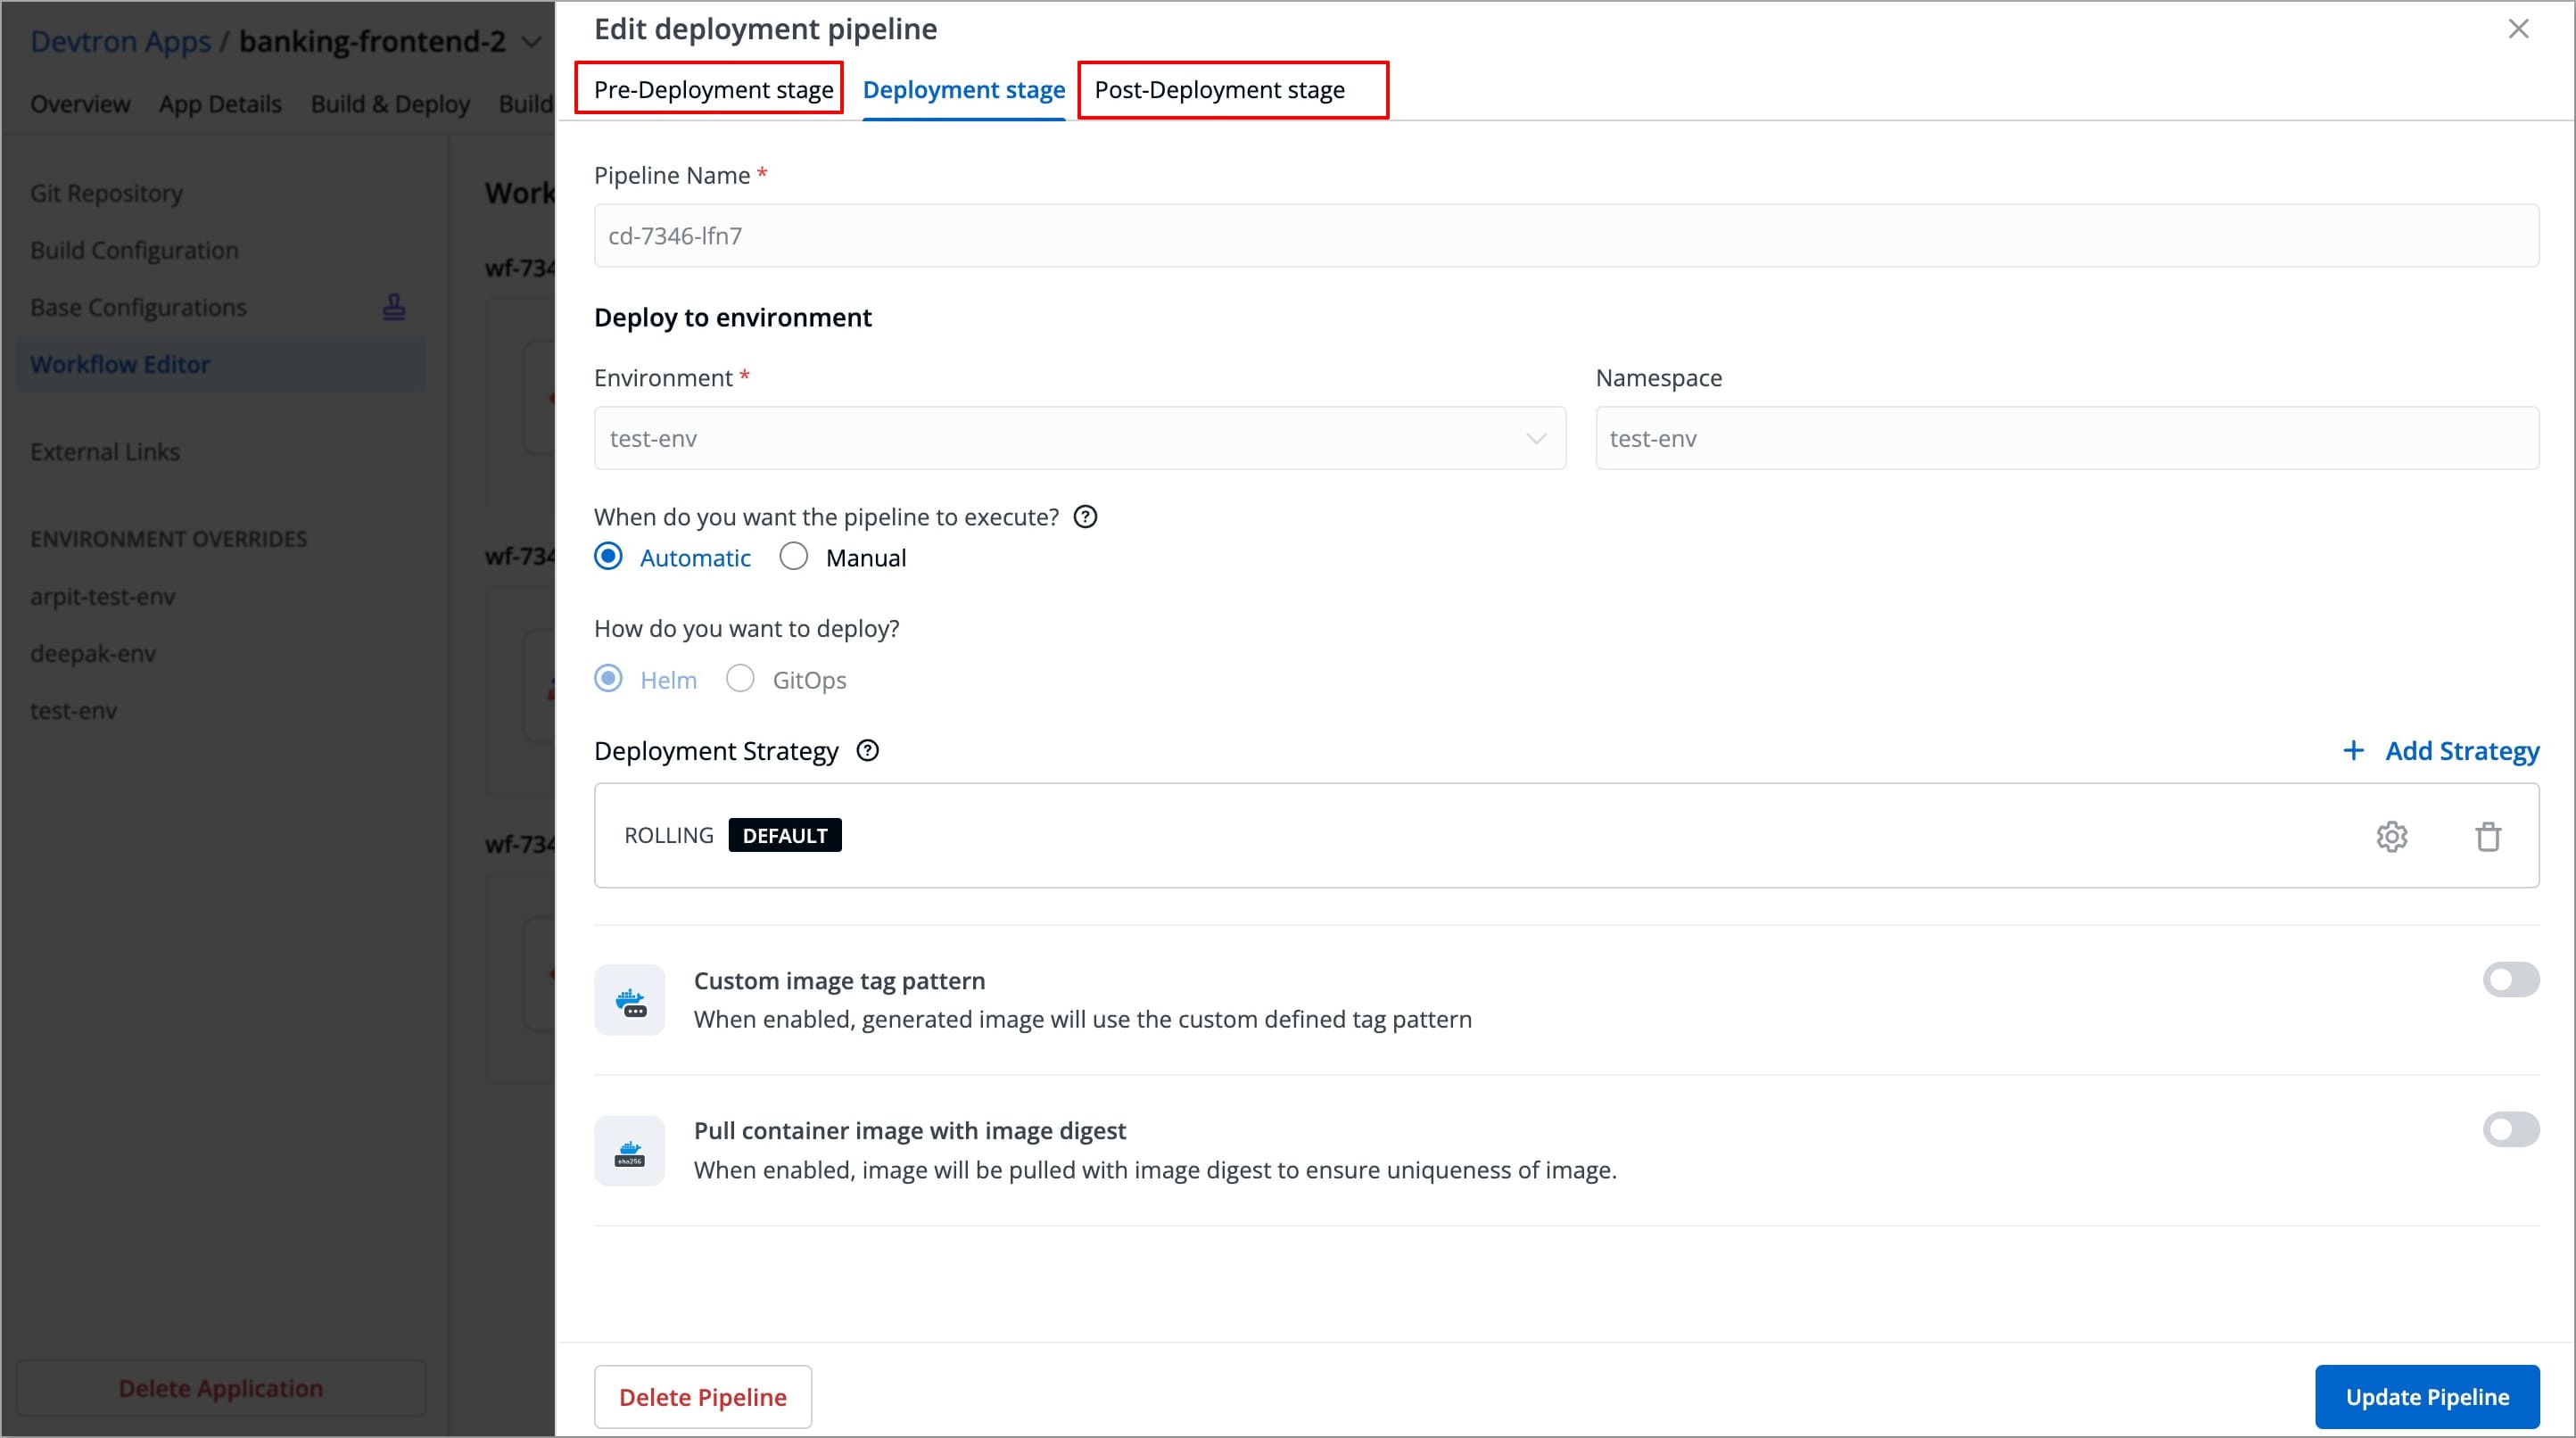
Deployment pipelines: On the Edit deployment pipeline window, select the Pre-Deployment stage or Post-Deployment stage tab.
-
-
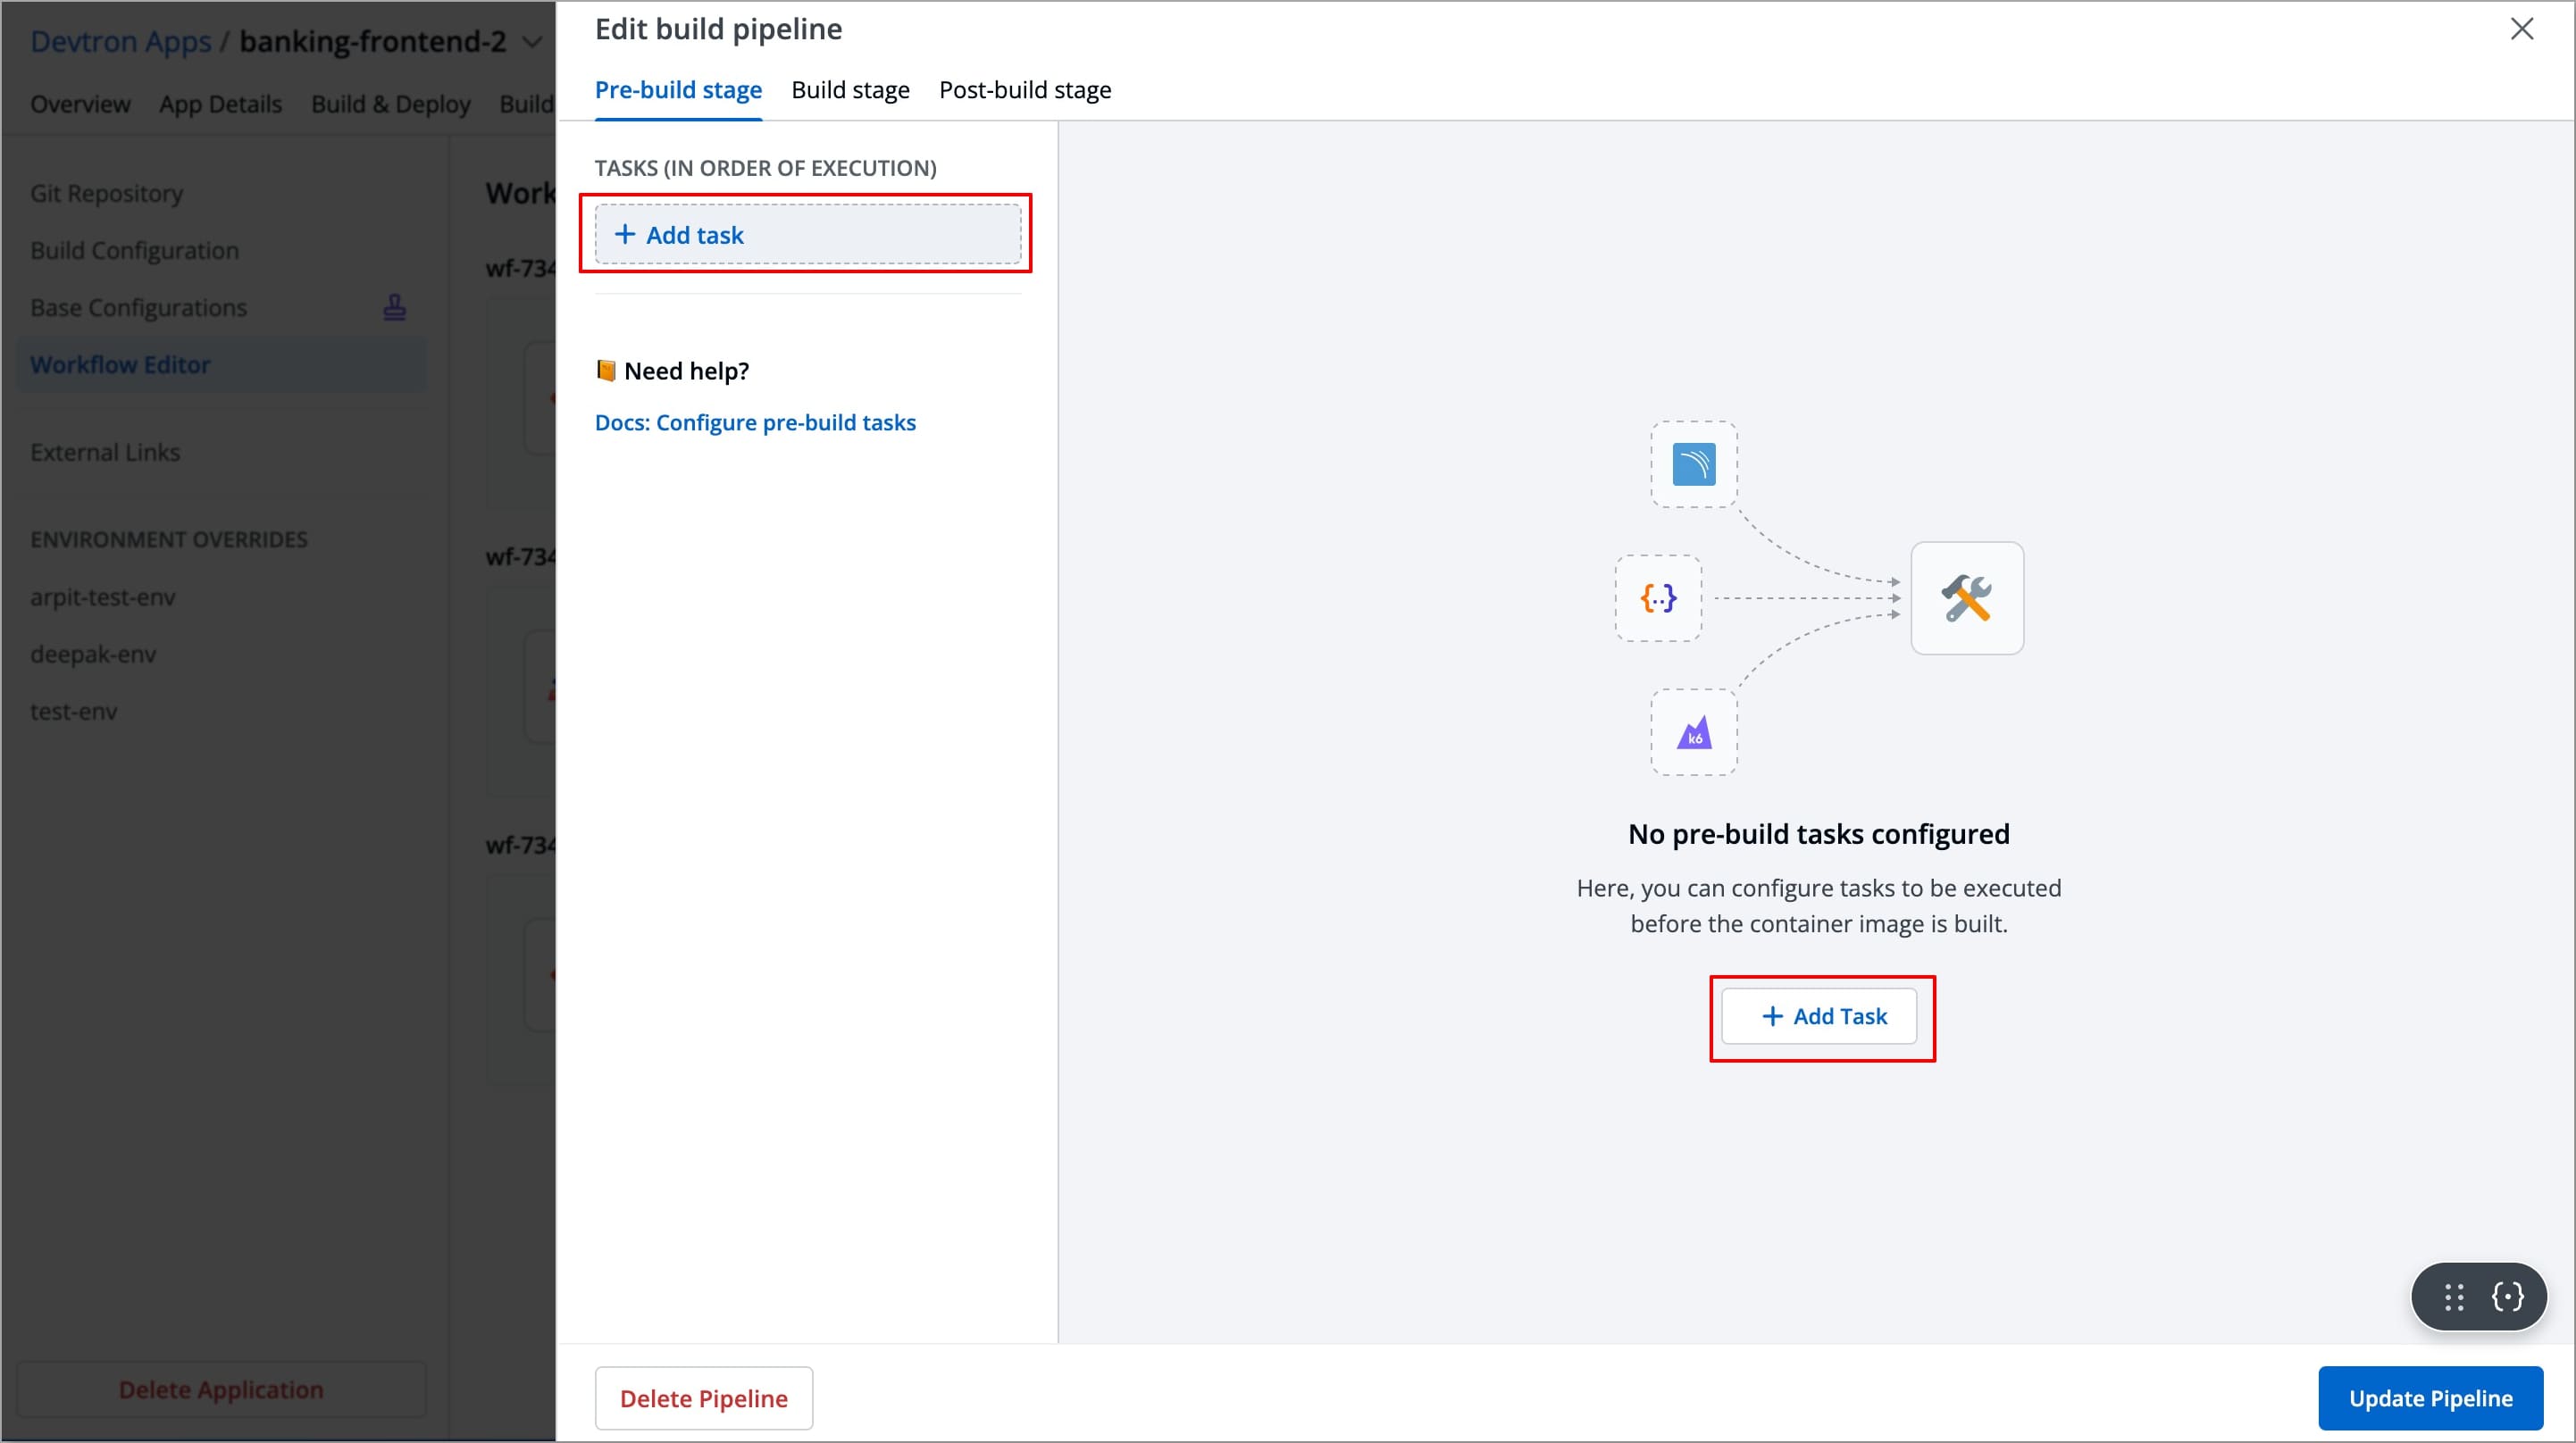
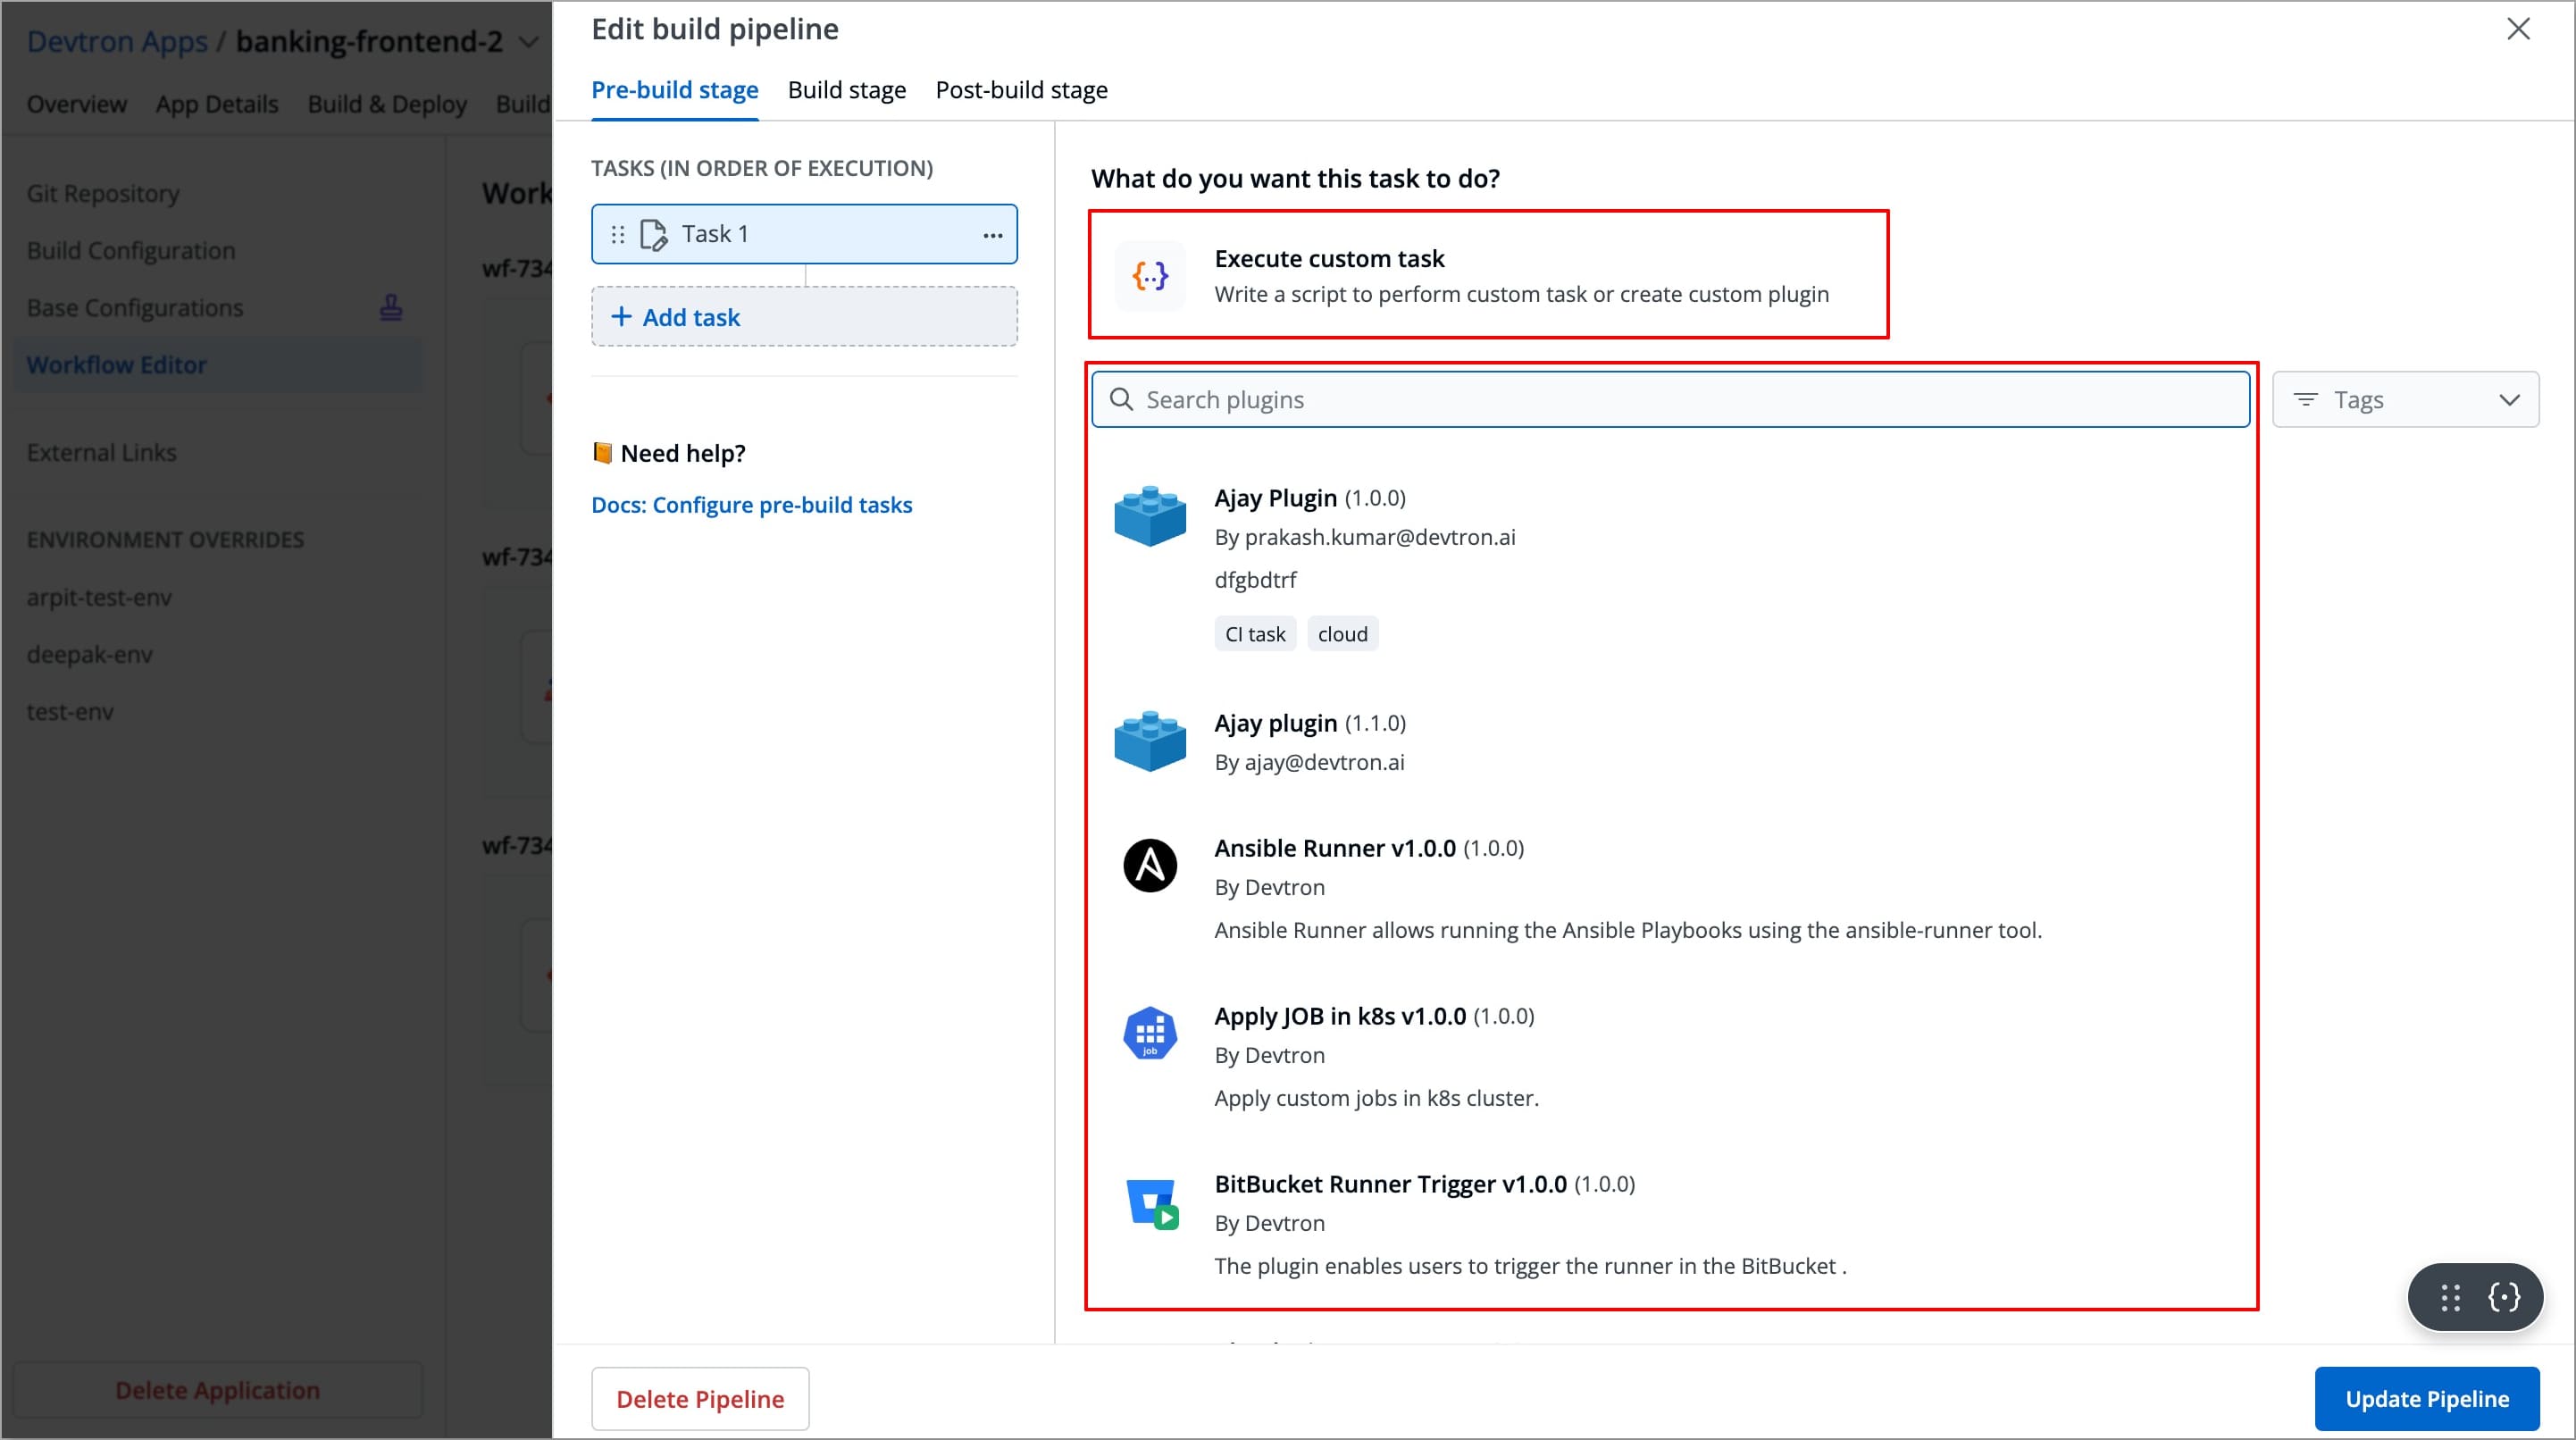
Select + Add task to add a task.
-
Configure the task using a preset plugin or Execute custom task. If you wish, you can add more tasks by clicking on + Add task in the left-side panel.
-
Click Update Pipeline. The pre/post task will be executed when you trigger the next build or deployment.

Configure a Task using Preset Plugins
In Devtron, preset plugins are pre-defined tasks templates that helps you automate and execute common operations such as provisioning infrastructure, taking backups, exporting container images etc., without writing custom scripts.
Devtron provides a set of built-in preset plugins, and you can also create your own plugins in Devtron according to your specific needs.
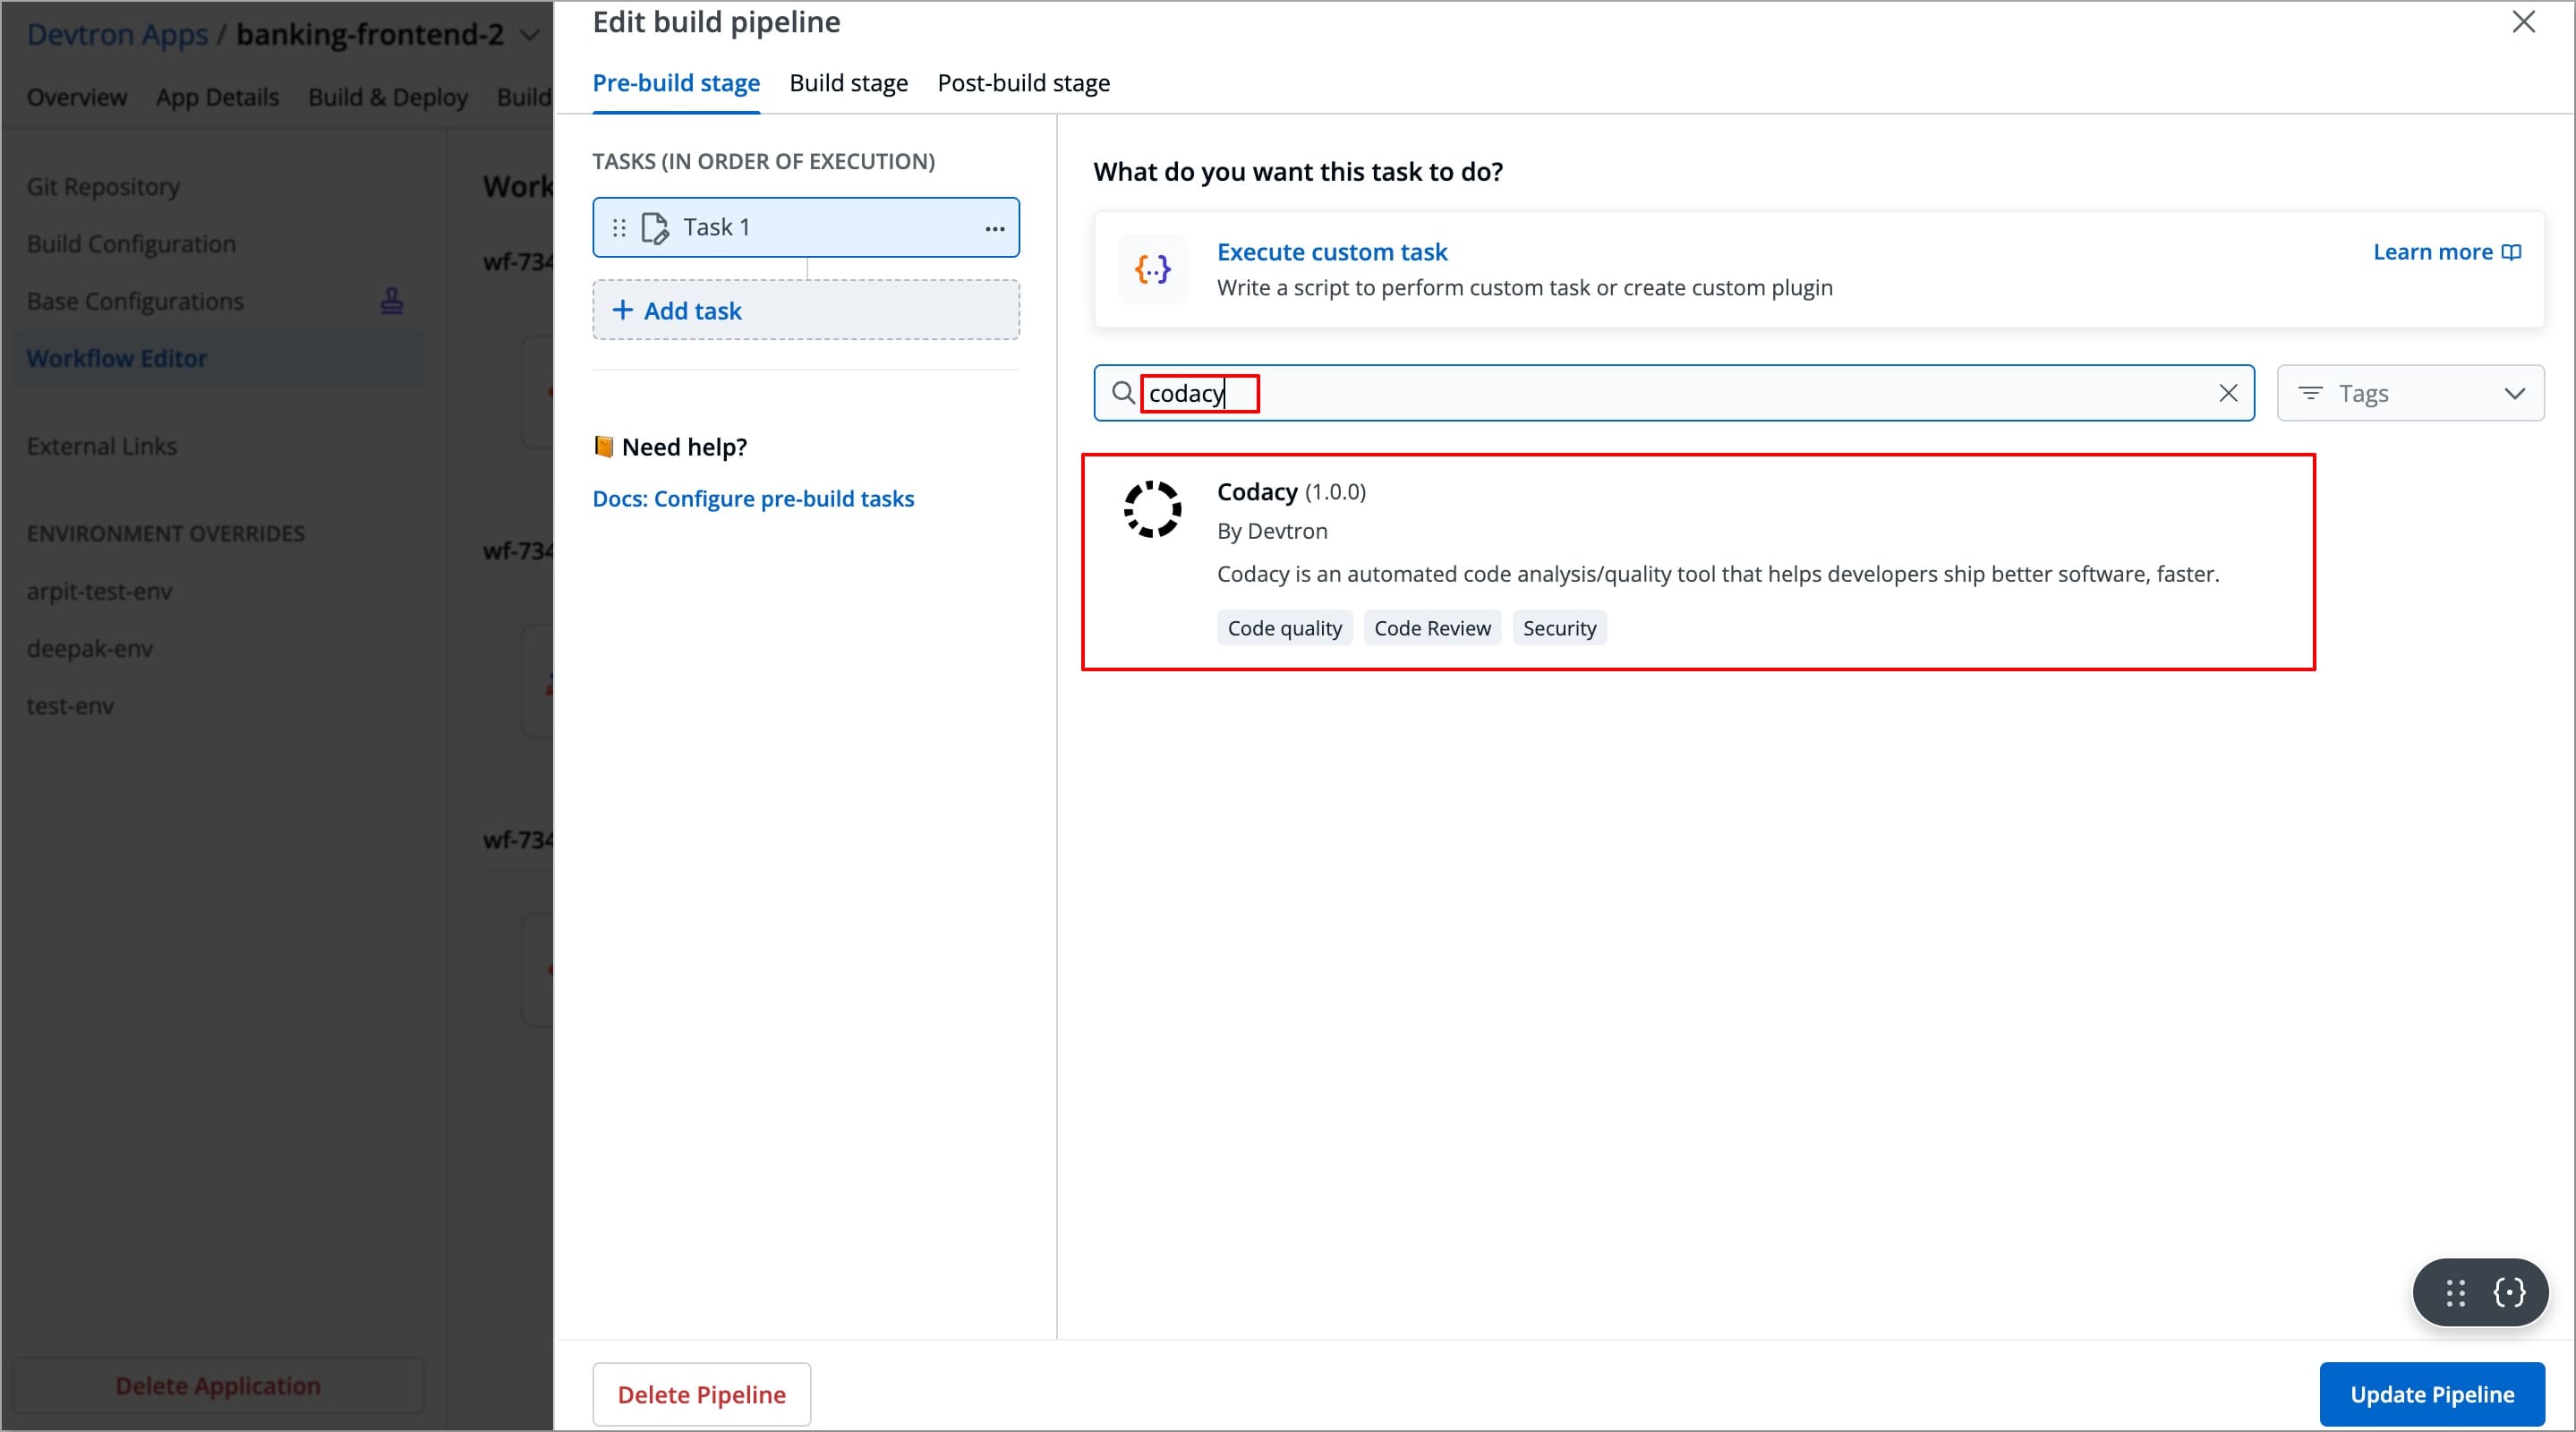
Let's take Codacy as an example and configure it in the Pre-Build stage in the CI pipeline for finding bugs, detecting dependency vulnerabilities, and enforcing code standards
To create a task using preset plugins, let's take Codacy as an example and configure it in the Pre-Build stage in the build pipeline for finding bugs, detecting dependency vulnerabilities, and enforcing code standards.
To configure a task using the Codacy plugin, follow the steps below:
-
Navigate to Pre-Build stage and select +Add task.
-
Search for
Codacyin the Search Plugin bar and select Codacy from the list of plugins.-
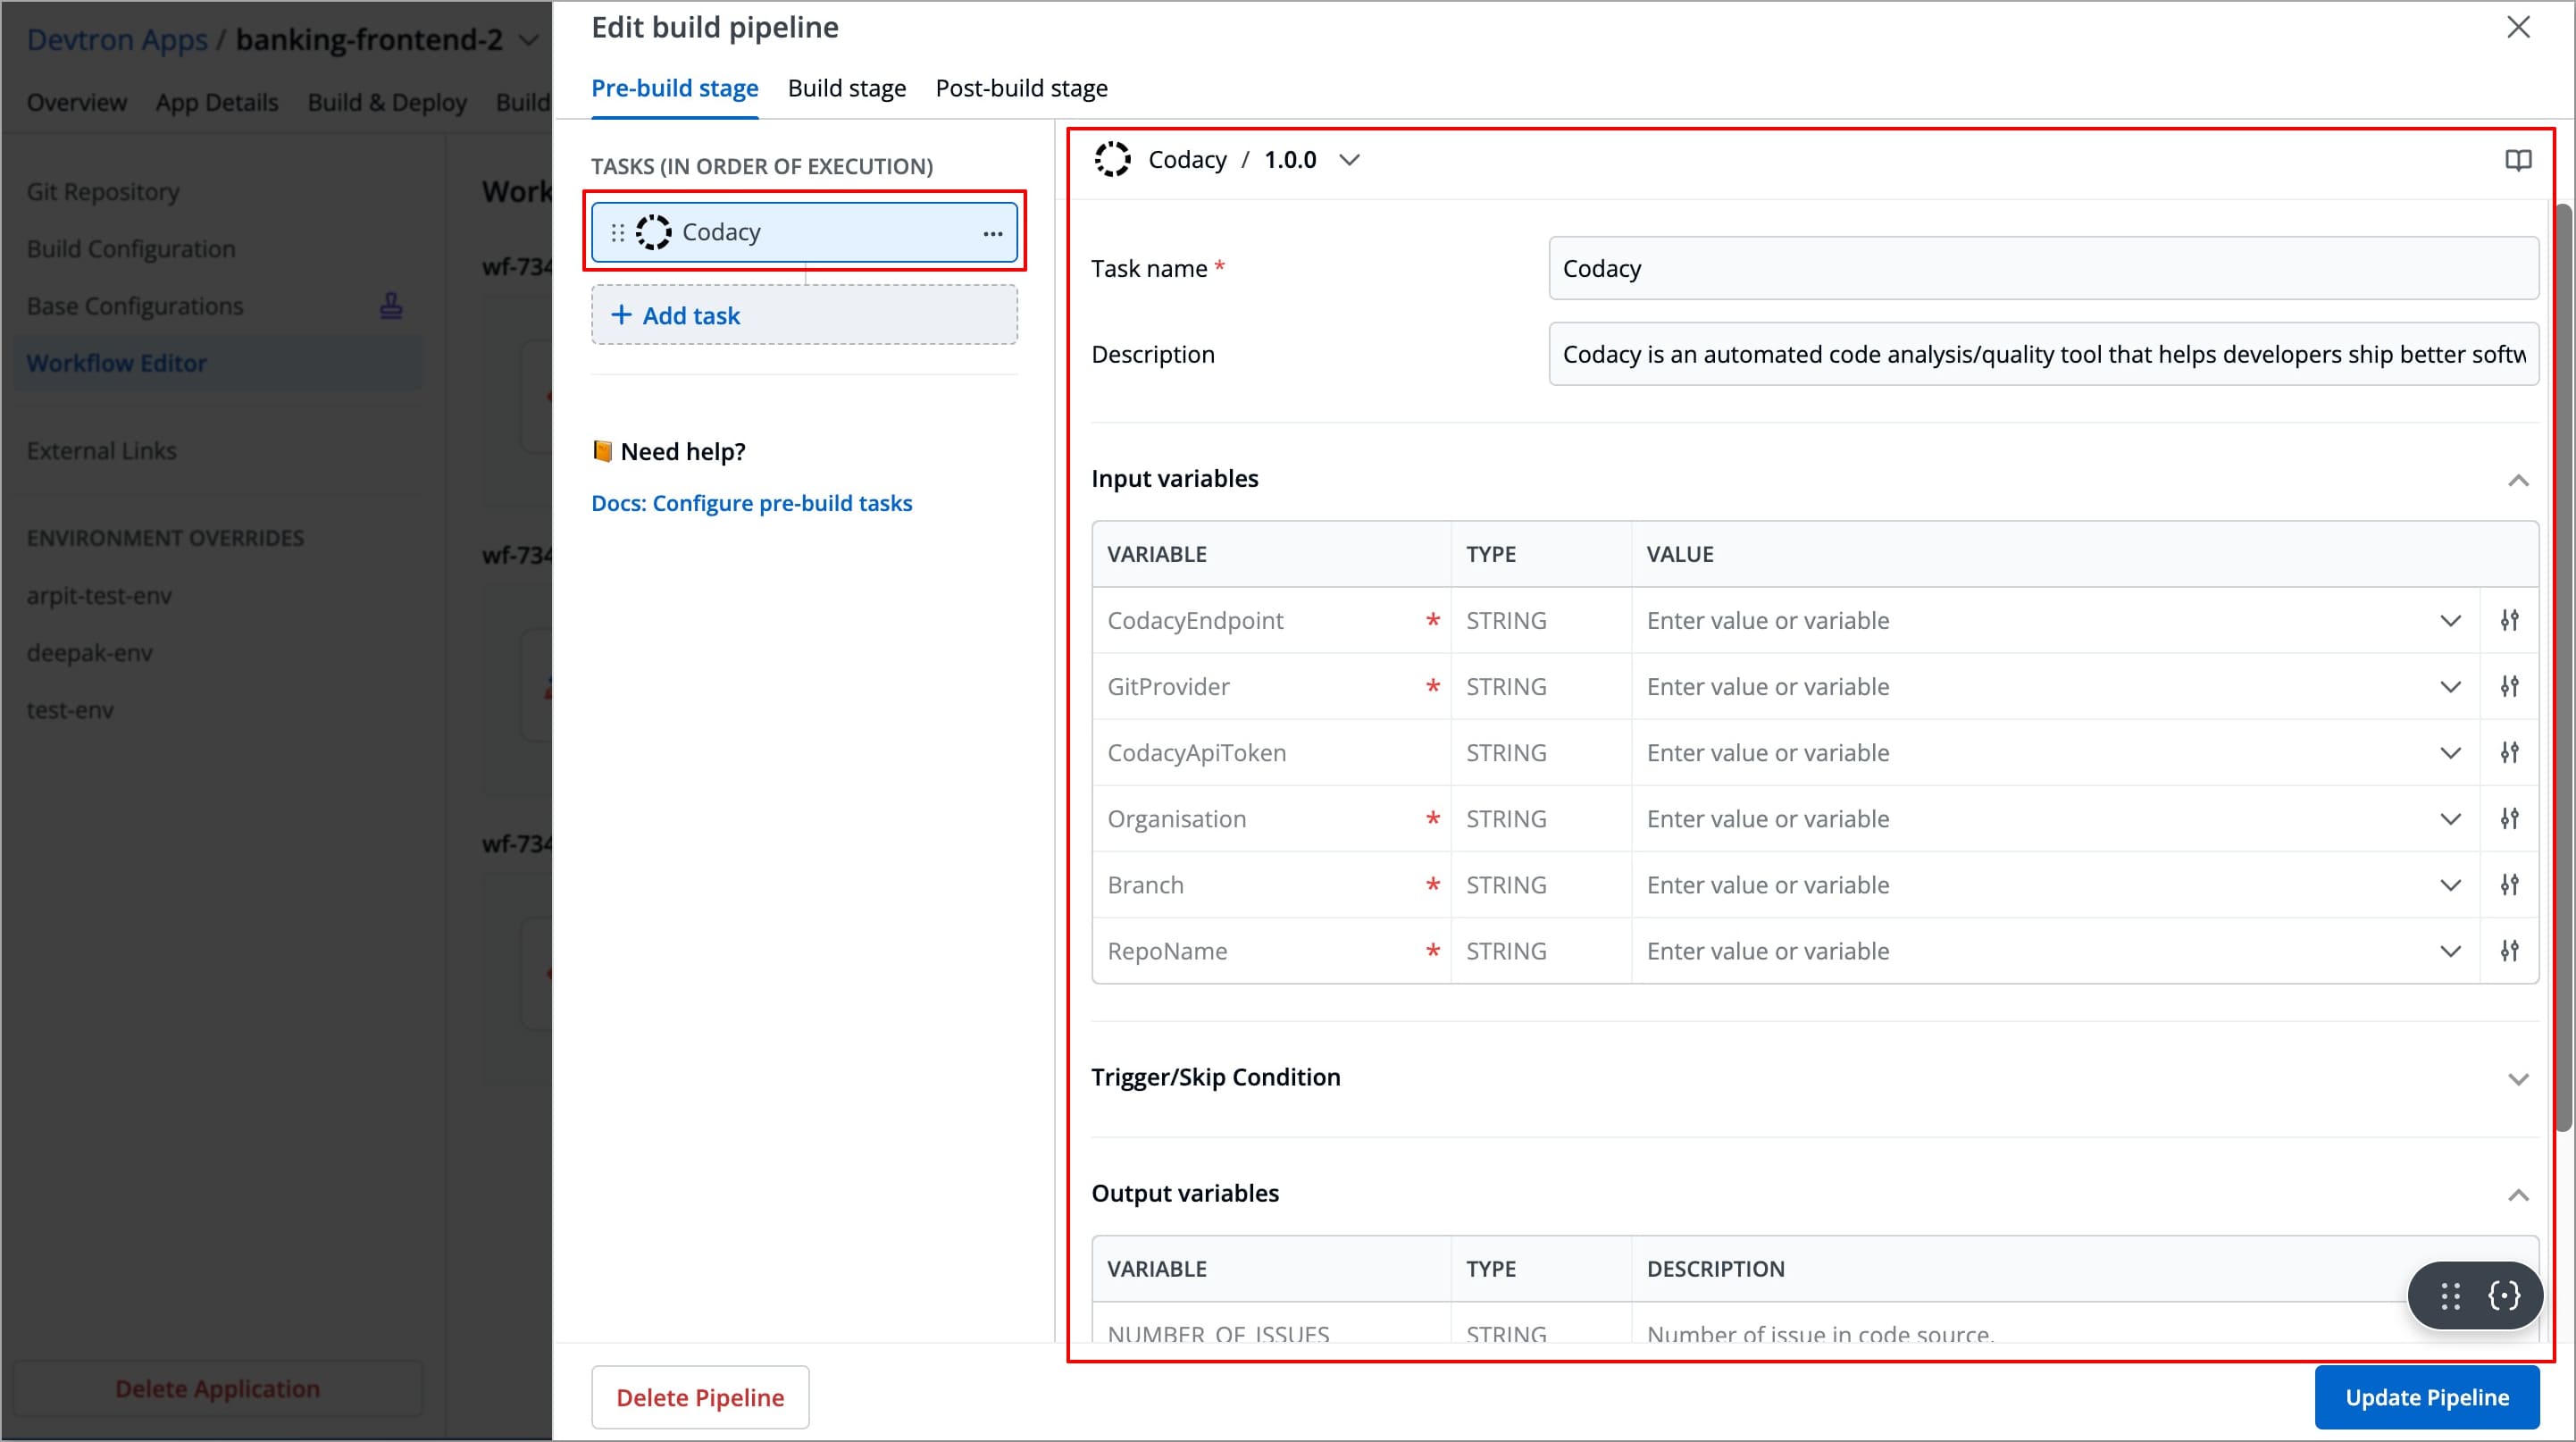
The right-side panel will display the fields specific to the Codacy plugin, which are required to be configured.
-
The left-side panel will now shows a task under Tasks (IN ORDER OF EXECUTION), named after the selected plugin(by default), along with its logo.
You can change the task's name using the Task name field but plugin's logo will remain indicating that it is a preset plugin.
-
-
Refer the Codacy documentation to configure the Codacy fields with appropriate values. You may explore Plugins documentation to configure any of the available plugins.
-
After configuring the fields successfully, your task will be created. If you wish, you can add more tasks by clicking on + Add task in the left-side panel.
-
Select Update pipeline; The pre/post task will be executed when you trigger the next build or deployment.
Similarly, you can configure any task with a preset plugin in Pre/post-build stages or pre/post-deployment stages.
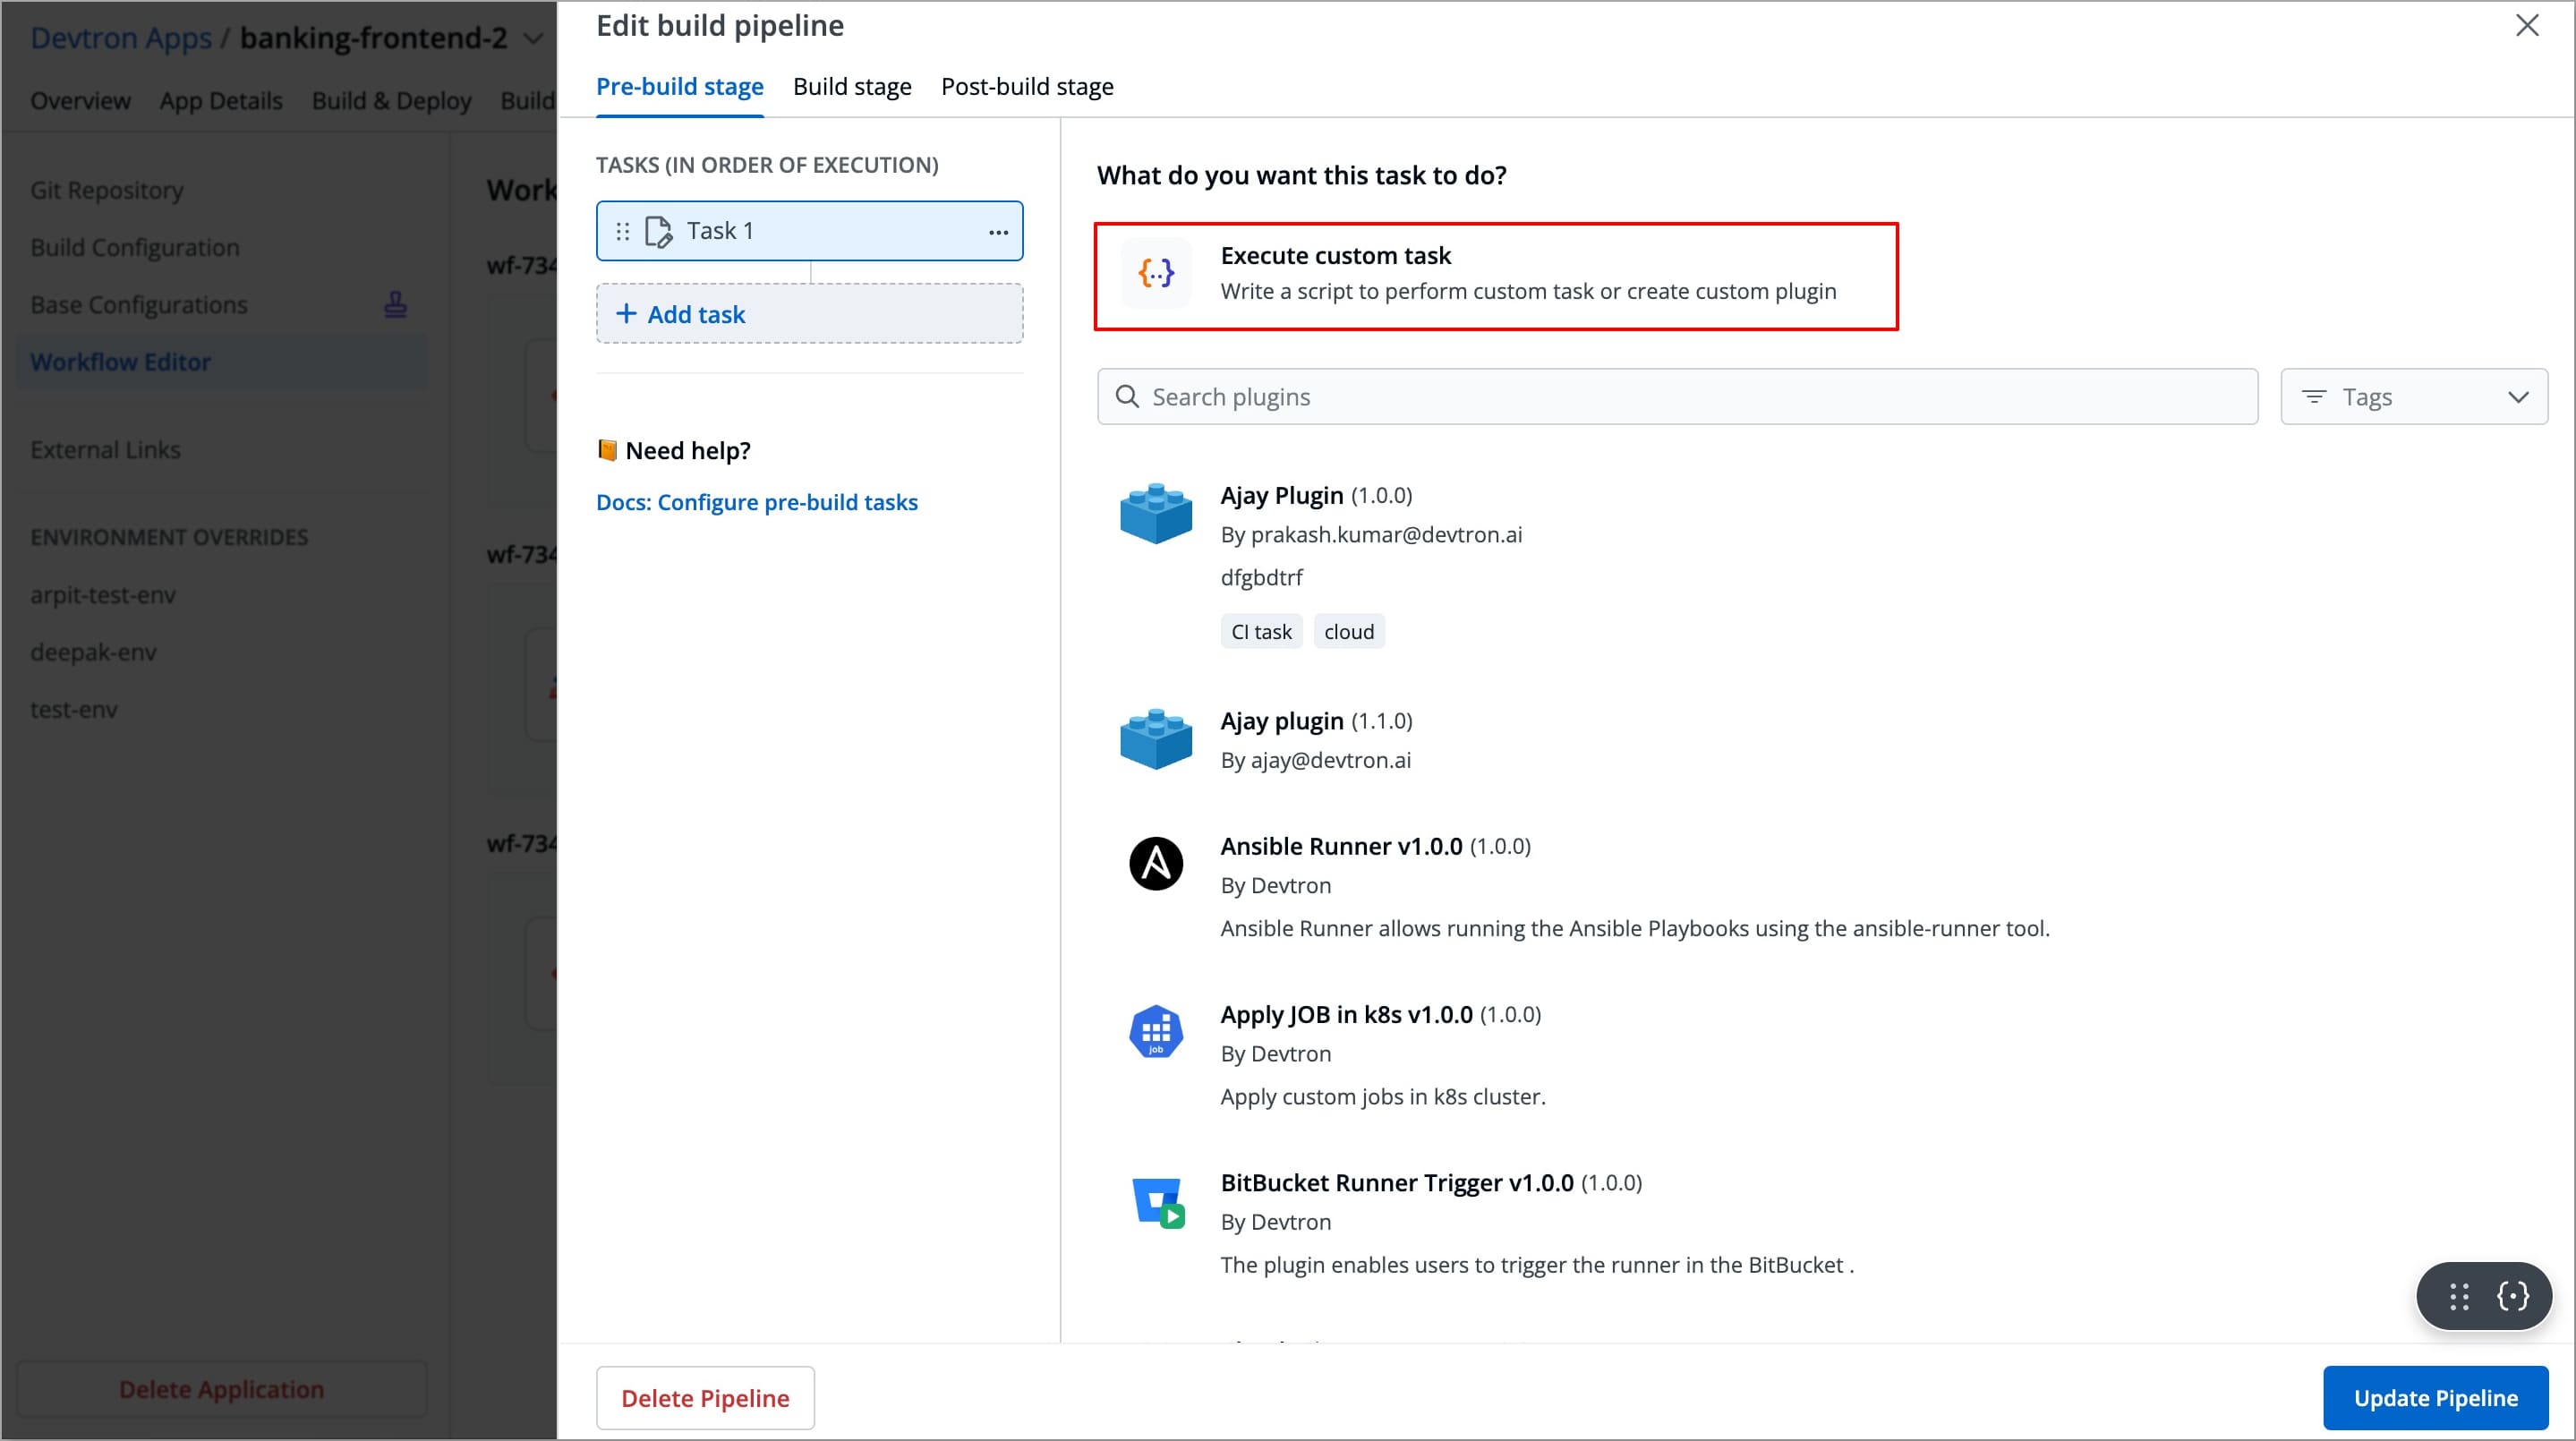
Execute Custom Task
-
After adding the task, select Execute custom task.
-
The right-side panel will display the fields that are required to be configured in order to create the task.
-
The left-side panel will now display a task under Tasks (IN ORDER OF EXECUTION).
-
-
Enter the Task name (required) and Task Description (optional).

-
Select the Task type, it can be
ShellorContainer Image.-
Shell Tasks: These execute shell scripts directly within the application runtime environment. In this type of task, you can define inline scripts or use script files from your configured source code.
-
Container Image Tasks: These allow you to execute commands and scripts inside a custom Docker container. Instead of using the default environment provided by Devtron, you can specify your own container image with all dependencies and tools required for the tasks.
These Tasks run using container in container approach, which means the specified image is pulled and run inside the App pod, thus providing a completely isolated environment.
-
-
After selecting the Task type, you need to configure task-specific fields based on that Task type. Refer the Examples and Use cases to configure both Shell type and Container image tasks.
Examples and Use Cases
Example 1 - Shell Task (Post-Build)
Let's take an example of a Shell task in the Post-Build stage, that send an email notification immediately after the build stage is completed.
Tasks Configurations
| Field | Values for This Example | Required/Optional | Description |
|---|---|---|---|
Task Name | email-notifier | Required | Enter a name for the task |
Task Description | This task sends a email after the build is completed | Optional | Short description for the task |
Task Type | Shell | Optional | Select the preferred task type |
Script | Refer the Script below | Required | Custom script for executing tasks |
Prerequisites
Make sure to create an App password for the sender's email account to use in the script below. Refer the below video to learn how to create an App password for GMAIL accounts
Script
!/bin/bash

# SMTP server settings for Gmail
SMTP_SERVER="smtp.gmail.com"
SMTP_PORT="587"
SMTP_USERNAME="docs@devtron.ai" # Enter the sender's email
SMTP_PASSWORD="xxxx-xxxx-xxxx-xxxx" # Replace with 16-character App Password of Gmail

# Recipient email address
TO="abc@gmail.com"

# Email subject and body
SUBJECT="Build is completed"
BODY="Build Stage is successfully completed."

# Construct the email message
MESSAGE="Subject: $SUBJECT\n\n$BODY"

# Send the email using Curl
curl --url "smtp://$SMTP_SERVER:$SMTP_PORT" \
     --ssl-reqd \
     --mail-from "$SMTP_USERNAME" \
     --mail-rcpt "$TO" \
     --user "$SMTP_USERNAME:$SMTP_PASSWORD" \
     --tlsv1.2 \
     -T <(echo -e "$MESSAGE")

echo "Email sent to $TO"
After the build stage is completes, this task will sends an email to notify you that the build stage is completed.
Example 2 - Shell Task (Pre-Build)
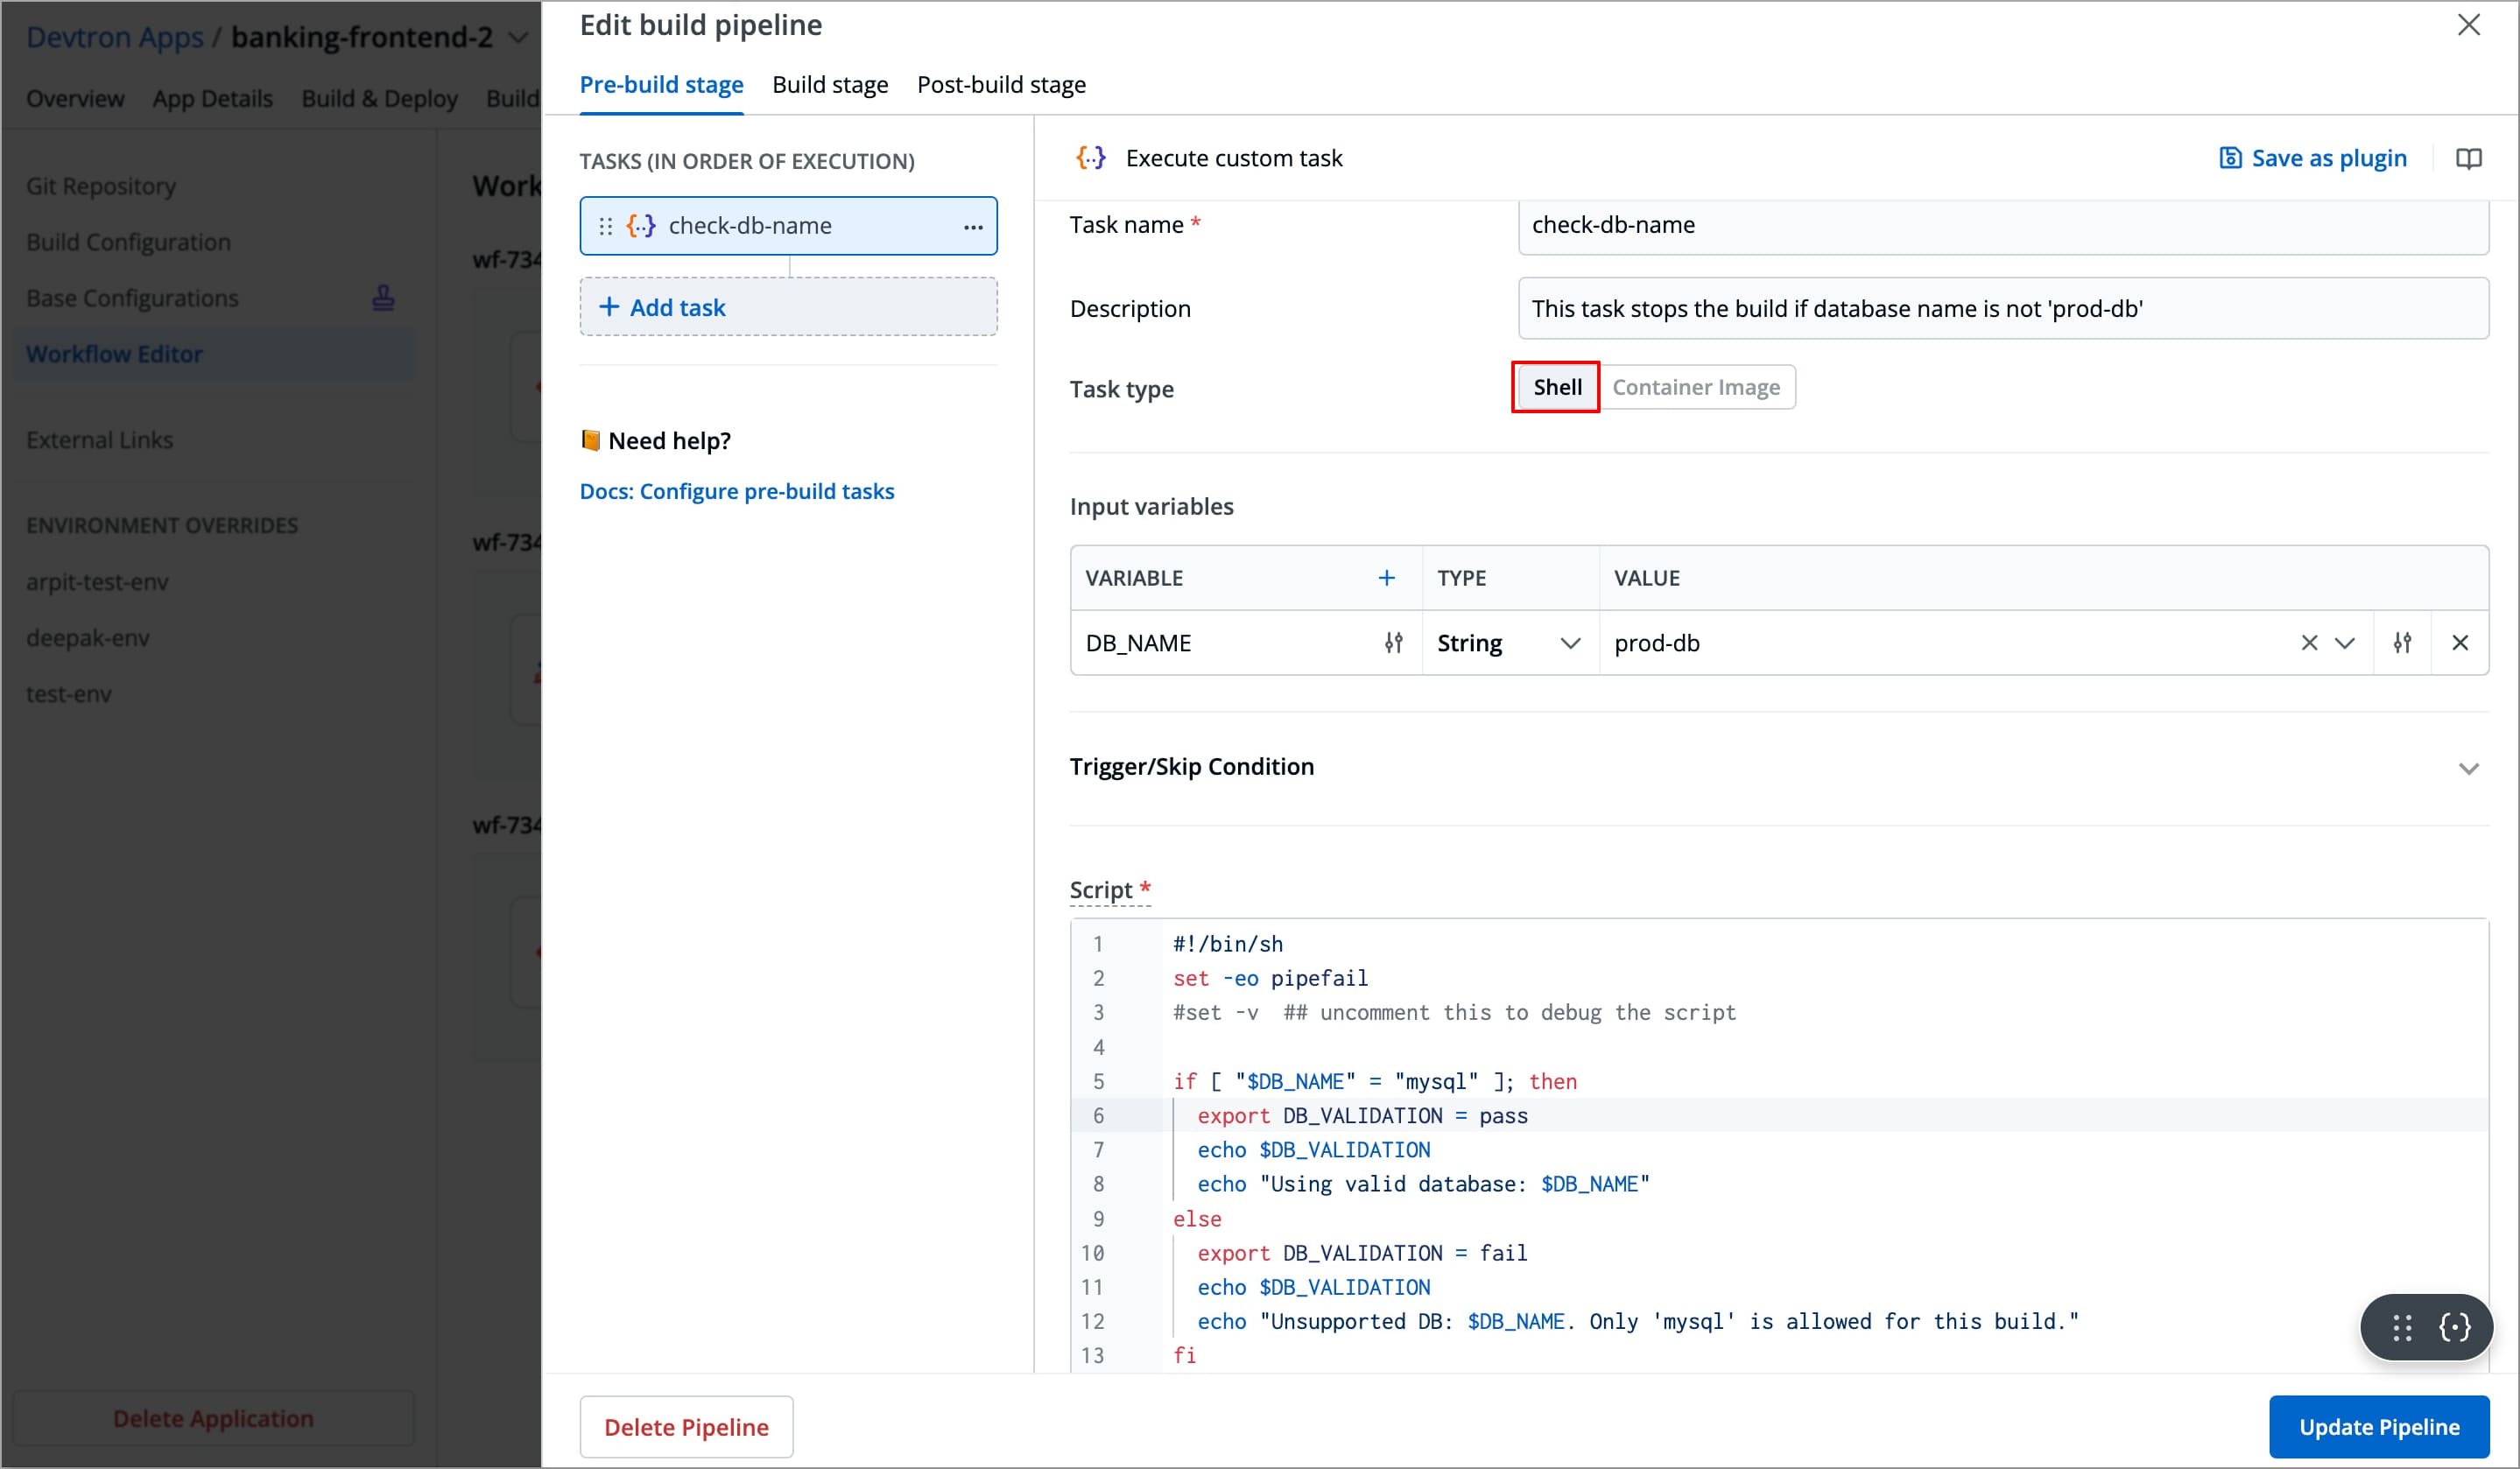
Let's take an example of a Shell task in the Pre-Build stage that ensures the database configured is prod-db. If the configured database is anything else, the build should stop.
Tasks Configurations

| Field | Values for This Example | Required/Optional | Description |
|---|---|---|---|
Task Name | check-db-name | Required | Enter a name for the task |
Task Description | This task stops the build if the database name is not 'prod-db' | Optional | Short description for the task |
Task Type | Shell | Optional | Select the preferred task type |
Input variables | Refer the Input Variable table below | Optional | These variables provide dynamic values to the script at the time of execution and are defined directly in the UI.
|
Trigger/Skip condition | Not required for this example | Optional | A conditional statement to execute or skip the task |
Script | Refer the Script below | Required | Custom script for executing tasks |
Output directory path | Not required for this example | Optional | Directory path where output files such as logs, errors, etc. will be available after the execution. |
Output variables | Refer to the output variable table | Optional | Output variables store the output as variables, and these variables can be used as input variables for the next task.
|
Input Variable Table
| Variable | Type | Value | Description |
|---|---|---|---|
DB_NAME | String | prod-db | Name of the database to be backed up |
-
To add an input variable, click + Add Variable next to the Input Variable, a new table appears asking you to enter the variable and its required information.
-
You can click
+icon next to Variable header field to add more rows to the input variable table.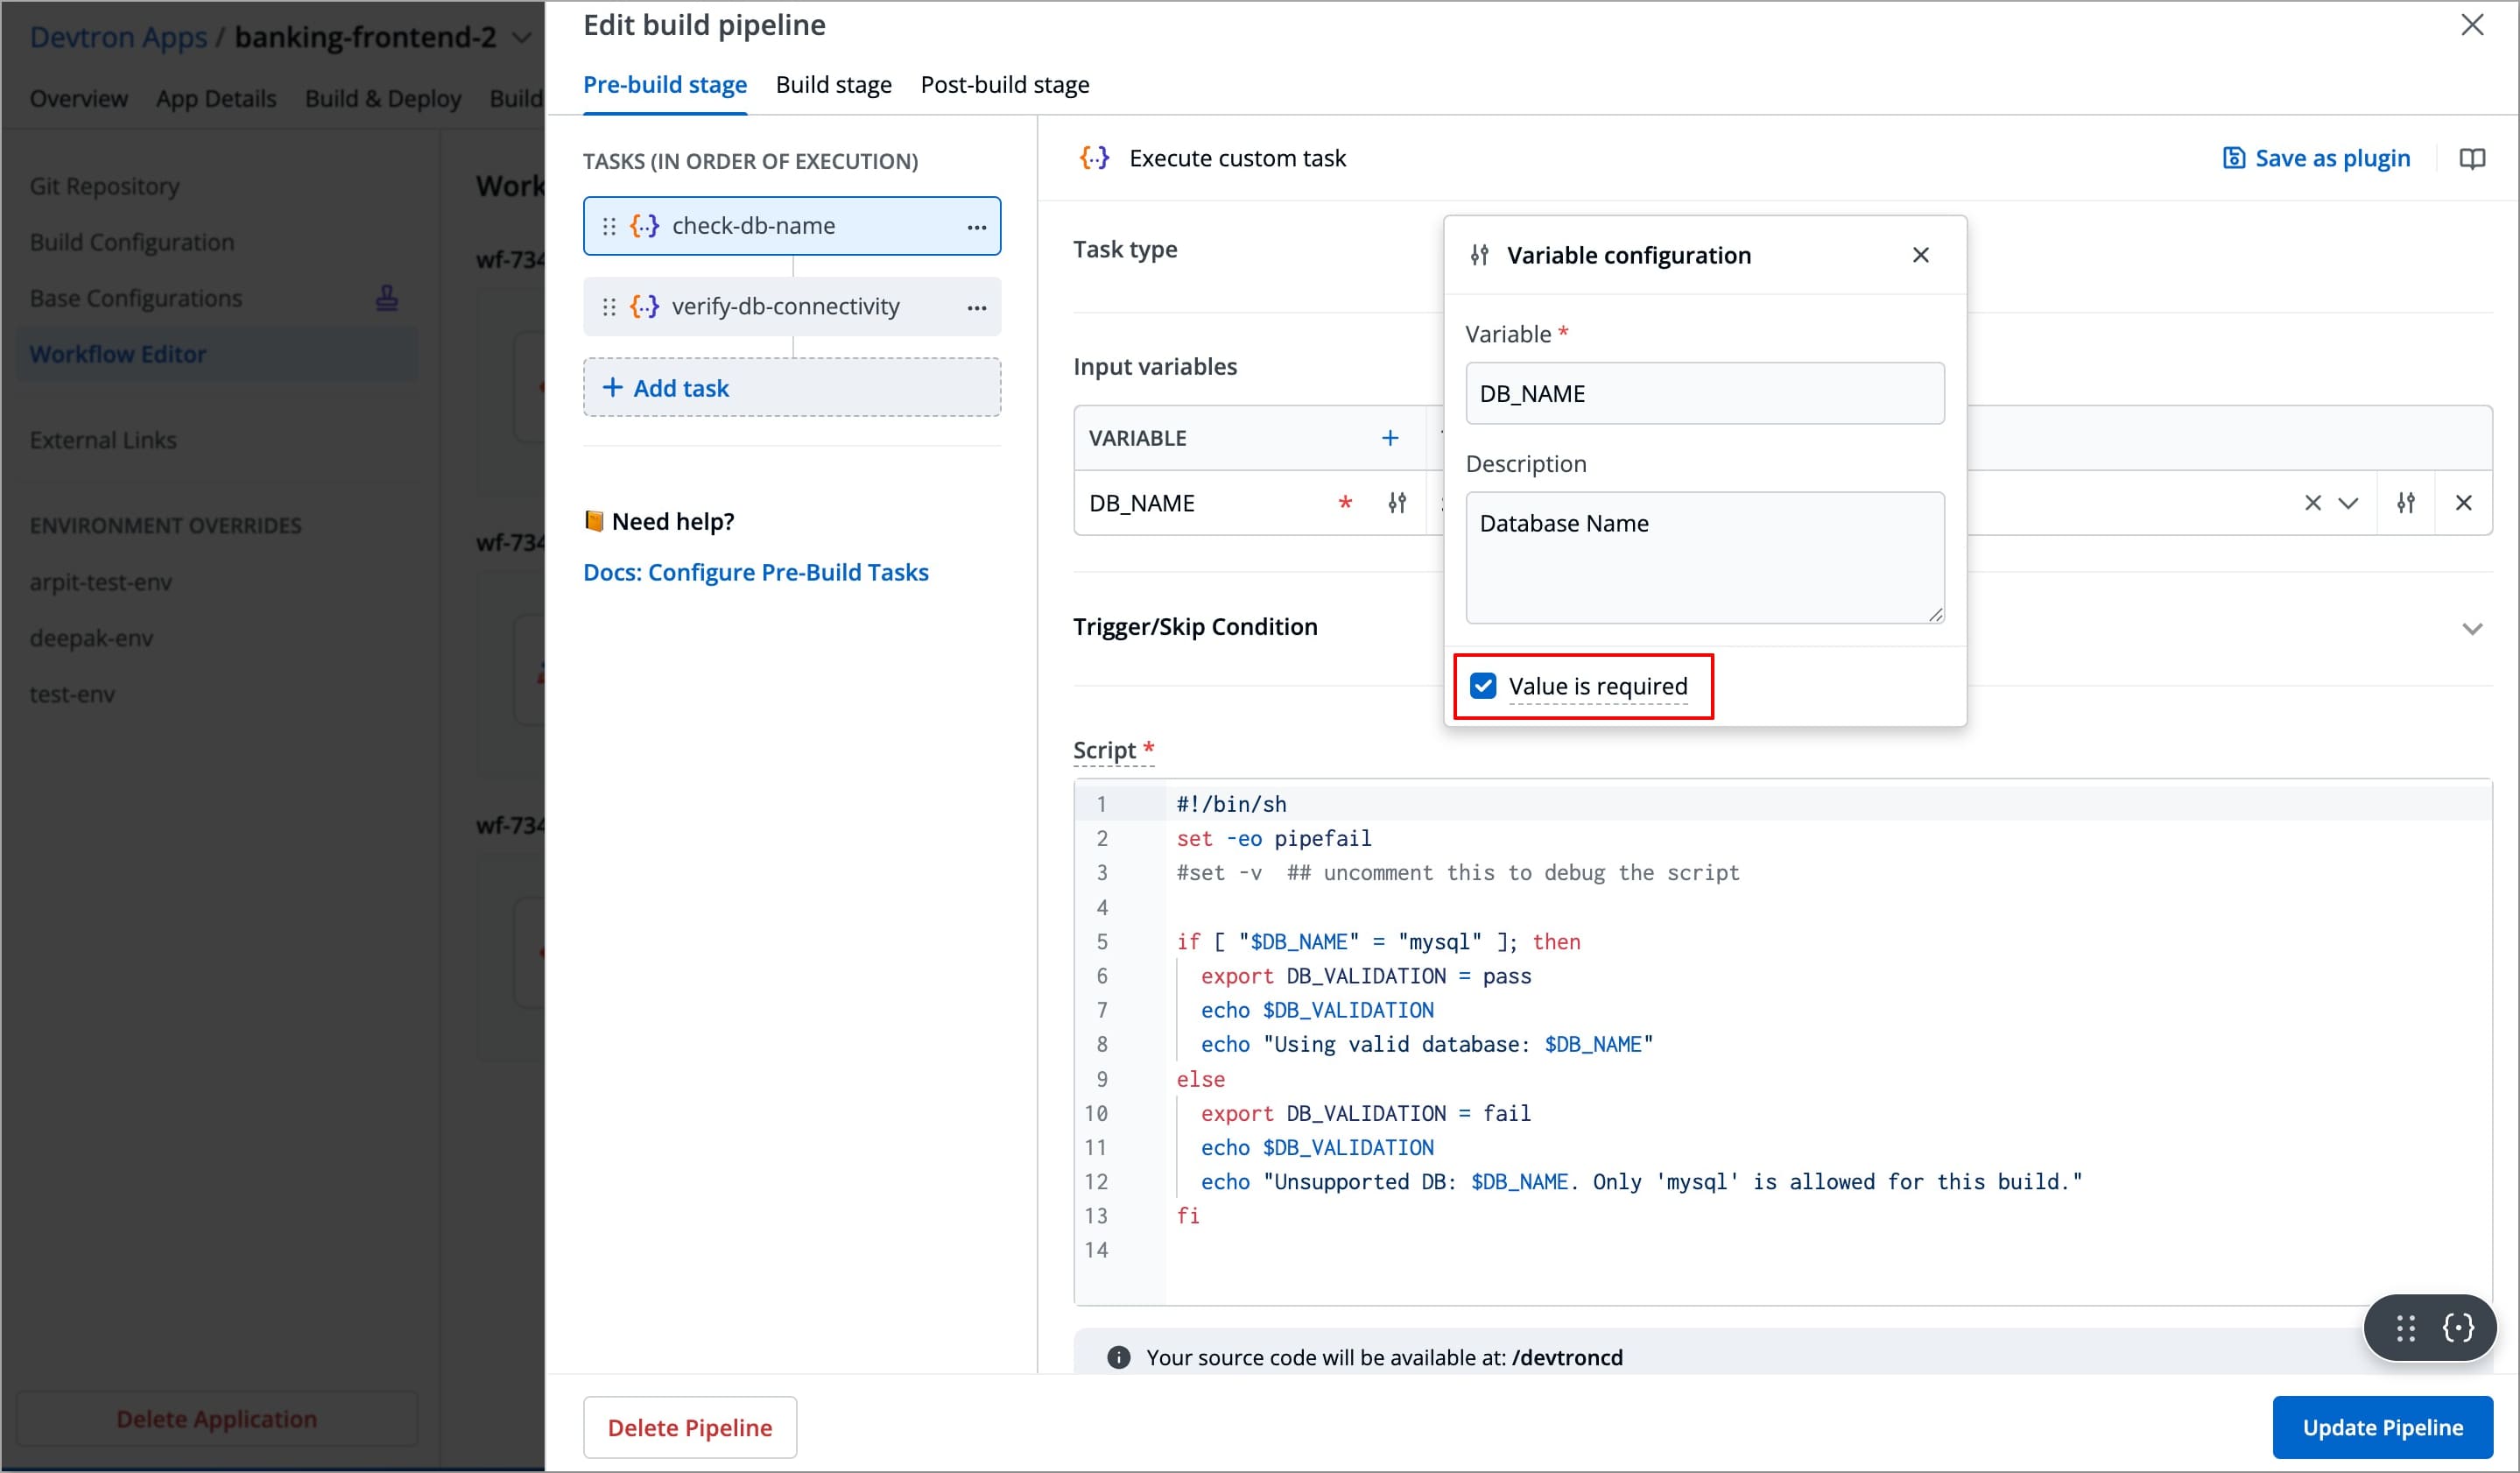
-
You can click the slider icon next to each variable name to make its value required and add a description for it.
-
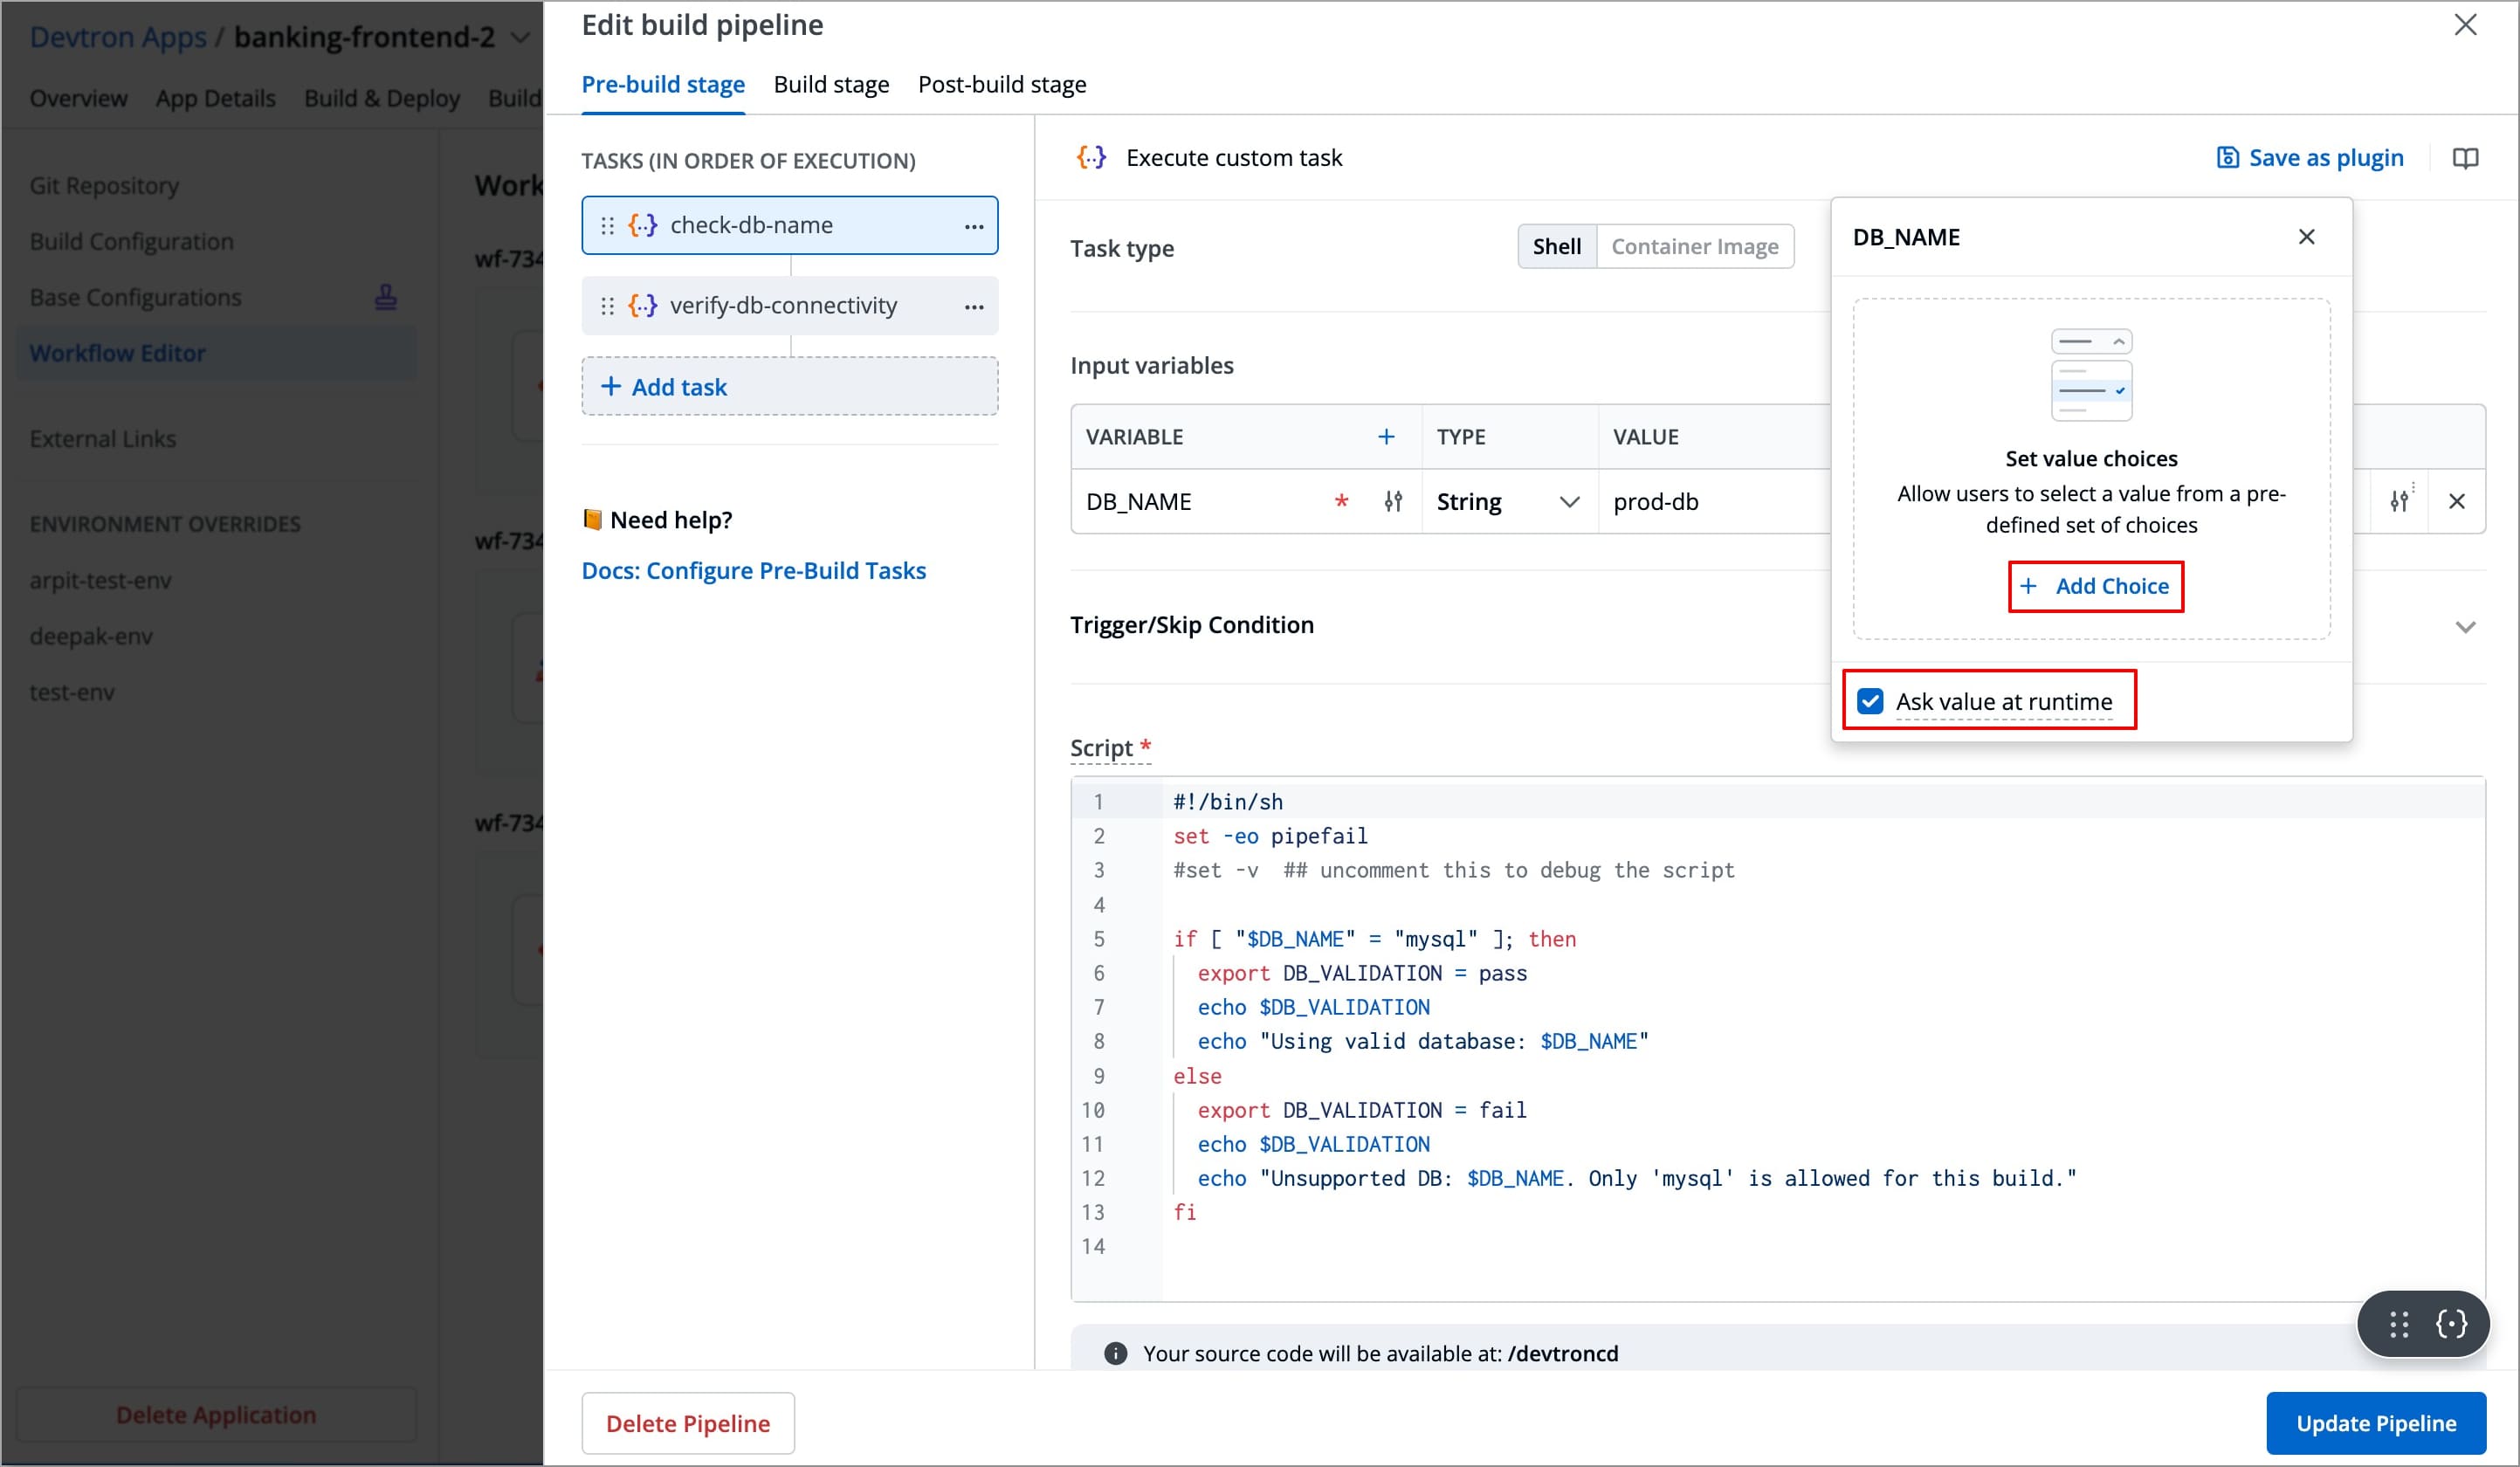
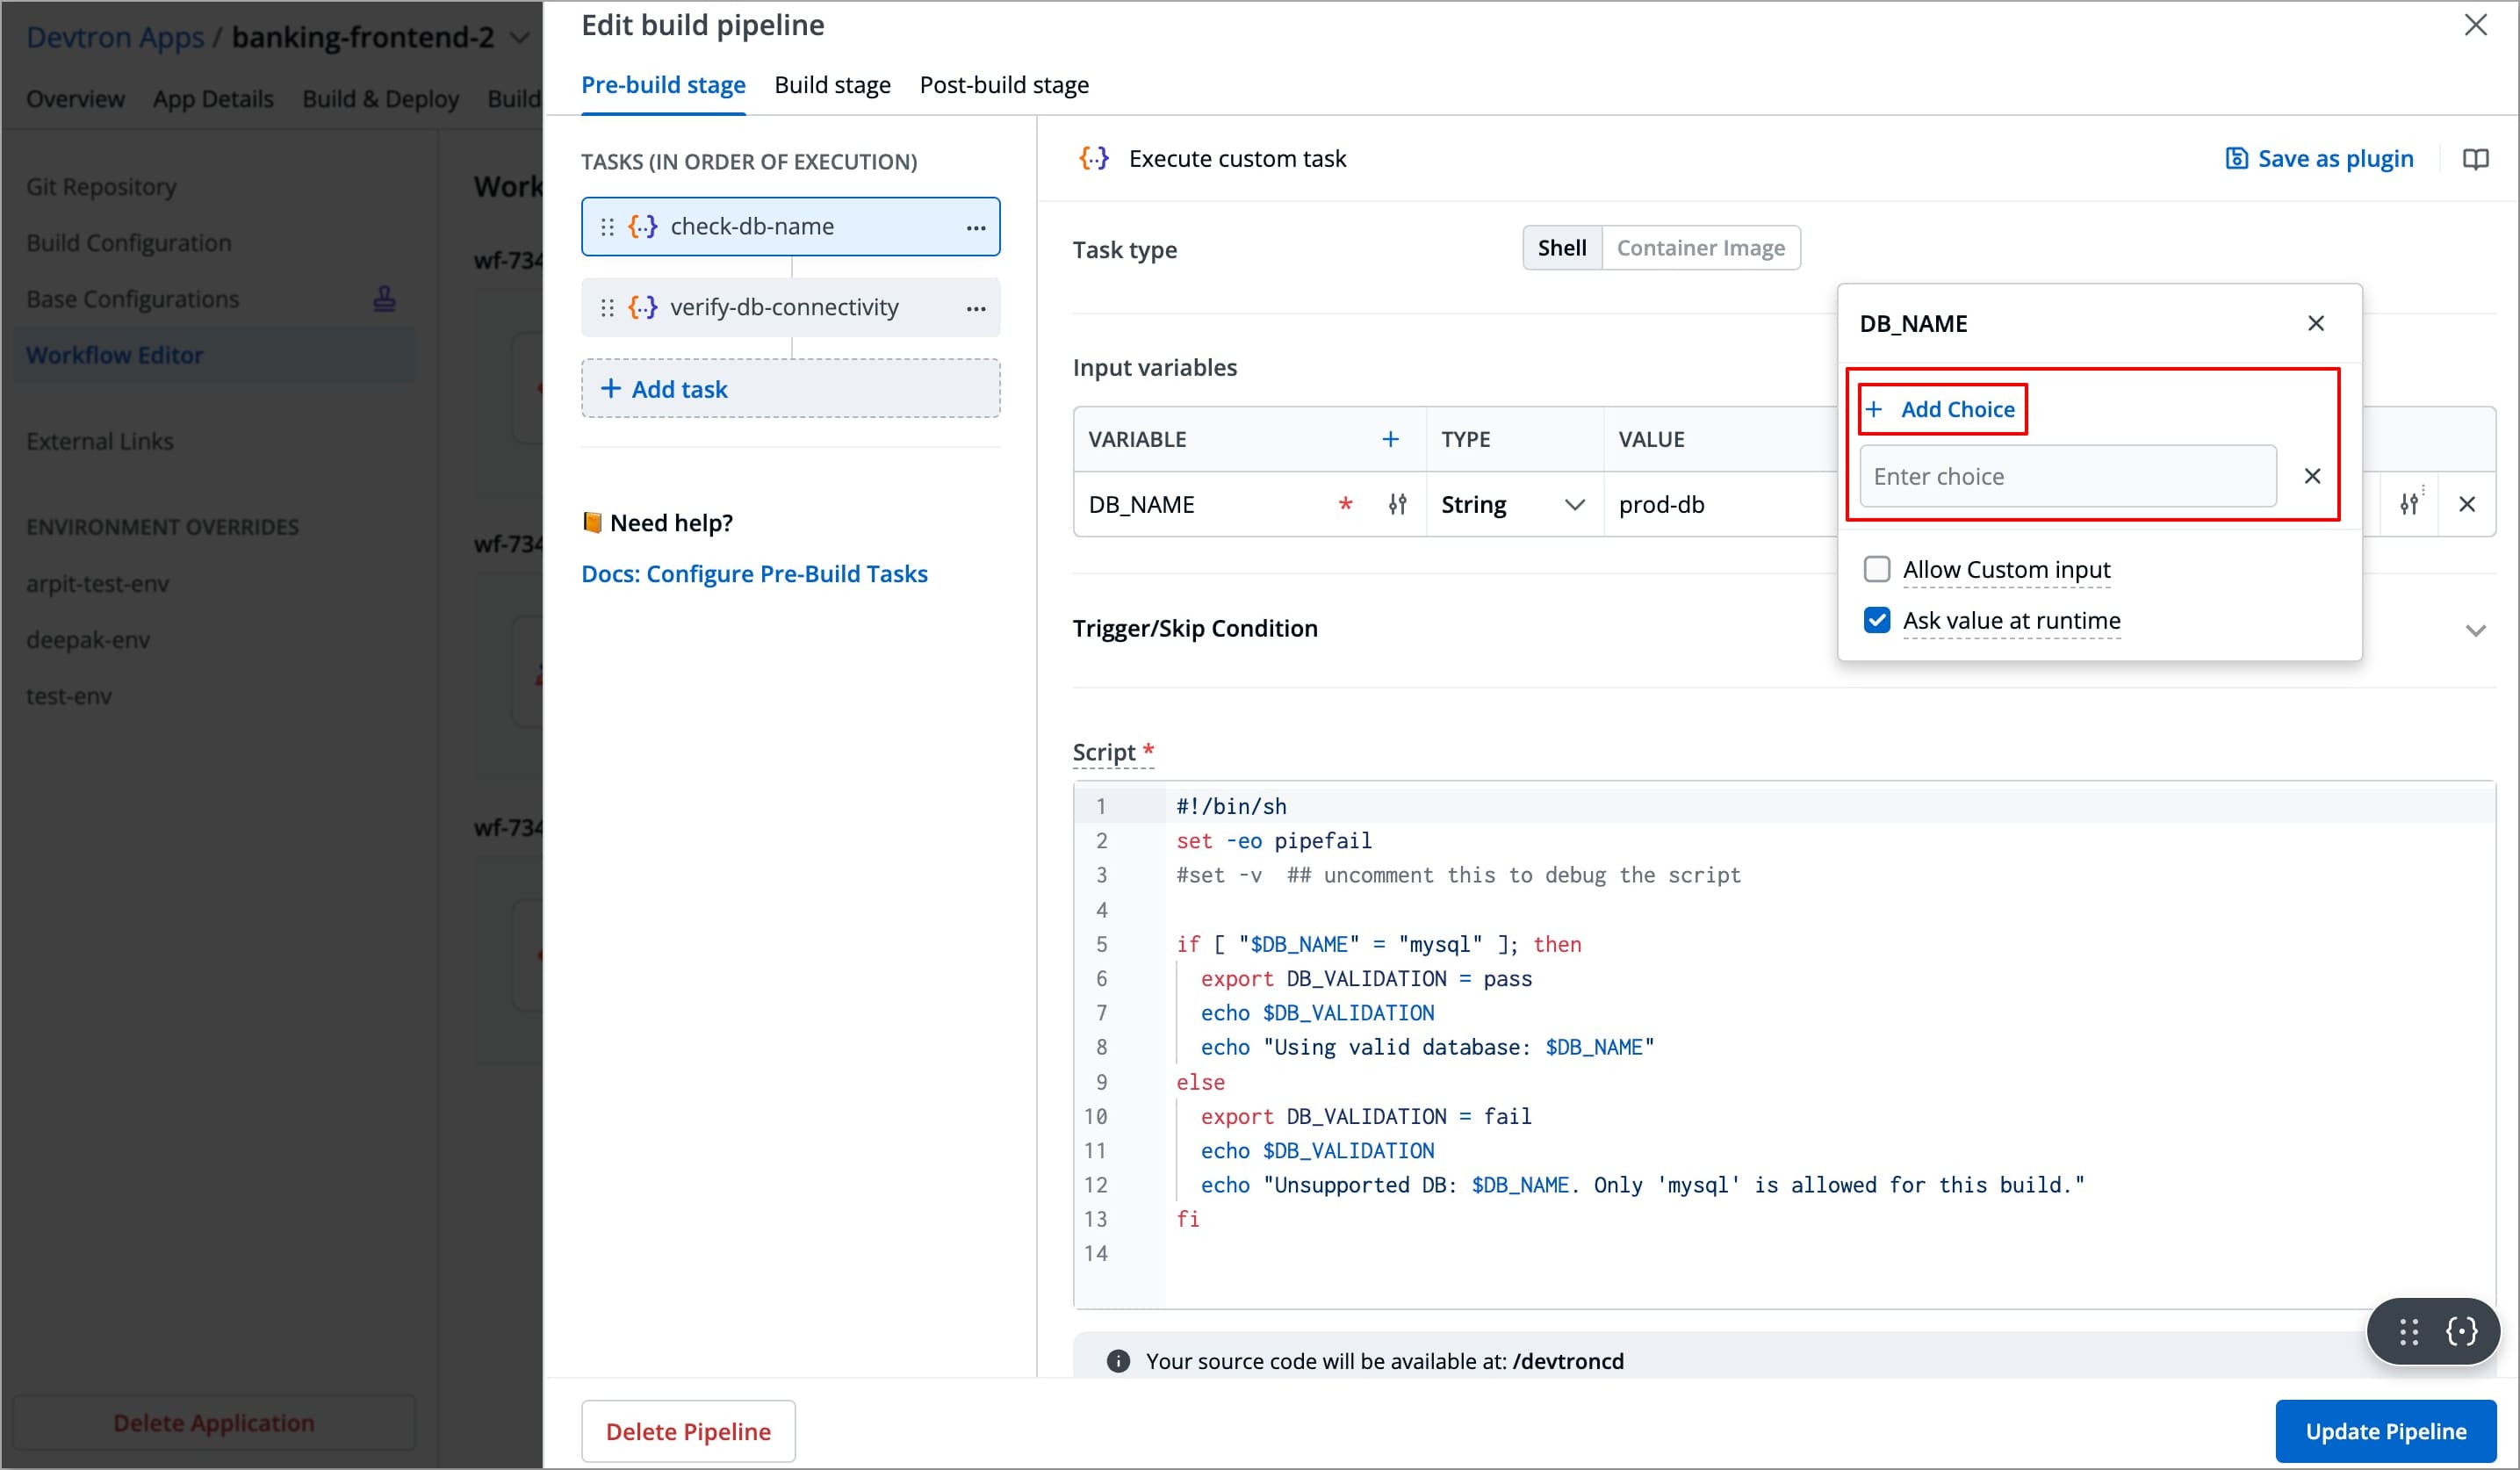
You can click the slider icon next to each variable value to add choices, allow custom input, and ask value at runtime.
Script
#!/bin/sh
set -eo pipefail
#set -v  ## uncomment this to debug the script

if [ "$DB_NAME" = "prod-db" ]; then
  export DB_VALIDATION=pass
  echo $DB_VALIDATION
  echo "Using valid database: $DB_NAME"
else
  export DB_VALIDATION=fail
  echo $DB_VALIDATION
  echo "Unsupported DB: $DB_NAME. Only 'prod-db' is allowed for this build."
fi
Output Variables
| Variable | Type | Description |
|---|---|---|
DB_VALIDATION | String | Indicates whether the DB is valid (pass or fail) |
Pass/Fail Condition
PASS If: DB_VALIDATION == pass
After adding this database validation task, you can add more tasks as well, for example, you can add a follow-up Pre-Build task that runs only if the database is valid.
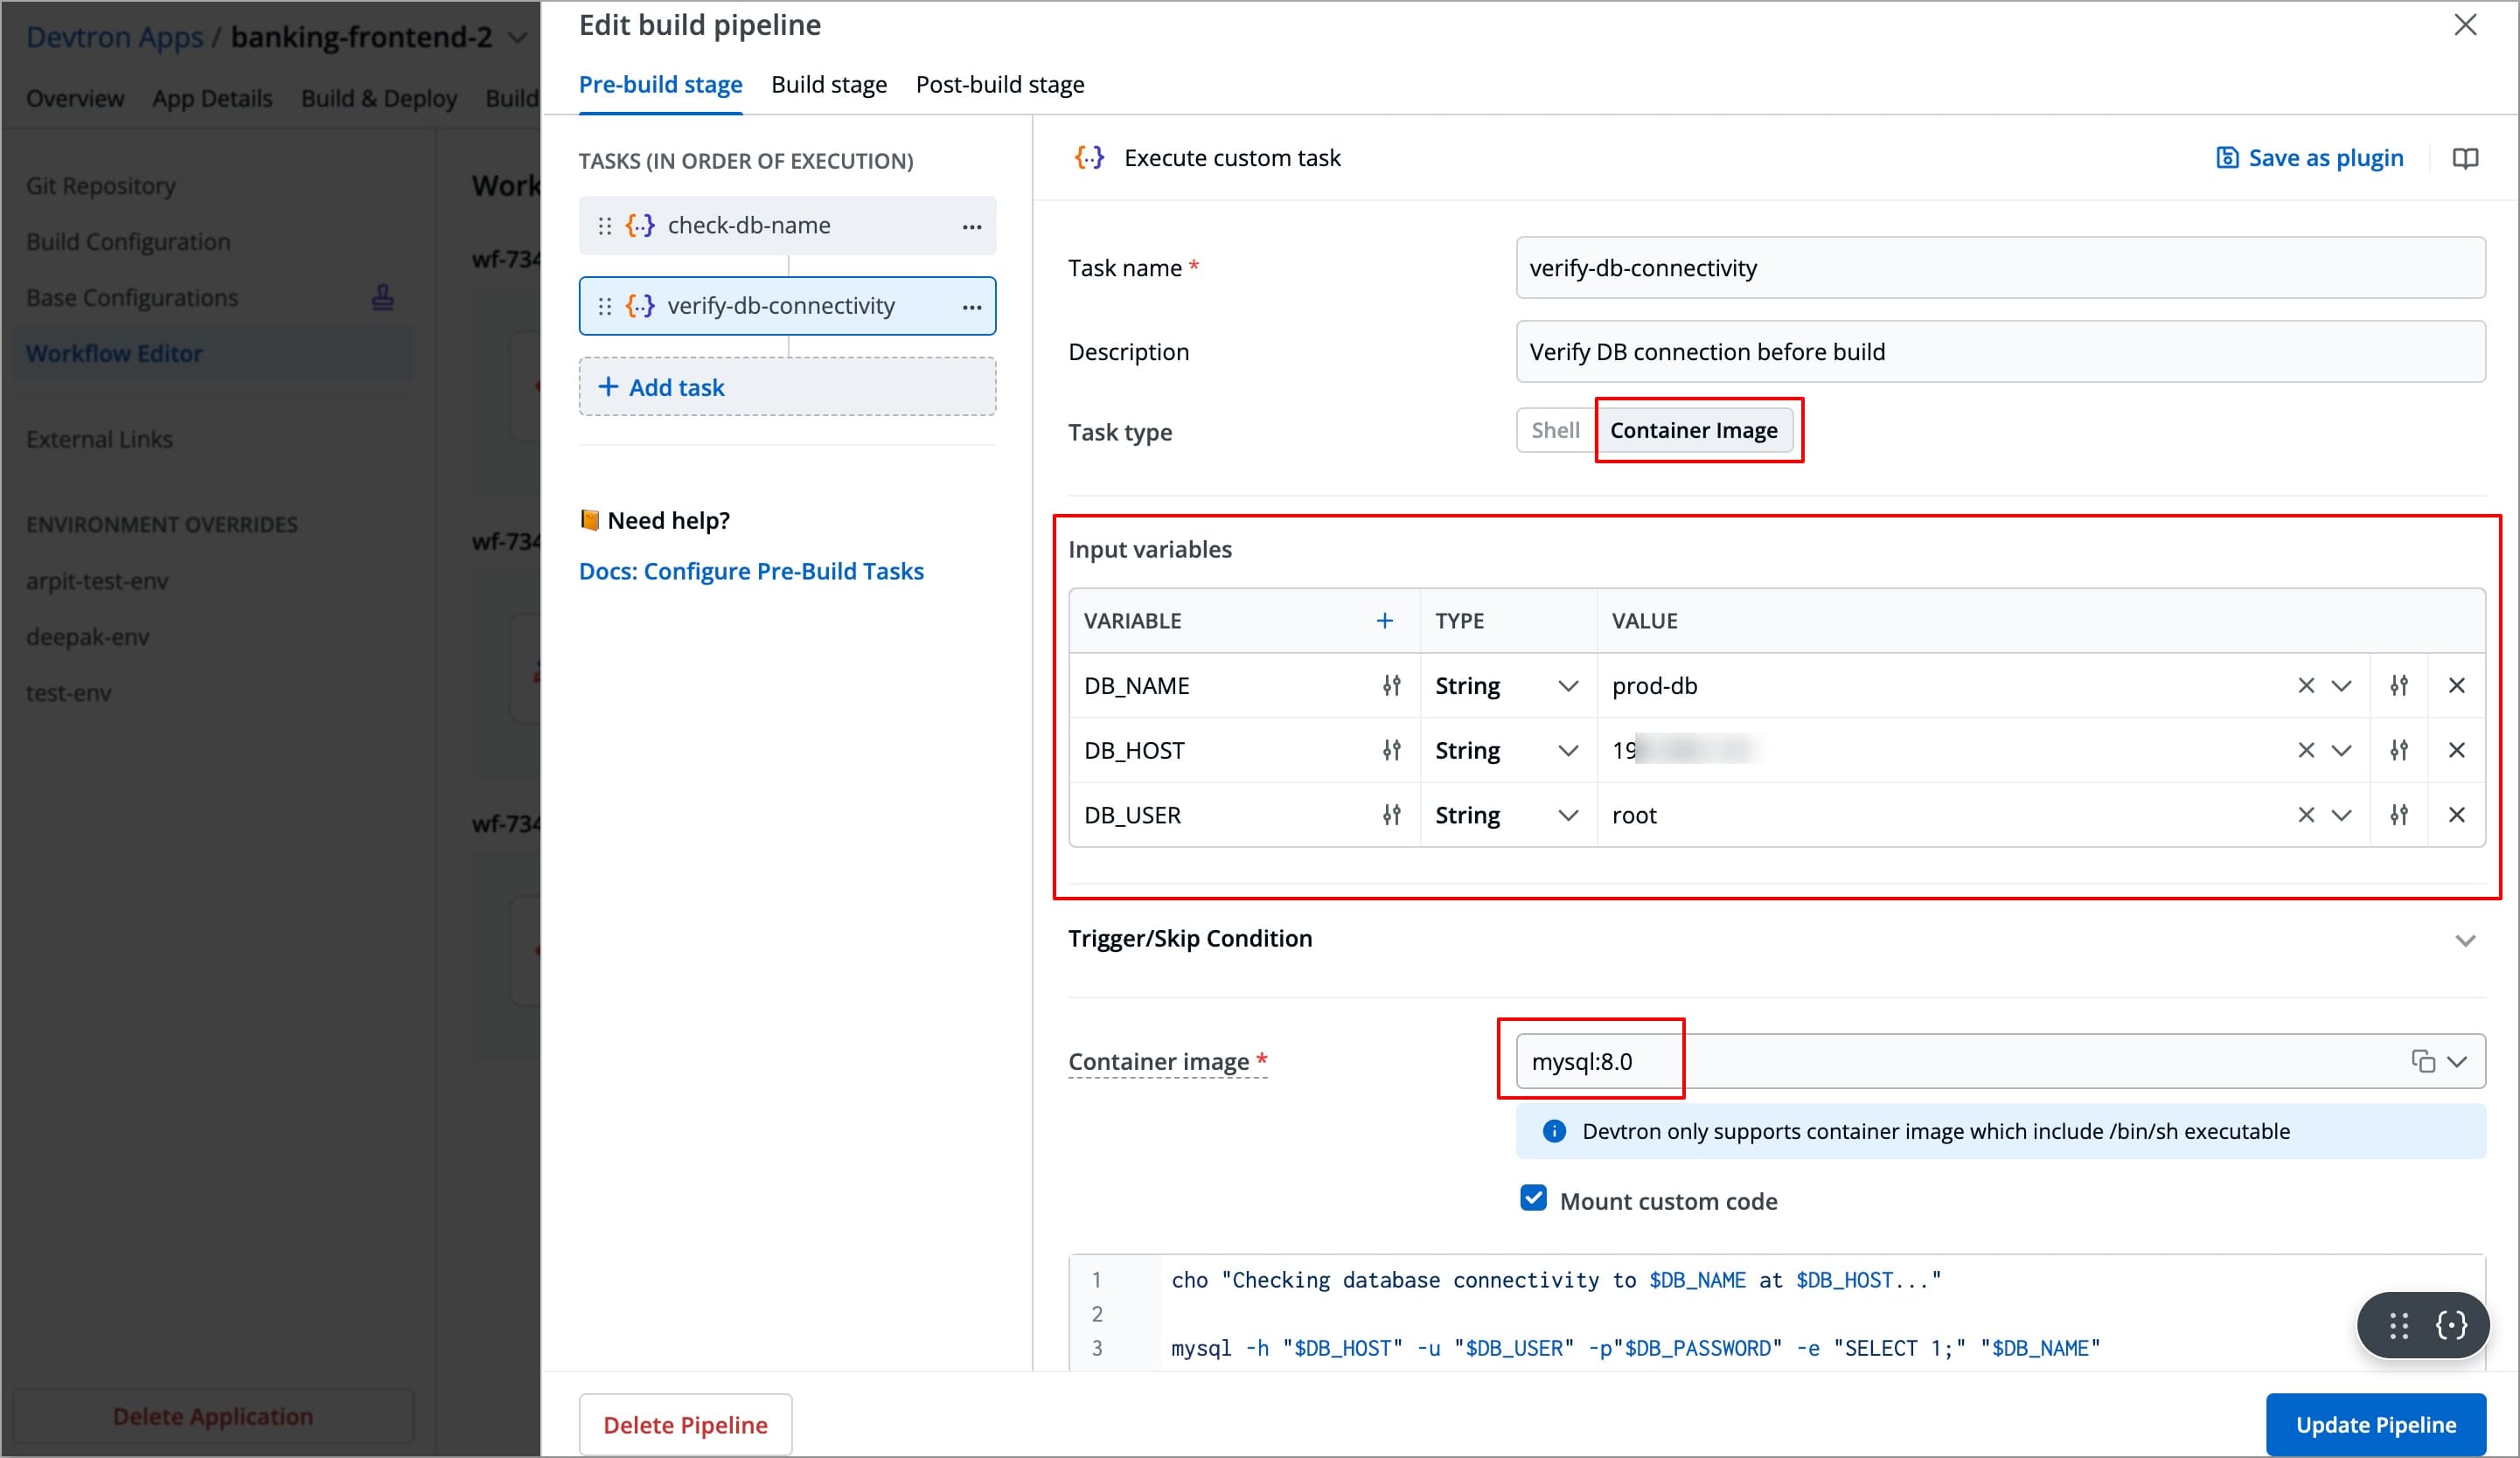
Example 3 - Container Image Task
Let's take an example of a Container Image Task that verify that the configured database is reachable and accepting connections before executing build stage. This ensures that the build does not proceed if the database configuration is incorrect or unreachable, saving time and resources.
Since we have already configured a shell task to validate the database name, we will add this task after the shell task; This means it will execute after the shell task. This container image task will run only if that check passes, to verify that we are connecting to the correct database and that it is reachable before the build starts.
Tasks Configurations
| Field | Values for This Example | Required/Optional | Description |
|---|---|---|---|
Task name | verify-db-connectivity | Required | Enter a name for the task |
Description | Verify DB connection before build | Optional | A descriptive message for the task |
Task type | Container Image | Optional | Allows you to execute commands and scripts inside a custom Docker container |
Input variables | Refer the Input Variable table below | Optional | These variables provide dynamic values to the script and are defined directly in the UI.
|
Trigger/Skip condition | DB_VALIDATION == pass | Optional | Execute or skip the task based on the condition provided. |
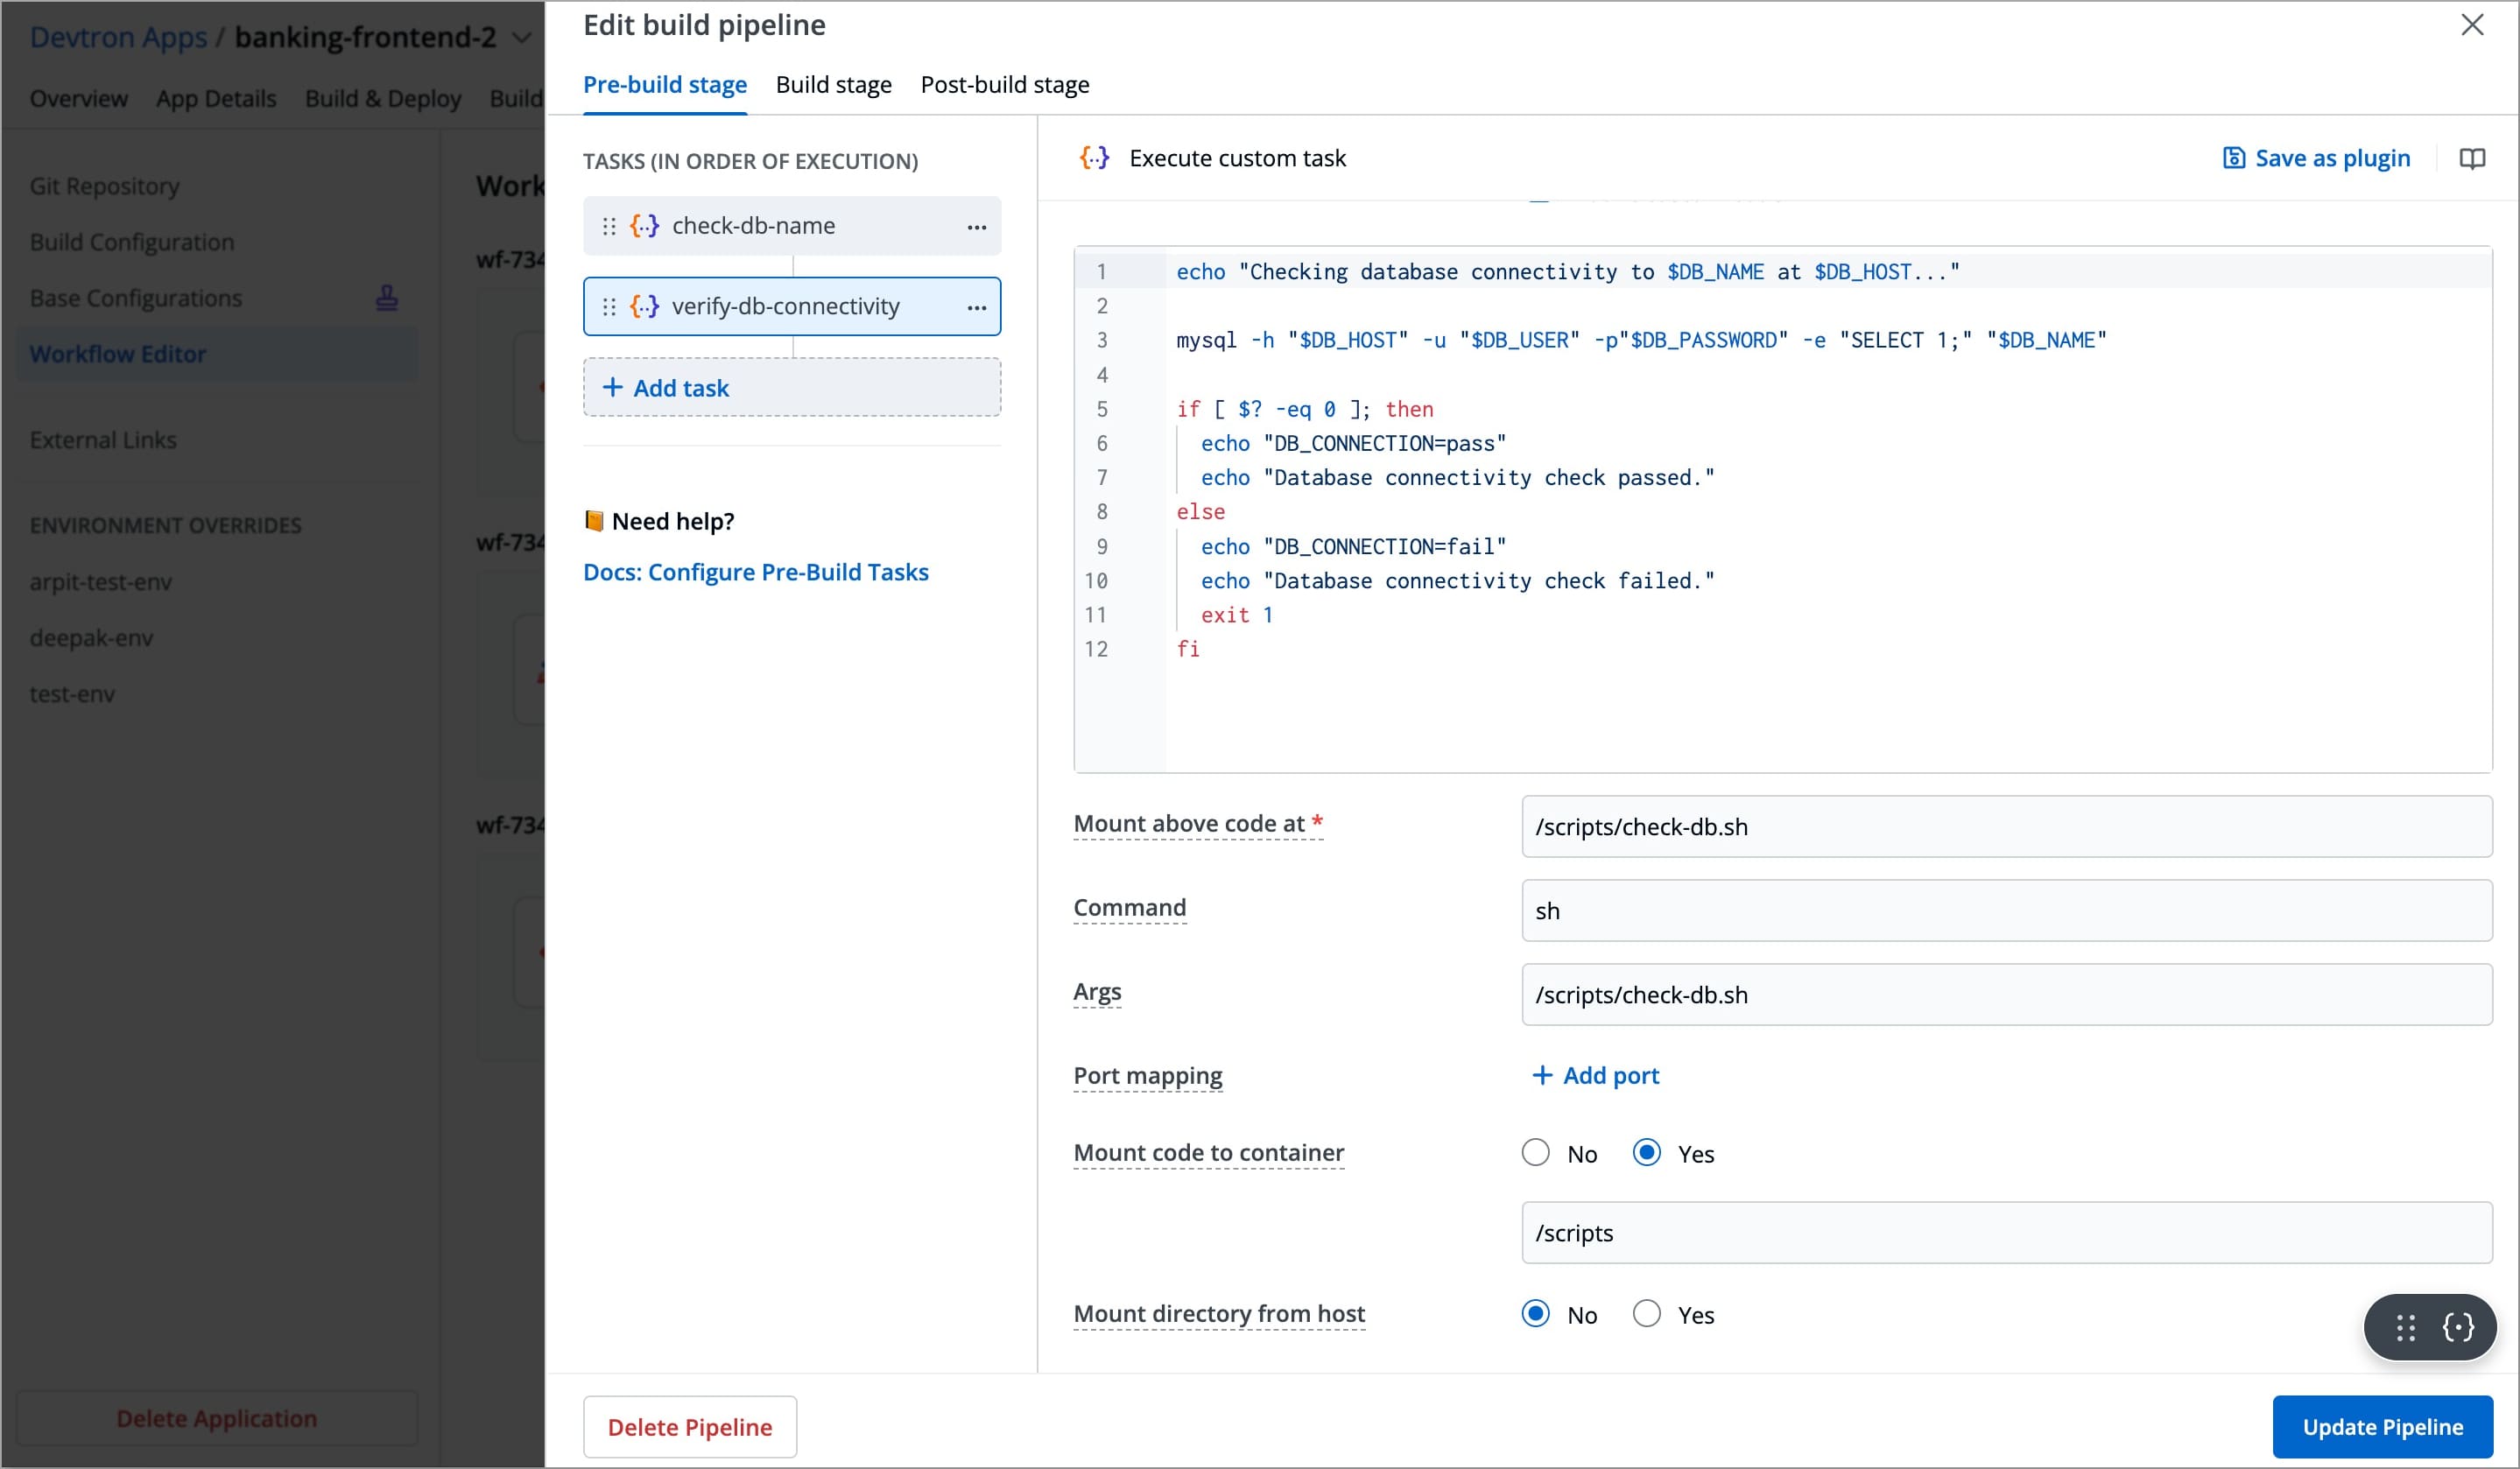
Container image | mysql:8.0 | Required | Select an image from the drop-down list or enter a custom value in the format <image>:<tag> |
Mount custom code | Refer below Mount custom code section | Optional | Enable to mount the custom code in the container. Enter the script in the box below.
|
Command | sh | Optional | Mention commands to execute inside the container |
Args | /scripts/check-db.sh | Optional | The arguments to be passed to the command mentioned in the command field |
Port mapping | No | Optional | The port number on which the container listens. The port number exposes the container to outside services. |
Mount code to container | yes | Optional | Mounts the source code (configured git repository) inside the container. The default is "No". If set to "Yes", enter the path where the source should be mounted inside the container. |
Mount directory from host | No | Optional | Mount any directory from the host into the container. This can be used to mount code or even output directories. |
Output directory path | No | Optional | Directory path where output files such as logs, errors, etc. will be available after the execution. |
Input Variable Table
| Variable | Type | Value | Description |
|---|---|---|---|
DB_NAME | String | prod-db | Name of the database |
DB_HOST | String | 192.168.1.10 | Database hostname or IP address |
DB_USER | String | root | Database user |
-
To add an input variable, click + Add Variable next to the
Input Variable, a new table appears asking you to enter the variable and its required information. -
You can click
+icon next to Variable header field to add more rows to the input variable table. -
You can click the slider icon next to each variable name to make its value required and add a description for it.
-
You can click the slider icon next to each variable value to add choices, allow custom input, and ask value at runtime.
Mount Custom Code
#!/bin/sh
set -e

echo "Checking database connectivity to $DB_NAME at $DB_HOST..."

mysql -h "$DB_HOST" -u "$DB_USER" -p"$DB_PASSWORD" -e "SELECT 1;" "$DB_NAME"

if [ $? -eq 0 ]; then
  echo "DB_CONNECTION=pass"
  echo "Database connectivity check passed."
else
  echo "DB_CONNECTION=fail"
  echo "Database connectivity check failed."
  exit 1
fi
Note: The examples above demonstrate configuring tasks in the Pre-Build and Post-Build stages; you can add tasks in the Pre-Deployment, and Post-Deployment stages in exactly the same way.
Additional configurations for Pre/Post-Deployment Tasks
Pre/Post-Deployment Tasks have some additional configurations (required and optional) which are not available in Pre/Post build tasks. These configurations are explained below
Trigger Pre/Post-Deployment Stage
The execution of the Pre/Post-Deployment stages can be set to:
Automatically (default):
- Pre-deployment stage will trigger automatically when the build image is available.
- Post-deployment stage will trigger automatically after the successful deployment.
Manually: The User needs to trigger the Pre/Post-Deployment stages manually.

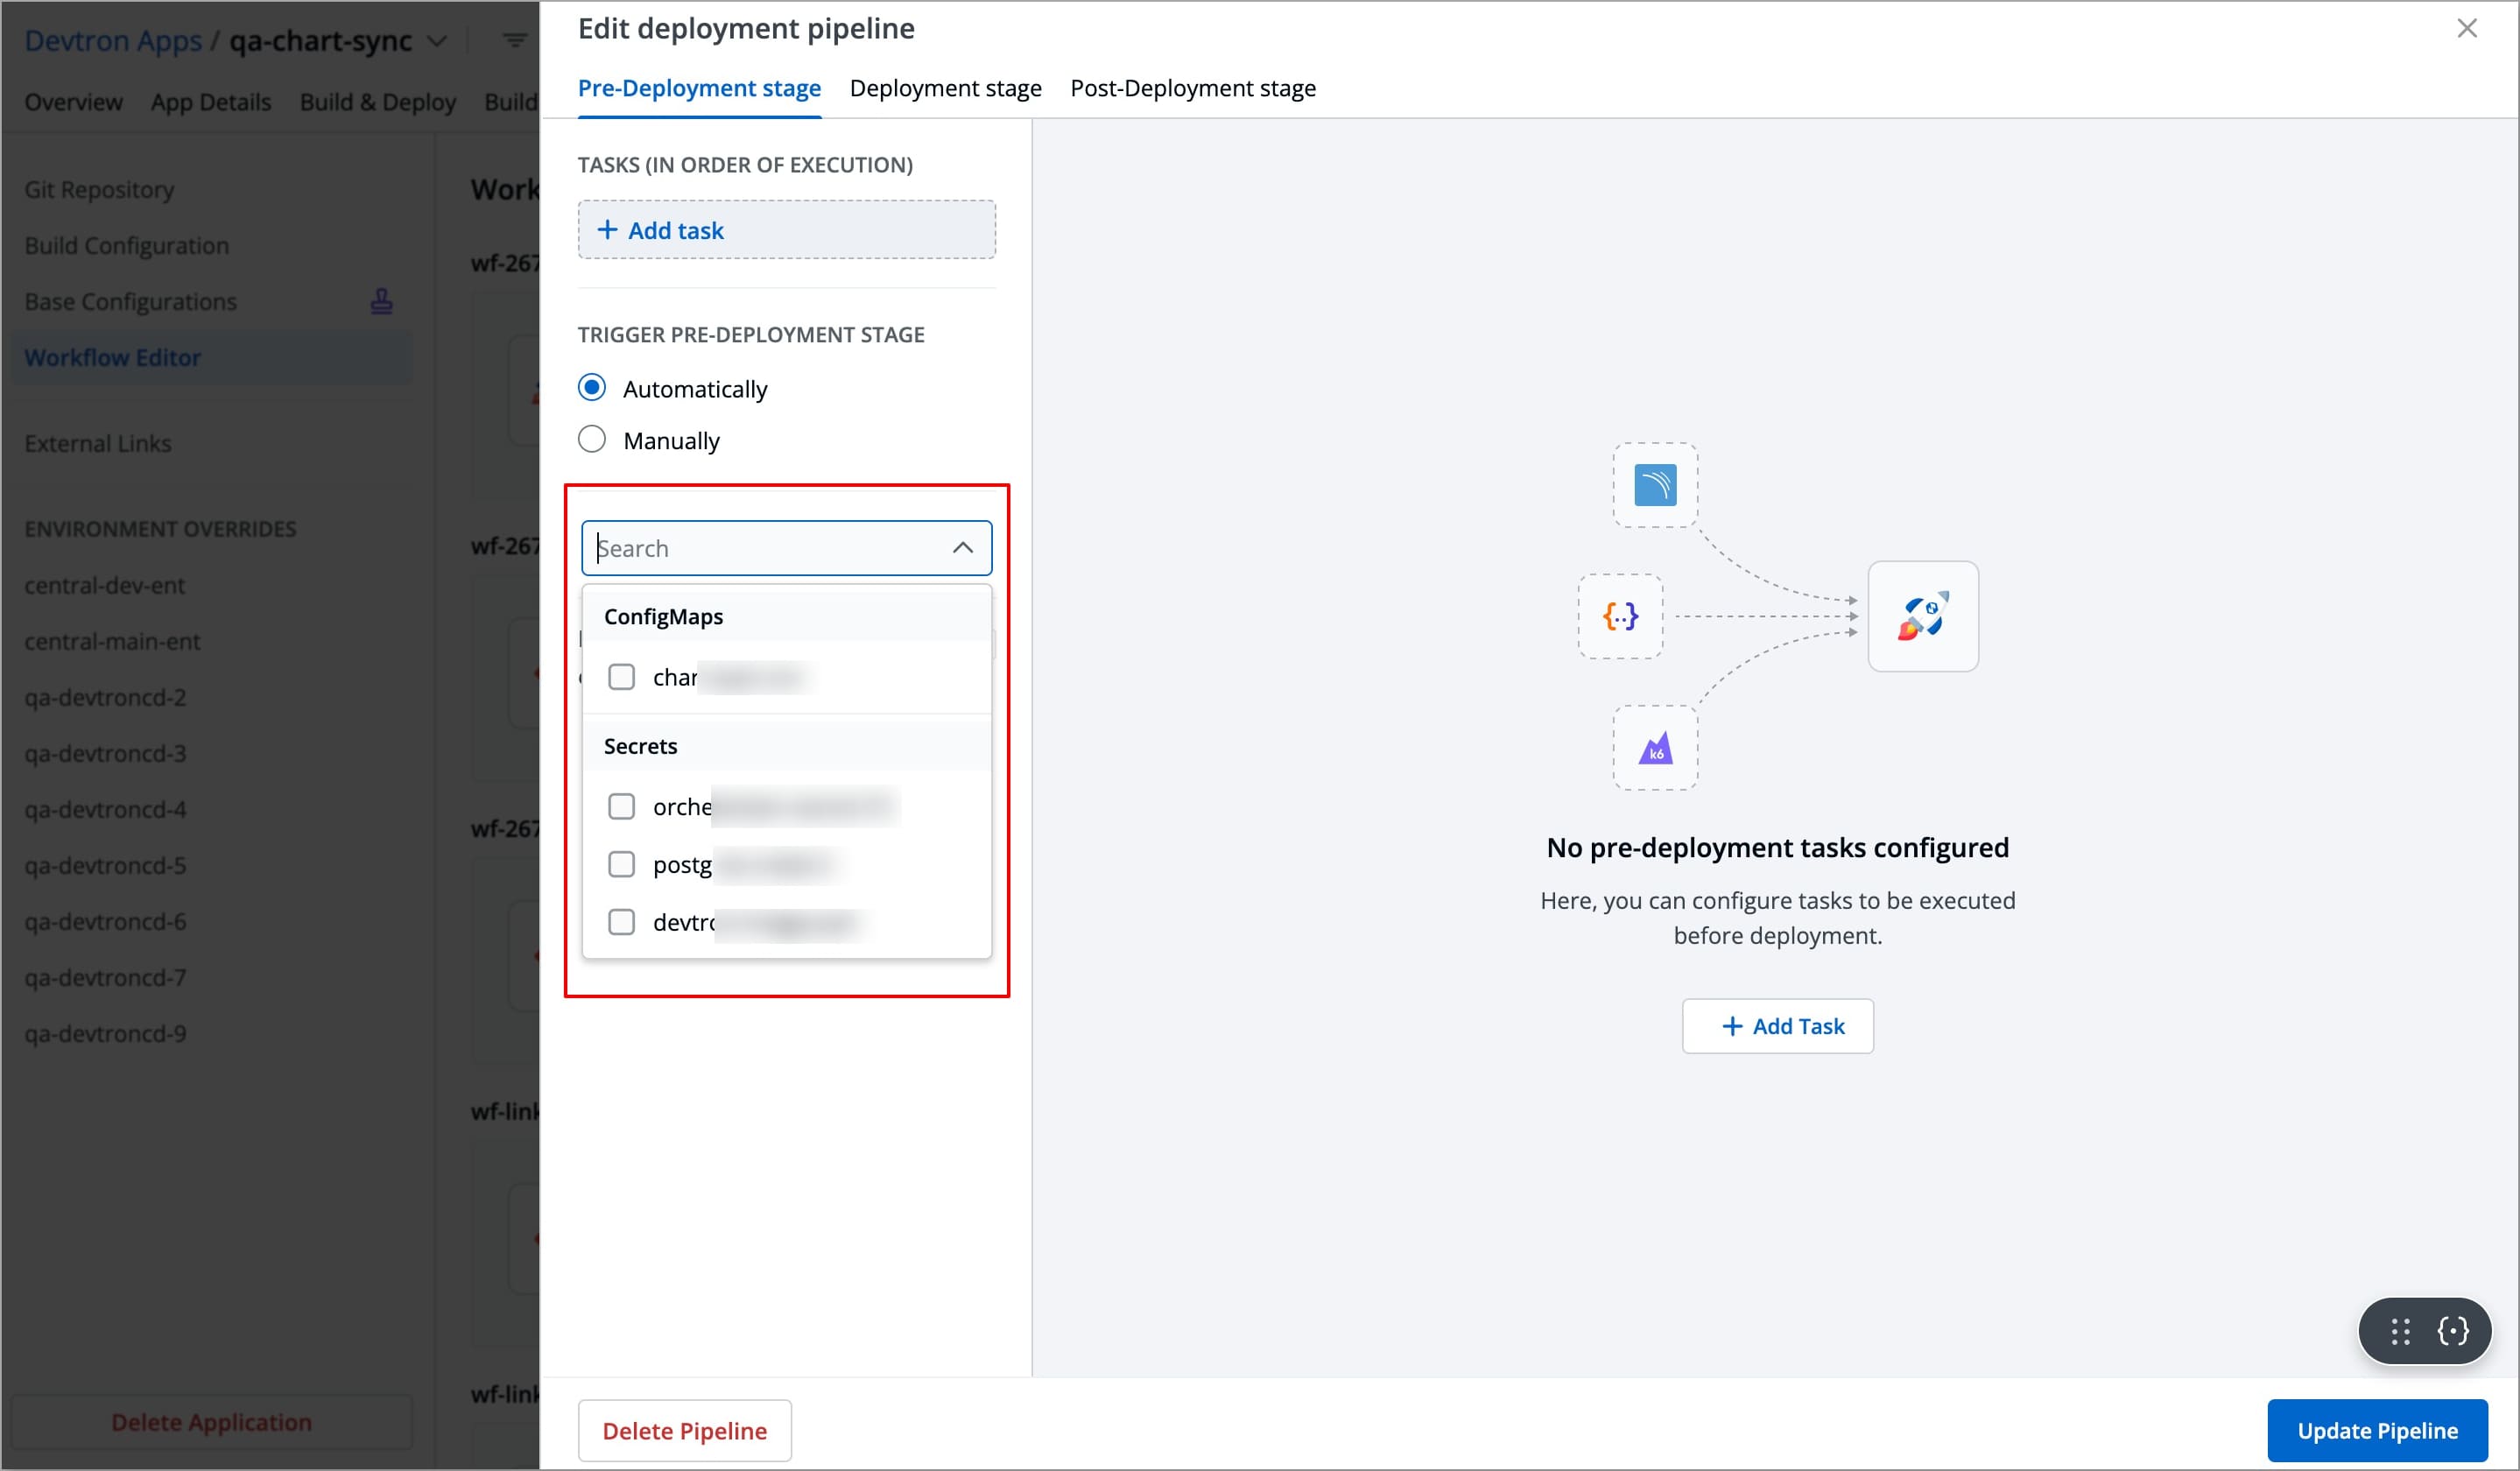
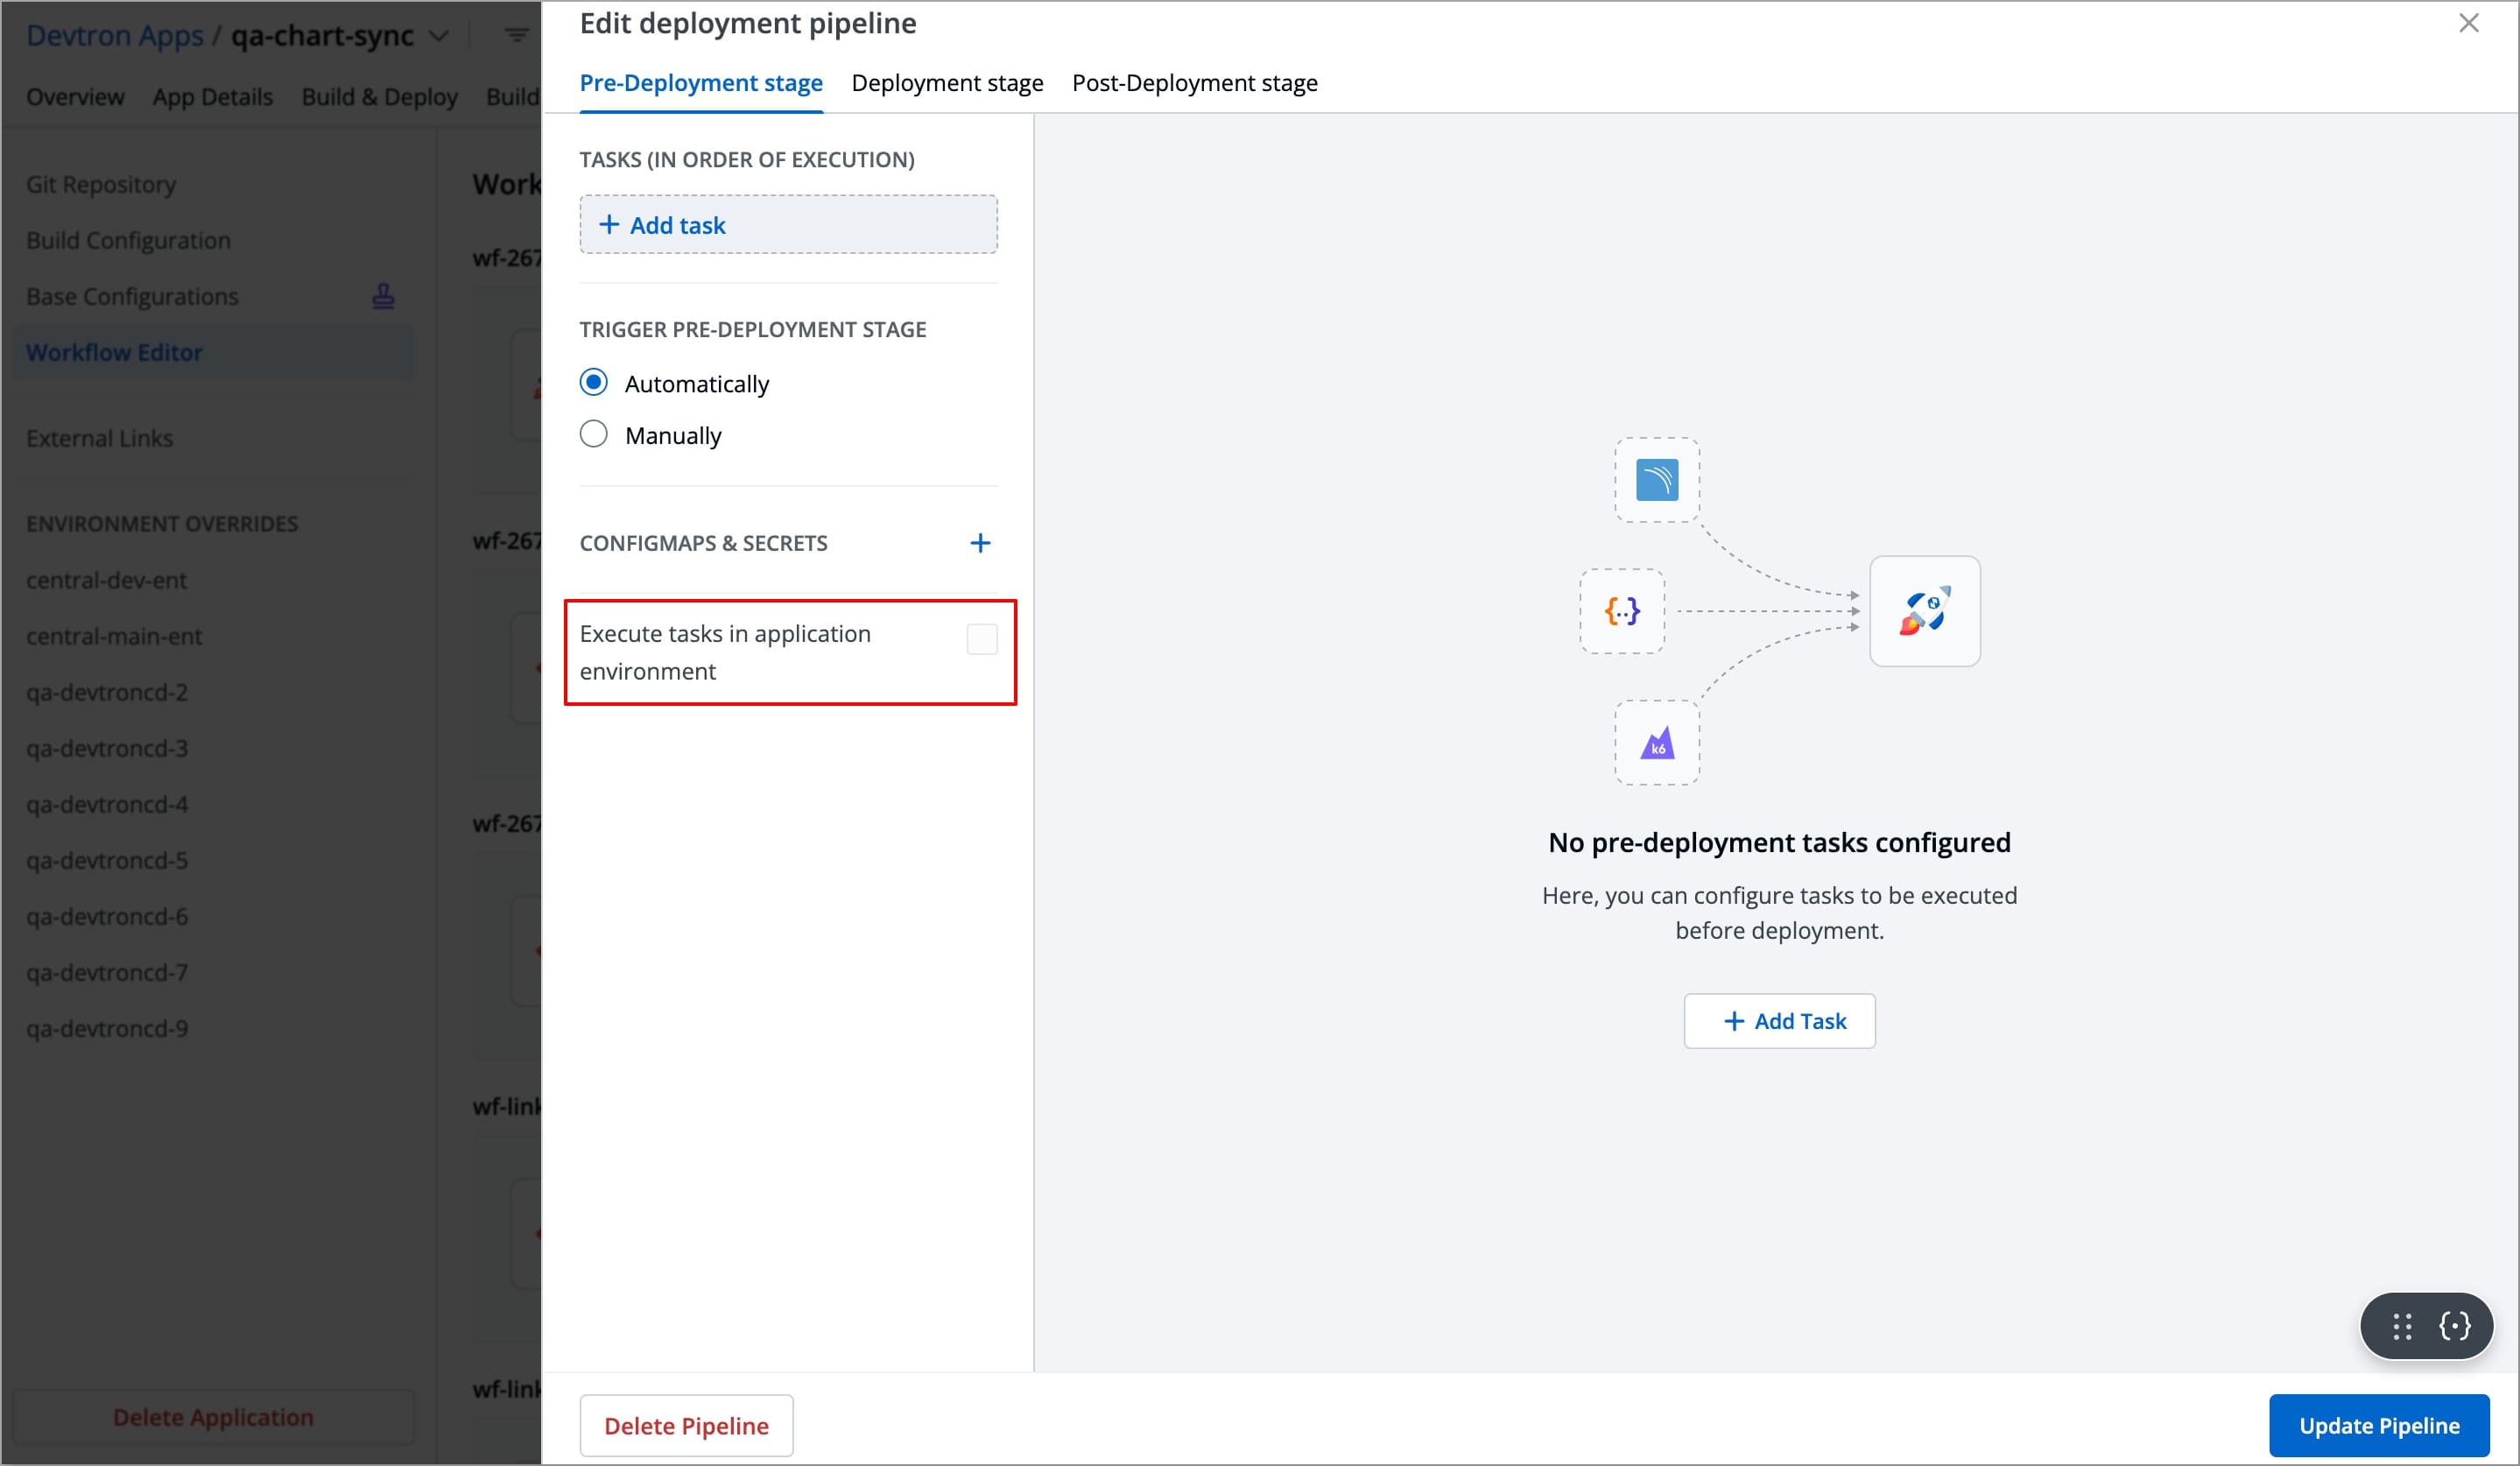
ConfigMaps & Secrets
Make sure you have added ConfigMaps and Secrets in App Configuration.
If you want to use some configuration files and secrets in pre-deployment stages or post-deployment stages, then you can use the ConfigMaps & Secrets options. You will get them as a drop-down in the pre-deployment stage.
Execute tasks in an application environment
These Pre-deployment CD / Post-deployment CD pods can be created in your deployment cluster or the Devtron build cluster. If your scripts/tasks has some dependency on the deployment environment, you may run these pods in the deployment cluster. Thus, your scripts (if any) can interact with the cluster services that may not be publicly exposed.
Some tasks require extra permissions for the node where Devtron is installed. However, if the node already has the necessary permissions for deploying applications, there is no need to assign them again. Instead, you can enable the Execute tasks in application environment option for the pre-CD or post-CD steps. By default, this option is disabled.
To enable the Execute tasks in application environment option, follow these steps:
-
Go to the Chart Store and search for the
devtron-in-clustercdchart.
-
Configure the chart according to your requirements and deploy it in the target cluster.
-
After the deployment, edit the devtron-cm configmap and add the following key-value pair:
ORCH_HOST: <host_url>/orchestrator/webhook/msg/nats

Example:

ORCH_HOST: http://xyz.devtron.com/orchestrator/webhook/msg/natsORCH_HOSTvalue should be the same as ofCD_EXTERNAL_LISTENER_URLvalue, which is passed in values.yaml.
-
Delete the Devtron pod using the following command:
kubectl delete pod -l app=devtron -n devtroncd -
Again, navigate to the chart store and search for the "migration-incluster-cd" chart.

-
Edit the
cluster-nameandsecret namevalues within the chart. Thecluster namerefers to the name used when adding the cluster in the global configuration and for which you are going to enableExecute tasks in application environmentoption.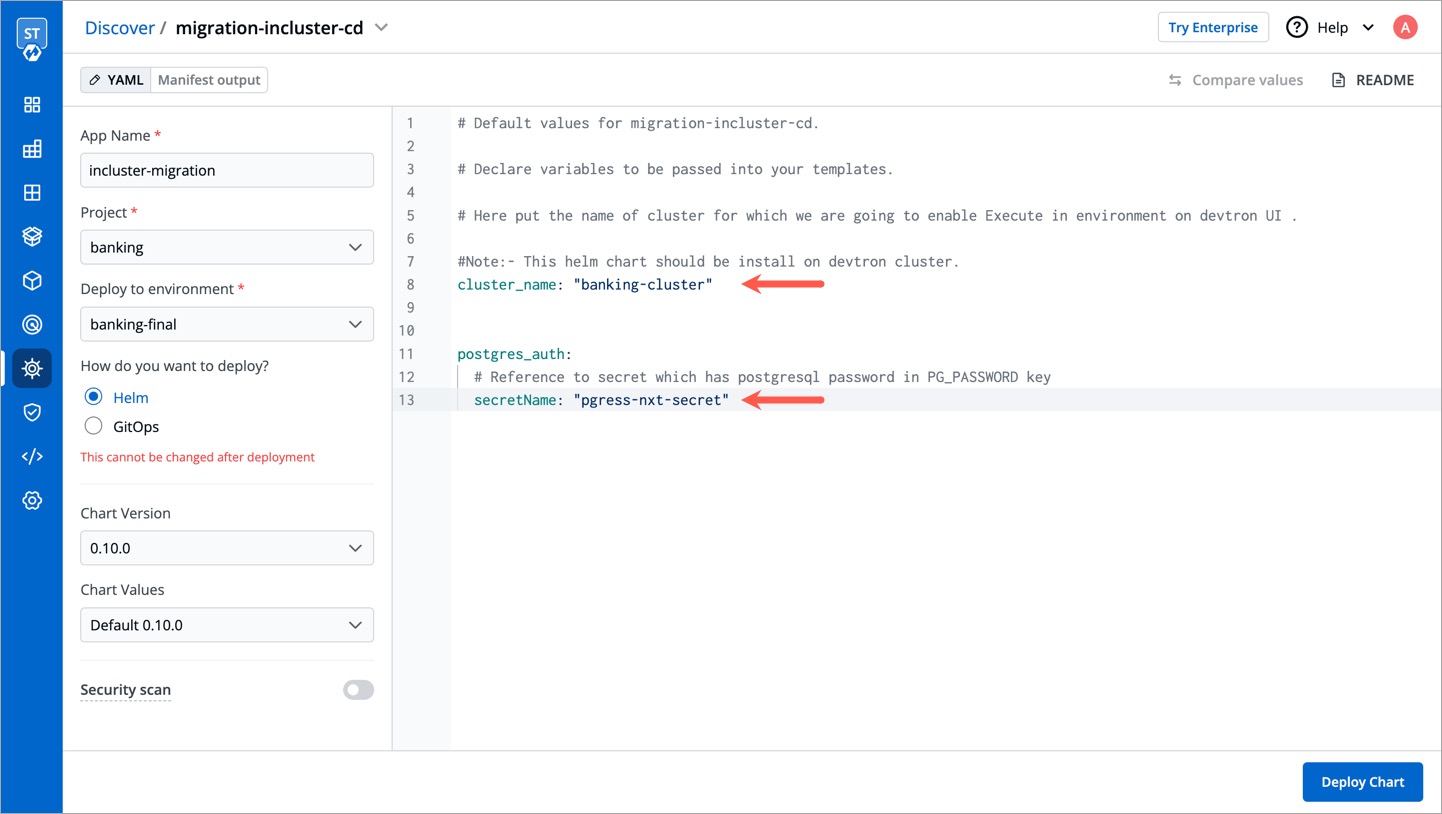
-
Deploy the chart in any environment within the Devtron cluster. Now you should be able to enable the
Execute tasks in application environmentoption for an environment of target cluster.
What's next
-
Trigger the CI pipeline
-
Trigger the CD pipeline