

Compare & Sync Clusters
Introduction 
The Compare & Sync feature in Devtron allows you to:
Compare two different clusters
Create missing Kubernetes resources (e.g., pods, ConfigMaps, Secrets, etc.)
Match the manifests (if required)
Refer to Use Cases to know more on how this feature can help you.
Who Can Perform This Action?
Only a Super-Admin can compare and sync clusters.
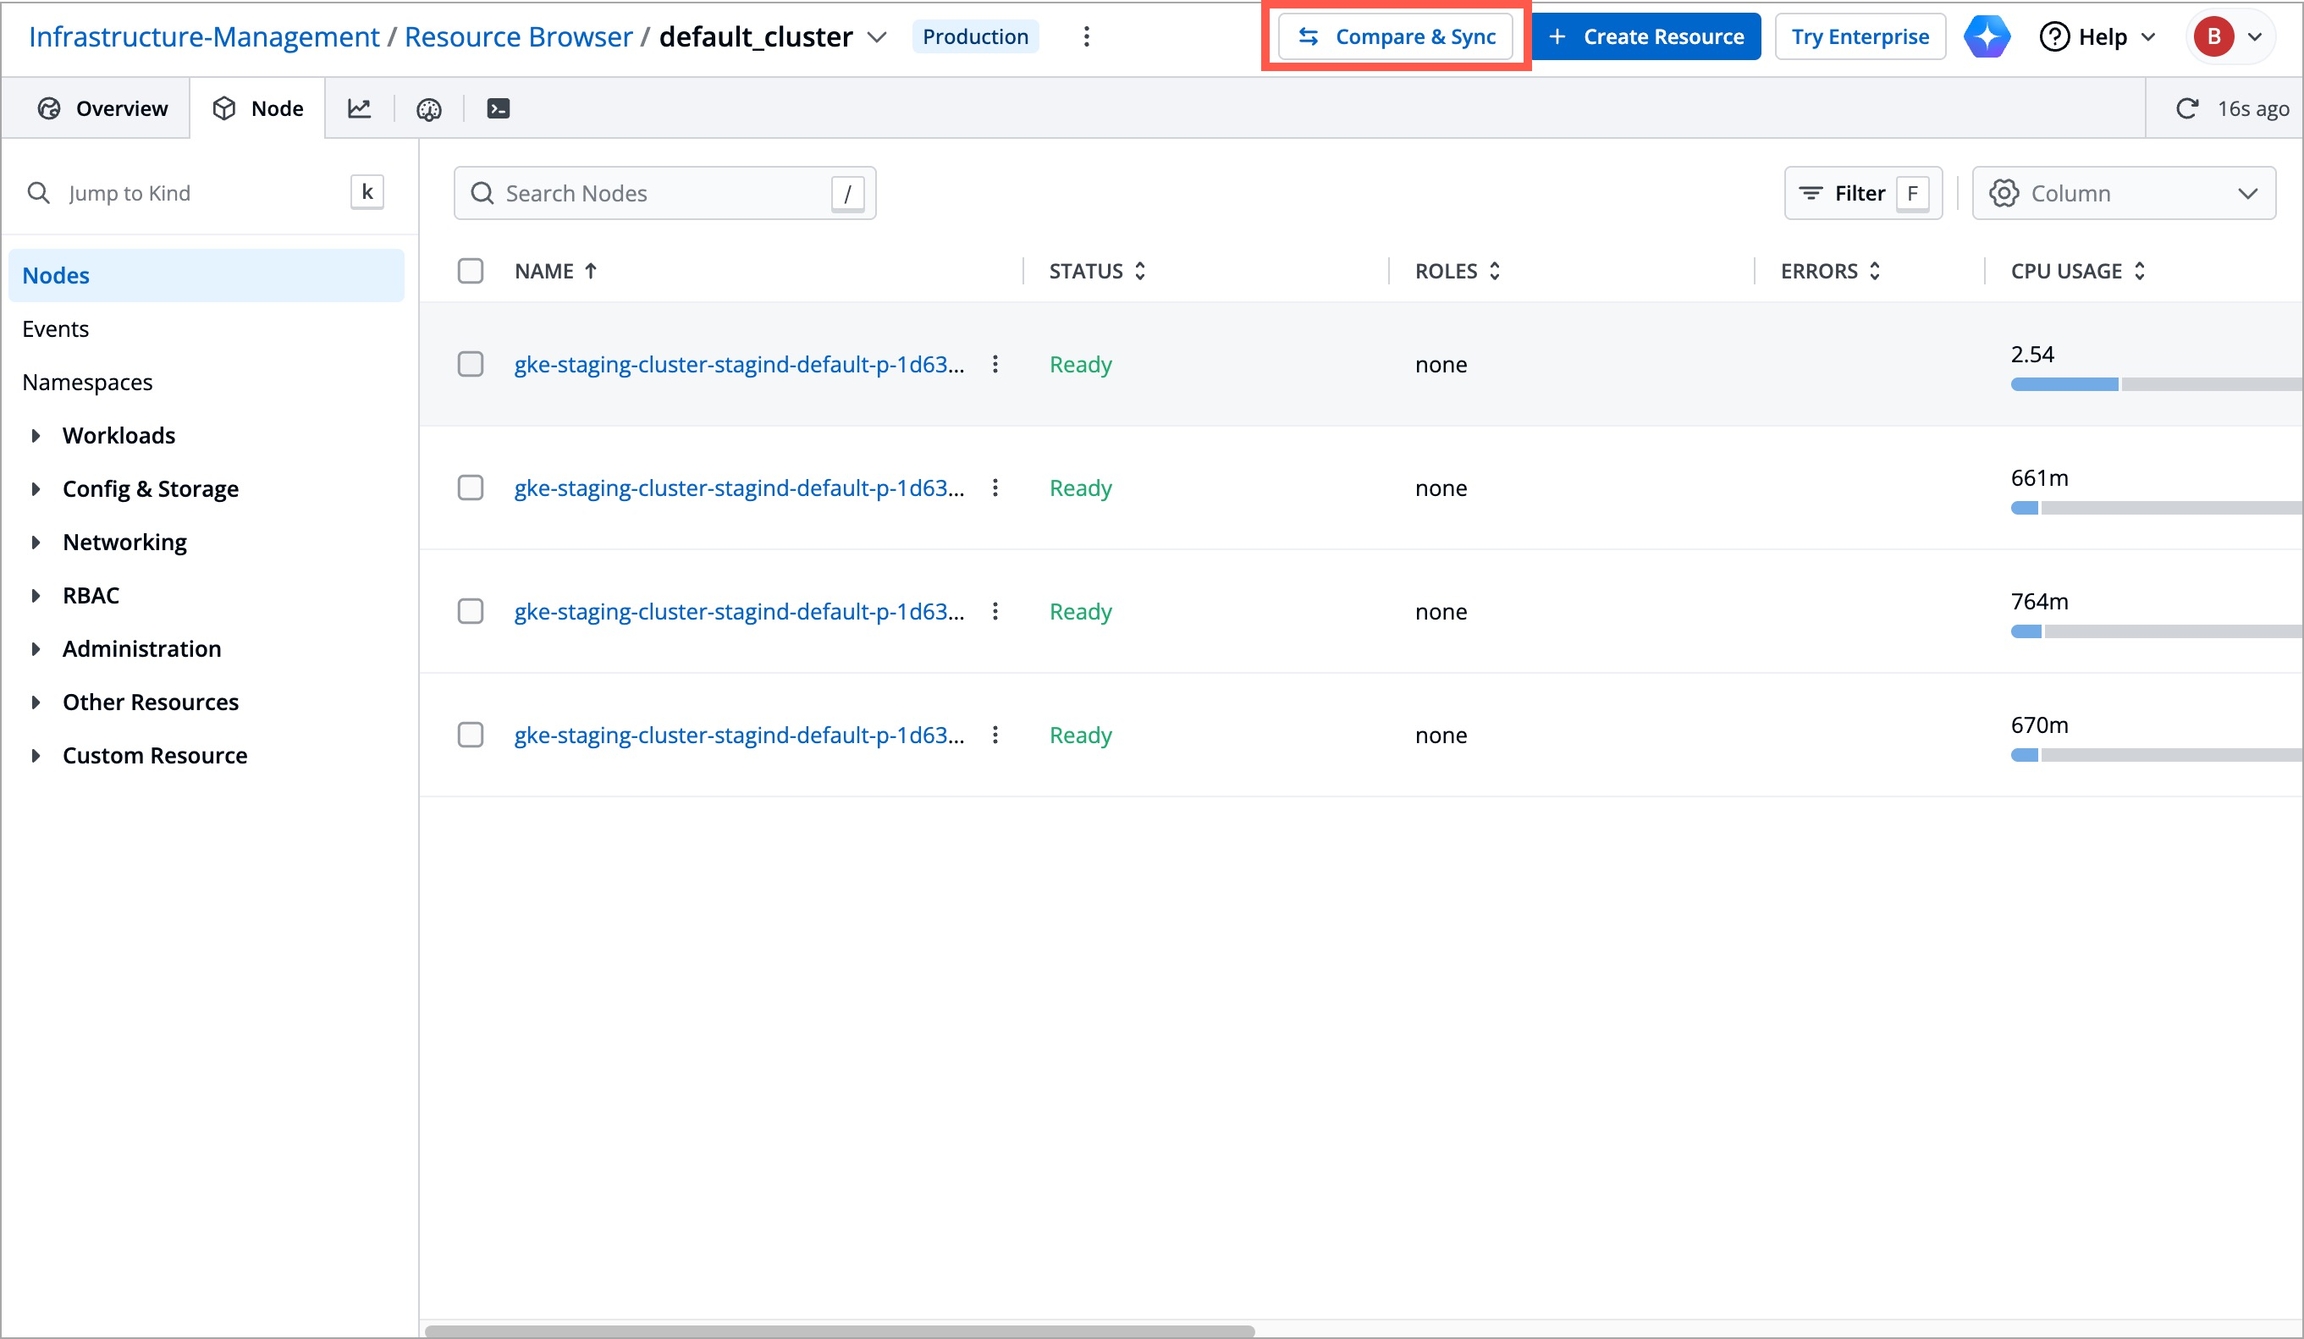
Steps
Navigate to Resource Browser.

Figure 2: Resource Browser Click the reference cluster (e.g.,
default-cluster) to compare against other clusters.Click the Compare & Sync button. The Compare & Sync Clusters page is displayed.
Figure 3: Compare & Sync Button The Compare & Sync Clusters page is primarily divided into two halves. The left side of the page displays the resources of the reference cluster you previously selected (
default-clusterin this case). The right side of the page displays the resources of the target cluster you want to compare against.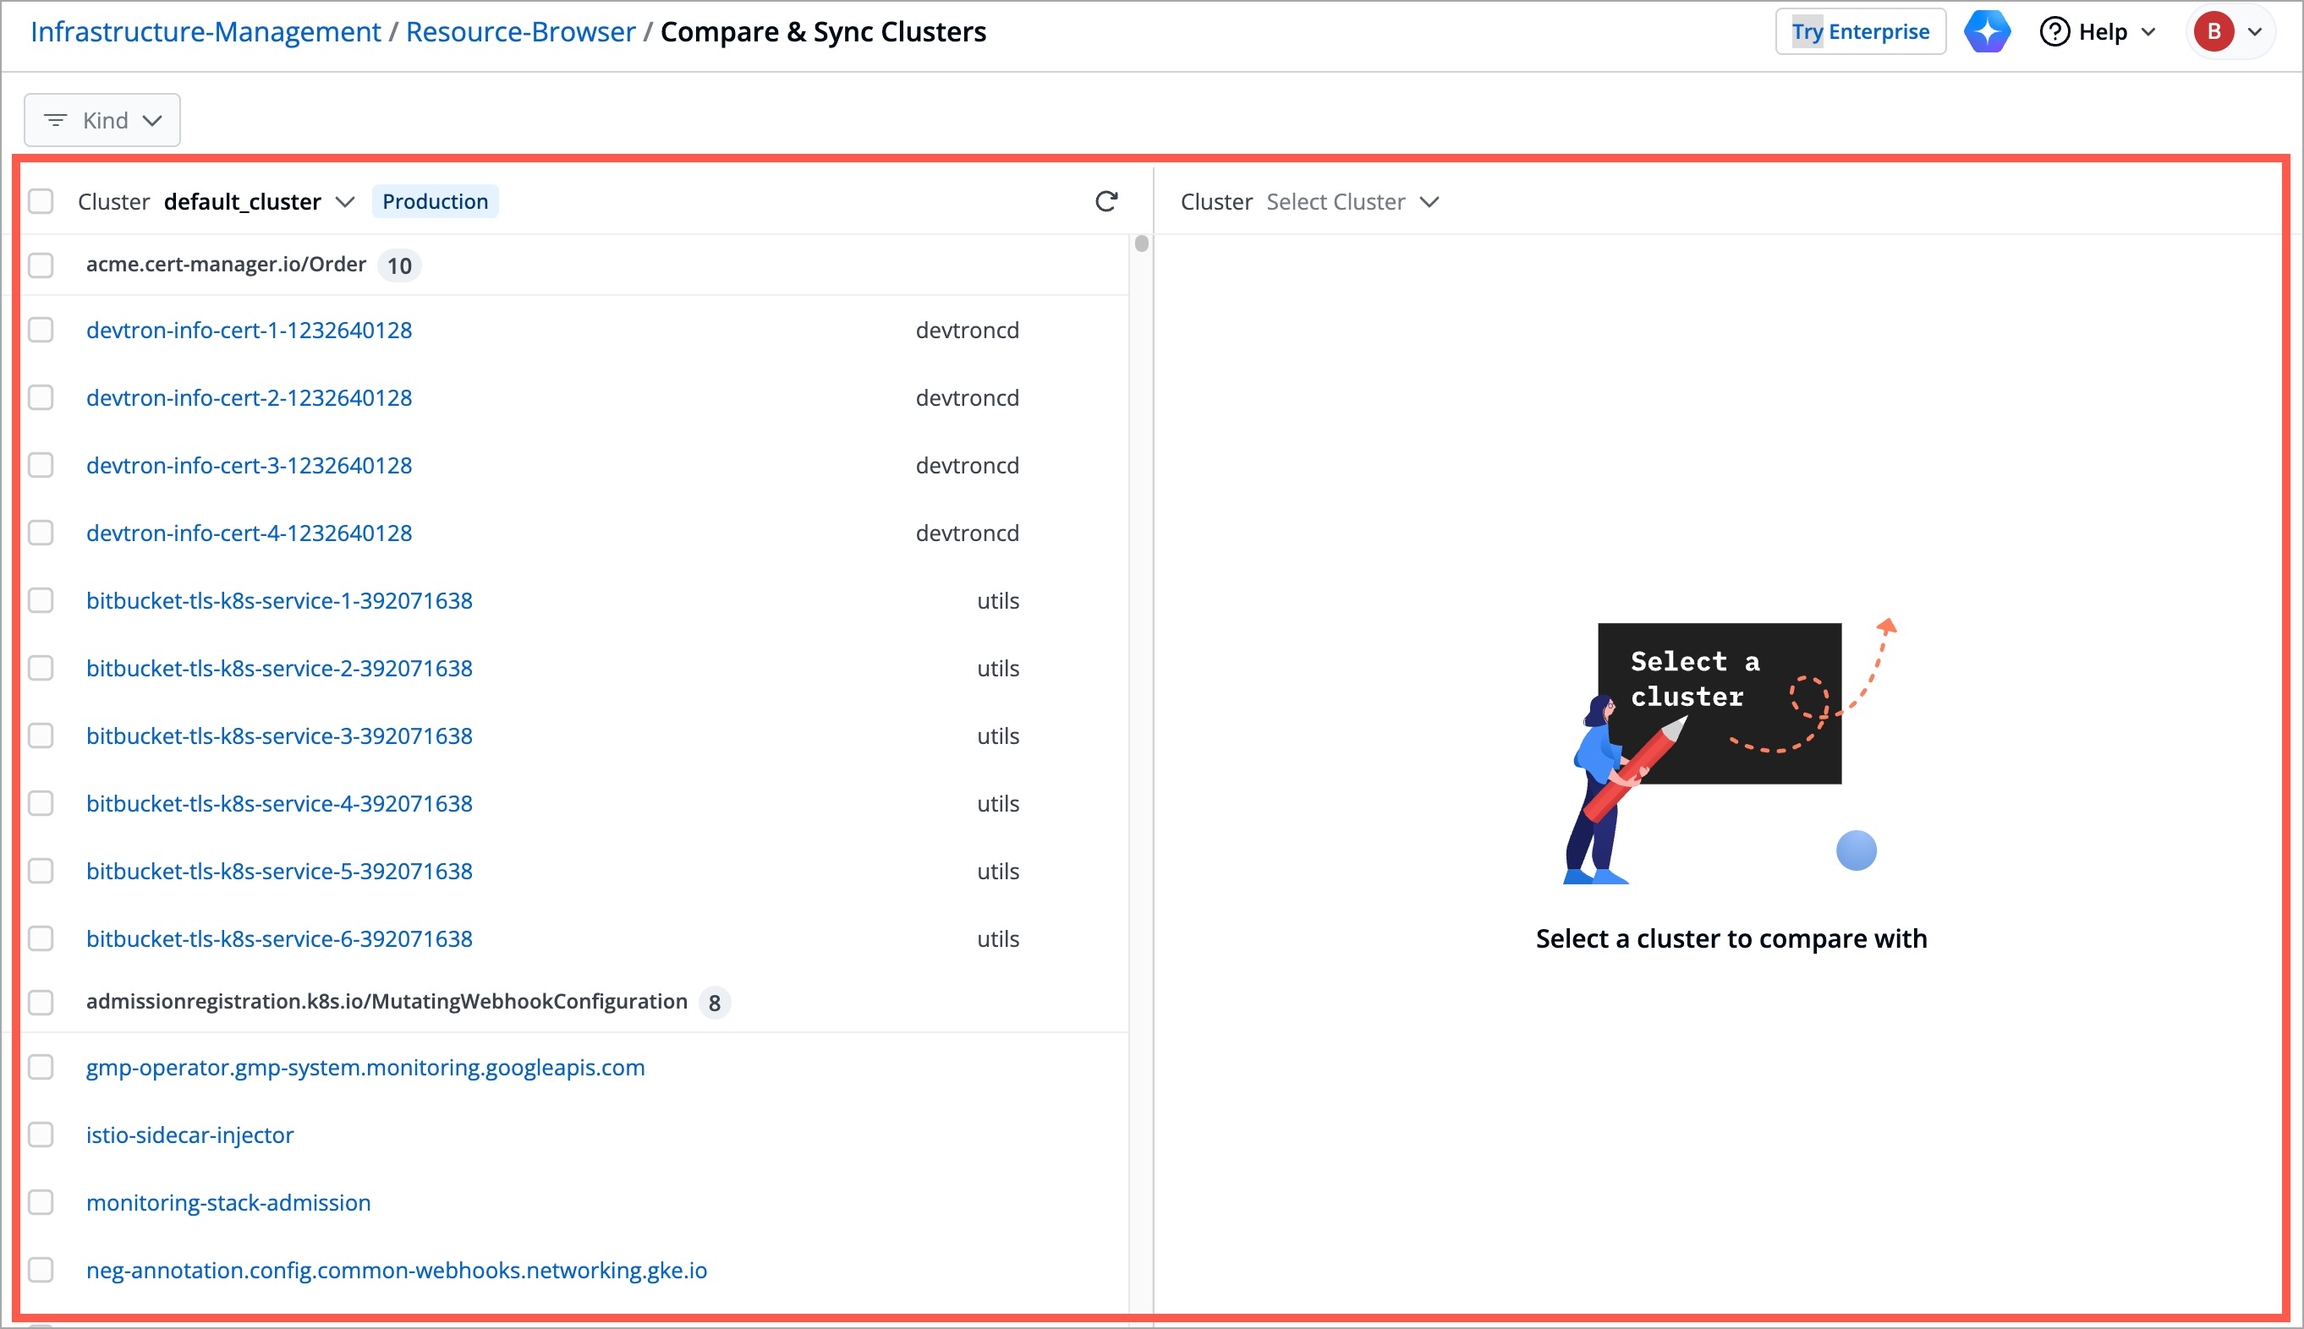
Figure 4: Compare & Sync Clusters Page Select the target cluster in the Select Cluster drop-down box (e.g.,
playground-vclusterin this case).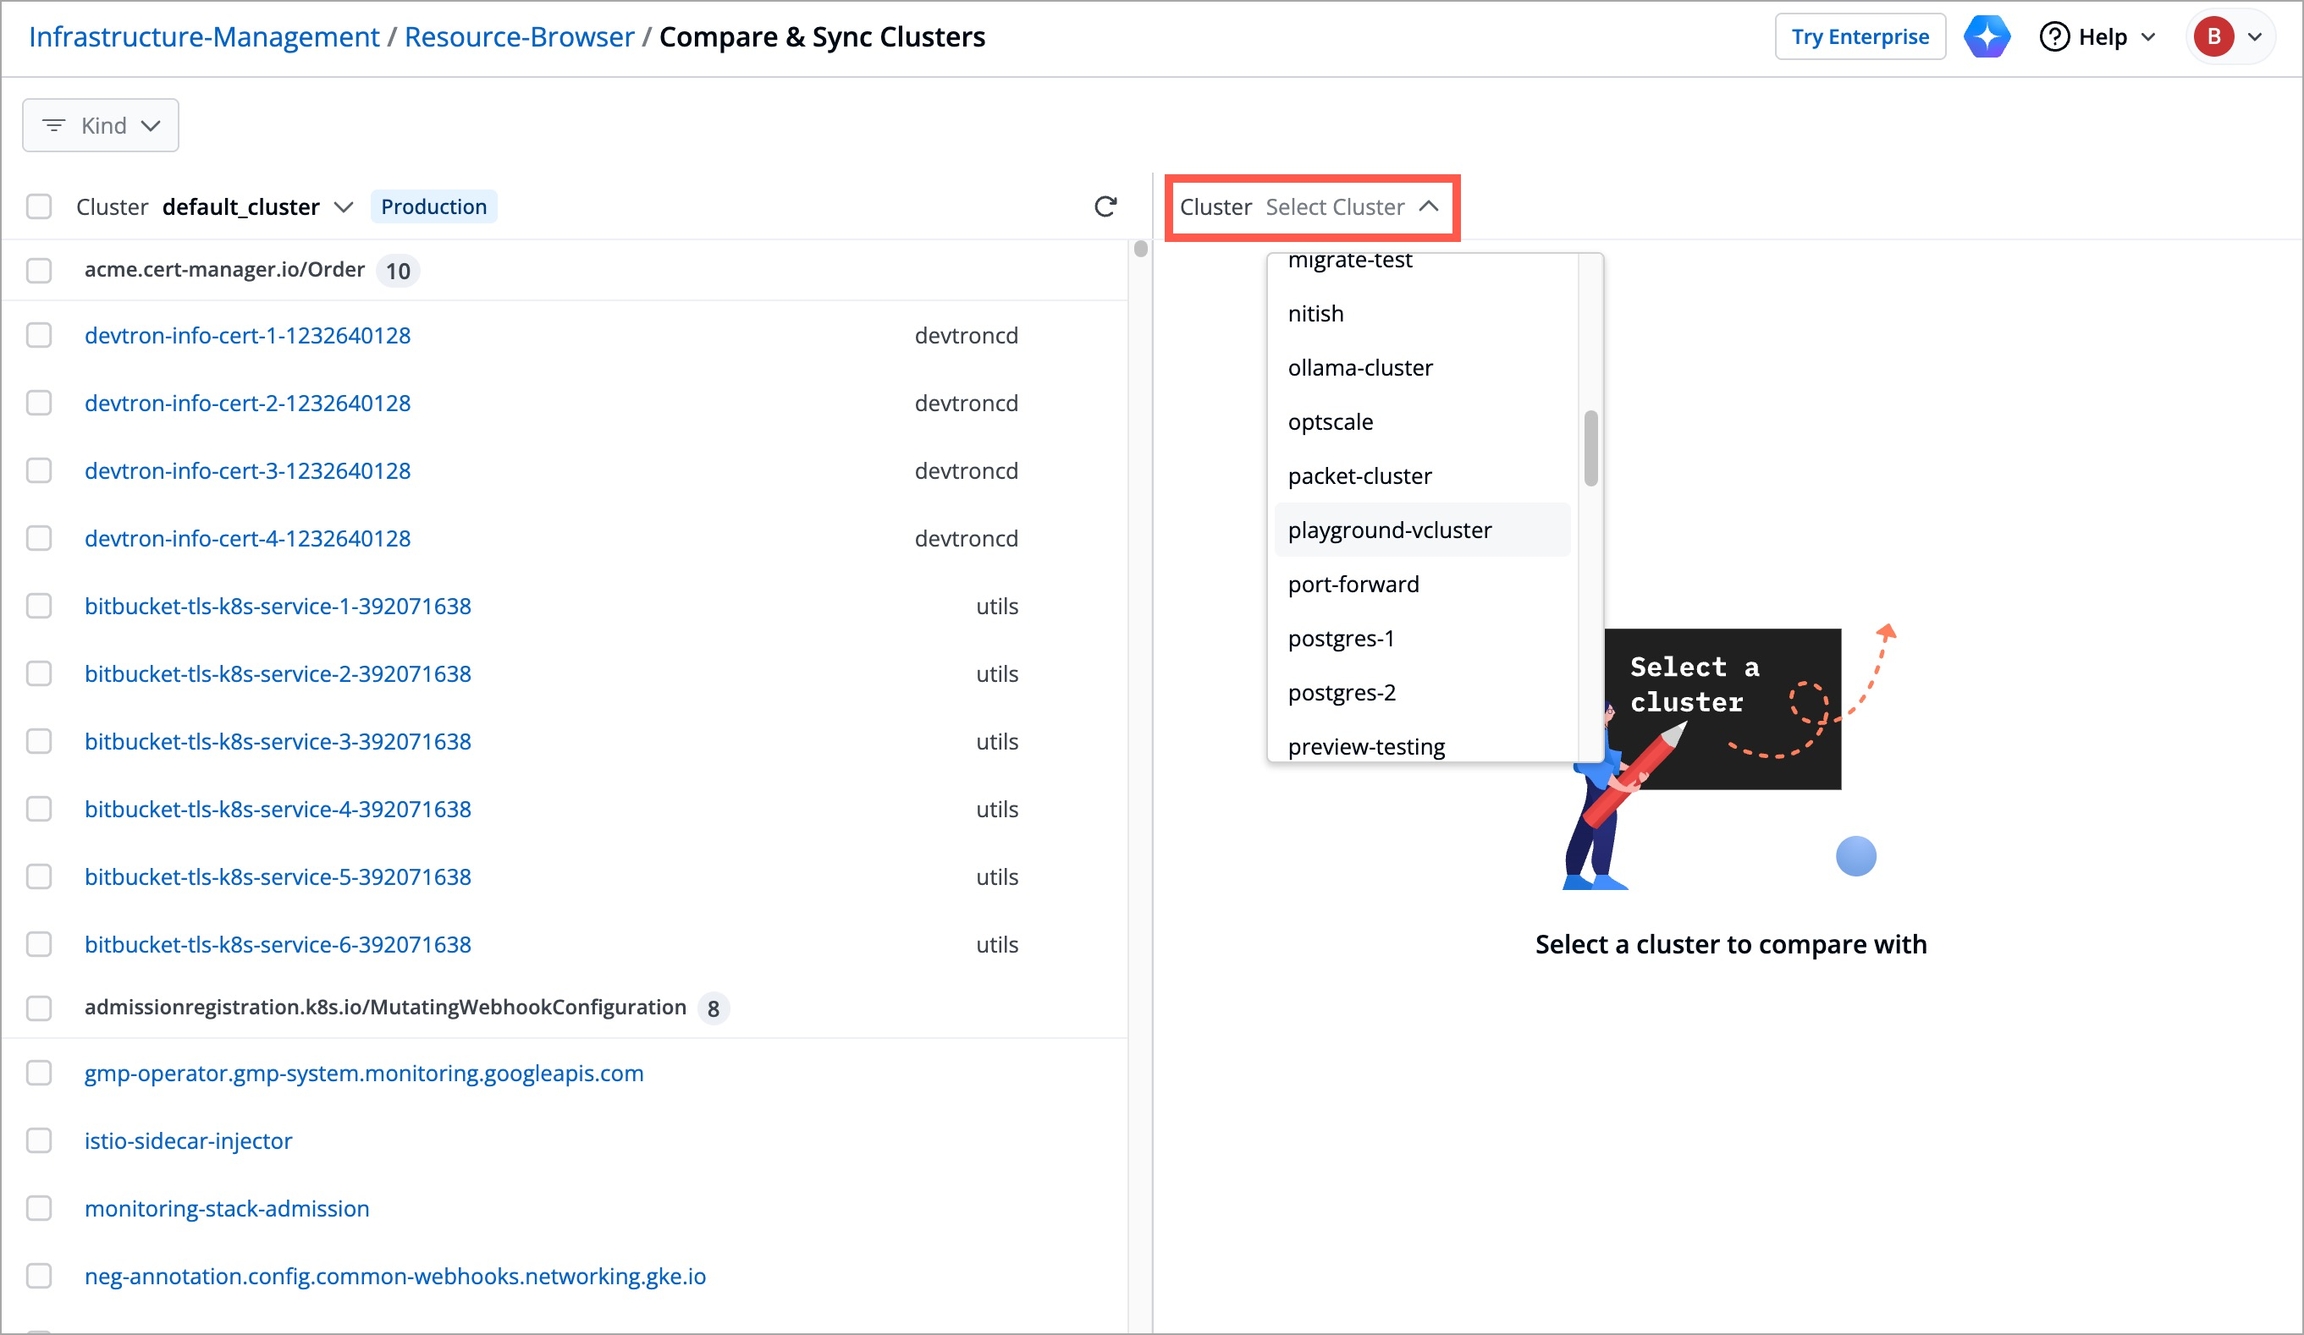
Figure 5: Select the Cluster Once you select the clusters that you want to compare, all the resources associated with those clusters are listed in the Compare & Sync Clusters page.
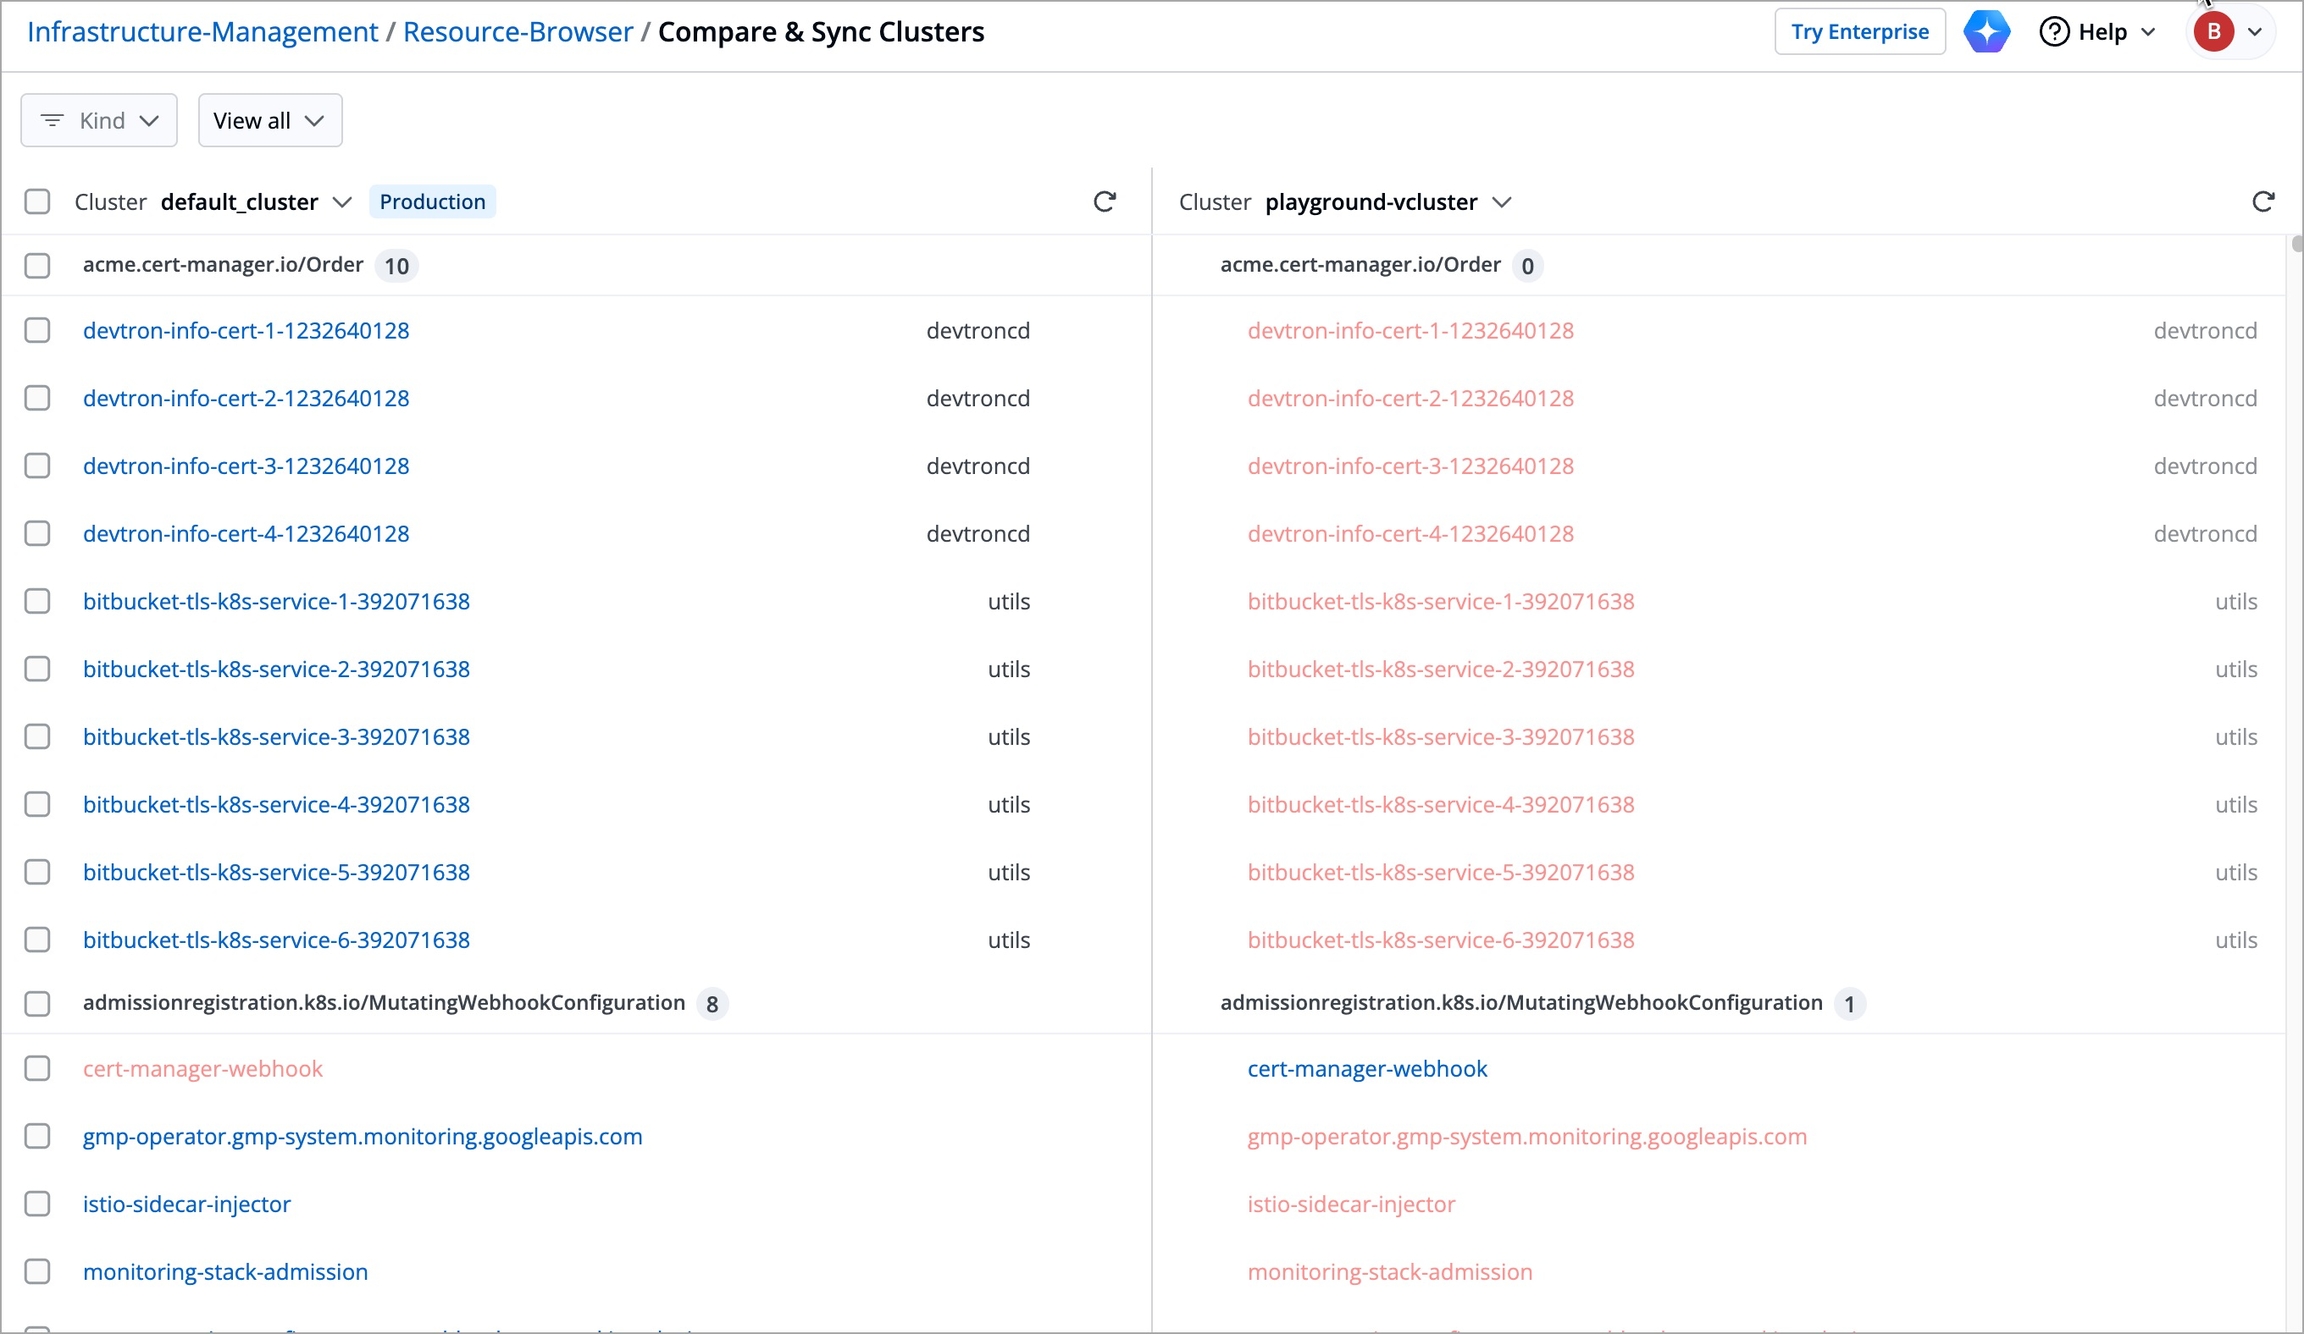
Figure 6: Cluster Resources are Displayed
How to Identify Missing Resource(s)?
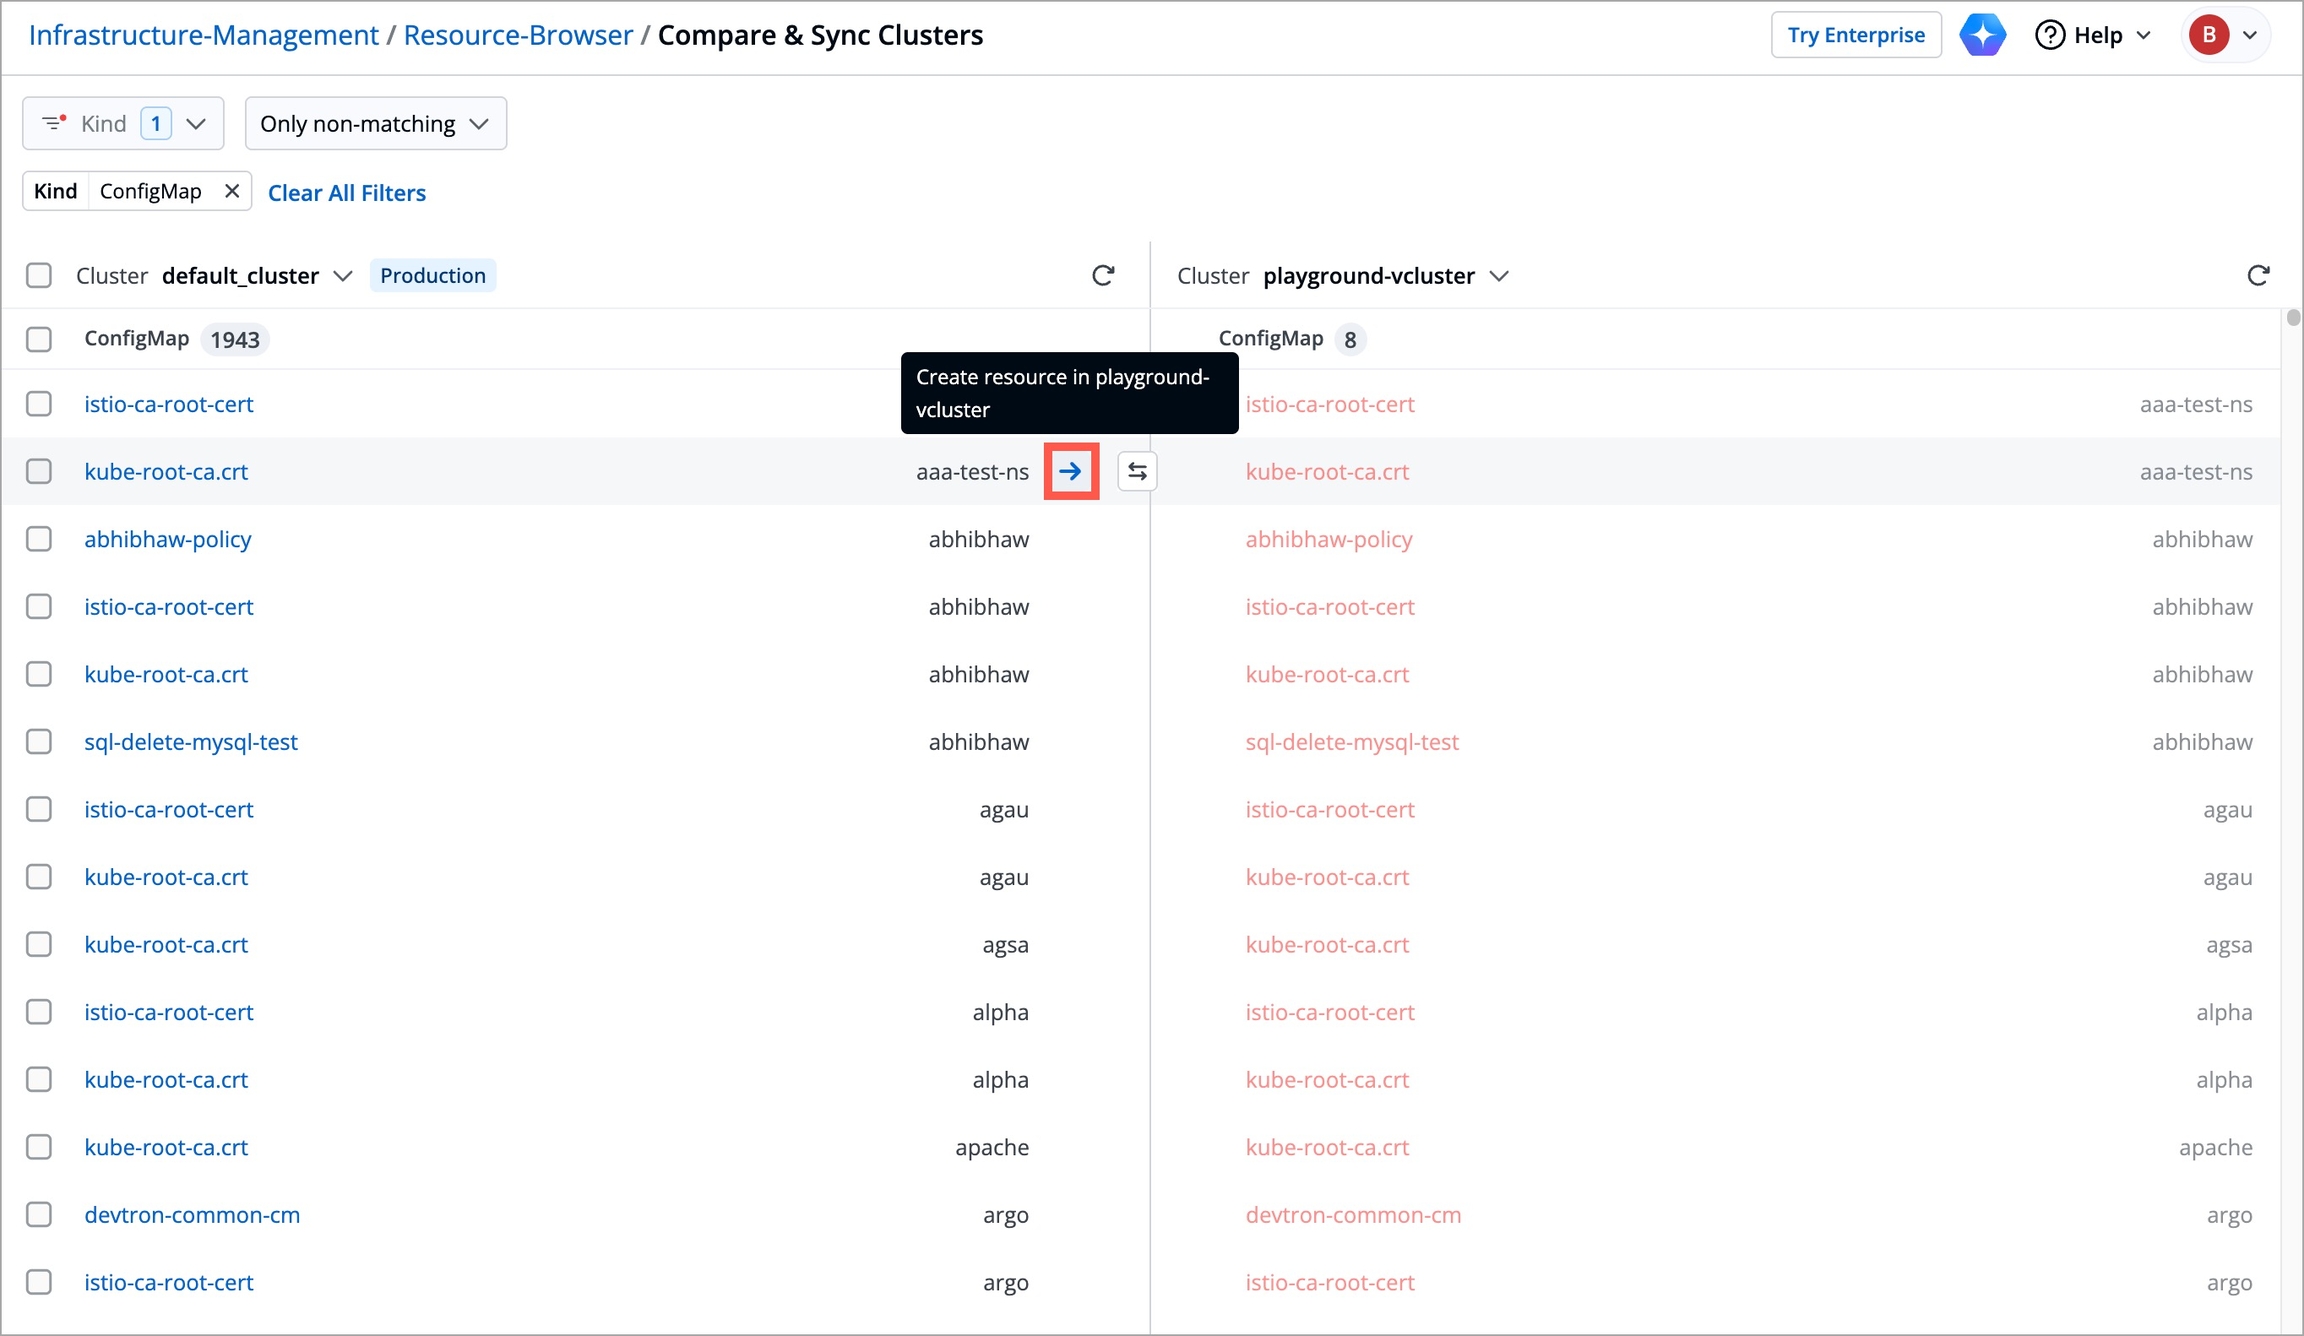
When the color of the resource is:
Red - The resource is not available in that particular cluster.
Blue - The resource is available in that particular cluster, but the manifest may not be the same. It is recommended to compare the manifest once.
For instance, when a resource is displayed in blue in cluster A and in red in cluster B, it means that the resource available in cluster A is not available in cluster B.
Click the filter available at the top left corner of the page. All the resource groups and resource kinds are displayed in the filter box. For example, when you select
ConfigMapas a resource kind, all the available ConfigMaps in both clusters are displayed.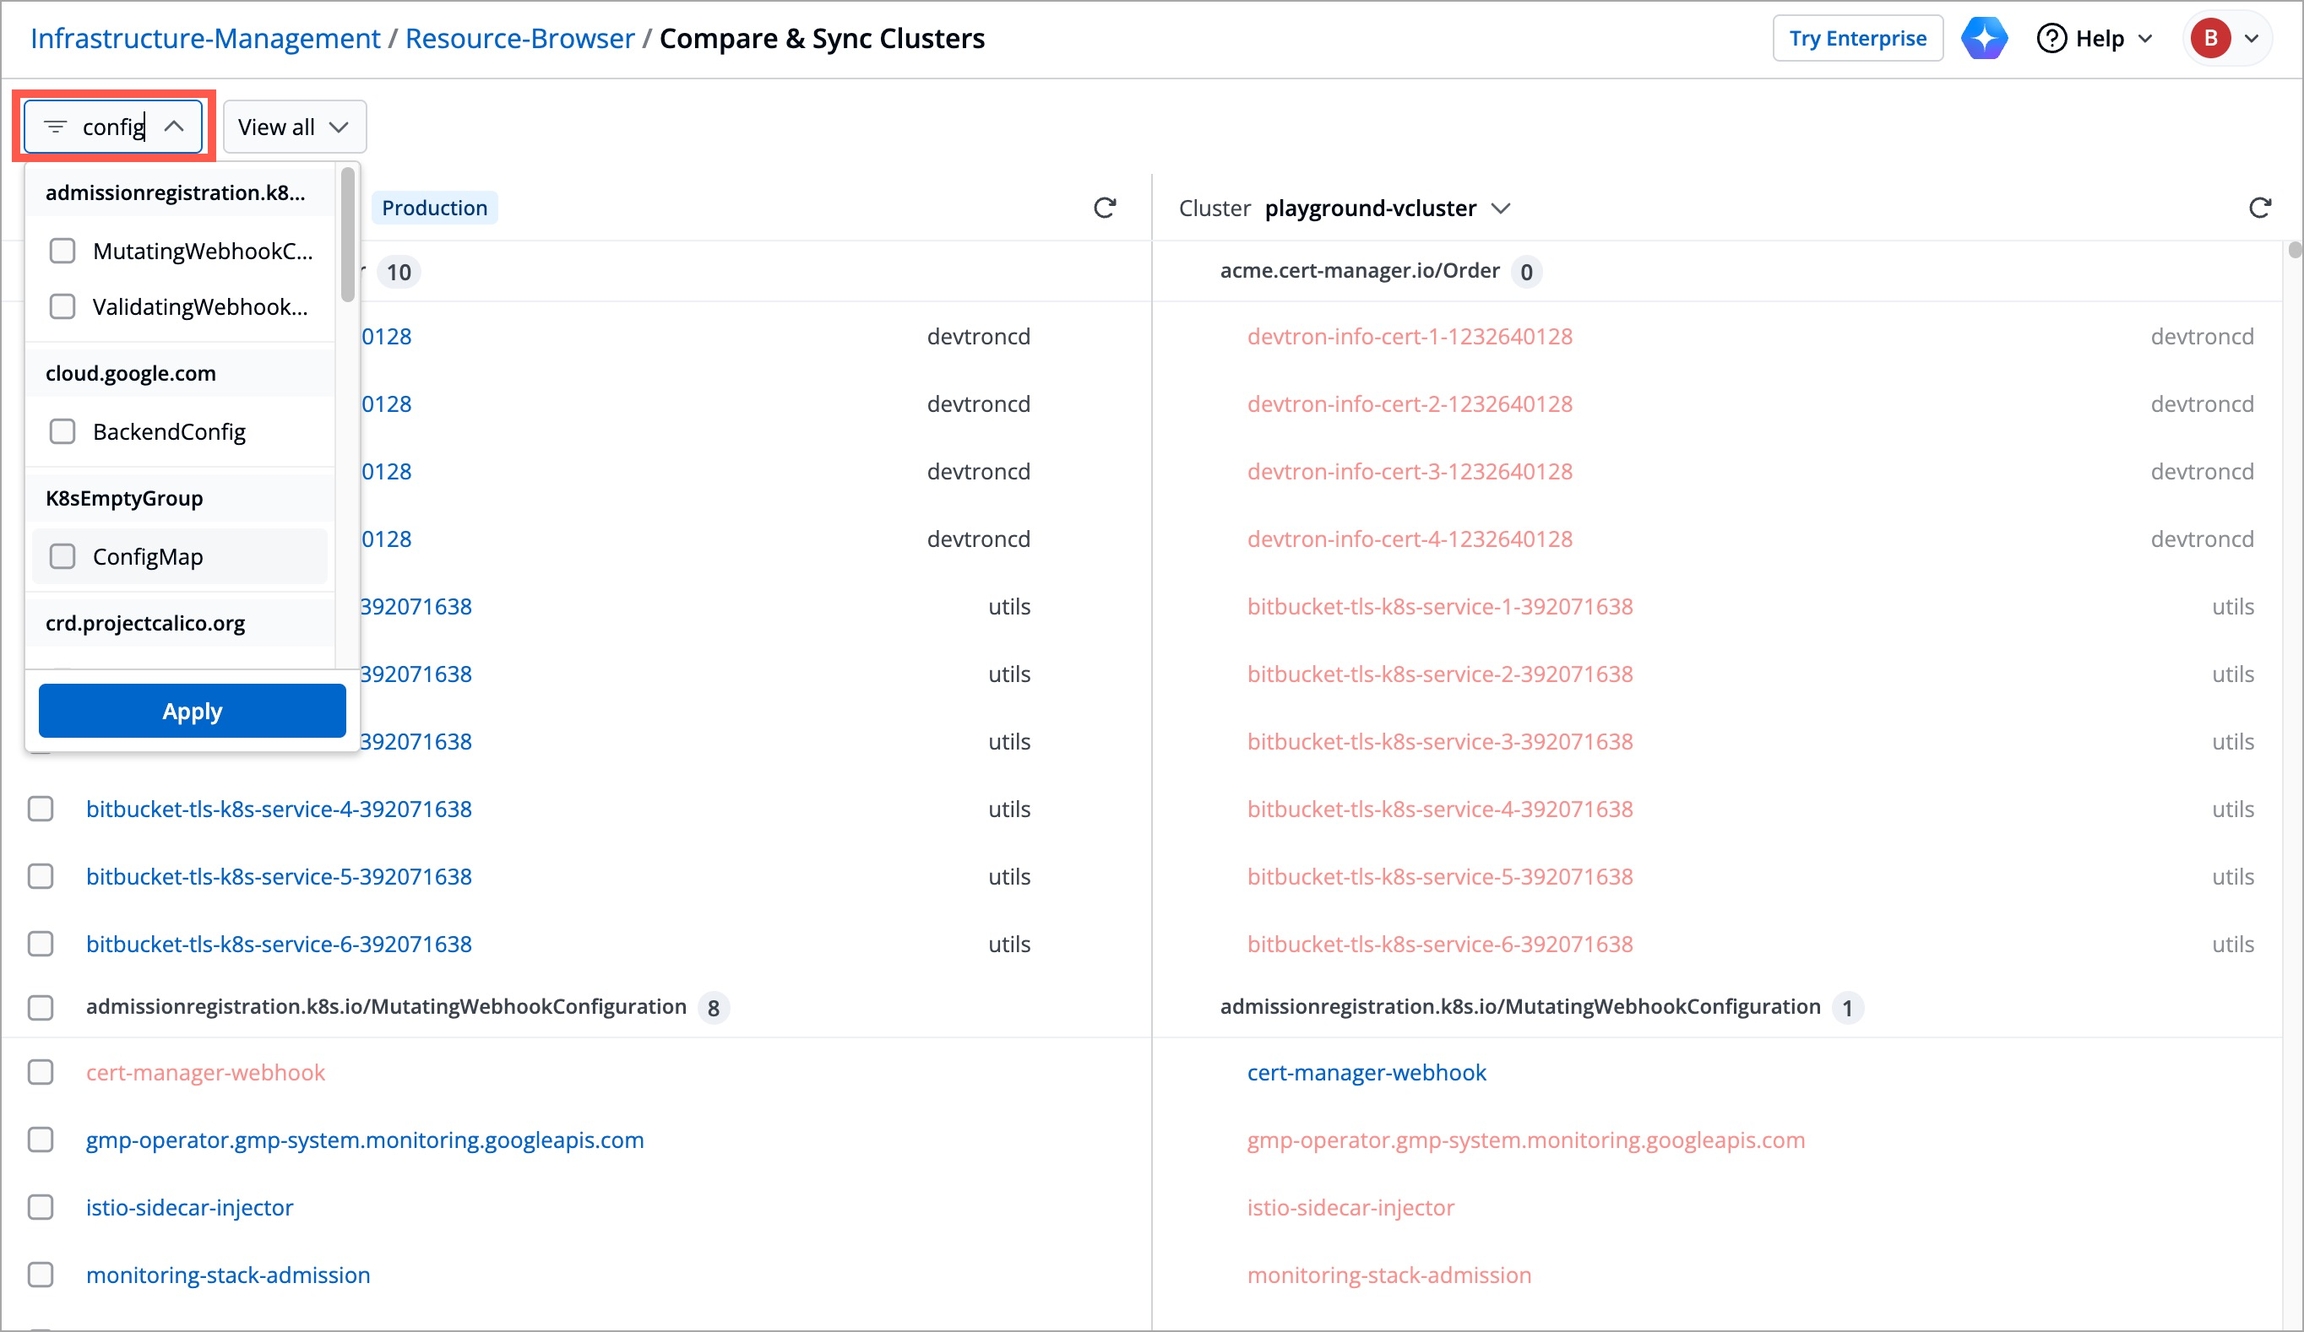
Figure 7: Resource Kind Filter Click the View all drop-down box. This filter allows you to filter the resources based on the following criteria:
View all- To display all resources from both clusters without any filters.Only matching- To only display resources that exist in both clusters.Only non-matching- To only display resources that are present in one cluster but not the other.View left join- To display all resources from the reference cluster (left-hand side) and only matching resources from the target cluster (right-hand side).View right join- To display all resources from the target cluster (right-hand side) and only matching resources from the reference cluster (left-hand side).
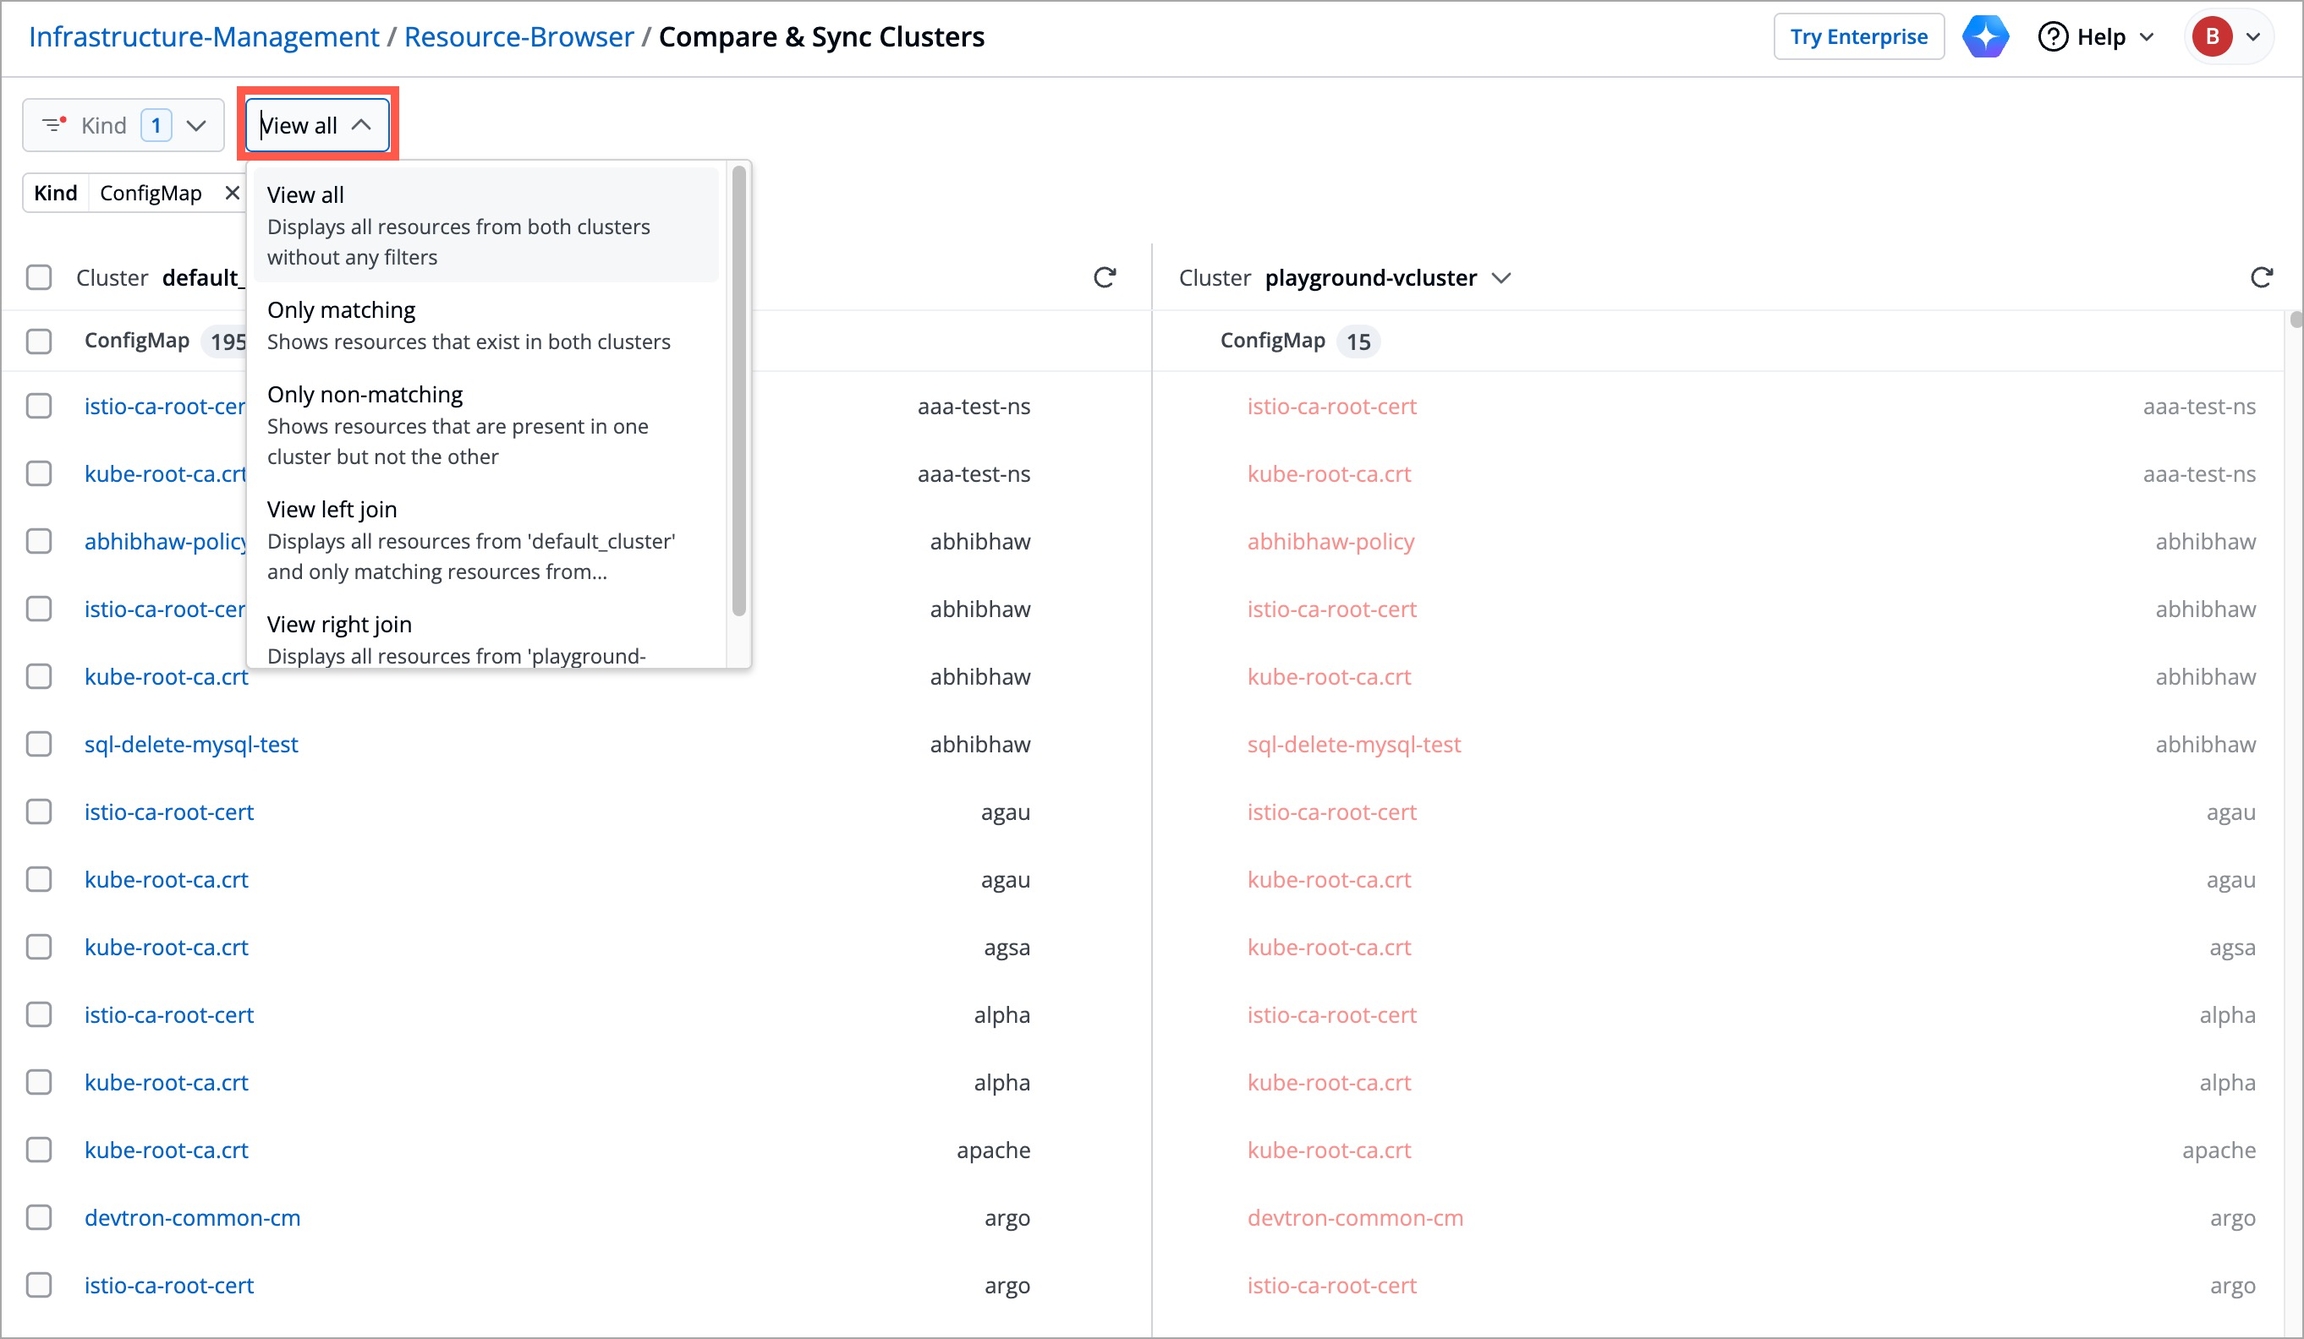
Figure 8: View All Filter
Creating a Missing Resource?
Before creating a missing resource or comparing a manifest, it is very important to match the namespaces in both clusters. Otherwise, an error will be displayed. For example, if cluster A has a namespace devtroncd and cluster B does not have the same namespace, then you will get an error message while creating a missing resource.
Follow the below steps to match the namespaces:
Enter
Namespacein the filter available at the top left corner of the Compare & Sync Clusters page.Compare the namespaces available in the reference cluster (left-hand side) against the namespaces available in the target cluster (right-hand side).
Select the namespace(s) for which you prefer to create missing resources for using the checkboxes.
Click the Create Resources button. The namespaces will now be matched.
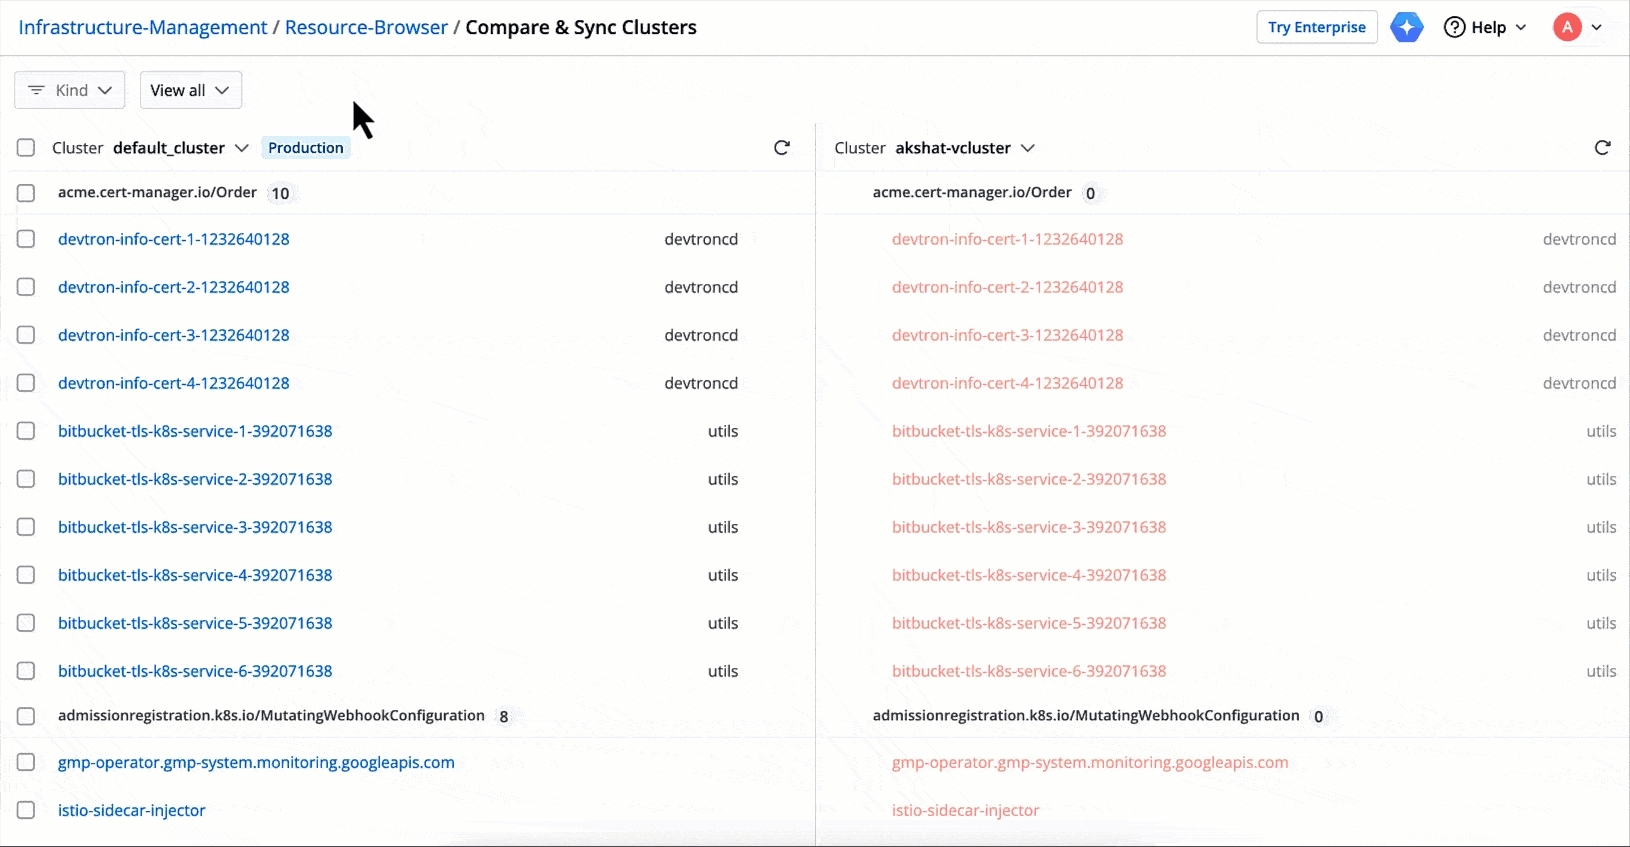
Figure 9: Match Namespaces
Create Missing Resource(s)
Hover over the resource that you'd like to create in the target cluster and click the Create Resource option.
Note
To create missing resources in bulk, select the checkboxes against the resources or resource groups and click the Create Resources button. All the selected resources will be created in the target cluster.
Even after creating missing resources, a few of them may not run as expected unless the dependencies required to run the resources correctly are also met. Therefore, it is recommended that you ensure all the necessary dependencies are taken care of while creating missing resources.
Compare Manifest
Hover over the resource and click the Compare manifest option to compare the manifest of the resource in both clusters.
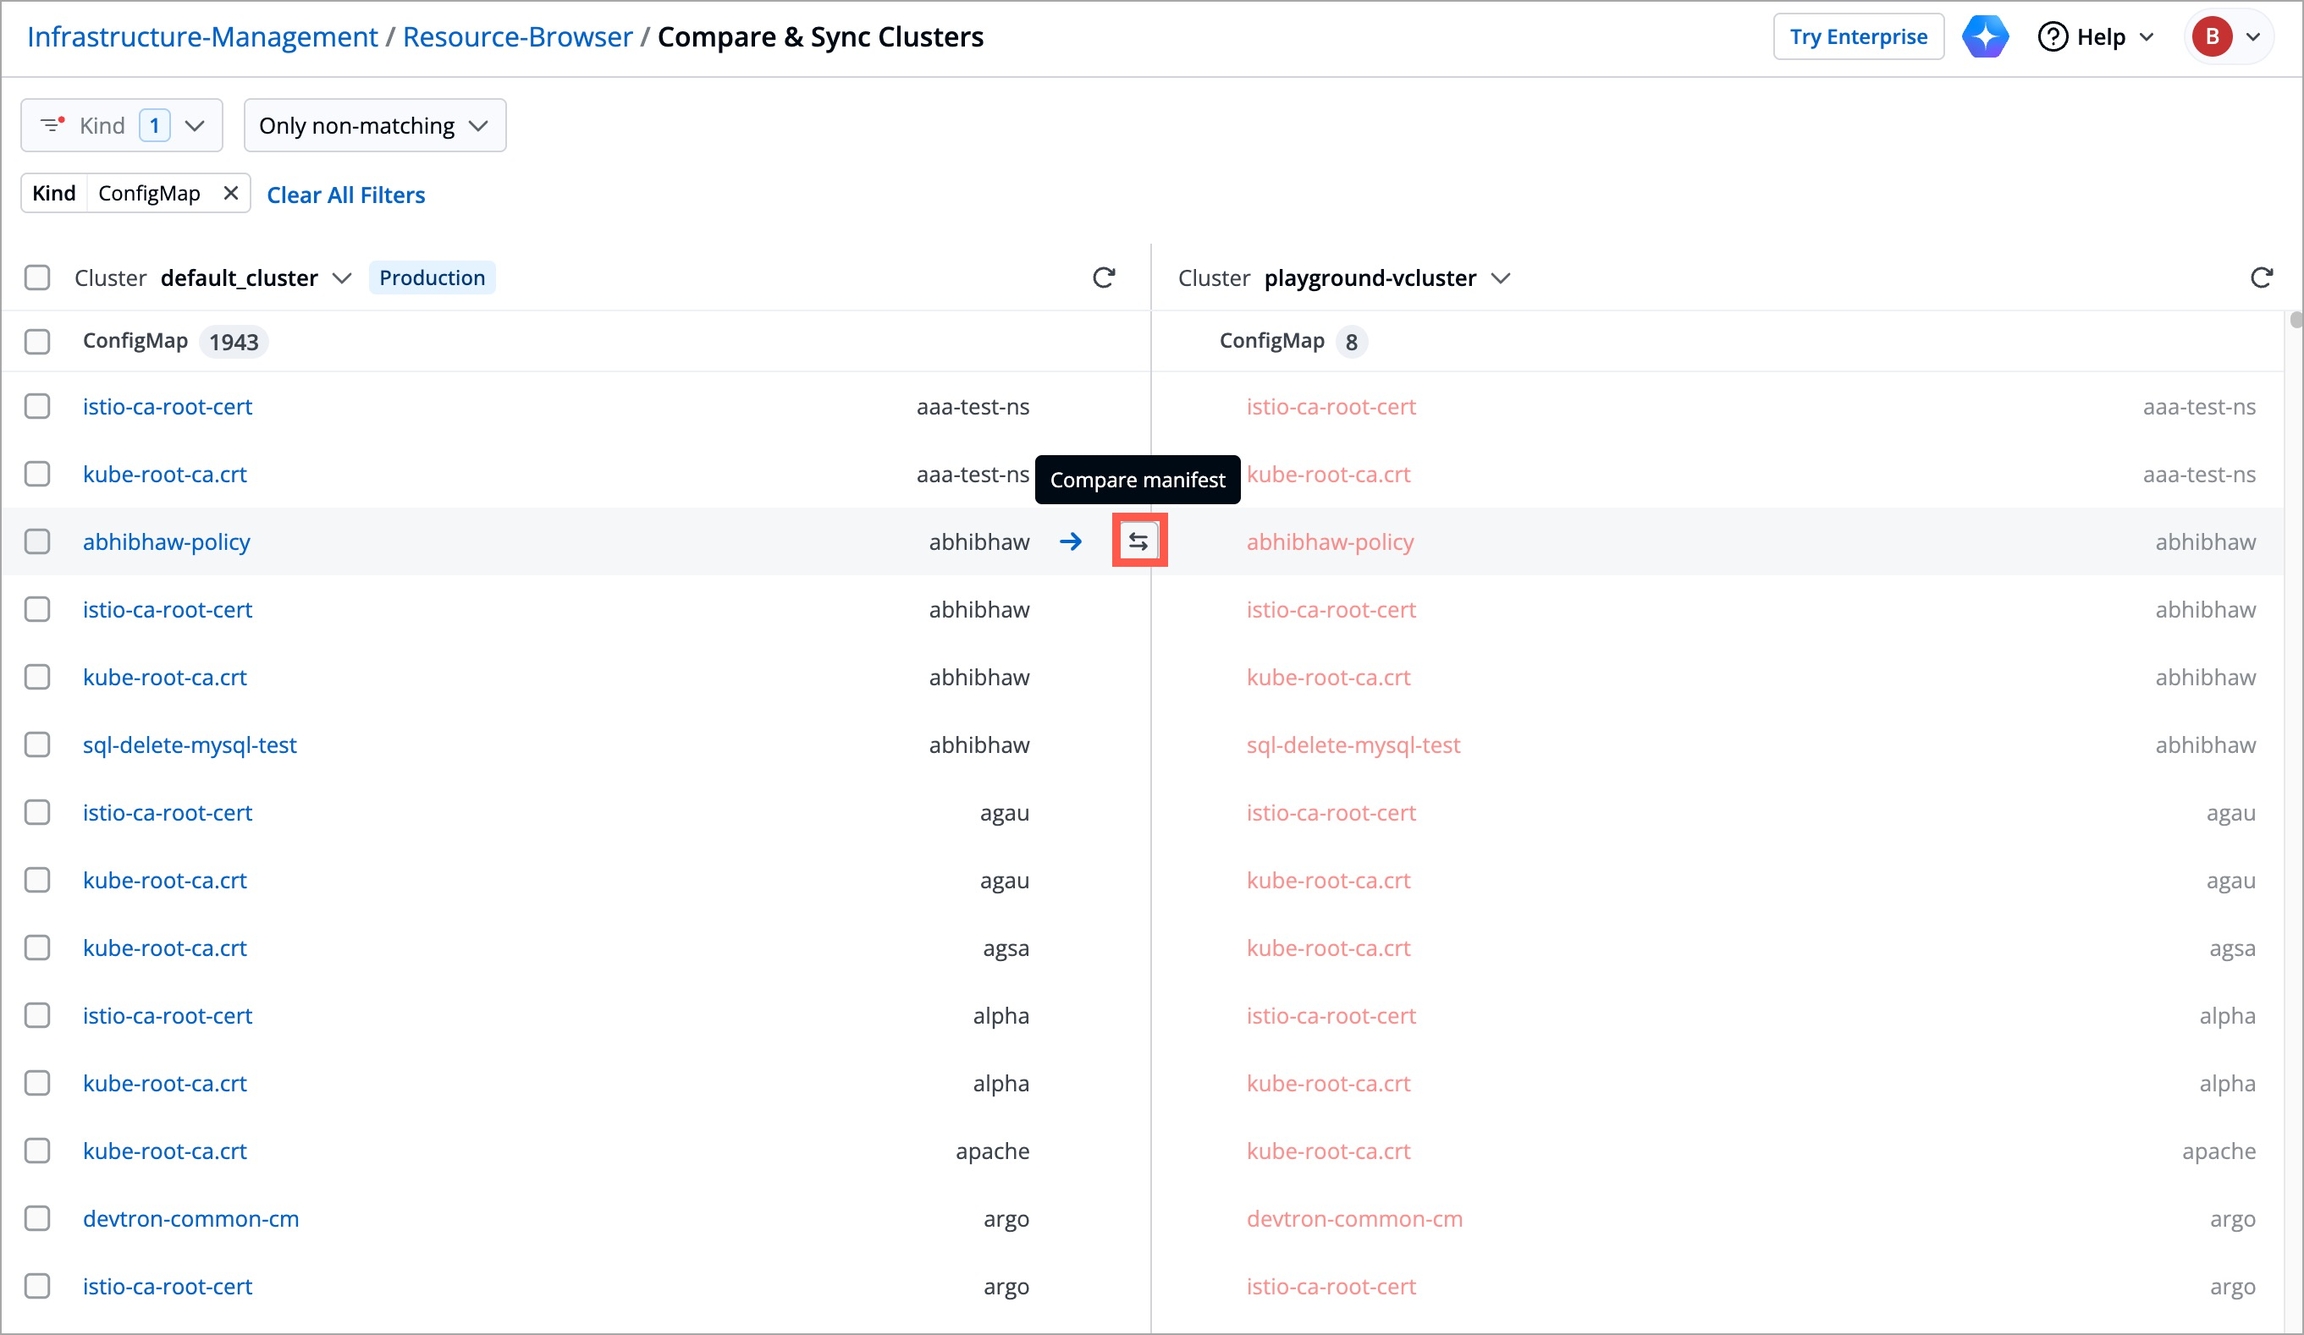
Figure 11: Compare Manifest Click Edit YAML.
Click the Revert this chunk option to enforce the values, if required, from the reference cluster to the target cluster.
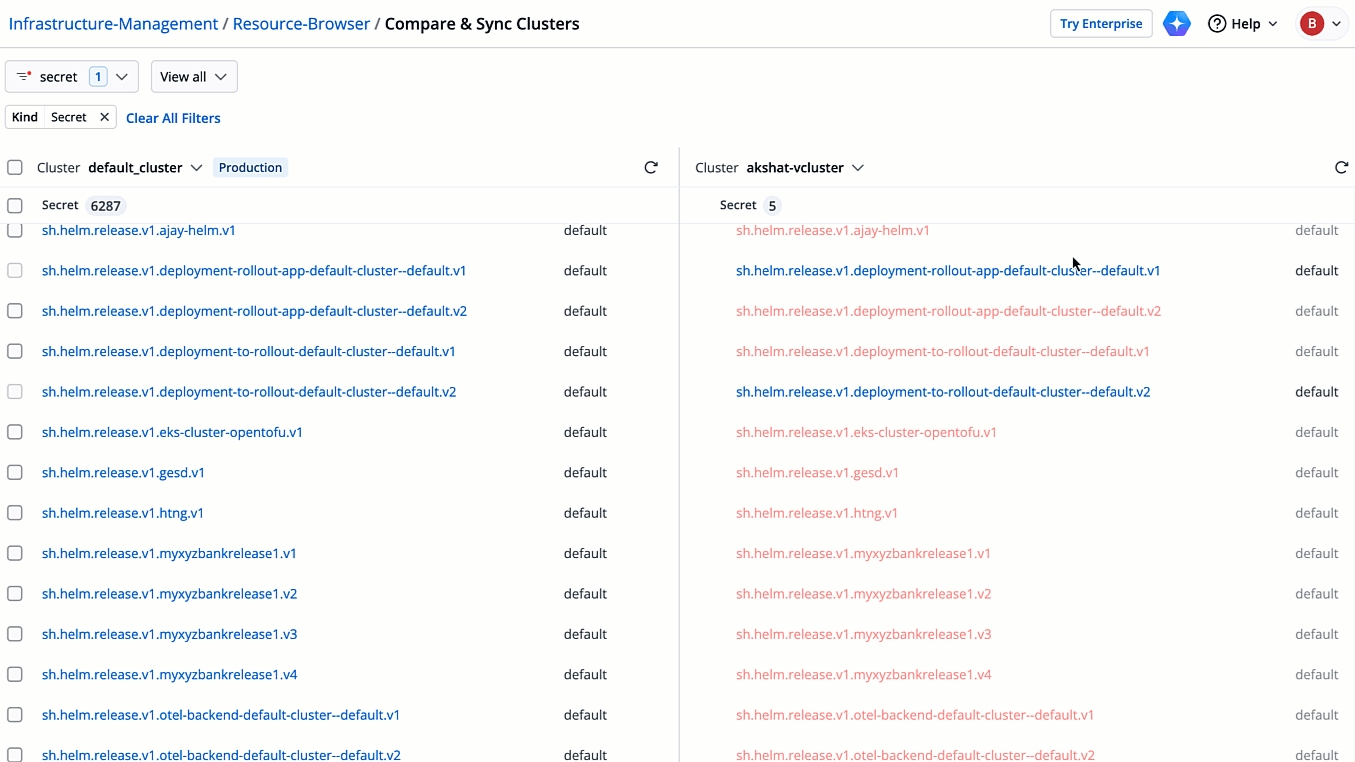
Figure 12: Revert this Chunk Click Apply Changes.
When you apply the changes, the Kubernetes resources from your reference cluster are copied to the target cluster. However, you can also make changes bidirectionally i.e., from the target cluster to the reference cluster. You can do so by copy pasting the values from one resource to another.
Use Cases
The following table highlights the use cases which the Compare and Sync Clusters feature:
What you can do
How it helps you
Backup Clusters
Create backup clusters for disaster recovery (e.g., cluster failure)
Compare Resources
Compare and spot missing resources across clusters
Create Missing Resources
Create and sync missing resources such as ConfigMaps and Secrets across multiple clusters
Match Manifest
Compare the resource manifest and match them, if required
Last updated
Was this helpful?