Workflow Editor
Introduction
The Workflow Editor in Devtron allows you to create and manage job pipelines. It provides a visual interface to create and configure job pipelines, define basic configurations such as trigger types, branch name, and allows you to add Tasks to be executed in the desired sequence.
To create and configure the Job Pipeline, follow the steps below:
Users need to have the Admin role or the Super Admin role. Refer the User permissions.
-
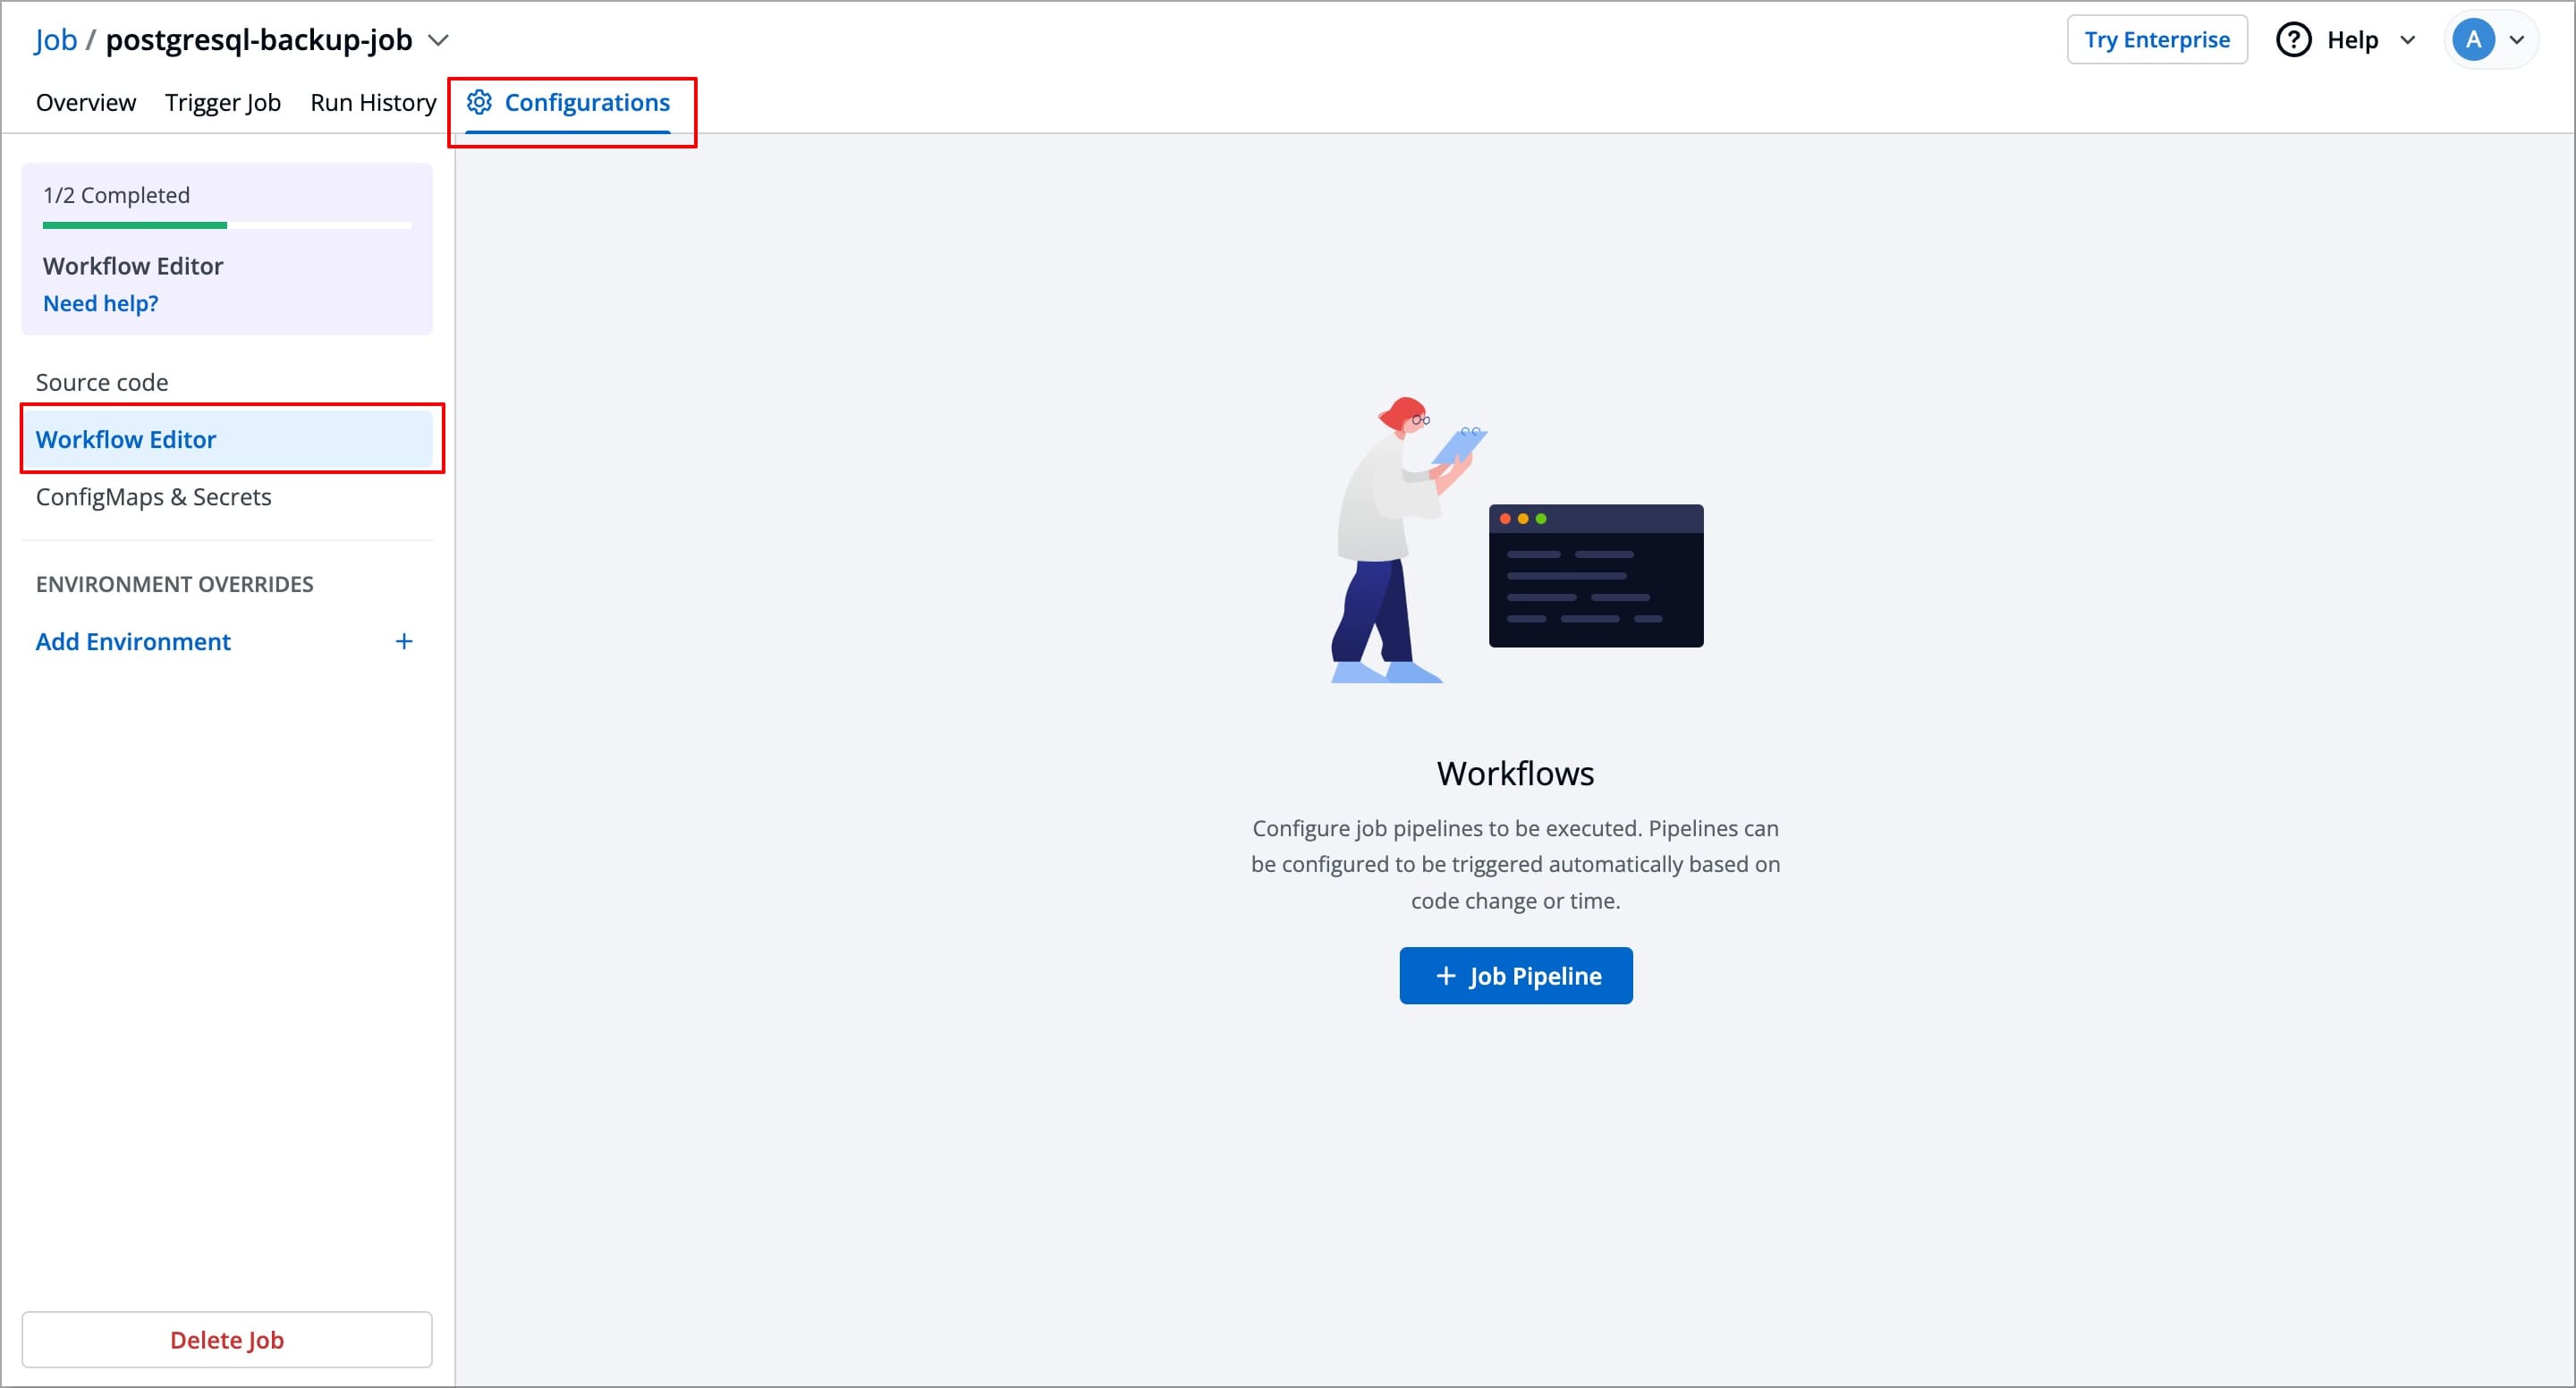
Navigate to the Workflow Editor in the left sidebar of the Configurations page.
-
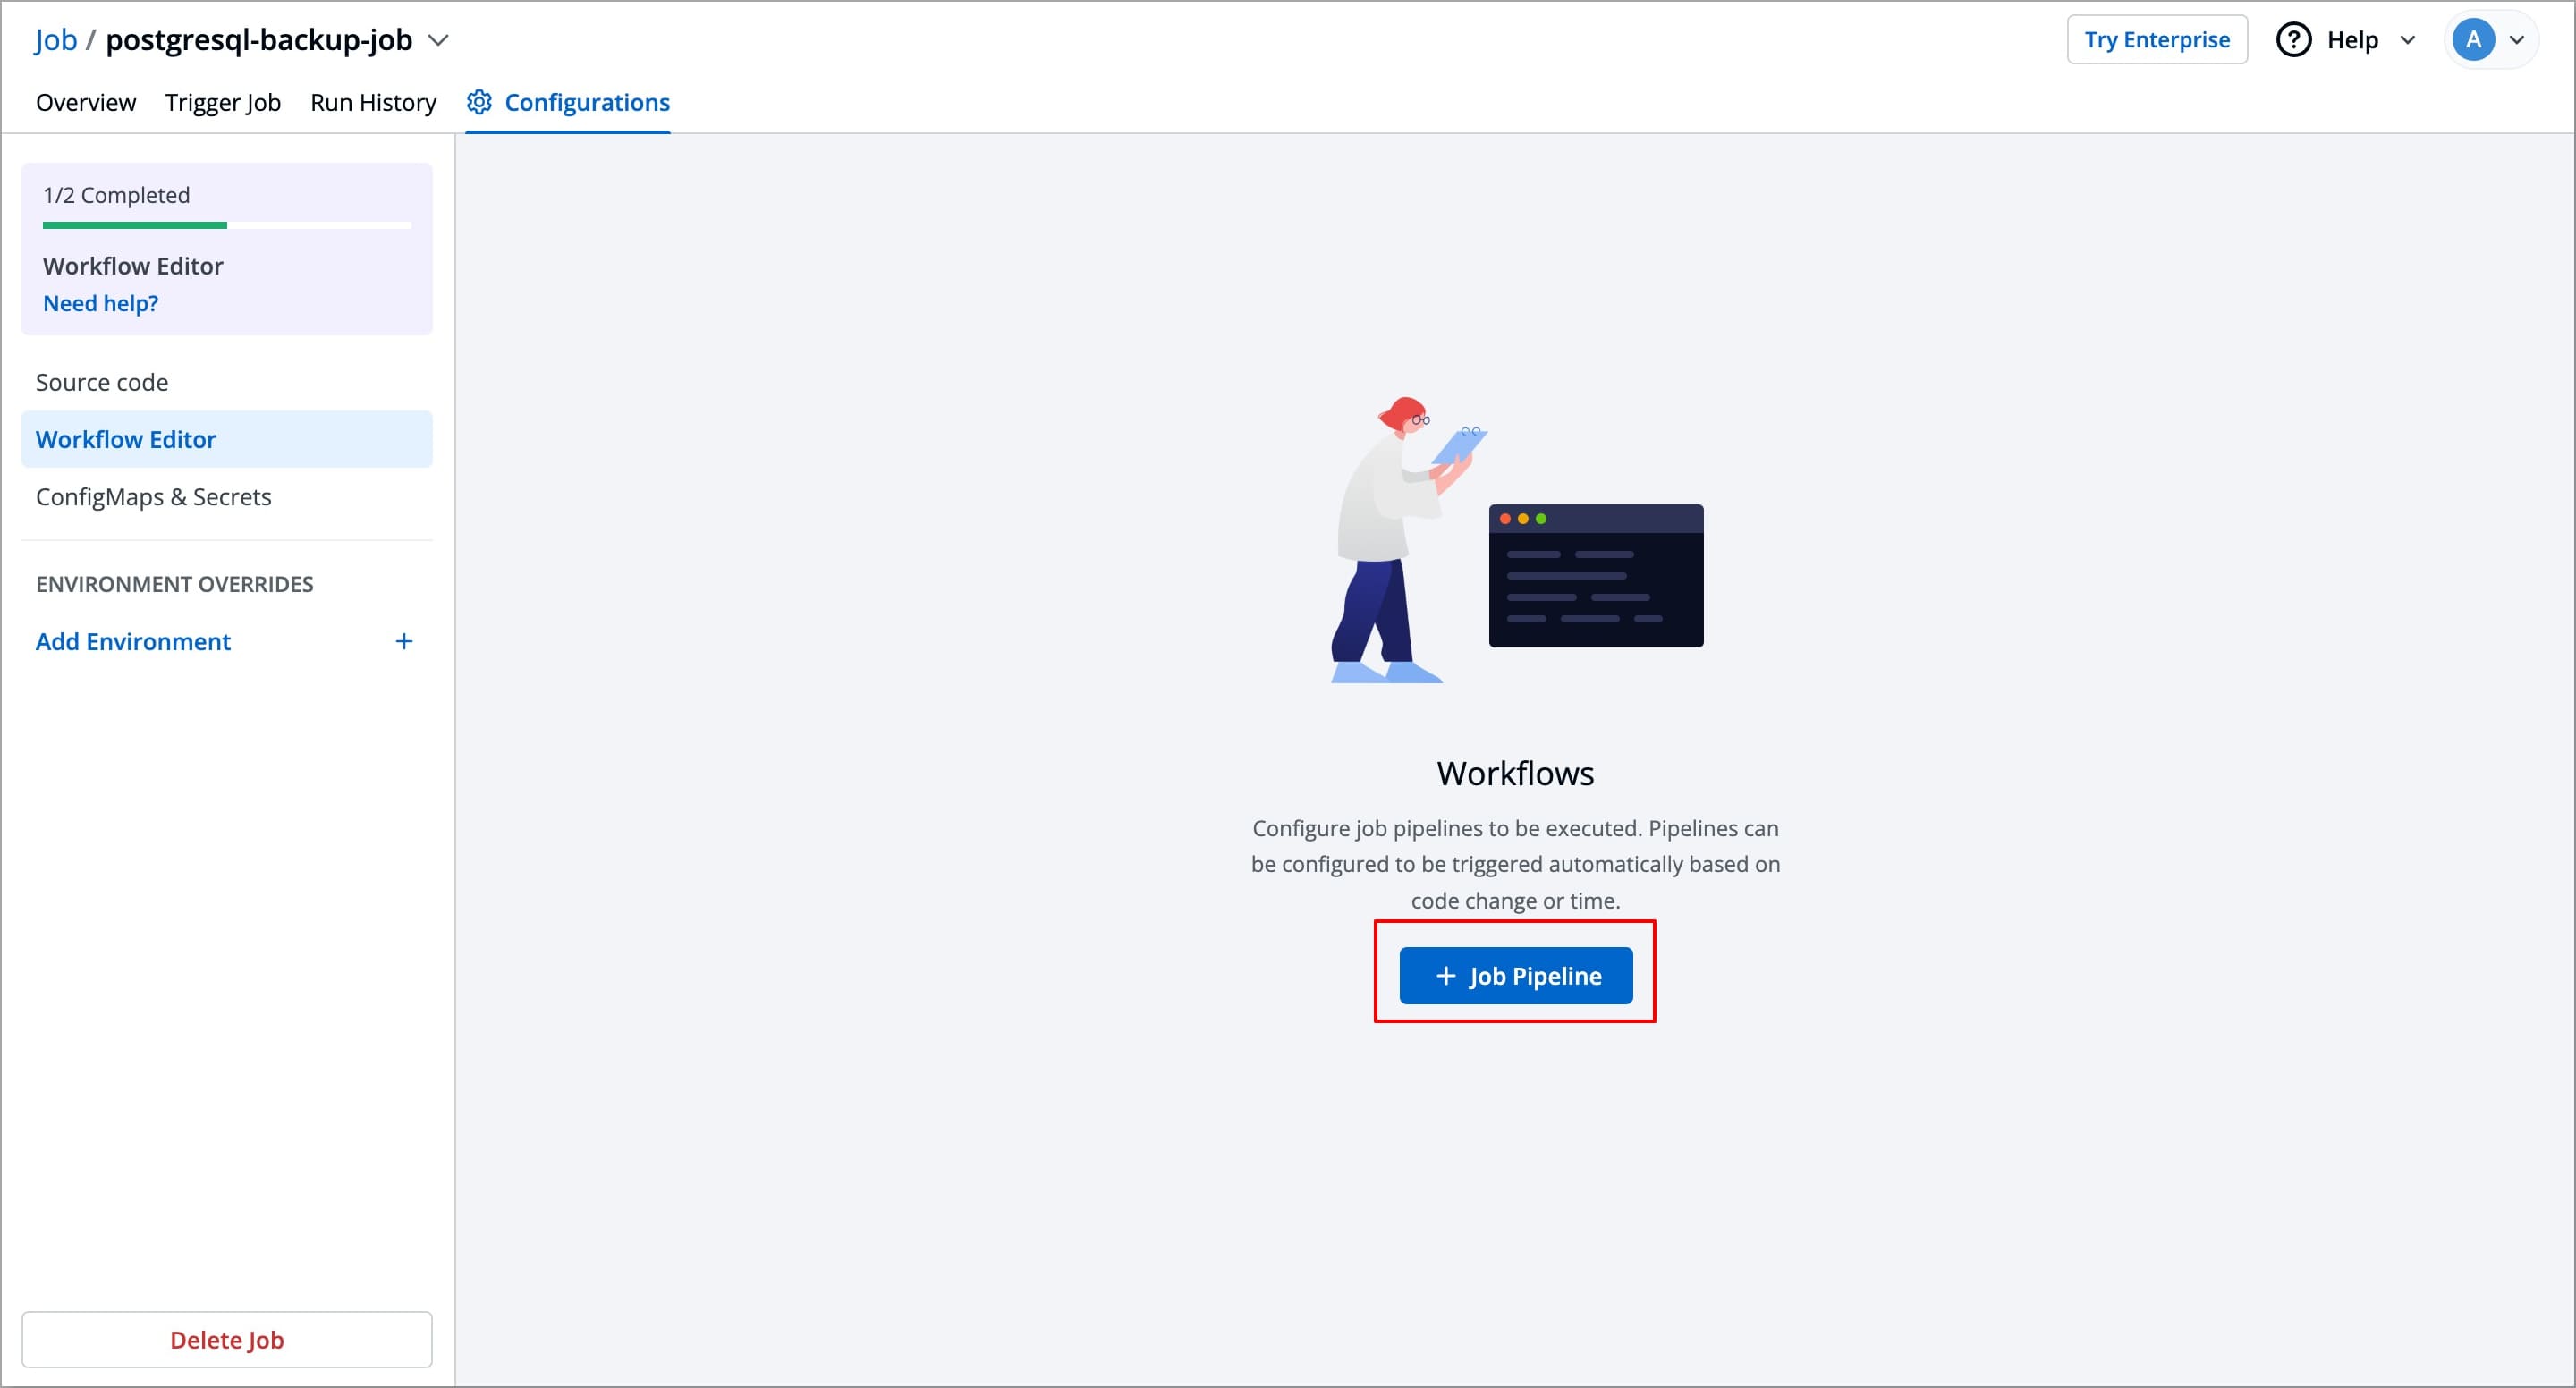
Click + Job Pipeline to create a new Job workflow. A pop-up Create job workflow will appear, asking you to enter a name for your Job workflow.
-
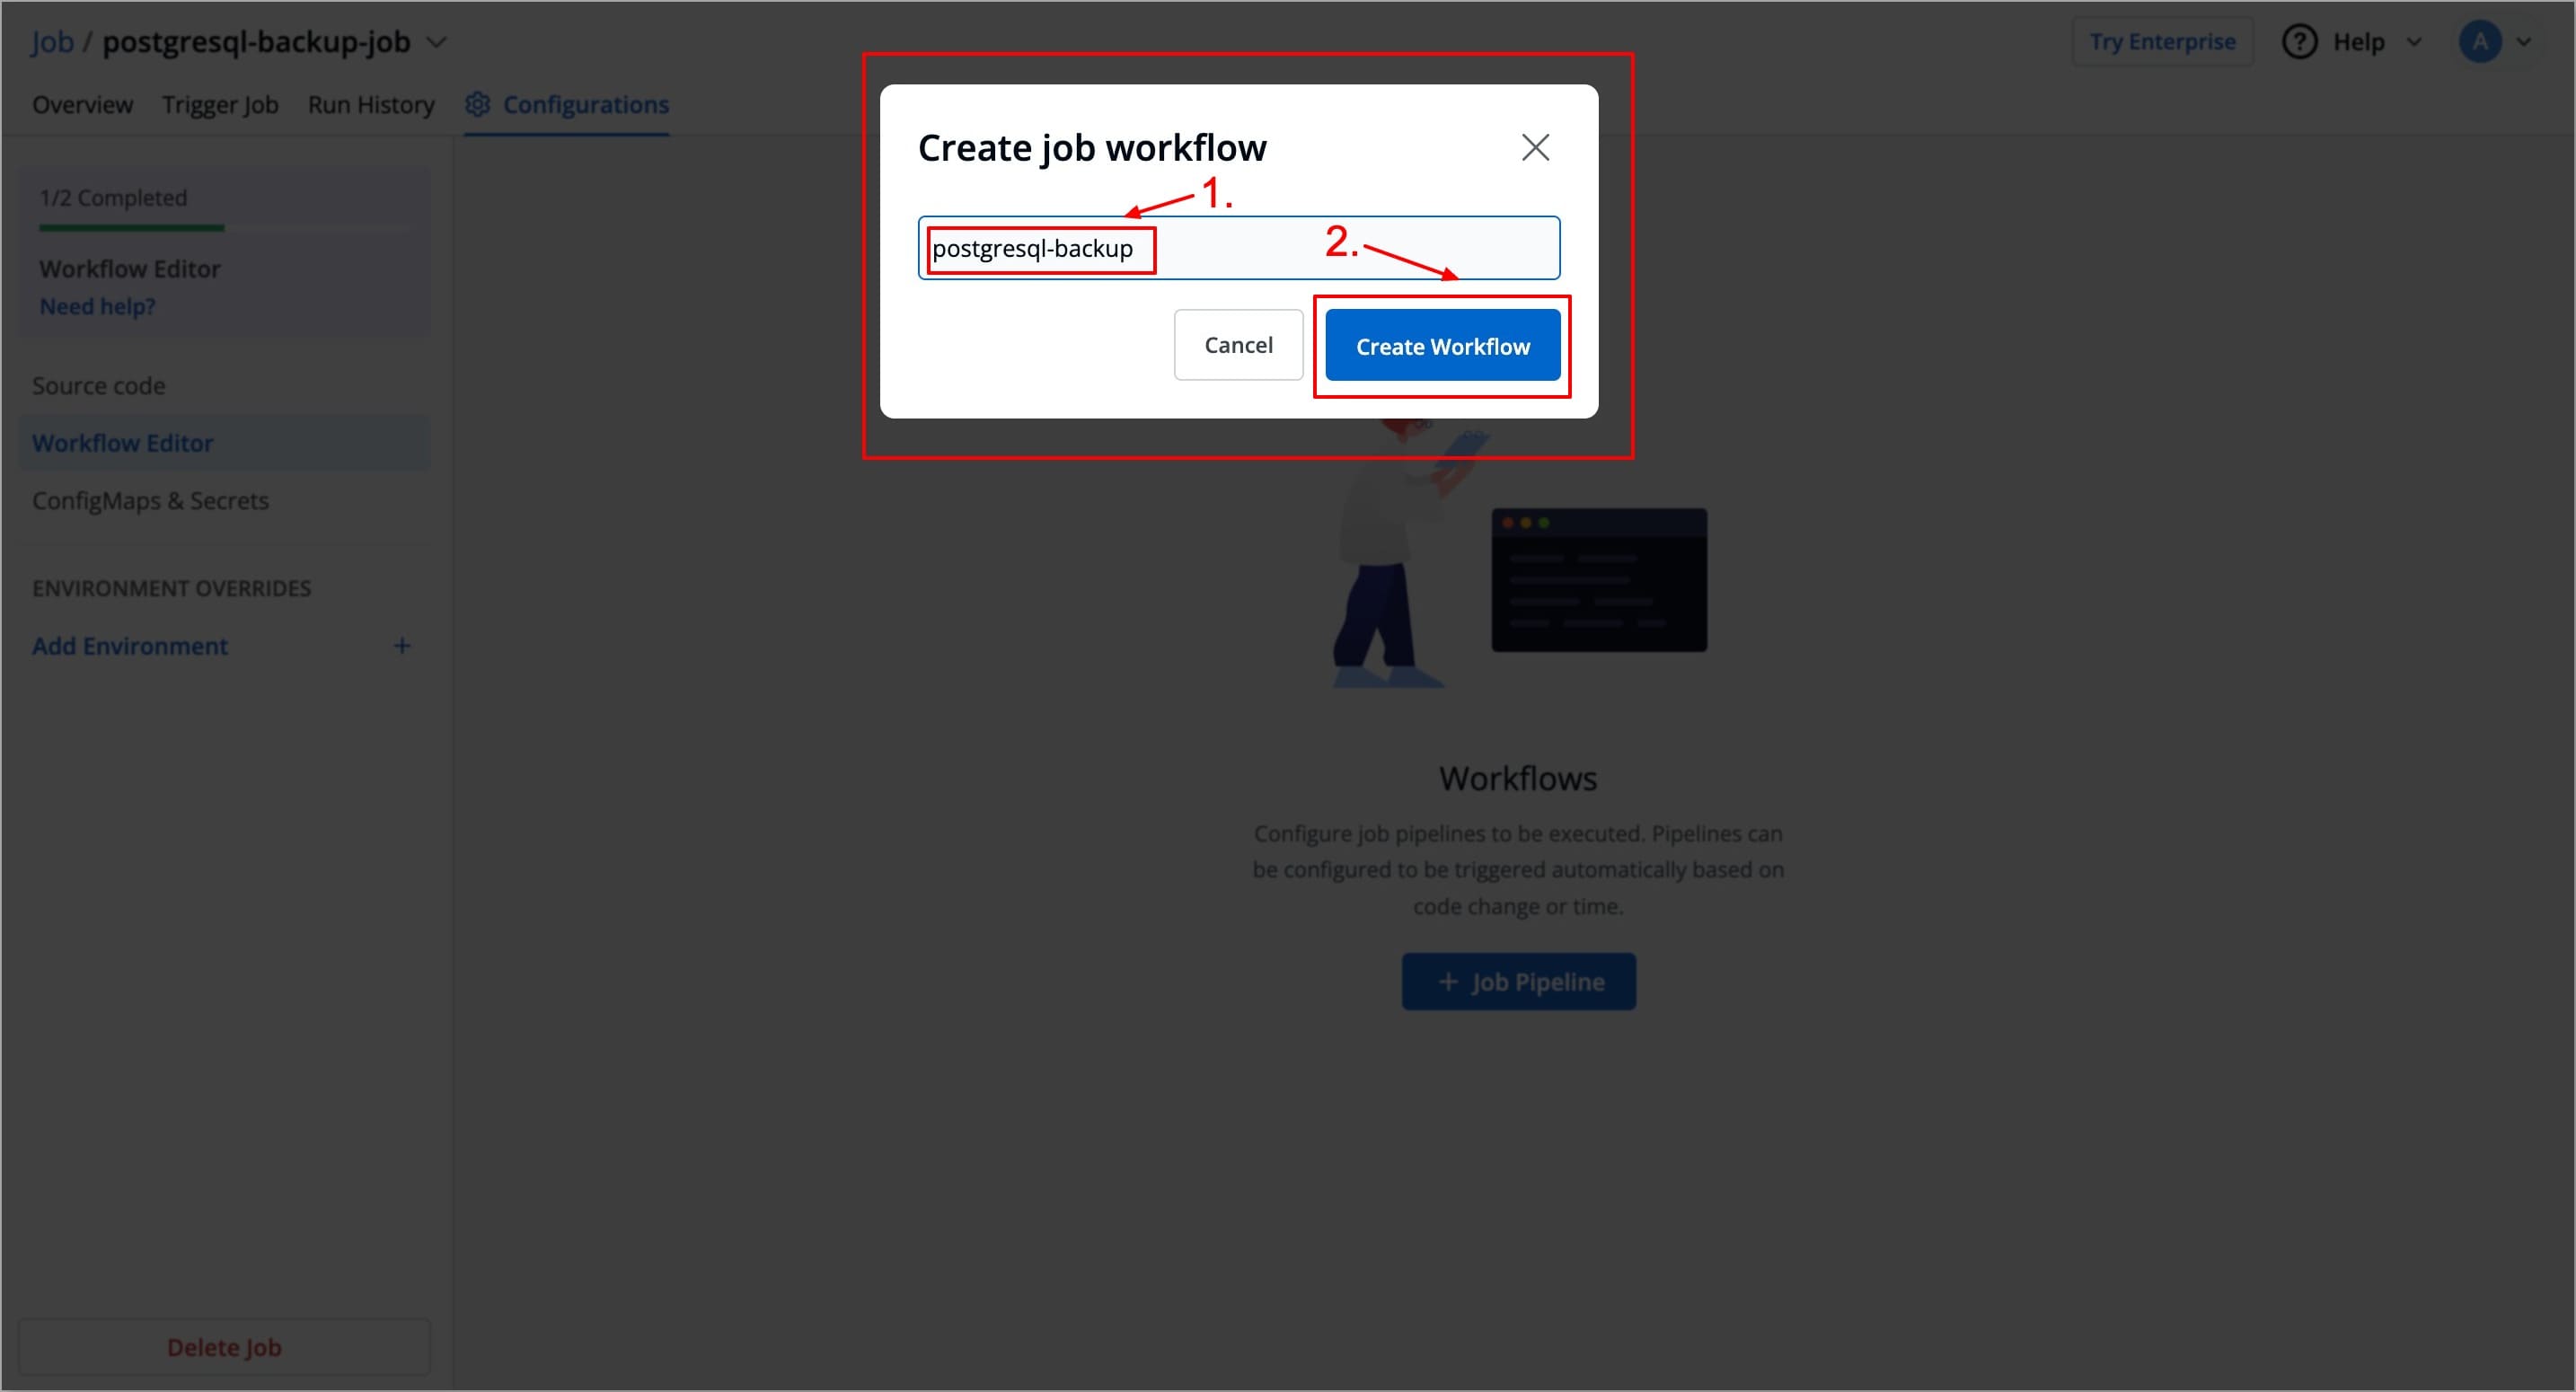
Enter the name for your Job workflow and click on the Create Workflow button. A new Job workflow will be created, in which you can add a job pipeline.
-
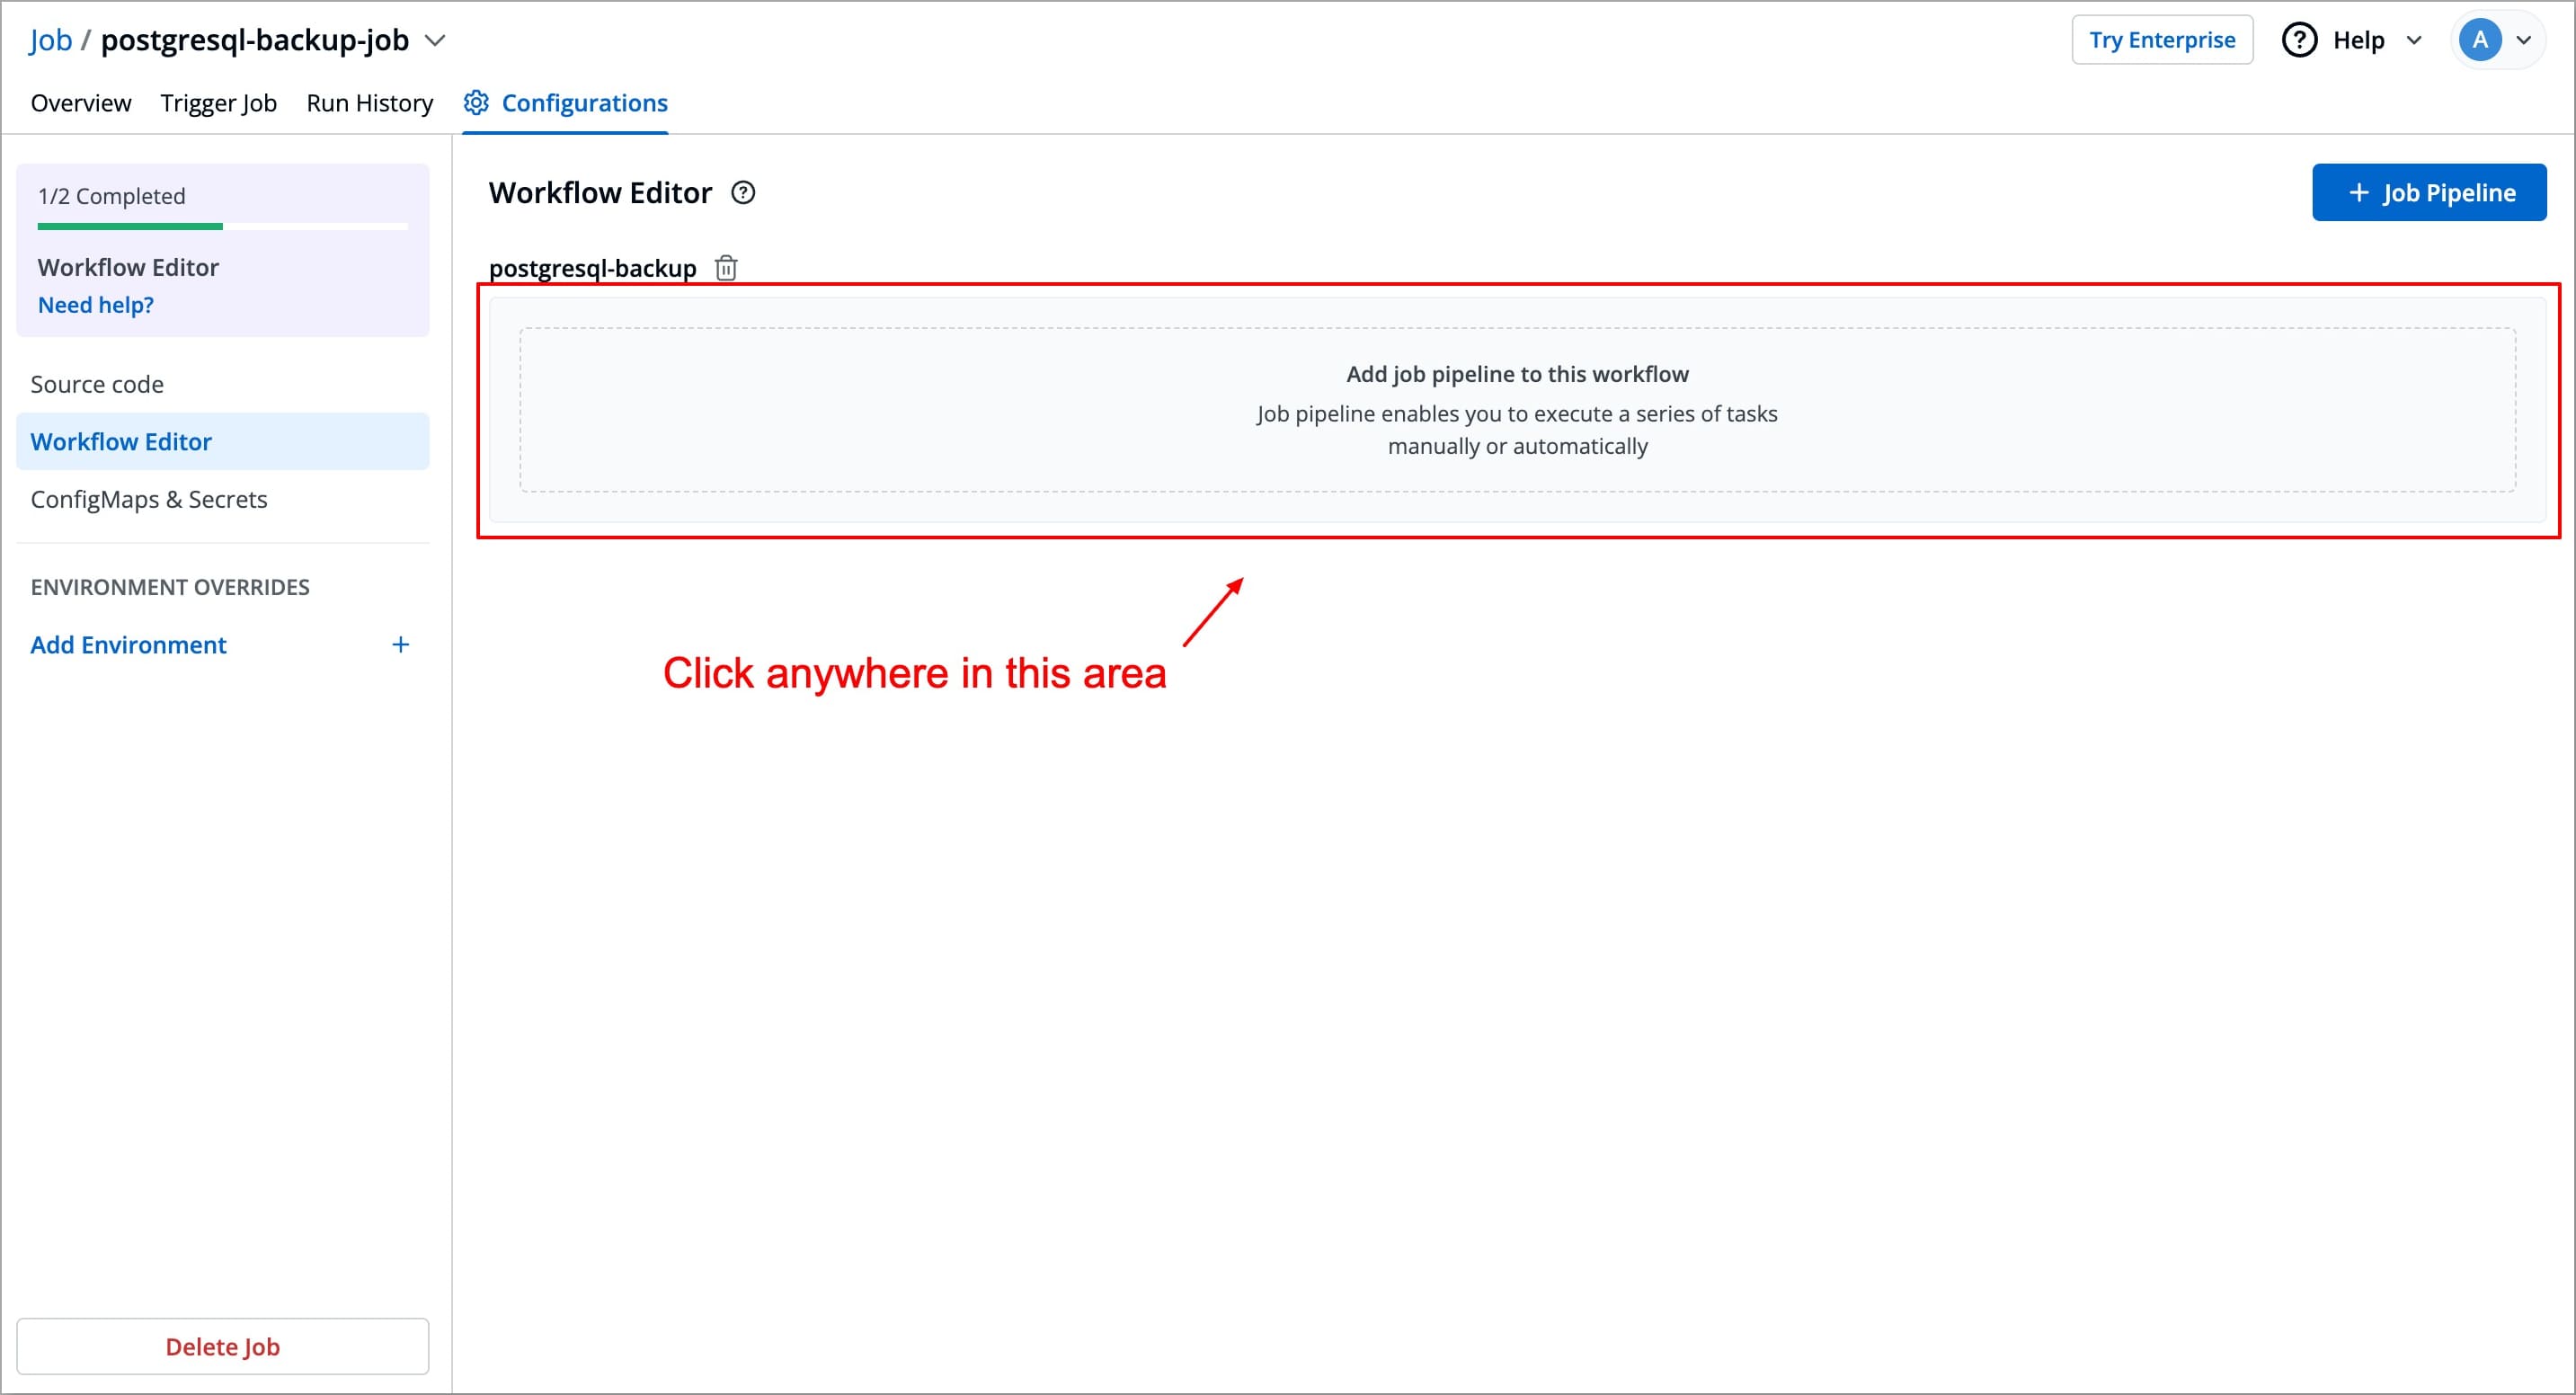
To add a job pipeline to your workflow, click anywhere in the Add job pipeline to this workflow area under the job workflow name. This opens the Create job pipeline Window in which you can create and configure your job.

Create Job Pipeline
In the Create job pipeline window, you can create and configure job pipelines.
It includes 2 stages
Basic Configurations
This stage allows you to define primary configurations such as Pipeline name, Source Type, Branch Name, and how the job should be triggered. Refer to the following table to configure each field.
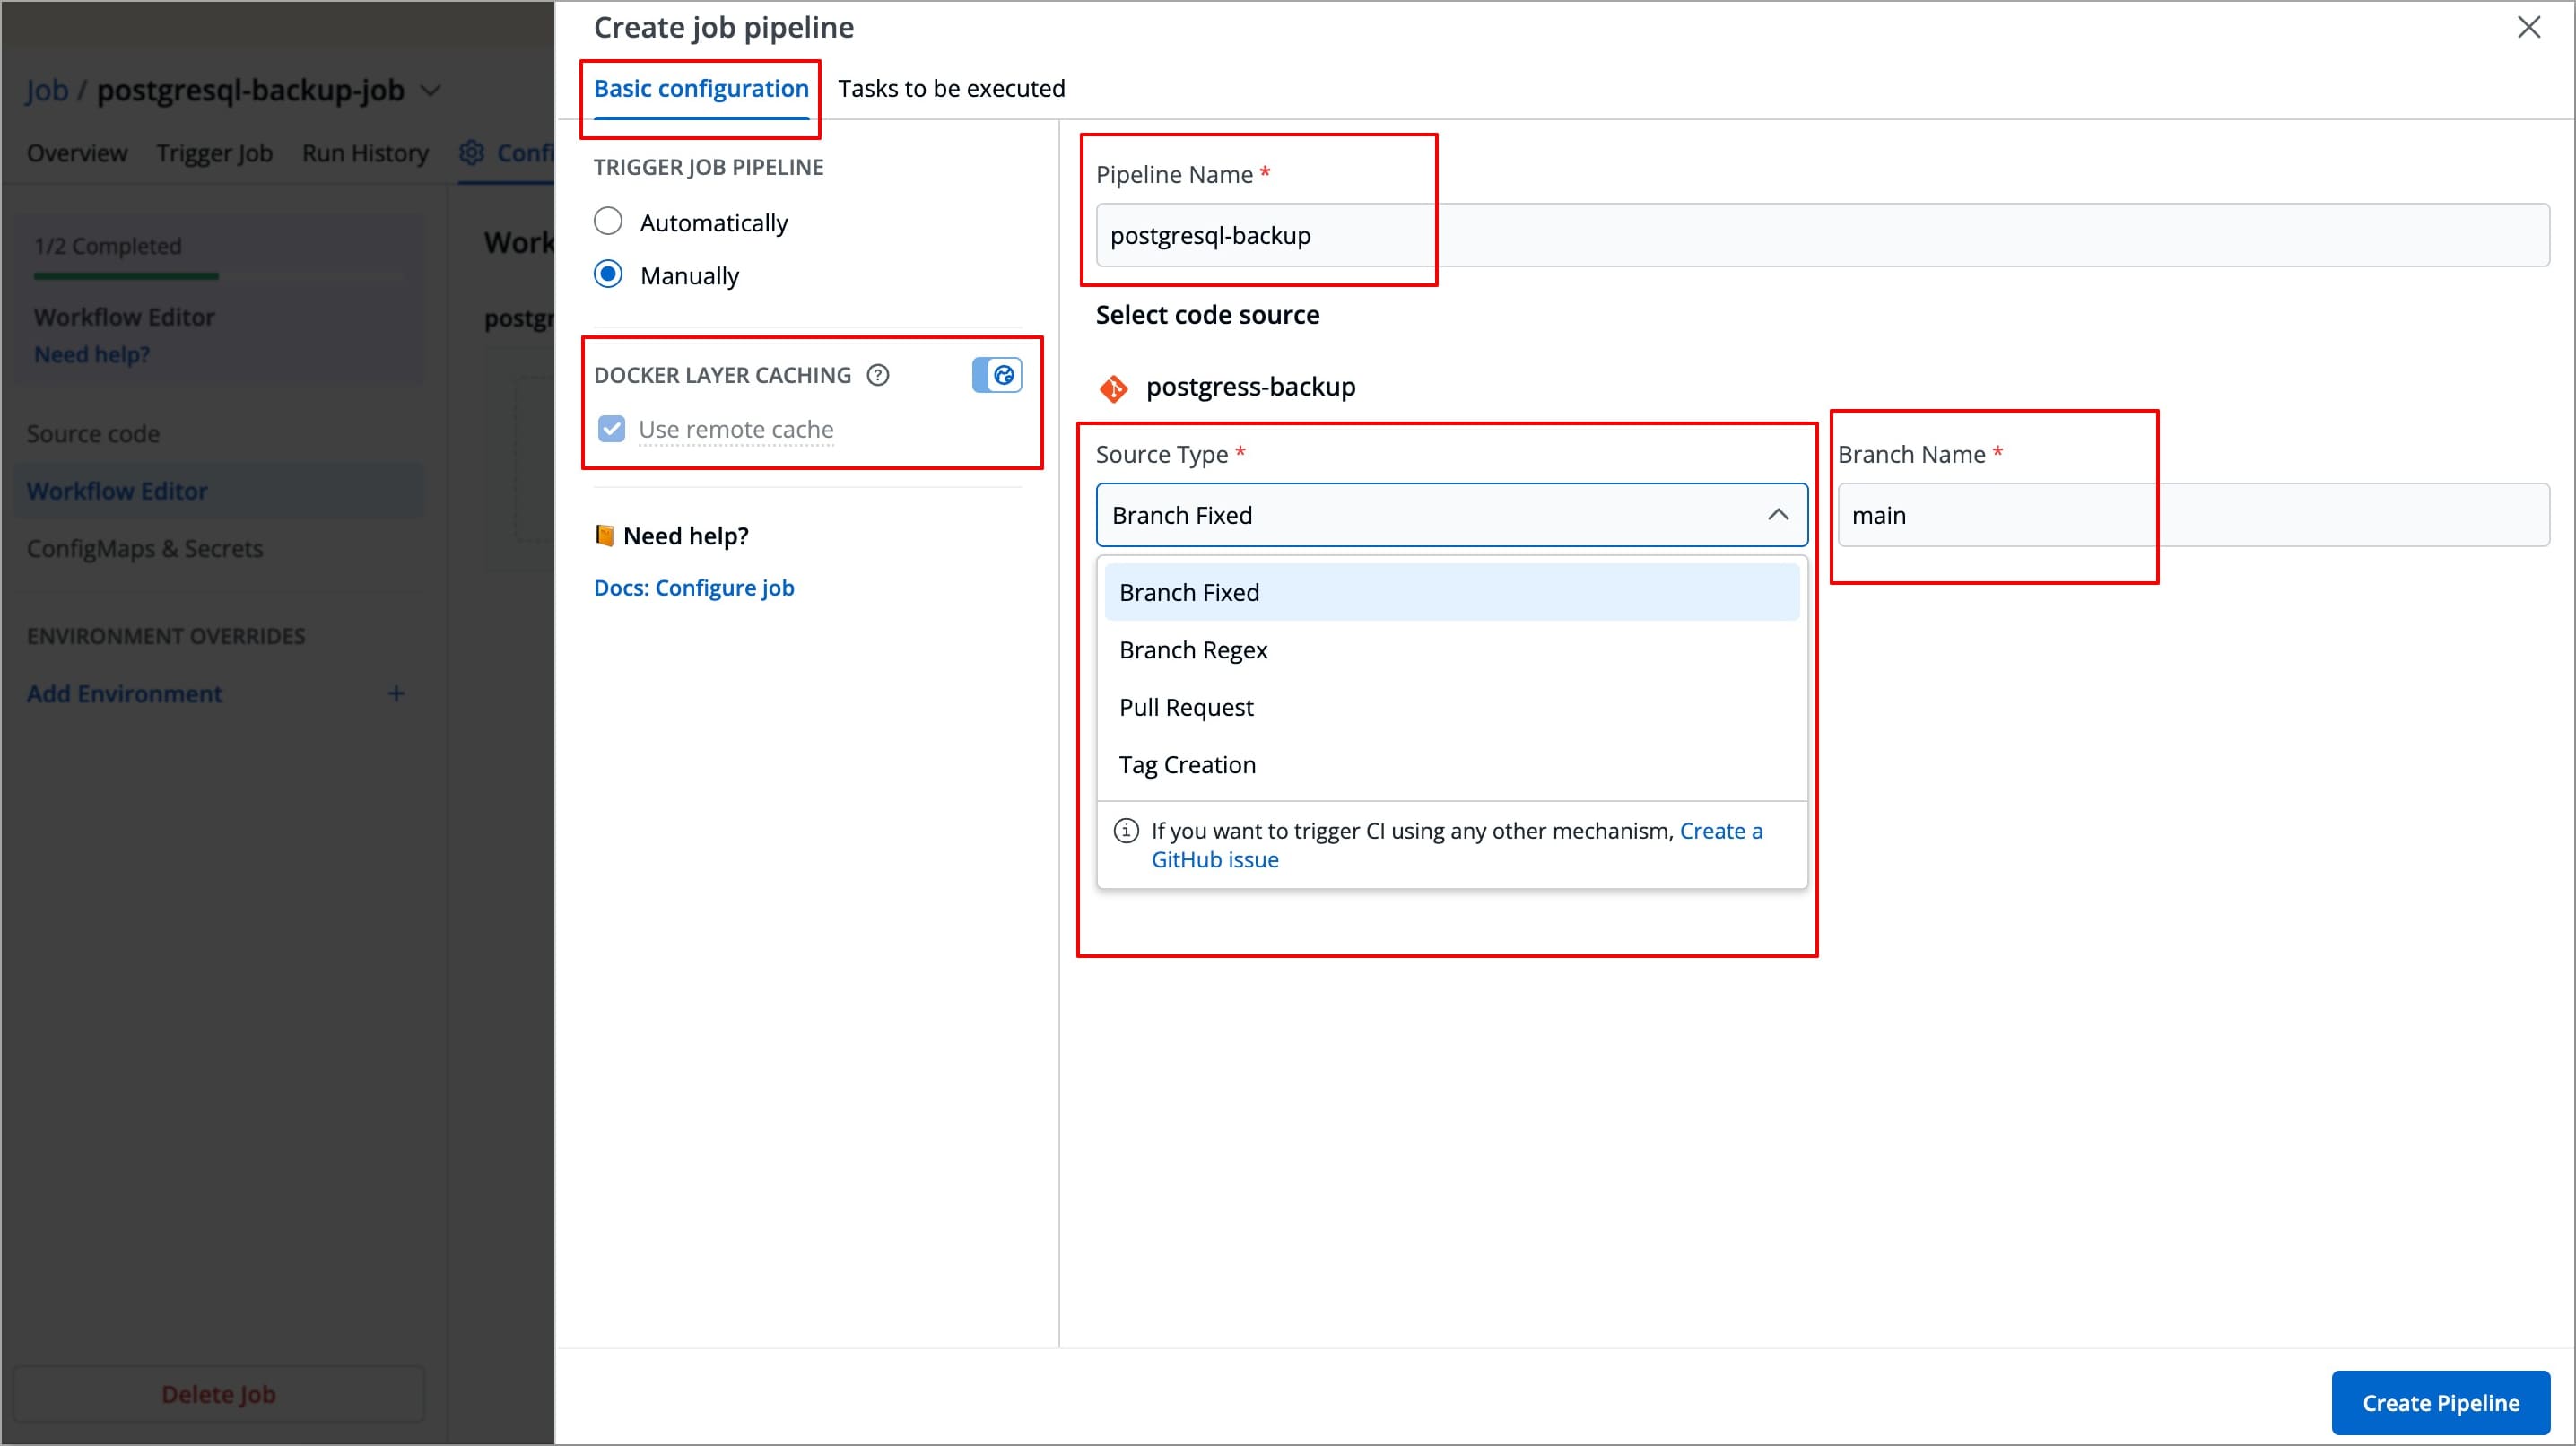
| Field Name | Description |
|---|---|
Trigger Job Pipeline | The job execution may be set to:
|
Pipeline Name | Assign a name to your job pipeline |
Source type | Source type to trigger the job pipeline. Available options: Branch Fixed, Branch Regex, Pull Request, Tag Creation |
Branch Name | Branch that triggers the CI build |
Use remote cache | Enable this option to use the Docker cache from previous builds. Docker's layer caching mechanism allows unchanged docker images layers to be reused across pipeline runs, thus drastically reducing execution times The globe toggle, next to
|
Tasks to be Executed
The Stage allows you to define tasks for your job.
You can create one or more tasks. Tasks can be dependent on each other for execution. In other words, the output variable of one task can be used as an input for the next task to execute your job. Tasks will execute in the order they are arranged and can be rearranged by drag-and-drop; however, the order of passing the variables must be followed.
To create a task:
-
Navigate to Tasks to be executed in the Create job pipeline window.
-
Click Add Task to add a task in your job pipeline.
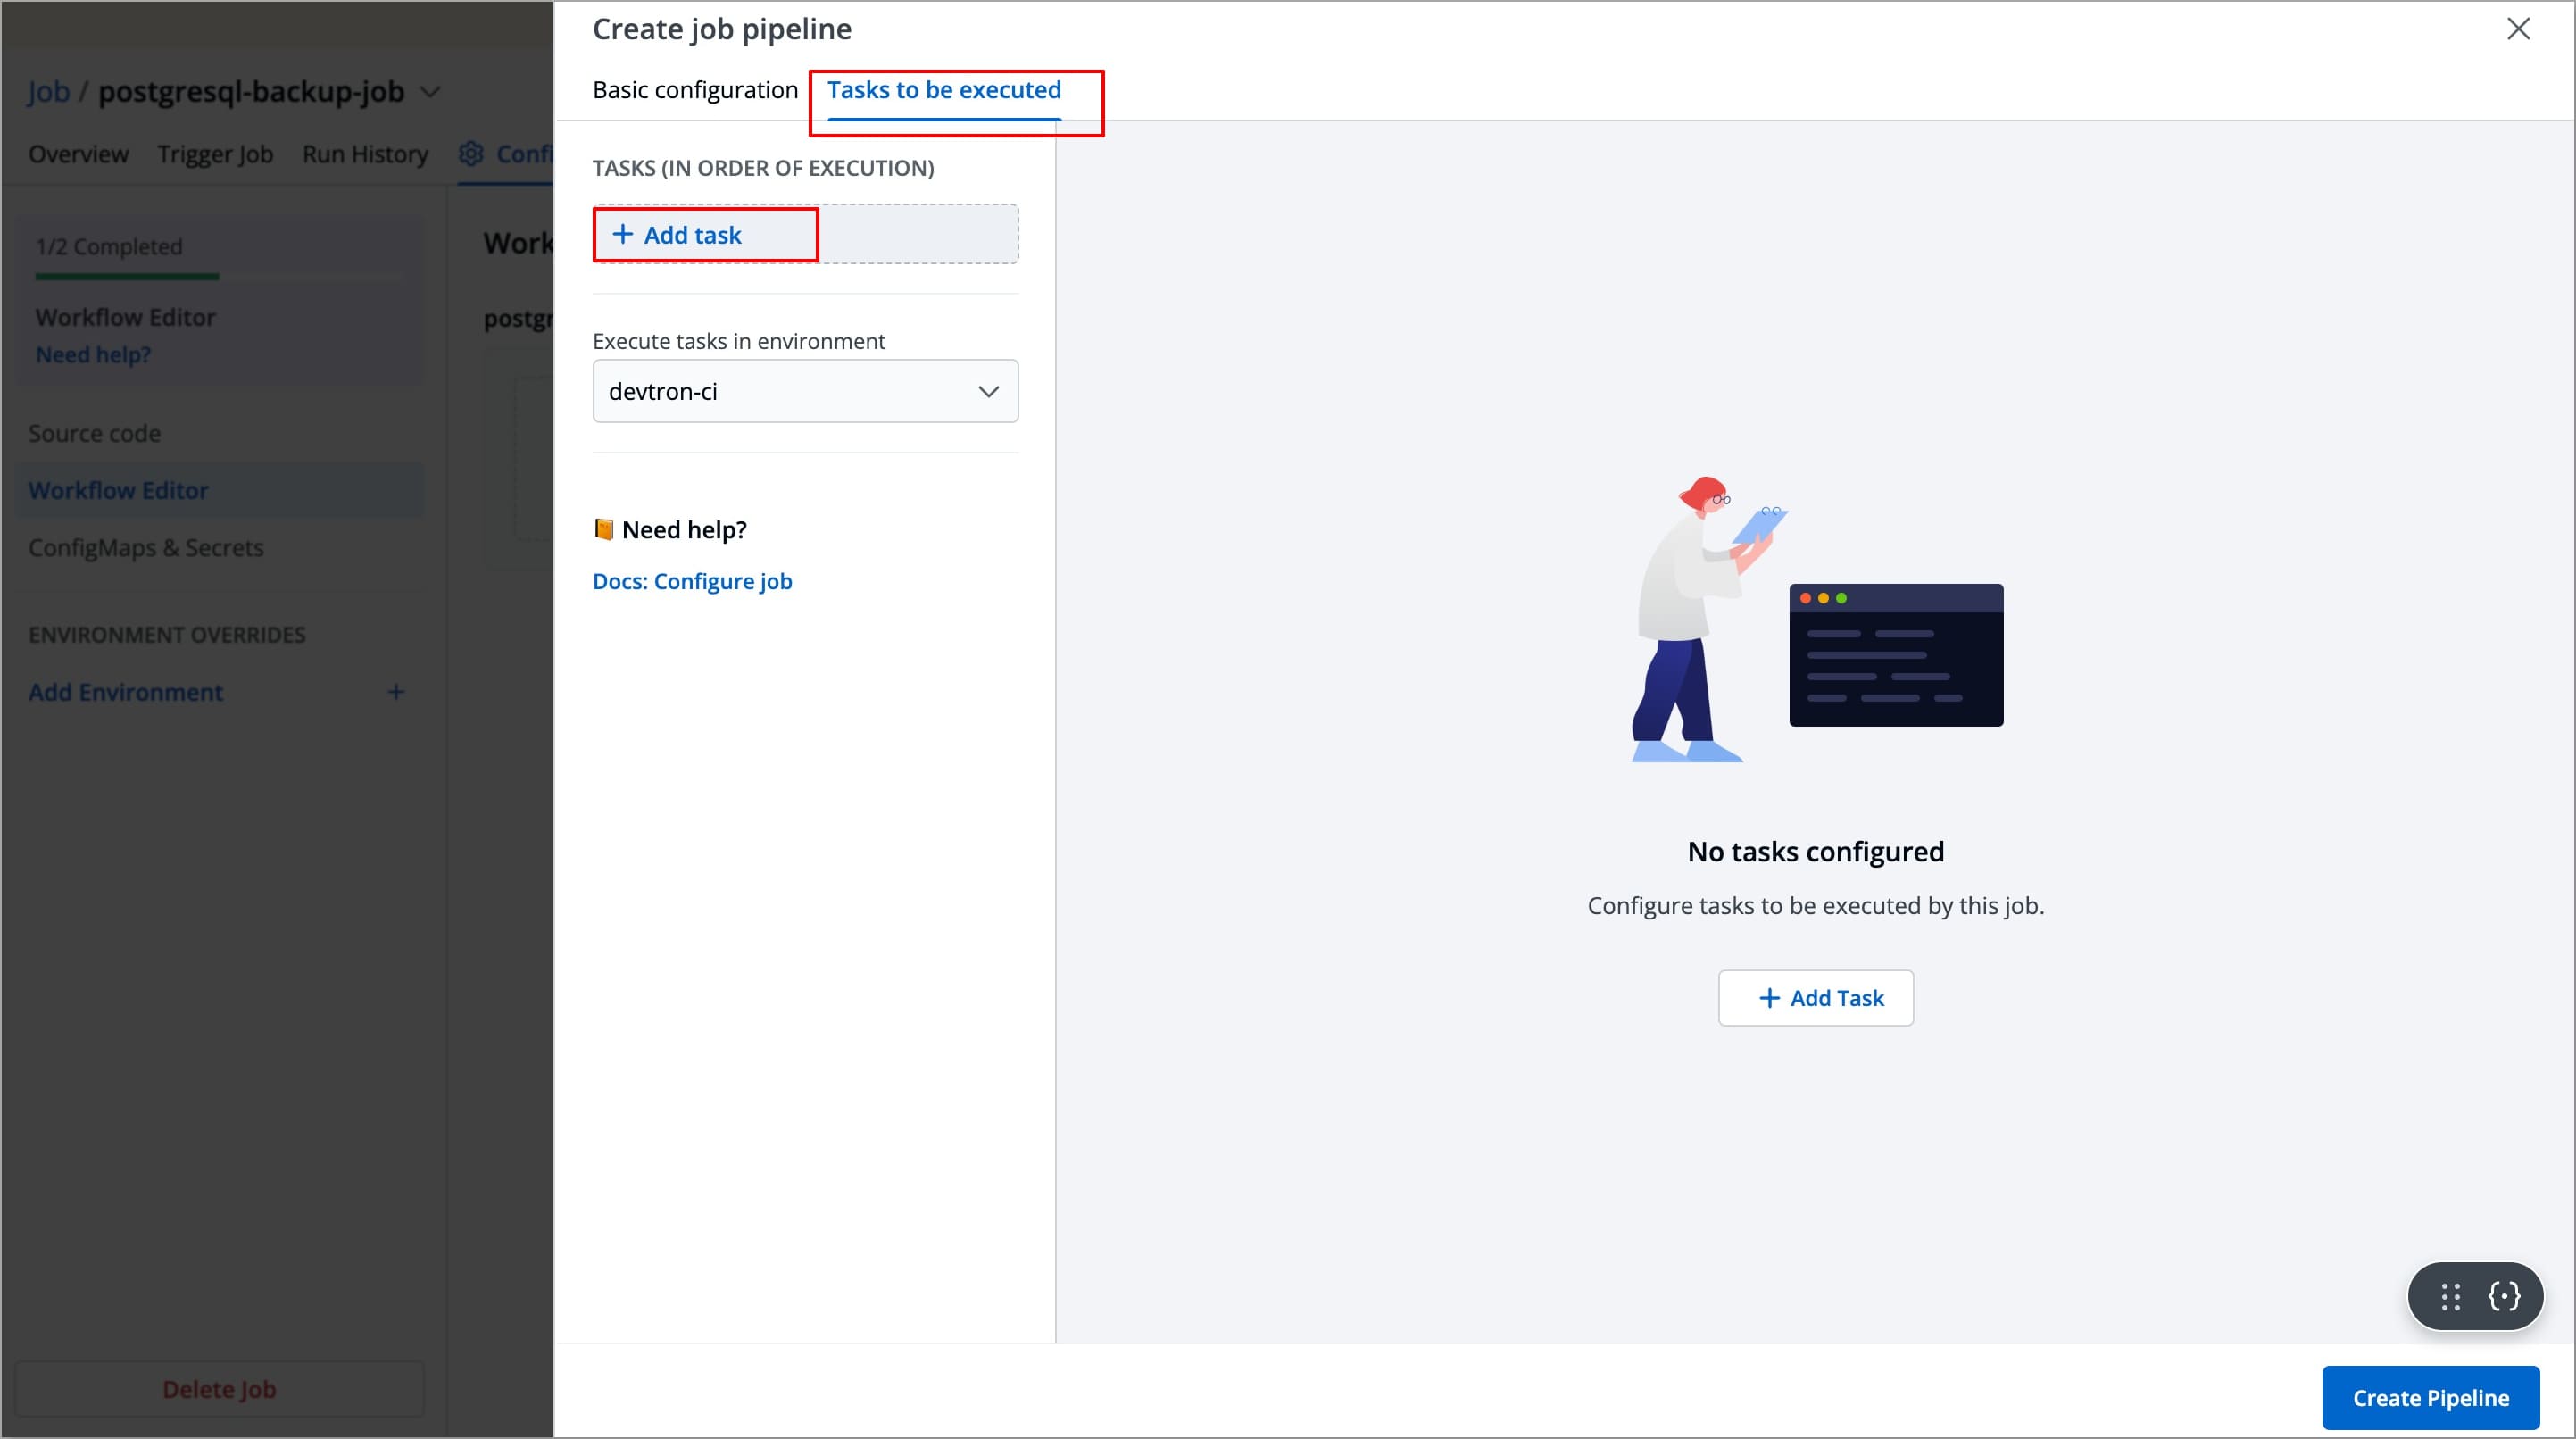
-
A new task will be added (on the left side of the 'Create job pipeline' window). You can configure the task either by selecting one of the available preset plugins or by Executing a custom script
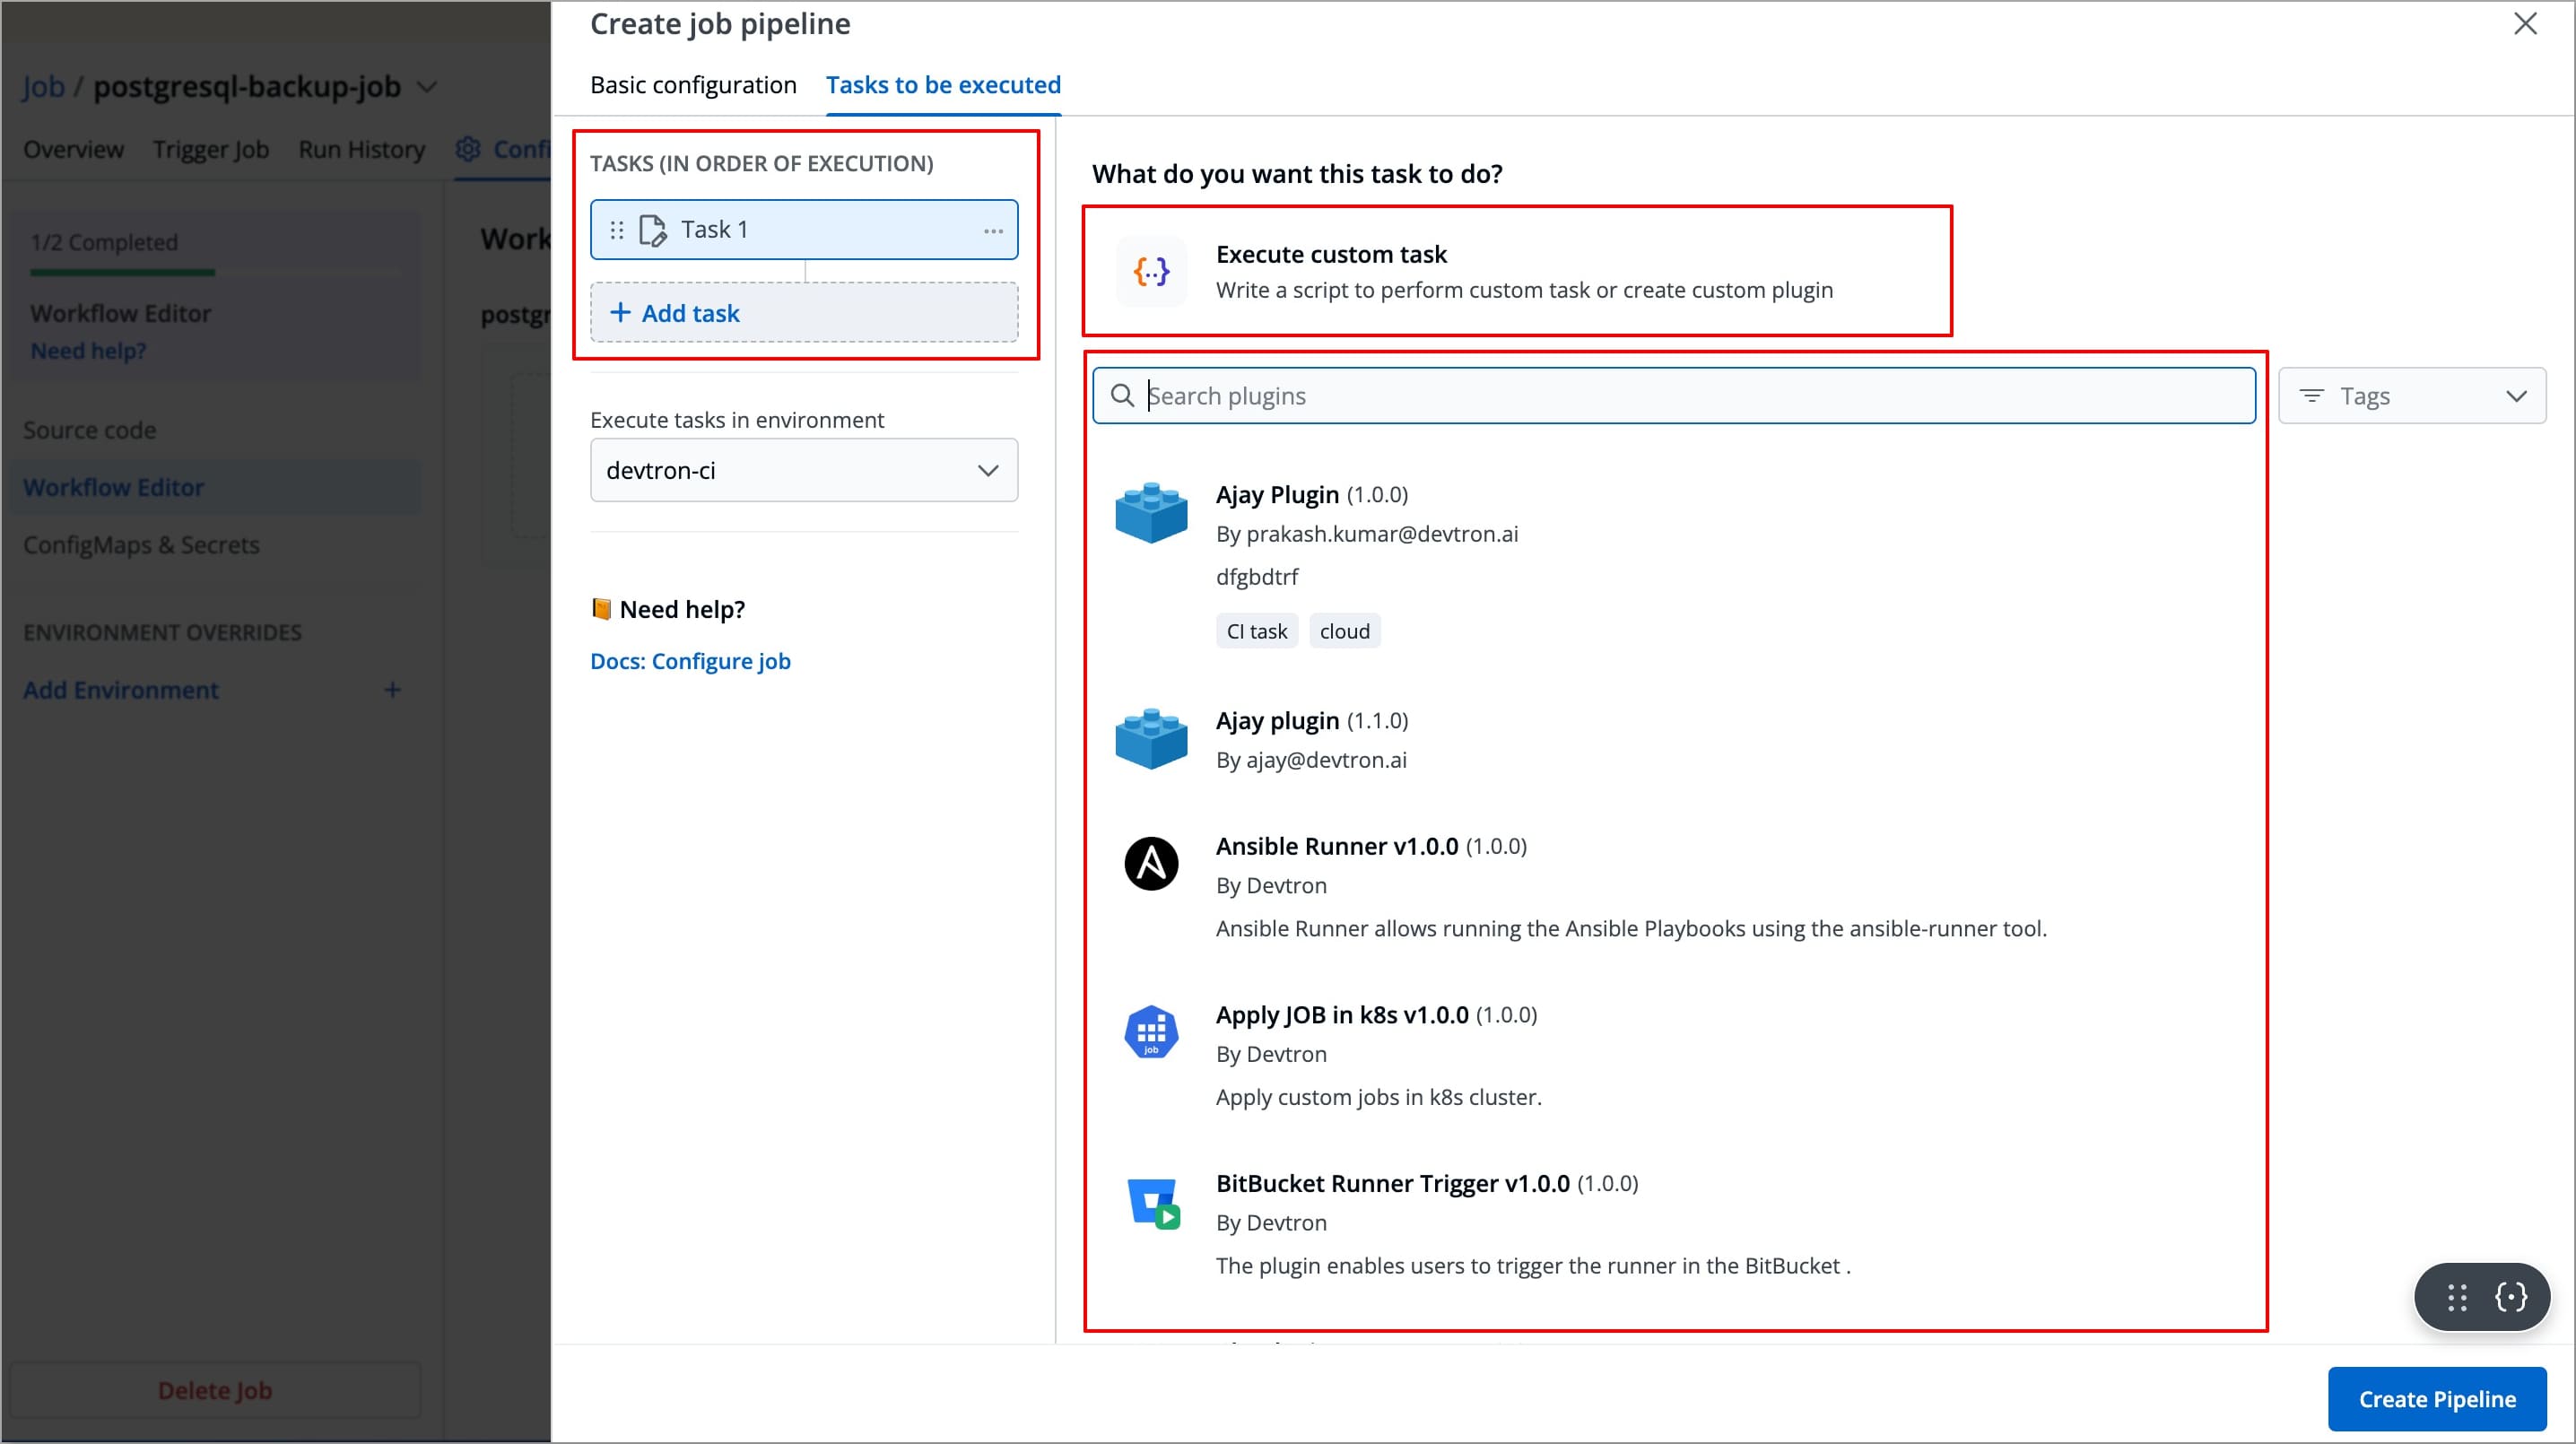
Create Task Using Preset Plugins
In Devtron, preset plugins are pre-defined tasks templates that helps you automate and execute common operations such as provisioning infrastructure, taking backups, exporting container images etc., without writing custom scripts.
Devtron provides a set of built-in preset plugins, and you can also create your own plugins in Devtron according to your specific needs.
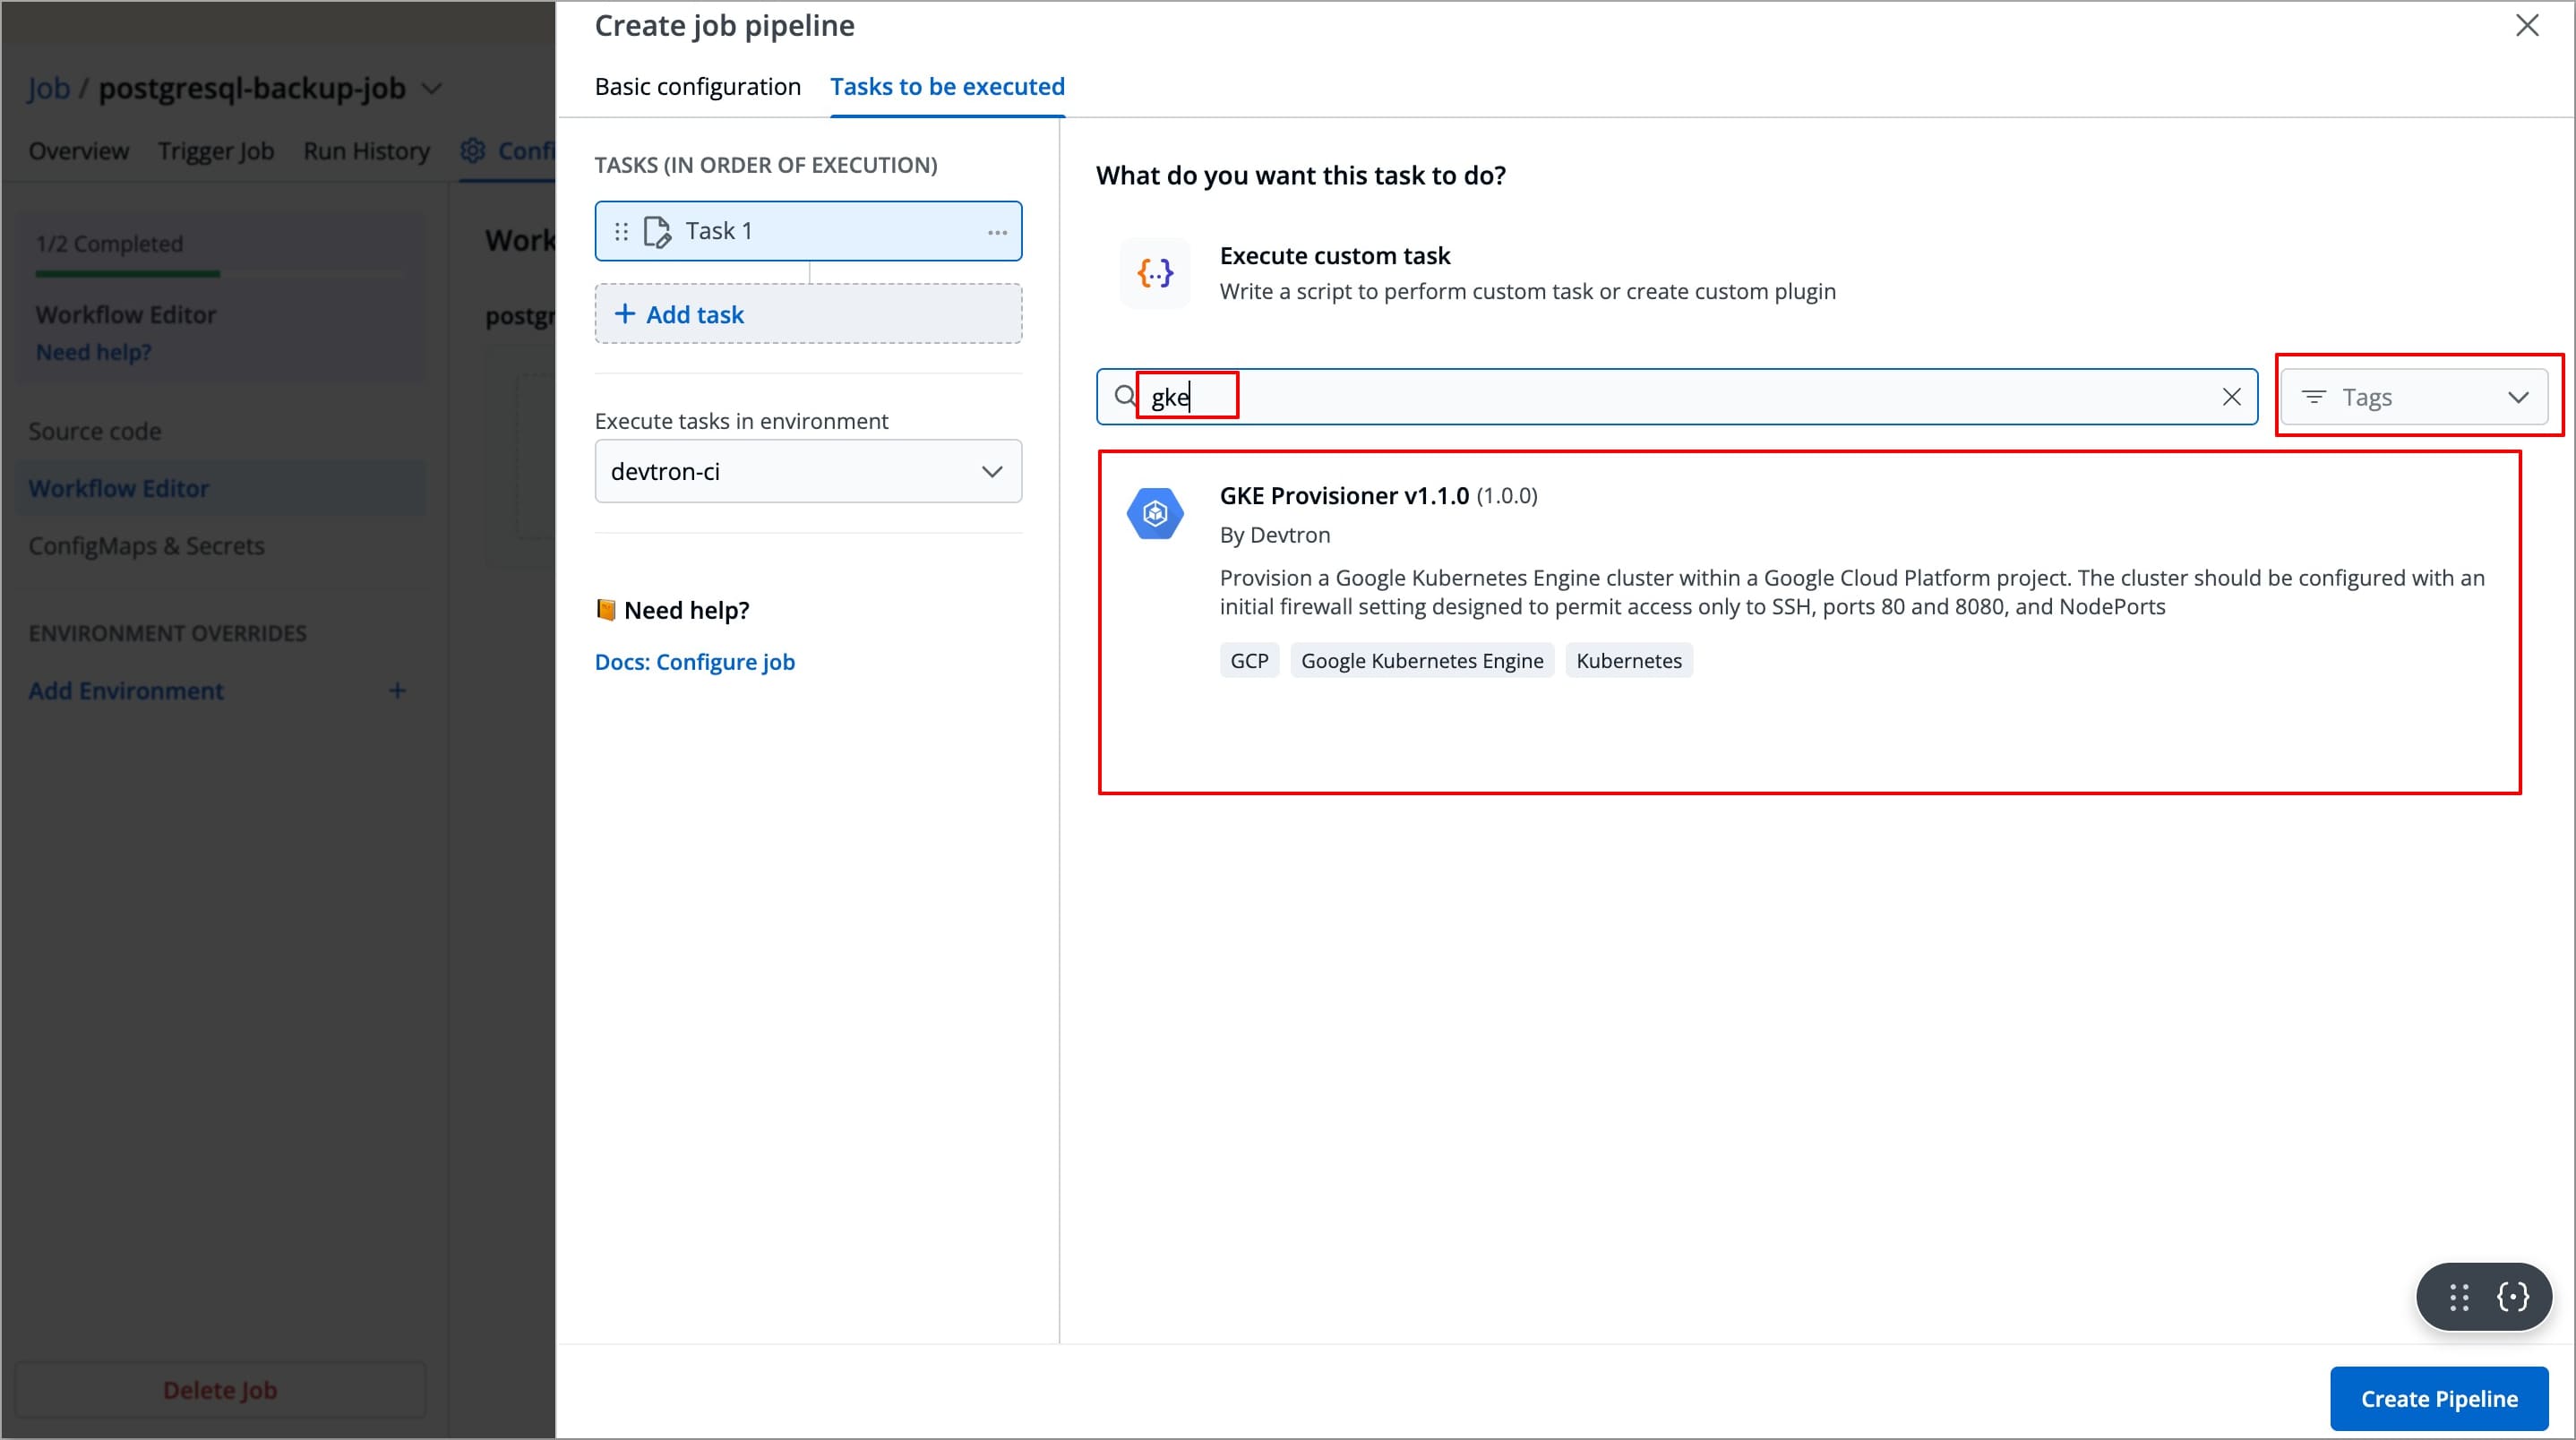
To create a task using preset plugins, let's take a scenario where you want to provision a GKE Cluster in your Google Cloud Console. Instead of defining a whole new custom script, you can use the GKE Provisioner plugin to provision the GKE cluster.
To create a task using the GKE Provisioner plugin, follow the steps below:
-
After configuring the basic configurations, select the Tasks to be executed Tab
-
Click +Add Task from the left side panel.
-
Search for
GKE Provisionerin the Search Plugin Search bar and select GKE Provisioner from the list of plugins.-
The right-side panel will display the fields specific to the GKE Provisioner plugin, which are required to be configured.
-
The left-side panel will now show a task under Tasks (IN ORDER OF EXECUTION), named after the selected plugin(by default), along with its logo.
You can change the task's name using the Task name field, but plugin's logo will remain indicating that it is a preset plugin.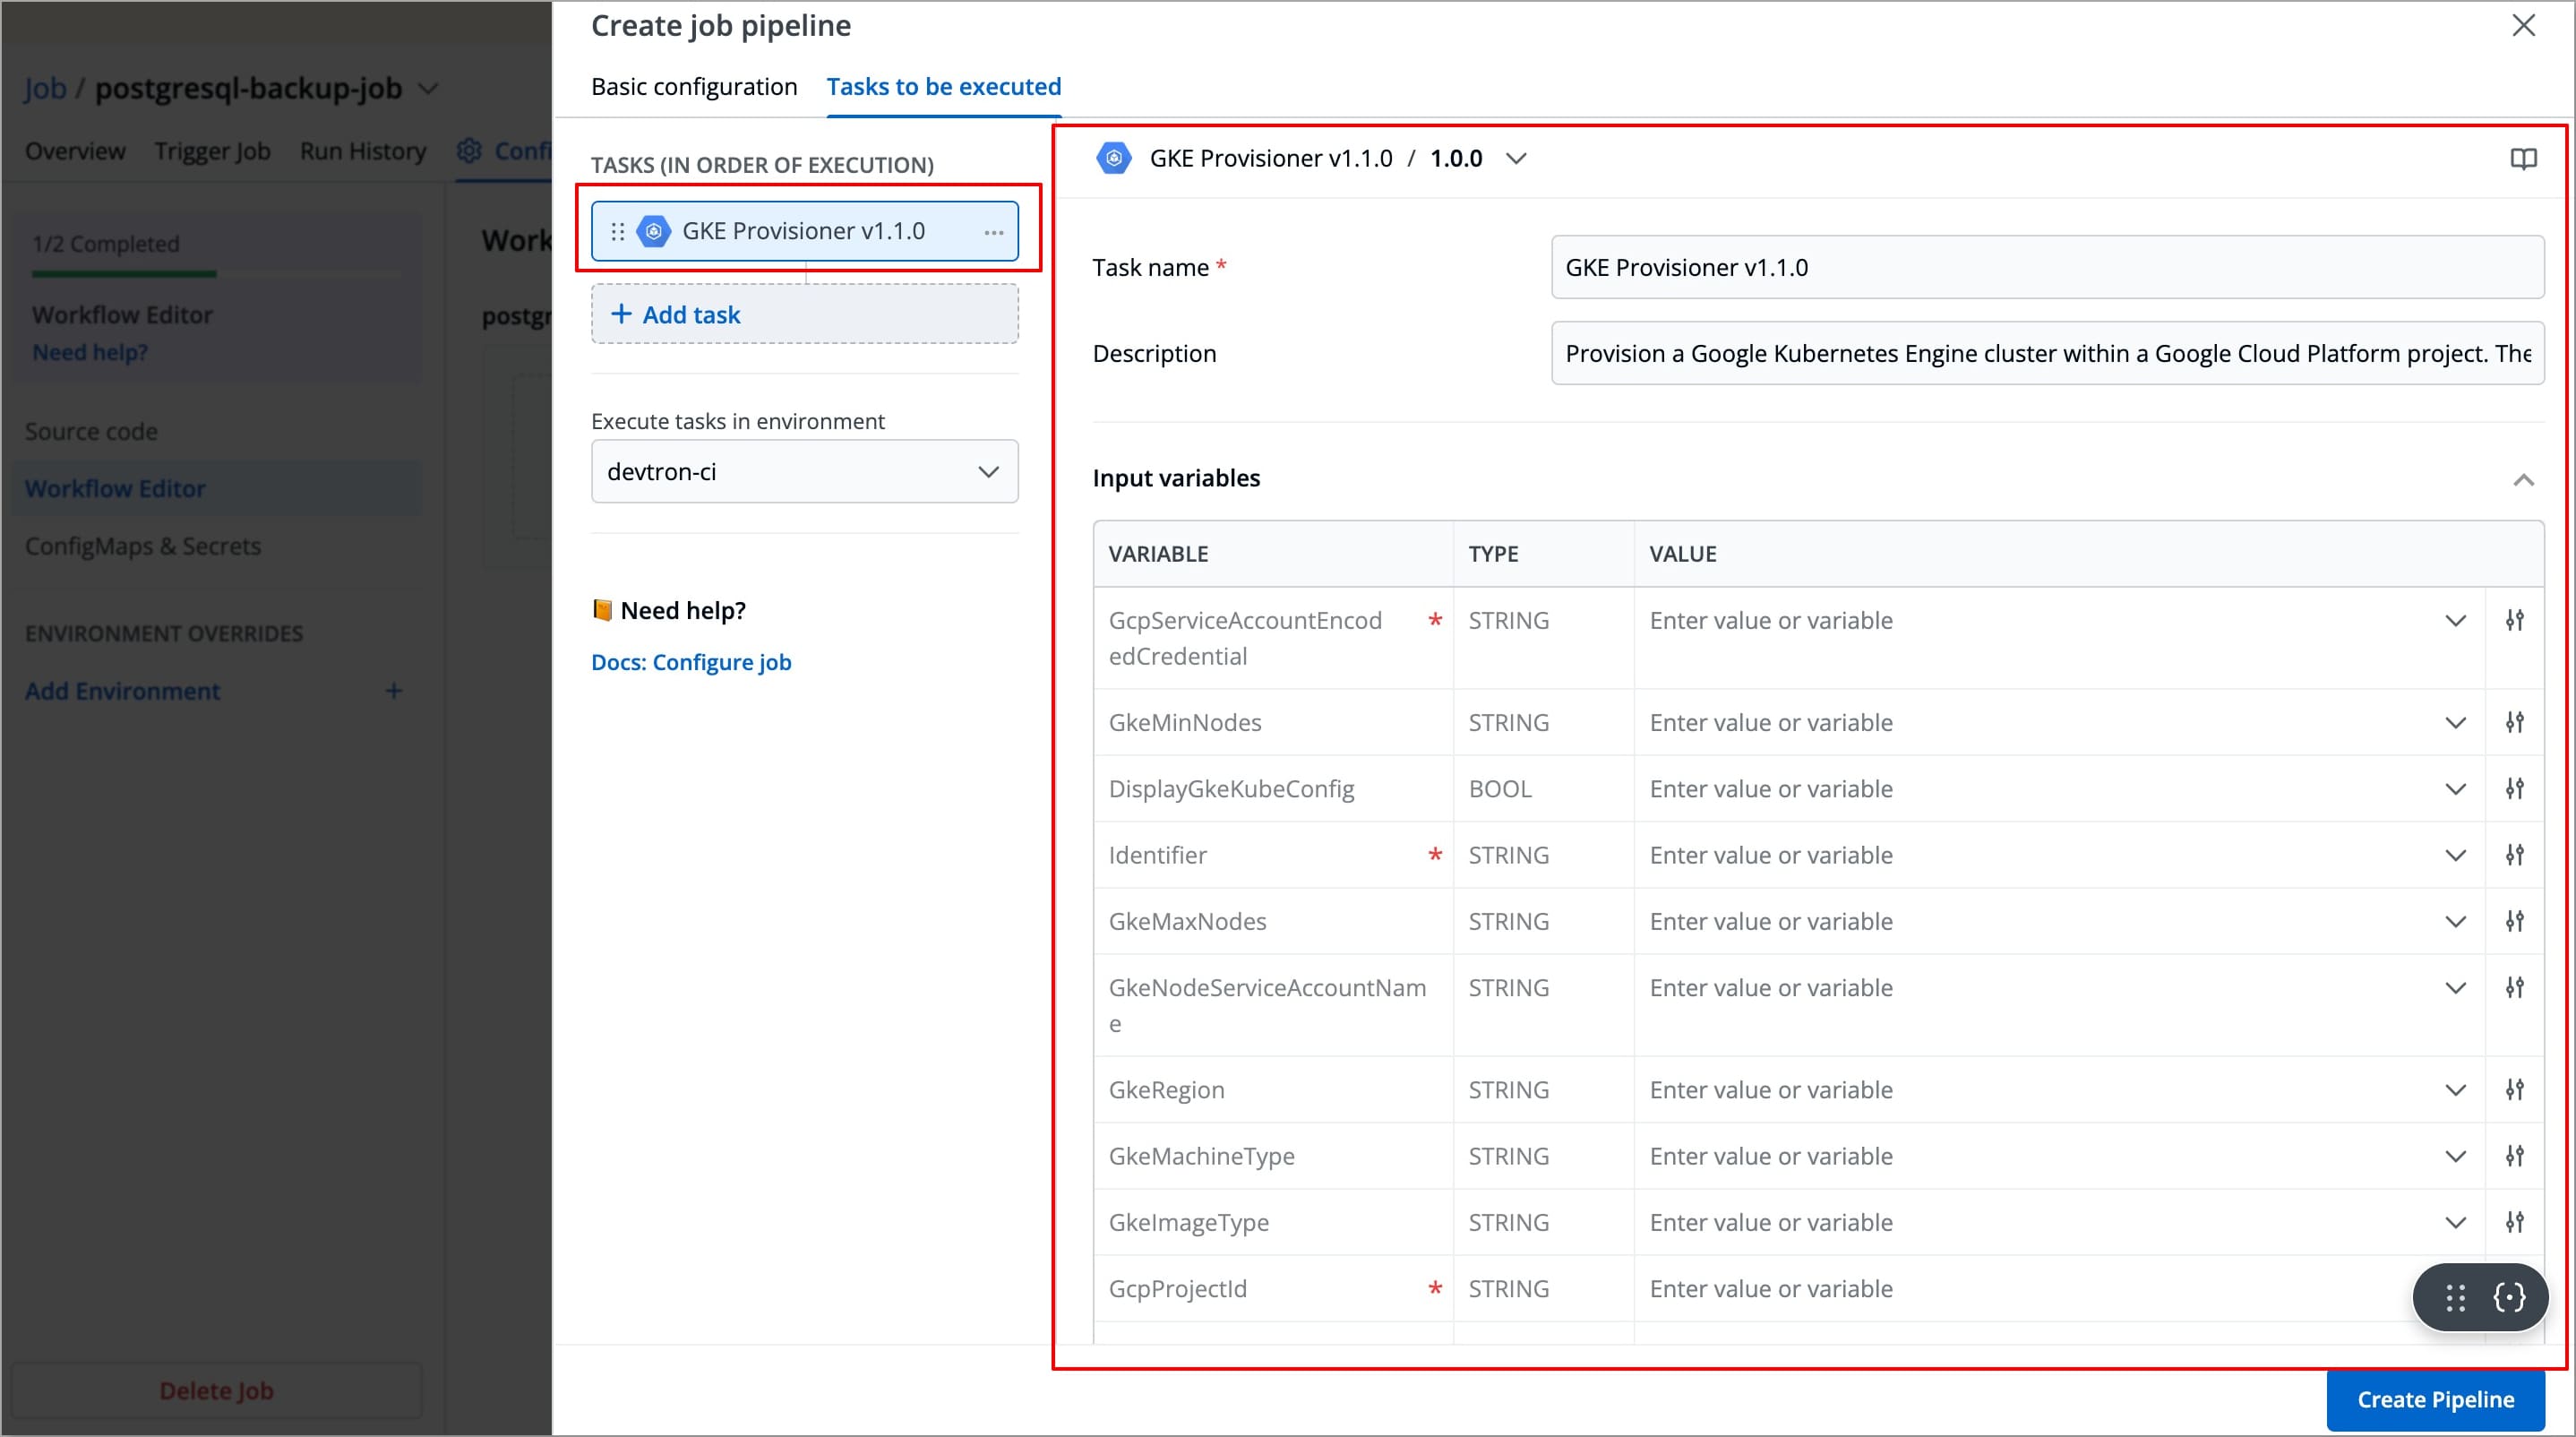
-
-
Refer the GKE Provisioner documentation to configure the GKE Provisioner fields with appropriate values. You may explore Plugins documentation to configure any of the available plugins.
-
After configuring the fields successfully, your task will be created. If you wish, you can add more tasks by clicking on + Add task in the left-side panel.
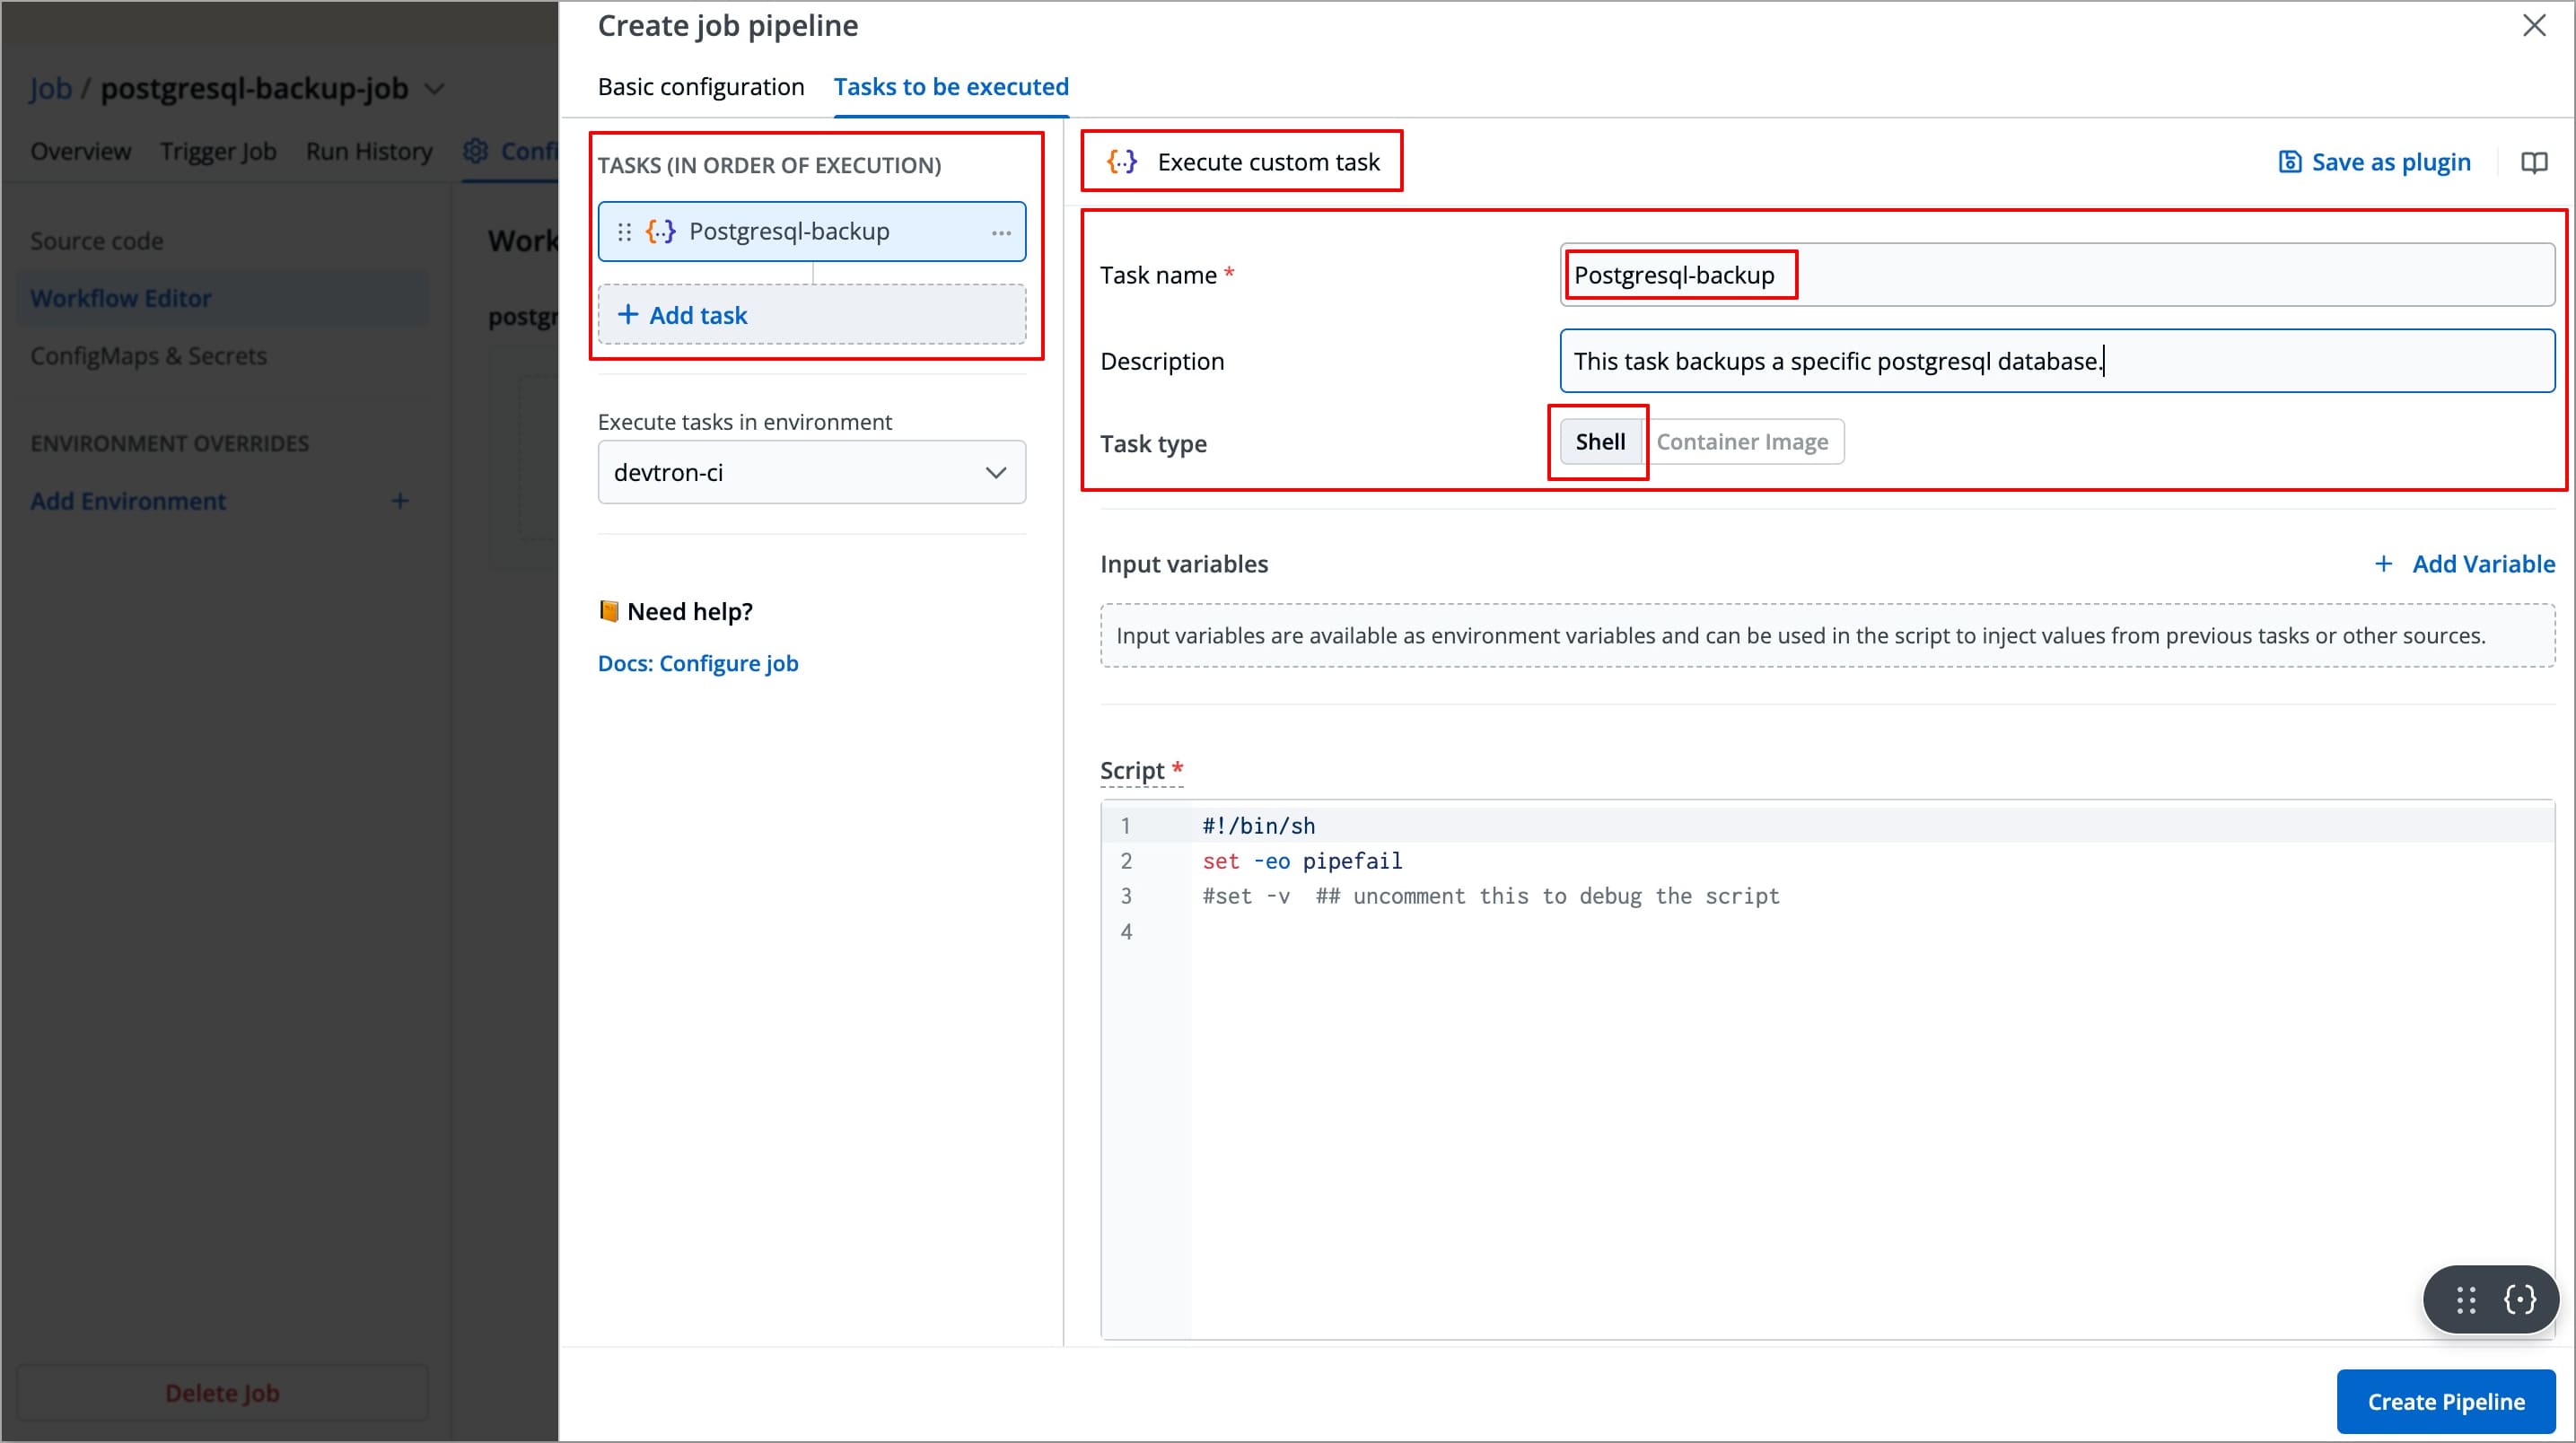
Create Task Using Custom Script
In Devtron, you can also define a task using a custom script to meet specific requirements. To create a task a task using a custom script, follow the steps below:
-
After configuring the basic configurations, select the Tasks to be executed Tab.
-
Click +Add Task from the left side panel, and then select Execute custom task.
-
The right-side panel will display the fields that are required to be configured in order to create the task.
-
The left-side panel will now display a task under Tasks (IN ORDER OF EXECUTION).
-
-
Enter the Task name(required) and Task Description (optional).
-
Select the Task type, it can be
ShellorContainer Image.-
Shell Tasks: These execute shell scripts directly within the job runtime environment. In this type of task, you can define inline scripts or use script files from your configured source code.
-
Container Image Tasks: These allow you to execute commands and scripts inside a custom Docker container. Instead of using the default environment provided by Devtron, you can specify your own container image with all dependencies and tools required for the tasks.
-
These Tasks run using container in container approach, which means the specified image is pulled and run inside the job pod, thus providing a complete isolated environment.
-
After selecting the Task type, you need to configure task-specific fields based on that Task type. Refer Examples and Use Cases section to configure both Shell type and Container image tasks.
-
After configuring the tasks, choose the environment in which you want the job to be executed.
-
Select Create Pipeline, and a job pipeline will be created.
Examples and Use Cases
Example - Shell Task
Let's take an example of a Shell task for a job that allows you to extract all the environment variables available to the job pod at runtime and store it as a file.
Task Configurations
| Field | Values for This Example | Required/Optional | Description |
|---|---|---|---|
Task Name | export-env-var | Required | Enter a name for the task |
Task Description | This task extract all the environment variables available to the job pod at runtime and saves it as a file | Optional | Short description for the task |
Task Type | Shell | Optional | Select the preferred task type |
Script | Refer the Script below | Required | Custom script for executing Job tasks |
Output variables | Refer to the output variable table | Optional | Output variables store the output as variables, and these variables can be used as input variables for the next task. |
Script
#!/bin/sh
set -e

ARTIFACT_DIR="/artifacts"
FILE="$ARTIFACT_DIR/env-vars.txt"

mkdir -p "$ARTIFACT_DIR"
printenv | sort > "$FILE"

# Verify file exists
ls -l "$ARTIFACT_DIR"

# Export output variable
echo "ENV_FILE=$FILE"
Output Variables
| Variable | Type | Description |
|---|---|---|
ENV_FILE | String | Stores the env variables to be used in other scripts (if needed). |
After running this job, you can access the generated file by navigating to Run History → Artifacts.
Use Case - Shell Task
Let's take an example of a Shell task for a job that allows you to back up a specific PostgreSQL database and store it as a file.
Tasks Configurations
| Field | Values for This Example | Required/Optional | Description |
|---|---|---|---|
Task Name | pg-backup-task | Required | Enter a name for the task |
Task Description | This task performs a backup of a specific PostgreSQL database and saves it as a file, and stores the file path as an output variable. | Optional | Short description for the task |
Task Type | Shell | Optional | Select the preferred task type |
Input variables | Refer the Input Variable table below | Optional | These variables provide dynamic values to the script at the time of execution and are defined directly in the UI.
|
Trigger/Skip condition | Trigger If: DB_NAME == prod-db | Optional | A conditional statement to execute or skip the task |
Script | Refer the Script below | Required | Custom script for executing Job tasks |
Output directory path | /backups | Optional | Directory path where output files such as logs, errors, etc., will be available after the execution. |
Output variables | Refer to the output variable table | Optional | Output variables store the output as variables, and these variables can be used as input variables for the next task.
|
Input Variable Table
| Variable | Type | Value | Description |
|---|---|---|---|
DB_NAME | String | prod-db | Name of the database to be backed up |
DB_USER | String | postgres | Username for the PostgreSQL instance |
DB_HOST | String | localhost | PostgreSQL server hostname |
BACKUP_PATH | String | /backup | Directory path where the backup file is saved |
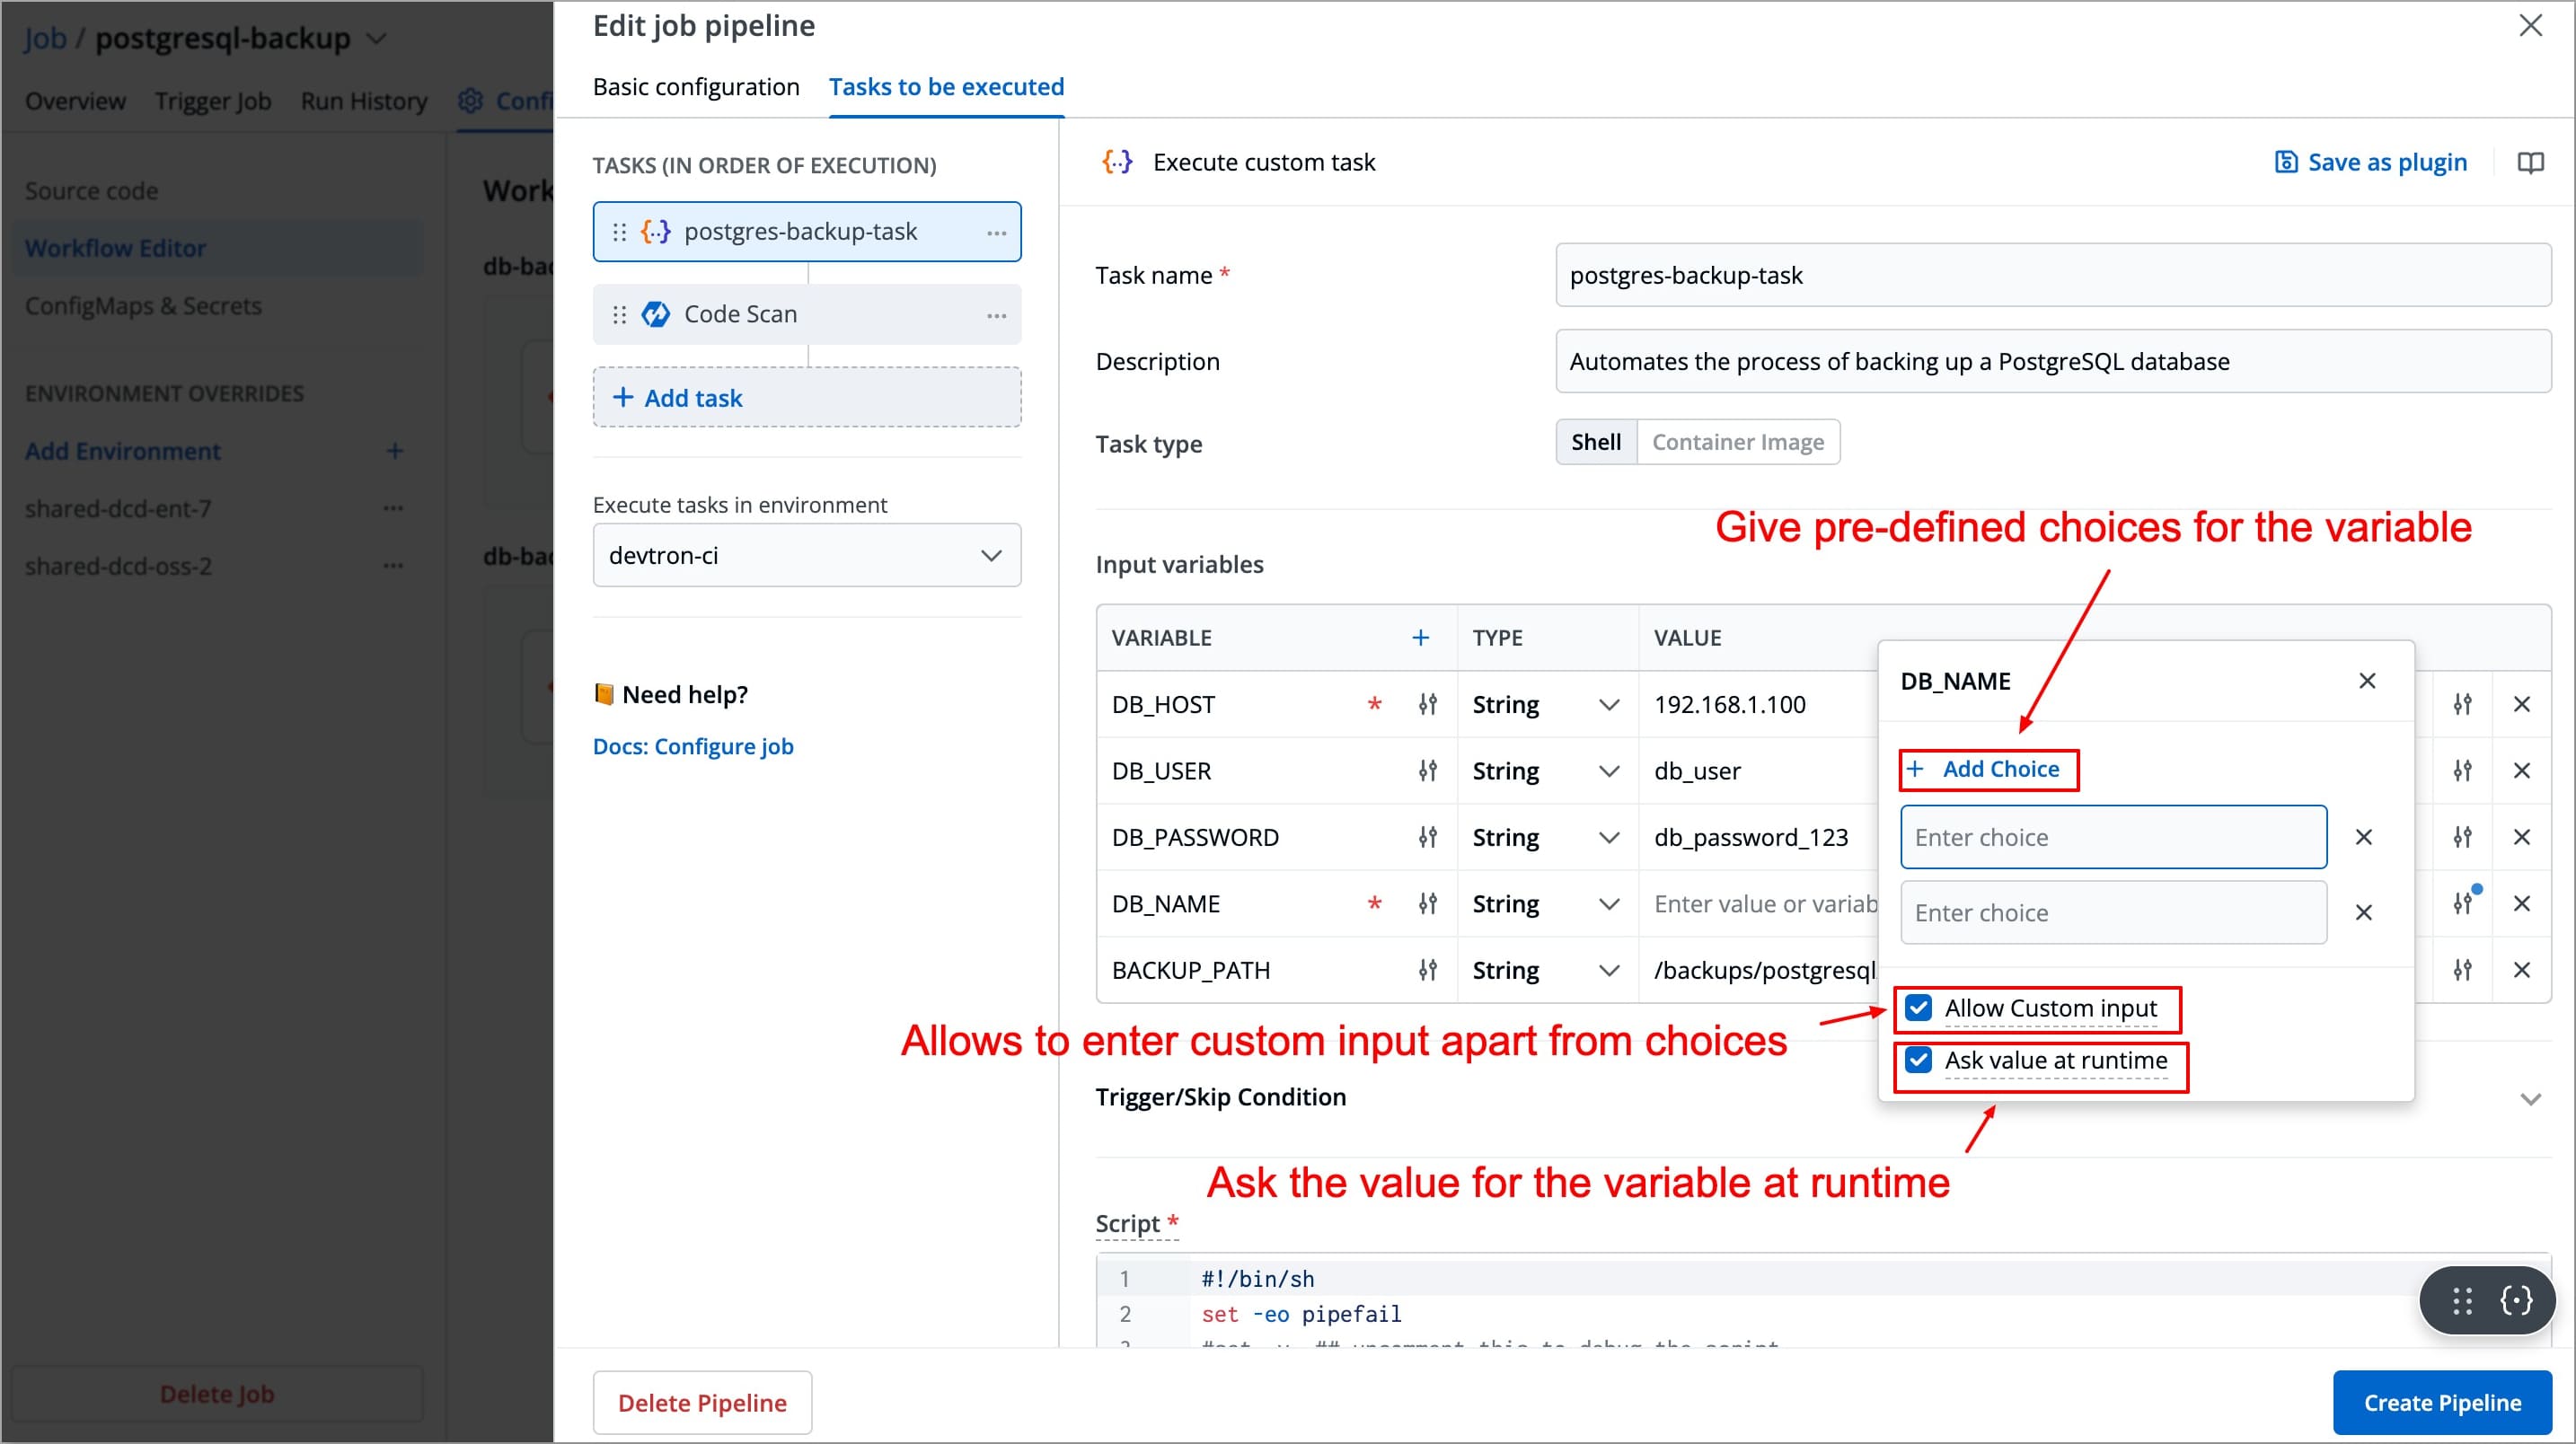
-
To add an input variable, click + Add Variable next to the Input Variable, a new table appears asking you to enter the variable and its required information.
-
You can click
+icon next to Variable header field to add more rows to the input variable table.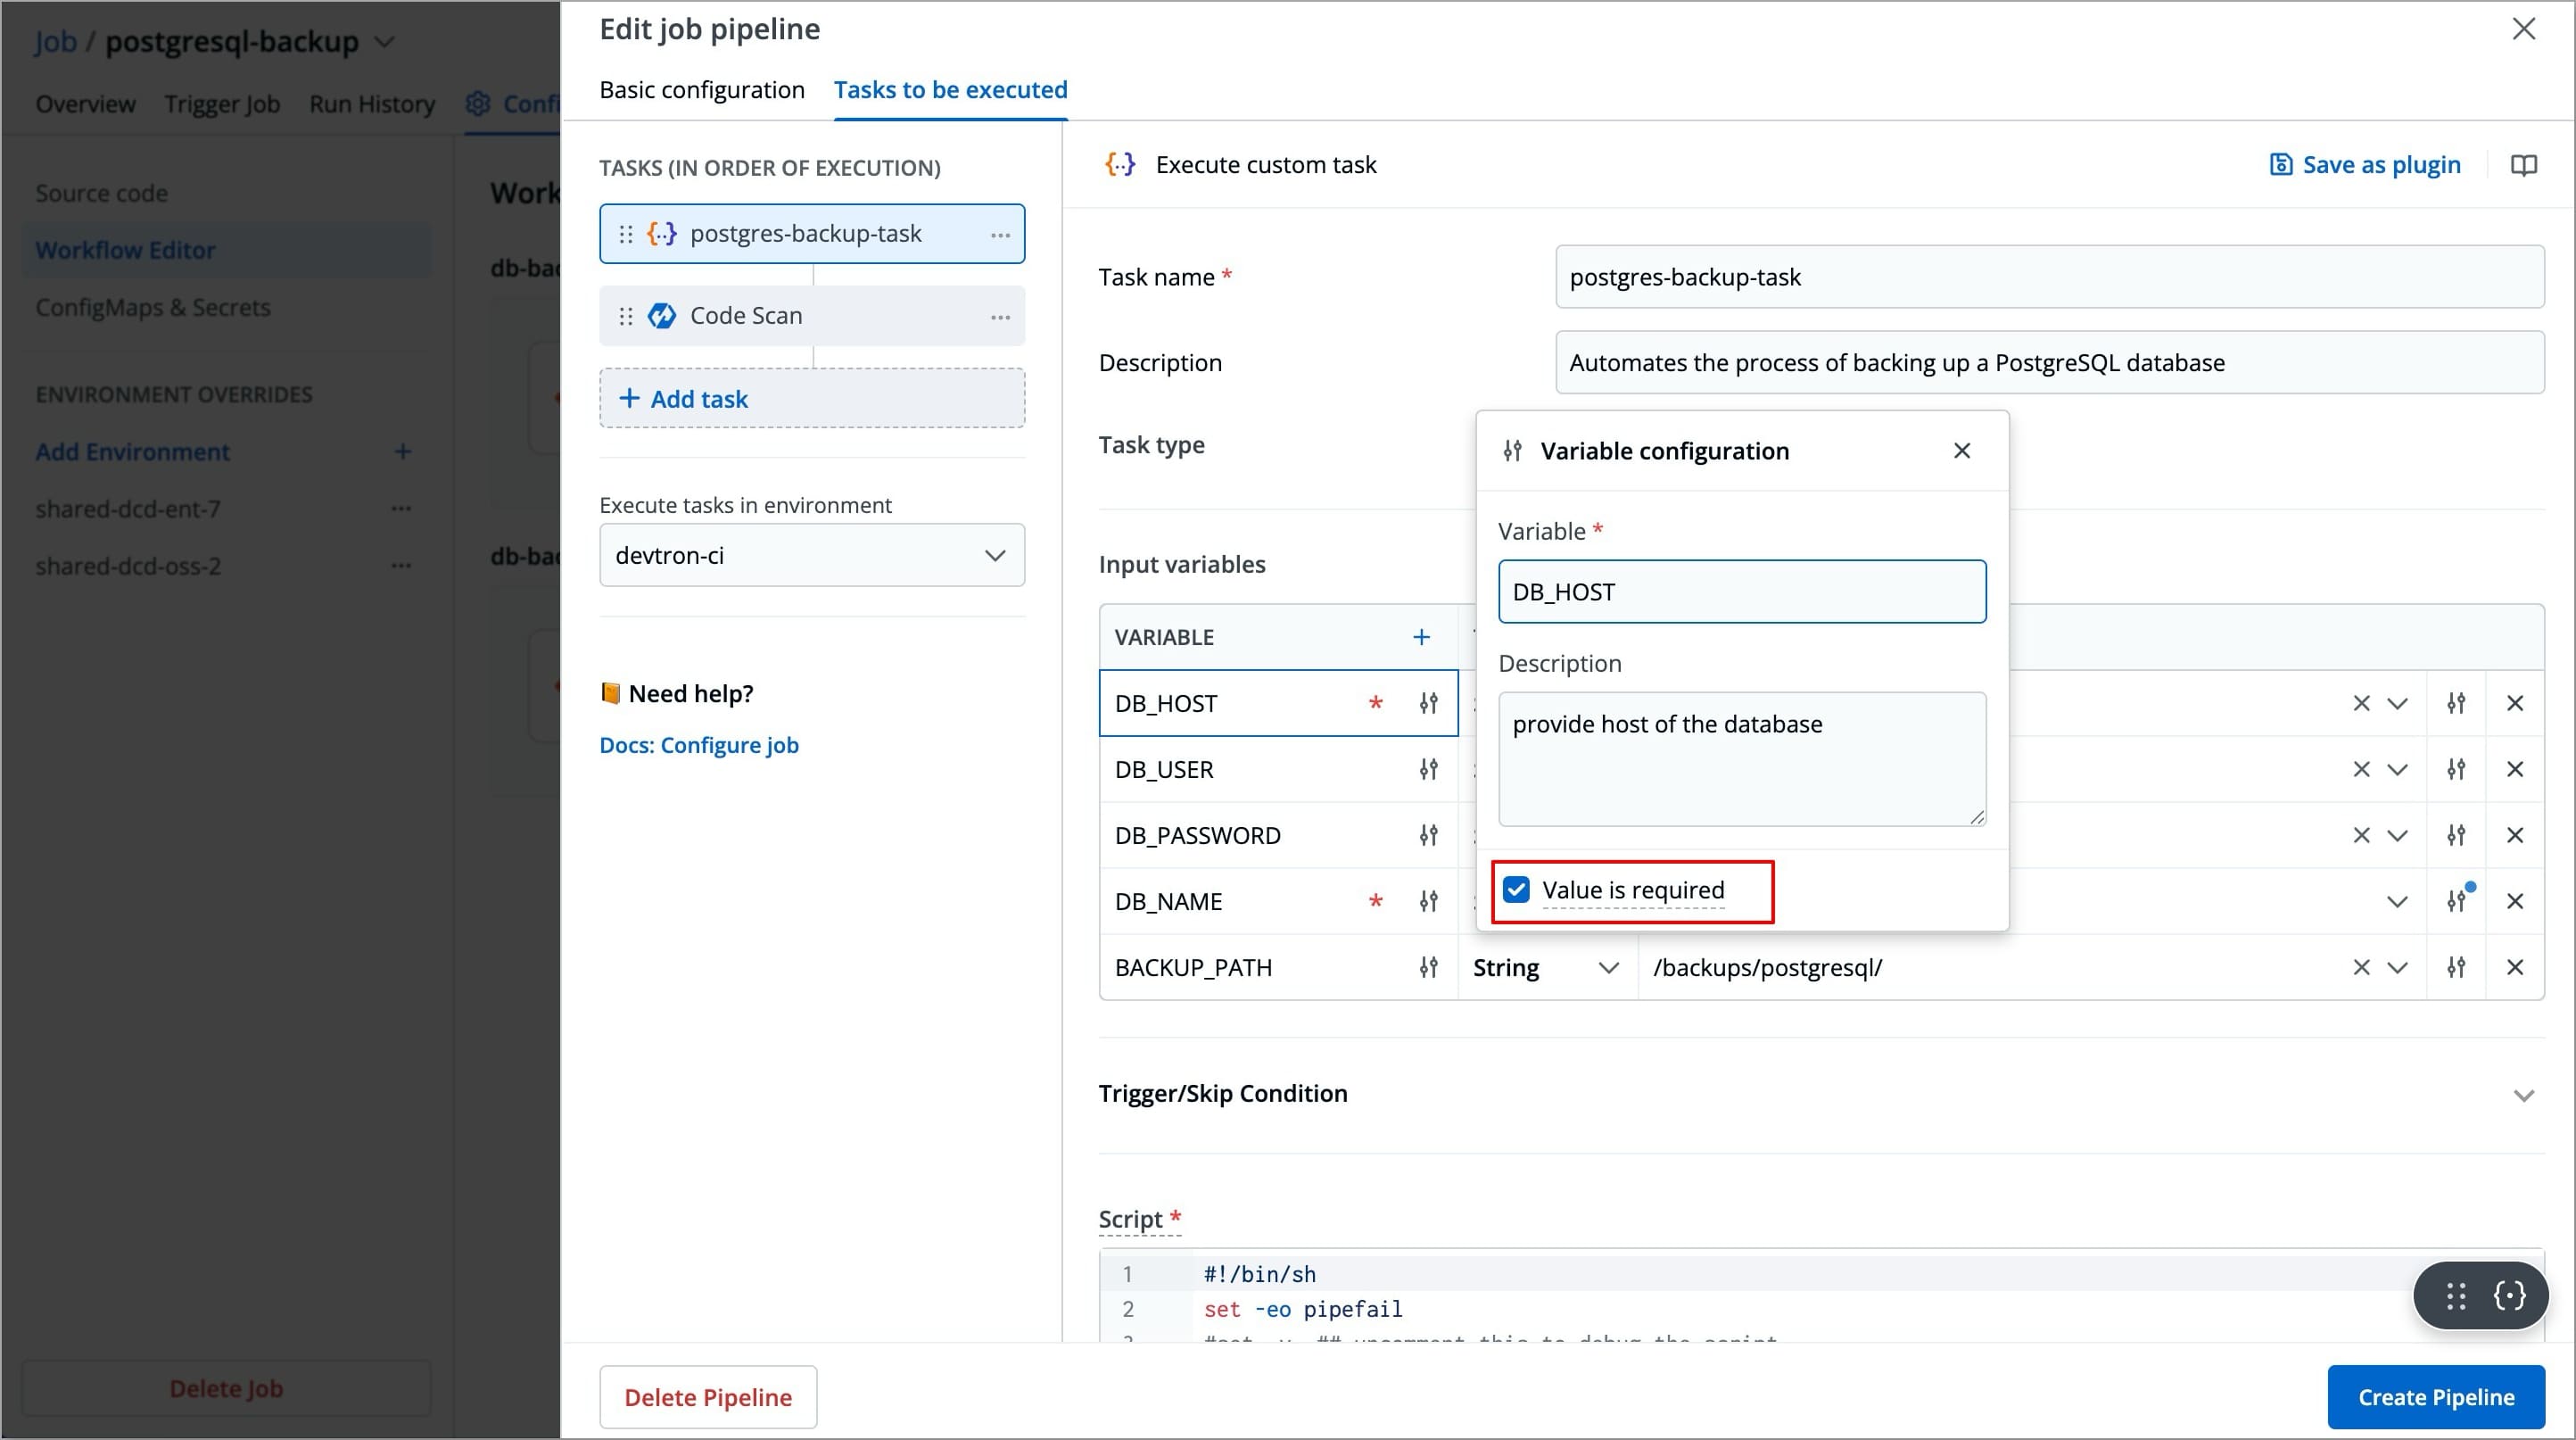
-
You can click the slider icon next to each variable name to make its value required and add a description for it.
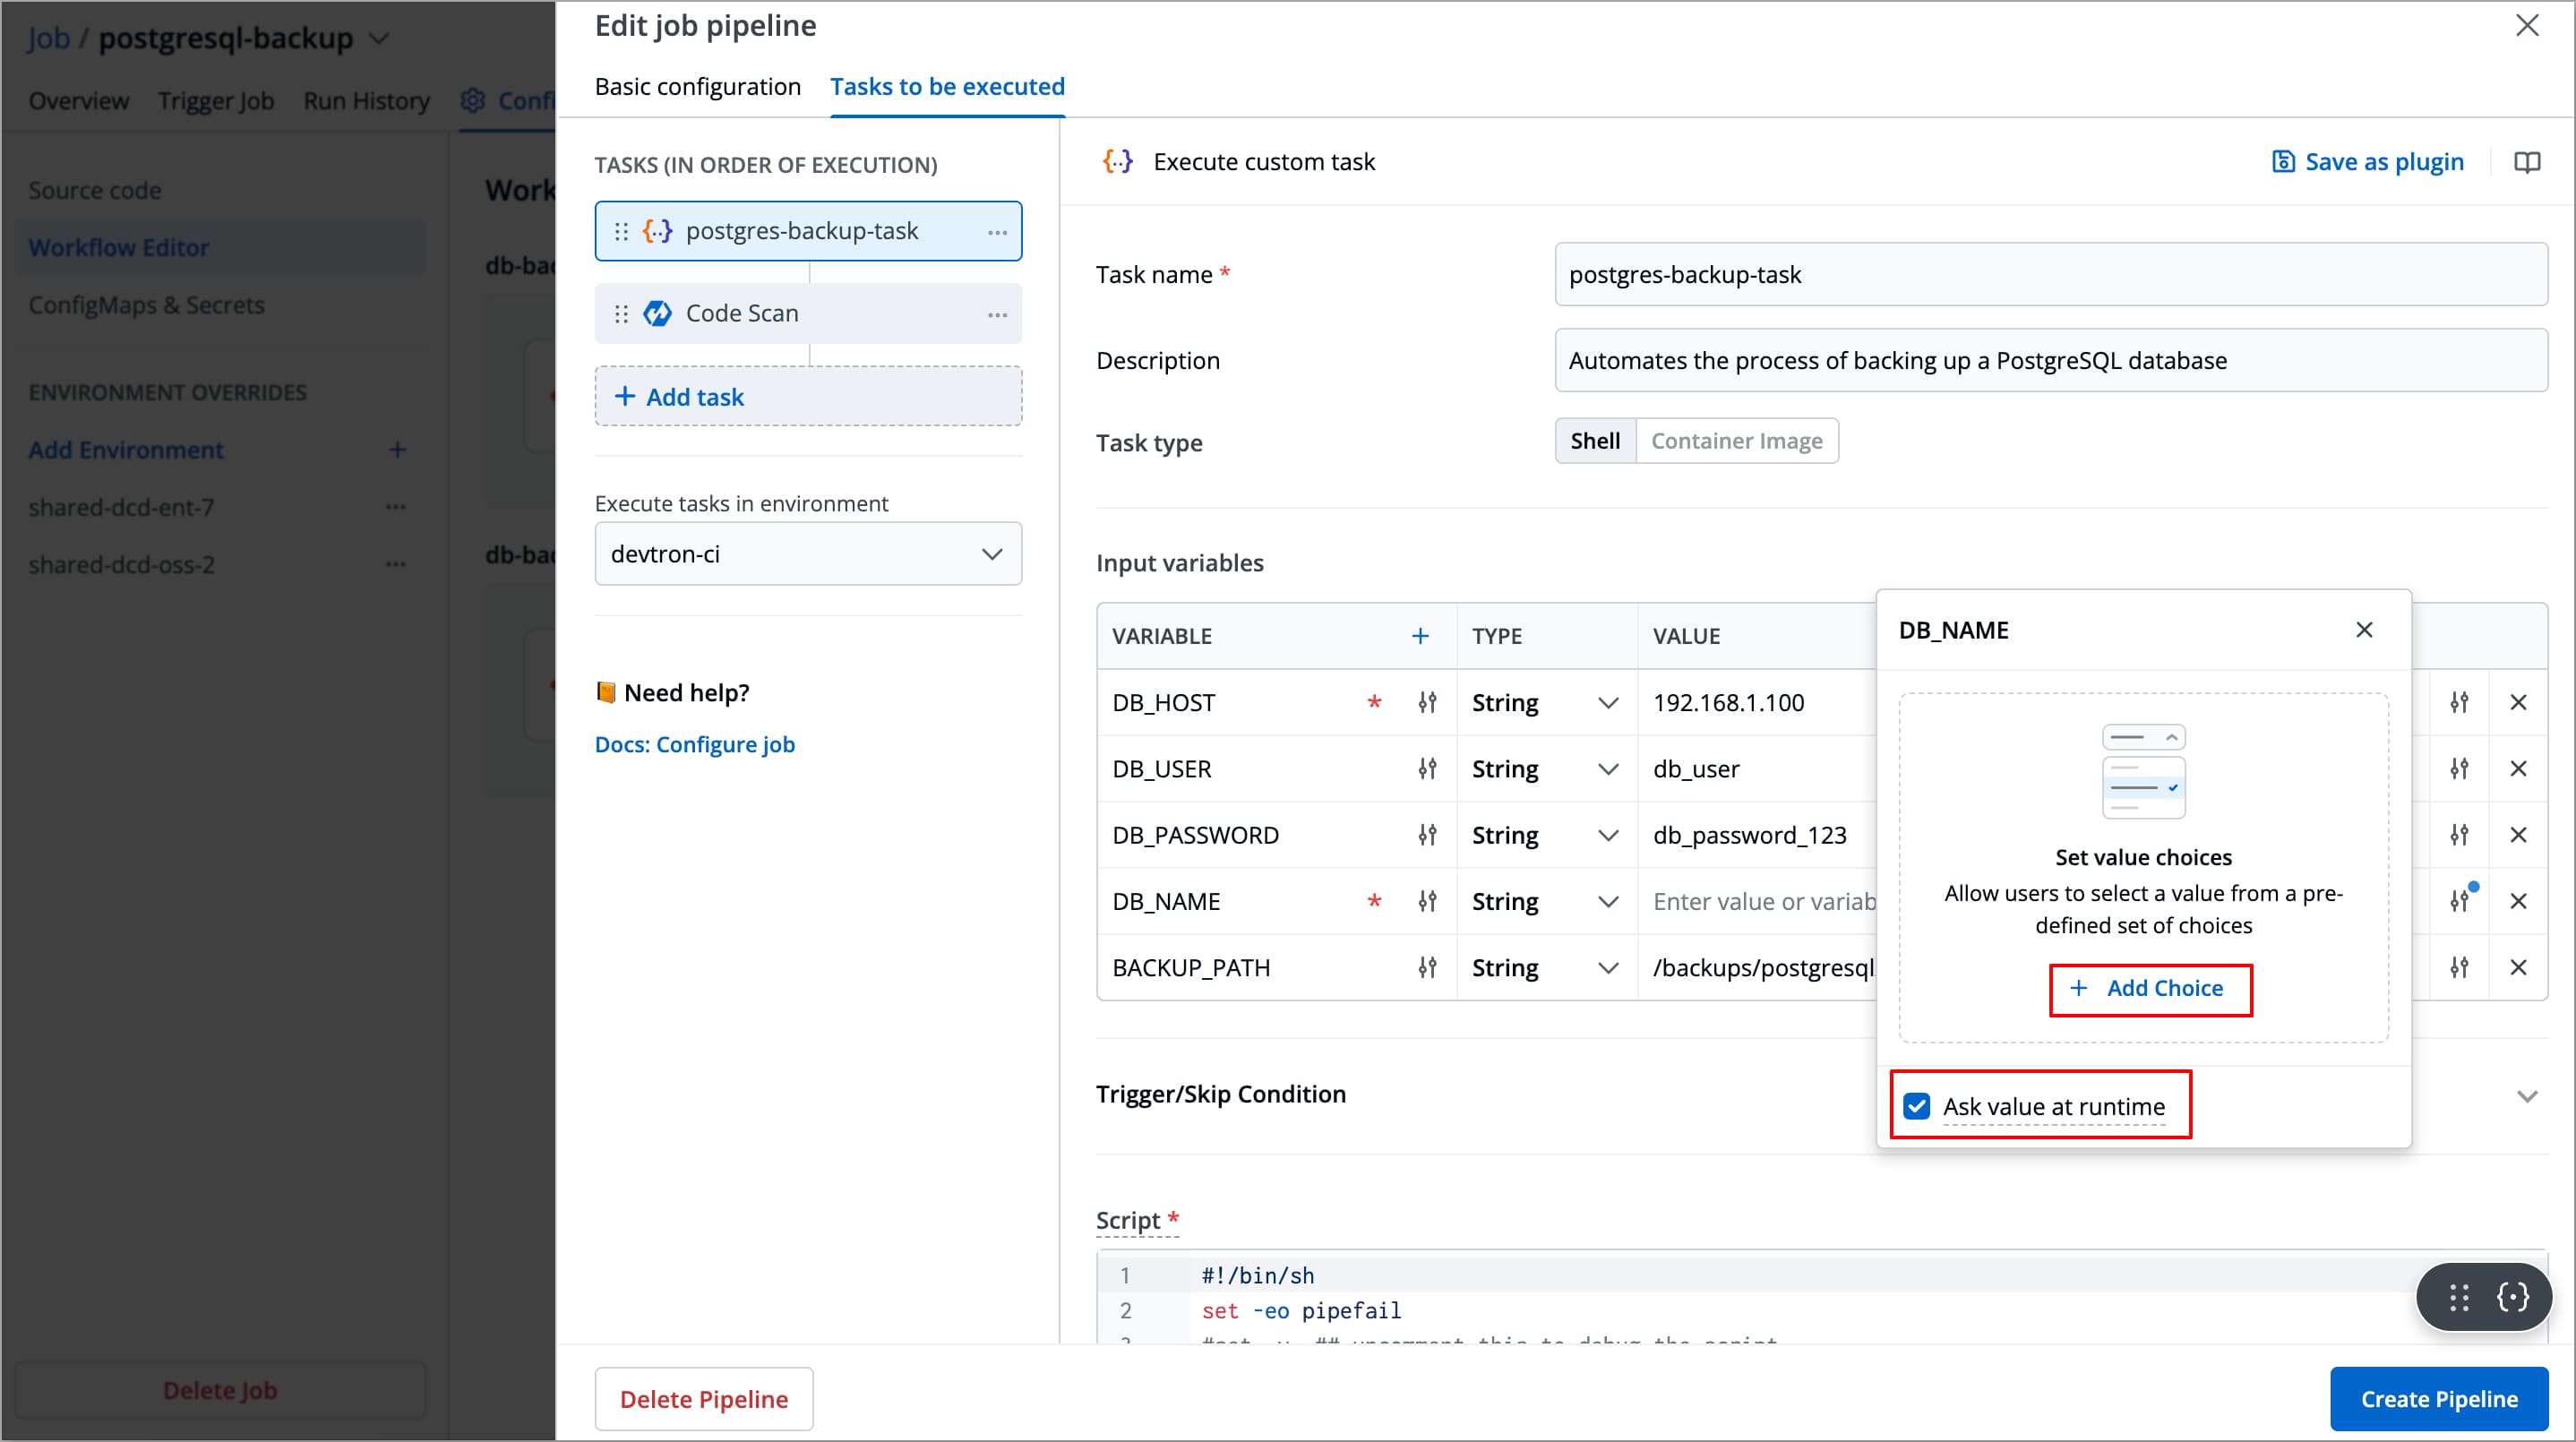
-
You can click the slider icon next to each variable value to add choices, allow custom input, and ask value at runtime.
Script
#!/bin/sh
set -eo pipefail
#set -v  ## uncomment this to debug the script

echo "Taking database backup"
bash ./scripts/backup.sh --db-host "$DB_HOST" --db-user "$DB_USER" --db-name "$DB_NAME" --backup-path "$BACKUP_PATH"
In the above script, instead of writing the entire script for the backup task, we have referenced the backup.sh script from the Github Repository configured as Source code. This approach avoids the need to rewrite the same script again and again for each task, thus making it reusable and efficient across multiple jobs.
backup.sh Script (Stored in Github repository)
#!/bin/bash

# Input variables for database connection
DB_HOST="$DB_HOST"
DB_USER="$DB_USER"
DB_NAME="$DB_NAME"
DB_PASSWORD="$DB_PASSWORD"
BACKUP_PATH="$BACKUP_PATH"

# Define the backup file path
BACKUP_FILE_PATH="/backups/$DB_NAME-$(date +%F).backup"

# Backup PostgreSQL database
pg_dump -h "$DB_HOST" -U "$DB_USER" -d "$DB_NAME" -F c -b -v -f "$BACKUP_FILE_PATH"

# Check if the backup was successful
if [ $? -eq 0 ]; then
    BACKUP_STATUS="success"
    echo "Backup completed successfully. File path: $BACKUP_FILE_PATH"
    echo "BACKUP_STATUS=$BACKUP_STATUS"  # Set the output variable
    echo "BACKUP_FILE_PATH=$BACKUP_FILE_PATH"  # Set the backup file path as an output variable
else
    BACKUP_STATUS="failure"
    echo "Backup failed."
    exit 1
fi
Output Variables
| Variable | Type | Description |
|---|---|---|
BACKUP_FILE_PATH | String | Stores the file path of the backup file generated. |
BACKUP_STATUS | String | Indicates whether the backup was successful or not. |
Pass/Fail Condition
PASS If: BACKUP_STATUS == success
PASS If: BACKUP_FILE_PATH != ""
After adding this backup task, you can add more tasks as well, for example, you can add a task to upload the backup files to cloud storage (e.g., AWS S3) or send a notification about the backup status. These additional tasks can use the output variable BACKUP_FILE_PATH to access the backup file generated in the first task.
Example - Container Image Task
Let's take an example of a Container Image Task for a job that test if a given endpoint (URL) is reachable from the job pod and save the result in an artifact.
Tasks Configurations
| Field | Values for This Example | Required/Optional | Description |
|---|---|---|---|
Task name | check-endpoint | Required | Enter a name for the task |
Description | Checks API endpoint | ||
Task type | Container Image | Optional | Allows you to execute commands and scripts inside a custom Docker container |
Input variables | Refer the Input Variable table below | Optional | These variables provide dynamic values to the script and are defined directly in the UI.
|
Trigger/Skip condition | No | Optional | Execute or skip the task based on the condition provided. |
Container image | alpine:3.2.0 | Required | Select an image from the drop-down list or enter a custom value in the format <image>:<tag> |
Mount custom code | Refer below Mount custom code section | Optional | Enable to mount the custom code in the container. Enter the script in the box below.
|
Command | sh | Optional | Mention commands to execute inside the container |
Args | /run.sh | Optional | The arguments to be passed to the command mentioned in the command field |
Port mapping | No | Optional | The port number on which the container listens. The port number exposes the container to outside services. |
Mount code to container | yes | Optional | Mounts the source code (configured git repository) inside the container. The default is "No". If set to "Yes", enter the path where the source should be mounted inside the container. |
Mount directory from host | No | Optional | Mount any directory from the host into the container. This can be used to mount code or even output directories. |
Output directory path | /artifacts | Optional | Directory path where output files such as logs, errors, etc. will be available after the execution. |
Input Variable Table
| Variable | Type | Value | Description |
|---|---|---|---|
Target_URL | String | https://kubernetes.io | URL that needs to be checked |
Mount Custom Code
#!/bin/sh
set -e

ARTIFACT_DIR="/artifacts"
FILE="$ARTIFACT_DIR/status.txt"

mkdir -p "$ARTIFACT_DIR"

apk add --no-cache curl ca-certificates

if curl -fsL --max-time 10 "$TARGET_URL" > /dev/null; then
  echo "$TARGET_URL is reachable" > "$FILE"
else
  echo "$TARGET_URL is NOT reachable" > "$FILE"
fi

echo "STATUS_FILE=$FILE"
You can provide the URL at runtime, and the after the job execution completed, you can access the generated file by navigating to Run History → Artifacts.
Use Case - Container Image Task
Let's take an example of a Container Image Task for a job that provisions an AWS S3 bucket using Terraform. Here, instead of installing dependencies (such as terraform), this task pulls the official terraform image (hashicorp/terraform:1.5.0) in which our task will execute. This means a container will be created inside the job pod and runs terraform commands inside the container, thus avoiding the need to install dependencies manually each time.
Tasks Configurations
| Field | Values for This Example | Required/Optional | Description |
|---|---|---|---|
Task name | provision-s3-bucket | Required | Enter a name for the task |
Description | Provision an S3 bucket with Terraform | Optional | A descriptive message for the task |
Task type | Container Image | Optional | Allows you to execute commands and scripts inside a custom Docker container |
Input variables | Refer the Input Variable table below | Optional | These variables provide dynamic values to the script and are defined directly in the UI.
|
Trigger/Skip condition | TF_ENV == "prod" | Optional | Execute or skip the task based on the condition provided. |
Container image | hashicorp/terraform:1.5.0 | Required | Select an image from the drop-down list or enter a custom value in the format <image>:<tag> |
Mount custom code | Refer below Mount custom code section | Optional | Enable to mount the custom code in the container. Enter the script in the box below.
|
Command | sh | Optional | Mention commands to execute inside the container |
Args | /run.sh | Optional | The arguments to be passed to the command mentioned in the command field |
Port mapping | No | Optional | The port number on which the container listens. The port number exposes the container to outside services. |
Mount code to container | yes | Optional | Mounts the source code (configured git repository) inside the container. The default is "No". If set to "Yes", enter the path where the source should be mounted inside the container. |
Mount directory from host | No | Optional | Mount any directory from the host into the container. This can be used to mount code or even output directories. |
Output directory path | No | Optional | Directory path where output files such as logs, errors, etc. will be available after the execution. |
Input Variable Table
| Variable | Type | Value | Description |
|---|---|---|---|
AWS_REGION | String | us-east-1 | AWS region where the bucket will be created. |
BUCKET_NAME | String | my-app-logs-bucket | Name of the S3 bucket to create. |
-
To add an input variable, click + Add Variable next to the
Input Variable, a new table appears asking you to enter the variable and its required information. -
You can click
+icon next to Variable header field to add more rows to the input variable table. -
You can click the slider icon next to each variable name to make its value required and add a description for it.
-
You can click the slider icon next to each variable value to add choices, allow custom input, and ask value at runtime.
Mount Custom Code
#!/bin/sh
set -eo pipefail

# Navigate to your Terraform config
cd /sourcecode/terraform/s3

# Initialize & apply without prompts
terraform init -input=false
terraform plan
terraform apply -auto-approve \
  -var="region=us-east-1" \
  -var="bucket_name=$BUCKET_NAME"

# Capture the bucket name output
echo "S3_BUCKET_NAME=$(terraform output -raw bucket_name)"
In the above script, instead of writing the entire Terraform script for provisioning the S3 bucket, we have stored the script main.tf and variable.tf in the Github Repository configured as Source code. By enabling mount code to container, the source code (configured Git Repository) is now mounted inside the container as well and available at /sourcecode. This approach avoids the need to rewrite the same scripts multiple times for each task, thus making the scripts reusable and efficient across multiple jobs.
main.tf Script (Stored in Github repository)
provider "aws" {
  region = var.region
}

resource "aws_s3_bucket" "this" {
  bucket = var.bucket_name

  tags = var.tags
}

resource "aws_s3_bucket_versioning" "this" {
  bucket = aws_s3_bucket.this.id

  versioning_configuration {
    status = var.versioning_enabled ? "Enabled" : "Suspended"
  }
}
variables.tf Script (Stored in Github repository)
variable "bucket_name" {
  description = "The name of the S3 bucket"
  type        = string
}

variable "region" {
  description = "AWS region to create the S3 bucket in"
  type        = string
}
After adding this S3 provisioner task, you can add more tasks as well, for example, you can add a task to add a bucket policy or send a notification to slack or email that s3 bucket is provisioned successfully.
Update Job Pipeline
Users need to have the Admin role or the Super Admin role. Refer the User permissions.
You can update the configurations of an existing Job Pipeline except for the pipeline's name. To update your job pipeline
-
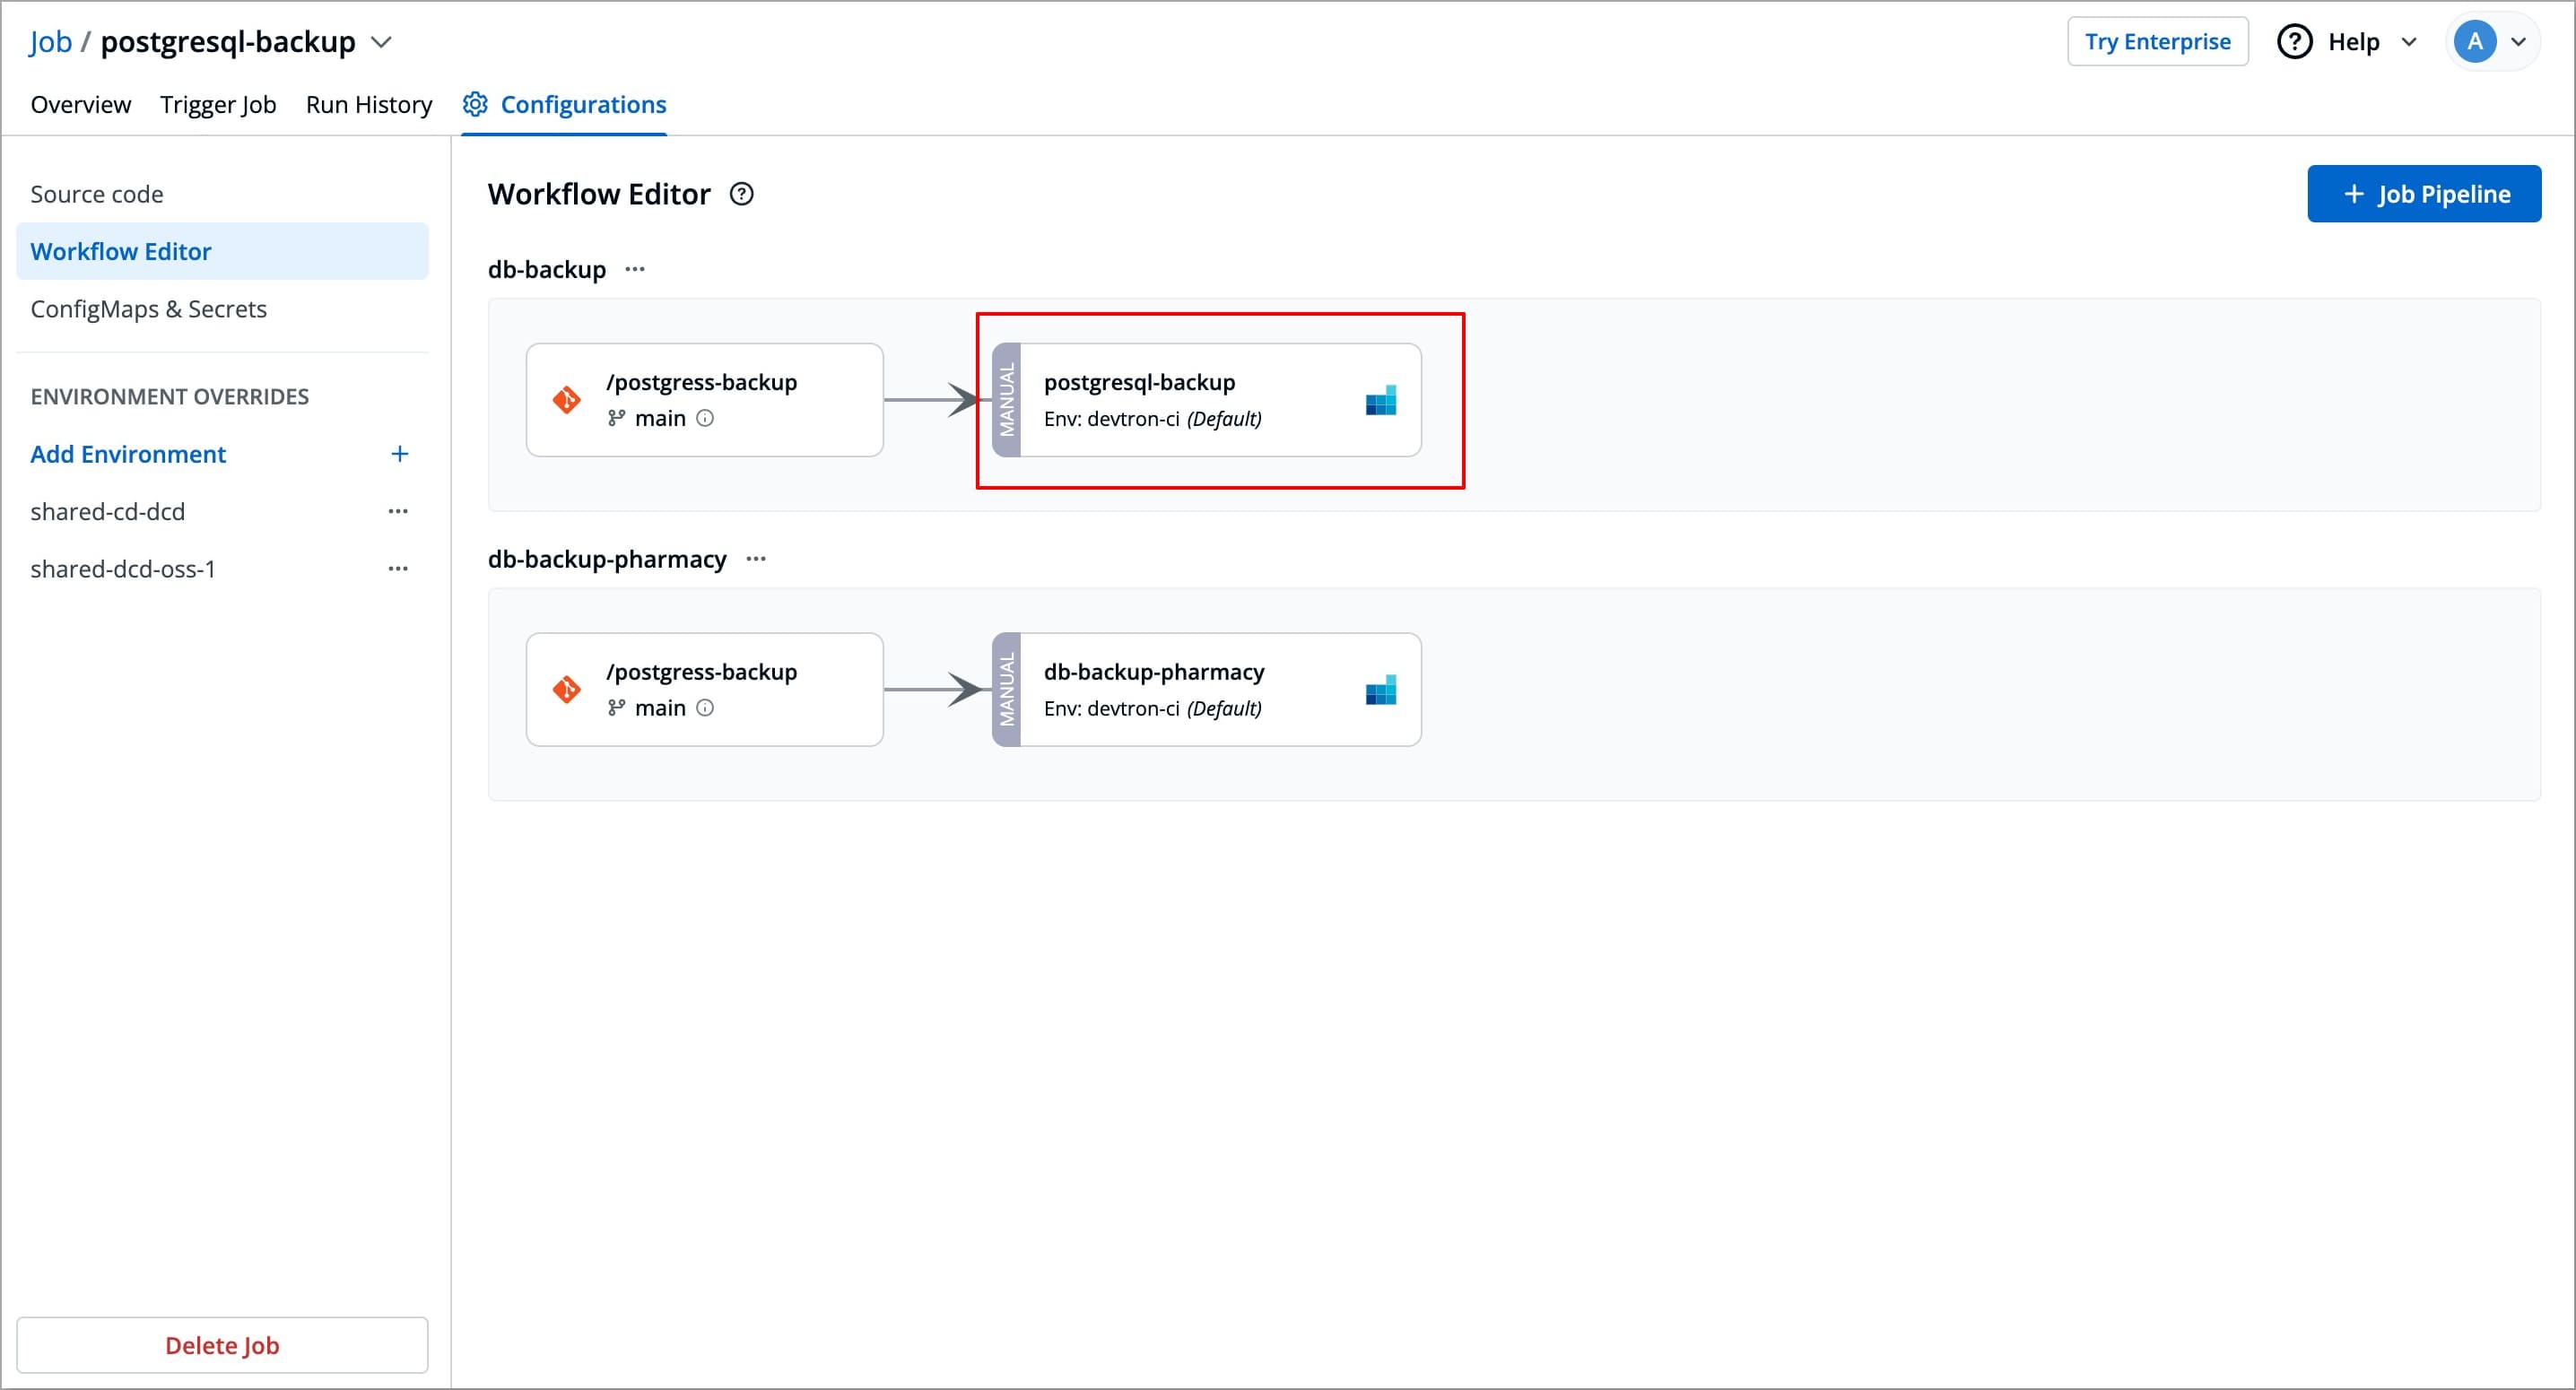
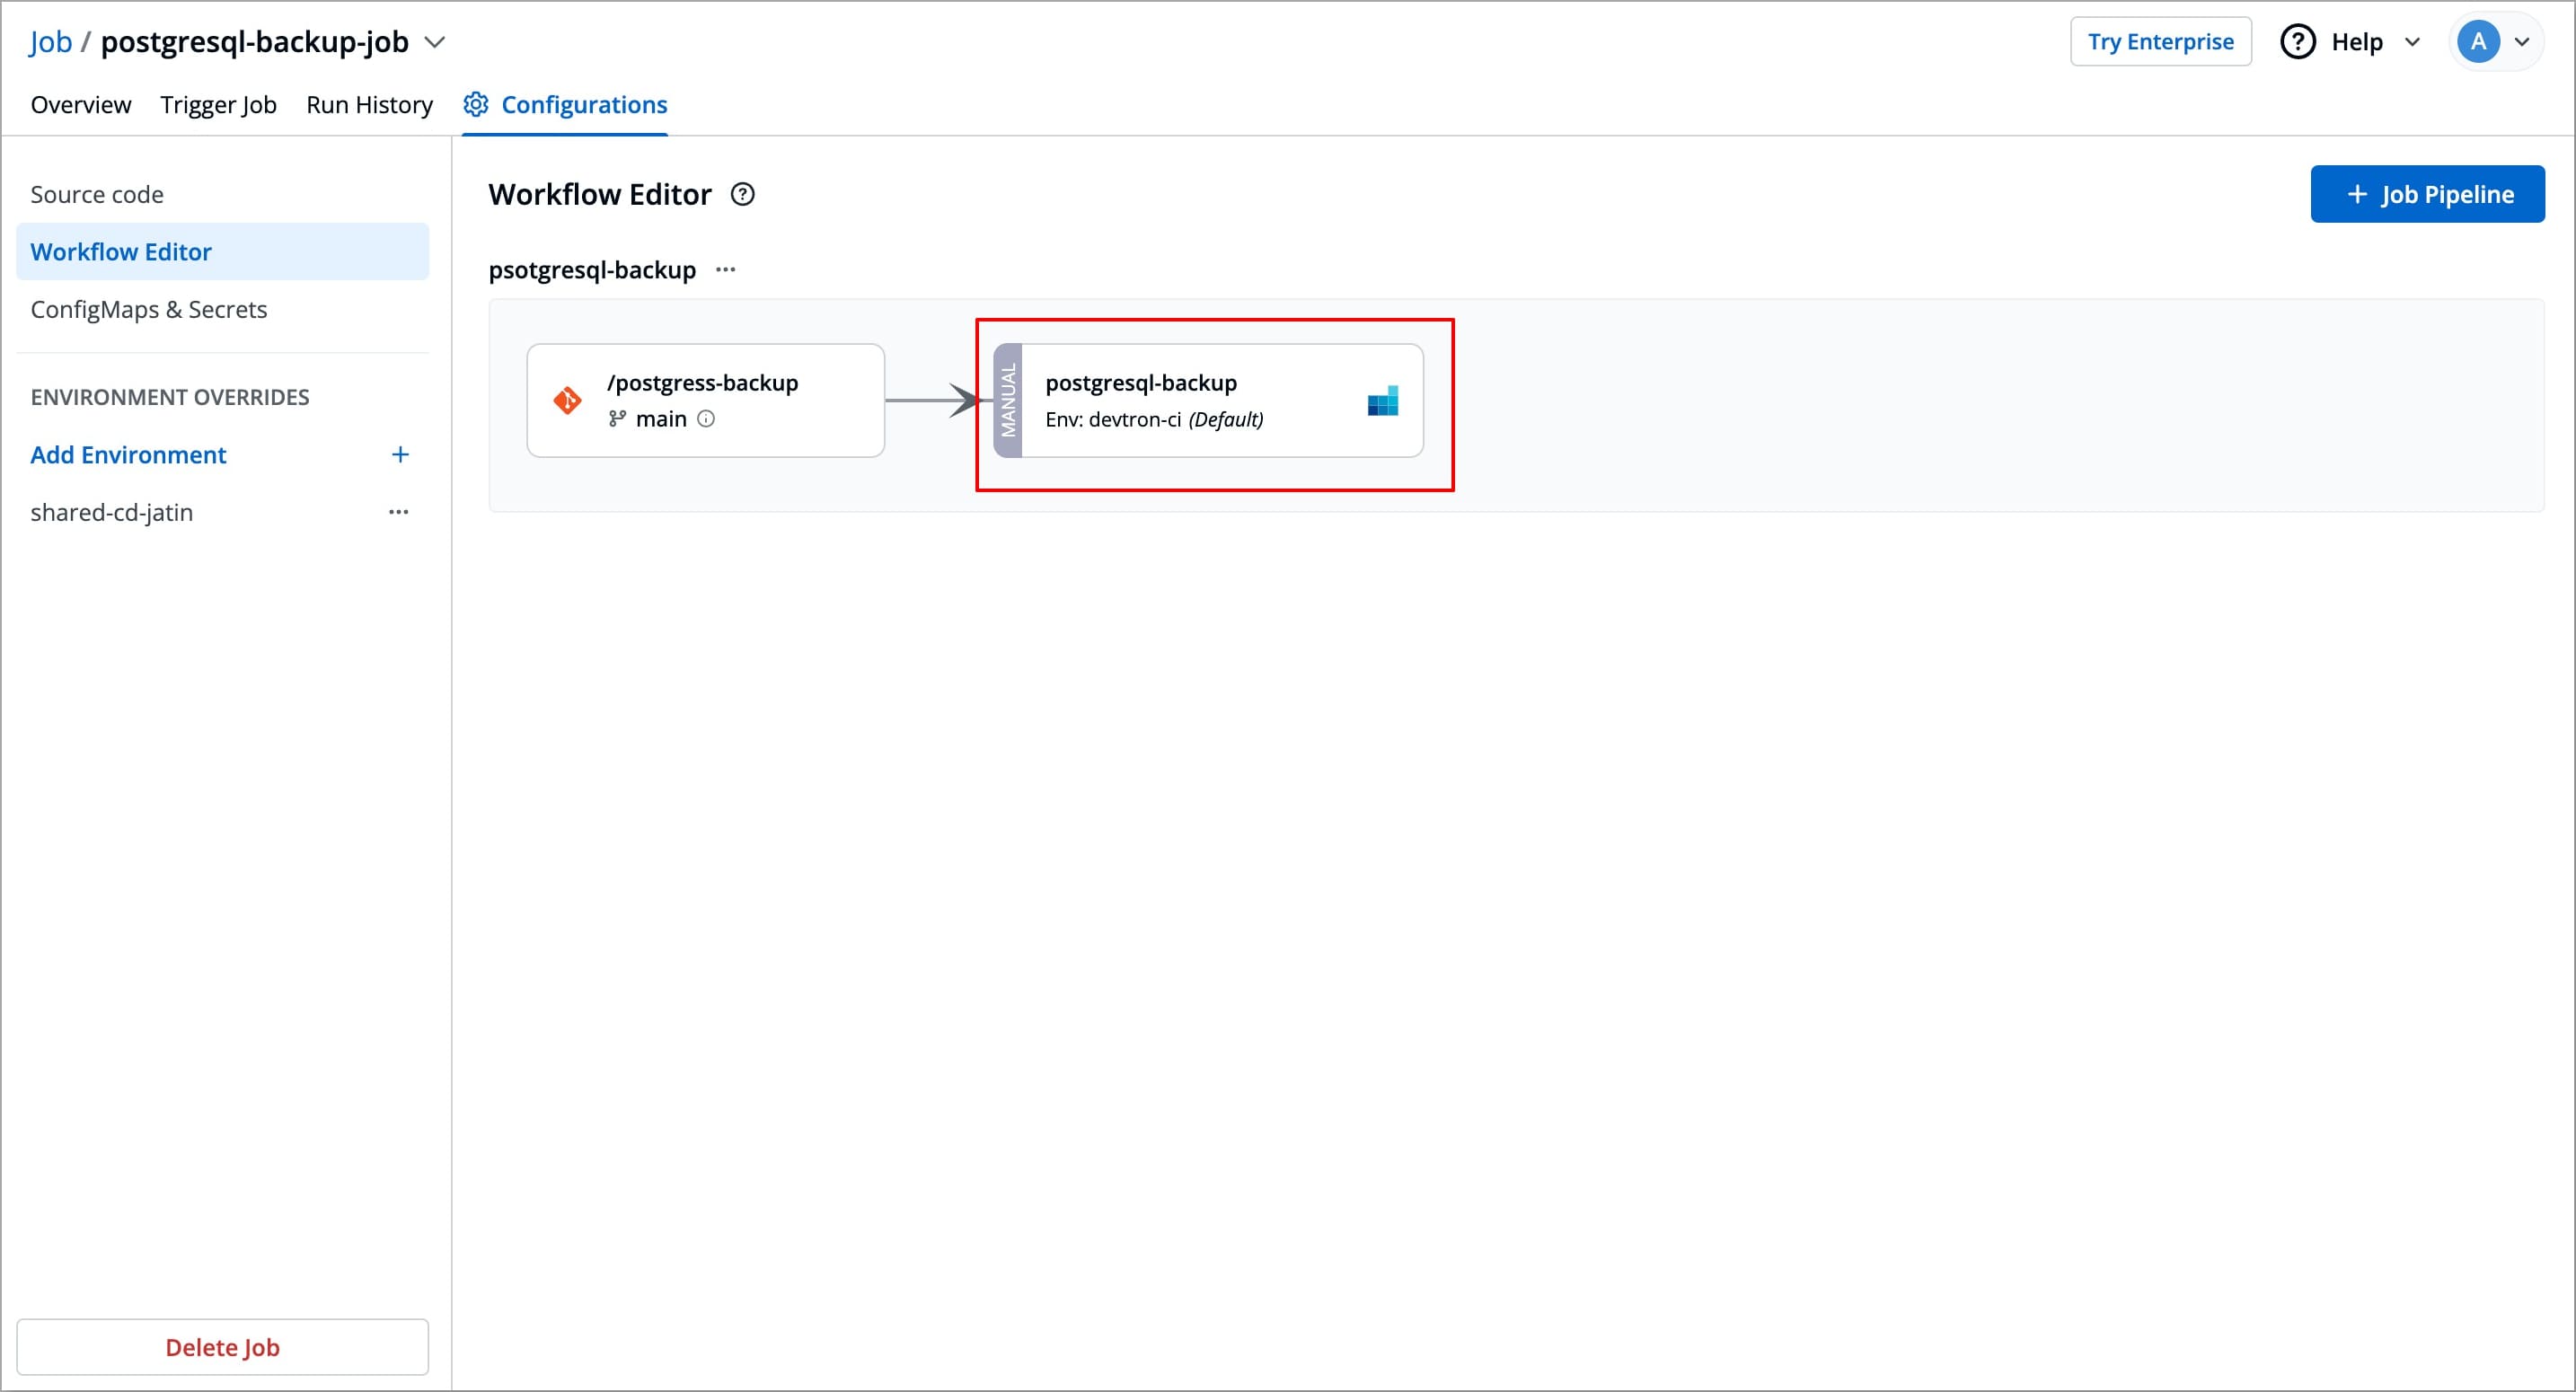
Navigate to Configurations (tab) → Workflow Editor of the specific job you want to update.
-
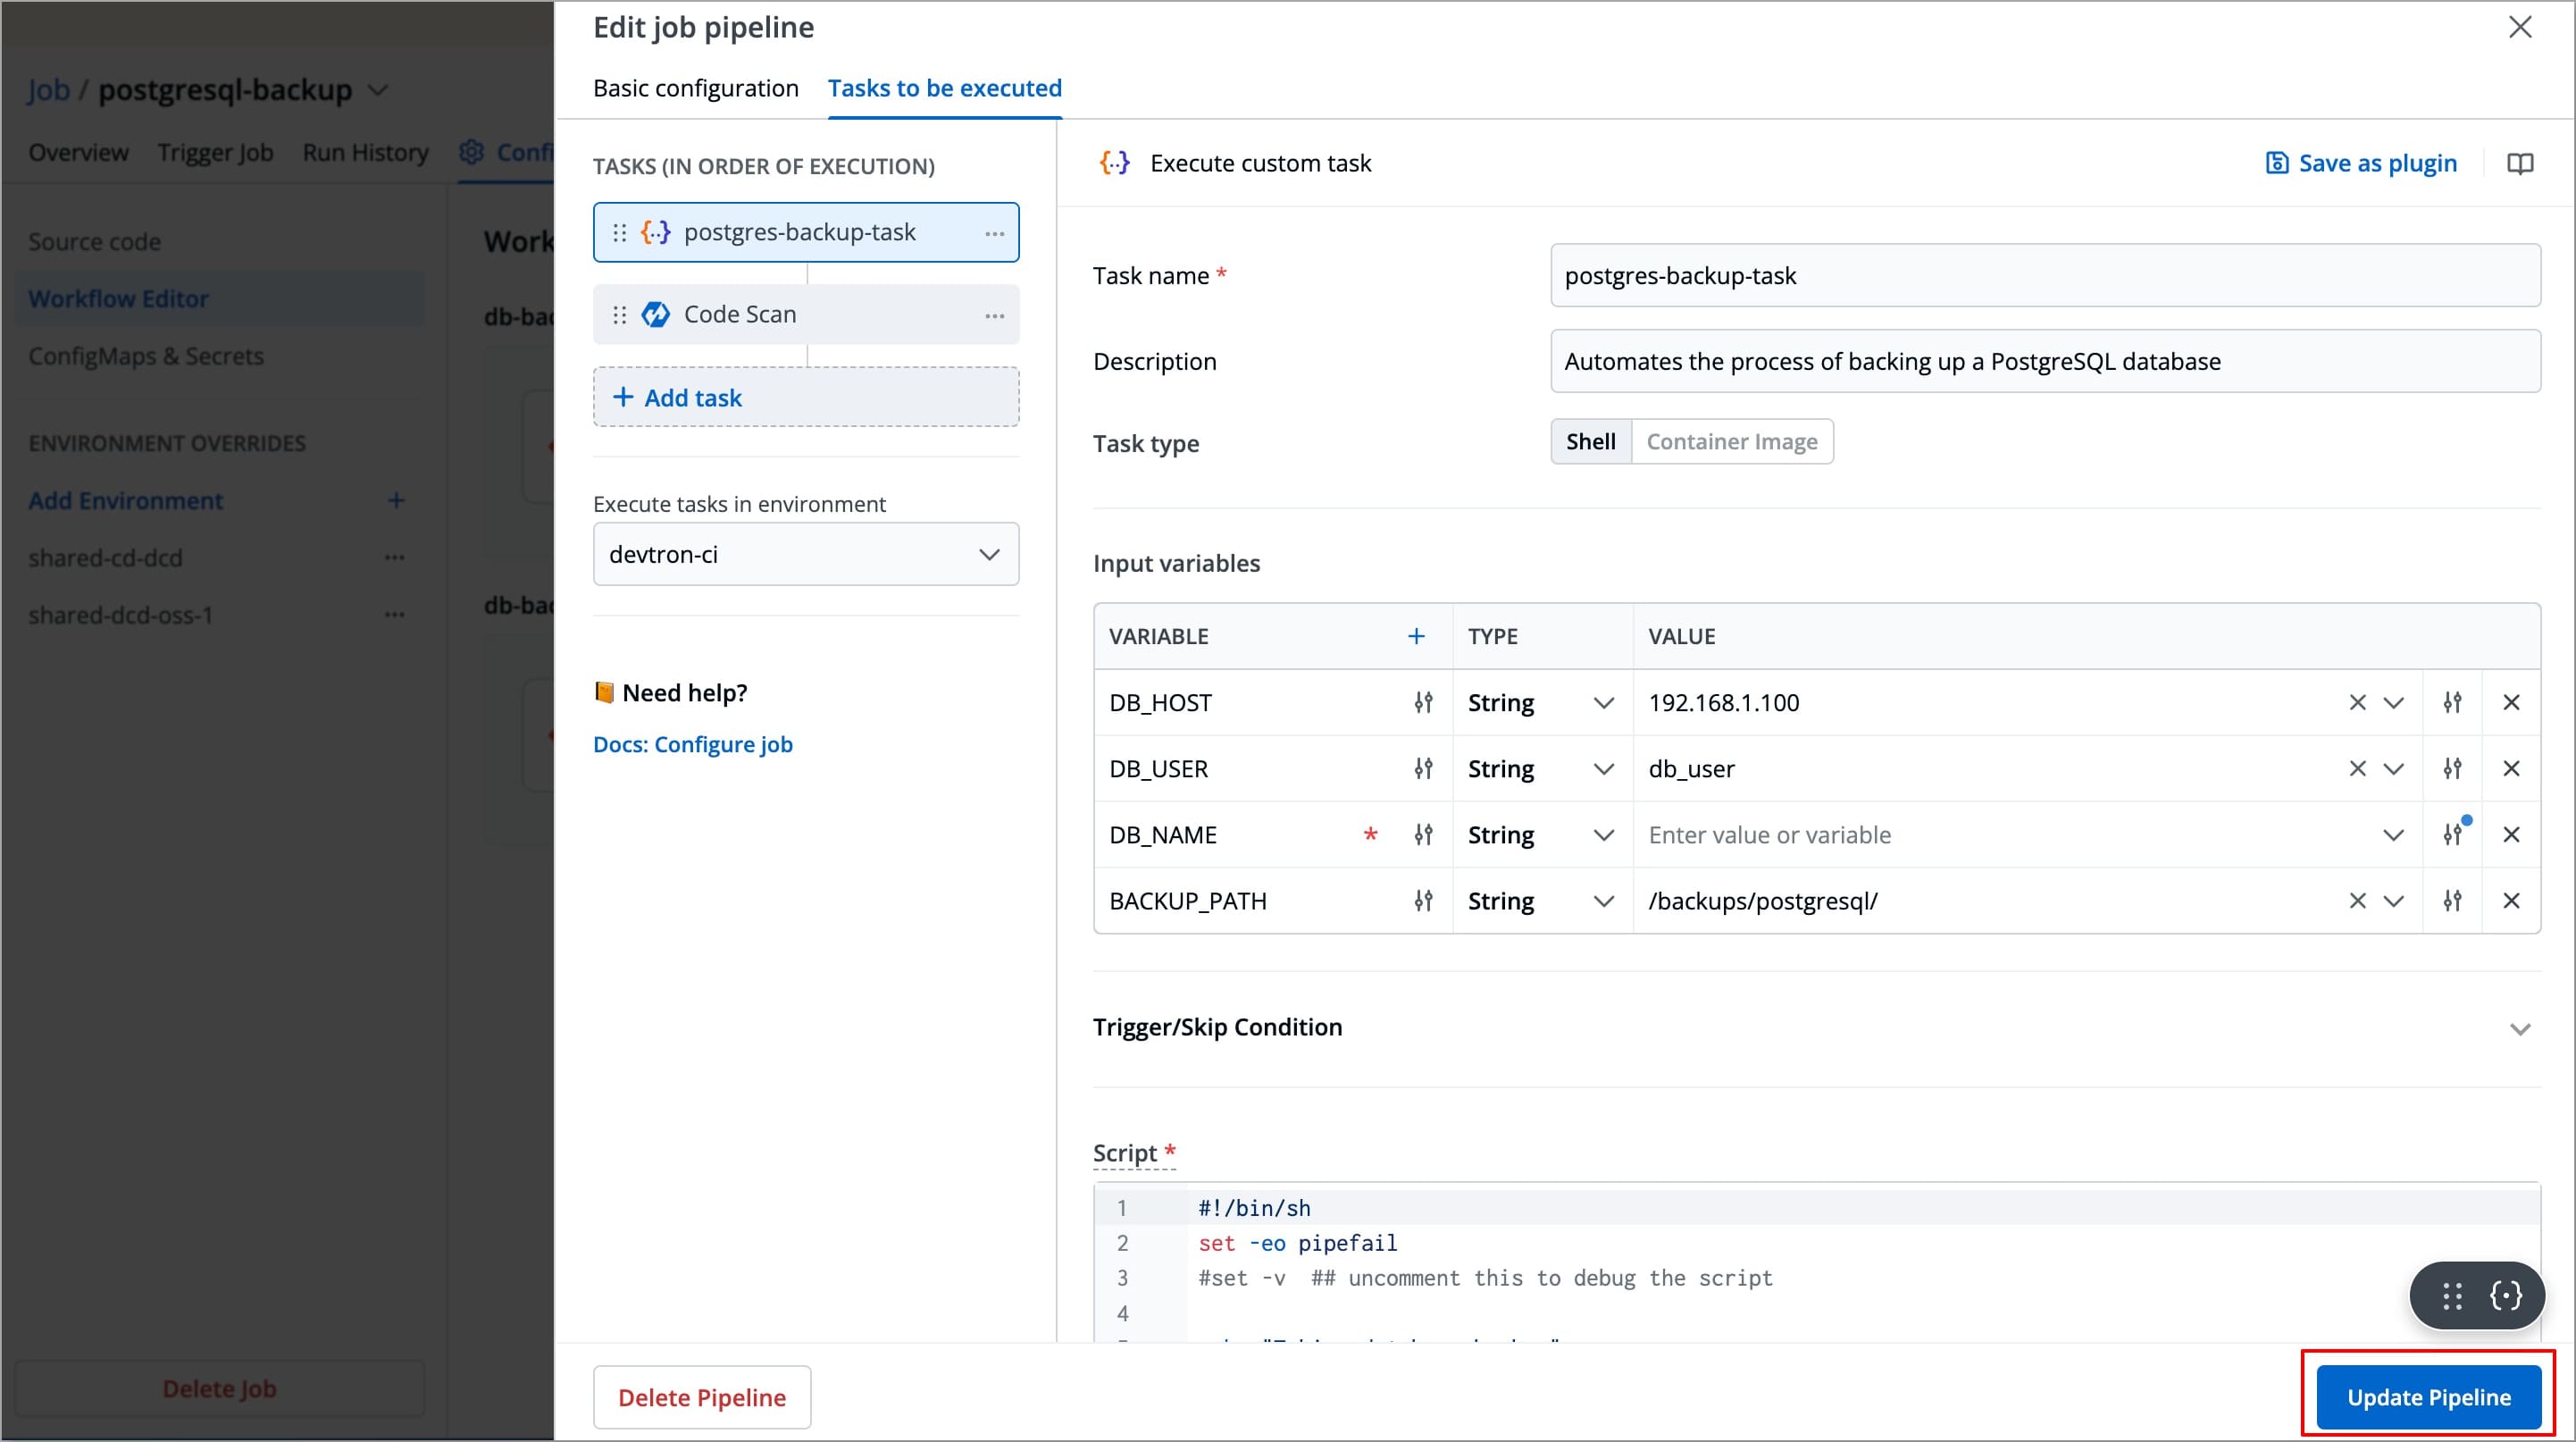
Select the Job pipeline you wish to update, a Edit job pipeline modal window will appear.
-
Change the required configurations as per your requirements and select Update Pipeline to update the pipeline
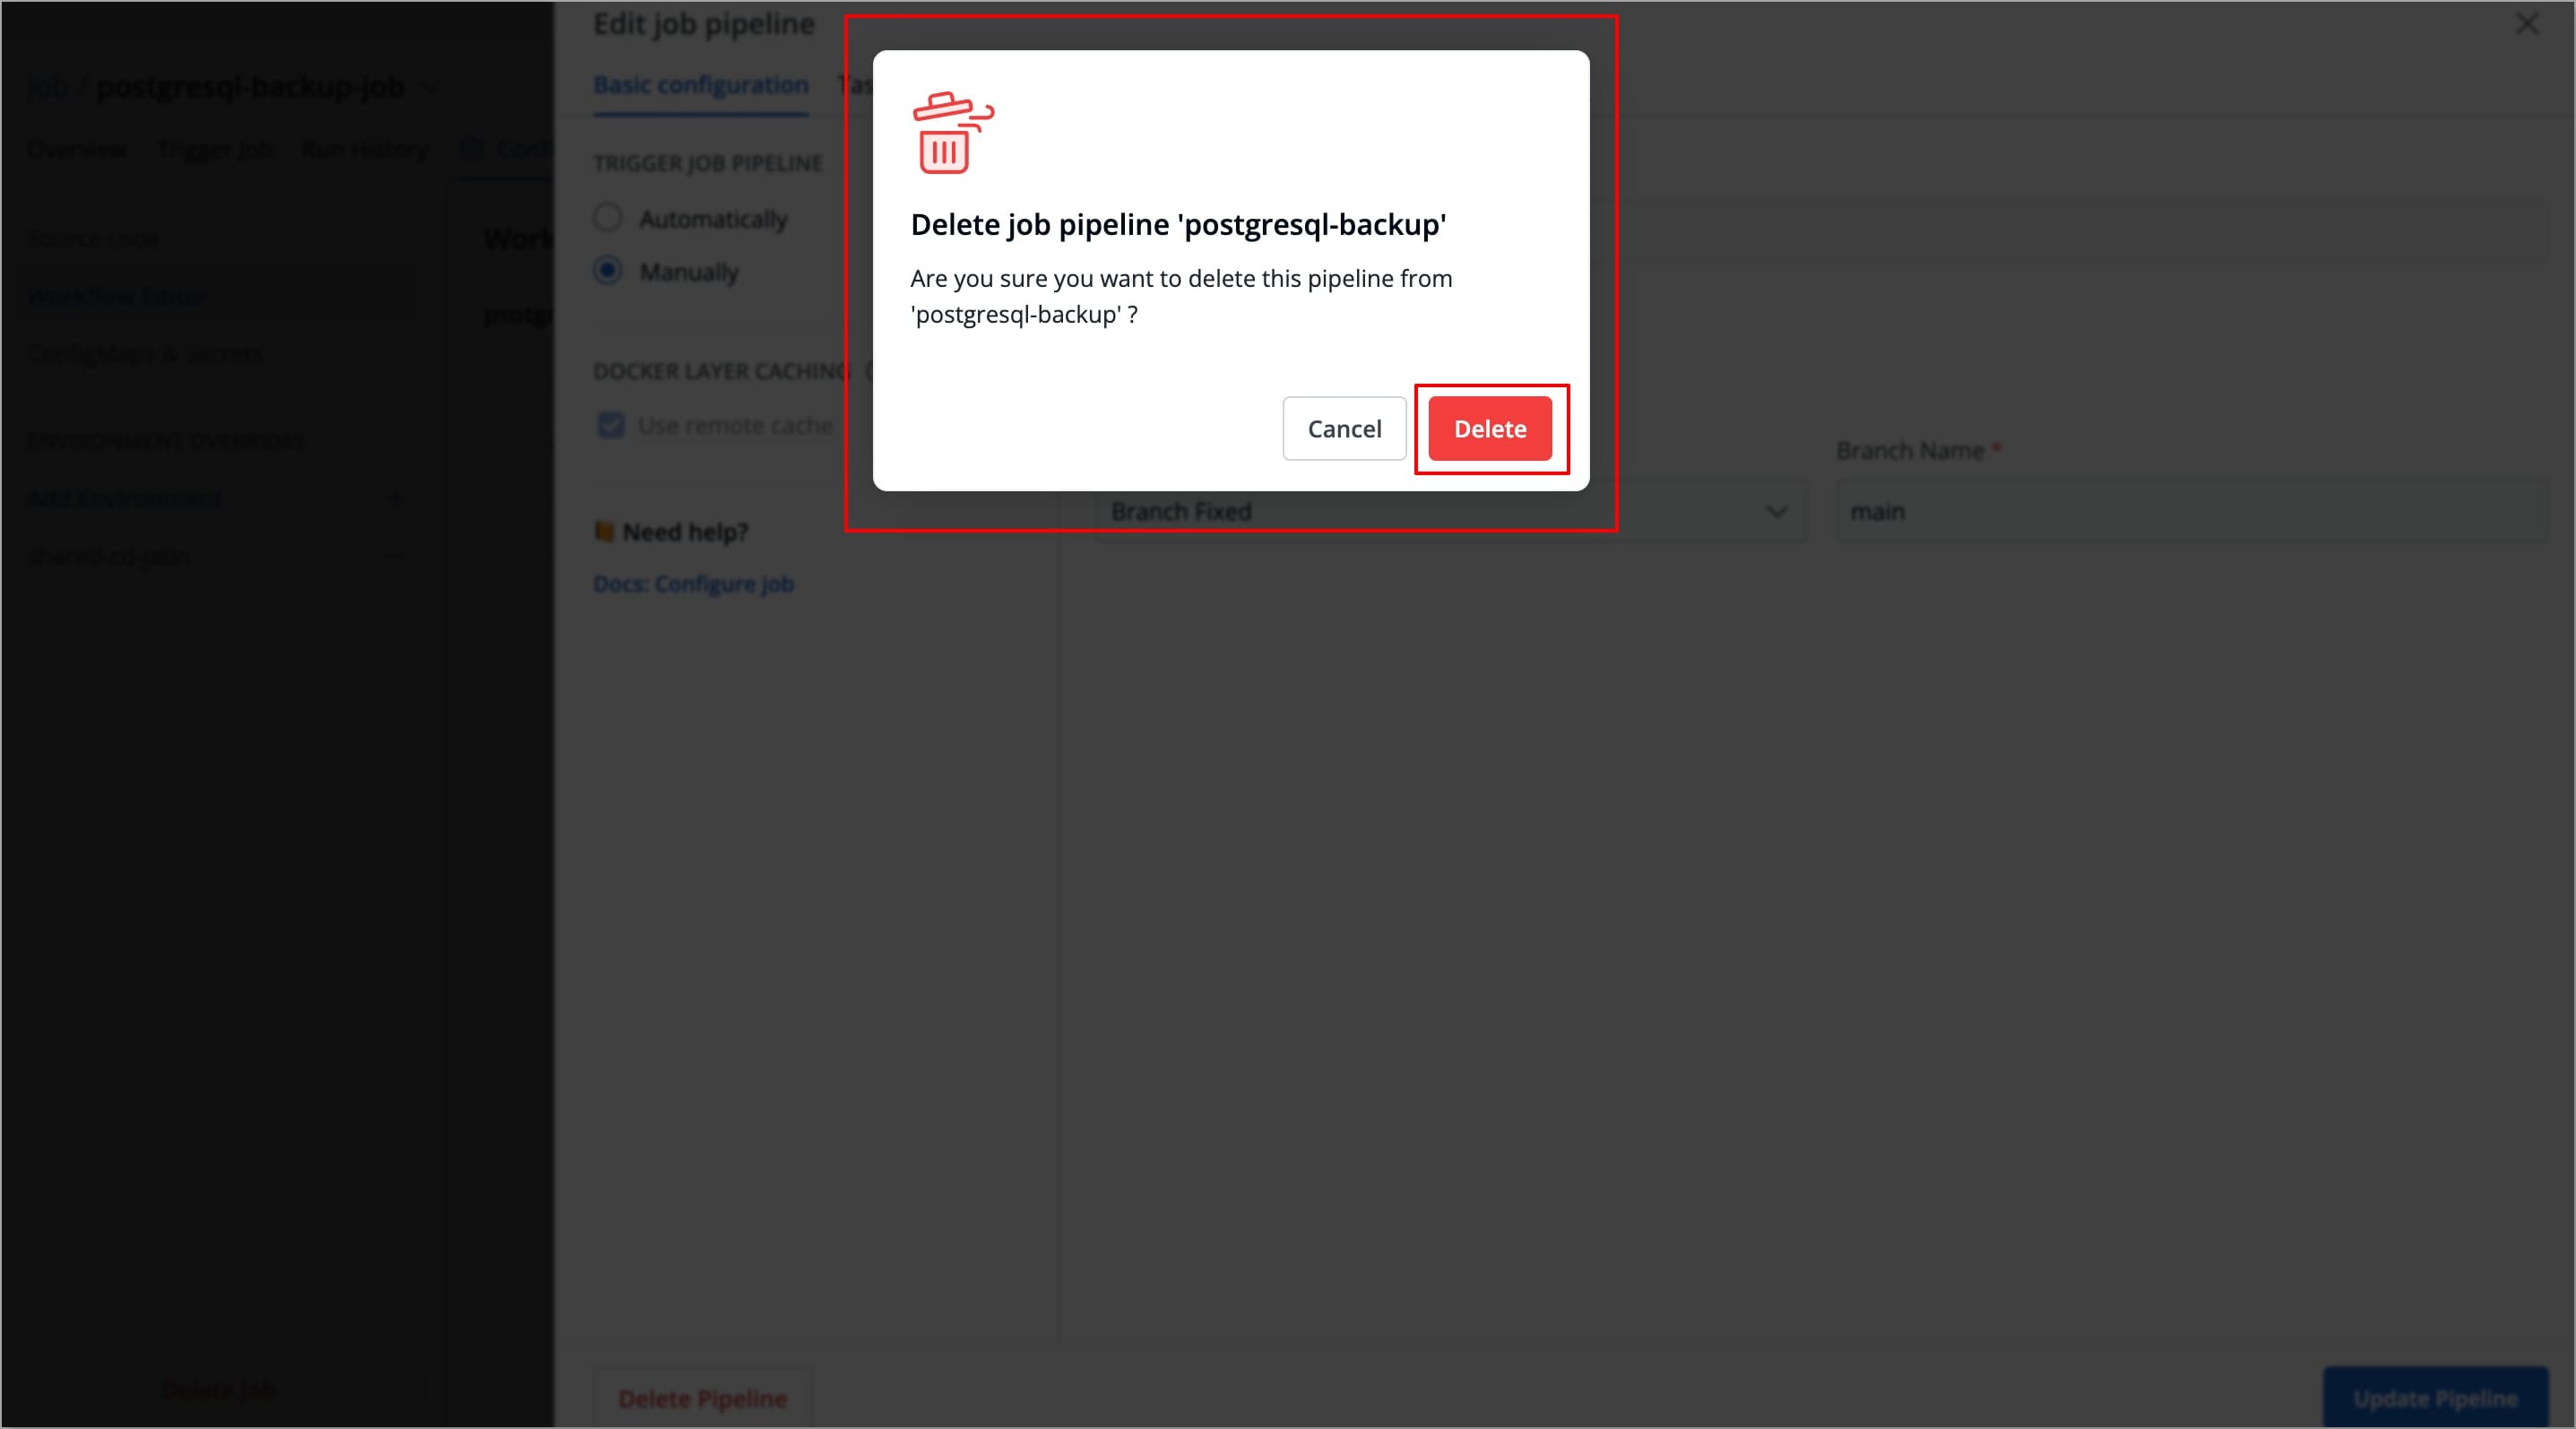
Delete Job Pipeline
Users need to have the Admin role or the Super Admin role. Refer the User permissions.
To delete a job pipeline
-
Navigate to Configurations (tab) → Workflow Editor for the job you want to delete.
-
Select the Job pipeline you wish to delete, a Edit job pipeline modal window will appear.
-
Select Delete Pipeline at the bottom left corner of the Edit job pipeline modal window to delete the job pipeline.

-
A pop-up window will appear asking you to confirm the Delete Pipeline action.
After creating the pipeline, you can configure ConfigMaps (optional) and Secrets (optional) and Environment overrides (optional) before triggering it.