GitOps
Introduction
In Devtron, you can use either Helm, GitOps (Argo CD), or GitOps (Flux CD) as your deployment method while deploying your application. When you choose Helm as your preferred deployment method, you are deploying your application directly into the Kubernetes cluster without version tracking of any kind.
However, if you choose GitOps - a branch of DevOps that focuses on using Git repositories as a single source of truth - Devtron stores Kubernetes configuration files (e.g., Kubernetes manifests or YAML configs) and the desired state of your applications in Git repositories to track each and every deployment.
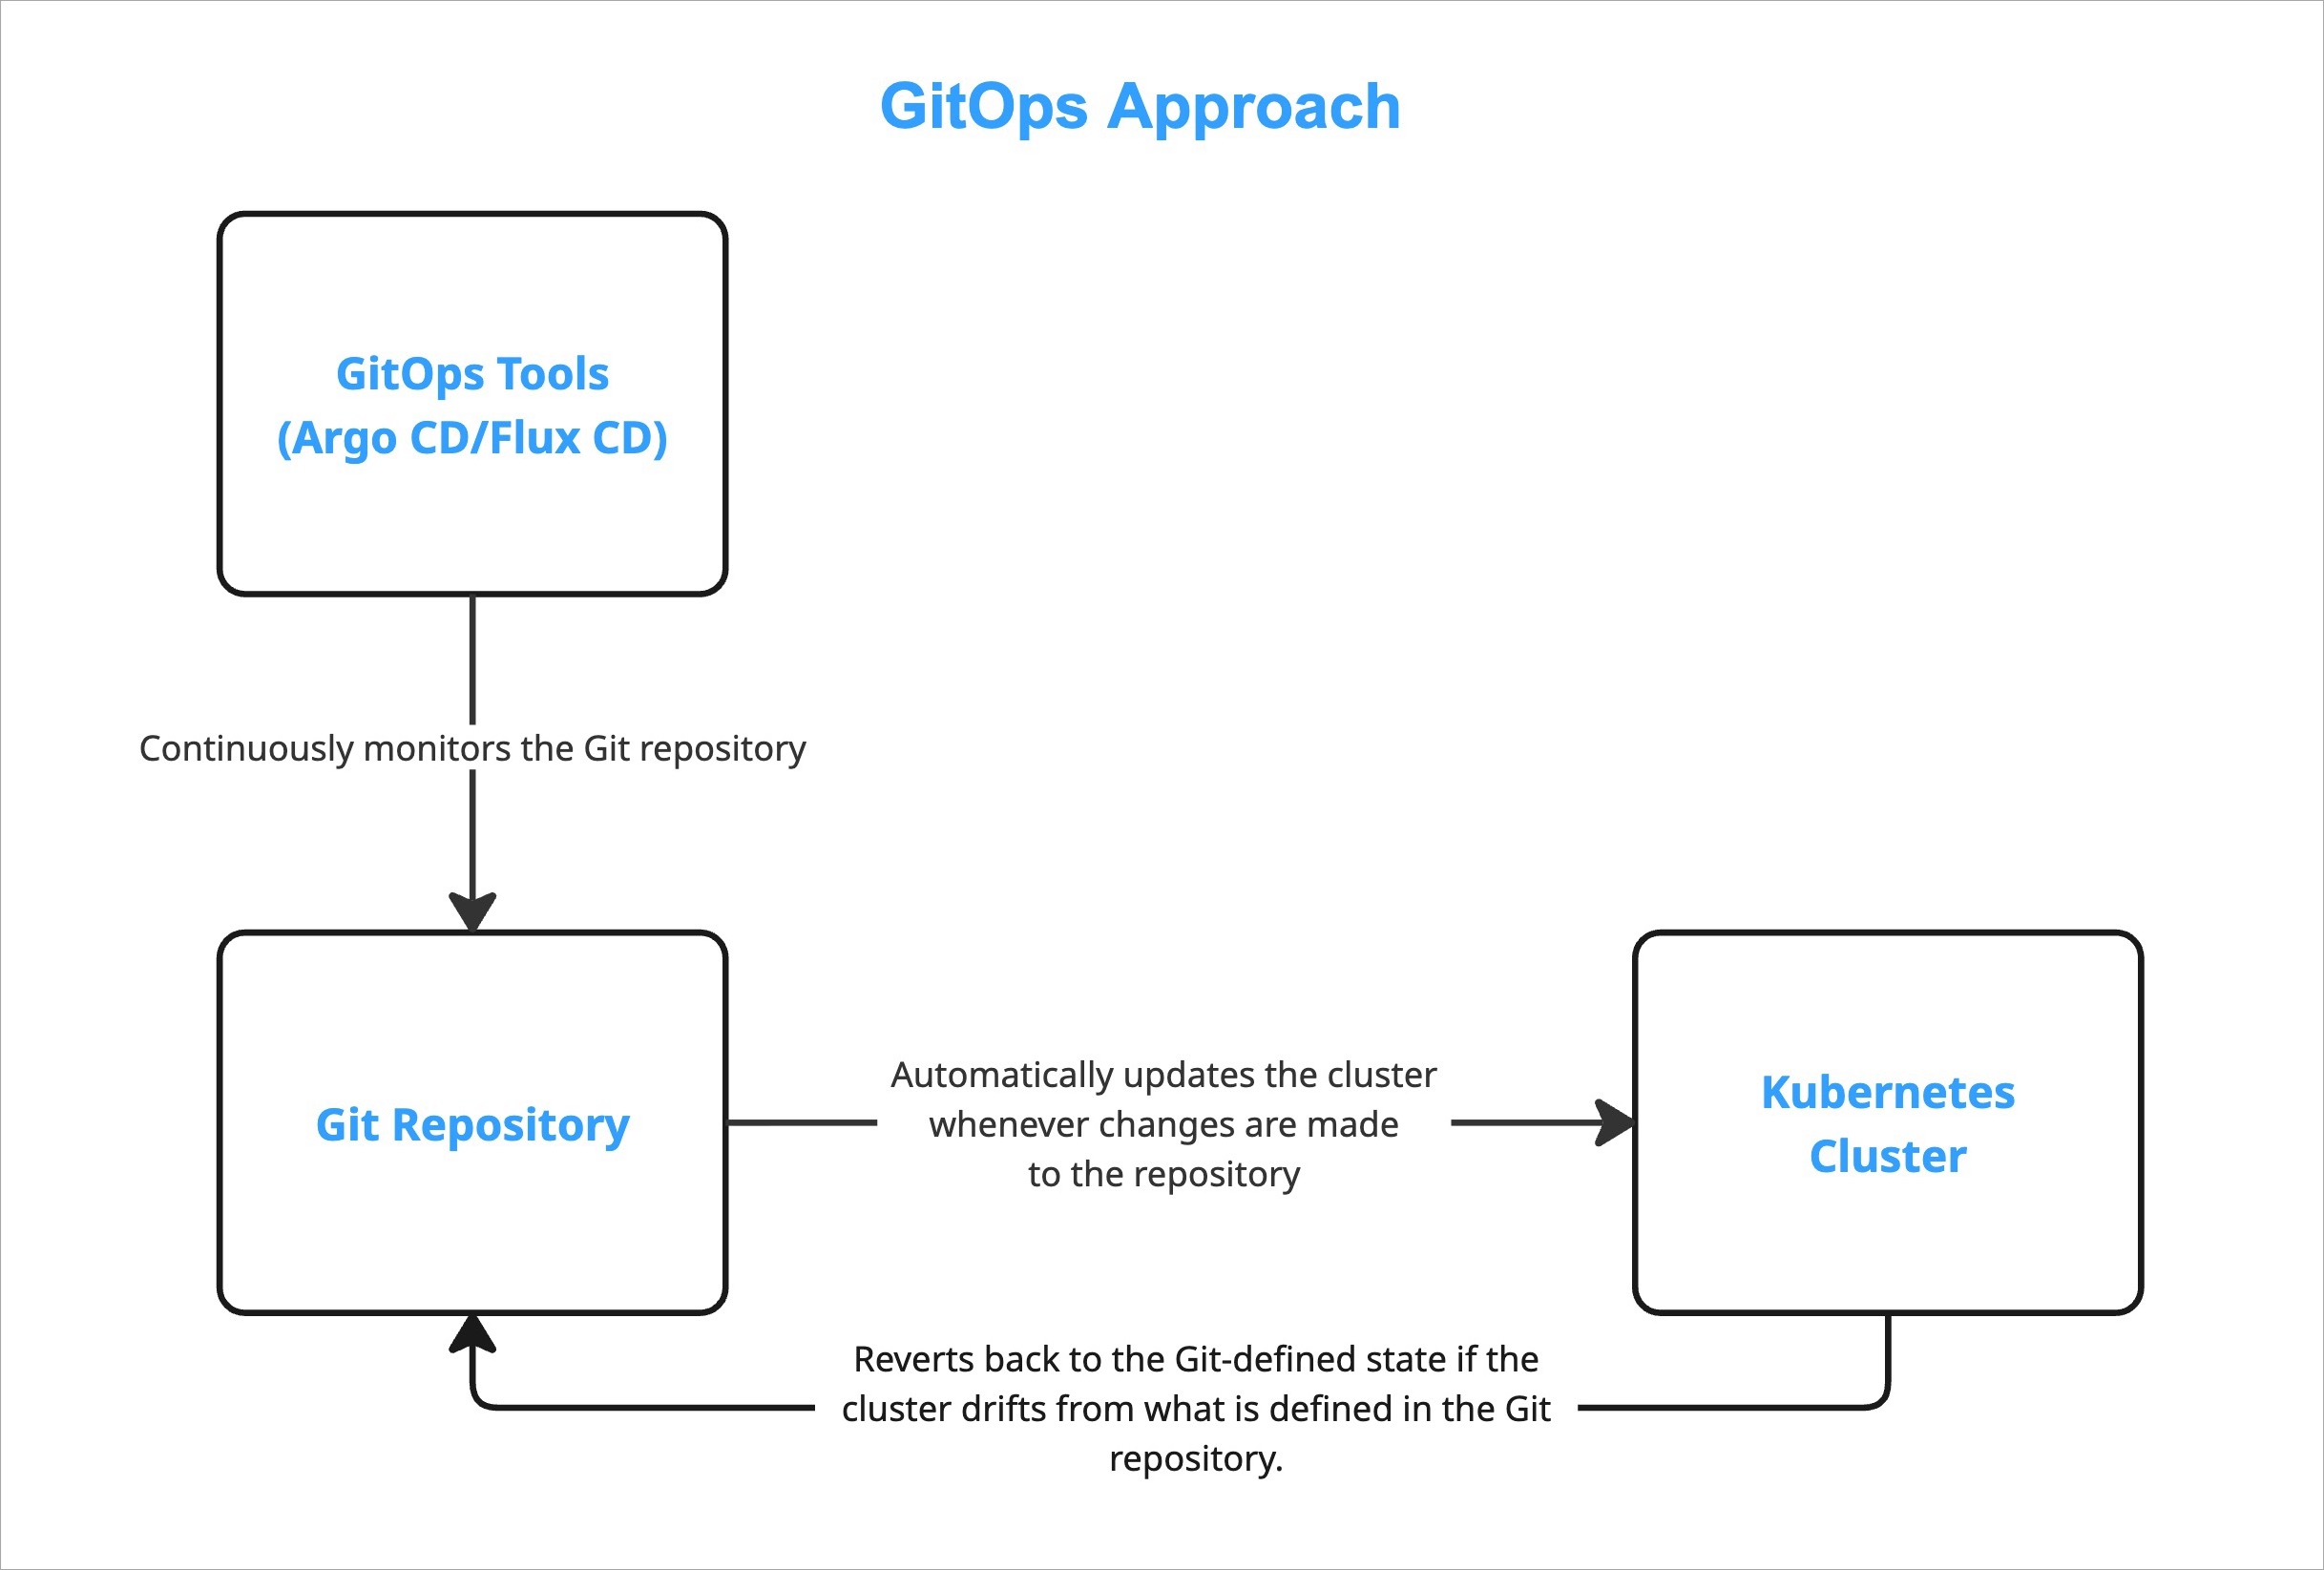
Whenever tools like Argo CD or Flux CD recognize changes in the Git repository, they apply those changes to the Kubernetes cluster automatically. Similarly, if they notice any change in the cluster, they will revert back the cluster to the Git-defined state.
Steps to Configure GitOps
Users need to have Super-Admin permission to configure GitOps.
-
Go to Global Configurations → GitOps

-
Select any one of the supported Git providers to configure GitOps.

The Git provider you select for configuring GitOps might impact the following sections:
-
Fill all the mandatory fields. Refer supported Git providers to know more about the respective fields.
-
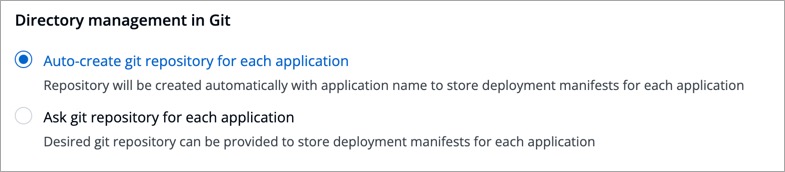
In the Directory Management in Git section, you get the following options:
-
Auto-create git repository for each application:
This option lets Devtron automatically create a GitOps repository within your organization. The repository name will match your application name, and it cannot be changed. Since Devtron needs admin access to create the repository, ensure the Git credentials you provided in Step 3 have administrator rights.
-
Ask git repository for each application:
Select this option if you wish to use your own GitOps repo. This is ideal if there are any confidentiality/security concerns that prevent you from giving us admin access. Therefore, the onus is on you to create a GitOps repo with your Git provider, and then add it to the specific application on Devtron. Make sure the Git credentials you provided in Step 3 have at least read/write access. Choosing this option will unlock a GitOps Configuration page under the App Configuration tab.
-
-
Click Save/Update. A green tick will appear on the active Git provider.
Feature Flag
Alternatively, you may use the feature flag FEATURE_USER_DEFINED_GITOPS_REPO_ENABLE to enable or disable custom GitOps repo.
For disabling - FEATURE_USER_DEFINED_GITOPS_REPO_ENABLE: "false"
For enabling - FEATURE_USER_DEFINED_GITOPS_REPO_ENABLE: "true"
How to Use Feature Flag
-
Go to Devtron's Resource Browser.
-
Select the cluster where Devtron is running, i.e.,
default_cluster. -
Go to the Config & Storage dropdown on the left.
-
Click ConfigMap.
-
Use the namespace filter (located on the right-hand side) to select
devtroncdnamespace. Therefore, it will show only the ConfigMaps related to Devtron, and filter out the rest. -
Find the ConfigMap meant for the dashboard of your Devtron instance, i.e.,
dashboard-cm(with an optional suffix). -
Click Edit Live Manifest.
-
Add the feature flag (with the intended boolean value) within the
datadictionary -
Click Apply Changes.
Supported Git Providers
Below are the Git providers supported in Devtron for storing configuration files.
GitHub
- A GitHub account
- A GitHub organization. If you don't have one, refer Creating Organization in GitHub.
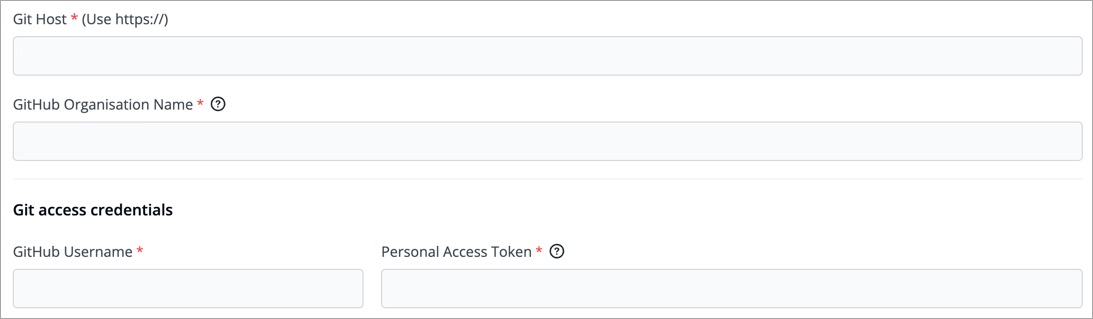
Fill the following mandatory fields:
| Field | Description |
|---|---|
| Git Host | Shows the URL of GitHub, e.g., https://github.com/ |
| GitHub Organisation Name | Enter the GitHub organization name. If you do not have one, refer How to create organization in GitHub. |
| GitHub Username | Provide the username of your GitHub account |
| Personal Access Token | Provide your personal access token (PAT). It is used as an alternate password to authenticate your GitHub account. If you do not have one, create a GitHub PAT here. Access Required: repo - Full control of private repositories (able to access commit status, deployment status, and public repositories). admin:org - Full control of organizations and teams (Read and Write access). May not be required if you are using user-defined git repo. delete_repo - Grants delete repo access on private repositories. |
GitLab
-
A GitLab account
-
A GitLab group. If you don't have one, refer Creating Group in GitLab.
Fill the following mandatory fields:
| Field | Description |
|---|---|
| Git Host | Shows the URL of GitLab, e.g., https://gitlab.com/ |
| GitLab Group ID | Enter the GitLab group ID. If you do not have one, refer GitLab Group ID. |
| GitLab Username | Provide the username of your GitLab account |
| Personal Access Token | Provide your personal access token (PAT). It is used as an alternate password to authenticate your GitLab account. If you do not have one, create a GitLab PAT here. Access Required: api - Grants complete read/write access to the scoped project API. write_repository - Allows read/write access (pull, push) to the repository. |
AWS Code Commit 
-
Existing user of AWS CodeCommit (as AWS stopped adding new customers to it)
-
An AWS IAM user with
AWSCodeCommitPowerUserpermission. Refer to Create and Configure an IAM User with AWSCodeCommitPowerUser Permission for more information. -
Obtain SSH Key ID and SSH Private Key. Refer to Generating SSH Private Key in AWS Code Commit for more information.
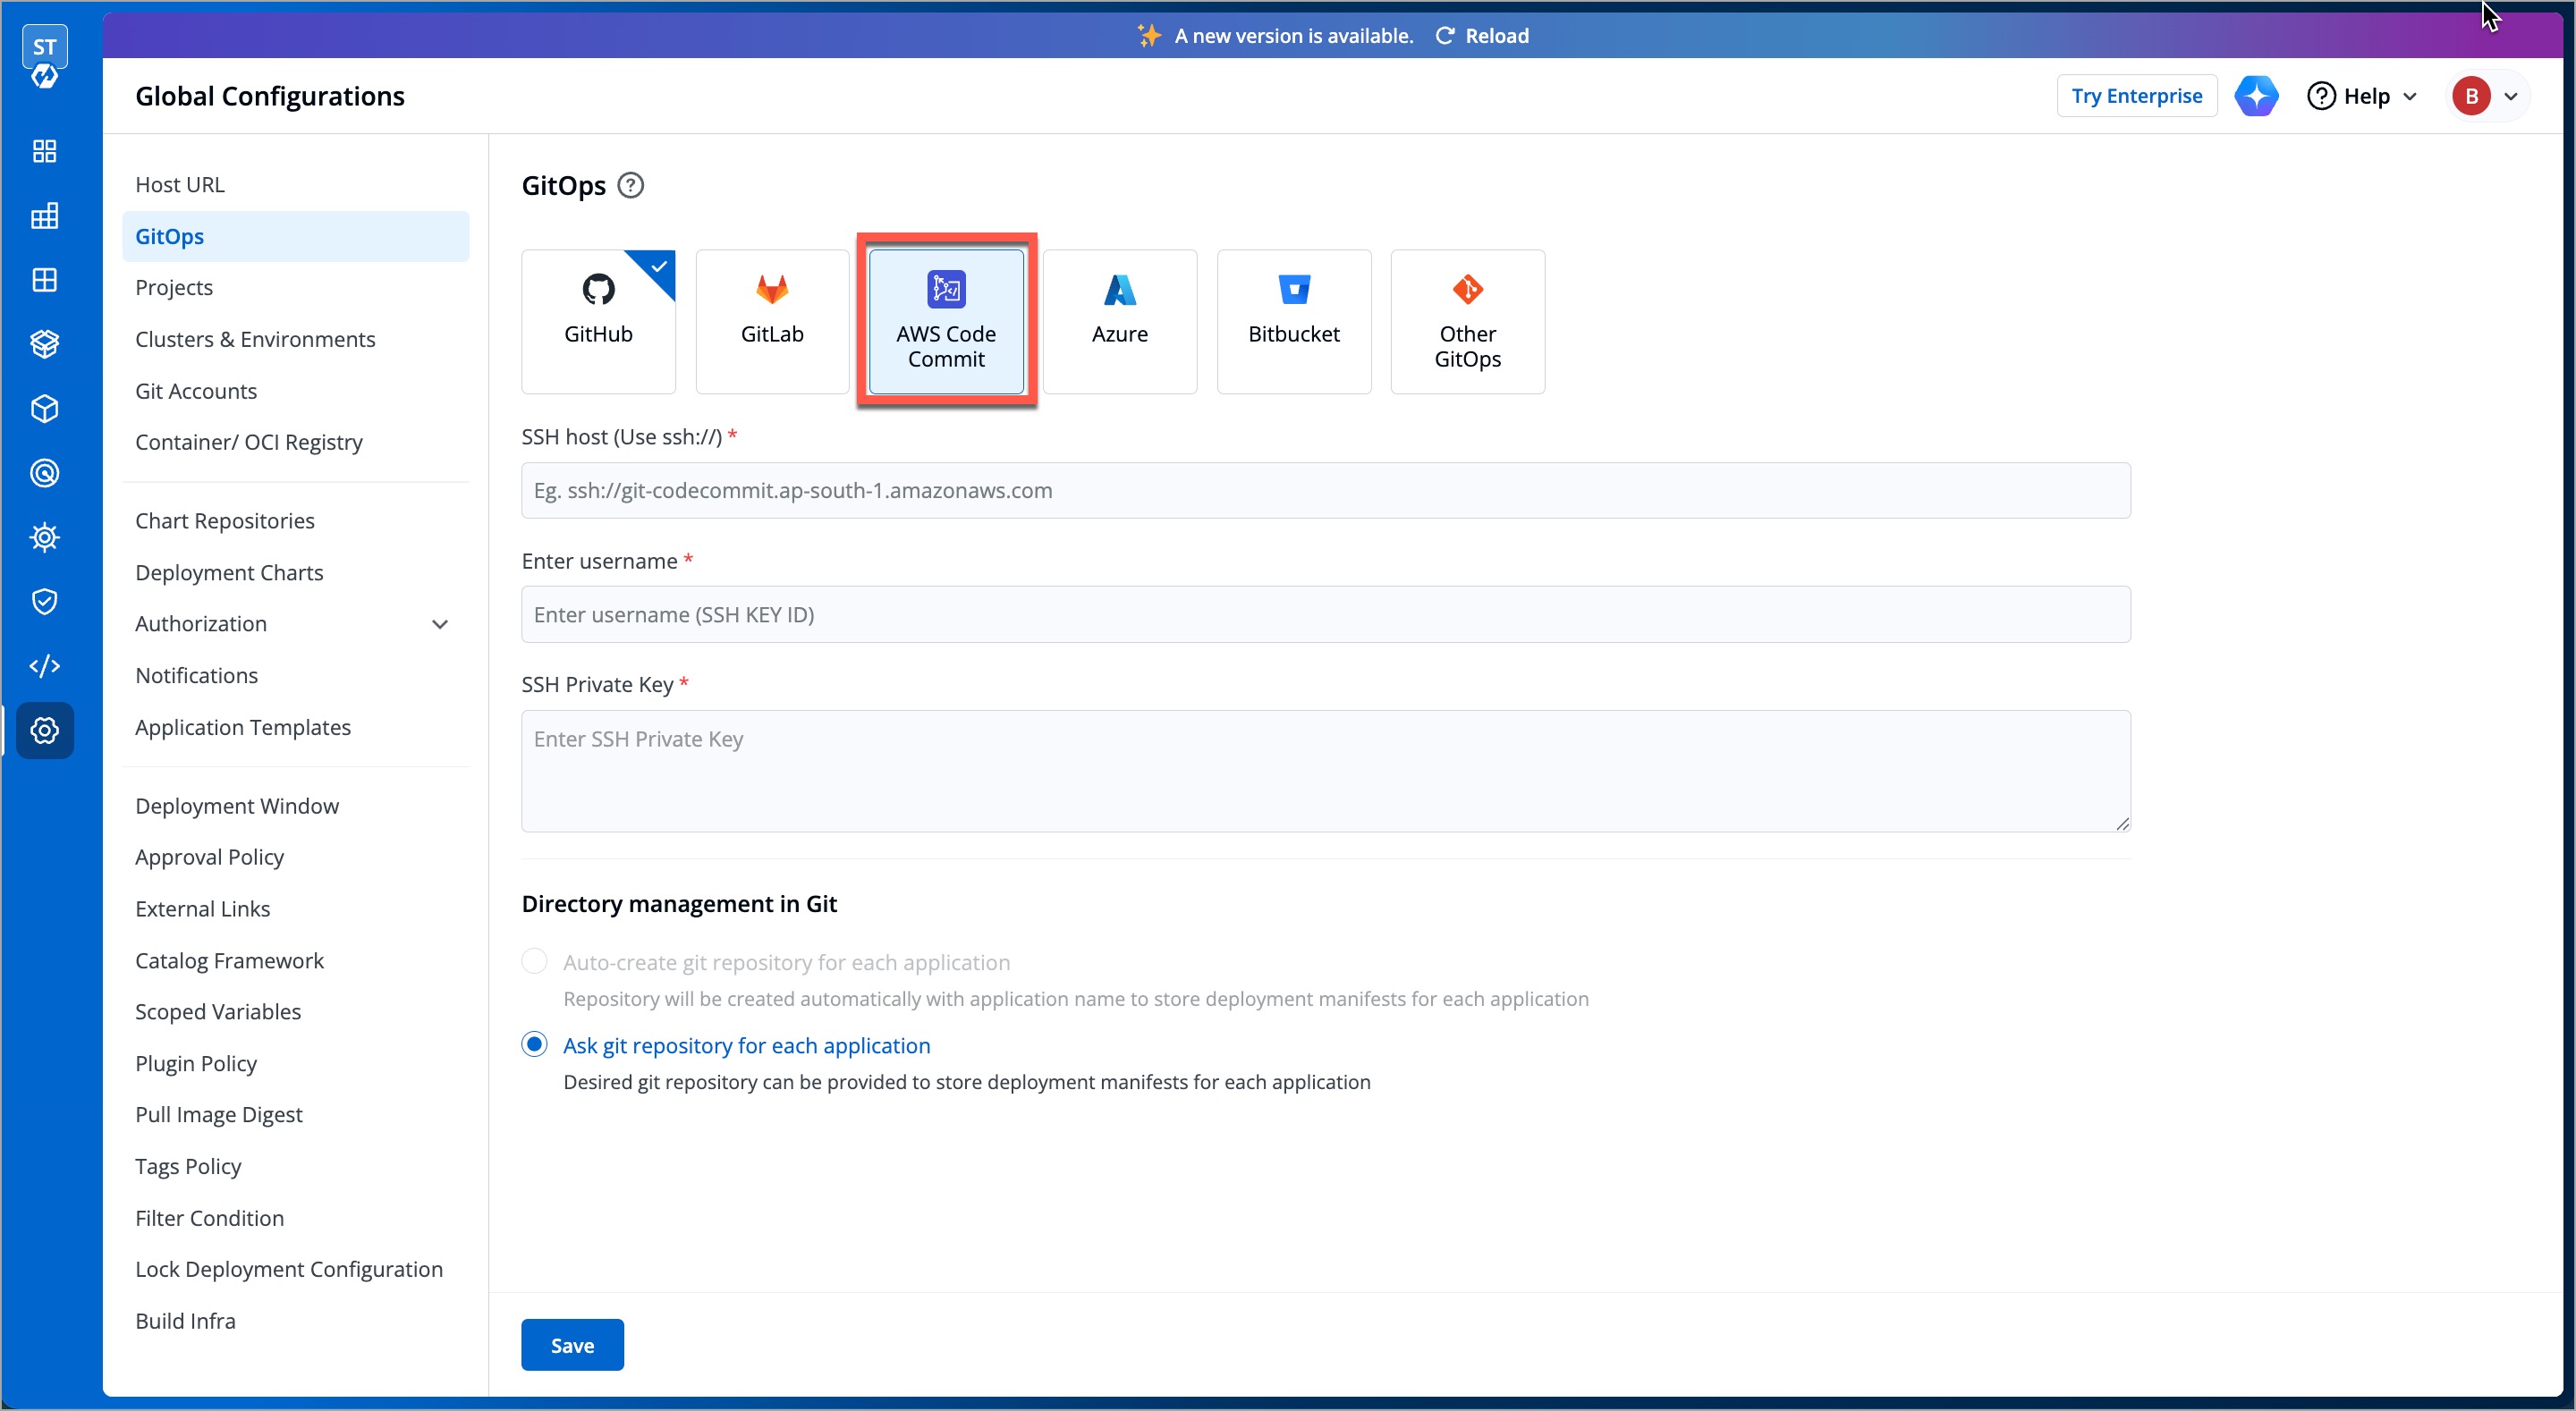
Fill the following mandatory fields:
| Field | Description |
|---|---|
| SSH Host | Enter the AWS Code Commit SSH host URL (e.g., ssh://git-codecommit.ap-south-1.amazonaws.com) |
| Enter username | Enter the username (SSH Key ID), e.g., APKDKDIERJS9EXAMPLE. |
| SSH Private Key | Enter the SSH private key. |
Click Save.
Azure
-
An organization on Azure DevOps. If you don't have one, refer this link.
-
A project in your Azure DevOps organization. Refer Creating Project in Azure.
Fill the following mandatory fields:
| Field | Description |
|---|---|
| Azure DevOps Organisation Url* | Enter the Org URL of Azure DevOps. Format should be https://dev.azure.com/<org-name>, where <org-name> represents the organization name, e.g., https://dev.azure.com/devtron-test |
| Azure DevOps Project Name | Enter the Azure DevOps project name. If you do not have one, refer Azure DevOps Project Name. |
| Azure DevOps Username* | Provide the username of your Azure DevOps account |
| Azure DevOps Access Token* | Provide your Azure DevOps access token. It is used as an alternate password to authenticate your Azure DevOps account. If you do not have one, create a Azure DevOps access token here. Access Required: code - Grants the ability to read source code and metadata about commits, change sets, branches, and other version control artifacts. More information on scopes in Azure DevOps. |
Bitbucket
Here, you get 2 options:
-
Bitbucket Cloud - Select this if you wish to store GitOps configuration in a web-based Git repository hosting service offered by Bitbucket.
-
Bitbucket Data Center - Select this if you wish to store GitOps configuration in a git repository hosted on a self-managed Bitbucket Data Center (on-prem).
Bitbucket Cloud
-
A Bitbucket account
-
A workspace in your Bitbucket account. Refer Creating Workspace in Bitbucket.

Fill the following mandatory fields:
| Field | Description |
|---|---|
| Bitbucket Host | Shows the URL of Bitbucket Cloud, e.g., https://bitbucket.org/ |
| Bitbucket Workspace ID | Enter the Bitbucket workspace ID. If you do not have one, refer Bitbucket Workspace ID |
| Bitbucket Project Key | Enter the Bitbucket project key. If you do not have one, refer Bitbucket Project Key. Note: If the project is not provided, the repository is automatically assigned to the oldest project in the workspace. |
| Bitbucket Username* | Provide the username of your Bitbucket account |
| Personal Access Token | Provide your personal access token (PAT). It is used as an alternate password to authenticate your Bitbucket Cloud account. If you do not have one, create a Bitbucket Cloud PAT here. Access Required: repo - Full control of repositories (Read, Write, Admin, Delete) access. |
Bitbucket Data Center
A Bitbucket Data Center account

Fill the following mandatory fields:
| Field | Description |
|---|---|
| Bitbucket Host | Enter the URL address of your Bitbucket Data Center, e.g., https://bitbucket.mycompany.com |
| Bitbucket Project Key | Enter the Bitbucket project key. Refer Bitbucket Project Key. |
| Bitbucket Username* | Provide the username of your Bitbucket Data Center account |
| Password | Provide the password to authenticate your Bitbucket Data Center account |
Other GitOps
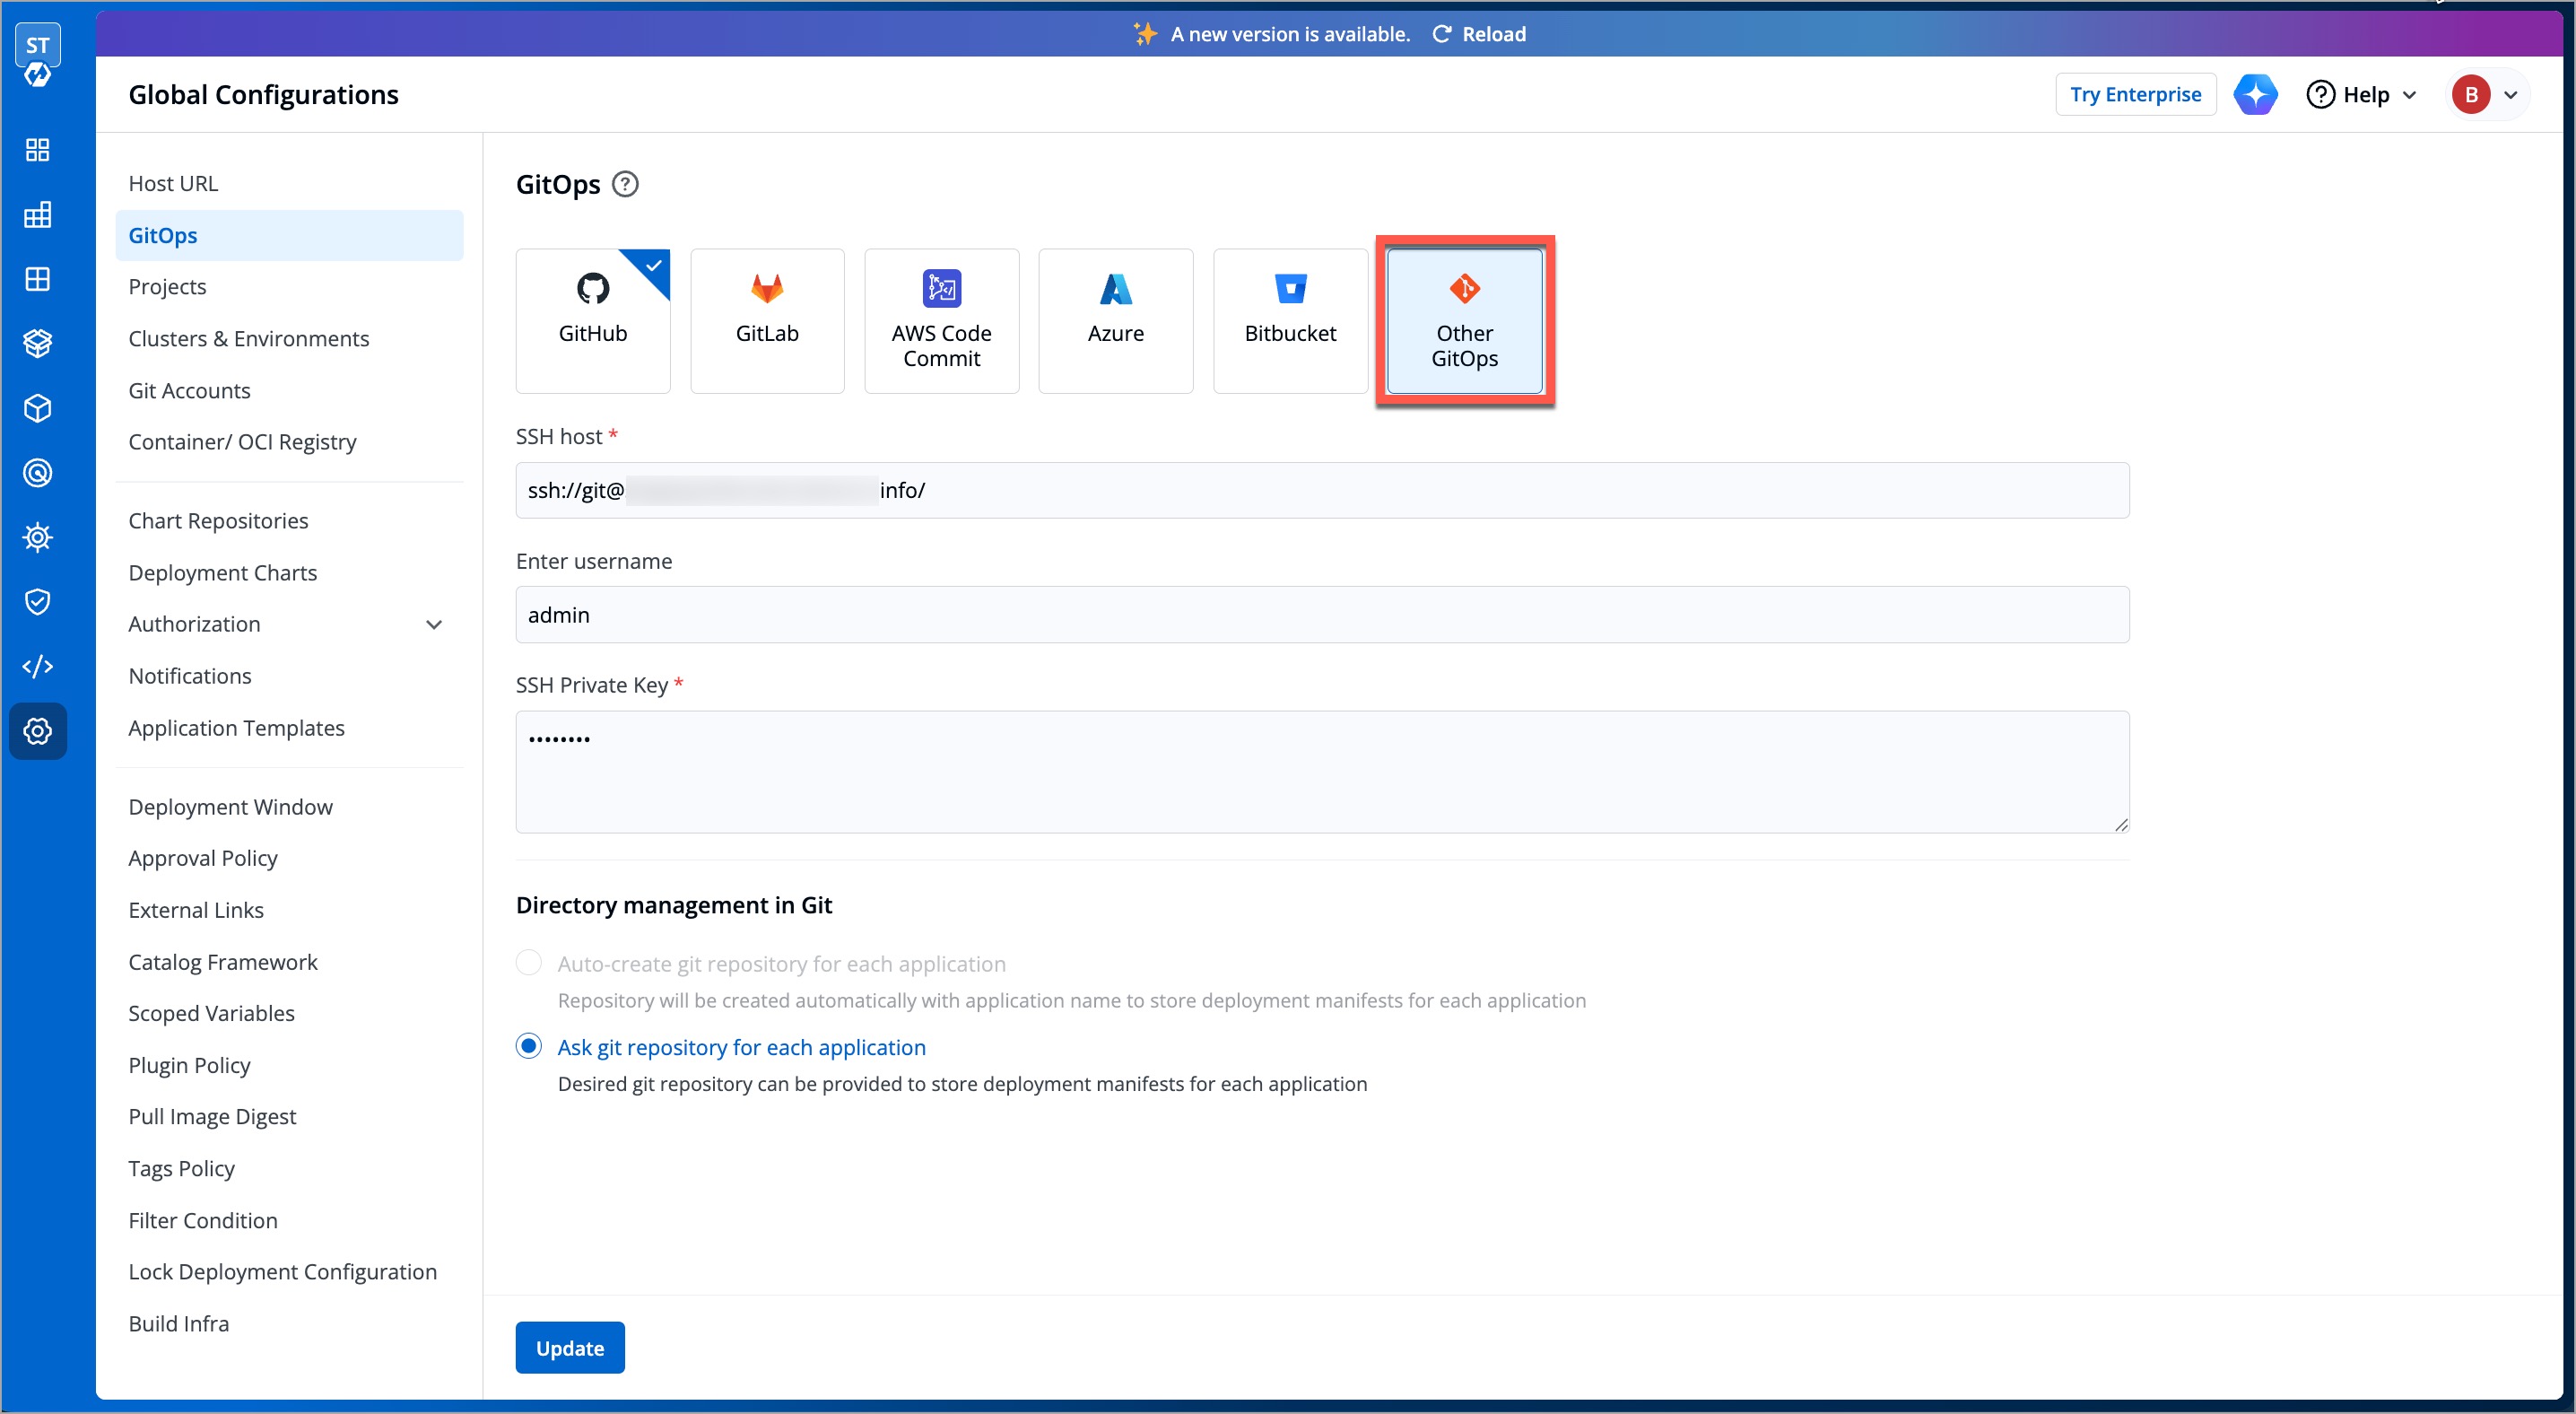
If you prefer to use the GitOps approach using a different platform other than the available ones, refer to the following table and fill in the mandatory fields:
| Field | Description |
|---|---|
| SSH Host | Enter the SSH host URL (e.g., ssh://git@<host>:<path>/<repo-name>.git). |
| Enter username | Enter the username (e.g., git). For other GitOps, the username will differ depending on the provider (e.g., personal access token or access key ID). |
| SSH Private Key | Enter the SSH private key (e.g., M7YtY8cdJKhZ7nYXxgXeqNffv) here against the public key added to your GitOps provider. |
Click Save.
Miscellaneous
Creating Organization in GitHub
We do NOT recommend using GitHub organization that contains your source code.
-
Create a new account on GitHub (if you do not have one).
-
On the upper-right corner of your GitHub page, click your profile photo, then click Settings.
-
On the
Accesssection, click Organizations. -
On the
Organizationssection, click New organization. -
Pick a plan for your organization. You have the option to select
create free organizationalso. -
On the
Set up your organizationpage,- Enter the
organization account name,contact email. - Select the option your organization belongs to.
- Verify your account and click Next.
- Your
GitHub organization namewill be created.
- Enter the
-
Go to your profile and click Your organizations to view all the organizations you created.
For more information about the plans available for your team, see GitHub's products. You can also refer GitHub organization official doc page for more detail.
Creating Group in GitLab
- Create a new account on GitLab (if you do not have one).
- You can create a group by going to the 'Groups' tab on the GitLab dashboard and click
New group. - Select
Create group. - Enter the group name (required) and select the optional descriptions if required, and click Create group.
- Your group will be created and your group name will be assigned with a new
Group ID(e.g. 61512475).
Creating Project in Azure DevOps
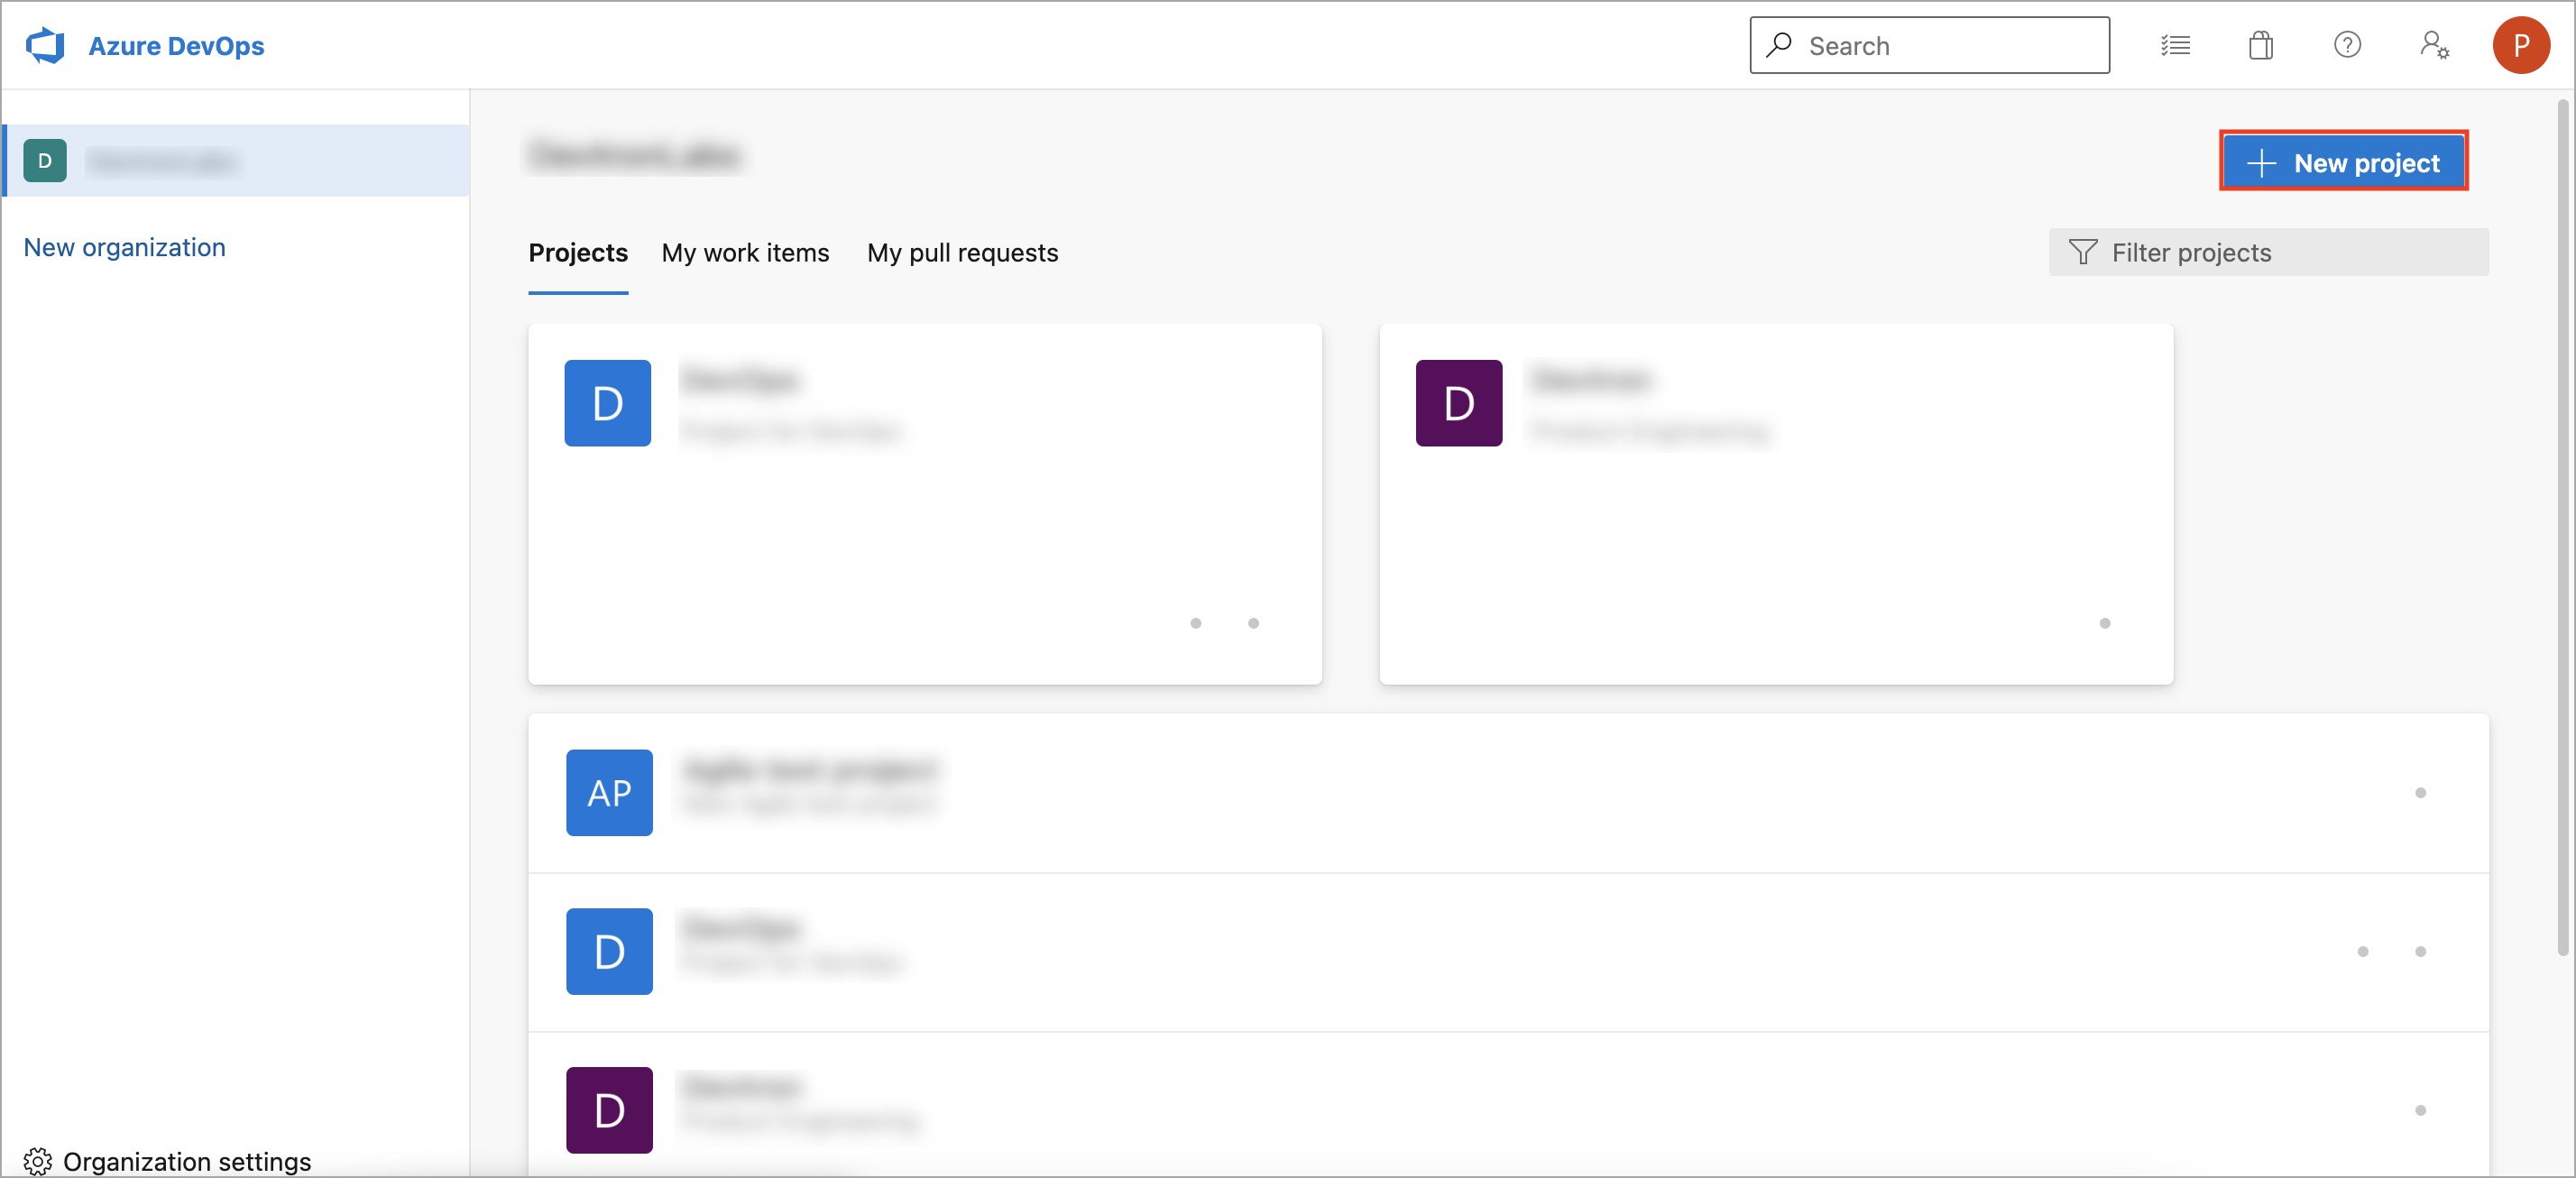
- Go to Azure DevOps and navigate to Projects.
- Select your organization and click
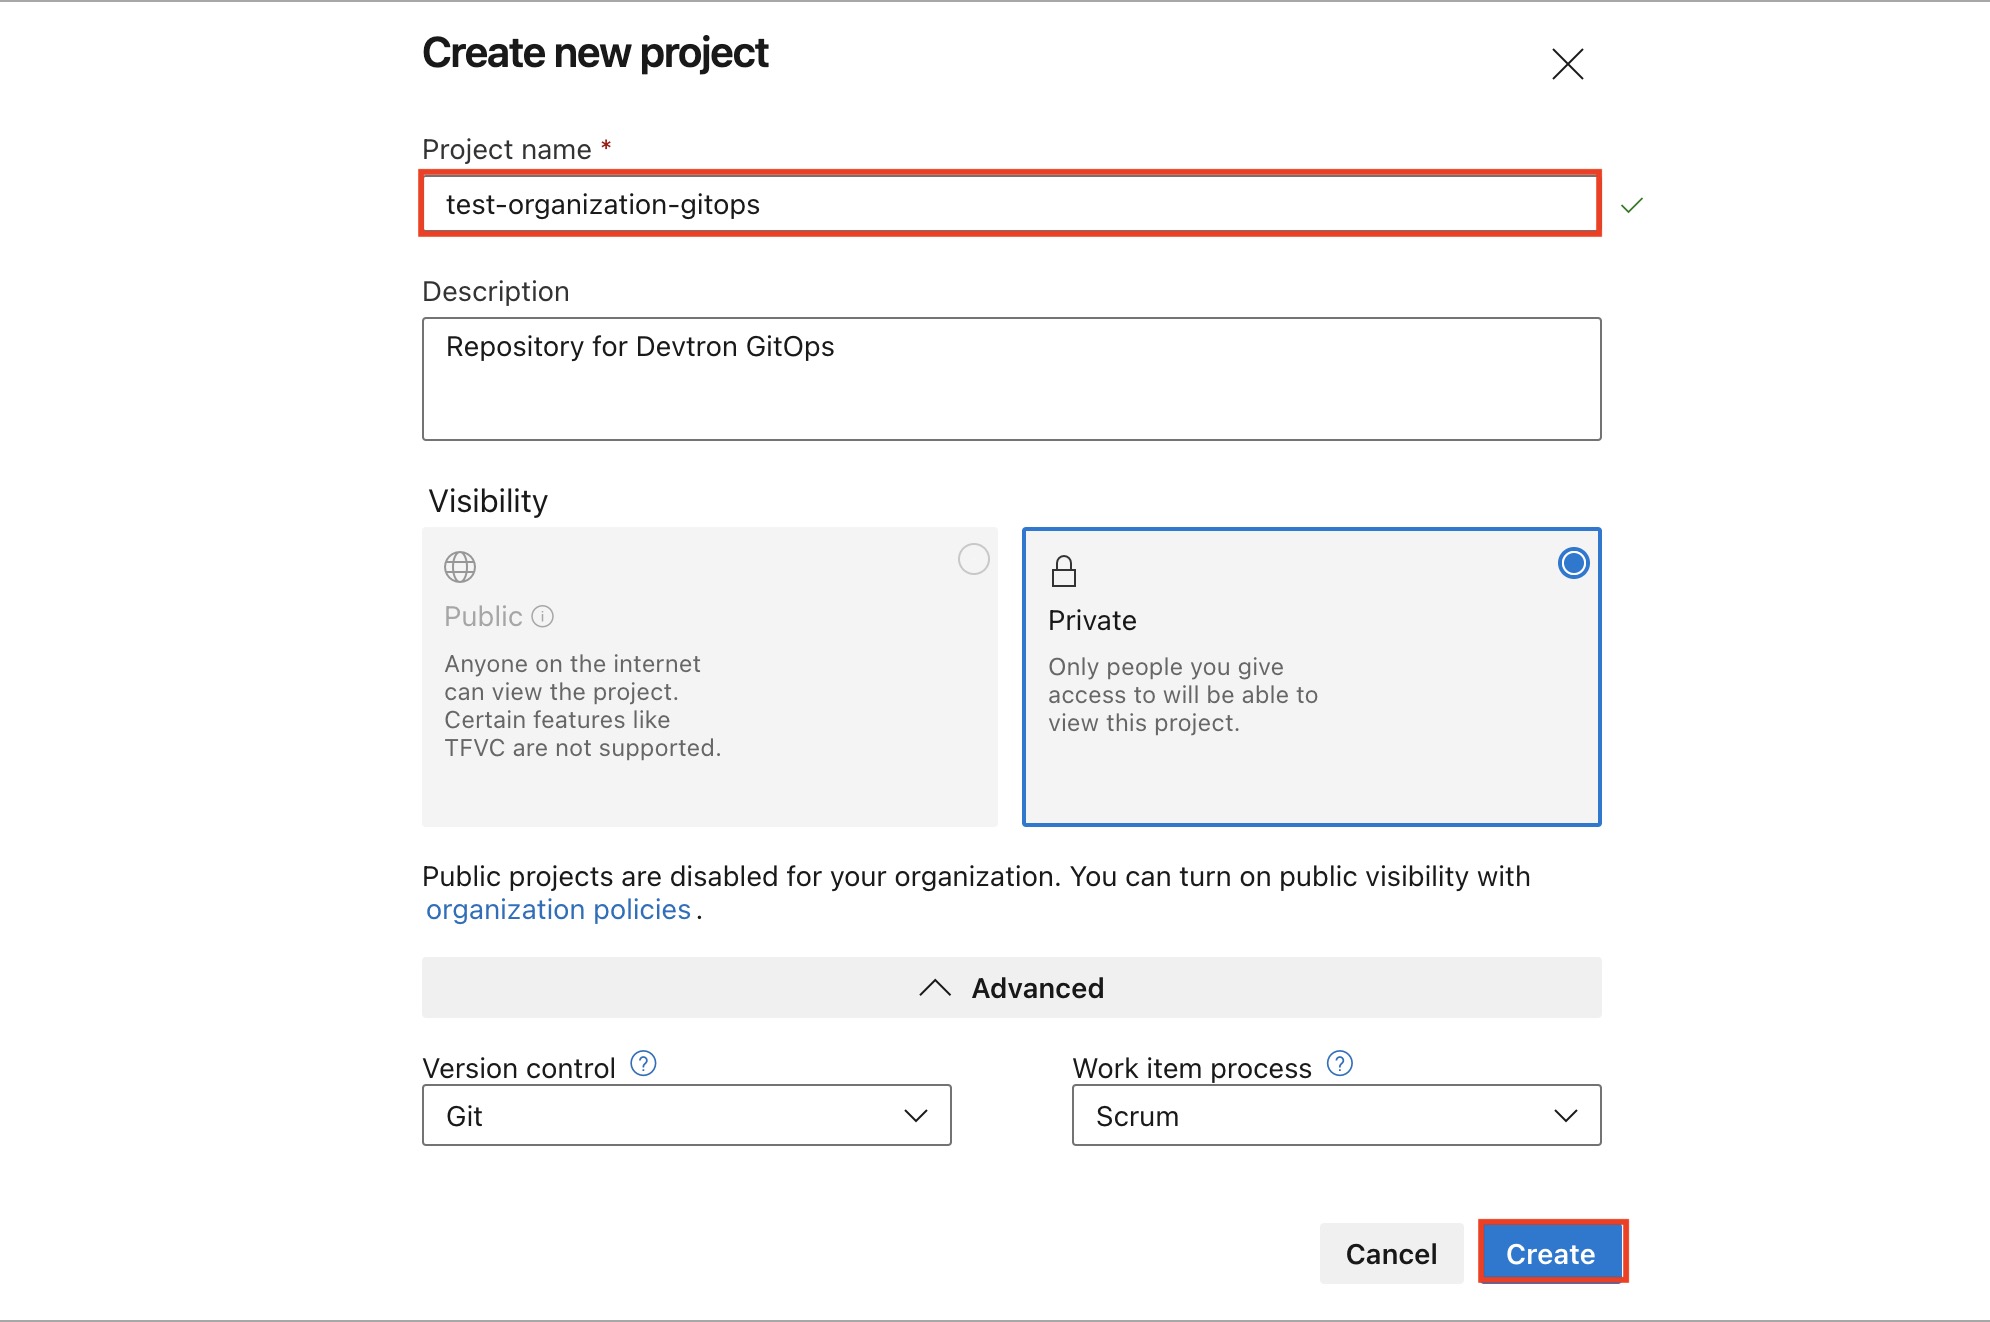
New project. - On the
Create new projectpage,- Enter the
project nameand description of the project. - Select the visibility option (private or public), initial source control type, and work item process.
- Click Create.
- Azure DevOps displays the project welcome page with the
project name.
- Enter the
You can also refer Azure DevOps - Project Creation official page for more details.
Creating Workspace in Bitbucket
- Create a new individual account on Bitbucket (if you do not have one).
- Select your profile and settings avatar on the upper-right corner of the top navigation bar.
- Select
All workspacesfrom the dropdown menu. - Select the
Create workspaceon the upper-right corner of theWorkspacespage. - On the
Create a Workspacepage:
- Enter a
Workspace name. - Enter a
Workspace ID. Your ID cannot have any spaces or special characters, but numbers and capital letters are fine. This ID becomes part of the URL for the workspace and anywhere else where there is a label that identifies the team (APIs, permission groups, OAuth, etc.). - Click Create.
- Your
Workspace nameandWorkspace IDwill be created.
You can also refer official Bitbucket Workspace page for more details.