

CI Pipeline
Who Can Perform This Action?
Users need to have the Admin role, the Manager role, or the Super Admin role. Refer the User permissions.
A workflow can be created in one of the following ways:
Each method has different use-cases that can be tailored according to the needs of the organization.
1. Build from Source Code
Build from Source Code workflow allows you to build the container image from a source code repository.
Note
Devtron typically uses a Dockerfile from your repository to build container images. If you don’t have one, Devtron provides default templates to help you get started. You can also build images without a Dockerfile using Buildpacks.
Creating a CI Pipeline
From the Applications page, select your application.
Go to Configurations tab and select Workflow Editor.
Click + New Workflow.
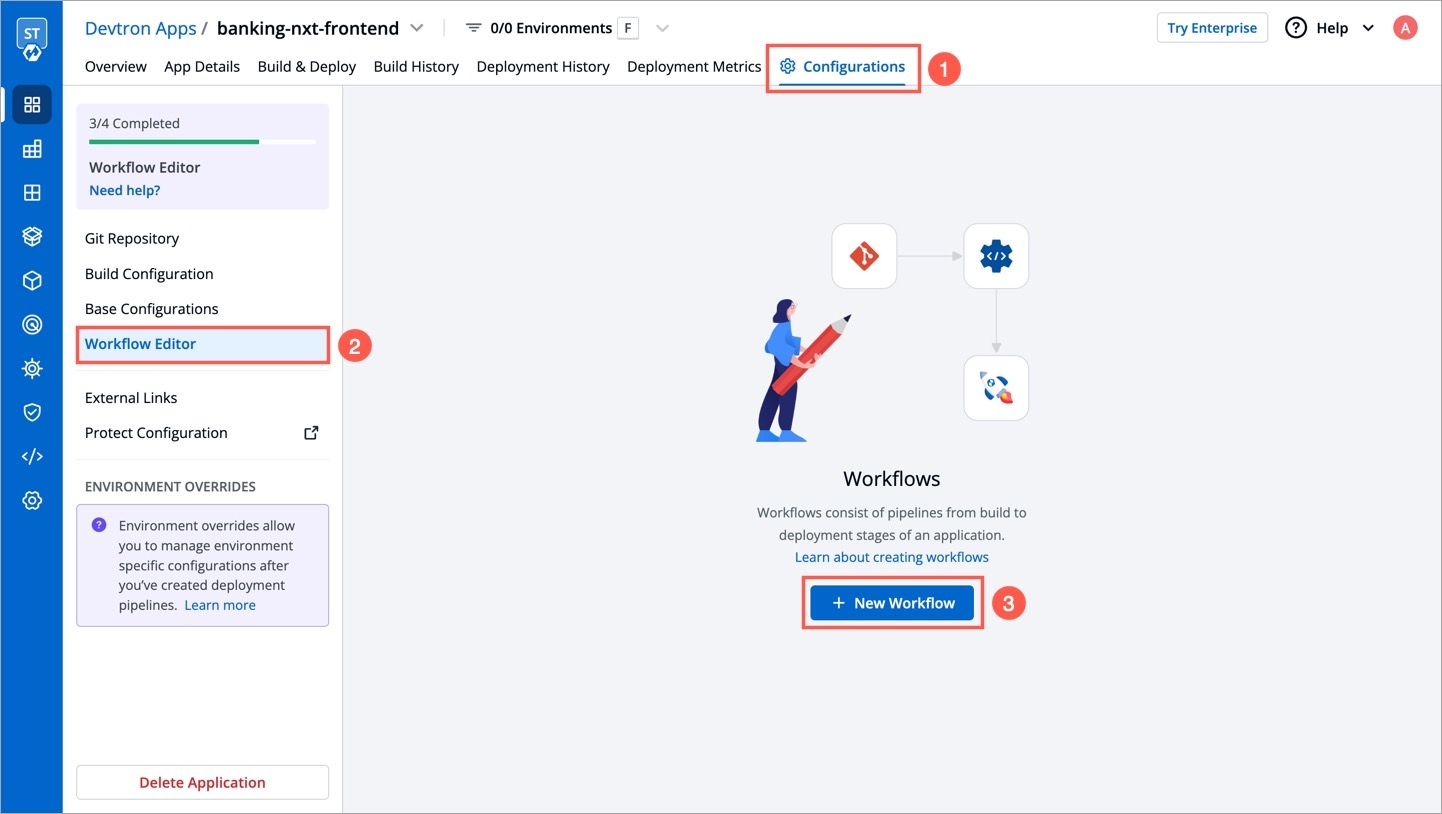
Figure 1: Creating New Workflow Select Build from Source Code.

Figure 2: 'Selecting Build from Source Code' In the Create Build Pipeline window, enter the following details:

Figure 3: Configuring build pipeline Field NameRequired/OptionalDescriptionPipeline NameRequired (Auto-Assigned)
Devtron automatically assigns a unique name for the pipeline. If you wish, you can change it in Advanced Options
Source typeRequired
Source type to trigger the CI. Available options:
Branch Fixed,Branch Regex,Pull Request,Tag CreationBranch NameRequired
Branch that triggers the CI build
Advanced OptionsOptional
Create Pre-Build, Build, and Post-Build tasks Refer the Configure Advanced options section to configure Advanced options.
Understanding Source TypesDevtron allows you set up different source types for a build pipeline, source types specify the repository events that initiate a build pipeline, such as a change in a branch, pull request creation, or tag creation.
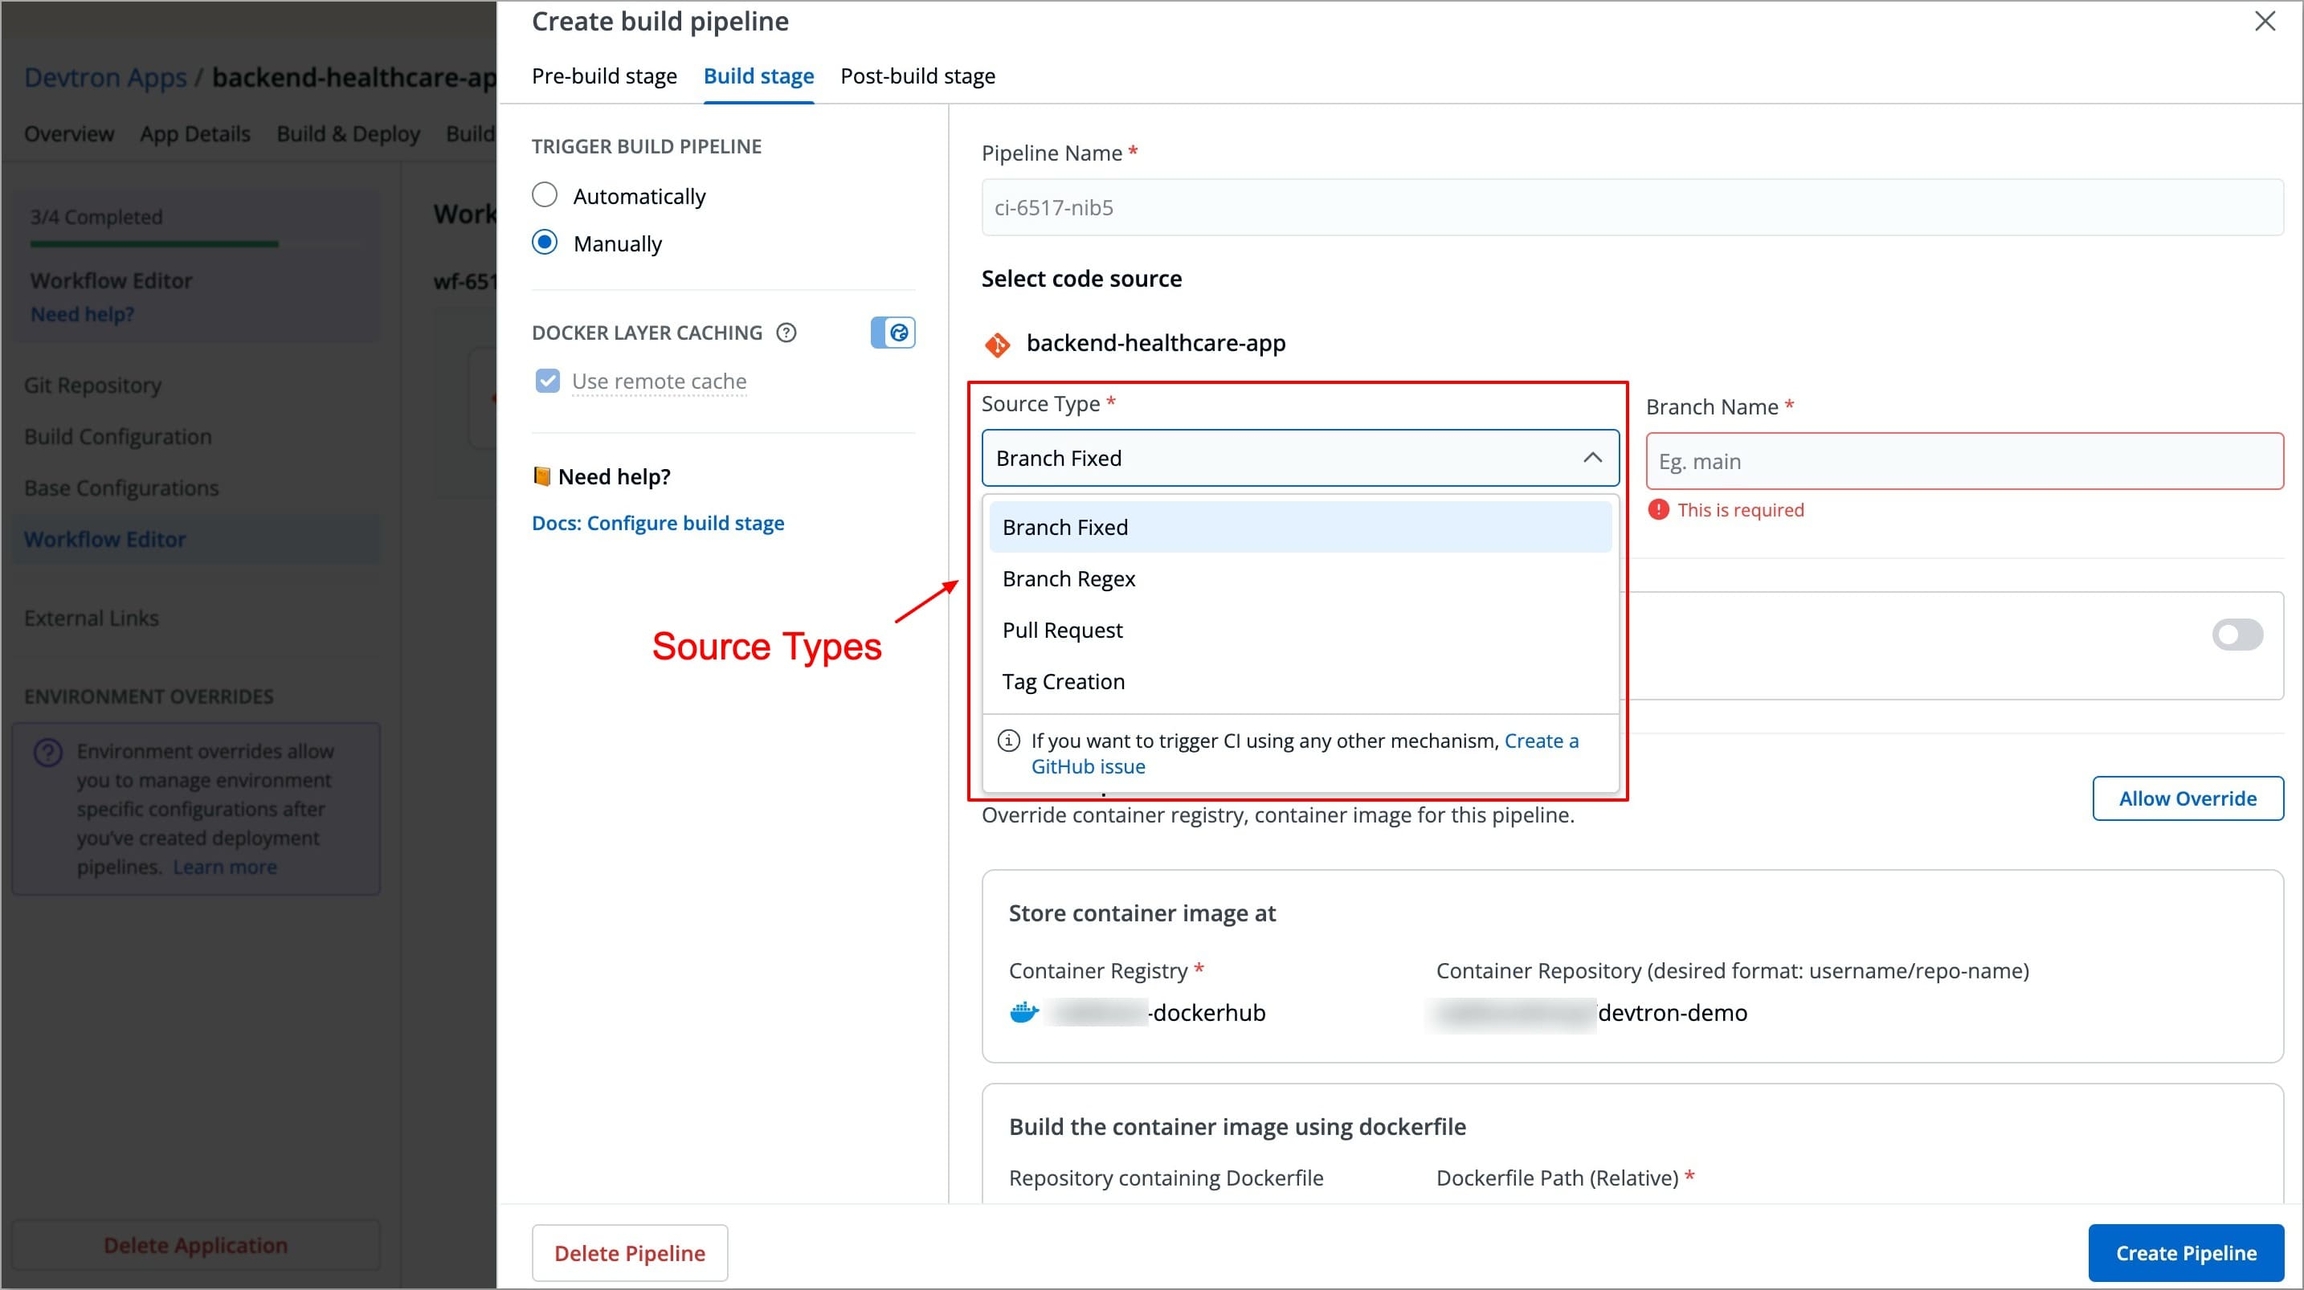
Figure 4: Source Types Source TypeDescriptionAdditional RequirementsBranch FixedTriggers a CI build whenever changes are pushed to a specified branch.
Requires a predefined branch name.
Branch RegexAllows dynamic branch selection based on a regex pattern
Requires a regex pattern to be defined. For example, if the user sets the Branch Regex as feature-*, then users can trigger the build from branches such as feature-1450, feature-hot-fix, etc.
Pull Request(PR)Triggers a CI build when a new pull request is created. You can also define filters (such as PR author, title, or branch) to control which pull requests trigger the pipeline.
Requires configuring a webhook for GitHub or Bitbucket.
Tag CreationTriggers a build whenever a new tag is created. You can also define filters (such as author and tag name) to control which tags trigger the pipeline.
Configuring a webhook for GitHub or Bitbucket.
Pull Request Filters
When using Pull Request as a source type, Devtron allows you to filter which PRs should trigger a build using the following filters
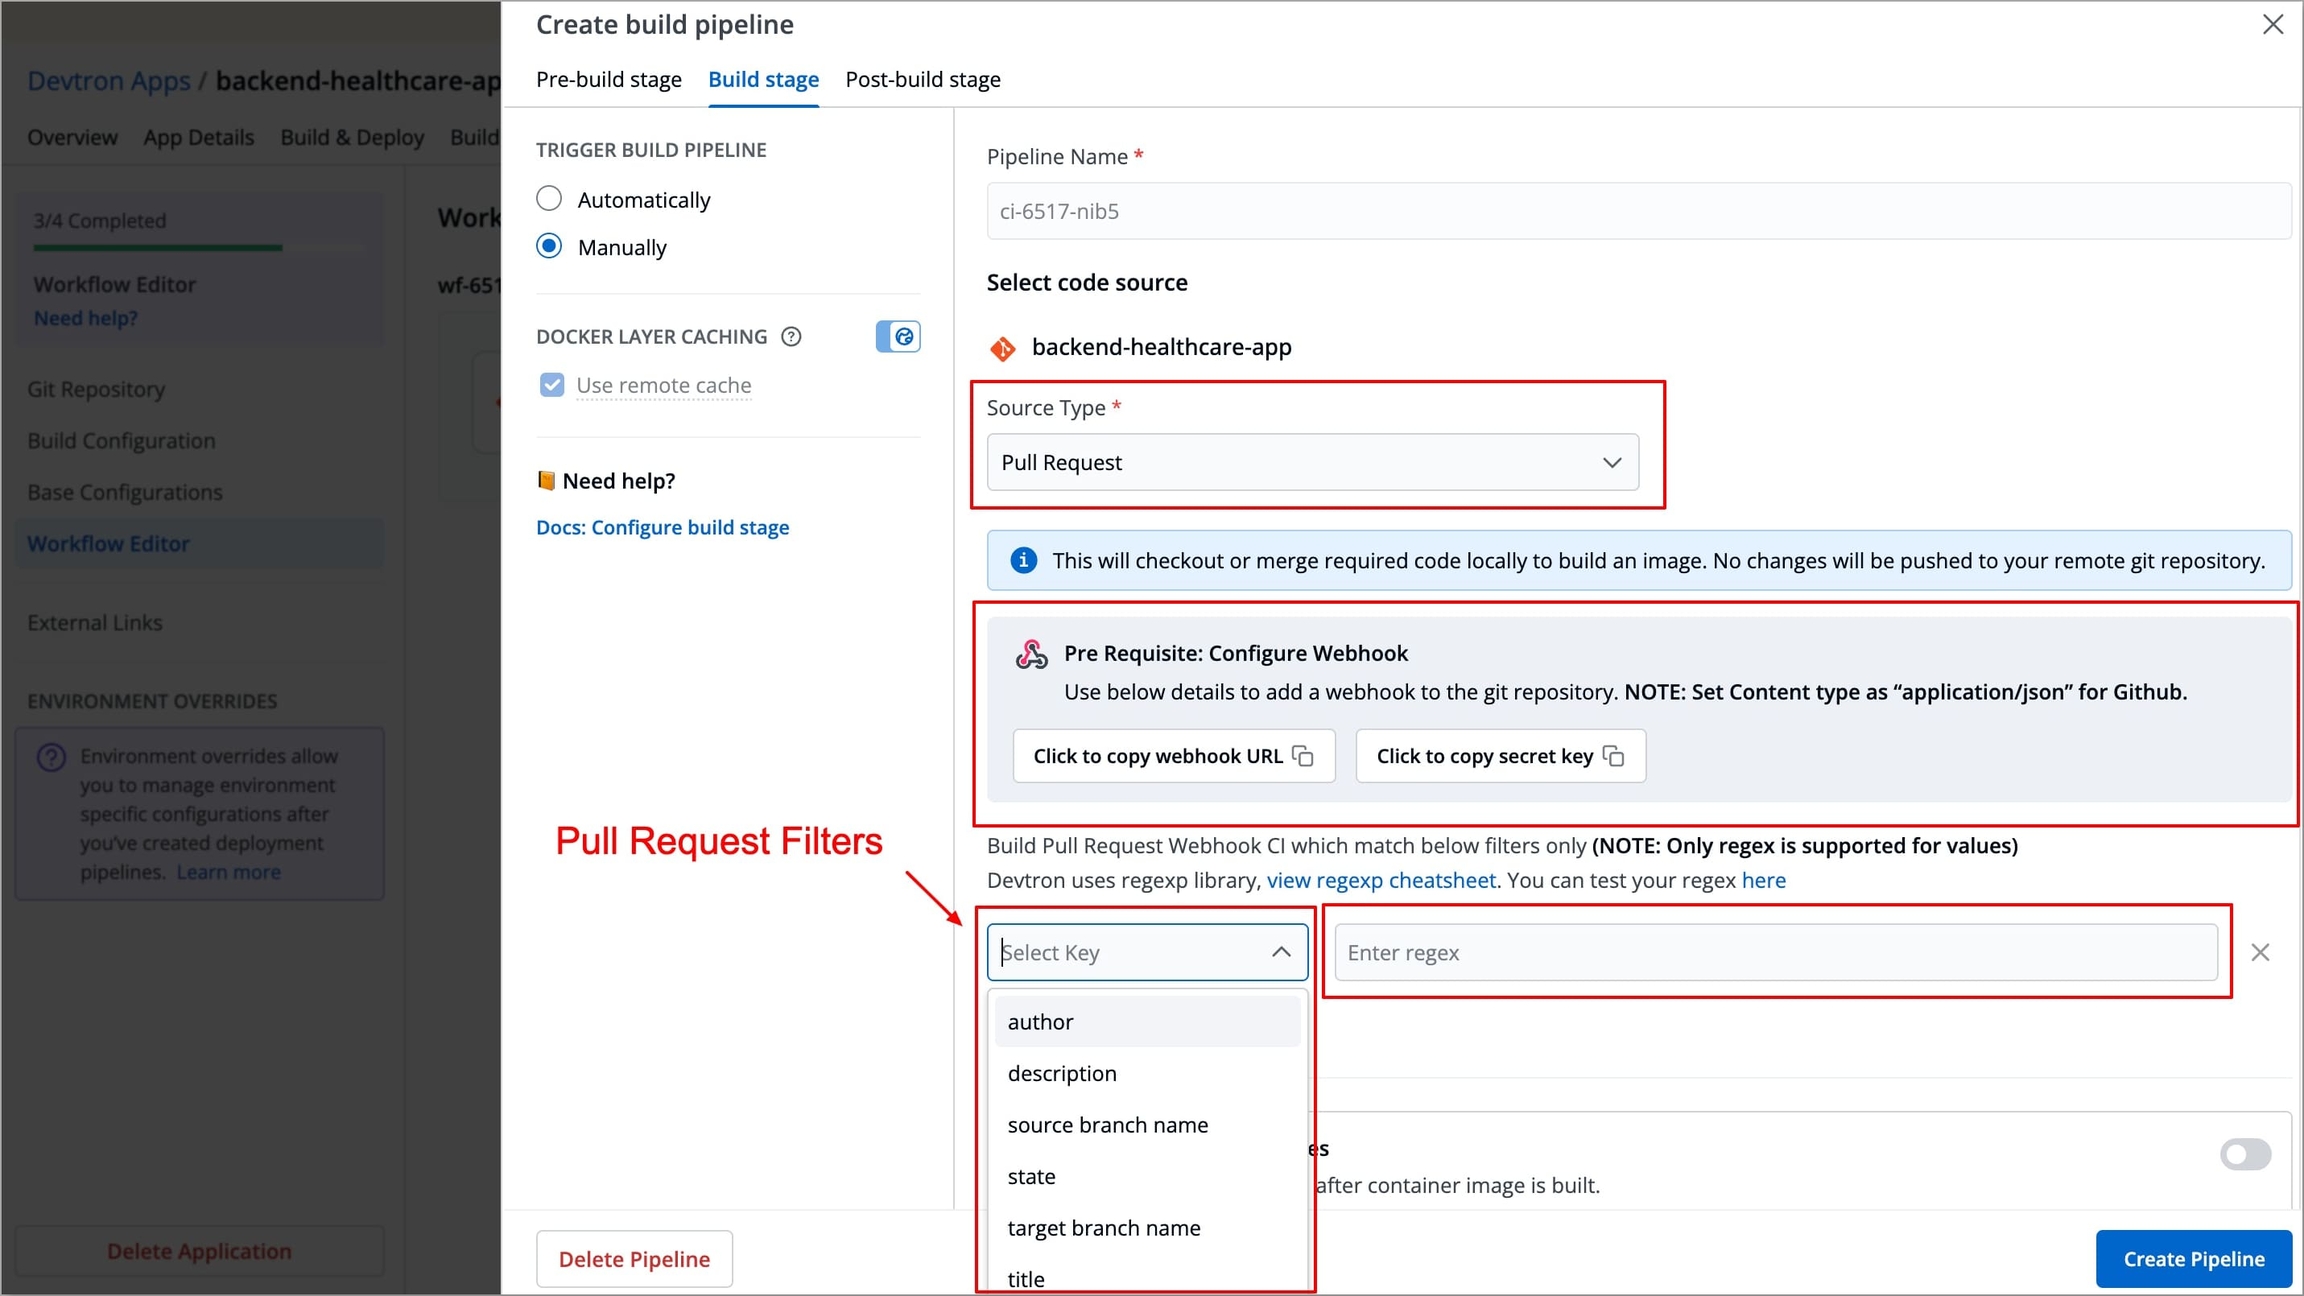
Figure 5: Pull Request Filters Select the appropriate filter and pass the matching condition as a regular expression (regex).
Author
Author of the PR
Source Branch
The git branch from which the PR originates, e.g., feature-login-auth
Target Branch
The git branch to which the PR is being merged, e.g., main
Title
Title of the PR
State
Status of the PR (default is open)
Tag Creation Filters
When using Tag Creation as a source type, Devtron allows you to filter which tags should trigger a build based on the following filters
Select the appropriate filter and pass the matching condition as a regular expression (regex).
Author
User who created the tag
Tag Name
Name of the tag
Click Create Pipeline to save the configuration. You can now proceed to trigger the build, or continue below to explore additional configuration options for customizing your pipeline.
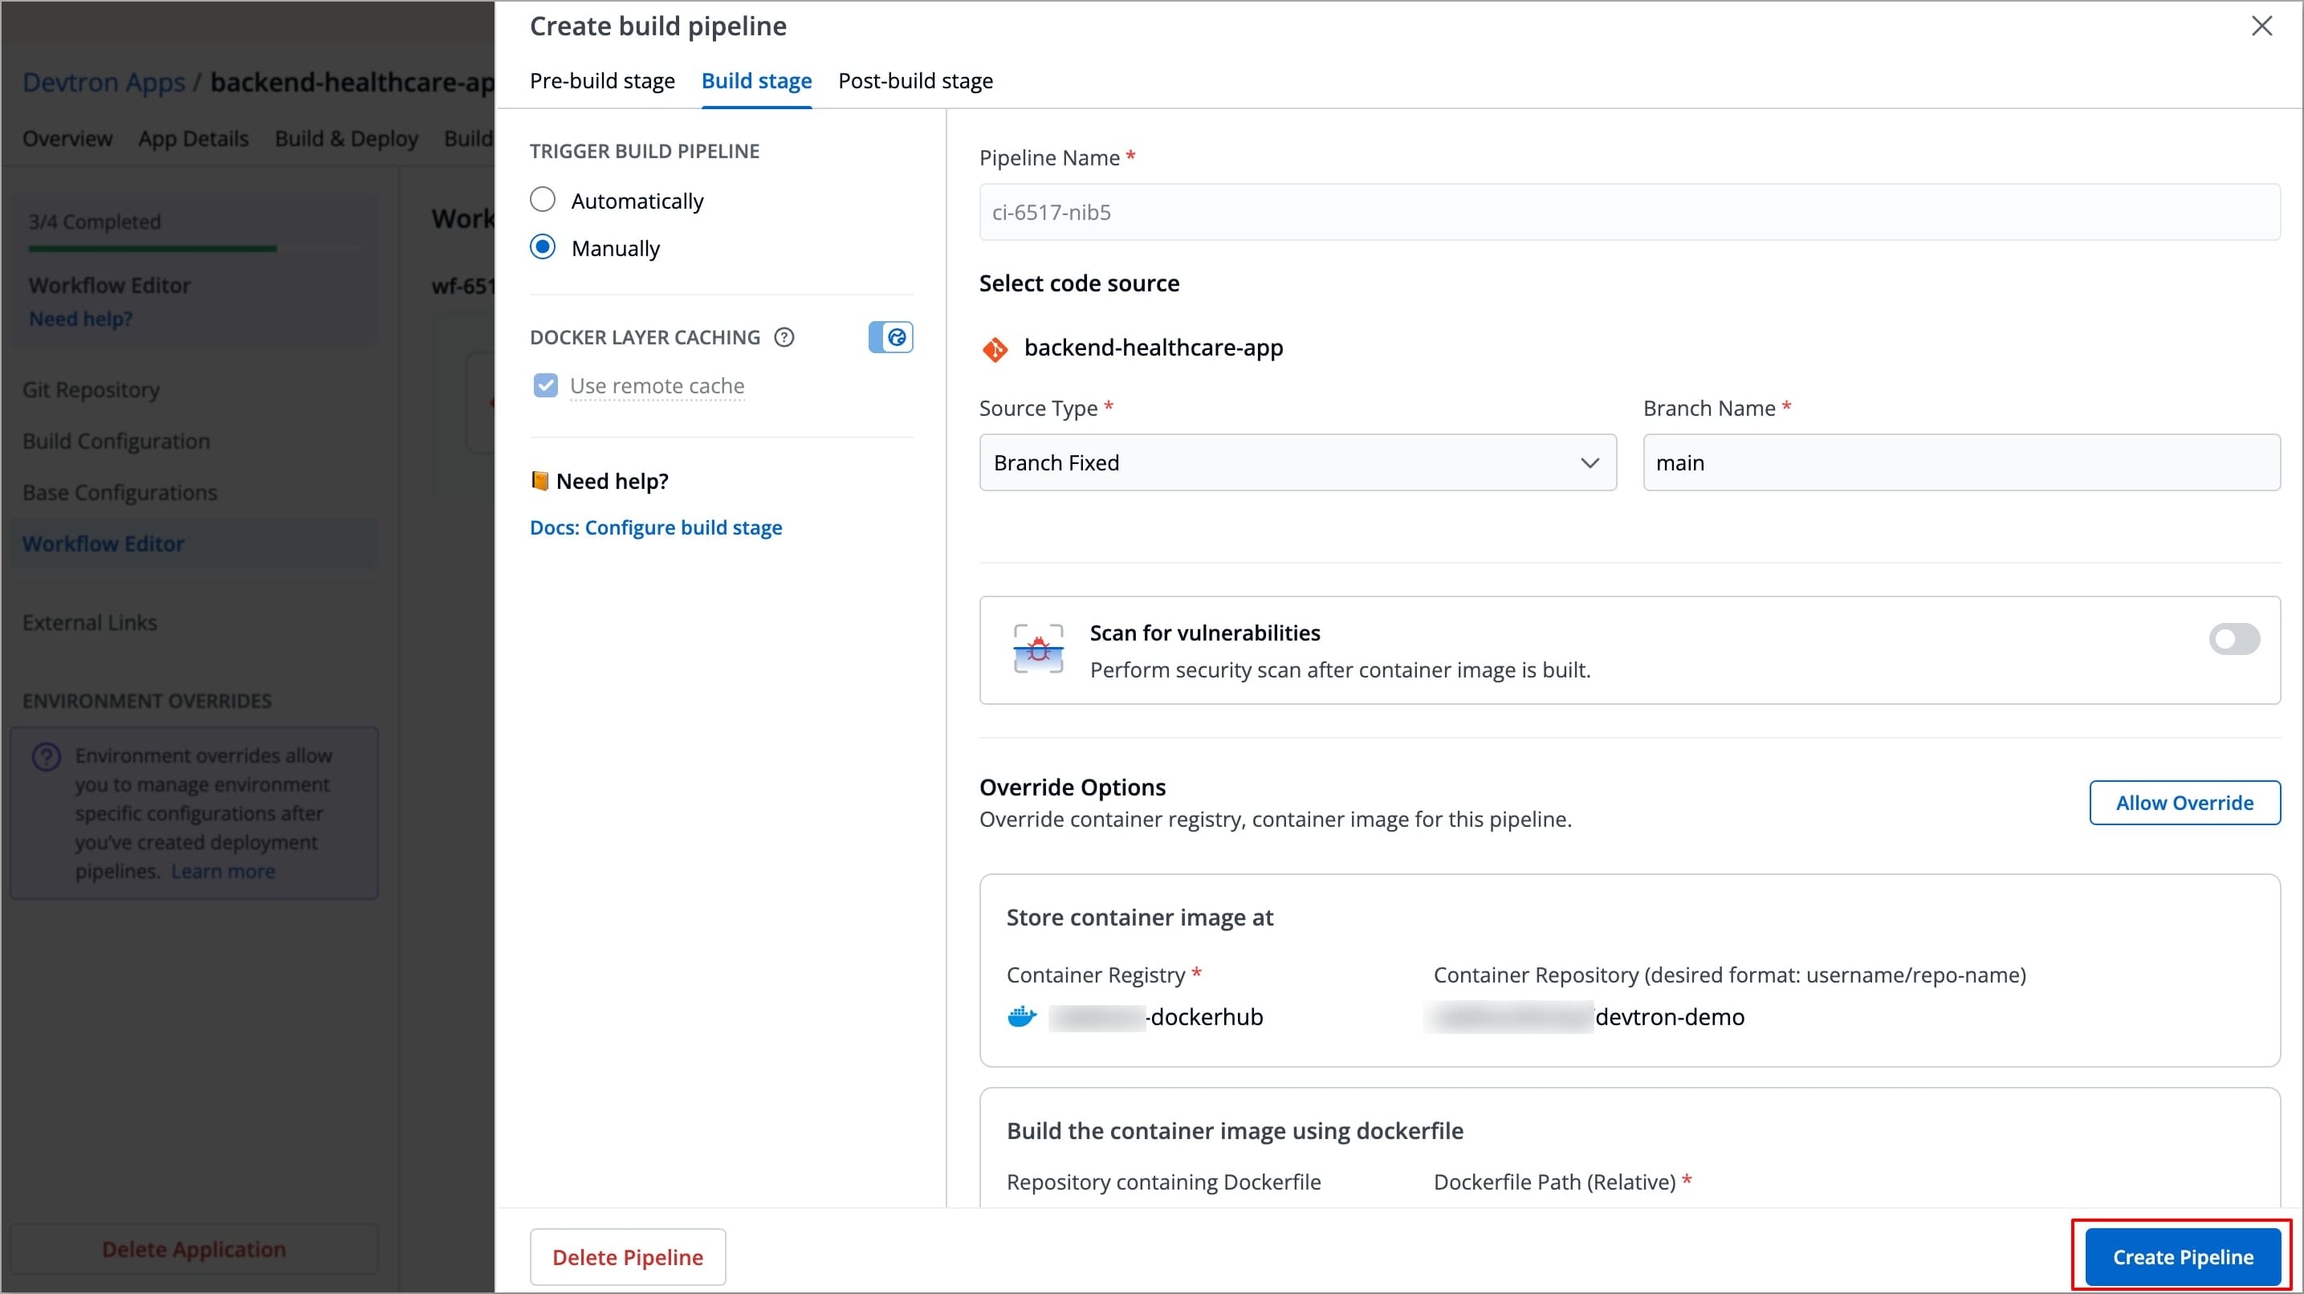
Figure 7: Creating pipeline
Configuring Advanced Options
Devtron provides three stages in a CI pipeline: Pre-Build, Build, and Post-Build.
Pre-build stage: The tasks in this stage are executed before the image is built.
Build stage: In this stage, the build is triggered from the source code that you provide.
Post-build stage: The tasks in this stage will be triggered once the build is complete.
This document focuses on configuring the Build Stage. If you want to set up Pre-Build and Post-Build stages, refer to the Pre/Post Stages to learn more.
Build Stage
In Create Build Pipeline window, select Advanced options.
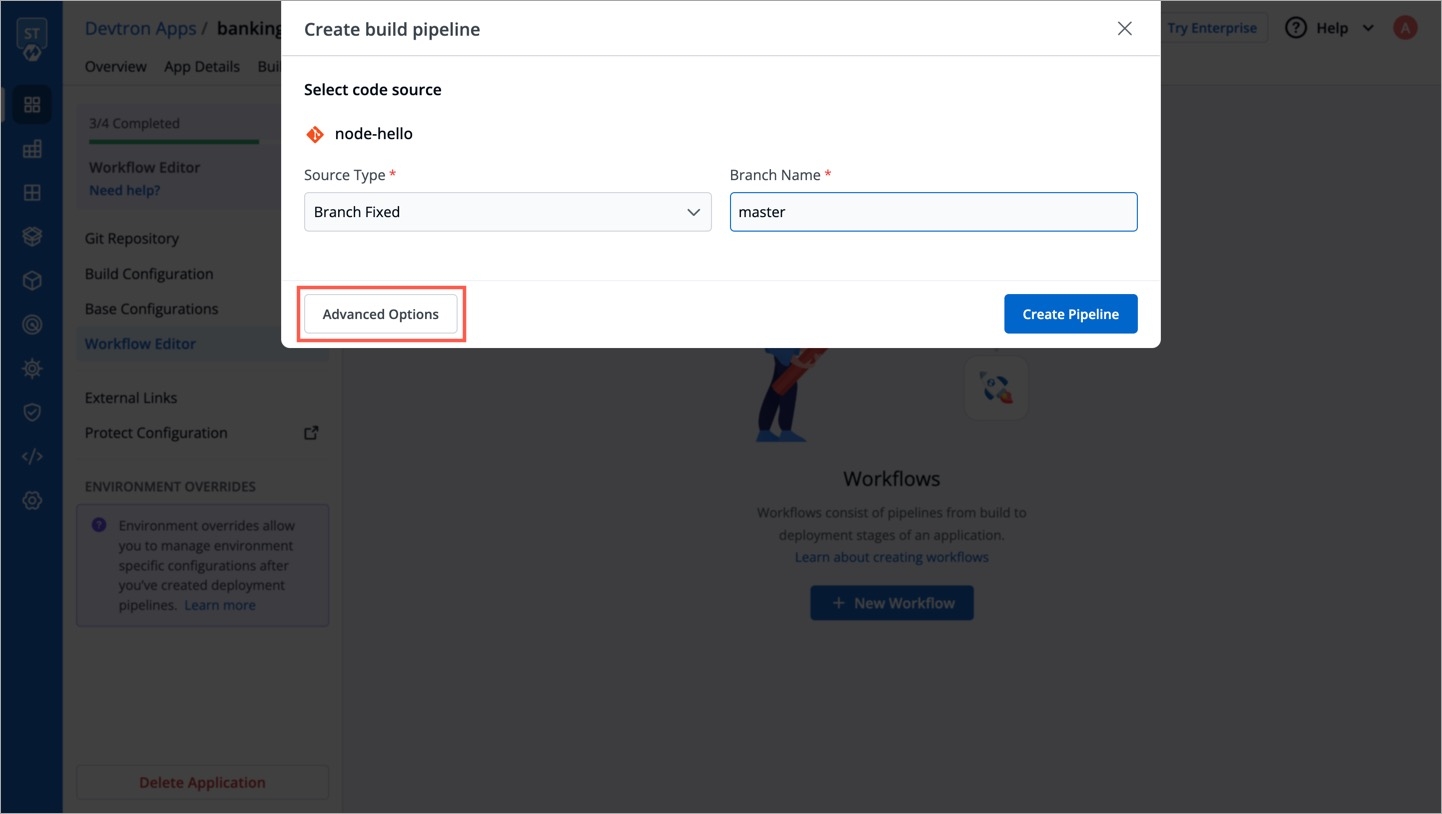
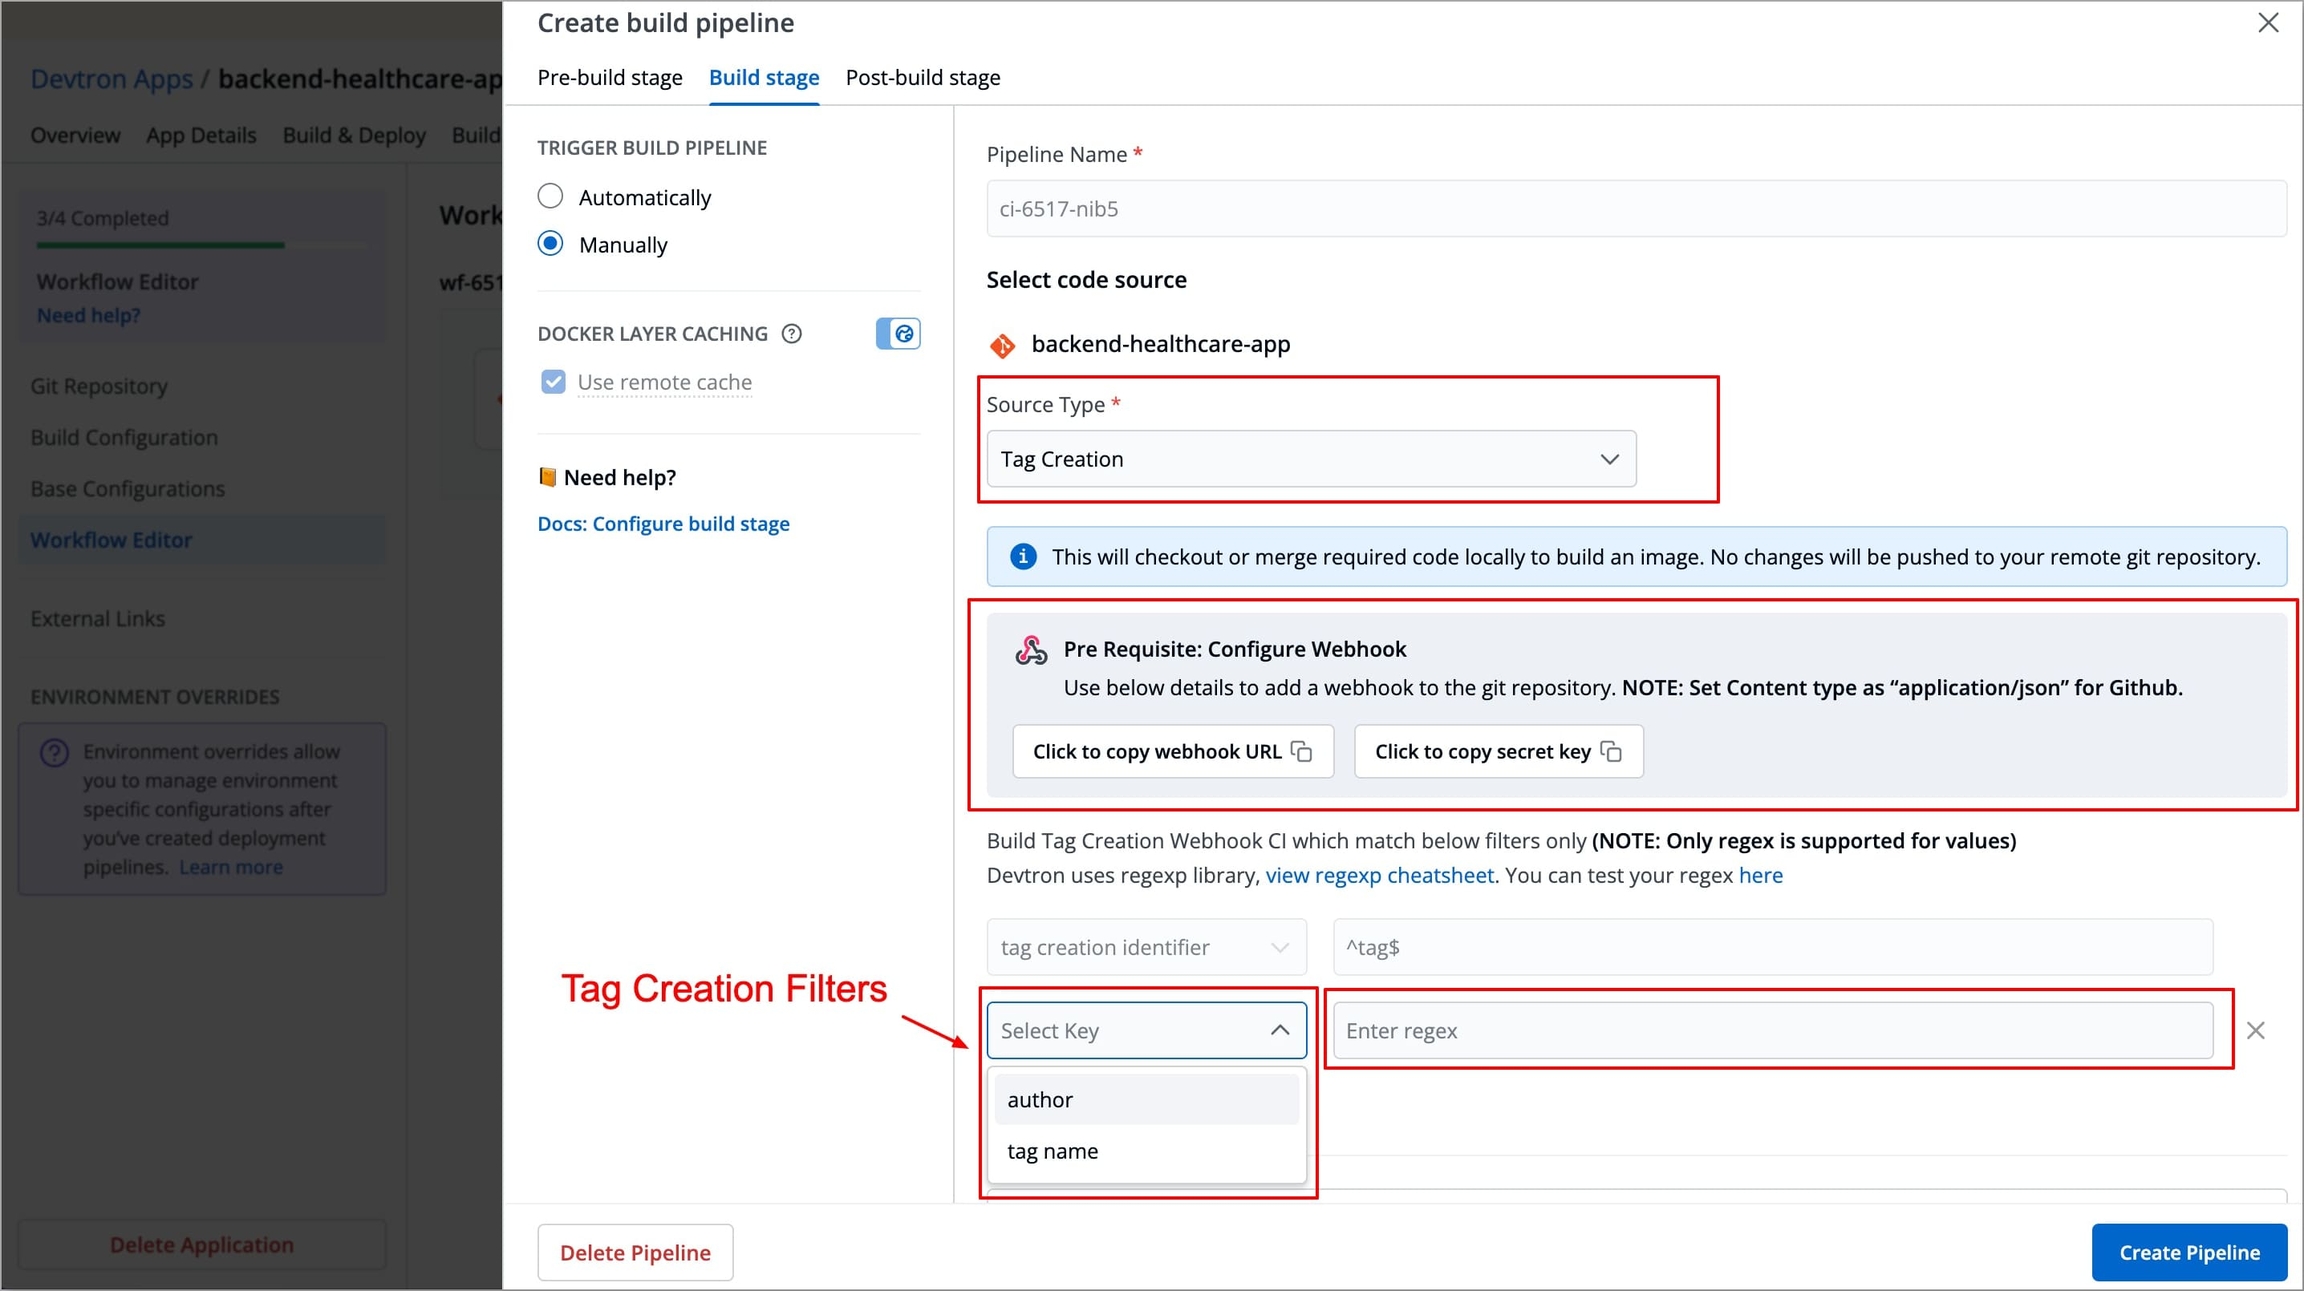
Figure 8: Advanced Options Go to Build stage tab and configure the following fields:
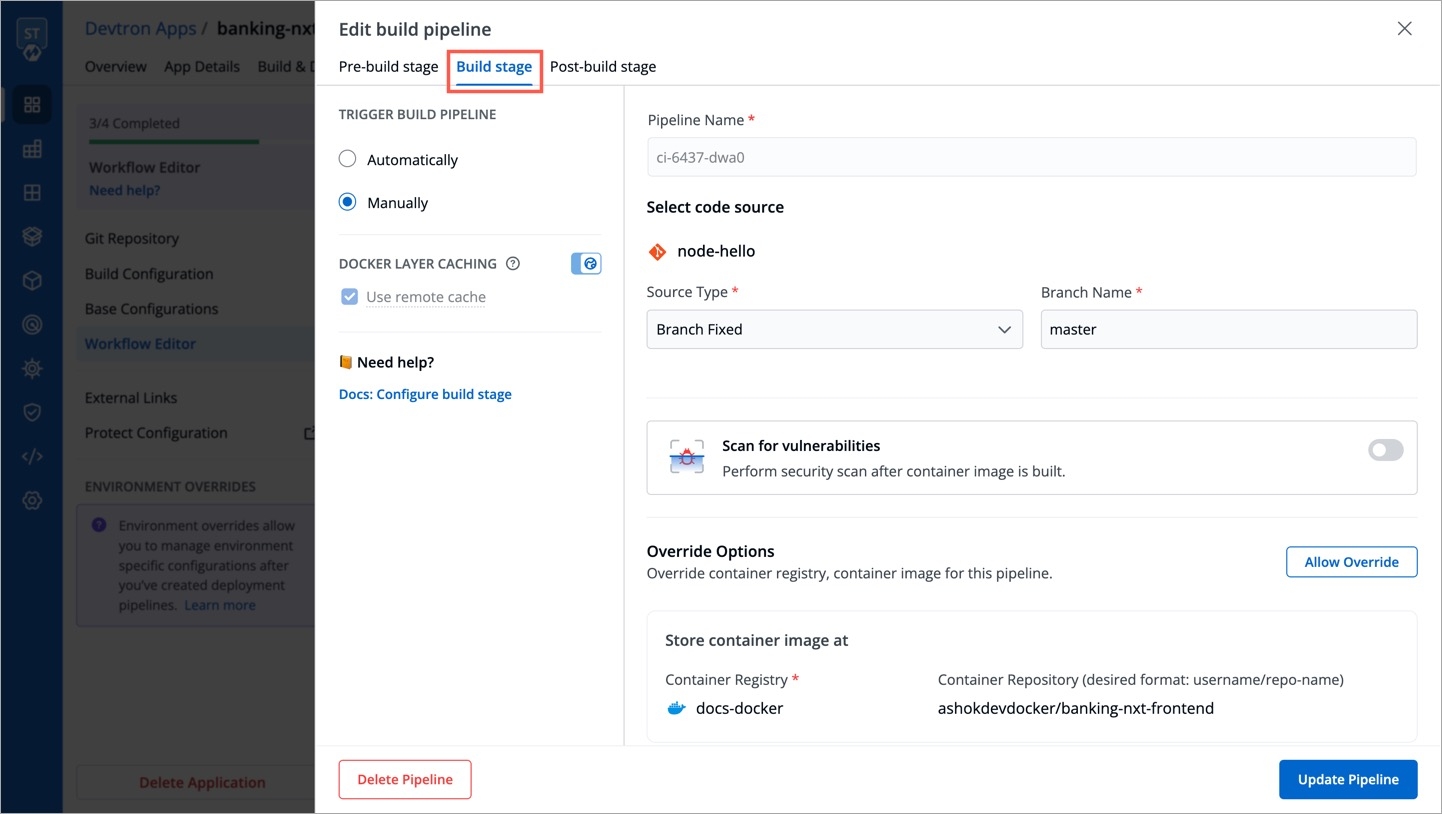
Figure 9: Build stage Field NameRequired/OptionalDescriptionTRIGGER BUILD PIPELINERequired
The build execution may be set to:
Automatically(default): Build is triggered automatically as the Git source code changes.Manually: Build is triggered manually.
DOCKER LAYER CACHING
Optional
Use this to enable/disable caching of docker image layers from your build pipeline
Pipeline NameRequired
Devtron automatically assigns a unique name for the pipeline, if you wish, you can edit it here.
Scan for VulnerabilitiesOptional
Prerequisite: Install either Clair or Trivy.
In the Build Stage, enable the Scan for vulnerabilities toggle.
Refer: Vulnerability Scanning to learn more.
Override OptionsOptional
Allows overriding configurations from earlier stages like CRI configuration, target platform configuration, etc.
Docker build argumentsOptional
Override docker build configurations for this pipeline.
Key: Field name
Value: Field value.
Custom Image Tag PatternOptional
Enable the Custom Image Tag Pattern toggle.
Define an alphanumeric pattern (e.g.,
test-v1.0.{x}) where{x}auto-increments with each build.Tags must not start or end with a period (.) or comma (,).
After configuration, trigger a build by navigating to Build & Deploy, selecting the Git commit by clicking on Select Material, and clicking Start Build.
The generated image tag will be available in Build History, Docker Registry, CD Pipeline (Image Selection)
Note: Build will fail if the resulting image tag has already been built in the past. This error might occur when you reset the value of the variable
xor when you disable/enable the toggle button for Custom image tag pattern.Click Create Pipeline to save the configuration.
Figure 10: Create Pipeline
Triggering a Build
Once the CI pipeline is set up, follow these steps to trigger a build:
Navigate to Build & Deploy.
Click Select Material in the specific pipeline for which you want to trigger the build.
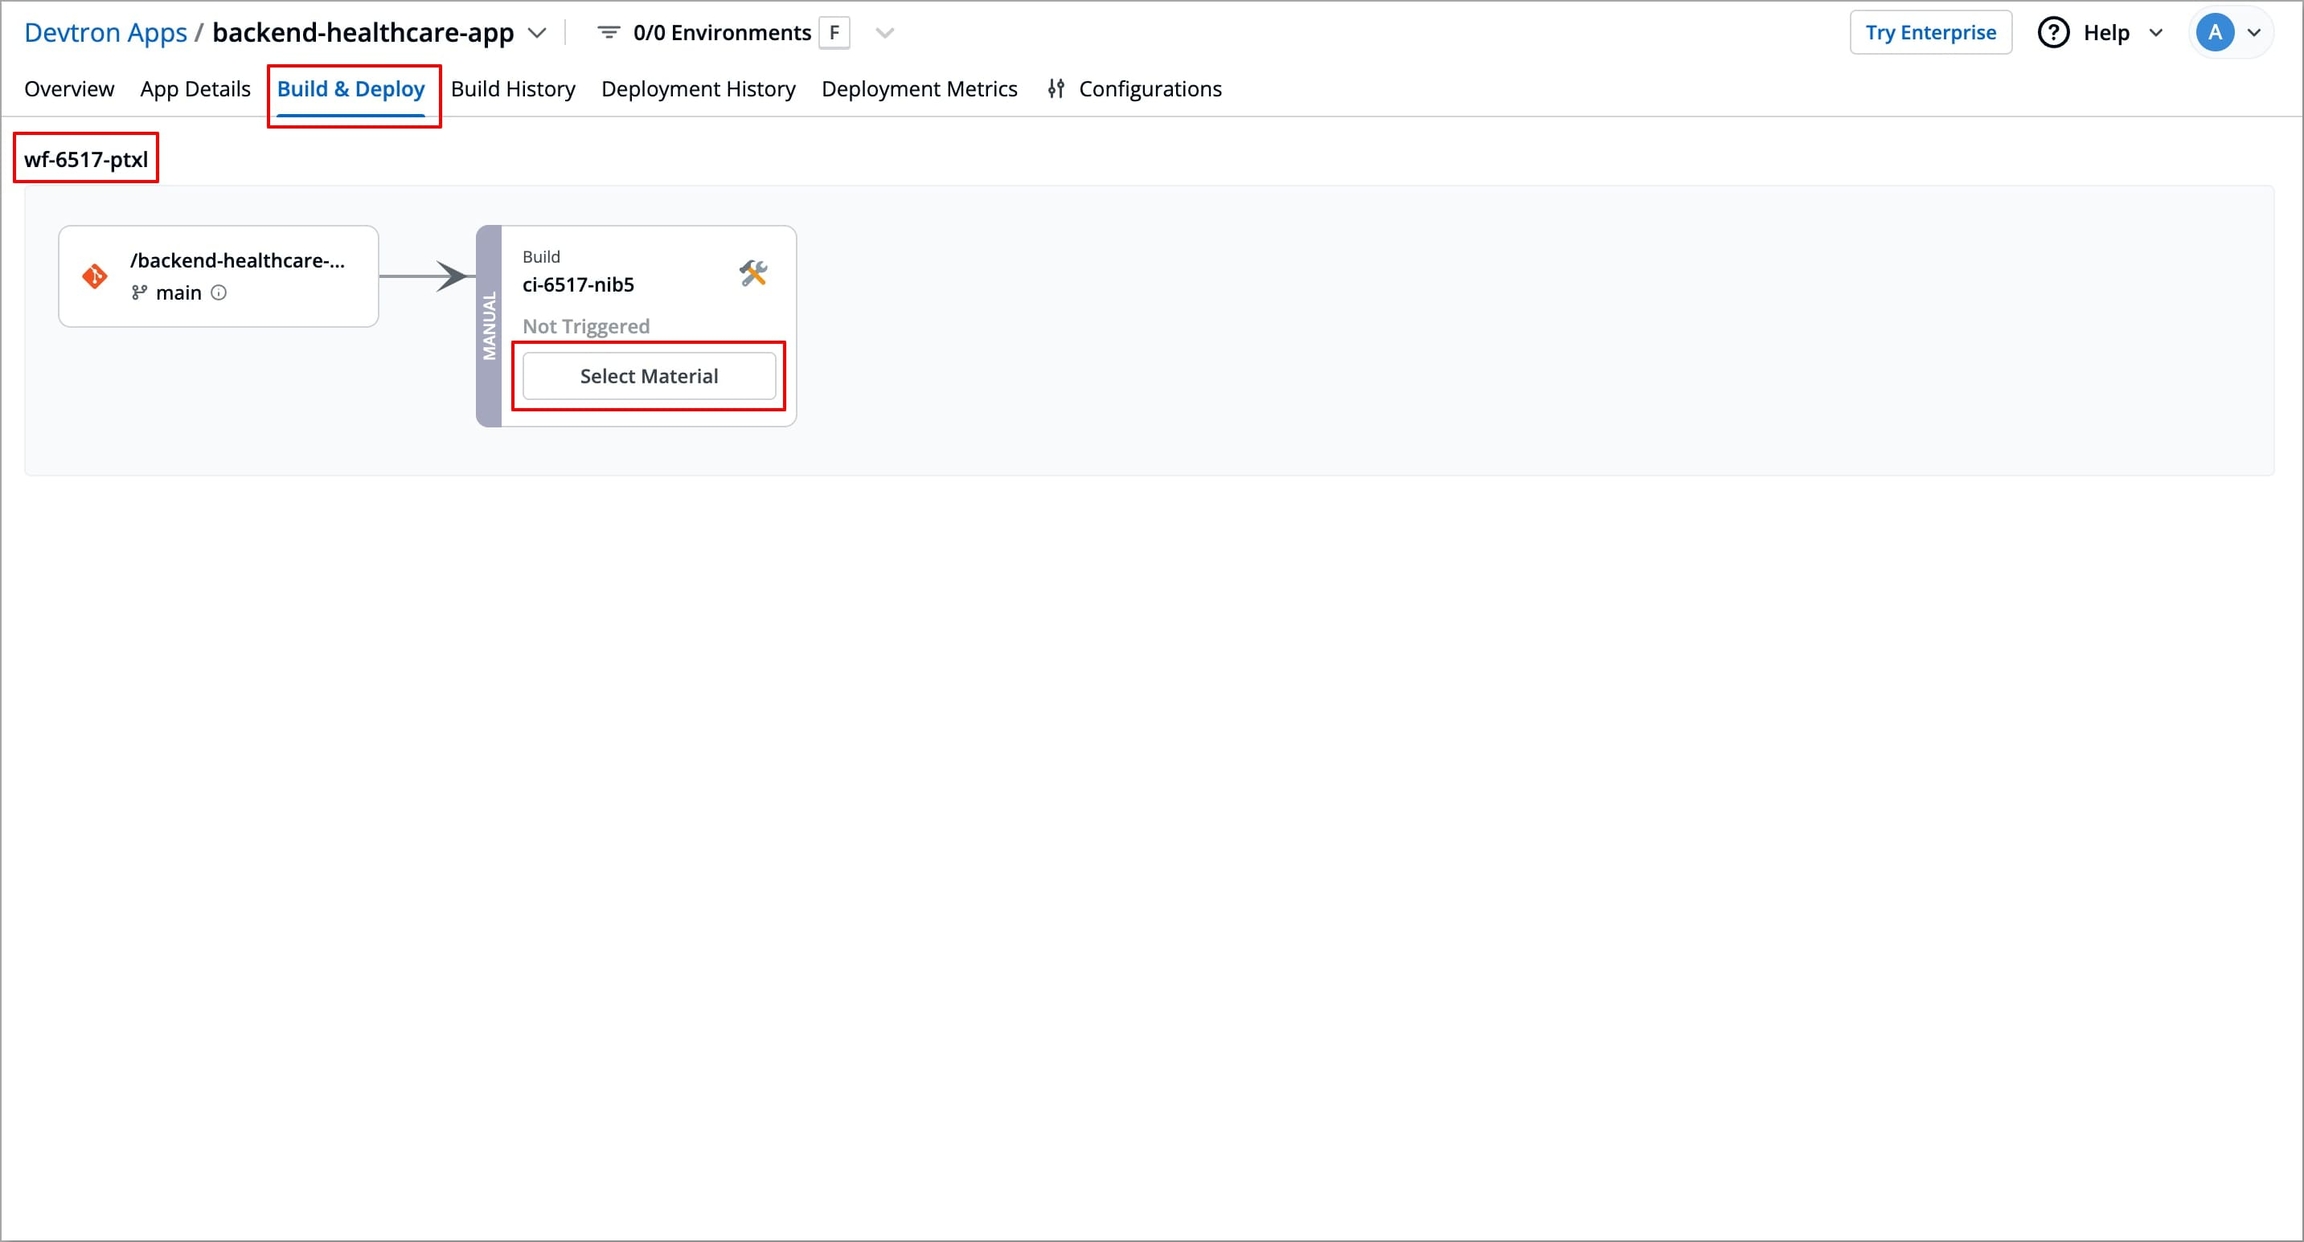
Figure 11: Selecting Material Choose the Git commit to build under Code Source tab.
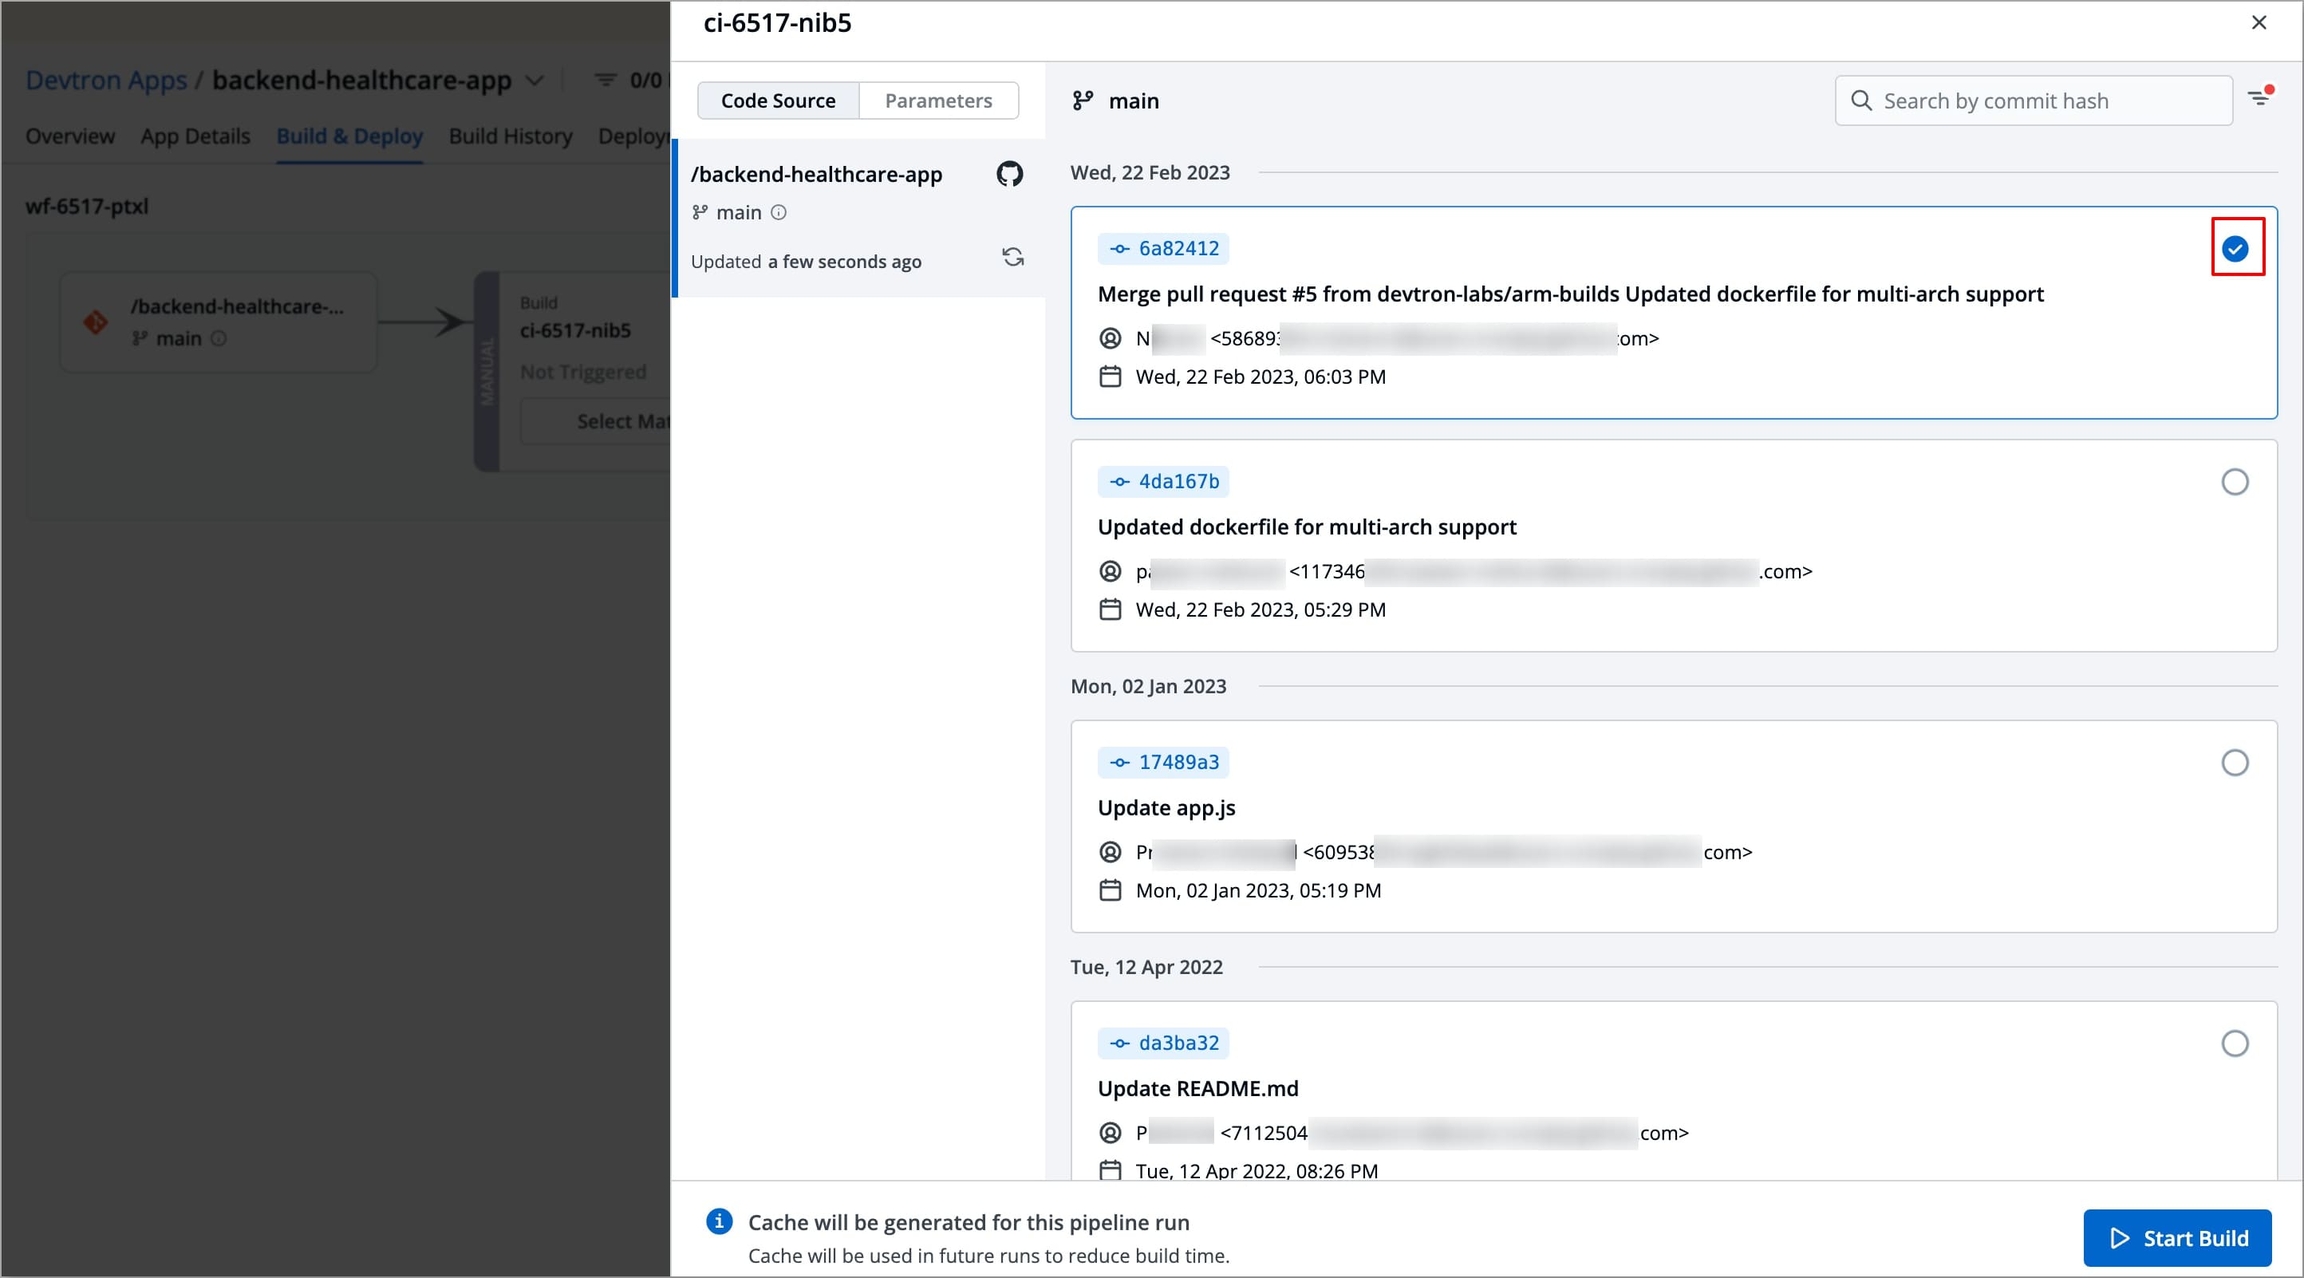
Figure 12: Selecting Git Commit Configure runtime parameters (if any) before starting the build under the Parameters tab.
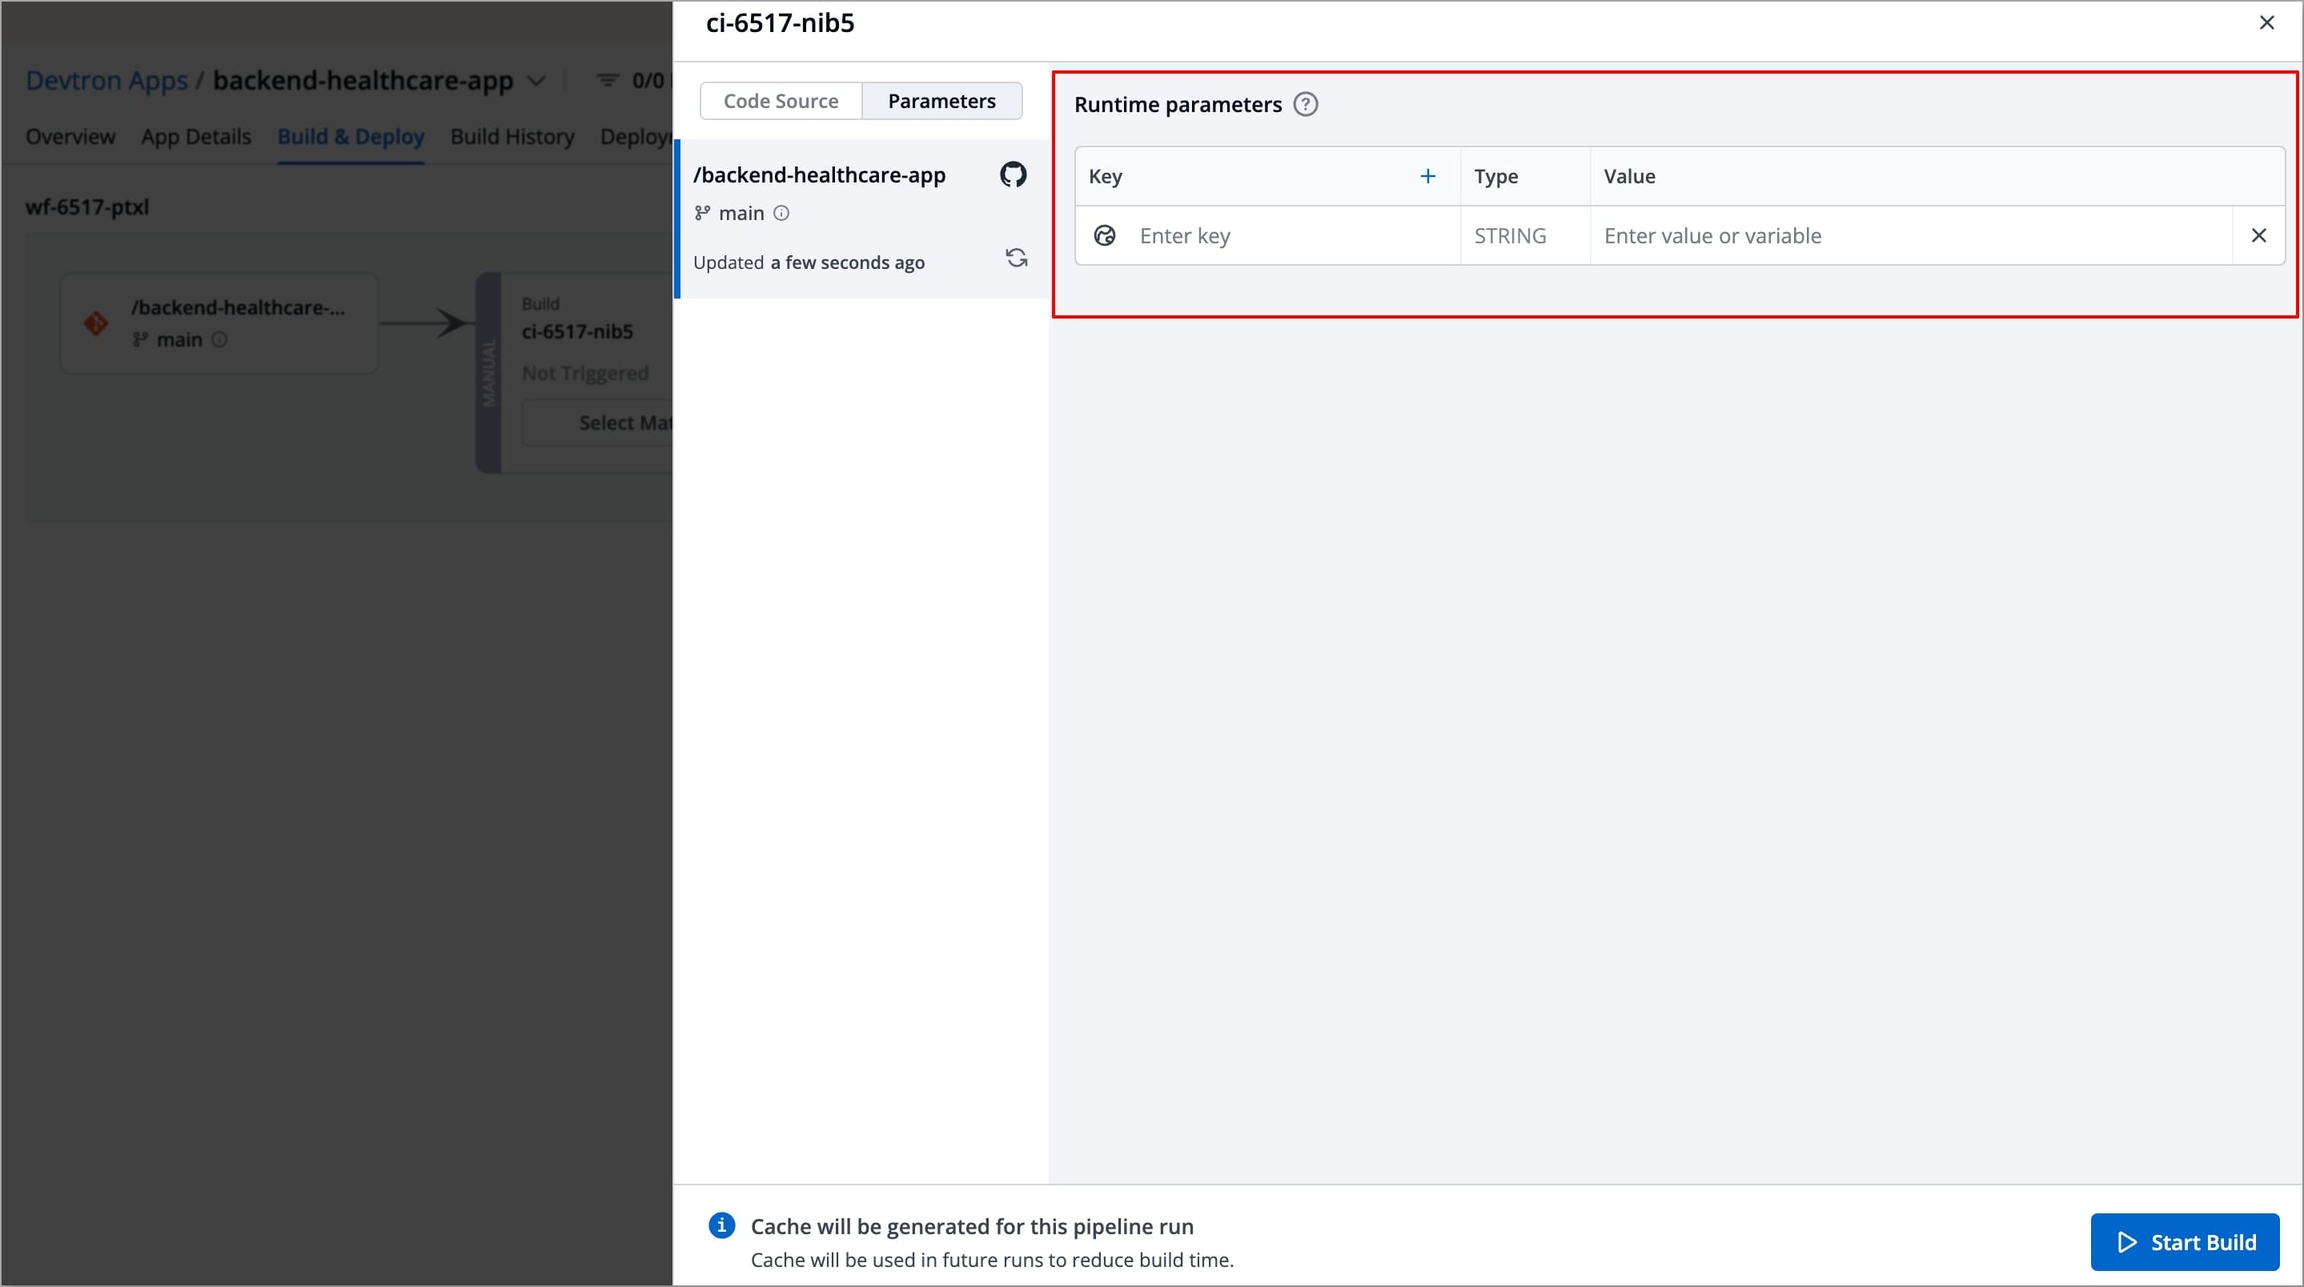
Figure 13: Configuring Runtime Parameters Click Start Build. This will trigger the build process and push the generated container image to the configured container registry for storage, versioning, and later use in the CD pipeline.
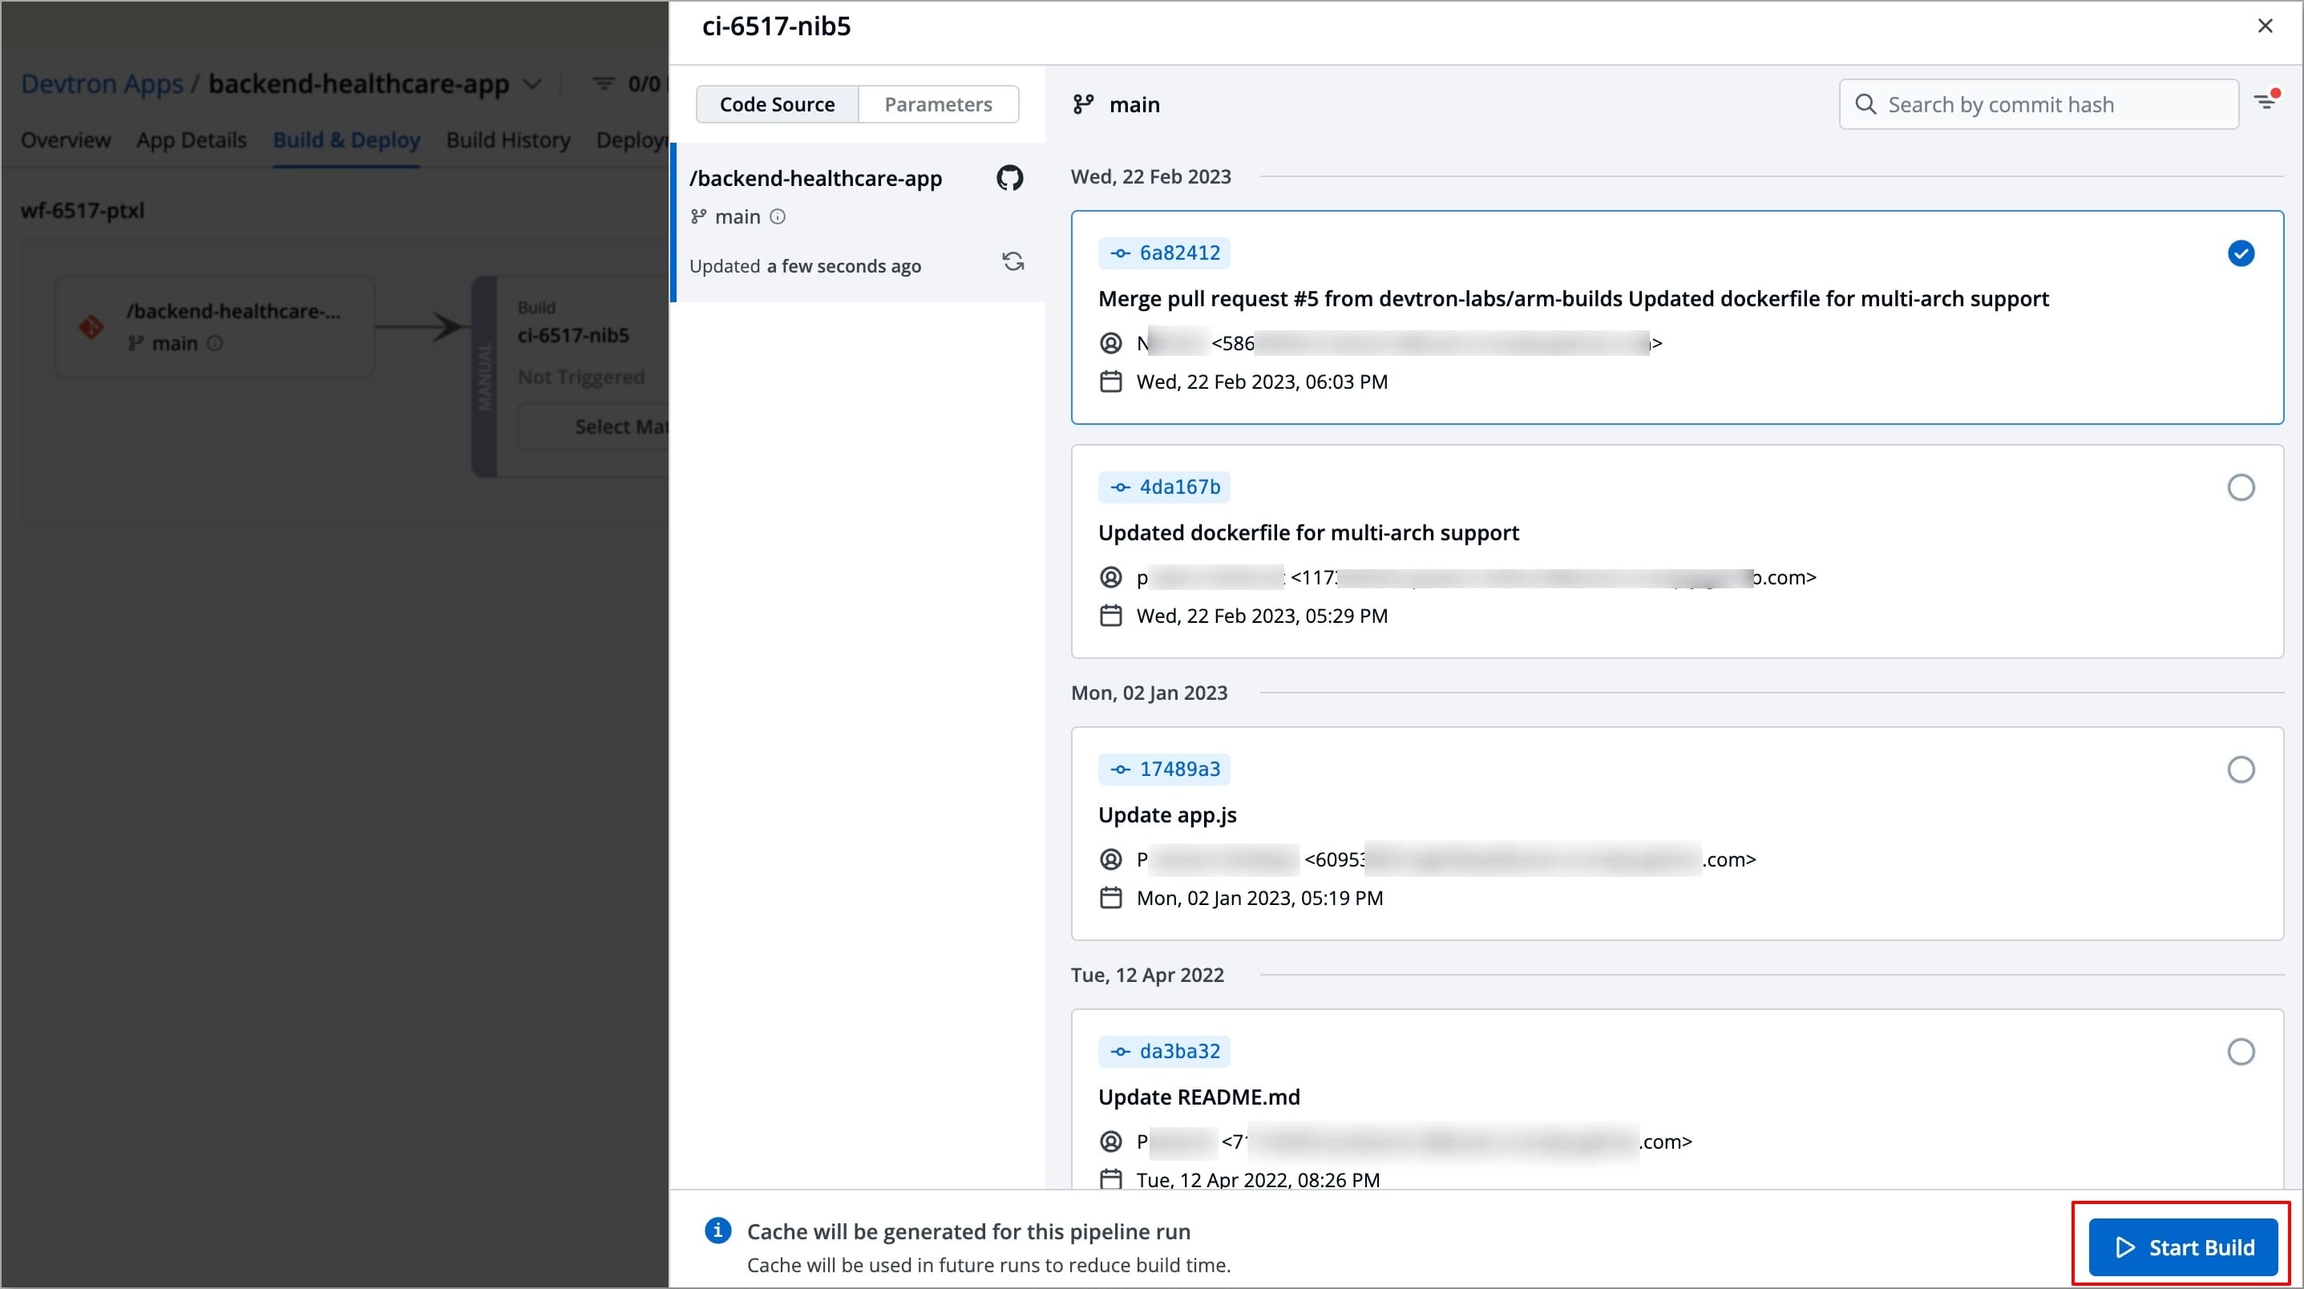
Figure 14: Starting Build
2. Linked Build Pipeline
Linked Build Pipeline allows you to reuse build images from another pipeline within Devtron, instead of building images from source code each time.
This is useful when the same codebase is shared across multiple applications.
Instead of creating and maintaining separate pipelines for each application, you can first set up a primary build pipeline (in the same application or in any other application) that builds the image from source code using Build and Deploy from Source Code or you can also use an existing pipeline from any application with the same codebase.
Then, for other applications, you can simply link that source pipeline to reuse its build images directly in your workflow and proceed to create a CD pipeline using those images.
To create a Linked Build Pipeline, follow the steps below.
Who Can Perform This Action?
Users need to have the Admin role, the Manager role, or the Super Admin role. Refer the User permissions.
Navigate to Configurations → Workflow Editor of your application.
Select + New Workflow, a modal window will appear where you can select the type of pipeline you want to create.

Figure 15: Creating New Workflow Select Linked Build Pipeline. Another modal window will appear where you can enter the details of the existing pipeline you want to link.
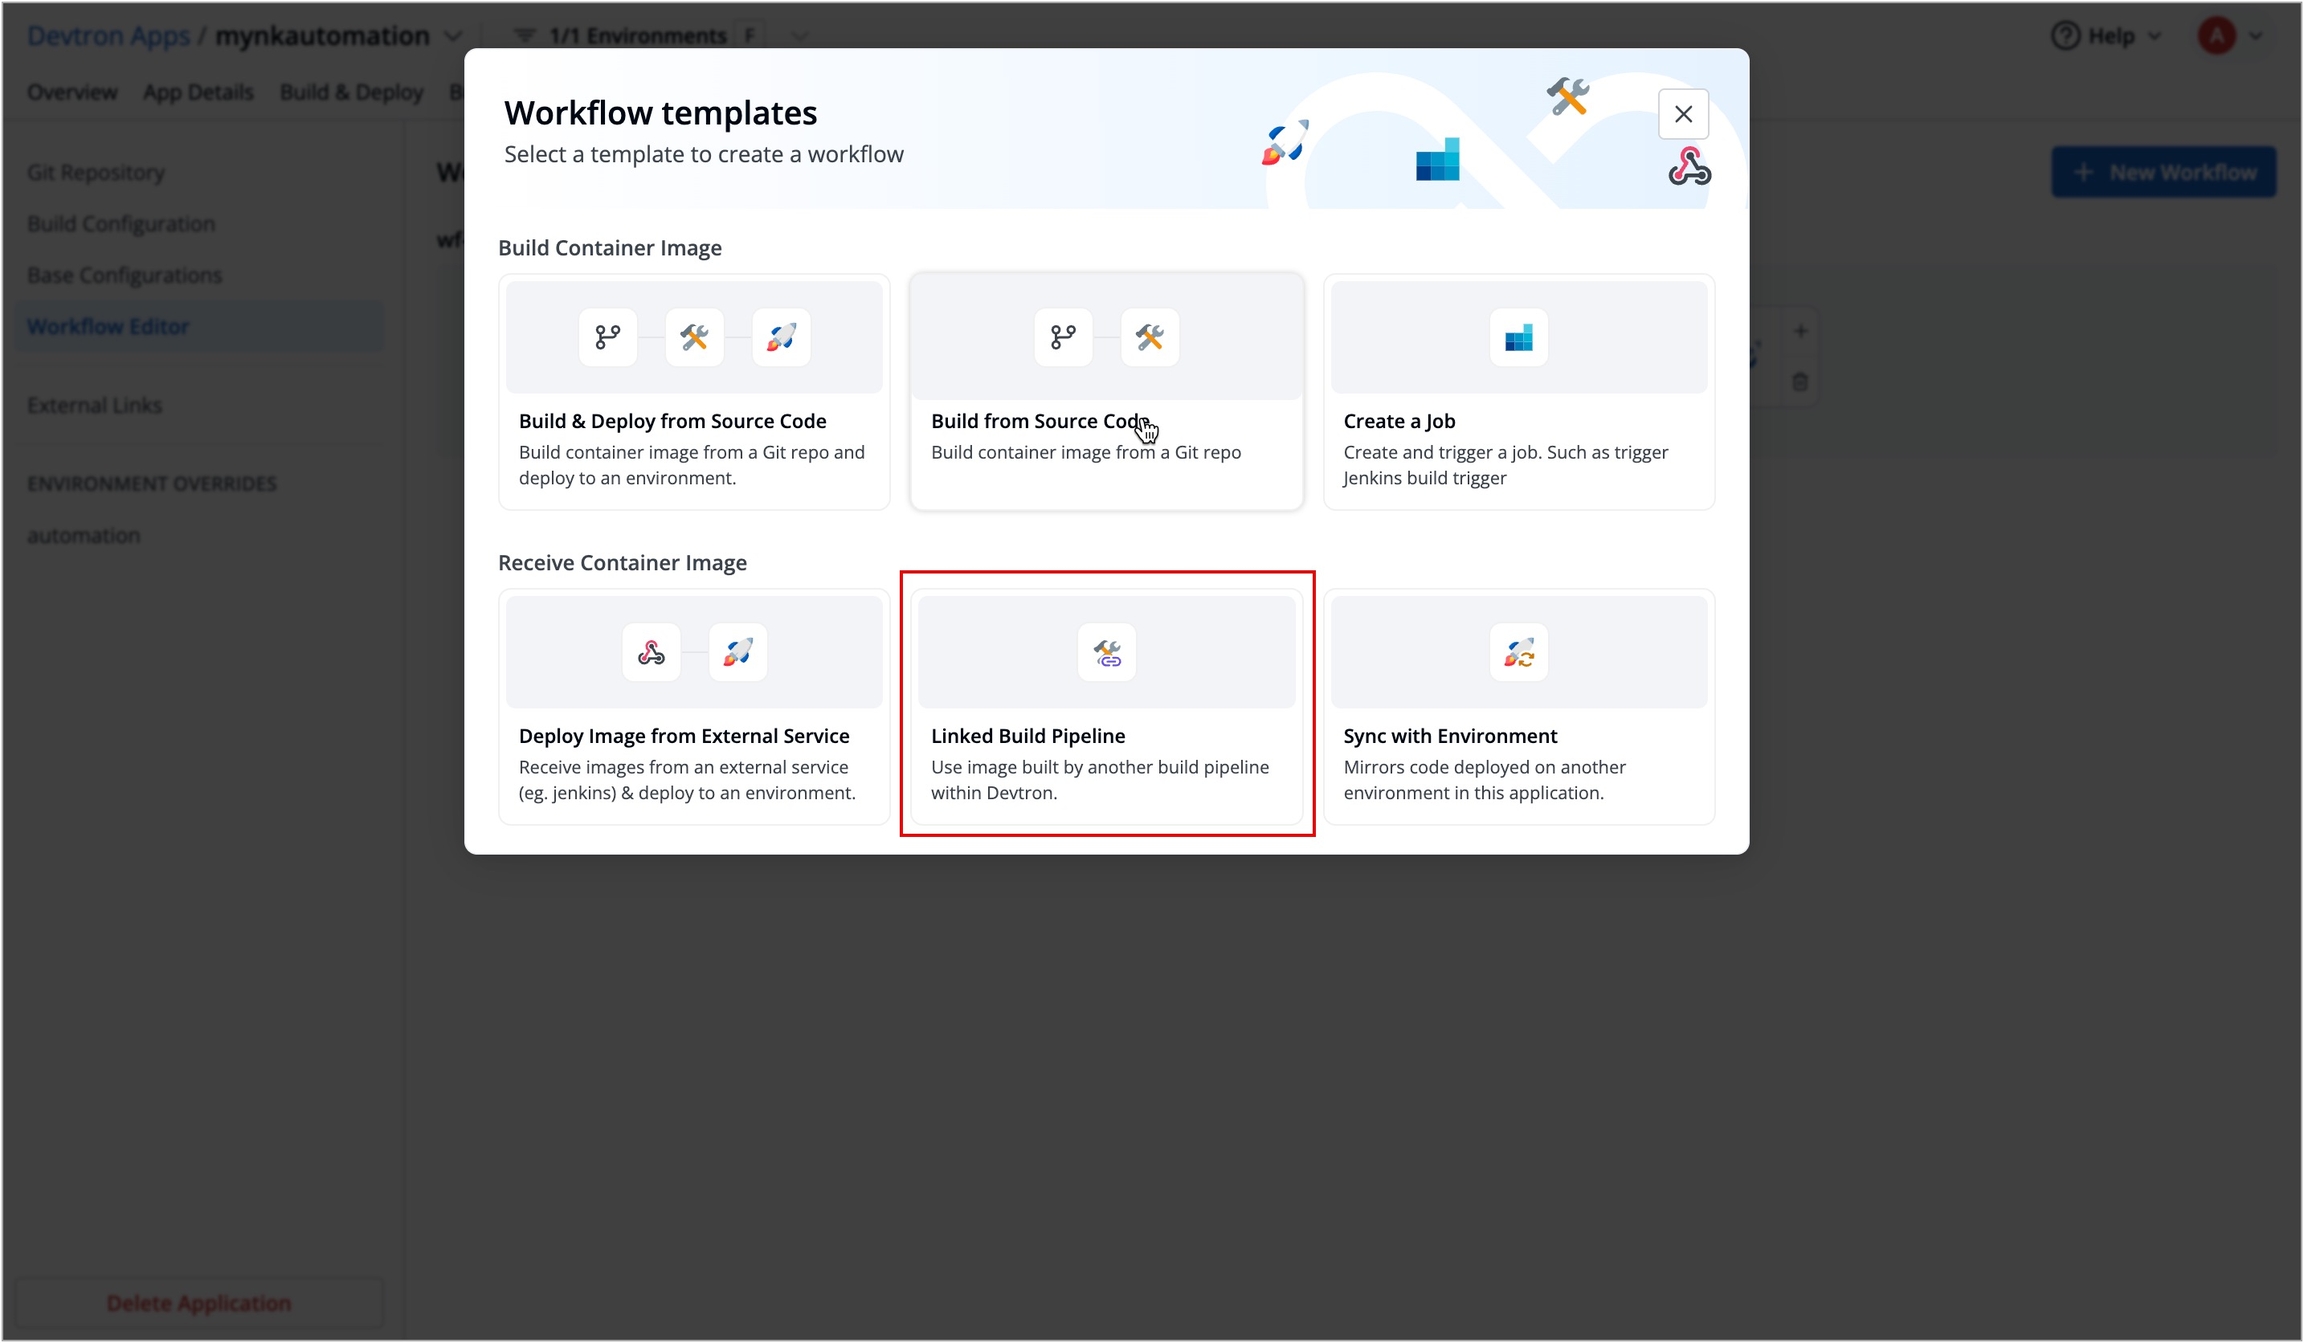
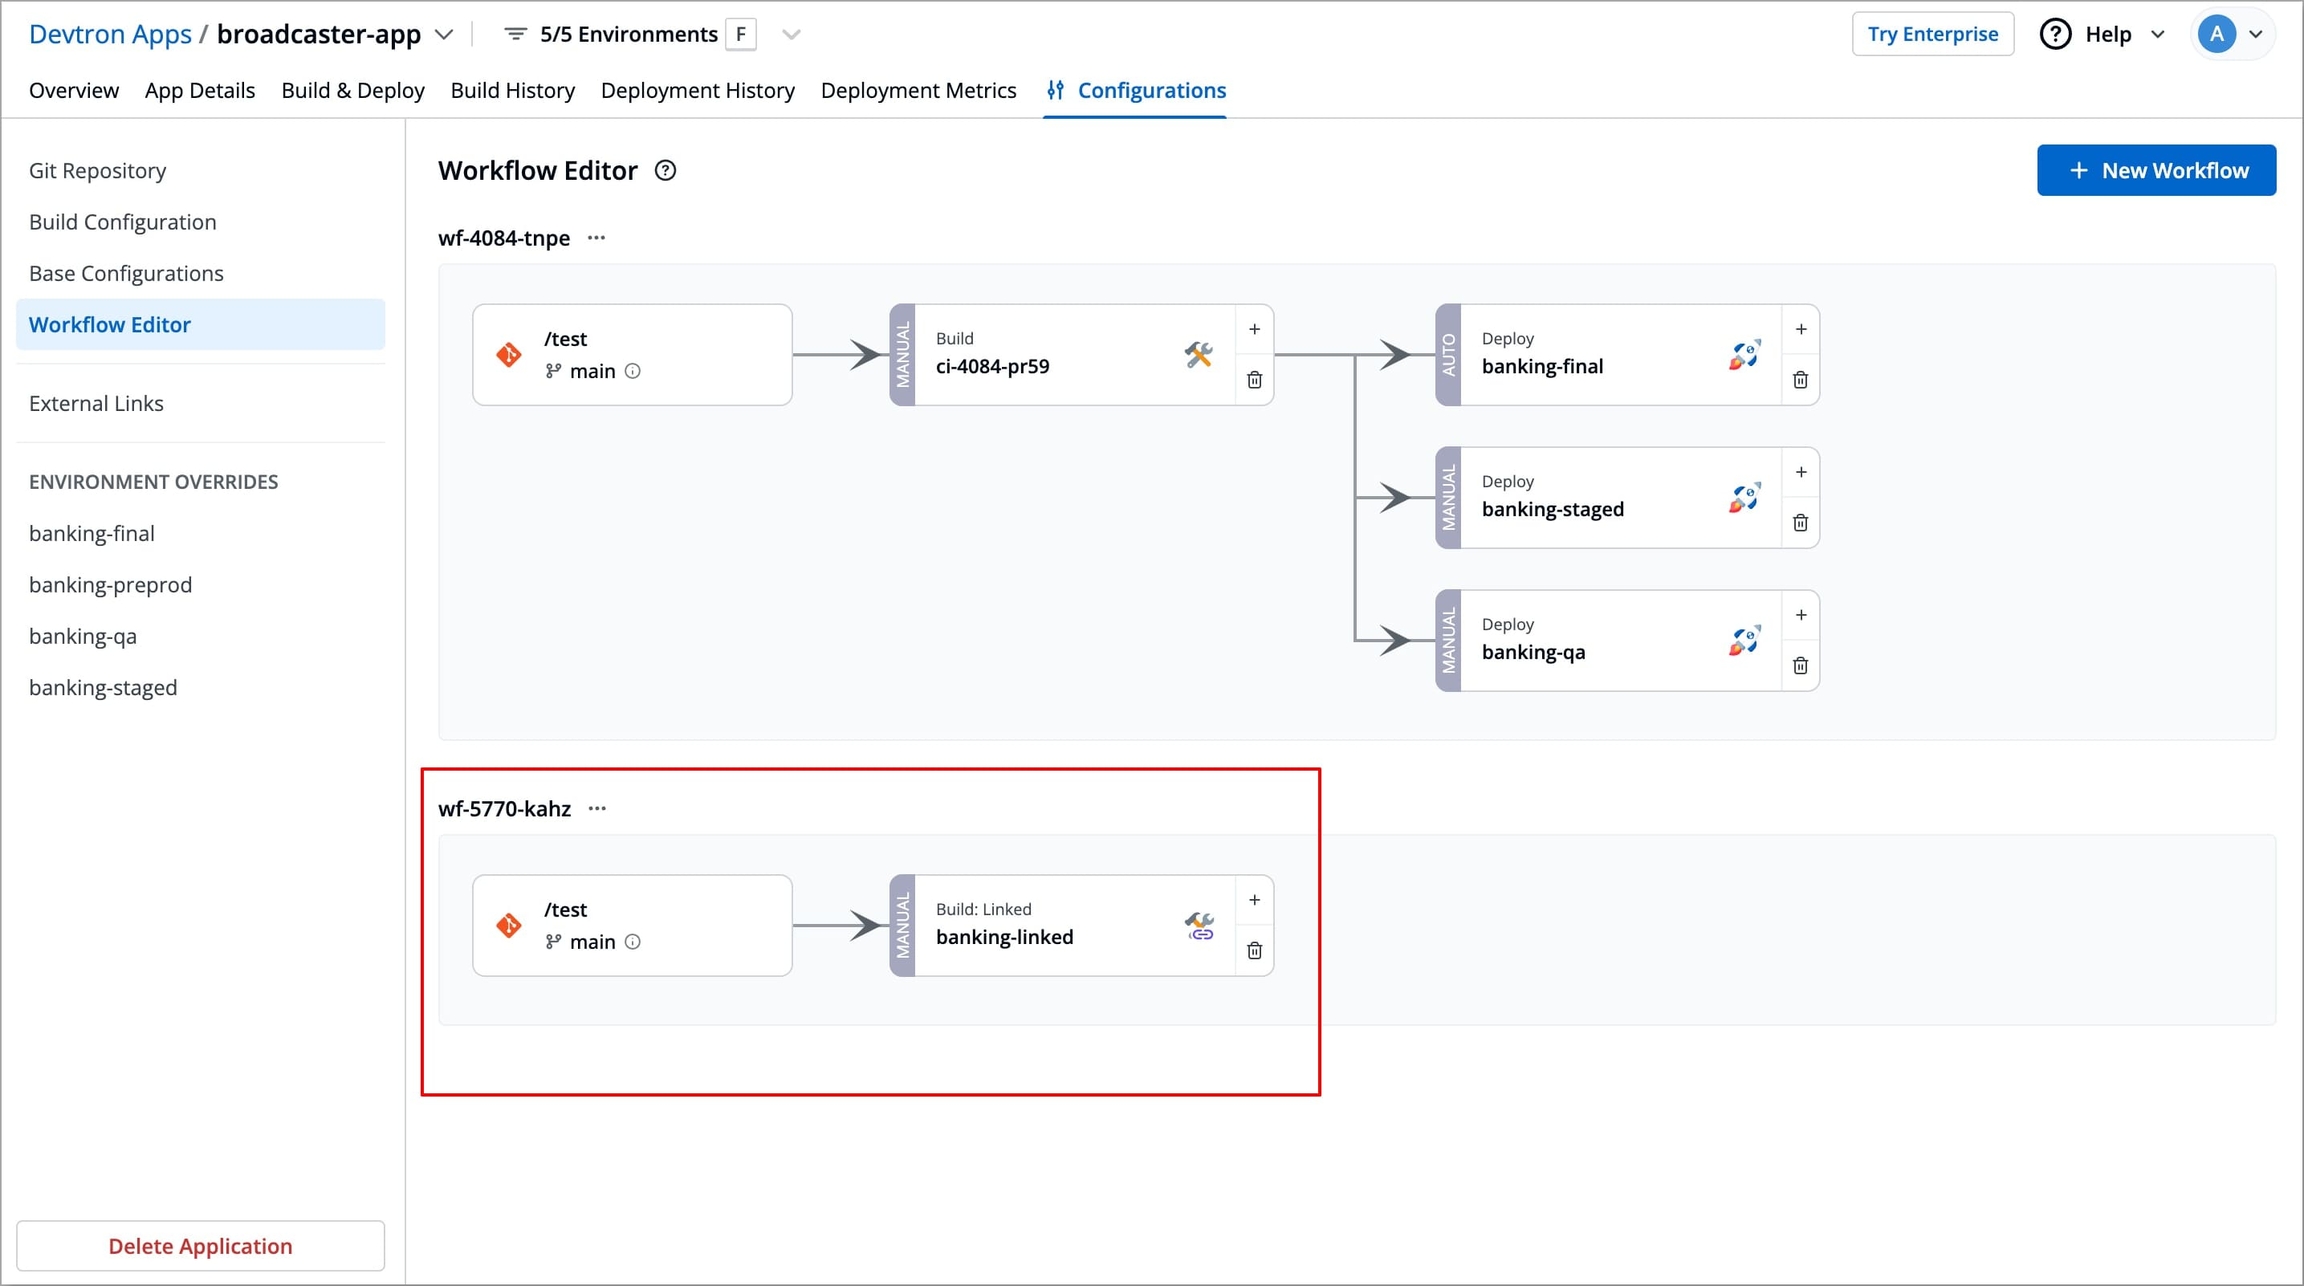
Figure 16: Selecting 'Linked Build Pipeline' Enter the details of the existing pipeline you want to link and click Create Linked CI Pipeline to create the pipeline.
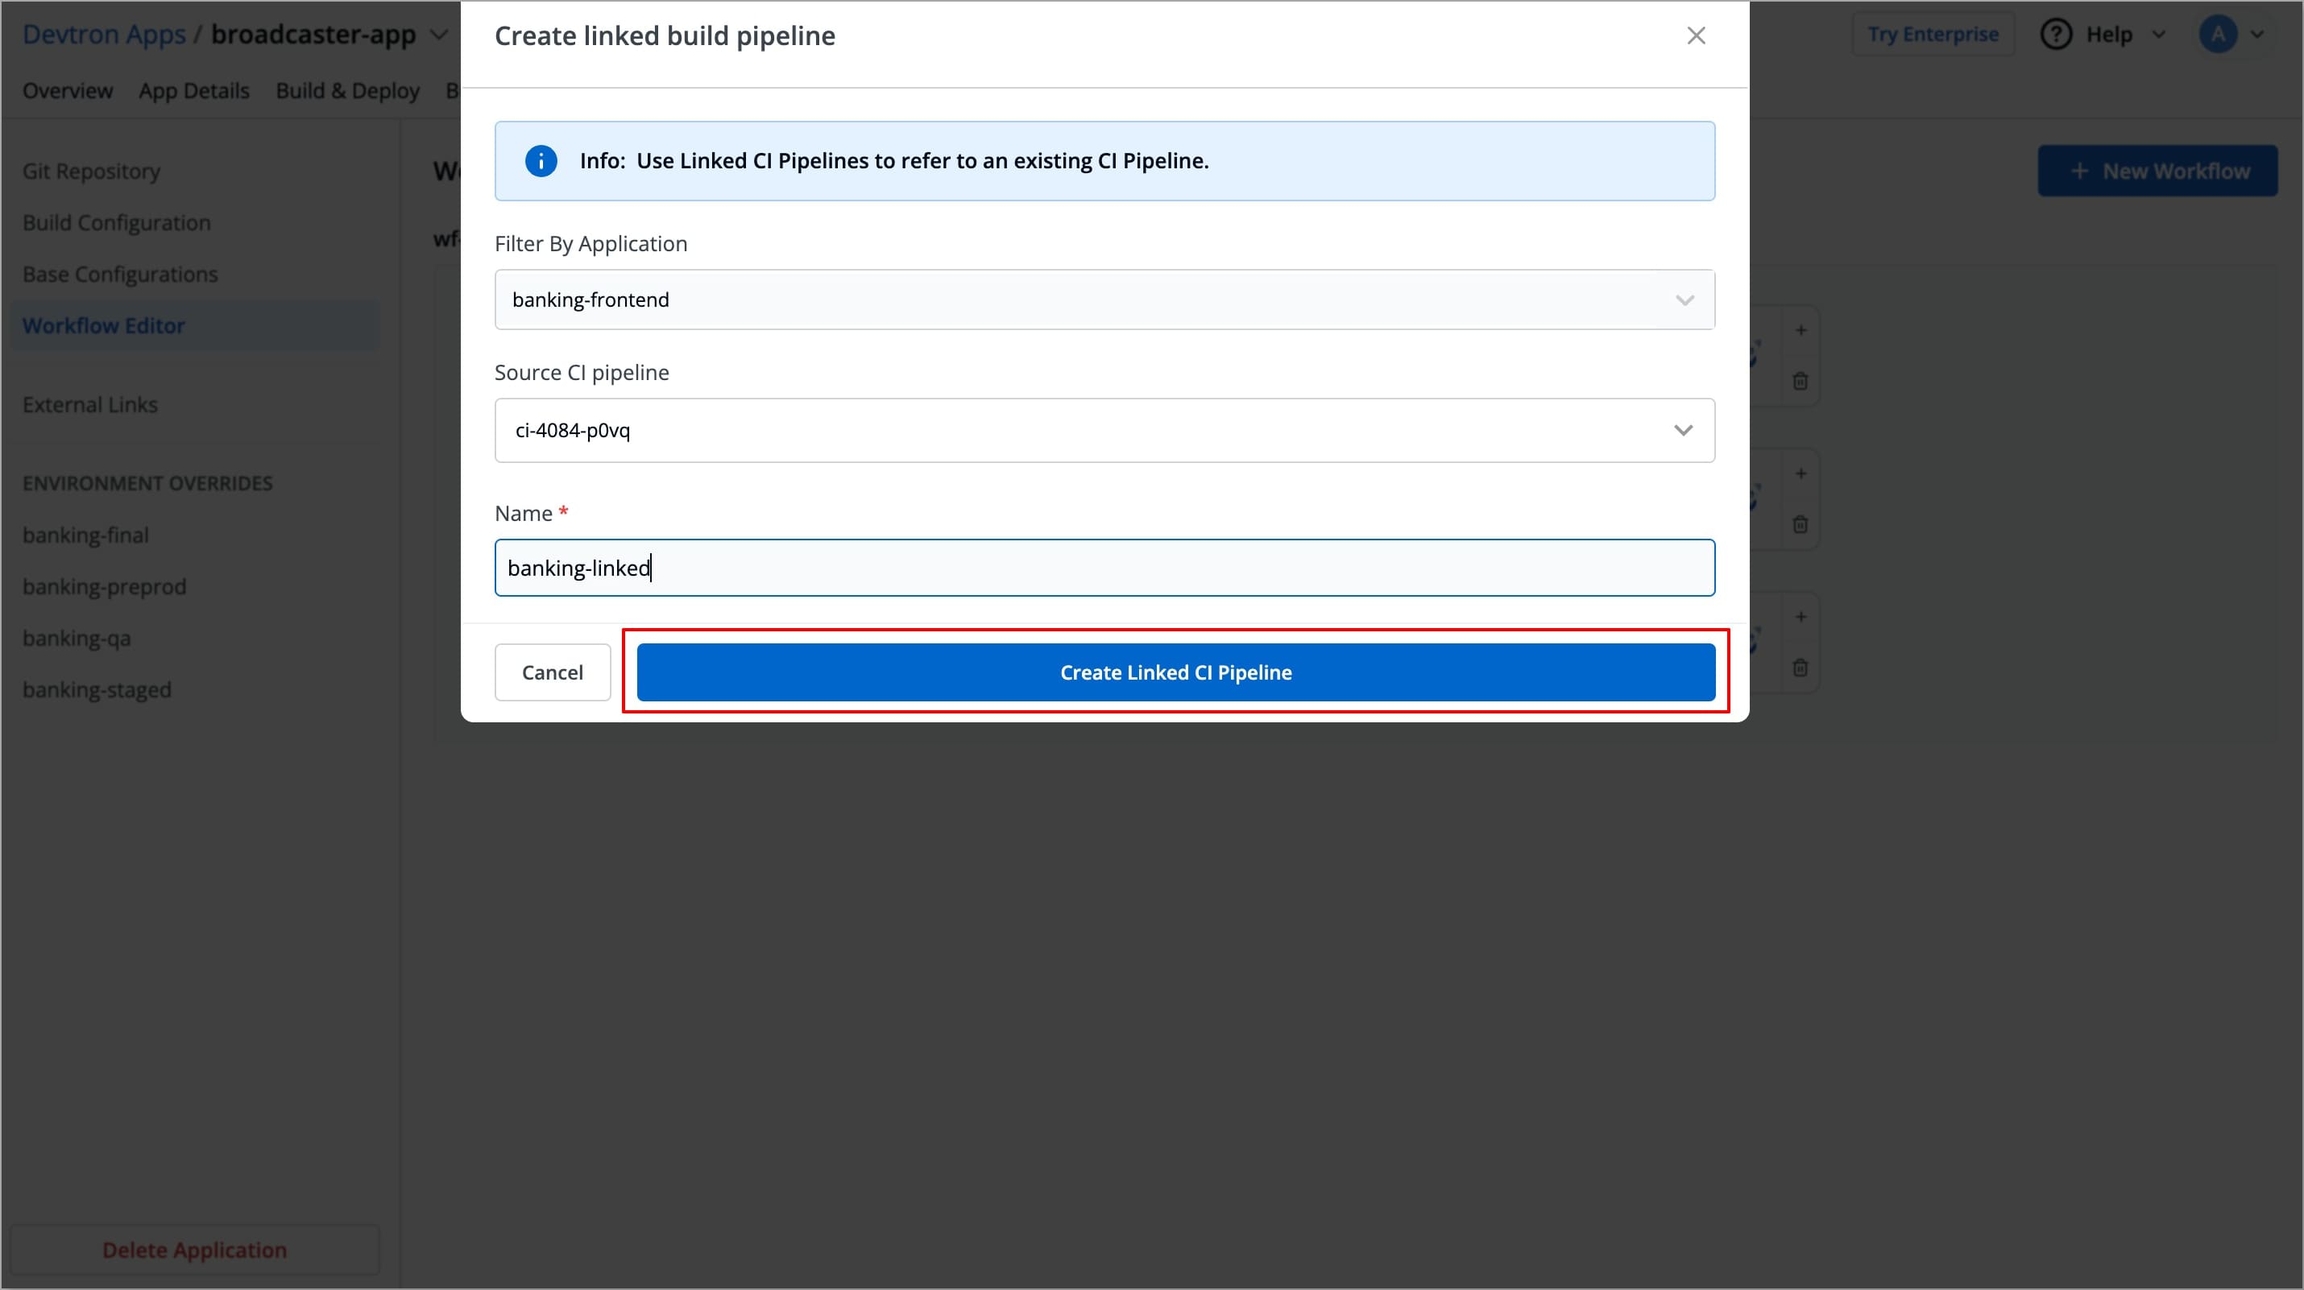
Figure 17: Entering details of existing pipeline
Note
The user must have at least view access to the application that contains the source pipeline, otherwise, the application will not appear in the Filter By Application field.
Filter By Application
Enter the application name in which the source CI pipeline exists.
Source CI pipeline
List all the build pipelines for the selected application. Choose the pipeline that you want to link
Name
Enter the name for the Linked Build Pipeline.
By default, it takes the name of the source pipeline, if you wish, you can rename it.
In case the source pipeline exists within the same application, the Linked Build Pipeline name must be different from the source pipeline, as Devtron does not allow two pipelines with the same name within a single application.
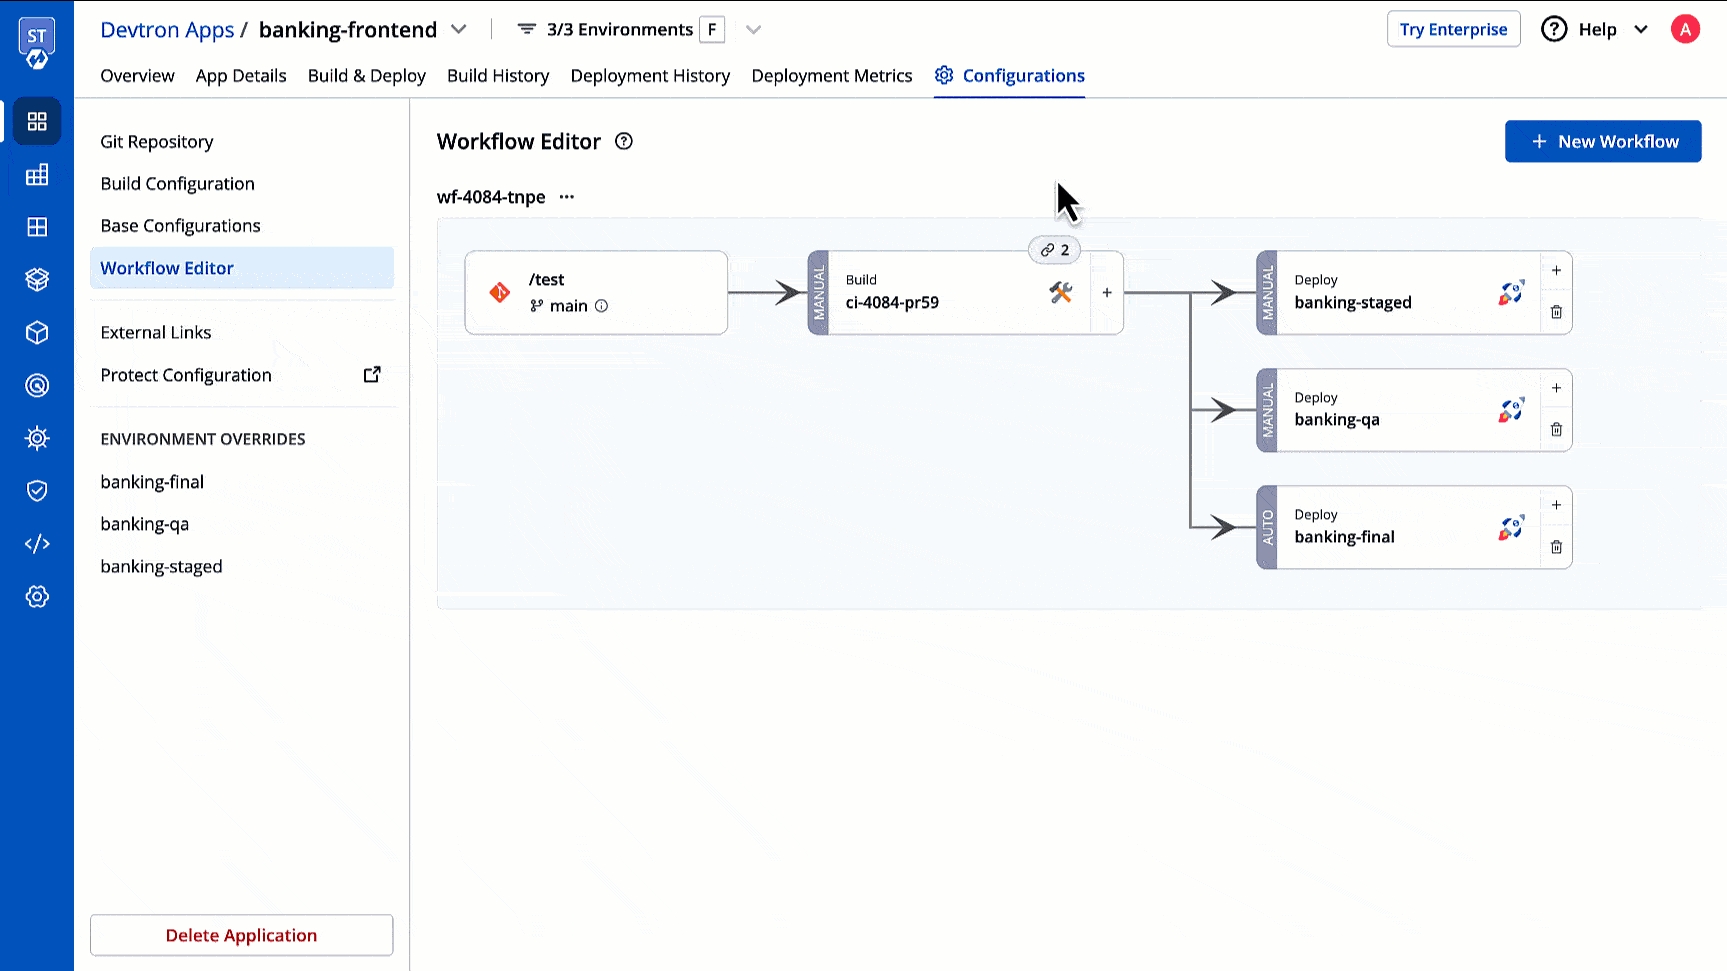
Thereafter, the source CI pipeline will indicate the number of Linked CI pipelines. On clicking it, a modal window will appear, which lists all the applications from which the source pipeline is linked, as shown in the image below.
After creating a Linked CI Pipeline, you can create a CD pipeline. Refer to CD Pipeline page to know more.
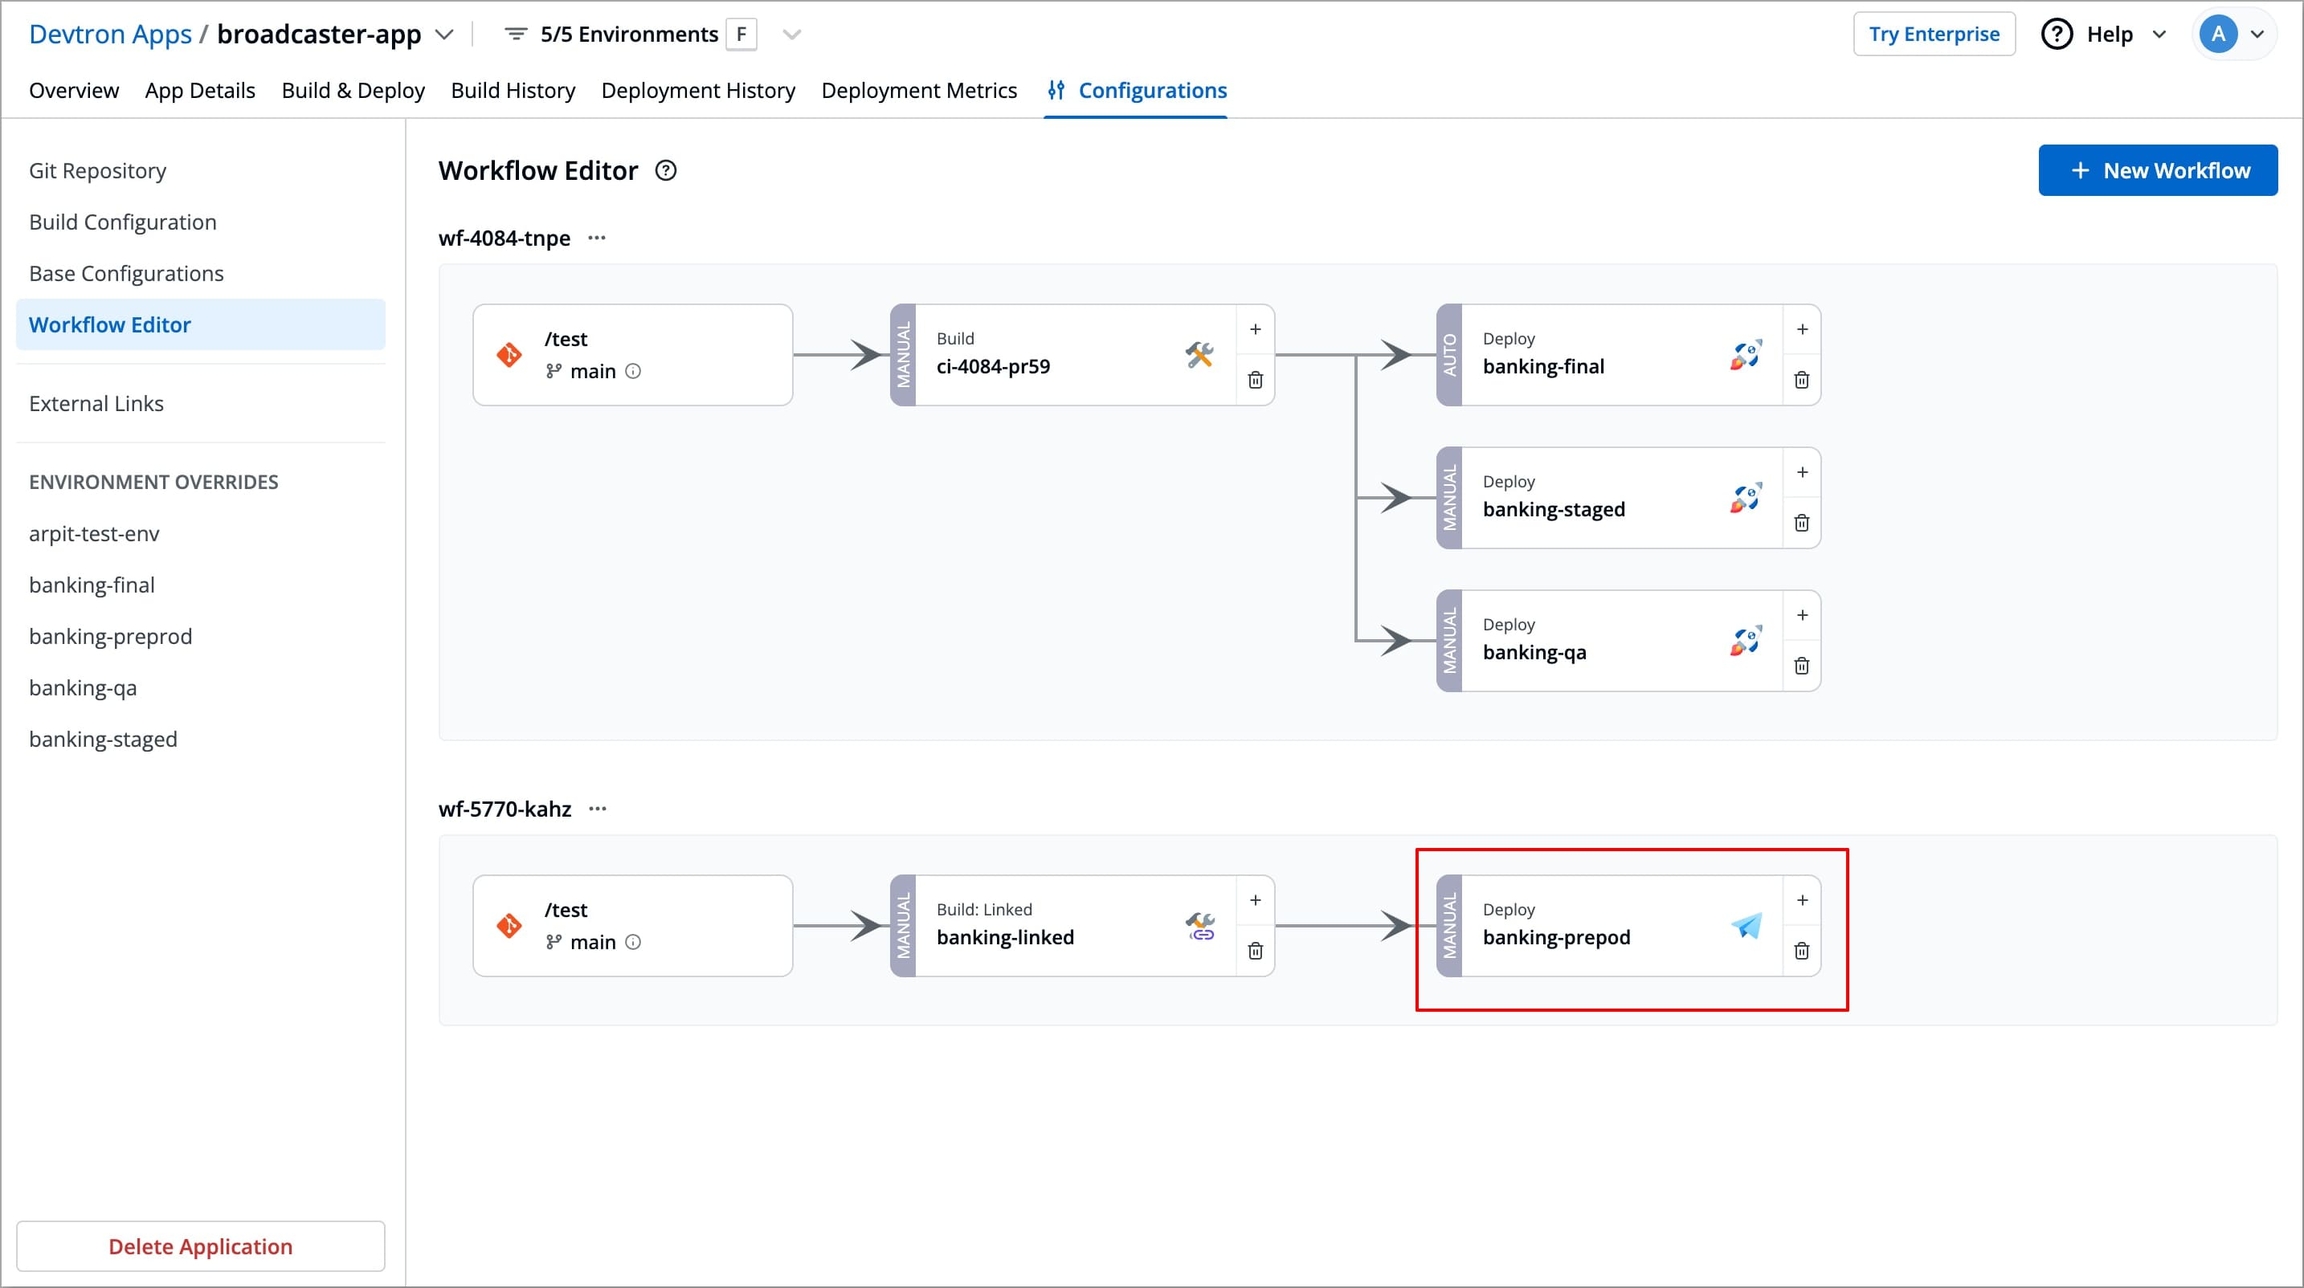
Figure 20: Creating CD pipeline
Note
Linked CI pipelines can't trigger builds. They rely on the source CI pipeline to build images. Trigger a build in the source CI pipeline to see the images available for deployment in the linked CI pipeline's Deployment stage.
3. Deploy Image from External Service
Deploy Image from External Service allows you to deploy container images built by external CI tools such as Jenkins, CircleCI, etc., using webhooks.
This is useful when your CI pipeline is managed outside the Devtron platform, allowing you to use Devtron exclusively for deploying container images on Kubernetes while maintaining your existing CI setup.
To create a pipeline form Deploy Image from External Service, follow the steps below
Navigate to Configurations → Workflow Editor of your application.
Select + New Workflow, a modal window will appear where you can select the type of pipeline you want to create.
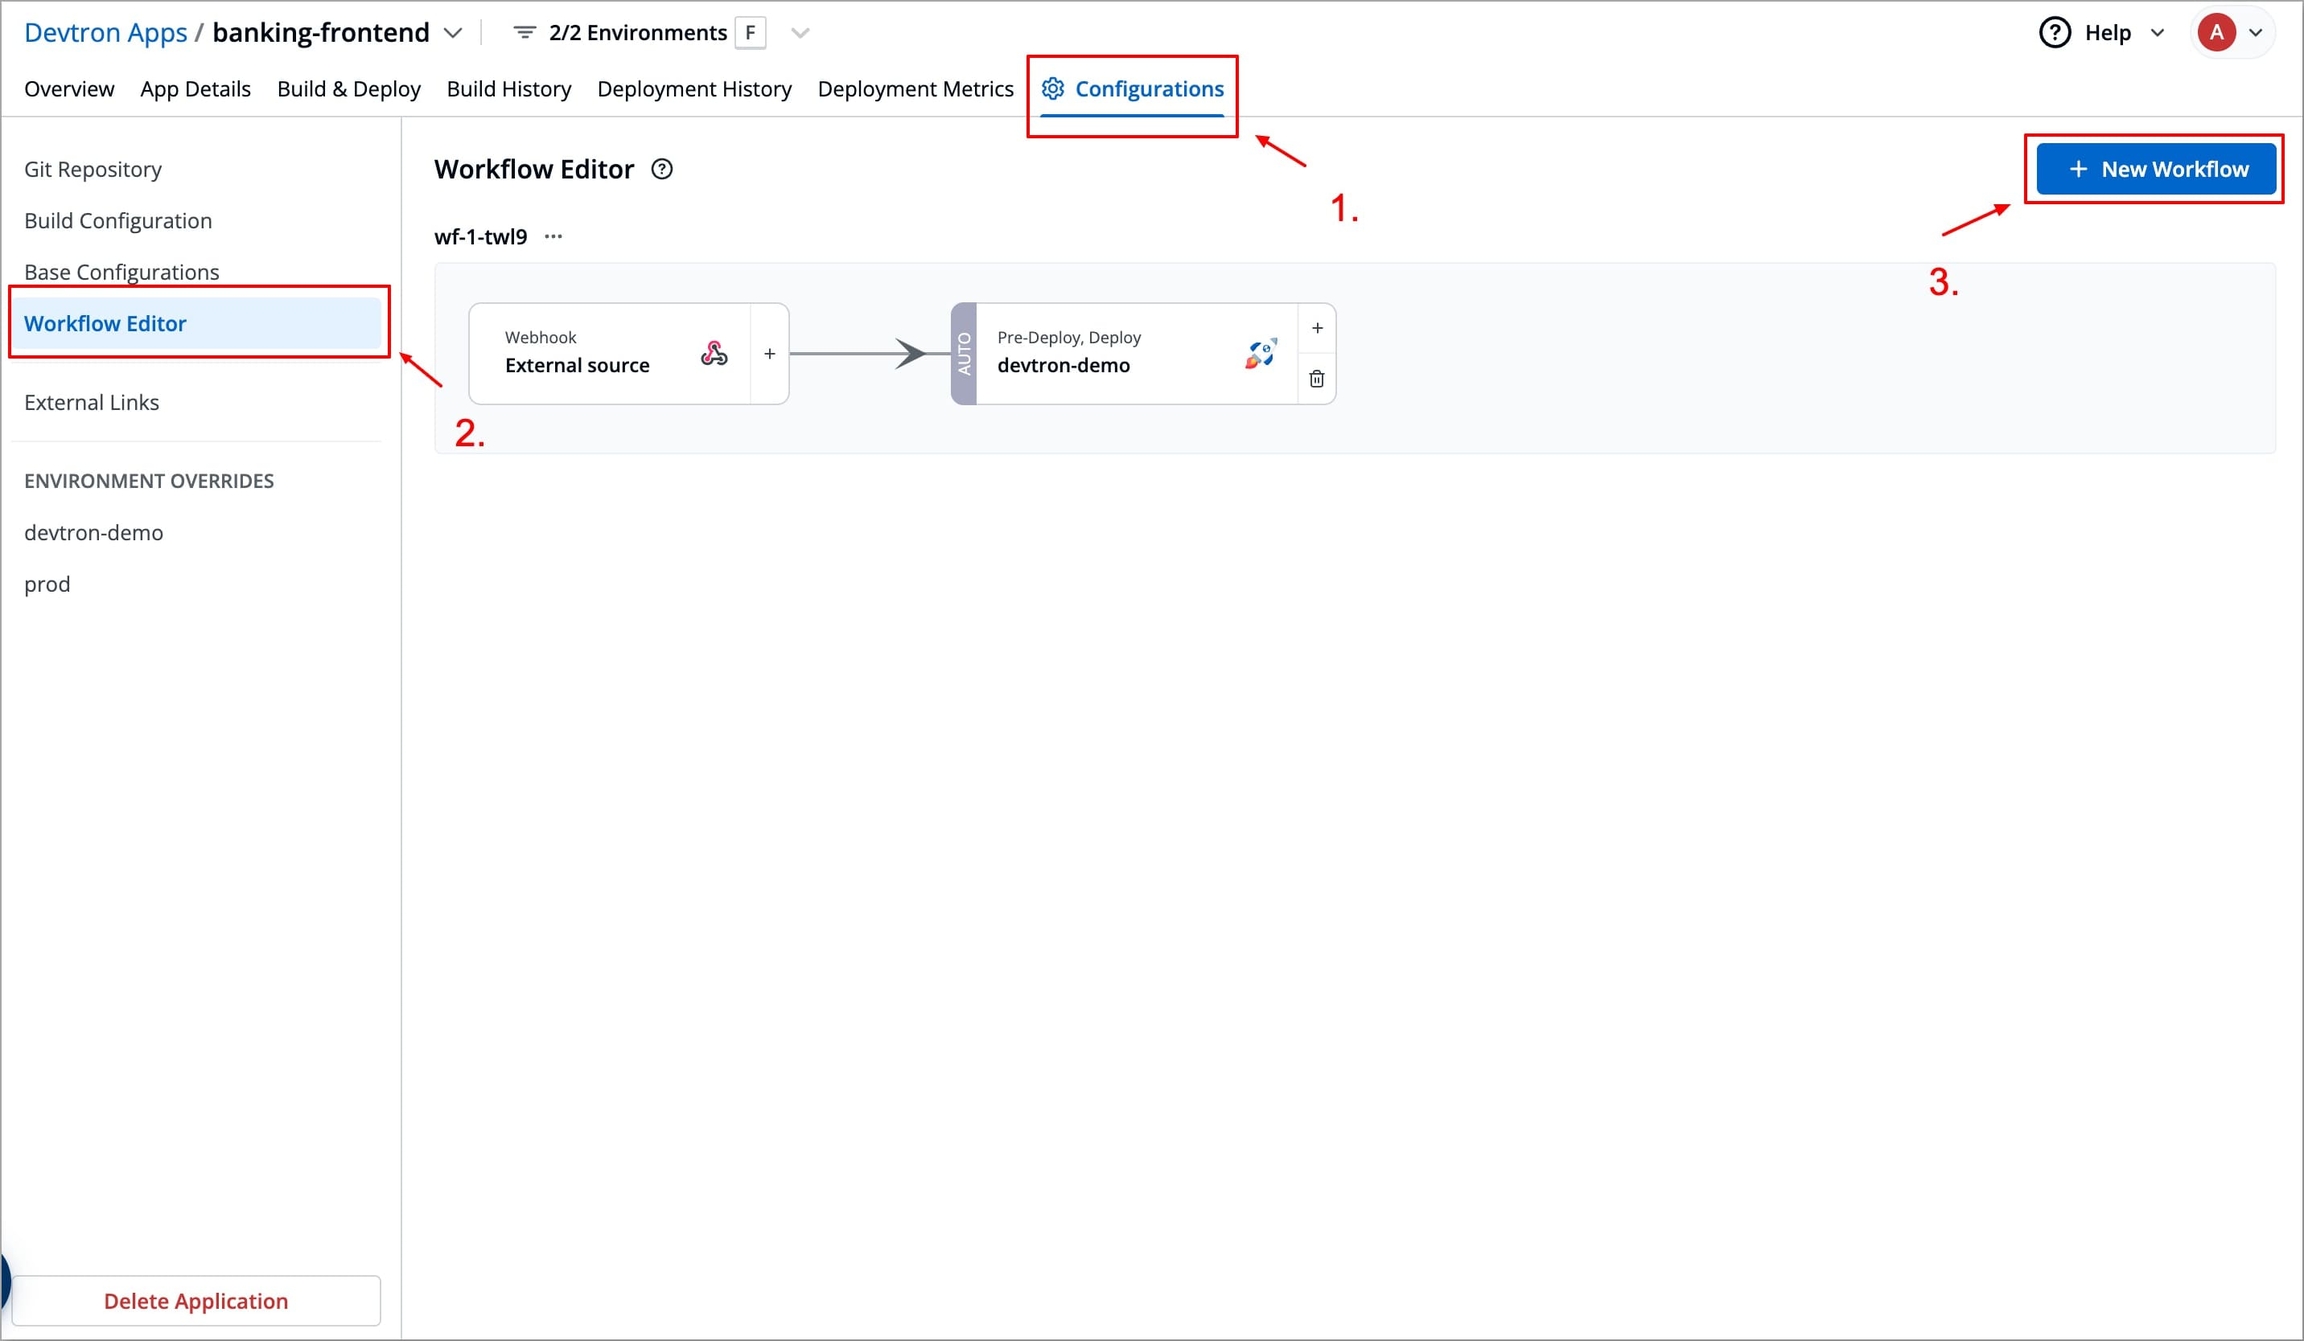
Figure 21: Creating New Workflow Select Deploy Image from External Service, another modal window will appear where you can enter deployment details such as environment, execution mode, and deployment strategy.
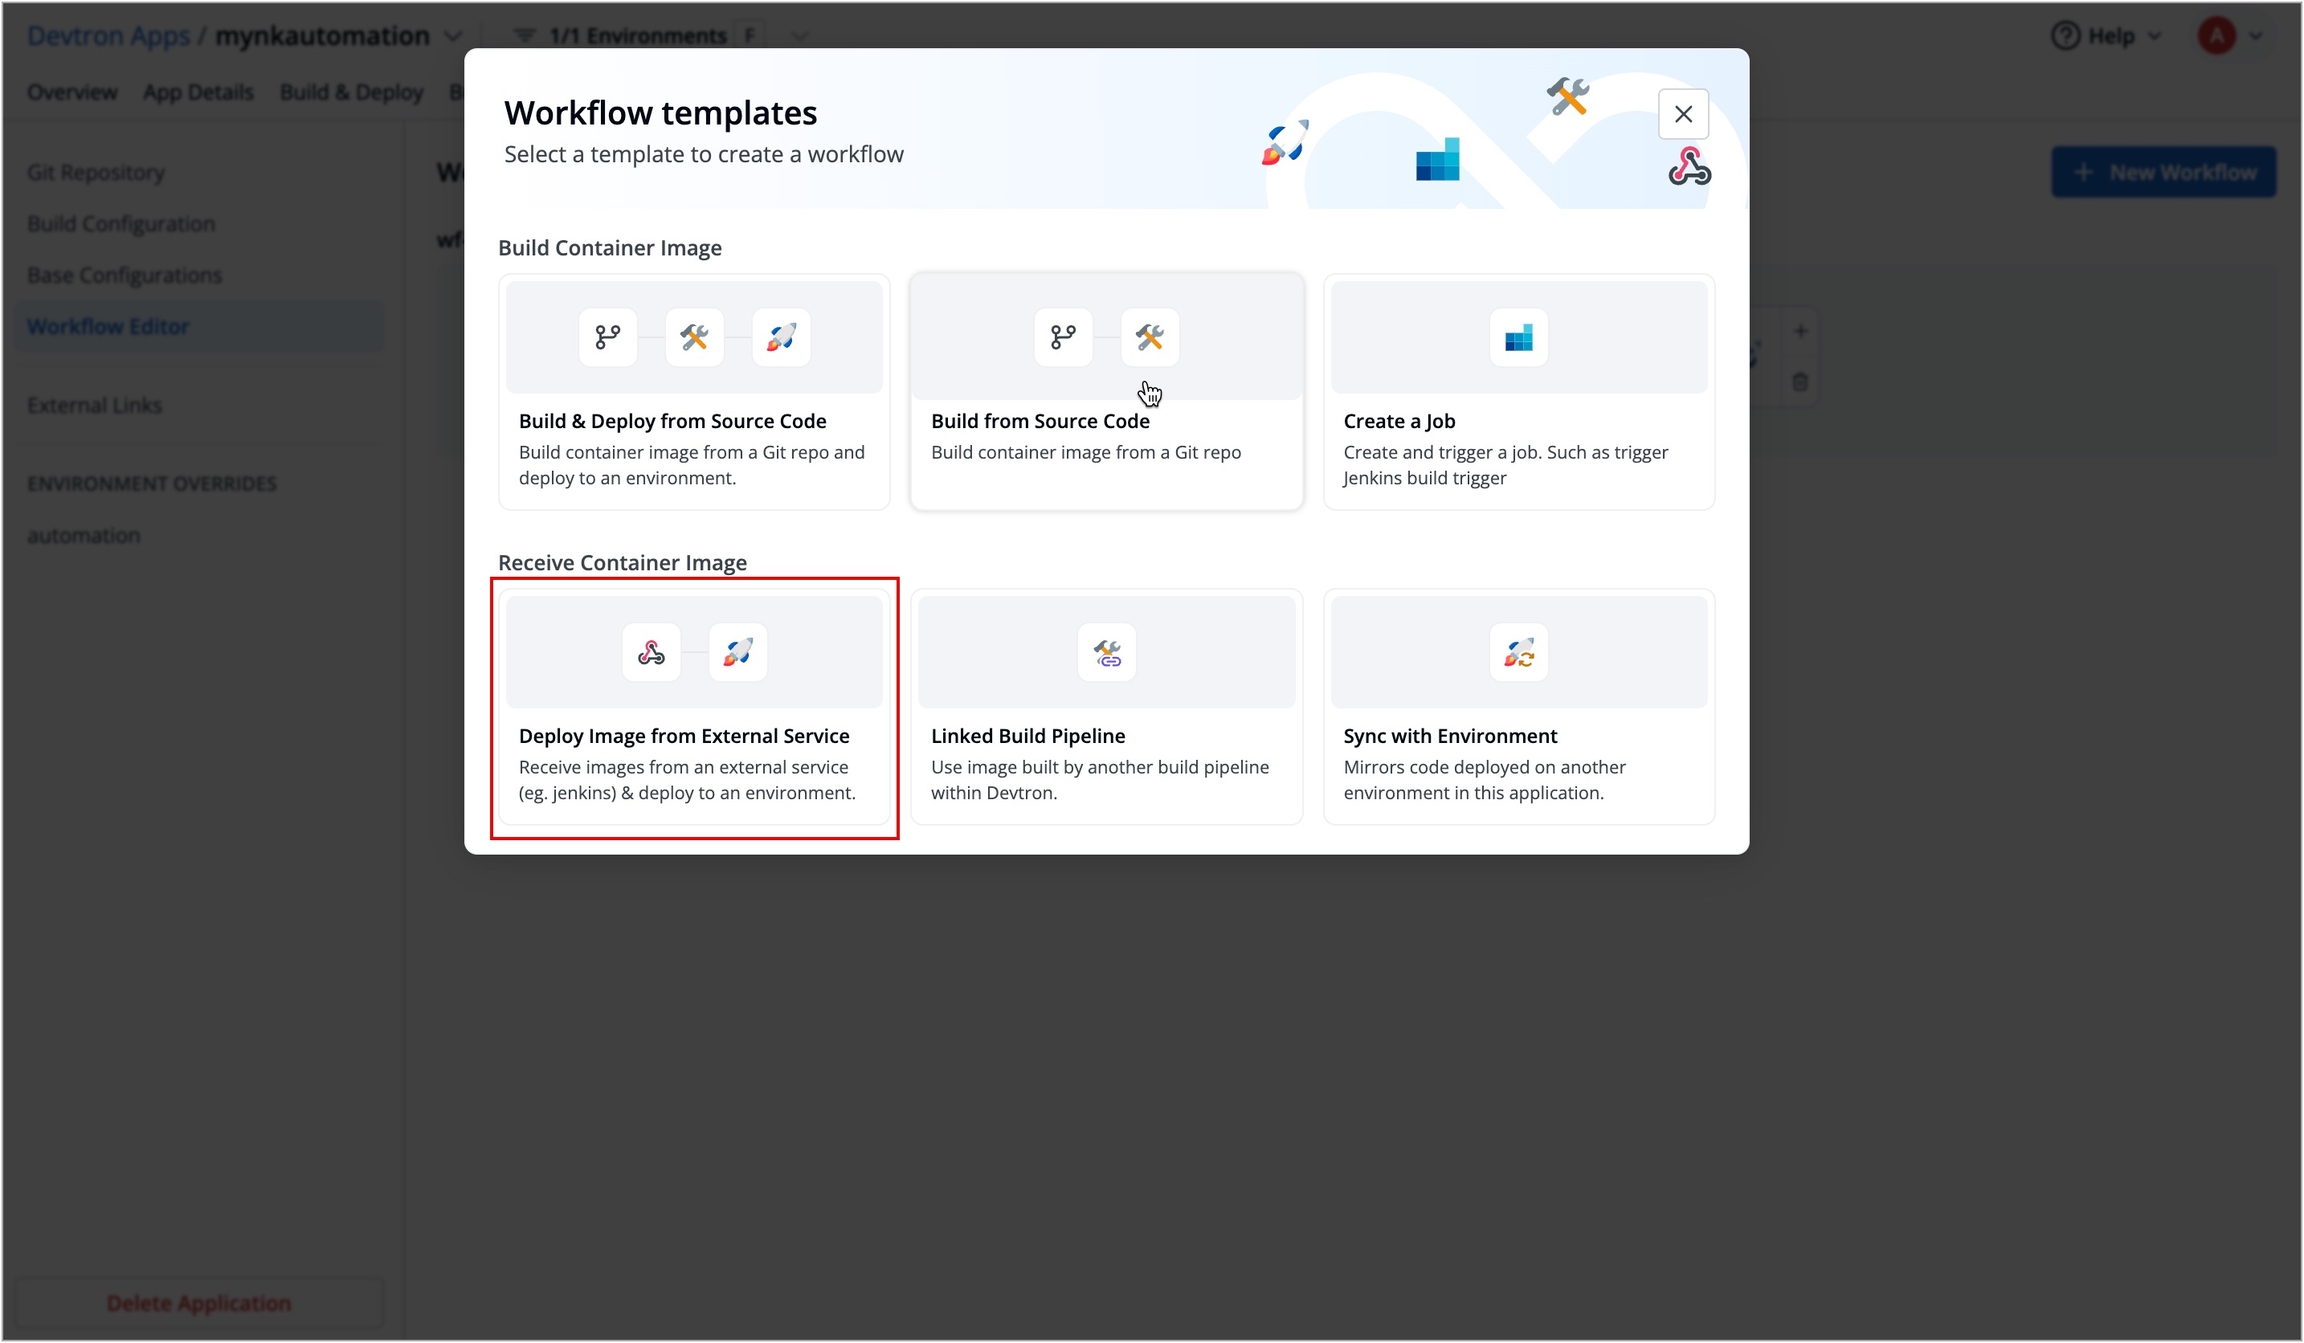
Figure 22: Selecting 'Deploy Image from External Service' Enter the deployment details and click Create Pipeline to create the pipeline.
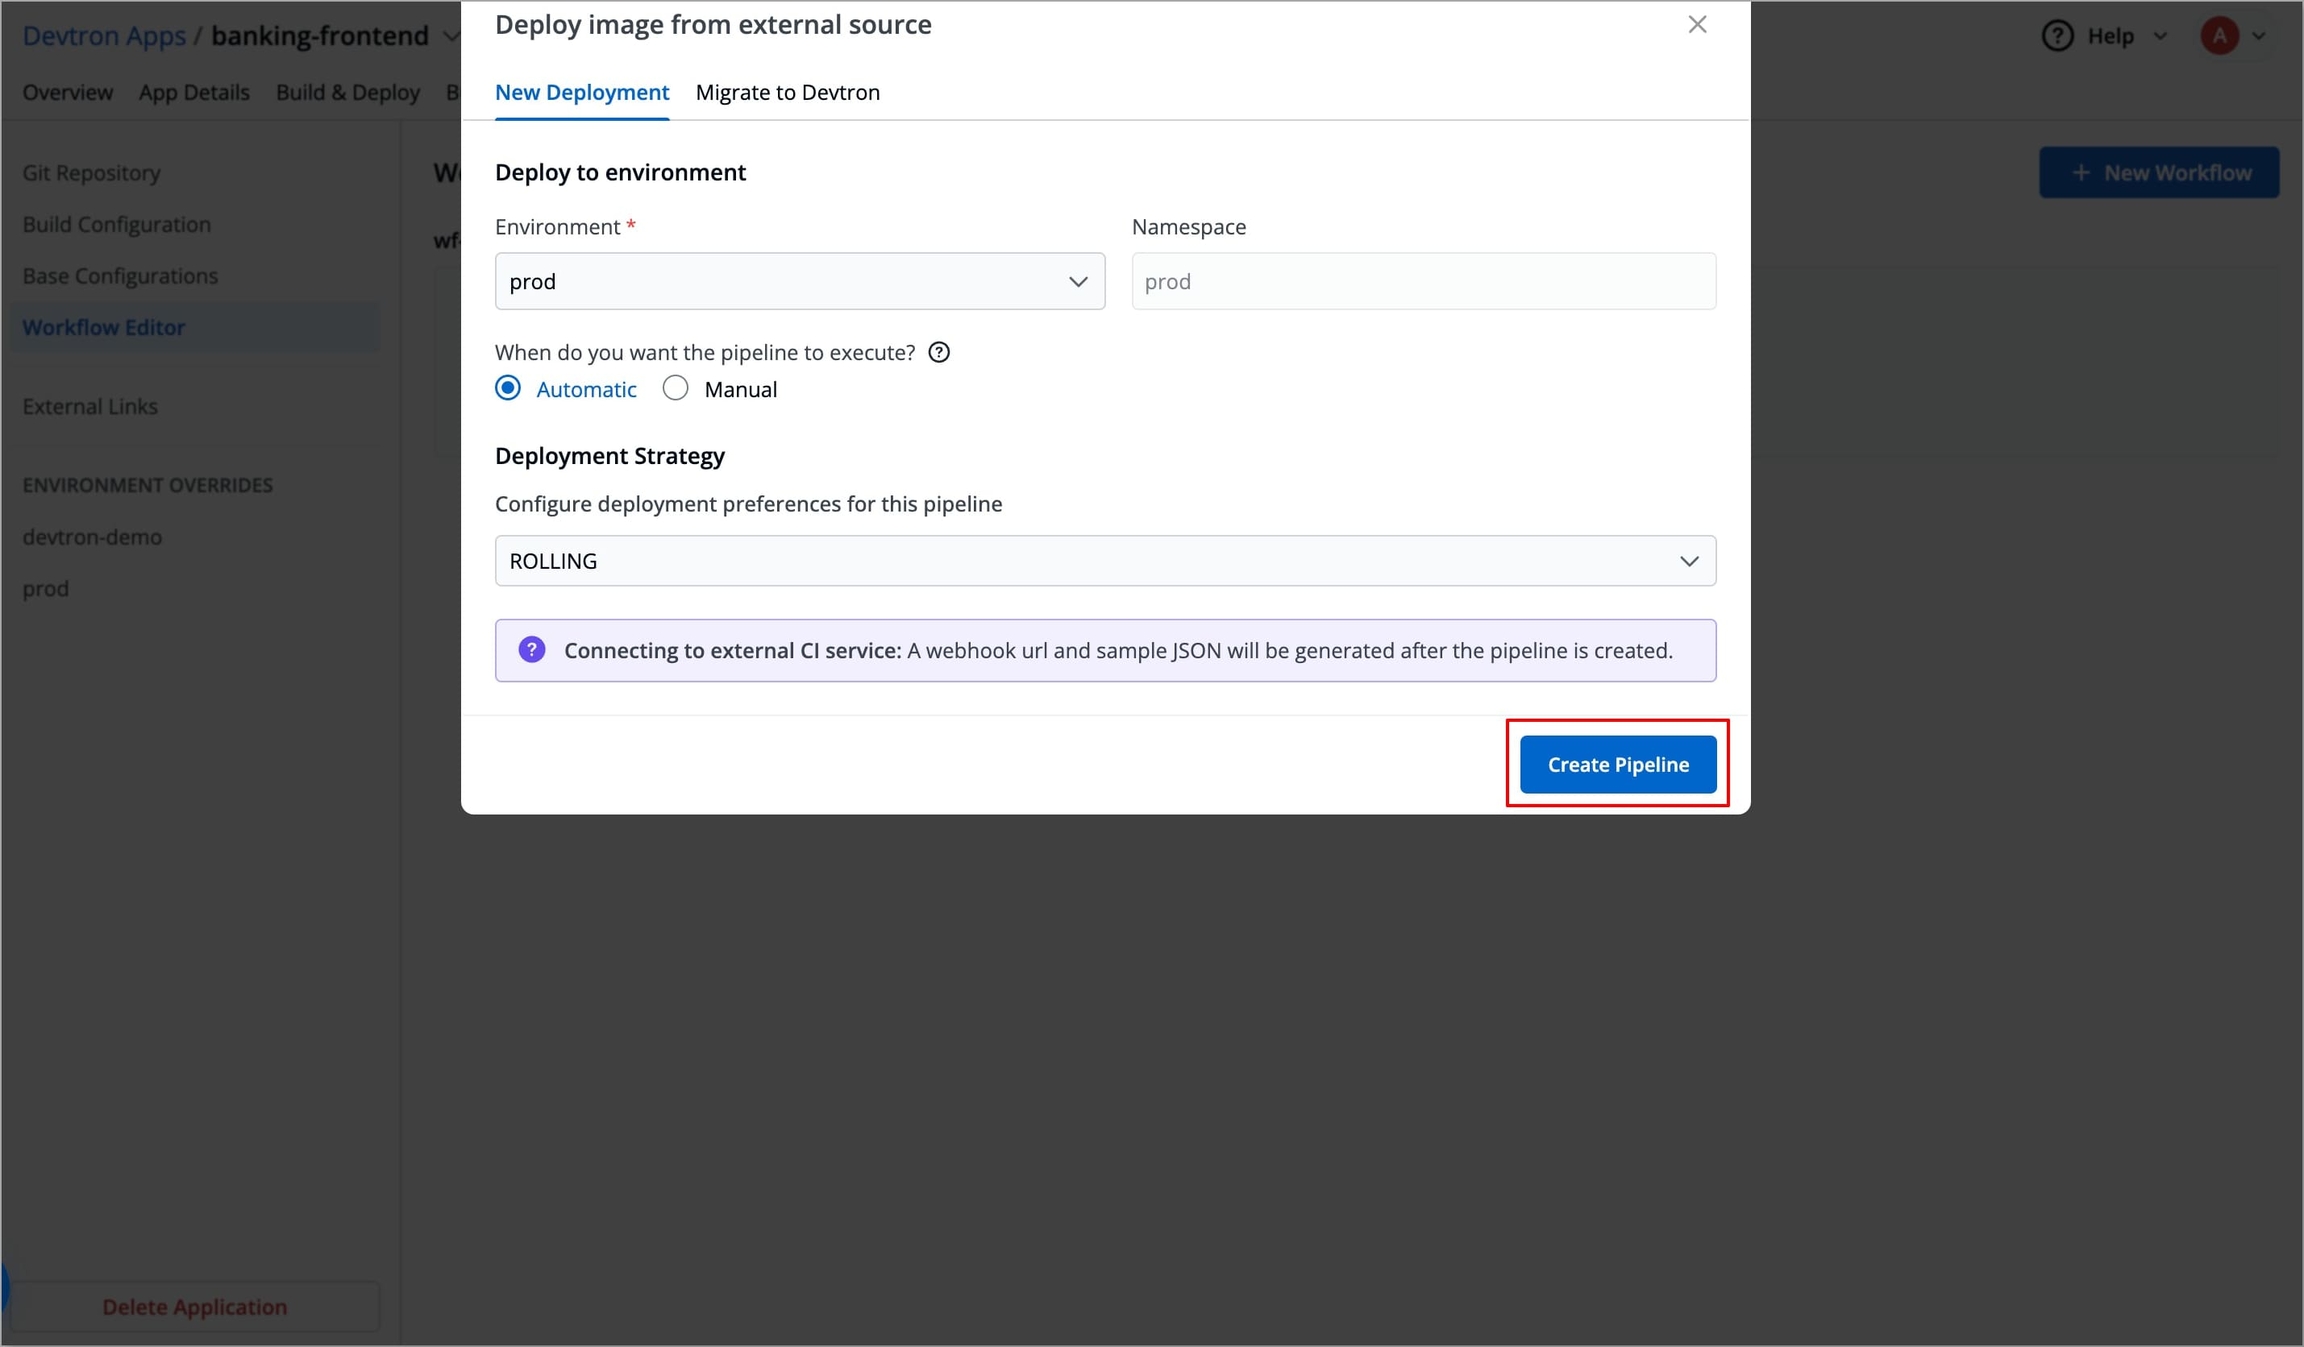
Figure 23: Entering deployment details FieldsDescriptionEnvironment
Provide the name of the Environment in which you want to deploy your image.
Namespace
It will display the namespace of that Environment.
When do you want the pipeline to execute?
You can deploy either in one of the following ways:
Automatic: Pipeline triggers automatically when a new container image is received from the previous stage. Users can also trigger the pipeline manually.
Manual: Users can trigger the pipeline manually.
Deployment Strategy
Choose the Deployment Strategy according to your preference.
To get the image from an external CI service (let's say Jenkins), you need to configure the Webhook provided by Devtron in your existing External CI pipeline.
Configure Webhook in External CI
To configure the Webhook in External CI, follow the steps below.
After creating the pipeline, select Show webhook details or select External Source stage to get the webhook URL and JSON sample payload to be used in the external CI pipeline.
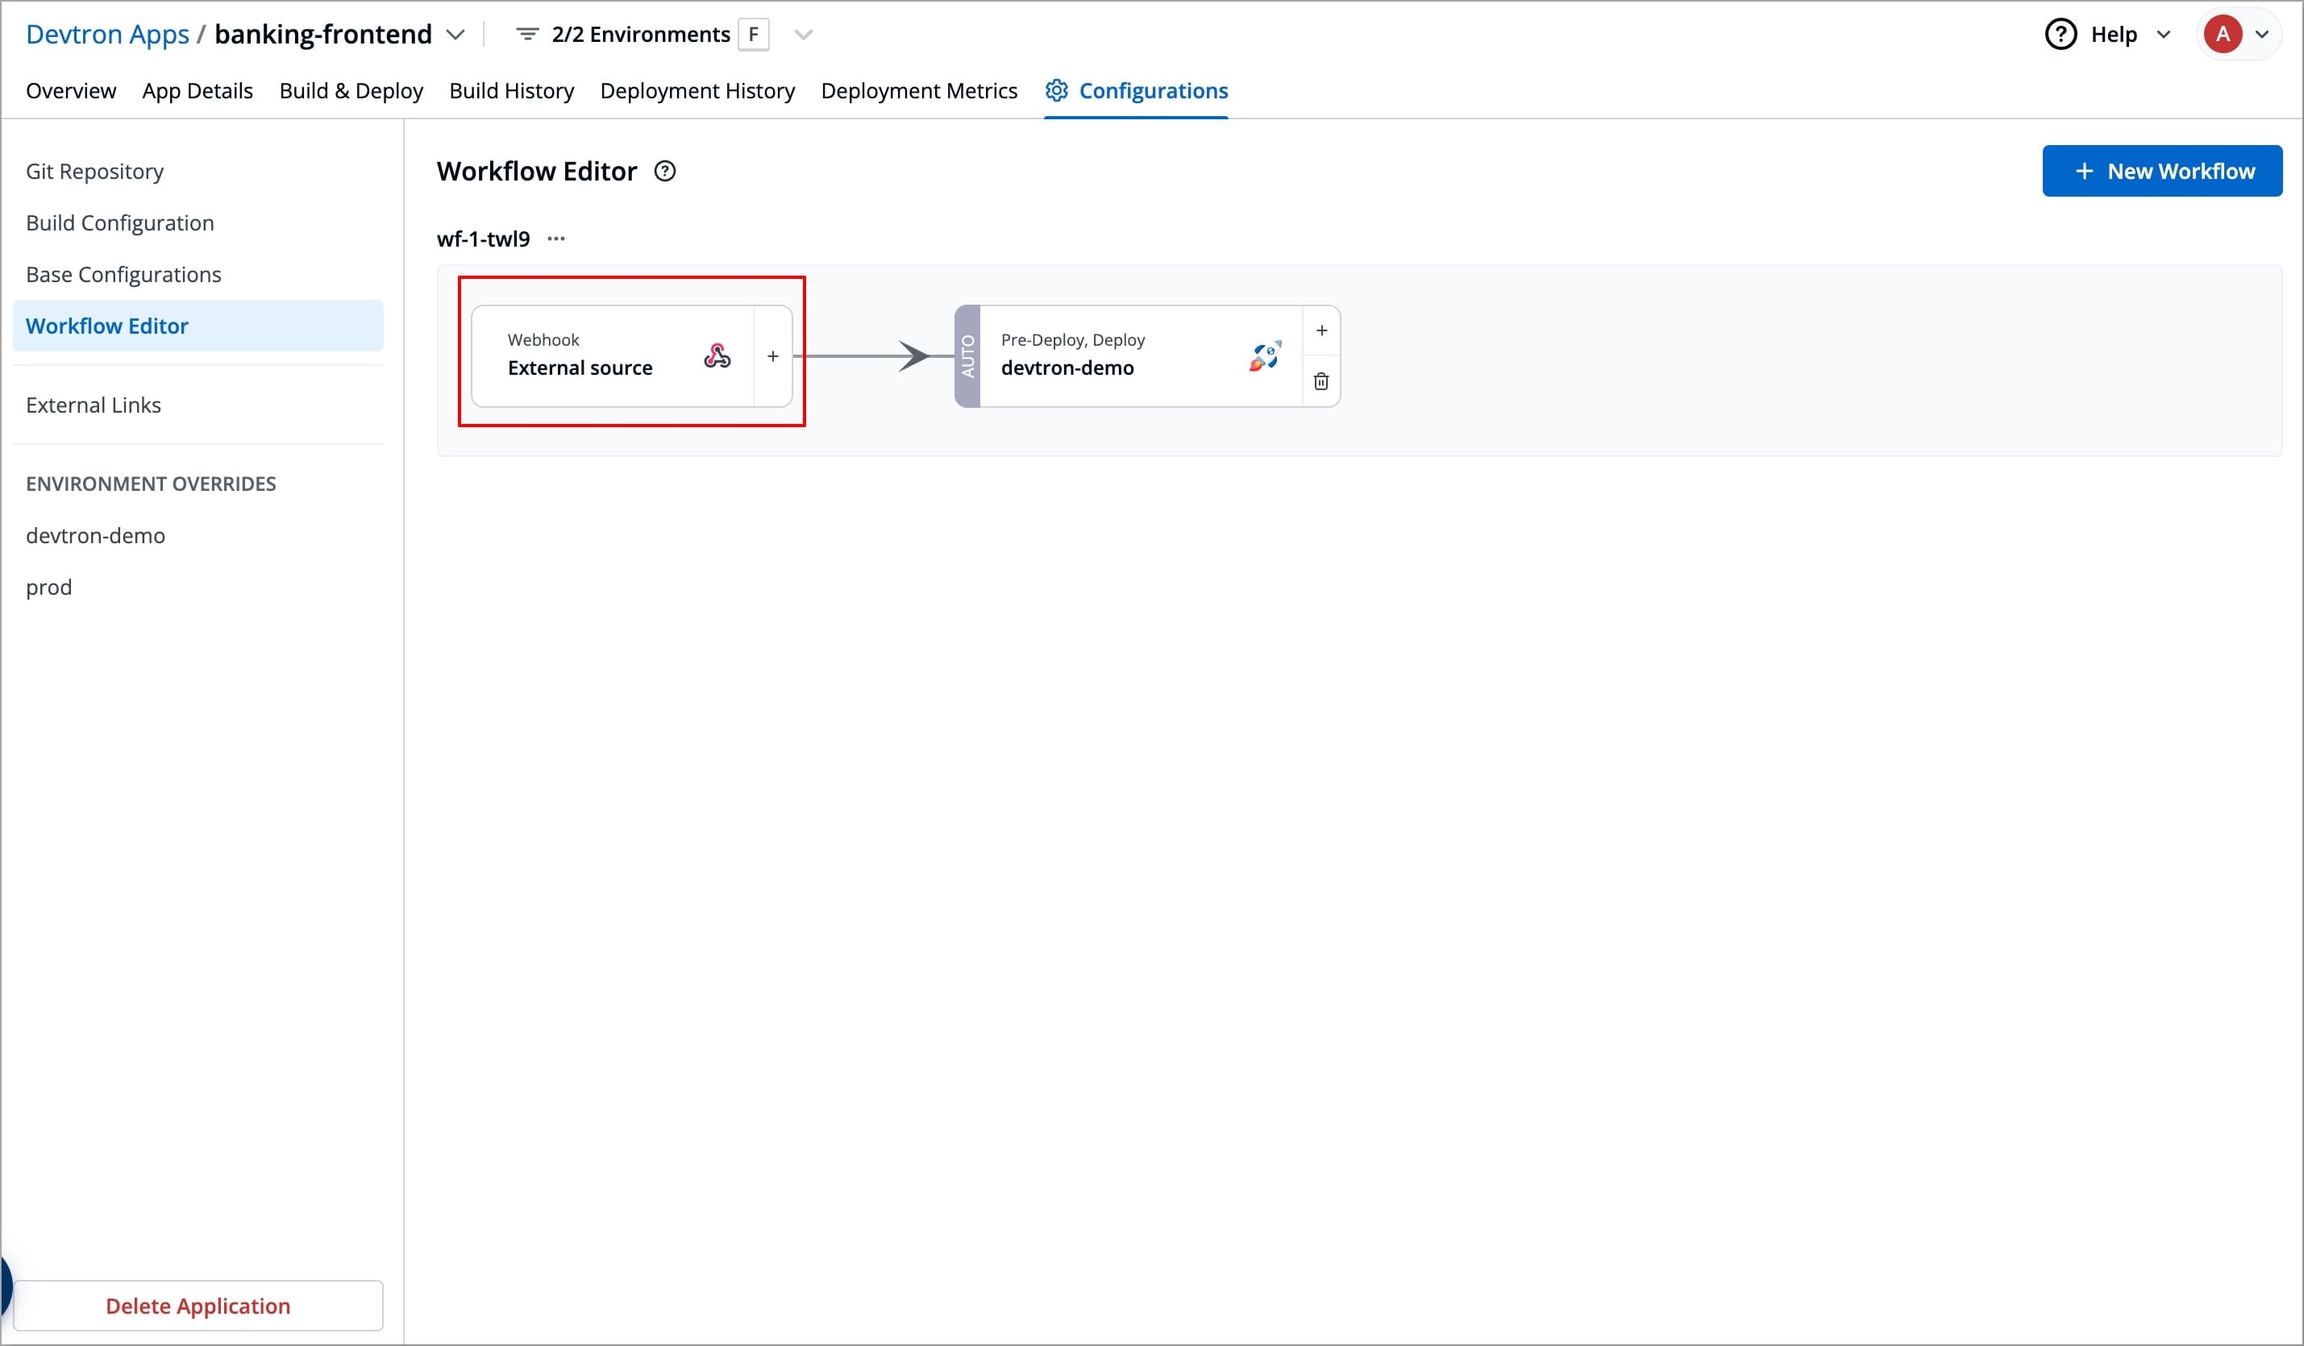
Figure 24: Getting Webhook Details On the Webhook Details page, click Select or auto-generate token with required permissions to select or generate a
API token. This token allows external CI services to authenticate with Devtron.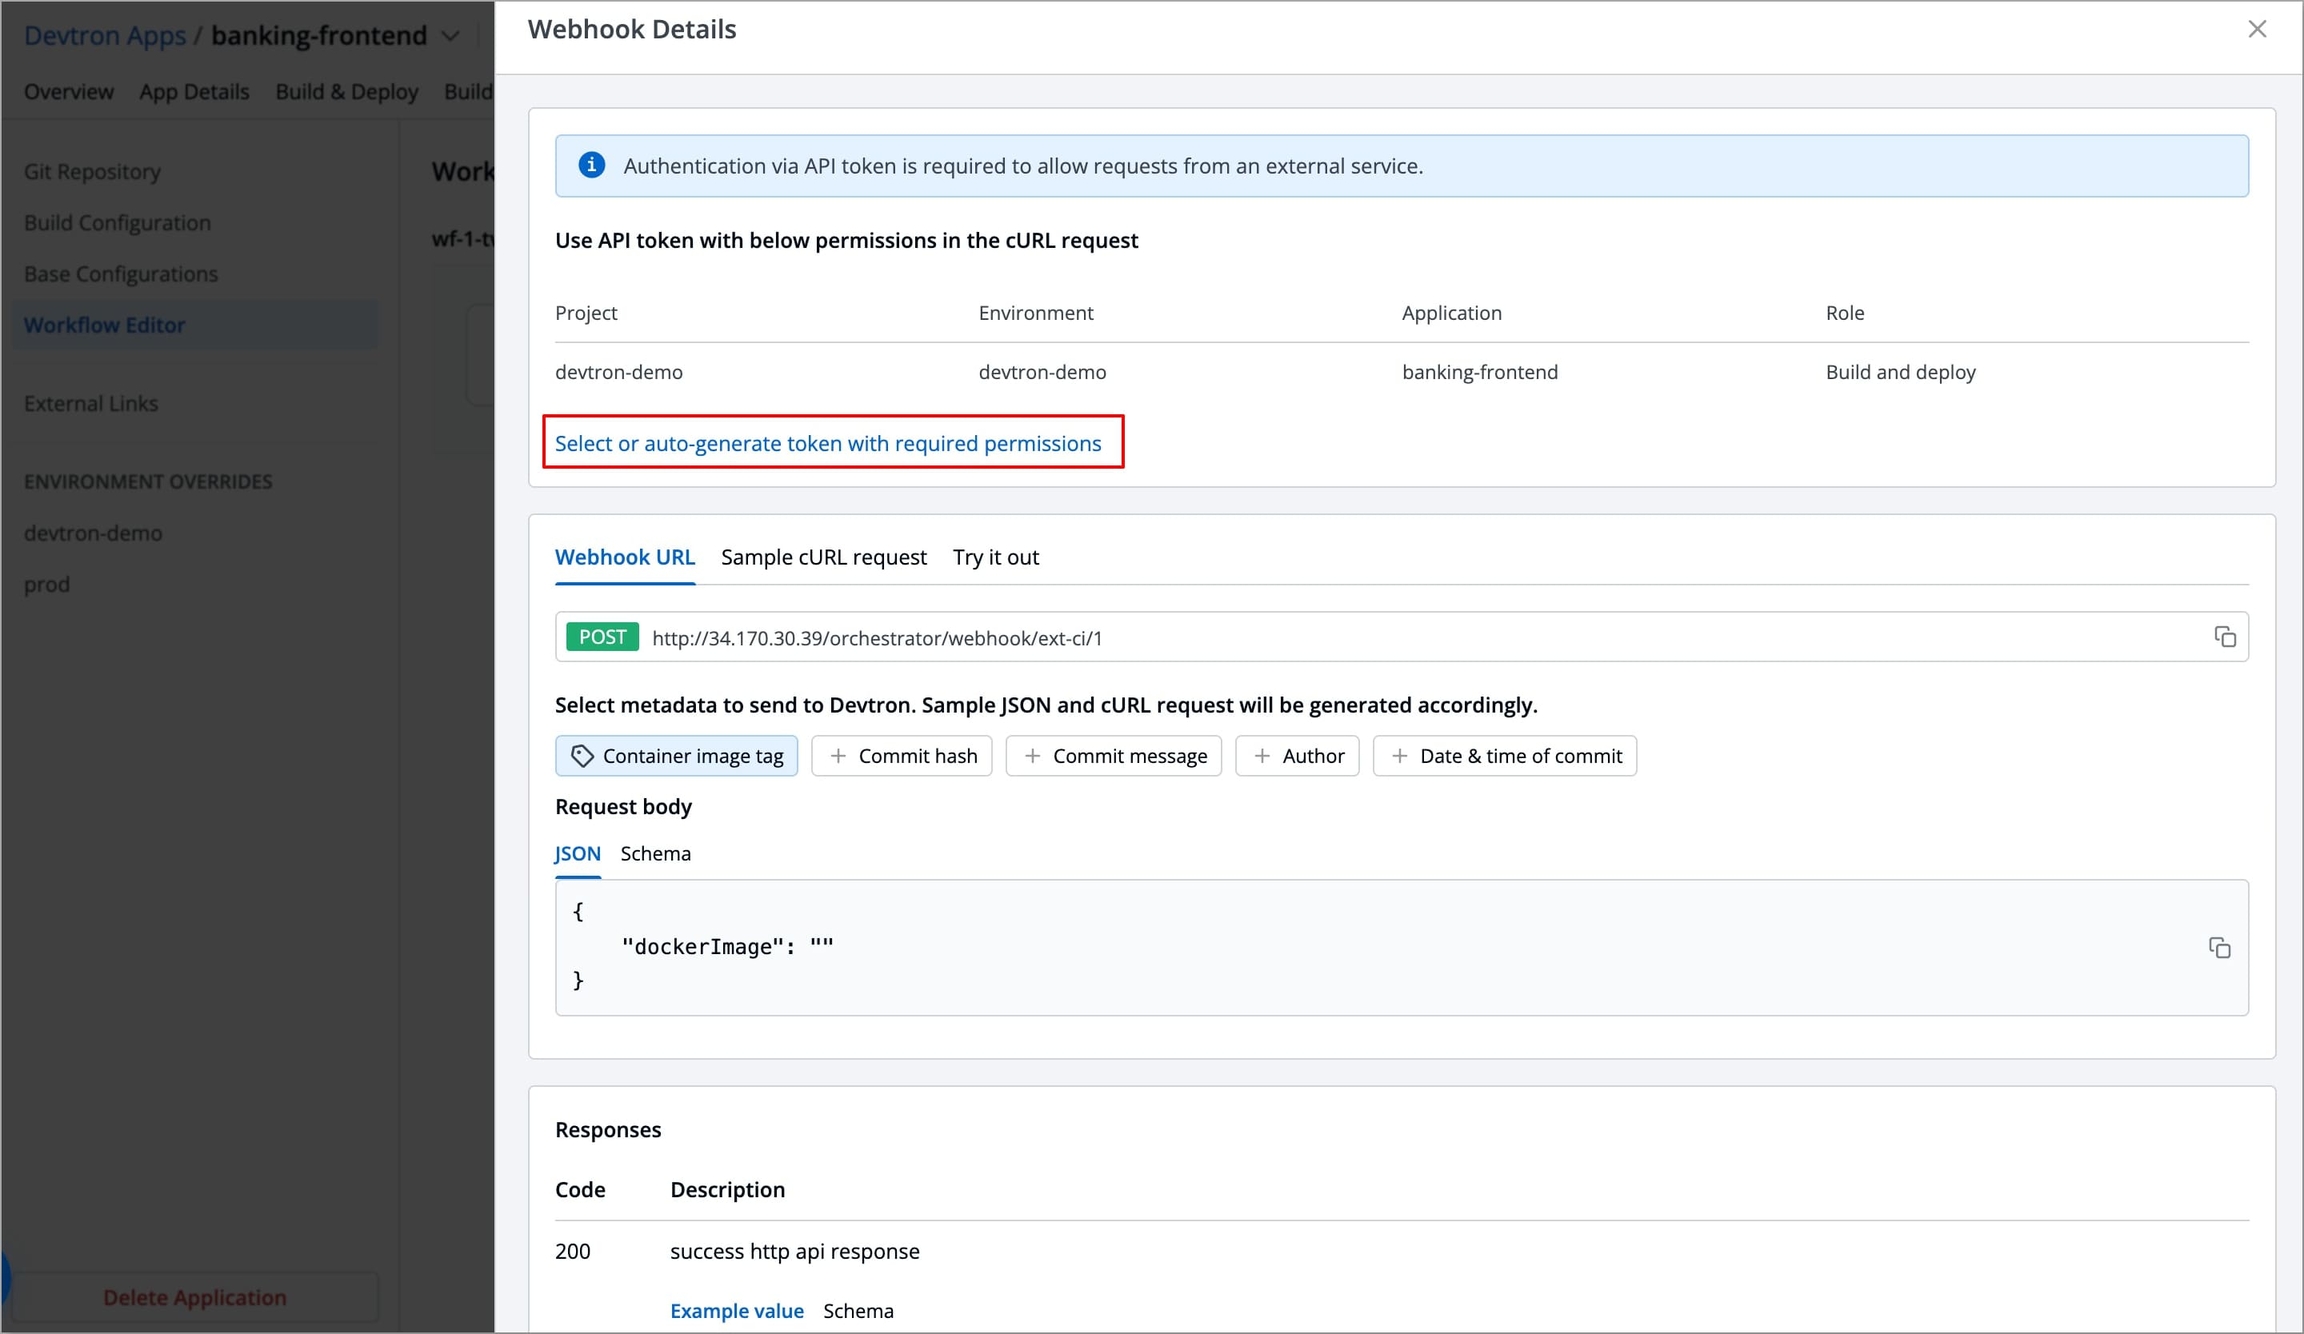
Figure 25: Clicking 'Select or auto-generate token with required permissions' To select an existing API token, choose an API token from the dropdown under Select API token.
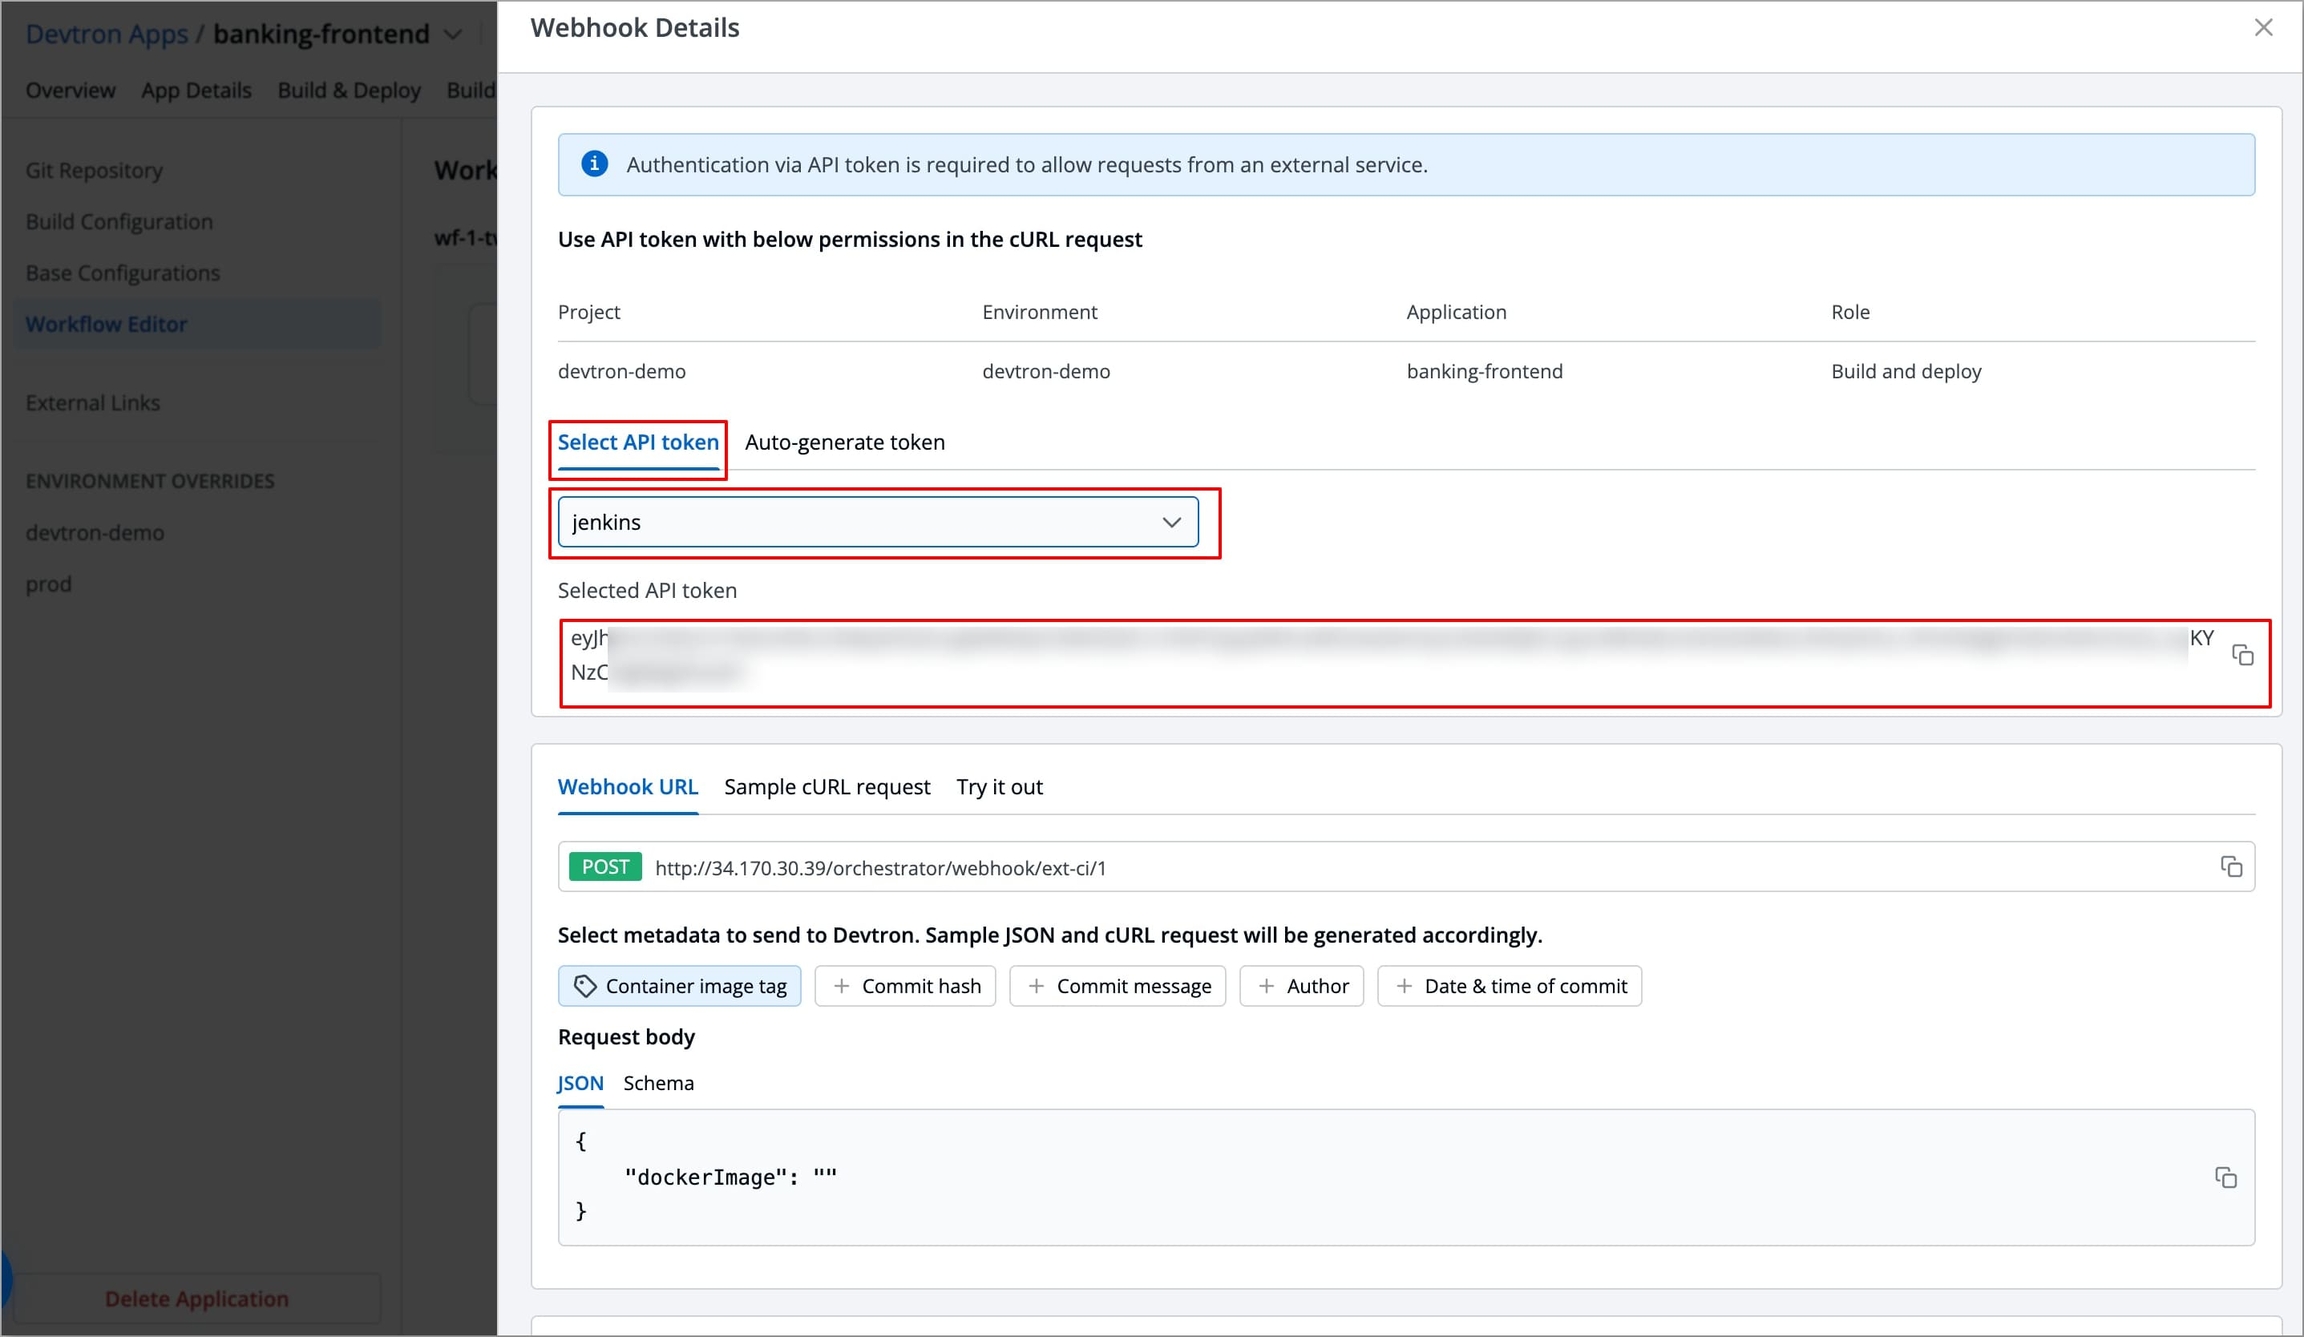
Figure 26: Selecting existing API Token To generate an API token, select Auto-generate token sub tab → Enter a name for the token in the Token Name field → Click Generate token to generate a token.
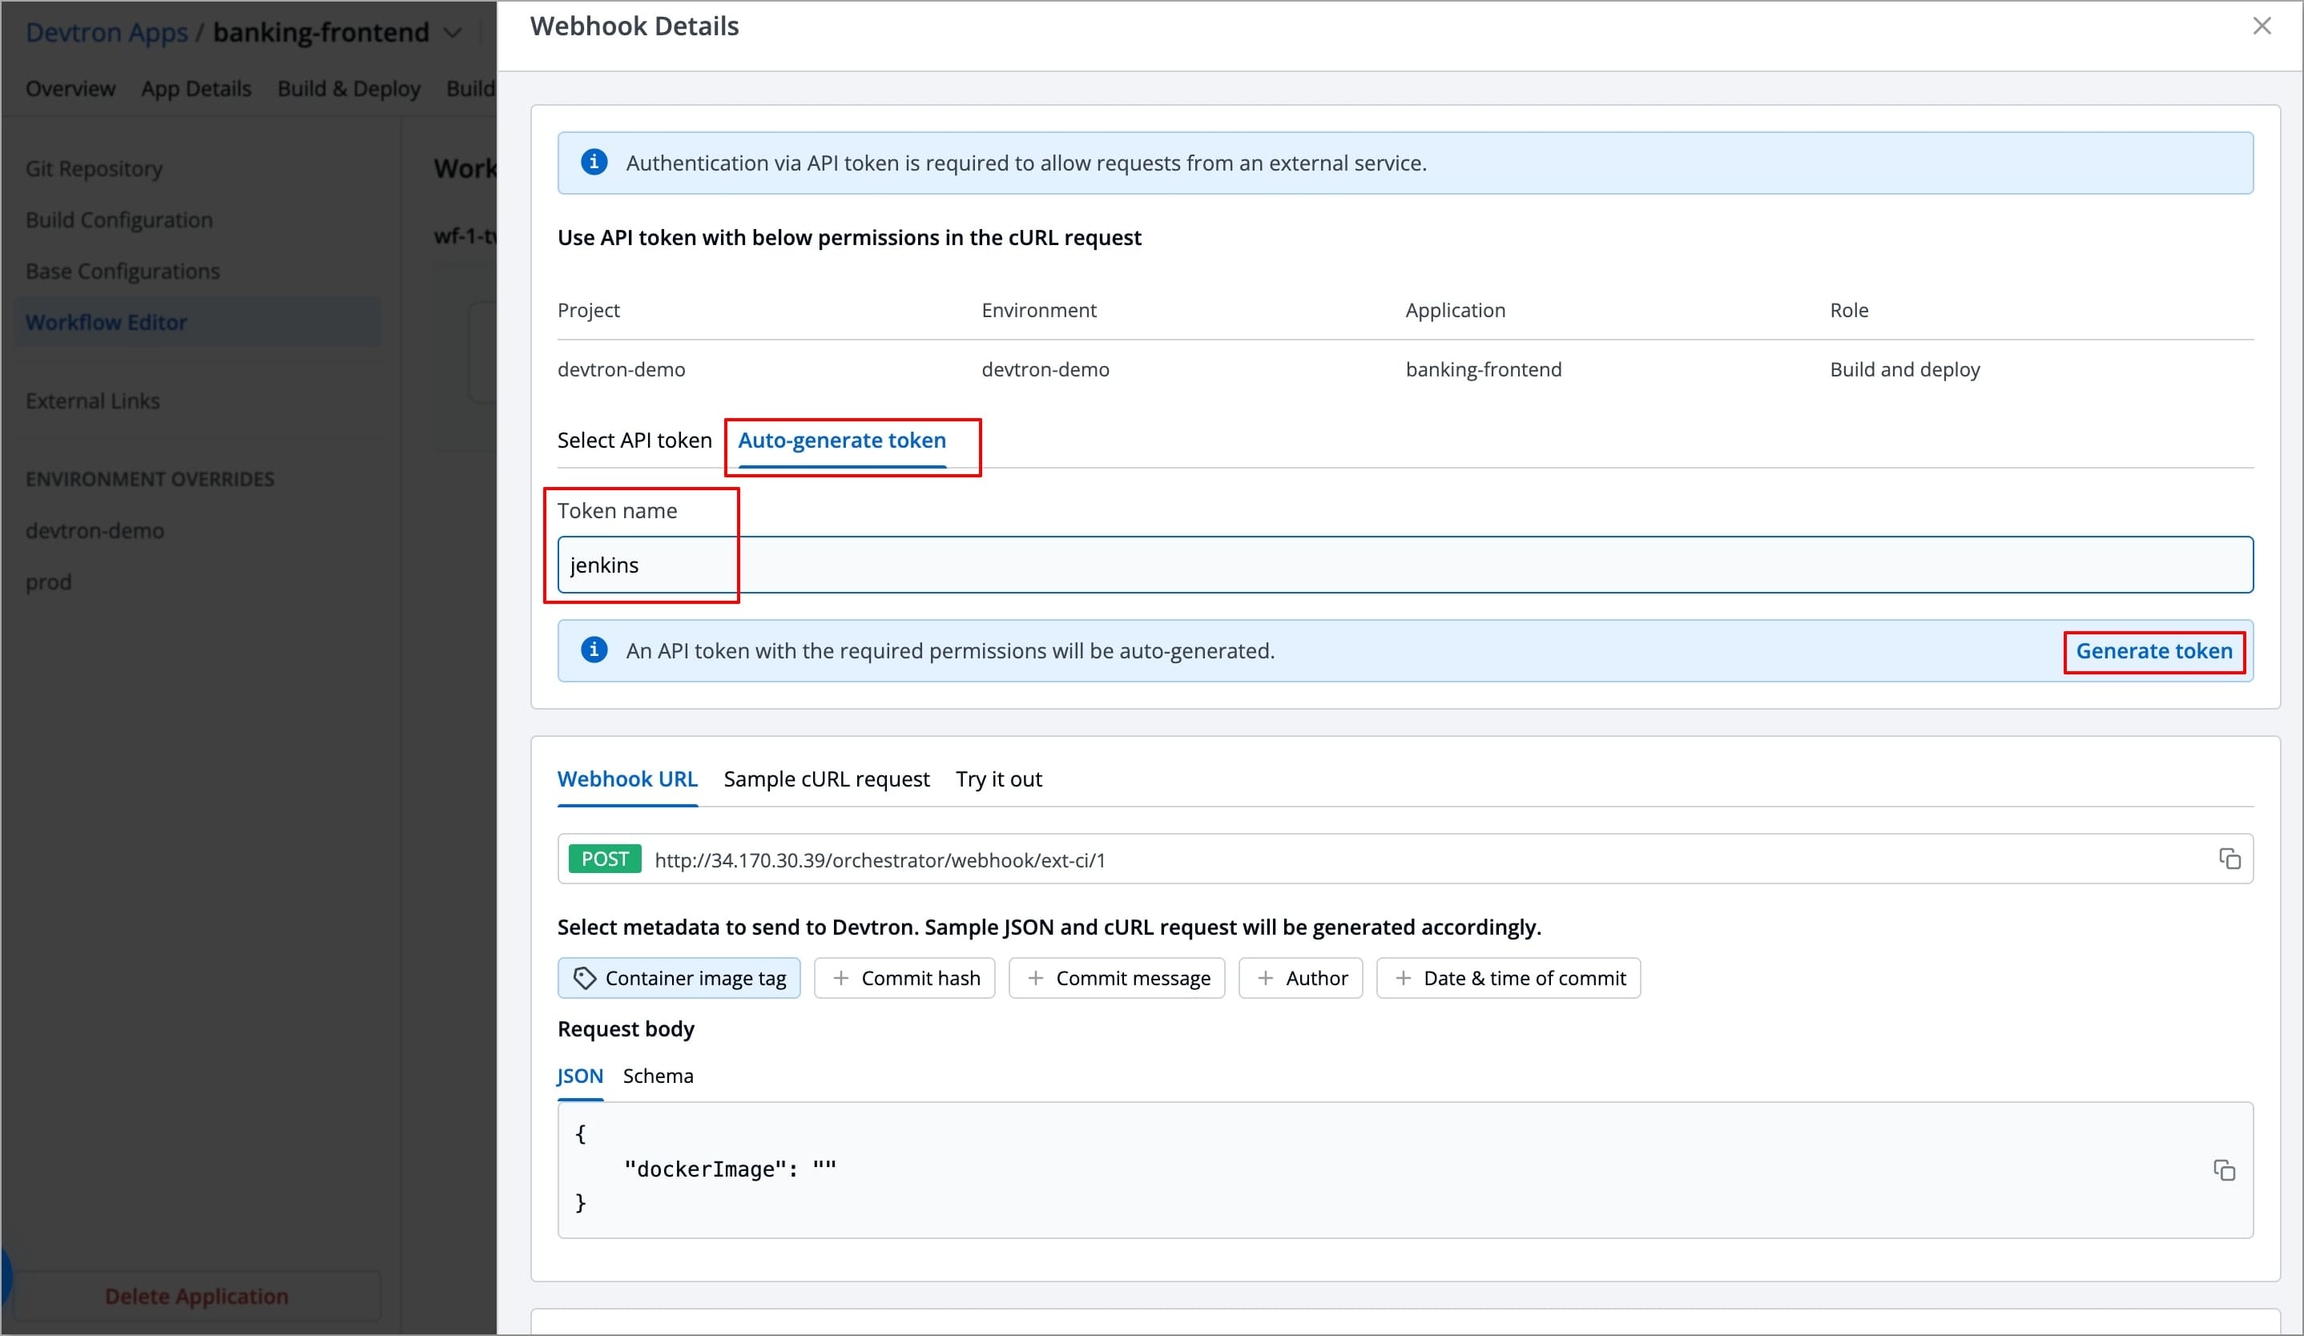
Figure 27a: Generating API Token 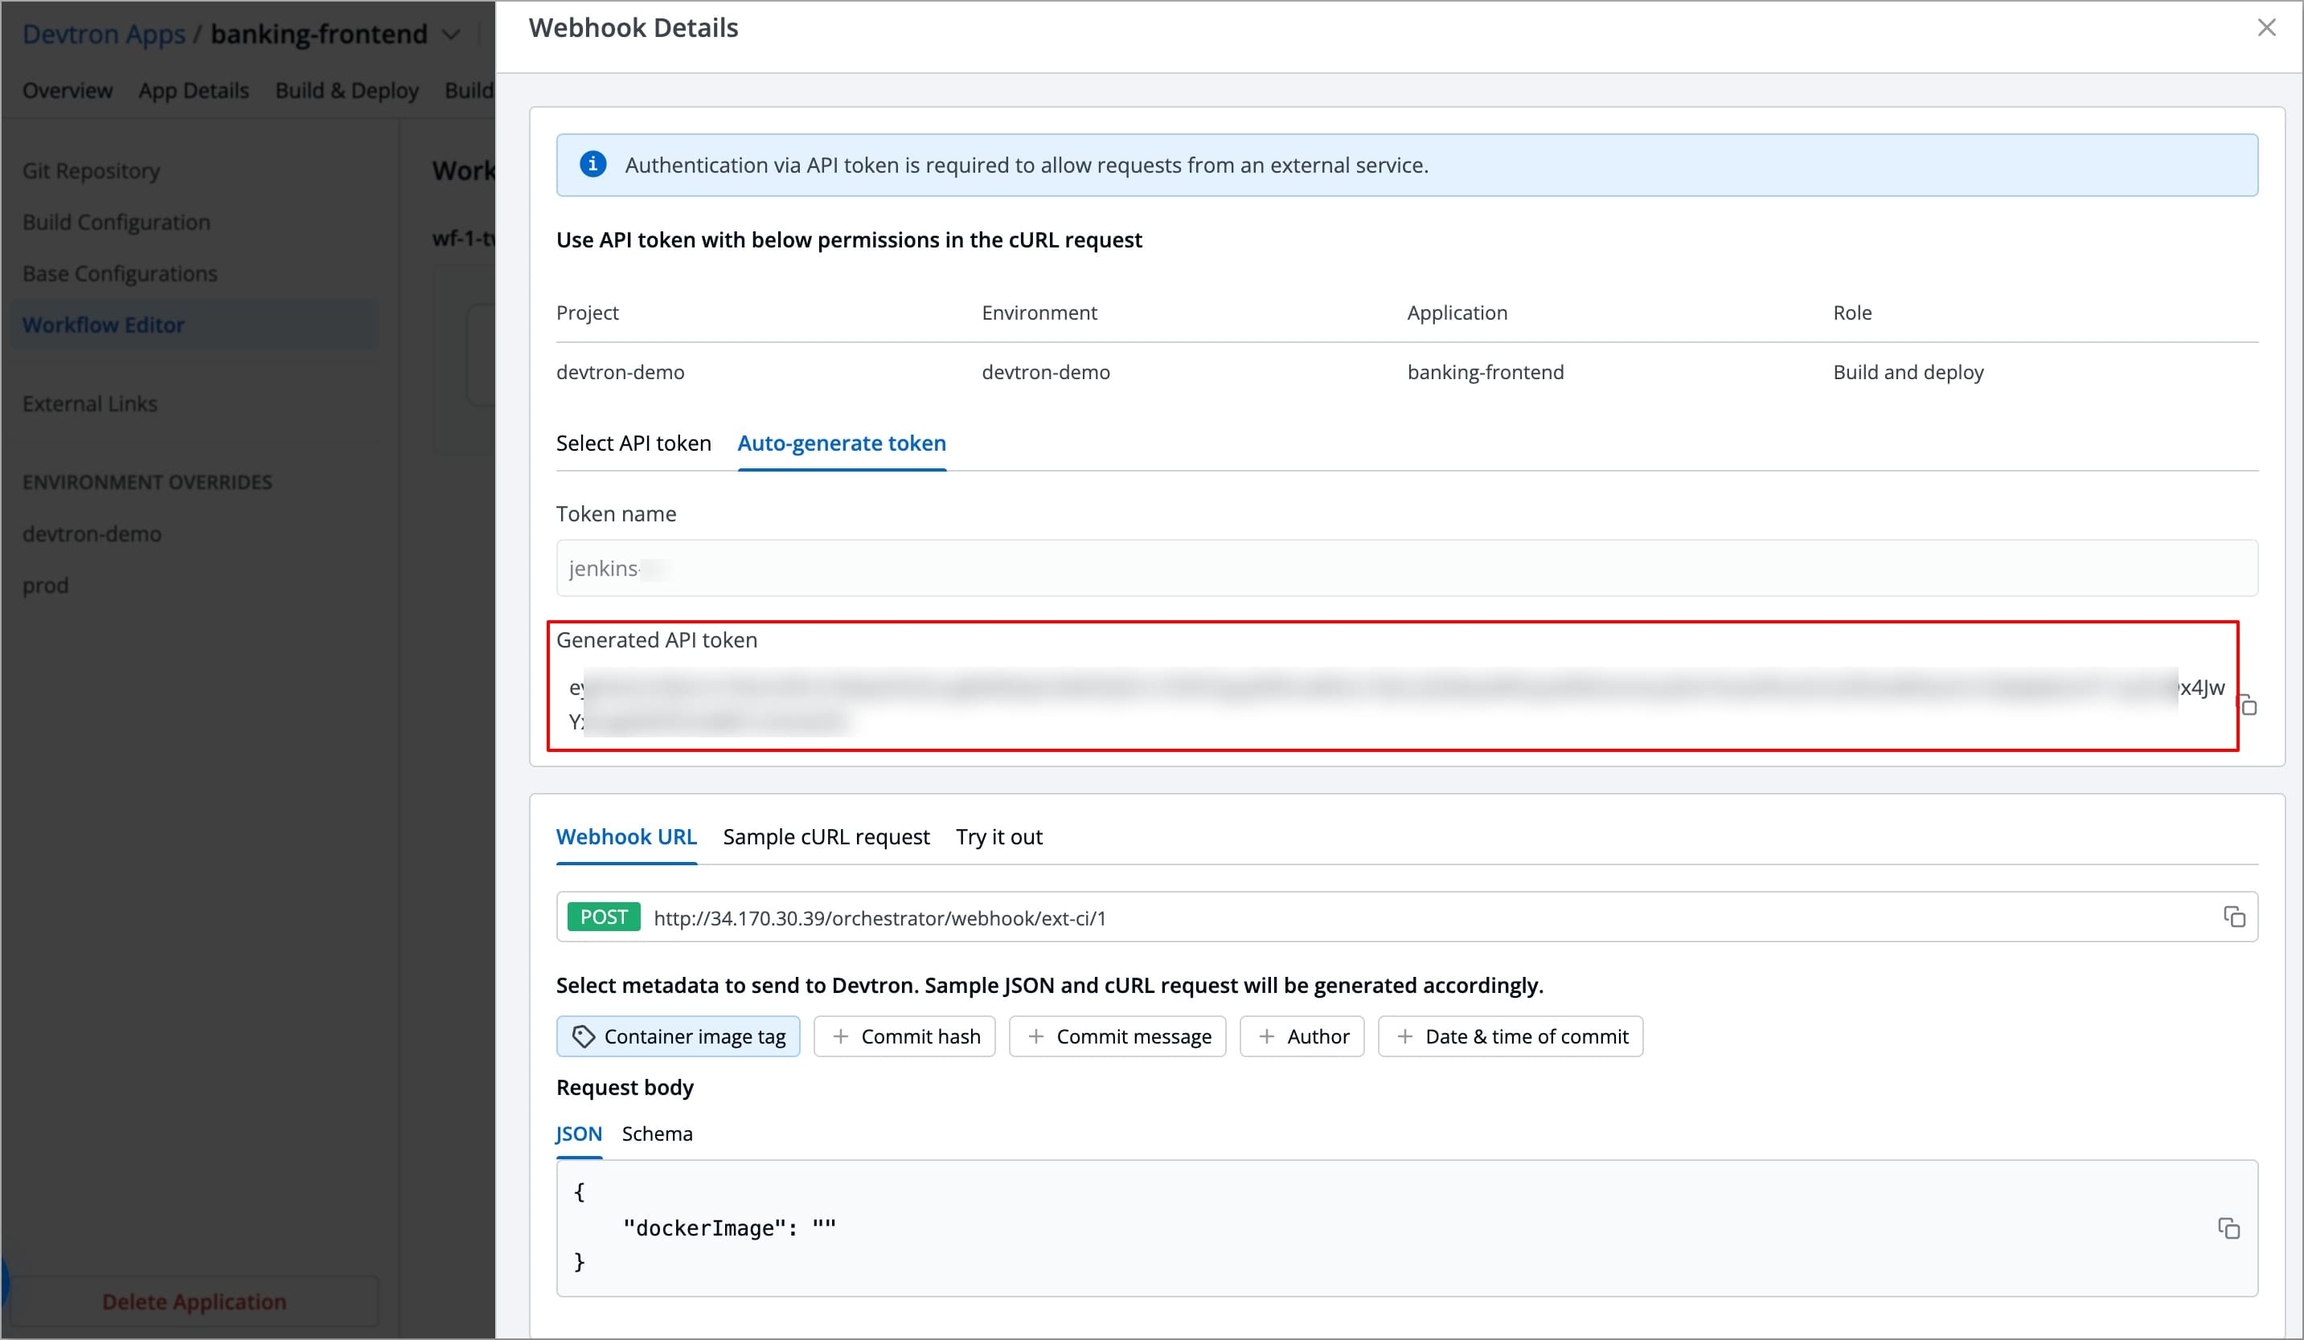
Figure 27b: API Token Generated
After generating an API token, click Sample cURL request and select the metadata you want to send to Devtron. Sample JSON and cURL request will be generated accordingly.
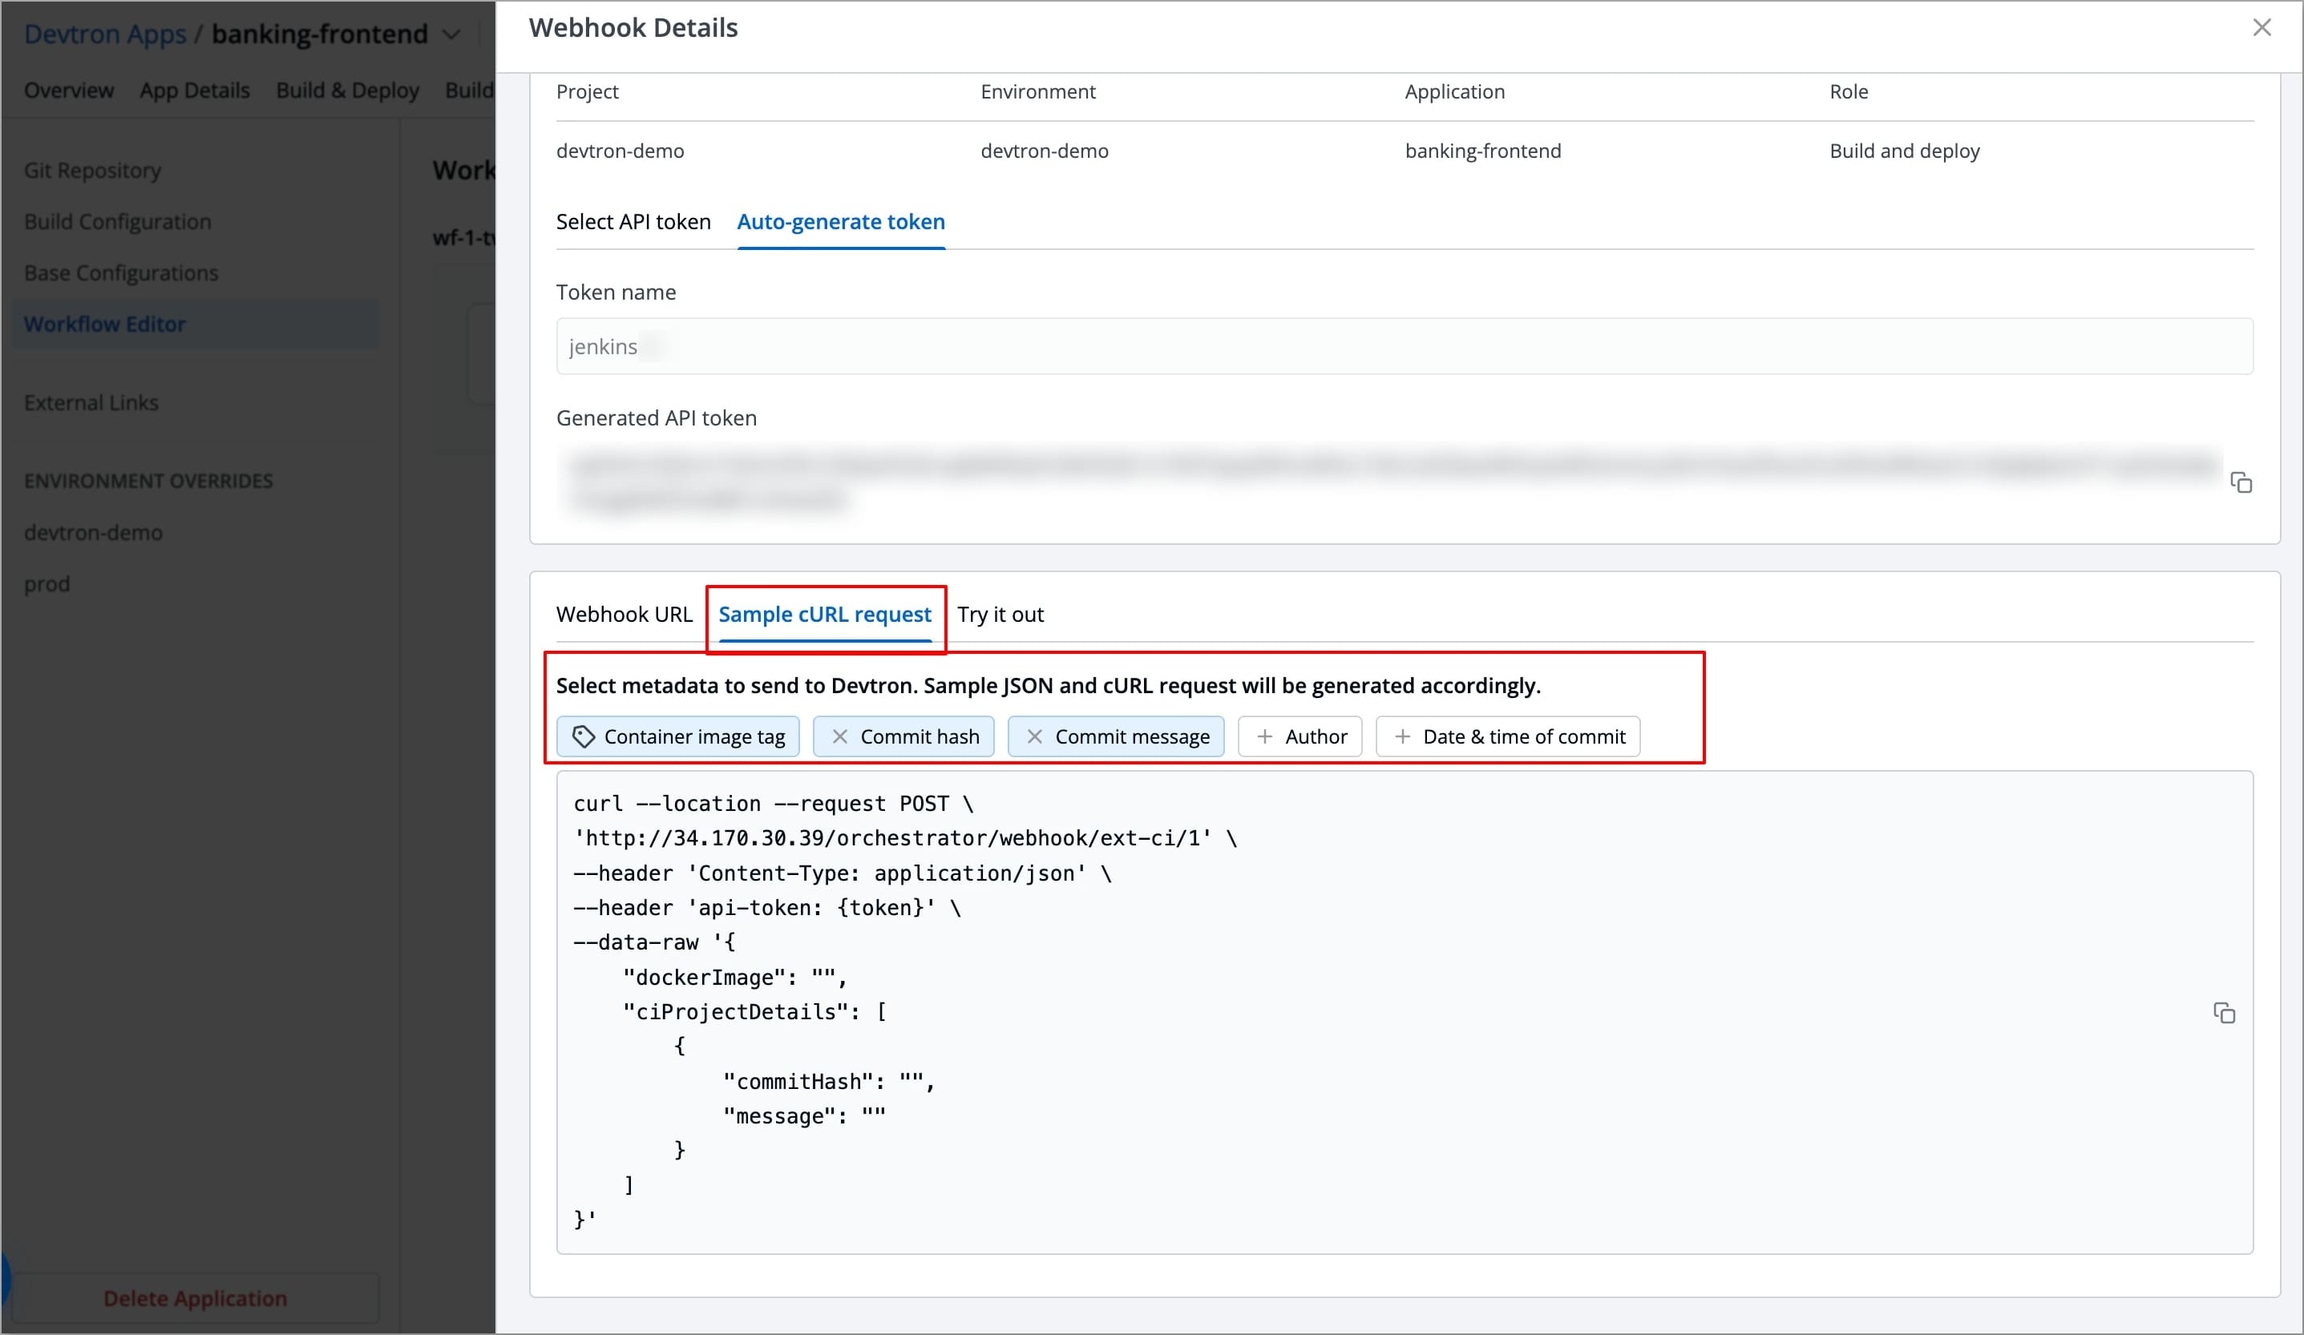
Figure 28: Getting sample cURL request and selecting metadata Copy the Sample cURL request and integrate it into your External CI (Jenkins) pipeline along with the API token and tag for Docker Image. Refer to Integrate with External Sources to know more.

Figure 29: Copying Sample cURL request After integrating the webhook, whenever the external CI pipeline is triggered and generates an image, the webhook will automatically send the image details to Devtron for deployment.
Integrate with External Sources - Jenkins
To integrate Webhook with your Jenkins project/pipeline, you need to add a new step/stage in your project/pipeline.
Before adding the stage/step, you need to add the API token provided by Devtron as the secret in Jenkins. To do so, follow the steps below:
Go to Manage Jenkins → Credentials.
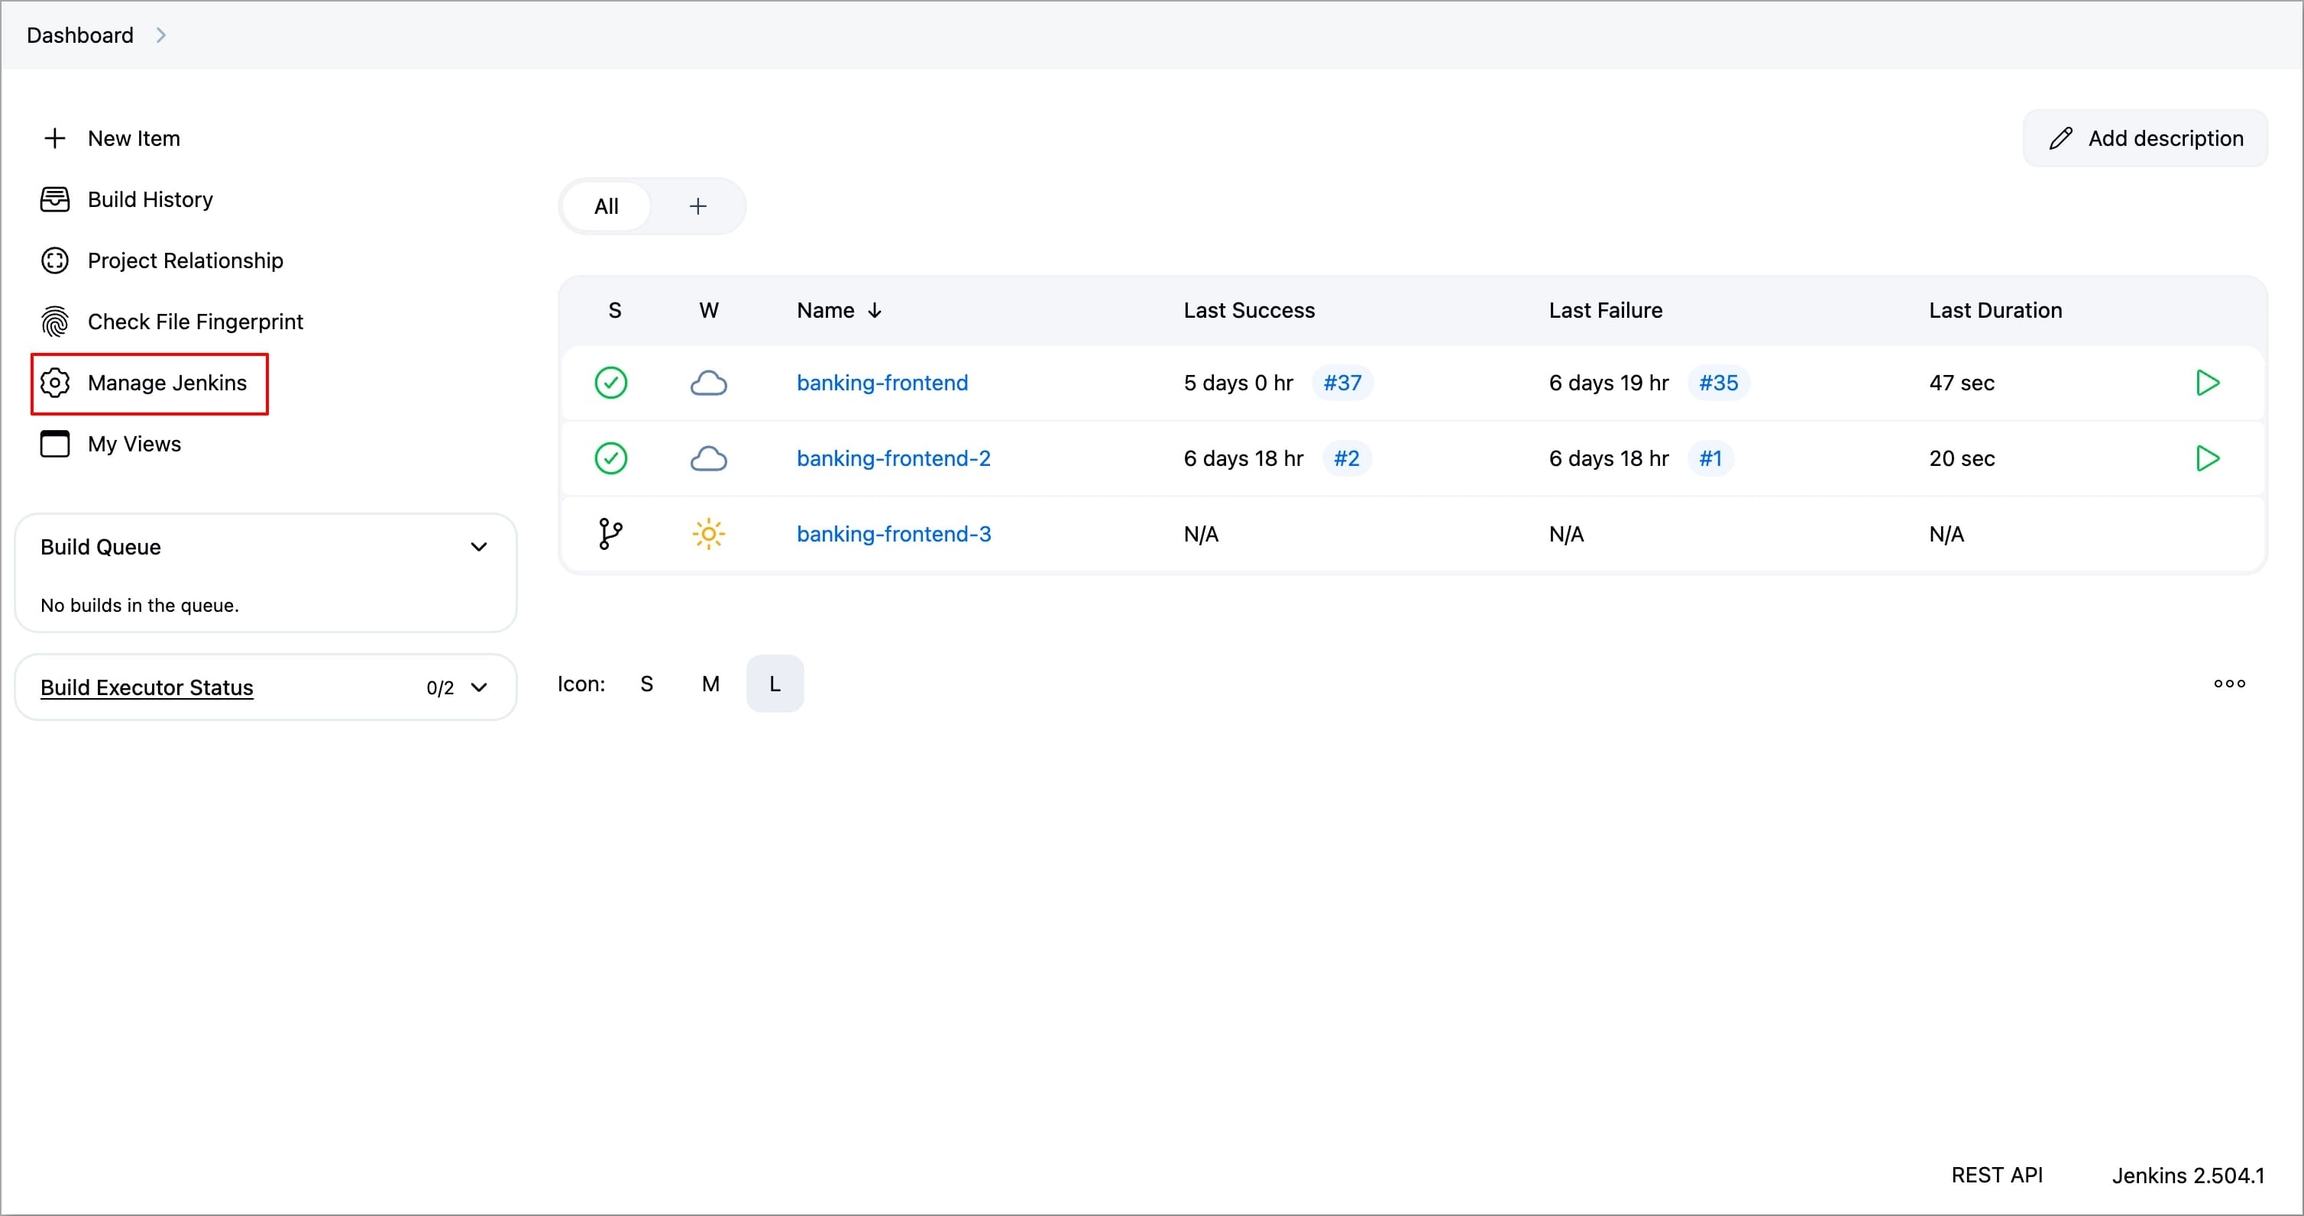
Figure 30a: Selecting 'Manage Jenkins' 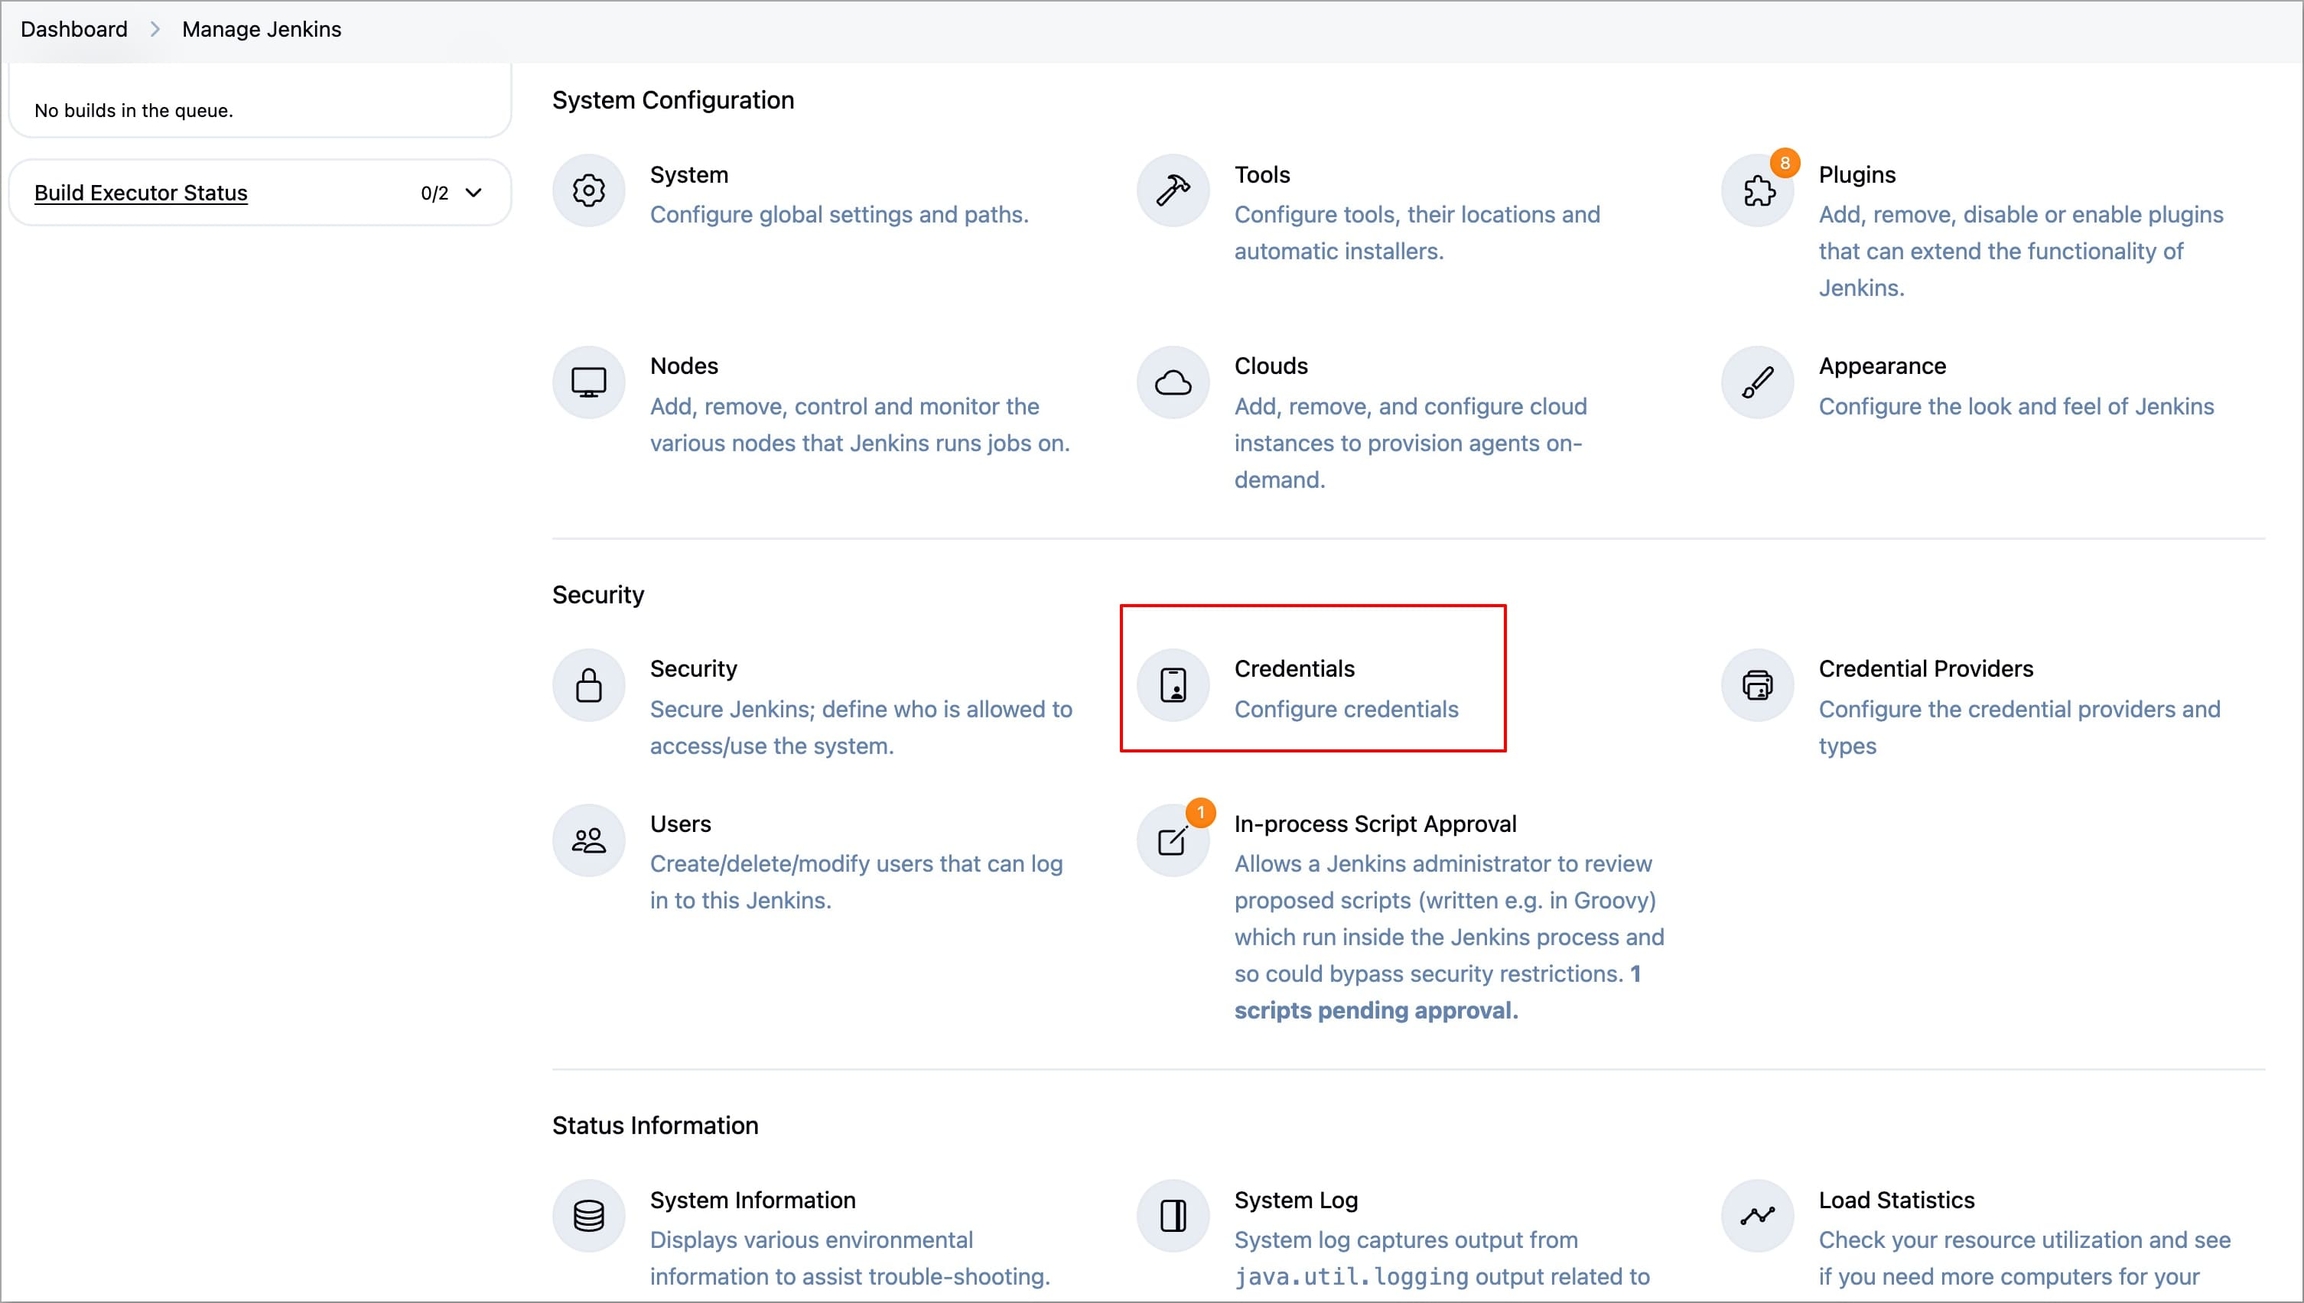
Figure 30b: Selecting 'Credentials' Select System under Stores scoped to Jenkins → Global credentials (unrestricted) → +Add Credentials.
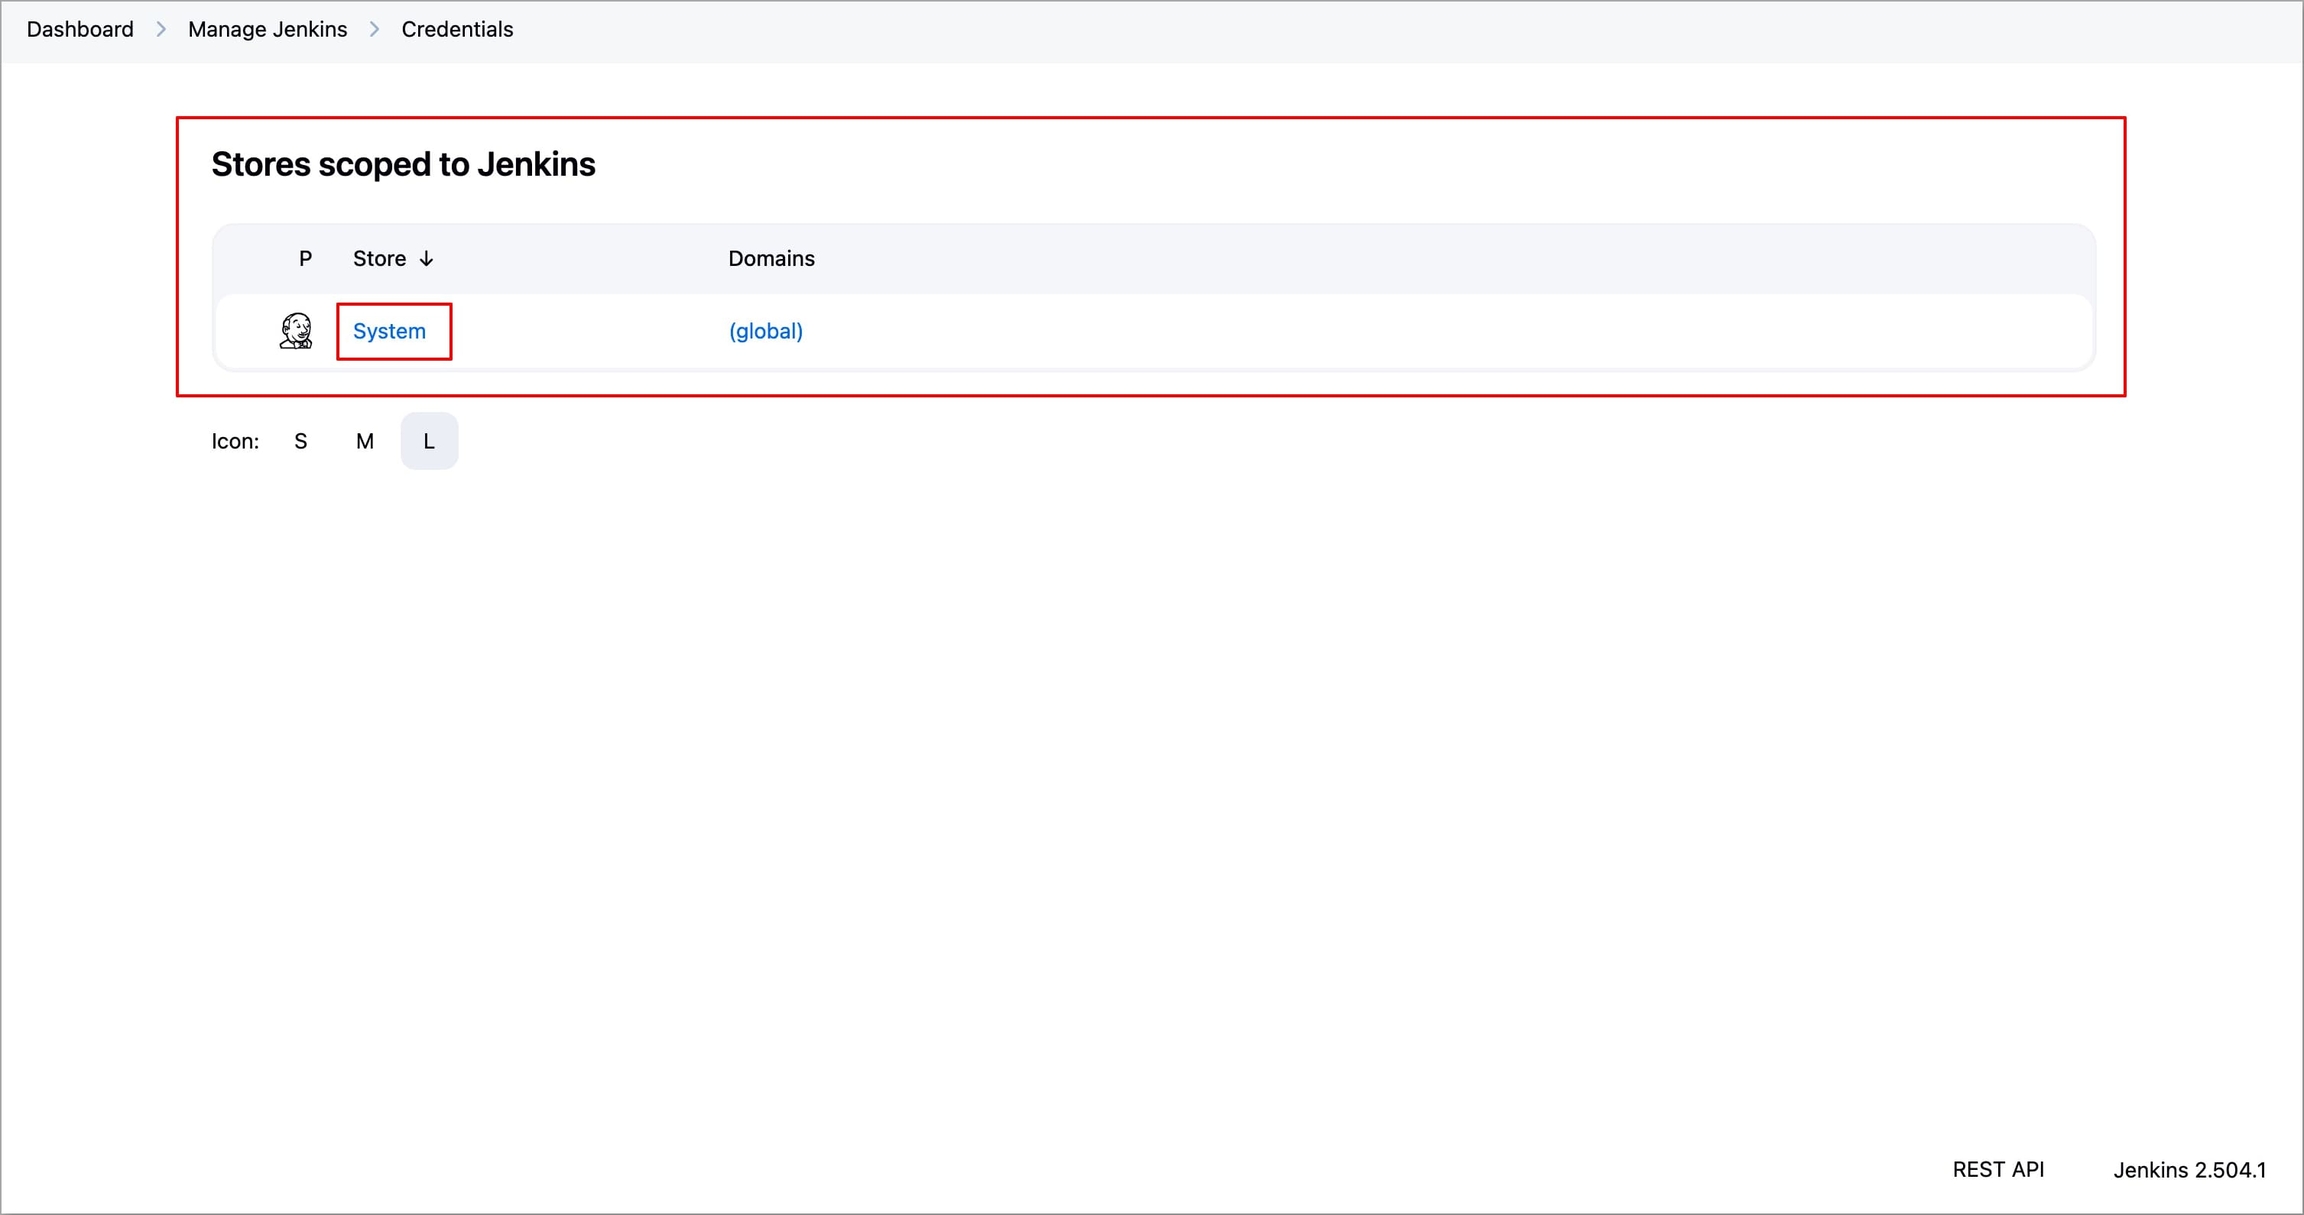
Figure 31a: Selecting 'System' under 'Stores scoped to Jenkins' 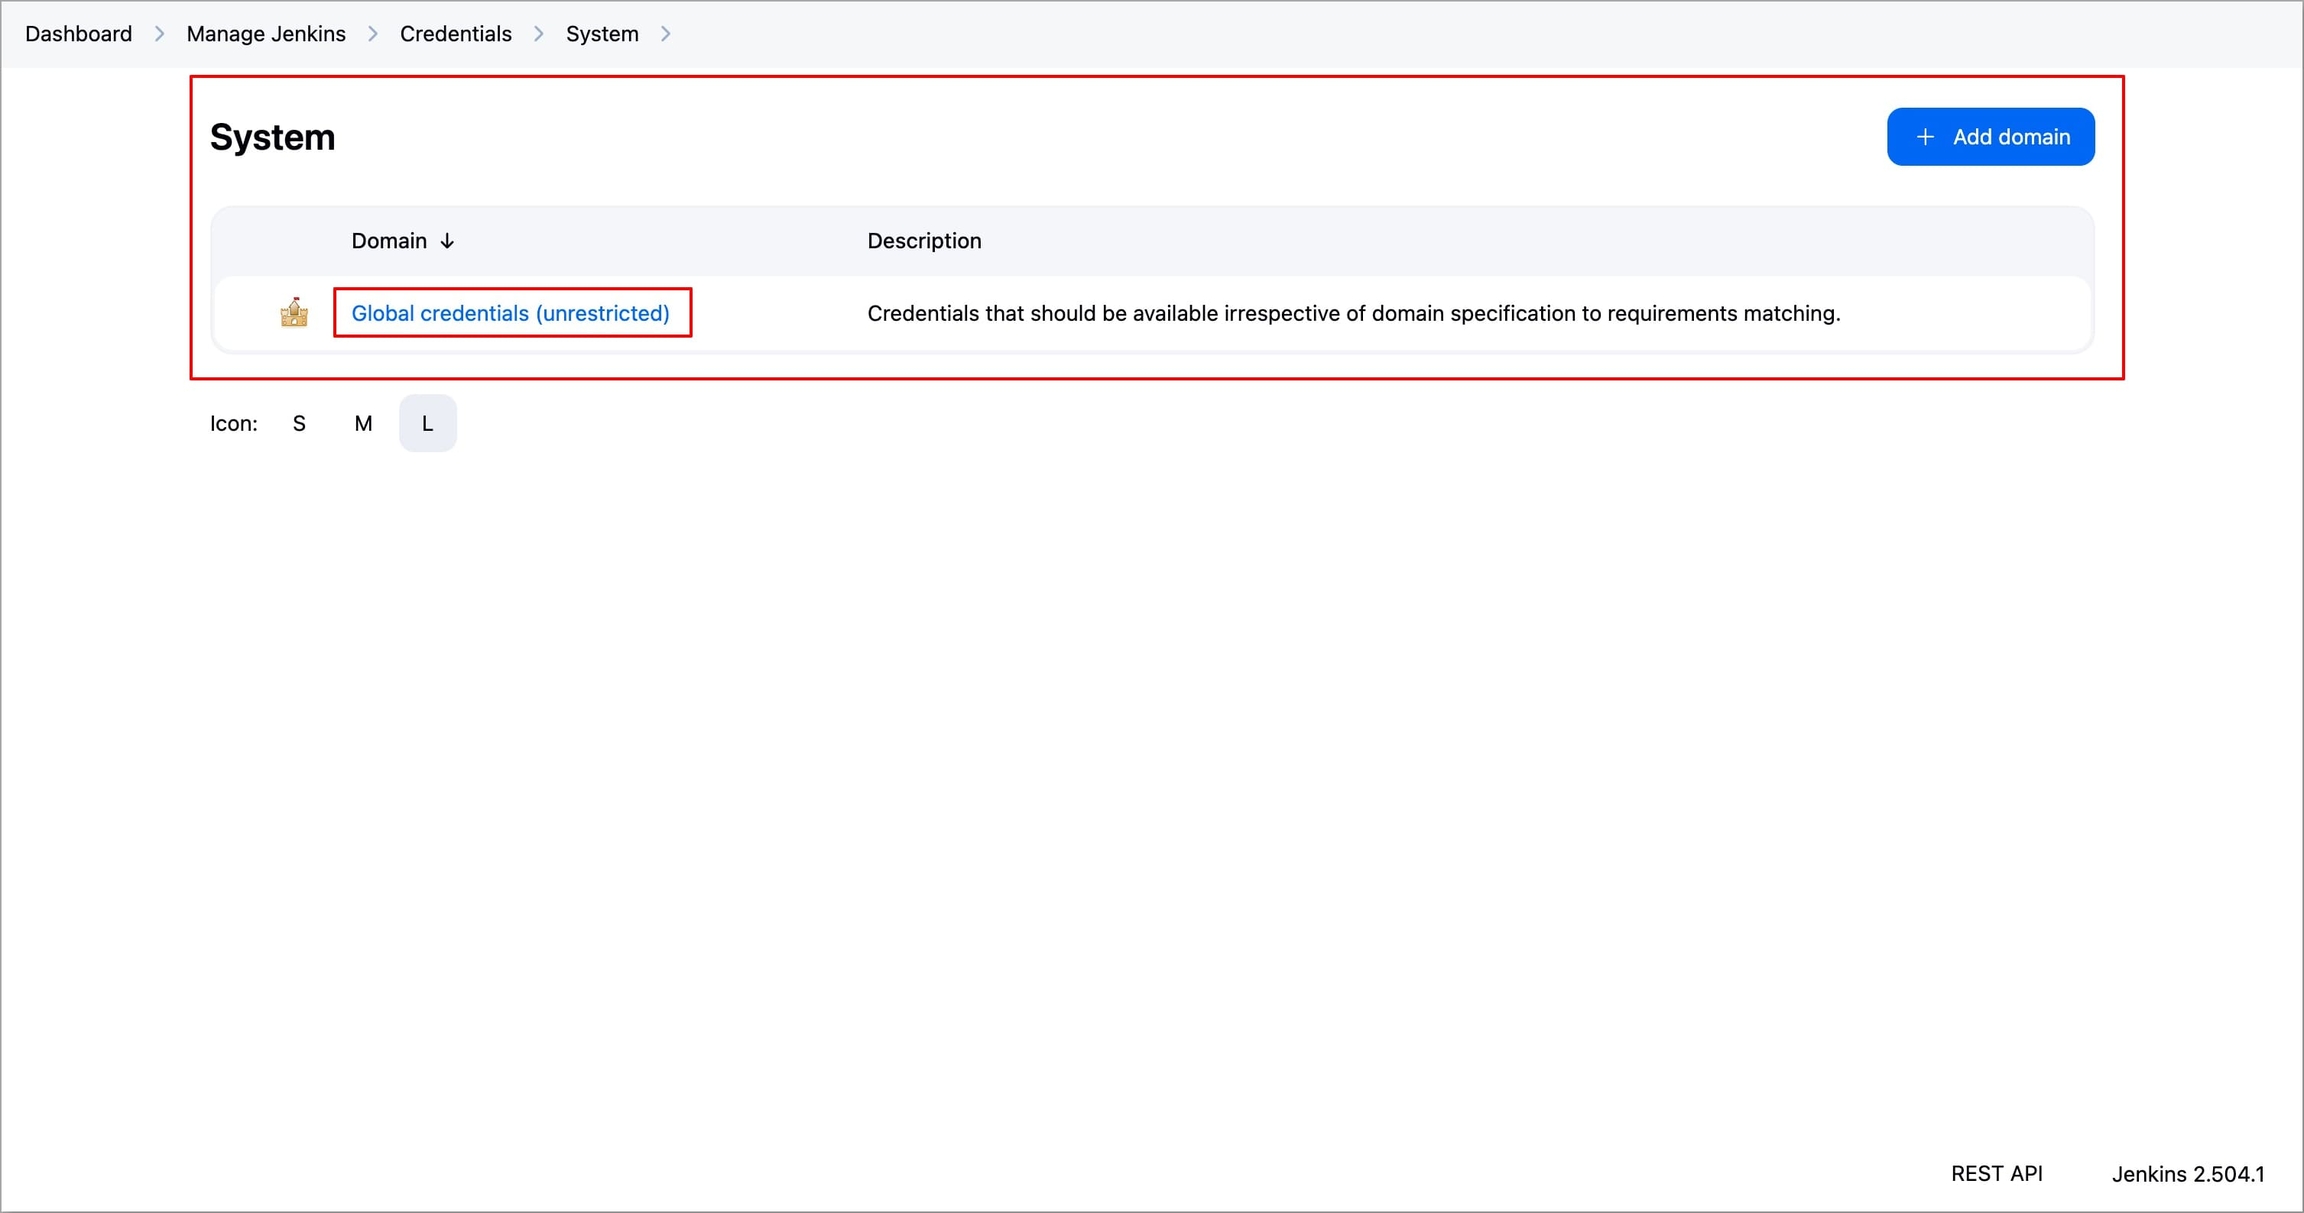
Figure 31b: Selecting Global credentials (unrestricted) 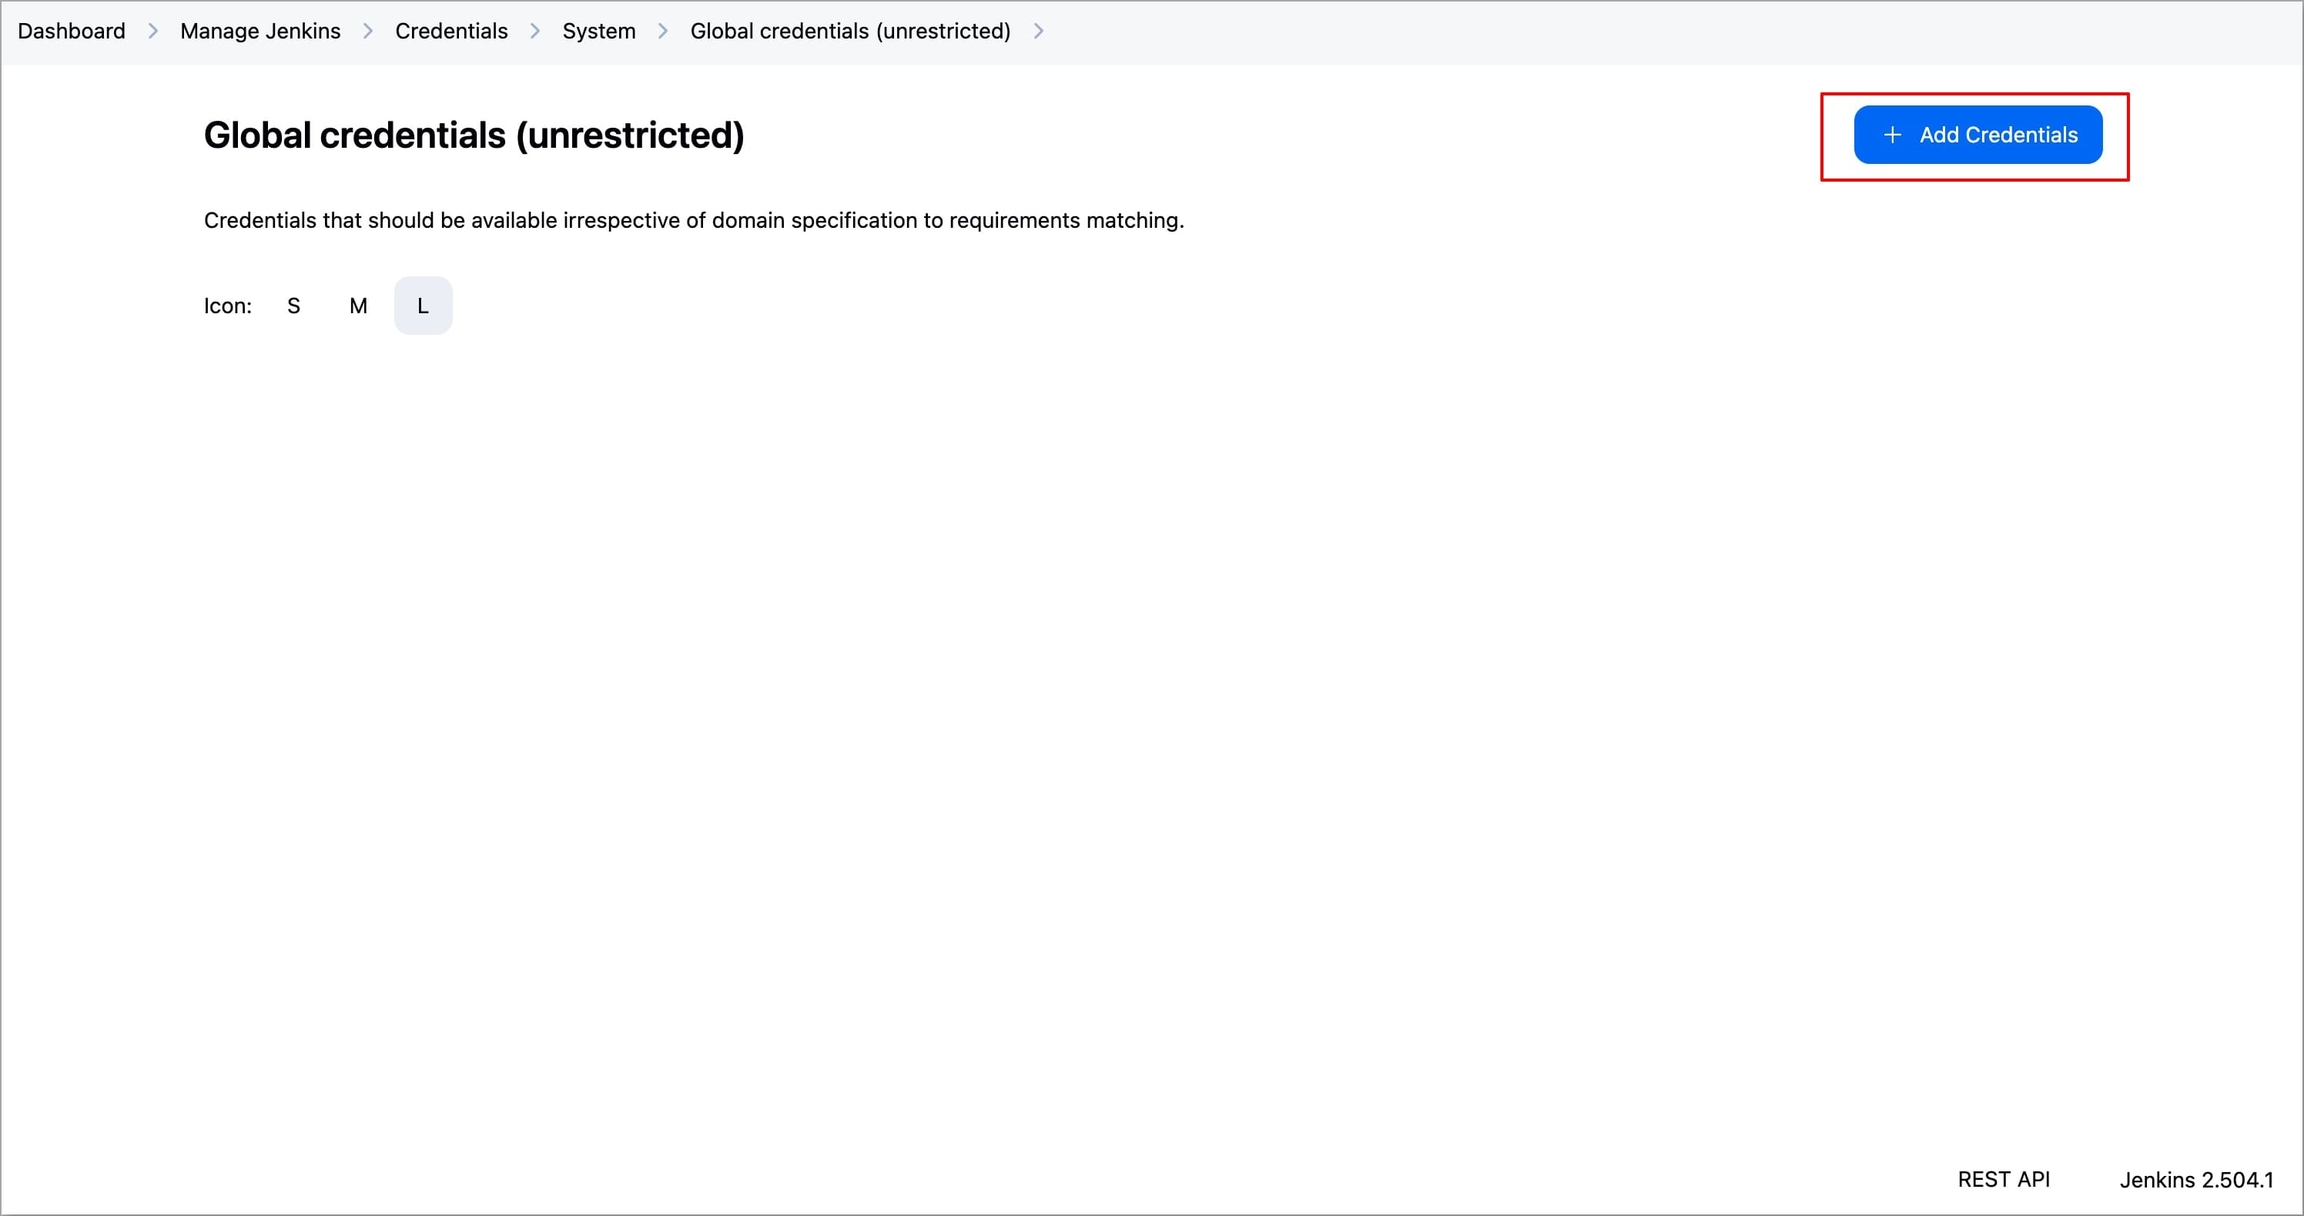
Figure 31c: Selecting 'Add Credentials' Select
Secret textin the Kind field and select the required ScopeEnter the API Token generated from Devtron in the Secret field.
Provide a
ID(devtron-token) in the ID field. If left blank, Jenkins will automatically generate an ID for the credential.If you want you can also provide an optional description in the Description field.
Select Create to create the secret in Jenkins.
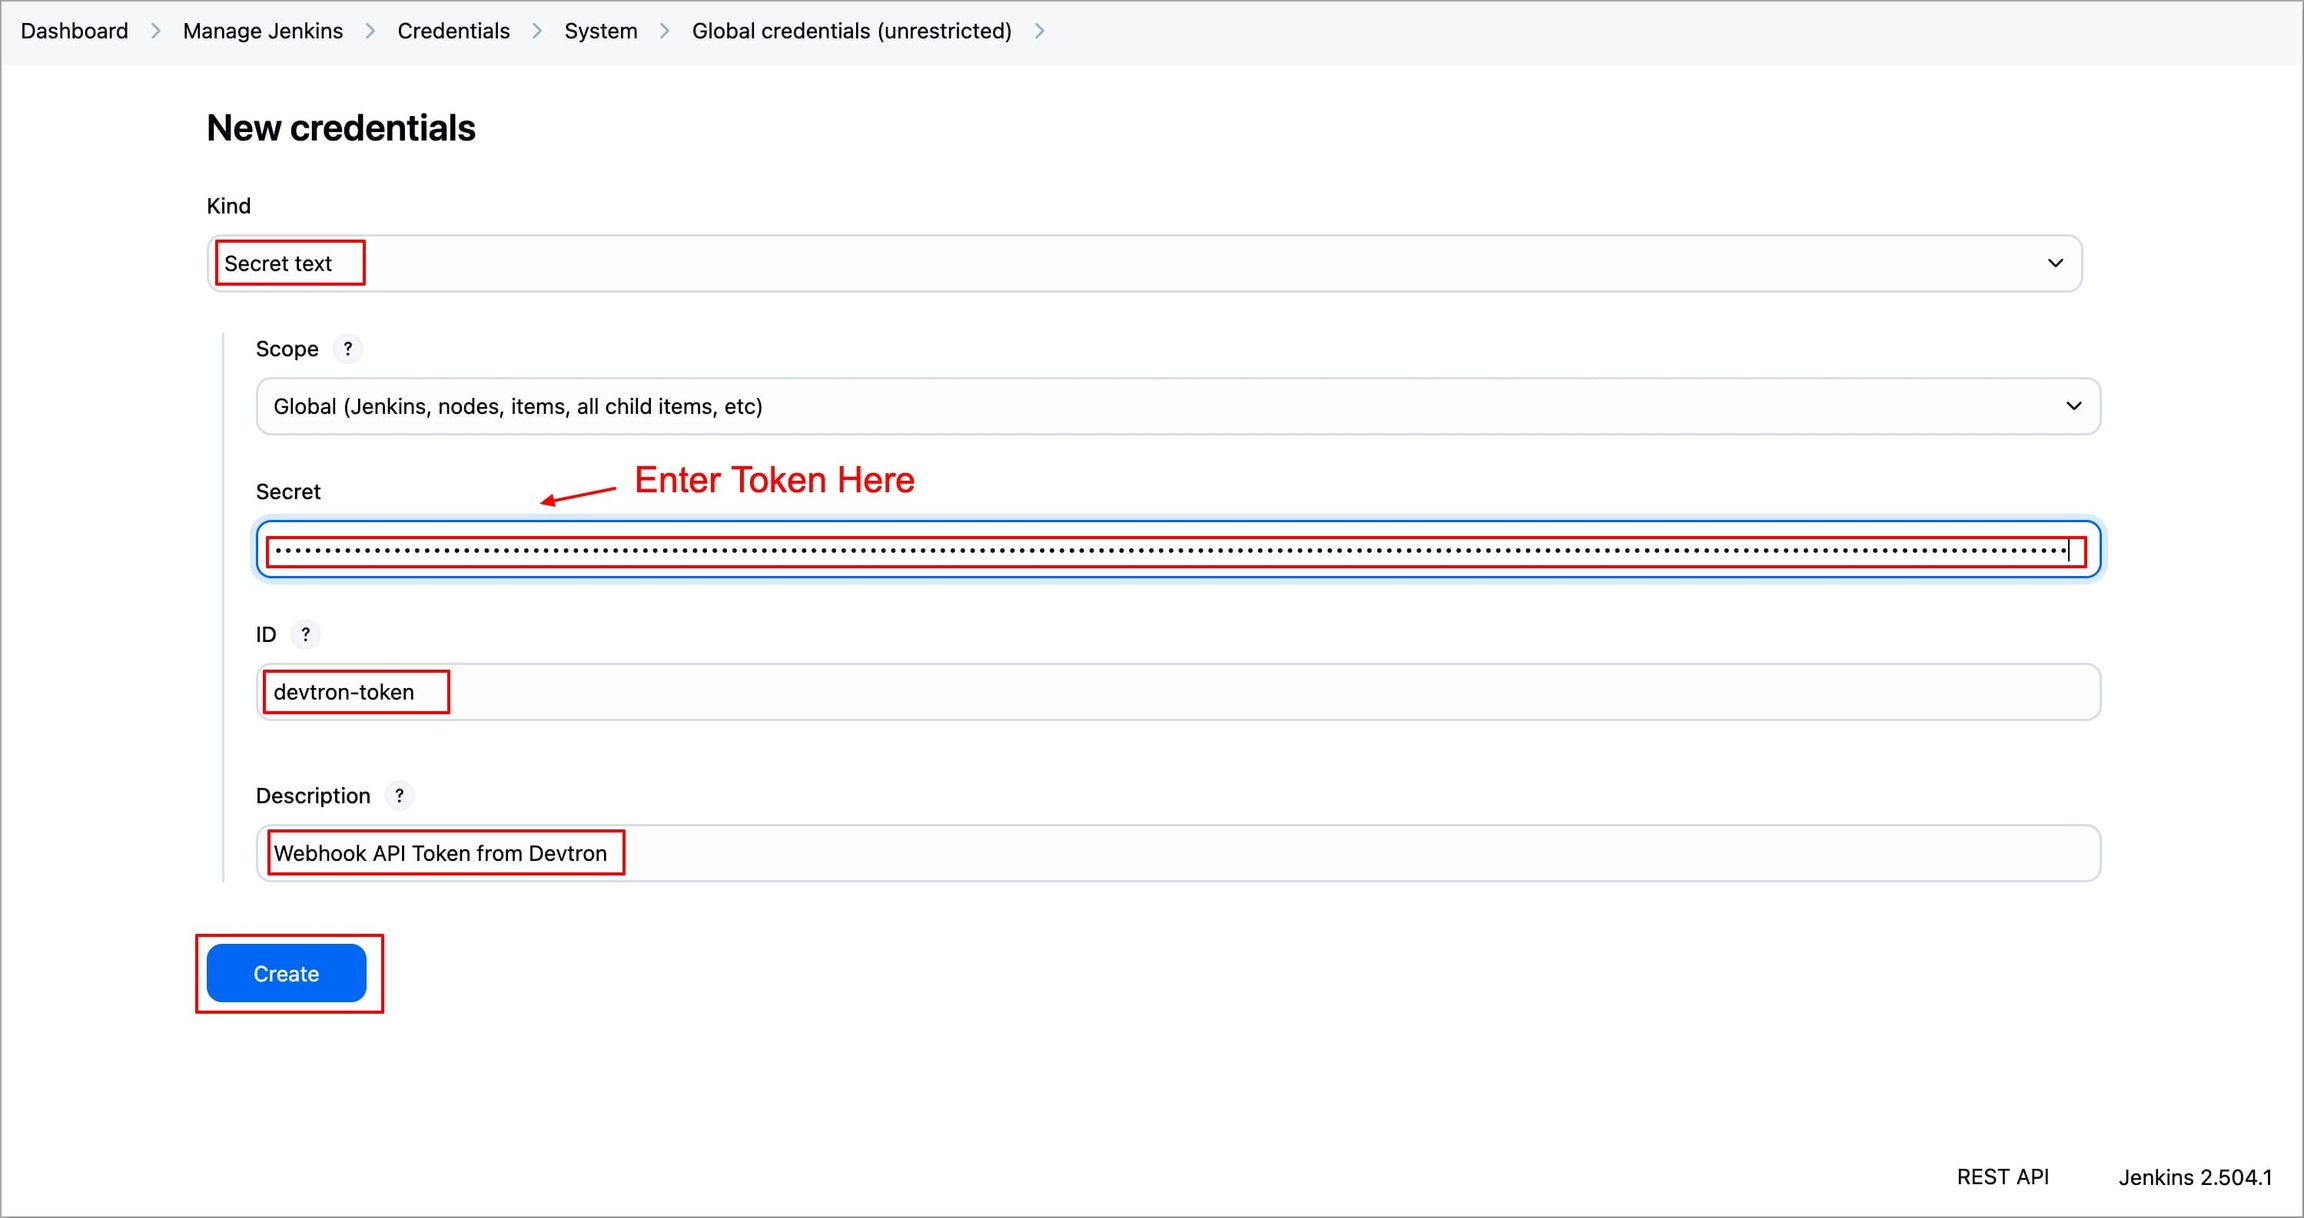
Figure 32a: Adding Credential 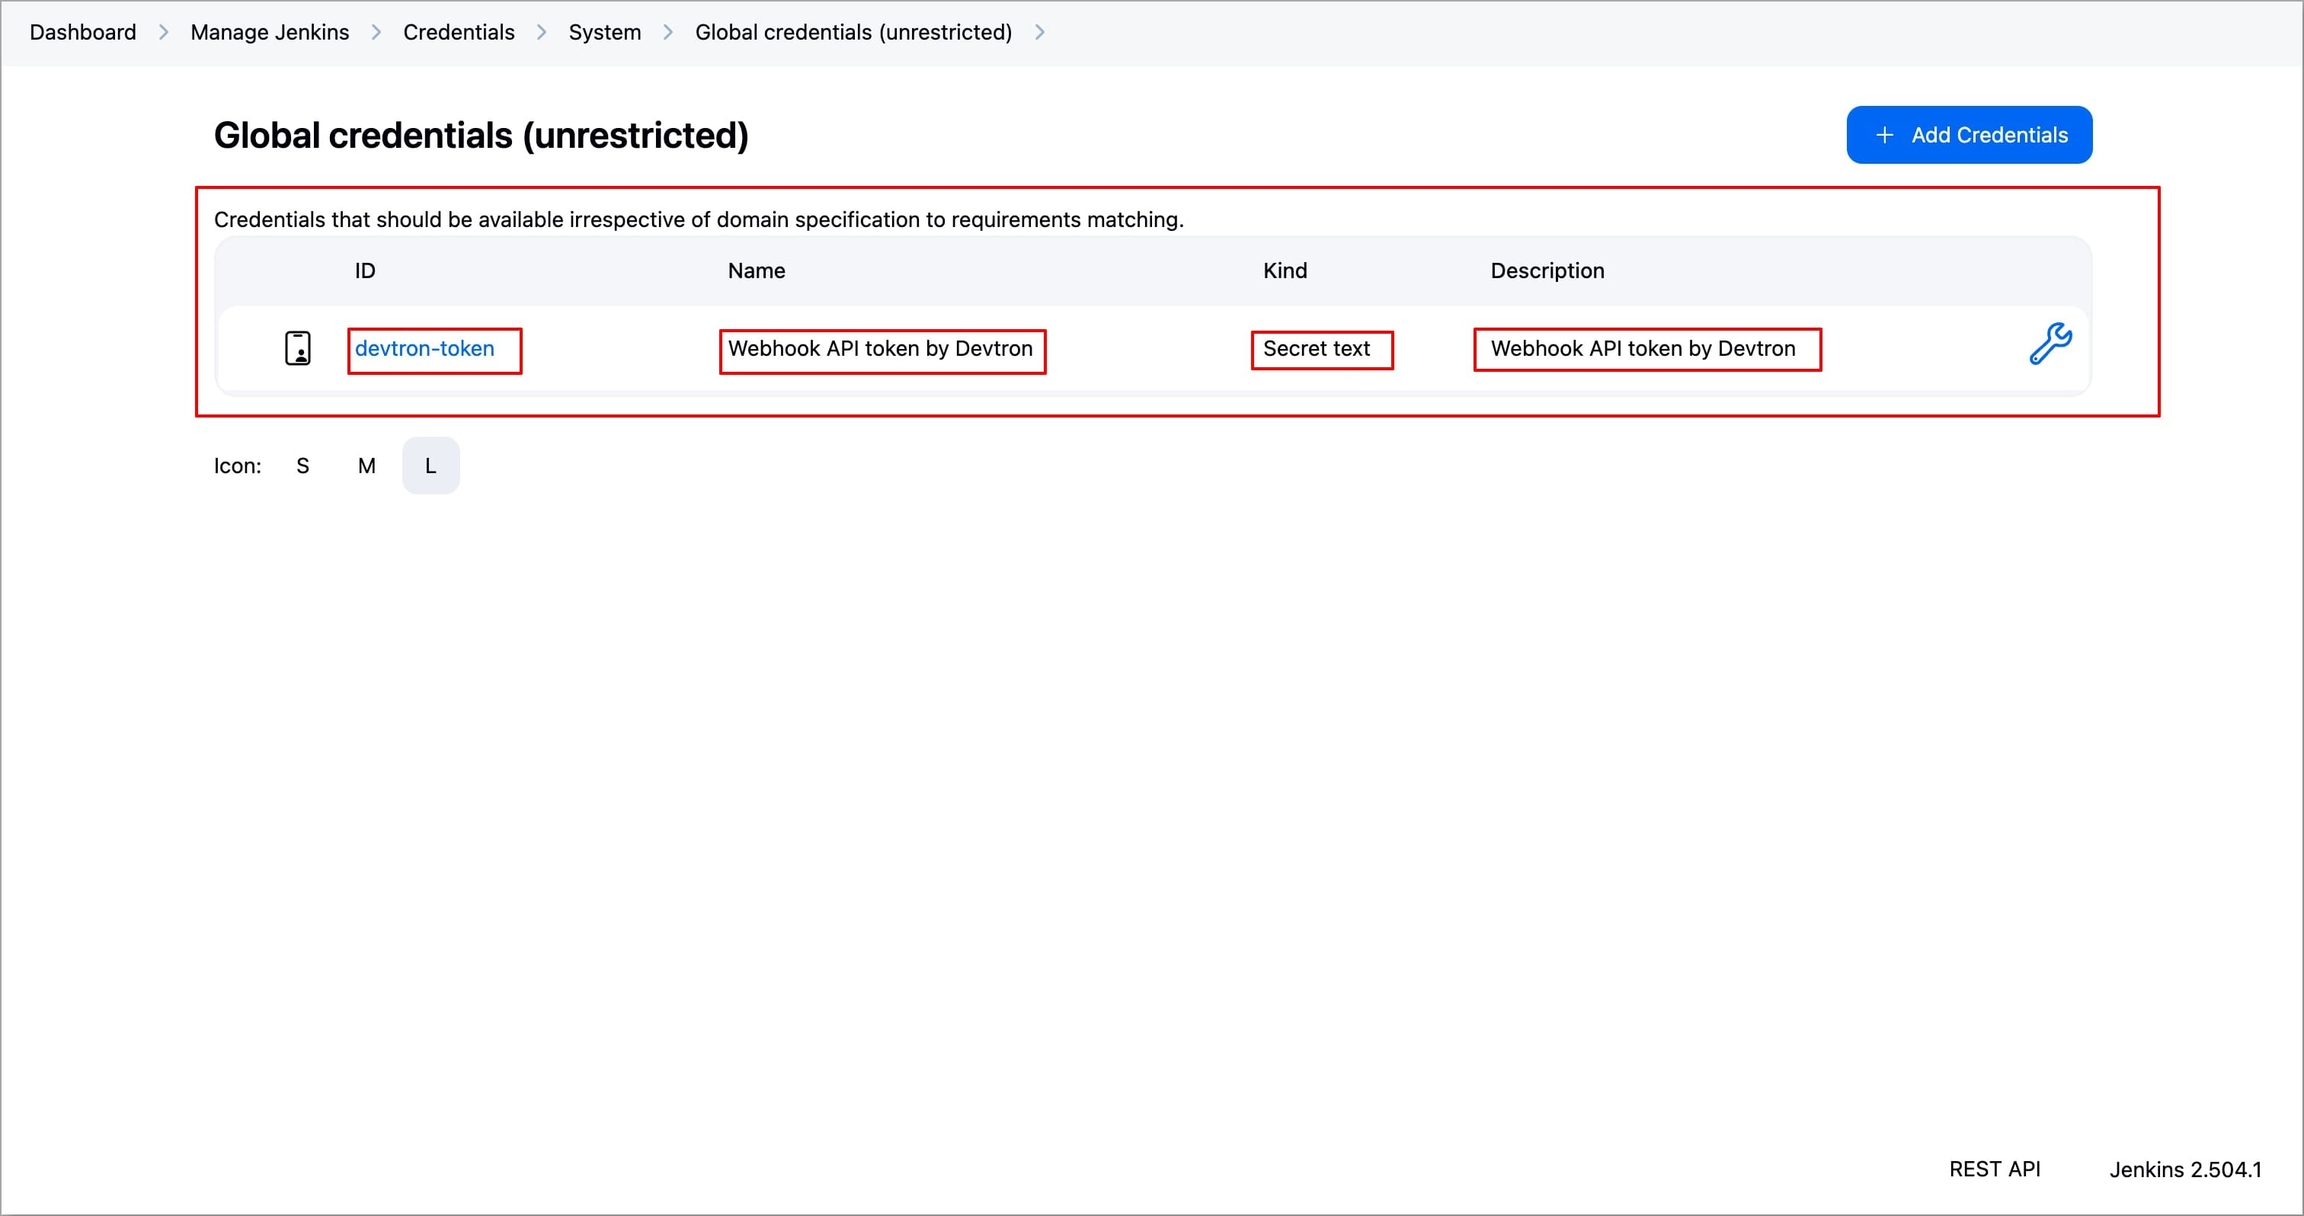
Figure 32b: Credential Added
After adding the API token as a secret, add a new step/stage in your Jenkins project/pipeline.
In case your Jenkins project is of type freestyle, follow the steps below:
Select the Jenkins project in which you want to integrate the Webhook.
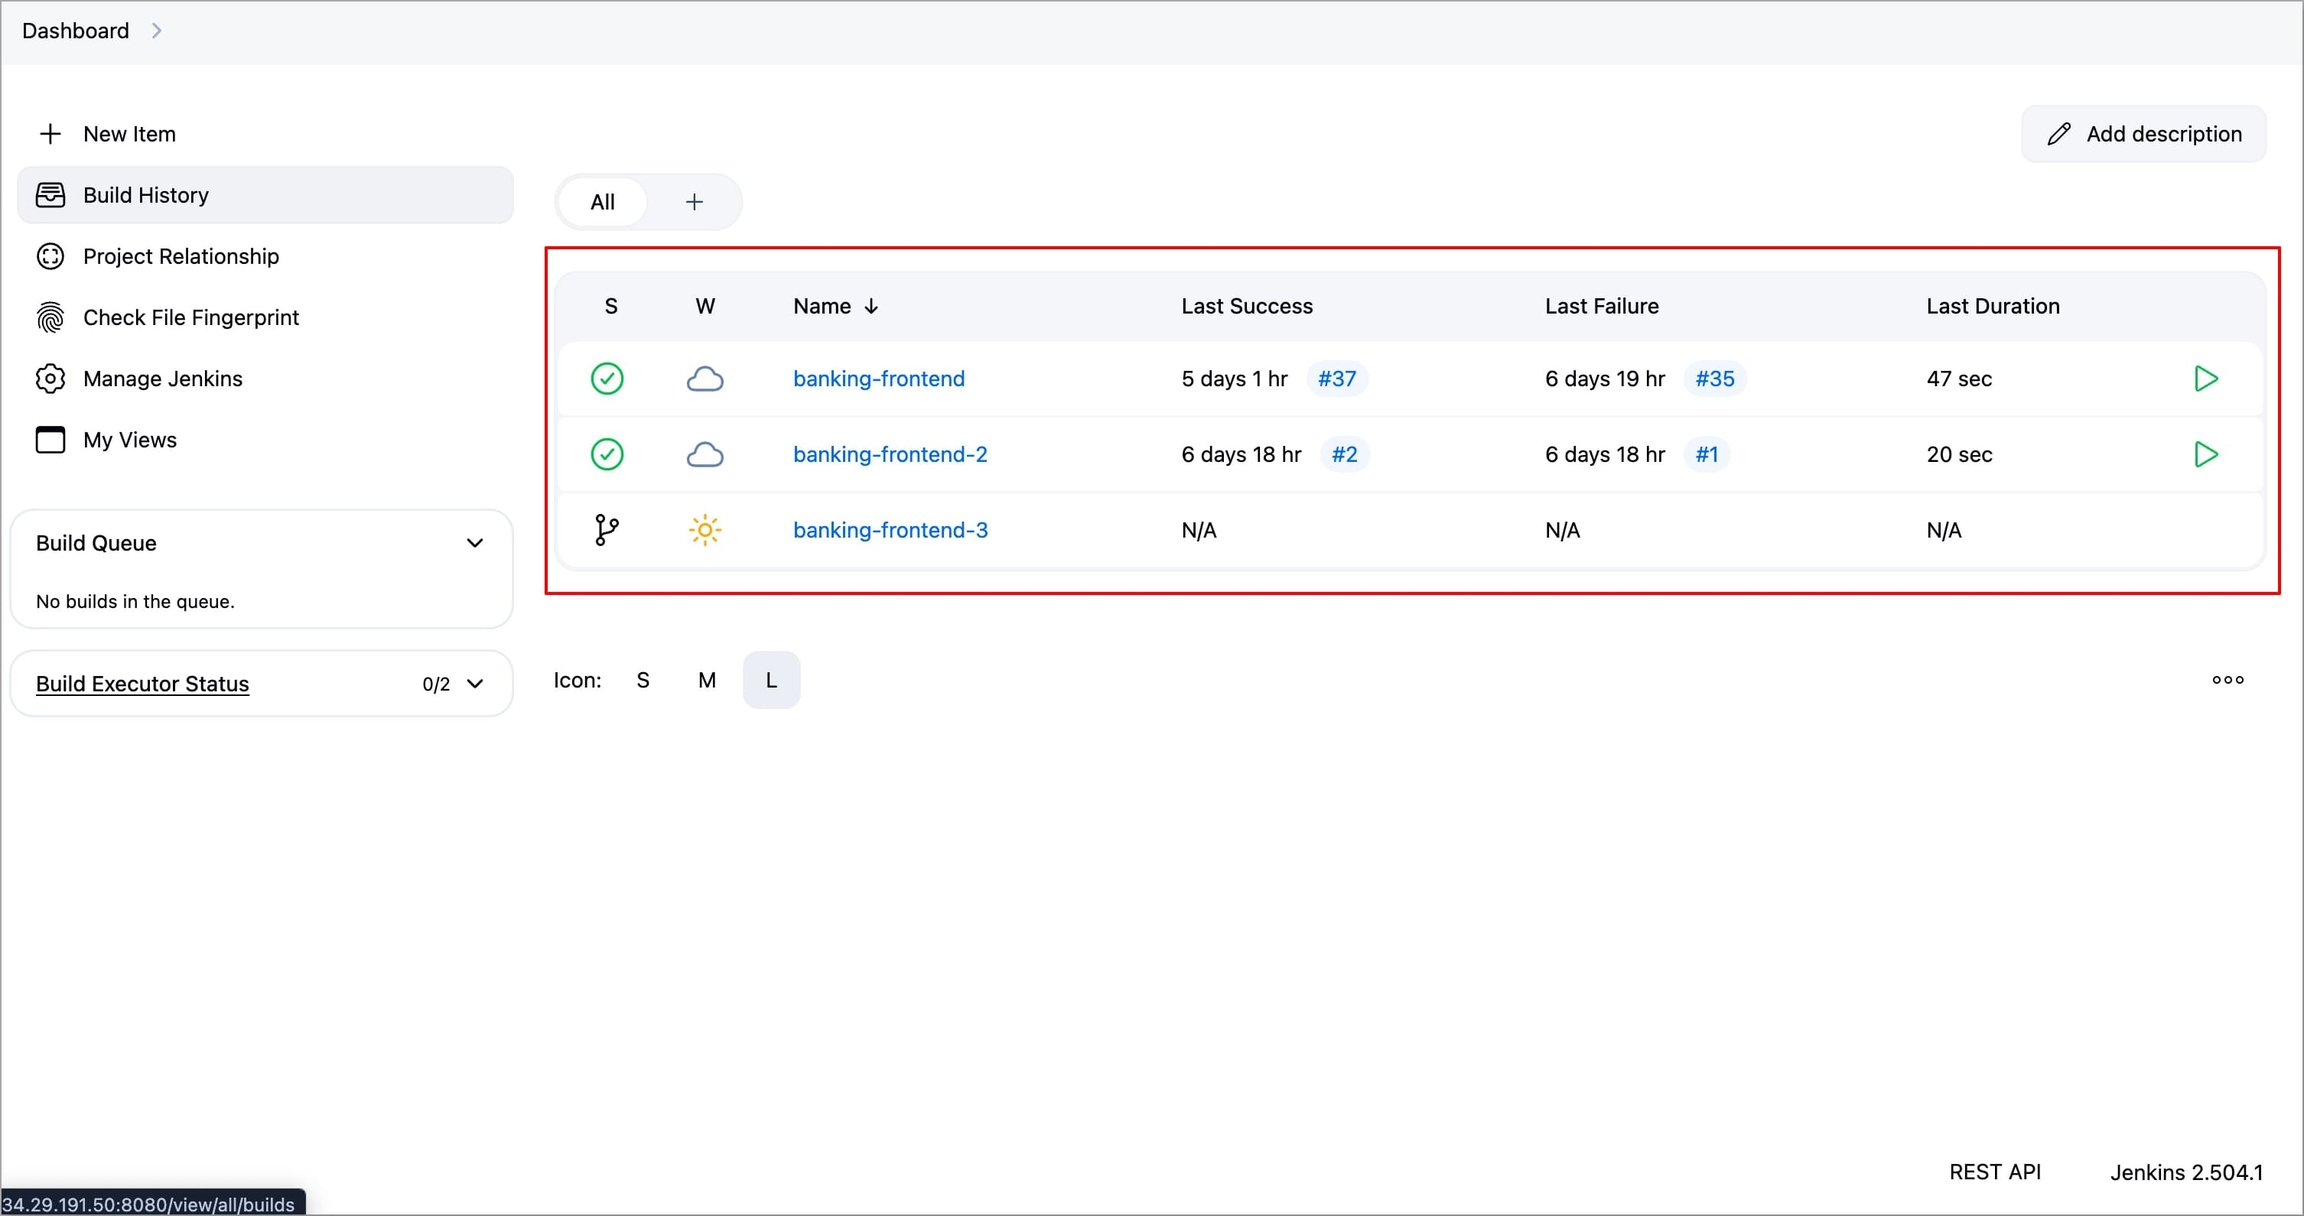
Figure 33: Selecting Jenkins Project Go to Configure → Environments and enable the Use secret text(s) or file(s) option.
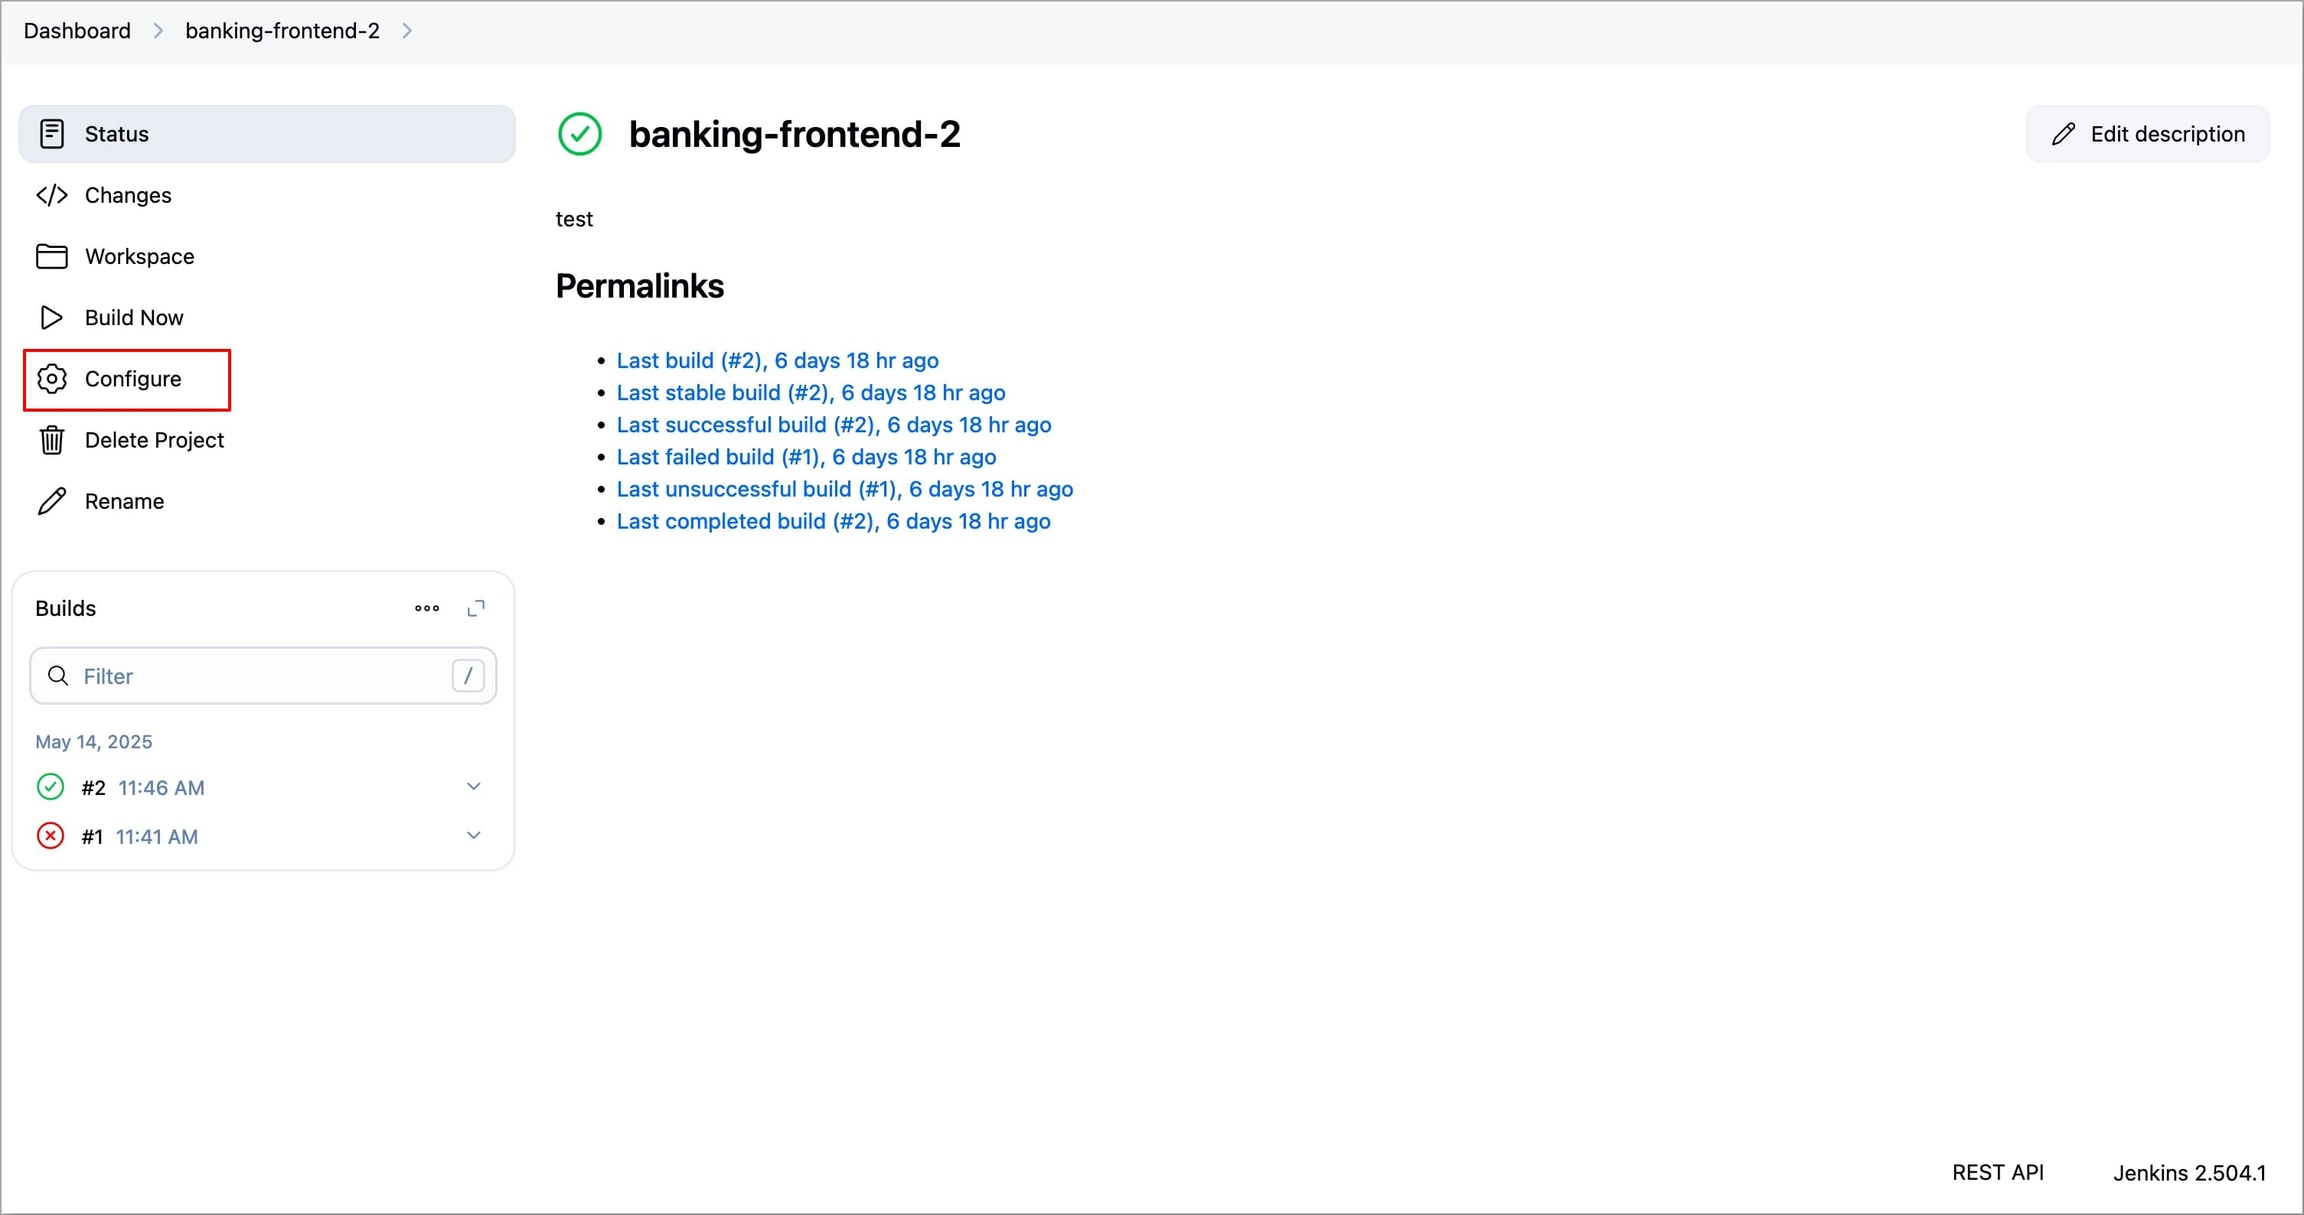
Figure 34: Selecting 'Configure' Click Add under Bindings and select Secret Text.
Provide a variable name (eg.,
DEVTRON_TOKEN) for the secret in Variable field. This variable name will be used to access the secret.Select the credential's
IDin Specific credentials under Credentials.Note: In case you have provided a description for your credential, then instead of the credential
ID, the description will be displayed.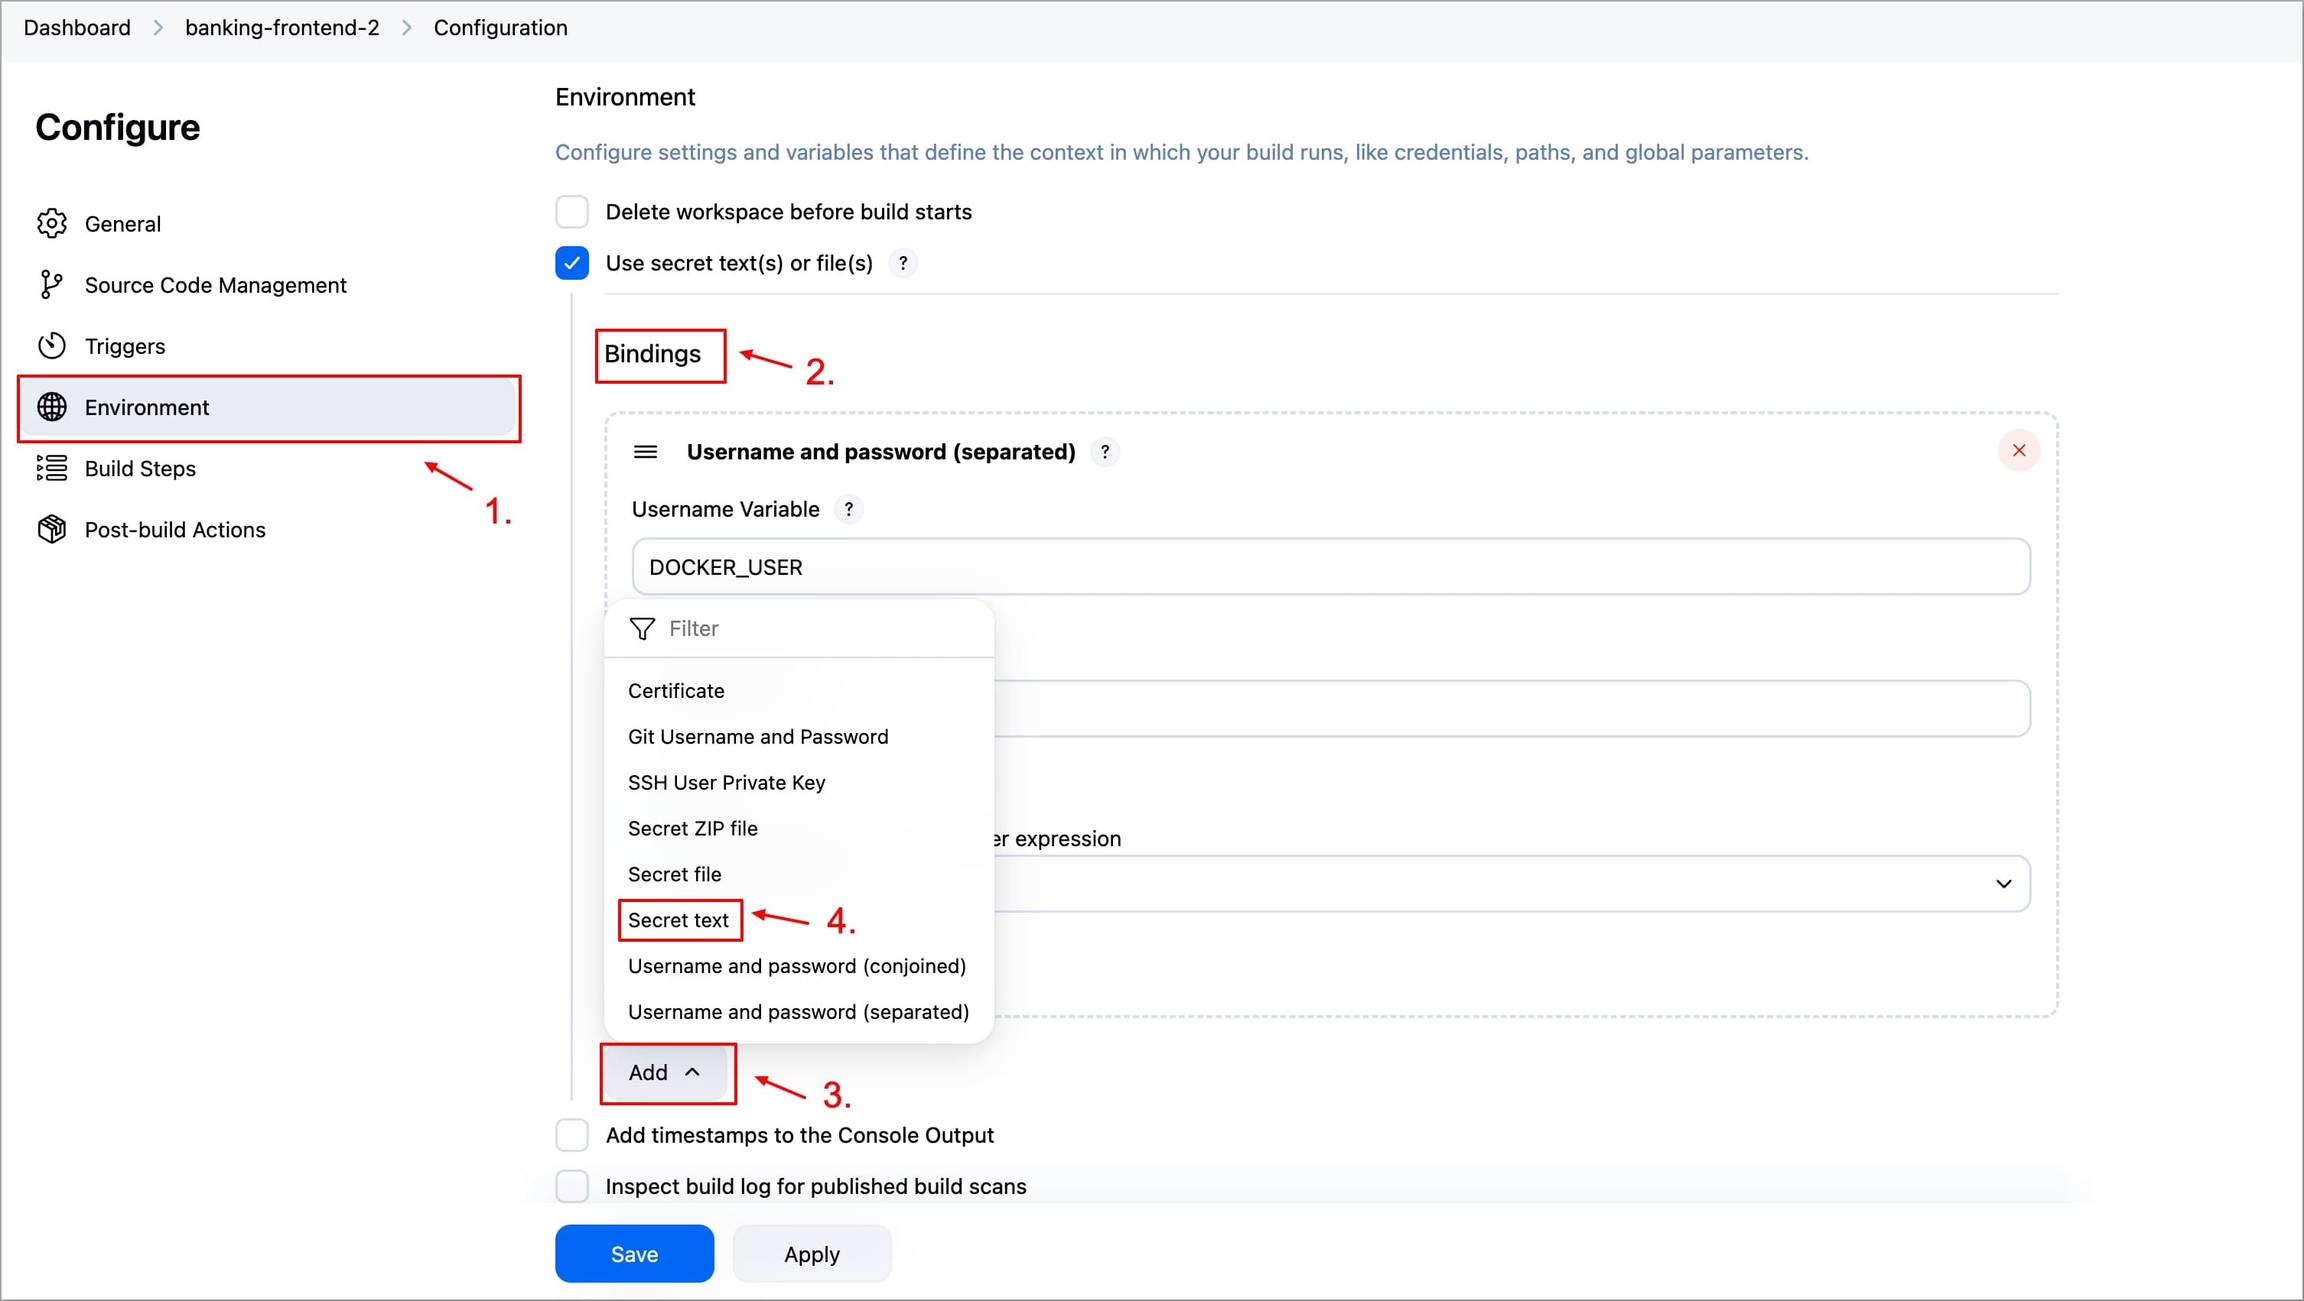
Figure 35a: Binding Credential in the project 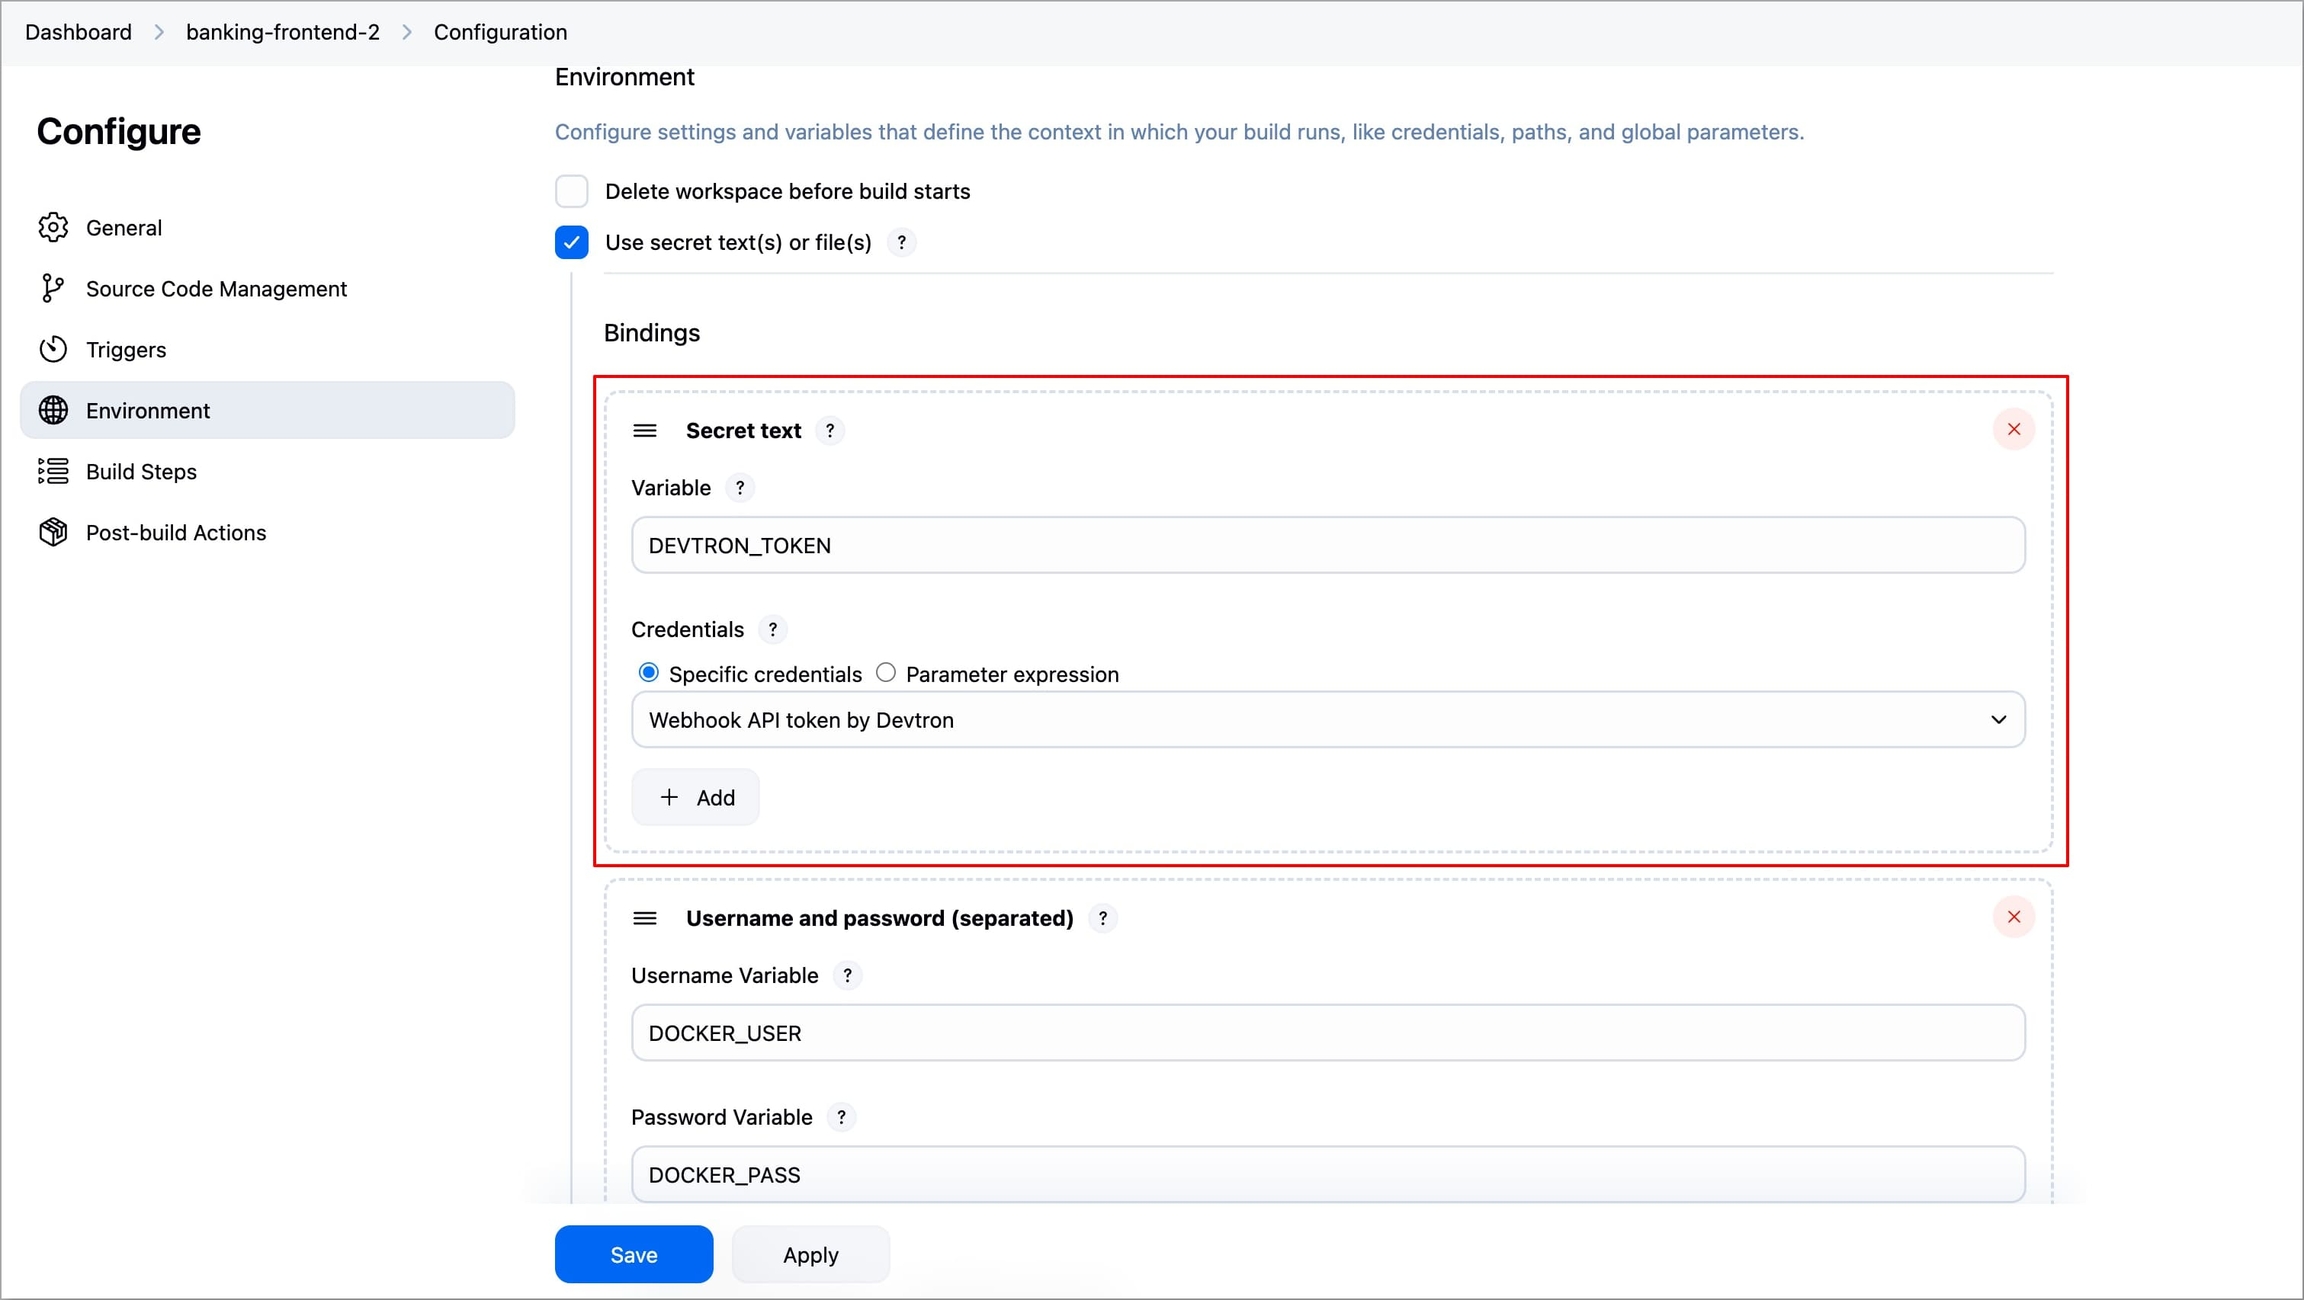
Figure 35b: Credential Binding successful Go to Configure → Build Steps, click Add build step, and then select Execute Shell.
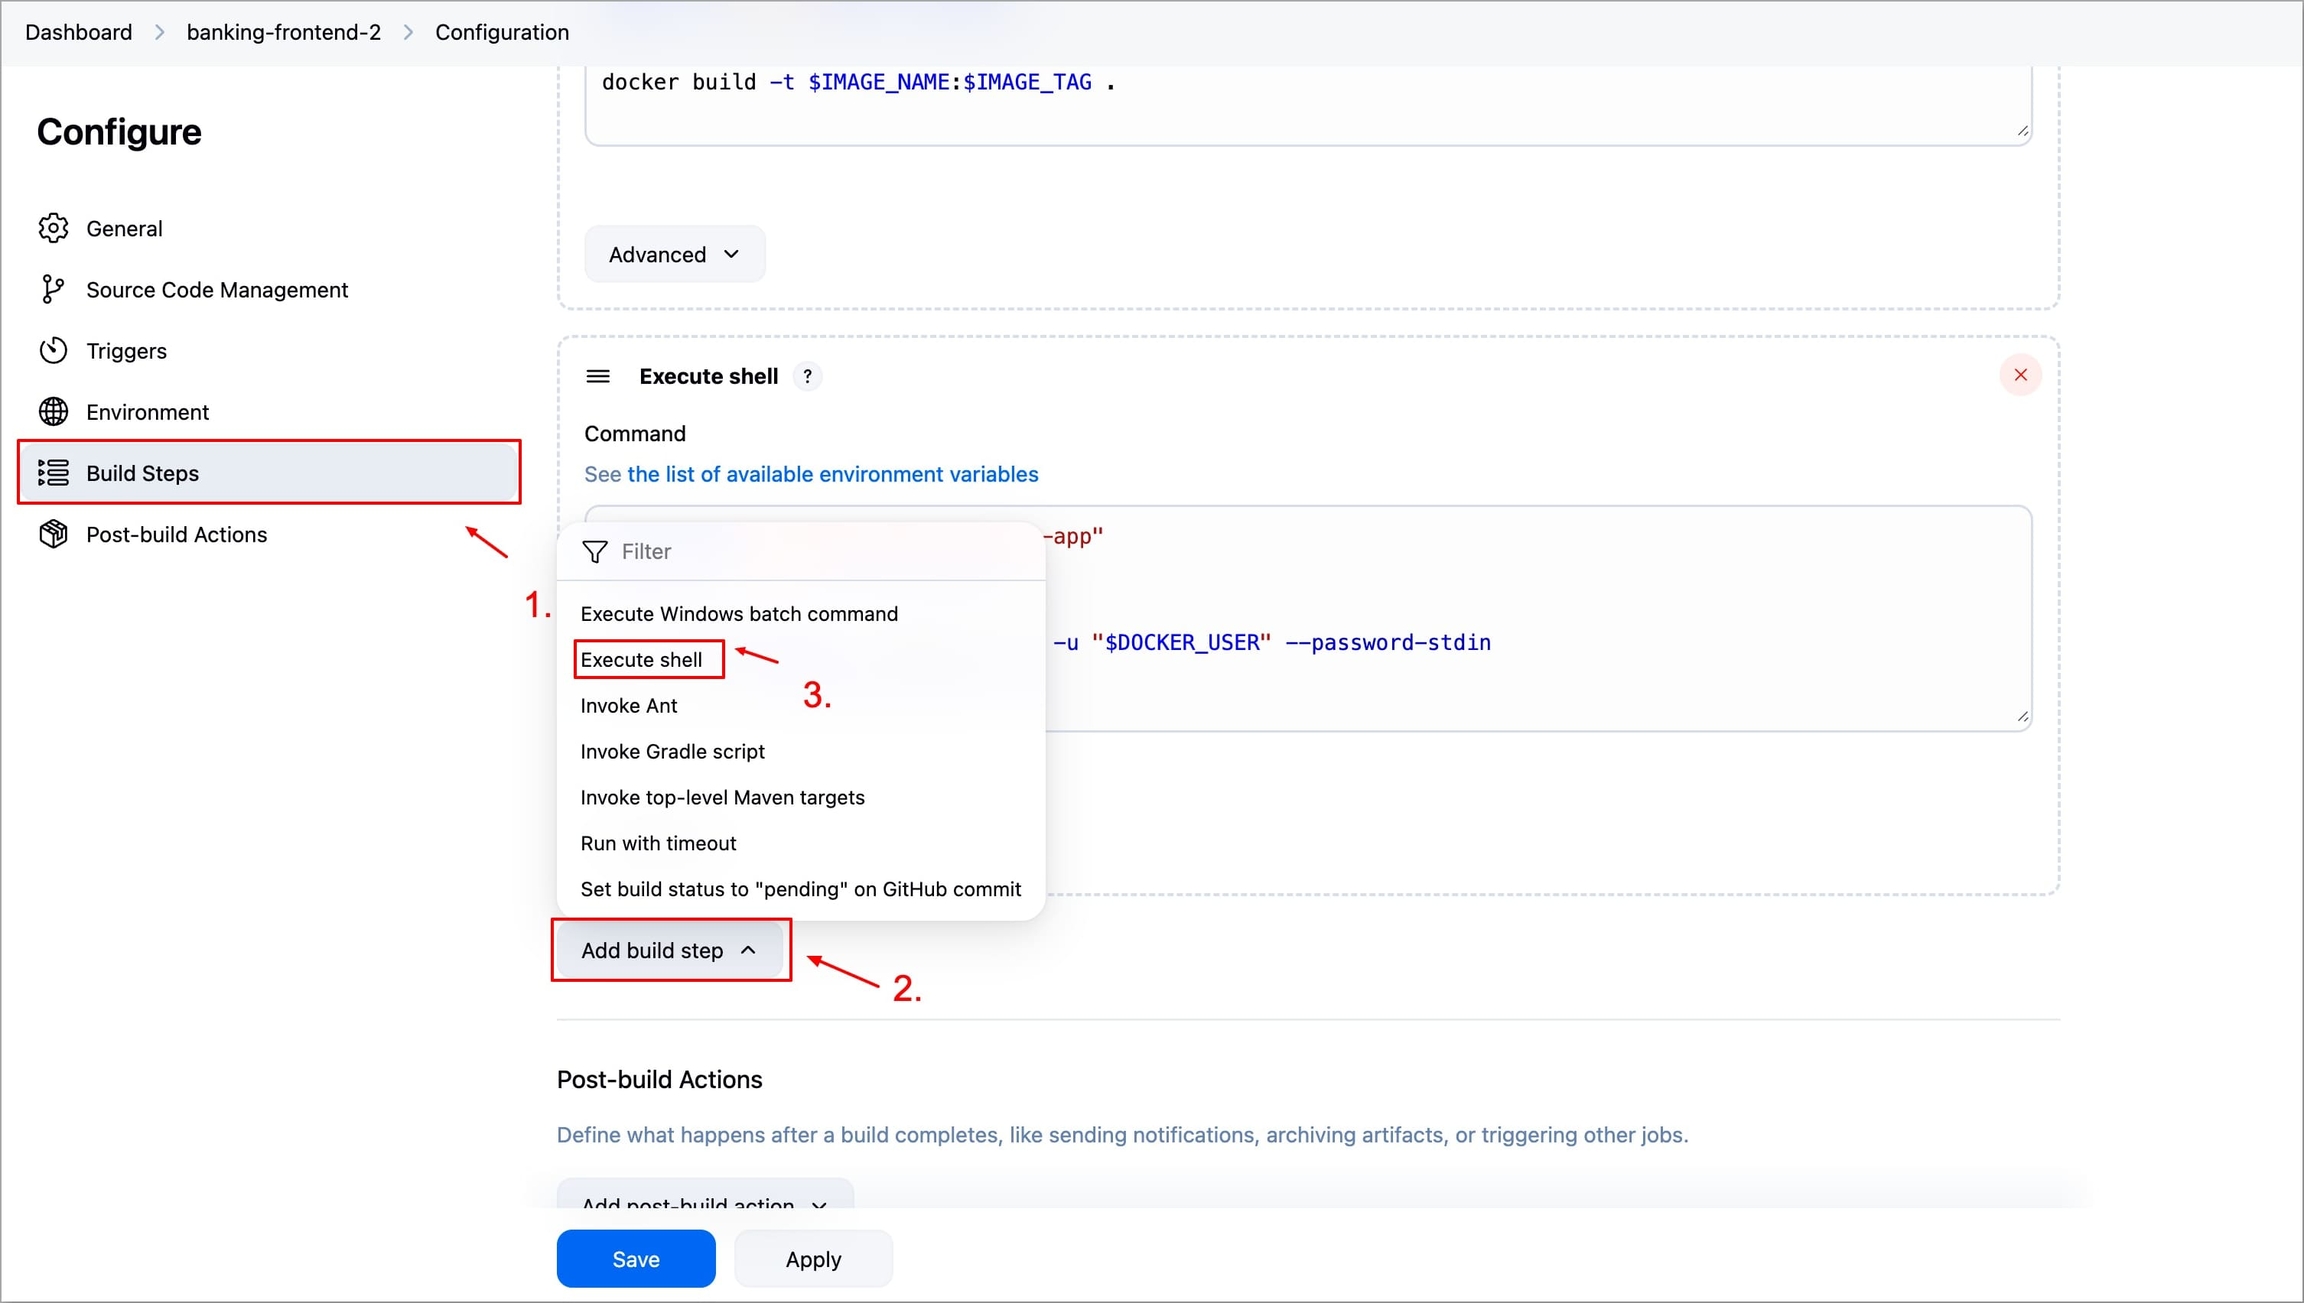
Figure 36: Adding Build Step for Webhook Enter the cURL request command as shown below. Make sure to enter the
API tokenanddockerImagein your cURL command and click Save.Note: API Token has been referenced from the secret via Variable Name (
DEVTRON_TOKEN) configured in Jenkins credentials using itsID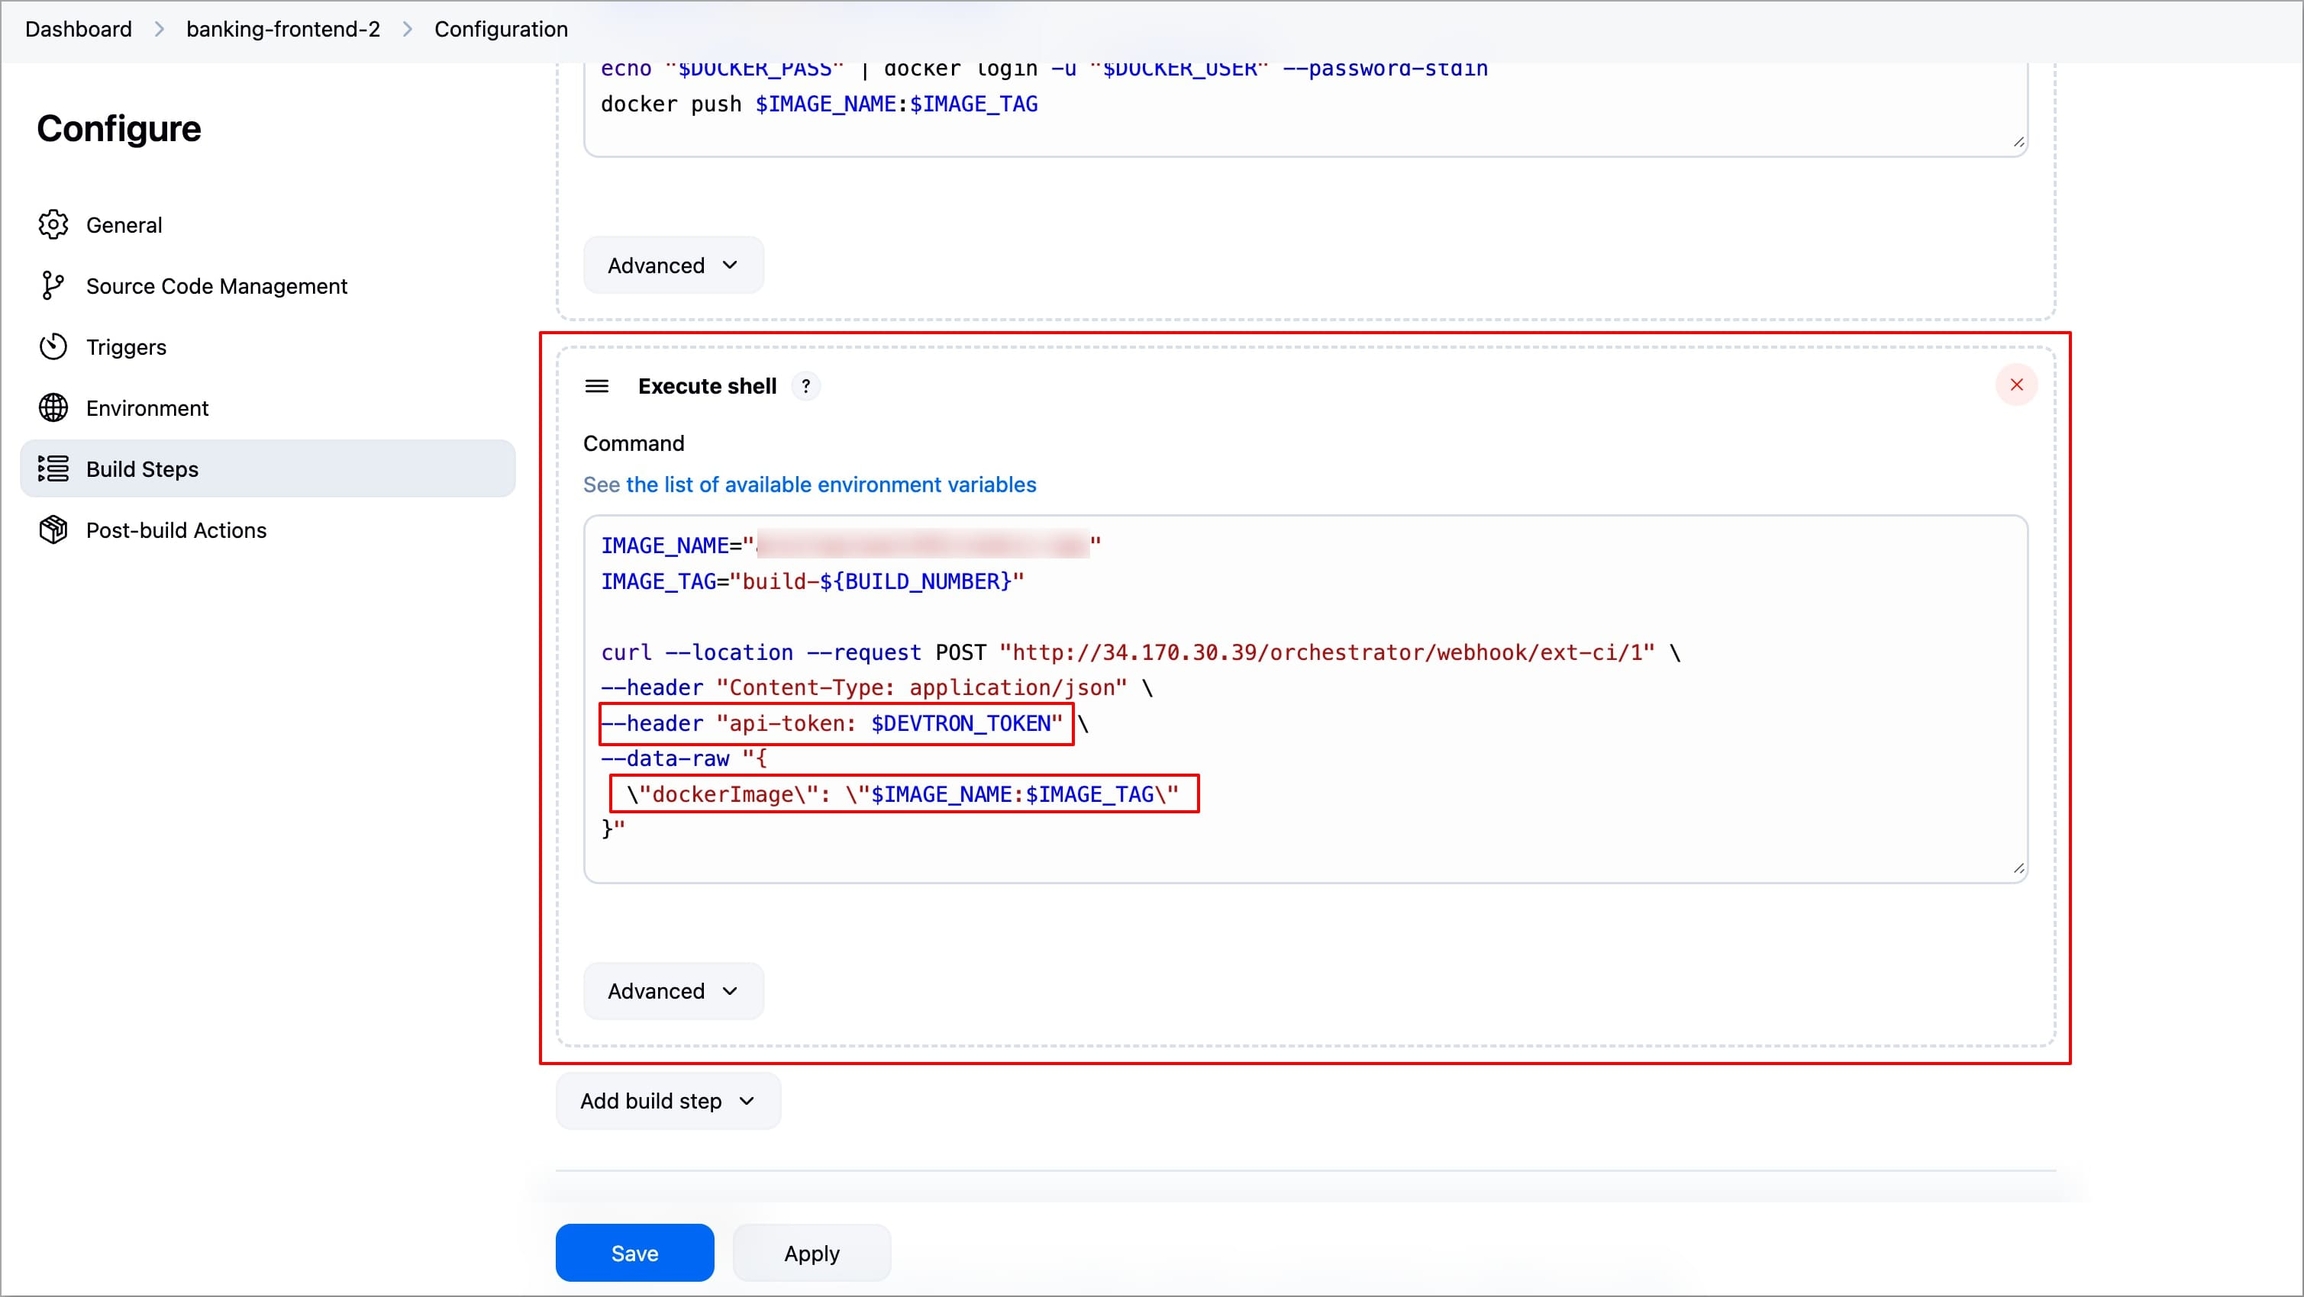
Figure 47: Configuring Webhook Build Step
In case your Jenkins project is of type pipeline, Multibranch Pipeline, etc., which uses a Pipeline Script or Jenkinsfile, then you need to add a new stage in the pipeline for configuring the webhook. To do so follow the steps below.
Select the Jenkins project in which you want to integrate the Webhook.
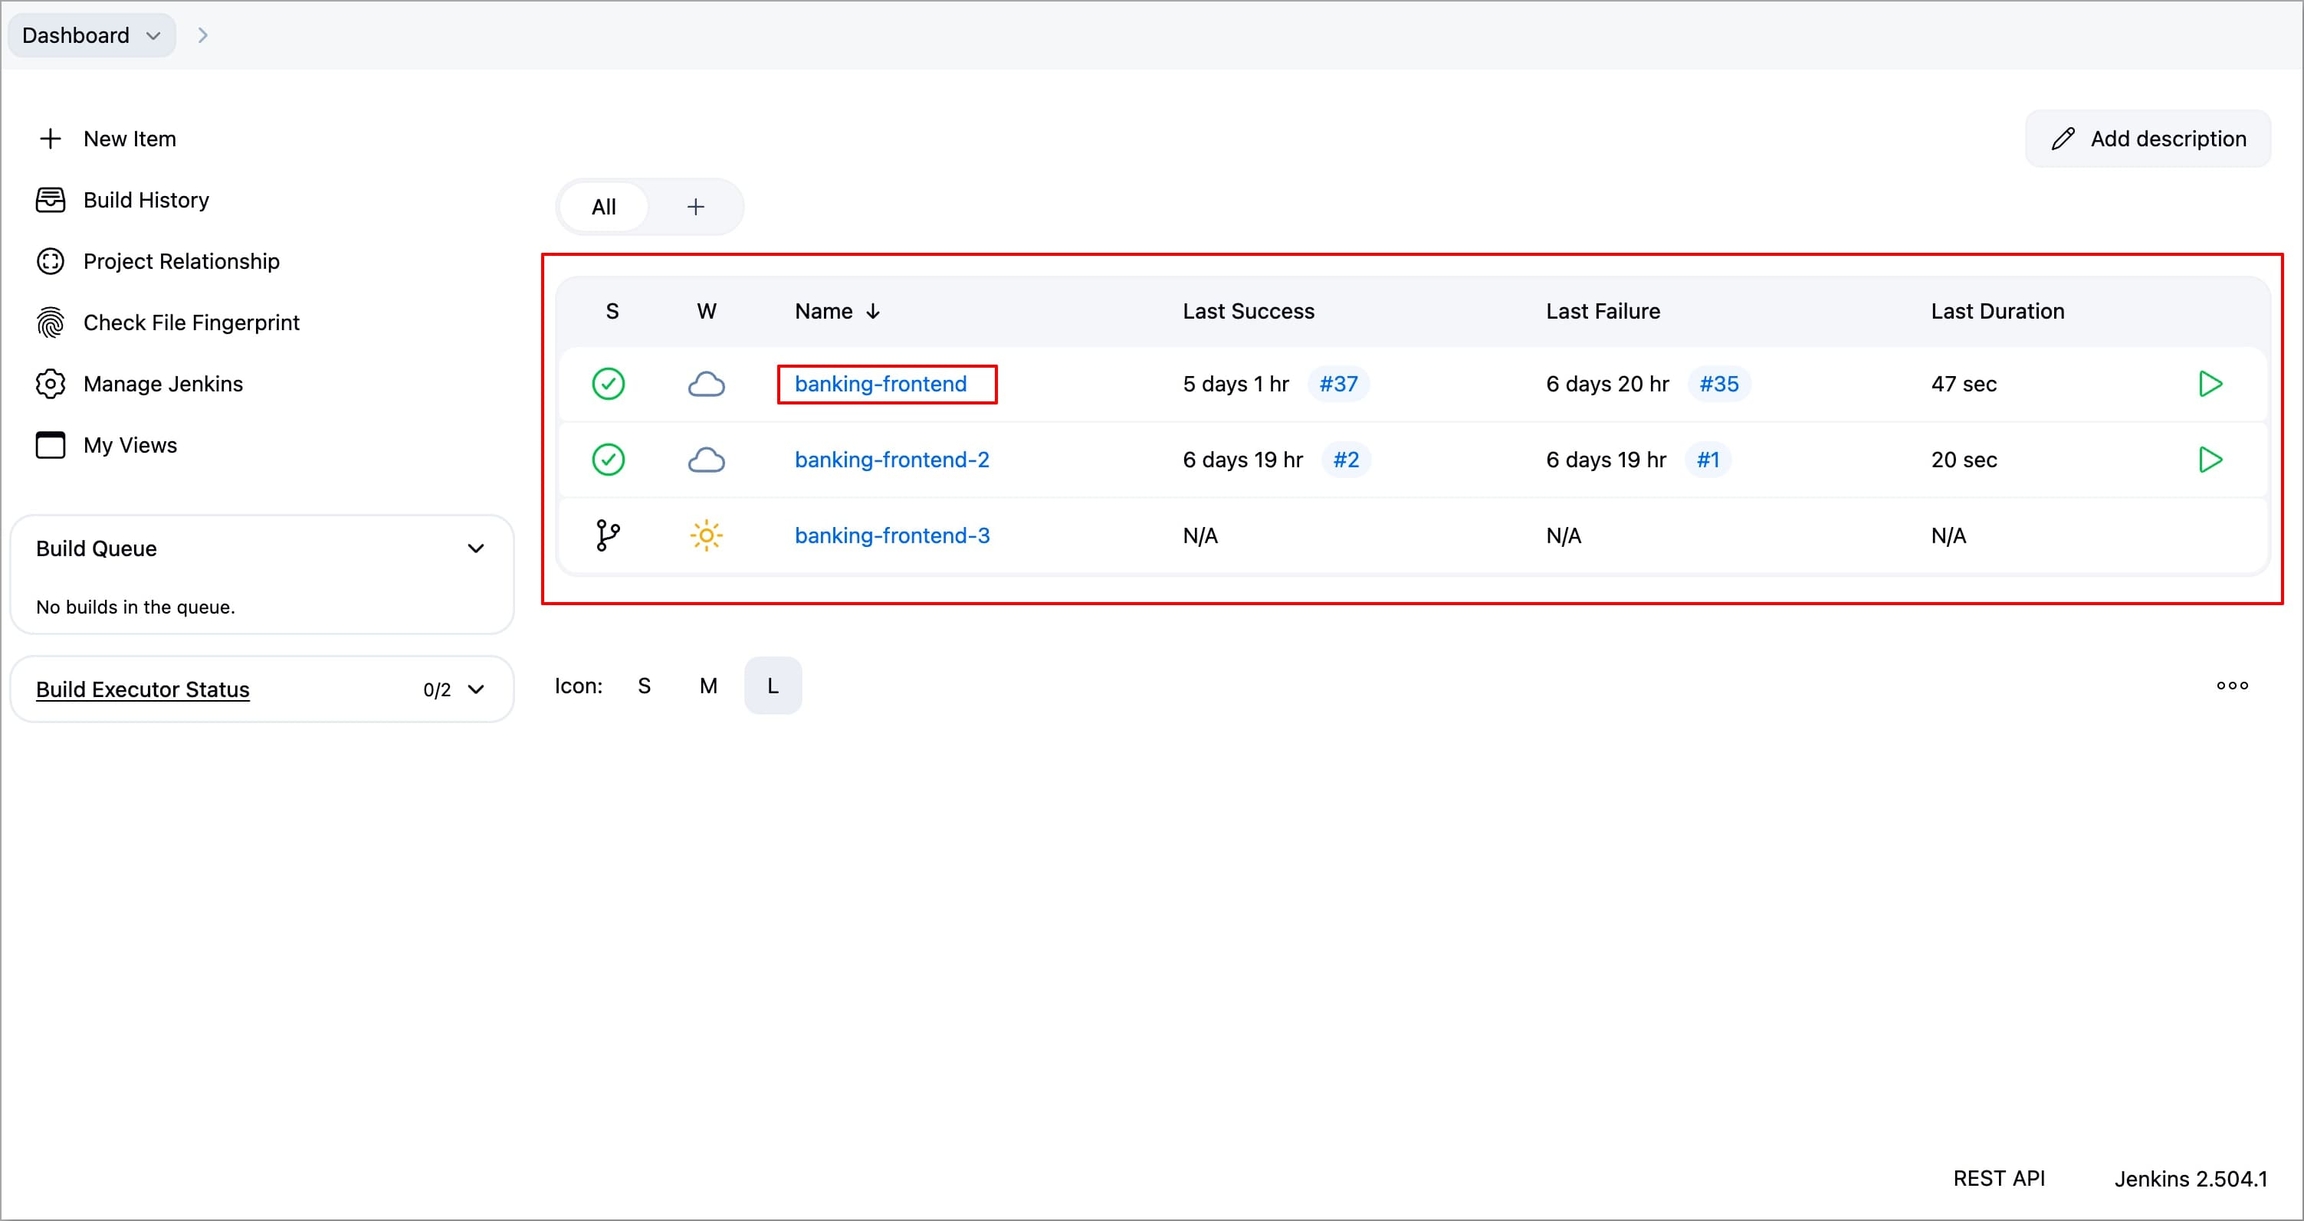
Figure 38: Selecting Jenkins Project Go to Configure → Pipeline.
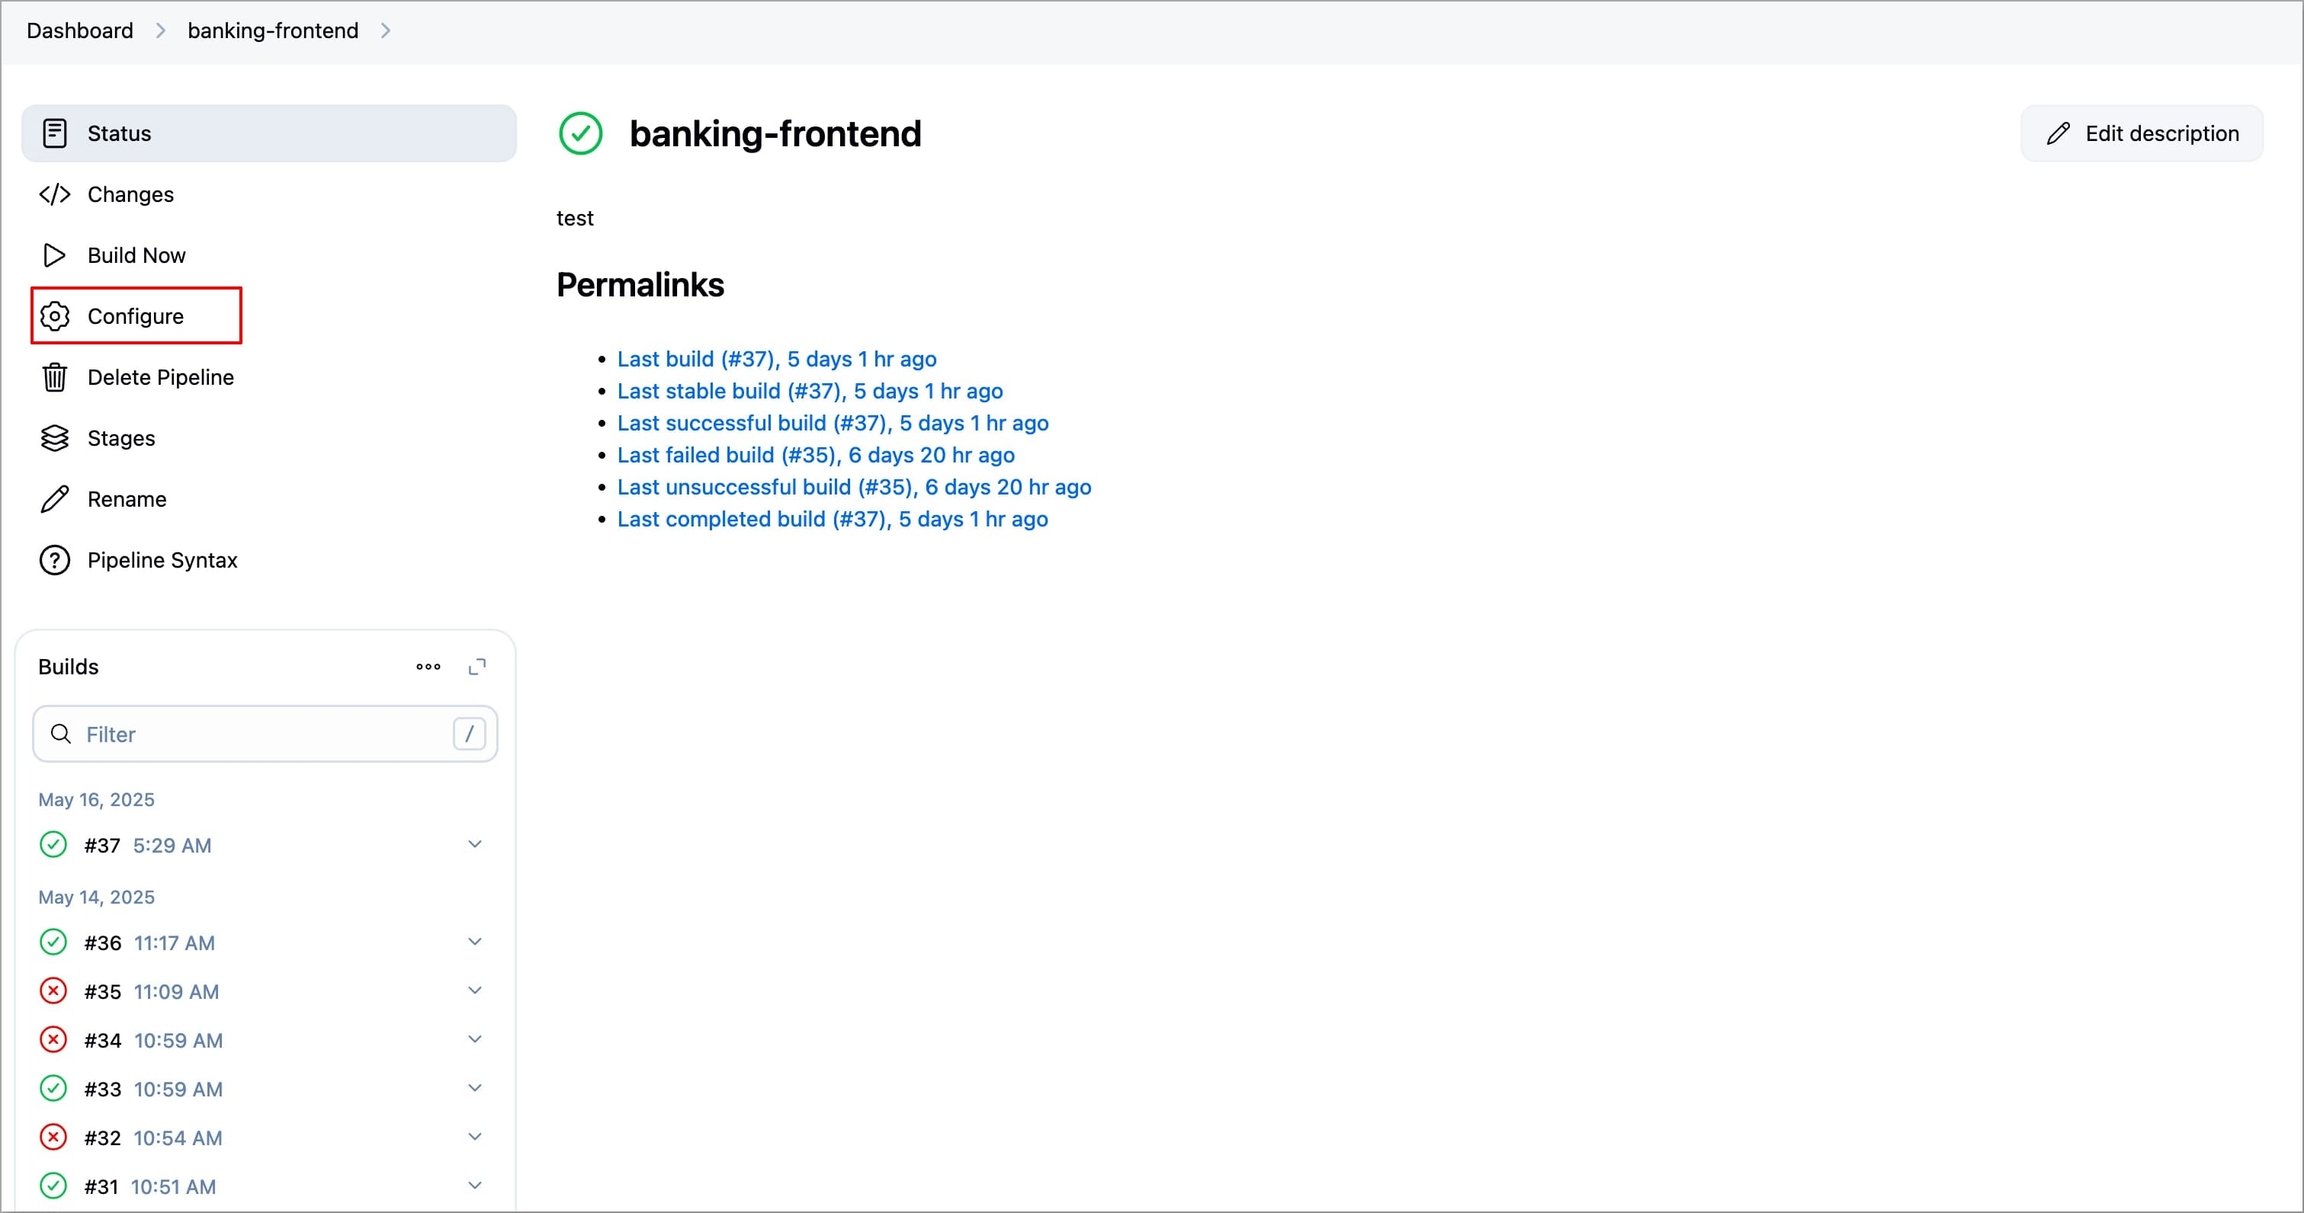
Figure 39: Selecting 'Configure' In case you are using Pipeline Script, then modify the script to add a new stage as shown below. If you are using Pipeline script from SCM, then modify your Jenkinsfile in the same way.
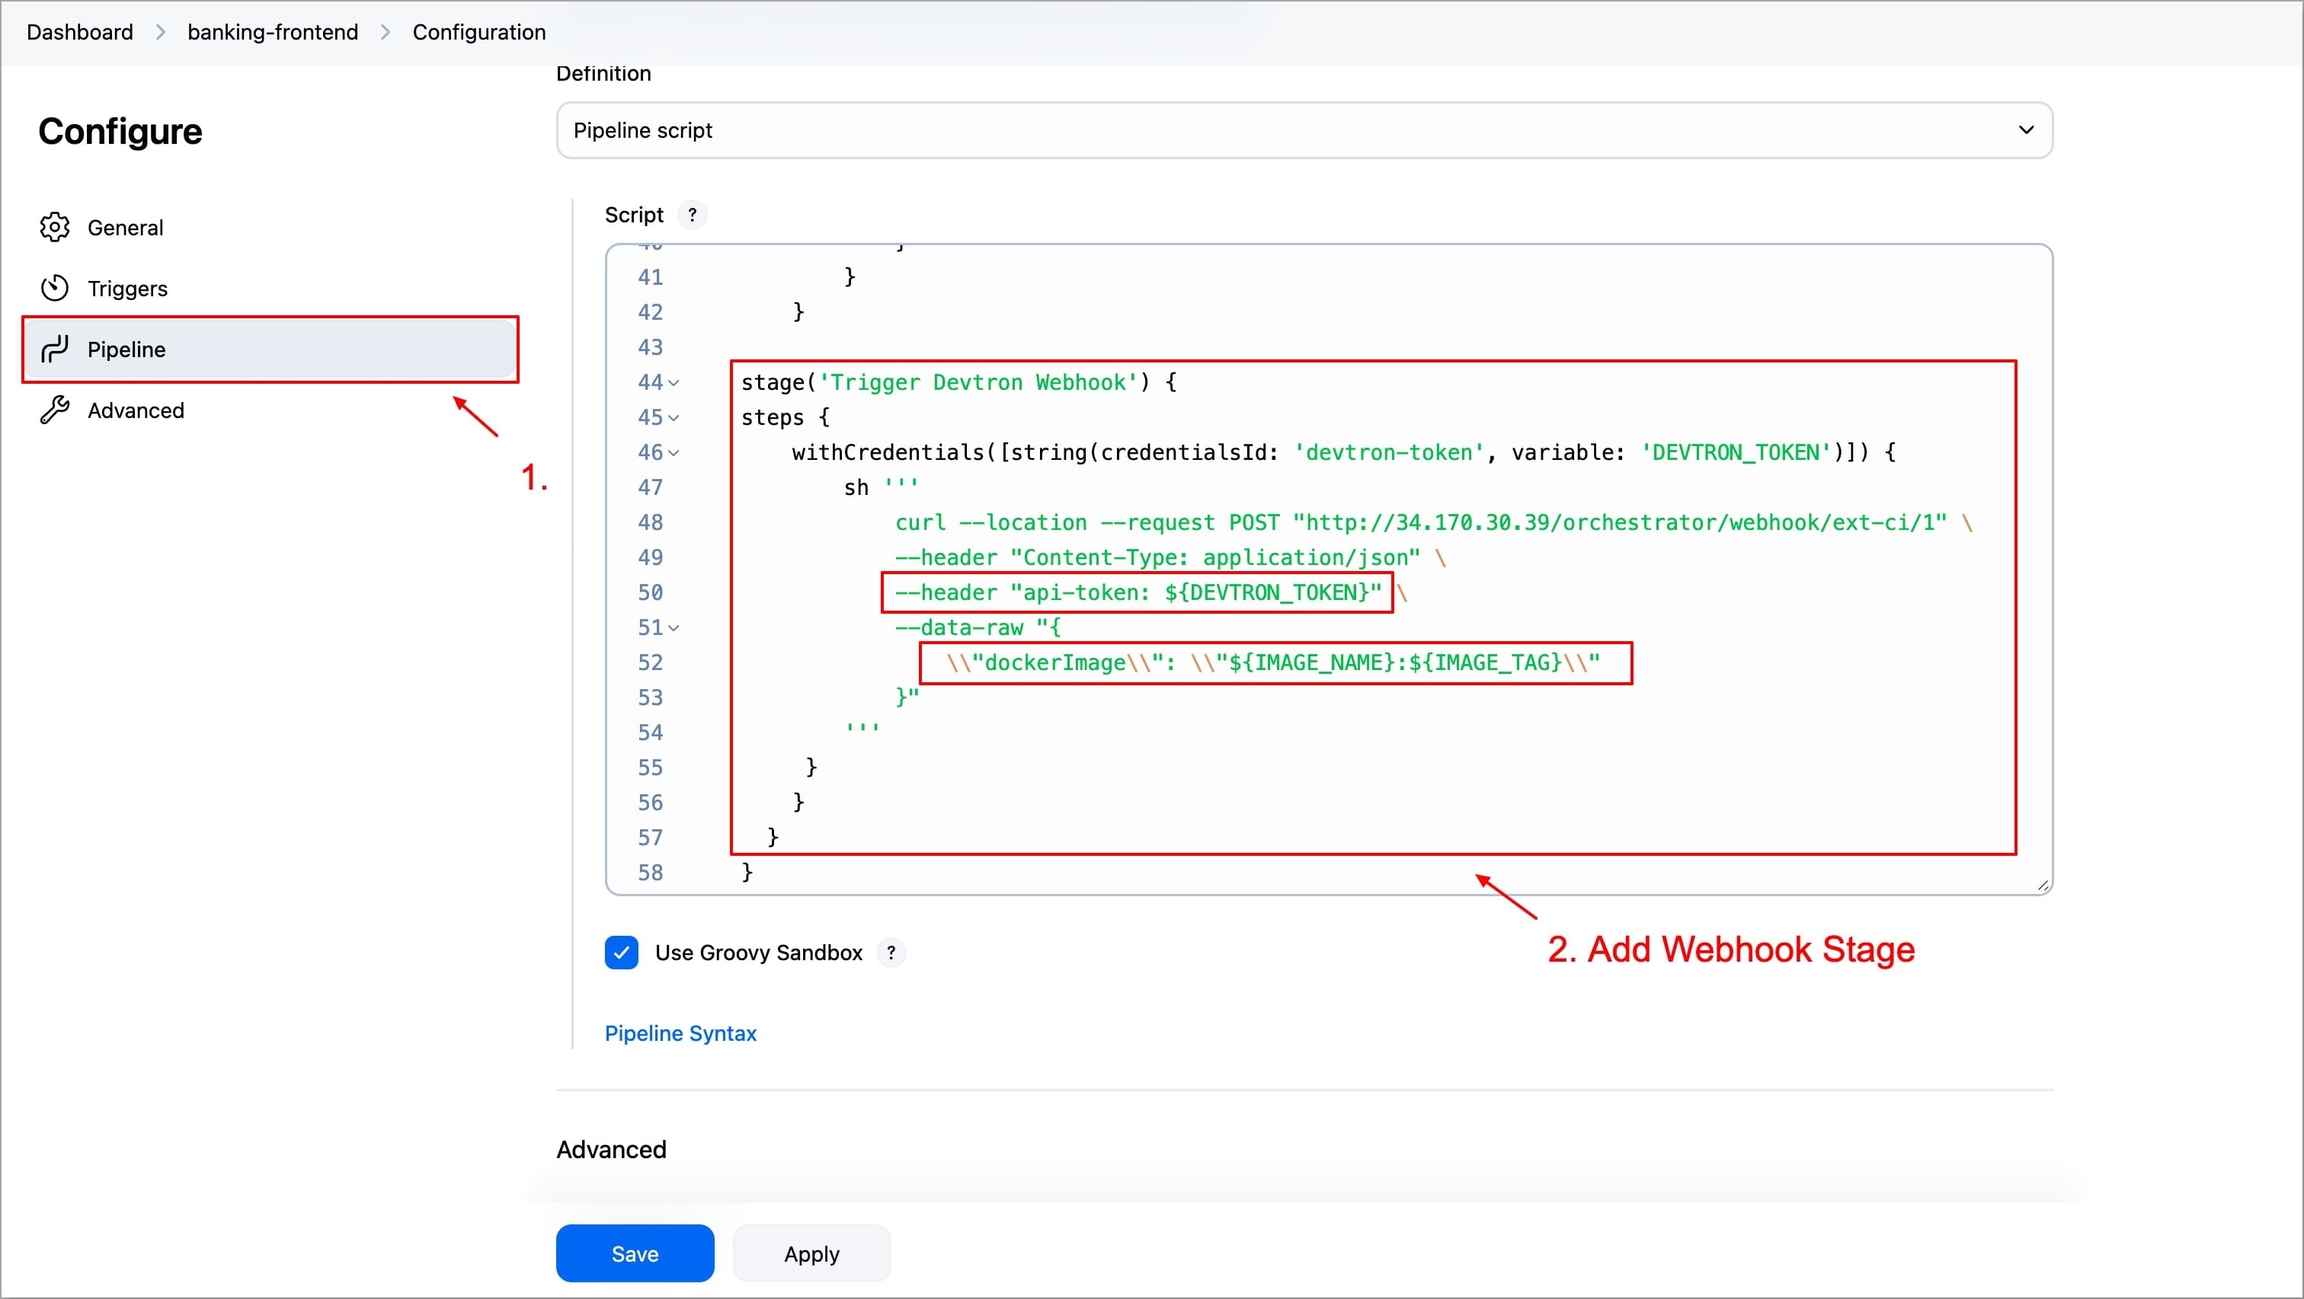
Figure 40: Adding Webhook pipeline stage Click Save.
The new images that will be built after adding the webhook will be available to Devtron for deployment.
Now, you can access the images on the Devtron dashboard and deploy manually. If you select the Automatic deployment option, your application deployment will trigger automatically when a new image is received.
Integrate with External Sources - GitHub Actions
To integrate Webhook with your GitHub Actions workflow, you need to add a new step in your workflow file.
Before adding the step in the workflow, you need to add the API token provided by Devtron as a secret in your repository. To do so, follow the steps below
Navigate to Settings tab of your repository.
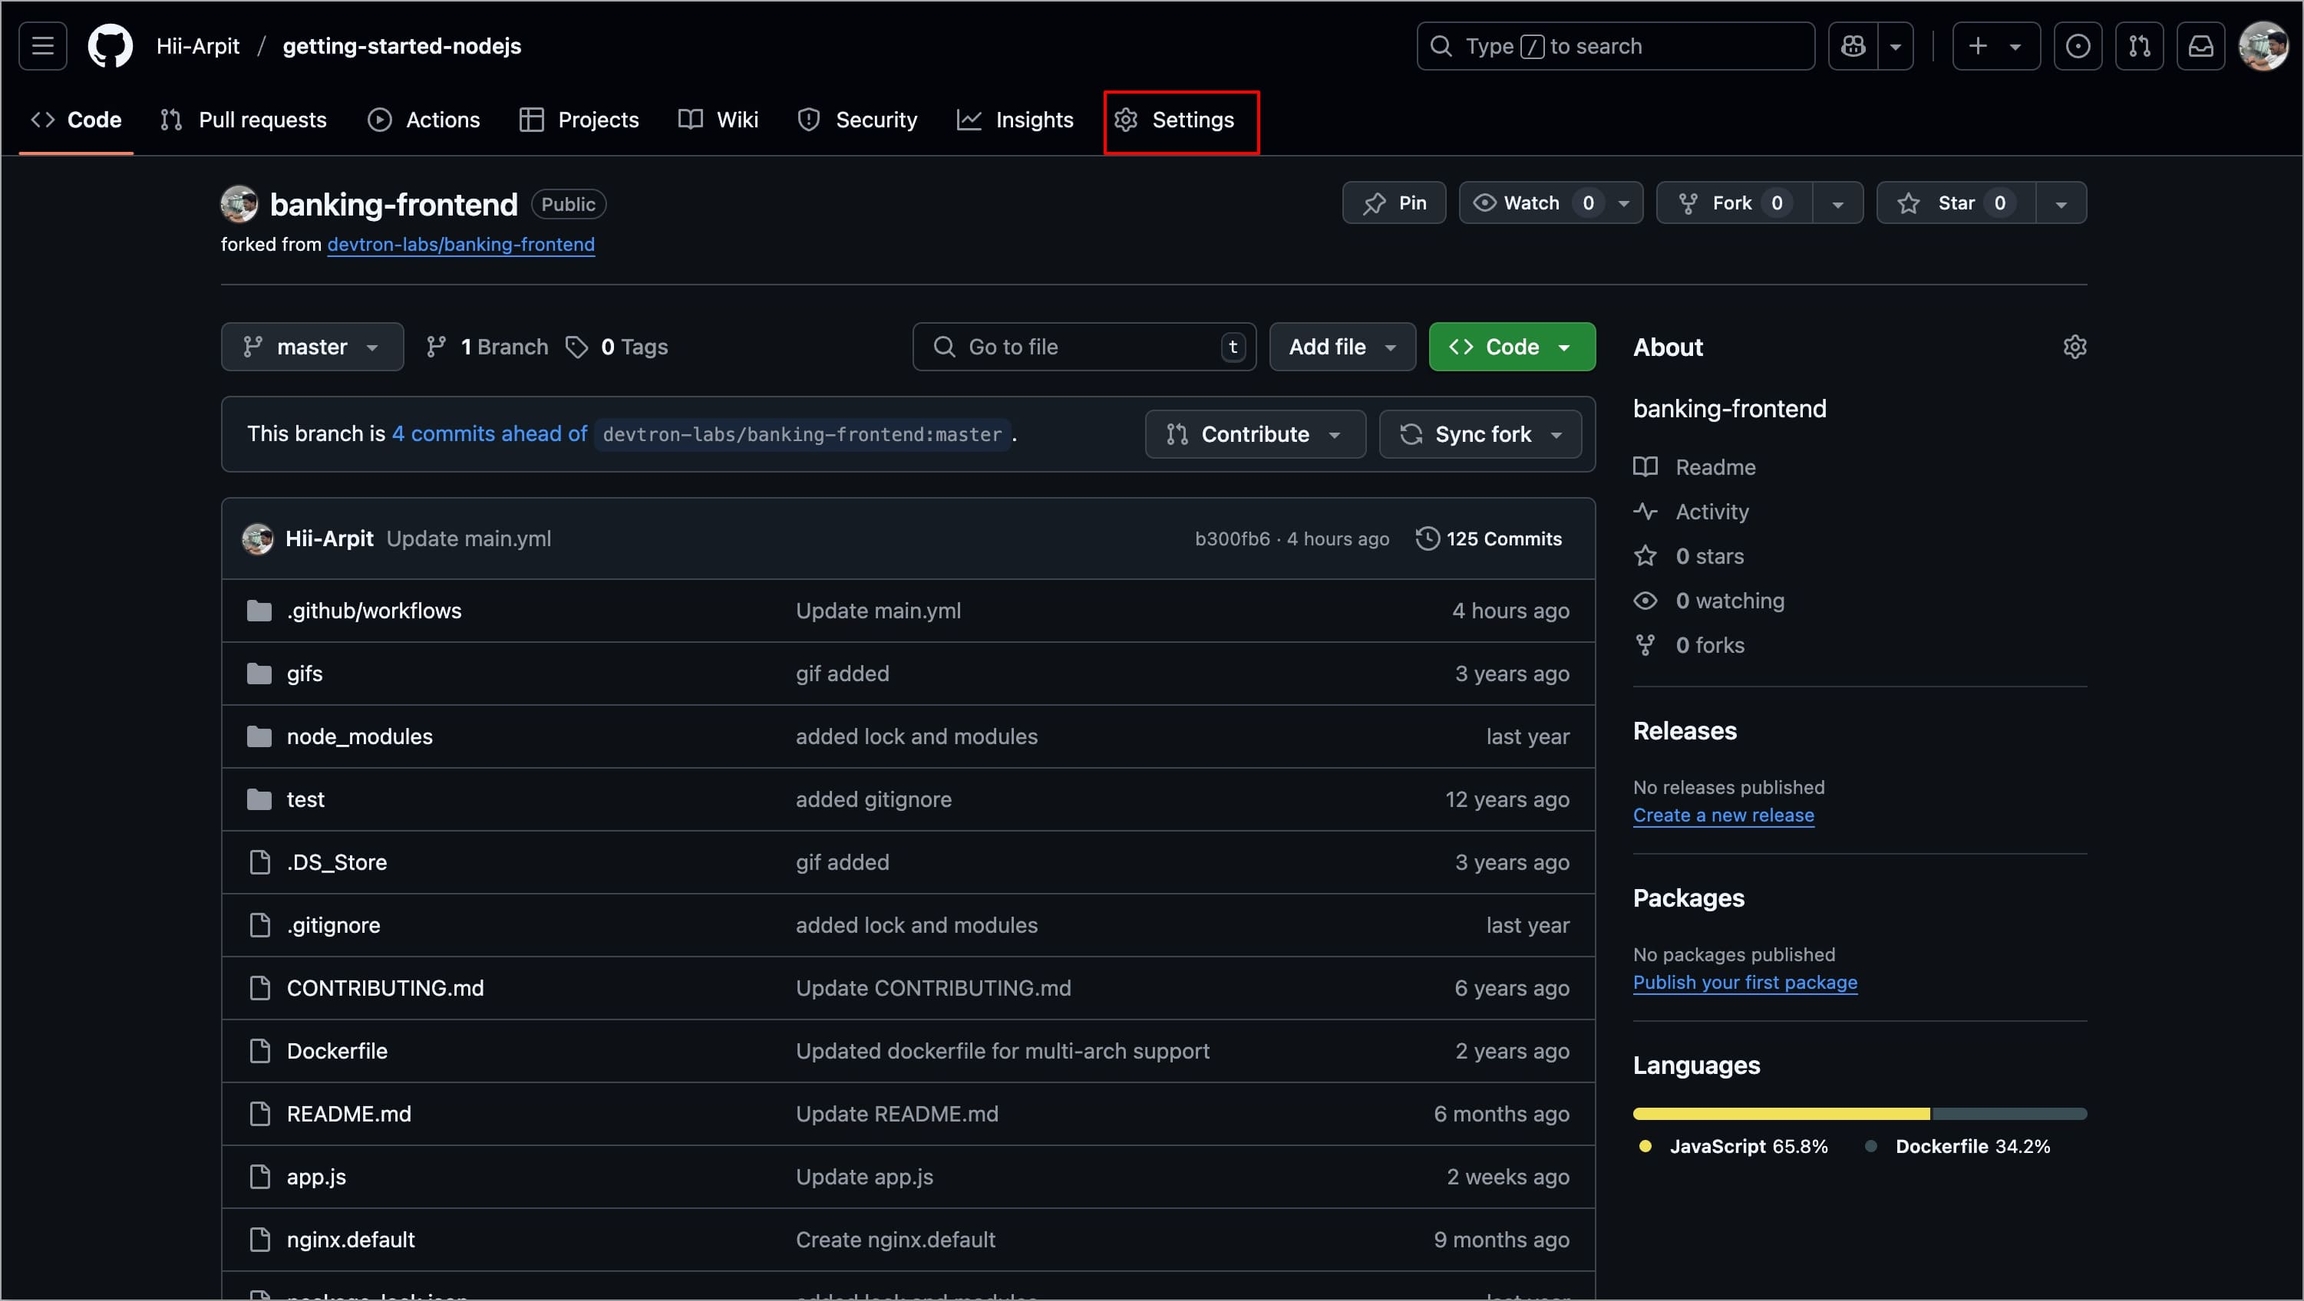
Figure 41: Navigating to 'Settings' Select Secrets and variables → Actions under Security.
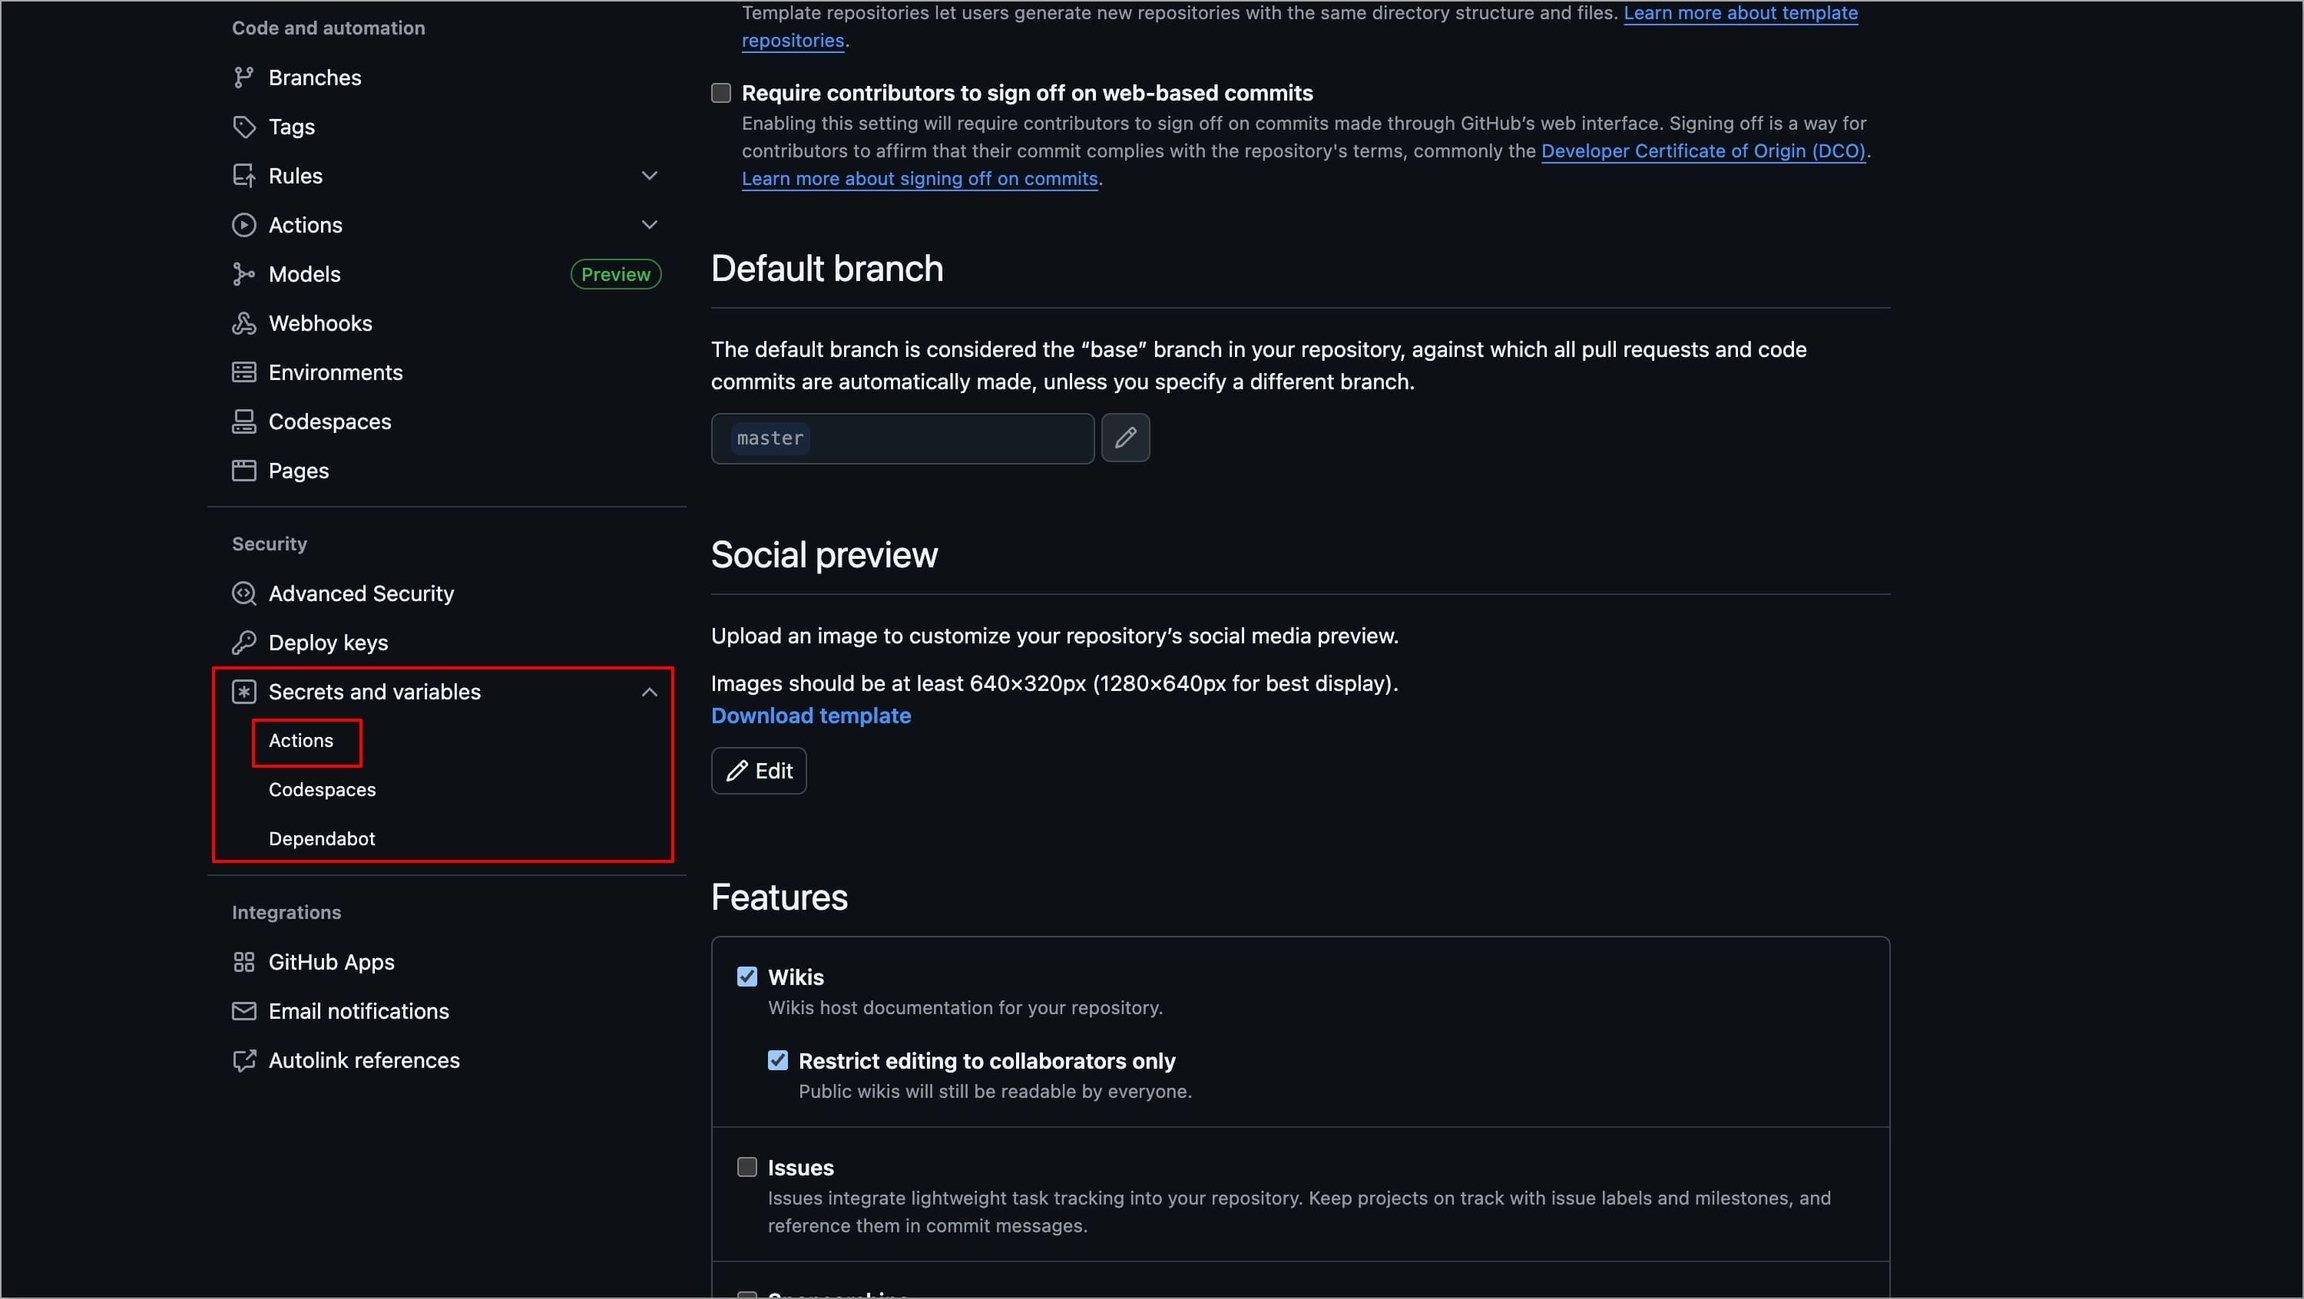
Figure 42: Selecting 'Actions' Under Secrets tab, select New repository secret.
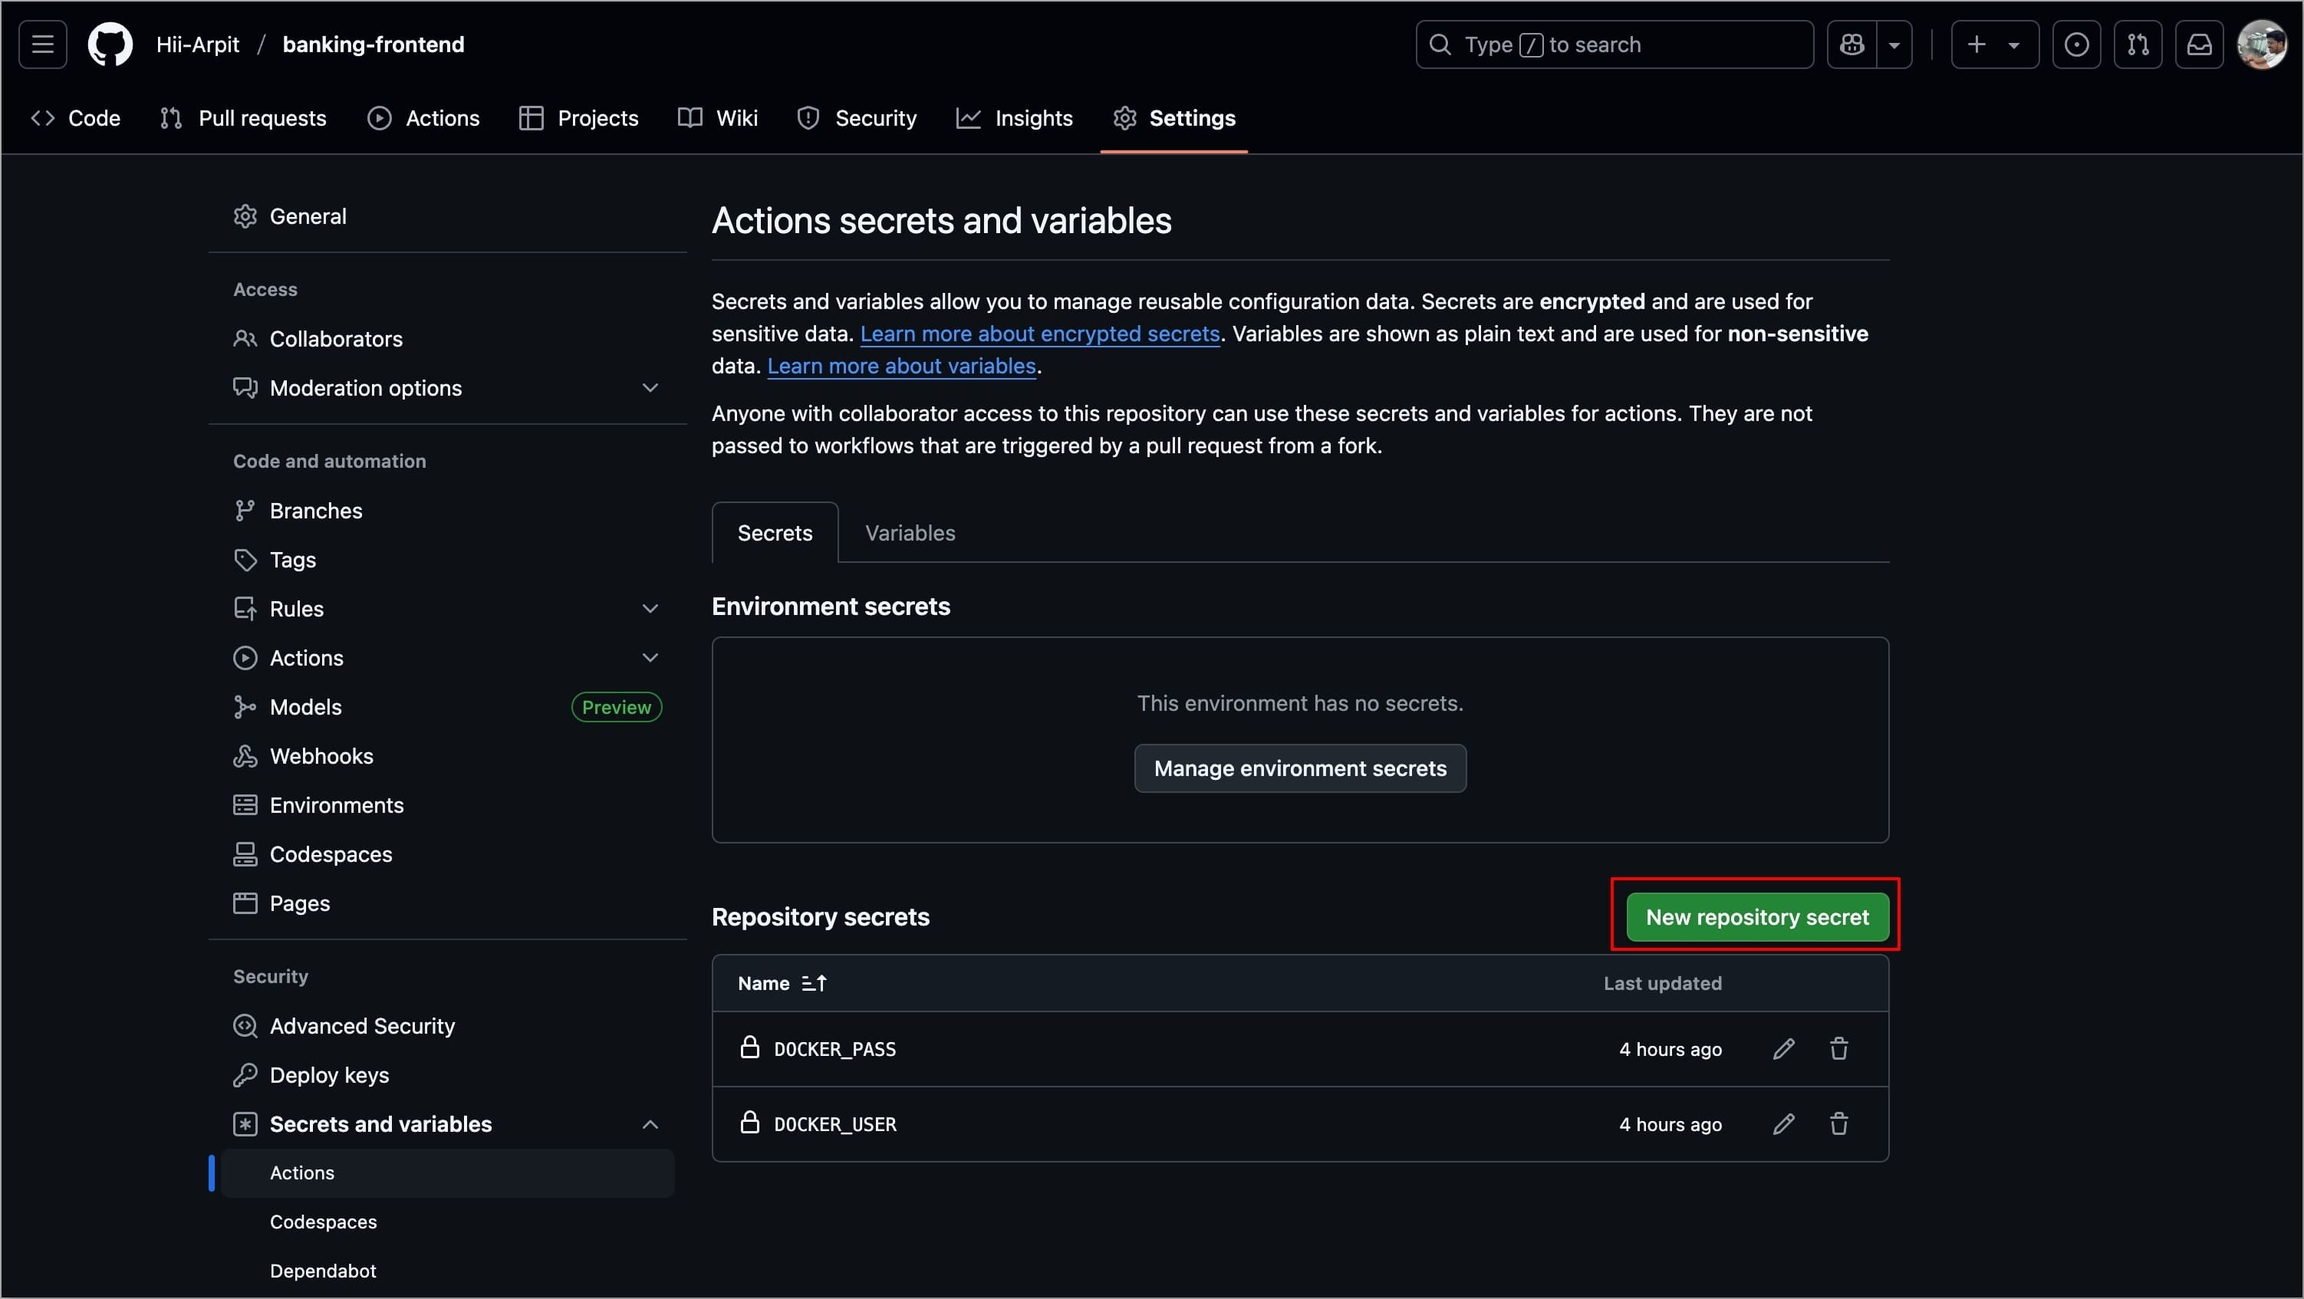
Figure 43: Selecting 'New repository secret' Enter a name for your secret in the Name field.
Enter the value of the secret in the Secret field.
Select Add Secret and the secret will be added to your repository.
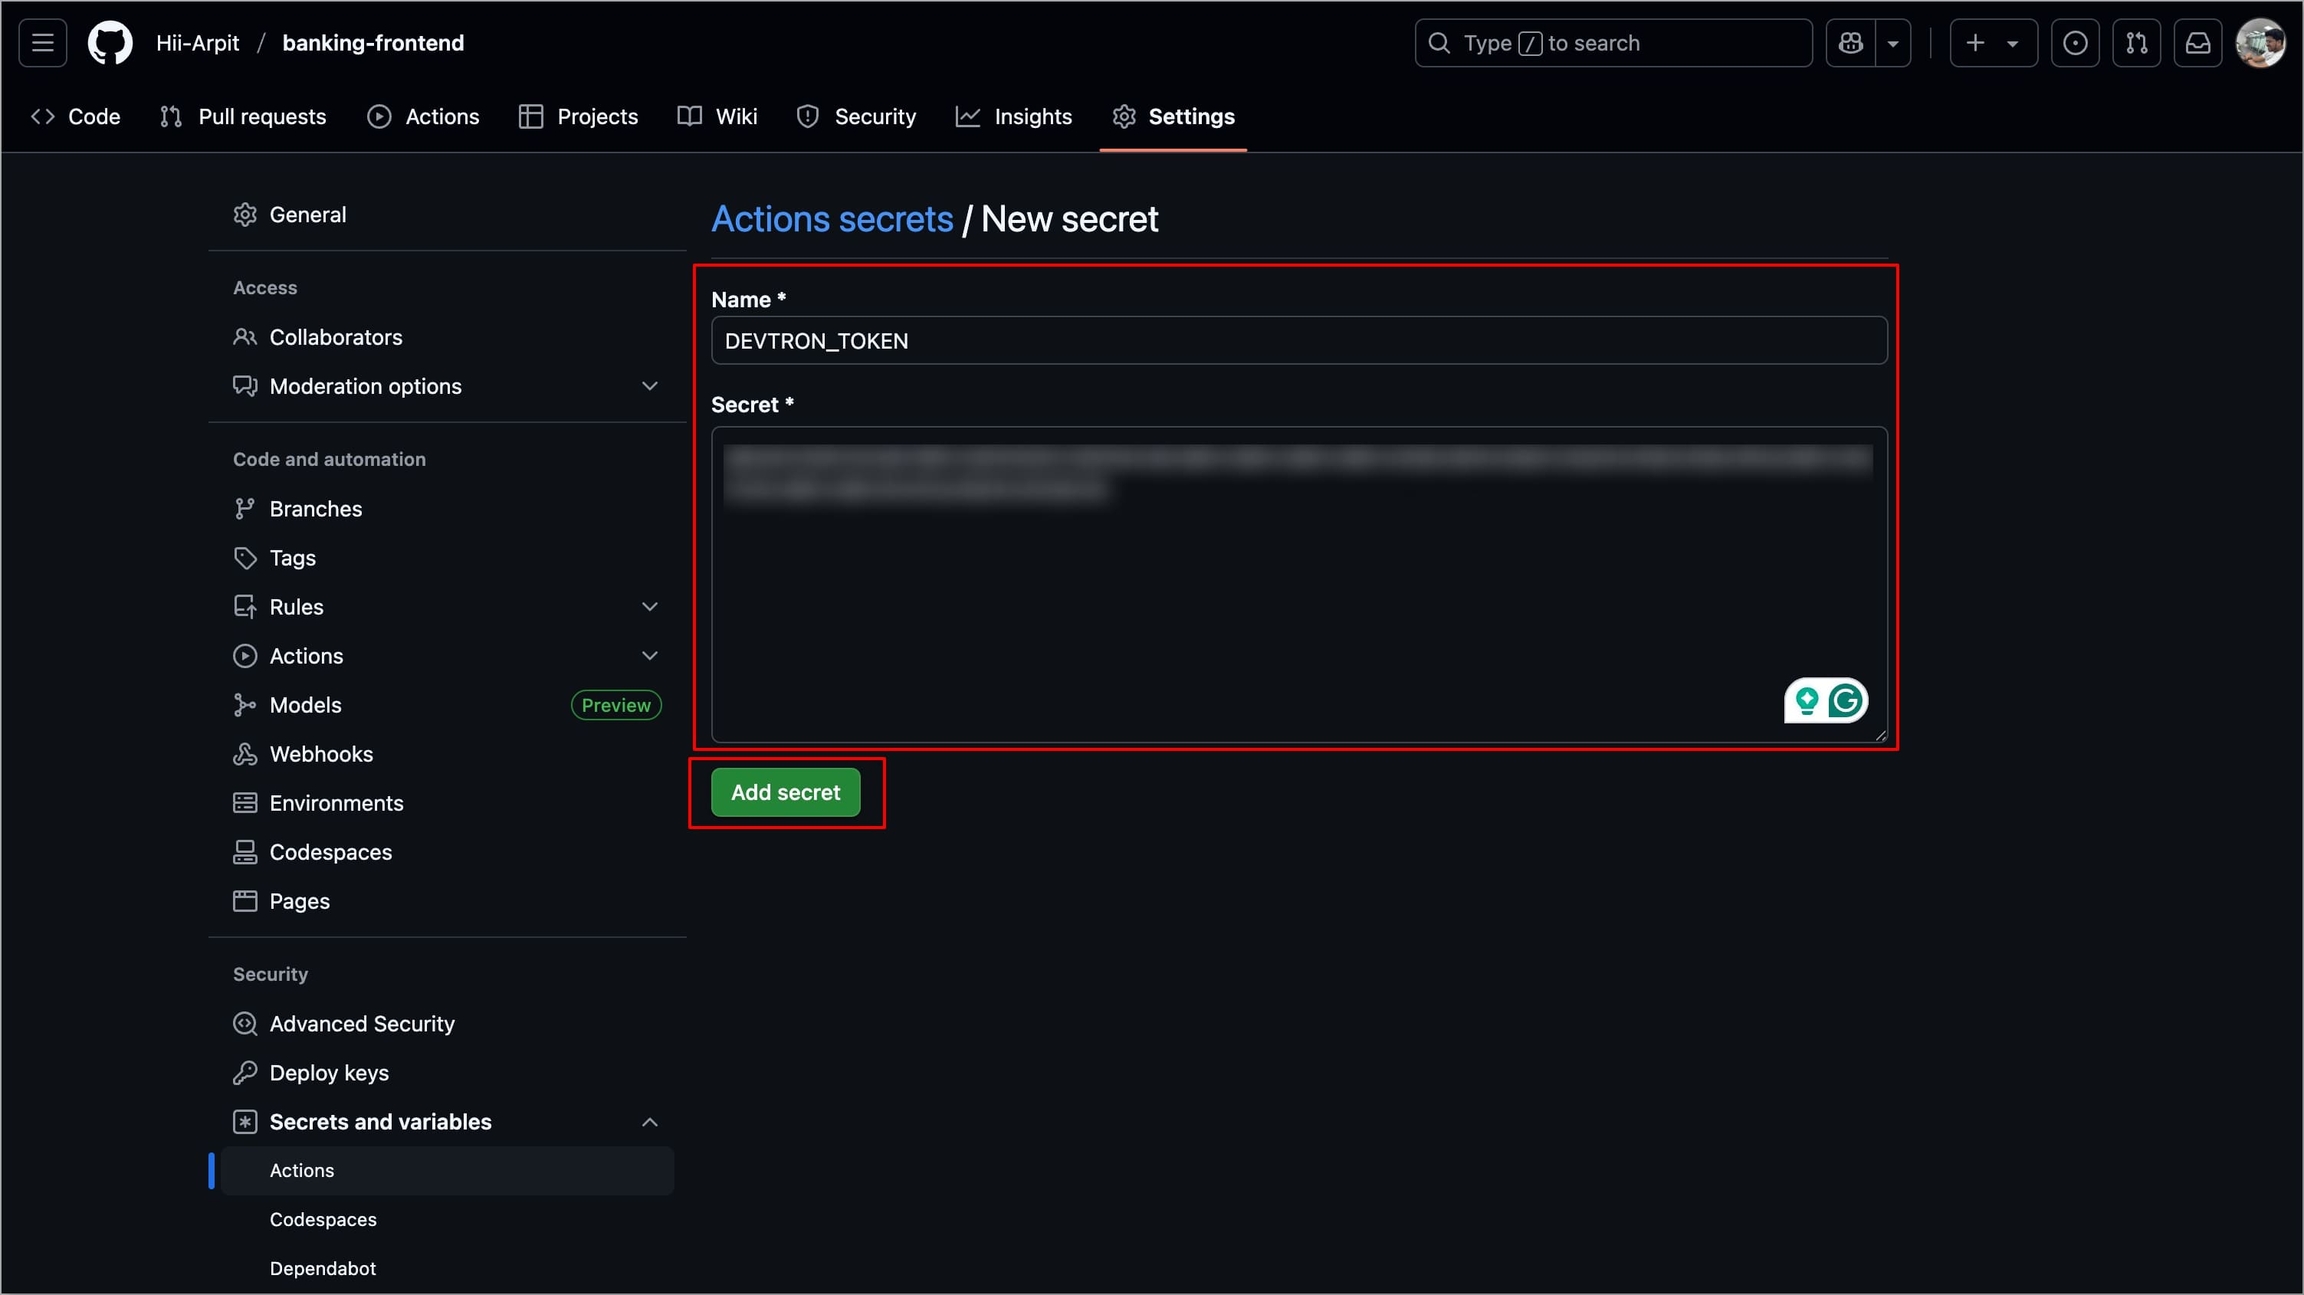
Figure 44a: Entering secret info 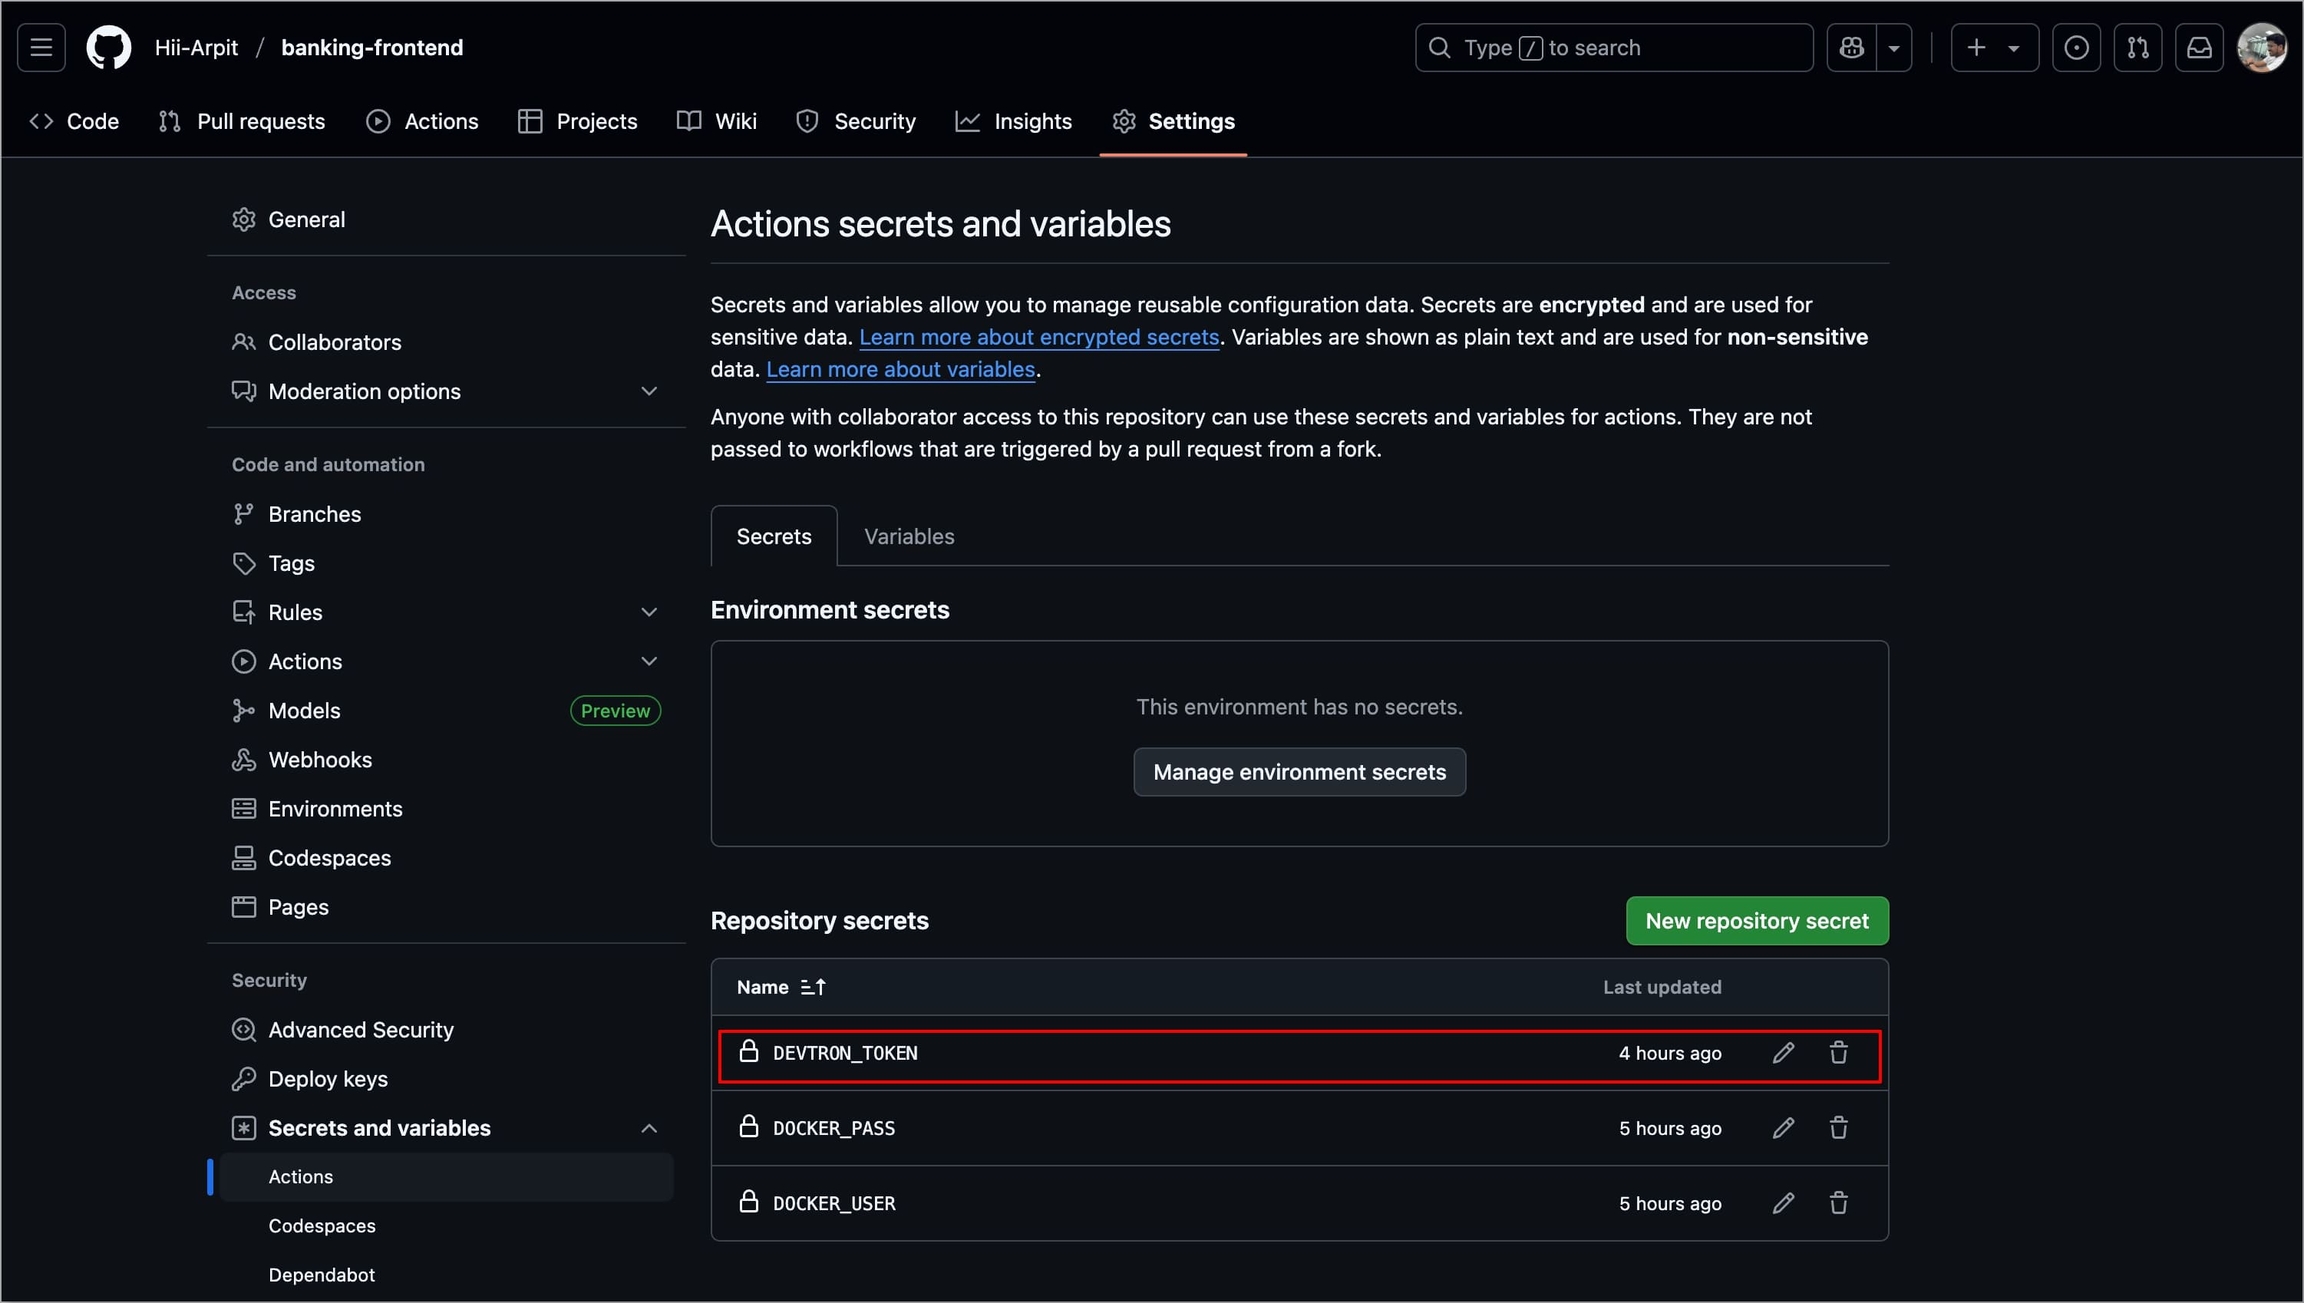
Figure 44b: Secret Added
After adding the API token as a secret, add a new step in your GitHub Action workflow. To do so, follow the steps below:
Navigate to Actions tab of your repository.
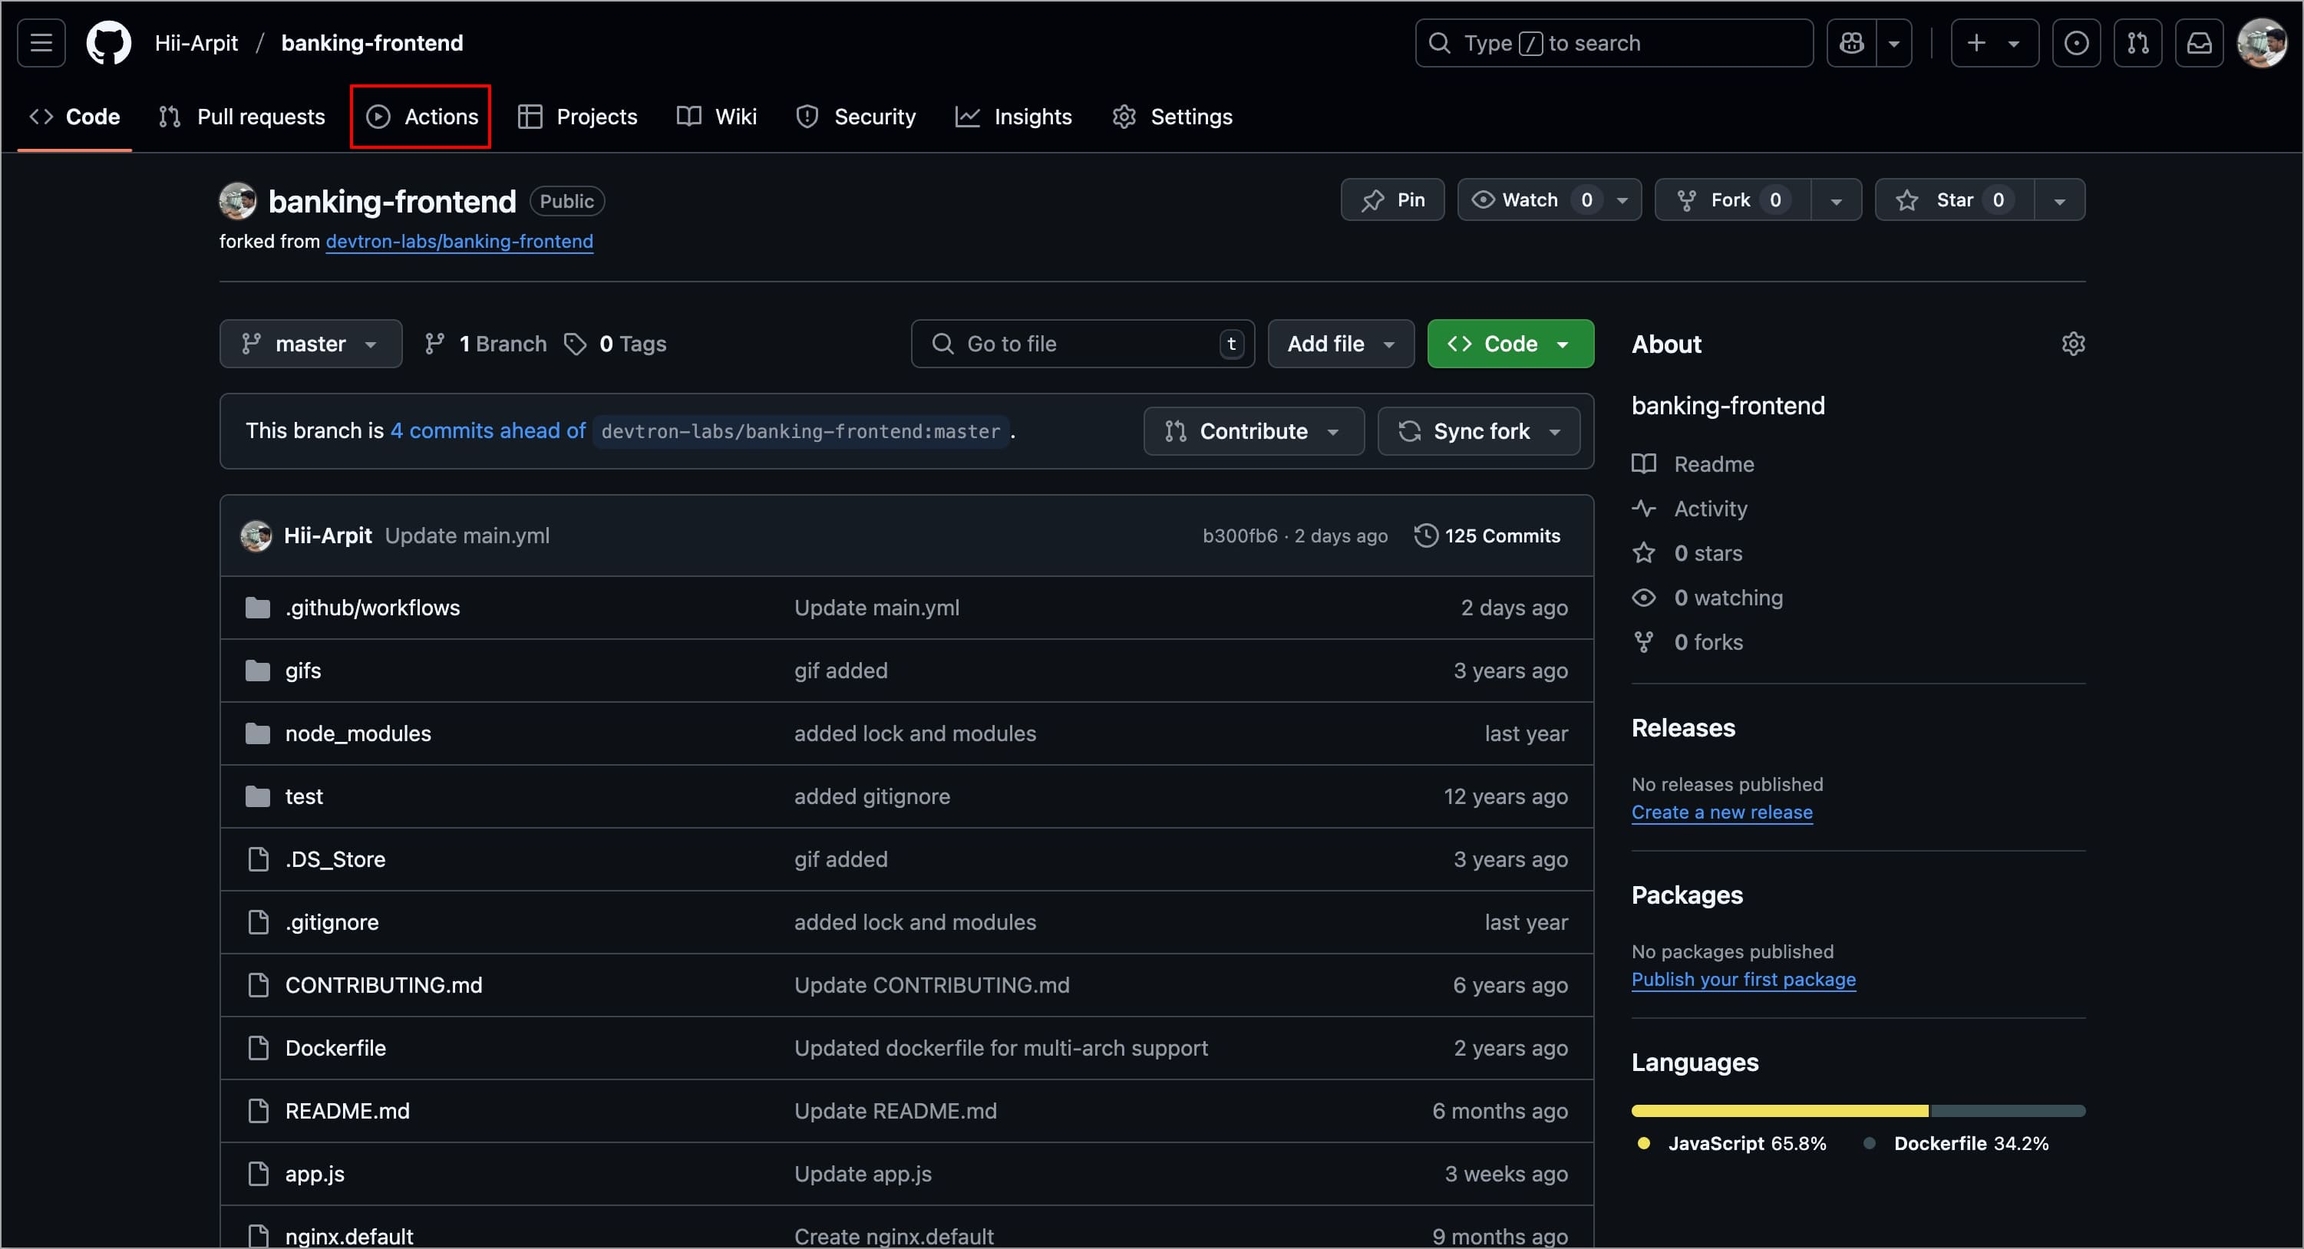
Figure 45: Navigating to Actions Select your workflow under the All workflows section.
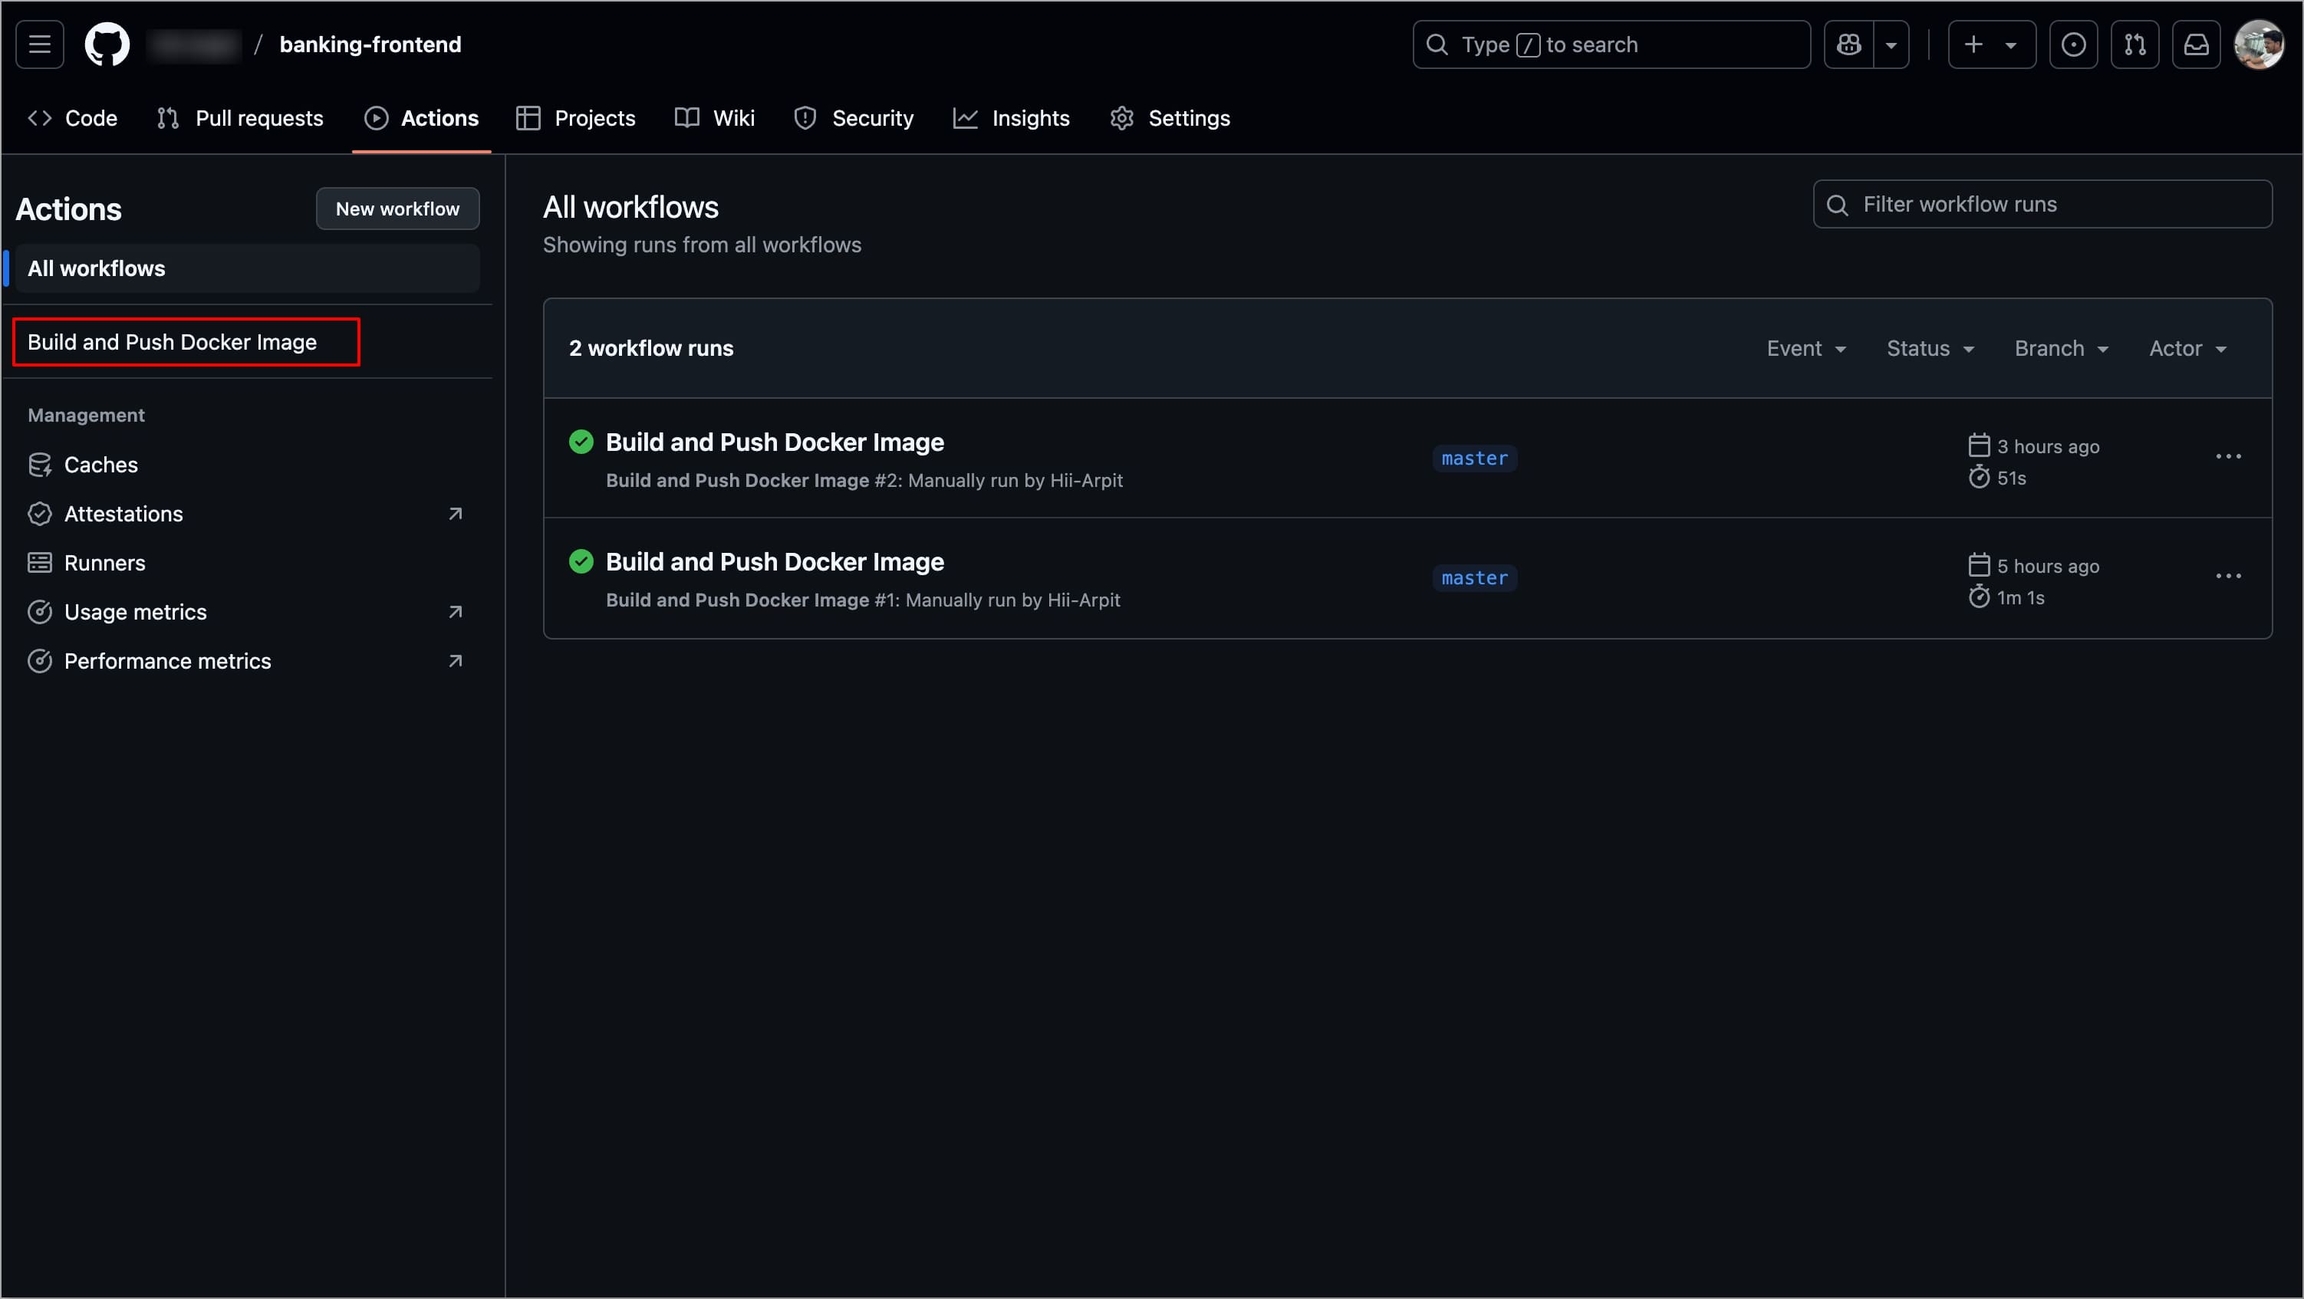
Figure 46: Selecting workflow Click the workflow file (
main.yml) under the workflow name, this will open the workflow file in GitHub.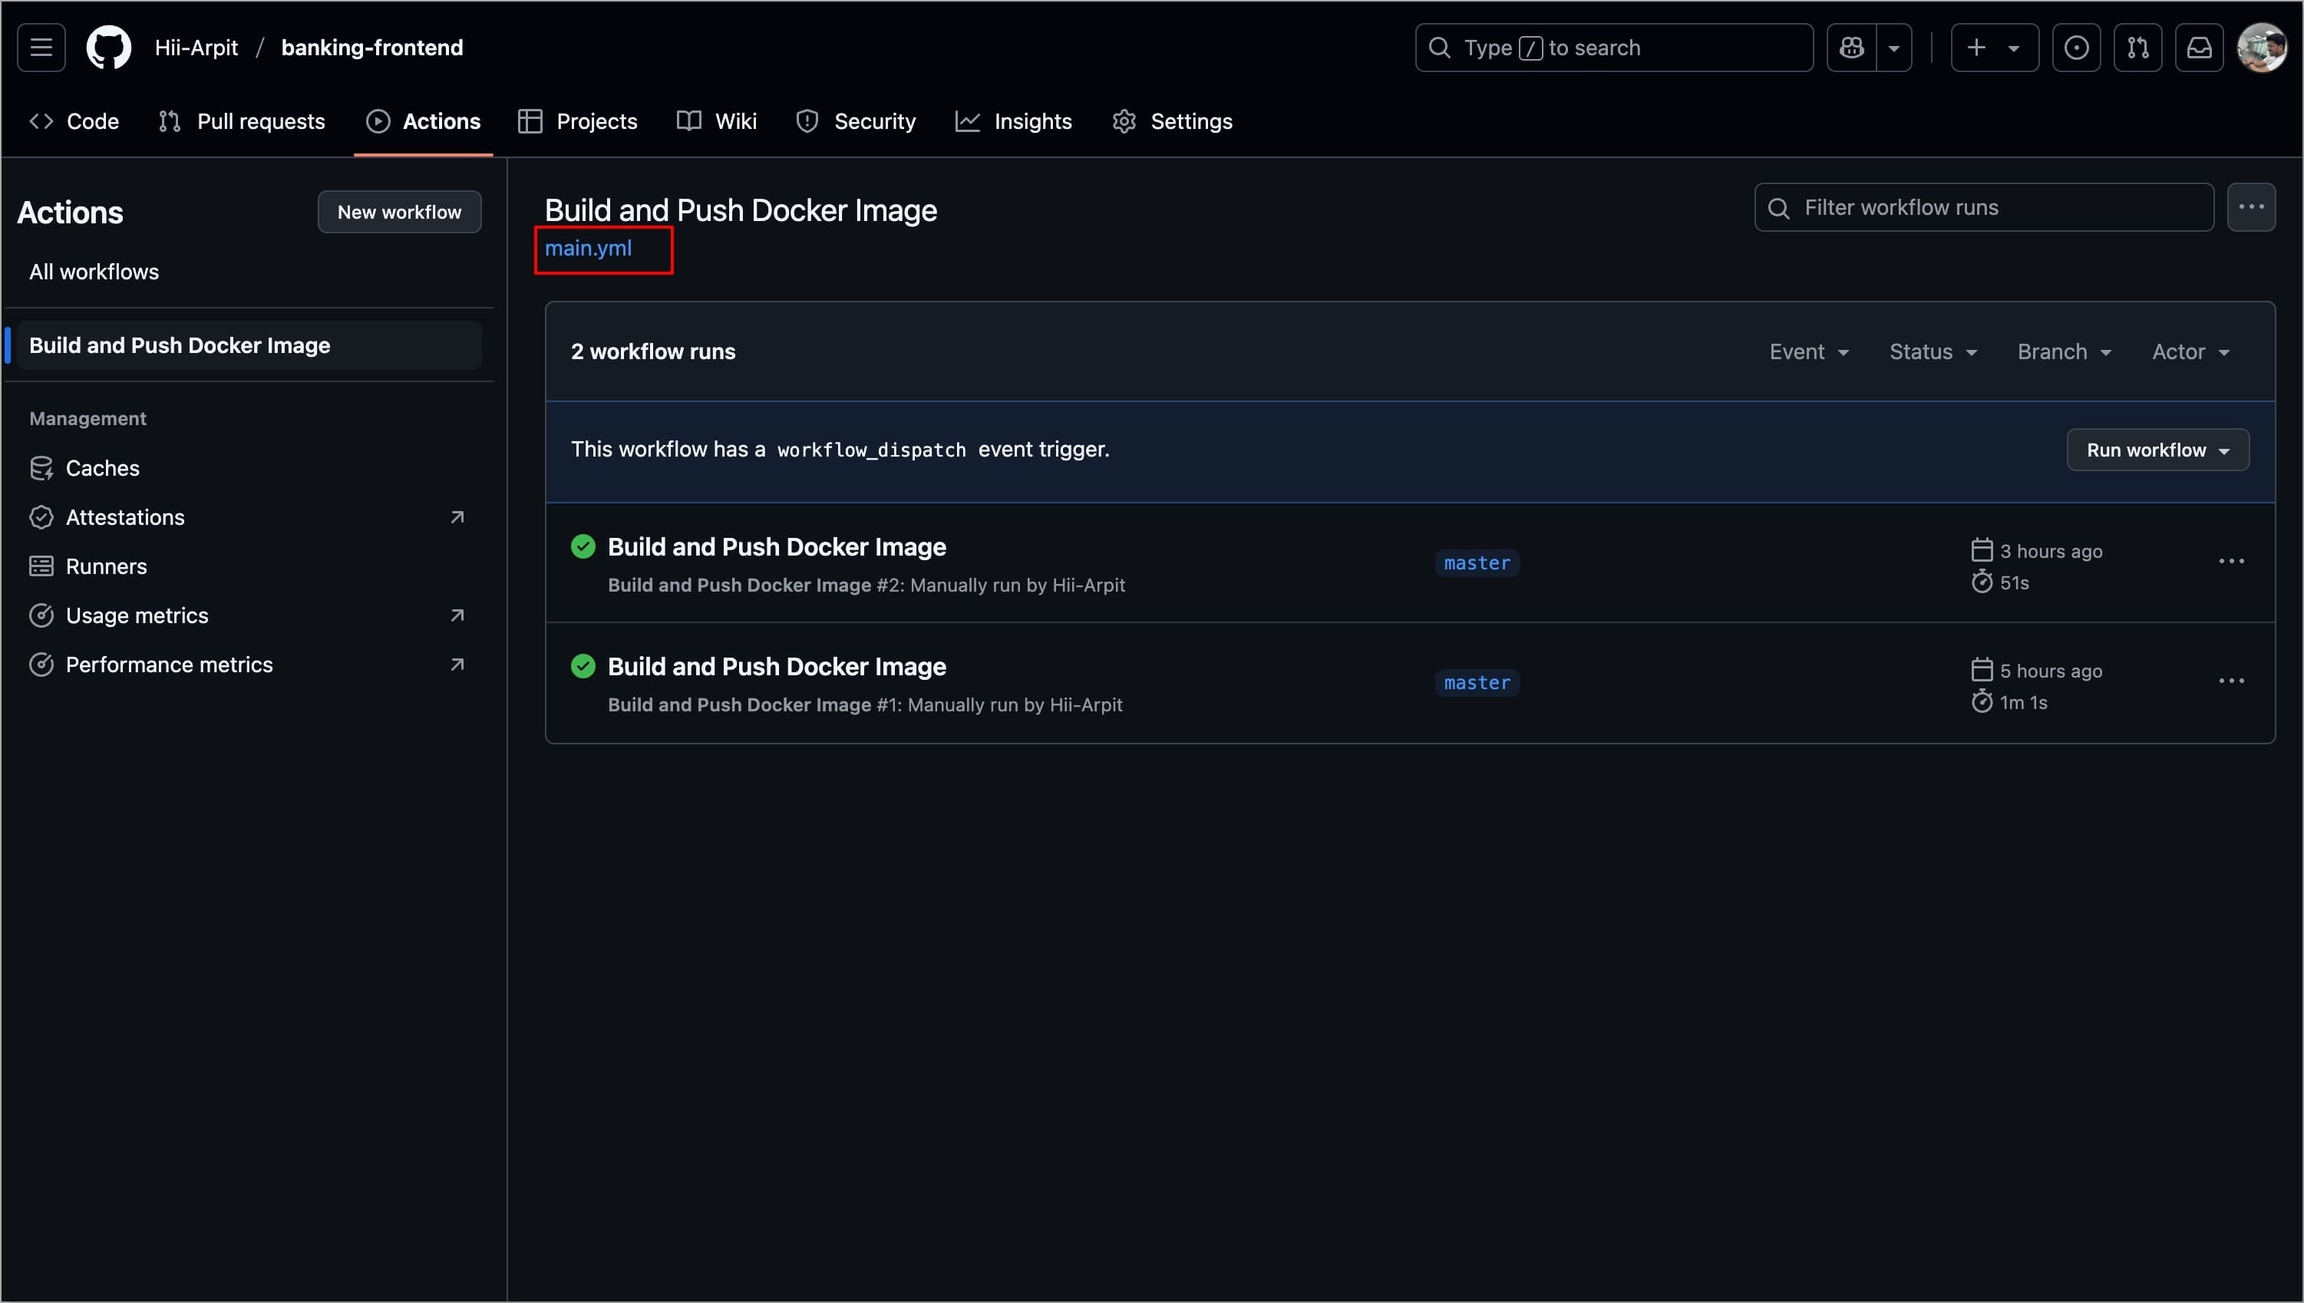
Figure 47: Selecting 'Workflow File' Select the edit icon to add the webhook step in the workflow file.
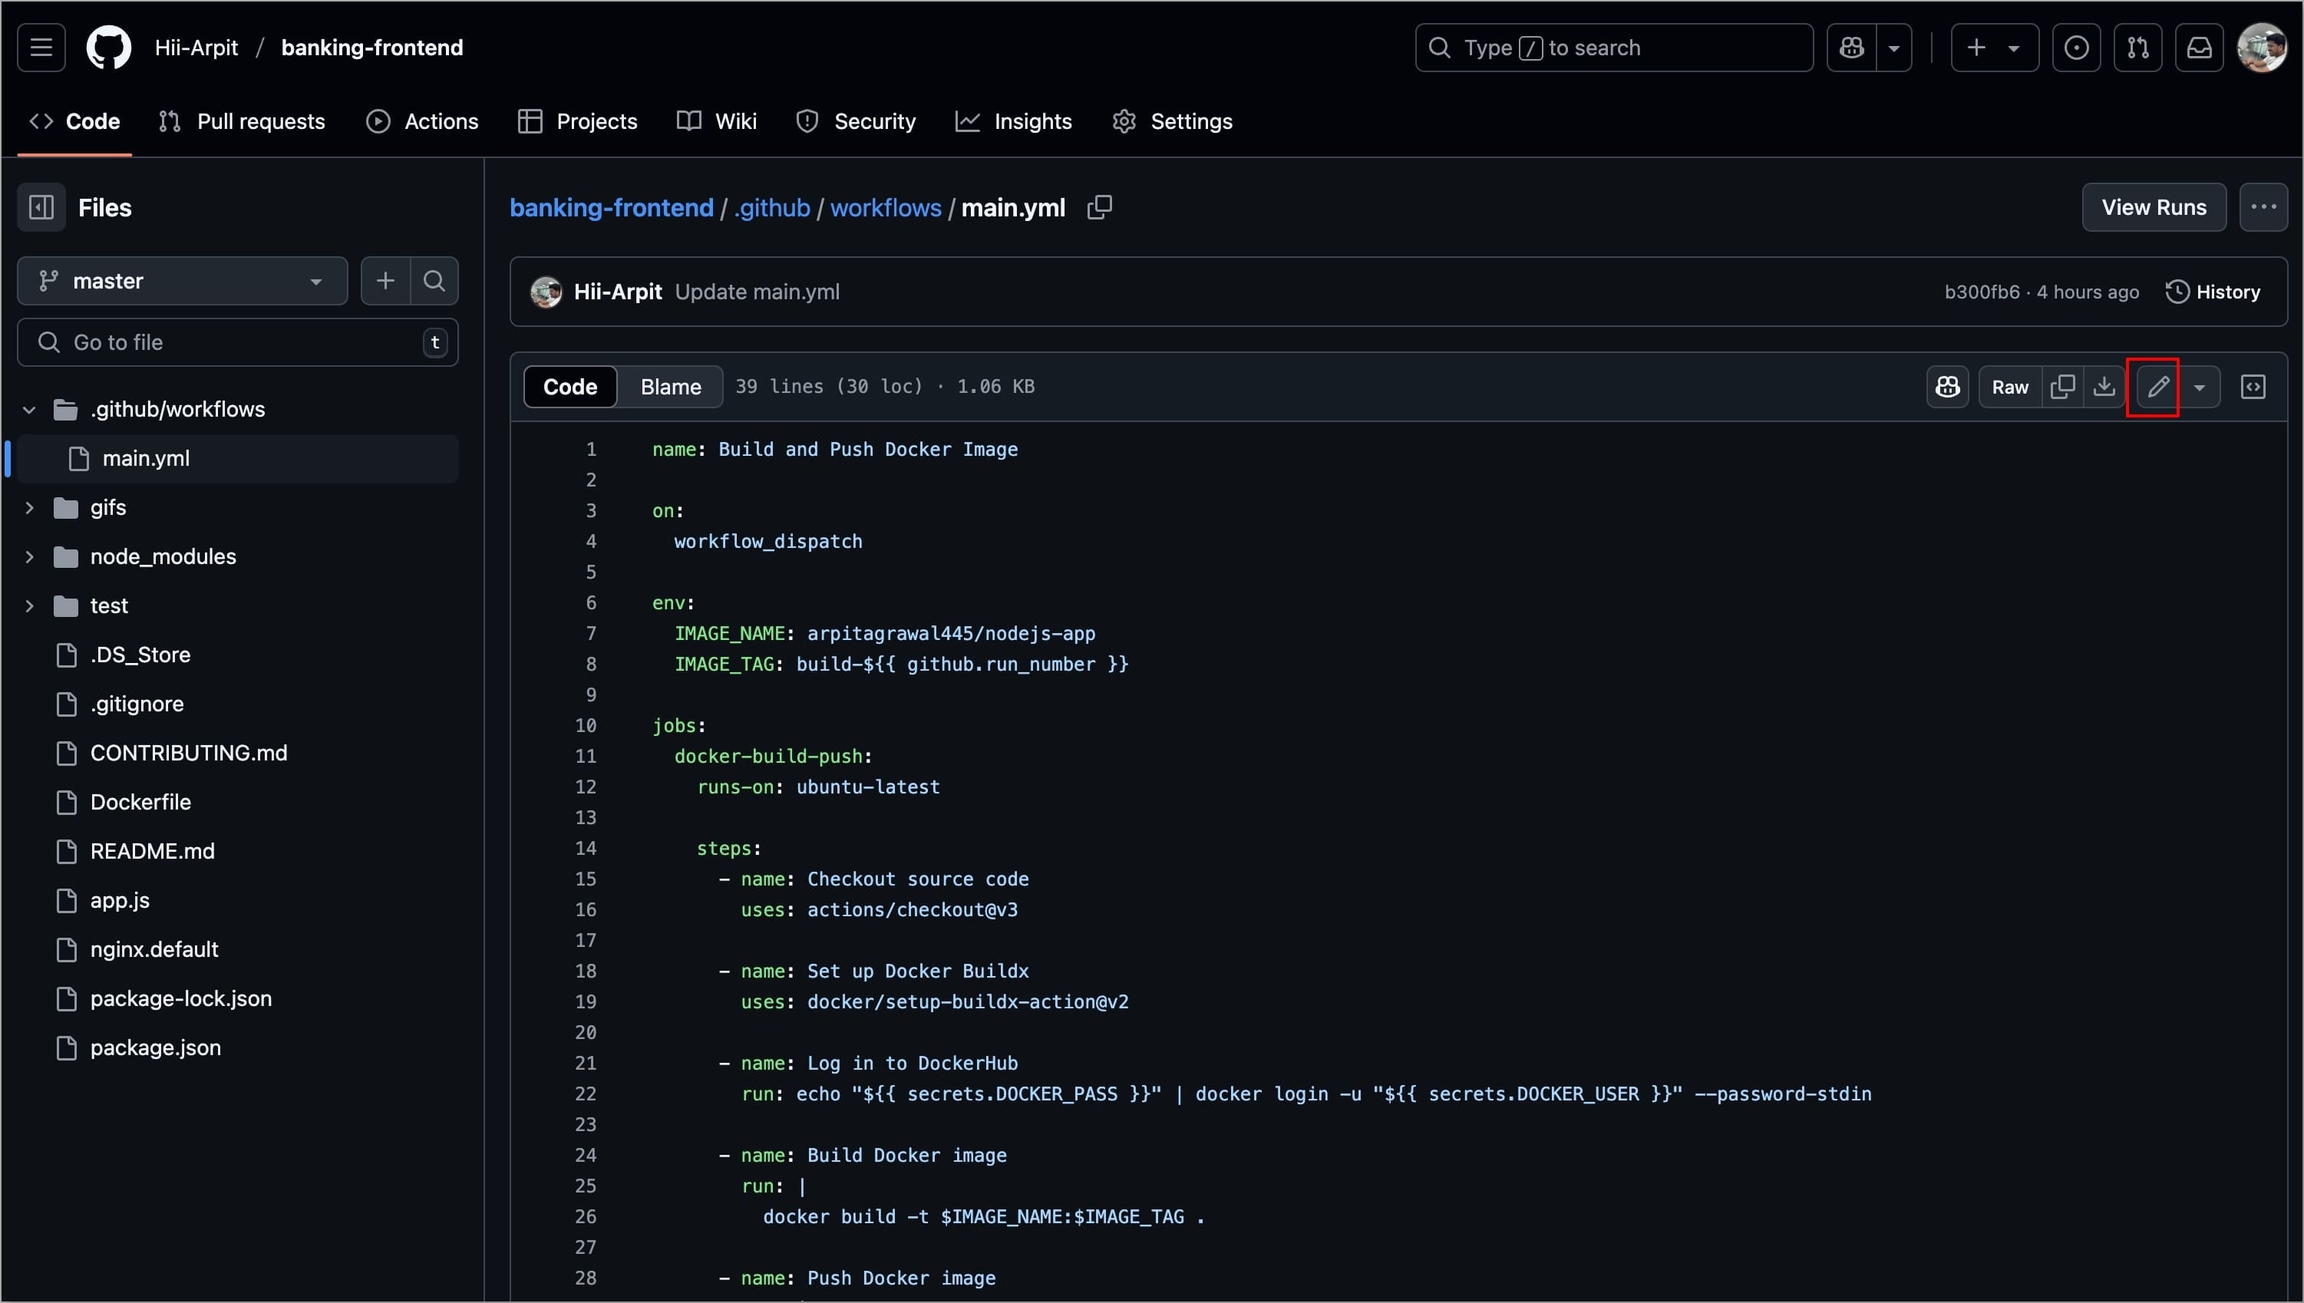
Figure 48: Selecting 'Edit' Icon Add the webhook step in the workflow file and select Commit changes...
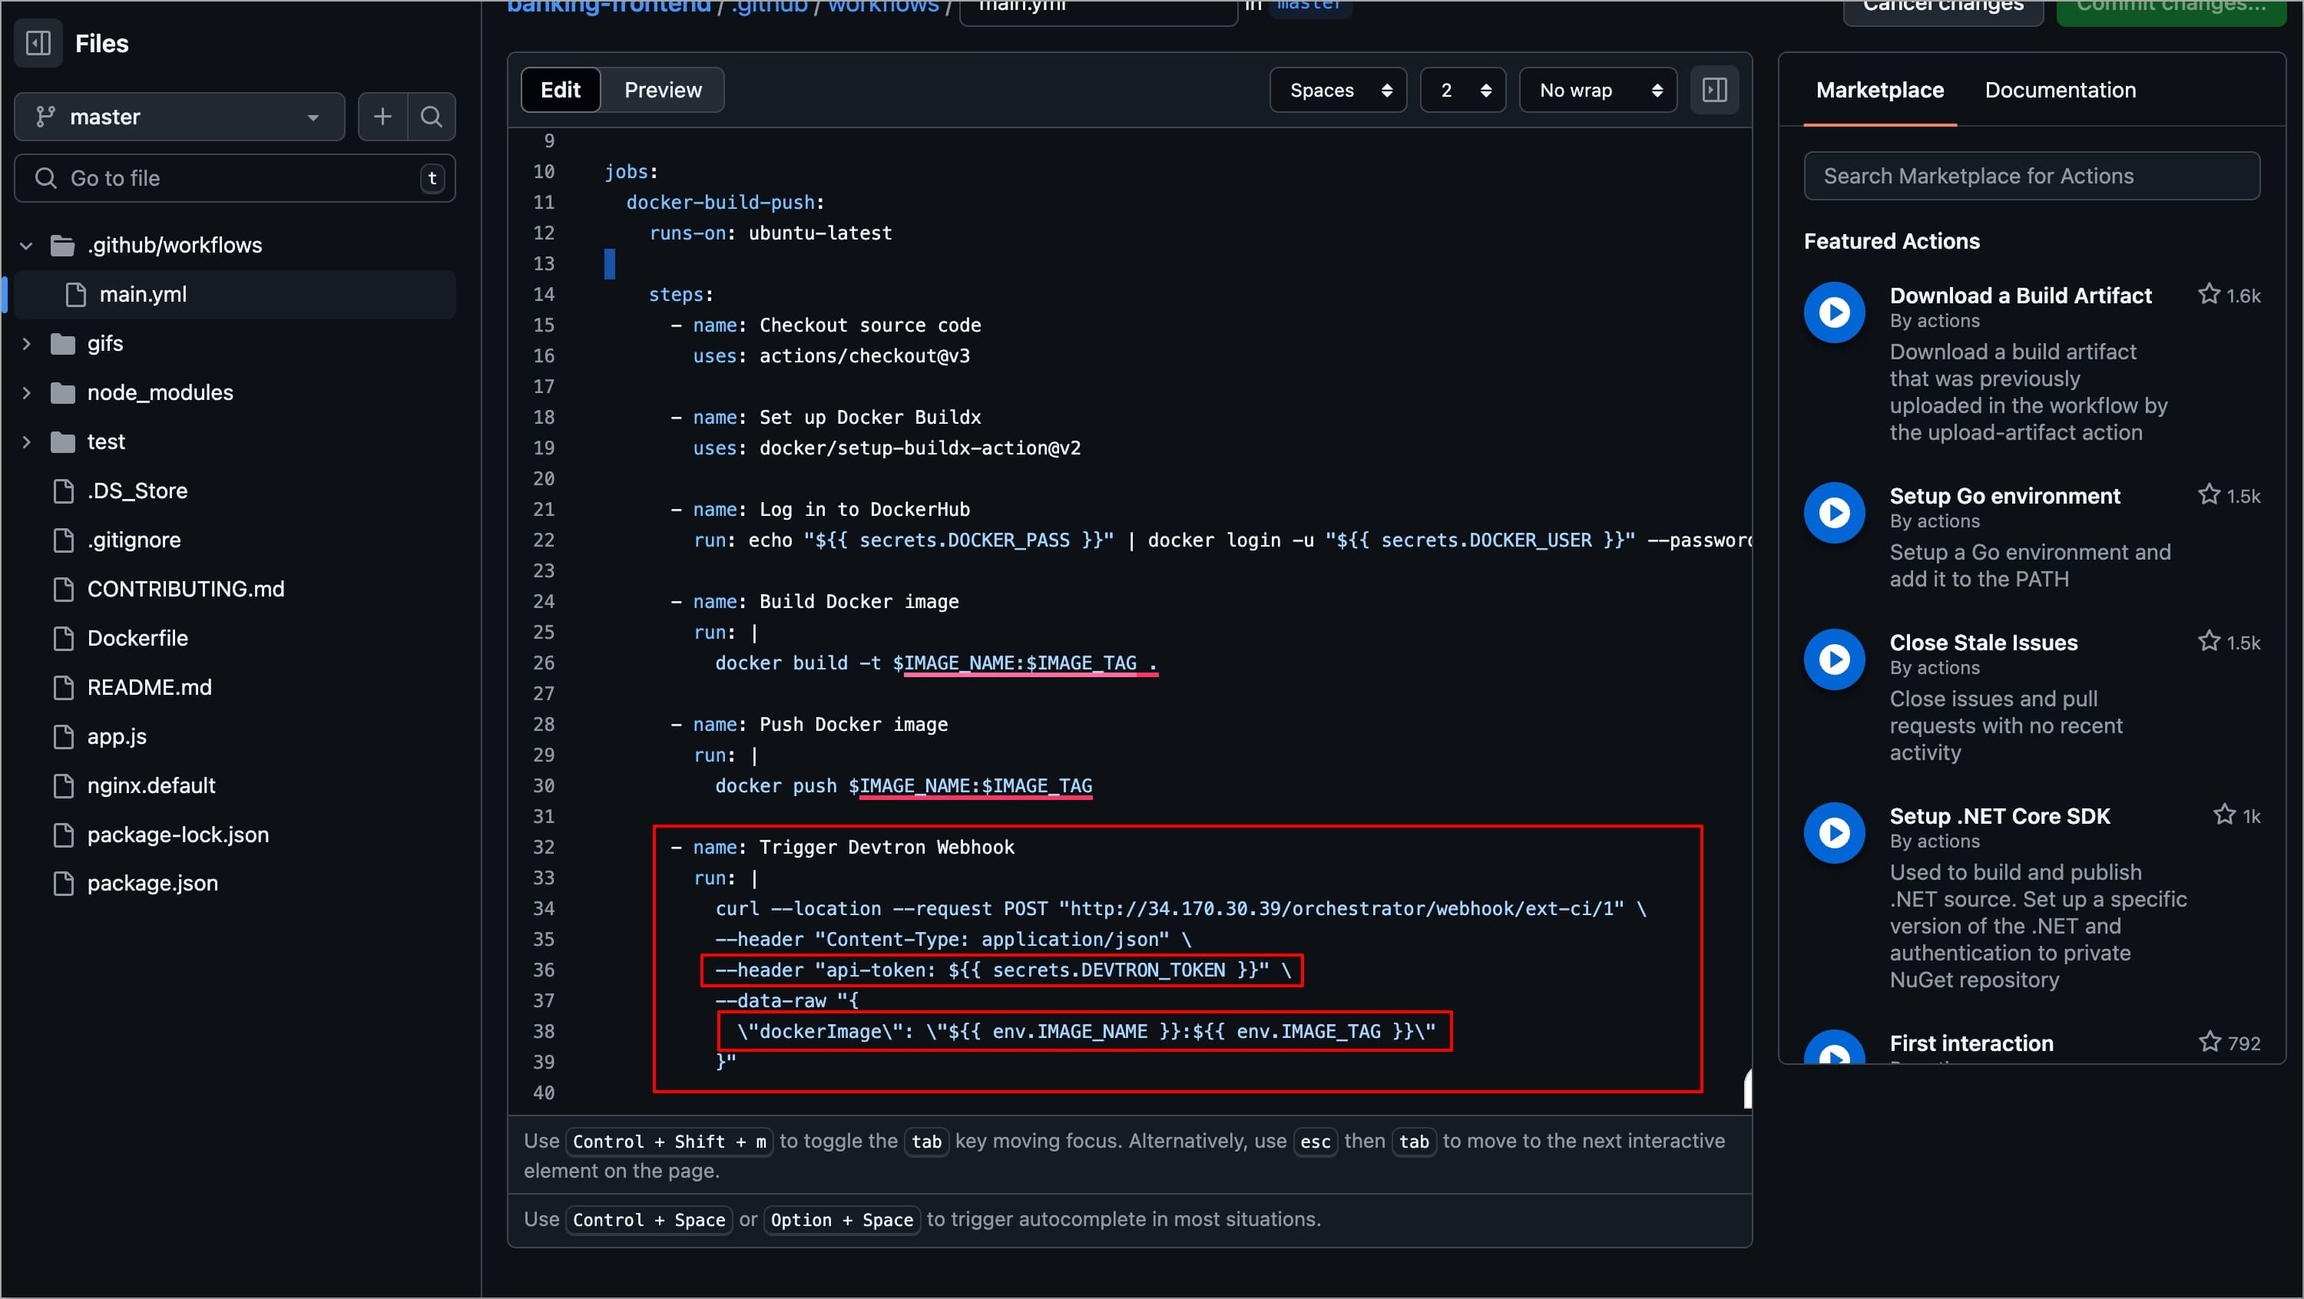
Figure 49a: Adding Webhook Step 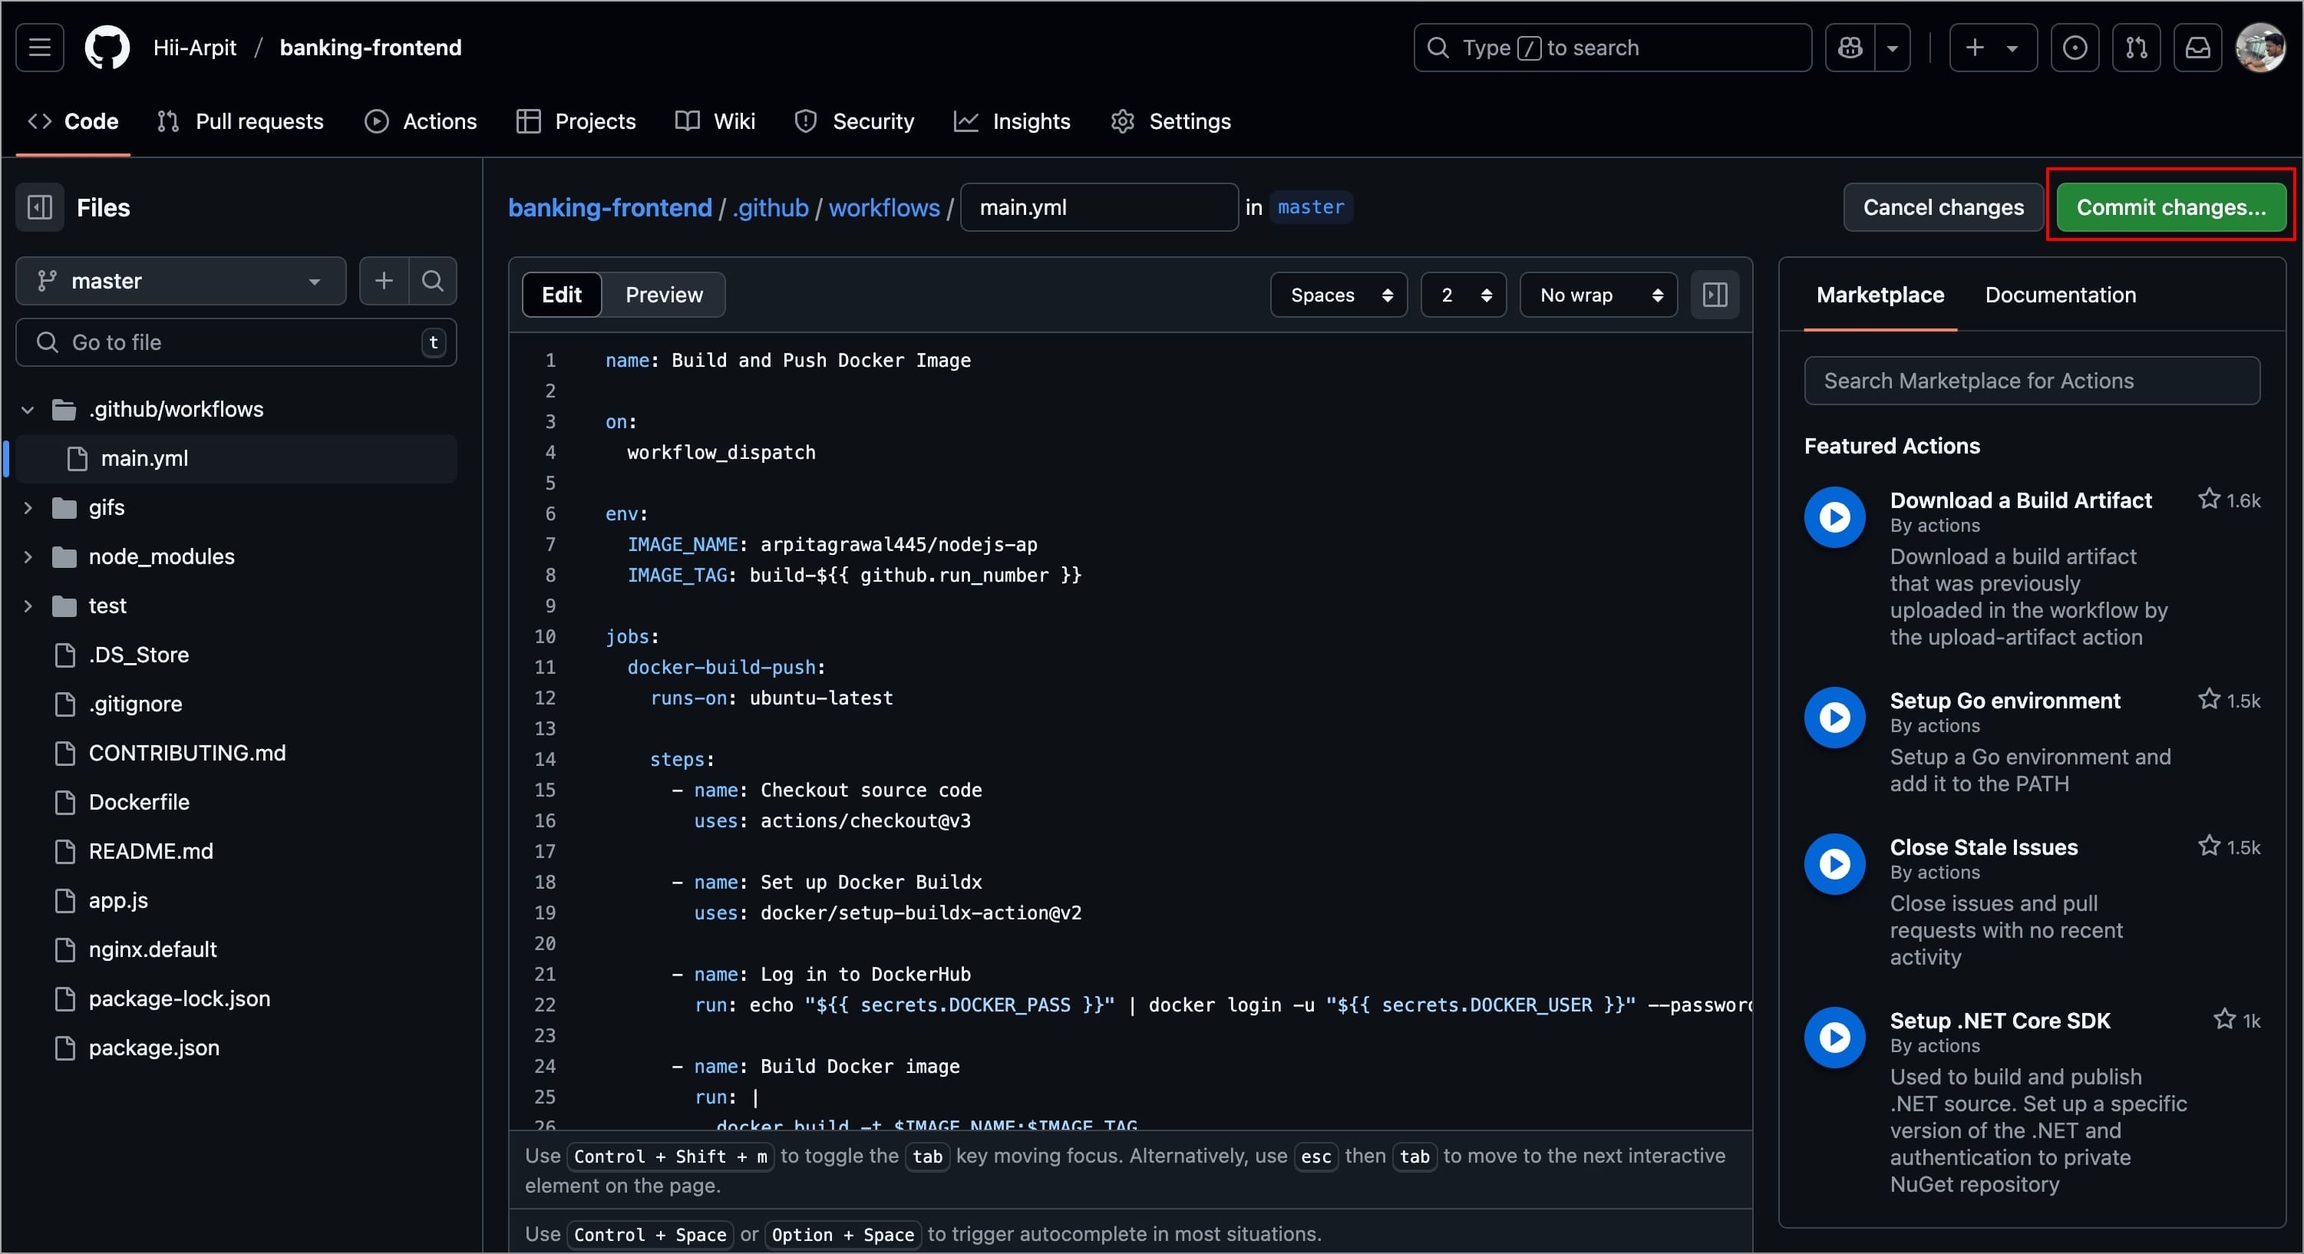
Figure 49b: Committing Changes Provide a Commit message and an optional description.
Select Commit changes, and the workflow file will be updated with the webhook step.
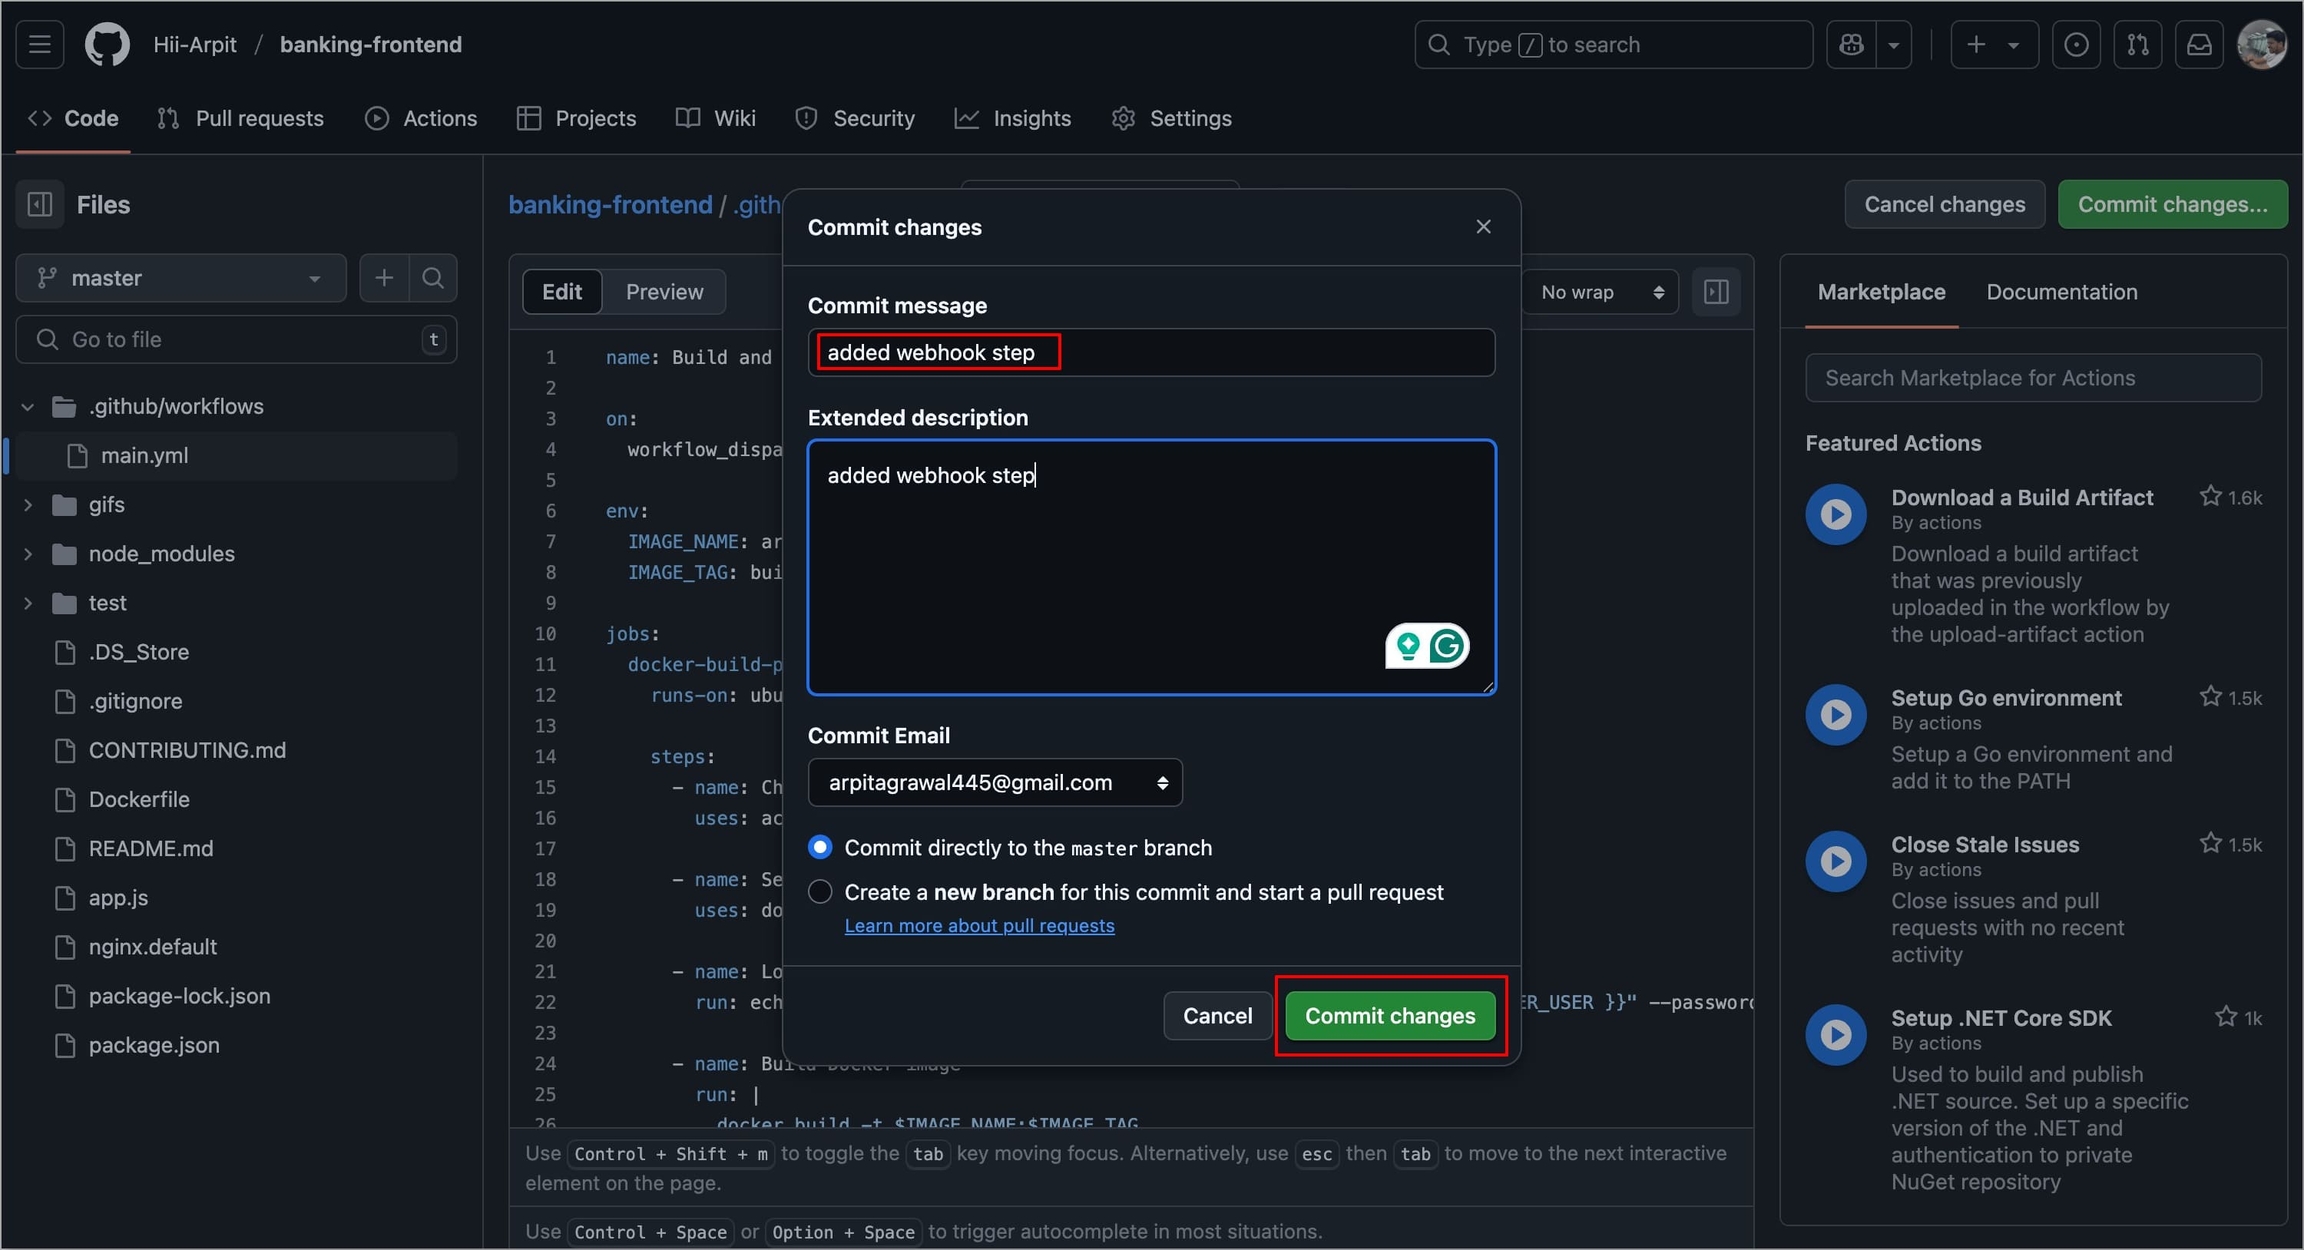
Figure 50: Selecting 'Commit changes'
The new images that will be built after adding the webhook will be available to Devtron for deployment.
Now, you can access the images on the Devtron dashboard and deploy manually. If you select the Automatic deployment option, your application deployment will trigger automatically when a new image is received.
4. Sync with Environment 
Sync with Environment allows you to reuse the deployed container image from one CD workflow in another CD workflow within the same application.
It is useful when you want to test a microservice (say, A) in a test environment, and it depends on another microservice (say, B). To ensure accurate testing of Microservice (A), you need a stable version of Microservice (B) (the one that is already running in production). However, modifying the production pipeline for testing purposes is not ideal and often not allowed due to stability concerns.
In such cases, you can use Sync with Environment to create a new workflow that uses the deployed image from the existing CD pipeline (of microservice B) from a specific environment. This image then acts as the source CI for the new workflow within the same application.
This allows the new workflow to use the same image as the stable production environment, thus enabling consistent and reliable testing without impacting production workloads.
To create a pipeline form Sync with Environment, follow the steps below
Navigate to Configurations → Workflow Editor of your application.
Select + New Workflow, a modal window will appear where you can select the type of pipeline you want to create.
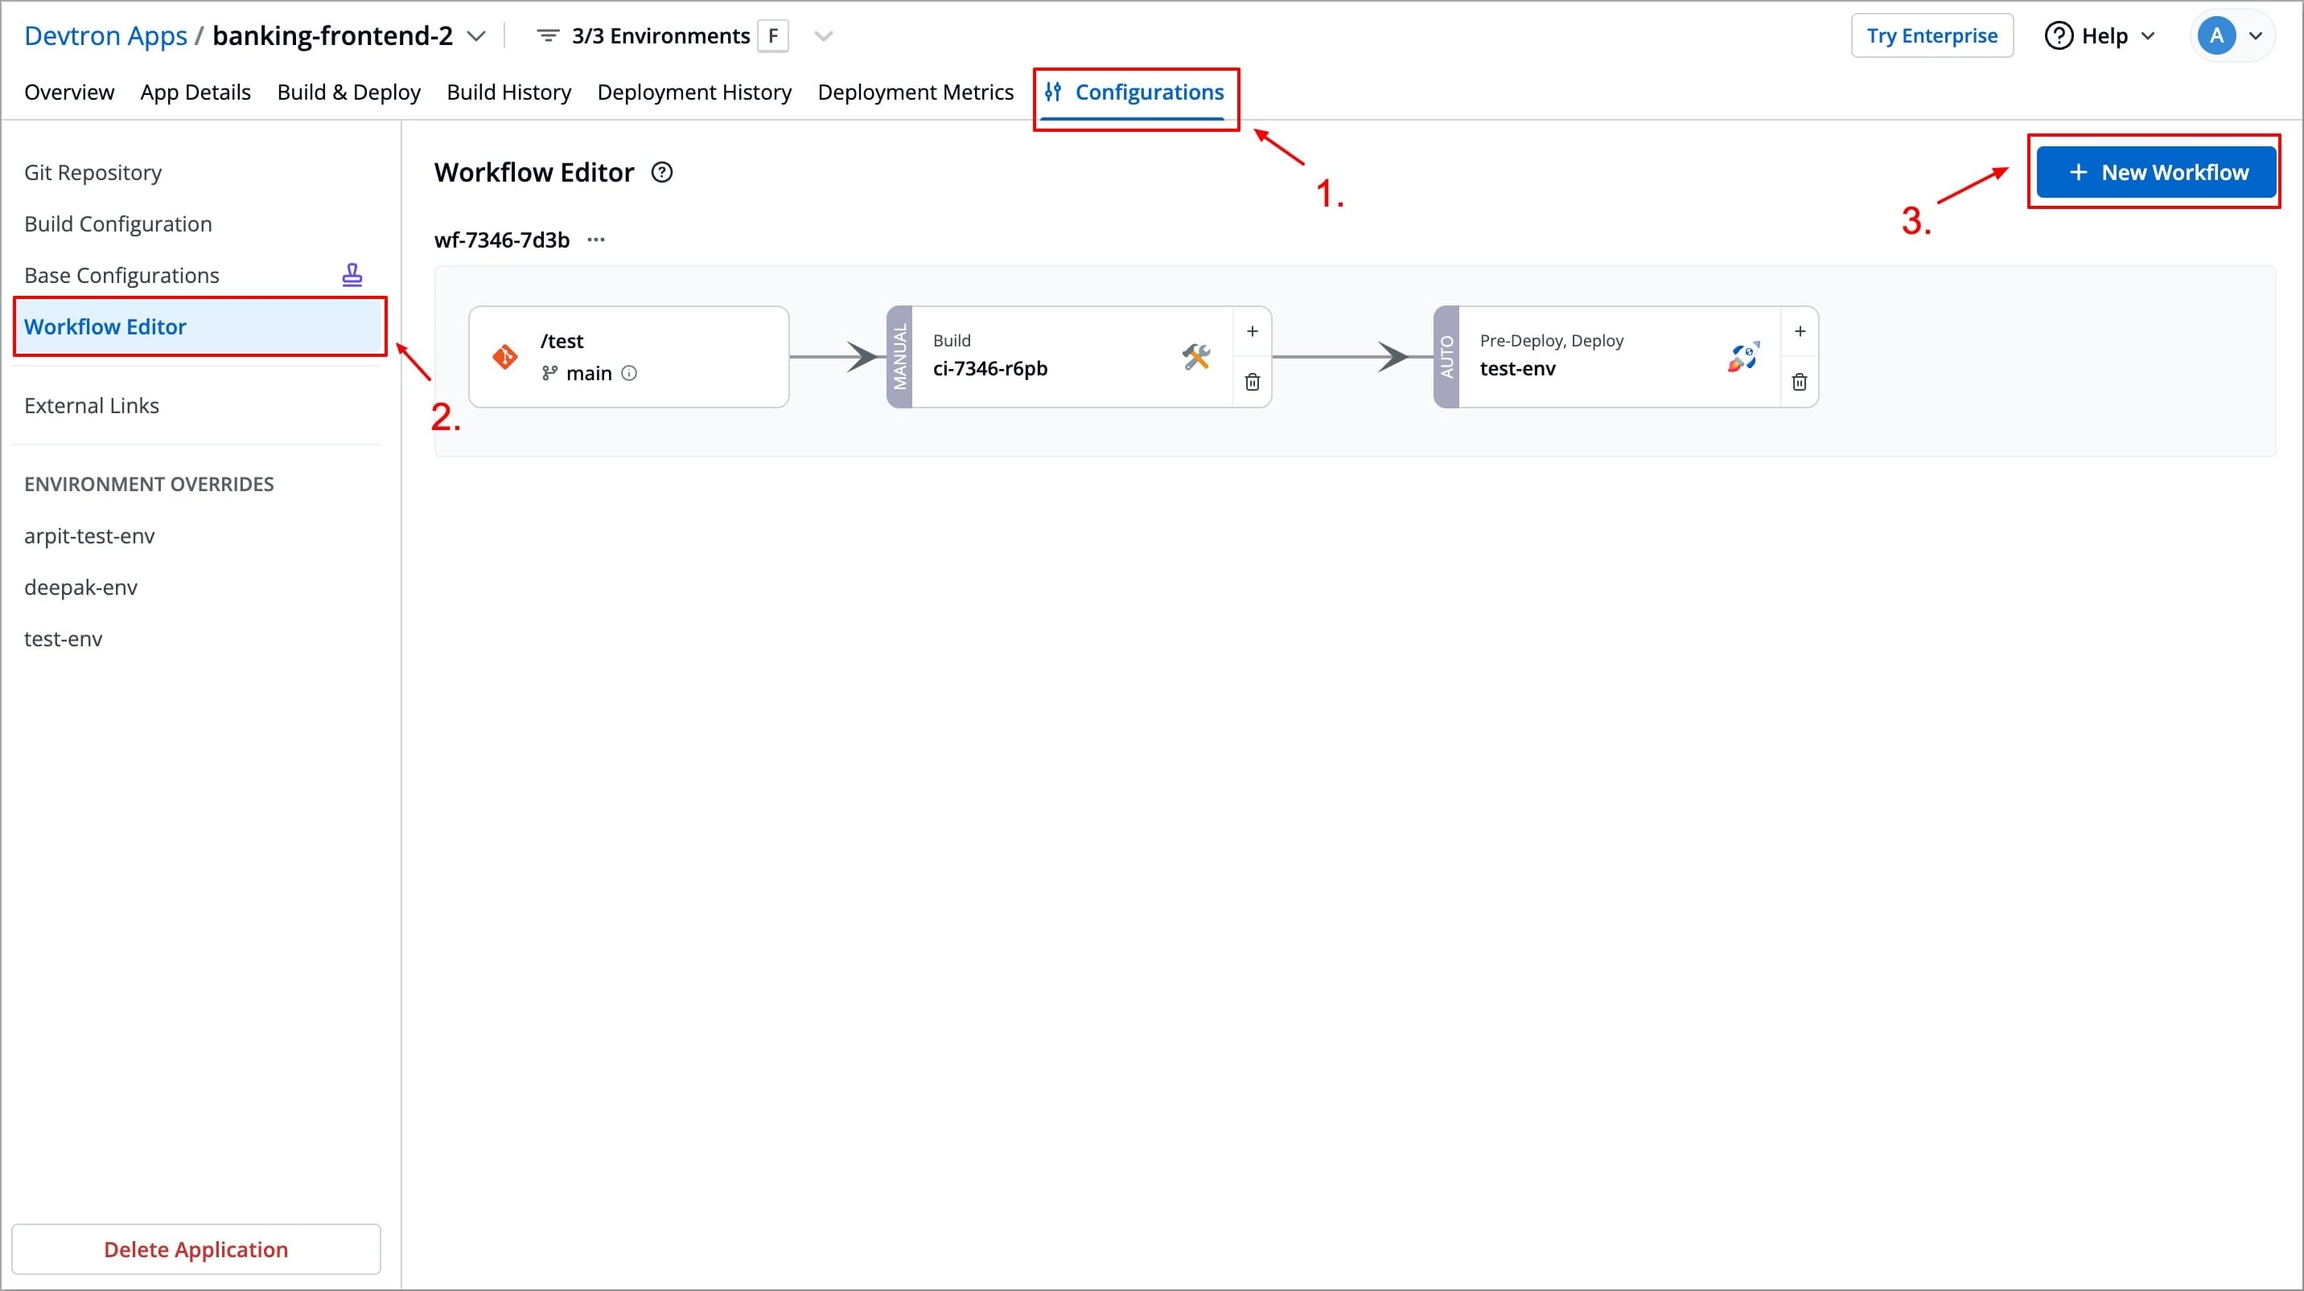
Figure 51: Creating New Workflow Select Sync with Environment, another modal window will appear where you need to select the environment in which the source CD pipeline exists.
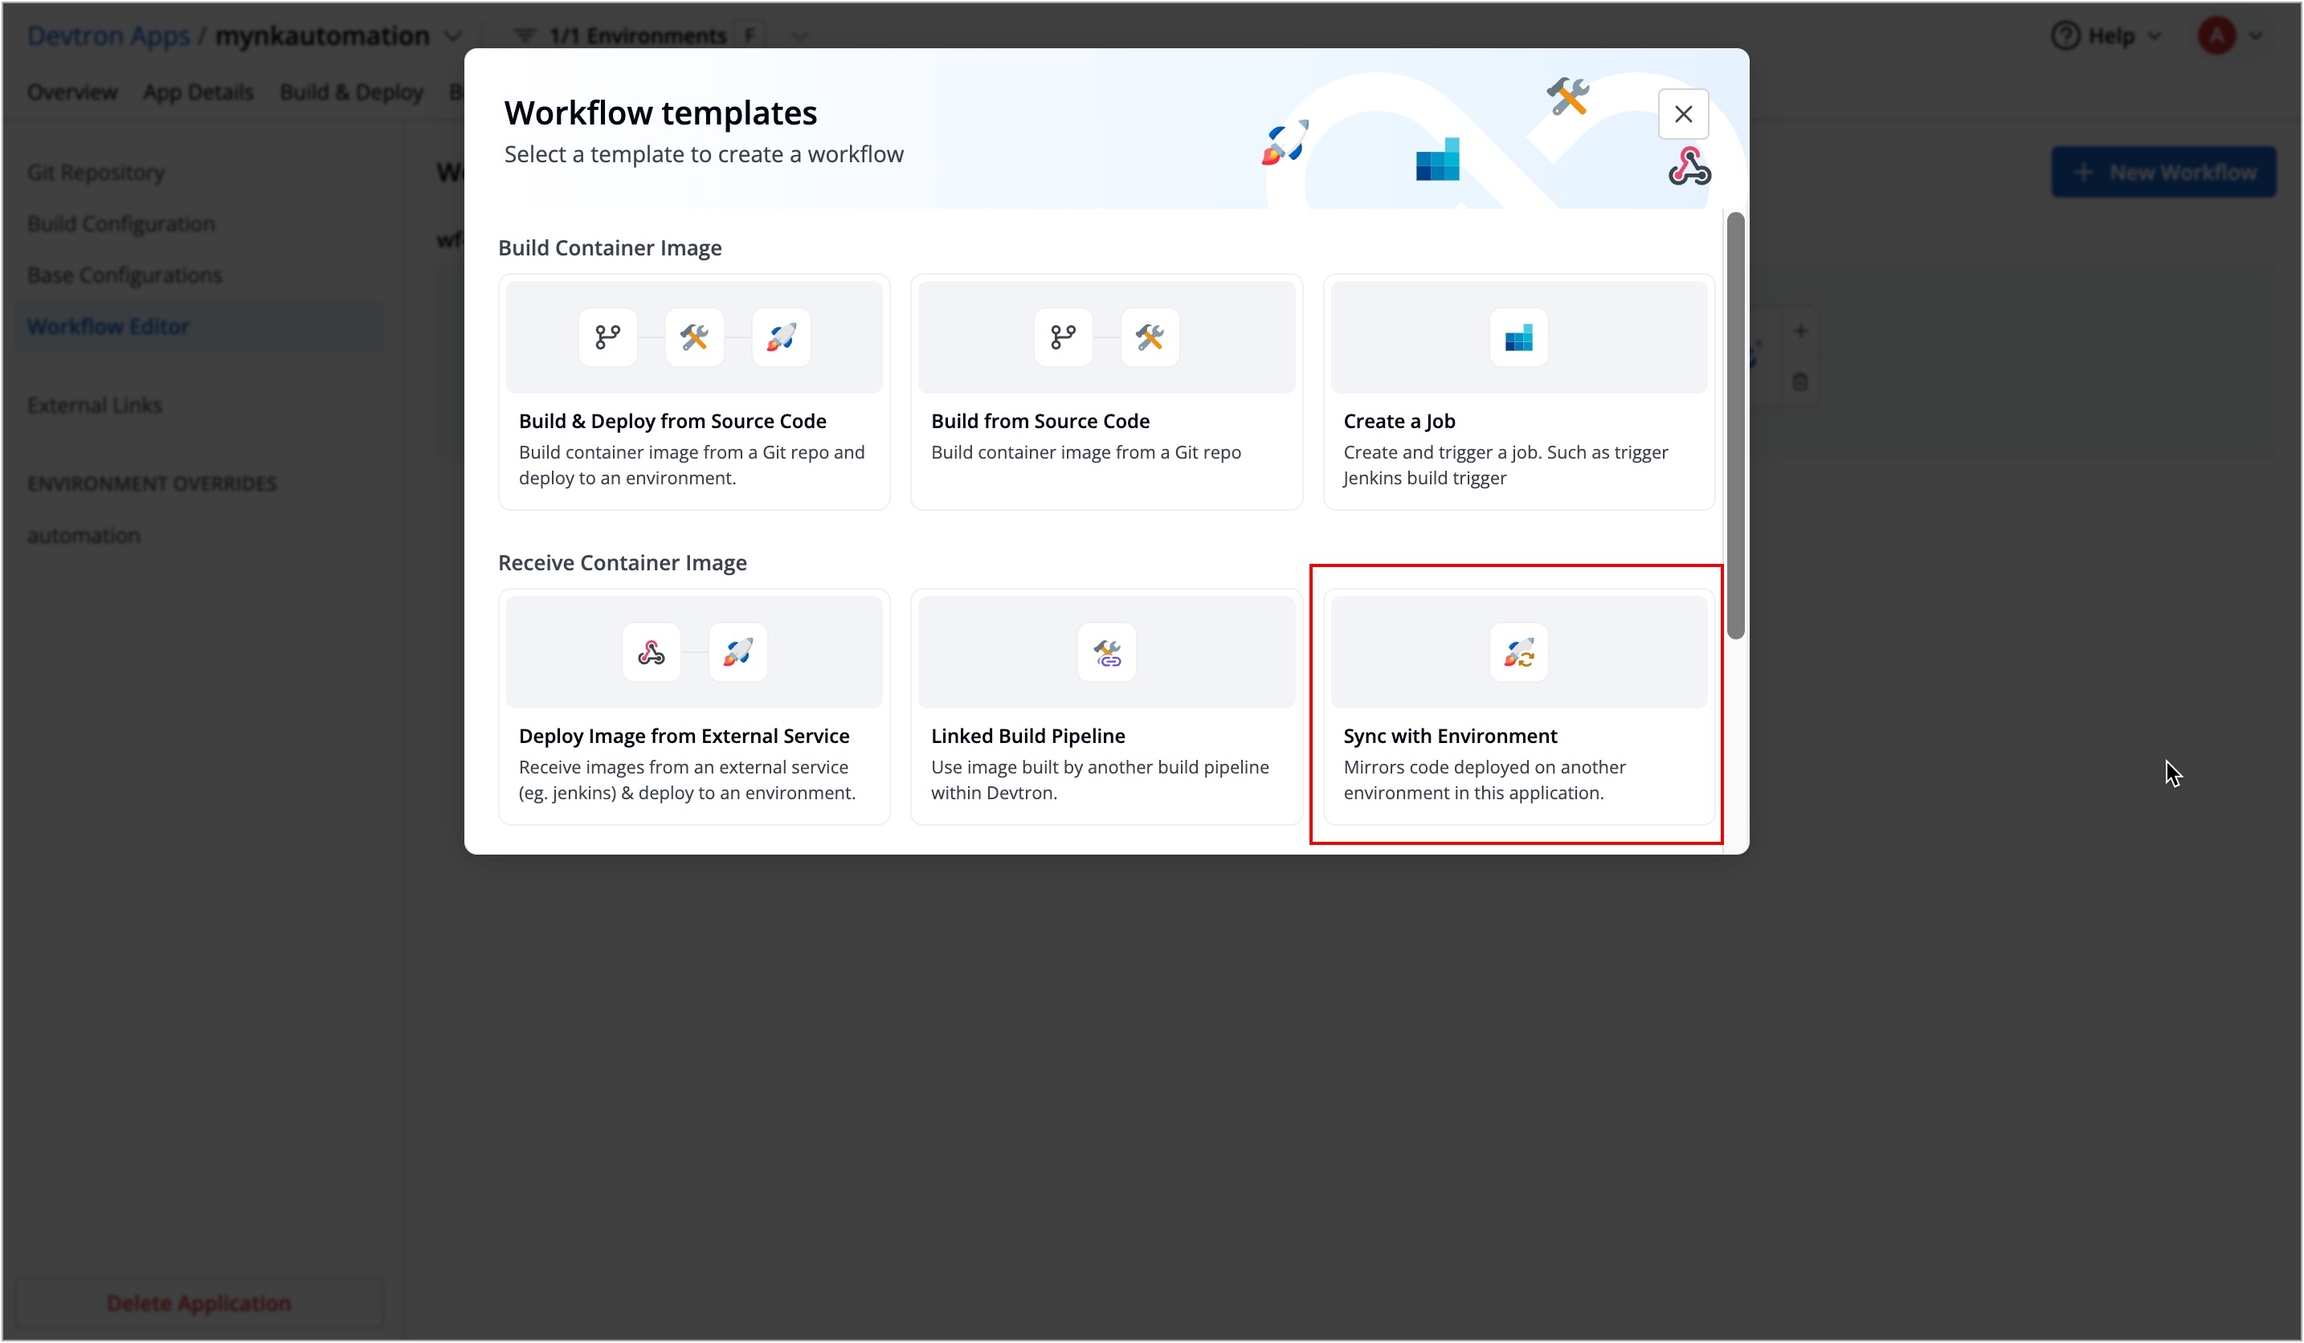
Figure 52 : Selecting 'Sync with Environment' Select the environment in which the source CD pipeline exists. You can only select one source CD per workflow.
Note: The CD pipeline used as a source cannot be deleted while it’s linked.
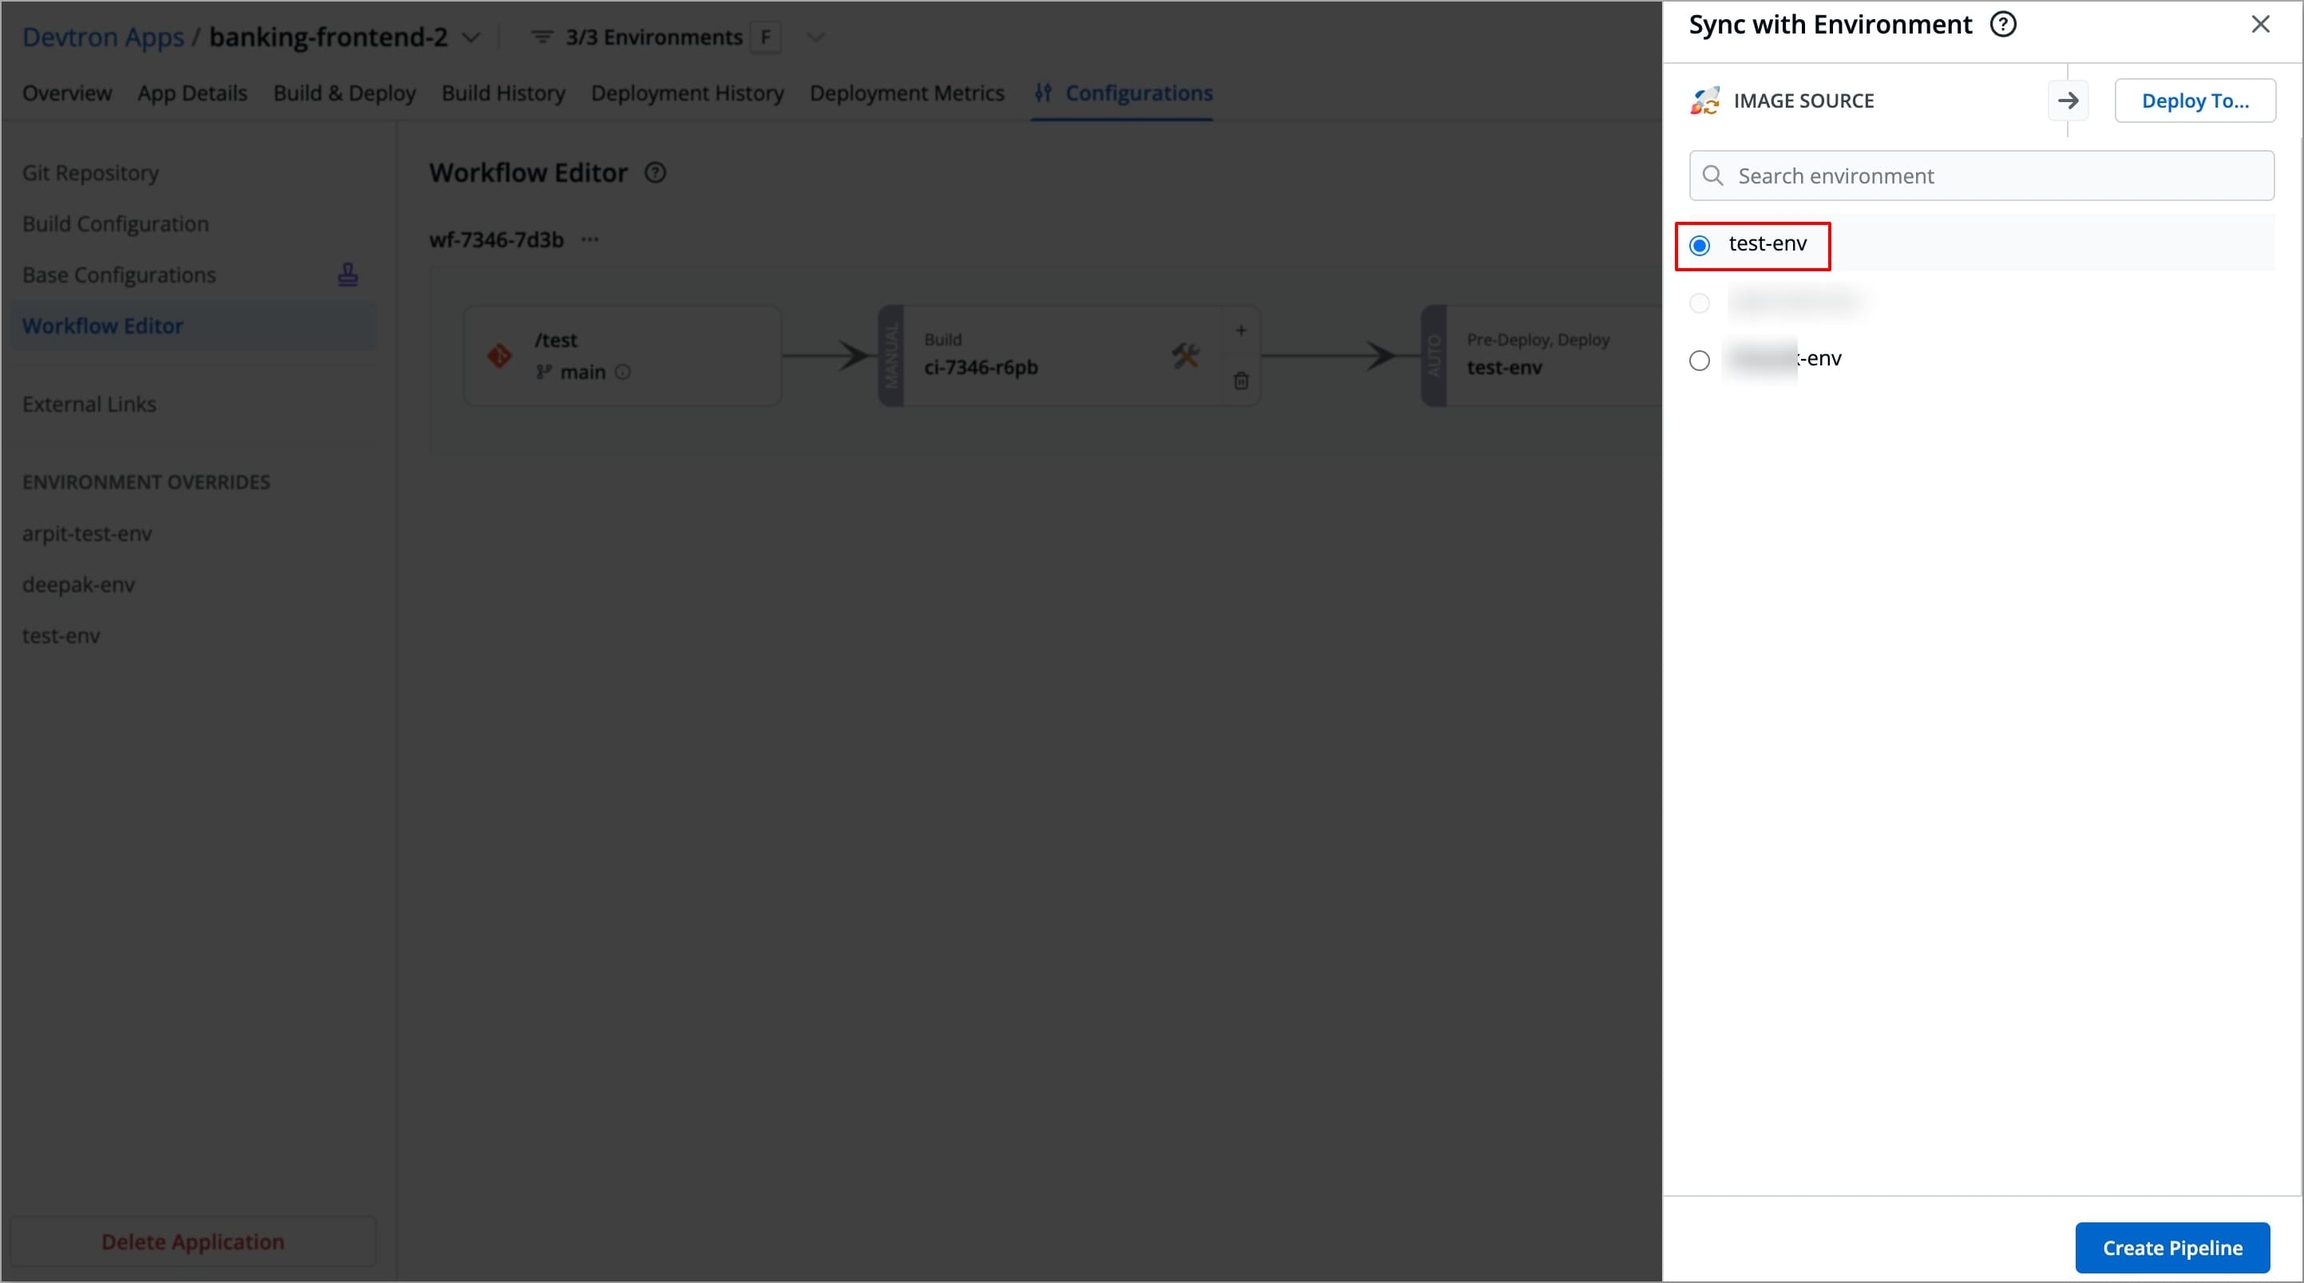
Figure 53: Selecting Source CD Environment Select Deploy to in the top right corner to select the environment in which you want to deploy the source CD image.
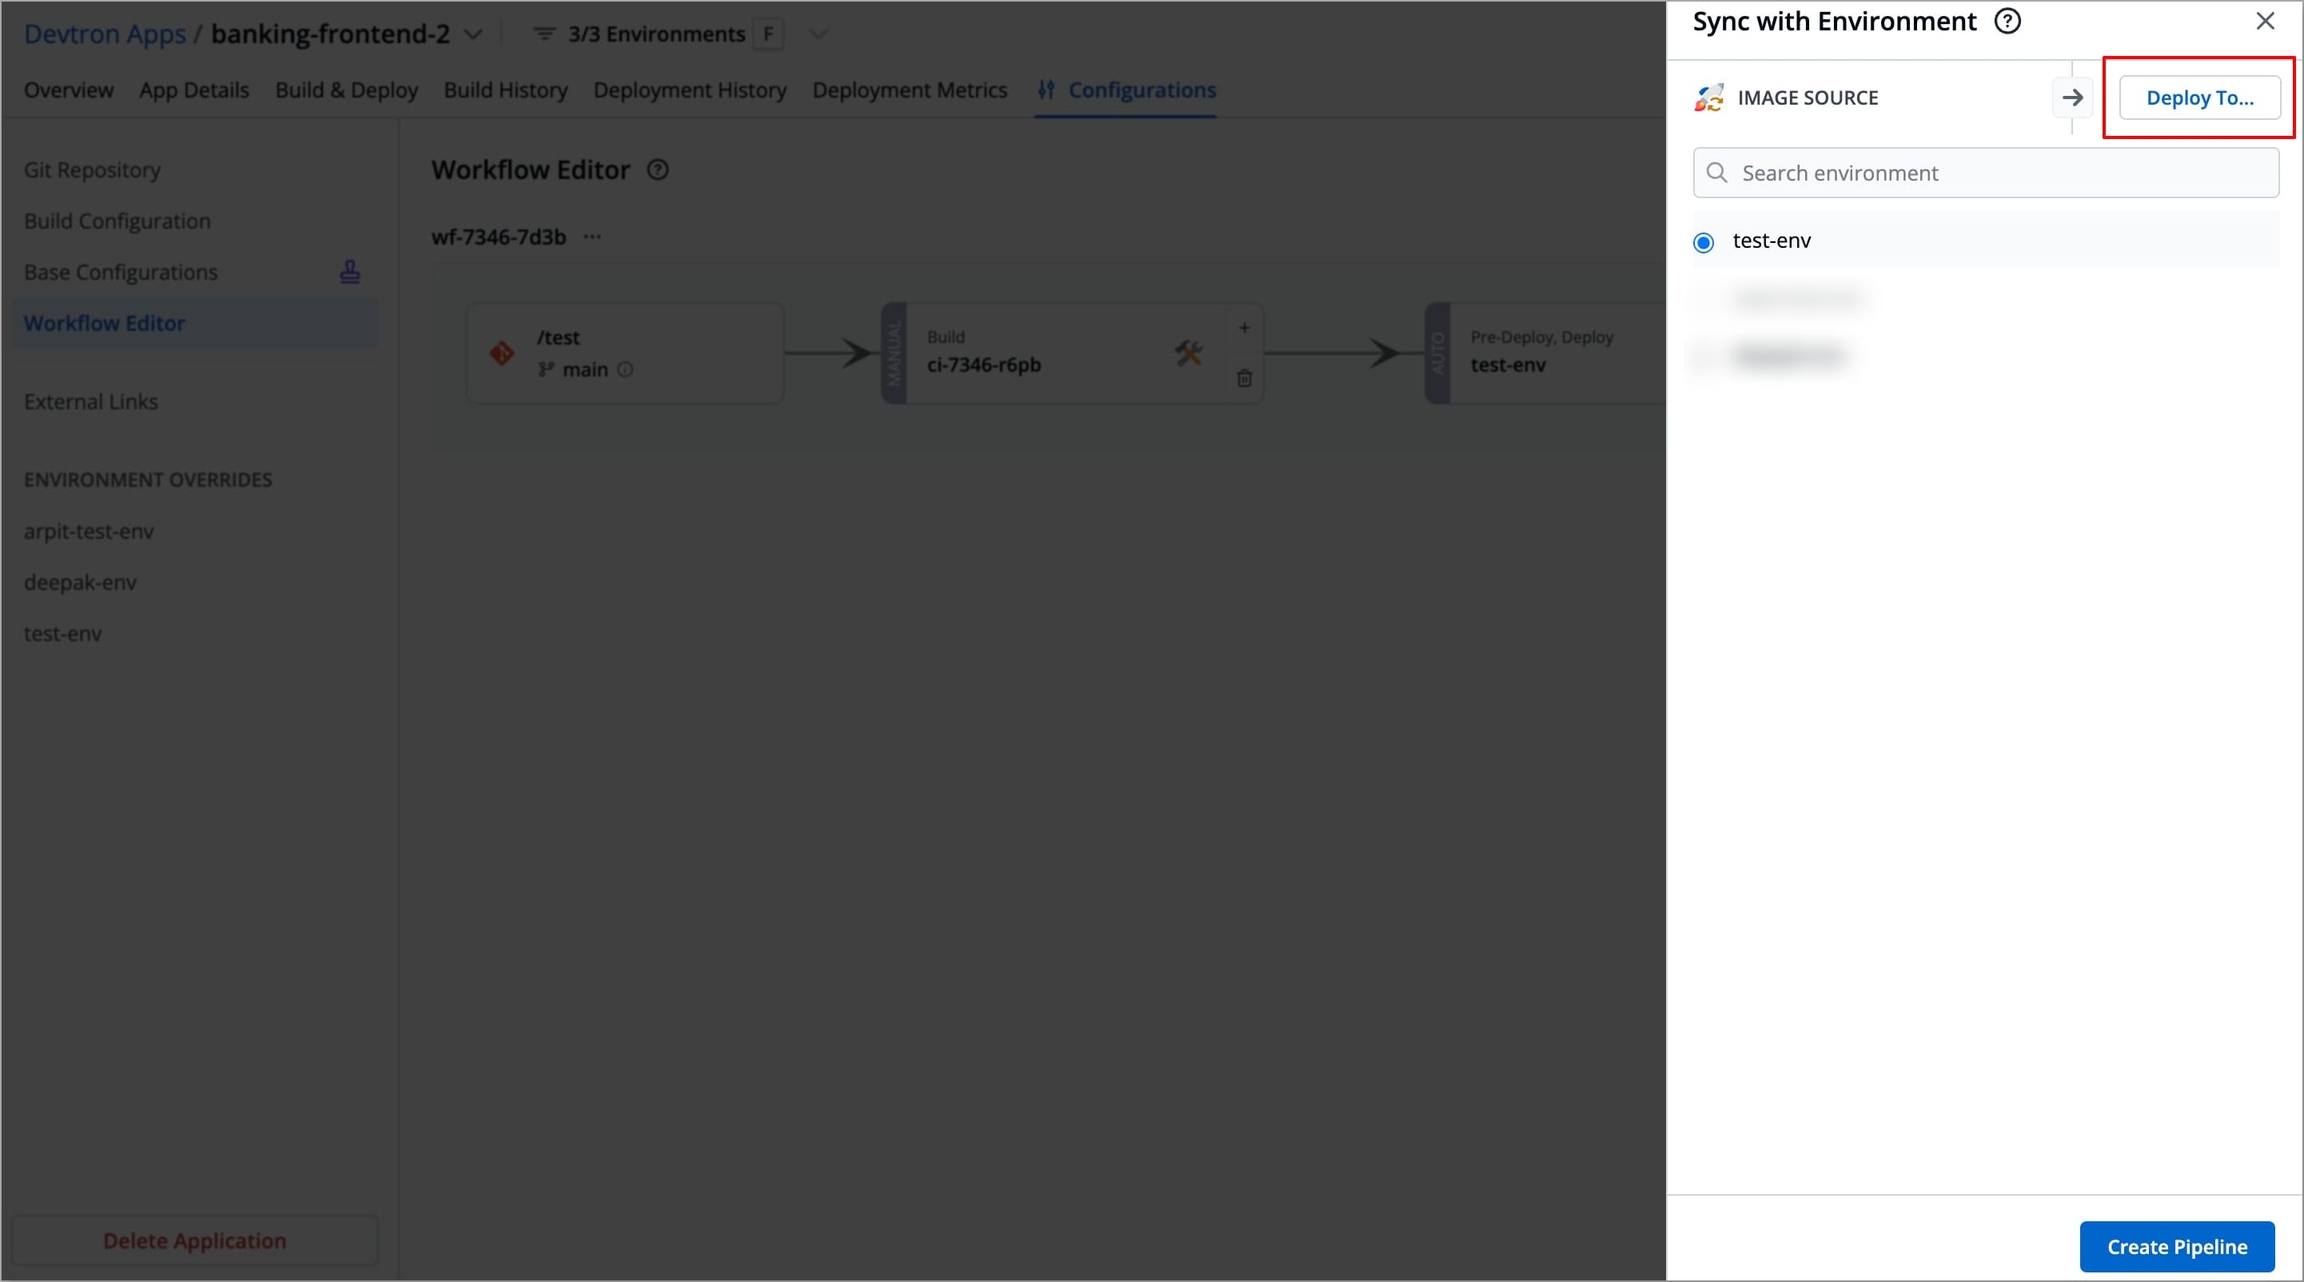
Figure 54a: Selecting 'Deploy To' 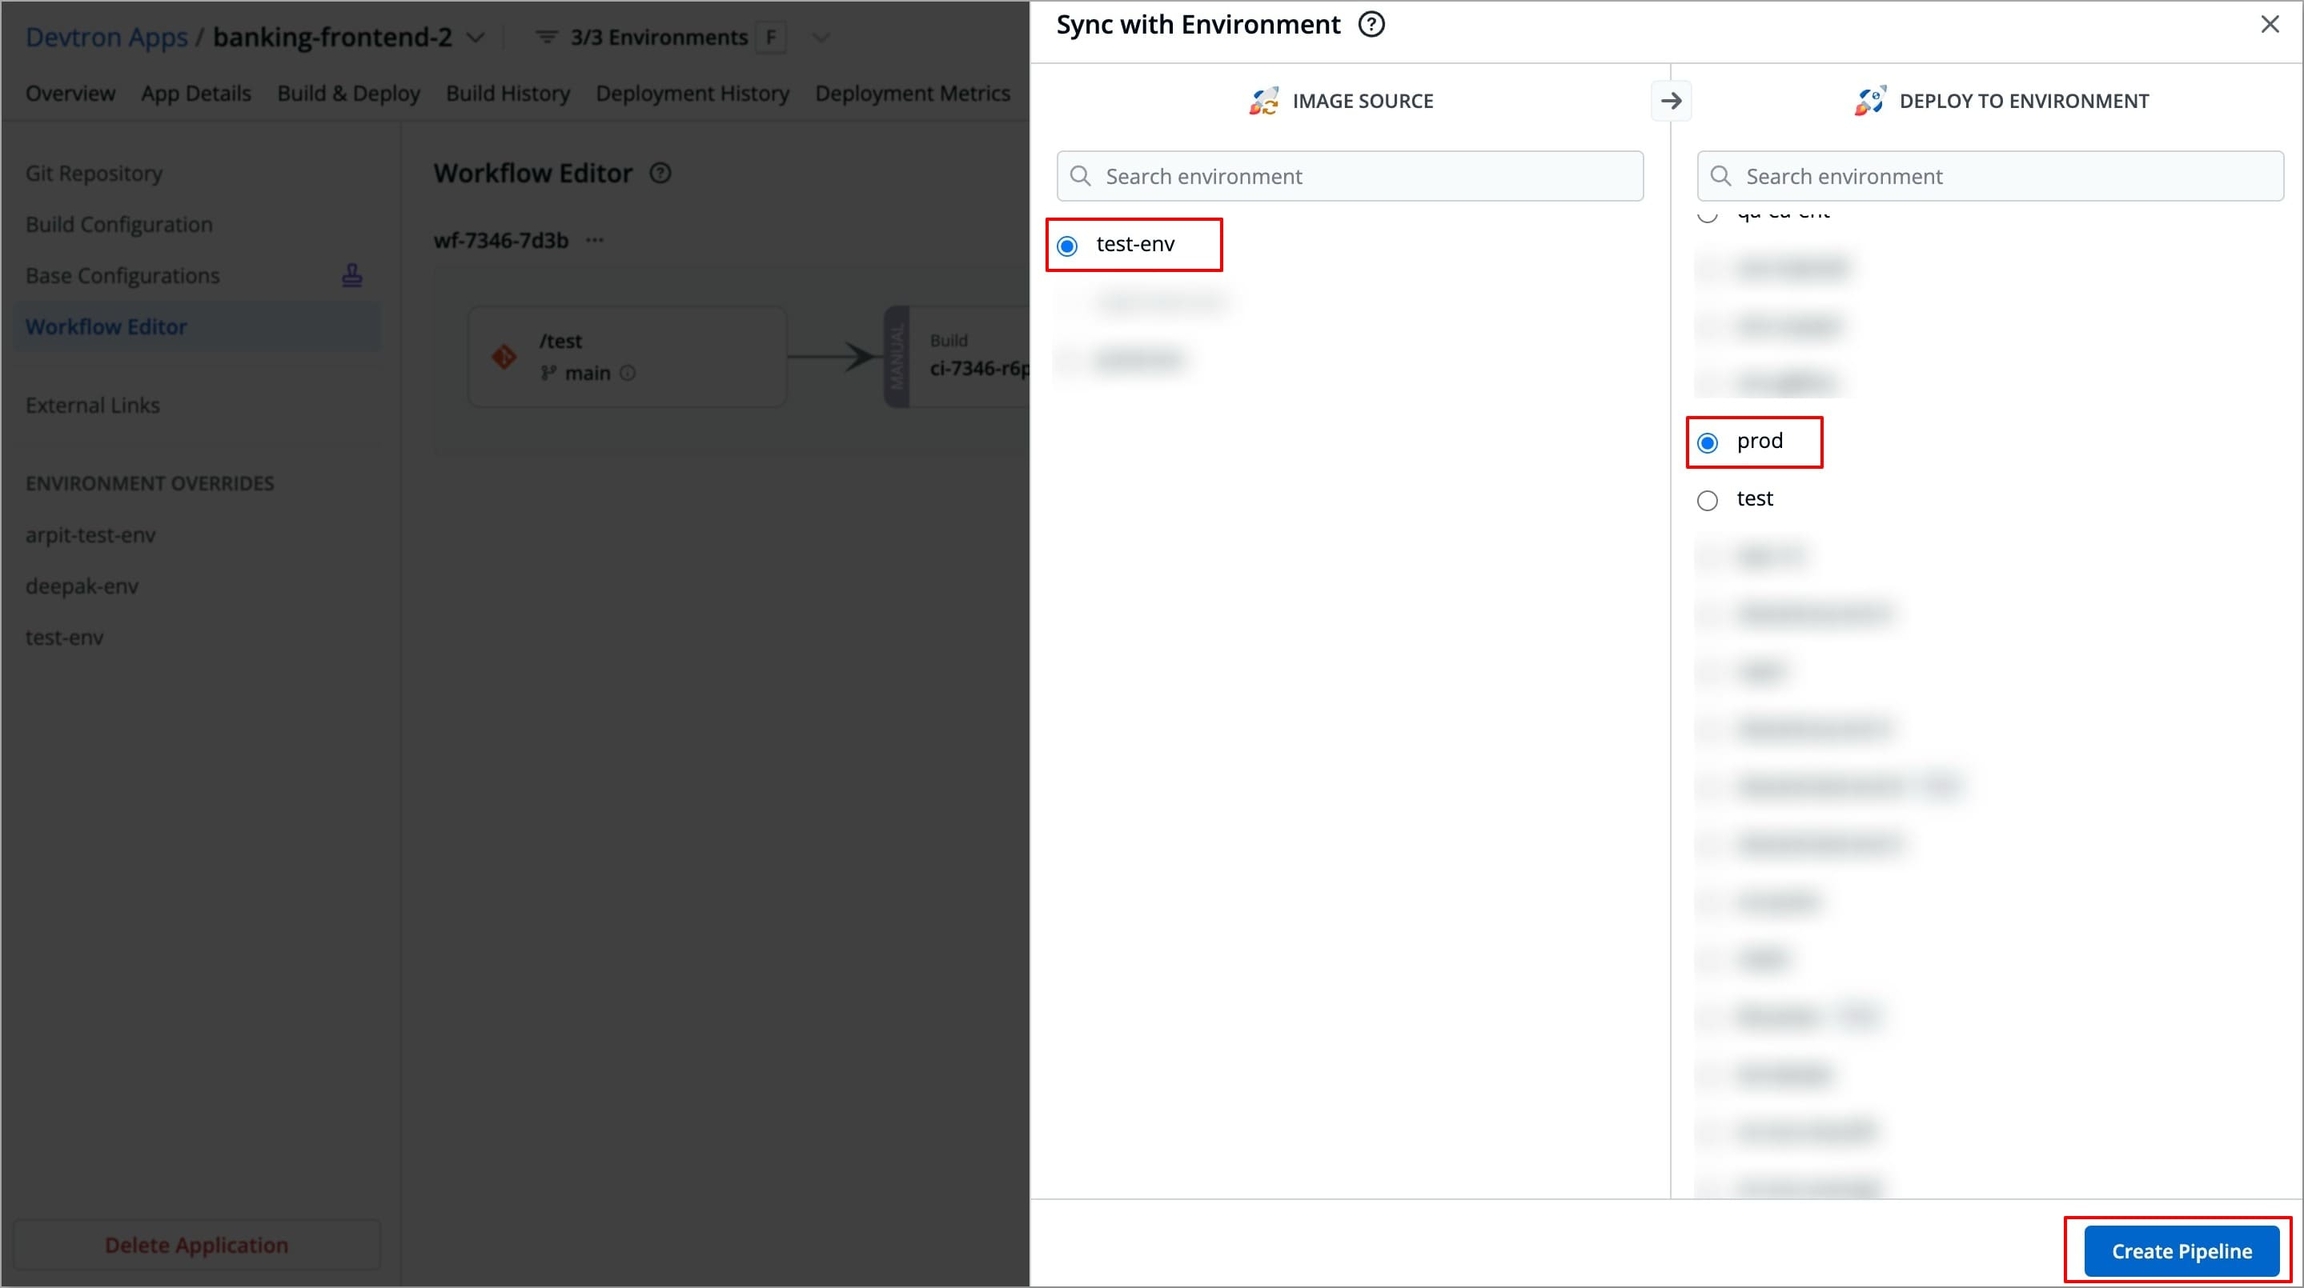
Figure 54b: Selecting the Deployment Environment Select Create Pipeline to create a new workflow.
You can now configure the deployment pipeline, and if you wish, you can also add more deployment pipelines within the same workflow.
5. Create a Job
If options like Build and Deploy from Source Code do not satisfy your use case, you can use Create a Job to define a workflow with a custom Build stage and with deployment capabilities.
In this workflow, the build stage is replaced by a Job stage, where you can either use Preset Plugins or define custom tasks to define custom steps to satisfy your use case. For e.g., you can use a preset plugin to pull the container images required for deployment from a container registry (such as ACR or ECR).
This is useful when the image is built externally (for example, in Jenkins) and needs to be brought into Devtron for further processing and deployment. You can configure tasks like scanning, testing, or notifications using preset plugins either in the Job stage or the pre-CD stage, depending on your use case.
Create a Job differs from Deploy Image from External Source by allowing you to define custom tasks after the image is received, using Job tasks.
To create a workflow using Create a job, follow the steps below
Navigate to Configurations → Workflow Editor of your application.
Select + New Workflow, a modal window will appear where you can select the type of pipeline you want to create.
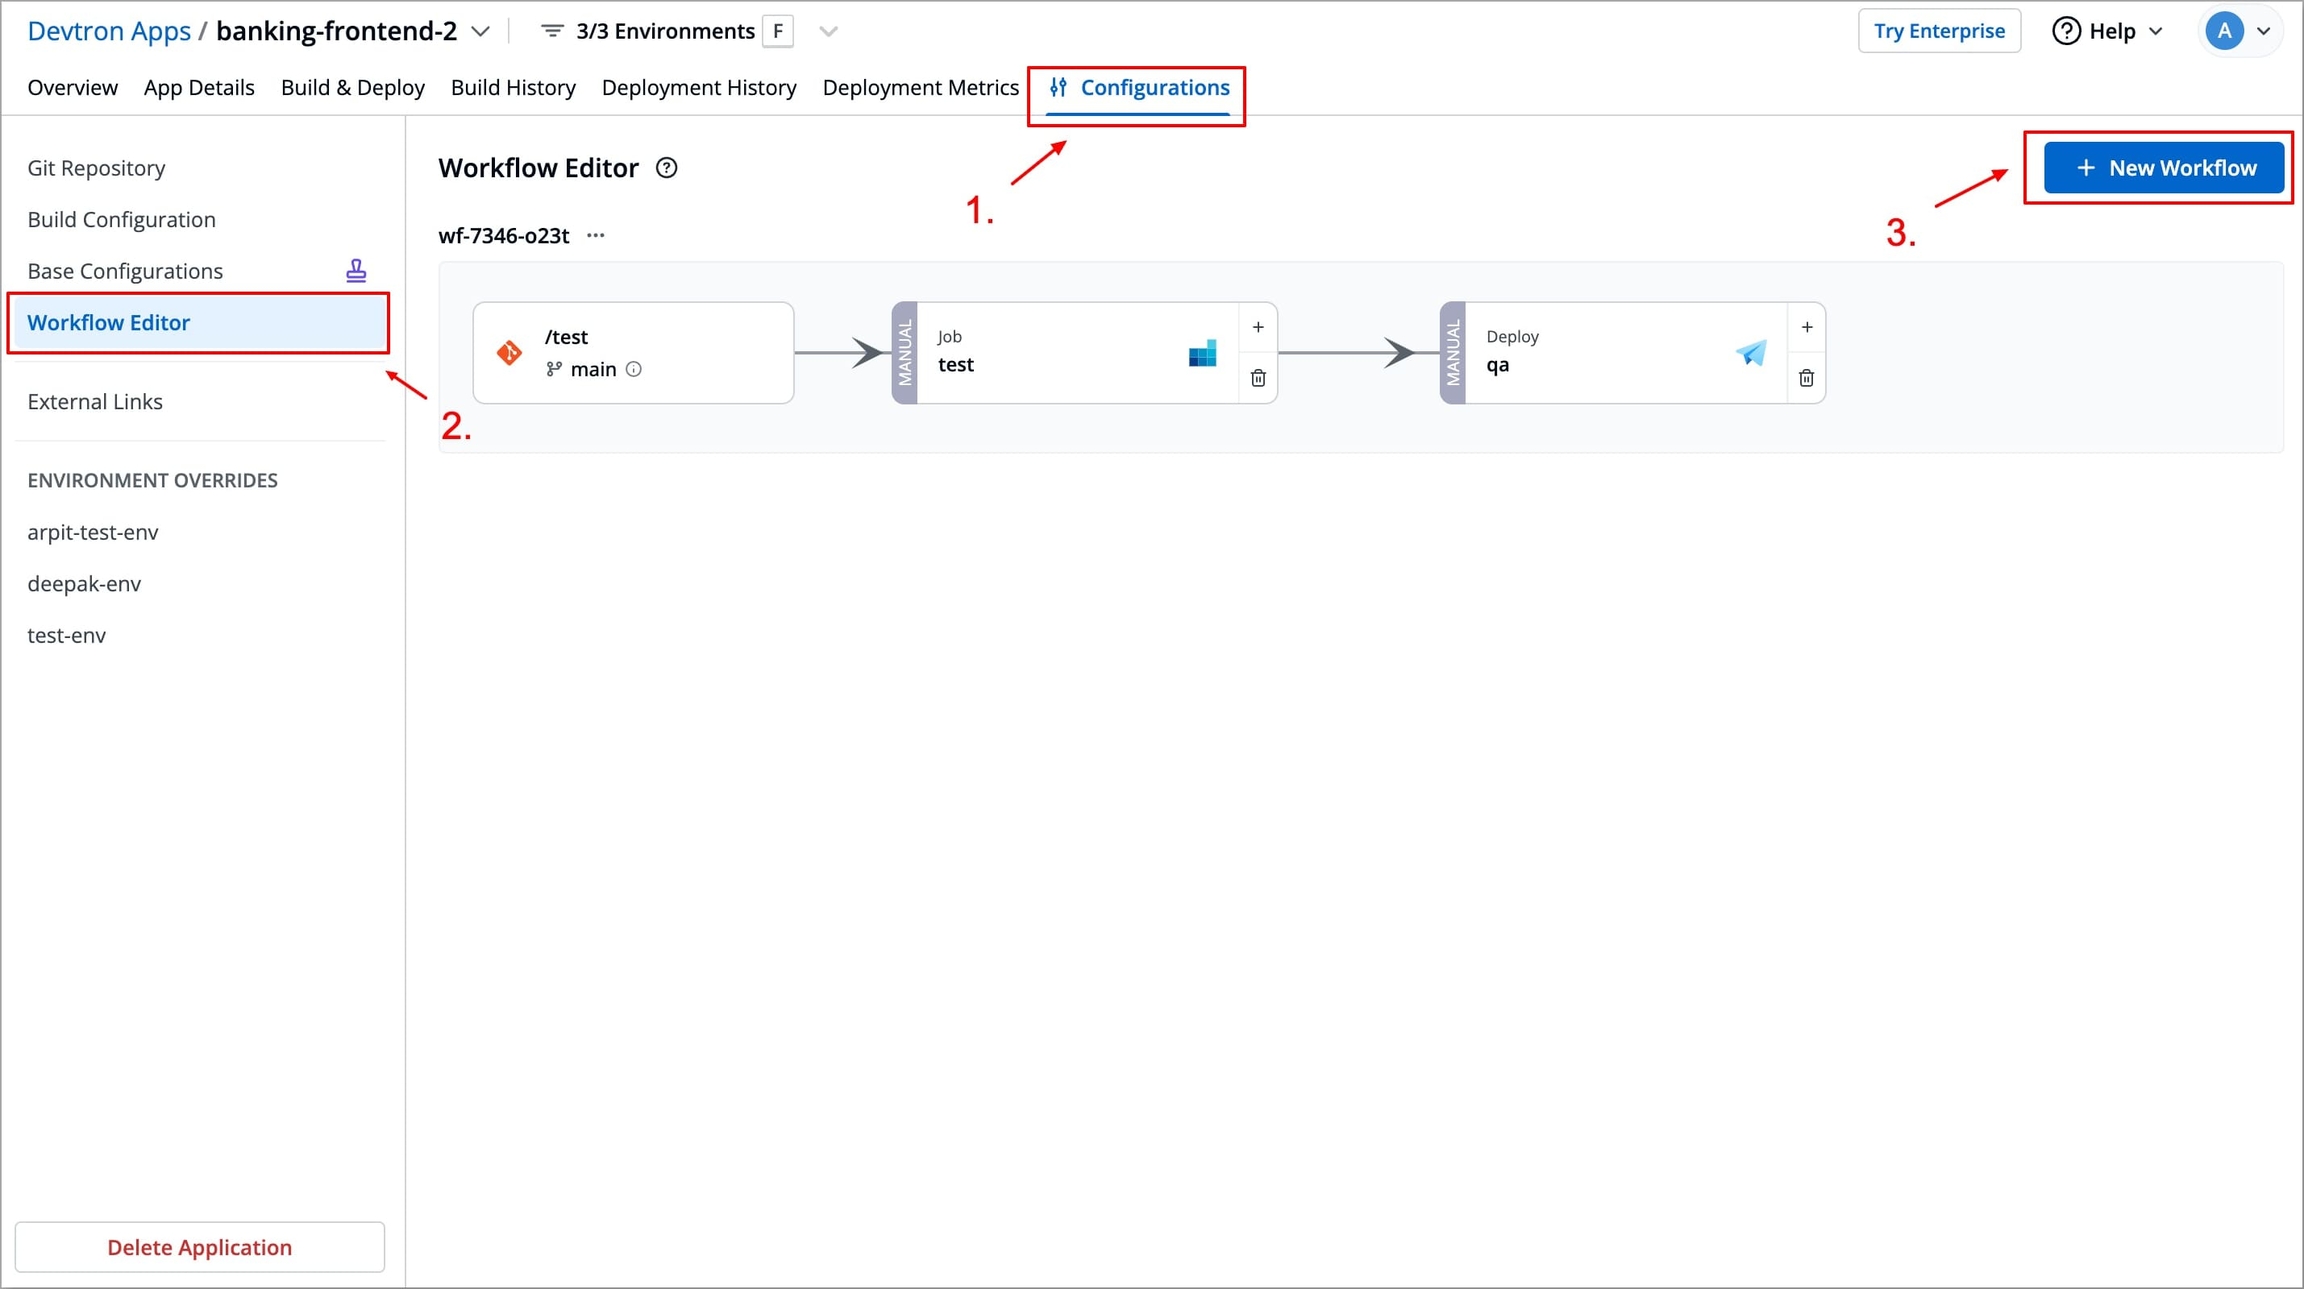
Figure 55: Creating New Workflow Select Create a job. This opens the Create job pipeline Window in which you can create and configure your job.
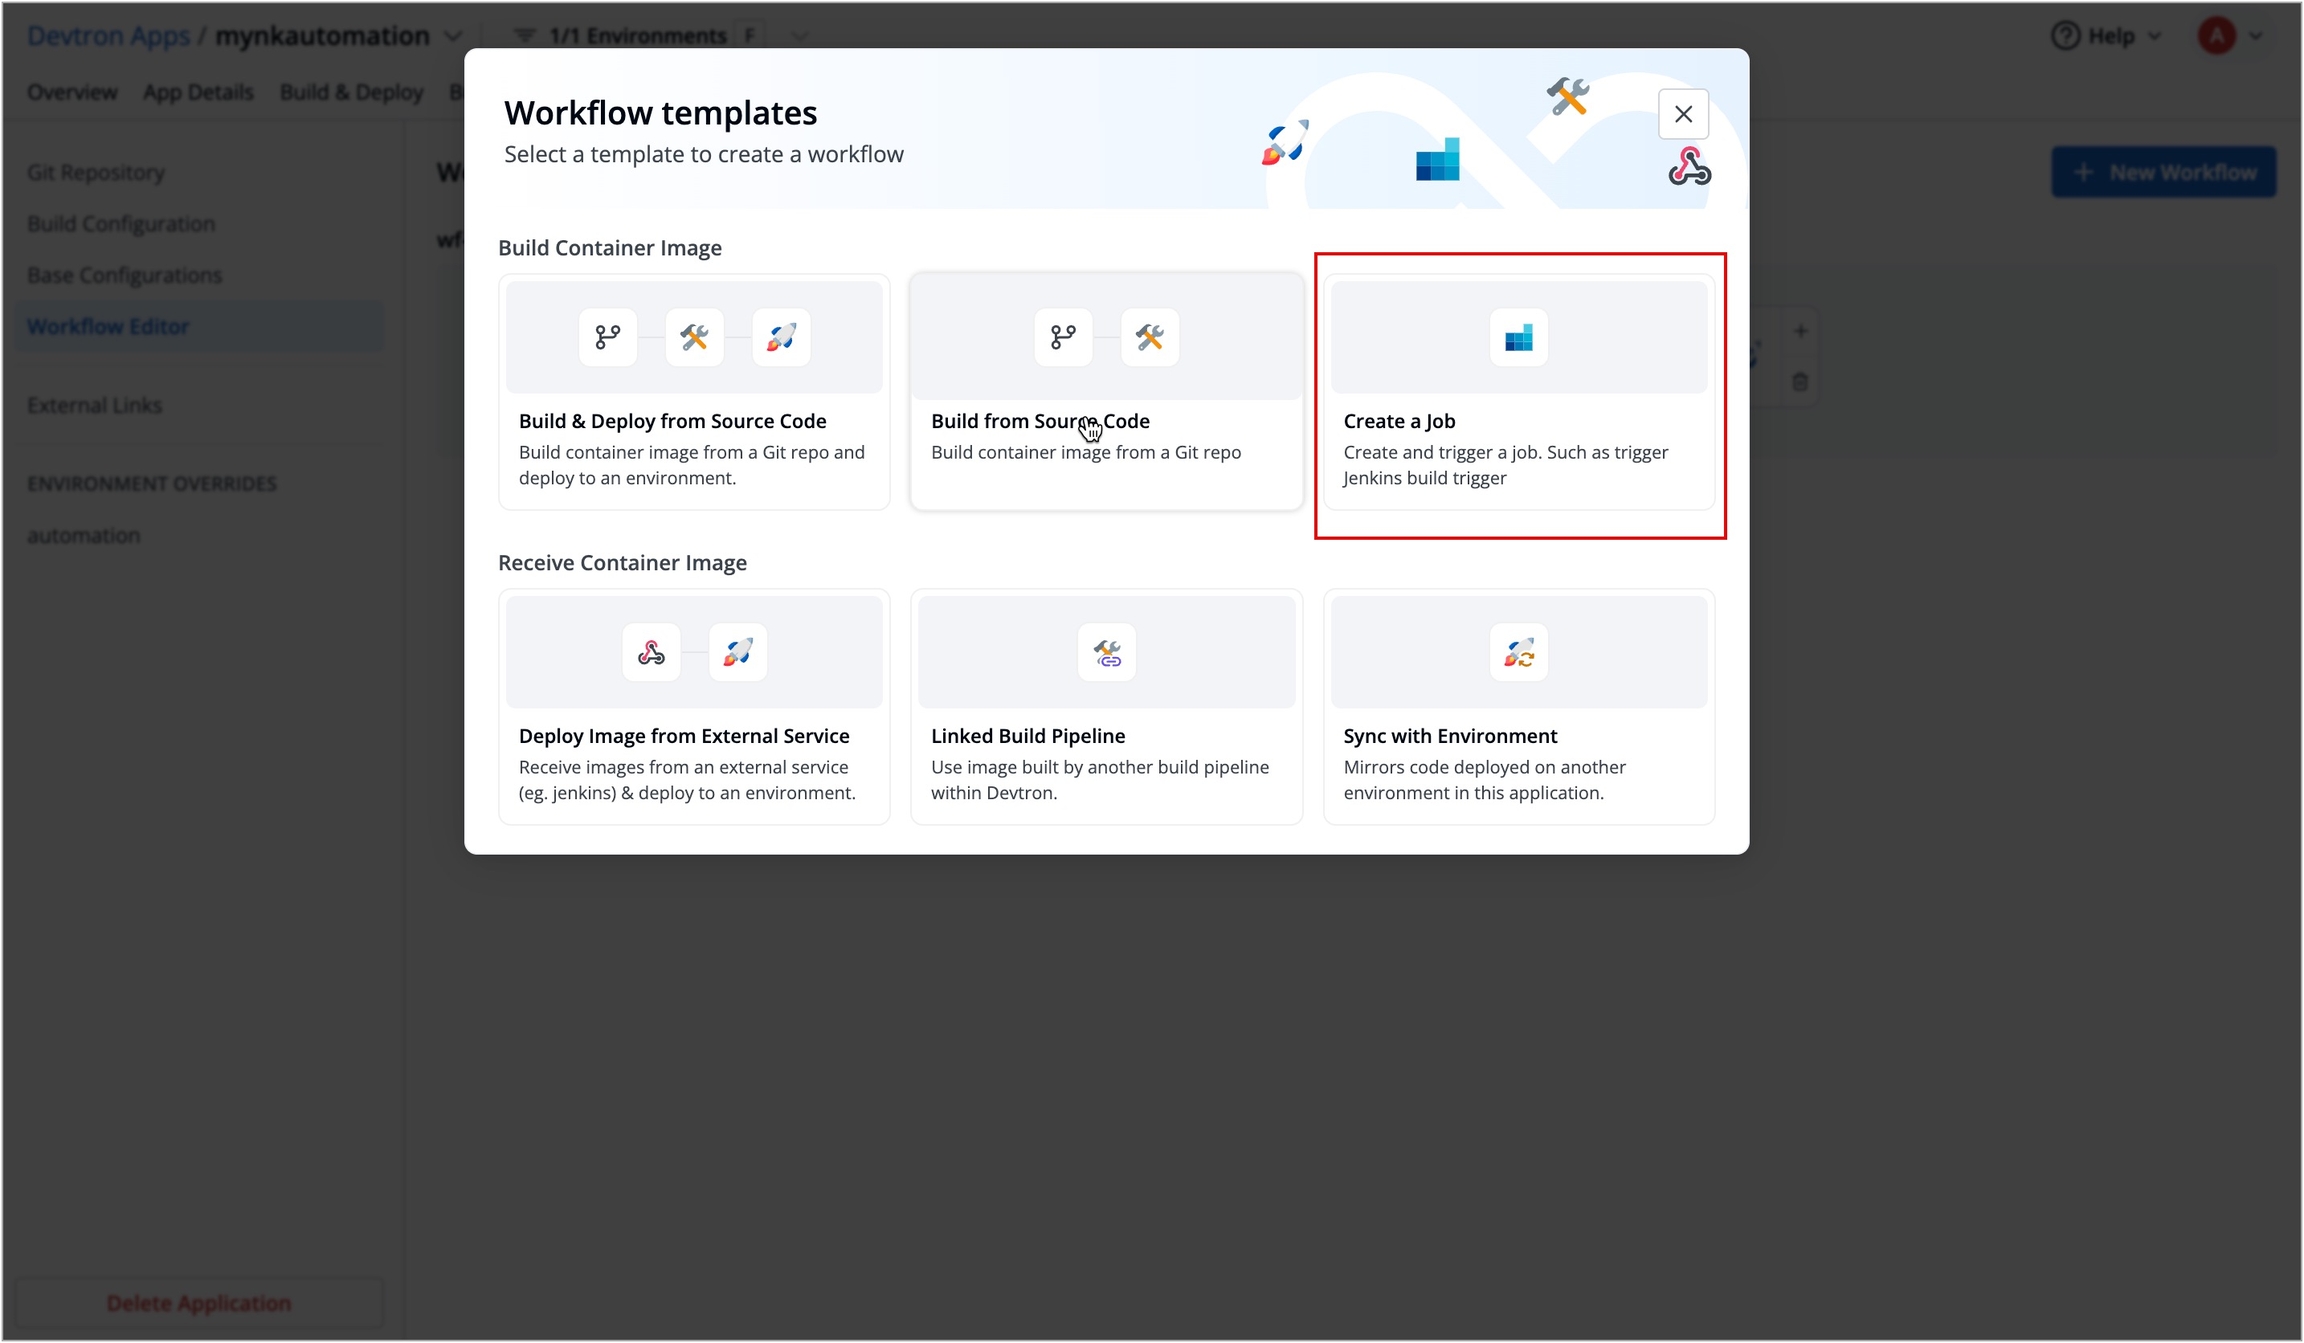
Figure 56: Selecting 'Create a job' In the Create job pipeline window, you can create and configure job pipelines.
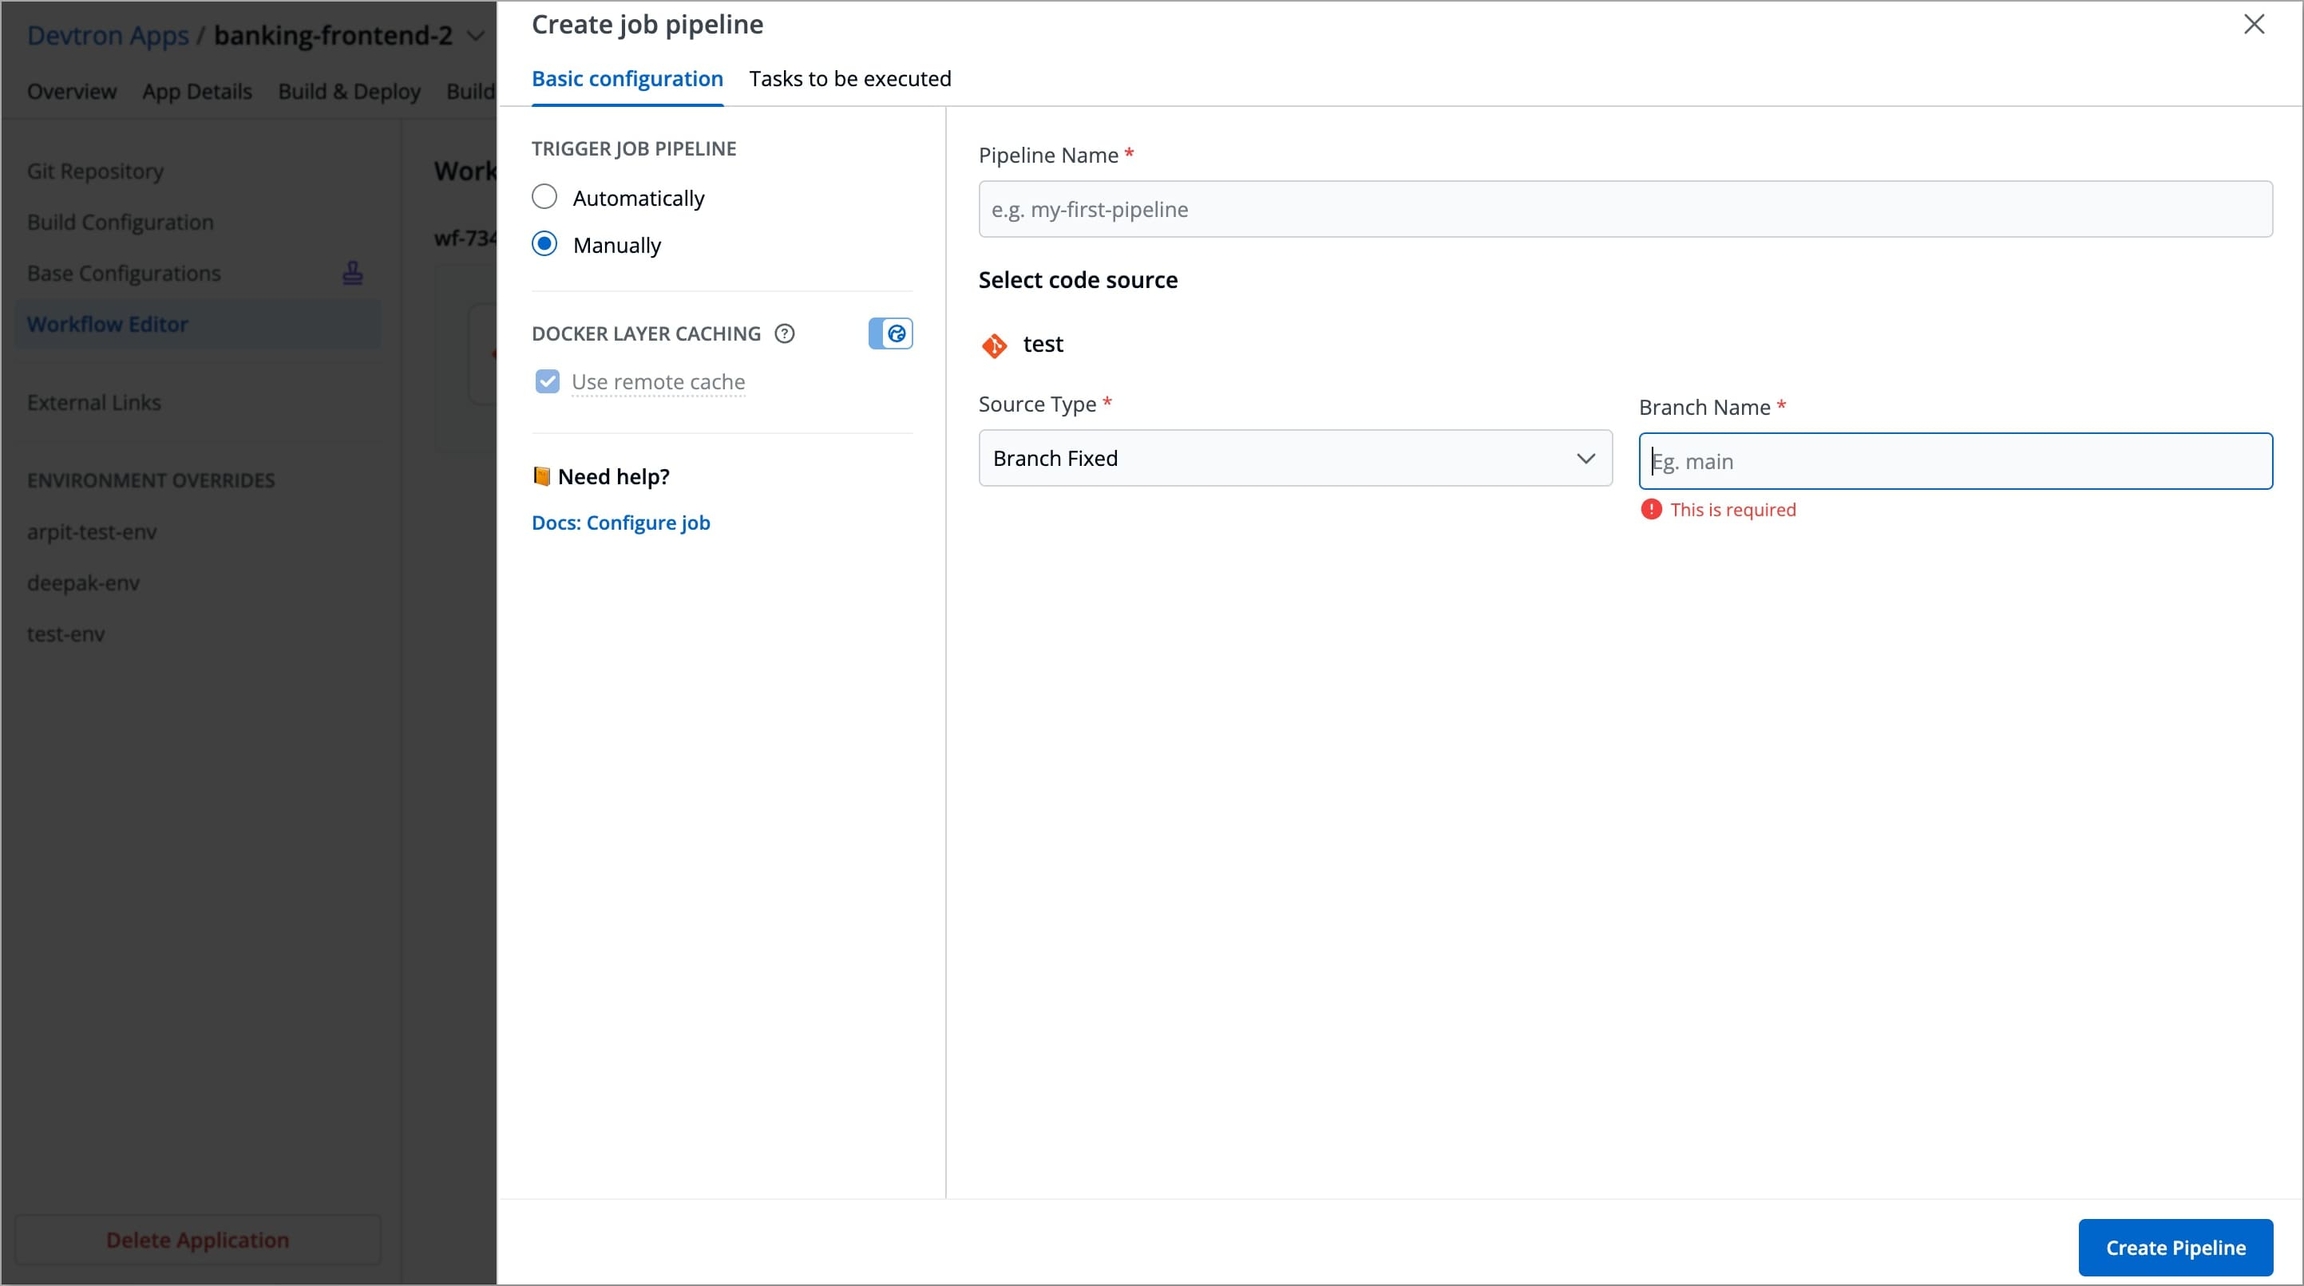
Figure 57: Create job pipeline
It includes 2 stages
Basic Configurations
This stage allows you to define primary configurations such as Pipeline name, Source Type, Branch Name, and how the job should be triggered. Refer to the following table to configure each field.

Trigger Job Pipeline
The job execution may be set to:
Automatically: Job execution is triggered automatically as the Git source code changes.Manually: Build is triggered manually.
Pipeline Name
Assign a name to your job pipeline
Source type
Source type to trigger the job pipeline. Available options: Branch Fixed, Branch Regex, Pull Request, Tag Creation
Branch Name
Branch that triggers the CI build
Use remote cache
Enable this option to use the Docker cache from previous builds. Docker's layer caching mechanism allows unchanged docker images layers to be reused across pipeline runs, thus drastically reducing execution times
Tasks to be executed
The Stage allows you to define tasks for your job.
You can create one or more tasks. Tasks can be dependent on each other for execution. In other words, the output variable of one task can be used as an input for the next task to execute your job. Tasks will execute in the order they are arranged and can be rearranged by drag-and-drop, however, the order of passing the variables must be followed.
To create a task:
Navigate to Tasks to be executed in the Create job pipeline window.
Click Add Task to add a task in your job pipeline.
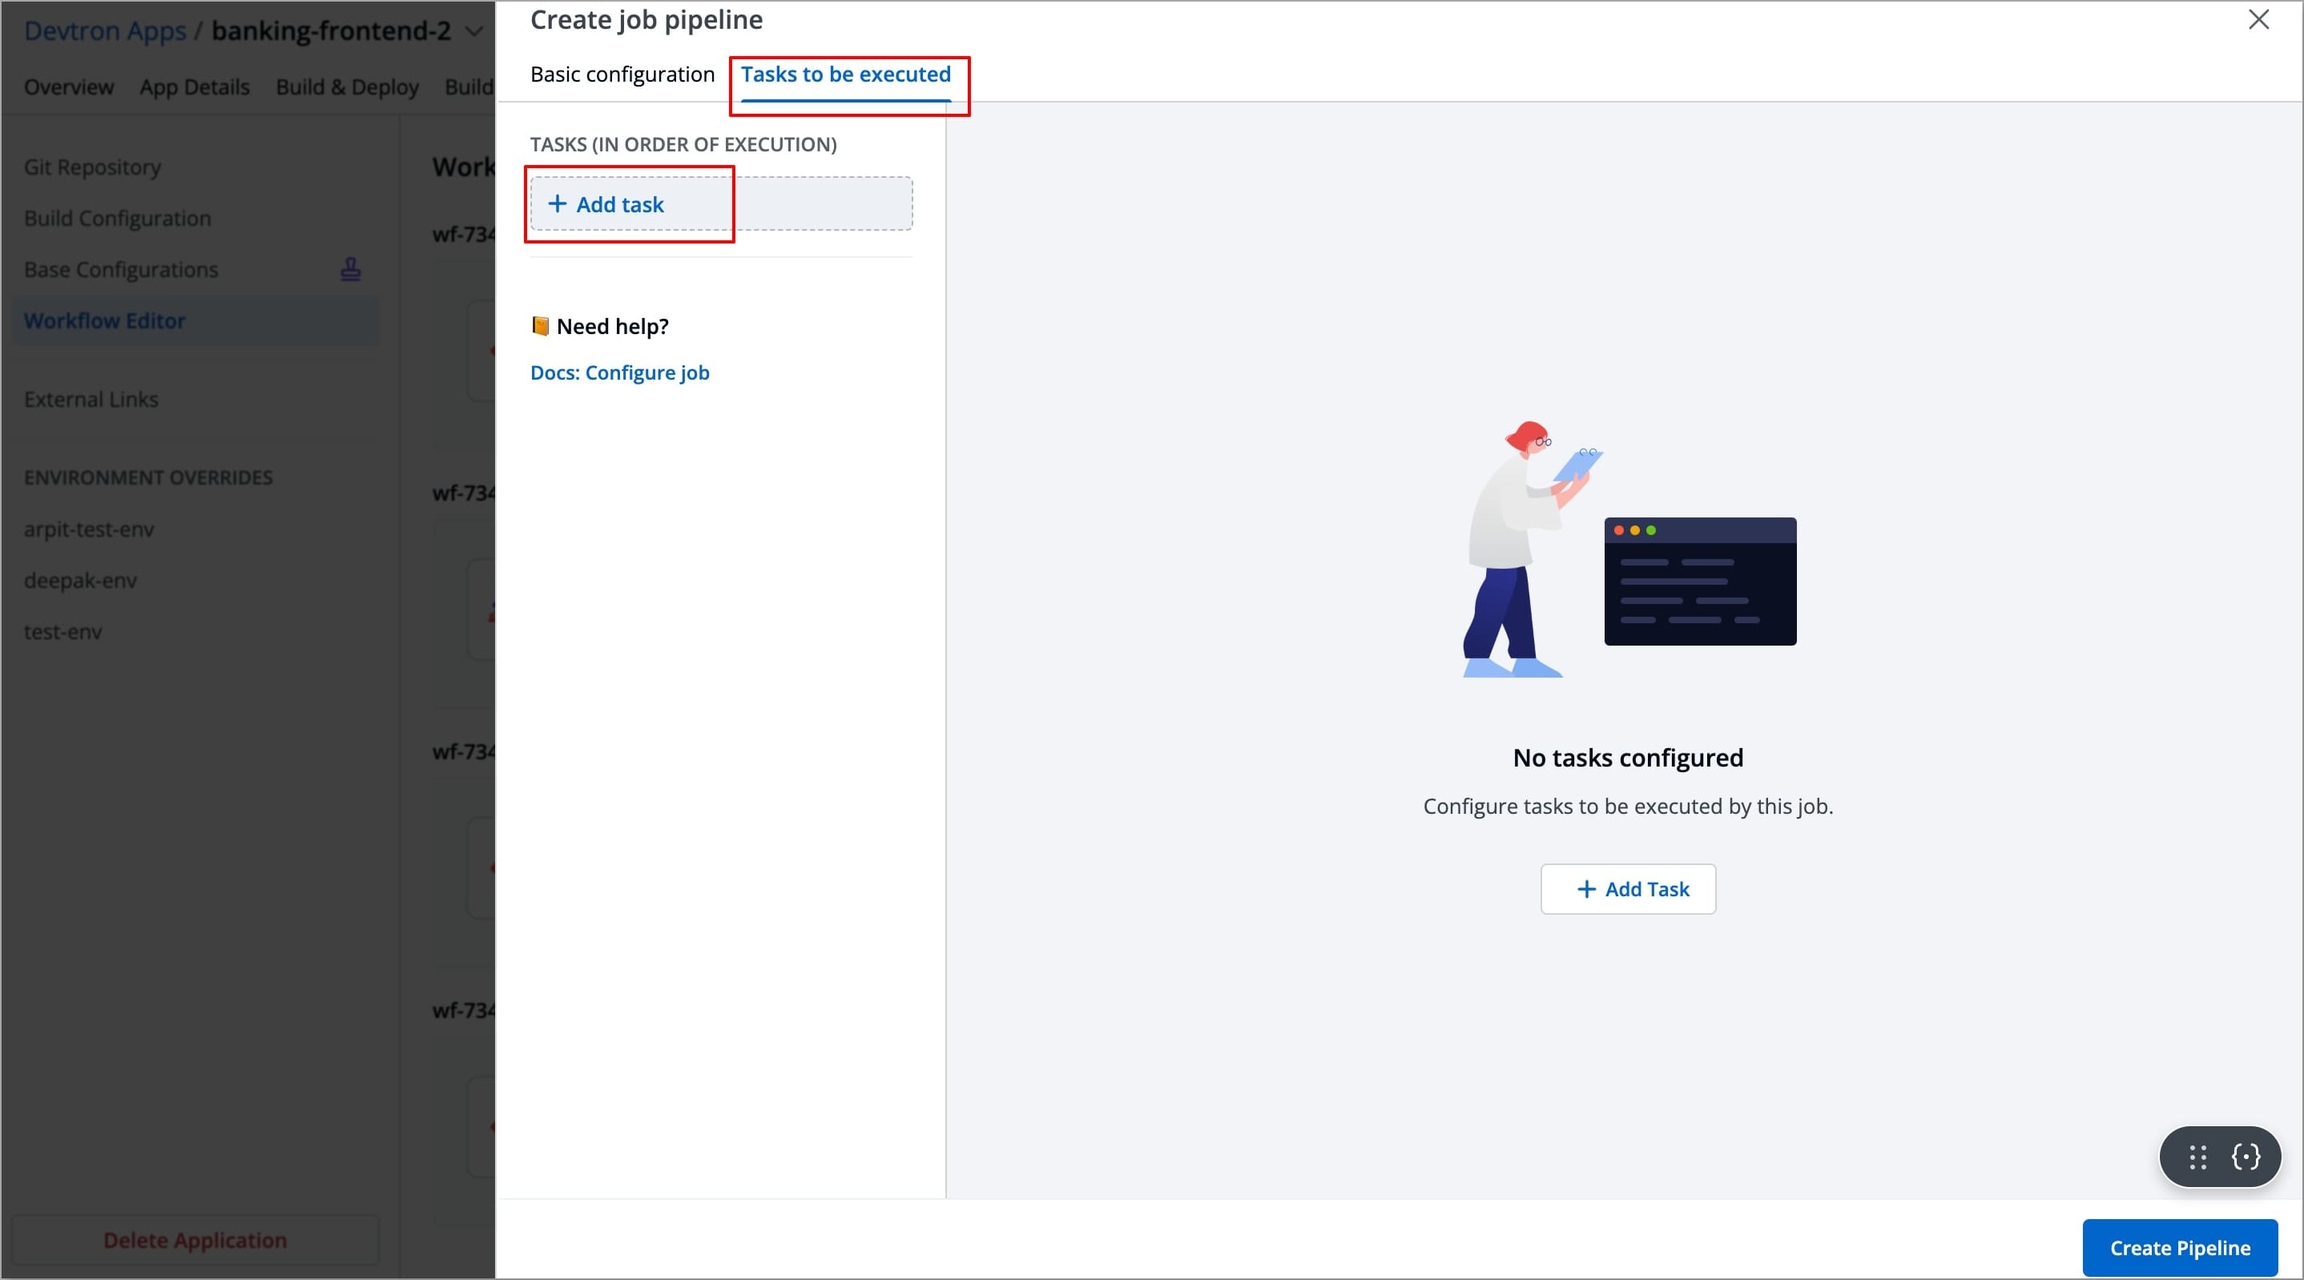
Figure 59: Add task A new task will be added (on the left side of the Create job pipeline window), you can configure the task either by selecting one of the available preset plugins or by Executing a custom script
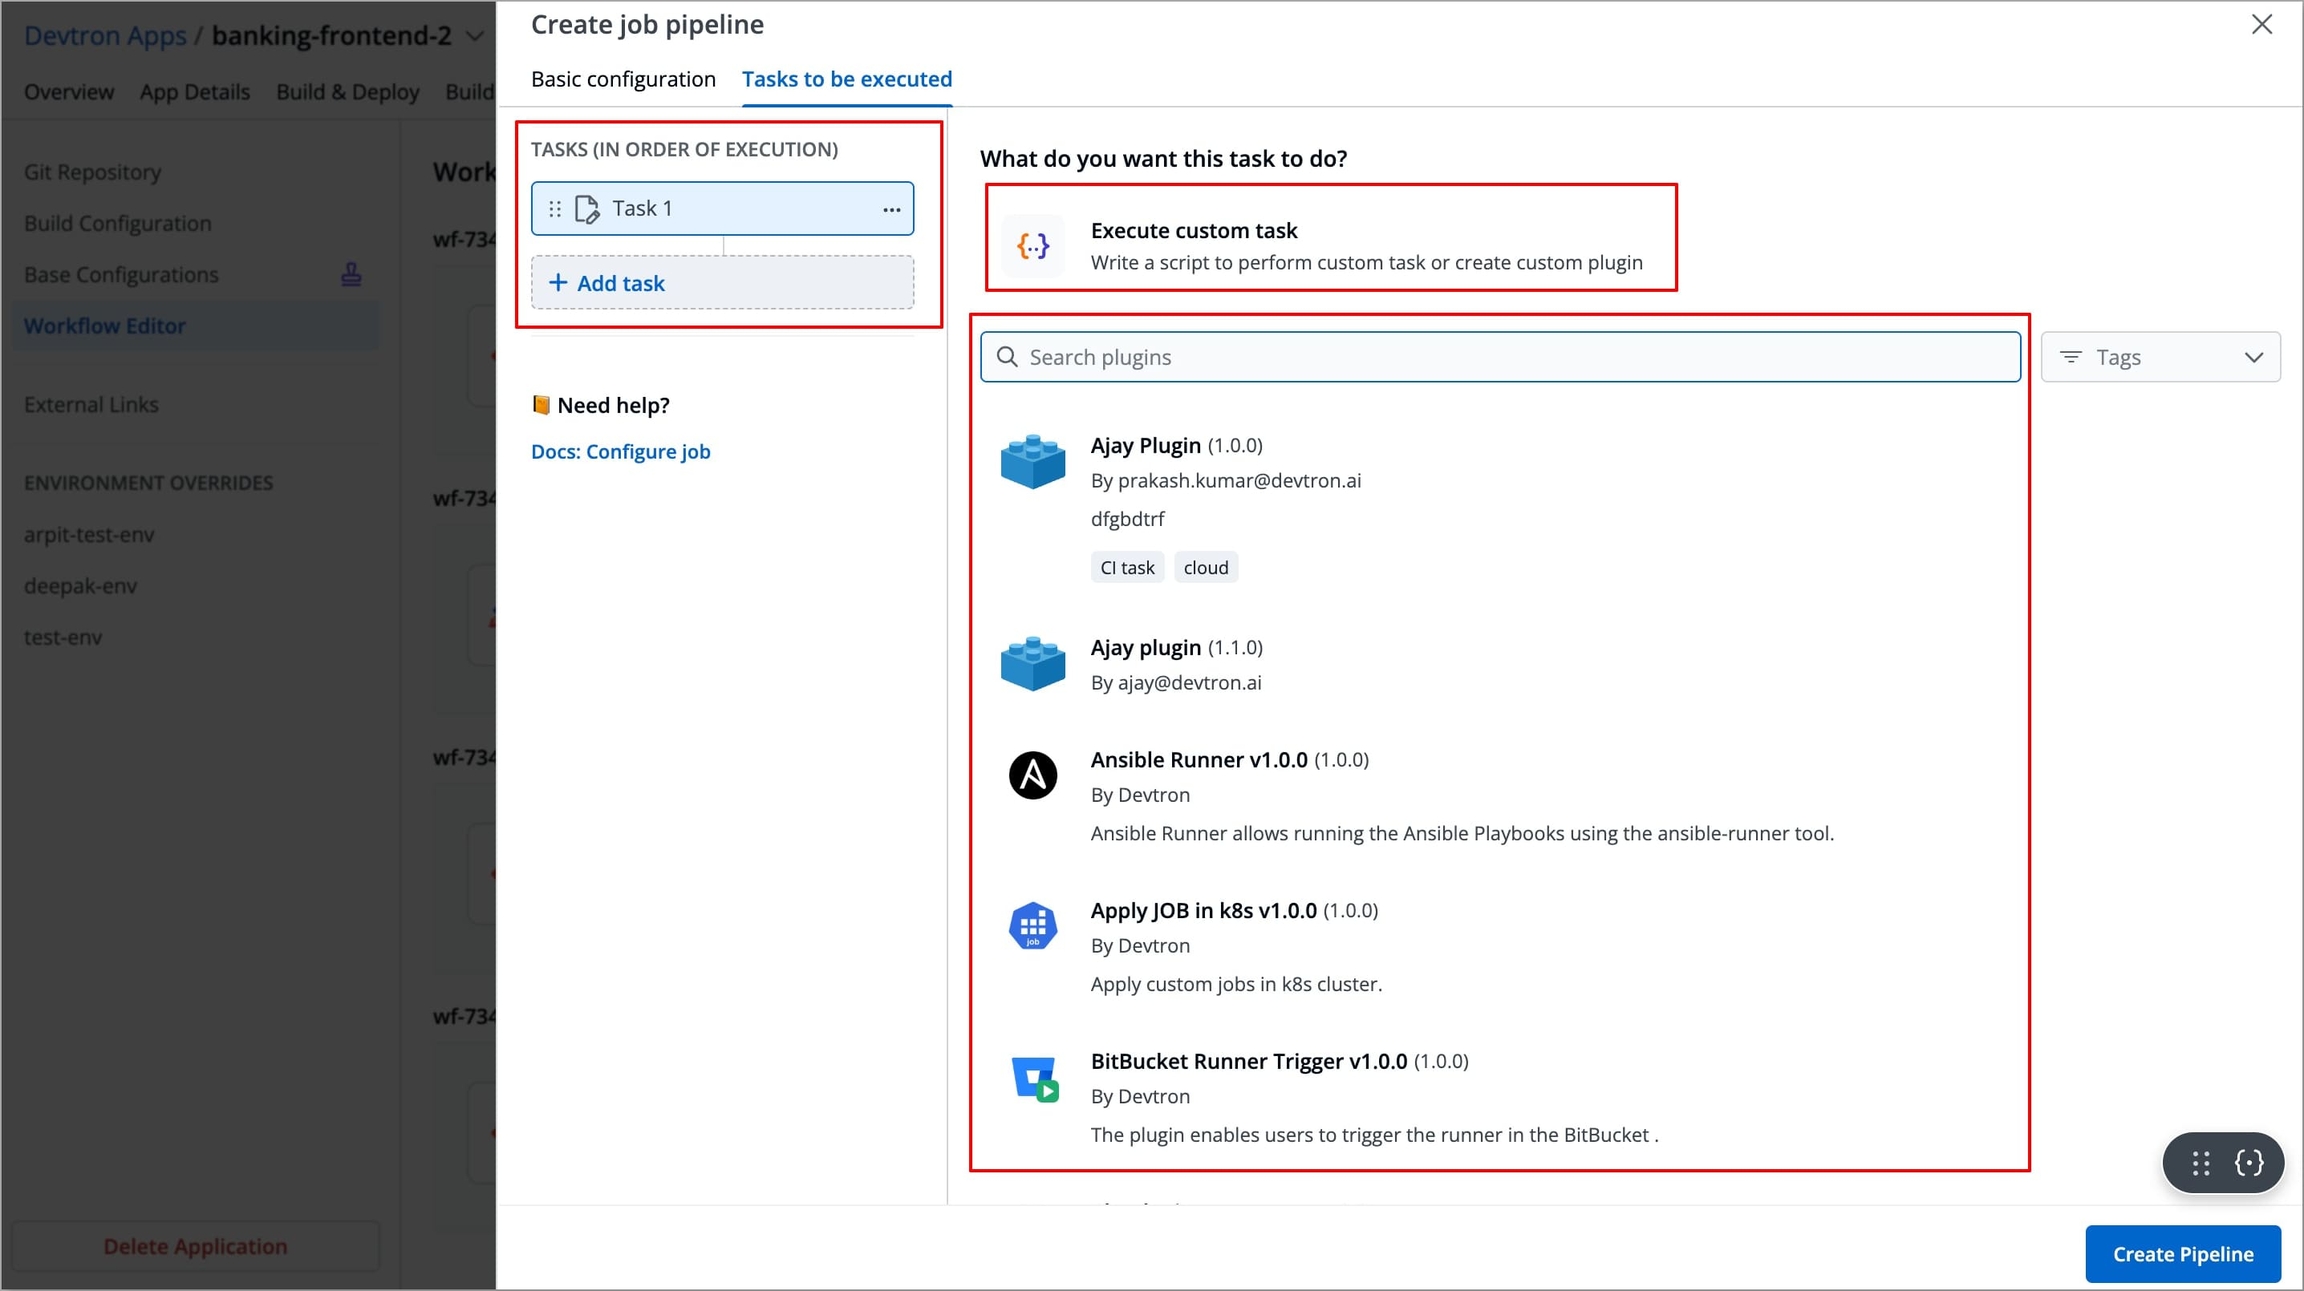
Figure 60: Type of tasks
Pulling Images through Preset Plugin
In Devtron, preset plugins are pre-defined tasks templates that helps you automate and execute common operations such as provisioning infrastructure, taking backups, exporting container images etc., without writing custom scripts.
Devtron provides a set of built-in preset plugins, and you can also create your own plugins in Devtron according to your specific needs.
To create a task using the Pull Images from Container Repository plugin, follow the steps below:
Note: Pull Images from Container Repository plugin only supports ECR (Elastic Container Registry) and ACR (Azure Container Registry).
After configuring the basic configurations, select the Tasks to be executed Tab
Click +Add Task from the left side panel.
Search for
Pull Images from Container Repositoryin the Search Plugin Search bar and select Pull Images from Container Repository from the list of plugins.The right-side panel will display the fields specific to the Pull Images from Container Repository plugin, which are required to be configured.
The left-side panel will now show a task under Tasks (IN ORDER OF EXECUTION), named after the selected plugin(by default), along with its logo. You can change the task's name using the Task name field, but plugin's logo will remain indicating that it is a preset plugin.
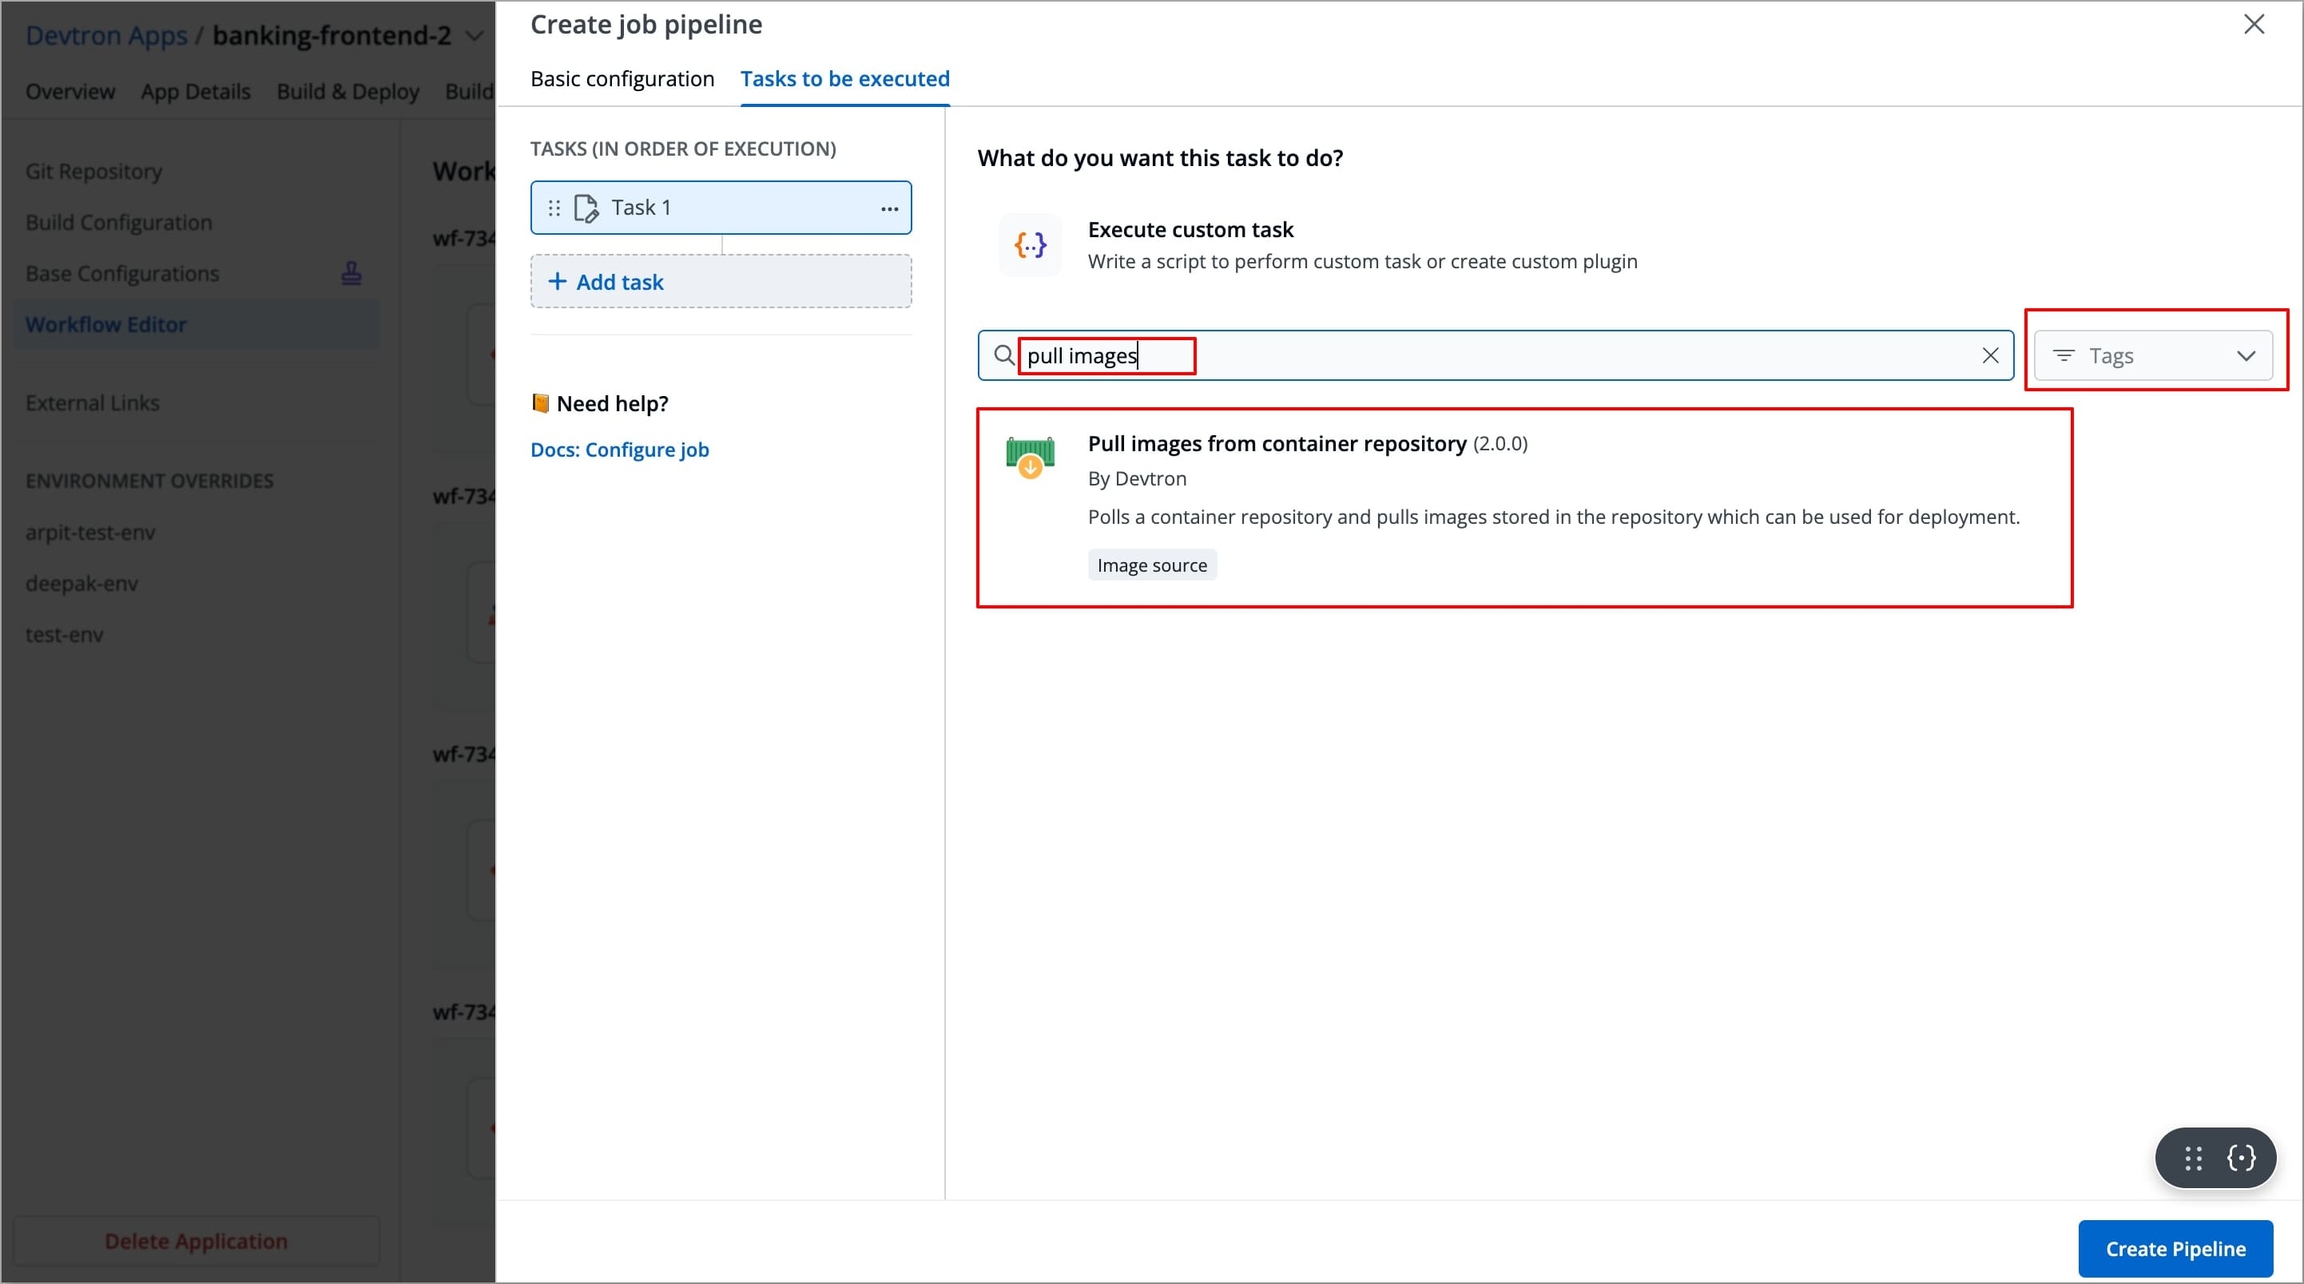
Figure 61: Search 'Pull Images from Container Repository' plugin 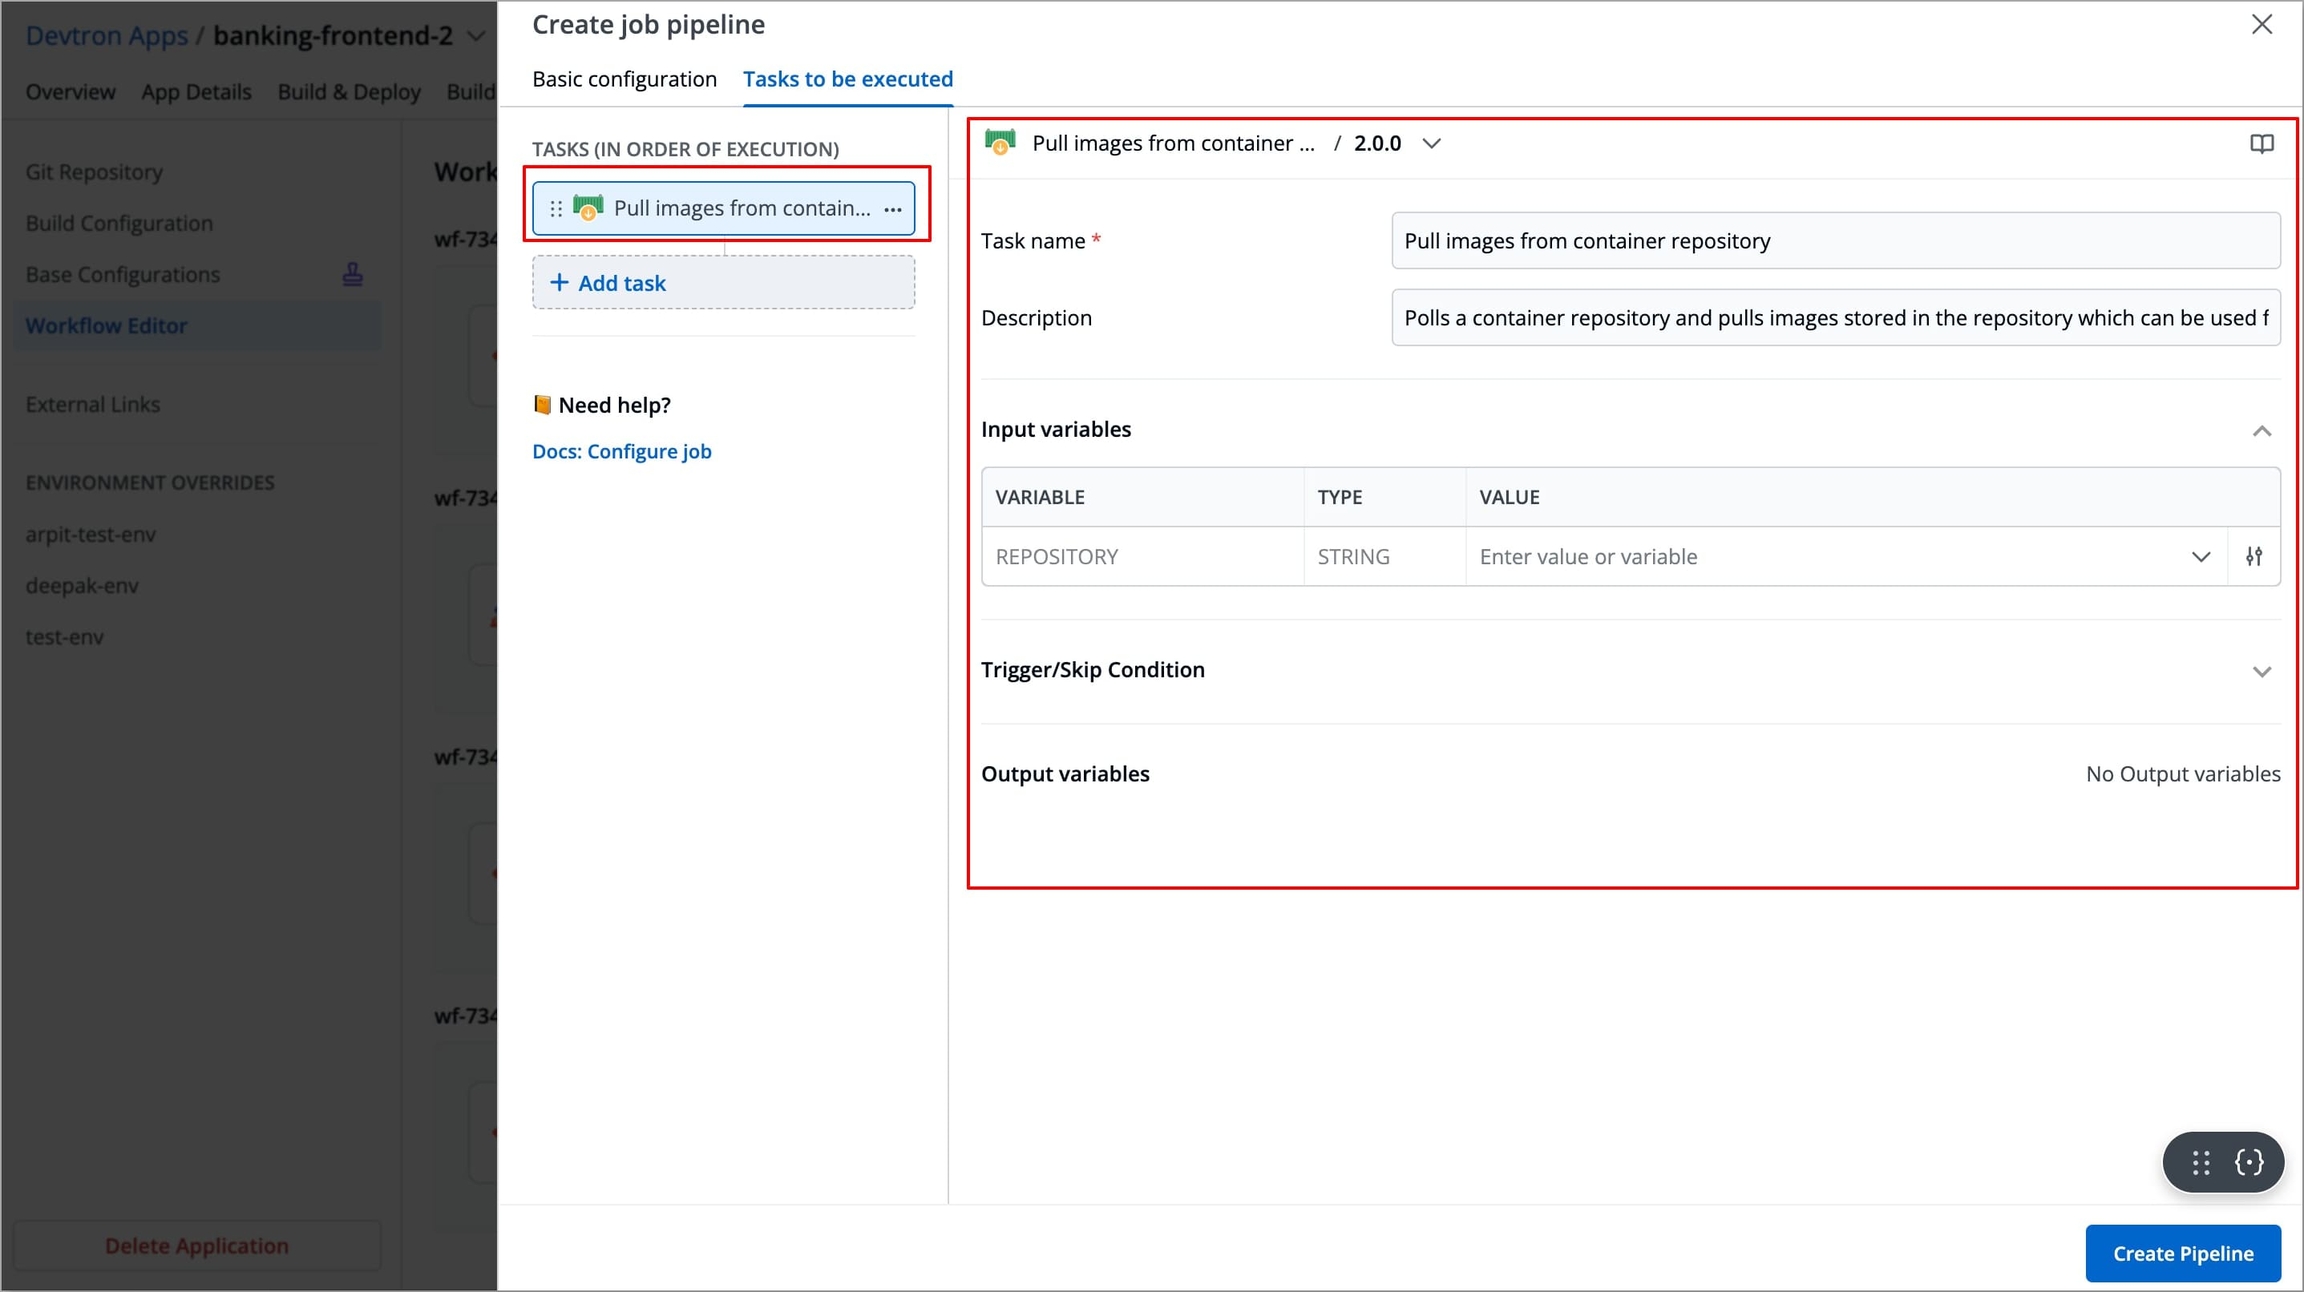
Figure 62: GKE provisioner plugin Refer the Pull Images from Container Repository documentation to configure the Pull Images from Container Repository fields with appropriate values. You may explore Plugins documentation to configure any of the available plugins.
After configuring the fields successfully, your task will be created. If you wish, you can add more tasks by clicking on + Add task in the left-side panel.
Create Task using Custom Script
In the job stage, you can also define a task using a custom script to meet specific requirements. To create a task using a custom script, follow the steps below:
After configuring the basic configurations, select the Tasks to be executed Tab.
Click +Add Task from the left side panel, and then select Execute custom task.
The right-side panel will display the fields that are required to be configured in order to create the task.
The left-side panel will now display a task under Tasks (IN ORDER OF EXECUTION).
Enter the Task name (required) and Task Description (optional).
Select the Task type, it can be
ShellorContainer Image.Shell Tasks: These execute shell scripts directly within the job runtime environment. In this type of task, you can define inline scripts or use script files from your configured source code.
Container Image Tasks: These allow you to execute commands and scripts inside a custom Docker container. Instead of using the default environment provided by Devtron, you can specify you own container image with all dependencies and tools required for the tasks.
These Tasks run using container in container approach, which means the specified image is pulled and run inside the job pod, thus providing a complete isolated environment.
After selecting the Task type, you need to configure task-specific fields based on that Task type.
After configuring the Basic Configurations and adding the tasks, select Create Pipeline to create a new workflow with a job stage (instead of a build stage).
Now, you can add a deployment pipeline to this workflow. The image will be pulled during the execution of the pipeline using the configured plugin, and then passed to the CD stage for deployment.
Updating CI Pipeline
You can update the configurations of an existing CI Pipeline except for the pipeline's name. To update a pipeline,
Select your CI pipeline.
In the Edit build pipeline window, edit the required stages and select Update Pipeline.
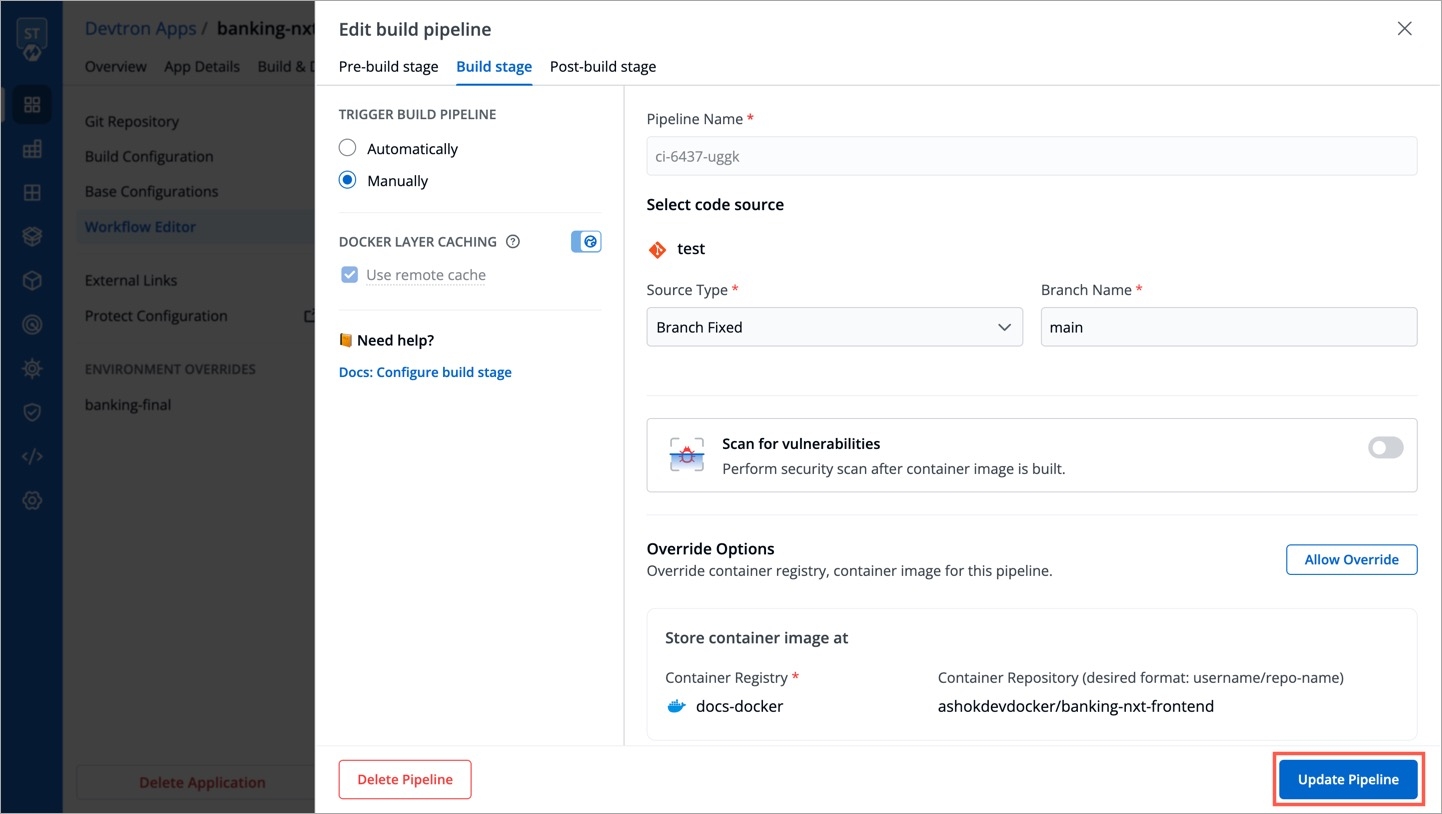
Figure 63: Updating CI pipeline
Deleting CI Pipeline
Before deleting a CI pipeline, make sure that there is no CD pipeline attached to it in your workflow. In that case, you must first delete the CD pipeline, and only then you can delete a CI pipeline.
To delete a CI pipeline, follow the steps below.
Navigate to Configurations → Workflow Editor and click the pipeline you wish to delete.
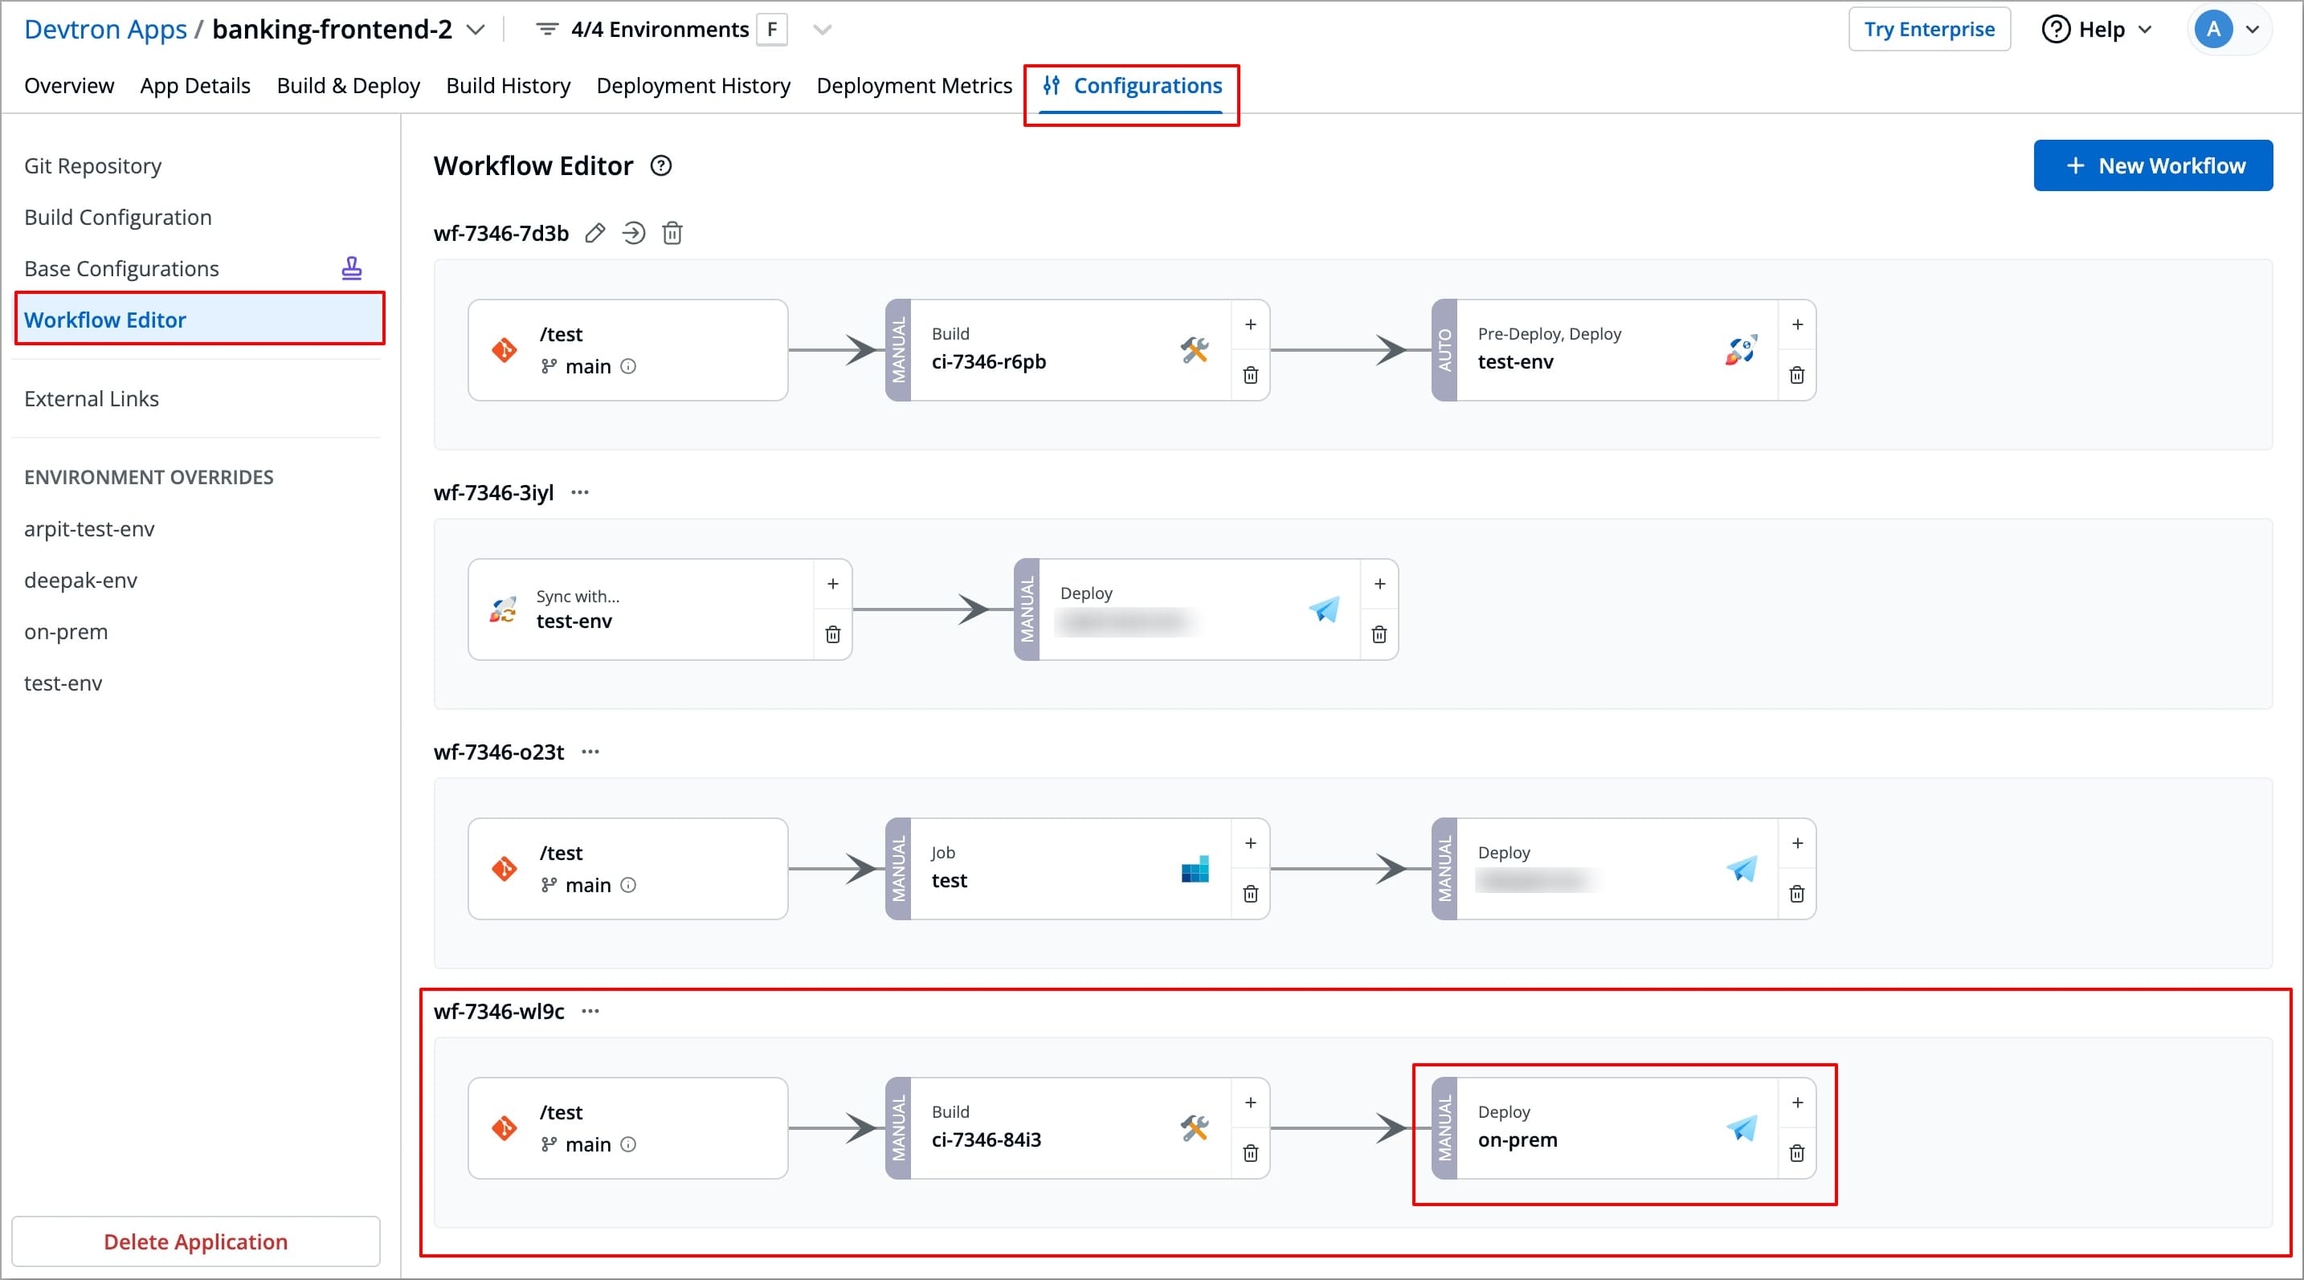
Figure 64: Selecting Workflow to delete Click on the Deployment Stage, Edit deployment pipeline window will open and select Delete Pipeline.
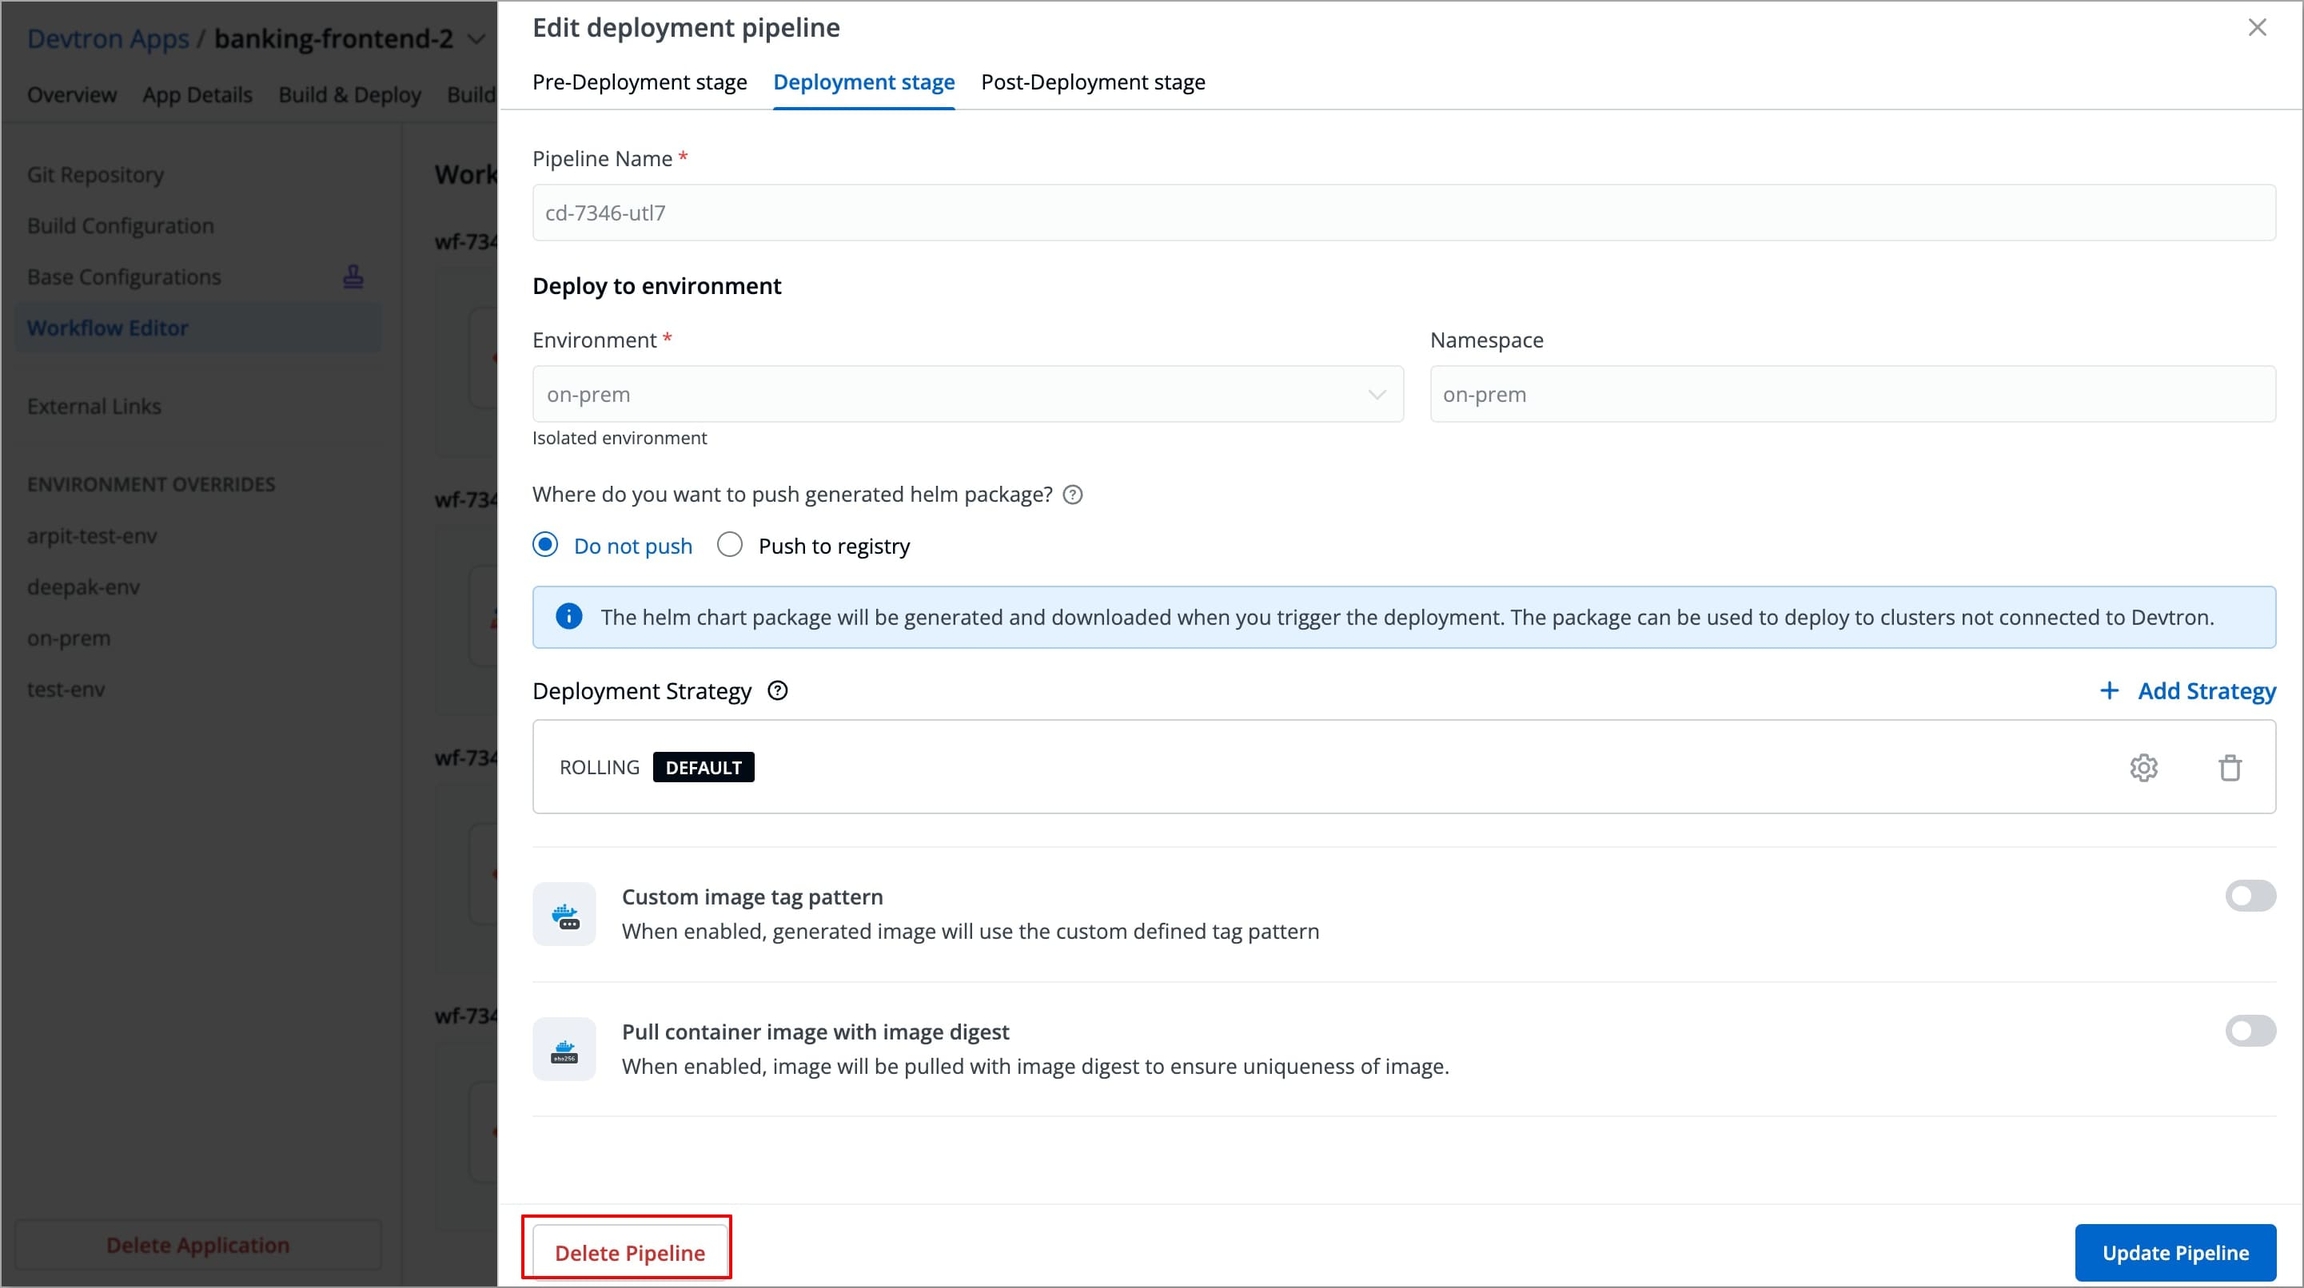
Figure 65: Clicking 'Delete Pipeline' A pop-up will appear asking you to enter the environment name of the deployment.
Enter the environment name and select Delete. The CD pipeline will be deleted.
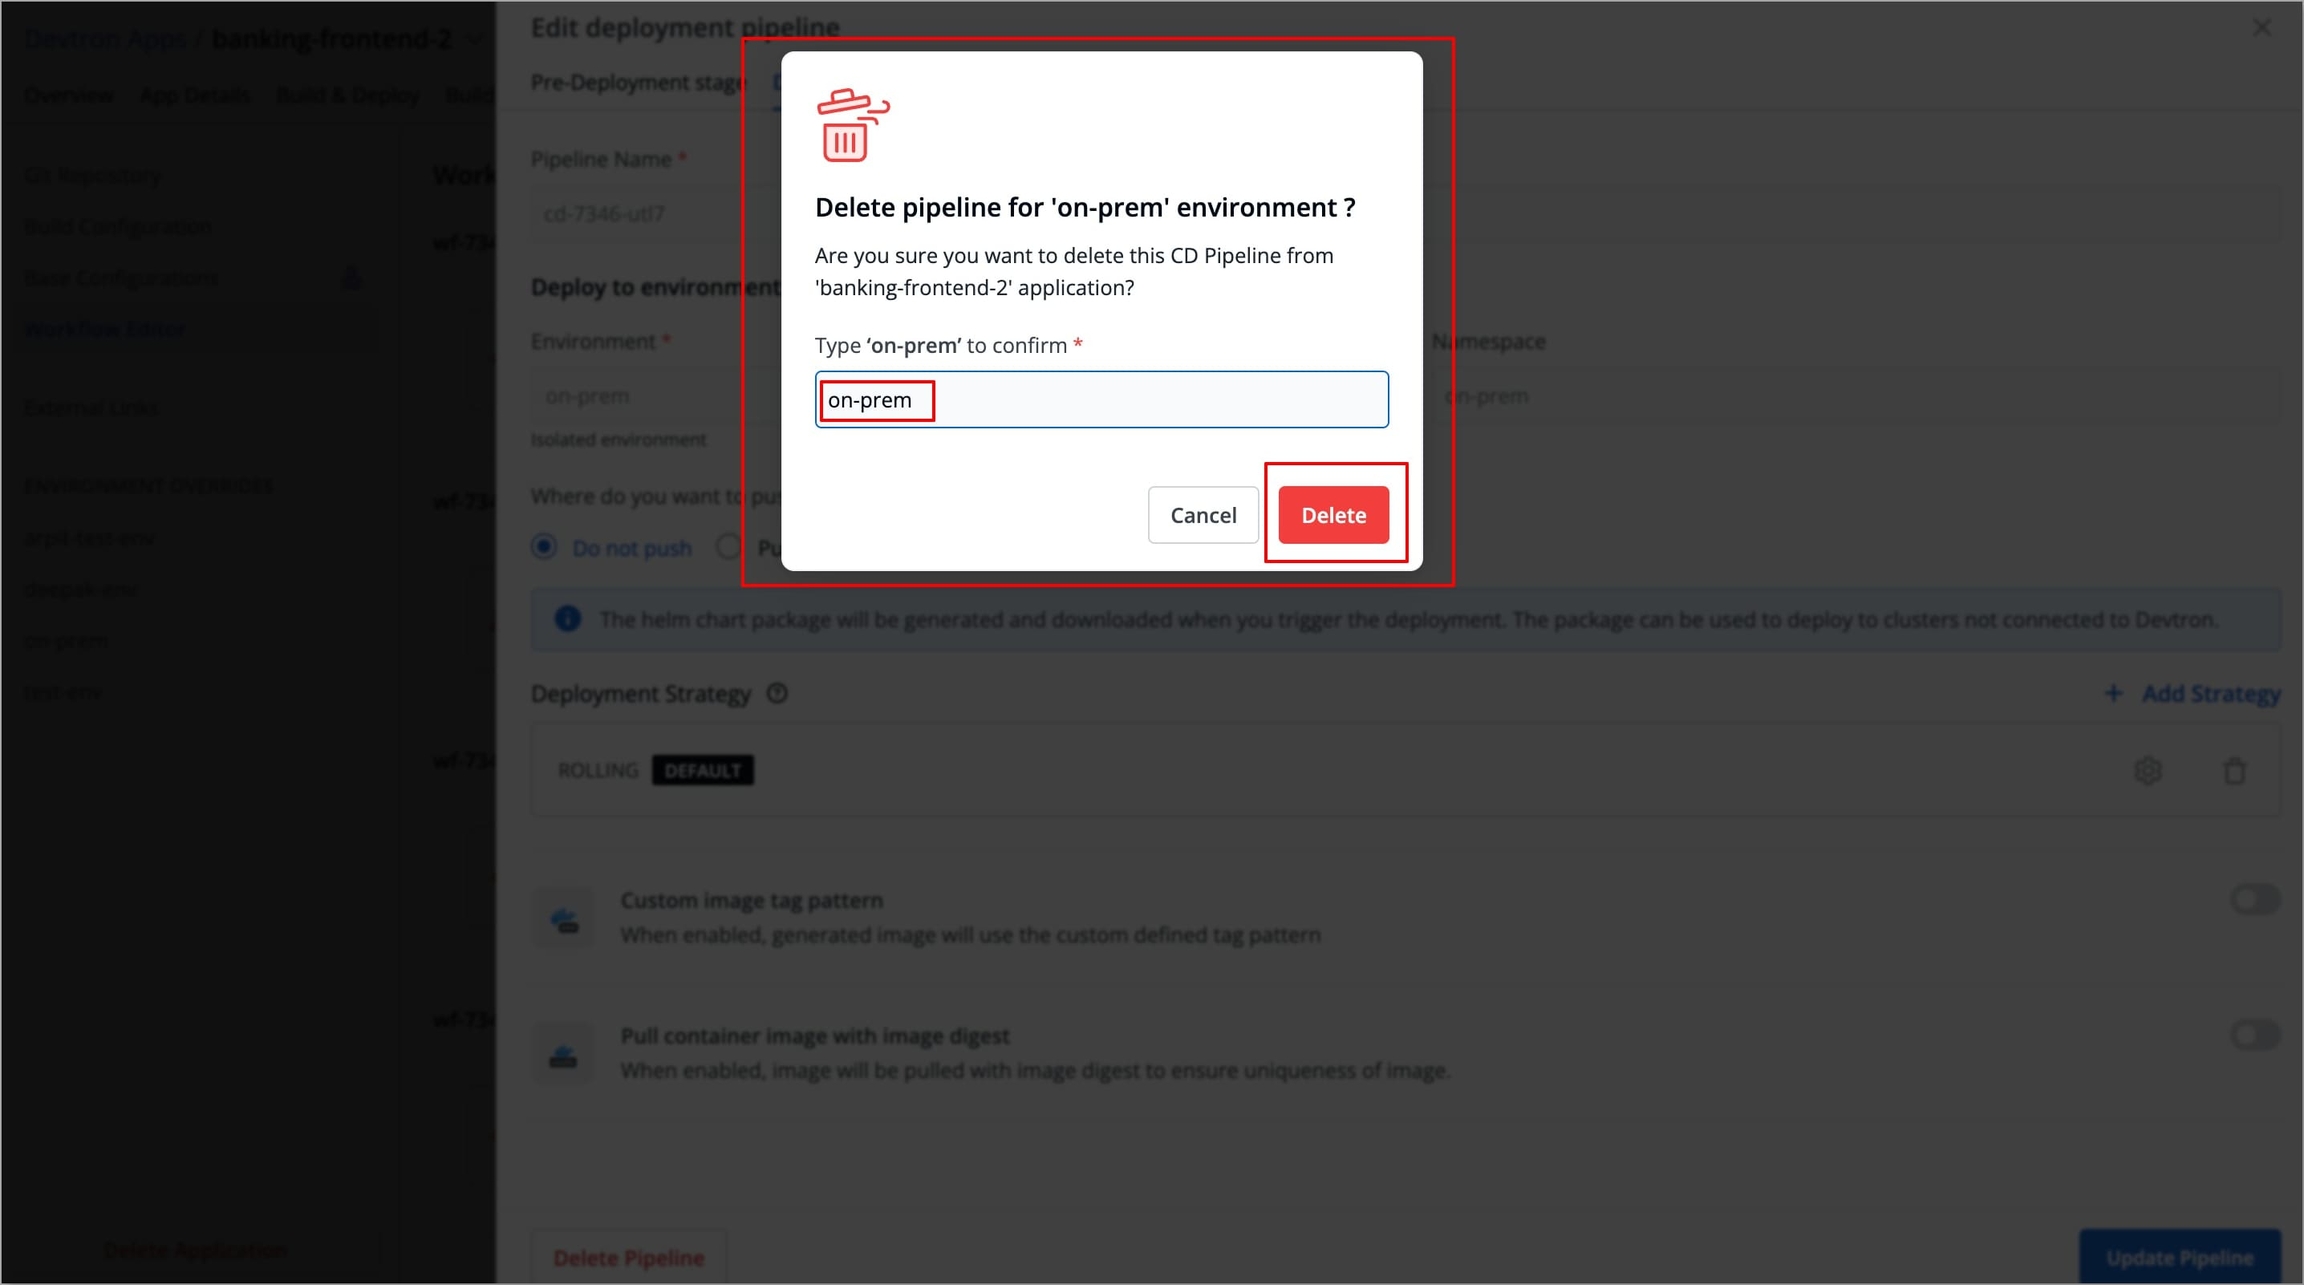
Figure 66: Deleting CD Pipeline
In case there are multiple CD pipelines in the workflow, then you need to delete them individually in a similar way.
After deleting all CD pipelines, click the Build stage, and the Edit build pipeline window will open.
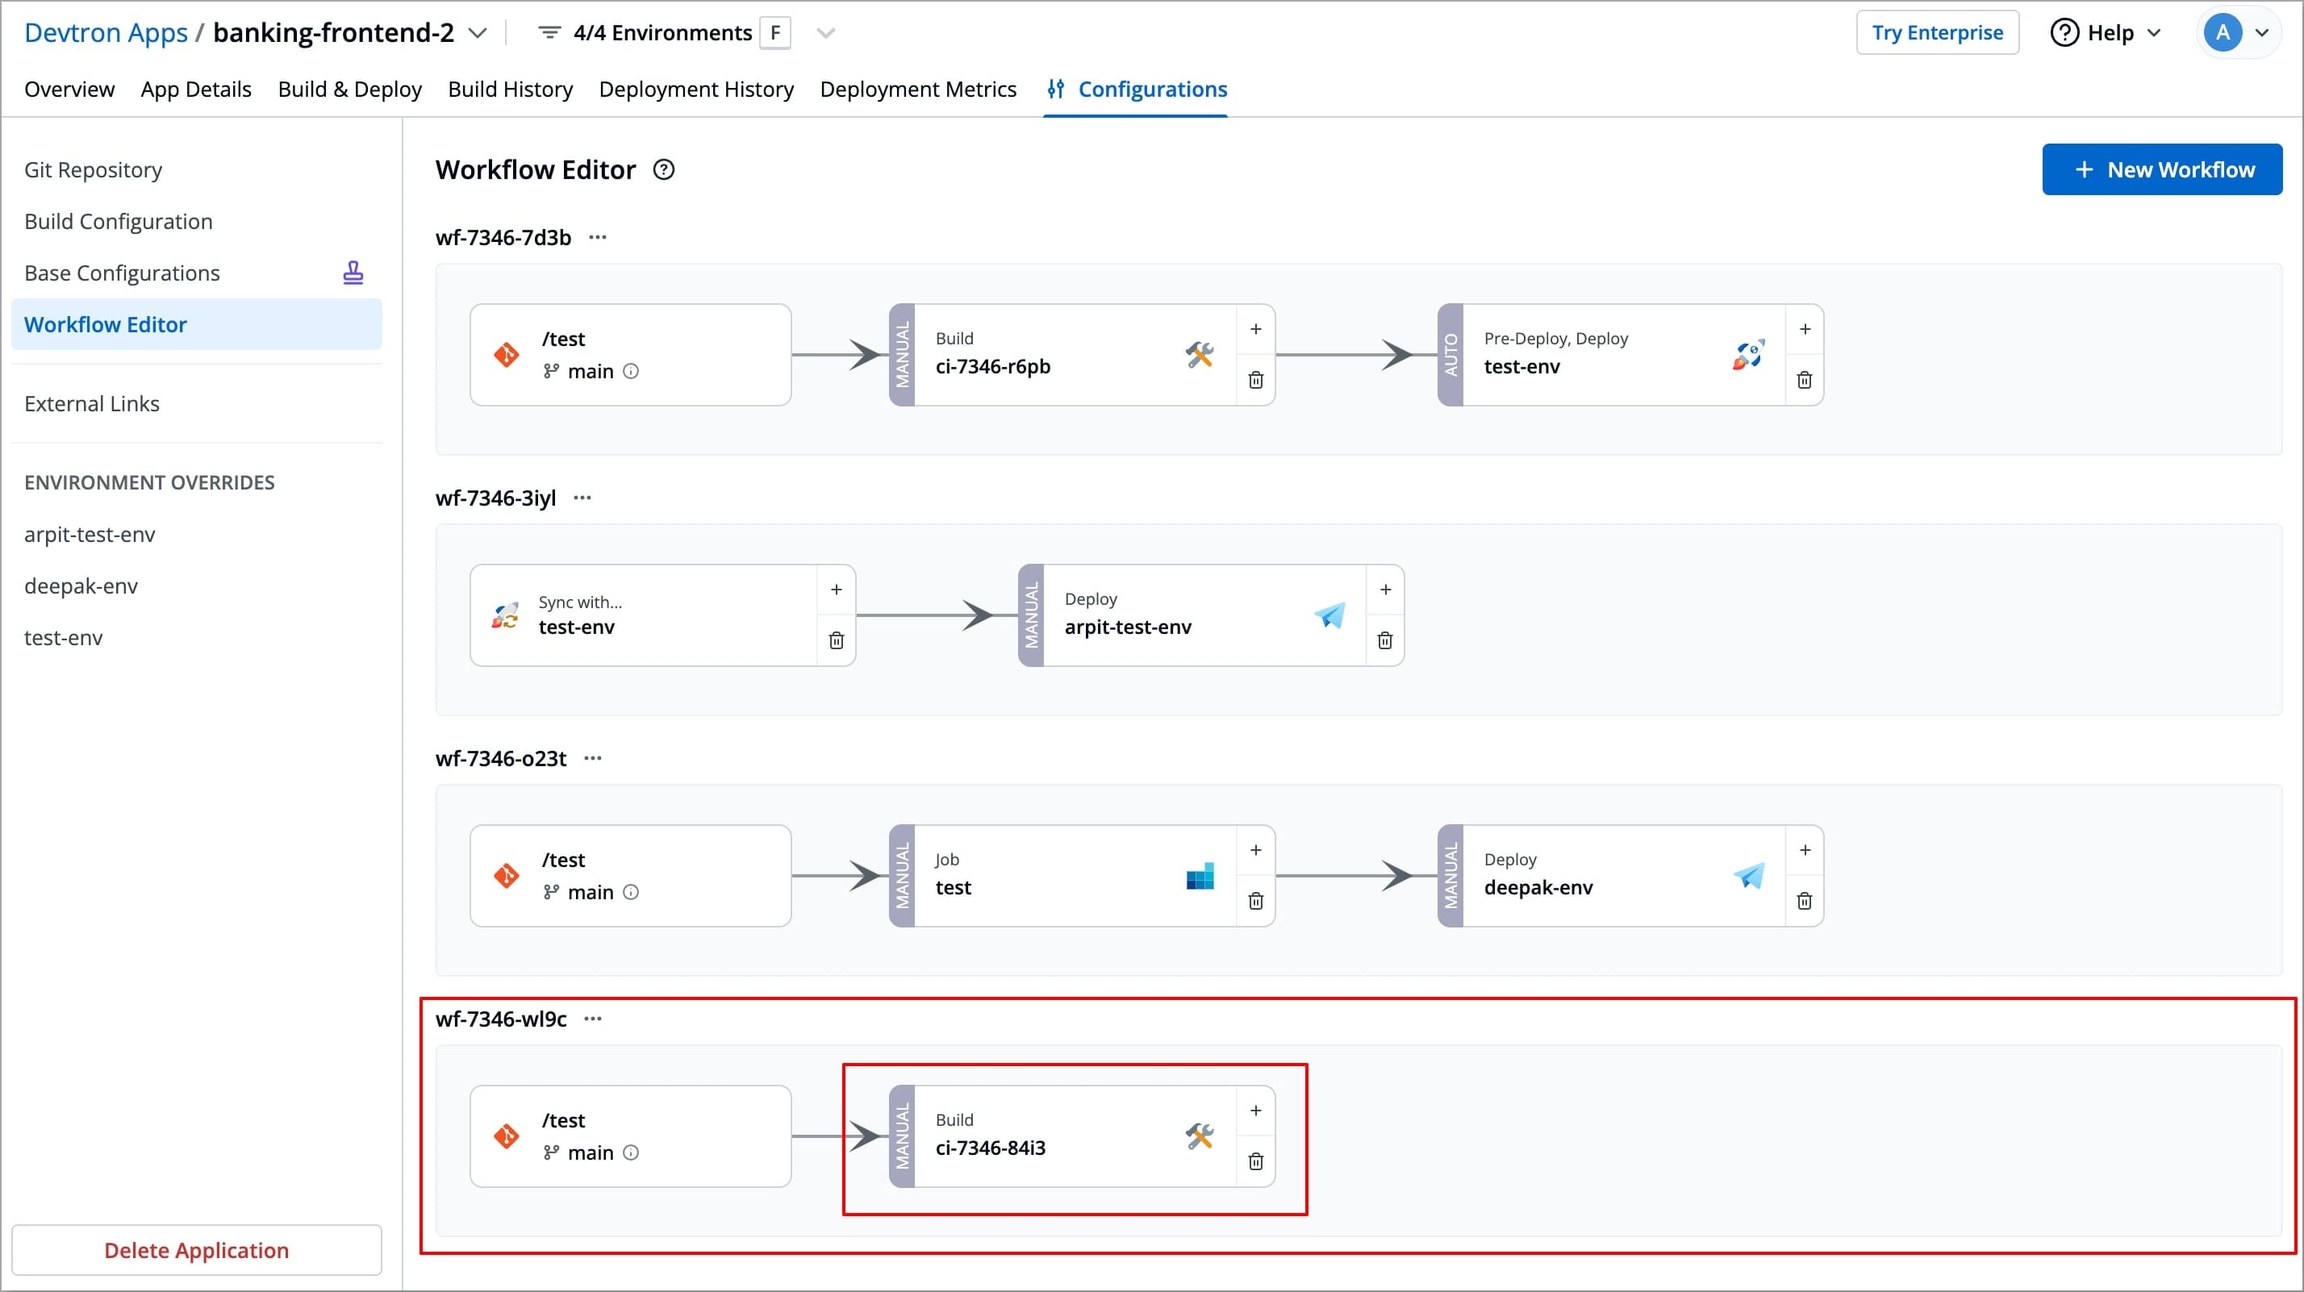
Figure 67: Selecting build stage Select Delete Pipeline from the bottom left corner of the window button in the Build stage, a pop-up will appear prompting you to delete the CI pipeline.
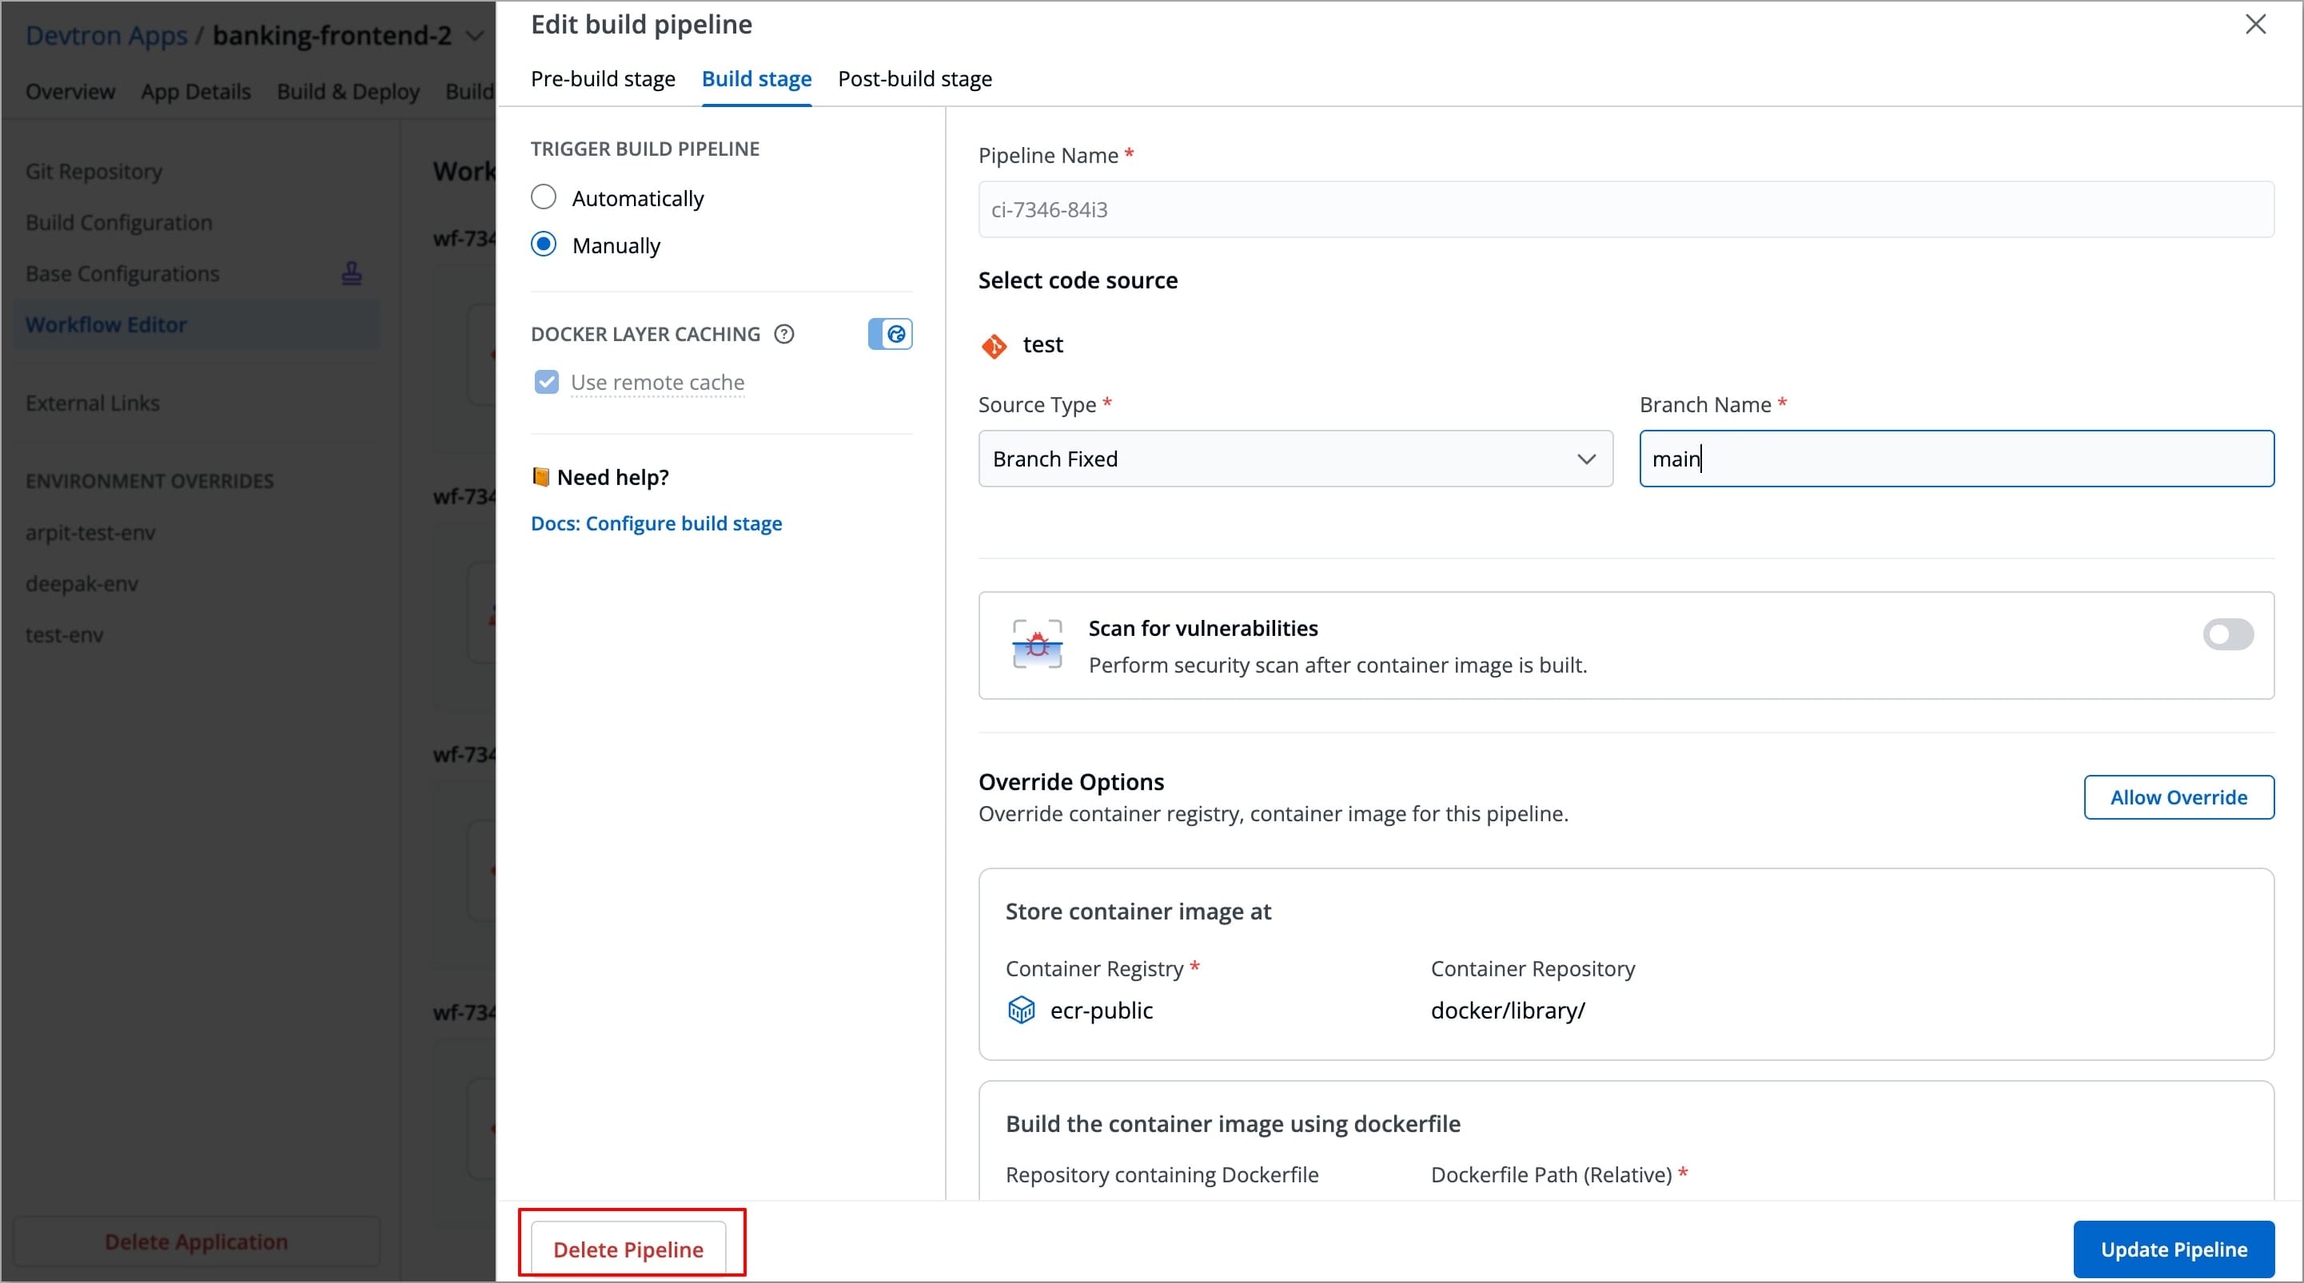
Figure 68: Clicking 'Delete Pipeline'
In case your build pipeline is linked to another pipeline through Linked Build Pipeline, then you must first delete the linked pipeline in order to delete your pipeline.
Select Delete and the CI pipeline will be deleted along with its workflow.
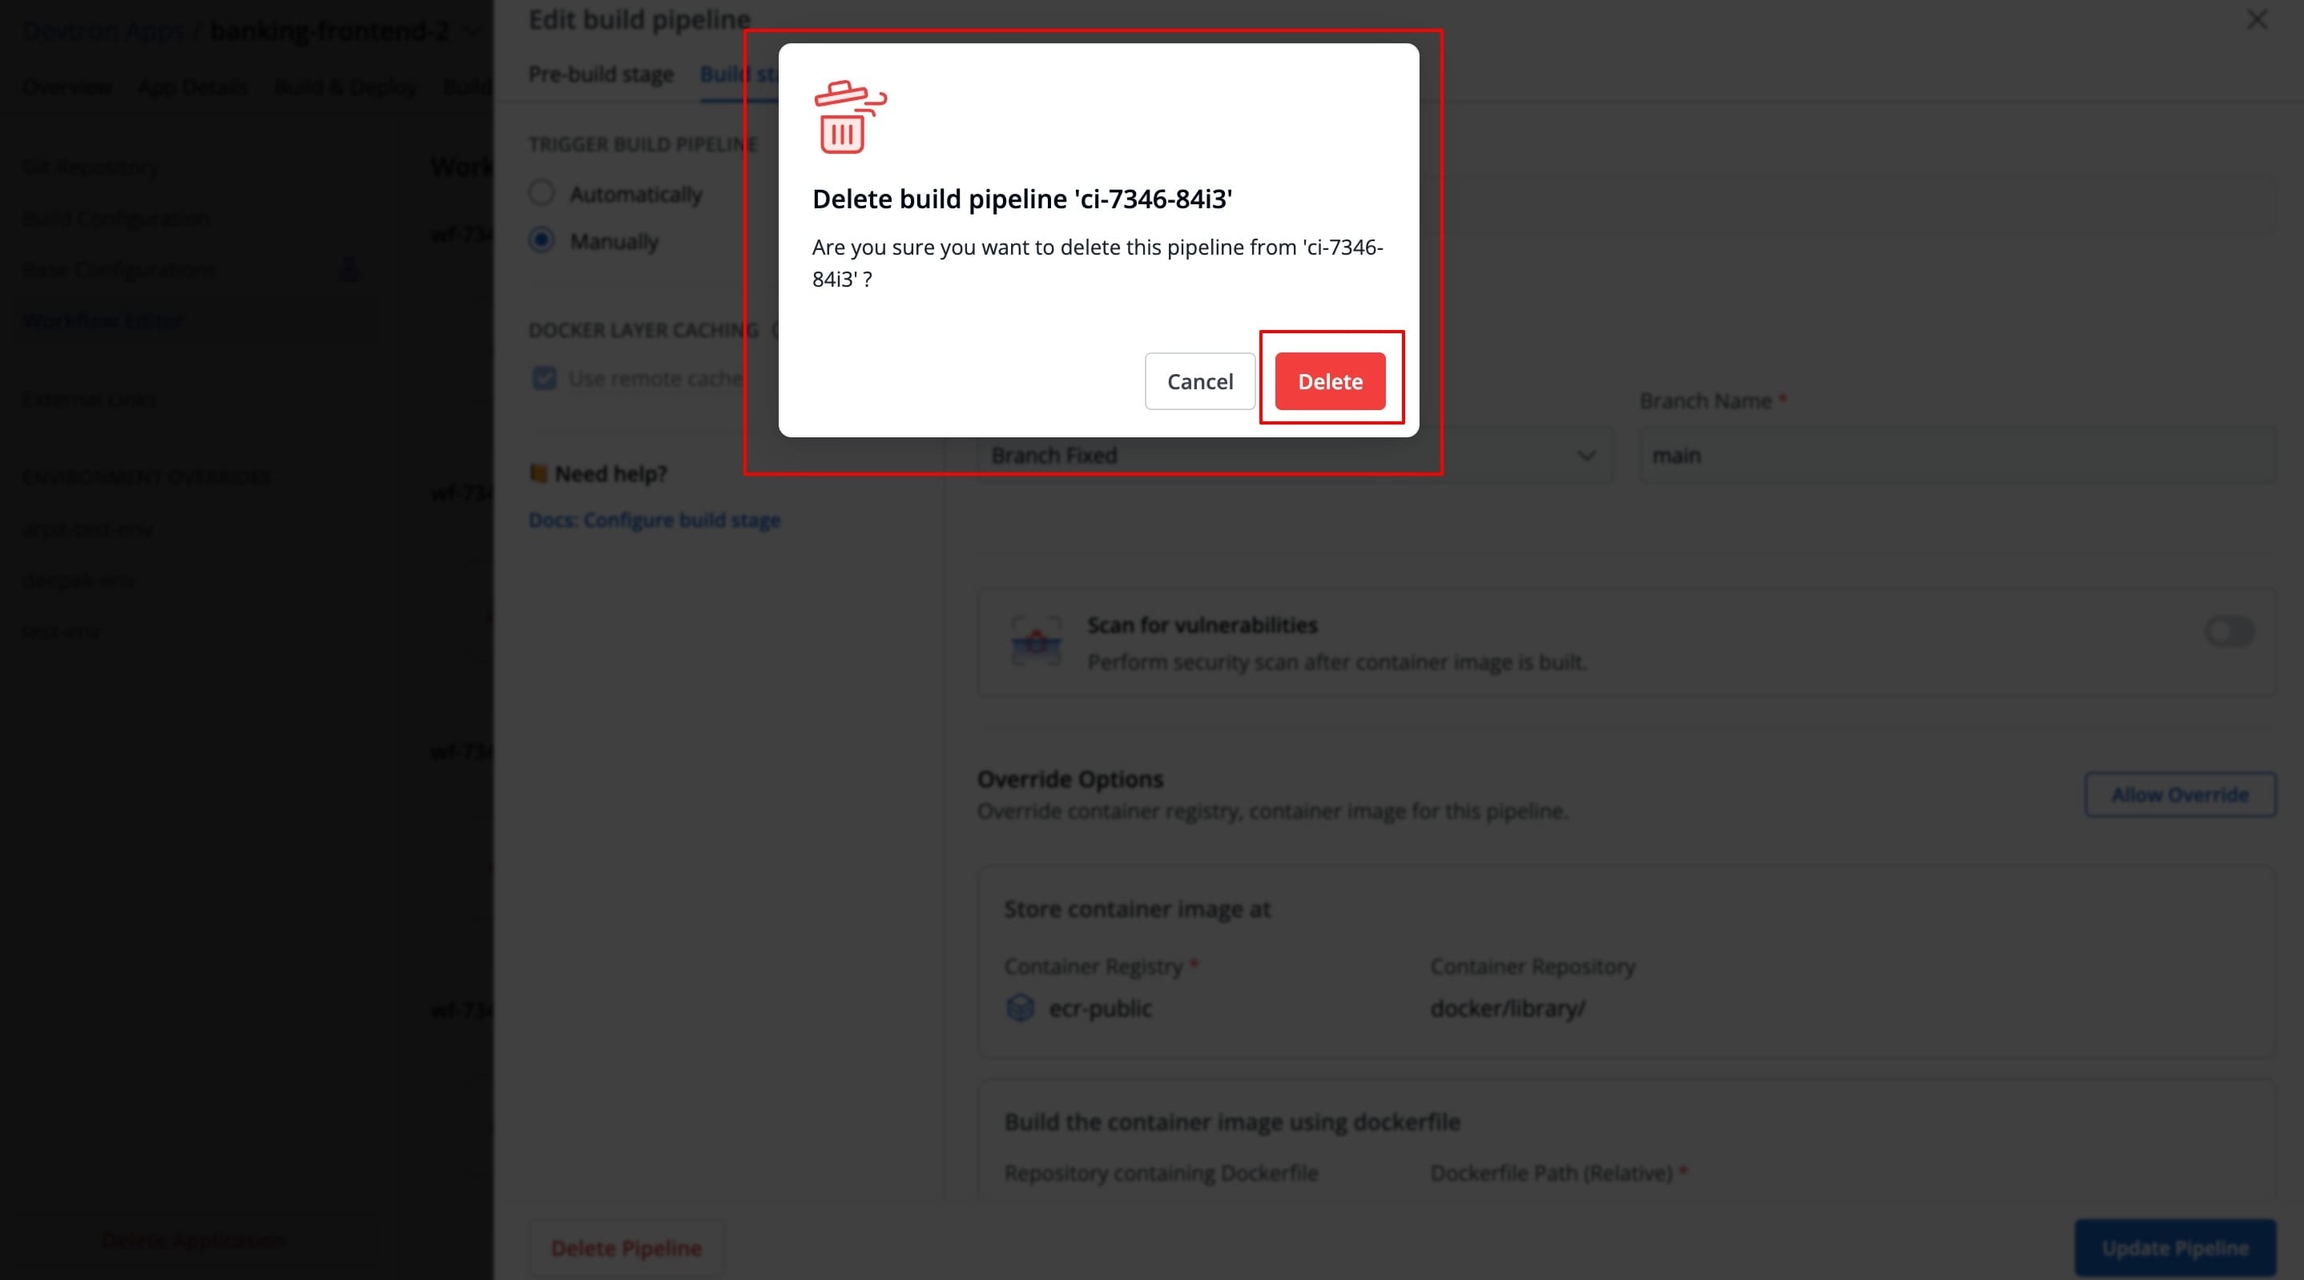
Figure 69: Deleting CI pipeline
Extras
Changing Image Source
The Change Image Source feature in Devtron lets you update the container image source for an application’s workflow without modifying it.
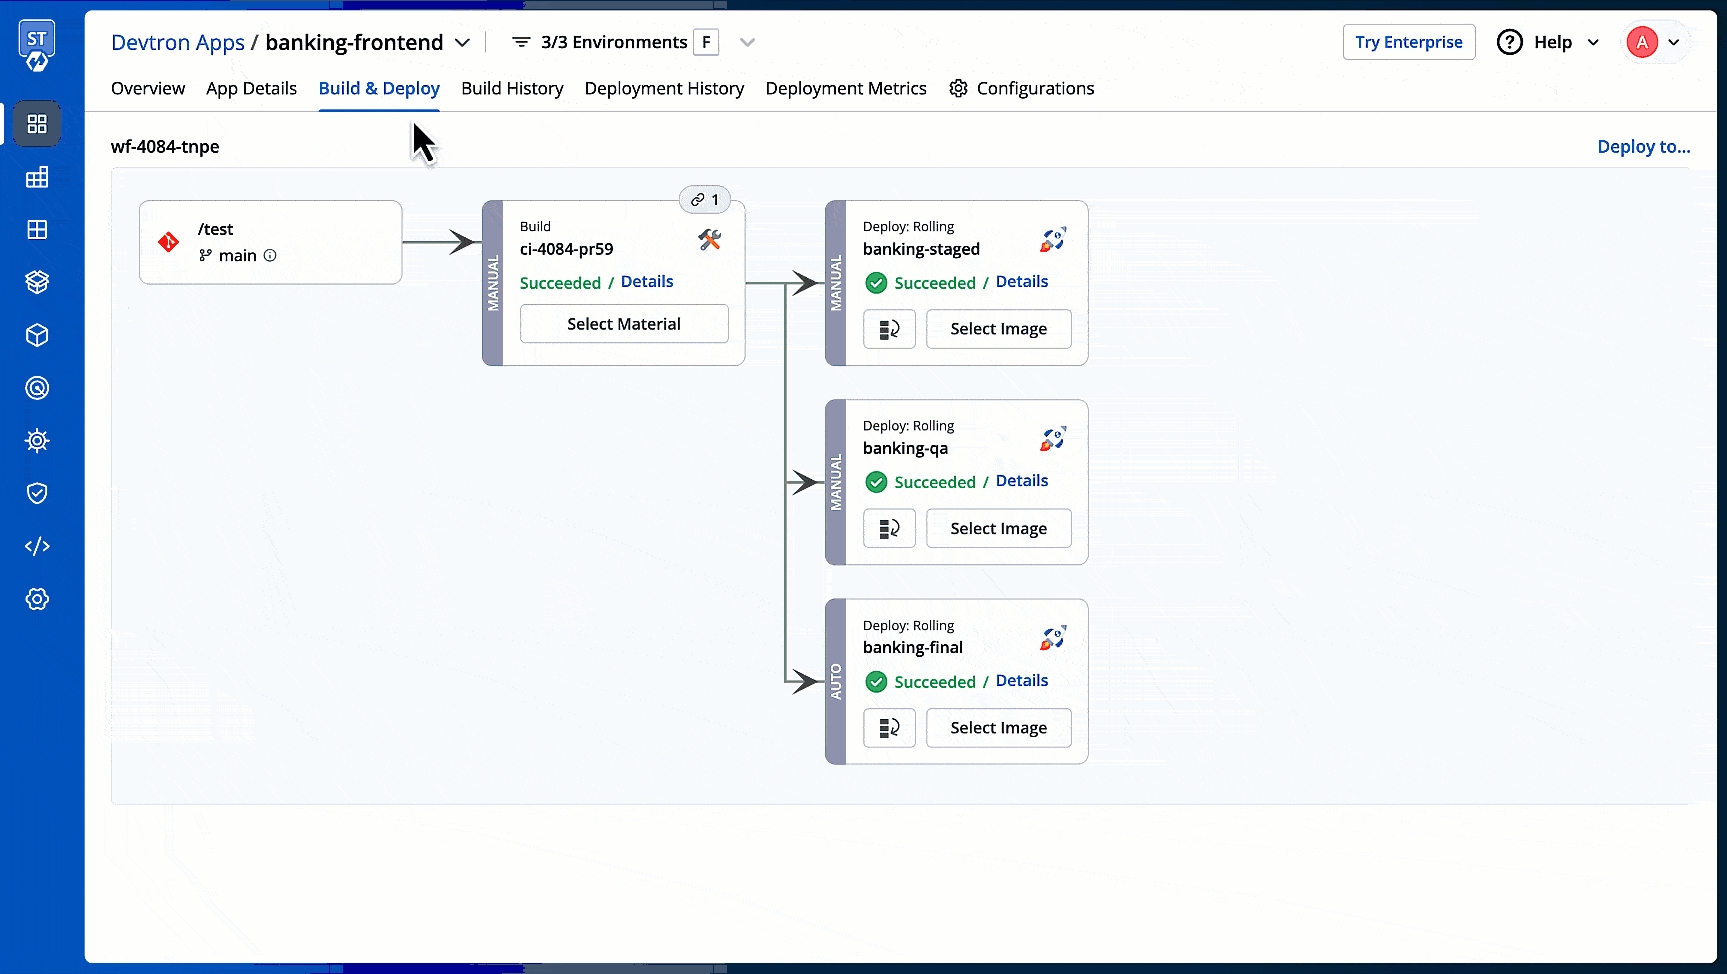
In the Configurations tab of your application, hover over the intended workflow name and click Change Image Source icon.
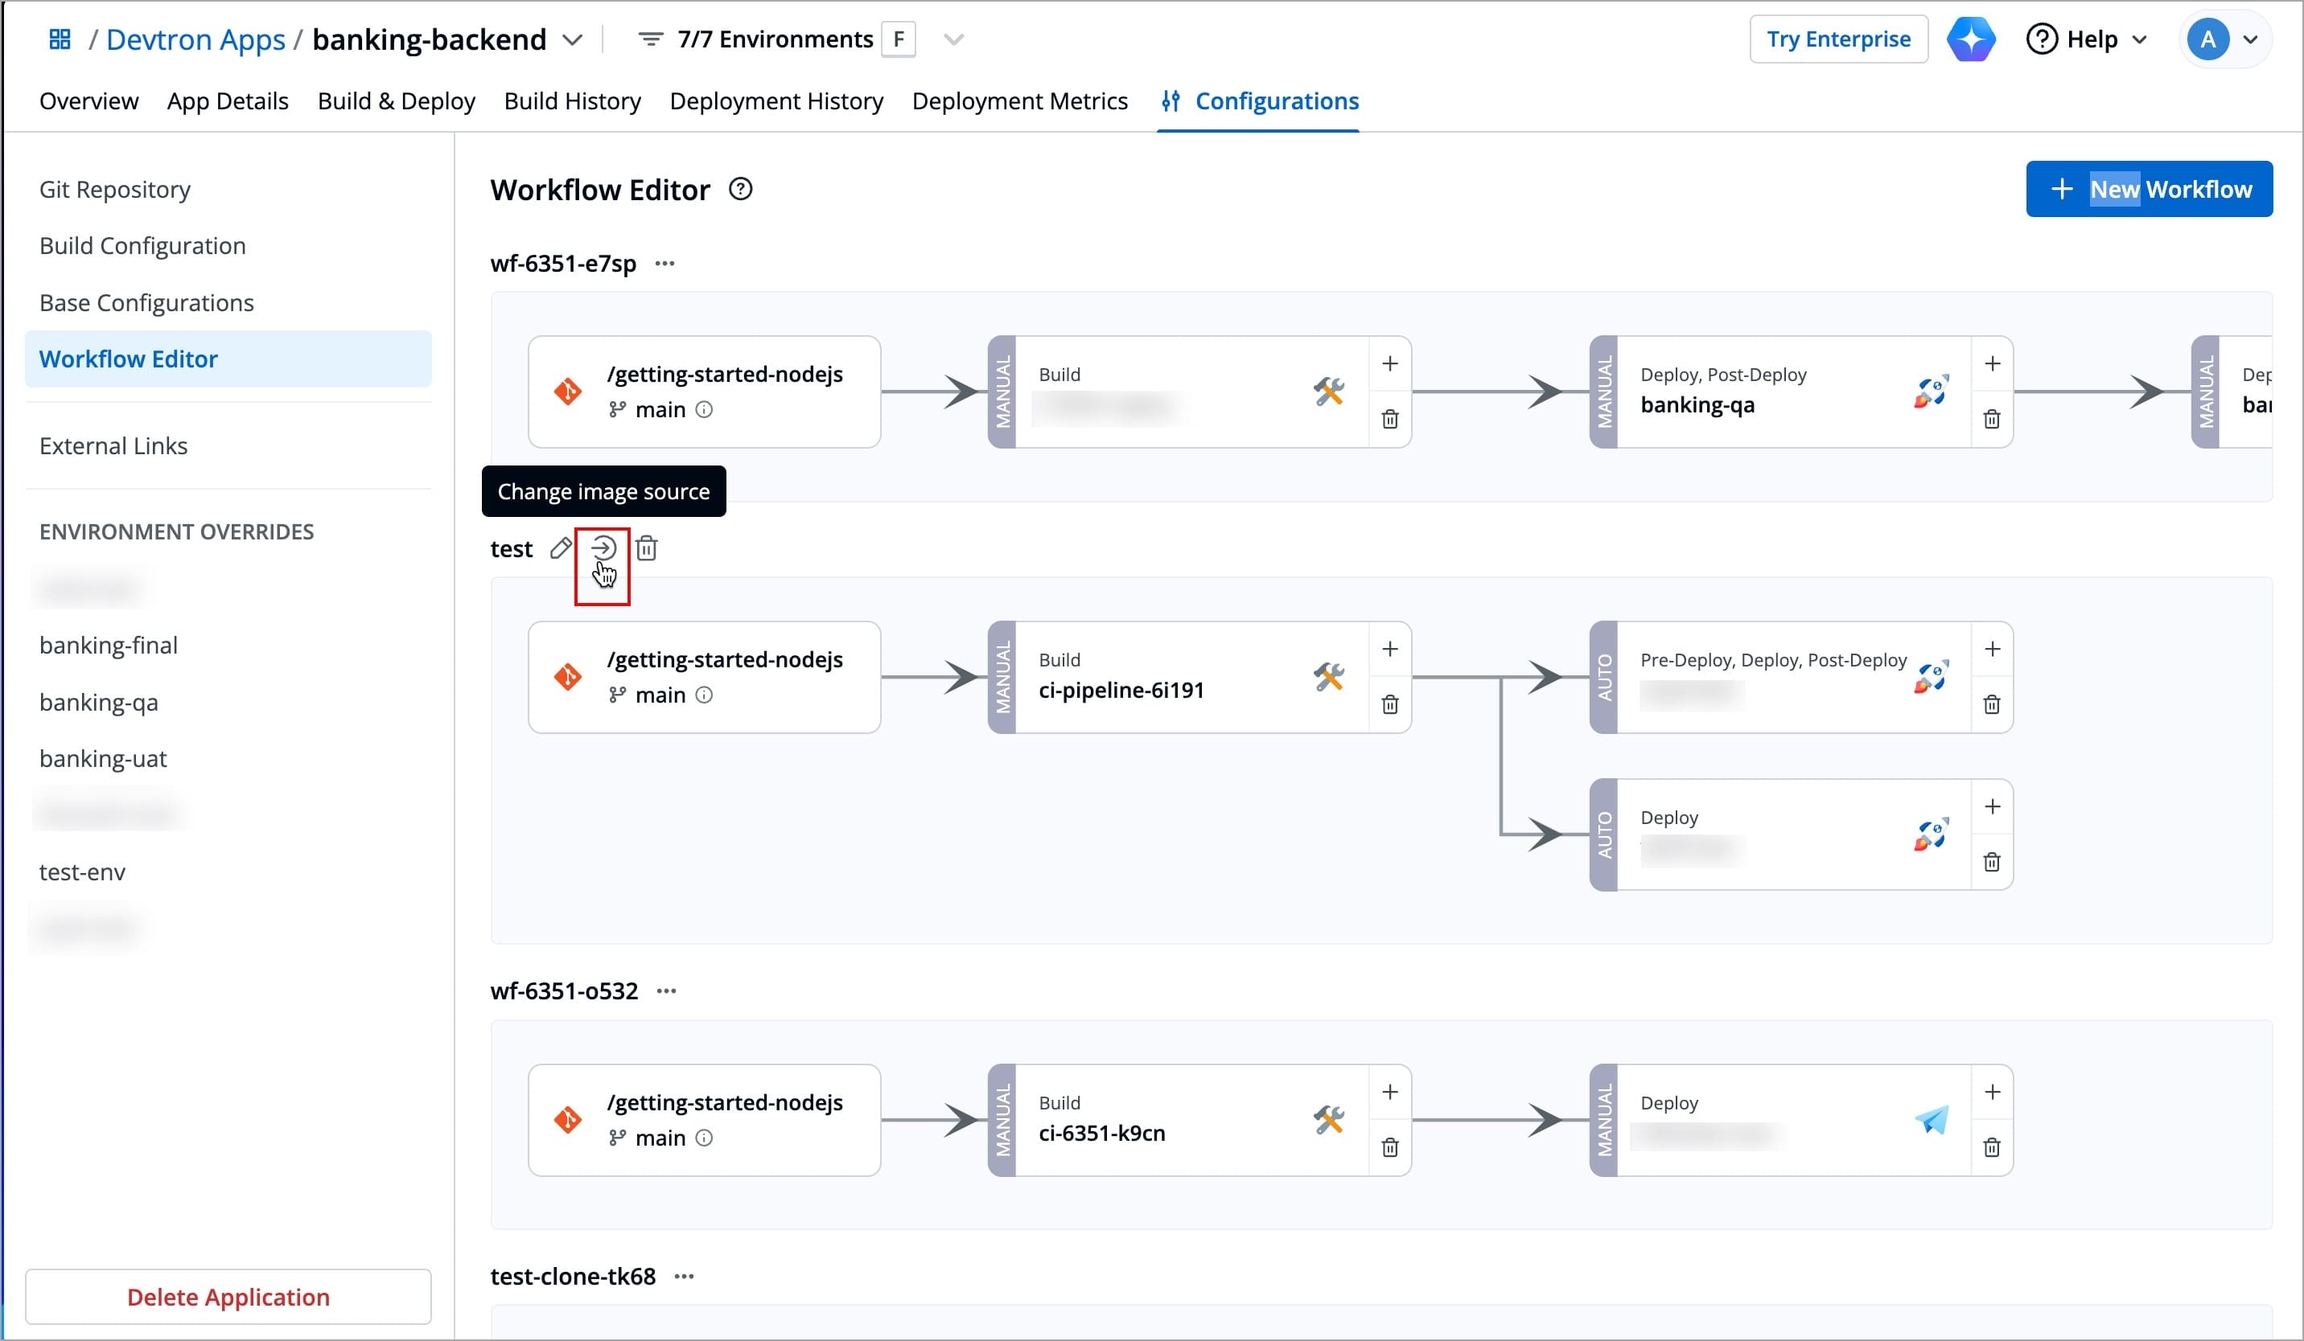
Figure 70a: Clicking 'Change Image Source' 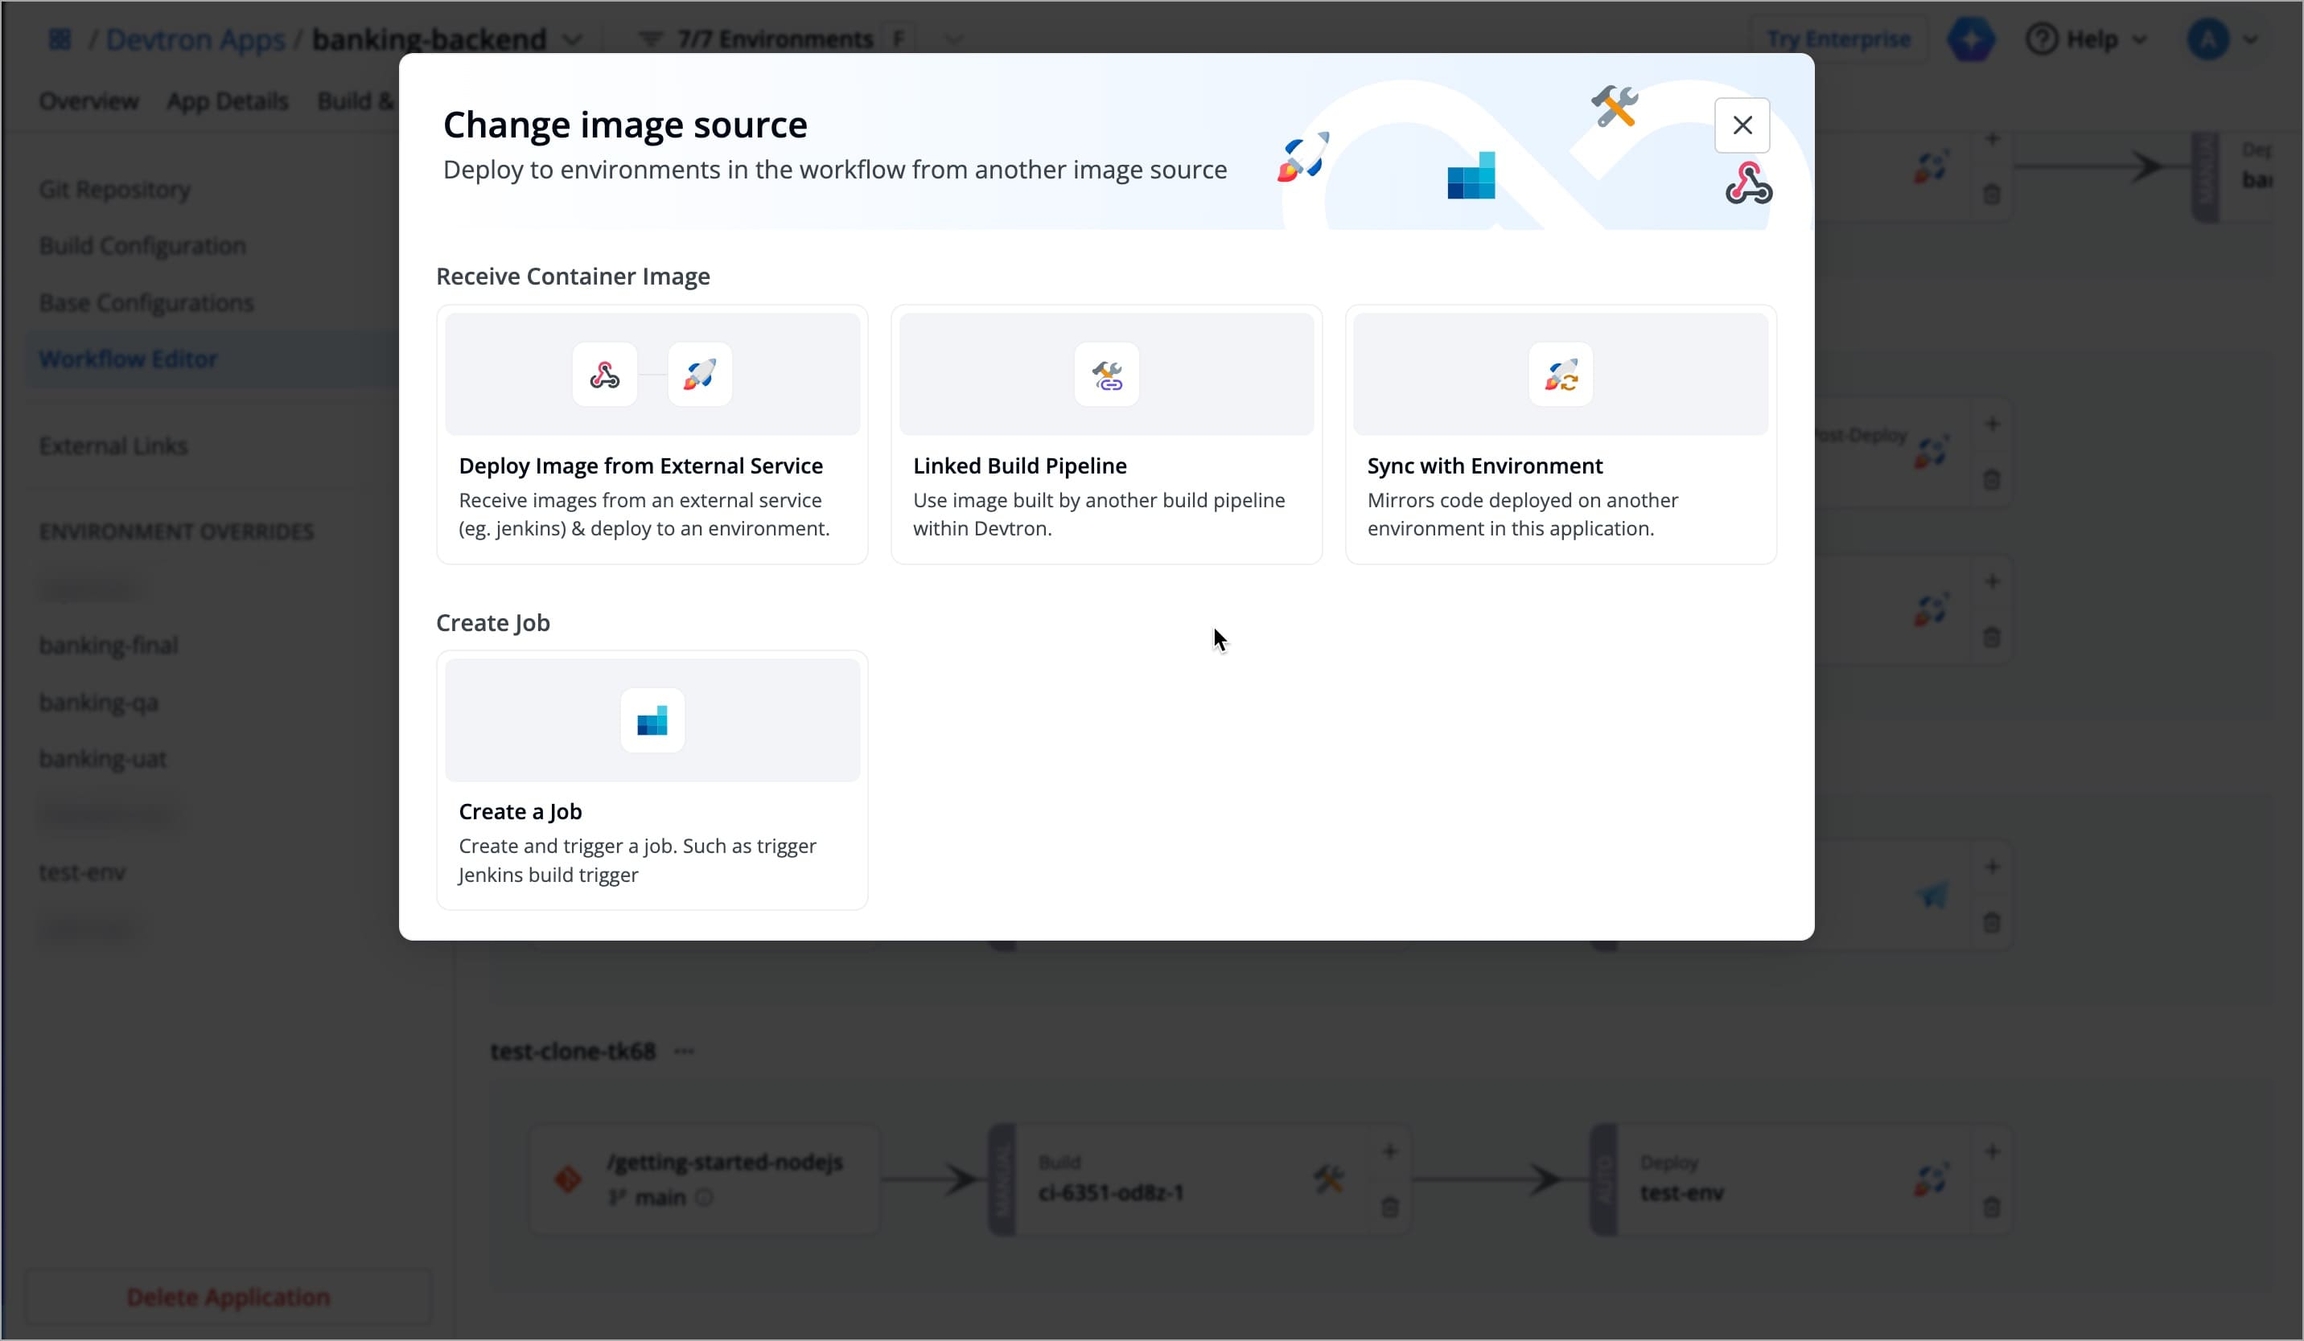
Figure 70b: Selecting Workflow Template Select the intended workflow template and enter the details required as per the selected workflow template. Refer Types of workflow templates to learn more.
Docker Layer Caching
Prerequisite
Configure blob storage if you wish to store cache.
If you are rebuilding the same Docker image frequently, an effective cache strategy can cut down build time. Docker images are built layer by layer, and Docker’s layer caching mechanism allows unchanged layers to be reused across pipeline runs.
You can disable caching if:
It’s not relevant to your workflow
It consumes unnecessary storage
The pipeline doesn’t perform an actual Docker build
Which cache gets impacted?
If a PVC with cache is attached, it will not be impacted by disabling cache. Only the remote cache is disabled.
There are 3 places from where you can control the cache behavior:
1. Orchestrator ConfigMap (Global Settings)
Super-admins can define the cache settings in orchestrator-cm globally for all applications and jobs using the following flags:
DEFAULT_CACHE_FOR_CI_BUILD # for main application build stage
DEFAULT_CACHE_FOR_CI_JOB # for CI jobs
DEFAULT_CACHE_FOR_JOB # for general jobs
DEFAULT_CACHE_FOR_CD_PRE # for pre-deployment stage
DEFAULT_CACHE_FOR_CD_POST # for post-deployment stage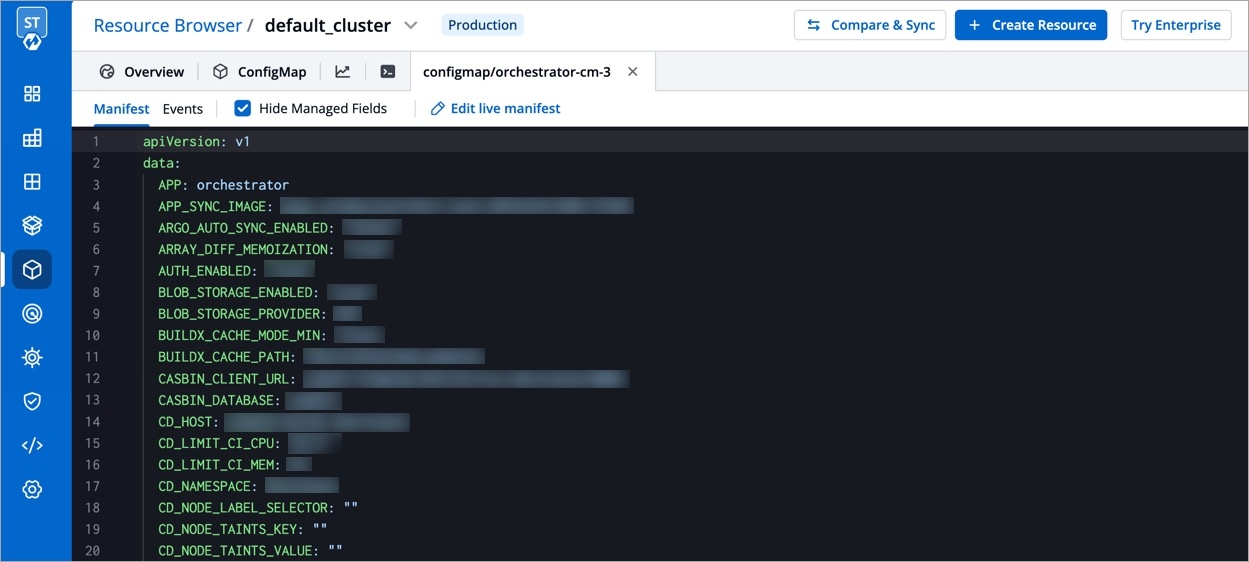
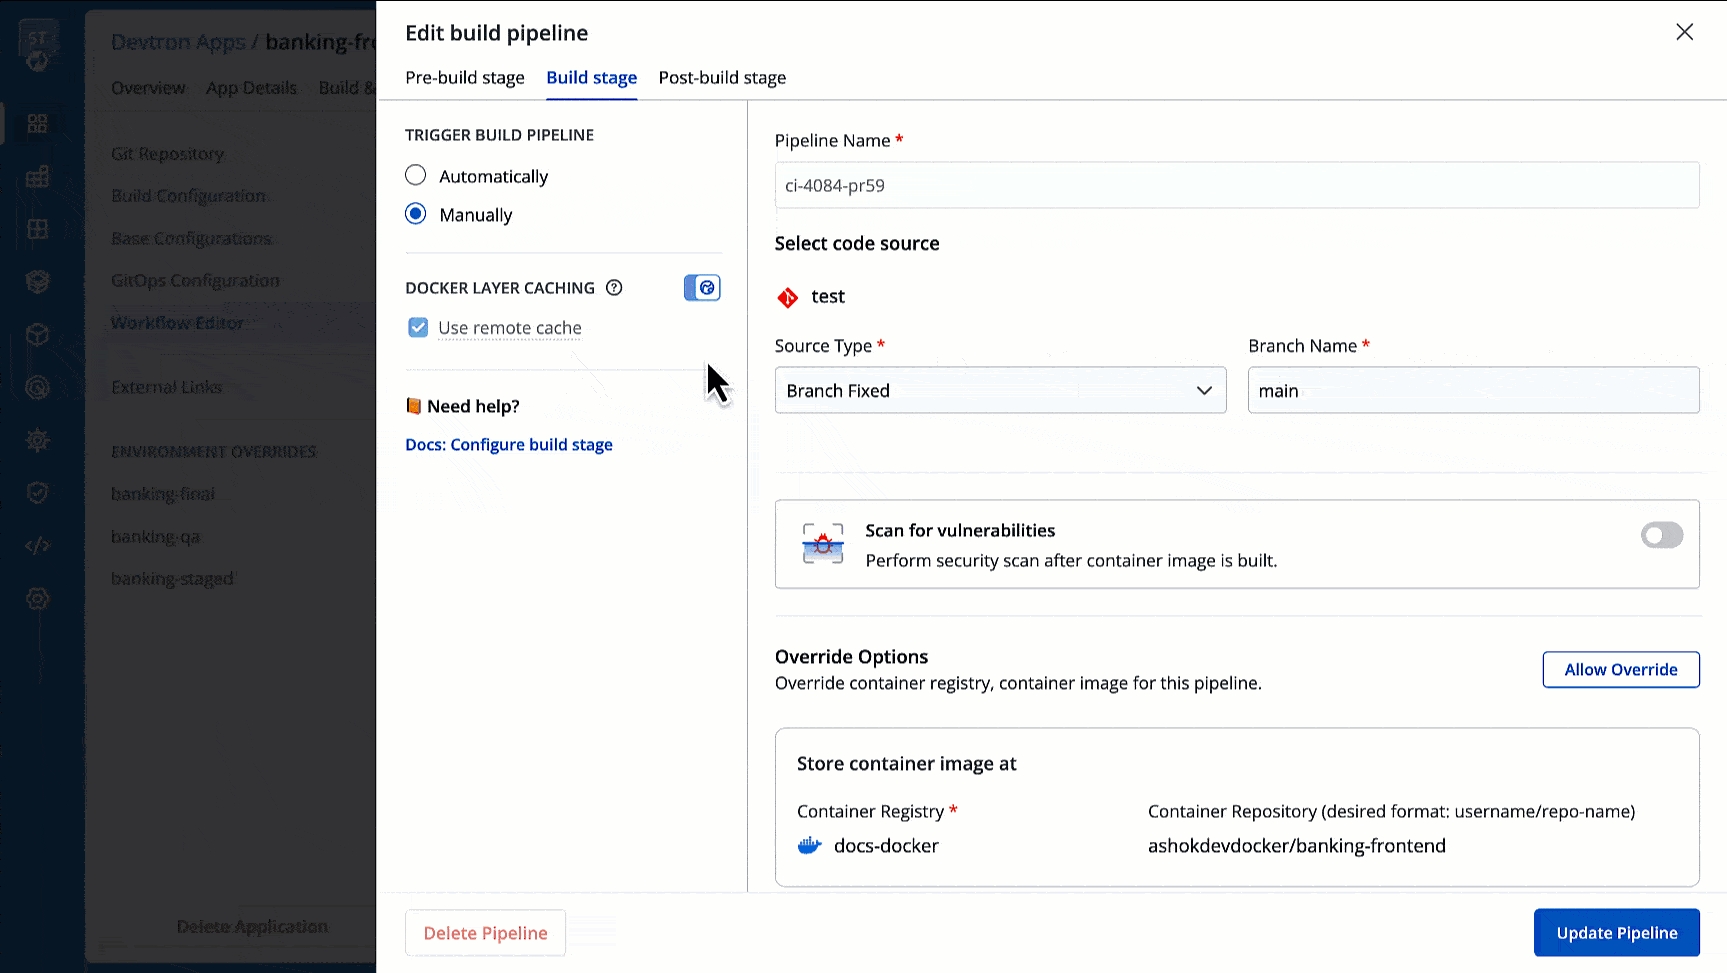
2. Editing Pipeline
Go to Workflow Editor → Edit Build Pipeline (Build Stage) → Docker Layer Caching (toggle) → Use remote cache (checkbox)
By default, your build pipeline will inherit the Global Settings. However, you can use the toggle button to override it and decide the caching behavior using the Use remote cache checkbox. In other words, cache behavior defined in the pipeline configuration will have higher priority than the global one.
3. During Trigger
Go to Build & Deploy (tab) → Select Material → Ignore Cache (checkbox)
You have the option to ignore cache while triggering a build (regardless of the cache settings defined at the pipeline or global level).
Note
If the caching flags in Global Settings are set to false, ignoring cache becomes the default behavior even if you don't select the 'Ignore Cache' checkbox during trigger.
Override Build Configuration
Override Options in Build Stage lets you override Build Configurations for each workflow of the same application. You can configure overrides in the build stage of each workflow.
For example, you might want to push development or testing builds to a separate registry from production builds, but in Build Configurations you have configured the production container registry to push build images. This means for all the workflows (testing or production), build images will be pushed to the production container registry by default.
To override this Build configuration for the specific workflow (testing workflow), you can use Override Options in the Build Stage of that workflow that lets you specify different container registries, how to build container images, and target platforms for different workflows of the same application. This means the images built for testing environment can be included to the testing registry and the images for production environment can be included to the production registry. This helps keep environments isolated, improves deployment safety, and makes managing multiple environments easier.
Creating Build Configuration Override
To override a container registry, container image, or target platform:
Go to Applications and select your application from the Devtron Apps tabs.
On the App Configuration tab, select Workflow Editor.
Select the build pipeline of your application.
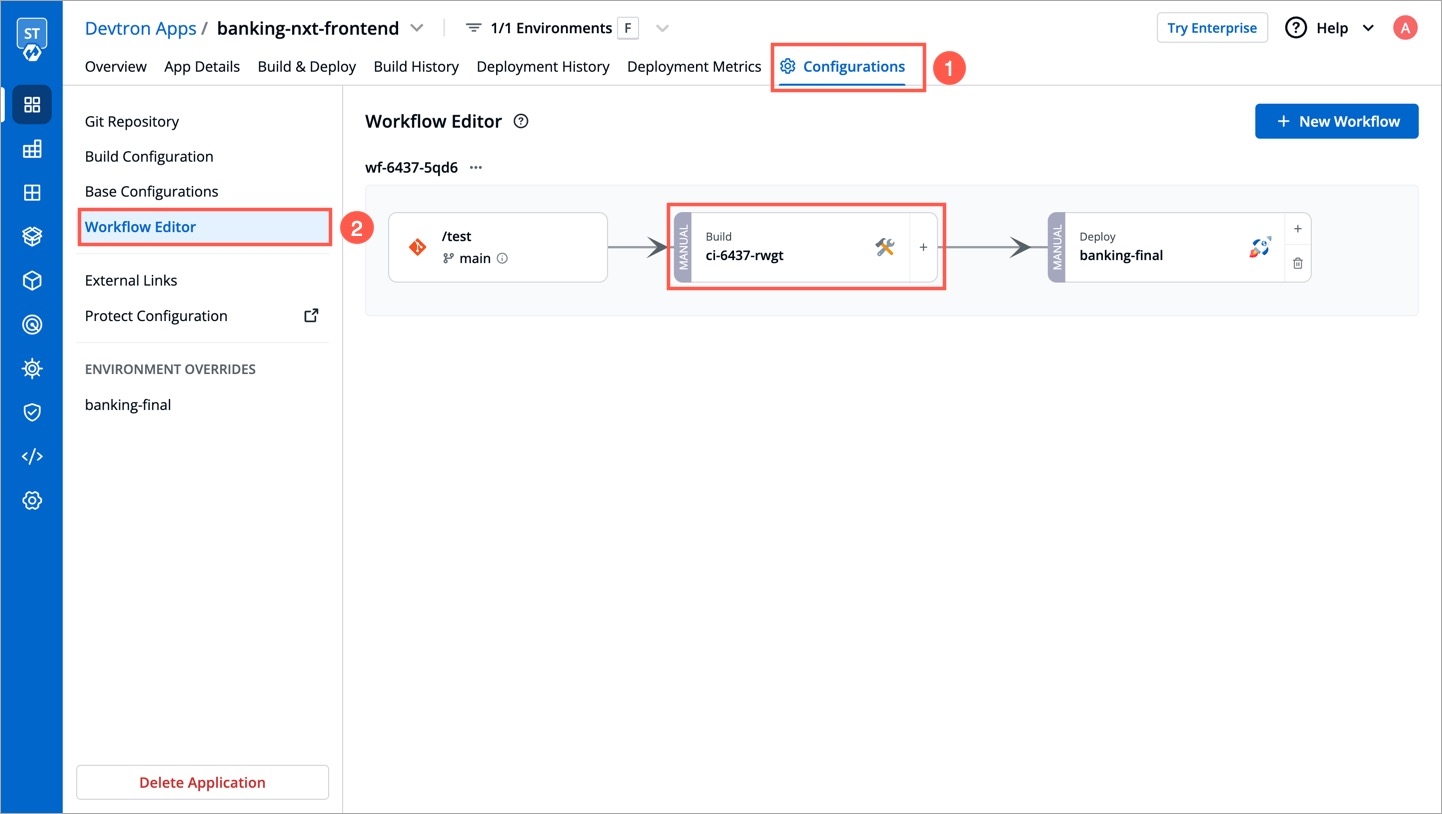
Figure 74: Selecting Build Pipeline Click Allow Override in the Build Stage:
Select the new container registry from the drop-down list.
Create and build the new container image with different options.
Set a new target platform from the drop-down list or enter a new target platform.
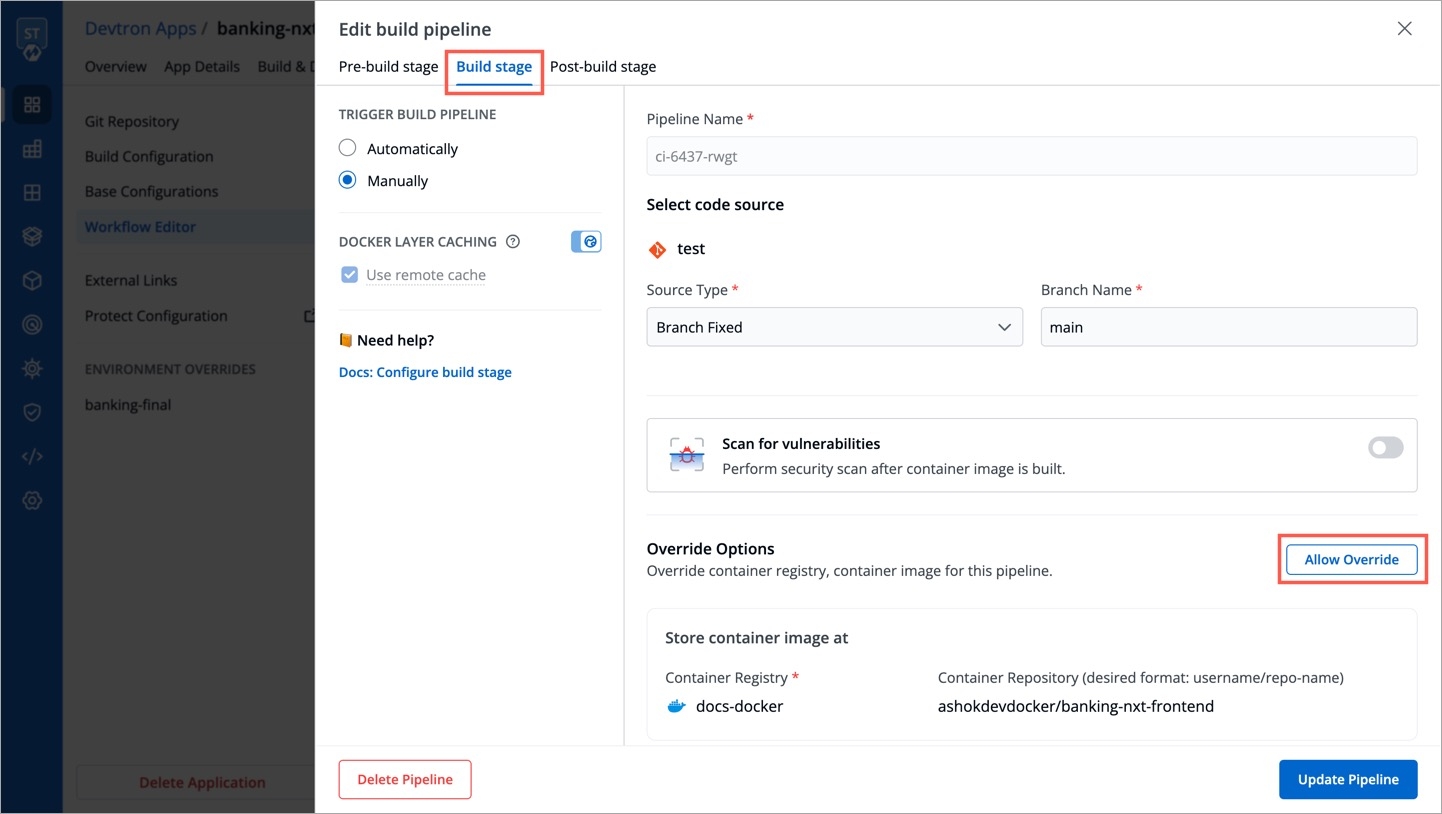
Figure 75: Selecting Allow Override Select Update Pipeline, The override will be effective when the next build is triggered.
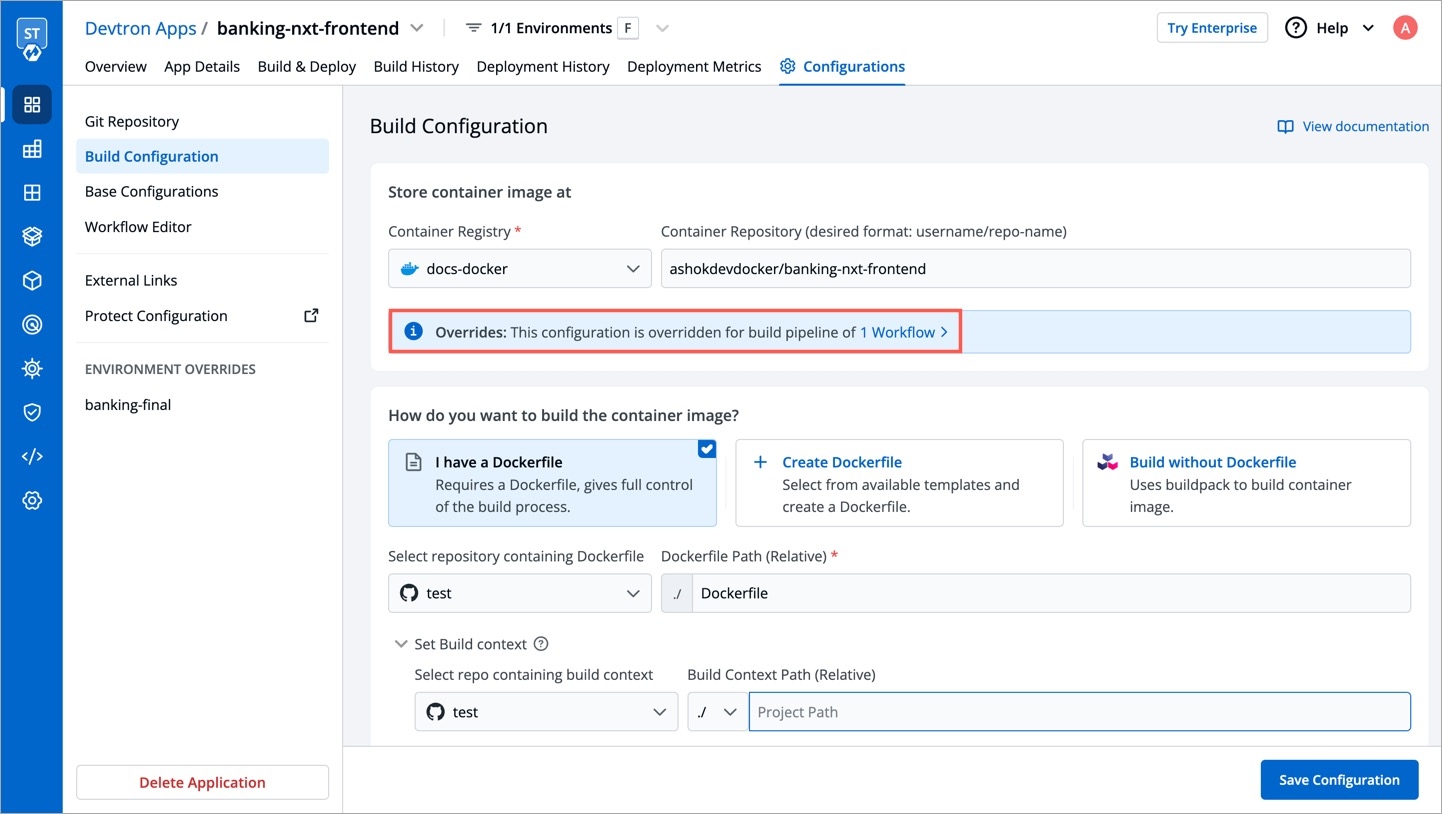
The overridden container registry/container image location/target platform will be reflected on the Build Configuration page. You can also see the number of build pipelines for which the container registry/container image location/target platform are overridden.
Configuring Webhook
For GitHub
Go to Settings → Webhooks of your repository.
Figure 77a: Navigating to Repository Settings 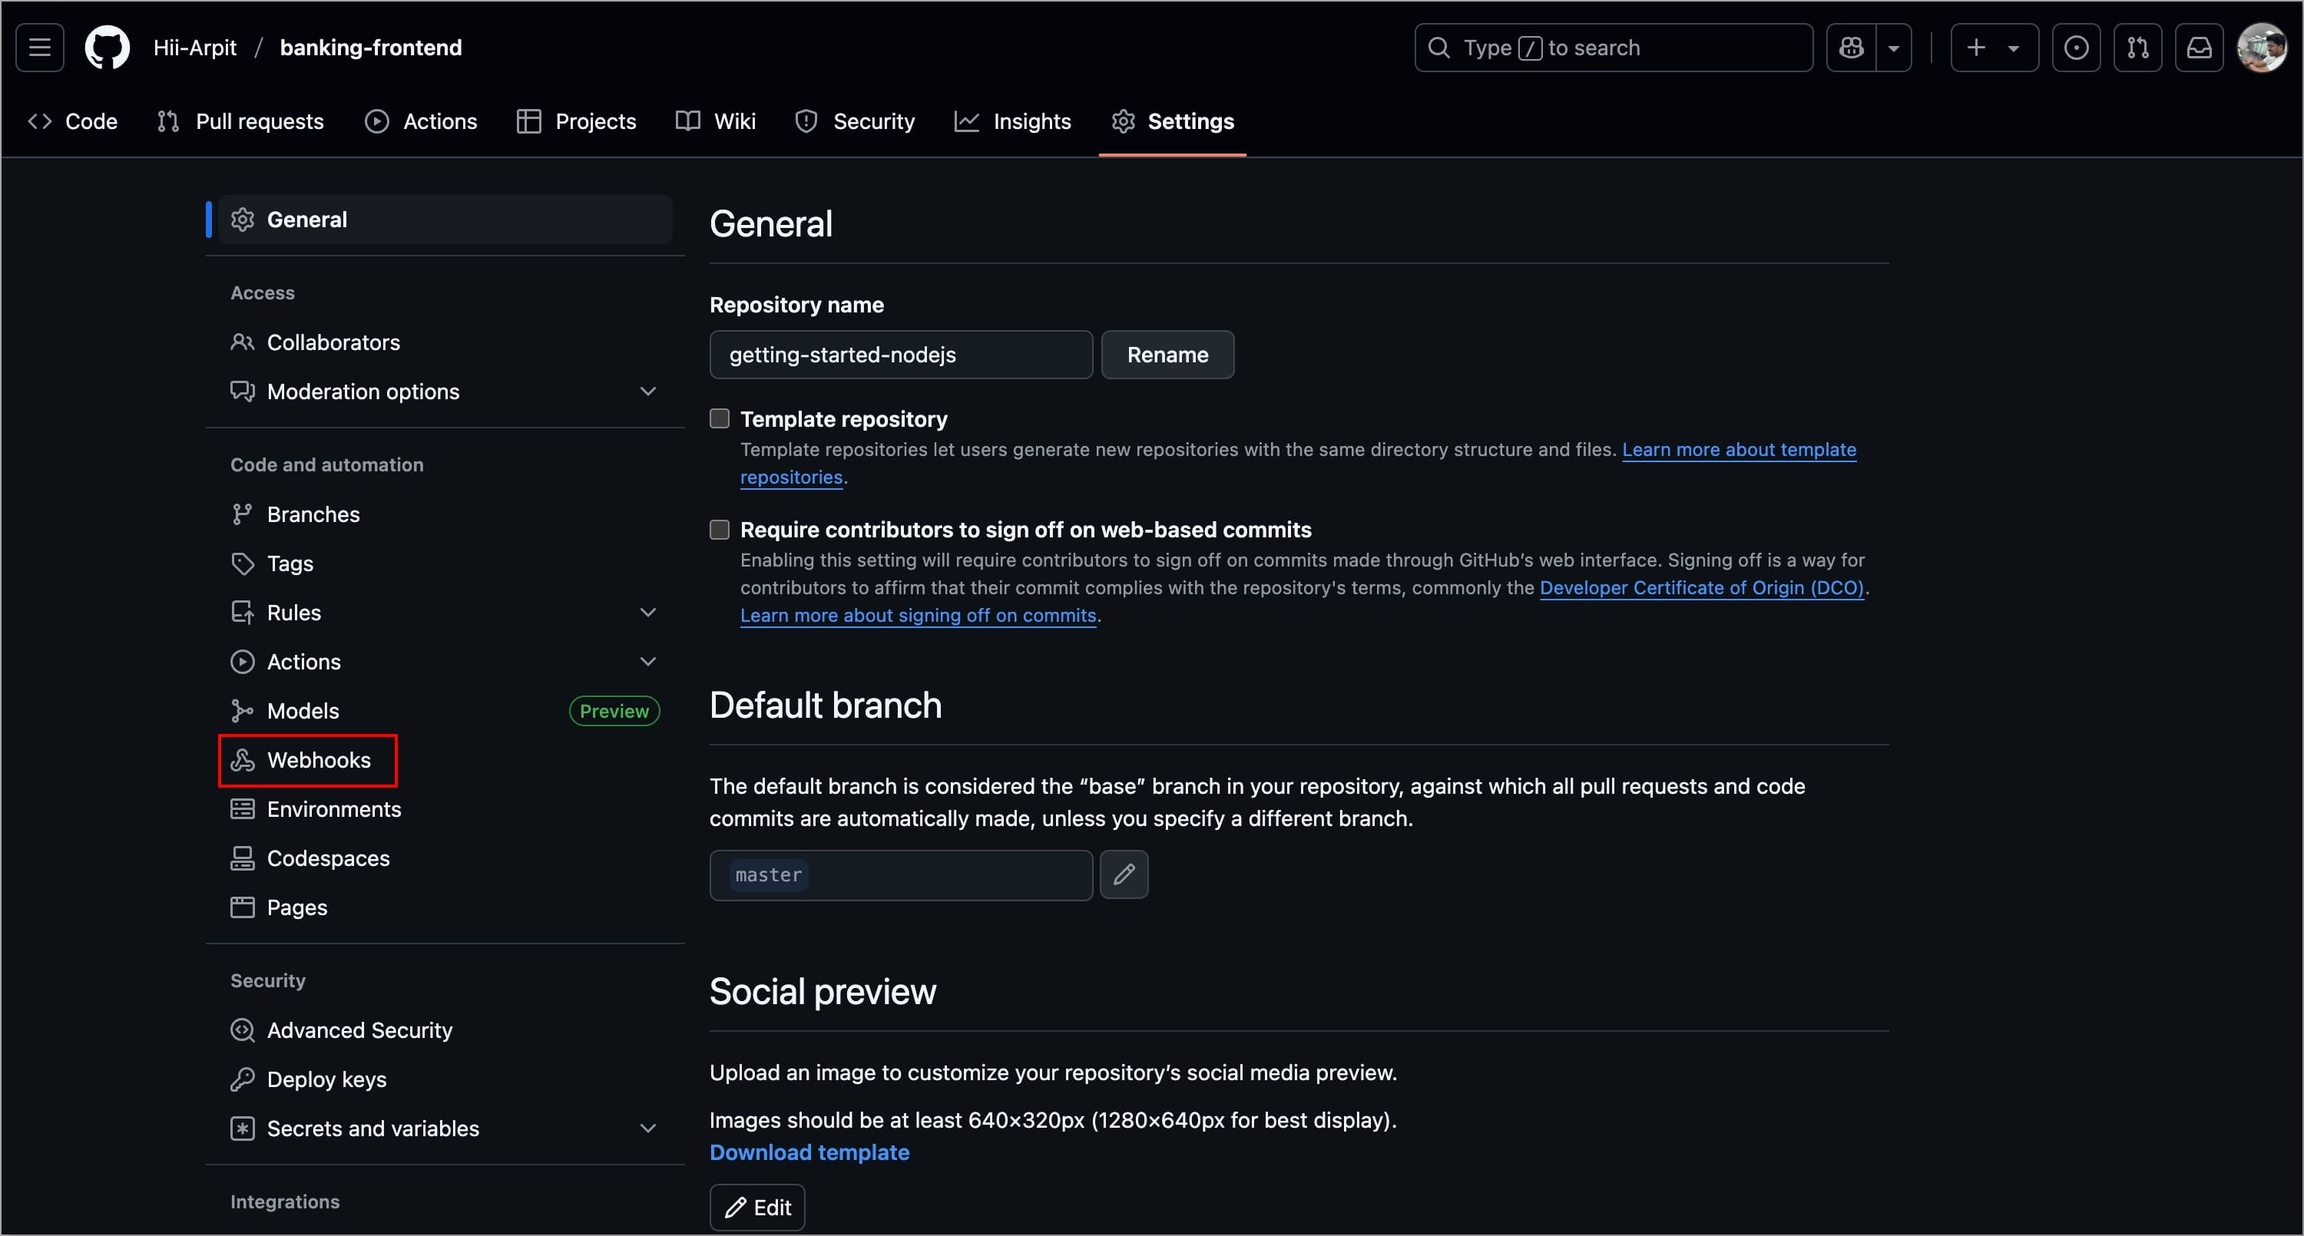
Figure 77b: Selecting 'Webhooks' Select Add webhook.
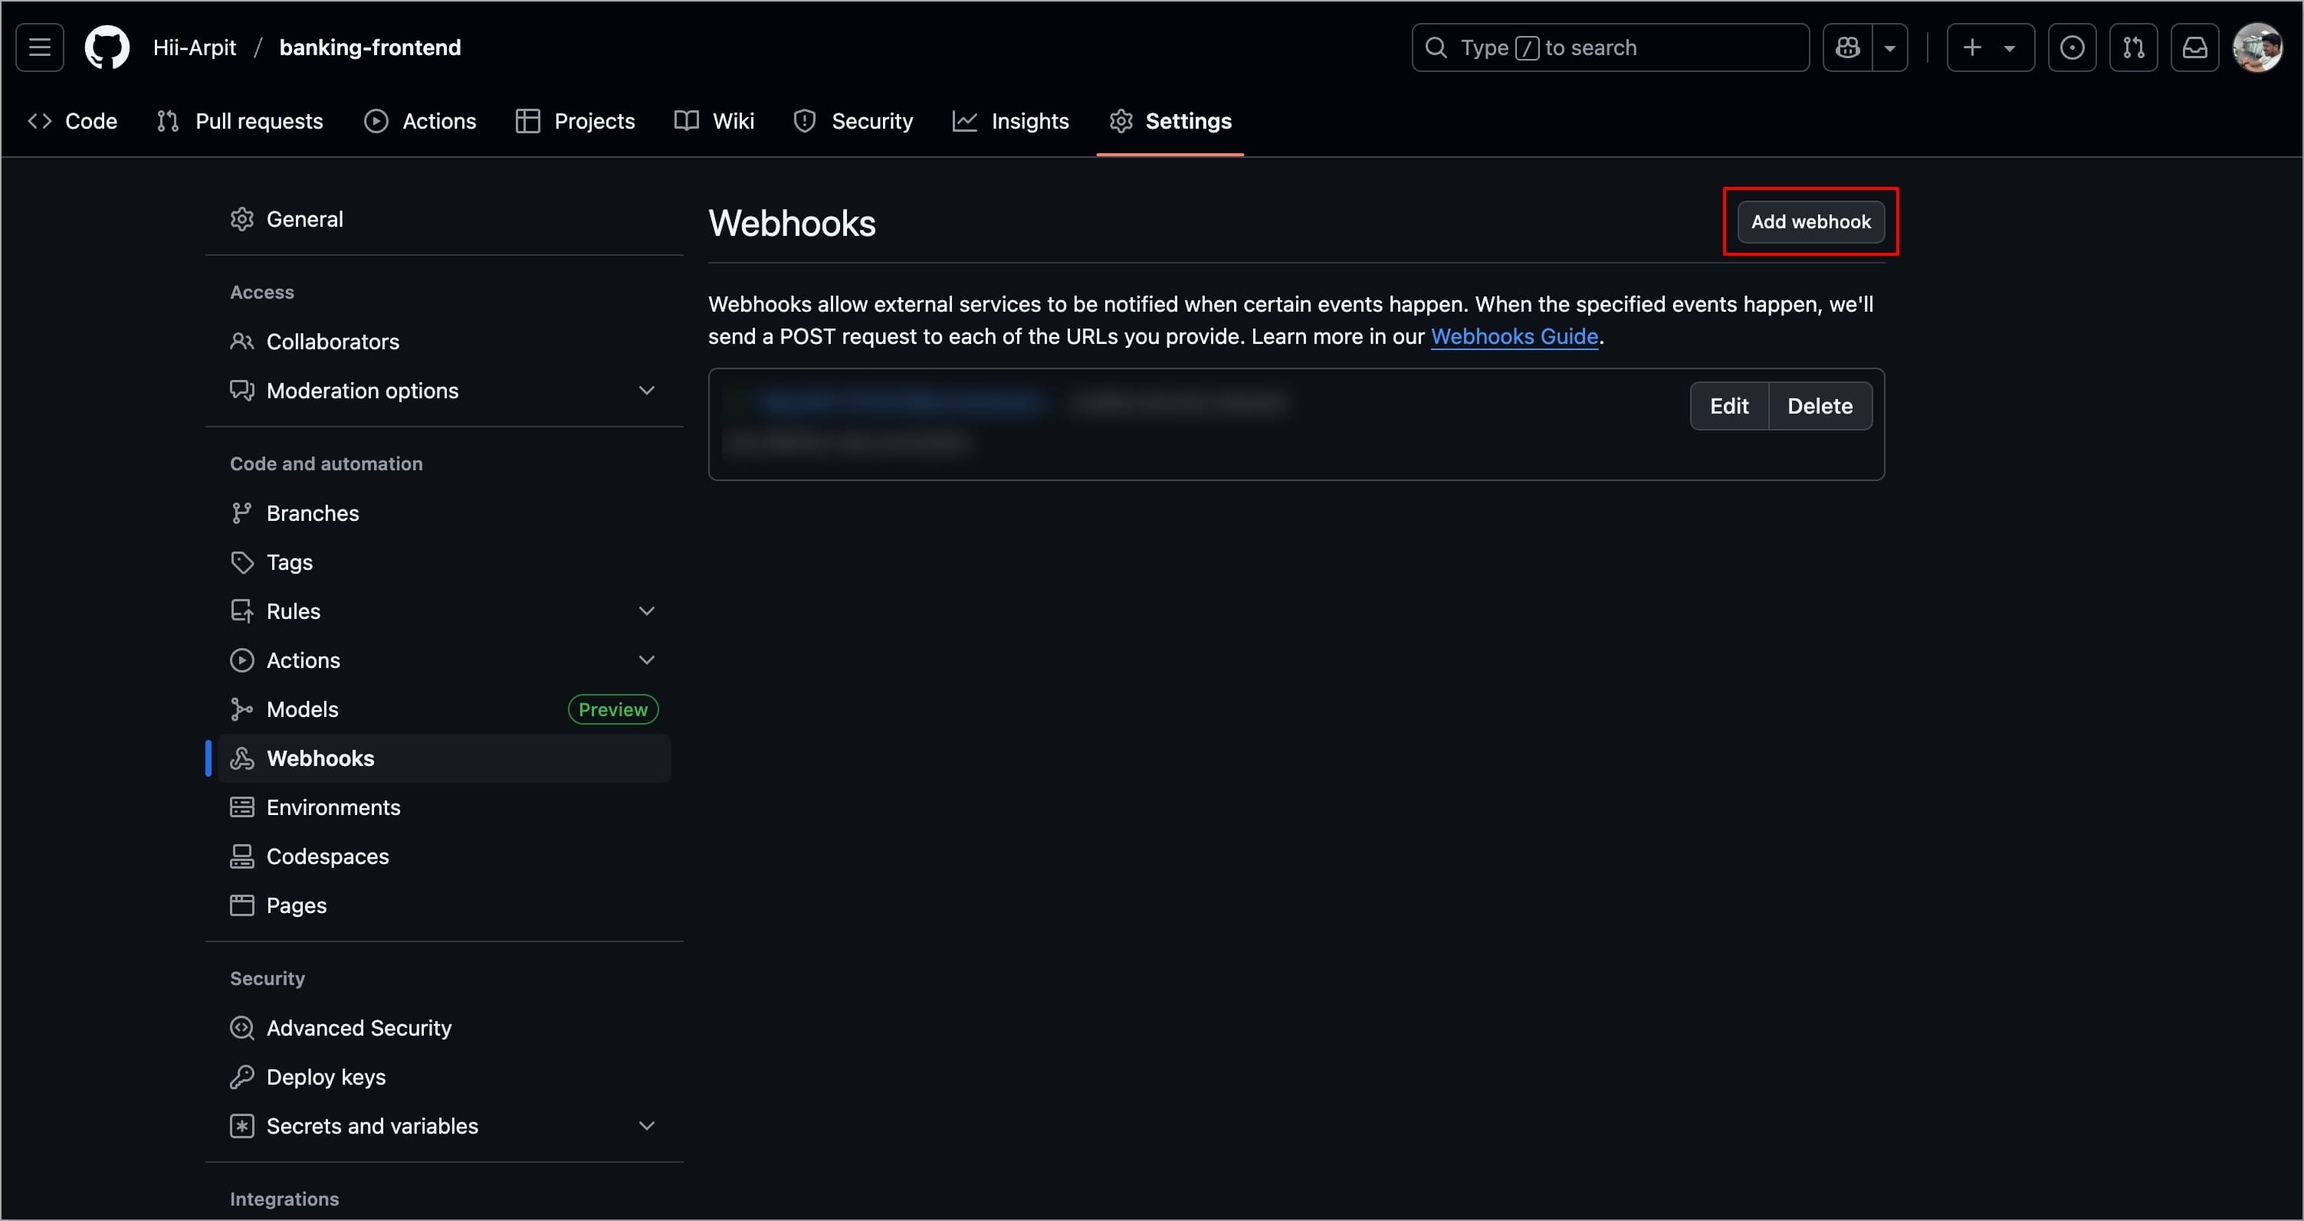
Figure 78: Selecting 'Add webhook' In the Payload URL field, enter the Webhook URL that you get on selecting the source type as "Pull Request" or "Tag Creation" in Devtron the dashboard.
Select the Content-type as
application/json.In the Secret field, enter the secret from Devtron the dashboard when you select the source type as "Pull Request" or "Tag Creation".
Under Which events would you like to trigger this webhook?, select Let me select individual events to trigger the webhook for specific events.
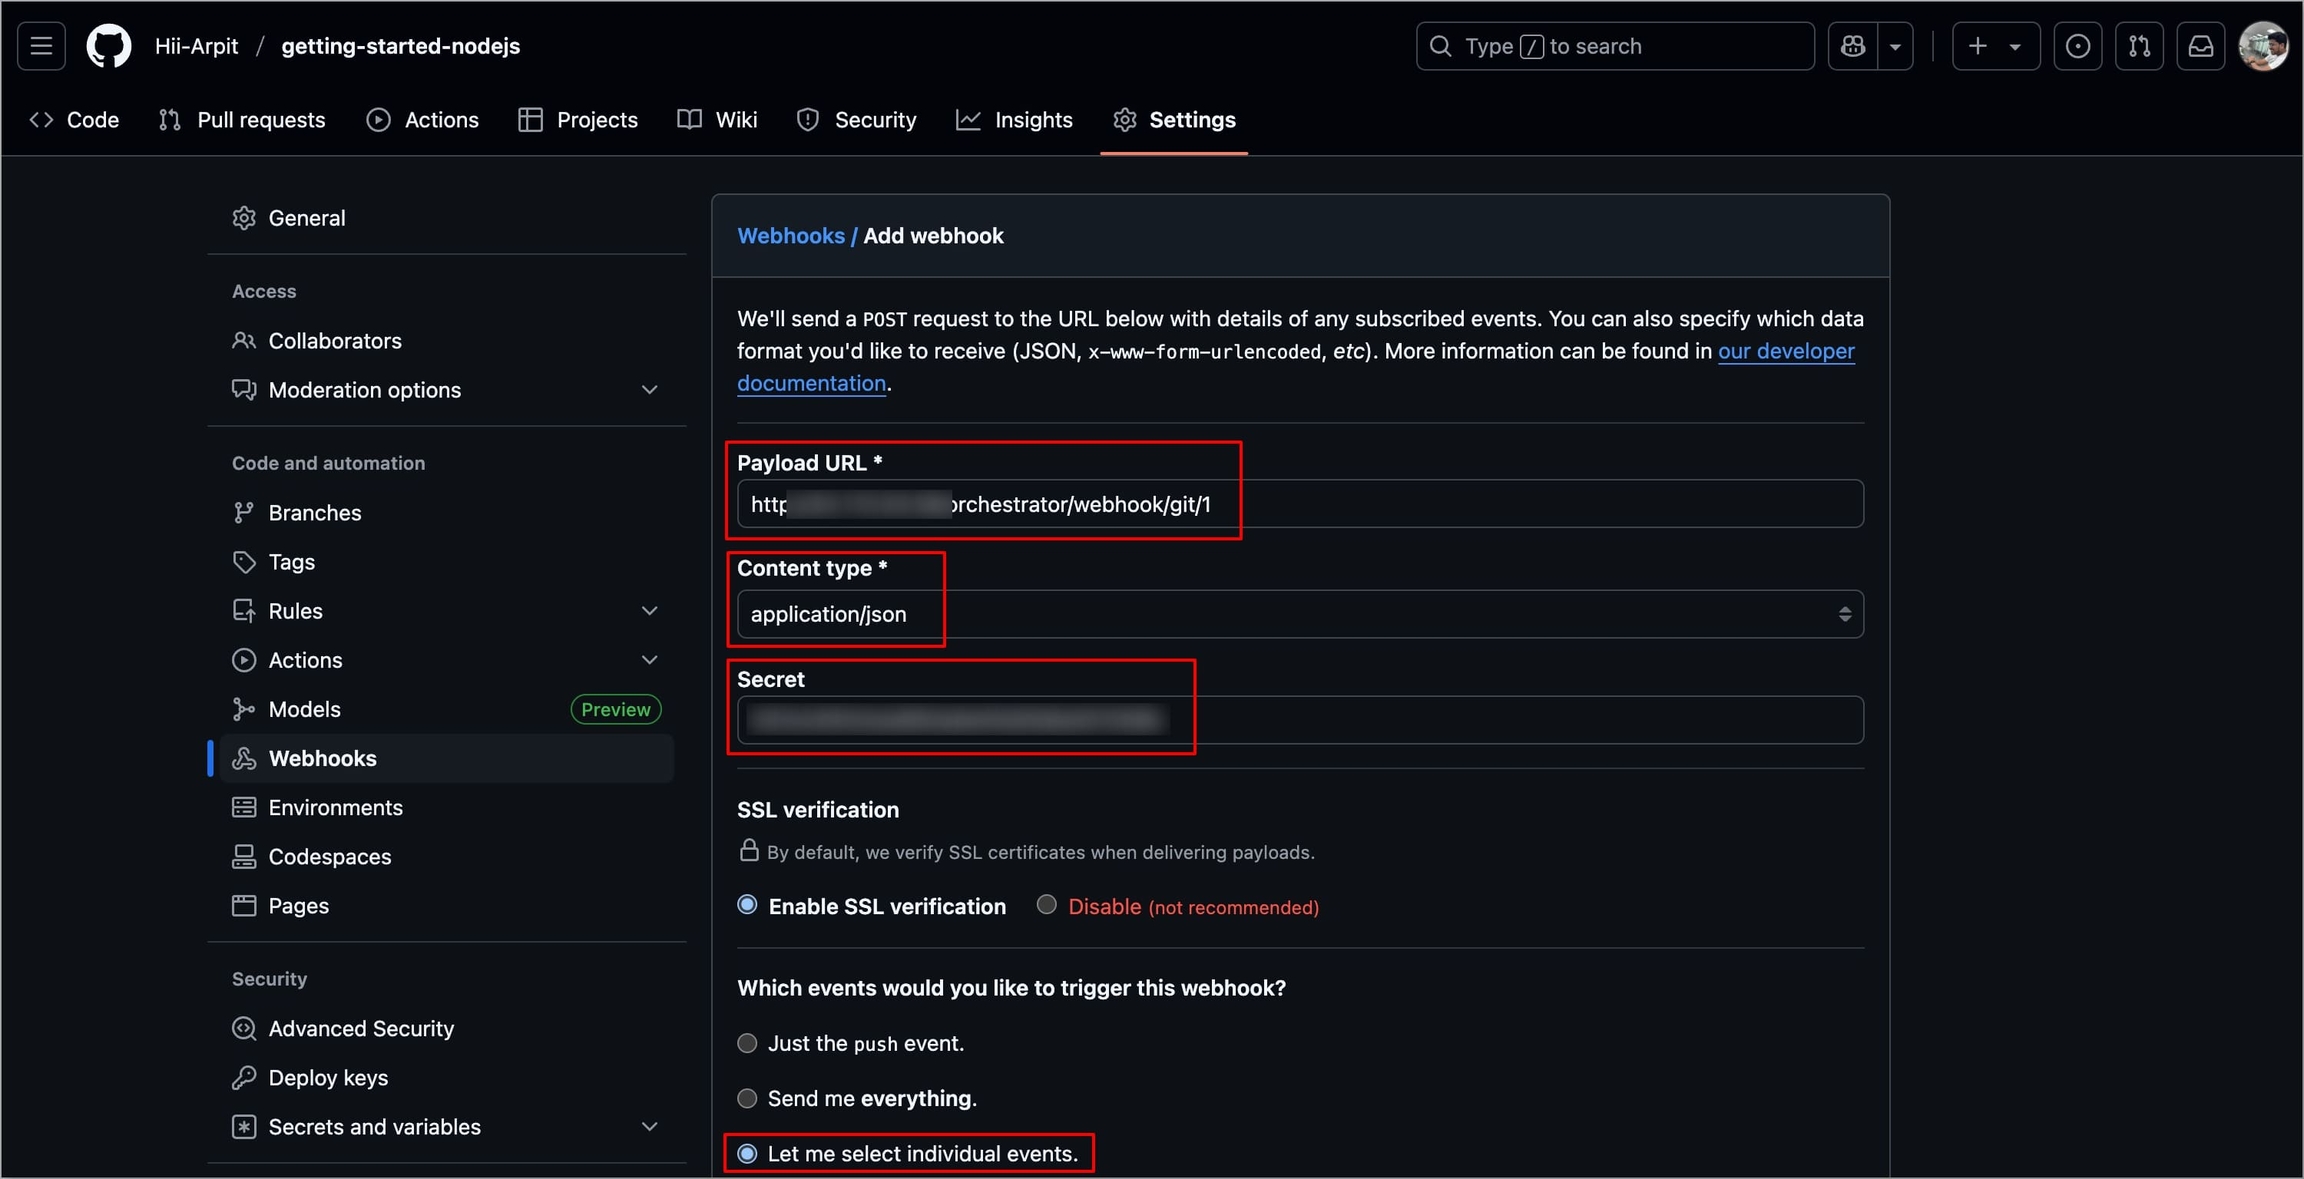
Figure 79: Configuring Webhook Select the appropriate triggers
For Pull Requests, select Pull Requests.
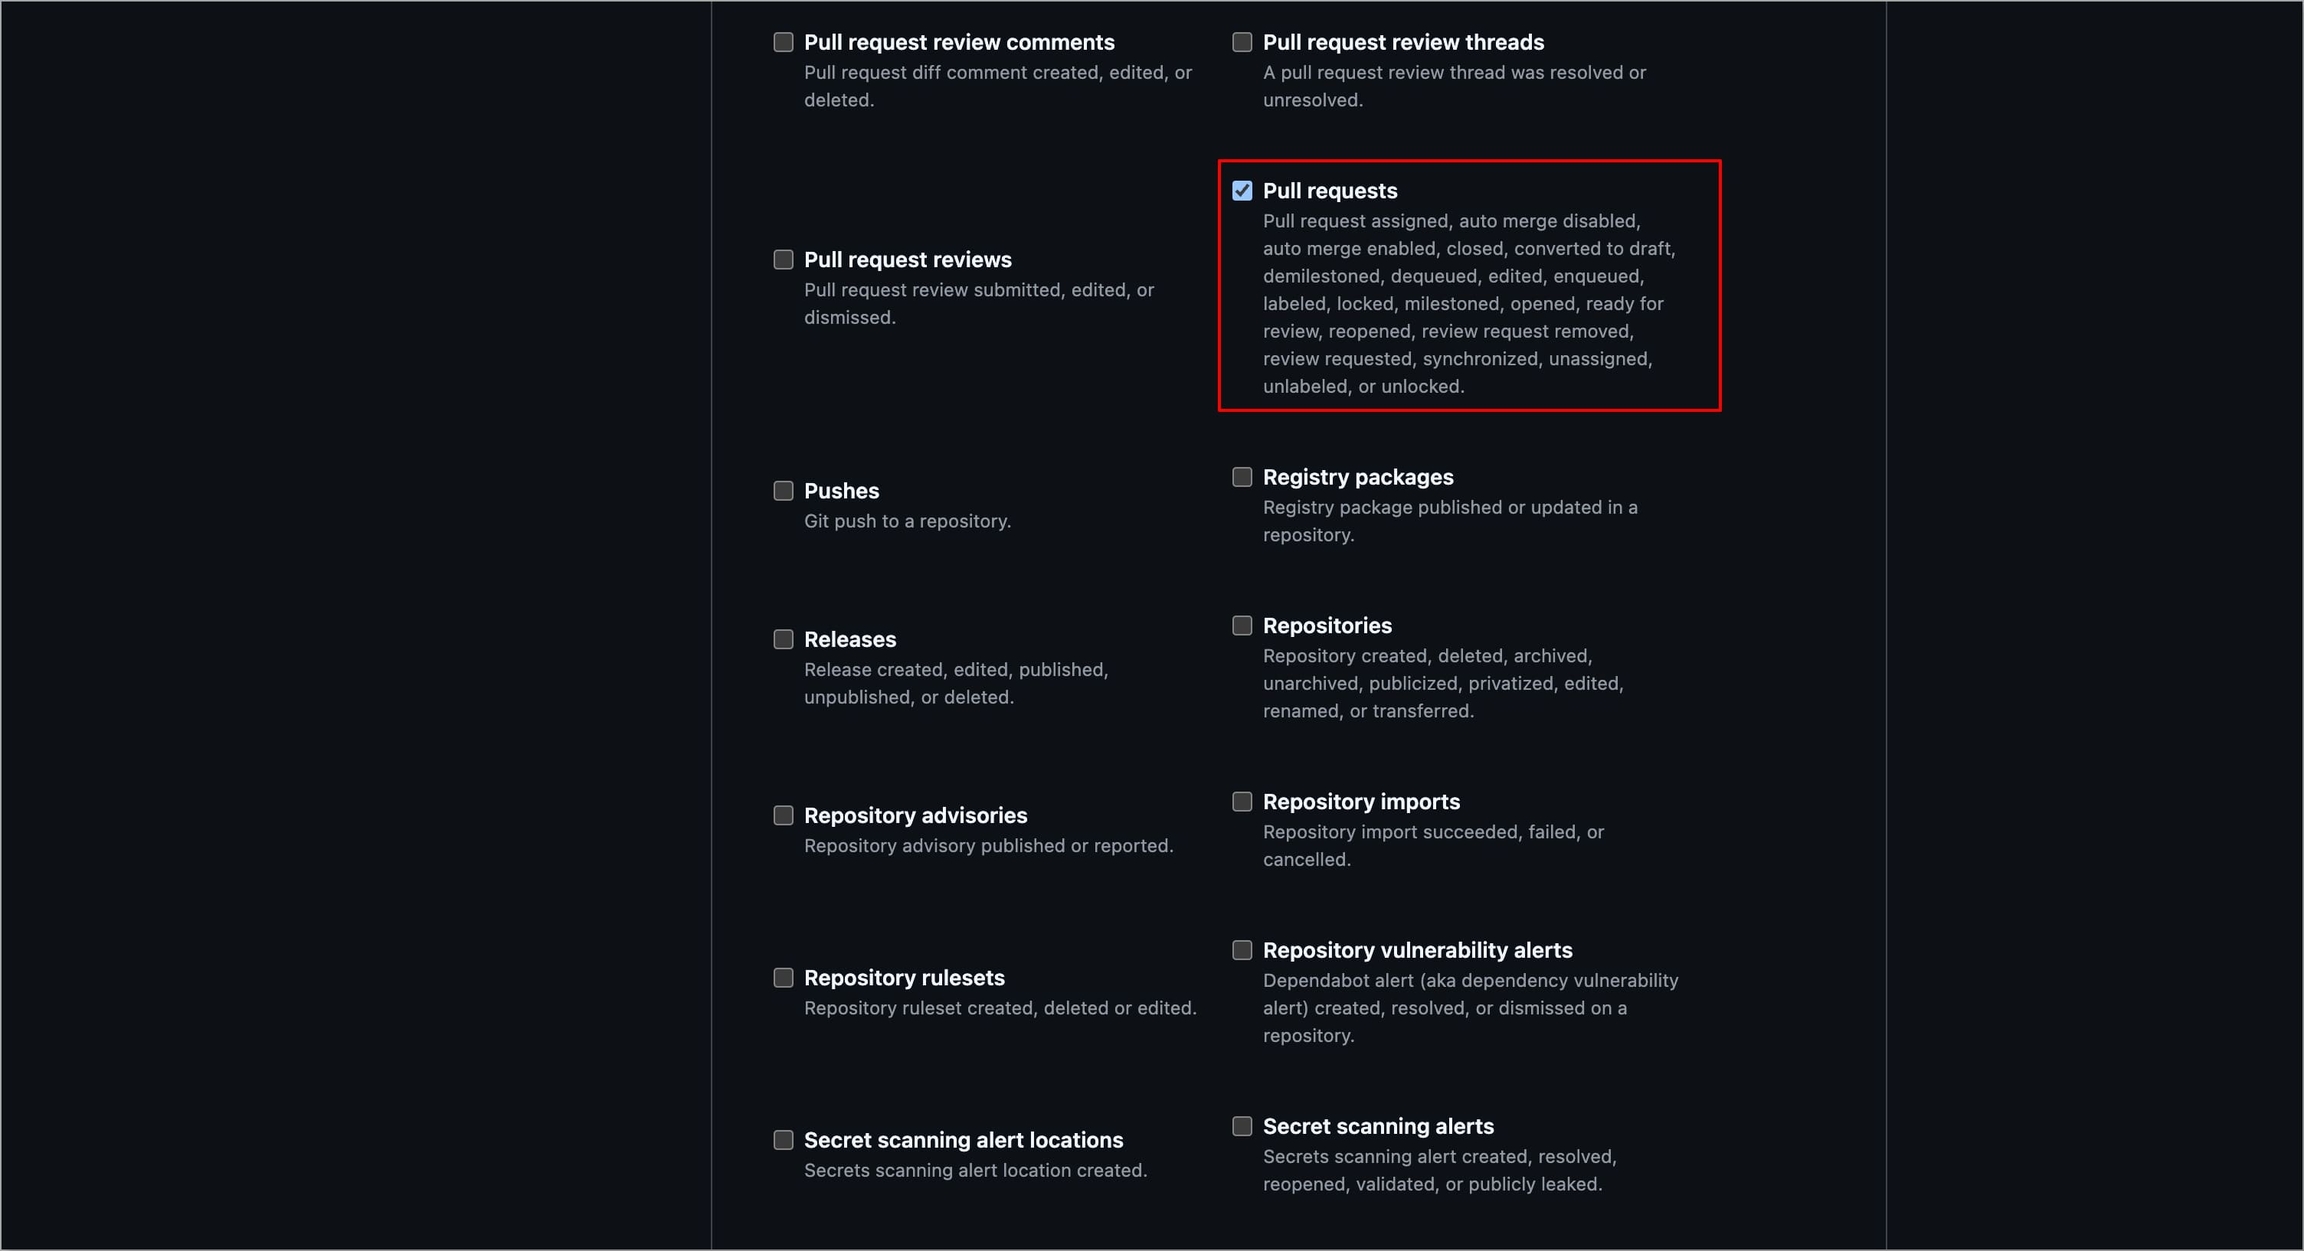
Figure 80: Selecting 'Pull Requests' For Tag Creation, select Branch or tag creation.
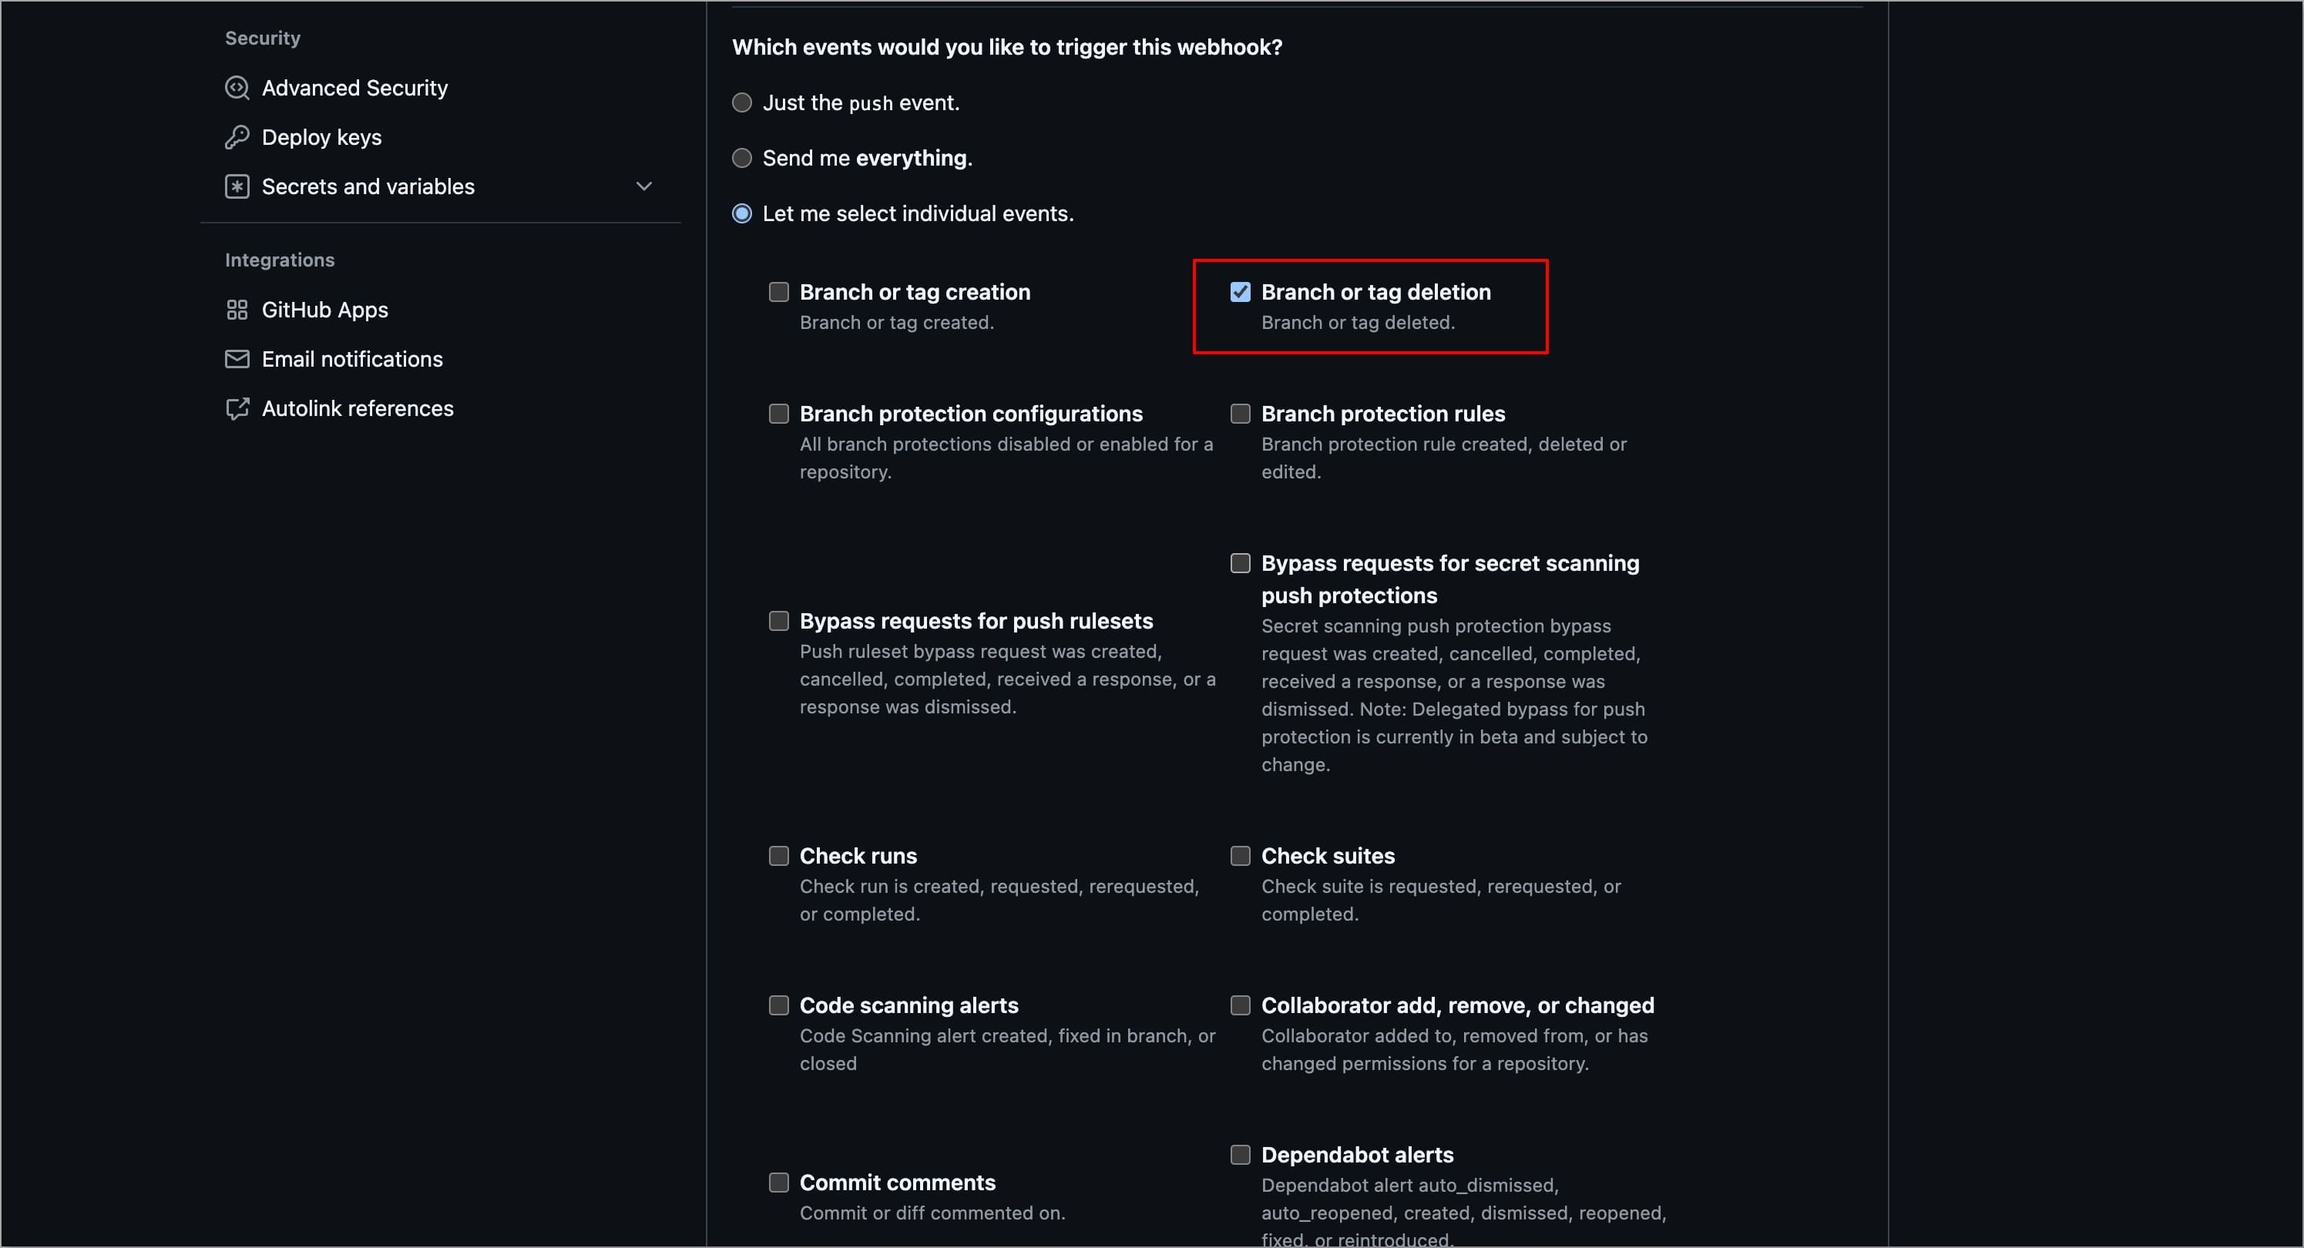
Figure 81: Selecting 'Branch or tag creation'
Select Add webhook.
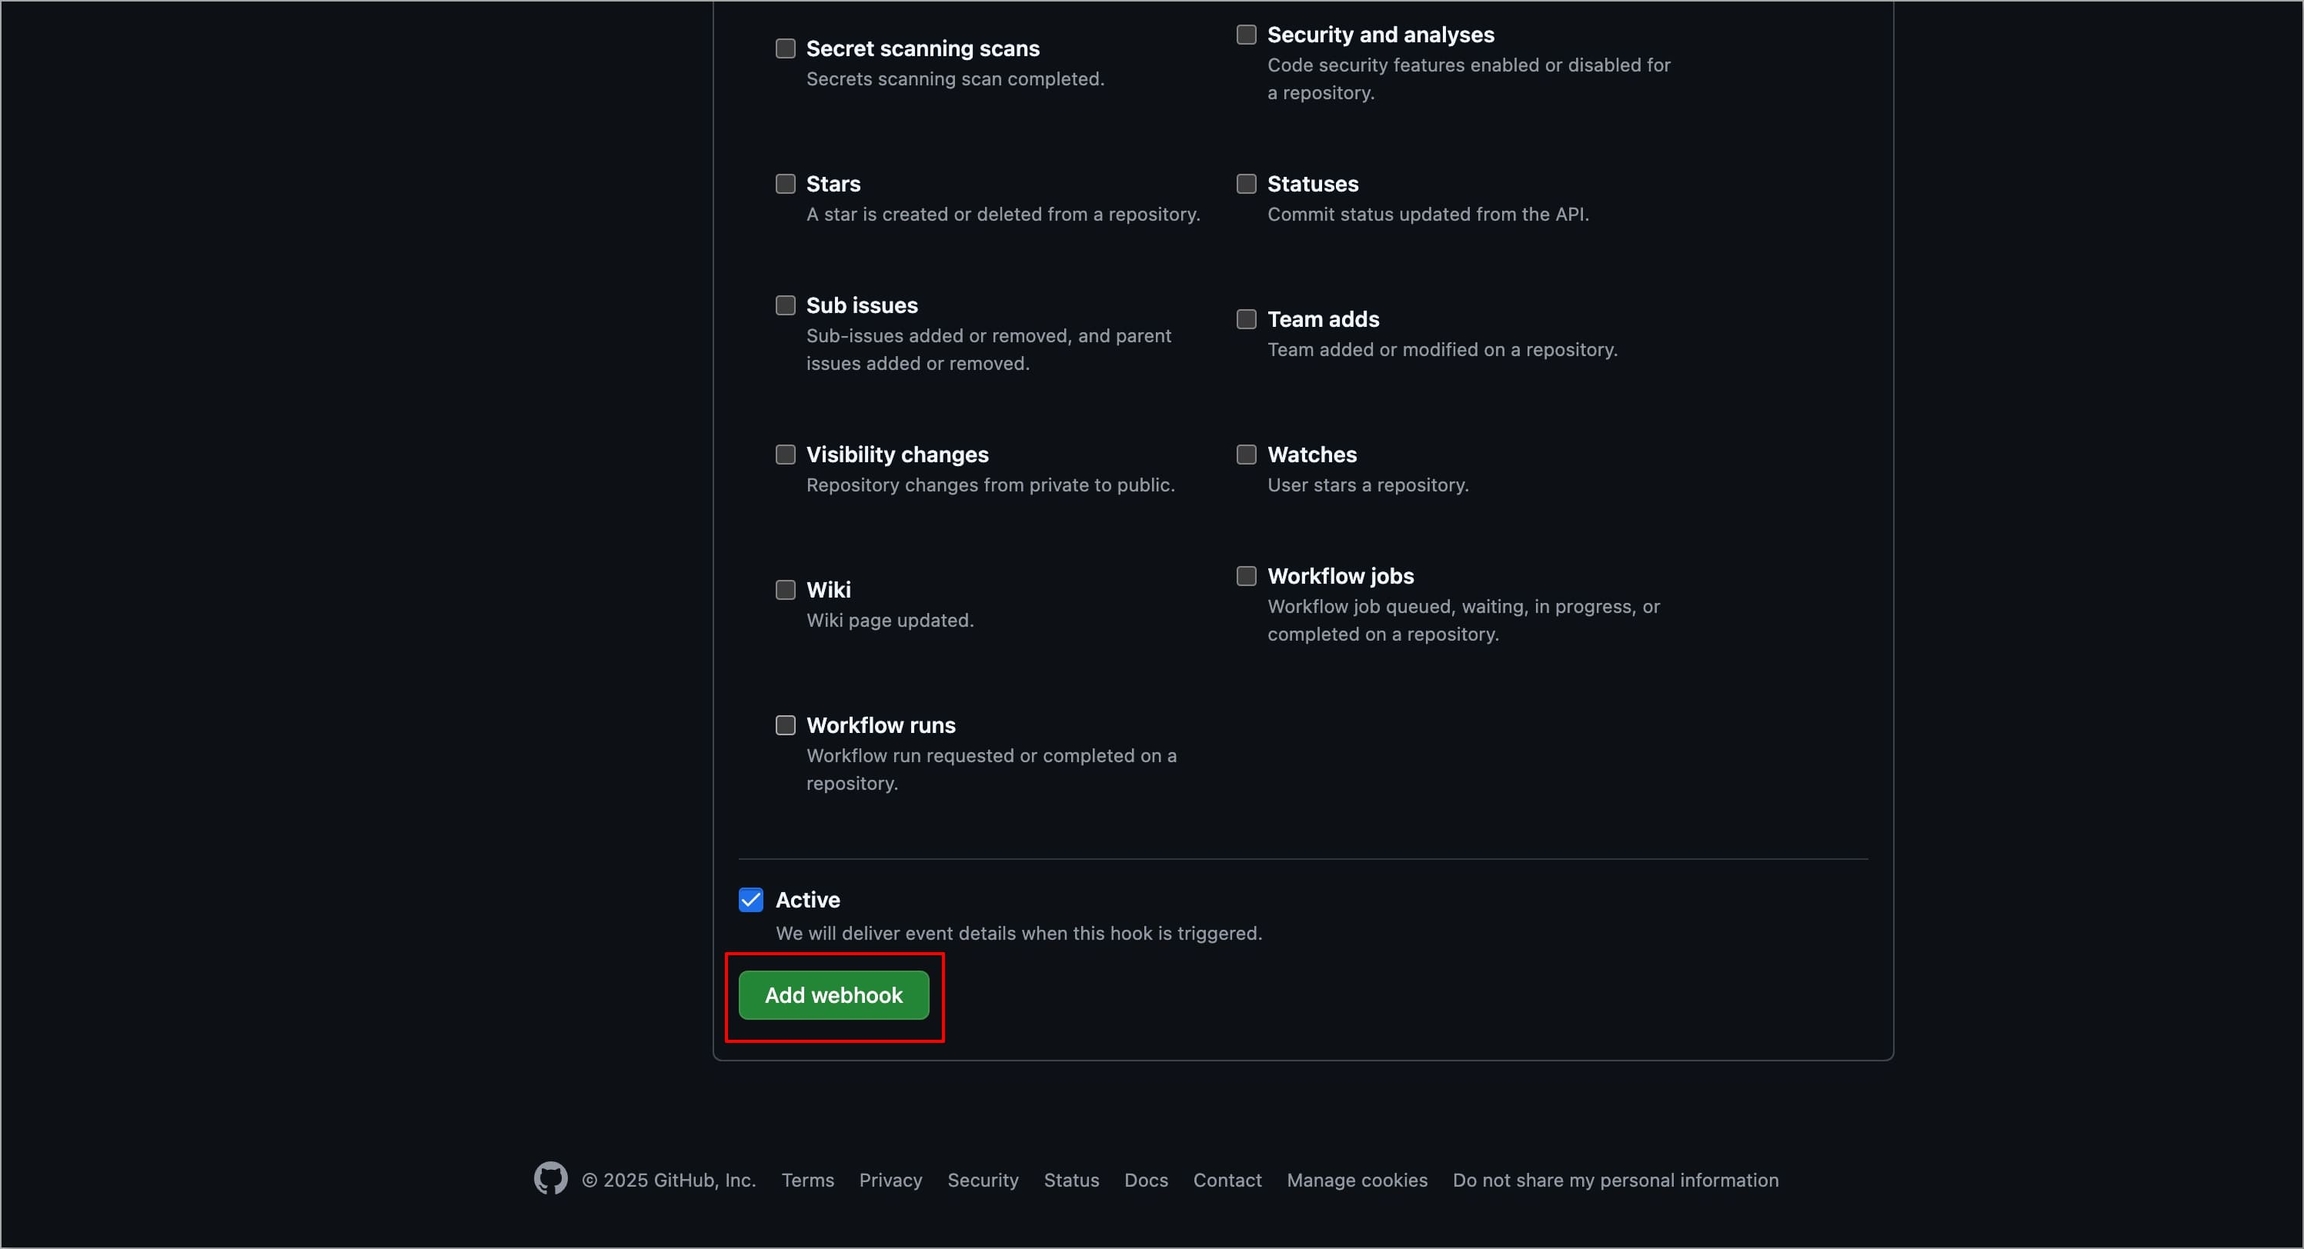
Figure 82: Selecting 'Add webhook'
For GitLab
Navigate to Setting → Webhooks of your repository.

Figure 83: Navigating to Repository Settings Select Add new webhook.
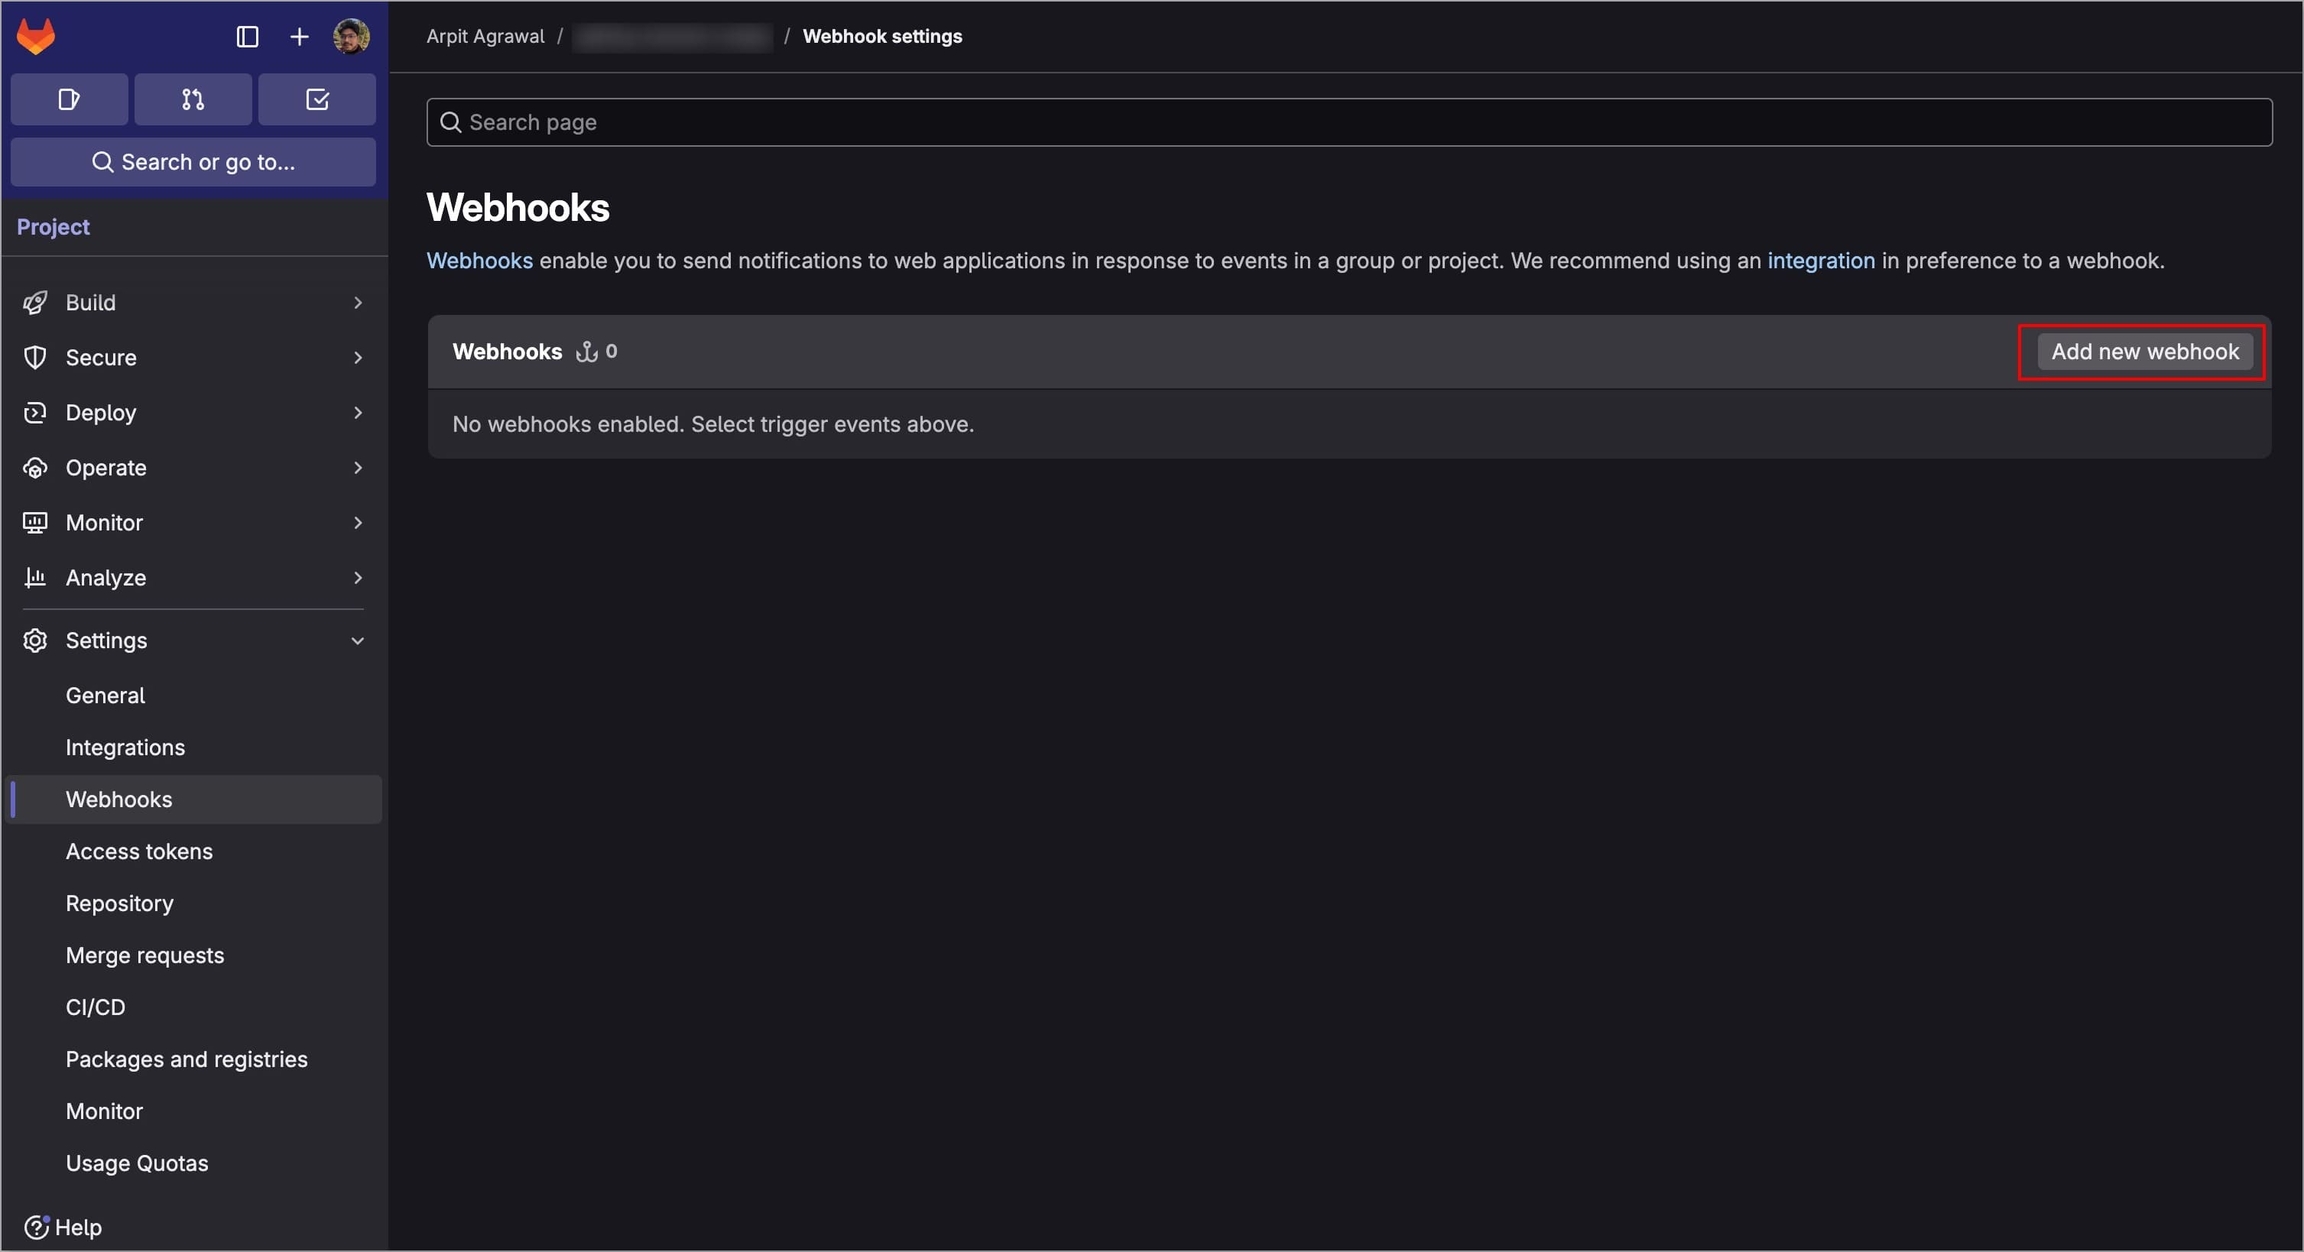
Figure 84: Selecting 'Add new webhook' You can provide a name and description (optional).
In the URL field, enter the Webhook URL that you get on selecting the source type as "Pull Request" or "Tag Creation" in the Devtron dashboard.
In the Secret token field, enter the secret from the Devtron dashboard when you select the source type as "Pull Request" or "Tag Creation".
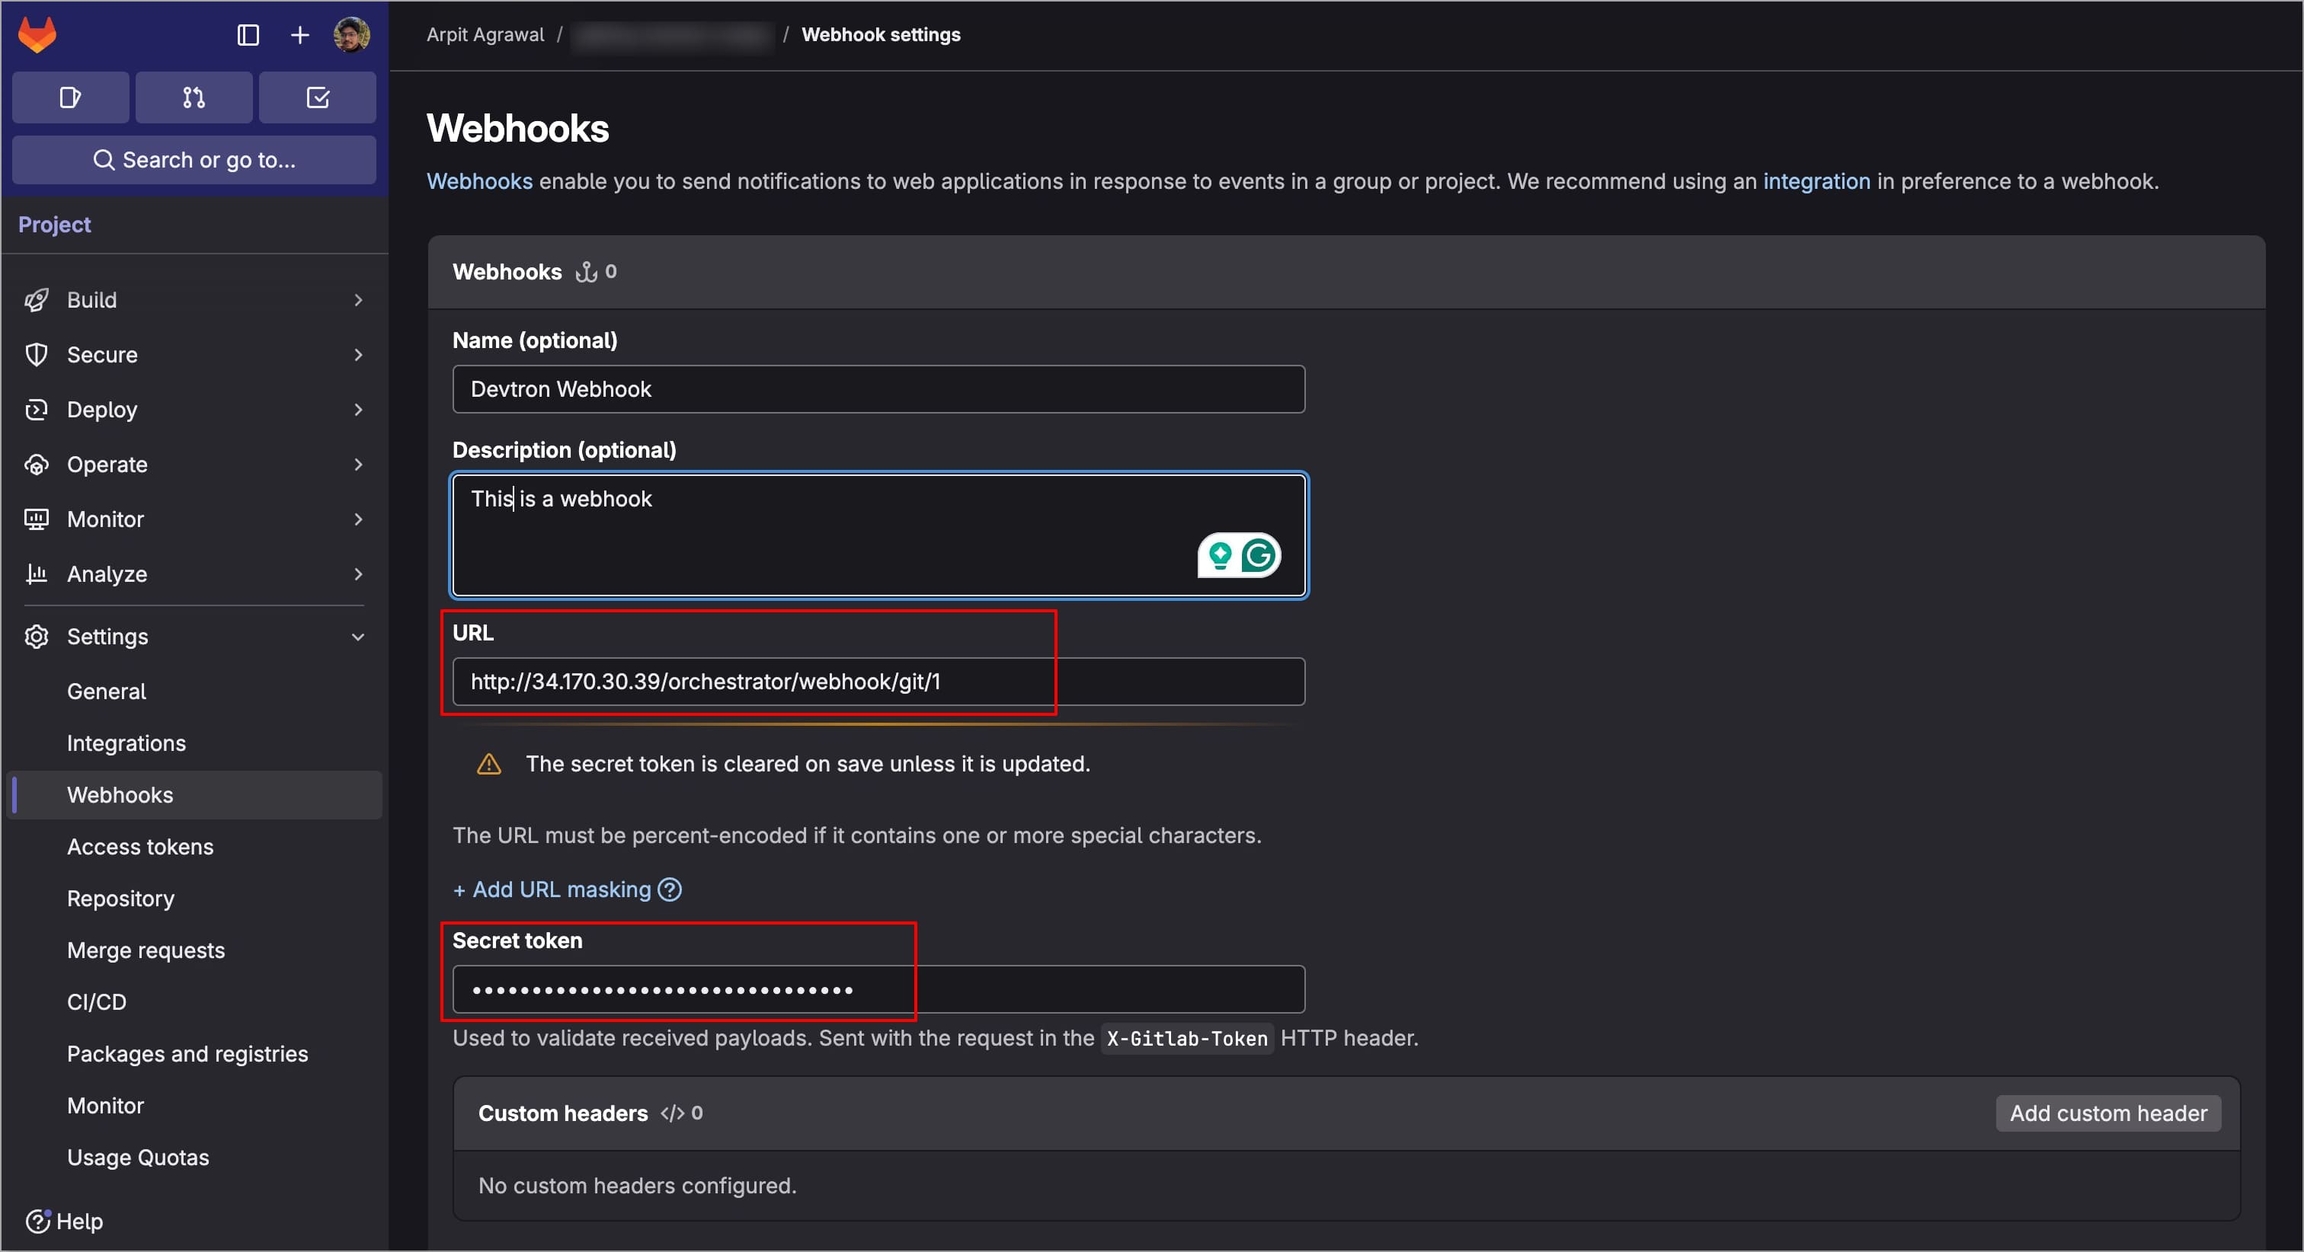
Figure 85: Configuring Webhook Checkmark the appropriate triggers under the Trigger section.
For Pull Requests, select Merge request events.
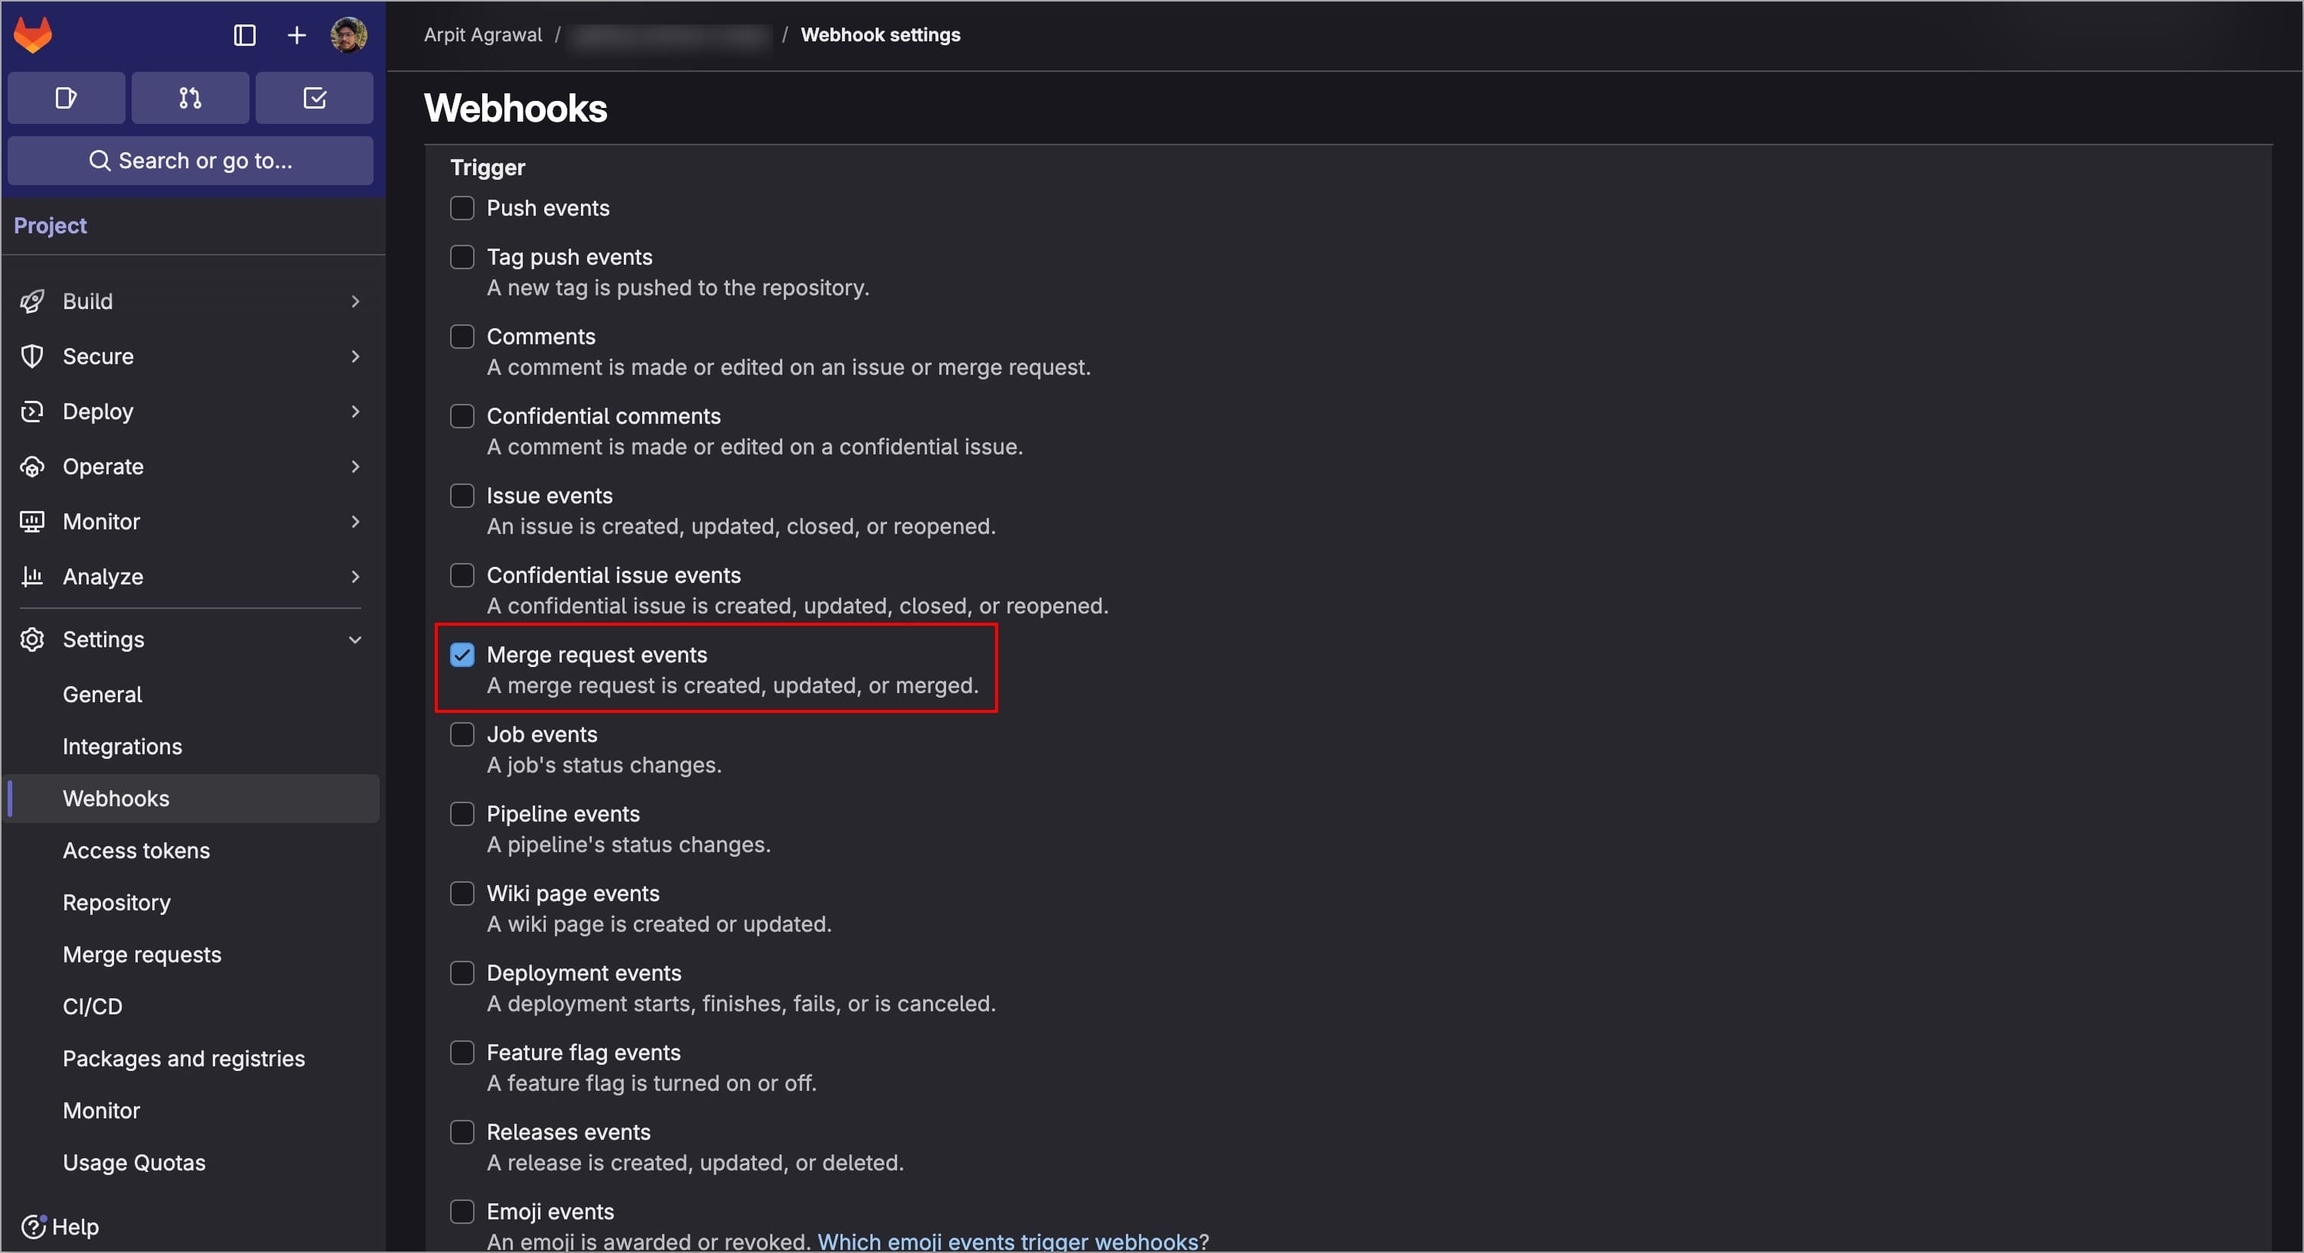
Figure 86: Selecting 'Merge request events' For Tag Creation, select Tag push events
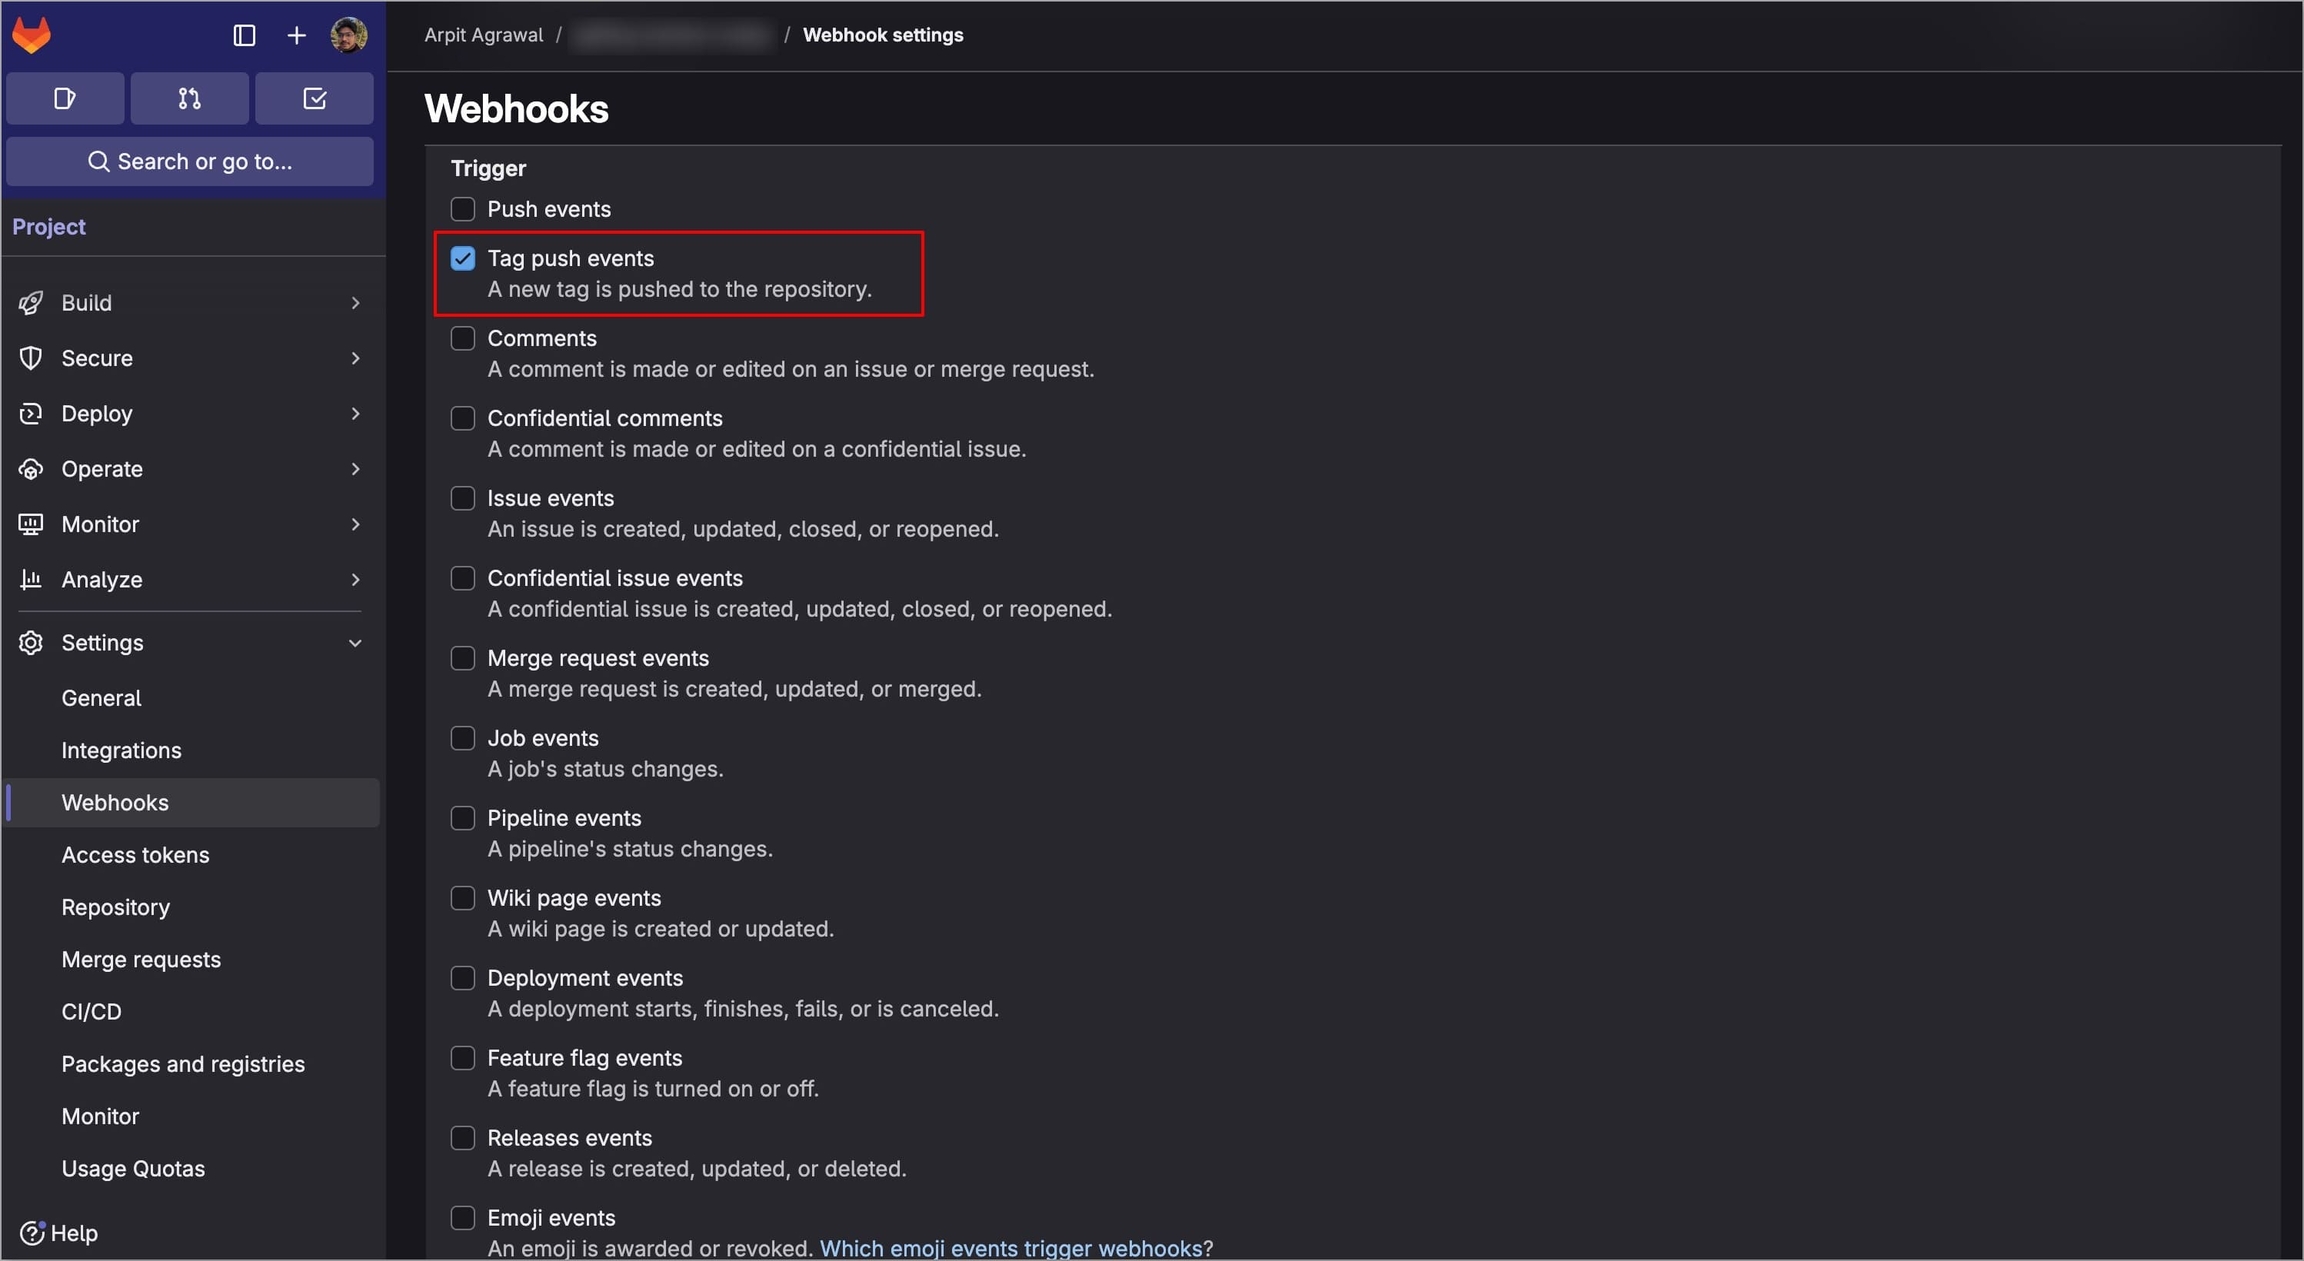
Figure 87: Selecting 'Tag push events'
Select Add Webhook and the webhook will be added to your repository.
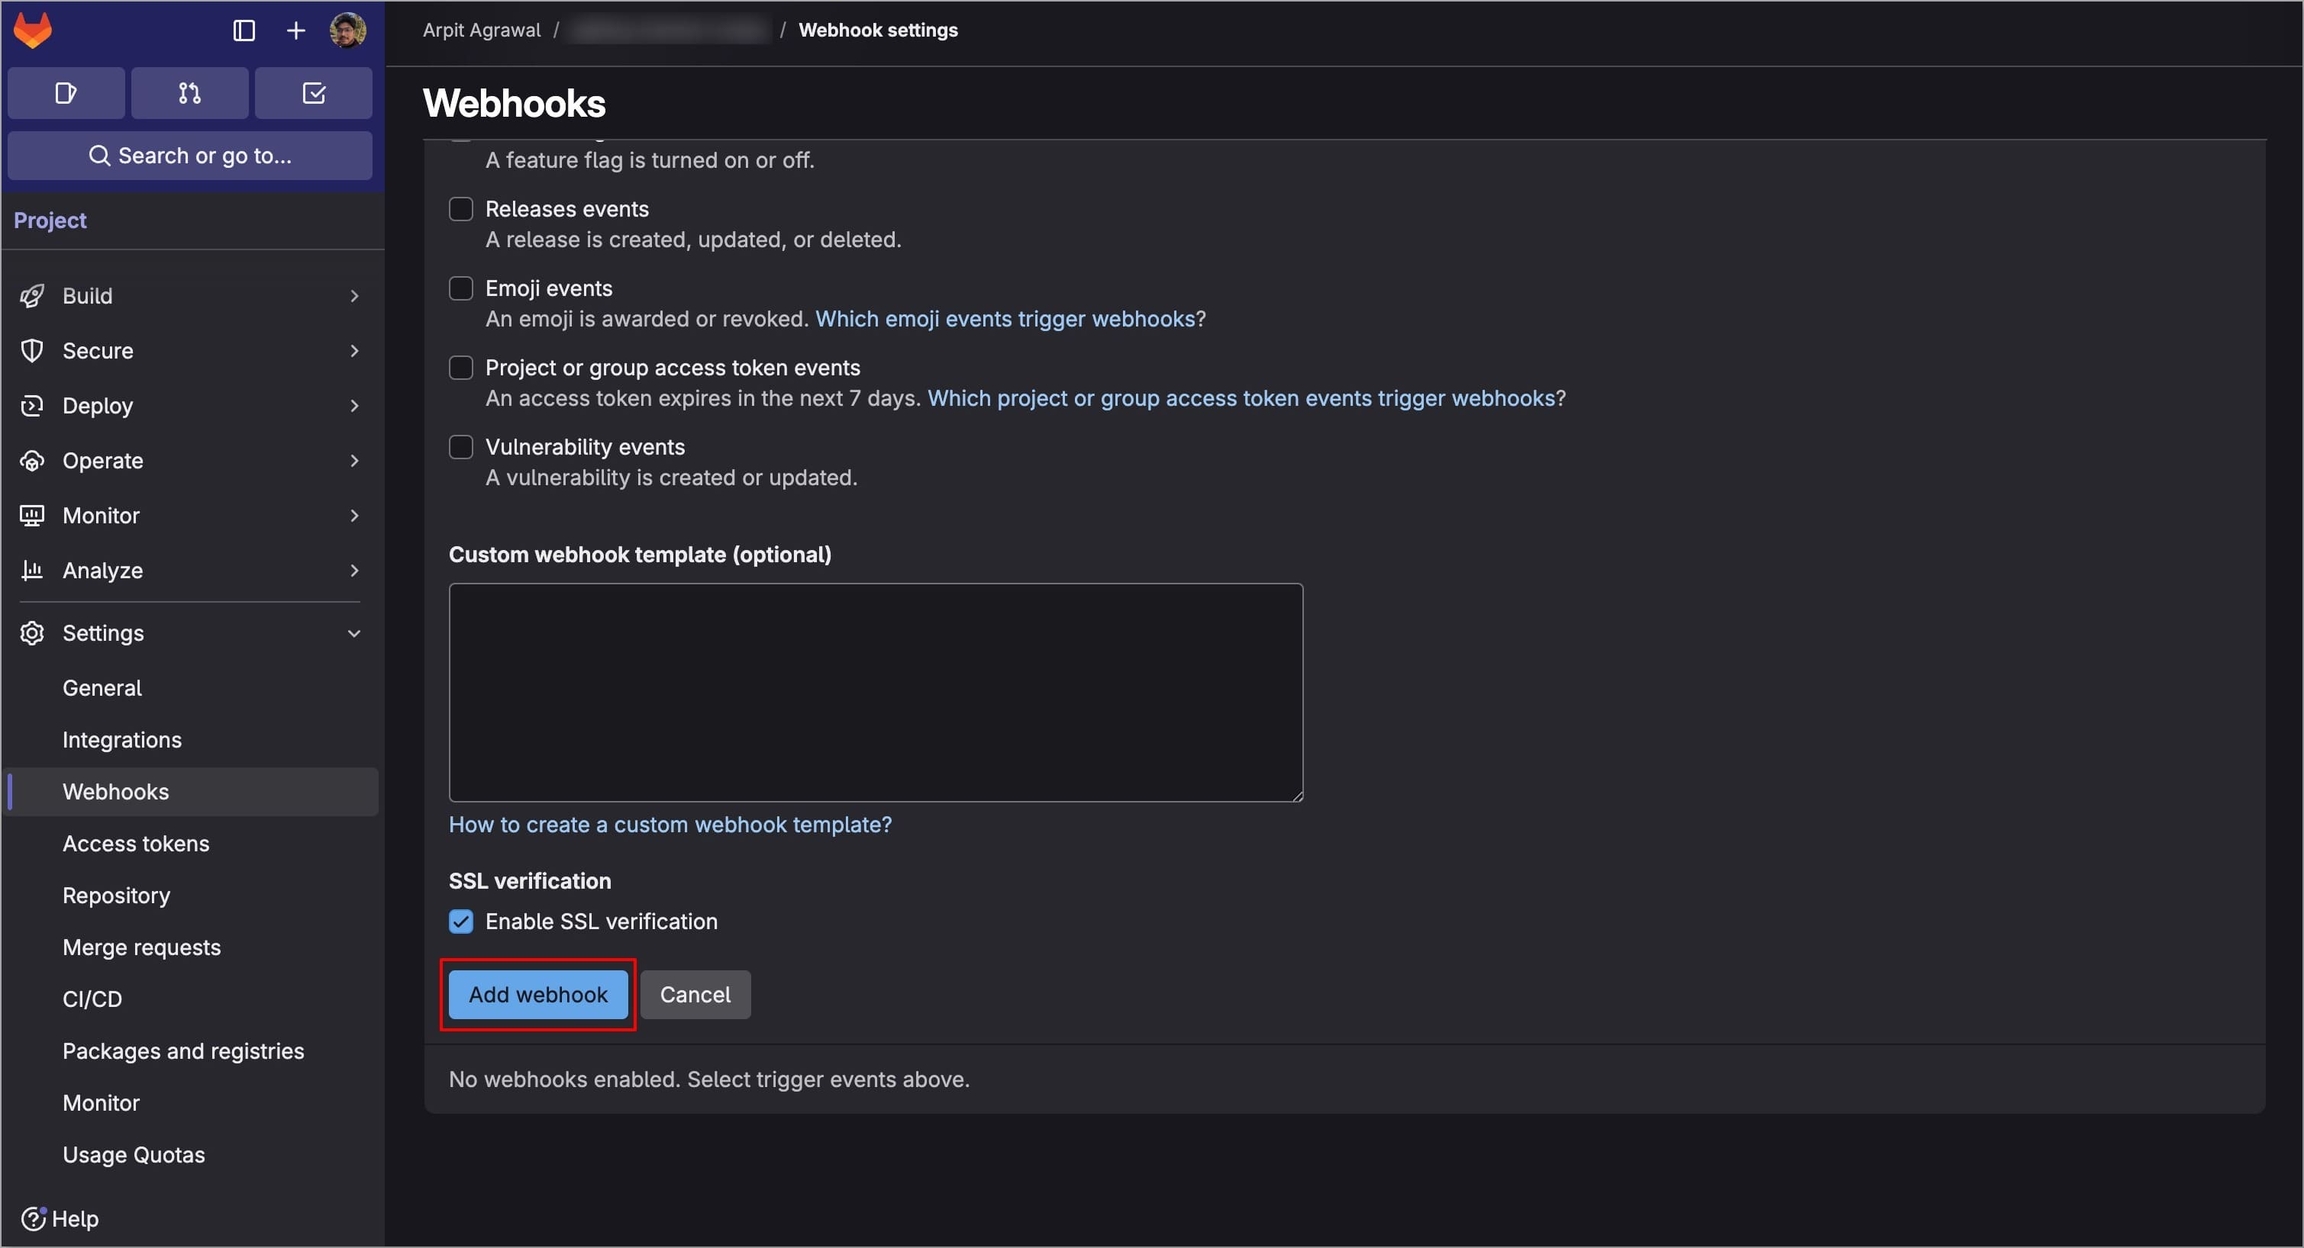
Figure 88:Selecting 'Add Webhook'
For Bitbucket Cloud
Navigate to the Repository settings page of your Bitbucket repository.
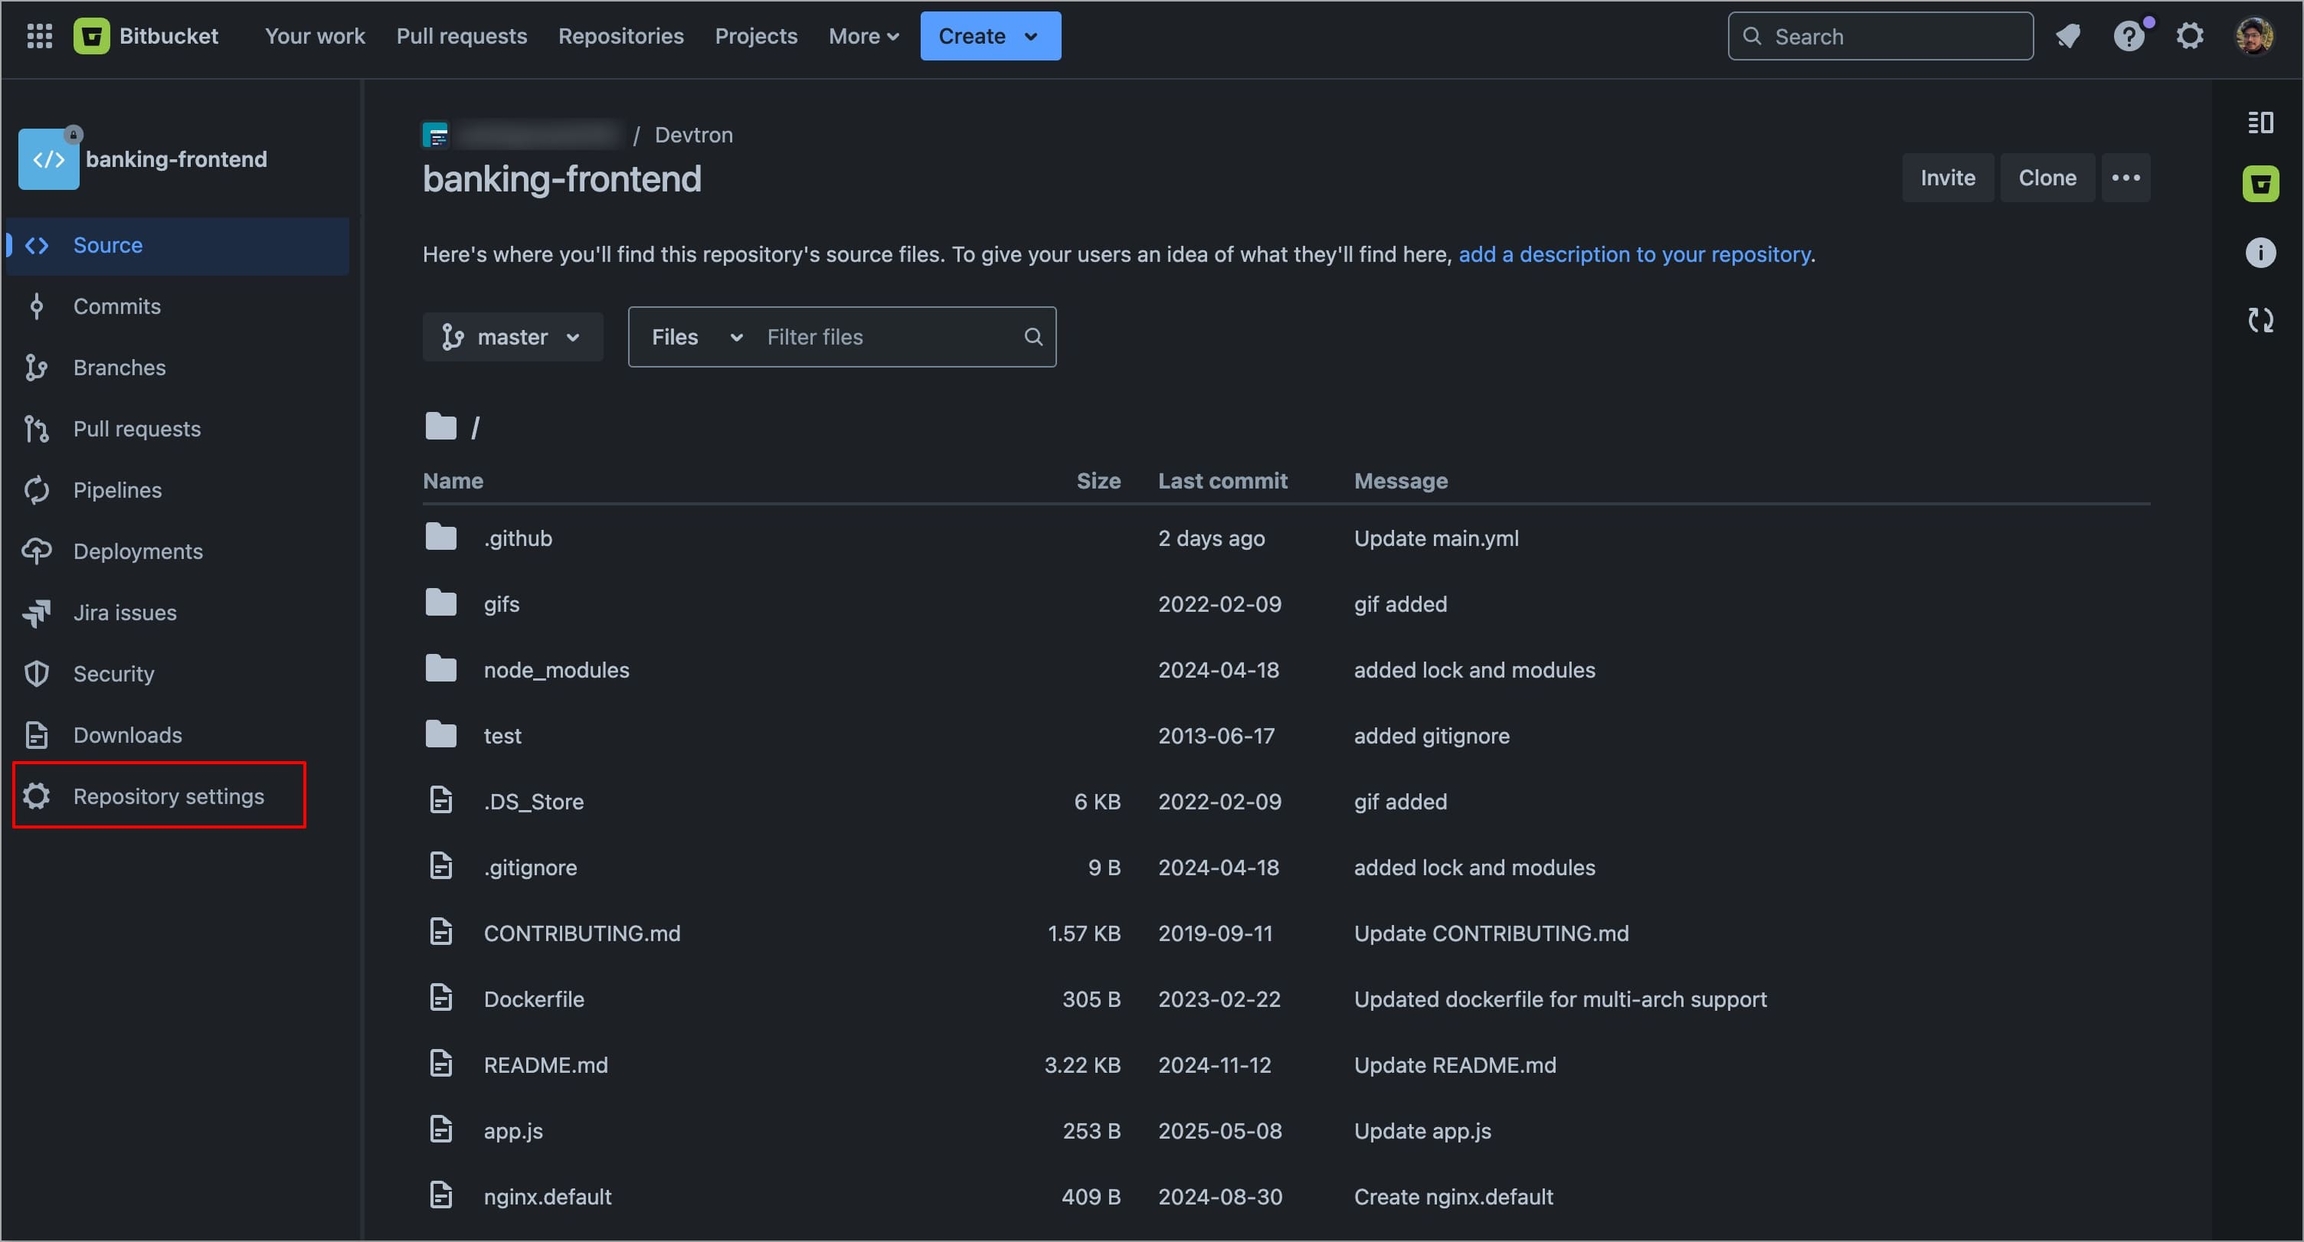
Figure 89: Navigating to Repository Settings Select Webhooks under Workflow section and then select Add webhook.
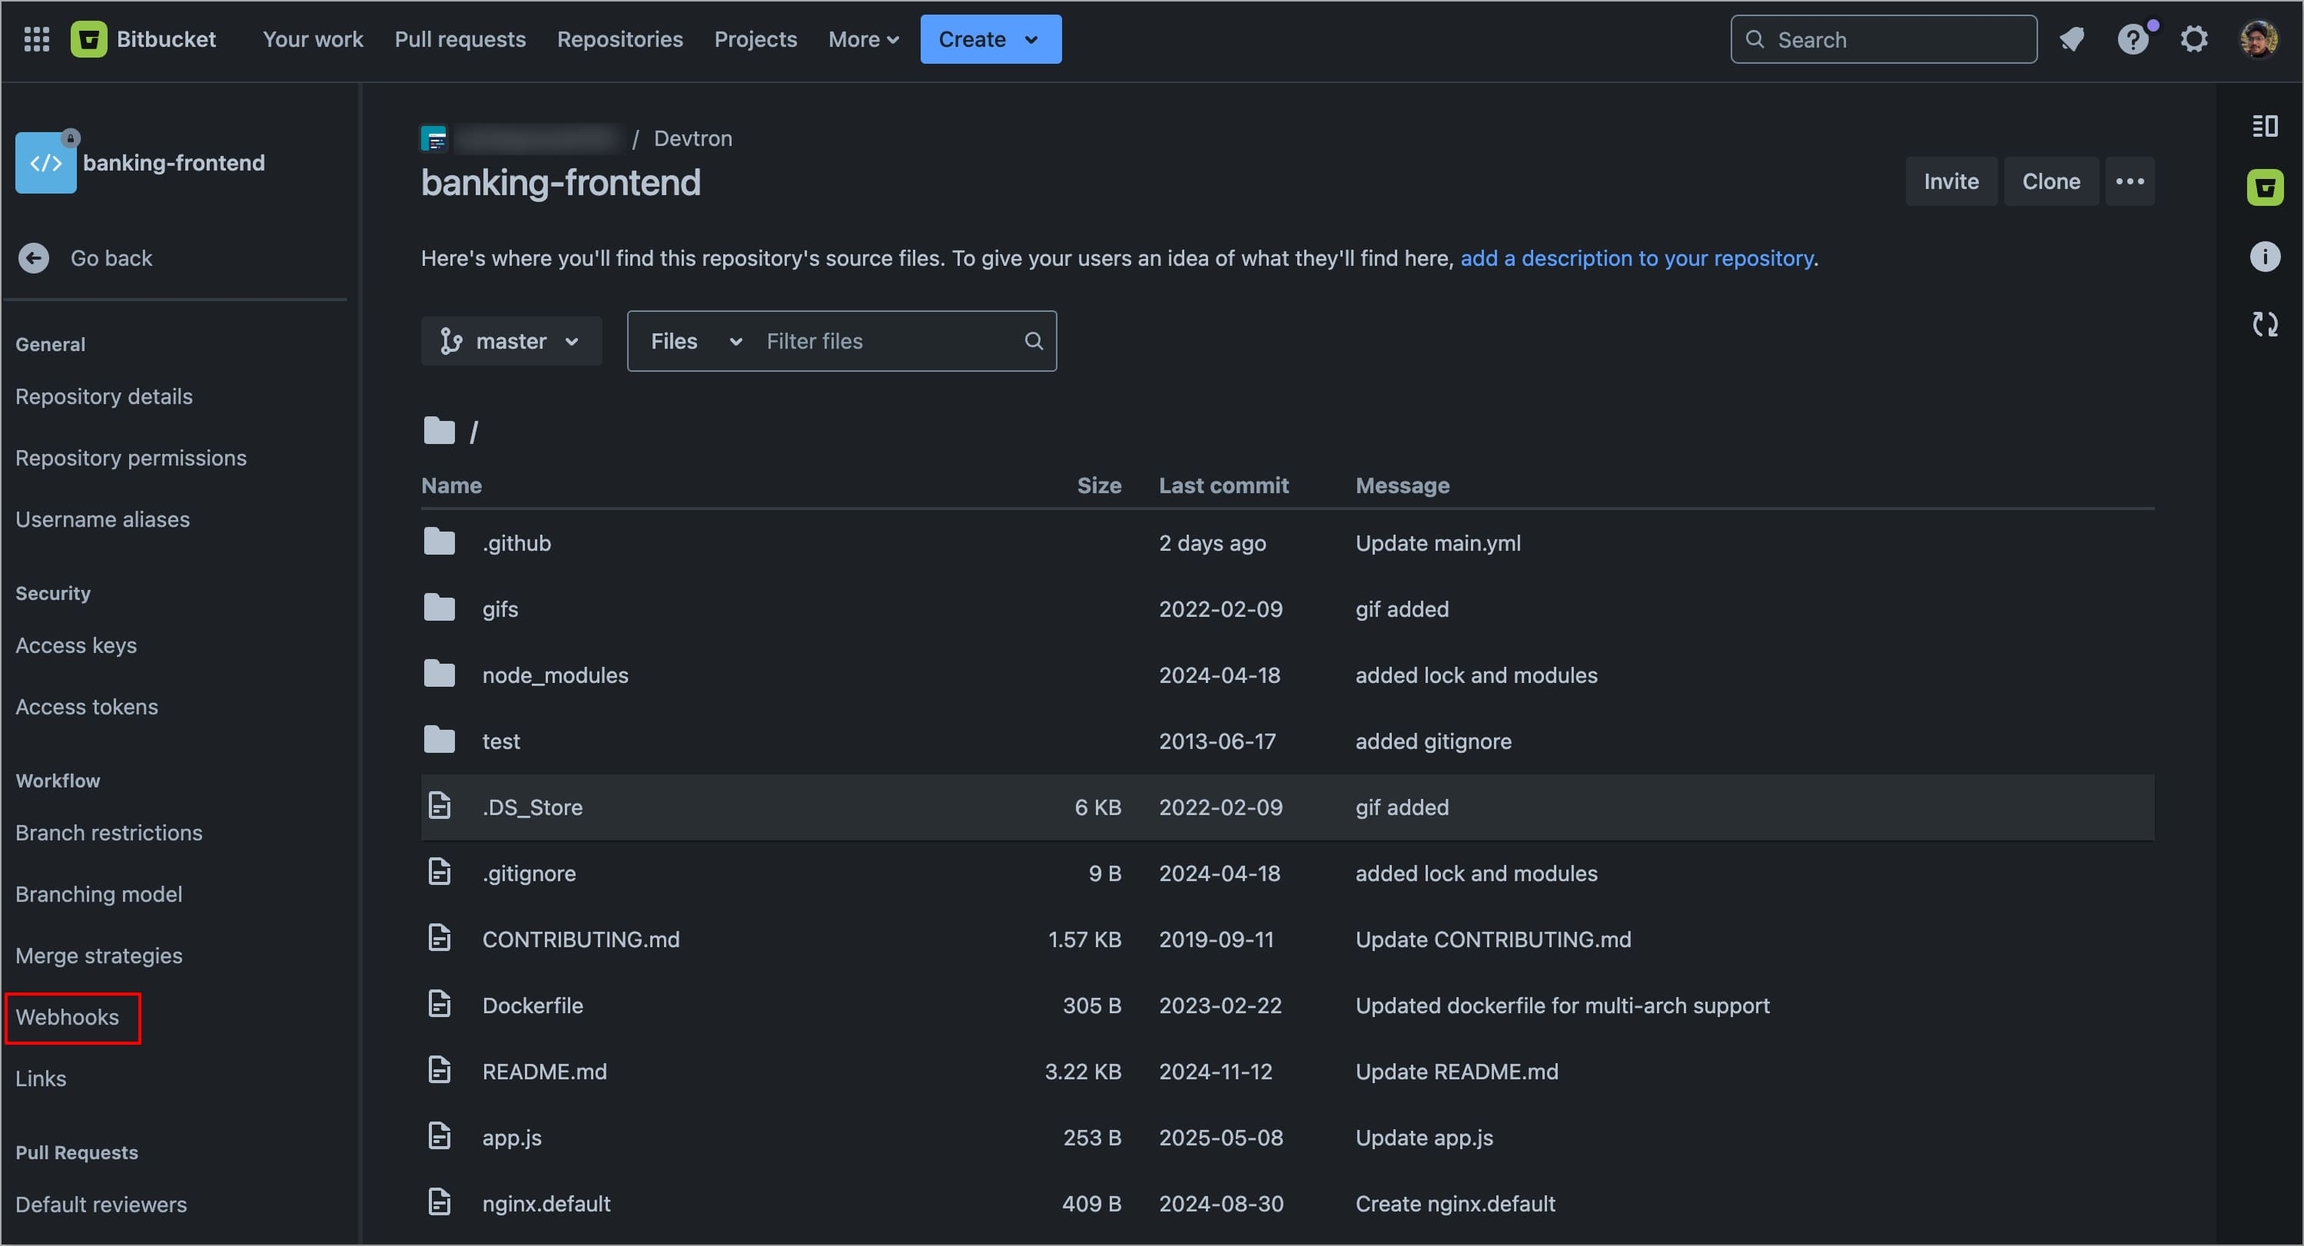
Figure 90a: Selecting 'Webhooks' 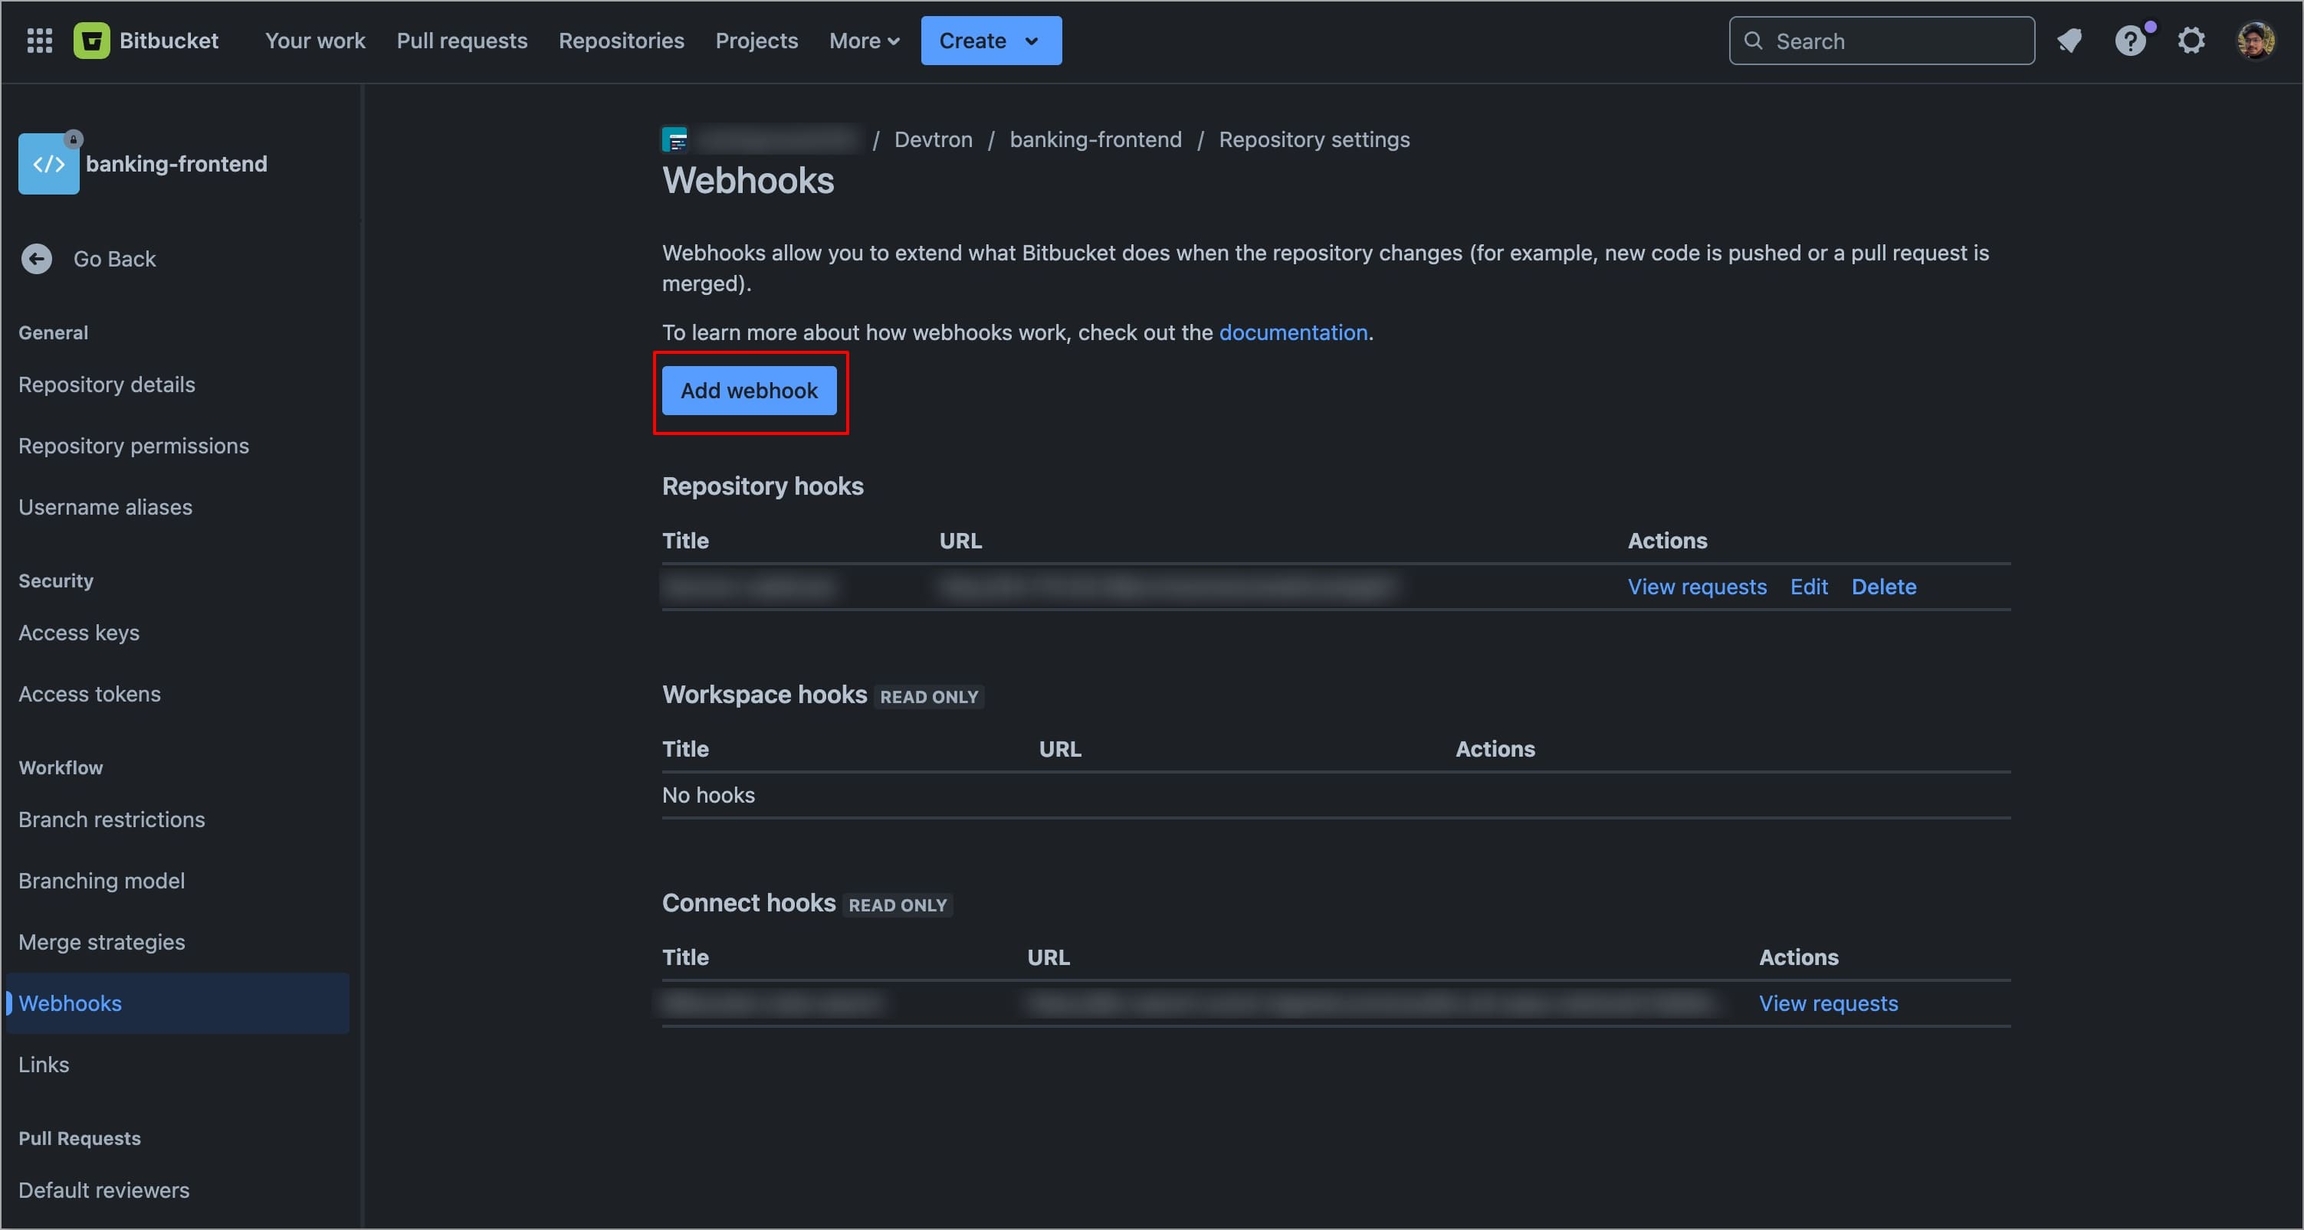
Figure 90b: Selecting 'Add webhook' Enter a Title for the webhook.
In the URL field, enter the Webhook URL that you get on selecting the source type as "Pull Request" or "Tag Creation" in the Devtron dashboard.
In the Secret field, enter the secret from the Devtron dashboard when you select the source type as "Pull Request" or "Tag Creation".
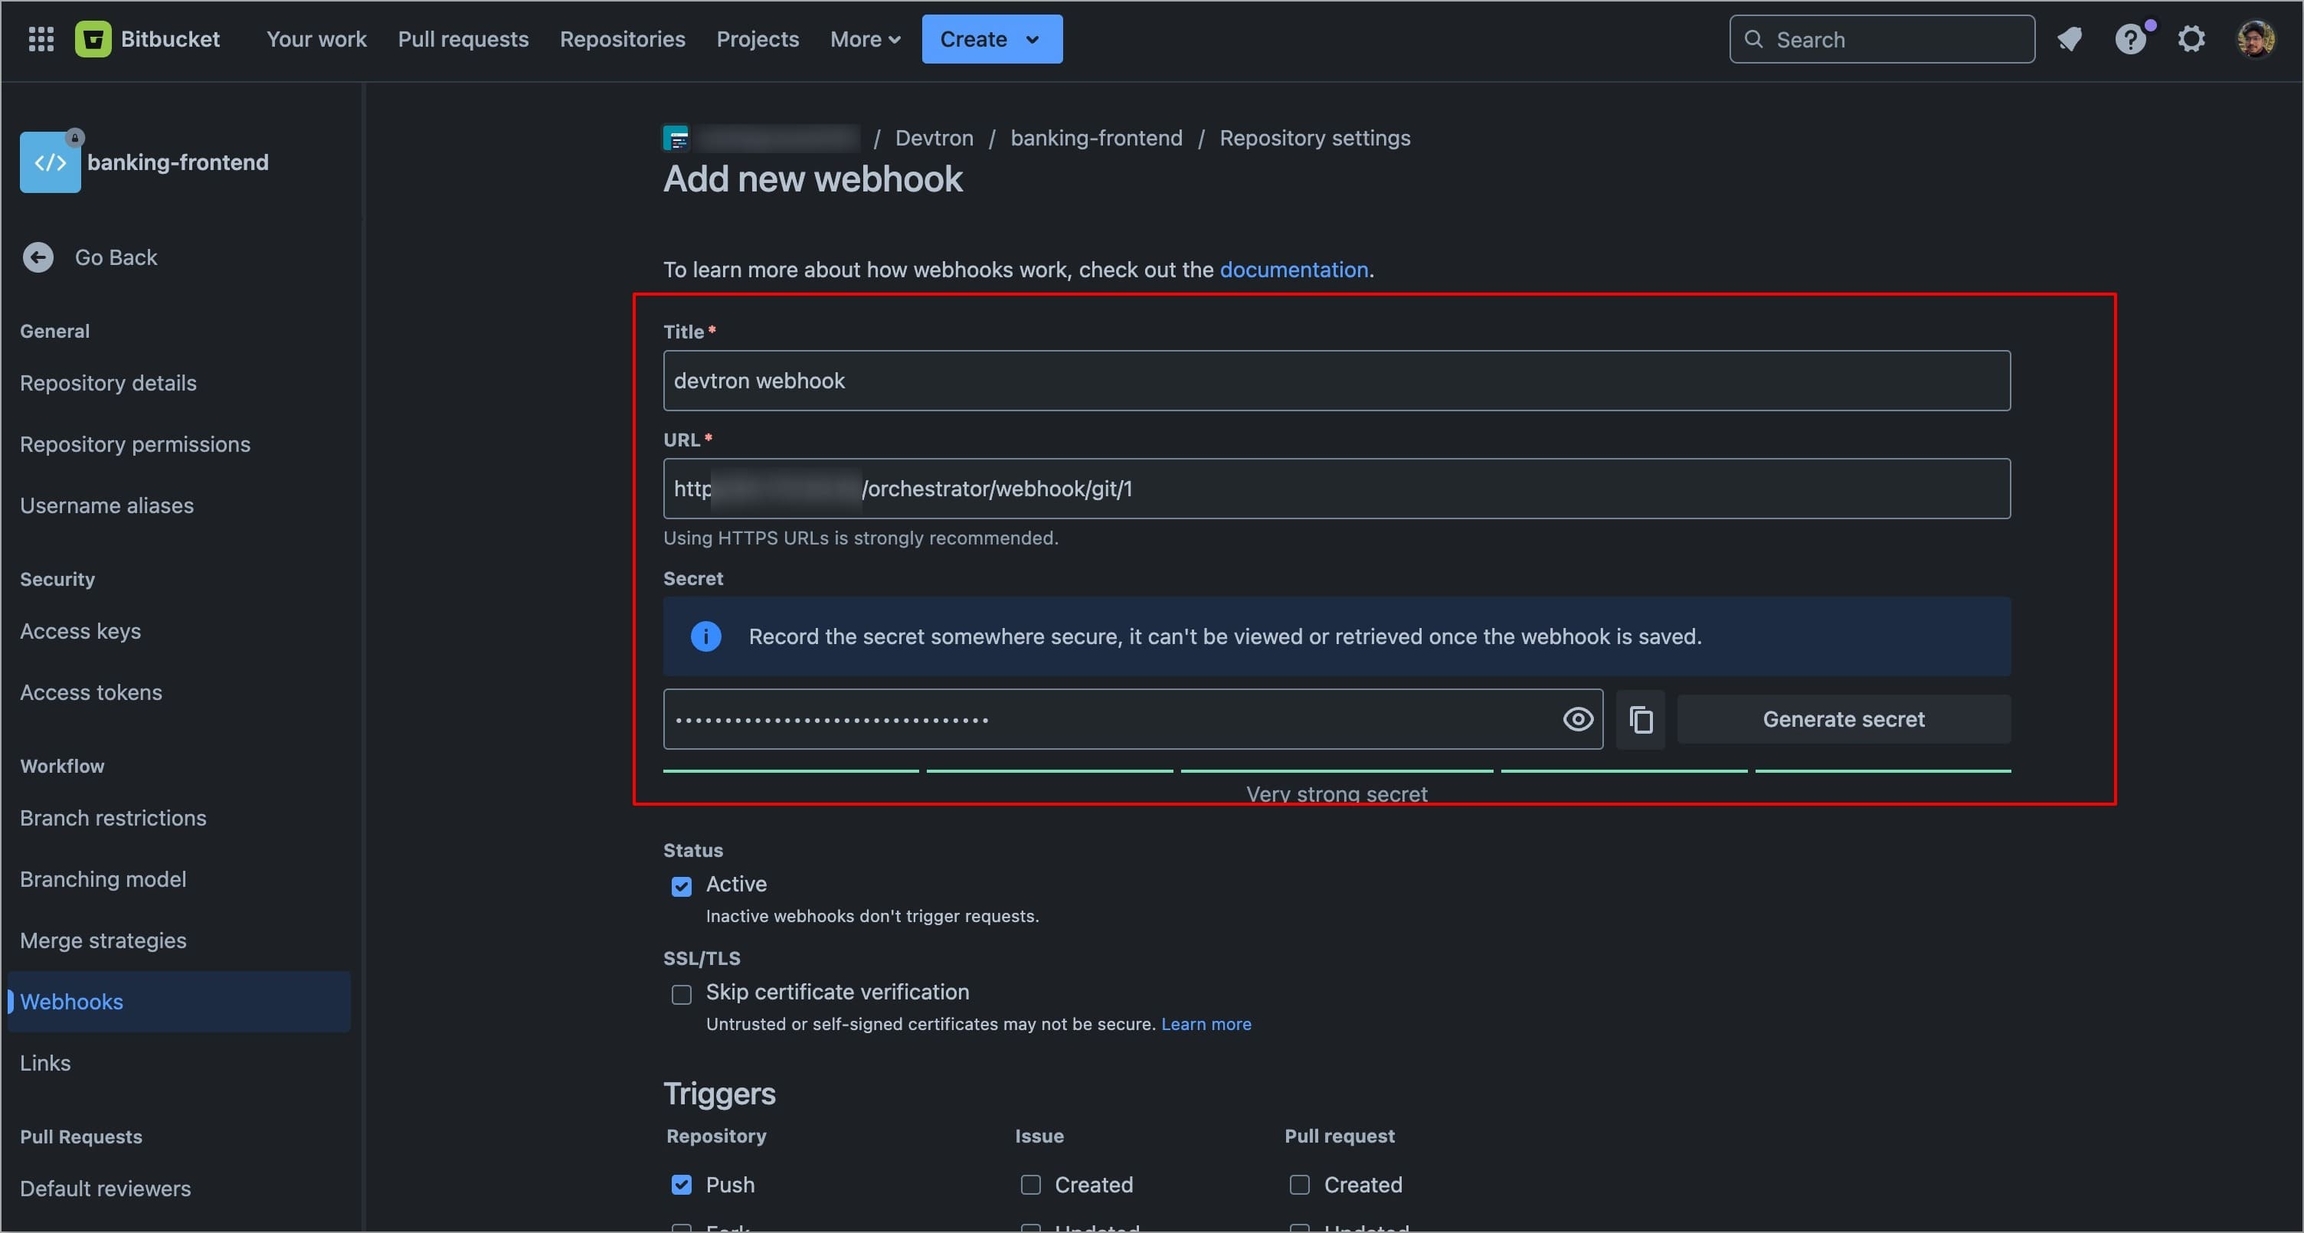
Figure 91: Configuring Webhook Select the event triggers for which you want to trigger the webhook under the Triggers section.
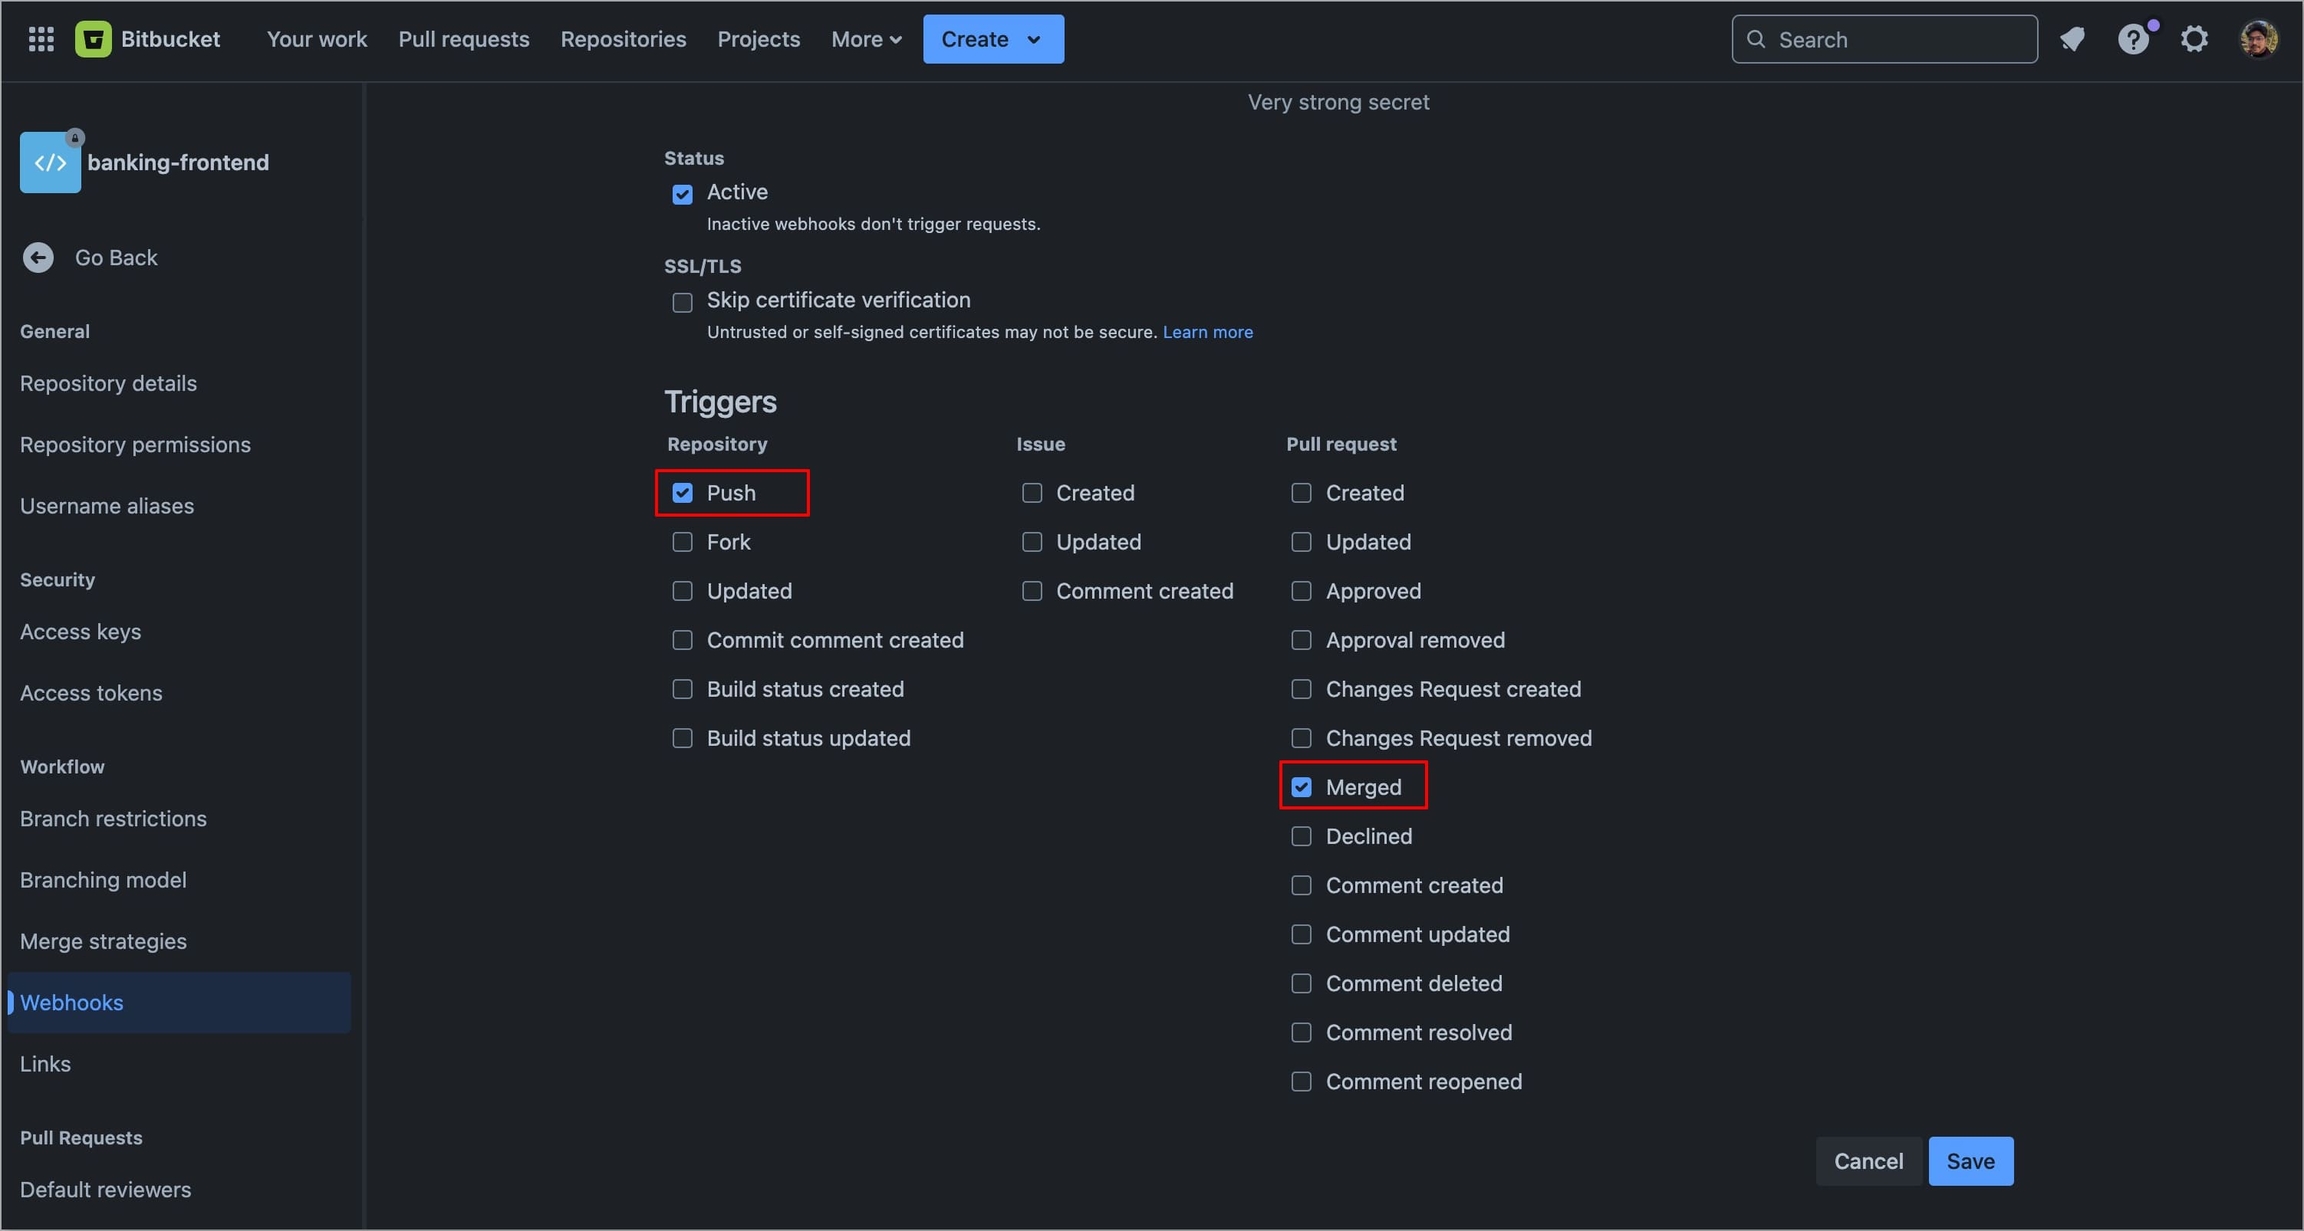
Figure 92: Selecting triggers Select Save to save your configurations.
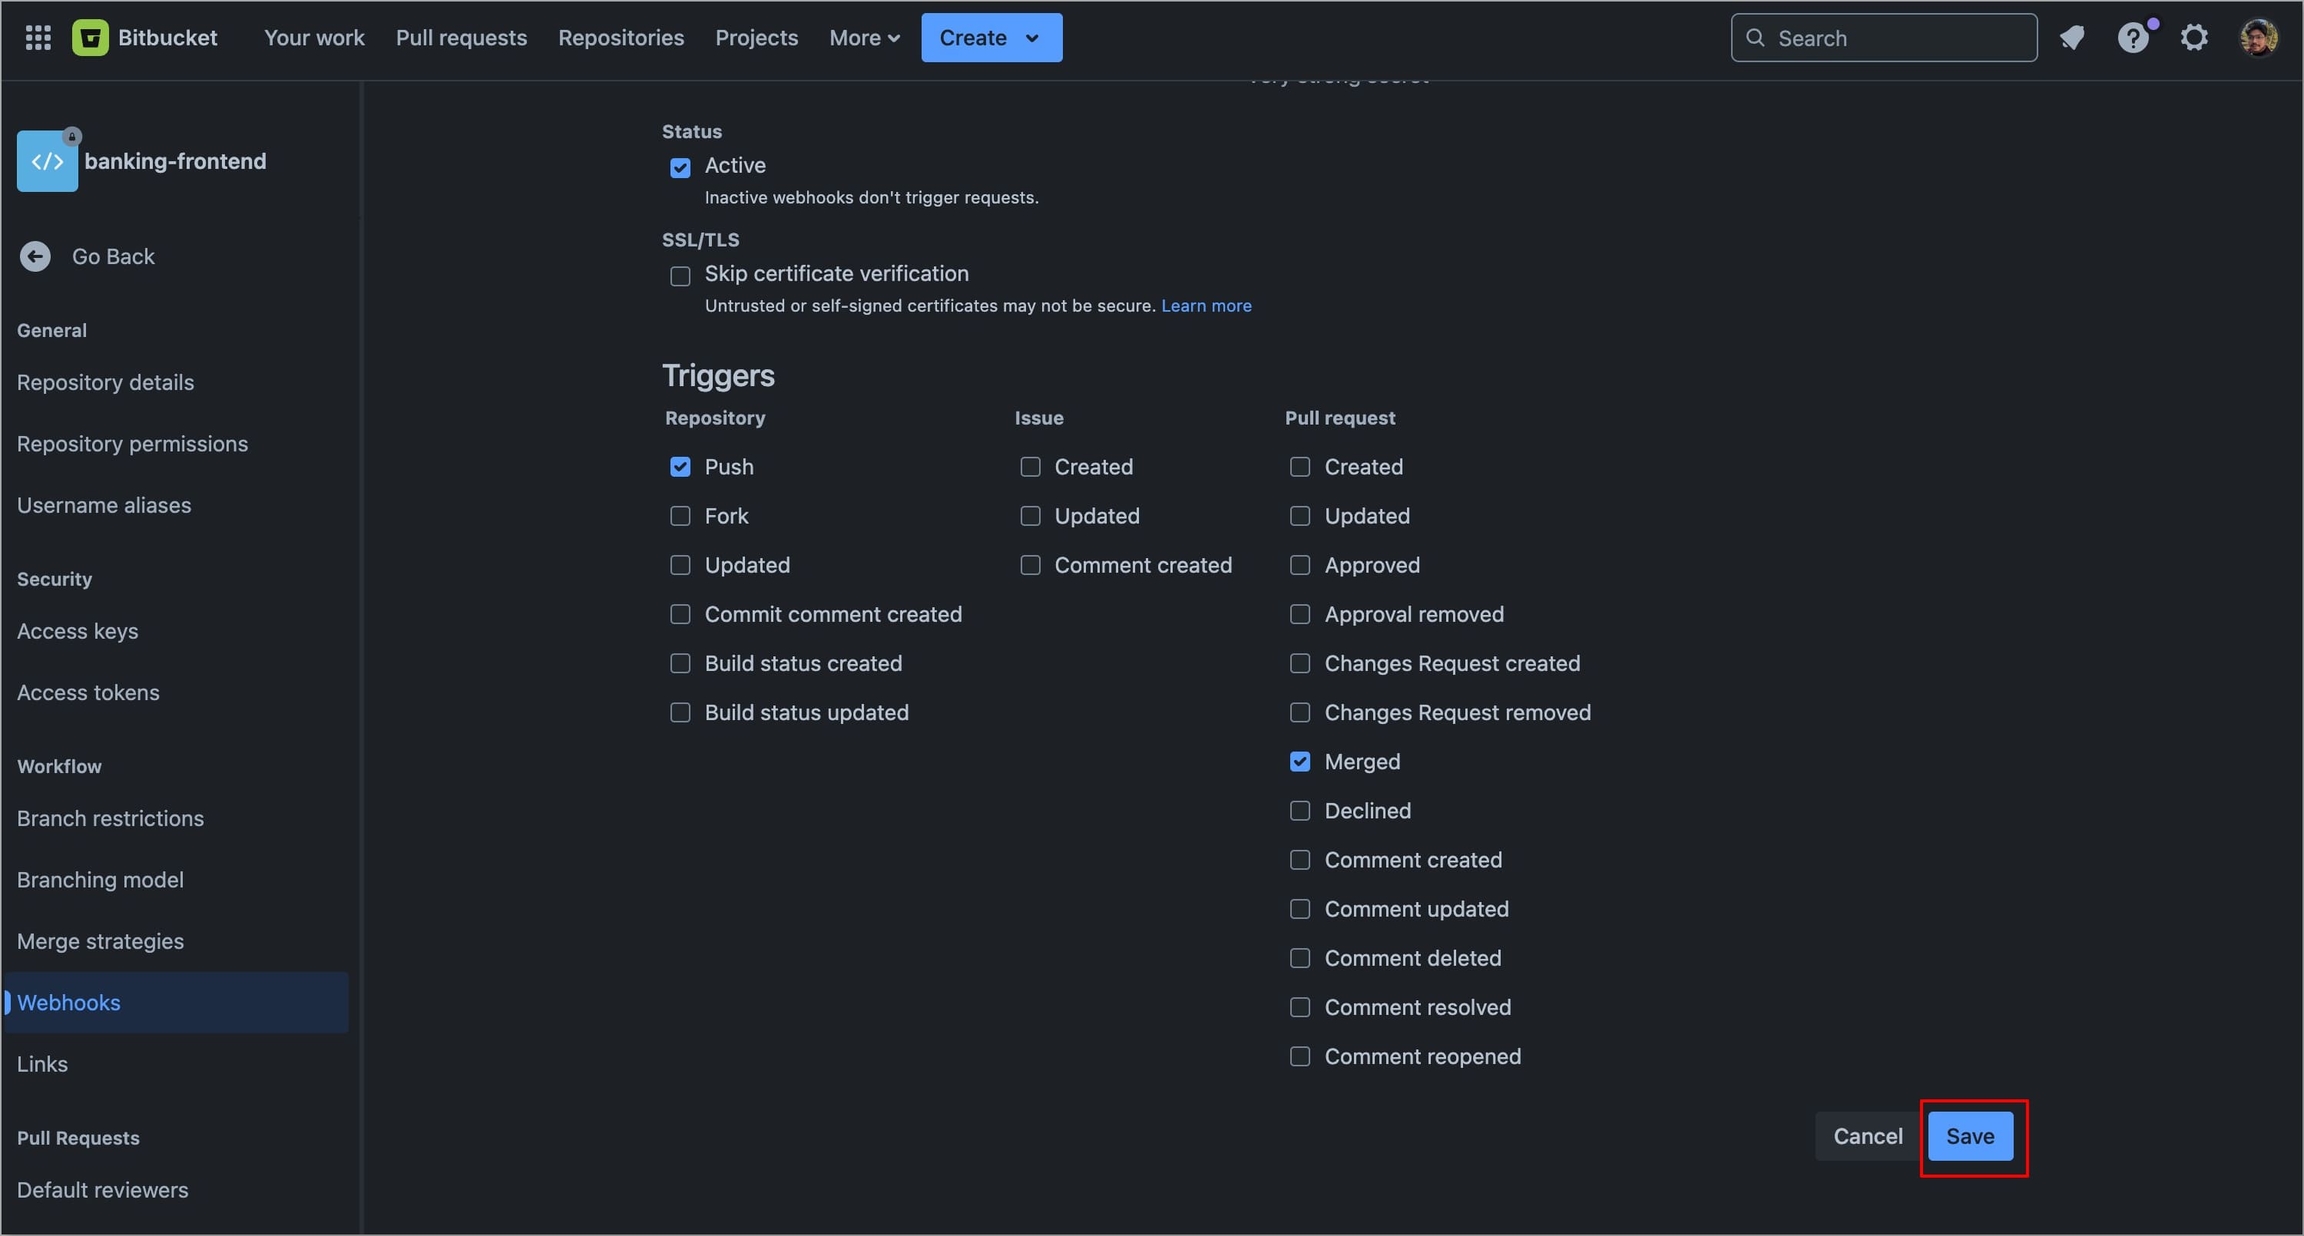
Figure 93: Saving Configurations
Last updated
Was this helpful?