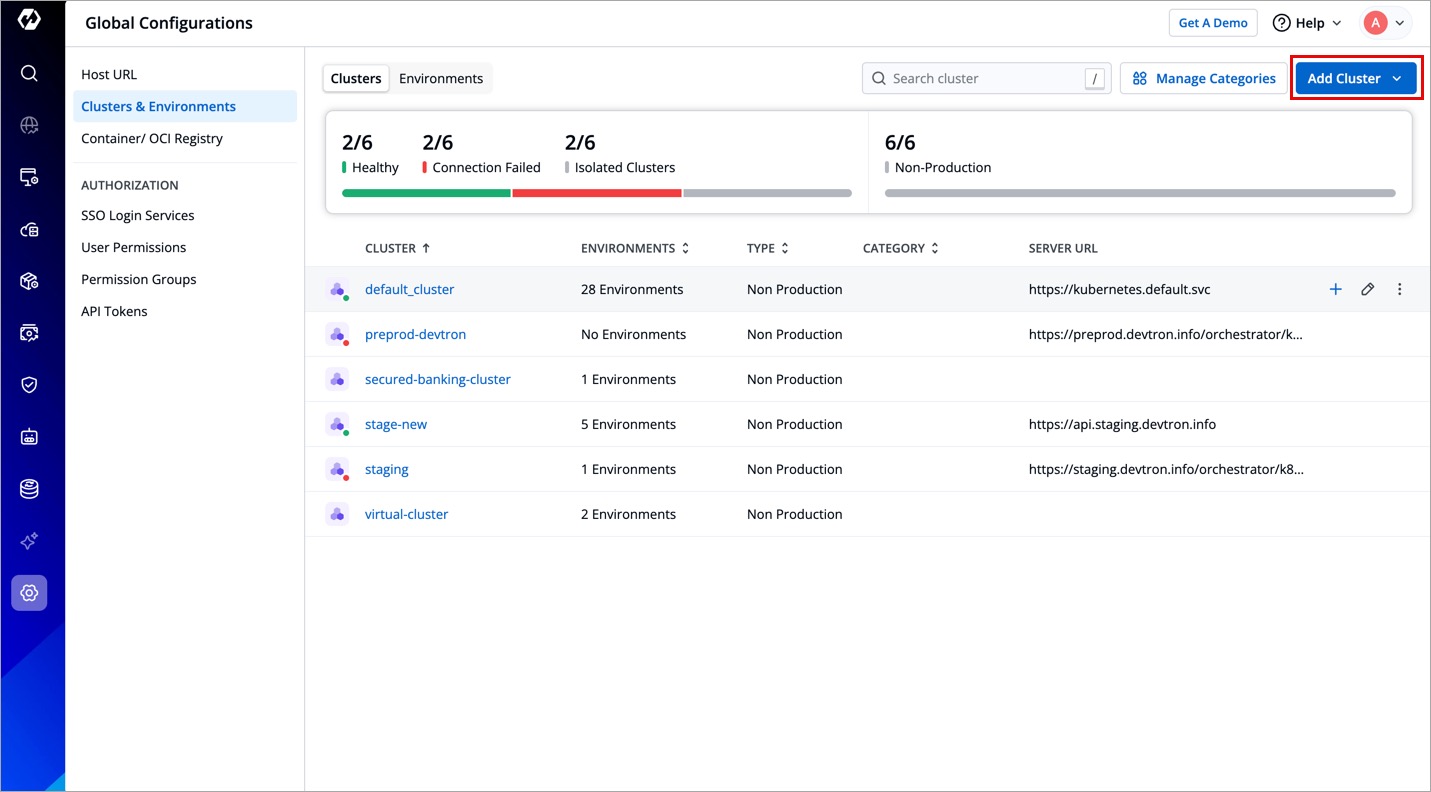
Add Clusters
Connecting your Kubernetes clusters to Devtron is the foundation for deploying, observing, and managing applications across your infrastructure. This page walks you through the different ways to add a cluster, whether you are connecting an existing cluster, using a kubeconfig file, or working with isolated and air-gapped setups. You will also learn how to configure connection types, set up TLS, enable application metrics, and assign categories for better organization.
Connect Your Existing Kubernetes Cluster
Users need to have super-admin permission to add a Kubernetes cluster to Devtron.
- Go to Global Configurations → Clusters & Environments → Add Cluster.
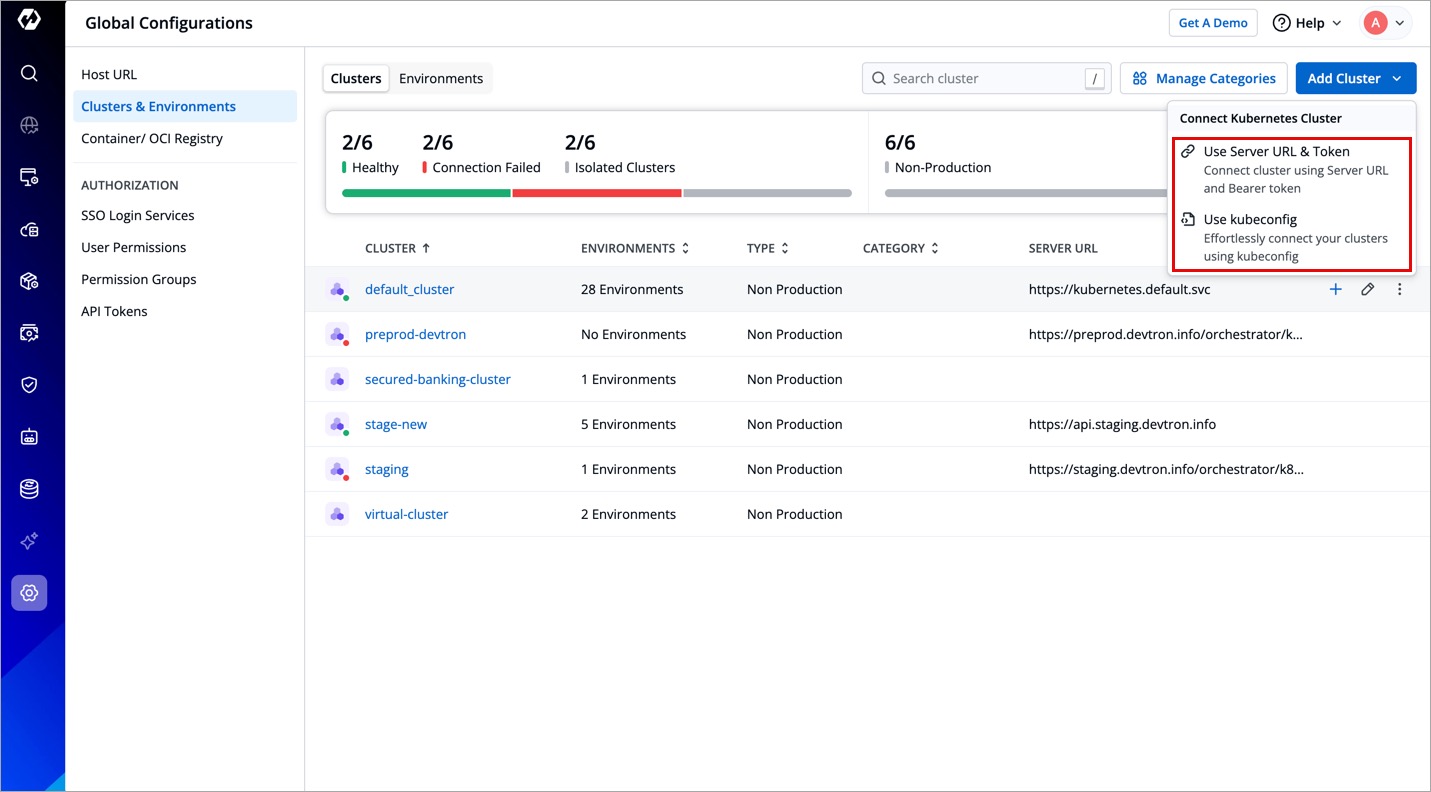
- Select Connect Kubernetes Cluster.
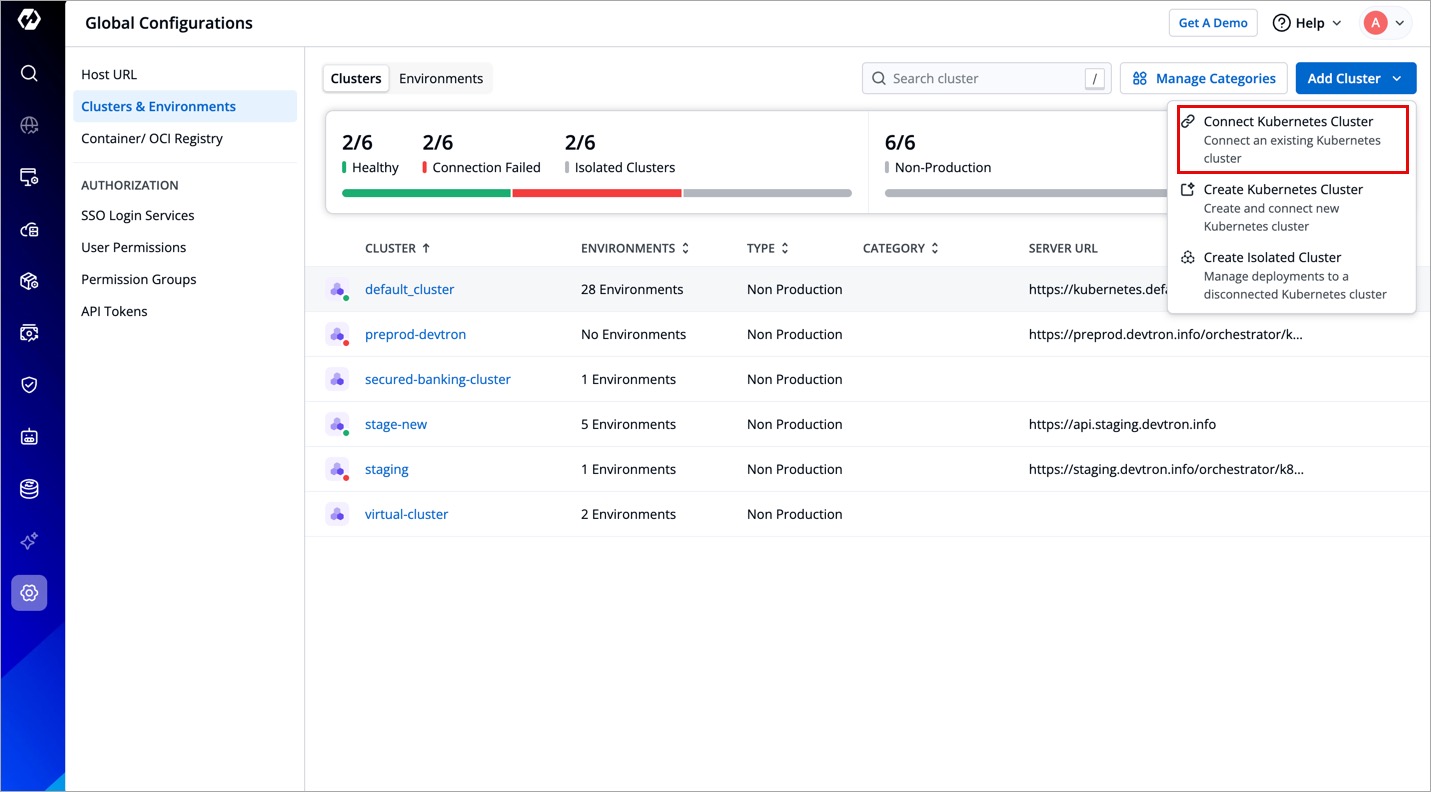
-
You can choose to add your Kubernetes cluster using either of the following methods:
Method Description Server URL & Bearer Token Use Server URL and Bearer Token to add a cluster. Kubeconfig Use Kubeconfigfile to add a cluster.
- Click Save Cluster and your cluster will be connected to Devtron.
Method 1: Add Cluster Using Server URL & Bearer Token
Refer to Get Cluster Credentials to learn the process of getting the Server URL and bearer token.
- To add a Kubernetes cluster on Devtron using Server URL and Bearer Token, provide the following information:
| Field | Description |
|---|---|
| Name | Enter the name of your cluster. |
| Server URL | Enter the Server URL of your cluster (with https) Note: We recommend using a self-hosted URL instead of a cloud-hosted URL. |
| Bearer Token | Paste the bearer token of your cluster |
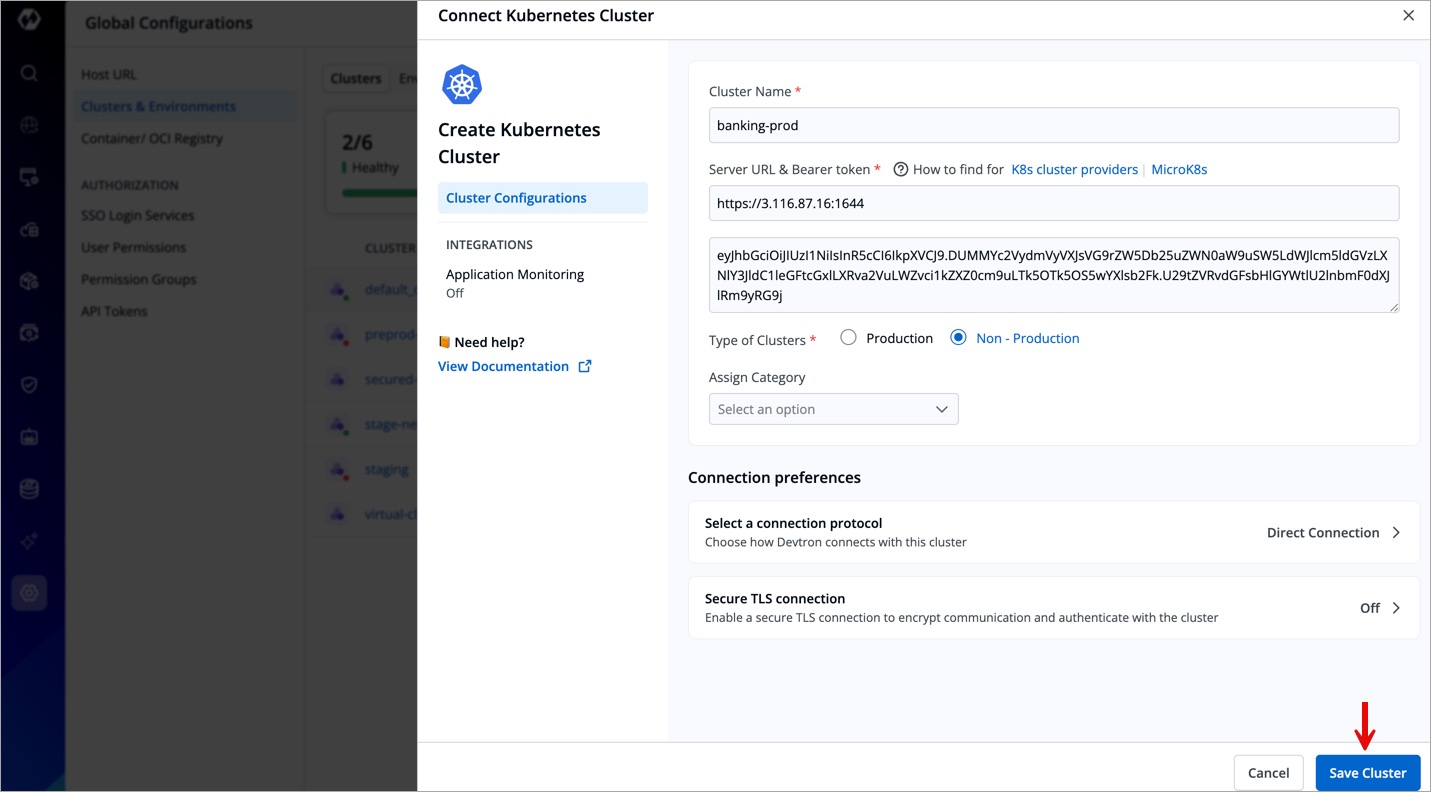
- Complete the remaining steps (optional):
If you have a kubeconfig file ready, you may skip the above process and refer to Add Cluster Using Kubeconfig instead.
Method 2: Add Cluster Using Kubeconfig
In case you prefer to add clusters using kubeconfig, follow these steps:
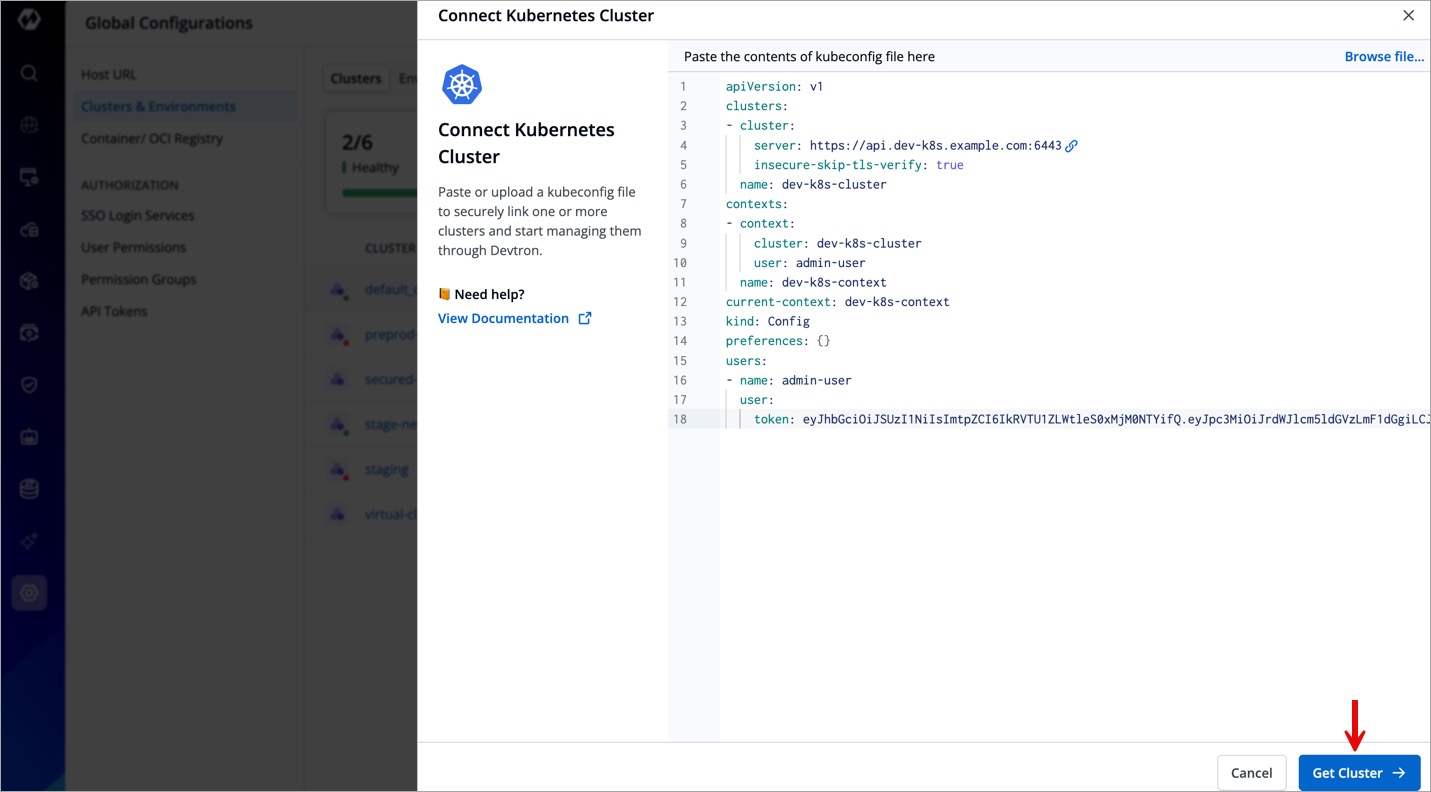
- Copy and paste your kubeconfig file into the editor. Alternatively, you may browse and select the file as well.
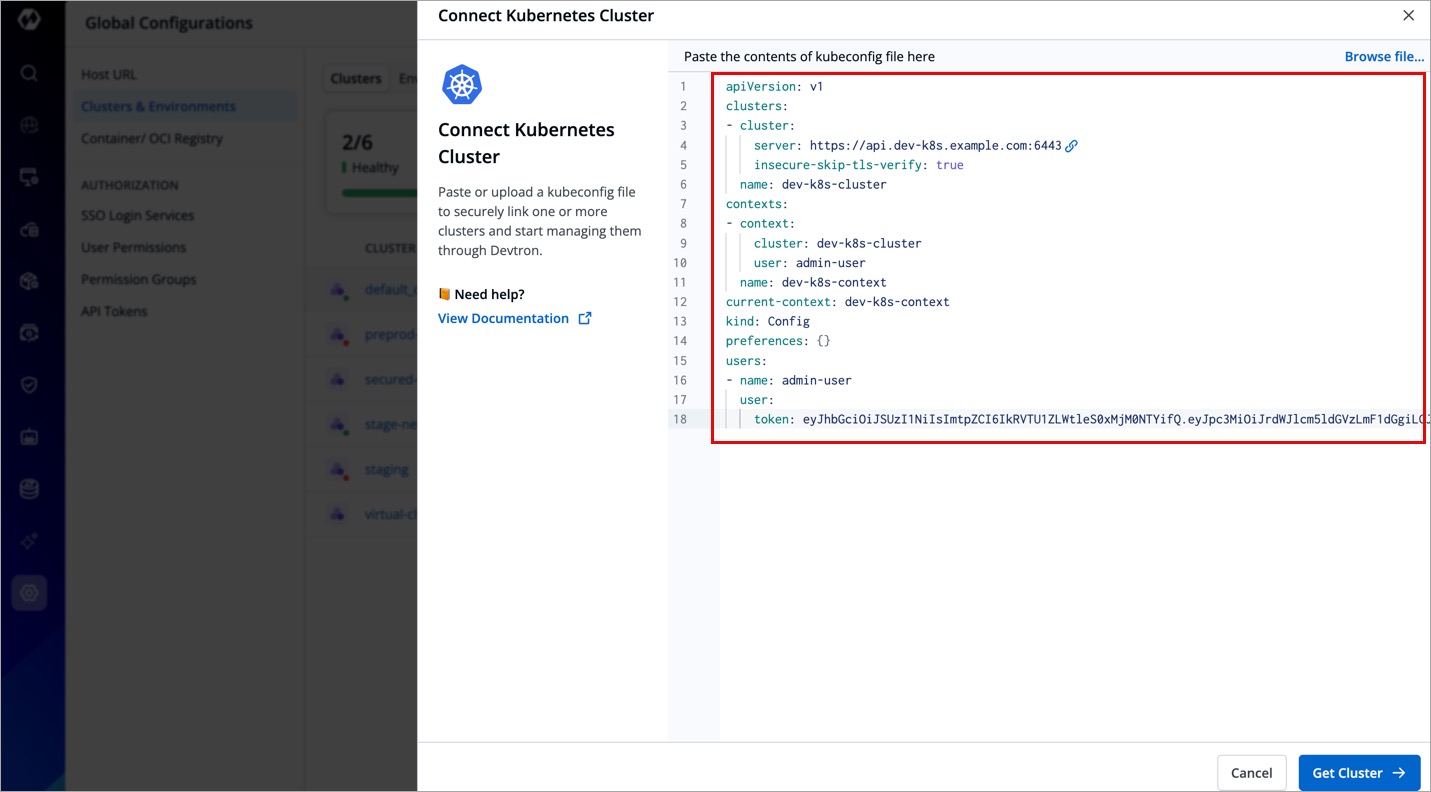
- Click the Get Cluster button. This action will display the cluster details alongside the kubeconfig.
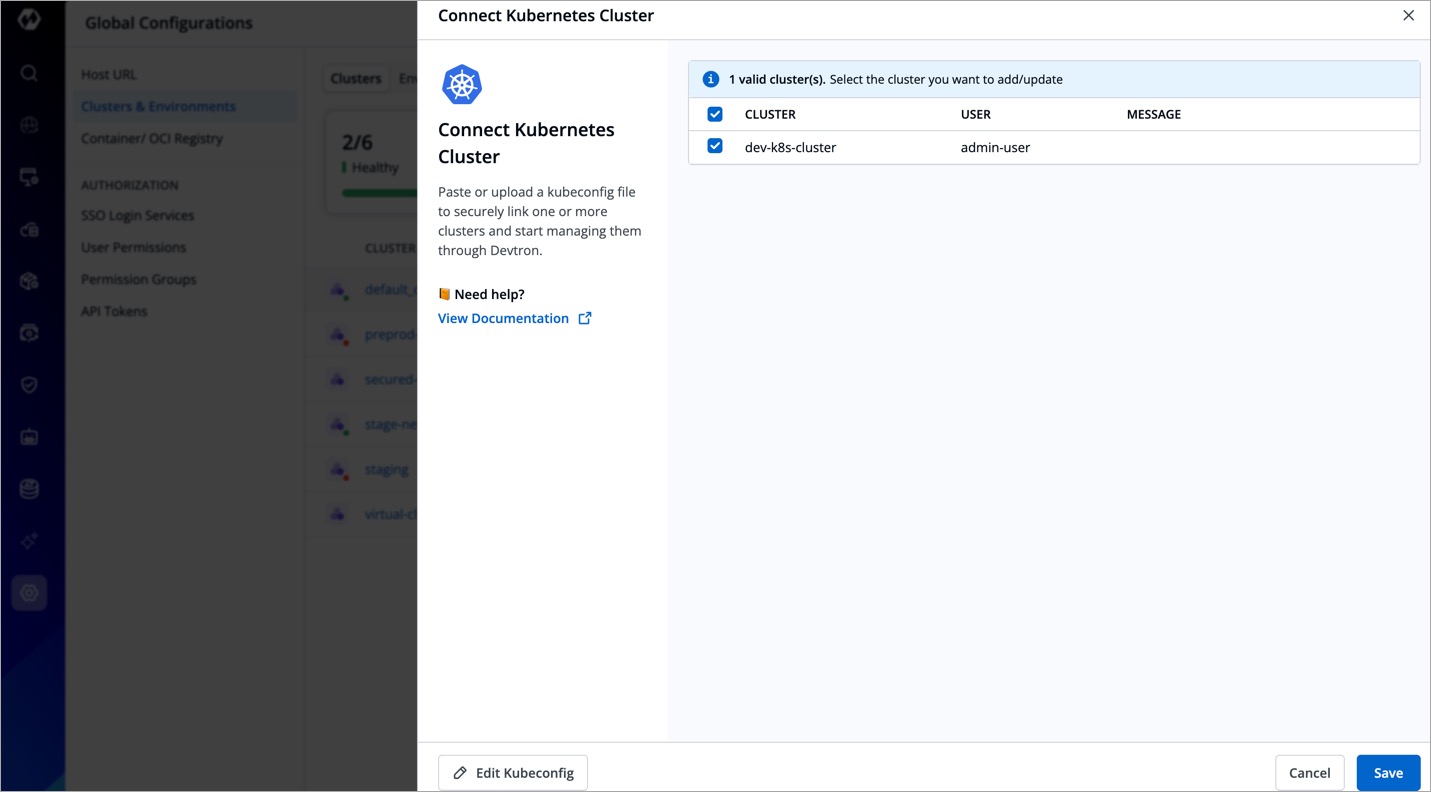
- If your kubeconfig file lists multiple clusters, they will be displayed in the window. Use the checkboxes to select the desired cluster(s) and click Save.
- Click the saved cluster, and complete the remaining steps (optional):
Ensure that the kubeconfig file has admin permissions. It is crucial for Devtron to have the necessary administrative privileges; otherwise, it may encounter failures or disruptions during deployments and other operations. Admin permission is essential to ensure the smooth functioning of Devtron and to prevent any potential issues that may arise due to insufficient privileges.
Create Kubernetes Cluster 
Prerequisites
Only a Super-Admin can add an OCI Registry in Devtron.
To create an EKS cluster, you need:
-
OpenTofu (
tofu-controller) chart installed in your Devtron instance. Refer to Getting Started with OpenTofu for more information. -
FluxCD controller (
flux2) chart installed in your Devtron instance -
Secret containing AWS credentials
Install OpenTofu
Follow the steps mentioned below to install OpenTofu:
-
Navigate to Global Configurations → Container/OCI Registry.
-
Refer to the following table and enter the information in the appropriate fields:
Field Value Registry provider Other Registry type Public Registry Name tofuRegistry URL ghcr.ioList of repositories flux-iac/charts/tofu-controller
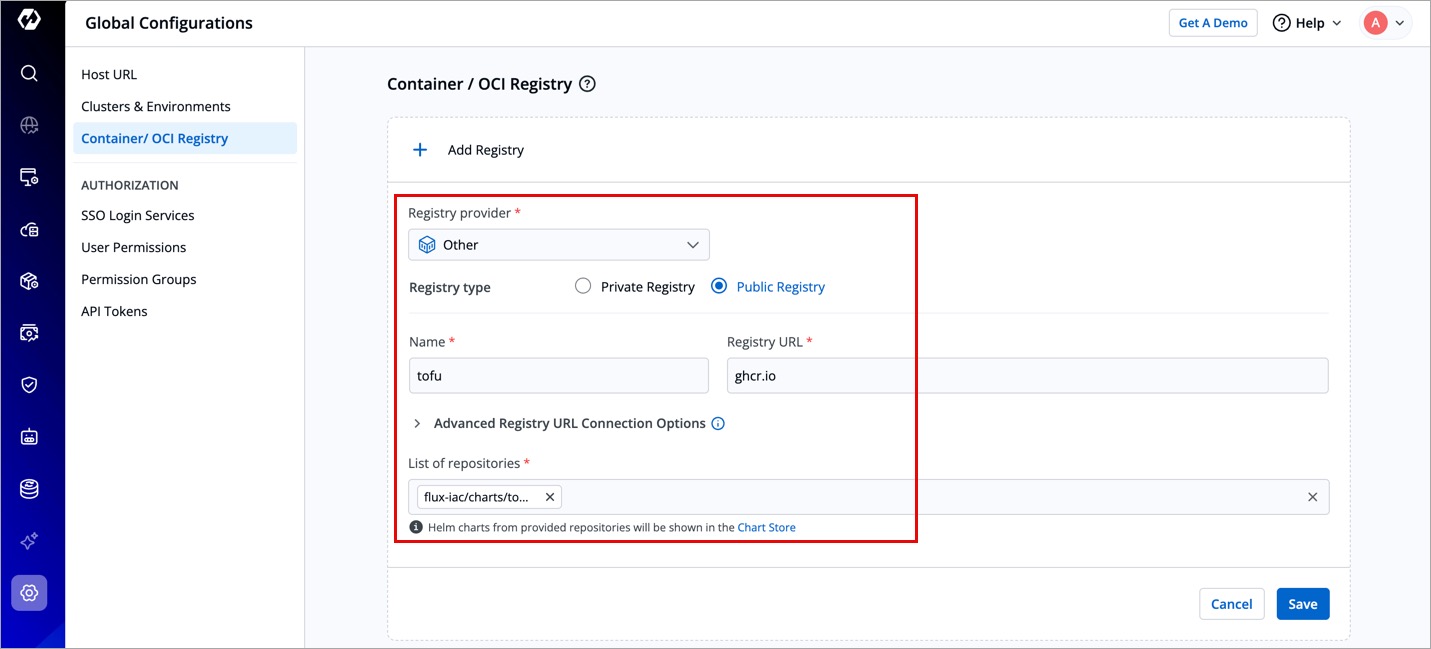
Figure 8: Container/OCI Registry -
Click Save. The
tofu-controllerchart will be displayed in the Chart Store page. -
Navigate to Chart Store and search for
tofu-controllerin the search box. -
Select the chart and click Configure & Deploy. The following page will be displayed.
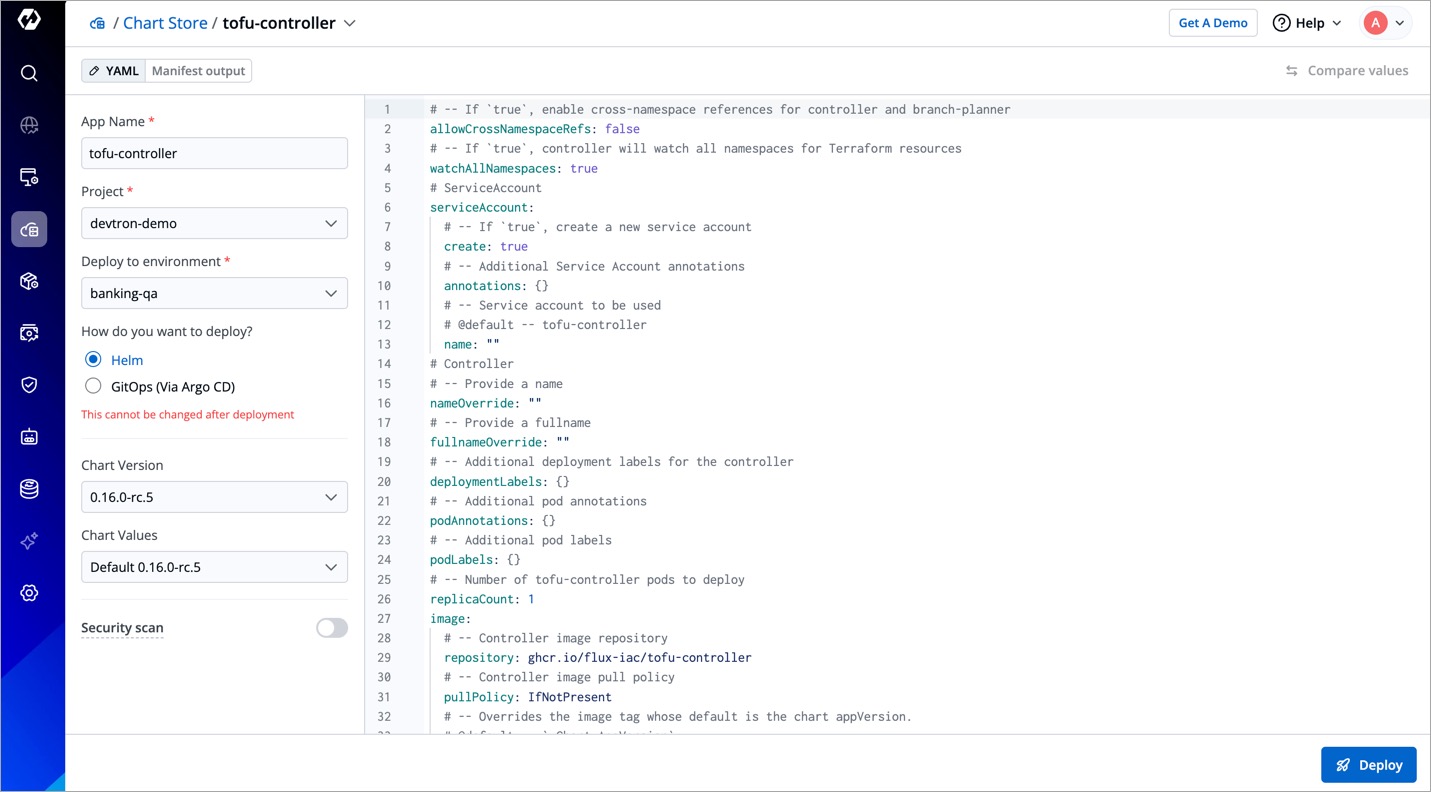
Figure 9: Tofu Controller Chart -
Enter the app name (e.g.,
tofu-controller) in the App Name field. -
Select your project in the Project drop-down box.
-
Select the environment where you want to deploy the chart in the Deploy to Environment drop-down box.
The environment/namespace where you install OpenTofu must be the same environment/namespace where the FluxCD controller will be installed (the next step) to create the cluster.
-
Choose either Helm or GitOps if configured as the deployment method.
-
Click Deploy Chart. OpenTofu will be installed in your Devtron instance.
Now that OpenTofu is installed, you can install the FluxCD controller in your Devtron instance.
Install FluxCD Controller
Follow the steps mentioned below to install OpenTofu:
-
Navigate to Chart Store and search for
flux2in the search box.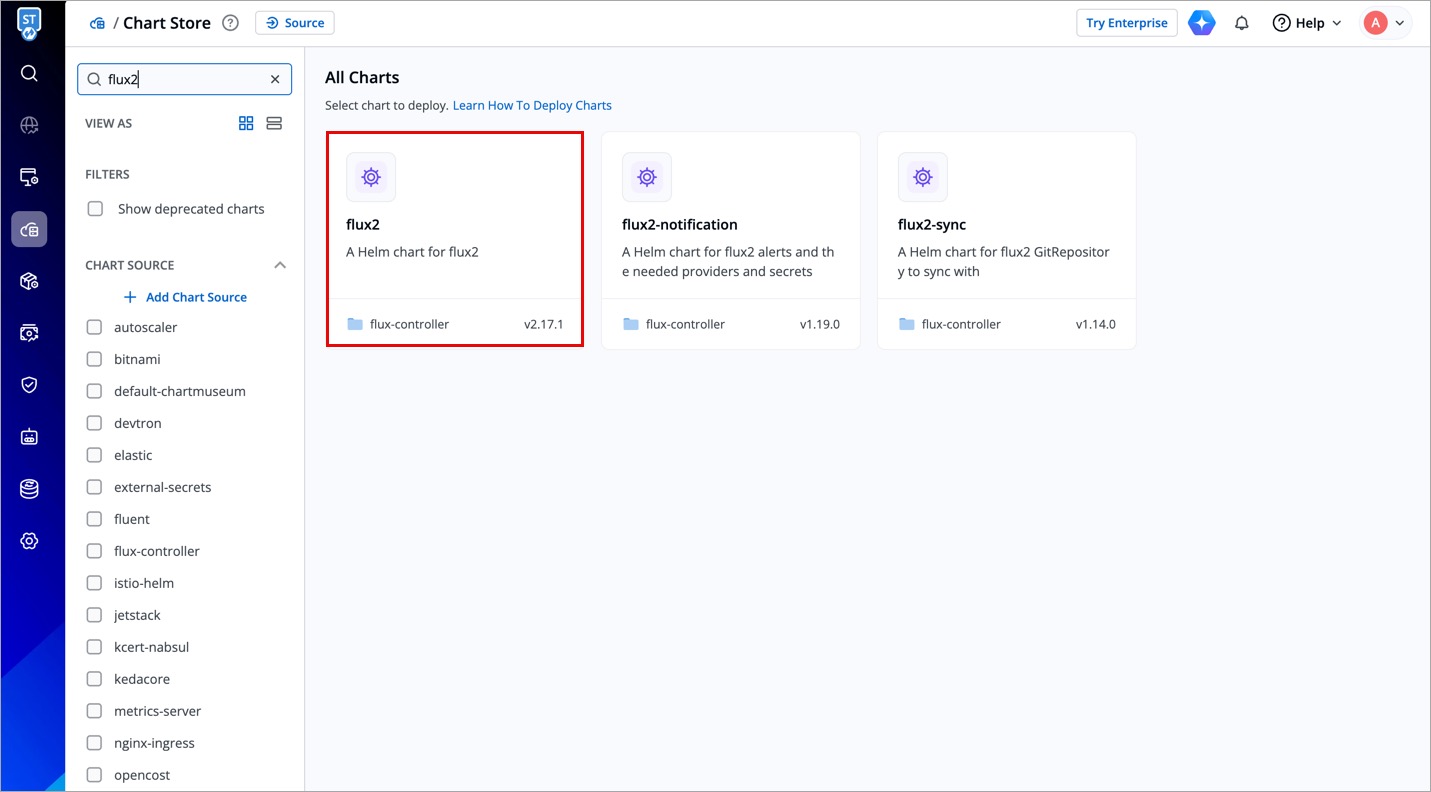
Figure 10: "flux2" Chart -
Select the chart and click Deploy.
-
Enter the app name (e.g.,
tofu2) in the App Name field. -
Select your project in the Project drop-down box.
-
Select the environment where you want to deploy the chart in the Deploy to Environment drop-down box.
The environment/namespace where you install the FluxCD controller must be the same environment/namespace where OpenTofu was installed to create the cluster.
-
Choose either Helm or GitOps if configured as the deployment method.
-
Click Deploy Chart. FluxCD controller will be installed in your Devtron instance.
Now that FluxCD controller is installed, the final prerequisite is to create a secret containing your AWS credentials.
Create a Secret
User needs to be an Admin of the Kubernetes resource or a Super-Admin to create a Secret.
Follow the steps mentioned below to create a secret containing your AWS credentials:
-
Navigate to Resource Browser.
-
Click the default_cluster.
-
Click Create Resource.
-
Copy the YAML snippet given below and paste it in the Create Kubernetes Resource page.
apiVersion: v1
data:
  AWS_ACCESS_KEY_ID: SDKDI382DKD0=
  AWS_SECRET_ACCESS_KEY: YVZsSIEOwcFRSMjlvM2xaUjSIE823J3PT0=
kind: Secret
metadata:
  name: tf-aws-creds
  namespace: your-namespace
type: Opaque
-
It is recommended to keep the
nameattribute totf-aws-creds. Changing this value might make the secret go unrecognized. -
The secret must be created in the same namespace where OpenTofu and FluxCD controller are installed.
-
When creating a secret, kindly ensure that your
AWS_ACCESS_KEY_IDandAWS_SECRET_ACCESS_KEYare encoded in base64. Go to Devtron Base64 Encoder to encode your AWS credentials.
-
Enter your AWS access key against the
AWS_ACCESS_KEY_IDattribute and AWS secret key against theAWS_SECRET_ACCESS_KEYattribute. Refer to Create New Access Keys for more information. -
Click Apply. The secret will be created.
Now that all the prerequisites are met, you can proceed to create a cluster from the Create Kubernetes Cluster page.
Steps
Only a Super-Admin can create a Kubernetes cluster.
-
Navigate to Global Configurations → Clusters & Environments → New Cluster → Create Kubernetes Cluster.
-
Refer the following table (containing mandatory fields) and enter the details in the corresponding fields:
Field Description Cluster ProviderSelect the type of cluster you'd like to create based on your requirement NameEnter the name of your Kubernetes cluster (e.g., eks-cluster-nonprodin the case of EKS andrancher-cluster-qain the case of Rancher)RegionSelect the region where your cluster is hosted (e.g., us-east-1in the case of EKS andap-south-3in the case of Rancher)
Refer to View cluster details using the AWS Management Console for more informationVPC CIDREnter the VPC CIDR value. This value determines the number of pods, nodes, or services your cluster can host (e.g., 10.0.1.6/16)Authentication ModeSelect the authentication mode you wish to perform for the cluster
- API_AND_CONFIG_MAP - Select this if you want to use both the API and the ConfigMap to authenticate who can access the cluster. This option is recommended if you are migrating from the old
aws-authConfigMap method (which is deprecated) to the new API method.
Refer to Grant IAM users access to Kubernetes with EKS access entries for more information. - API - Select this if you want to manage access using a single API. This option is recommended as this is the best practice for EKS cluster creation.
Refer to Manage User Access with API for more information. - CONFIG MAP - Select this if you want to rely on the original (but deprecated) way of authentication using
aws-authConfigMap. This option is not recommended anymore.
Refer to Grant IAM users access to Kubernetes. with a ConfigMap. for more information.
Enable IRSATurn on this IRSA toggle (IAM Roles for Service Accounts) if you want your application to securely connect to other AWS services using a service account Allow public accessTurn on this toggle if you want to allow your EKS control plane endpoint to be accessed publicly from anywhere without the VPC. It is recommended to keep this toggle disabled Cluster VersionSelect your preferred Kubernetes cluster version. If you are running a live application in a production environment, it is recommended that you select a stable version instead of the latest version
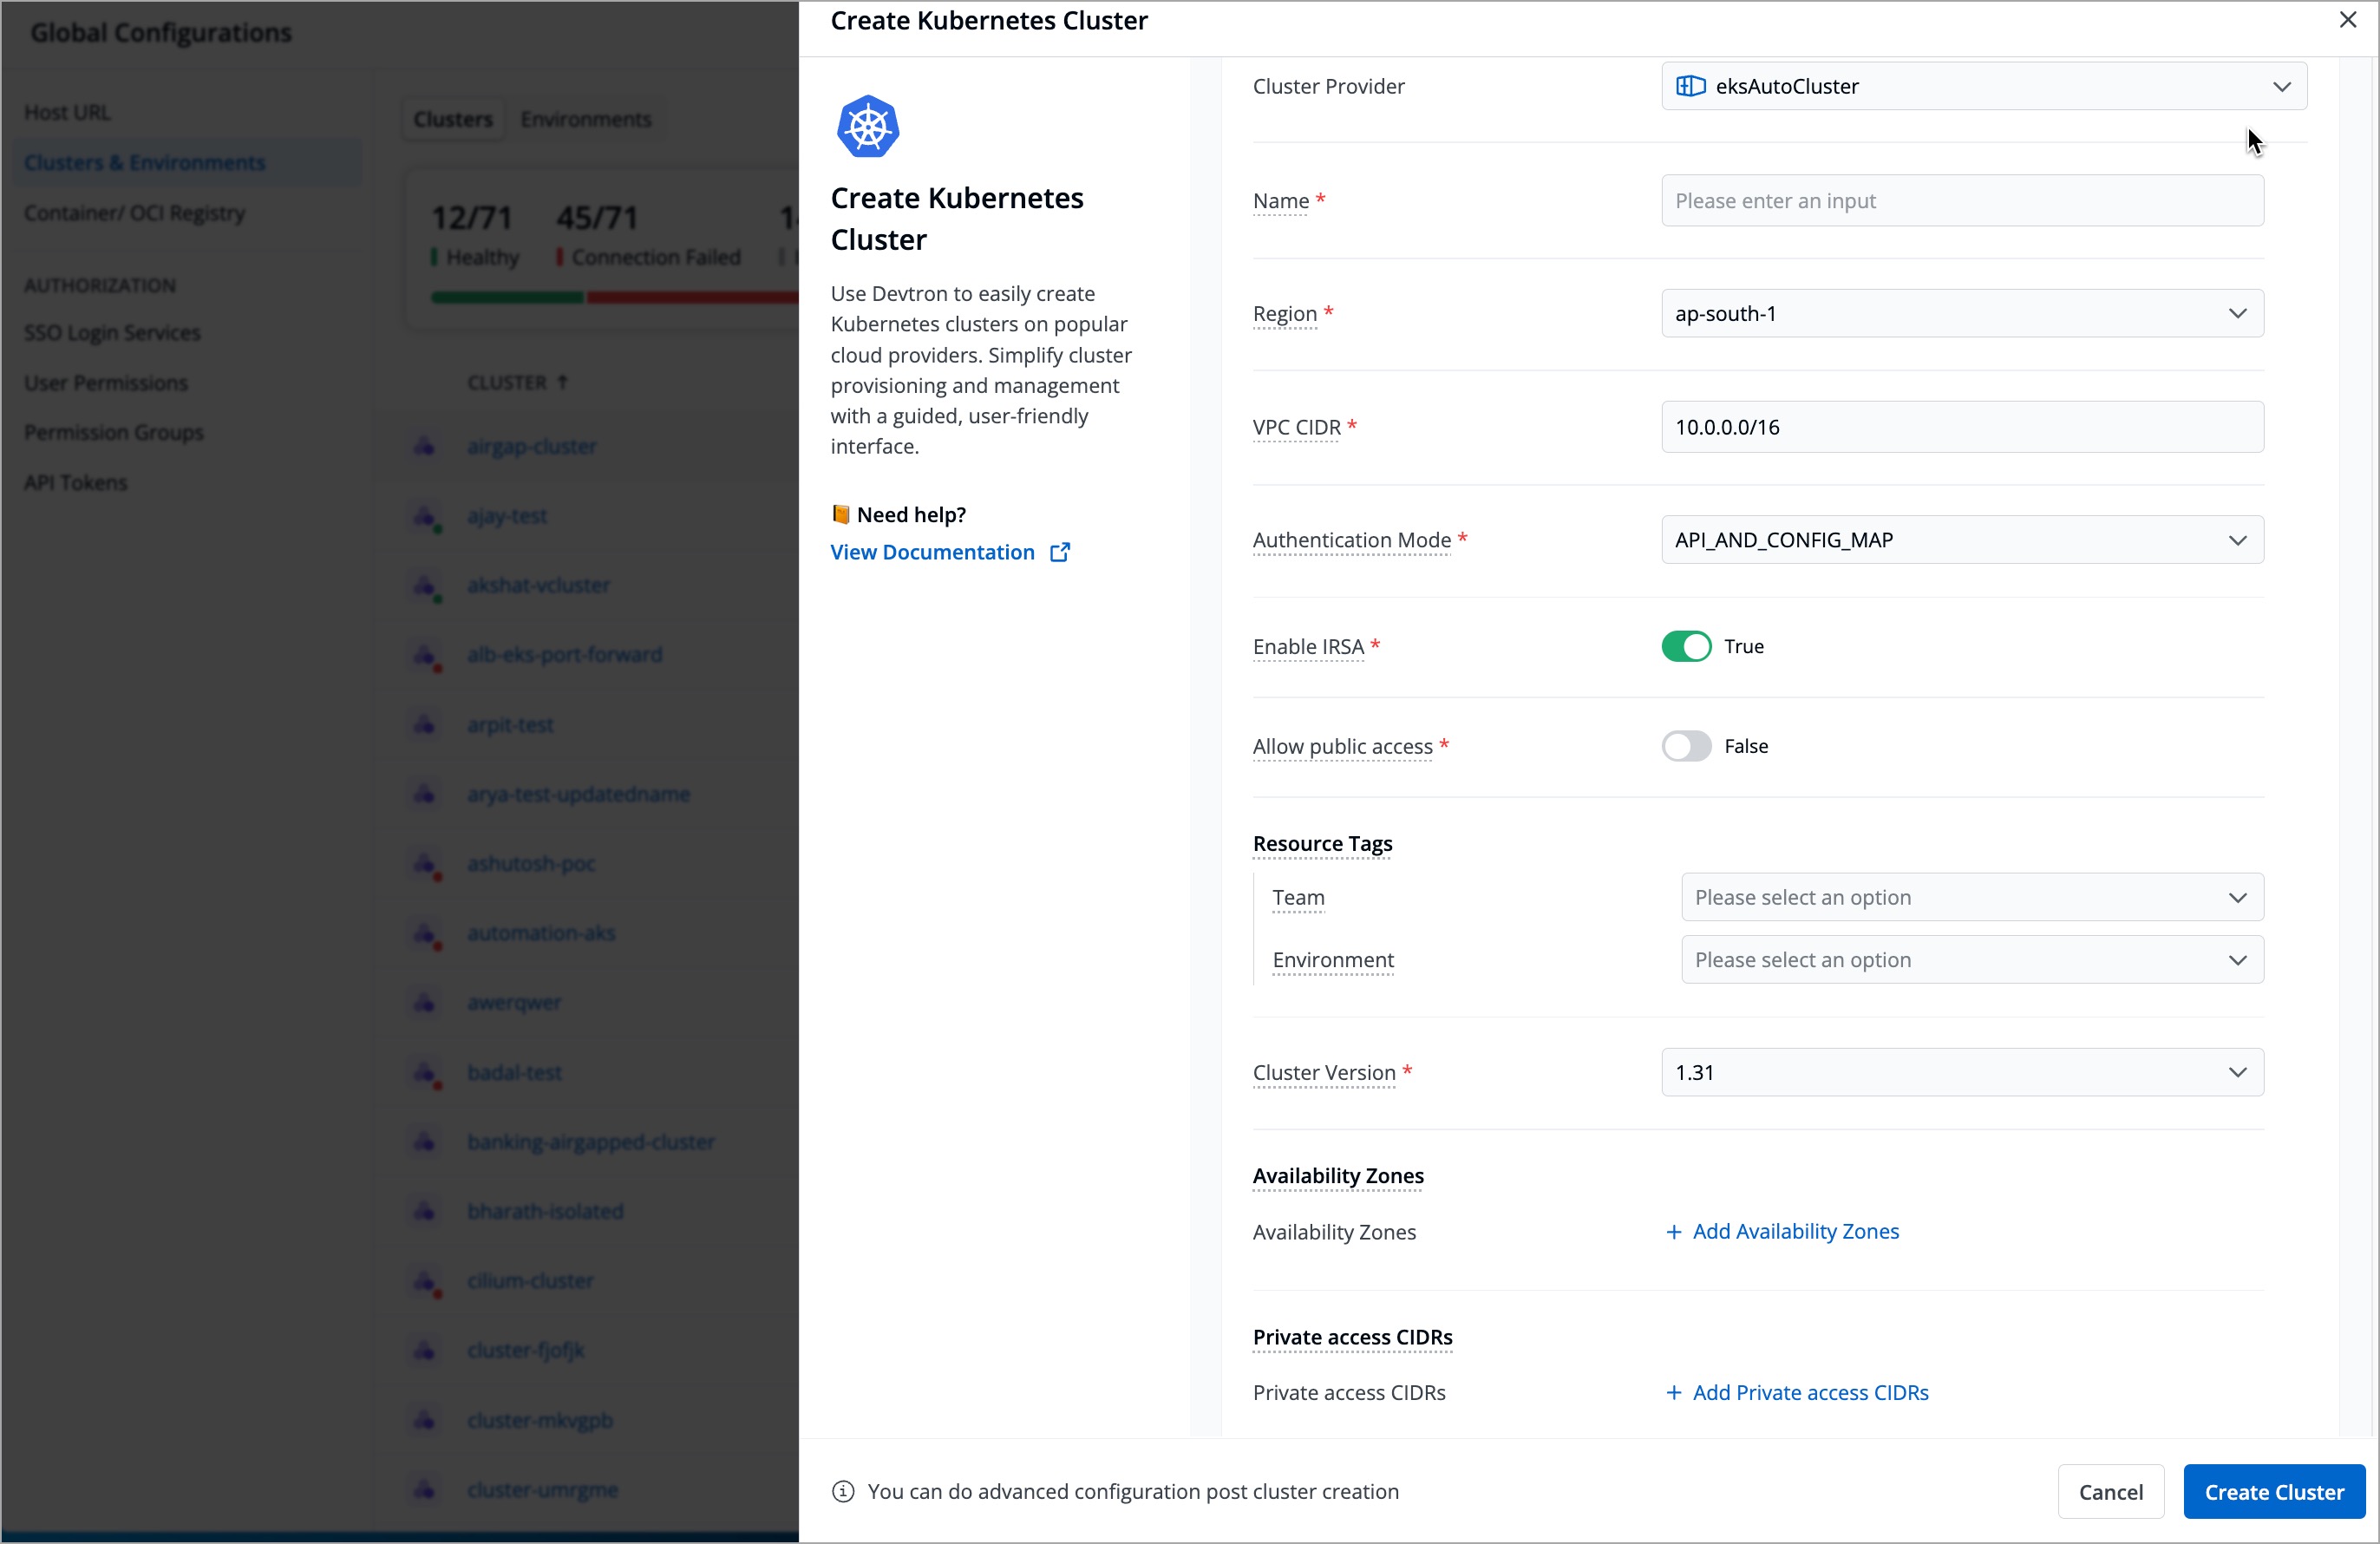
Figure 11: Create Kubernetes Cluster
- API_AND_CONFIG_MAP - Select this if you want to use both the API and the ConfigMap to authenticate who can access the cluster. This option is recommended if you are migrating from the old
-
Refer the following table (containing optional fields) and enter the details in the corresponding fields:
Field Description TeamSelect the team whose tag you want to attach to the cluster resources. For example, when you select qa-team, it means that the cluster resources (pods, ConfigMaps, etc.) created with this cluster are owned by the QA teamEnvironmentSelect the environment. For example, when you select qa, it means that this cluster is a part of the QA environmentAvailability ZonesSelect availability zones (e.g., us-east-2bandap-west-1a) if you prefer to distribute your worker nodes across multiple zones to make your cluster highly available.
This means that even if one availability zone goes down (e.g.,us-east-2b), the other zones (e.g.,ap-west-1a) keep your cluster up and runningPrivate access CIDRsEnter the private access CIDRs (IP addresses that are allowed to reach the API server). If you had turned off the Allow public access toggle, then your EKS control plane endpoint would be private.
It then becomes crucial to enter the private access CIDRs so that the API server recognizes them and allows them to access the endpoint -
Click Create Cluster.
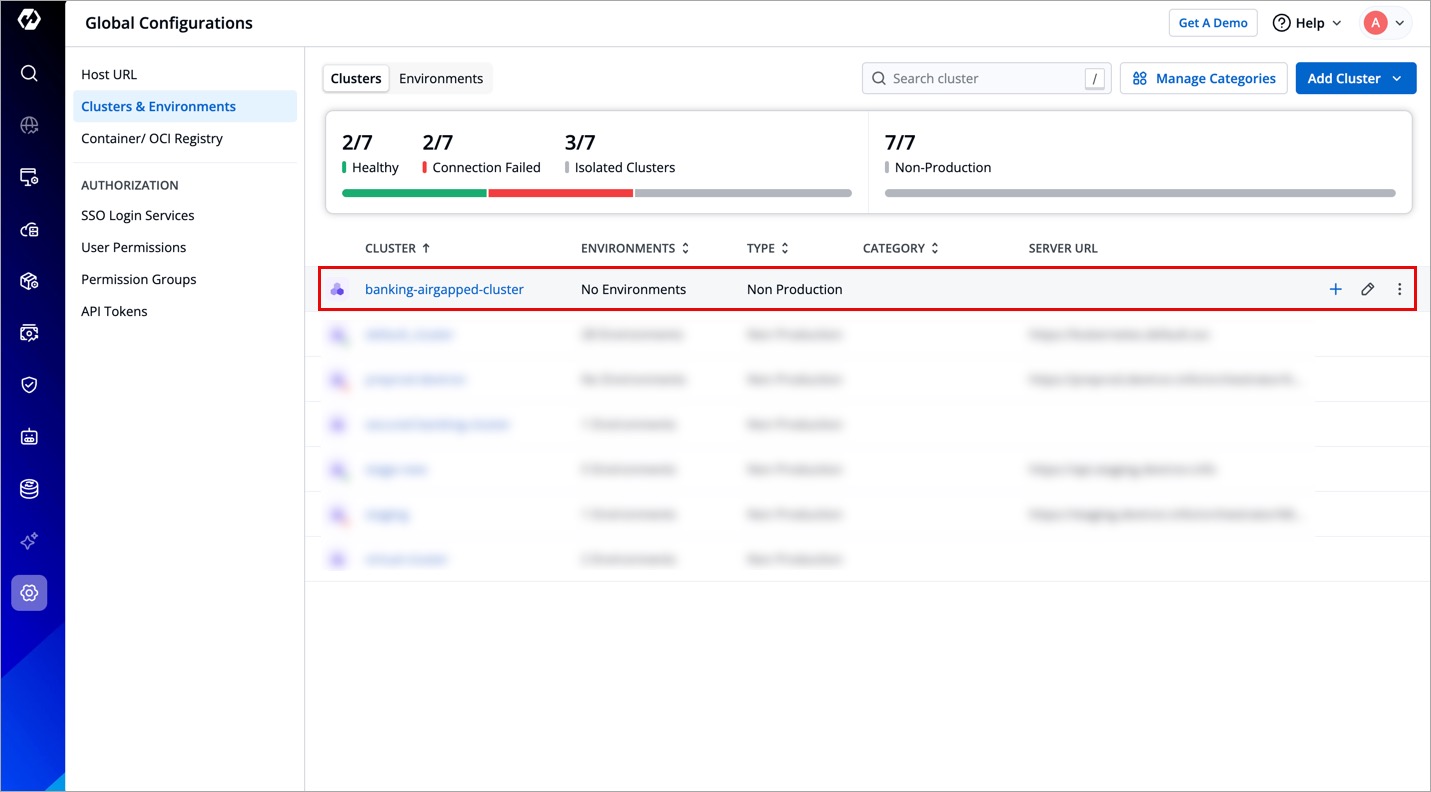
Add Isolated Cluster
Users need to have super-admin permission to add an isolated/air-gapped cluster to Devtron.
For air-gapped Kubernetes clusters with restricted inbound and outbound traffic, Devtron enables seamless management using isolated clusters. While these are not actual clusters with API endpoints, they provide a convenient way to deploy applications in such environments.
- On the New Cluster modal window, select Add Isolated Cluster.
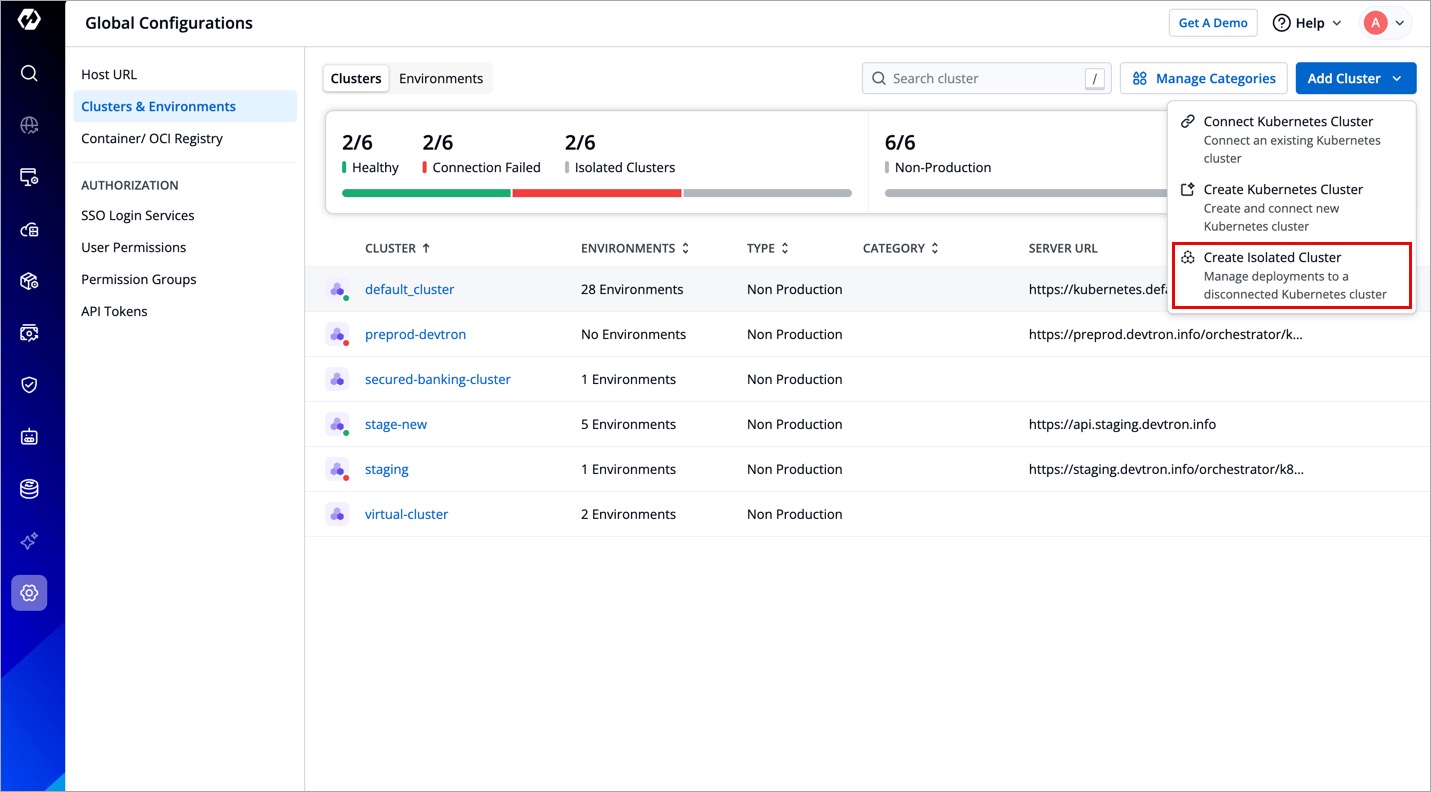
- Add a cluster name (e.g. banking-airgapped-cluster) and click Save Cluster.
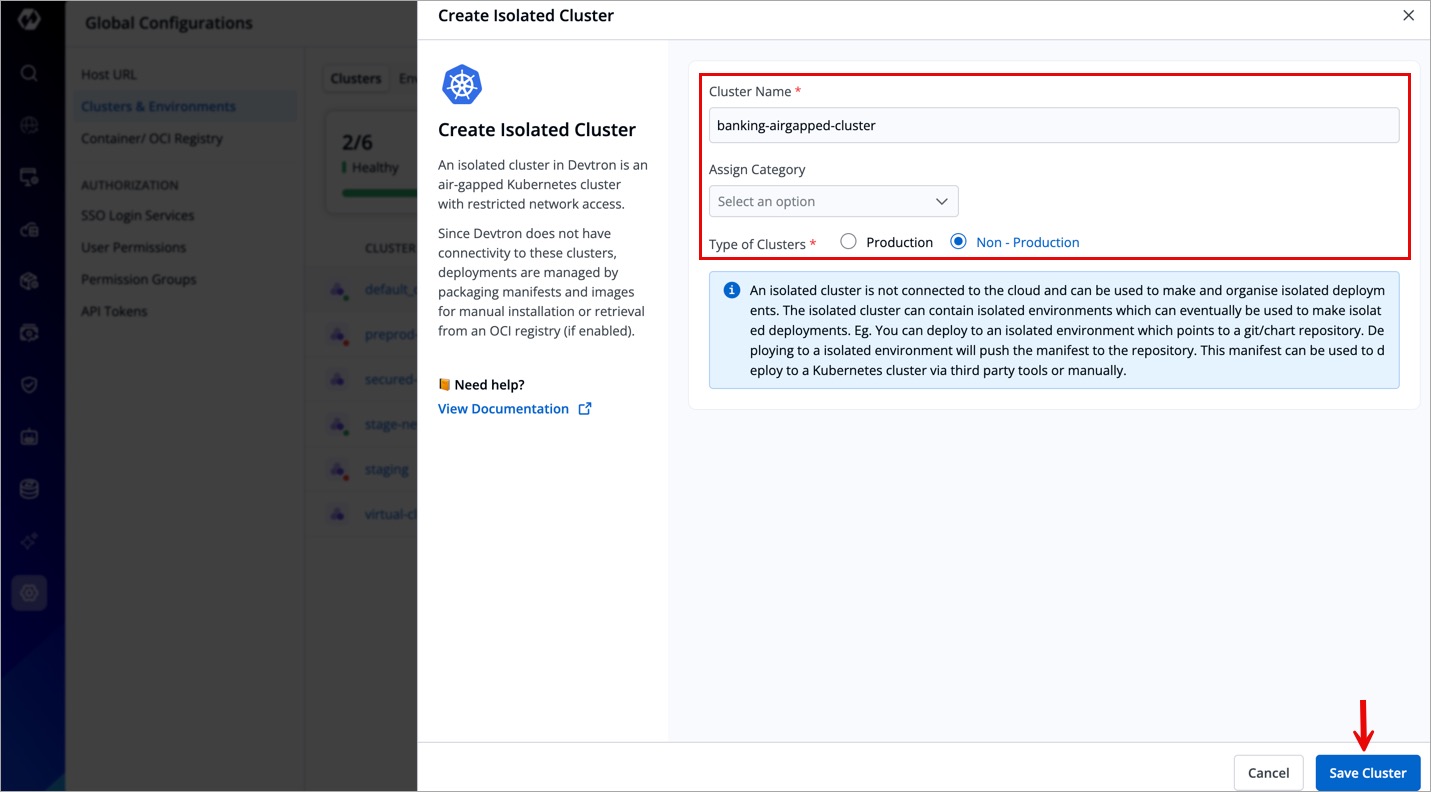
You have successfully configured an isolated cluster.
When you deploy to an isolated environment, Devtron automatically packages application manifests and images into a Helm chart. You can then either:
- Download and install manually in a fully air-gapped setup.
- Push it to an OCI registry (provided pushing of helm package is enabled), allowing manifests to be pulled manually or automatically via Devtron on an air-gapped cluster (if pull access to the OCI registry is available).
Extras
Assign Category to a Cluster
Devtron allows you to assign a category (for e.g. Prod, QA, Dev, or Stage) to your clusters. This enables category-based filtering in the UI, allowing you to determine whether an application is deployed to the Prod, QA, Dev, or Stage environment.
Before assigning a category, you must first add the category. To add a category, refer to the Adding a Category section to learn more.
To assign a category to a cluster, follow the steps below:
-
Select a category from the dropdown under Assign Category and click Update Cluster.
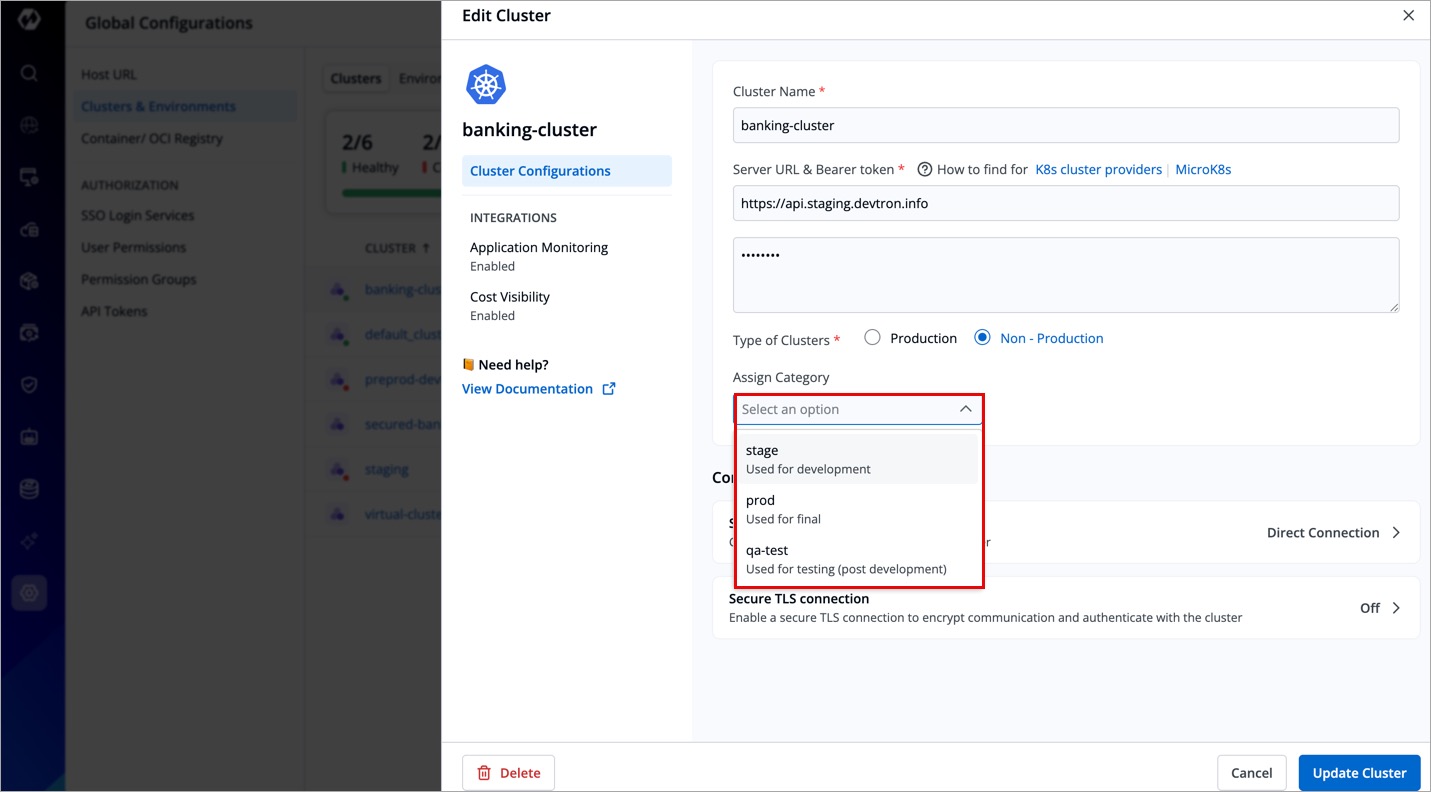
Figure 15: Assigning Category -
The selected category will be assigned to the cluster.
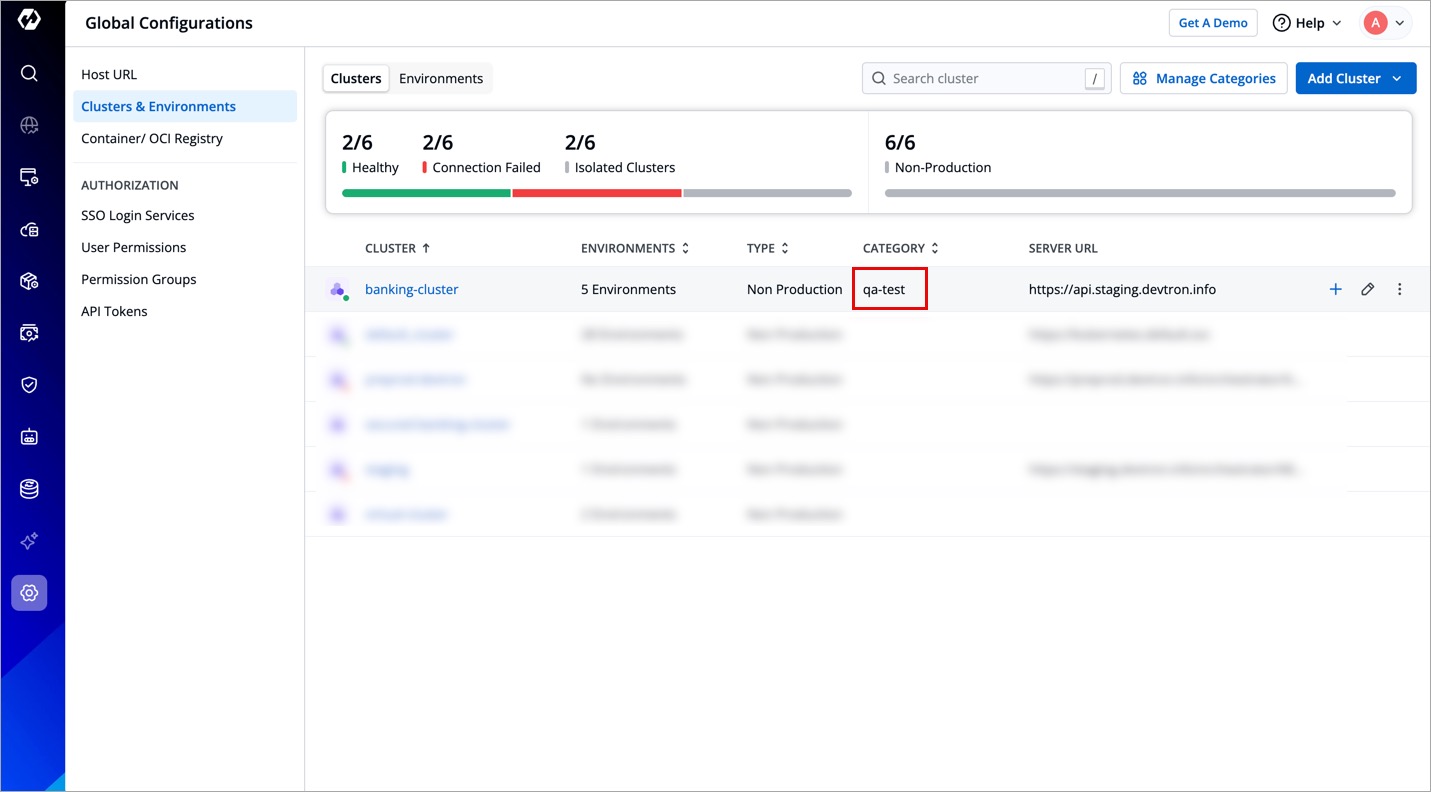
Figure 16: Category Assigned
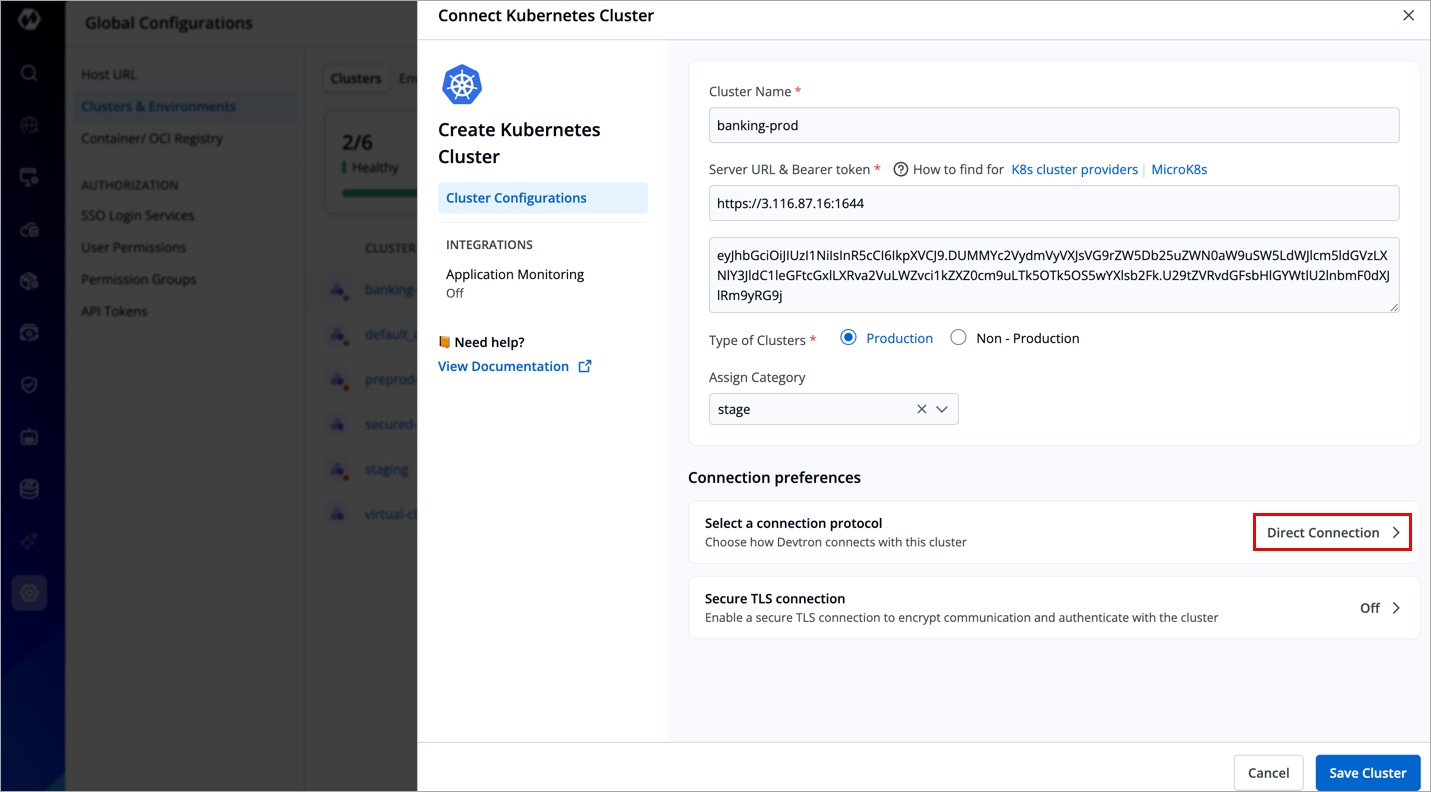
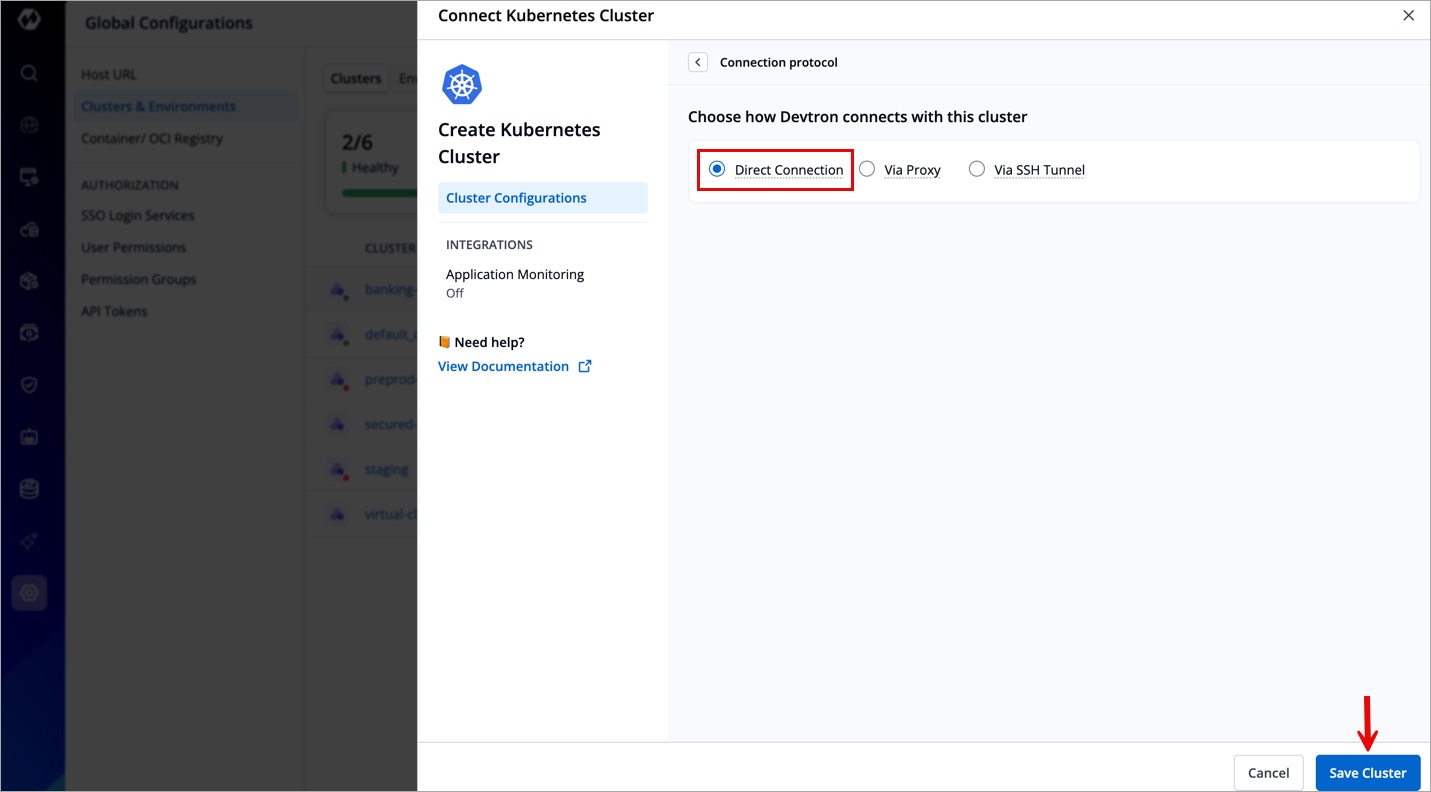
Choose Method of Connection
When adding a new cluster to Devtron, you must choose how Devtron will connect to it. There are three connection options available:
Direct Connection
Clusters with a directly accessible API server endpoint, either publicly or via private peering, can be added as Direct Connection clusters.
- Devtron connects directly without an intermediary.
- Recommended when the cluster is publicly accessible or has a direct network route from Devtron.
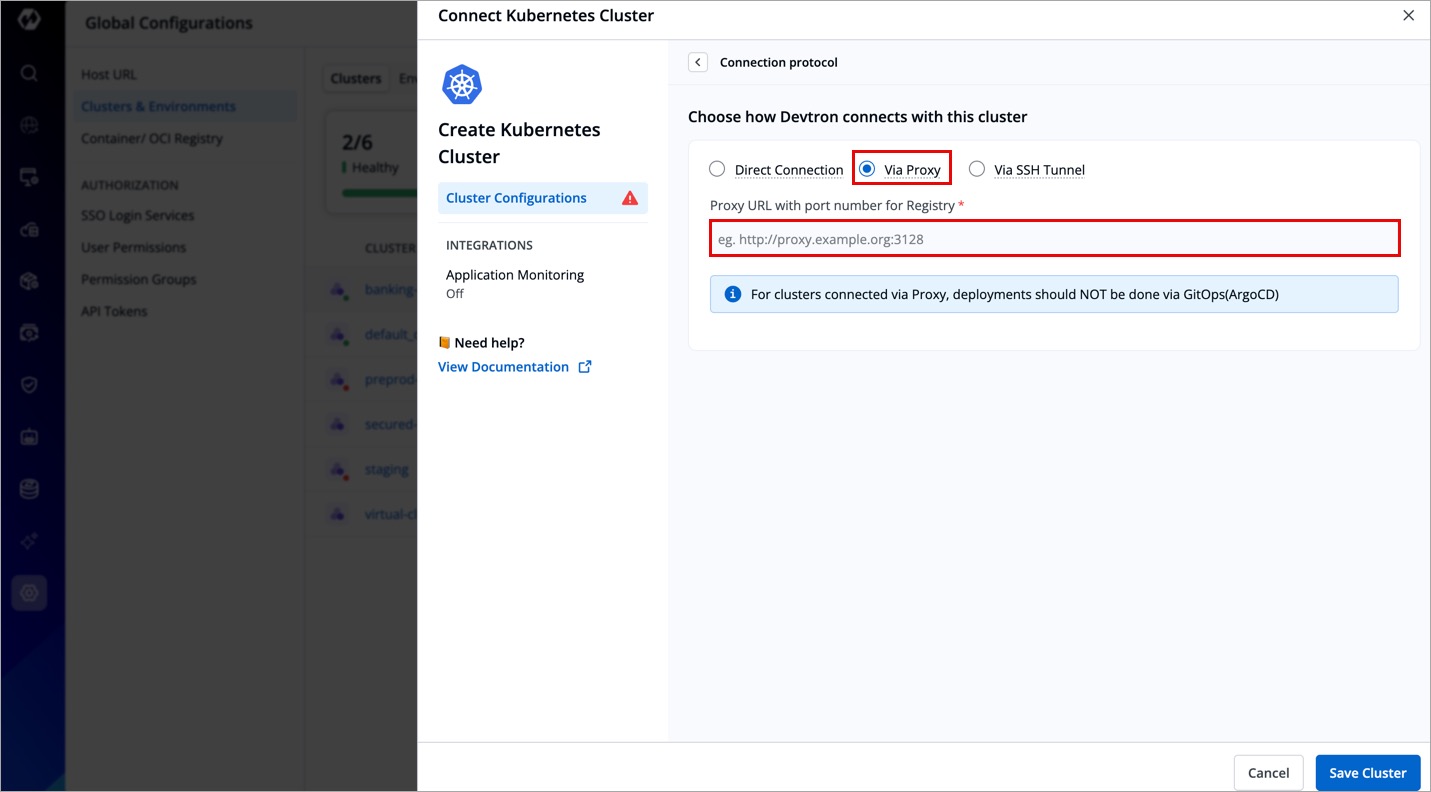
Via Proxy
For security reasons, some Kubernetes clusters are deployed behind a proxy. In this setup, Devtron routes all communication through the specified proxy URL.
- Use this option when network restrictions require traffic to go through a proxy server.
- Requires specifying a Proxy URL (e.g.,
http://proxy.example.org:3128). - Limitation: Deployments via GitOps (ArgoCD) are not recommended for clusters connected via proxy.
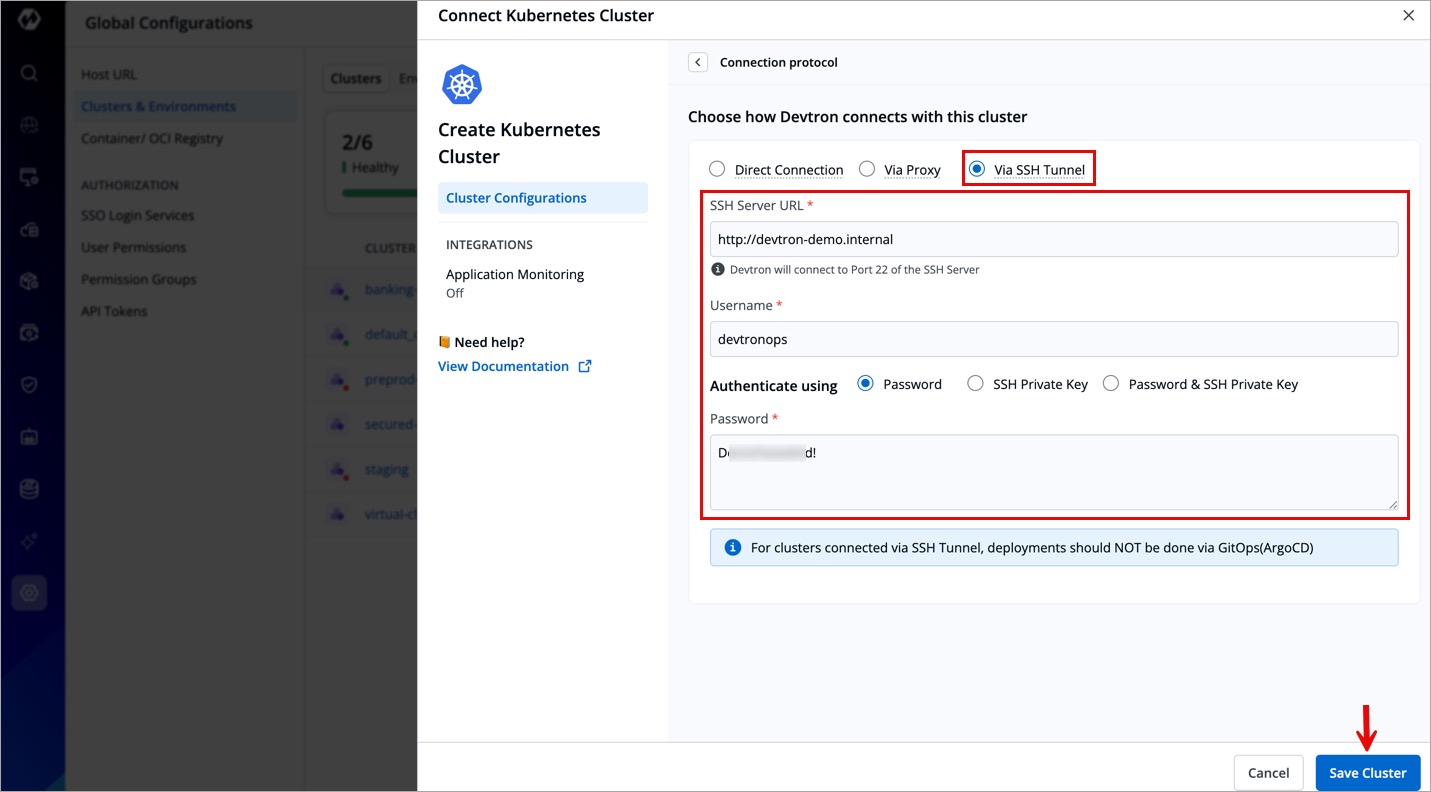
Via SSH Tunnel
When a direct connection isn't possible, Devtron can connect to the Kubernetes cluster through an SSH tunnel, ensuring secure and encrypted communication.
- Requires:
- SSH Server URL (e.g.,
http://proxy.example.org). - Username for authentication.
- Authentication Method:
- Password
- SSH Private Key
- Both Password & SSH Private Key
- SSH Server URL (e.g.,
- Limitation: Deployments via GitOps (ArgoCD) are not recommended for clusters connected via SSH Tunnel.
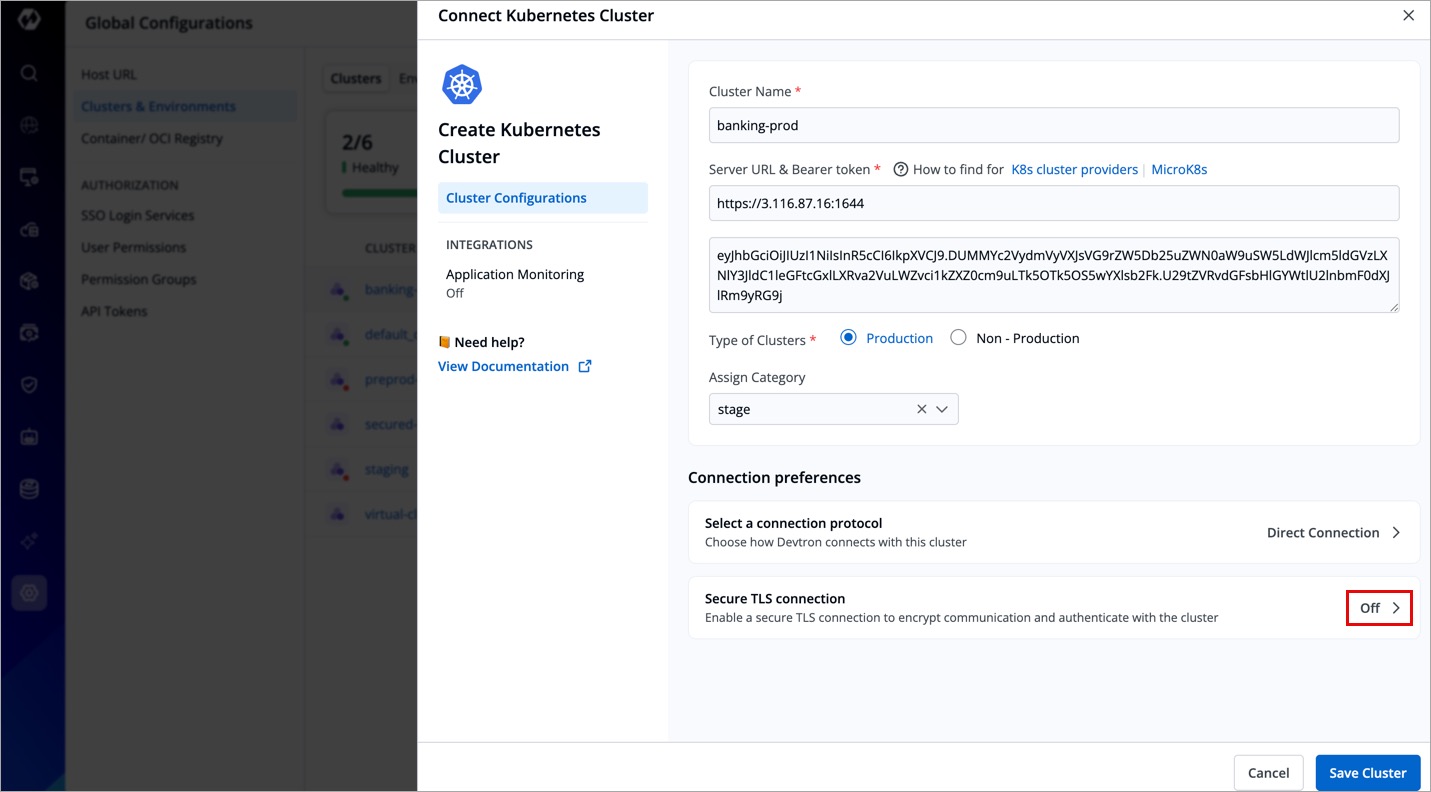
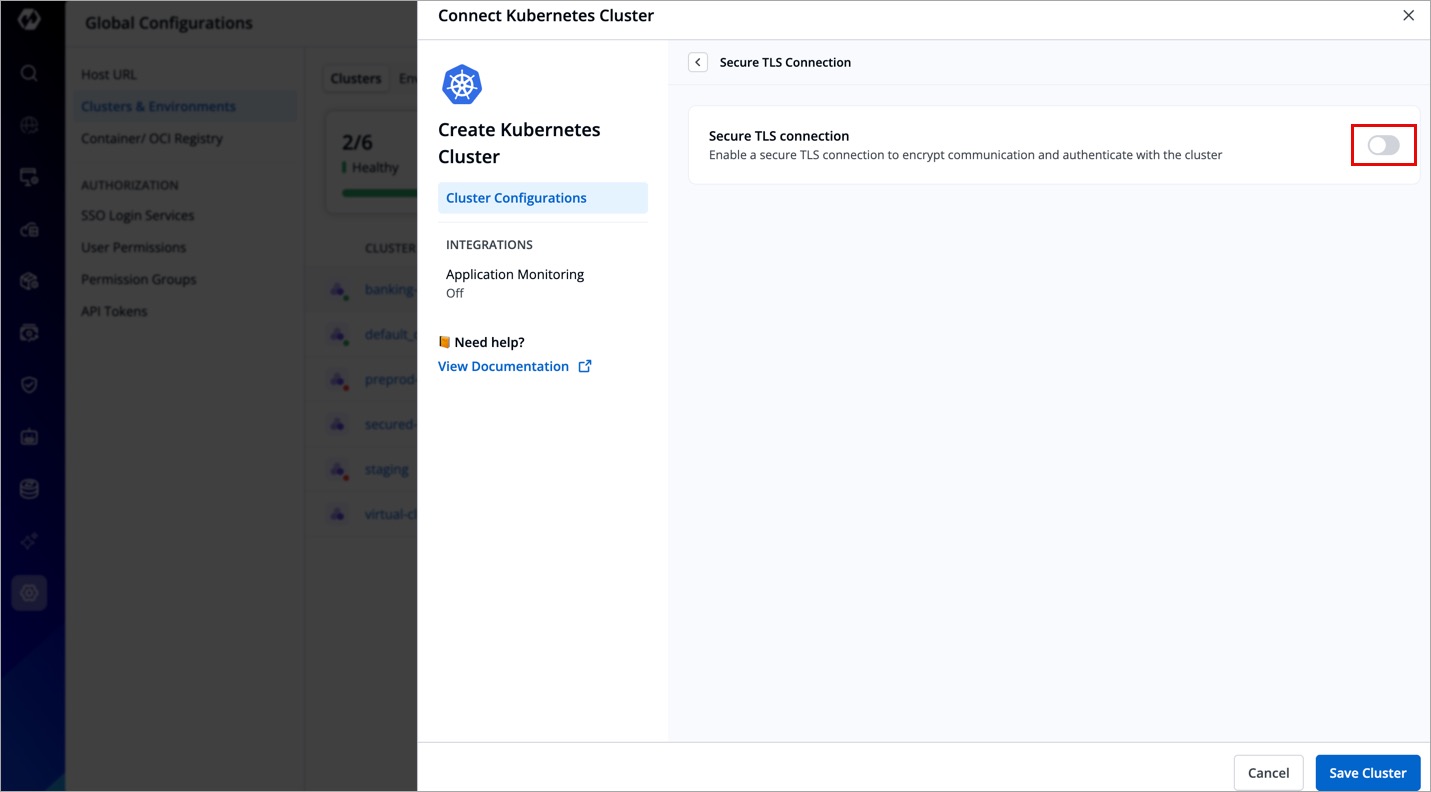
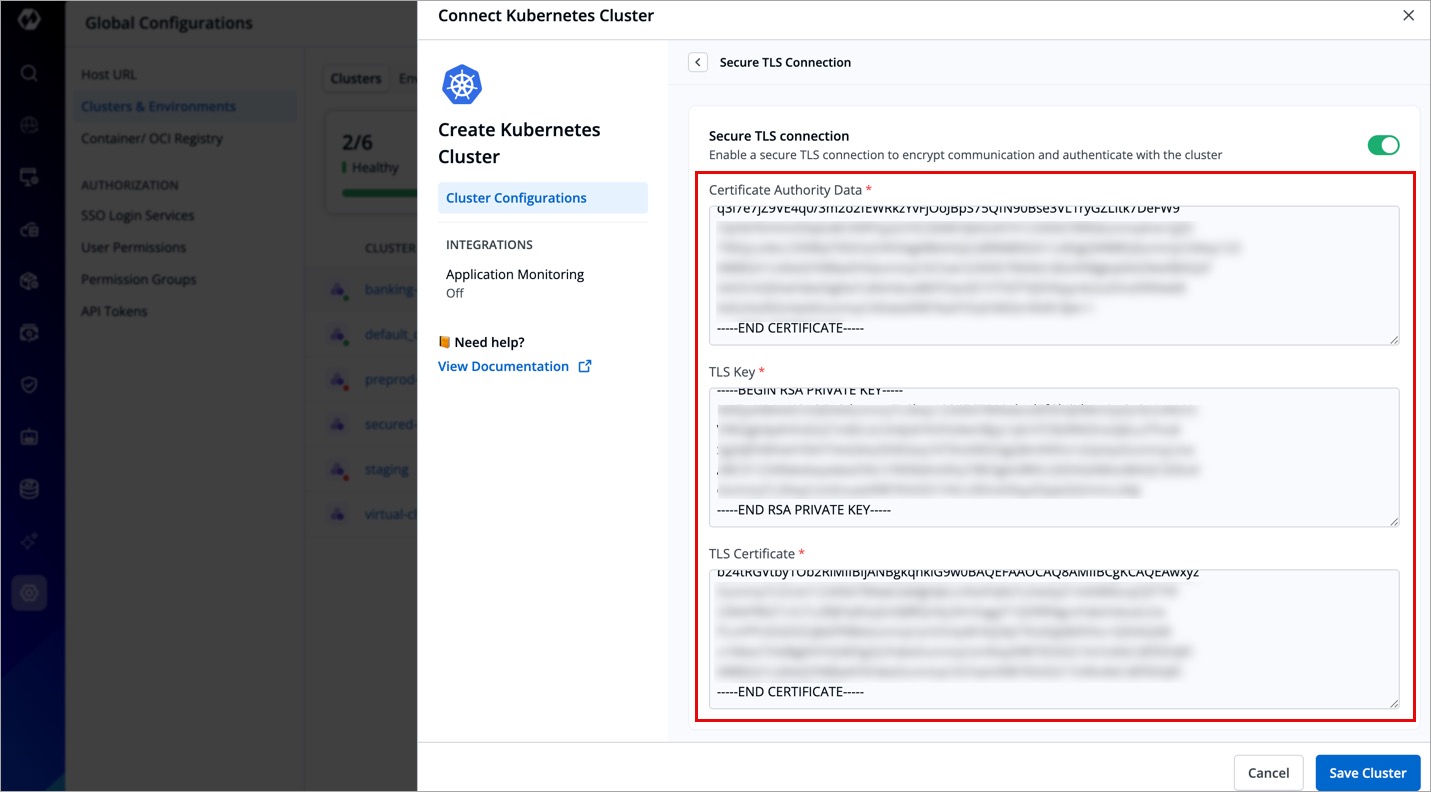
Use Secure TLS Connection
For a secure cluster connection, you can opt for TLS connection, where you need to provide Certificate Authority Data, a TLS Key, and a TLS Certificate.
If your cluster is managed (e.g., EKS, AKS, GKE), you might need to download these certificates from your cloud provider’s dashboard or API.
| Field | Description |
|---|---|
| Certificate Authority (CA) Data | The CA certificate (see: example) used to verify the Kubernetes API server’s identity. |
| TLS Key | The private key associated with the client certificate for authentication. |
| TLS Certificate | The client certificate used to authenticate with the Kubernetes API server. |
Configure Prometheus (Enable Application Metrics)
If you want to see application metrics against the applications deployed in the cluster, Prometheus must be deployed in the cluster. Prometheus is a powerful tool to provide graphical insight into your application behavior.
Enable application metrics to configure Prometheus as shown below. In case it is not available, make sure to install the Monitoring (Grafana) integration from Devtron Stack Manager to configure Prometheus.
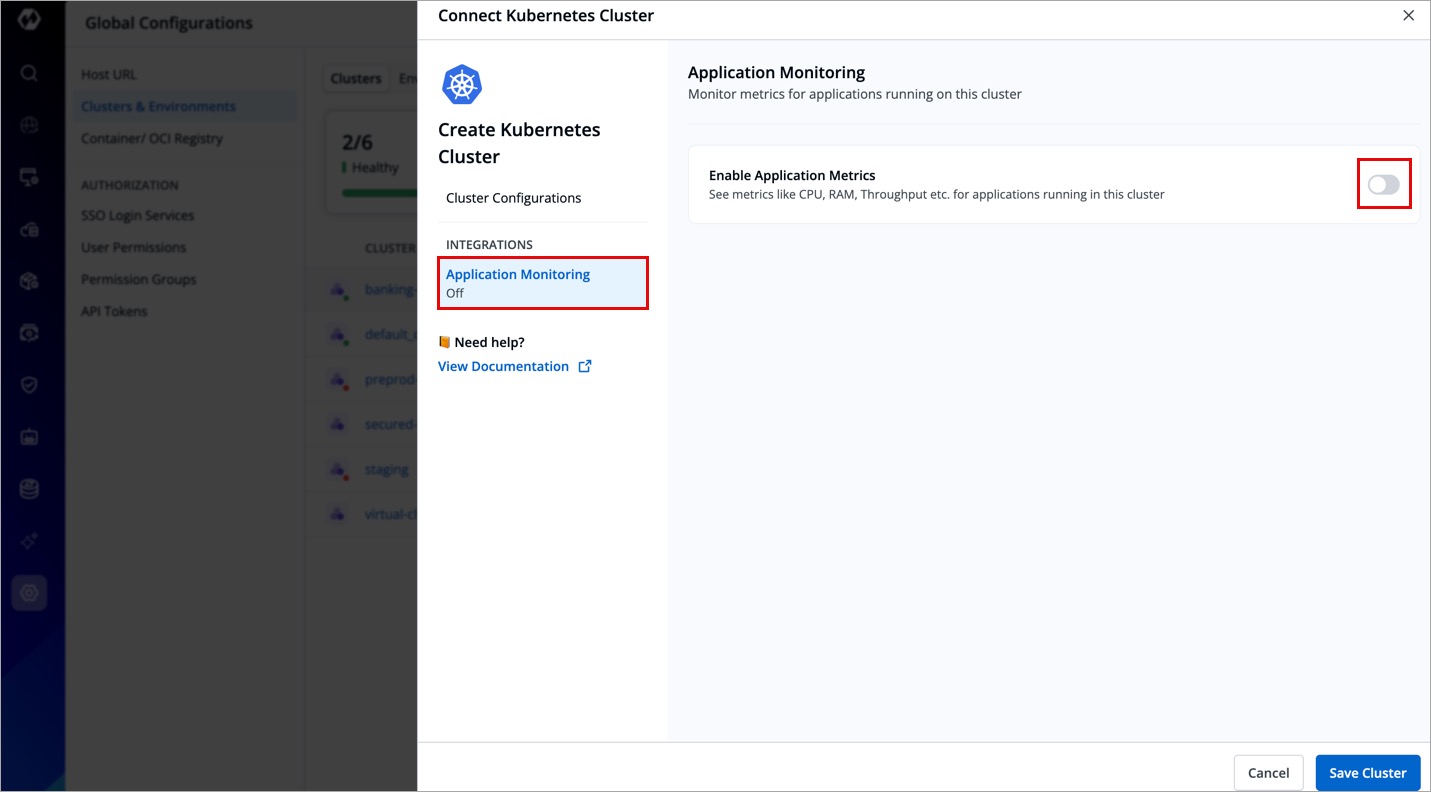
Provide the information in the following fields:
| Field | Description |
|---|---|
| Prometheus endpoint | Provide the URL of your Prometheus |
| Authentication Type | Prometheus supports two authentication types:
|
| TLS Key & TLS Certificate | These fields are optional and can be used when you use a customized URL. |
Click Save Cluster to save your cluster on Devtron.
Get Cluster Credentials
kubectl must be installed on the bastion.
We recommend using a self-hosted URL instead of a cloud-hosted URL. Refer to the benefits of a self-hosted URL.
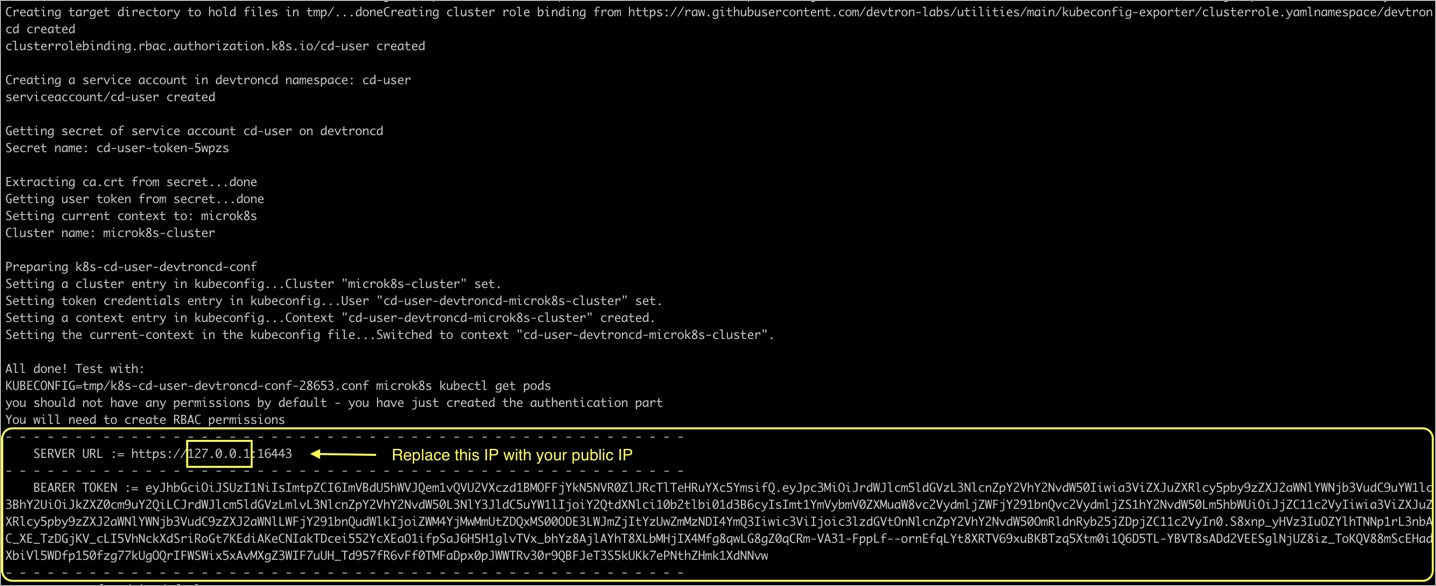
You can get the Server URL and Bearer Token by running the following command, depending on the cluster provider:
- k8s Cluster Providers
- Microk8s Cluster
If you are using EKS, AKS, GKE, Kops, Digital Ocean managed Kubernetes, run the following command to generate the server URL and bearer token:
curl -O https://raw.githubusercontent.com/devtron-labs/utilities/main/kubeconfig-exporter/kubernetes_export_sa.sh && bash kubernetes_export_sa.sh cd-user devtroncd
If you are using a microk8s cluster, run the following command to generate the server URL and bearer token:
curl -O https://raw.githubusercontent.com/devtron-labs/utilities/main/kubeconfig-exporter/kubernetes_export_sa.sh && sed -i 's/kubectl/microk8s kubectl/g' \
kubernetes_export_sa.sh && bash kubernetes_export_sa.sh cd-user \
devtroncd
Benefits of Self-hosted URL
-
Disaster Recovery:
- You cannot edit the server URL of a cloud-specific provider. If you're using an EKS URL (e.g.
*****.eu-west-1.elb.amazonaws.com), it will be a tedious task to add a new cluster and migrate all the services one by one. - But in case of using a self-hosted URL (e.g.
clear.example.com), you can just point to the new cluster's server URL in DNS manager and update the new cluster token and sync all the deployments.
- You cannot edit the server URL of a cloud-specific provider. If you're using an EKS URL (e.g.
-
Easy Cluster Migrations:
- In case of managed Kubernetes clusters (like EKS, AKS, GKE etc) which is a cloud provider specific, migrating your cluster from one provider to another will result in waste of time and effort.
- On the other hand, migration for a self-hosted URL is easy, as the URL belongs to a single hosted domain independent of the cloud provider.