

Install Devtron Enterprise
Introduction
With the Enterprise version of Devtron, you can access the premium features beyond the open-source version. For your advanced and challenging use cases, you get comprehensive enterprise features including but not limited to:
Release orchestration
Resource monitoring
Advanced filtering
Fine-grained access control
Security scans
Policies related to approval, deployment, plugins, tags, infra...and many more.
Enjoy an uninterrupted 14-day free trial and explore all the features of Devtron Enterprise to their full potential.
Already using Devtron's Open Source version?
This guide is intended for fresh installation of Devtron Enterprise. If you're currently using the open-source (OSS) version of Devtron, we do not recommend converting your existing setup to the Enterprise edition.
Instead, we suggest you to perform a fresh installation of Devtron Enterprise (following the steps below) for the best experience.
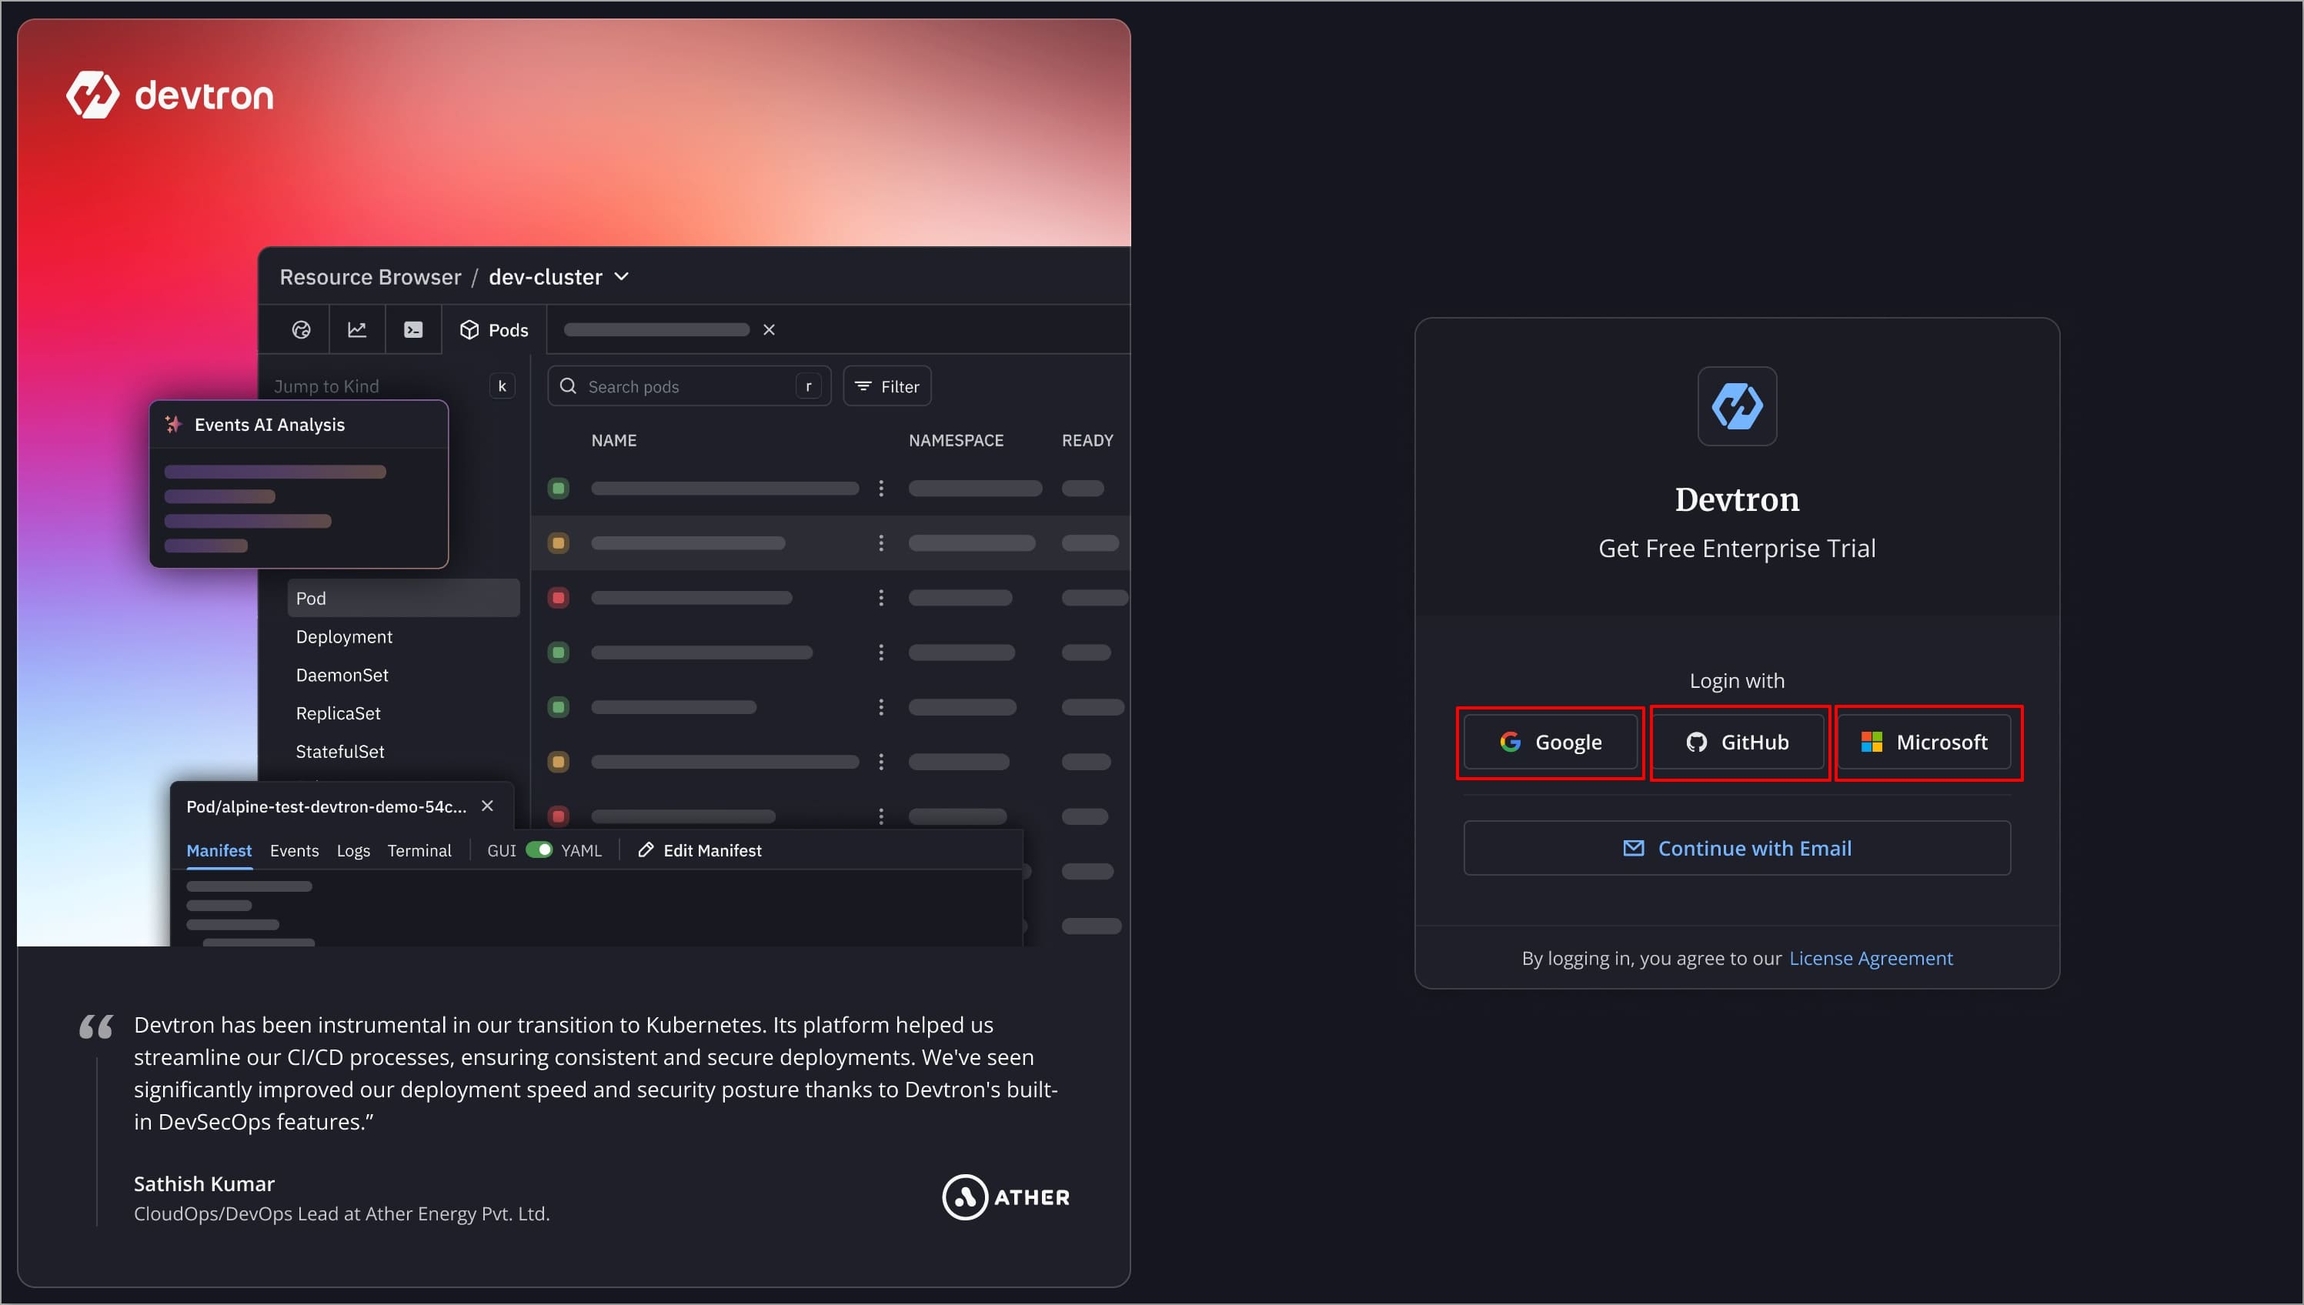
Step 1: Go to the Devtron License Dashboard
To install Devtron Enterprise; go to the Devtron License Dashboard. Log in with your work email to access the license dashboard. Devtron provides two login methods to log in to the License Dashboard
Method 1: Log In with SSO
Log in using Google, GitHub, or Microsoft SSO providers. Personal email accounts such as Gmail, Yahoo are not supported.
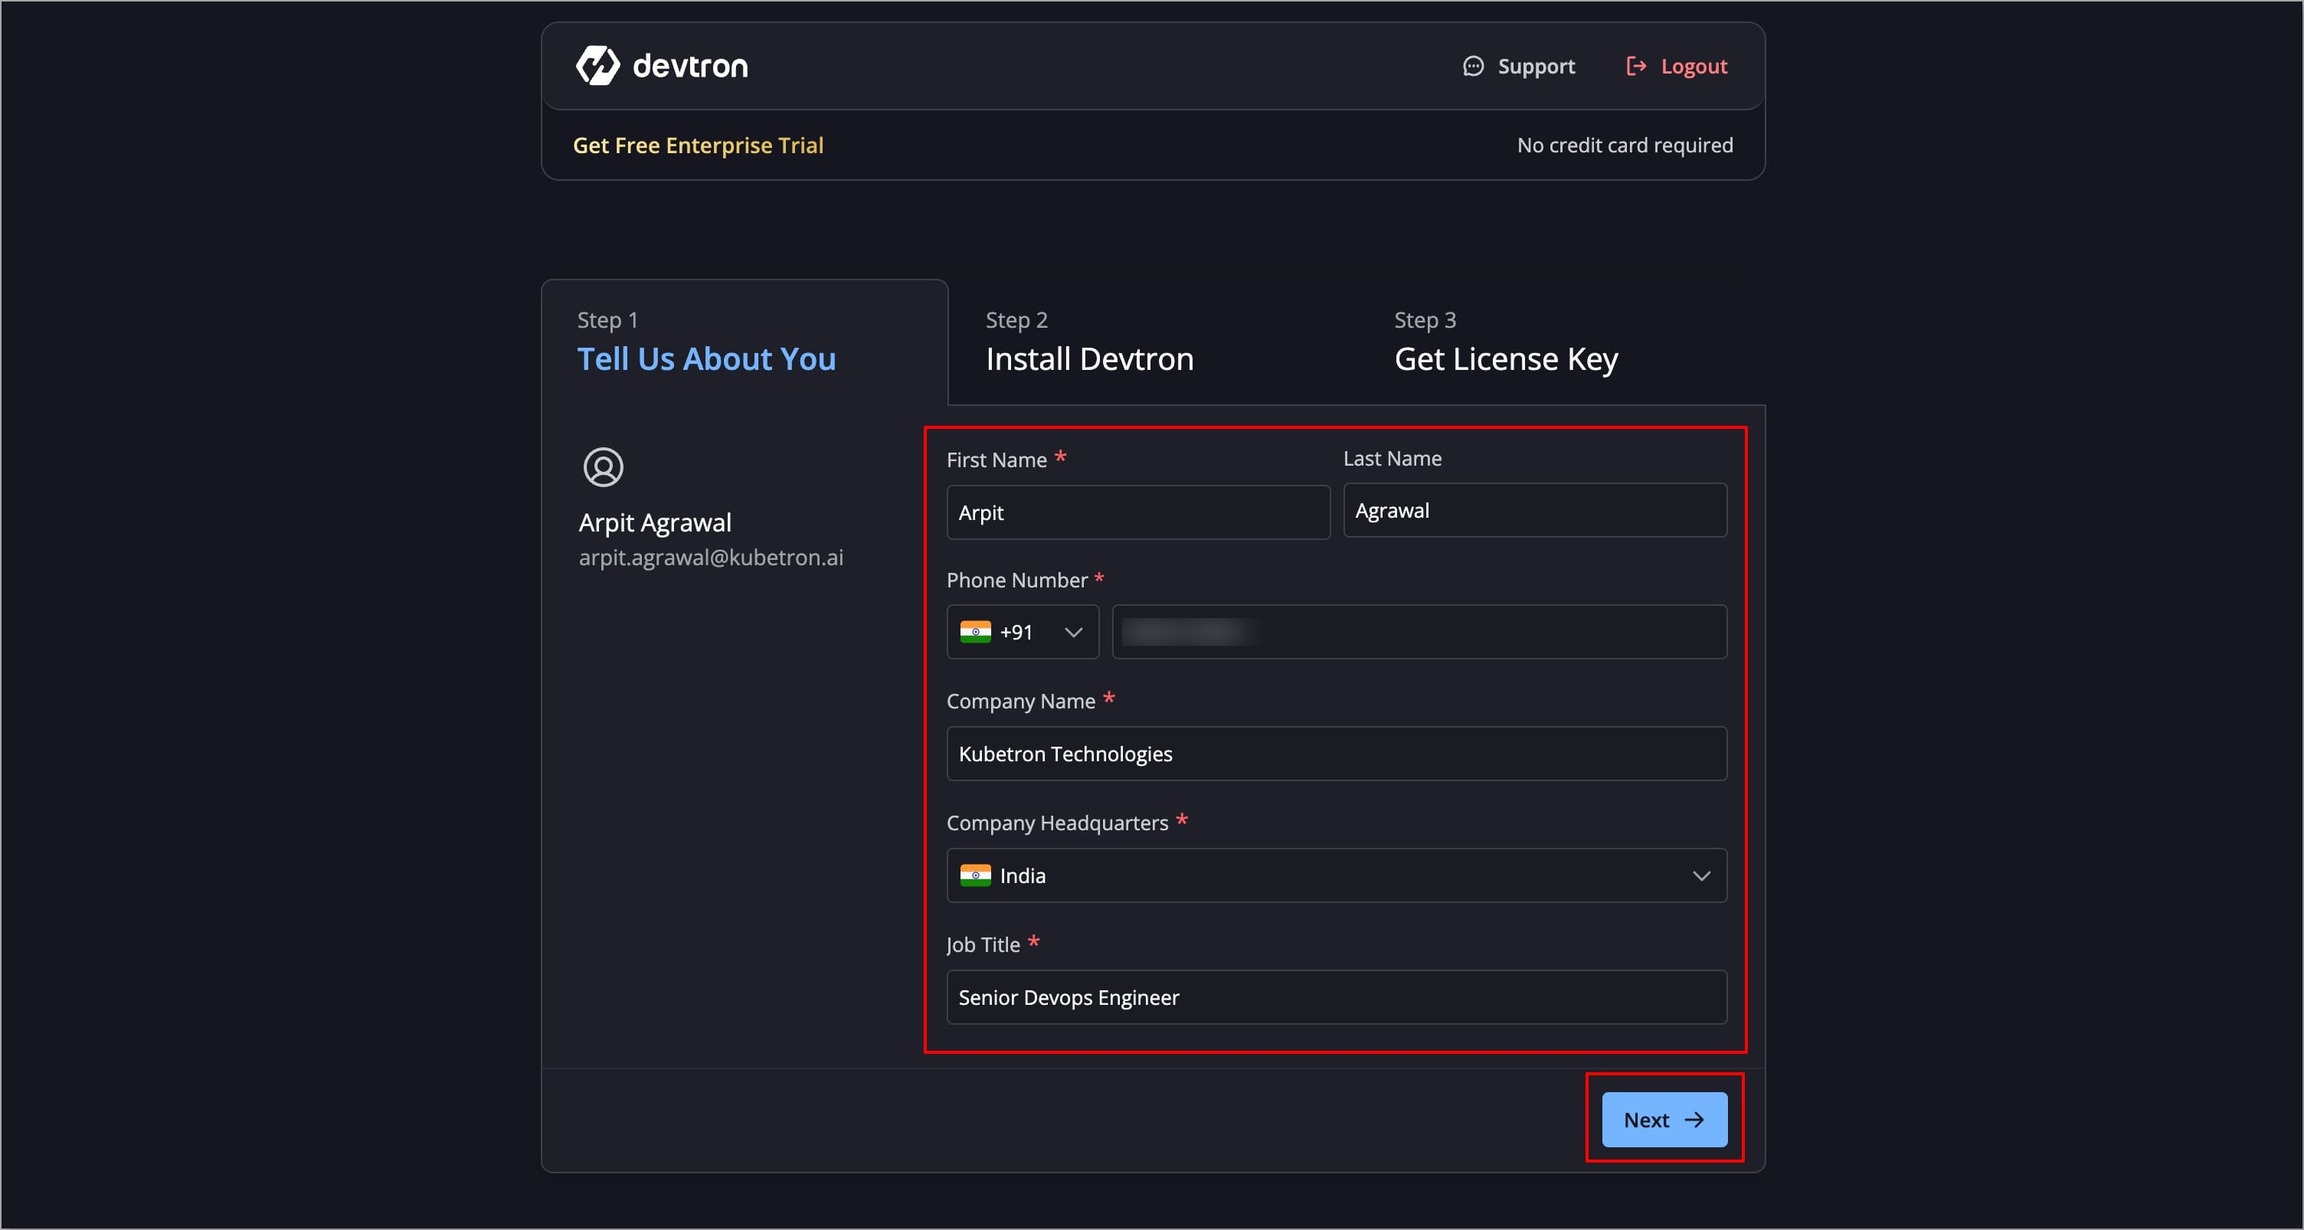
Once logged in, the Devtron License Dashboard will open.
Under Tell Us About You, enter some basic details to help us improve your Devtron Experience.
After entering the details, click Next to proceed to Step 2: Install Devtron.
Method 2: Log In with Email
You can also log in via Continue with Email. This will send a login link to the provided work email. To do so, follow the below steps:
Select Continue with Email to log in.

Enter your work email and select Send Login Link
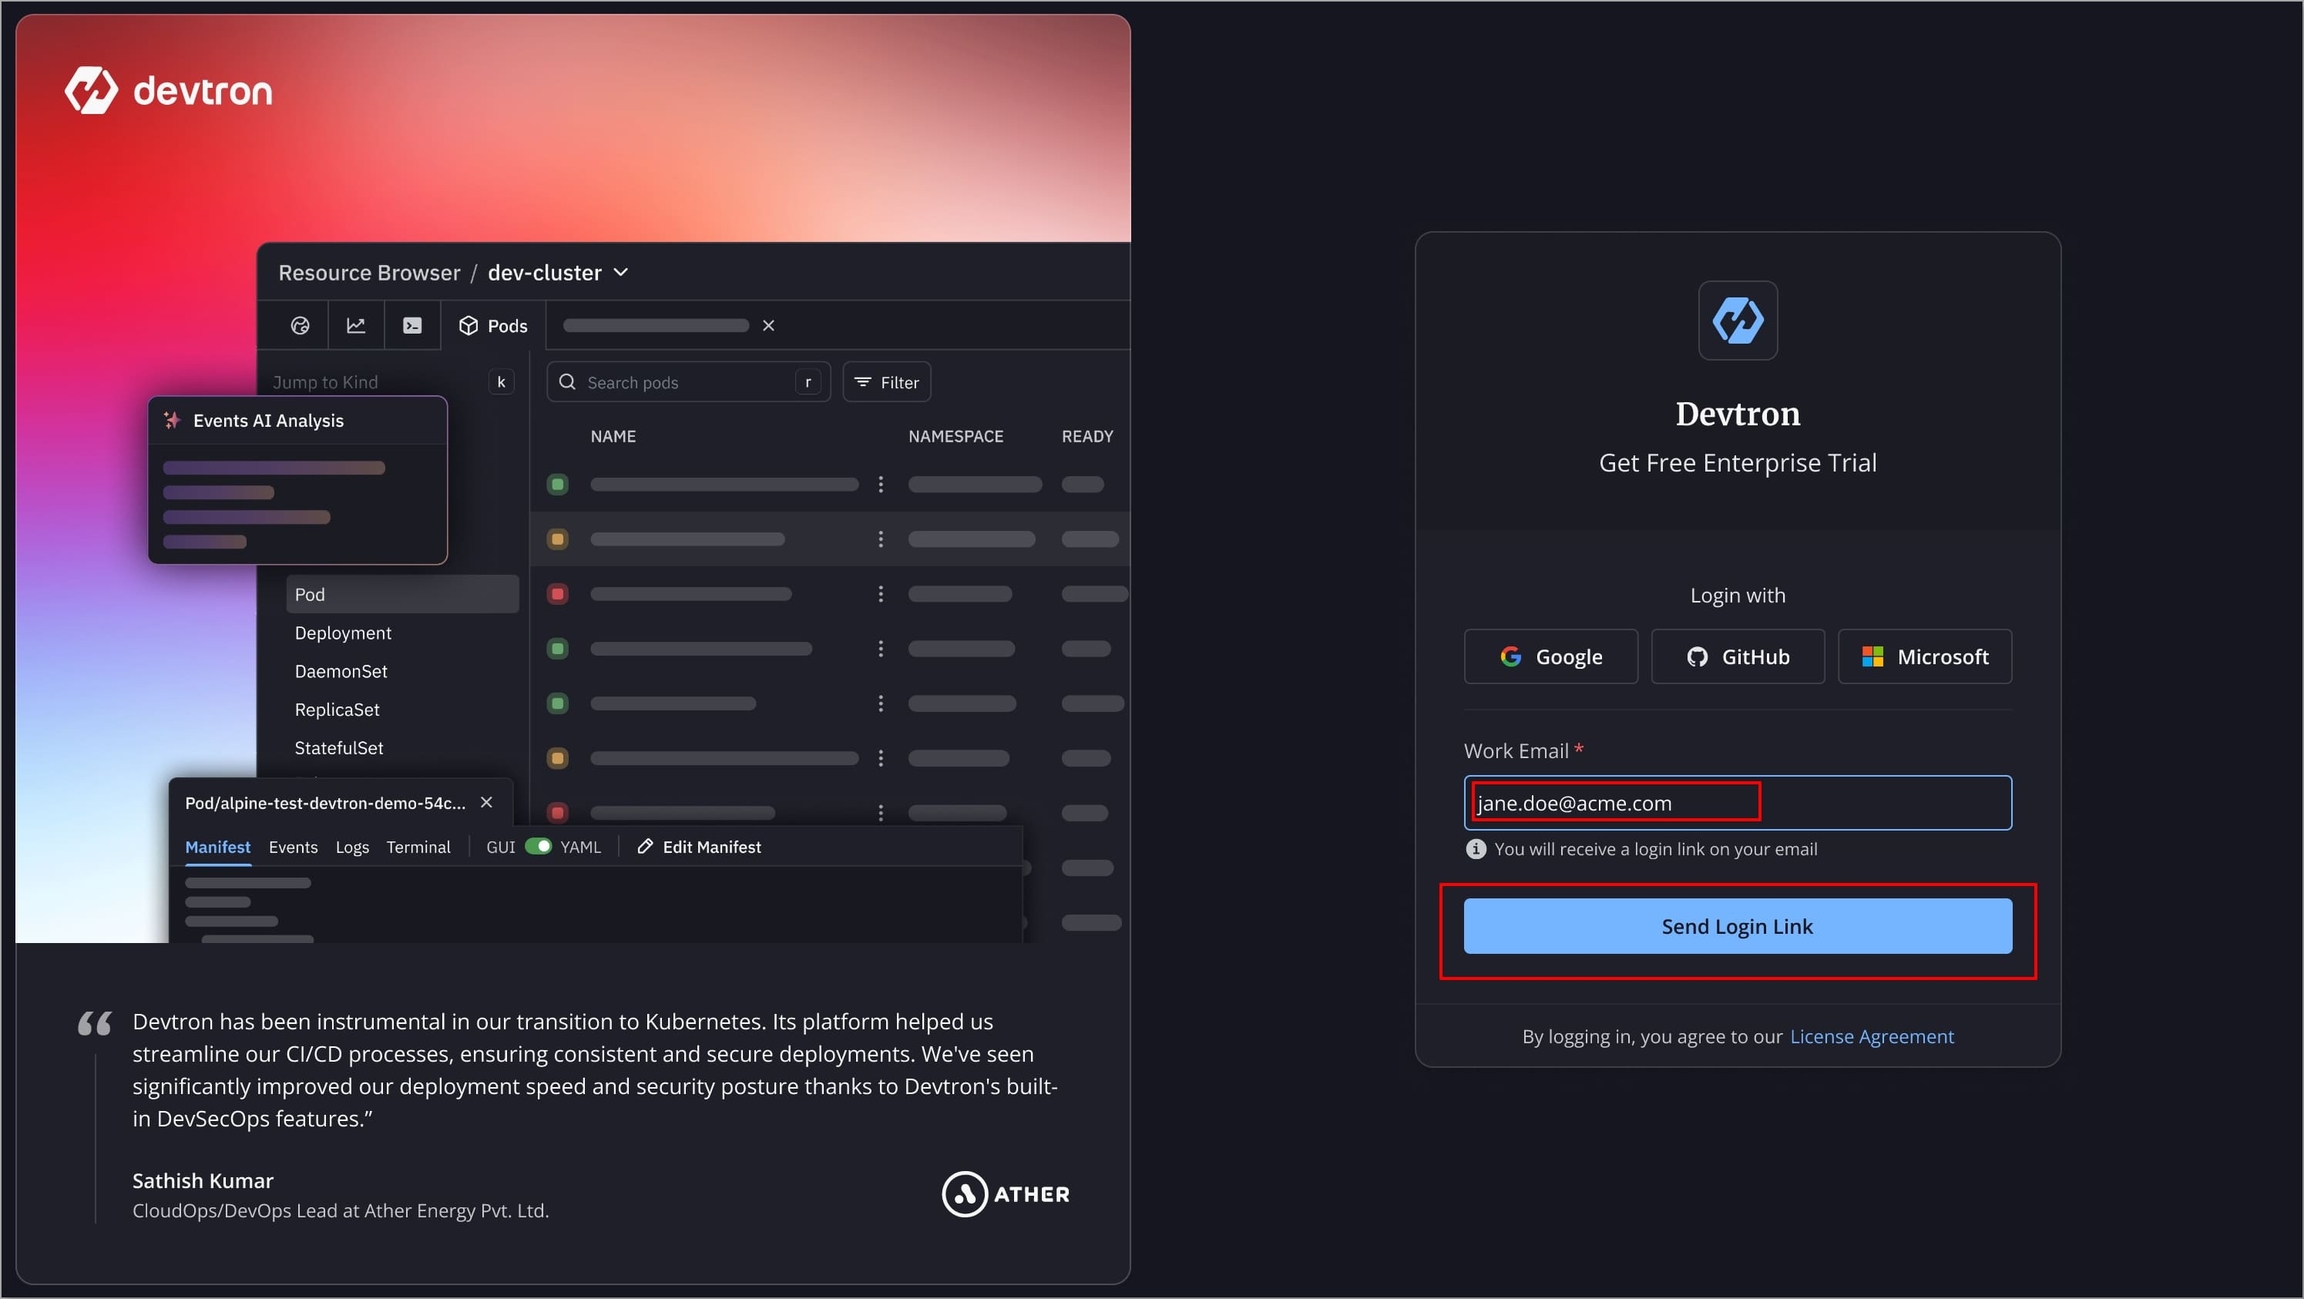
A login link will be sent to the email provided by you. If you do not receive the link, you can resend it after 30 seconds.
Note: Your login link is valid only for 10 minutes.

Email not received?
Check all sections of the mailbox, including the Spam section.
If you find the login link email in the Spam section, mark it as 'Not Spam'.
Go to your provided email inbox and use the login link.
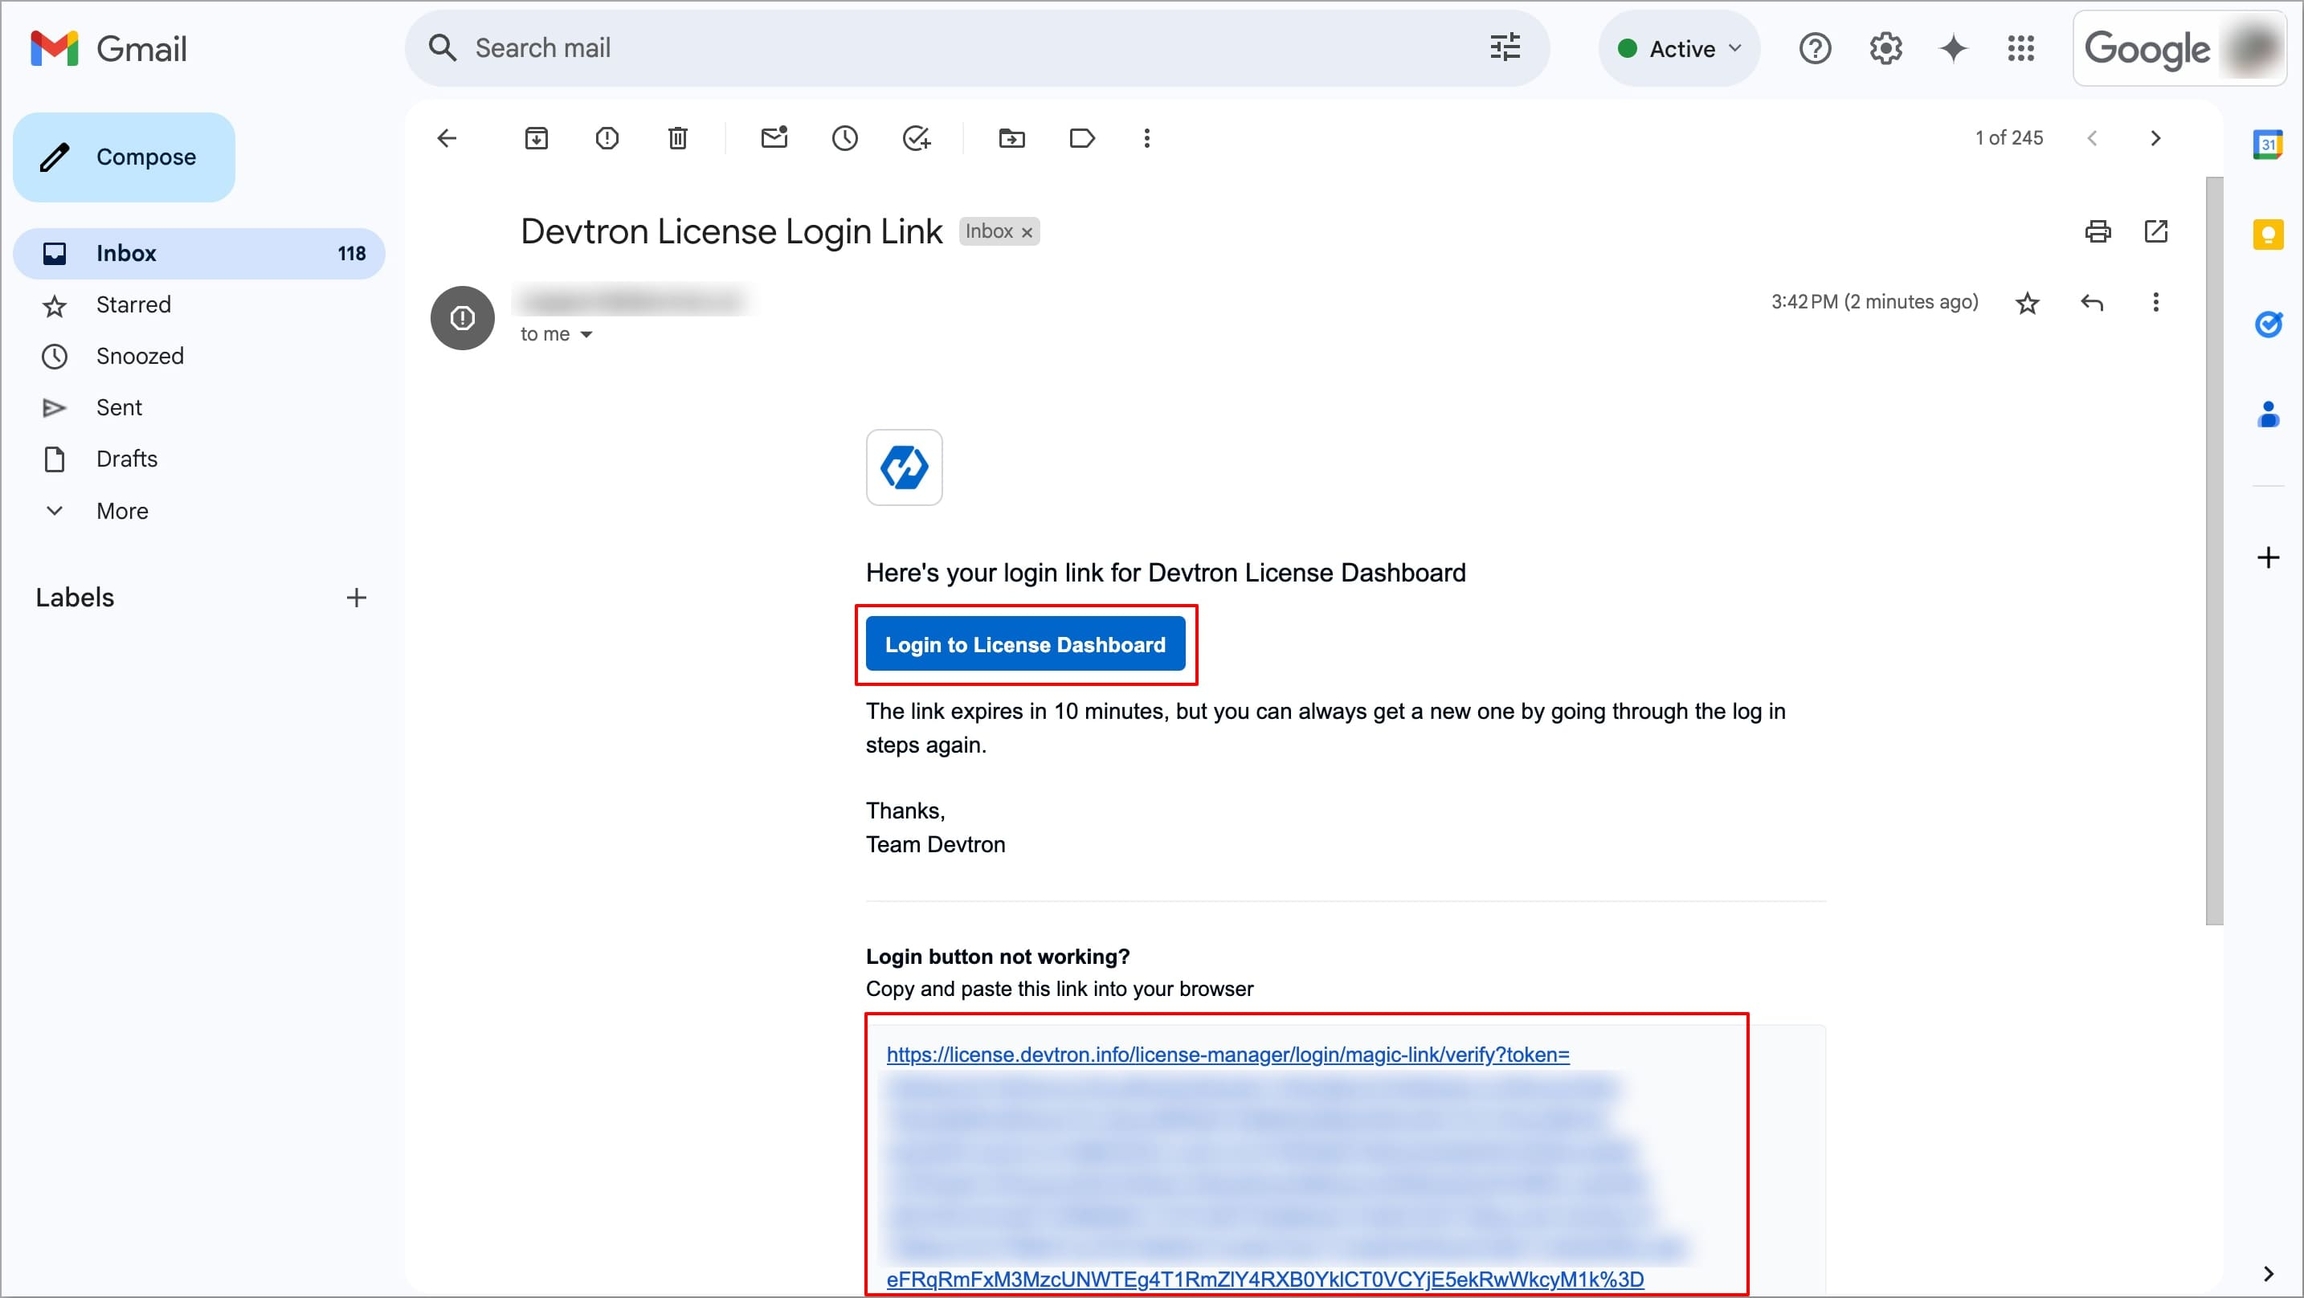
Once logged in, the Devtron License Dashboard will open.
Under Tell Us About You, enter a few basic details to help us improve your Devtron Experience.
Click Next to proceed to Step 2: Install Devtron.
Step 2: Install Devtron
After entering the basic details, the next step is to install Devtron Enterprise.
The installation commands for installing Devtron in Full Mode (with integrations) is directly available on the Devtron License Dashboard for different K8s distributions.
Choose your preferred K8s distribution and follow the displayed commands to install Devtron in Full Mode.
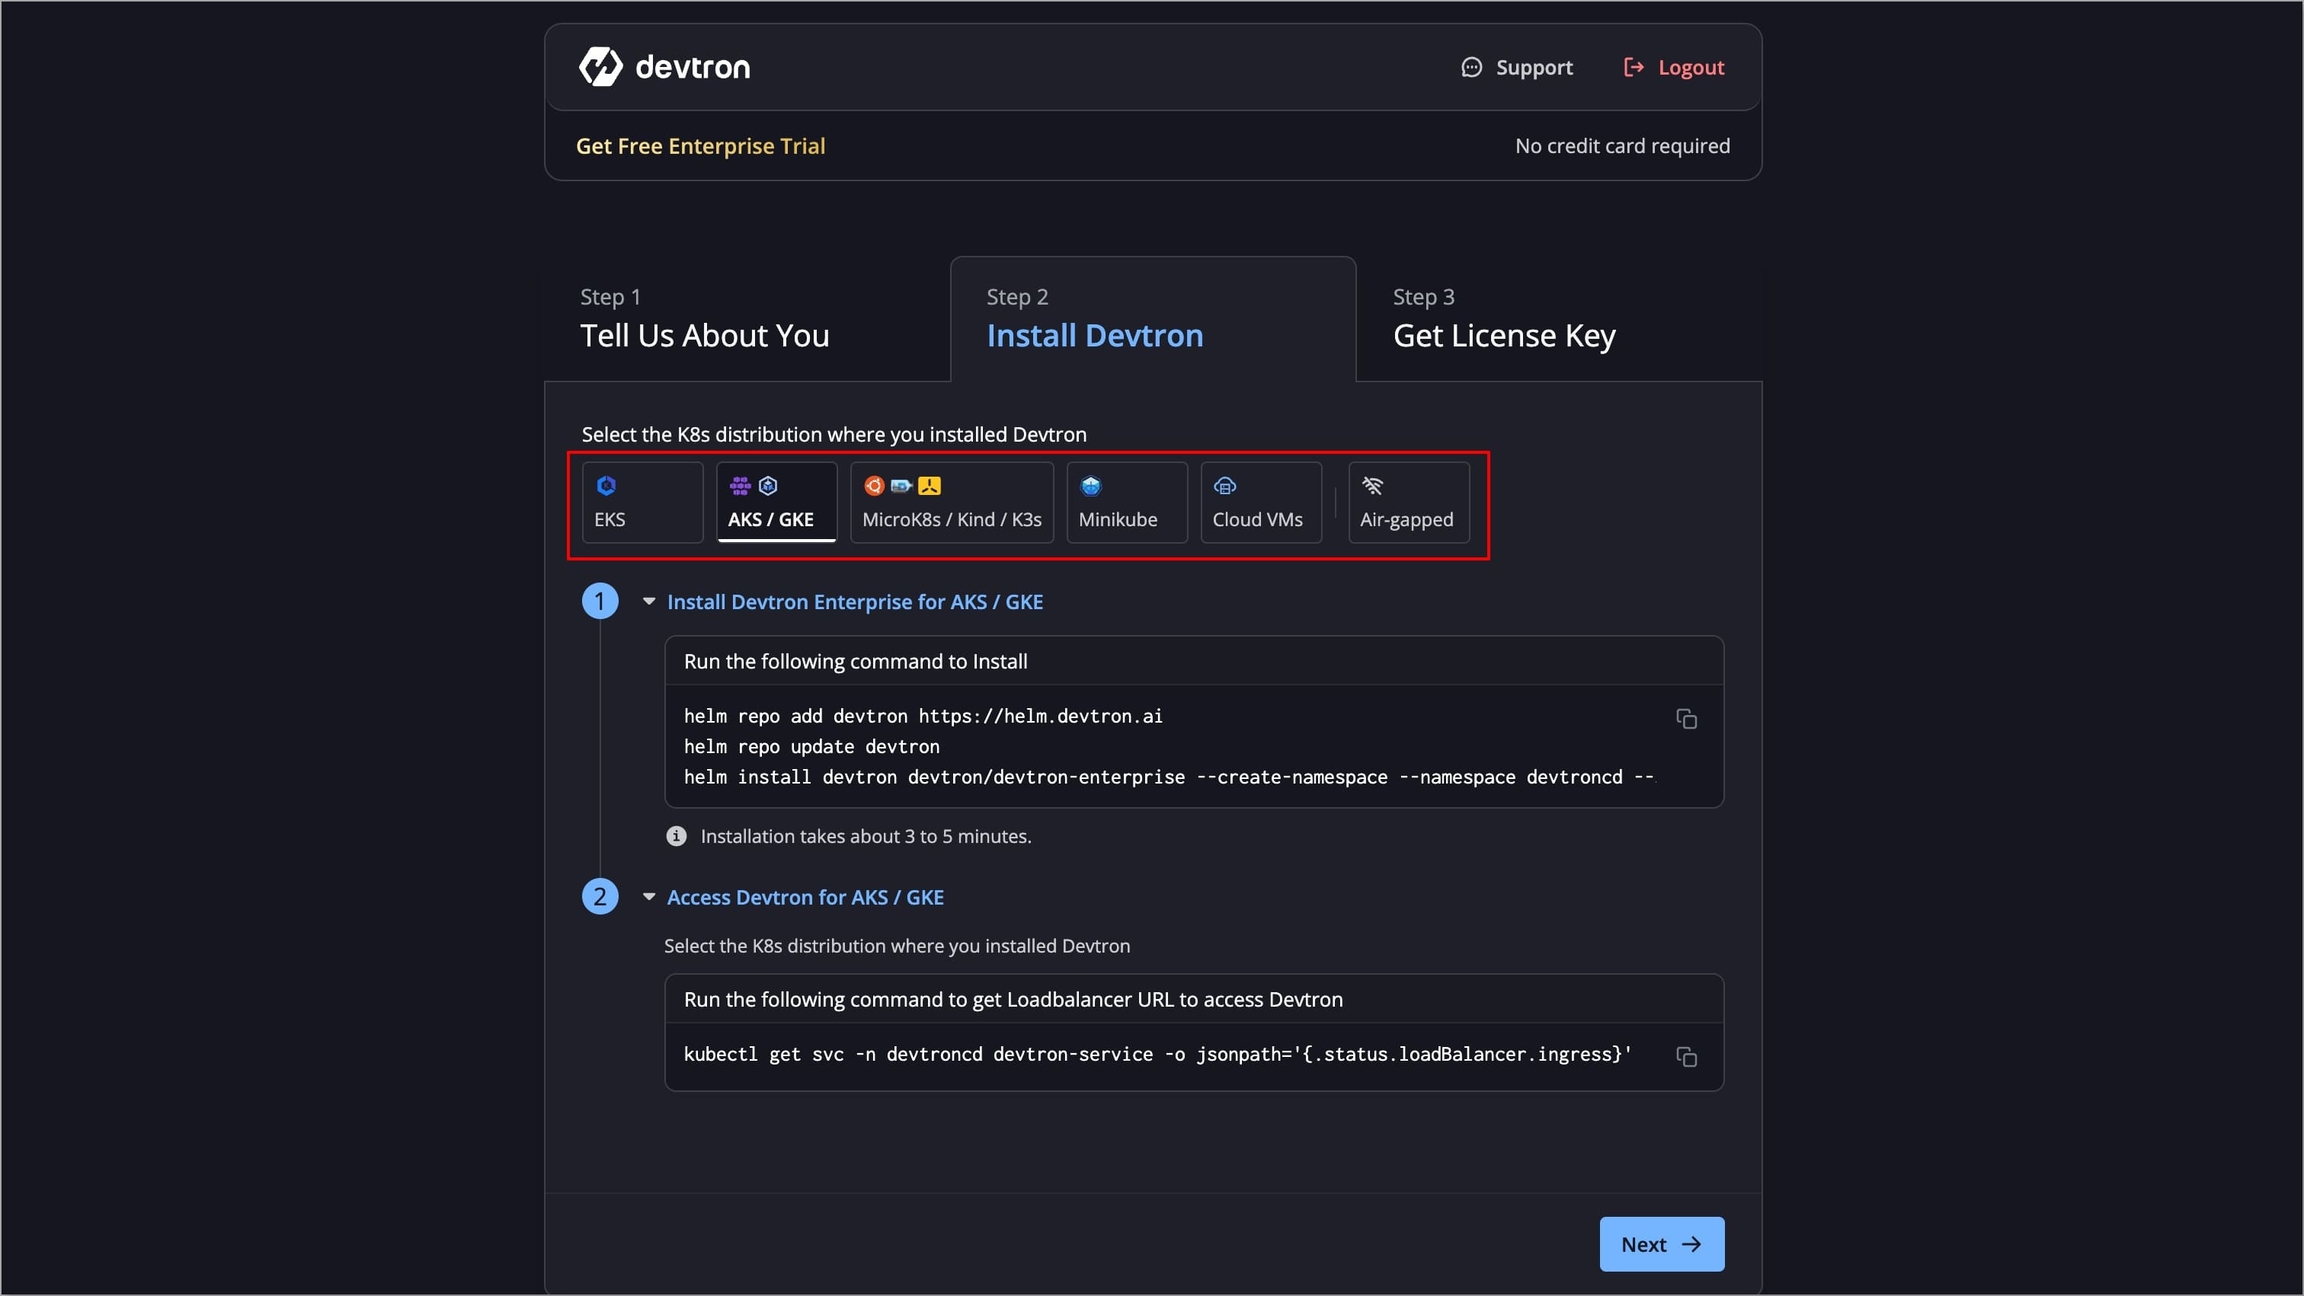
In case, you want to install Devtron dashboard only, use the commands given in Devtron without integrations (only dashboard) tab in Choose an Installation Option section.
Install Devtron in Air-Gapped Environments
You can also install Devtron in Air-Gapped environments to securely manage and deploy applications without internet access.
Refer the Devtron Enterprise (Air‐gapped) Guide to install Devtron in Air-Gapped environments.
2.1 Add Devtron Helm Repository
helm repo add devtron https://helm.devtron.ai
helm repo update devtron
2.2 Choose an Installation Option
To install Devtron with all core enterprise features except ArgoCD:
helm install devtron devtron/devtron-enterprise --create-namespace --namespace devtroncd To include ArgoCD integration, add
--set devtron.argo-cd.enabled=true
helm install devtron devtron/devtron-enterprise --create-namespace --namespace devtroncd --set devtron.argo-cd.enabled=trueTo install only the Devtron Dashboard (without CI/CD, ArgoCD, Security, Notification, or Monitoring):
helm install devtron devtron/devtron-enterprise --create-namespace --namespace devtroncd \
--set devtron.installer.modules={} --set devtron.security.enabled=false  \
--set devtron.notifier.enabled=false  --set devtron.security.trivy.enabled=false --set devtron.monitoring.grafana.enabled=false
2.3 Obtain the Dashboard URL
Run the following command to get the Dashboard URL:
kubectl get svc -n devtroncd devtron-service -o jsonpath='{.status.loadBalancer.ingress}'You can access your Devtron Dashboard using the LoadBalancer URL displayed in the output.
Accessing the Dashboard locally (MicroK8s/Kind/K3s)
To obtain the Dashboard URL when MicroK8s/Kind/K3s running locally, run the following command to port-forward the devtron service to port 8000
kubectl -n devtroncd port-forward service/devtron-service 8000:80After port-forwarding, The Dashboard URL will be: http://127.0.0.1:8000
Accessing the Dashboard via NodePort
To obtain the Dashboard URL on MicroK8s/Kind/K3s using NodePort, run the following command to retrieve the port number assigned to the service:
kubectl get svc -n devtroncd devtron-service -o jsonpath='{.spec.ports[0].nodePort}'The Dashboard URL will be: http://<HOST_IP>:<NODEPORT>/dashboard
Accessing the Dashboard locally from a remote VM (Port Forwarding via Kubeconfig)
To obtain the Dashboard URL if Devtron is installed on a remote VM (e.g., AWS EC2, Azure VM, GCP Compute Engine) using MicroK8s, Kind, or K3s, run the following commands:
scp user@cloud-vm-ip:/path/to/kubeconfig ~/.kube/config
# Export the kubeconfig file from the remote VM to your local system.

kubectl config use-context <context-name>
# Set the correct context.

kubectl -n devtroncd port-forward service/devtron-service 8000:80
# This command will forward traffic from the service running on the
# remote VM's MicroK8s, Kind, or K3s cluster to your local system’s port.
The Dashboard URL will be http://127.0.0.1:8000 on your local machine.
To access the dashboard on Minikube cluster, run the following command:
minikube service devtron-service --namespace devtroncdThis will directly open the dashboard URL on your browser
Accessing the Dashboard via NodePort
To obtain the dashboard URL on Cloud VMs using NodePort, run the following command to retrieve the port number assigned to the service:
kubectl get svc -n devtroncd devtron-service -o jsonpath='{.spec.ports[0].nodePort}'The Dashboard URL will be: http://<HOST_IP>:<NODEPORT>/dashboard
Accessing the Dashboard locally from a remote VM (Port Forwarding via Kubeconfig)
To obtain the Dashboard URL if Devtron is installed on a remote VM (e.g., AWS EC2, Azure VM, GCP Compute Engine) using MicroK8s, Kind, or K3s, run the following commands:
scp user@cloud-vm-ip:/path/to/kubeconfig ~/.kube/config
# Export the kubeconfig file from the remote VM to your local system.

kubectl config use-context <context-name>
# Set the correct context.

kubectl -n devtroncd port-forward service/devtron-service 8000:80
# This command will forward traffic from the service running on the
# remote VM's MicroK8s, Kind, or K3s cluster to your local system’s port.
The Dashboard URL will be http://127.0.0.1:8000 on your local machine.
After successfully installing Devtron and obtaining the dashboard URL, click Next to proceed to Step 3: Get License Key
Step 3: Get License Key
You will now need to enter your Devtron Installation Fingerprint to generate a license key.
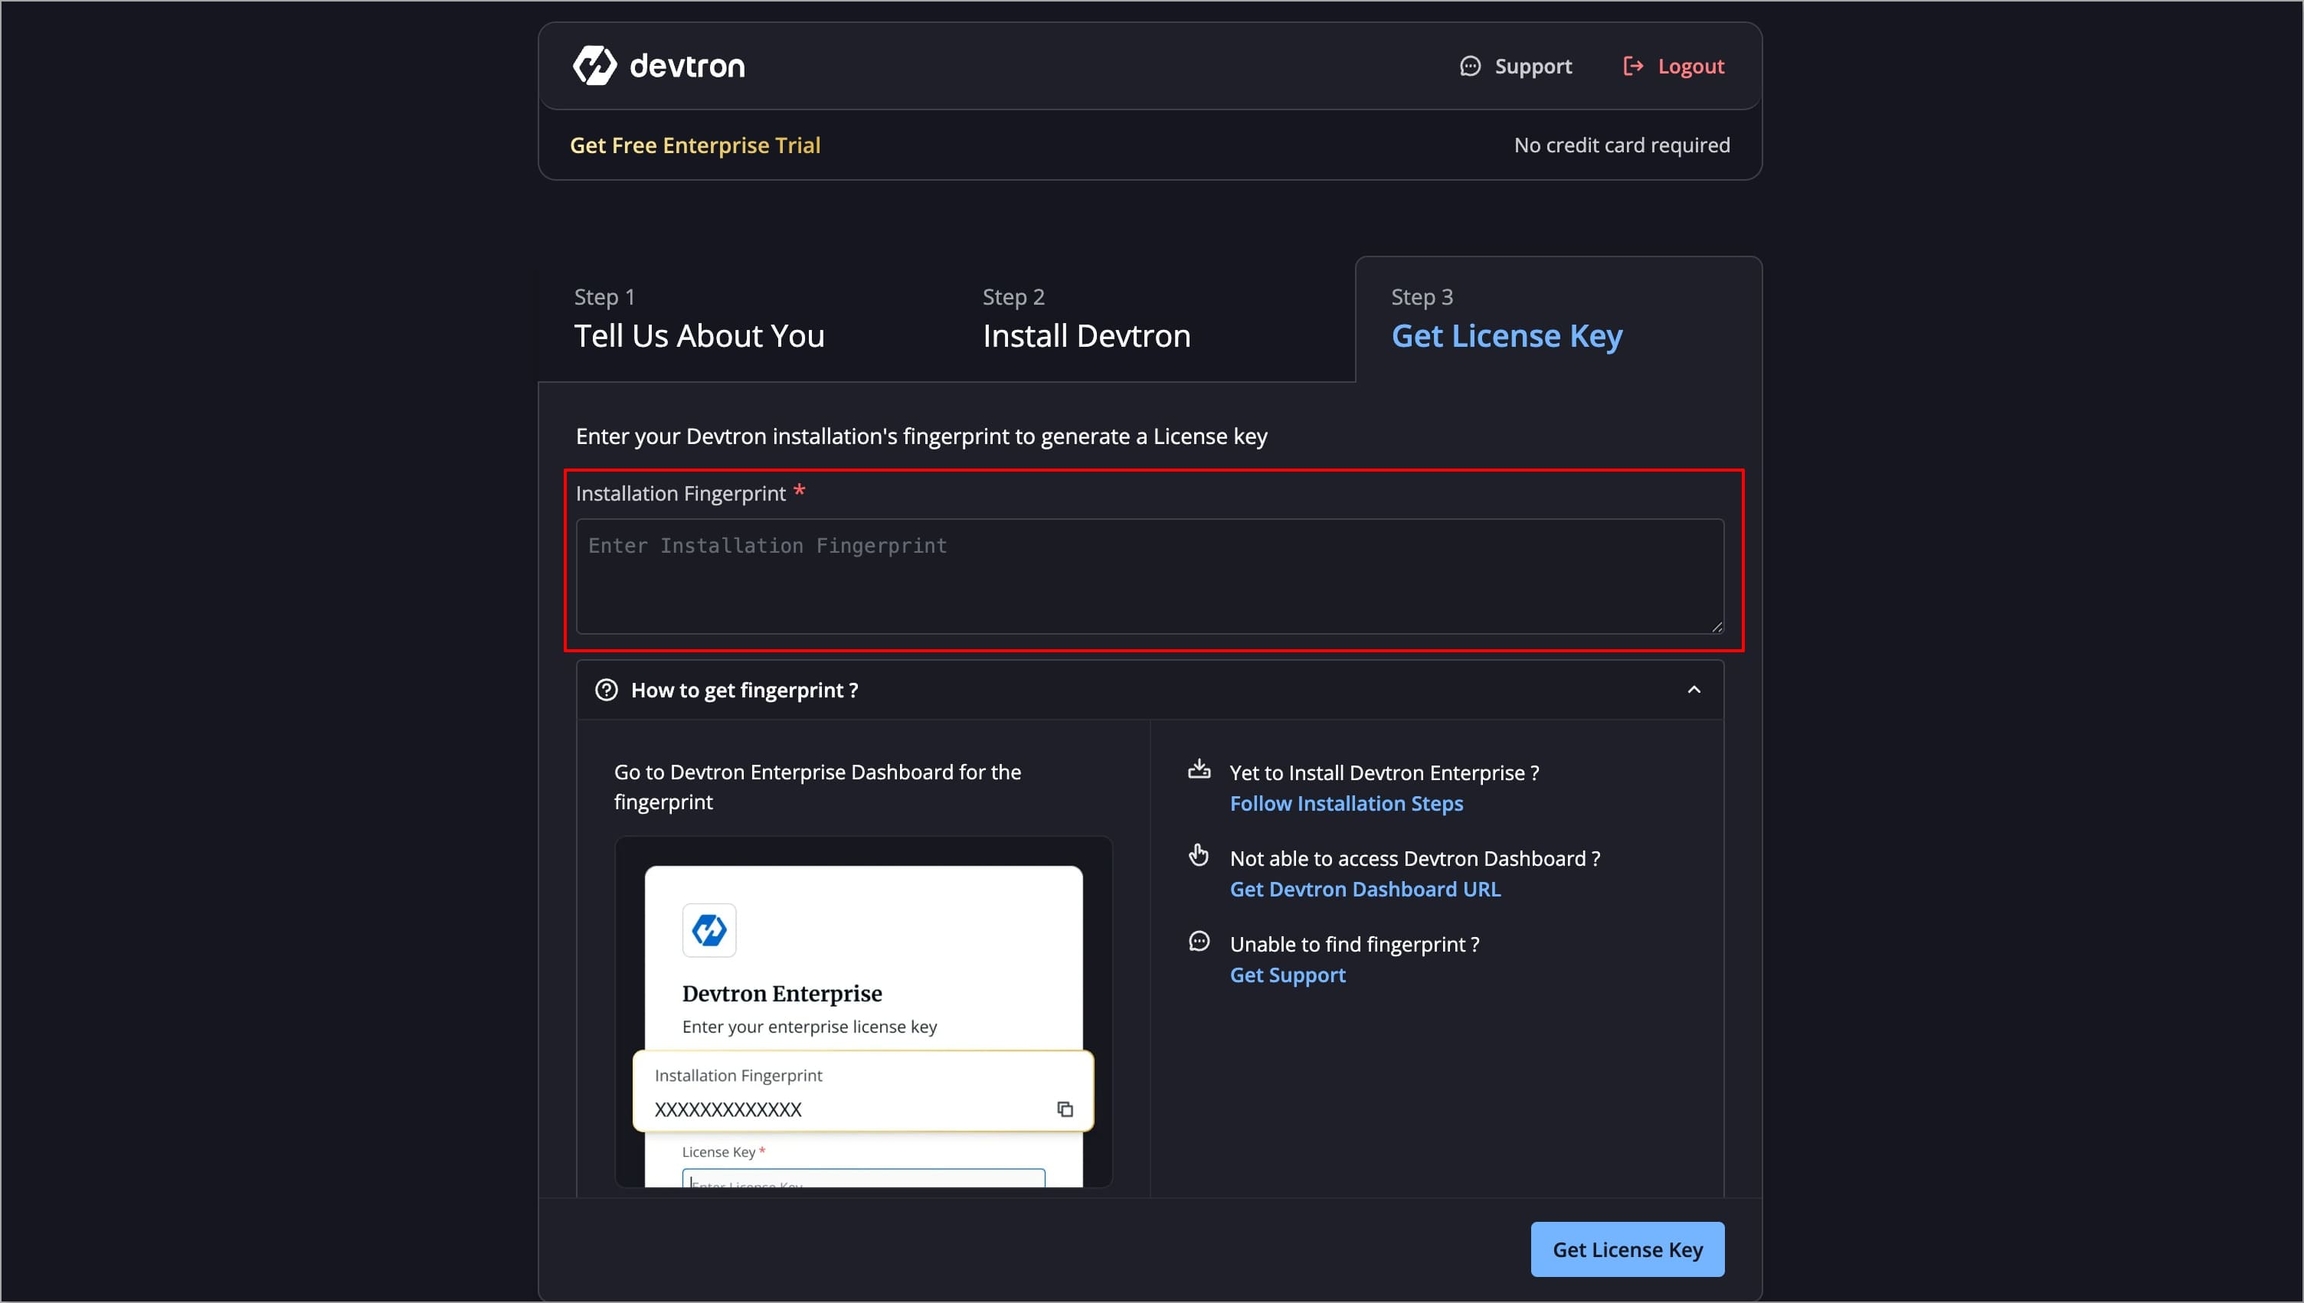
Get Devtron installation's fingerprint
To get the Installation Fingerprint, follow the below steps
Visit your Dashboard URL (which you have obtained in Step-2.3)as shown below.
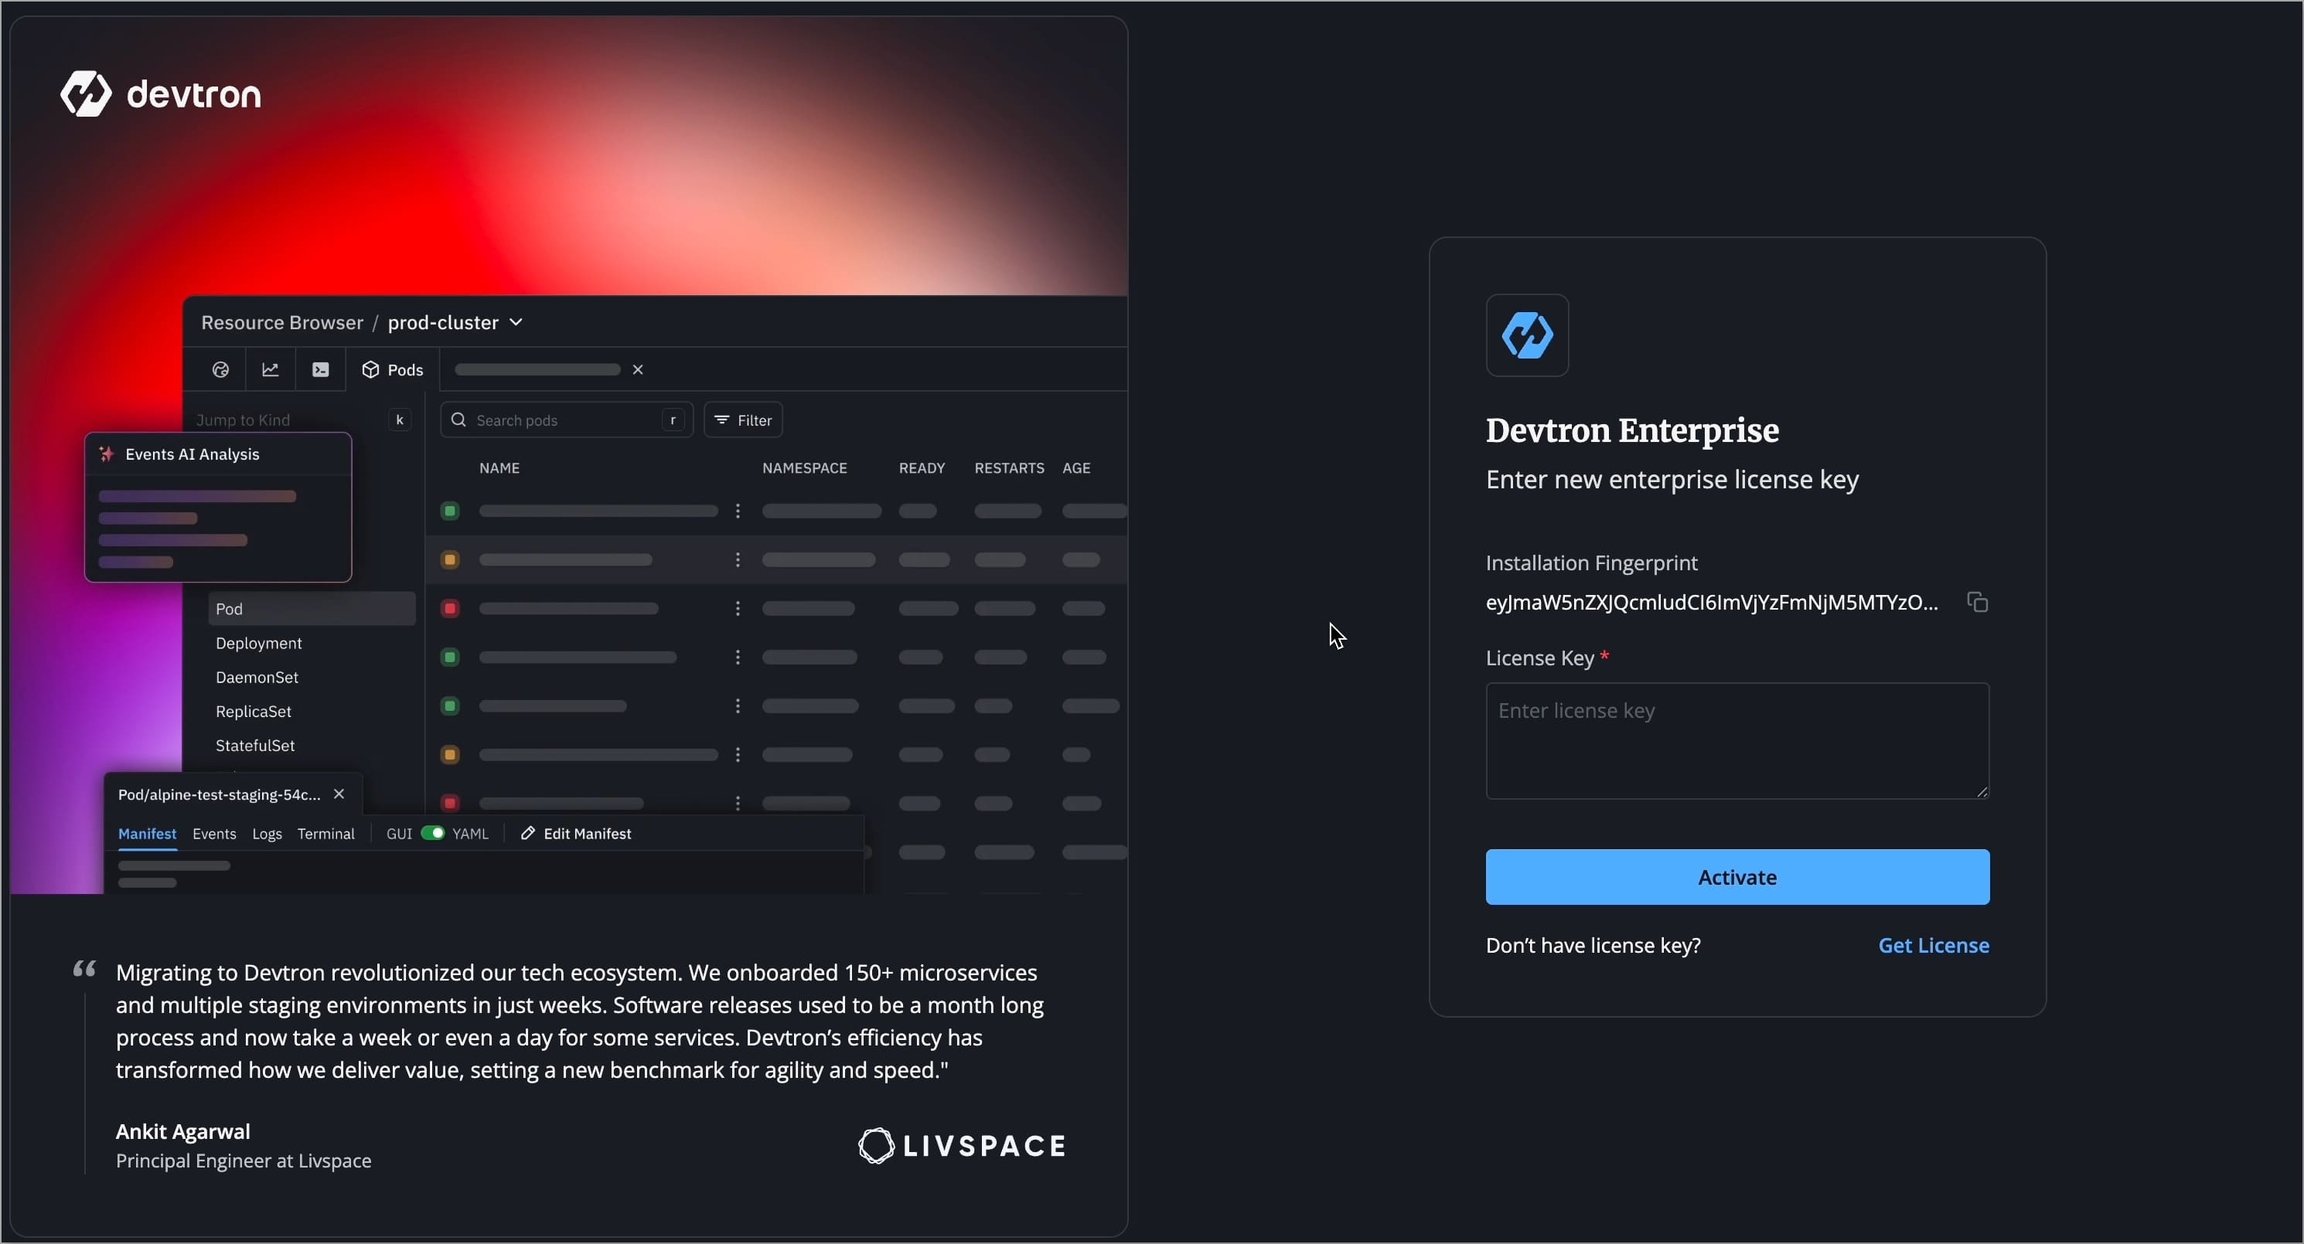
You will see an Installation Fingerprint that uniquely identifies your installation. Copy the fingerprint.

Go back to the License Dashboard and paste the fingerprint you copied earlier and click Get License Key.
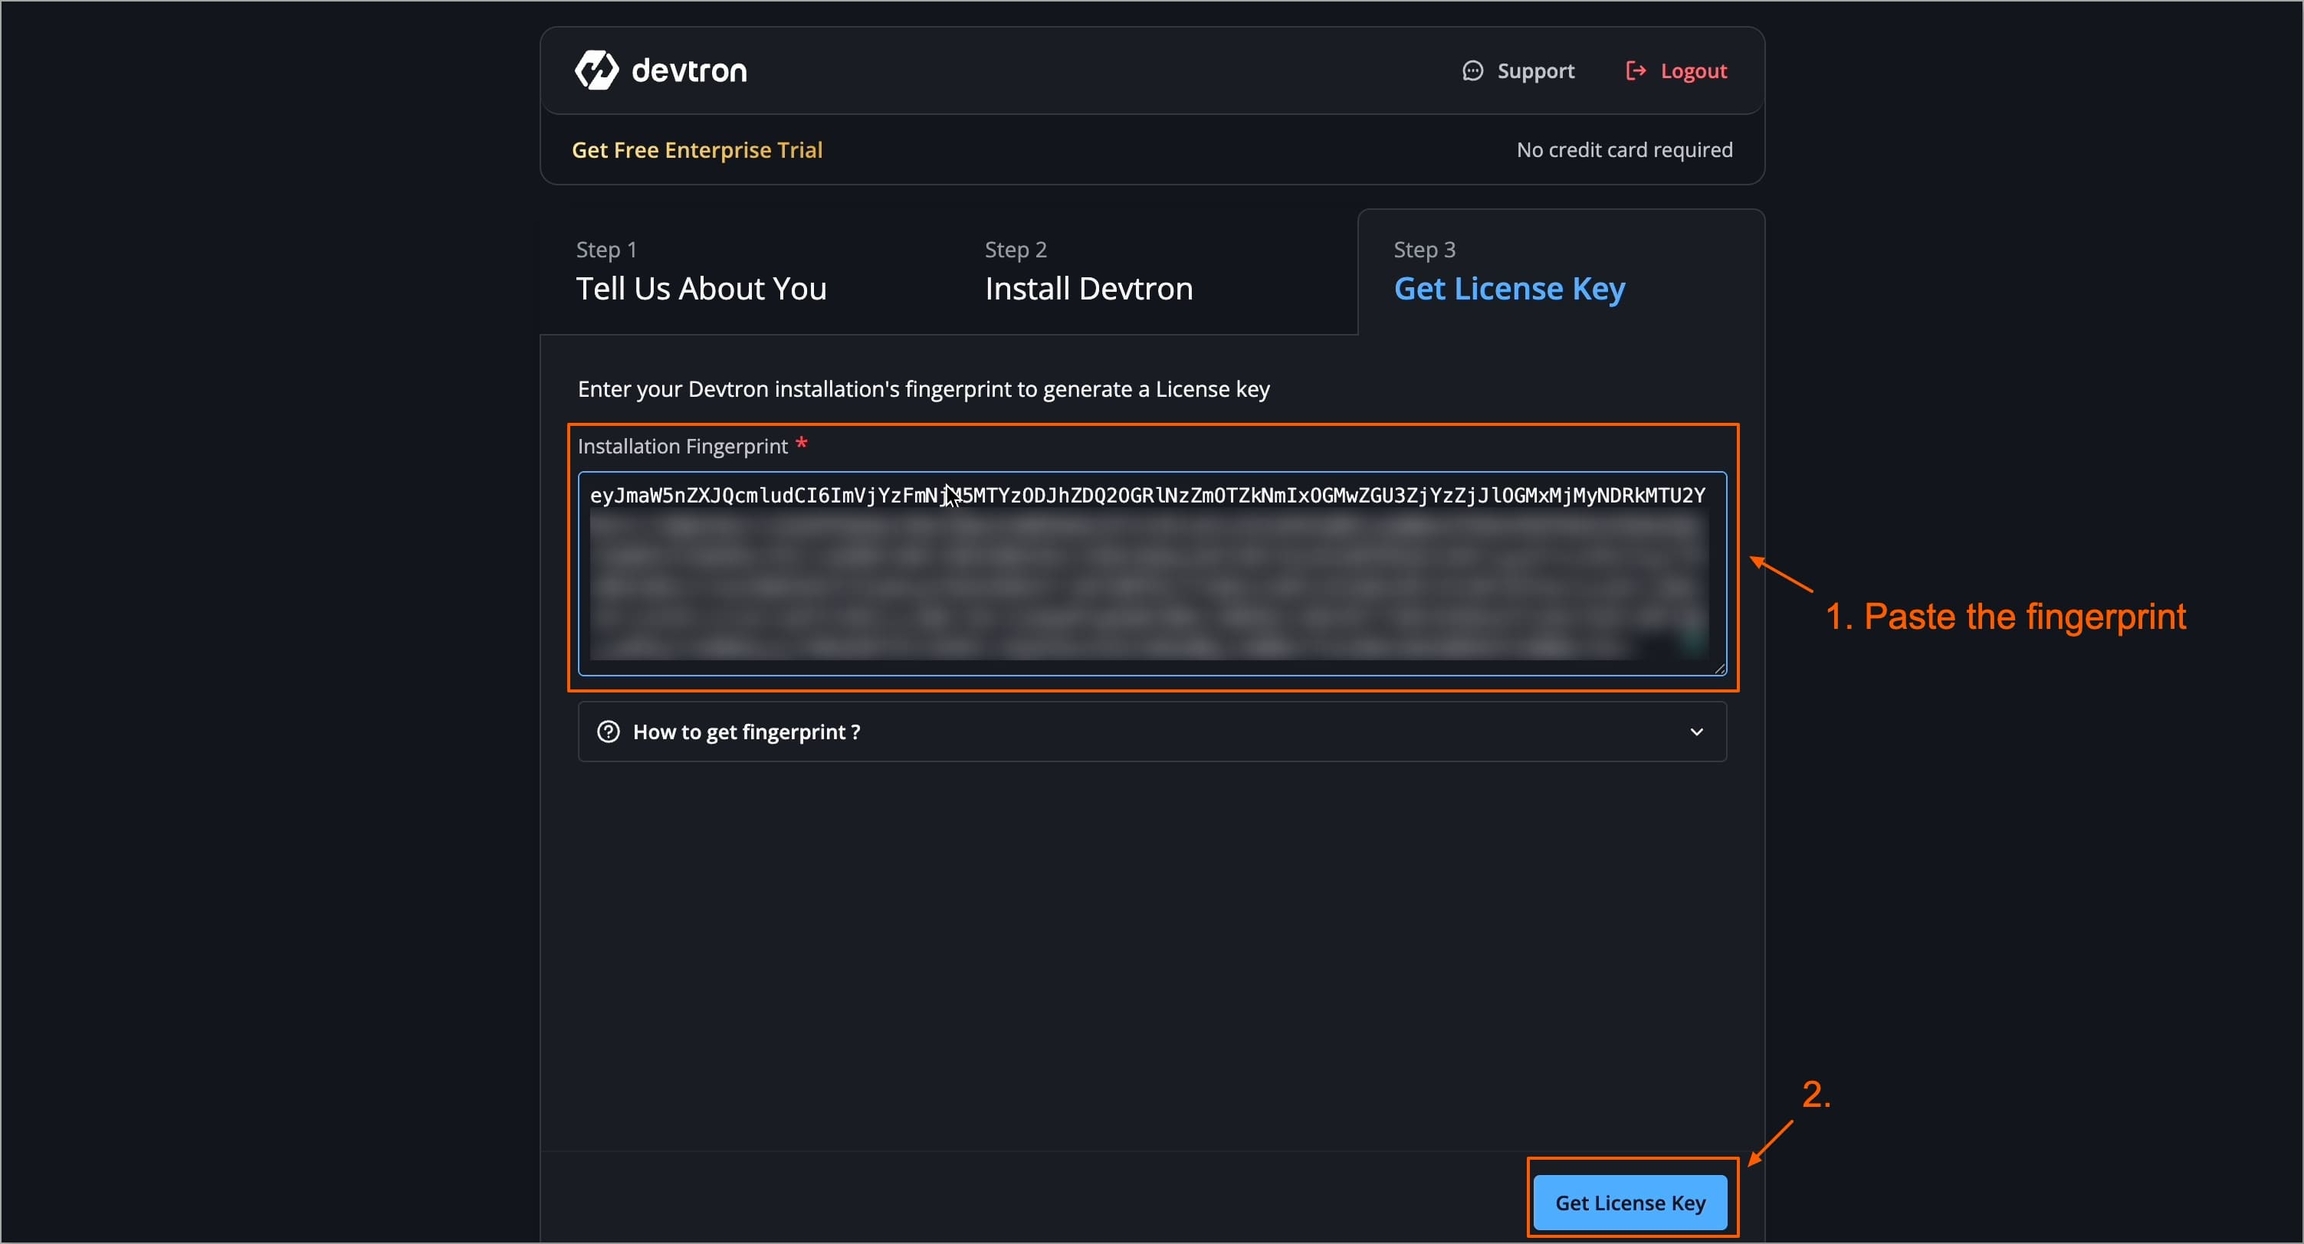
Your license will be generated. Copy the license key.
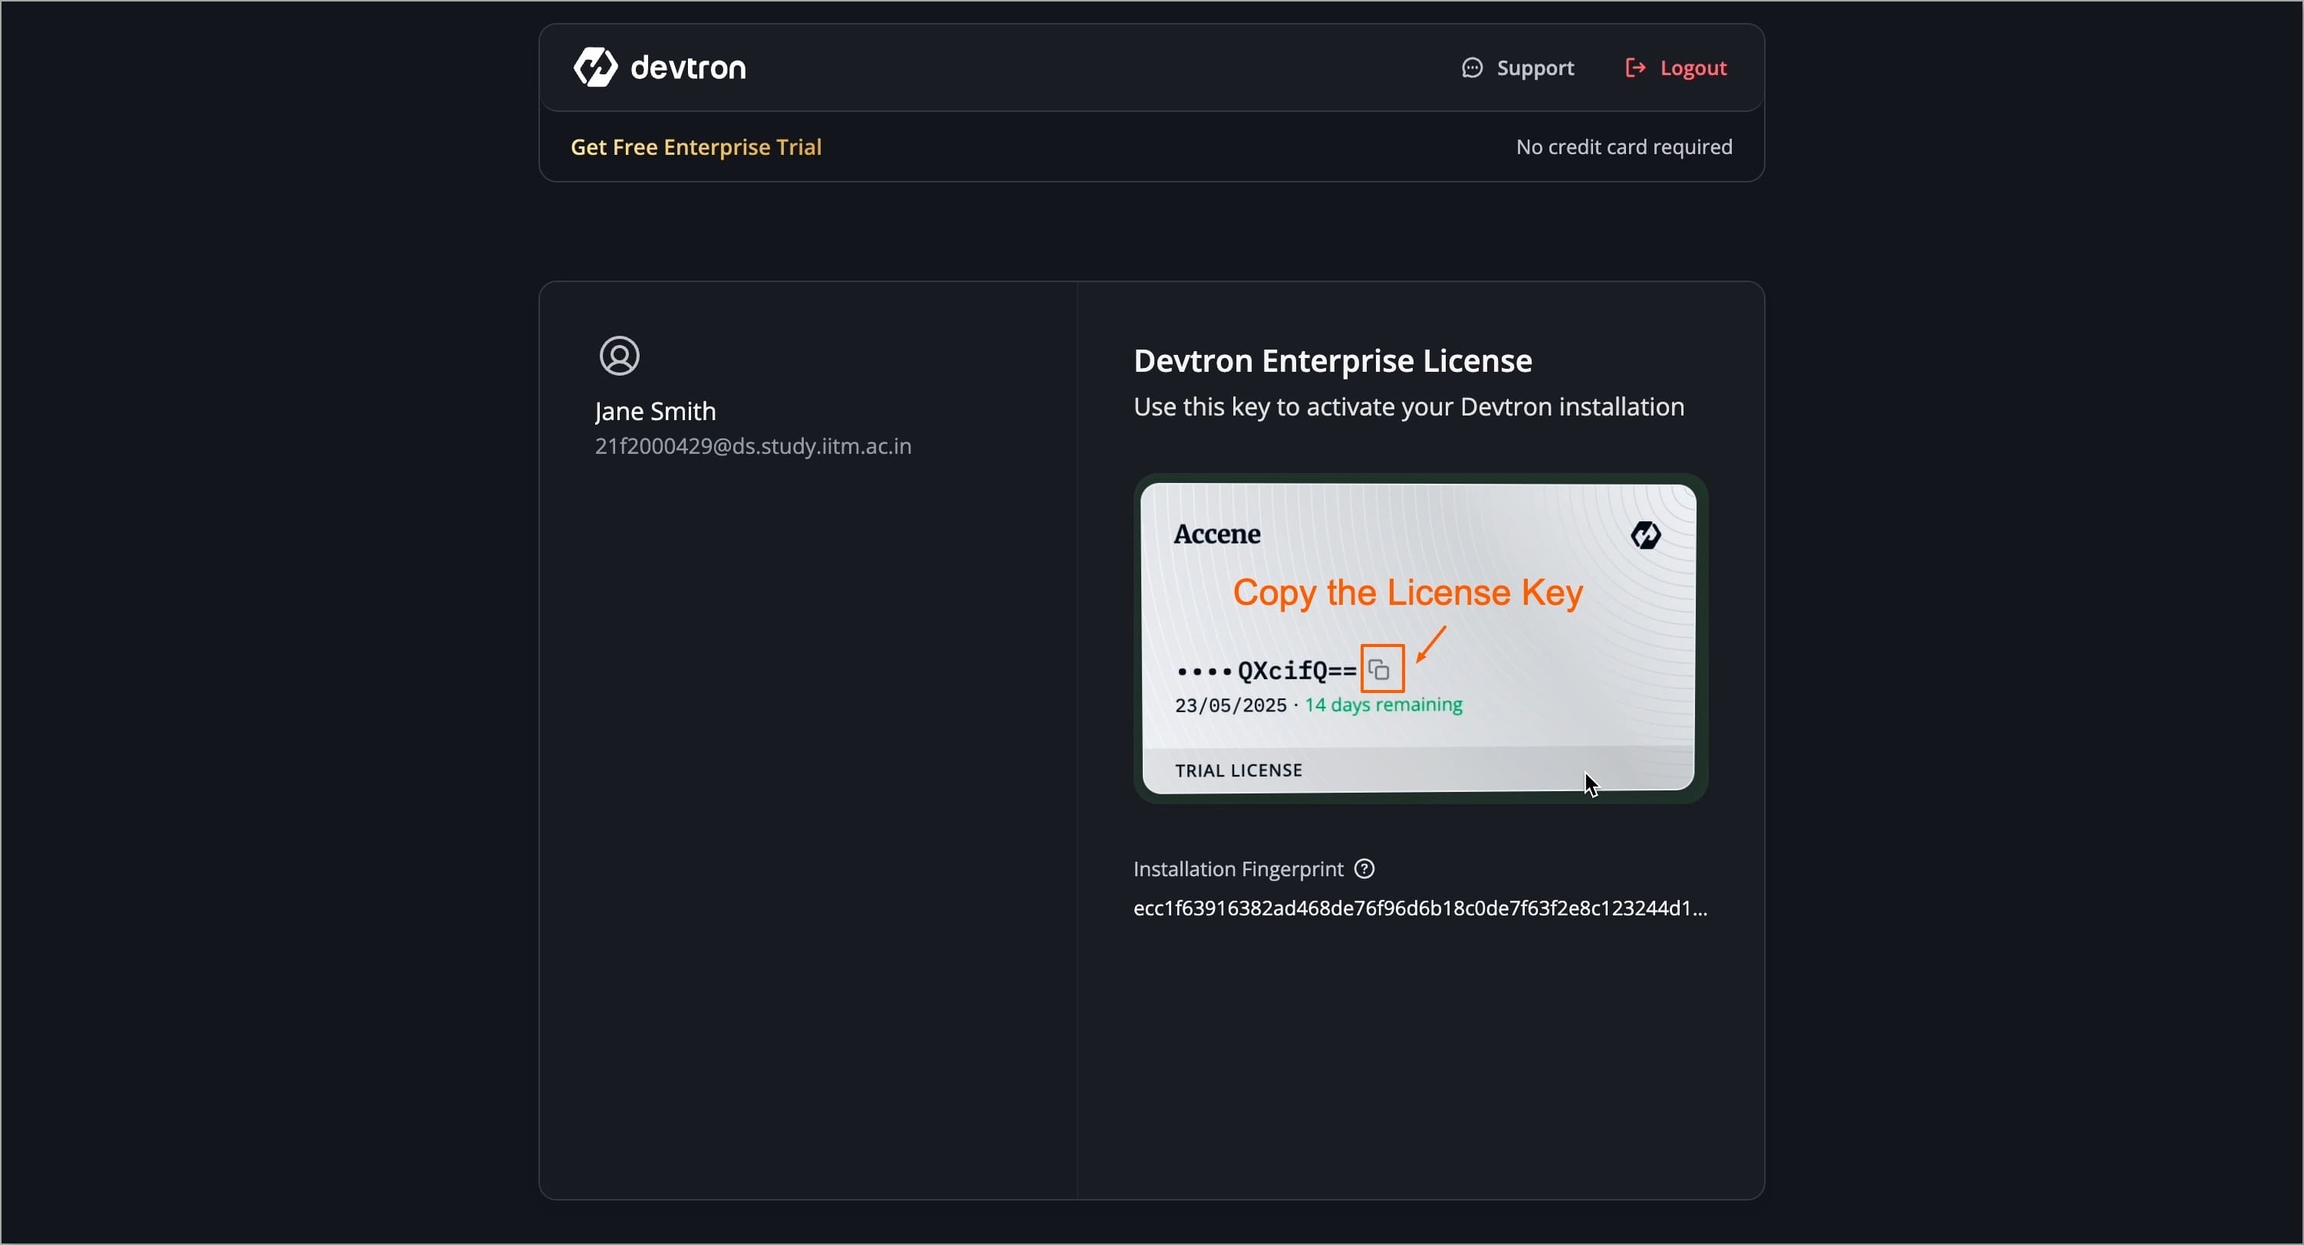
Note
The license key you generate will be valid only for your enterprise installation. It is uniquely mapped to your installation fingerprint.
Go back to your Devtron Dashboard URL page and paste your license key under License Key field and click Activate.
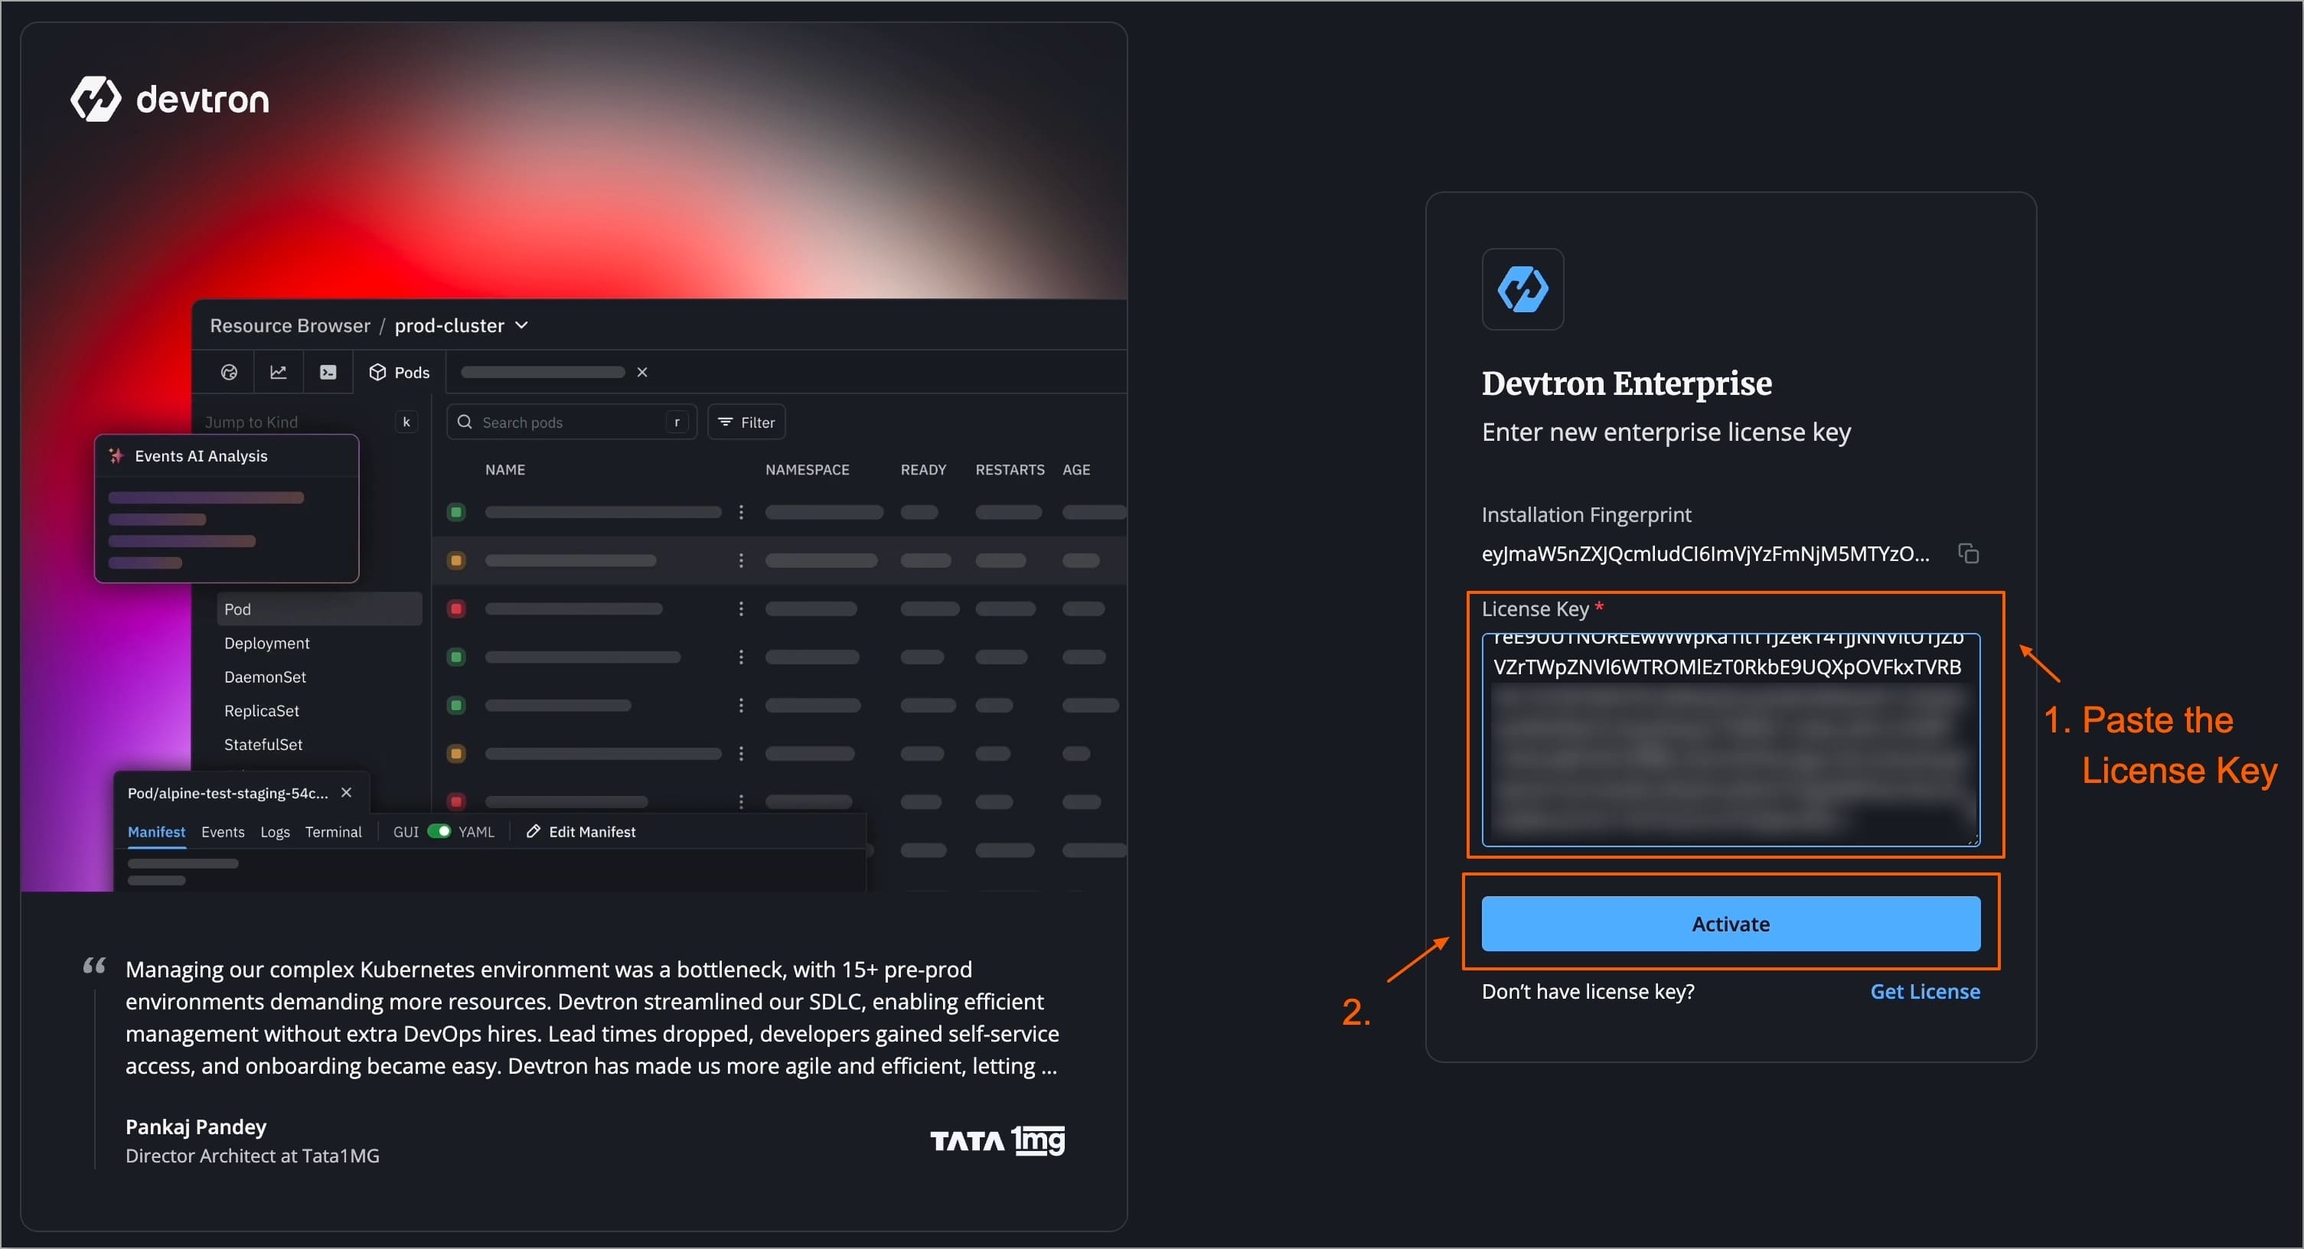
Devtron Enterprise License will be activated and you can log in to Devtron Dashboard.

Facing Issues?
Visit the Troubleshoot section to identify the issue or connect with Devtron Support.
Log in to Devtron
After successful license activation, you will see the Devtron login page.
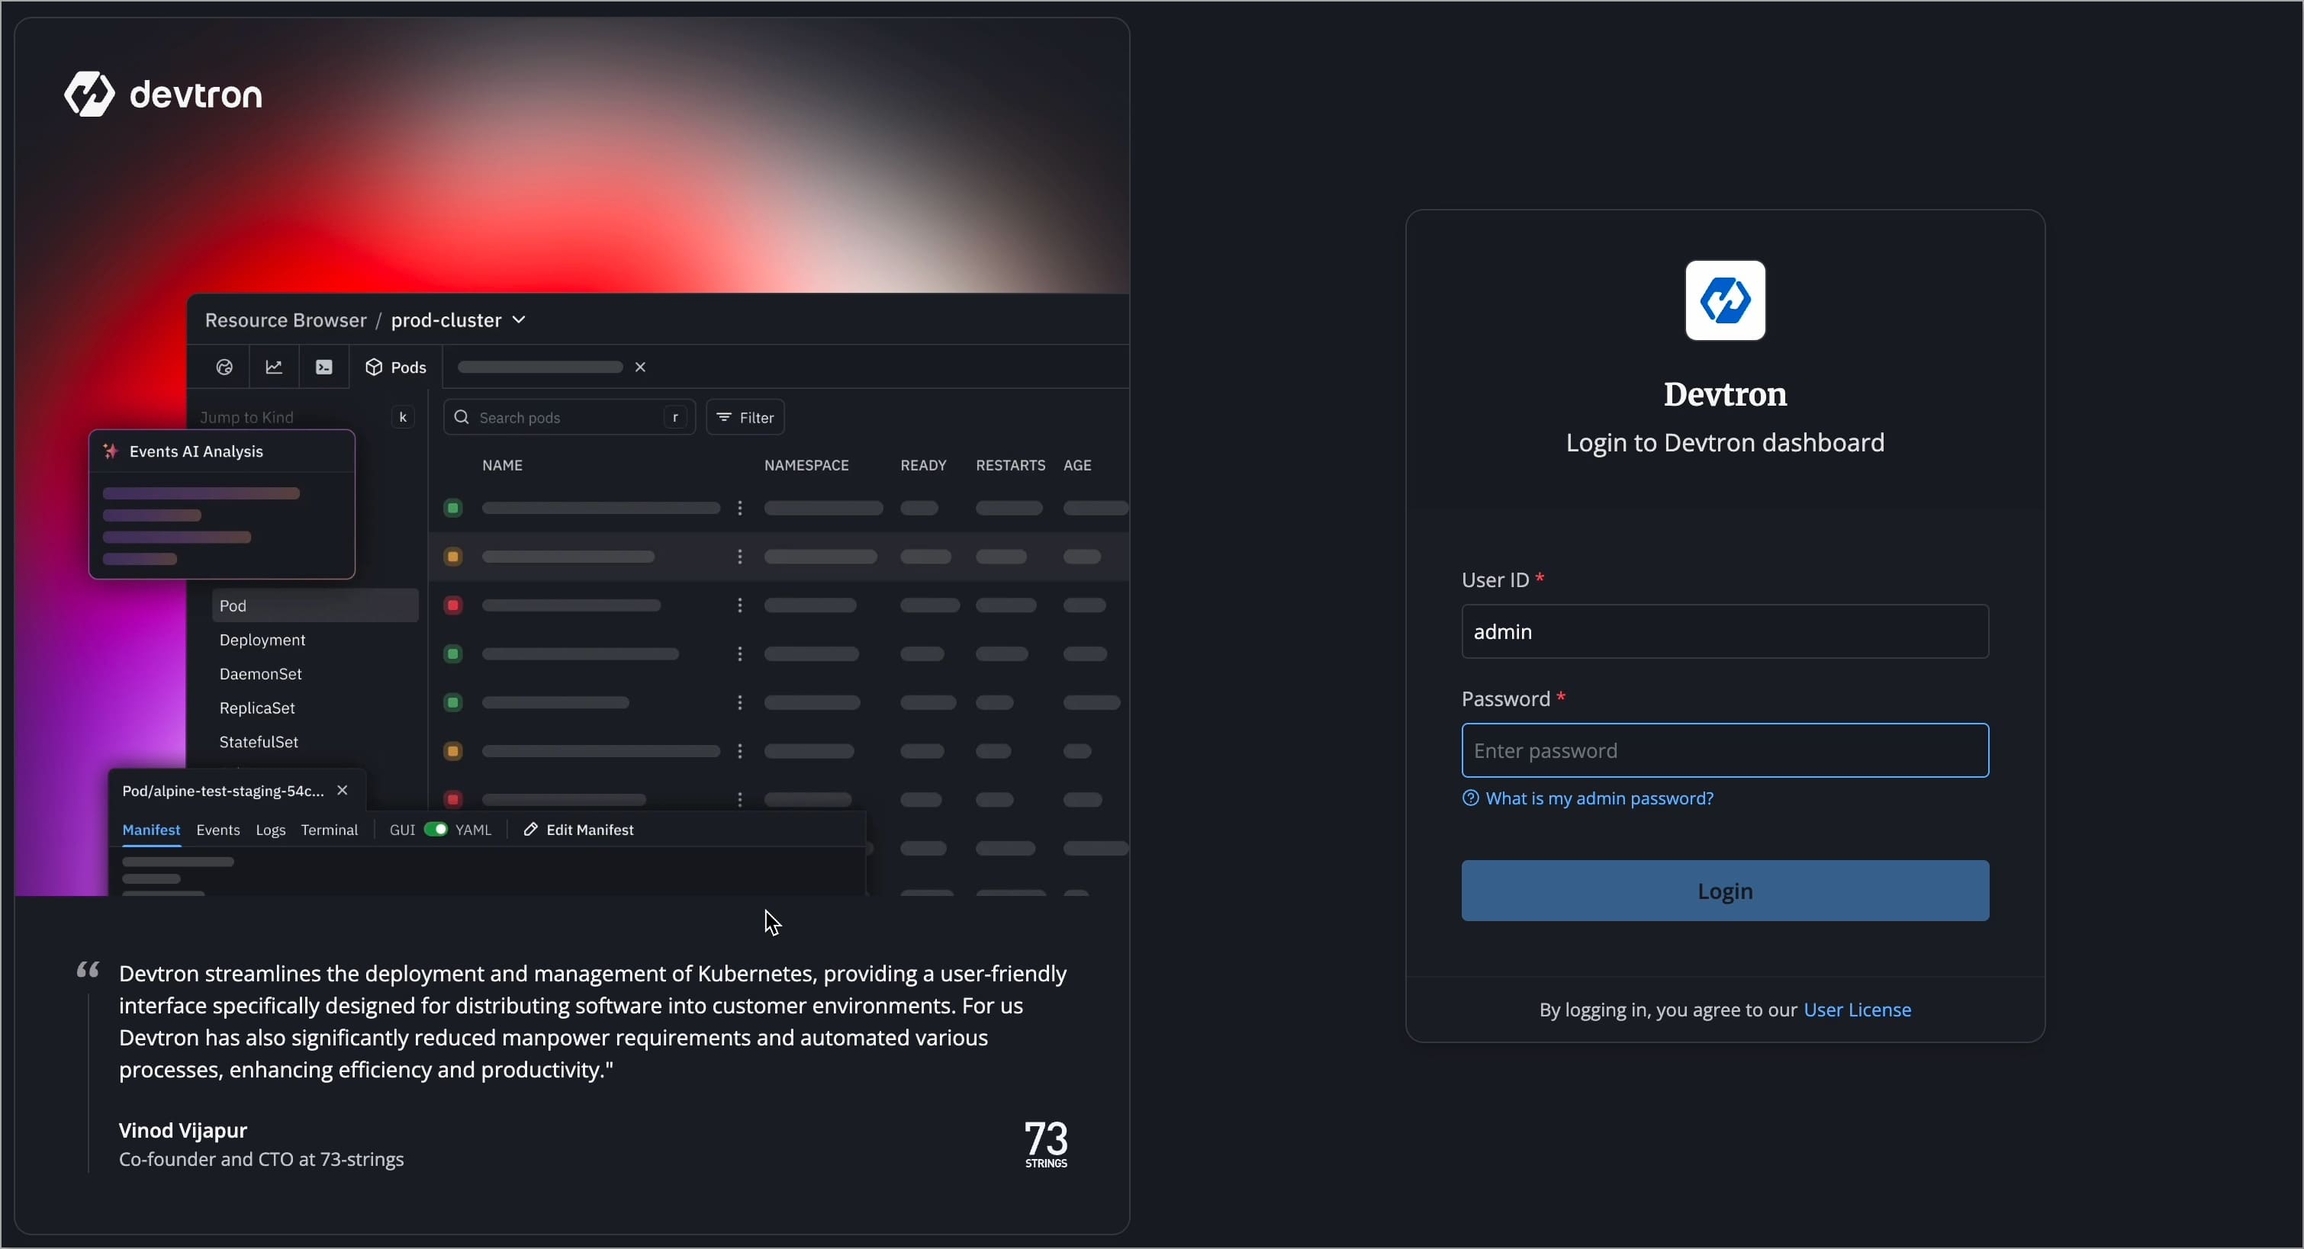
Initially, log in with the administrator credentials. By default, the username is admin. Run the following command to get the admin password:
kubectl -n devtroncd get secret devtron-secret \
-o jsonpath='{.data.ADMIN_PASSWORD}' | base64 -d
Note
When you install Devtron for the first time, it creates a default admin user and password (with unrestricted access to Devtron). You can use it to log in as an administrator.
After the initial login, we recommend you set up any Single Sign-On (SSO) service like Google, GitHub, etc., and then add other users (including yourself). Subsequently, all the users can use the same SSO (let's say, GitHub) to log in to the Dashboard.
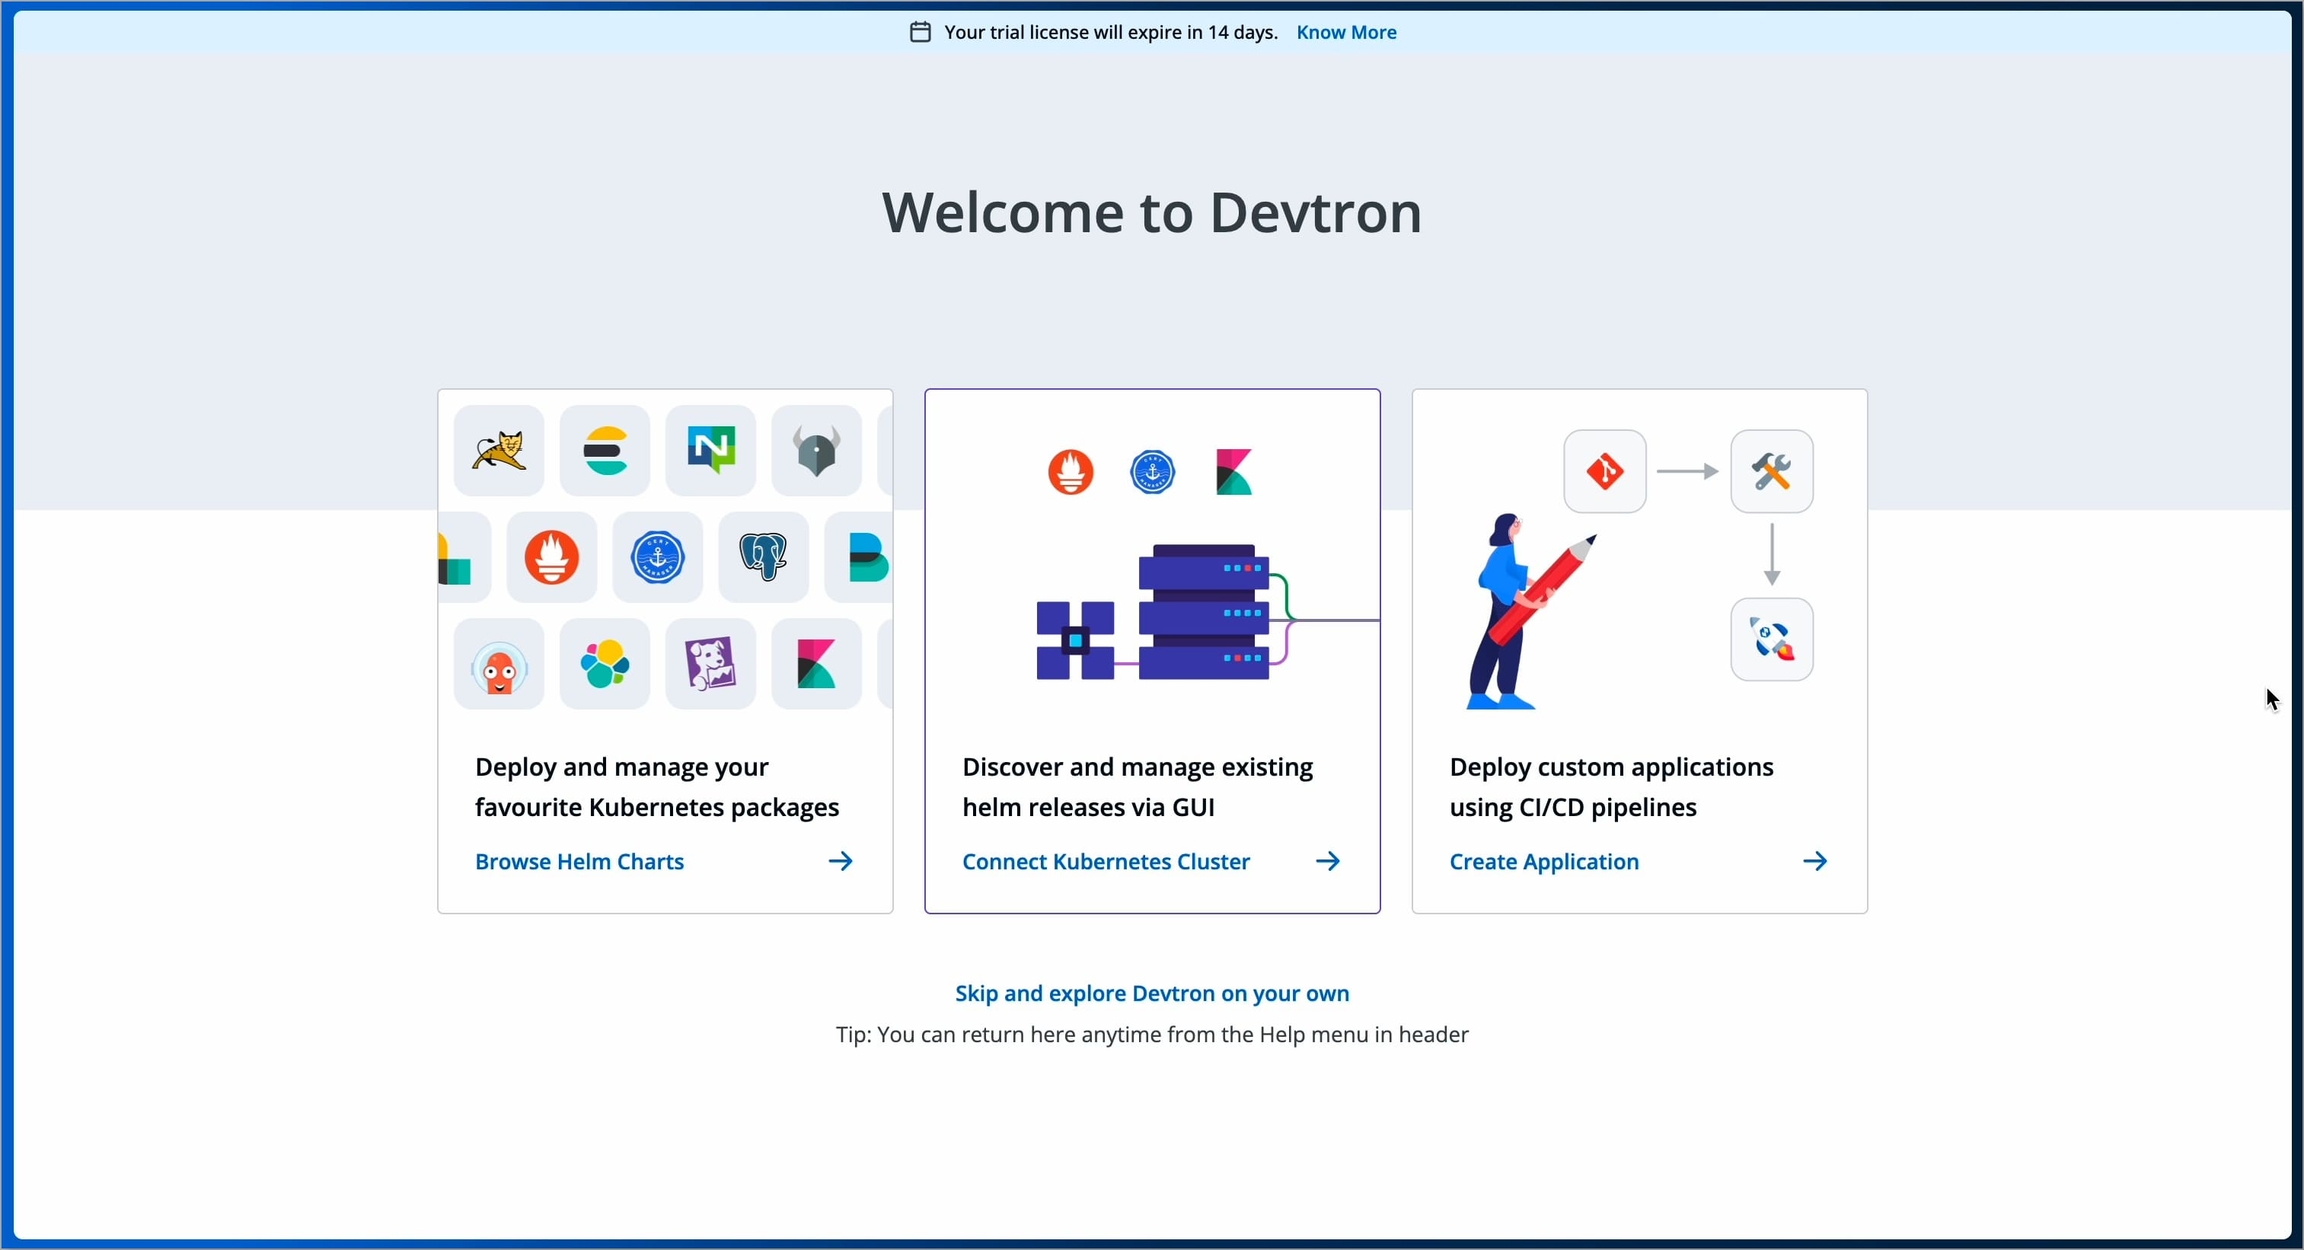
After a successful login, the Devtron Dashboard will open, and you can explore Devtron Enterprise features.
Additional Actions
Check License Details
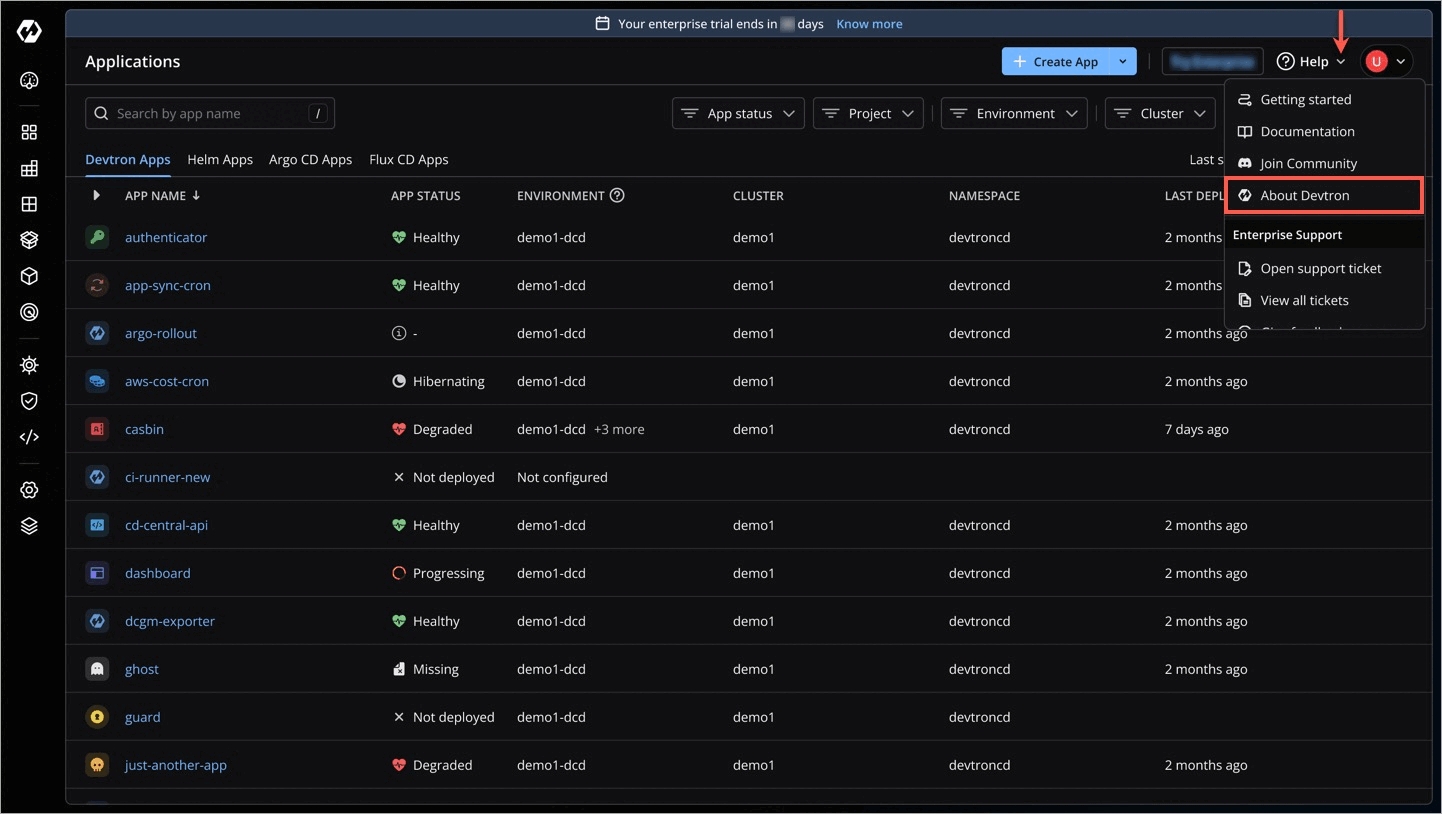
In Devtron, click the Help menu (top-right corner) → About Devtron to know the following:
License details (Key and Expiry)
Installation fingerprint
Enterprise version
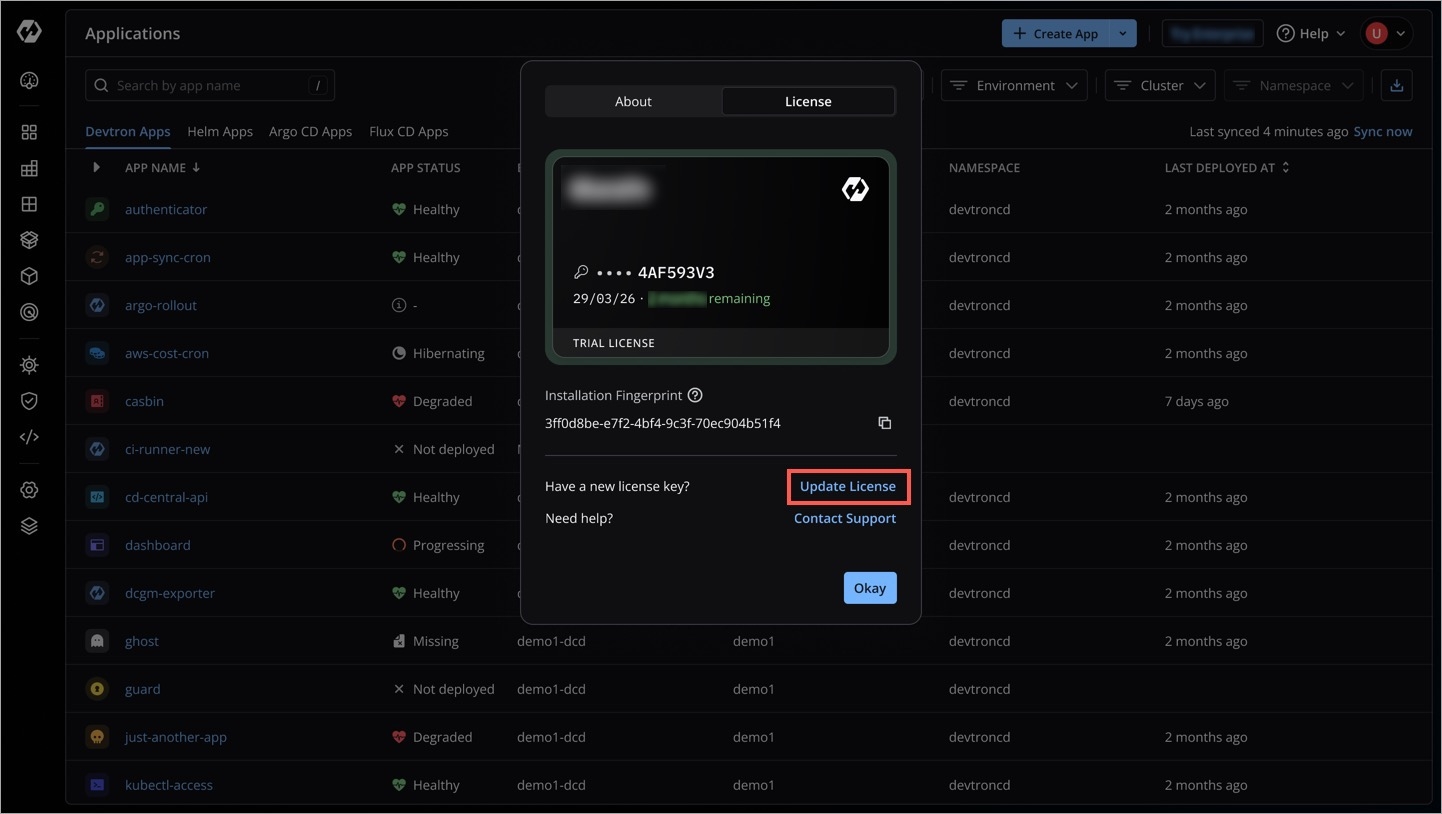
Update License
If you have a new license key, you can update the license key directly within Devtron, from the About Devtron page.
Renew License
If your trial license has expired and you wish to renew it, email us at [email protected] or reach out to your Devtron representative.
Troubleshoot Issues
License Claimed Snapshot
Someone from your organization has already availed a license
License Dashboard
Reach out to [email protected] for another trial
Invalid License Key Snapshot
The license key is incorrect or partial
Devtron Dashboard Page
Go to the License Dashboard and recheck the license
License Key No Longer Valid Snapshot
The license key has become invalid for your installation fingerprint
Devtron Dashboard Page
Generate a new license from License Dashboard.
Invalid Fingerprint Snapshot
The fingerprint is incorrect or partial
License Dashboard (Step-3)
Go to the License Activation Page and verify the fingerprint
License Has Expired Snapshot
You have exhausted the free trial
Devtron Dashboard Page or License Dashboard
Reach out to [email protected] for renewal
License Key Already Exists for Fingerprint Snapshot
You cannot generate more than 1 license key for 1 fingerprint
License Dashboard (Step-3)
Contact Support
Last updated
Was this helpful?