Loading...
Loading...
Loading...
Loading...
Loading...
Loading...
Loading...
Loading...
Loading...
Loading...
Loading...
Loading...
Loading...
Loading...
Loading...
Loading...
Loading...
Loading...
Loading...
Loading...
Loading...
Loading...
Loading...
Loading...
Loading...
Loading...
Loading...
Loading...
Loading...
Loading...
Loading...
The Bitbucket Runner Trigger plugin by Devtron enables integration between Devtron CI/CD workflows and Bitbucket Runners. It allows users to remotely trigger and manage Bitbucket Runners directly from within their Devtron pipelines, enhancing automation capabilities and workflow control.
Before integrating the Bitbucket Runner Trigger plugin, ensure you have a Bitbucket account, properly configured Bitbucket Runner, and Bitbucket Token with appropriate permissions.
Go to Applications → Devtron Apps.
Click your application.
Go to App Configuration → Workflow Editor.
Click New Workflow and navigate to the Build and Deploy from Source Code.
Fill the required fields in the Create build pipeline window and navigate to the Pre-Build stage.
If you have already configured workflow, edit the build pipeline, and navigate to Pre-Build stage.
Under 'TASKS', click the + Add task button.
Select the Bitbucket Runner Trigger plugin.
Enter the following user inputs with appropriate values.
Enter the name of your task
e.g., Bitbucket Runner Trigger
Add a brief explanation of the task and the reason for choosing the plugin. Include information for someone else to understand the purpose of the task.
e.g., The Bitbucket Runner Trigger plugin is integrated to trigger a BitBucker Runner remotely through Devtron CI/CD workflow.
BitBucketWorkspaceName
STRING
The workspace name in Bitbucket where your repository is located
dev-workspace
BitBucketUsername
STRING
Your Bitbucket username used for authentication (Mandatory when pipeline is configured through SSH)
john.doe
BitBucketToken
STRING
Bitbucket access token for API authentication (Mandatory when pipeline is configured through SSH)
eyJ0eXBlIjoic2VydmljZV9hY2
BitBucketBranchName
STRING
The branch name where the pipeline will be triggered
main
BitBucketRepoName
STRING
The name of your Bitbucket repository
dev-repo
StatusTimeOutSeconds
STRING
Maximum time (in seconds) to wait for runner status response
300
Here you can set conditions to execute or skip the task. You can select Set trigger conditions for the execution of a task or Set skip conditions to skip the task.
Bitbucket Runner Trigger will not be generating an output variable.
Click Update Pipeline.
Codacy is an automated code analysis/quality tool that helps developers to ship better software in a faster manner.
Prerequisite: Make sure you have set up an account in Codacy or get the API keys from an admin.
On the Edit build pipeline page, select the Pre-Build Stage (or Post-Build Stage).
Click + Add task.
Select Codacy from PRESET PLUGINS.
Enter a relevant name in the Task name field. It is a mandatory field.
Enter a descriptive message for the task in the Description field. It is an optional field.
Provide a value for the input variable. Note: The value may be any of the values from the previous build stages, a global variable, or a custom value.
Trigger/Skip Condition refers to a conditional statement to execute or skip the task. You can select either:
Set trigger conditions or
Set skip conditions
Pass/Failure Condition refers to conditions to execute pass or fail of your build. You can select either:
Set pass conditions or
Set failure conditions
Click Update Pipeline.
The Ansible Runner plugin by Devtron enables seamless execution of Ansible Playbooks within your Devtron workflows using the Ansible Runner tool. For example, users can use this plugin to trigger the Ansible Playbooks which can automate tasks like configuring cluster add-ons managing node configurations, and network configurations.
Before integrating the Ansible Runner plugin make sure that you have properly configured Ansible playbooks.
Navigate to the Jobs section, click Create, and choose Job.
In the 'Create job' window, enter Job Name and choose a target project.
Click Create Job.
In the 'Configurations' tab, fill the required fields under the 'Source code' section and click Save.
In Workflow Editor, click + Job Pipeline.
Give a name to the workflow and click Create Workflow.
Click Add job pipeline to this workflow.
Fill the required fields in ‘Basic configuration’ tab.
Go to the ‘Tasks to be executed’ tab.
Under ‘Tasks’, click the + Add task button.
Select the Ansible Runner plugin.
Enter the following with appropriate values.
Enter the name of your task.
e.g., Ansible Runner
Add a brief explanation of the task and the reason for choosing the plugin. Include information for someone else to understand the purpose of the task.
e.g., The Ansible Runner plugin is integrated for updating network configuration before deployment of appliction.
Here you can set conditions to execute or skip the task. You can select Set trigger conditions for the execution of a task or Set skip conditions to skip the task.
Ansible Runner plugin will not be generating an output variable.
Click Update Pipeline.
The Copacetic plugin of Devtron helps you patch your container image vulnerabilities traced by the security scan Devtron performed on your container image. By integrating the Copacetic plugin into your workflow and enabling the Scan for vulnerabilities at your Build stage, you can:
Trace the vulnerabilities of your container images, and the Copacetic plugin will automatically patch the container image vulnerabilities for you.
Before integrating the Copacetic plugin, install the Vulnerability Scanning (Trivy/Clair) integration from Devtron Stack Manager. Once the integration is installed, make sure you have enabled Scan for vulnerabilities at the Build stage or integrated the plugin in the Pre-build stage.
Go to Applications → Devtron Apps.
Click your application.
Go to App Configuration → Workflow Editor.
Click New Workflow and navigate to the Build and Deploy from Source Code.
Fill the required fields in the Create build pipeline window and navigate to the Post-build stage.
If you have already configured workflow, edit the build pipeline, and navigate to Pre-build stage.
Under 'TASKS', click the + Add task button.
Click the Copacetic plugin.
Enter the following with appropriate values.
Enter the name of your task.
e.g., Patch container image vulnerability
Add a brief explanation of the task and the reason for choosing the plugin. Include information for someone else to understand the purpose of the task.
e.g., The Copacetic plugin is configured to patch the vulnerabilities in container image
Here you can set conditions to execute or skip the task. You can select Set trigger conditions for the execution of a task or Set skip conditions to skip the task.
Copacetic will not be generating an output variable.
Click Update Pipeline.
The Code Scan plugin of Devtron allows you to perform the code scanning using Trivy. By integrating the Code Scan plugin into your workflow you can detect common Vulnerabilities, Misconfigurations, License Risks, and Exposed Secrets in your code.
Before integrating the Code Scan plugin, install the integration from Devtron Stack Manager.
Go to Applications → Devtron Apps.
Click your application.
Go to App Configuration → Workflow Editor.
Click New Workflow and navigate to the Build and Deploy from Source Code.
Fill the required fields in the Create build pipeline window and navigate to the Pre-build stage.
If you have already configured workflow, edit the build pipeline, and navigate to Pre-build stage.
Under 'TASKS', click the + Add task button.
Select the Code Scan plugin.
Enter the following with appropriate values.
Enter the name of your task
e.g., Code Scanning
Add a brief explanation of the task and the reason for choosing the plugin. Include information for someone else to understand the purpose of the task.
e.g., The Code Scan plugin is integrated for scanning the in-code vulnerabilities.
No input variables are required for the Code Scan plugin.
Code Scan will not be generating an output variable.
Click Update Pipeline.
CodacyEndpoint
String
API endpoint for Codacy
GitProvider
String
Git provider for the scanning
CodacyApiToken
String
API token for Codacy. If it is provided, it will be used, otherwise it will be picked from Global secret (CODACY_API_TOKEN).
Organisation
String
Your Organization for Codacy
RepoName
String
Your Repository name
Branch
String
Your branch name
ProjectDirectory
STRING
The project directory path containing Ansible playbooks
/ansible/playbooks
RunnerDirectory
STRING
The directory path where ansible-runner will store temporary data and artifacts
/tmp/ansible-runner
RunnerArgument
STRING
Additional command-line arguments to pass to ansible-runner
"-v --inventory /path/to/inventory"
CopaTimeout
STRING
Provide timeout for copa patch command, default time is 5 minutes
10m
The Container Image Exporter plugin facilitates the export of container images into tarball files and then uploads these files to cloud storage. This process simplifies the transfer of container images, particularly beneficial for air-gapped environments where external network access is restricted. By converting images to tarballs, you can easily transport them via physical drives to the isolated systems. This approach is especially valuable in scenarios where direct network-based transfers are not permitted.
Before integrating the Container Image Exporter plugin, you need to properly configure your cloud storage to store the generated tarball files.
Go to Applications → Devtron Apps.
Click your application.
Go to App Configuration → Workflow Editor.
Click New Workflow and navigate to the Build and Deploy from Source Code.
Fill the required fields in the Create build pipeline window and navigate to the Post-Build stage.
If you have already configured workflow, edit the build pipeline, and navigate to Post-Build stage.
Under 'TASKS', click the + Add task button.
Select the Container Image Exporter plugin.
Enter the following user inputs with appropriate values.
Enter the name of your task
e.g., Container Image Exporter
Add a brief explanation of the task and the reason for choosing the plugin. Include information for someone else to understand the purpose of the task.
e.g., The Container Image Exporter plugin is integrated to generate a tarball archive of docker images
Platform
STRING
Specify the CPU architecture for the exported images (arm64 or amd64)
amd64
AwsRegion
STRING
Enter the AWS region where your S3 bucket is located
ap-south-1
FilePrefix
STRING
Add a prefix to your exported image file name
temp_
AwsAccessKey
STRING
Provide your AWS Access Key ID for authentication if using AWS as a cloud provider
VtbXliYXNlNjR2YWx1
AwsSecretKey
STRING
Enter your AWS Secret Access Key if using AWS as a cloud provider
VtudqygefuyqgjR29283bcq
AzureAccountKey
STRING
Provide the Account Key for your Azure Storage account, if using Azure as a cloud provider
abc123def567ghi
AzureAccountName
STRING
Enter the Account Name of your Azure Storage account, if using Azure as a cloud provider
prod-us
Expiry
STRING
Set the expiration time for the S3 bucket (in minutes, a whole number between 1 and 720)
10
BucketName
STRING
Enter the name of the storage container where you want to upload the exported image file
tarball-store
ContainerImage
STRING
Provide the name of the system variable containing the image to be exported
DOCKER_IMAGE
GcpServiceAccountJson
STRING
Enter your Google Cloud service account JSON credentials in base64 format (use scoped variables for security), if using GCP as a cloud provider
wogICJ0eXBlIjogInNlcnZpY2VfYWNjb3VudCIsCiAgInByb2plY3RfaWQiOiAiZHV
GcpProjectName
STRING
Specify the Google Cloud project name associated with your service account, if using GCP as a cloud provider
project-12345
CloudProvider
STRING
Choose your preferred cloud storage provider (aws for Amazon S3, Azure for azure Blob Storage, or gcp for Google Cloud Storage)
aws
Here you can set conditions to execute or skip the task. You can select Set trigger conditions for the execution of a task or Set skip conditions to skip the task.
Container Image Exporter will not be generating an output variable.
Click Update Pipeline.
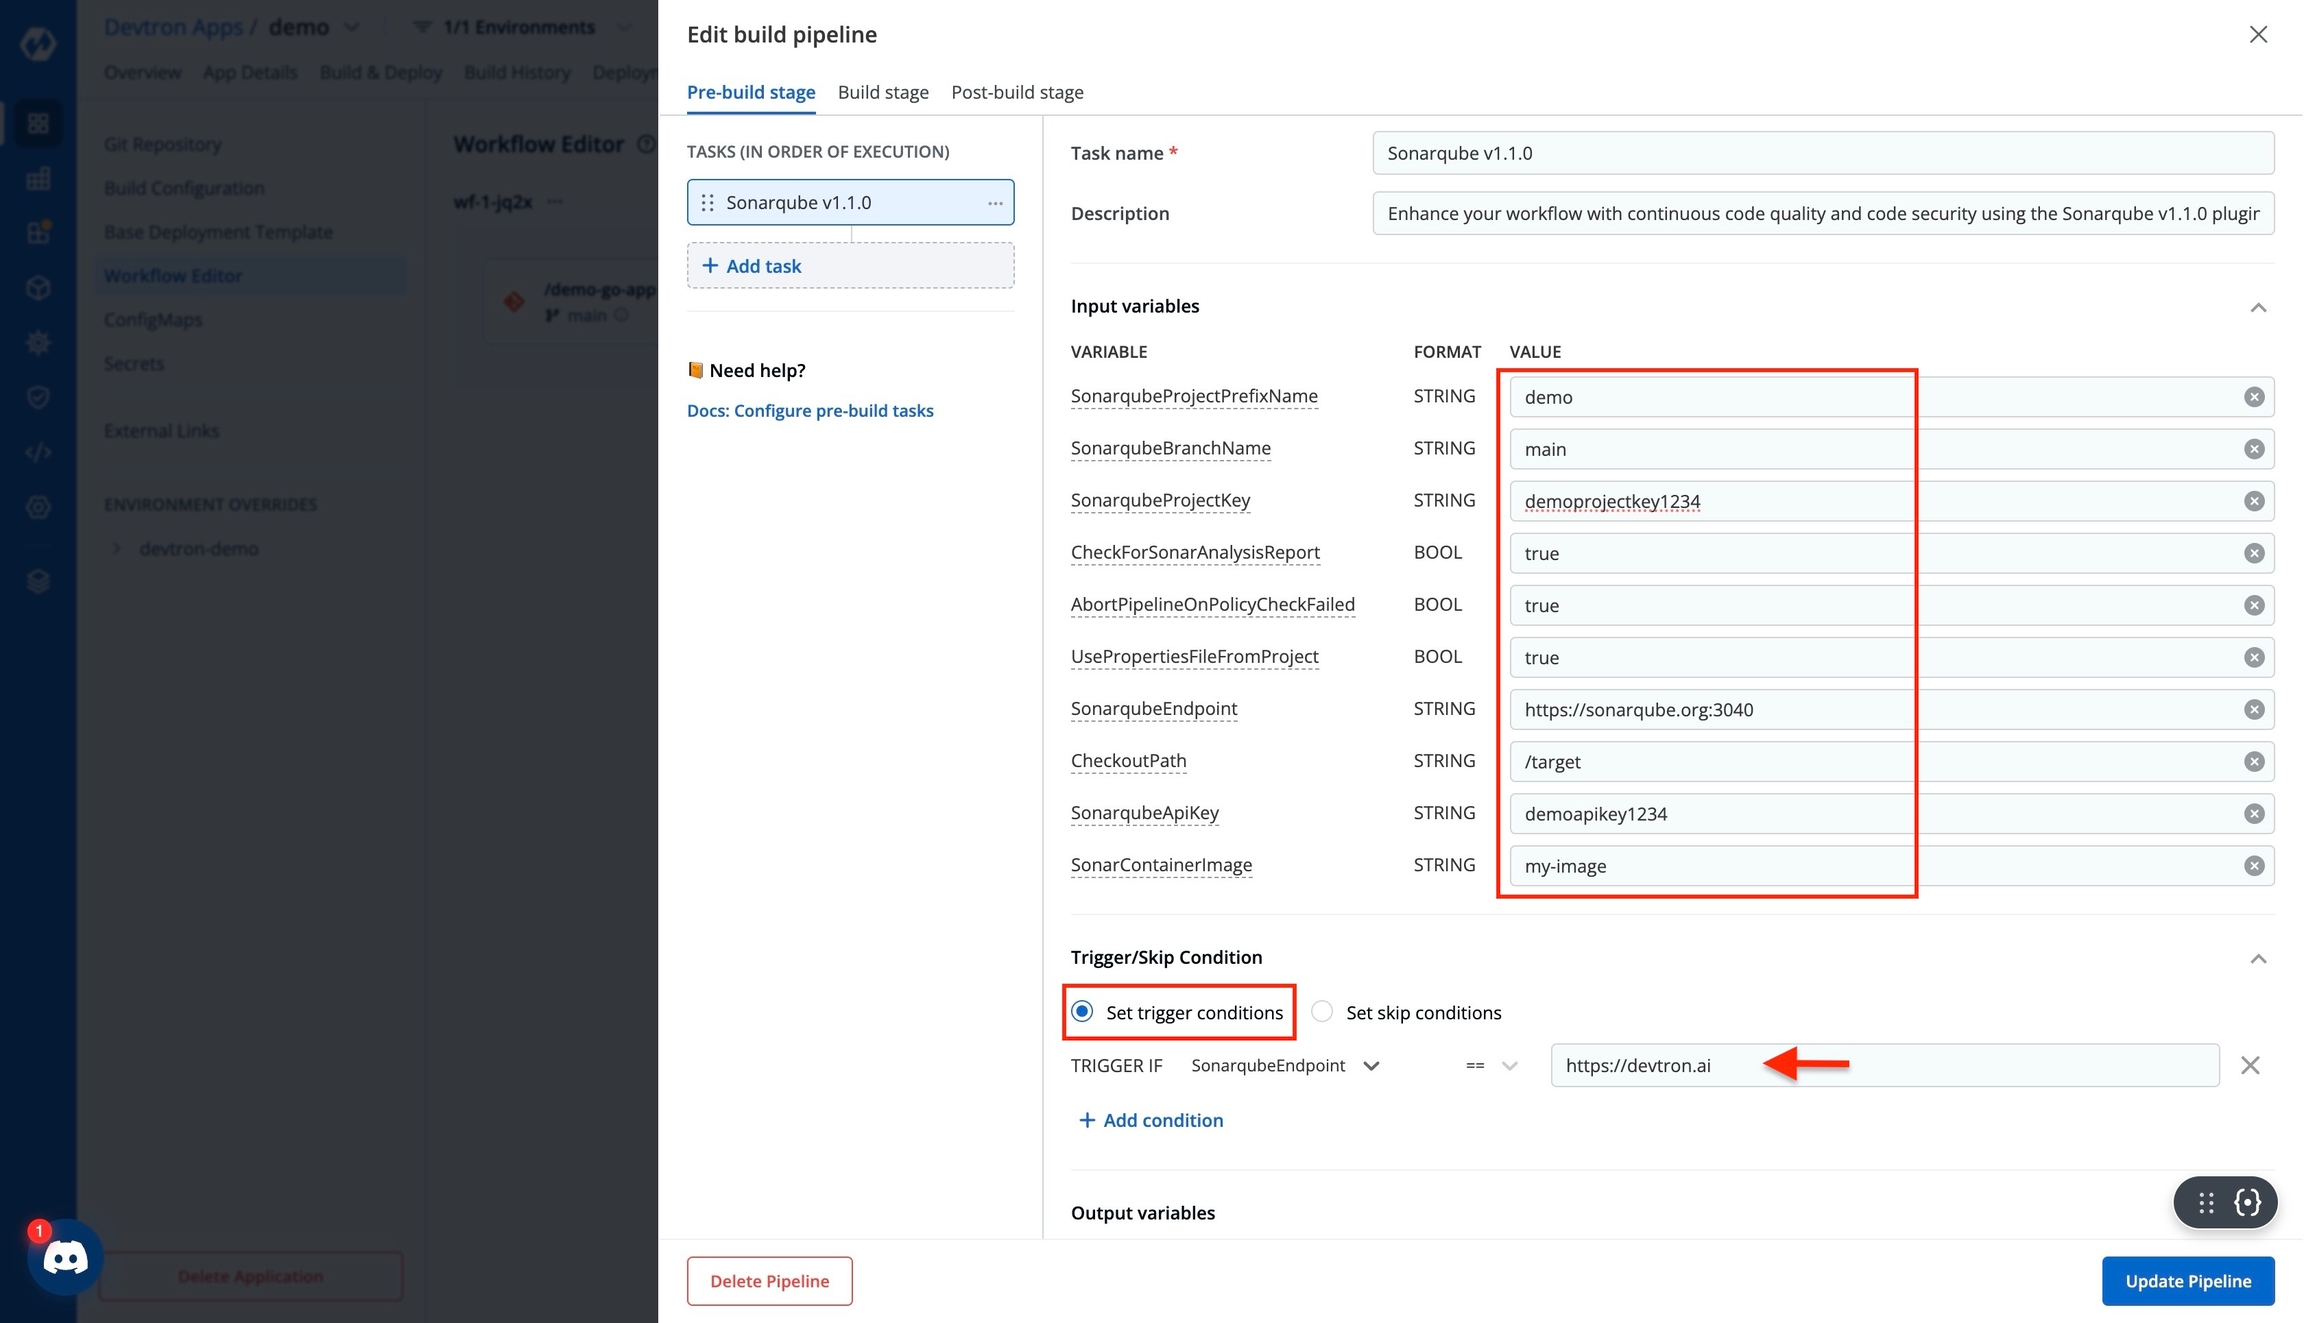
Configuring Sonarqube-v1.1.0 in pre-build or post build task enhances your workflow with Continuous Code Quality & Code Security.
Prerequisite: Make sure you have set up an account in Sonarqube or get the API keys from an admin.
On the Edit build pipeline page, select the Pre-Build Stage (or Post-Build Stage).
Click + Add task.
Select Sonarqube v1.1.0 from PRESET PLUGINS.
Enter a relevant name in the Task name field. It is a mandatory field.
Enter a descriptive message for the task in the Description field. It is an optional field.
Provide a value for the input variable. Note: The value may be any of the values from the previous build stages, a global variable, or a custom value.
Trigger/Skip Condition refers to a conditional statement to execute or skip the task. You can select either:
Set trigger conditions or
Set skip conditions
Pass/Fail Condition refers to a conditional statement to pass or fail the Pre-Build Stage (or Post-Build Stage). You can select either:
Set pass conditions or
Set failure conditions
Click Update Pipeline.
SonarqubeProjectPrefixName
String
This is the SonarQube project prefix name. If not provided, the prefix name is automatically generated.
SonarqubeBranchName
String
Branch name to be used to send the scanned result on sonarqube project.
SonarqubeProjectKey
String
Project key of SonarQube account
CheckForSonarAnalysisReport
Bool
Boolean value - true or false. Set true to poll for generated report from sonarqube.
AbortPipelineOnPolicyCheckFailed
Bool
Boolean value - true or false. Set true to abort on report check failed.
UsePropertiesFileFromProject
Bool
Boolean value - true or false. Set true to use source code sonar-properties file.
SonarqubeEndpoint
String
API endpoint of SonarQube account.
CheckoutPath
String
Checkout path of Git material.
SonarqubeApiKey
String
API key of SonarQube account
SonarContainerImage
String
Container Image that will be used for sonar scanning purpose.
We have multiple plugins available in Devtron. At the moment, here are the plugins for which user guide is available.
The Cosign plugin by Devtron enables secure signing of your container images, enhancing supply chain security. It authenticates your identity as the creator and ensures image integrity, allowing users to verify the source and detect any tampering. This provides greater assurance to developers incorporating your artifacts into their workflows.
Before integrating the Cosign plugin, ensure that you have configured the Cosign and have a set of private and public keys to sign the container images.
Go to Applications → Devtron Apps.
Click your application.
Go to App Configuration → Workflow Editor.
Click New Workflow and navigate to the Build and Deploy from Source Code.
Fill the required fields in the Create build pipeline window and navigate to the Post-build stage.
If you have already configured workflow, edit the build pipeline, and navigate to Post-build stage.
Under 'TASKS', click the + Add task button.
Click the Cosign plugin.
Enter the following user inputs with appropriate values.
Enter the name of your task
e.g., Signing of container images
Add a brief explanation of the task and the reason for choosing the plugin. Include information for someone else to understand the purpose of the task.
e.g., The Cosign plugin is integrated for ensuring the authenticity of container images.
PrivateKeyFilePath
STRING
Path of private key file in Git repo
cosign/cosign.key
PostCommand
STRING
Command to run after image is signed by Cosign
cosign verify $DOCKER_IMAGE
ExtraArguments
STRING
Arguments for Cosign command
--certificate-identity=name@example.com
CosignPassword
STRING
Password for Cosign private key
S3cur3P@ssw0rd123!
VariableAsPrivateKey
STRING
base64 encoded private-key
@{{COSIGN_PRIVATE_KEY}}
PreCommand
STRING
Command to get the required conditions to execute Cosign command
curl -sLJO https://raw.githubusercontent.com/devtron-labs/sampleRepo/branchName/private
Here you can set conditions to execute or skip the task. You can select Set trigger conditions for the execution of a task or Set skip conditions to skip the task.
Cosign will not be generating an output variable.
Click Update Pipeline.
The Devtron Job Trigger plugin enables you to trigger Devtron Jobs from your current application workflow. For example, by integrating this plugin at the pre-deployment stage of your application workflow, you can trigger jobs designed to run migration scripts in your database. This ensures that necessary migrations are executed before your application is deployed.
Before integrating the Devtron Job Trigger plugin, you need to properly configure the target Devtron Job to ensure smooth execution.
Go to Applications → Devtron Apps.
Click your application.
Go to App Configuration → Workflow Editor.
Click New Workflow and navigate to the Build and Deploy from Source Code.
Fill the required fields in the Create build pipeline window and navigate to the Create deployment pipeline.
Fill the required fields in the Deployment Stage window and navigate to the Pre-Deployment stage.
If you have already configured workflow, edit the deployment pipeline, and navigate to Pre-Deployment stage.
Under 'TASKS', click the + Add task button.
Select the Devtron Job Trigger plugin.
Enter the following user inputs with appropriate values.
Enter the name of your task
e.g., Triggers Devtron Job
Add a brief explanation of the task and the reason for choosing the plugin. Include information for someone else to understand the purpose of the task.
e.g., The Devtron Job Trigger plugin is integrated for triggering the Devtron Job.
DevtronApiToken
STRING
Enter Devtron API token with required permissions.
abc123def456token789
DevtronEndpoint
STRING
Enter the URL of Devtron dashboard.
https://devtron.example.com
DevtronJob
STRING
Enter the name or ID of Devtron Job to be triggered
plugin-test-job
DevtronEnv
STRING
Enter the name or ID of the Environment where the job is to be triggered. If JobPipeline is given, ignore this field and do not assign any value
prod
JobPipeline
STRING
Enter the name or ID of the Job pipeline to be triggered. If DevtronEnv is given, ignore this field and do not assign any value
hello-world
GitCommitHash
STRING
Enter the commit hash from which the job is to be triggered. If not given then, will pick the latest
cf19e4fd348589kjhsdjn092nfse01d2234235sdsg
StatusTimeoutSeconds
NUMBER
Enter the maximum time to wait for the job status
120
Here you can set conditions to execute or skip the task. You can select Set trigger conditions for the execution of a task or Set skip conditions to skip the task.
Devtron Job Trigger will not be generating an output variable.
Click Update Pipeline.
The DockerSlim plugin by Devtron helps you to optimize your container deployments by reducing Docker image size. Now with these lighter Docker images, you can perform faster deployments and enhance overall system efficiency.
Support for Docker buildx images will be added soon.
No prerequisites are required for integrating the DockerSlim plugin.
Go to Applications → Devtron Apps.
Click your application.
Go to App Configuration → Workflow Editor.
Click New Workflow and navigate to the Build and Deploy from Source Code.
Fill the required fields in the Create build pipeline window and navigate to the Post-build stage.
If you have already configured workflow, edit the build pipeline, and navigate to Post-build stage.
Under 'TASKS', click the + Add task button.
Click the DockerSlim plugin.
Enter the following user inputs with appropriate values.
Enter the name of your task
e.g., Reduce Docker image size
Add a brief explanation of the task and the reason for choosing the plugin. Include information for someone else to understand the purpose of the task.
e.g., The DockerSlim plugin is integrated for reducing the size of Docker image.
At IncludePathFile input variable list down the file path of essential files from your Dockerfile. Files for which the path is not listed at IncludePathFile will may be excluded from the Docker image to reduce size.
HTTPProbe
BOOL
Indicates whether the port is exposed in Dockerfile or not
false
IncludePathFile
STRING
File path of required files
/etc/nginx/include.conf
Here you can set conditions to execute or skip the task. You can select Set trigger conditions for the execution of a task or Set skip conditions to skip the task.
DockerSlim will not be generating an output variable.
Click Update Pipeline.
Configuring Dependency Track for NodeJs in pre-build or post build task creates a bill of materials from Maven & Gradle projects and environments and uploads it to D-track for Component Analysis to identify and reduce risk in the software supply chain.
Prerequisite: Make sure you have set up an account in dependency track or get the API keys from an admin.
On the Edit build pipeline page, select the Pre-Build Stage (or Post-Build Stage).
Click + Add task.
Select Dependency track for Maven & Gradle from PRESET PLUGINS.
Enter a relevant name in the Task name field. It is a mandatory field.
Enter a descriptive message for the task in the Description field. It is an optional field.
Provide a value for the input variable. Note: The value may be any of the values from the previous build stages, a global variable, or a custom value.
BuildToolType
String
Type of build tool your project is using. E.g., Maven, or Gradle
DTrackEndpoint
String
API endpoint of your dependency track account
DTrackProjectName
String
Name of your dependency track project
DTrackProjectVersion
String
Version of dependency track project
DTrackApiKey
String
API key of your dependency track account
CheckoutPath
String
Checkout path of Git material
Trigger/Skip Condition refers to a conditional statement to execute or skip the task. You can select either:
Set trigger conditions or
Set skip conditions
Click Update Pipeline.
Configuring Dependency Track for Python in pre-build or post build task creates a bill of materials from Python projects and environments and uploads it to D-track for Component Analysis to identify and reduce risk in the software supply chain.
Prerequisite: Make sure you have set up an account in dependency track or get the API keys from an admin.
On the Edit build pipeline page, select the Pre-Build Stage (or Post-Build Stage).
Click + Add task.
Select Dependency track for Python from PRESET PLUGINS.
Enter a relevant name in the Task name field. It is a mandatory field.
Enter a descriptive message for the task in the Description field. It is an optional field.
Provide a value for the input variable. Note: The value may be any of the values from the previous build stages, a global variable, or a custom value.
ProjectManifestType
String
RelativePathToPoetryLock
String
Path to your poetry.lock file inside your project
RelativePathToPipfile
String
Path to your Pipfile.lock file inside your project
RelativePathToRequirementTxt
String
Path to your requirements.txt file inside your project
DTrackEndpoint
String
API endpoint of your dependency track account
DTrackProjectName
String
Name of your dependency track project
DTrackProjectVersion
String
Version of dependency track project
DTrackApiKey
String
API key of your dependency track account
CheckoutPath
String
Checkout path of Git material
Trigger/Skip Condition refers to a conditional statement to execute or skip the task. You can select either:
Set trigger conditions or
Set skip conditions
Click Update Pipeline.
The EKS Create Cluster plugin streamlines the creation of a Amazon Elastic Kubernetes Service (EKS) cluster through the eksctl config file or by providing some required input parameters. This plugin automates the provisioning of EKS by which you can save time, ensures consistency in cluster setup, maintain security standards, and provides a Kubernetes-ready environment for deploying your containerized applications.
Before integrating the EKS Create Cluster plugin make sure that you have a AWS account with valid permissions to provision EKS.
Navigate to the Jobs section, click Create, and choose Job.
In the 'Create job' window, enter Job Name and choose a target project.
Click Create Job.
In the 'Configurations' tab, fill the required fields under the 'Source code' section and click Save.
In Workflow Editor, click + Job Pipeline.
Give a name to the workflow and click Create Workflow.
Click Add job pipeline to this workflow.
Fill the required fields in ‘Basic configuration’ tab.
Go to the ‘Tasks to be executed’ tab.
Under ‘Tasks’, click the + Add task button.
Select the EKS Create Cluster plugin.
Enter the following with appropriate values.
Enter the name of your task
e.g., EKS Create Cluster
Add a brief explanation of the task and the reason for choosing the plugin. Include information for someone else to understand the purpose of the task.
e.g., The EKS Create Cluster plugin is integrated for provisioning of EKS cluster.
Here you can set conditions to execute or skip the task. You can select Set trigger conditions for the execution of a task or Set skip conditions to skip the task.
Click Update Pipeline.
The CraneCopy plugin by Devtron facilitates the transfer of multi-architecture container images between registries. When integrated into Devtron's Post-build stage, this plugin allows you to efficiently copy and store your container images to a specified target repository.
No prerequisites are required for integrating the CraneCopy plugin.
Go to Applications → Devtron Apps.
Click your application.
Go to App Configuration → Workflow Editor.
Click New Workflow and navigate to the Build and Deploy from Source Code.
Fill the required fields in the Create build pipeline window and navigate to the Post-build stage.
If you have already configured workflow, edit the build pipeline, and navigate to Post-build stage.
Under 'TASKS', click the + Add task button.
Click the CraneCopy plugin.
Enter the following with appropriate values.
Enter the name of your task
e.g., Copy and store container images
Add a brief explanation of the task and the reason for choosing the plugin. Include information for someone else to understand the purpose of the task.
e.g., The CraneCopy plugin is integrated to copy the container images from one registry to another.
Here you can set conditions to execute or skip the task. You can select Set trigger conditions for the execution of a task or Set skip conditions to skip the task.
CraneCopy will not be generating an output variable.
Click Update Pipeline.
Configuring Dependency Track for NodeJs in pre-build or post build task creates a bill of materials from NodeJs projects and environments and uploads it to D-track for to identify and reduce risk in the software supply chain.
Prerequisite: Make sure you have set up an account in dependency track or get the API keys from an admin.
On the Edit build pipeline page, select the Pre-Build Stage (or Post-Build Stage).
Click + Add task.
Select Dependency track for NodeJs from PRESET PLUGINS.
Enter a relevant name in the Task name field. It is a mandatory field.
Enter a descriptive message for the task in the Description field. It is an optional field.
Provide a value for the input variable. Note: The value may be any of the values from the previous build stages, a global variable, or a custom value.
Trigger/Skip Condition refers to a conditional statement to execute or skip the task. You can select either:
Set trigger conditions or
Set skip conditions
Click Update Pipeline.
This plugin streamlines the creation and configuration of a Google Kubernetes Engine (GKE) cluster on your Google Cloud Platform (GCP). It automates the provisioning process while implementing essential security measures, including a preconfigured firewall that allows access to SSH, HTTP (port 80), 8080, and Kubernetes NodePorts. By automating the GKE provisioning process through this plugin, you can save time, ensure consistency in cluster setup, maintain security standards, and provide a Kubernetes-ready environment for deploying your containerized applications.
The GKE Provisioner plugin creates a , not an Autopilot GKE cluster.
Before integrating the GKE Provisioner plugin make sure that you have a GCP account with valid permissions to provision GKE.
Navigate to the Jobs section, click Create, and choose Job.
In the 'Create job' window, enter Job Name and choose a target project.
Click Create Job.
In the 'Configurations' tab, fill the required fields under the 'Source code' section and click Save.
In Workflow Editor, click + Job Pipeline.
Give a name to the workflow and click Create Workflow.
Click Add job pipeline to this workflow.
Fill the required fields in ‘Basic configuration’ tab.
Go to the ‘Tasks to be executed’ tab.
Under ‘Tasks’, click the + Add task button.
Select the GKE Provisioner plugin.
Enter the following with appropriate values.
Enter the name of your task
e.g., GKE Provisioner
Add a brief explanation of the task and the reason for choosing the plugin. Include information for someone else to understand the purpose of the task.
e.g., The GKE Provisioner plugin is integrated for provisioning of GKE cluster.
Here you can set conditions to execute or skip the task. You can select Set trigger conditions for the execution of a task or Set skip conditions to skip the task.
Click Update Pipeline.
Building container images in CI often results in a growing number of images, not all of which are production-ready. Therefore, it's a best practice to maintain a separate repository exclusively for storing production-builds. However, this would involve copying the container image (production-ready) from your existing repository to the production repository.
This plugin helps you copy a container image to a desired container . The pushing of image can be between repositories of the same container or between repositories of different container registry. One of the major usecases this plugin serves is multi-cloud deployments.
The plugin can be used at post CI, pre-CD, and post-CD. Moreover, you can also for the copied image.
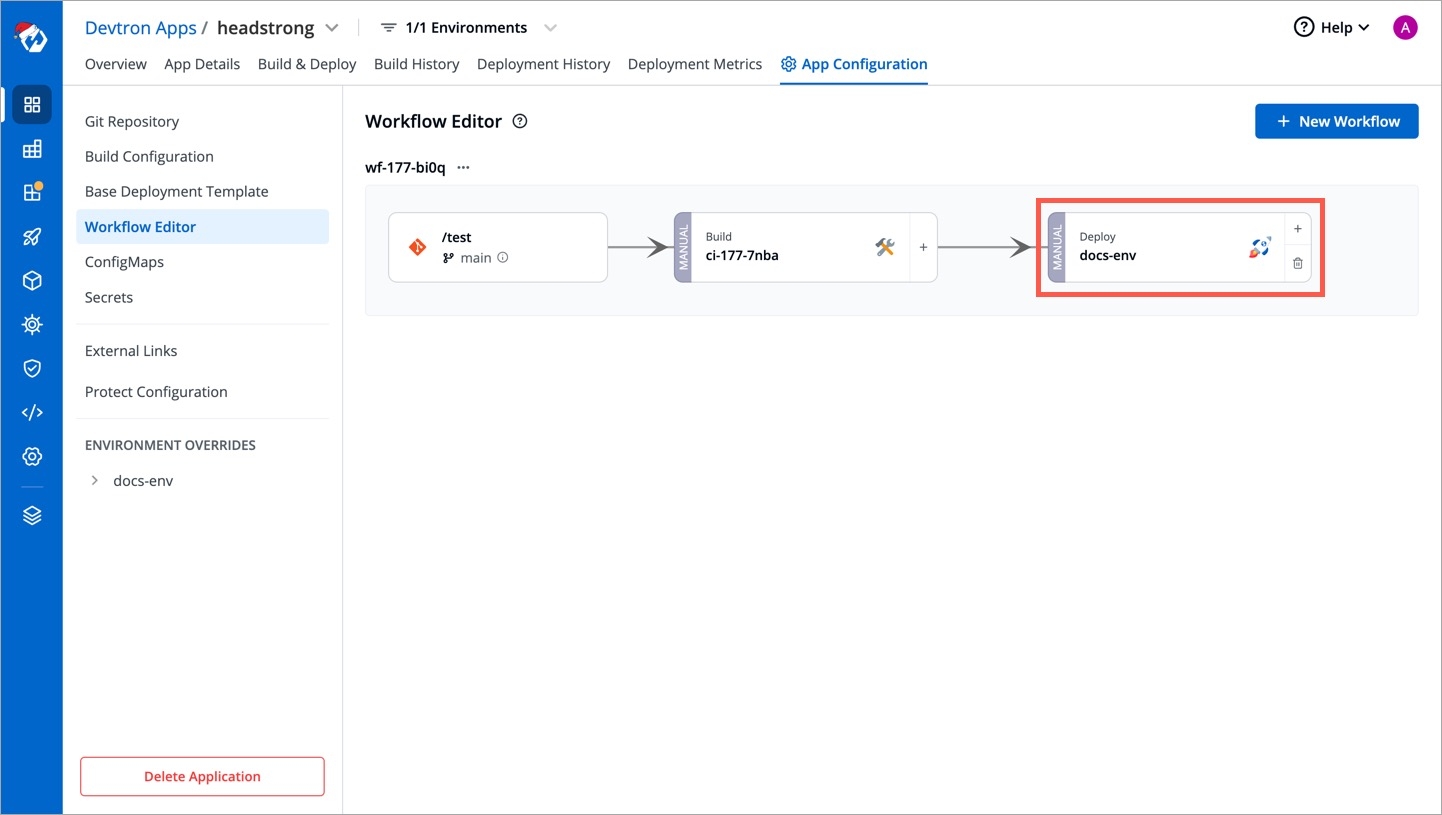
Go to App Configuration tab of your application.
Select Workflow Editor and click your deployment pipeline.
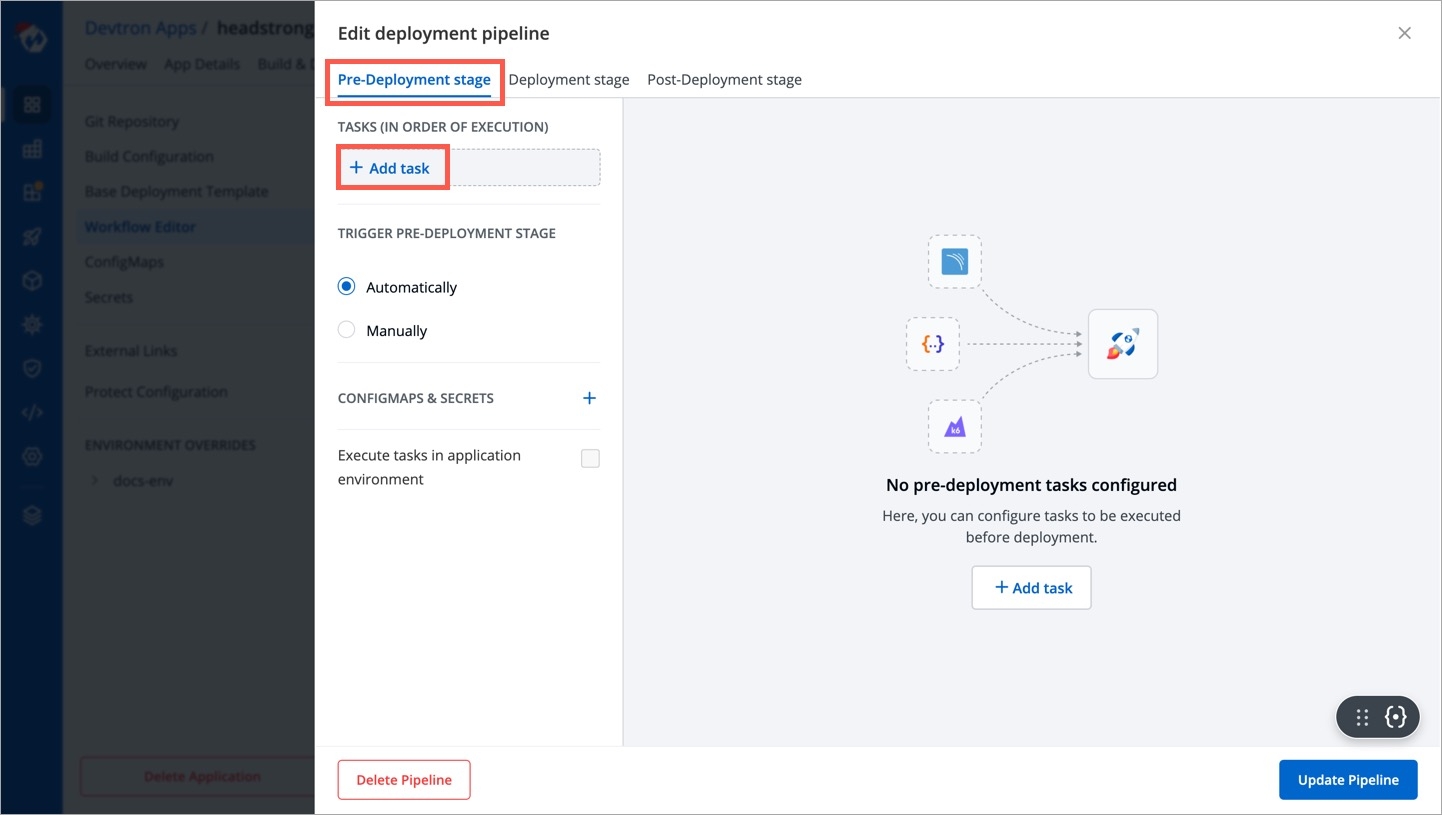
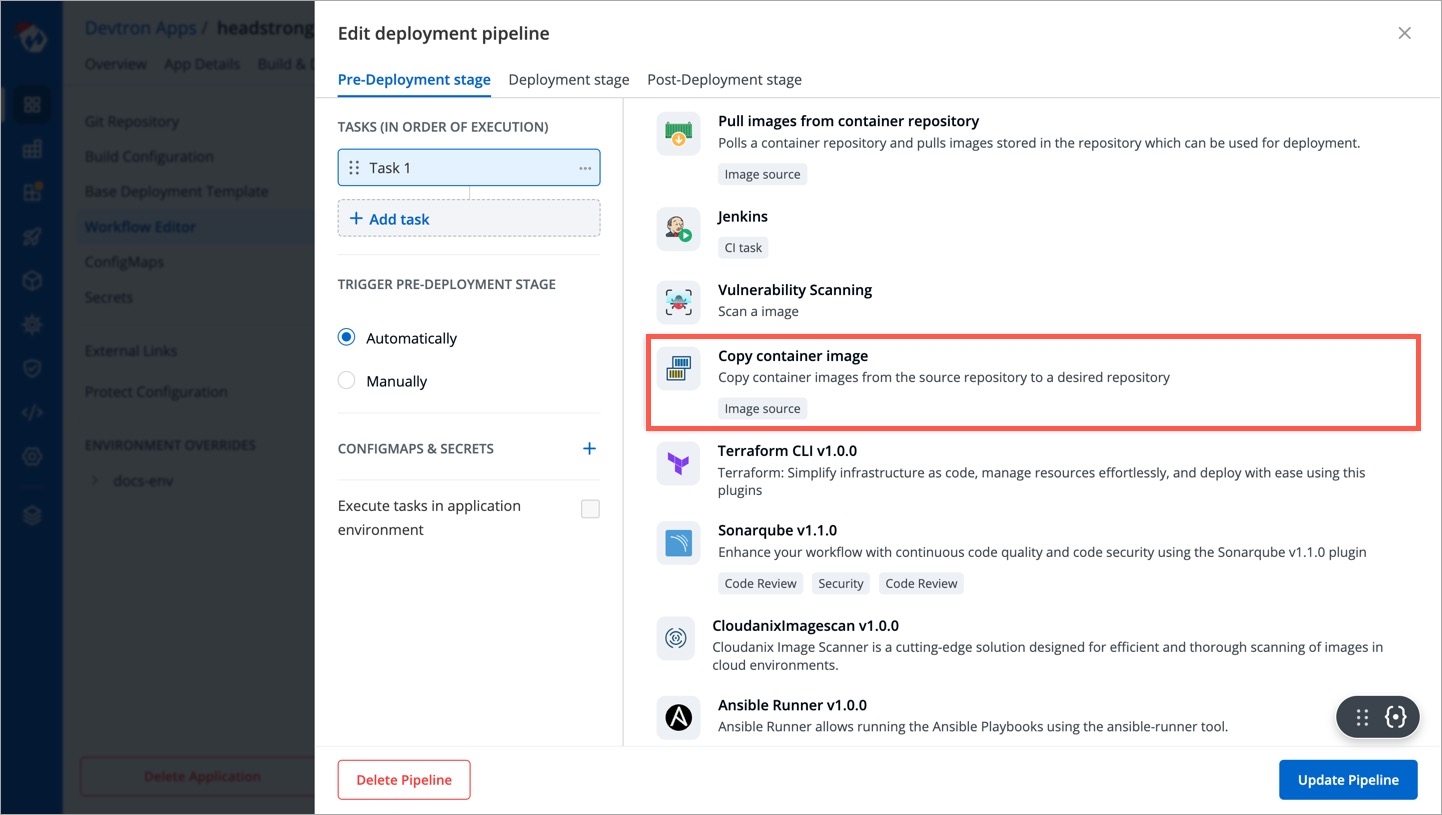
In this example, we will be adding the plugin in pre-CD stage; therefore, go to Pre-Deployment stage tab of your deployment pipeline and click Add task.
From the list of plugins, choose Copy container image.
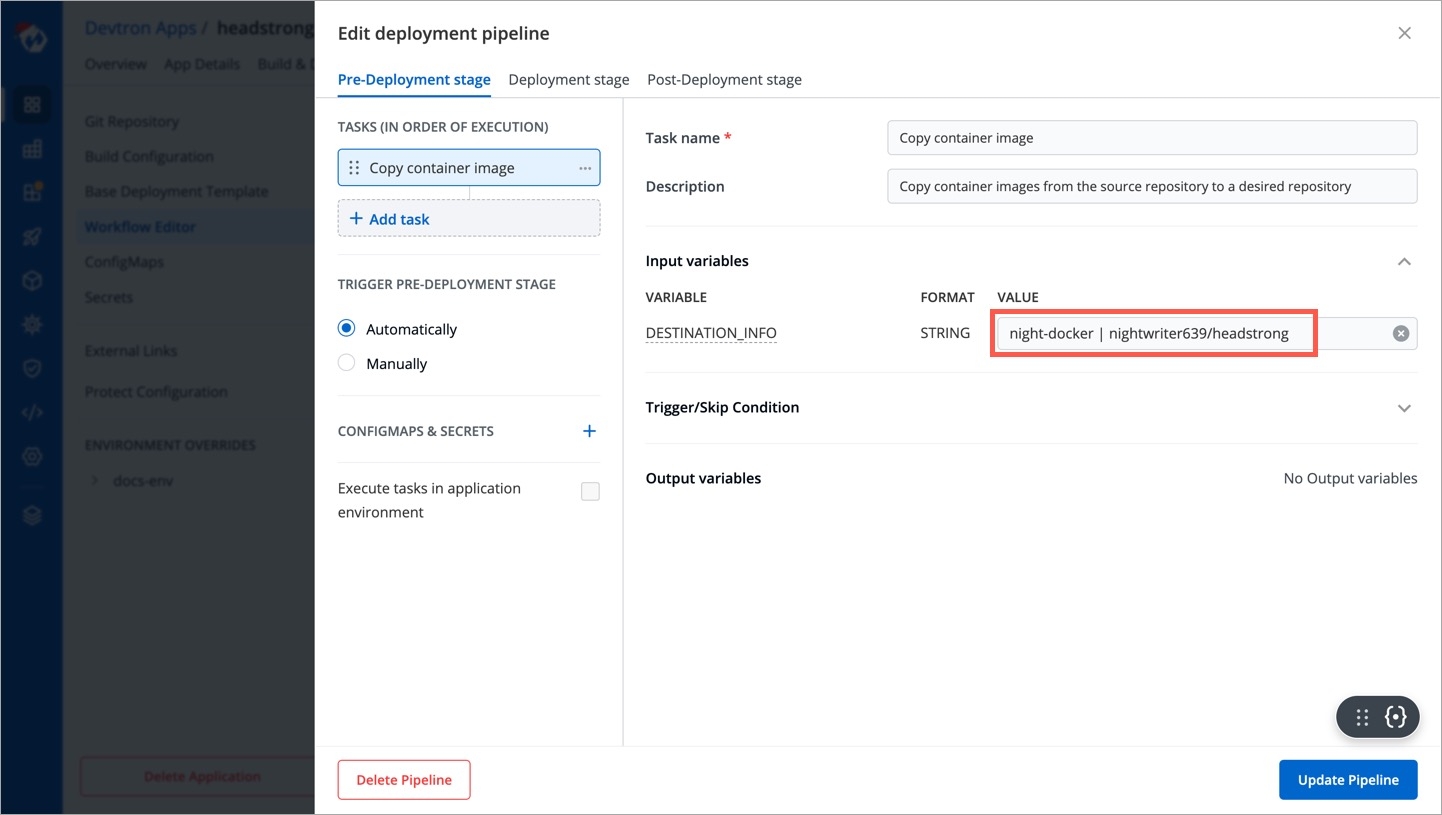
Add the image destination in the field given for DESTINATION_INFO variable. The format is registry-name | username/repository-name.
registry-name is the name you gave to your container registry while adding it in .
user-name is the your account name registered with you container registry, e.g., DockerHub.
repository-name is the name of the repository within your container registry that hosts the container images of your application.
Click Update Pipeline.
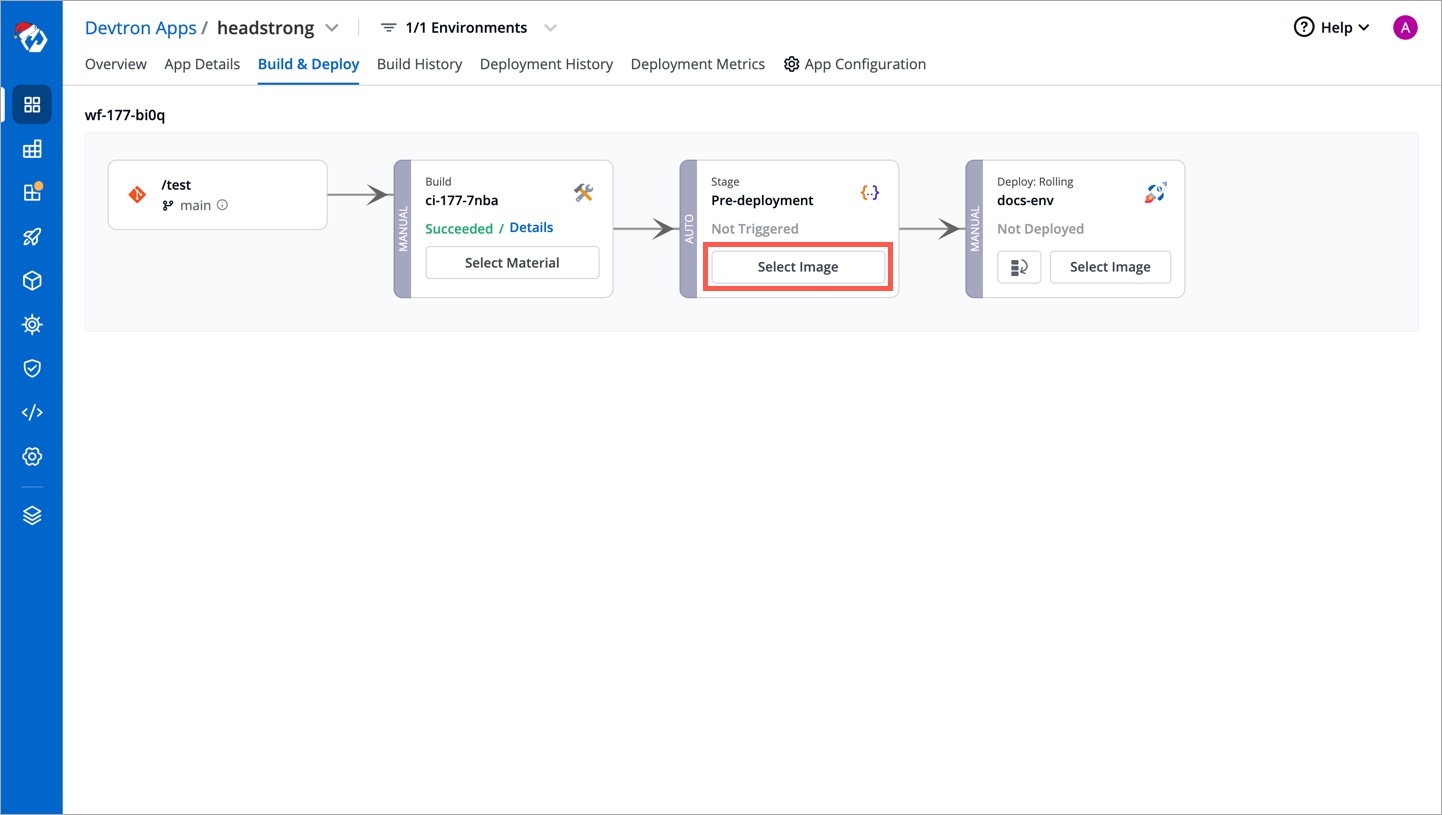
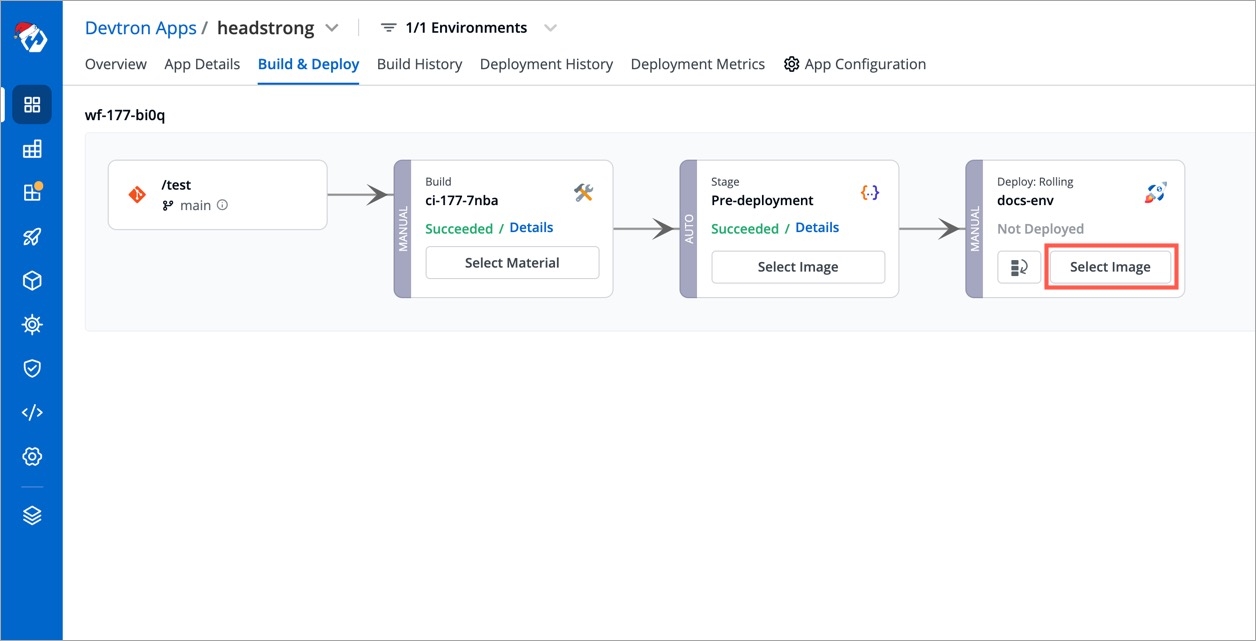
Go to the Build & Deploy tab of your application and click Select Image in the pre-deployment stage.
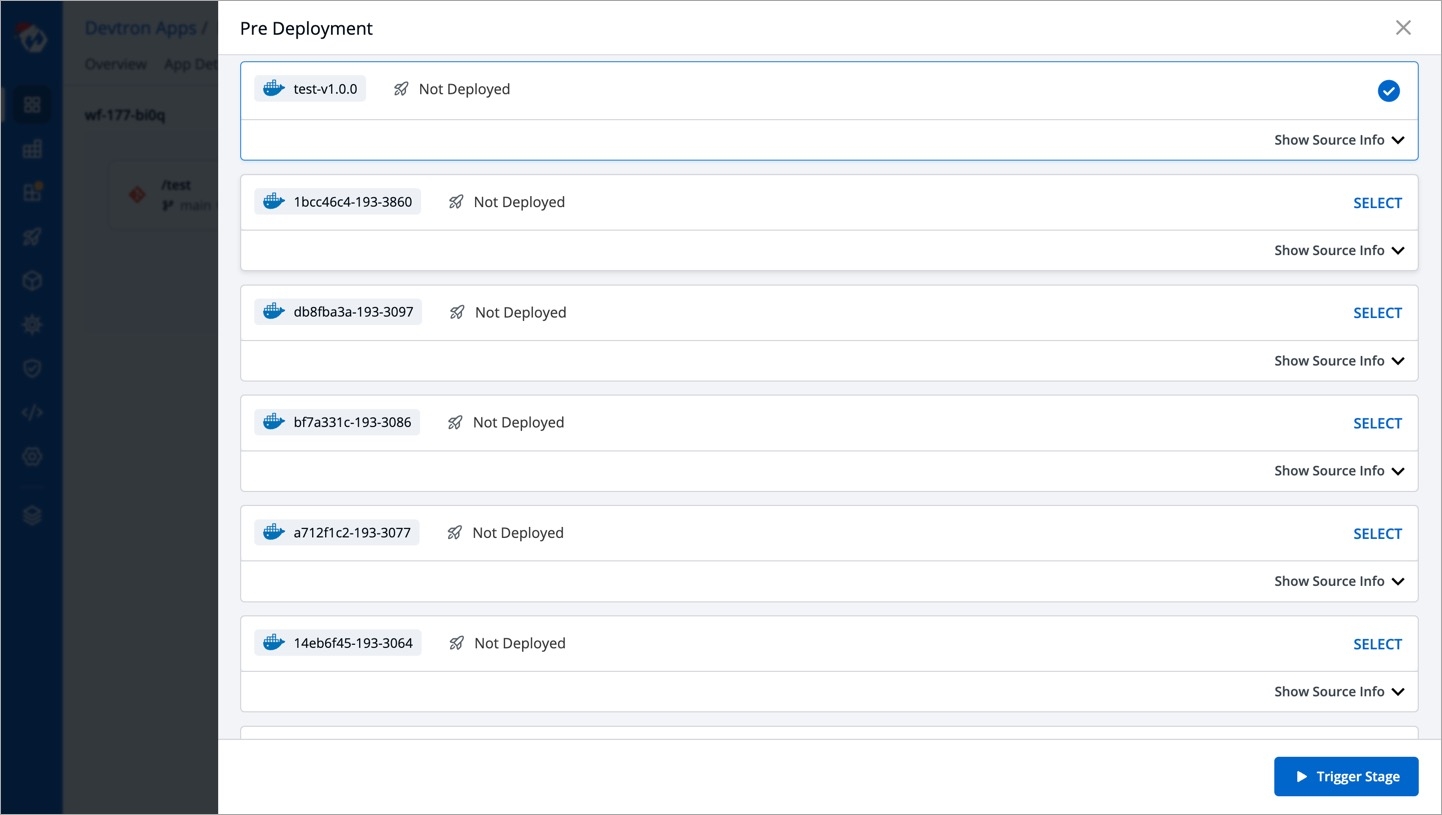
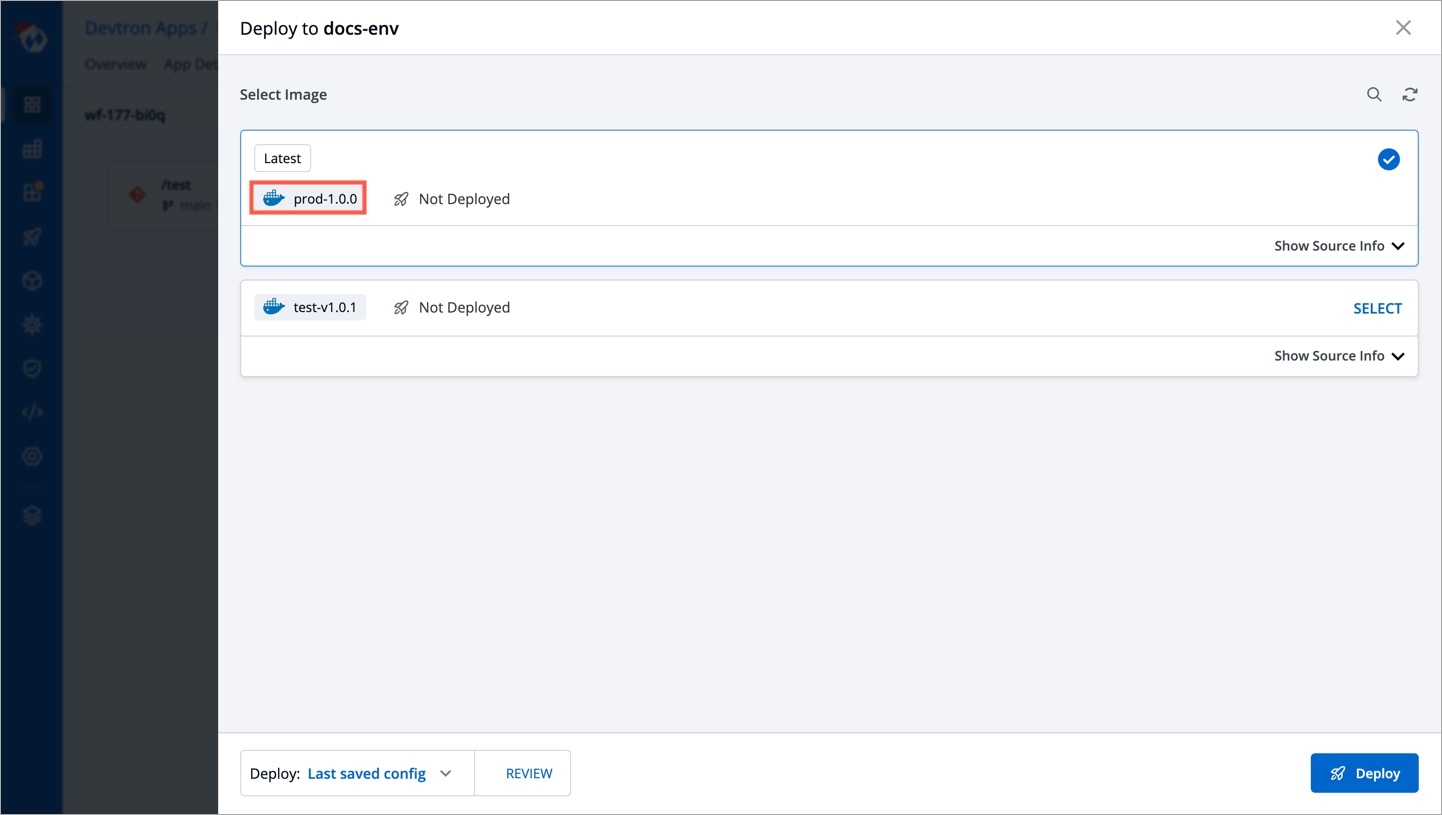
Choose a CI image that you wish to copy to the destination and click Trigger Stage.
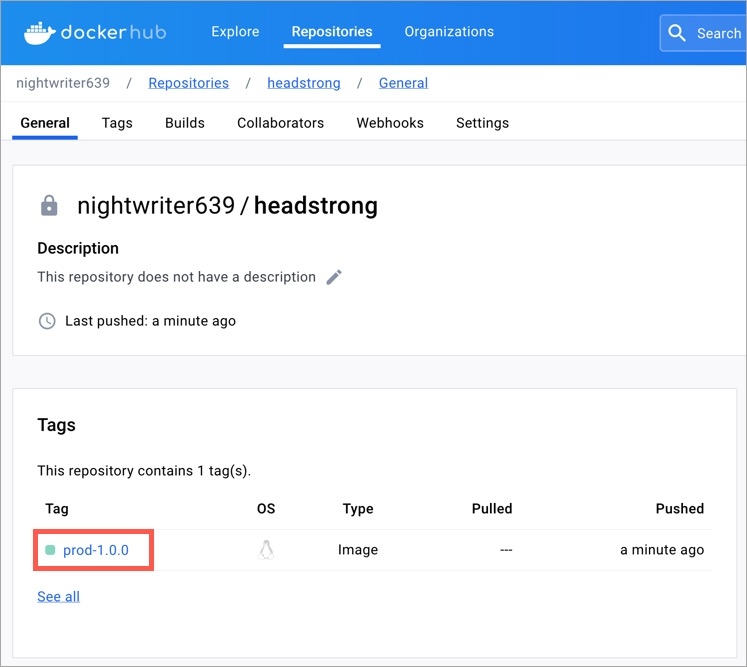
The copying process will initiate, and once it is successful, the would reflect at all relevant screens:
Destination Repository
CD Pipeline (Image Selection)
The Devtron CD Trigger plugin allows you to trigger the PRE-CD, CD, or POST-CD stages of target Devtron App from within your current application workflow. This plugin offers flexibility in managing application dependencies and deployment sequences. For example, by incorporating this plugin at the pre-deployment stage of your application workflow, you can deploy another application that contains dependencies required by your current application, ensuring a coordinated deployment process.
Before integrating the Devtron CD Trigger plugin, you need to properly configure the target Devtron App to ensure smooth execution.
Go to Applications → Devtron Apps.
Click your application.
Go to App Configuration → Workflow Editor.
Click New Workflow and navigate to the Build and Deploy from Source Code.
Fill the required fields in the Create build pipeline window and navigate to the Create deployment pipeline.
Fill the required fields in the Deployment Stage window and navigate to the Post-Deployment stage.
If you have already configured workflow, edit the deployment pipeline, and navigate to Post-Deployment stage.
Under 'TASKS', click the + Add task button.
Select the Devtron CD Trigger plugin.
Enter the following with appropriate values.
Enter the name of your task
e.g., Triggers CD Pipeline
Add a brief explanation of the task and the reason for choosing the plugin. Include information for someone else to understand the purpose of the task.
e.g., The Devtron CD Trigger plugin is integrated for triggering the CD stage of another application.
Here you can set conditions to execute or skip the task. You can select Set trigger conditions for the execution of a task or Set skip conditions to skip the task.
Devtron CD Trigger will not be generating an output variable.
Click Update Pipeline.
The Devtron CI Trigger plugin allows you to trigger the CI stages of the target Devtron App from the current application workflow. This plugin offers flexibility in managing application dependencies. For example, by incorporating this plugin into your application workflow, you can trigger CI builds of other applications that contain dependencies required by your current application, ensuring a smooth and coordinated CI/CD process.
Before integrating the Devtron CI Trigger plugin, you need to properly configure the target CI pipeline of the Devtron App to ensure smooth execution.
Go to Applications → Devtron Apps.
Click your application.
Go to App Configuration → Workflow Editor.
Click New Workflow and navigate to the Build and Deploy from Source Code.
Fill the required fields in the Create build pipeline window and navigate to the Create deployment pipeline.
Fill the required fields in the Deployment Stage window and navigate to the Pre-Deployment stage.
If you have already configured workflow, edit the deployment pipeline, and navigate to Pre-Deployment stage.
Under 'TASKS', click the + Add task button.
Select the Devtron CI Trigger plugin.
Enter the following with appropriate values.
Enter the name of your task
e.g., Triggers CI Pipeline
Add a brief explanation of the task and the reason for choosing the plugin. Include information for someone else to understand the purpose of the task.
e.g., The Devtron CI Trigger plugin is integrated for triggering the CI stage of another application.
Here you can set conditions to execute or skip the task. You can select Set trigger conditions for the execution of a task or Set skip conditions to skip the task.
Devtron CI Trigger will not be generating an output variable.
Click Update Pipeline.
The GitHub Pull Request Updater plugin automatically adds pipeline status and deployment information as comments on your GitHub pull requests. Every time your Devtron CI pipeline runs, you get instant visibility onto the specific pull request on GitHub. This seamless integration eliminates the need to switch between multiple tools or platforms to track your deployment. Development teams also save time by avoiding manual status updates and reducing the back-and-forth communication about deployment states.
Before integrating the GitHub Pull Request Updater plugin, ensure you have a GitHub Personal Access Token (PAT) with appropriate permissions to access your GitHub repository.
Go to Applications → Devtron Apps.
Click your application.
Go to App Configuration → Workflow Editor.
Click New Workflow and navigate to the Build and Deploy from Source Code.
Fill the required fields in the Create build pipeline window and navigate to the Post-build stage.
If you have already configured workflow, edit the build pipeline, and navigate to Post-build stage.
Under 'TASKS', click the + Add task button.
Click the GitHub Pull Request Updater plugin.
Enter the following with appropriate values.
Enter the name of your task
e.g., GitHub Pull Request Updater
Add a brief explanation of the task and the reason for choosing the plugin. Include information for someone else to understand the purpose of the task.
e.g., A plugin to update GitHub pull request
Here you can set conditions to execute or skip the task. You can select Set trigger conditions for the execution of a task or Set skip conditions to skip the task.
The GitHub Pull Request Updater plugin will not be generating an output variable.
Click Update Pipeline.
The Pull images from container repository plugin helps you poll the specified container repository and fetch the container images to deploy them on your target Kubernetes environments using Devtron's CD pipeline. By integrating this plugin you can:
Poll the designated container repository to get the specific container image build using external CI like Jenkins and Github actions. Once the image becomes available, you can deploy it to your target Kubernetes environment using Devtron's CD pipeline.
Currently, this plugin only supports ACR and ECR registry. Support for other container registries will be added soon.
Before integrating the Pull images from the container repository plugin, ensure that you have a specific container image present at your ECR container repository to pull the image and deploy it to the target environment.
Go to Applications → Devtron Apps.
Click your application.
Go to App Configuration → Workflow Editor.
Click New Workflow and navigate to the CREATE JOB PIPELINE.
Enter the required fields in the Basic configuration window.
Under 'TASKS', click the + Add task button.
Select the Pull images from container repository plugin.
Enter the following with appropriate values.
Enter the name of your task.
e.g., Pull container image
Add a brief explanation of the task and the reason for choosing the plugin. Include information for someone else to understand the purpose of the task.
e.g., Pull container image build by external CI
Here you can set conditions to execute or skip the task. You can select Set trigger conditions for the execution of a task or Set skip conditions to skip the task.
Pull images from container repository will not be generating an output variable.
Click Update Pipeline.
The GCS Create Bucket plugin of Devtron enables automated creation of Google Cloud Storage (GCS) bucket directly within CI/CD workflows. By integrating the GCS Create Bucket plugin, teams can simplify cloud storage provisioning and can efficiently manage and store application logs, deployment artifacts, backup data, and other critical application assets in a centralized cloud storage.
Before integrating the GCS Create Bucket plugin, ensure you have a Google Cloud Platform (GCP) account and GCP Project with appropriate permissions.
Navigate to the Jobs section, click Create, and choose Job.
In the 'Create job' window, enter Job Name and choose a target project.
Click Create Job.
In the 'Configurations' tab, fill the required fields under the 'Source code' section and click Save.
In Workflow Editor, click + Job Pipeline.
Give a name to the workflow and click Create Workflow.
Click Add job pipeline to this workflow.
Fill the required fields in ‘Basic configuration’ tab.
Go to the ‘Tasks to be executed’ tab.
Under ‘Tasks’, click the + Add task button.
Select the GCS Create Bucket plugin.
Enter the following with appropriate values.
Enter the name of your task
e.g., GCS Create Bucket
Add a brief explanation of the task and the reason for choosing the plugin. Include information for someone else to understand the purpose of the task.
e.g., A Plugin to create GCS Bucket
Here you can set conditions to execute or skip the task. You can select Set trigger conditions for the execution of a task or Set skip conditions to skip the task.
Here you can define when a task should be marked as passed or failed. You can select Set pass conditions to define success criteria or Set failure conditions to specify failure scenarios.
Click Update Pipeline.
Type of your Python project manifest which is used to build cycloneDx . E.g., PIP, Poetry etc.
You can also filter out specific images (of target repository) from deployment. Refer to know the process.
MinNodes
STRING
Minimum number of nodes in the EKS NodeGroup.
1
MaxNodes
STRING
Maximum number of nodes in the EKS NodeGroup.
1
UseEKSConfigFile
BOOL
Flag to use a config file for EKS cluster creation (true/false).
false
EKSConfigFilePath
STRING
Path to the EKS cluster configuration file (required if UseEKSConfigFile flag is true).
eksctl-configs/eks-arm-config.yaml
EnablePlugin
BOOL
Flag to enable the EKS Create Cluster plugin.
true
AutomatedName
BOOL
Flag to enable naming for the cluster (true/false).
false
UseIAMNodeRole
BOOL
Flag to use IAM Node Role for EKS cluster creation.
false
AWSAccessKeyId
STRING
Valid AWS access key ID for authentication.
VtbXliYXNlNjR2YWx1
AWSSecretAccessKey
STRING
AWS secret access key for authentication.
Njknsdcwjnchwjn34nk
ClusterName
STRING
Name for the EKS cluster.
prod-us
Version
STRING
Kubernetes version to use for the EKS cluster.
1.30
Region
STRING
AWS region where the EKS cluster will be provisioned.
ap-south-1
Zones
STRING
Availability zone for the EKS cluster.
ap-south-1a,ap-south-1b
NodeGroupName
STRING
Name for the EKS cluster's NodeGroup.
prod-us-01
NodeType
STRING
EC2 instance type for EKS worker nodes.
t3.medium
DesiredNodes
STRING
Desired number of nodes in the EKS cluster.
1
CreatedClusterName
STRING
Name of the created EKS cluster.
EKSKubeConfigPath
STRING
File path of the generated EKS cluster kubeconfig
RegistryUsername
STRING
Username of target registry for authentication
admin
RegistryPassword
STRING
Password for the target registry for authentication
Tr5$mH7p
TargetRegistry
STRING
The target registry to push to image
docker.io/dockertest
GcpServiceAccountEncodedCredential
STRING
GCP Service Account credentials (base64 encoded) for GKE cluster creation.
ZHVtbXliYXNlNjR2YWx1ZQ==
GkeMinNodes
STRING
Minimum node count for the GKE cluster (default: 1)
2
DisplayGkeKubeConfig
BOOL
Flag to determine if the GKE Kubeconfig should be displayed.
true
Identifier
STRING
Brief description of the GKE cluster's purpose or characteristics
plugin-demo-test
GkeMaxNodes
STRING
Maximum node count for the GKE cluster (default: 3).
4
GkeNodeServiceAccountName
STRING
Custom GCP service account name for node VMs (uses project default if not specified)
gke-node-service-account-xyz123
GkeRegion
STRING
GCP region for cluster provisioning (default: us-central1).
us-central1
GkeMachineType
STRING
Machine type for GKE nodes (default: n1-standard-4).
e2-medium
GkeImageType
STRING
OS image for GKE nodes (default: COS_CONTAINERD).
COS_CONTAINERD
GcpProjectId
STRING
GCP project ID where the GKE cluster will be created.
gcp-68493
GkeClusterVersion
STRING
Kubernetes version for the GKE cluster.
1.30.2-gke.1587003
GkeKubeconfigFilePath
STRING
File path of the generated GKE cluster kubeconfig
DevtronApiToken
STRING
Enter target Devtron API token.
abc123DEFxyz456token789
DevtronEndpoint
STRING
Enter the target URL of Devtron.
https://devtron.example.com
DevtronApp
STRING
Enter the target Devtron Application name/ID
plugin-demo
DevtronEnv
STRING
Enter the target Environment name/ID. Required if JobPipeline is not given
preview
StatusTimeoutSeconds
STRING
Enter the maximum time (in seconds) a user can wait for the application to deploy. Enter a positive integer value
120
GitCommitHash
STRING
Enter the git hash from which user wants to deploy its application. By default it takes latest Artifact ID to deploy the application
cf19e4fd348589kjhsdjn092nfse01d2234235sdsg
TargetTriggerStage
STRING
Enter the Trigger Stage PRE/DEPLOY/POST. Default value is Deploy.
PRE
DevtronApiToken
STRING
Enter Devtron API token.
abc123DEFxyz456token789
DevtronEndpoint
STRING
Enter the URL of Devtron.
https://devtron.example.com
DevtronApp
STRING
Enter the Devtron Application name/Id.
plugin-demo
DevtronEnv
STRING
Enter the Environment name/Id. Required if JobPipeline is not given.
preview
CiPipeline
STRING
Enter the name or ID of the CI pipeline to be triggered. Required if DevtronEnv is not given.
ci-176-yu5g
GitCommitHash
STRING
Enter the git hash from which user wants to deploy its application. By default it takes latest Artifact ID to deploy the application.
cf19e4fd348589kjhsdjn092nfse01d2234235sdsg
Timeout
NUMBER
Enter the maximum time to wait for the build status(in seconds).
120
AccessToken
STRING
GitHub Personal Access Token (PAT) with appropriate permissions, used for authentication.
ghp_1234abcd5678efgh9012ijkl3456mnop
UpdateWithDockerImageId
BOOL
When set to true, the plugin will include Docker image information in PR comments. Default: True
true
UpdateWithBuildStatus
BOOL
When set to true, the plugin will update PR comments with pipeline build status including success/failure state. Default: True
true
REPOSITORY
STRING
Provide name of repository for polling
dev-repo
BucketName
STRING
Name of the GCS bucket to be created
my-app-logs-bucket
StorageClass
STRING
Storage class for the bucket (STANDARD, NEARLINE, COLDLINE, ARCHIVE)
archive
Project
STRING
GCP project ID where the bucket will be created
gcp-68493
EnableBucketPrefix
STRING
Enable prefix for bucket naming (true/false)
true
ServiceAccountCred
STRING
Base64 encoded GCP service account credentials
eyJ0eXBlIjoic2VydmljZV9hY2
LocationType
STRING
Type of location (region/dual-region/multi-region)
region
Location
STRING
Geographic location where bucket will be created
us-central1
EnableAutoClass
BOOL
Automatically optimizes storage costs by moving objects between storage classes based on how frequently they are accessed. The default is false.
true
UniformAccess
STRING
Enable uniform bucket-level access control to create a bucket with bucket-level permissions instead of an Access control list (true/false)
true
BucketName
STRING
The name of the bucket created.
DTrackEndpoint
String
API endpoint of your dependency track account
DTrackProjectName
String
Name of your dependency track project
DTrackProjectVersion
String
Version of dependency track project
DTrackApiKey
String
API key of your dependency track account
CheckoutPath
String
Checkout path of Git material
Jenkins is an open-source Continuous Integration (CI) server. You can manage multiple stages of software delivery using Jenkins including Automated testing, Static Code Analysis, Building, Packaging, and Deploying. With Devtron's Jenkins plugin, you can:
Trigger pre-configured Jenkins jobs from Devtron and stream the logs to the Devtron dashboard.
Execute Jenkins build pipelines through Devtron and deploy to target environments using the Devtron CD pipeline.
Before integrating the Jenkins plugin, ensure that you have properly configured your Jenkins job and also have the necessary parameters set for triggering from Devtron.
Go to Applications → Devtron Apps.
Click on your application.
Go to App Configuration → Workflow Editor.
Click New Workflow and navigate to the CREATE JOB PIPELINE.
Enter the required fields in the Basic configuration window.
Under 'TASKS', click the + Add task button.
Click the Jenkins plugin.
Enter the following user inputs with appropriate values.
Enter the name of your task.
e.g. Jenkins_Job
Add a brief explanation of the task and the reason for choosing the plugin. Include information for someone else to understand the purpose of the task.
e.g. Trigger the build Job of Jenkins
URL
STRING
The base URL of the Jenkins server.
https://jenkins.example.com
USERNAME
STRING
Username for Jenkins server.
admin
PASSWORD
STRING
Password of the Jenkins user for authentication
securePass123!
JOB_NAME
STRING
The name of the Jenkins job to be triggered.
CI-build-job
JOB_TRIGGER_PARAMS
STRING
Parameters to be passed for triggering a job.
branch=main&environment=production
JENKINS_PLUGIN_TIMEOUT
INTEGER
The maximum time (in minutes) to wait for a Jenkins plugin operation to complete before timing out.
60
Here you can set conditions to execute or skip the task. You can select Set trigger conditions for the execution of a task or Set skip conditions to skip the task.
Jenkins will not be generating an output variable.
Click Update Pipeline.
Semgrep is a fast, open source, static analysis engine for finding bugs, detecting dependency vulnerabilities, and enforcing code standards.
Prerequisite: Make sure you have set up an account in Semgrep or get the API keys from an admin.
On the Edit build pipeline page, select the Pre-Build Stage (or Post-Build Stage).
Click + Add task.
Select Semgrep from PRESET PLUGINS.
Enter a relevant name in the Task name field. It is a mandatory field.
Enter a descriptive message for the task in the Description field. It is an optional field.
Provide a value for the input variable. Note: The value may be any of the values from the previous build stages, a global variable, or a custom value.
SemgrepAppToken
String
App token of Semgrep. If it is provided, this token will be used, otherwise it will be picked from Global Secret.
PrefixAppNameInSemgrepBranchName
Bool
Enter either true or false accordingly whether you want app name to be reflected with a branch name. If it is true, it will add app name with branch name. E.g., {SemgrepAppName}-{branchName}
UseCommitAsSemgrepBranchName
Bool
Enter either true or false accordingly whether you want app name to be reflected with commit hash. If it is true, it will add app name with commit hash. E.g., {SemgrepAppName}-{CommitHash}.
SemgrepAppName
String
App name for Semgrep. If it is provided, and PrefixAppNameInSemgrepBranchName is true, then this will be prefixed with branch name/commit hash.
ExtraCommandArguments
String
Extra command arguments for Semgrep CI command. E.g., Input: --json --dry-run.
Trigger/Skip Condition refers to a conditional statement to execute or skip the task. You can select either:
Set trigger conditions or
Set skip conditions
Click Update Pipeline.
The Vulnerability Scanning plugin by Devtron enables you to scan and detect vulnerabilities of your applications using Trivy/Clair. The Vulnerability Scanning plugin is recommended to be integrated into the Job Pipeline, especially when you are using external CI pipelines like Jenkins, GitLab, or GitHub Actions. Based on Vulnerability Scanning results, you can enforce security policies to either proceed with or abort the deployment process, giving you more control over your deployment process.
Before integrating the Vulnerability Scanning plugin, ensure that you have installed the Vulnerability Scanning (Trivy/Clair) integration from Devtron Stack Manager.
Go to Applications → Devtron Apps.
Click your application.
Go to App Configuration → Workflow Editor.
Click New Workflow and navigate to the CREATE JOB PIPELINE.
Enter the required fields in the Basic configuration window.
Click Task to be executed.
Under 'TASKS', click the + Add task button.
Click the Vulnerability Scanning plugin.
Enter the following user inputs with appropriate values.
Enter the name of your task
e.g., Vulnerability Scanning for External CI
Add a brief explanation of the task and the reason for choosing the plugin. Include information for someone else to understand the purpose of the task.
e.g., The Vulnerability Scanning plugin is integrated for detecting vulnerabilities in applications.
IMAGE_SCAN_MAX_RETRIES
STRING
Maximum retries for image scanning.
2
IMAGE_SCAN_RETRY_DELAY
STRING
Delay between image scanning retries (seconds).
120
Here you can set conditions to execute or skip the task. You can select Set trigger conditions for the execution of a task or Set skip conditions to skip the task.
Vulnerability Scanning will not be generating an output variable.
Click Update Pipeline.
Migrate reads migrations from sources file and applies them in correct order to a database.
Prerequisite: Make sure you have SQL files in format used by the golang-migrate tool.
official-documentation: https://github.com/golang-migrate/migrate postgres-example: https://github.com/golang-migrate/migrate/tree/master/database/postgres
On the Edit build pipeline page, select the Pre-Build Stage (or Post-Build Stage). or
Click + Add task.
Select GoLang-migrate from PRESET PLUGINS.
Enter a relevant name in the Task name field. It is a mandatory field.
Enter a descriptive message for the task in the Description field. It is an optional field.
Provide a value for the input variable. Note: The value may be any of the values from the previous build stages, a global variable, or a custom value.
DB_TYPE
String
Currently this plugin support postgres,mongodb,mongodb+srv,mysql,sqlserver.
DB_HOST
String
The hostname, service endpoint or IP address of the database server.
DB_PORT
String
The port number on which the database server is listening.
DB_NAME
String
The name of the specific database instance you want to connect to.
DB_USER
String
The username required to authenticate to the database.
DB_PASSWORD
String
The password required to authenticate to the database.
SCRIPT_LOCATION
String
Location of SQL files that need to be run on desired database.
MIGRATE_IMAGE
String
Docker image of golang-migrate default:migrate/migrate.
MIGRATE_TO_VERSION
String
migrate to which version of sql script need to be run on desired database(default: 0 is for all files in directory).
PARAM
String
extra params that runs with db queries.
POST_COMMAND
String
post commands that runs at the end of script.
Trigger/Skip Condition refers to a conditional statement to execute or skip the task. You can select either:
Set trigger conditions or
Set skip conditions
Click Update Pipeline.
Use in-cluster/ Execute tasks in application environment feature in pre-deploy or post-deploy, in case when the database service is not reachable or accessible from devtron cluster.
In case the DB_TYPE is not supported for your database, then use POST_COMMAND as
use DB_PASSWORD with scope-variable feature for more security.

The Jira Issue Validator plugin extends the filtering capabilities of the Devtron CI and lets users perform validation based on Jira Ticket ID status. This plugin ensures that only builds associated with valid Jira tickets are executed, improving the accuracy of the CI process.
A Jira account with the necessary API access.
The API credentials (username, password, and base URL) for your Jira instance. Obtain the API credentials from your Jira admin if required.
A pull request raised with your Git provider. Title of pull request must contain the Jira ID.
Jira Issue (e.g., REDOC-12)
Webhook added to the git repository. Click here to know more.
On the Edit build pipeline page, go to the Pre-Build Stage (or Post-Build Stage).
Click + Add task.
Select Jira Issue Validator from the list of plugins.
Enter a task name (mandatory).
Optionally, enter a description.
Provide values for the input variables.
JiraUsername
String
Your Jira username (e.g., johndoe@devtron.ai)
JiraPassword
String
Your Jira API token provided by the Jira admin
JiraBaseUrl
String
The base URL of your Jira instance (e.g., https://yourdomain.atlassian.net)
Trigger/Skip Condition allows you to set conditions under which this task will execute or be skipped.
Pass/Failure Condition allows you to define conditions that determine whether the build passes or fails based on Jira validation.
Go to the Build Stage.
Select Pull Request in the Source Type dropdown.
Use filters to fetch only the PRs matching your regex. Here are few examples:
Title can be a regex pattern (e.g., ^(?P<jira_Id>([a-zA-Z0-9-].*))) to extract the Jira ID from the PR title. Only those PRs fulfilling the regex will be shown for image build process.
State can be ^open$, where only PRs in open state will be shown for image build process.
Click Update Pipeline.
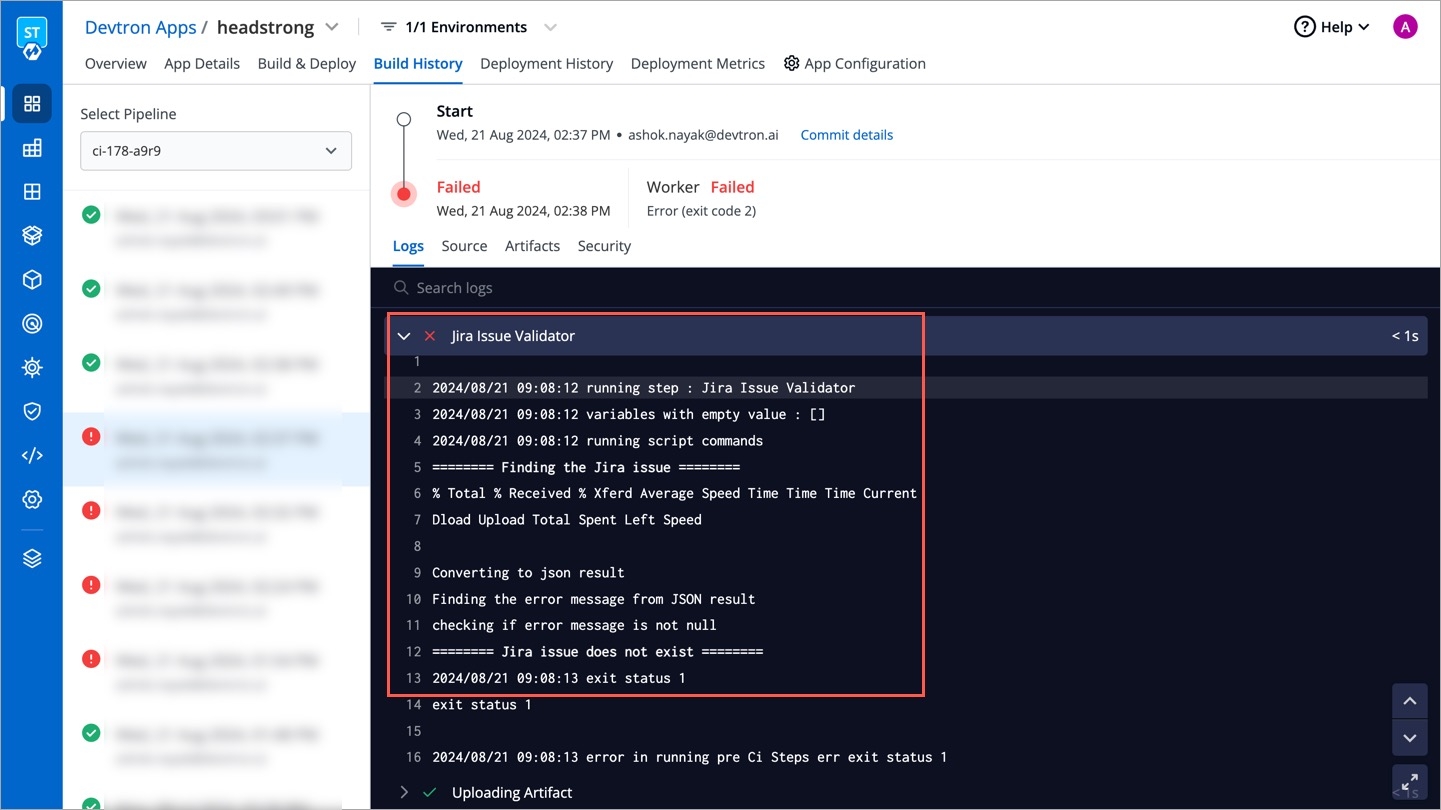
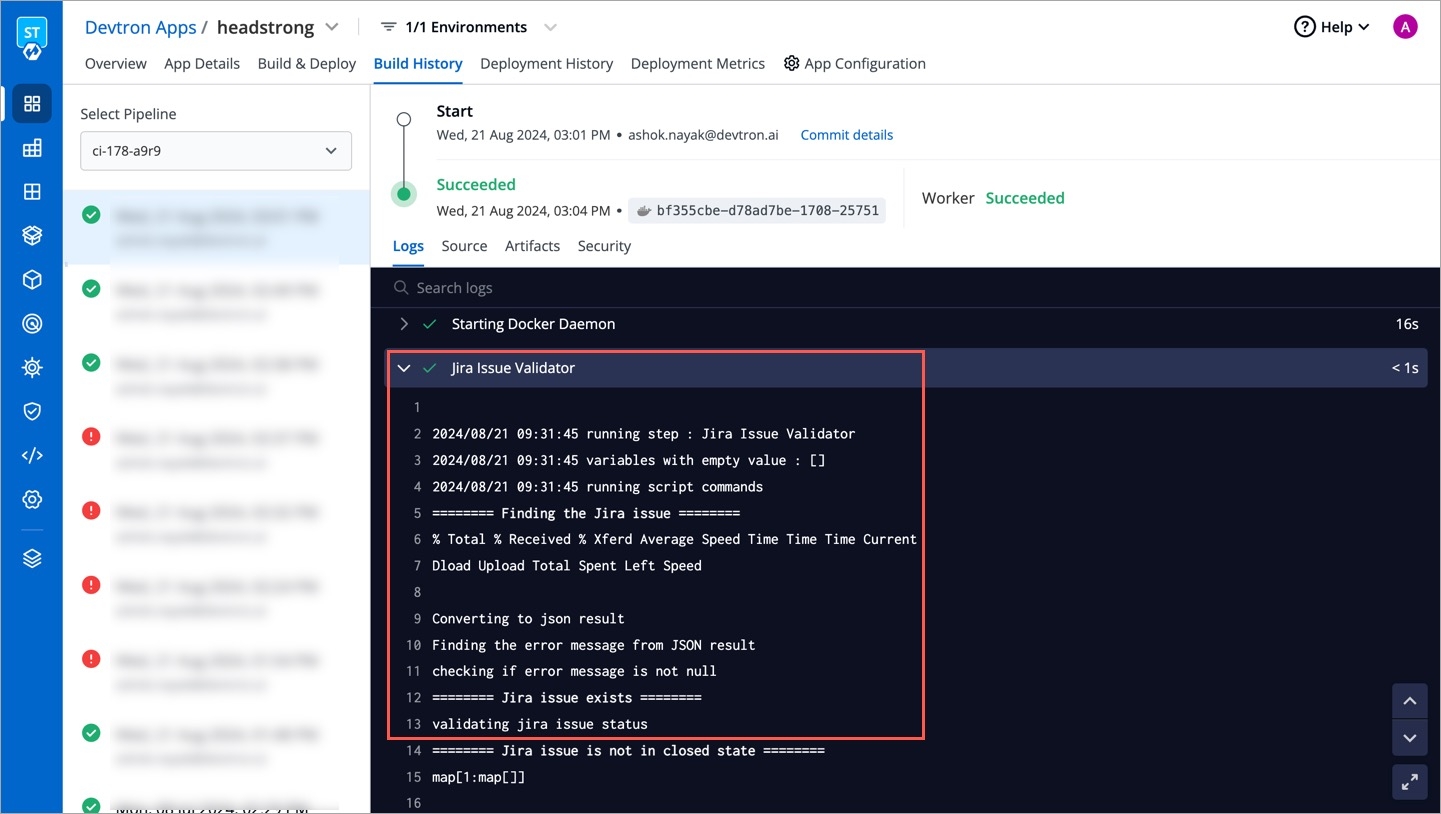
Case 1: If Jira issue exists and the same is found in the PR title
Case 2: If Jira issue is not found
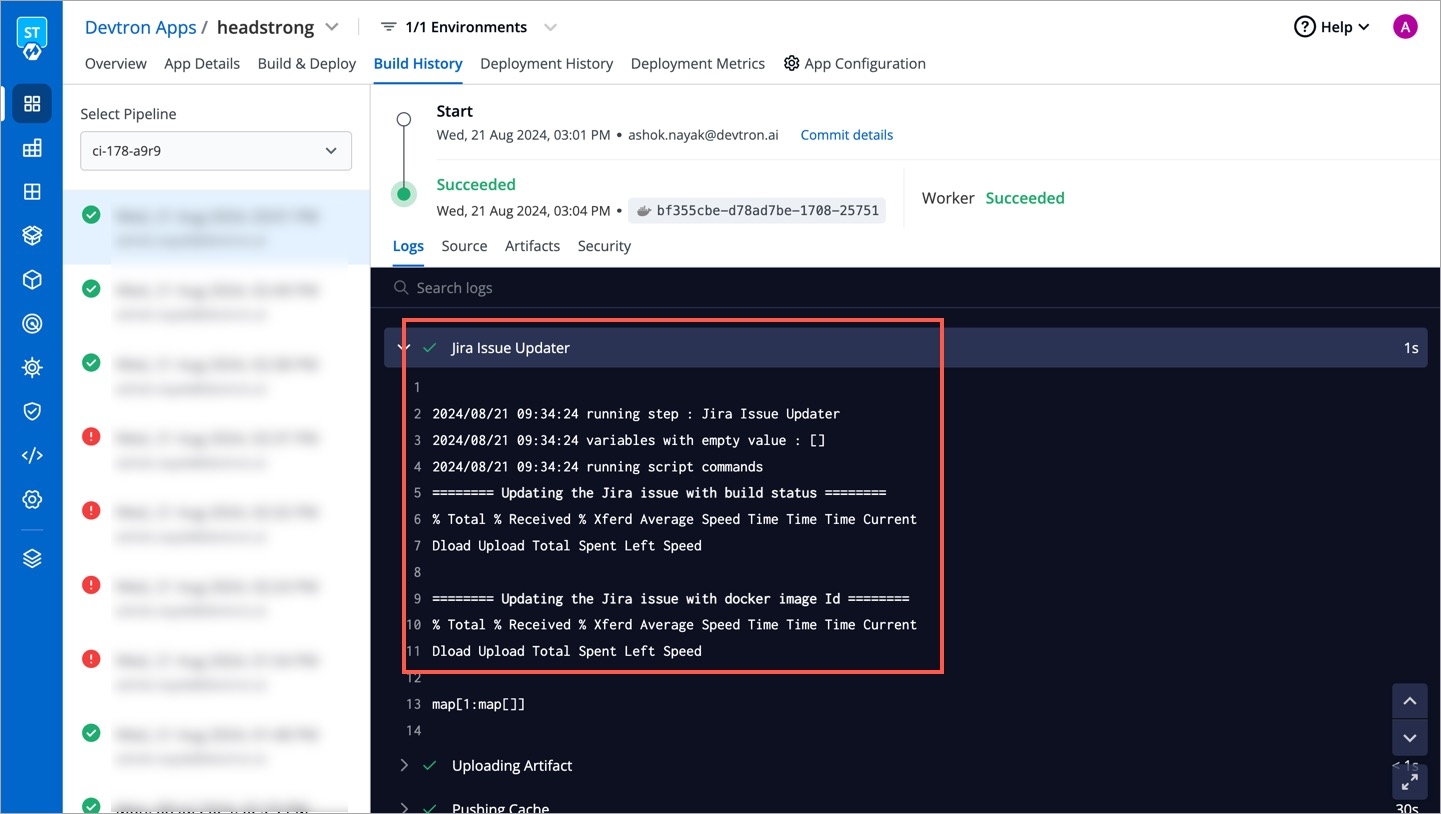
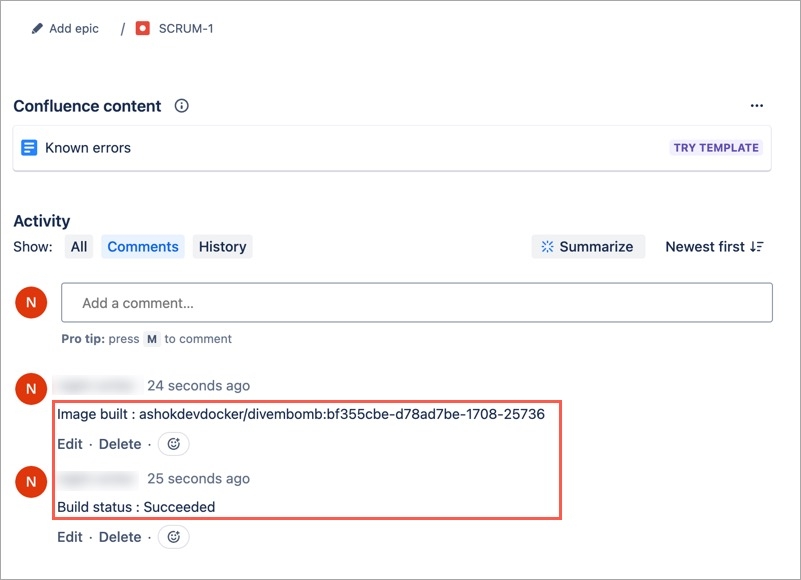
The Jira Issue Updater plugin extends the capabilities of Devtron CI by allowing updates to Jira issues directly from the pipeline. It can add build pipeline status and docker image ID as a comment on Jira tickets, keeping the issue tracking synchronized with your CI processes.
A Jira account with the necessary API access.
The API credentials (username, password, and base URL) for your Jira instance. Obtain the API credentials from your Jira admin if required.
A pull request raised with your Git provider. Title of pull request must contain the Jira ID.
Jira Issue (e.g., REDOC-12)
Webhook added to the git repository. Click here to know more.
On the Edit build pipeline page, go to the Post-Build Stage.
Click + Add task.
Select Jira Issue Updater from the list of plugins.
Enter a task name (mandatory).
Optionally, enter a description.
Provide values for the input variables.
JiraUsername
String
Your Jira username (e.g., johndoe@devtron.ai)
JiraPassword
String
Your Jira API token provided by the Jira admin
JiraBaseUrl
String
The base URL of your Jira instance (e.g., https://yourdomain.atlassian.net/)
UpdateWithDockerImageId
Bool
Set to true to include the Docker Image ID in the update
UpdateWithBuildStatus
Bool
Set to true to include the build status in the update
Trigger/Skip Condition allows you to set conditions under which this task will execute or be skipped.
Pass/Failure Condition allows you define conditions to determine if the build passes or fails based on the Jira update.
Go to the Build Stage.
Select Pull Request in the Source Type dropdown.
Use filters to fetch only the PRs matching your regex. Here are few examples:
Title can be a regex pattern (e.g., ^(?P<jira_Id>([a-zA-Z0-9-].*))) to extract the Jira ID from the PR title. Only those PRs fulfilling the regex will be shown for image build process.
State can be ^open$, where only PRs in open state will be shown for image build process.
Click Update Pipeline.
Configuring Sonarqube in pre-build or post build task enhances your workflow with Continuous Code Quality & Code Security.
Prerequisite: Make sure you have set up an account in Sonarqube or get the API keys from an admin.
On the Edit build pipeline page, select the Pre-Build Stage (or Post-Build Stage).
Click + Add task.
Select Sonarqube from PRESET PLUGINS.
Enter a relevant name in the Task name field. It is a mandatory field.
Enter a descriptive message for the task in the Description field. It is an optional field.
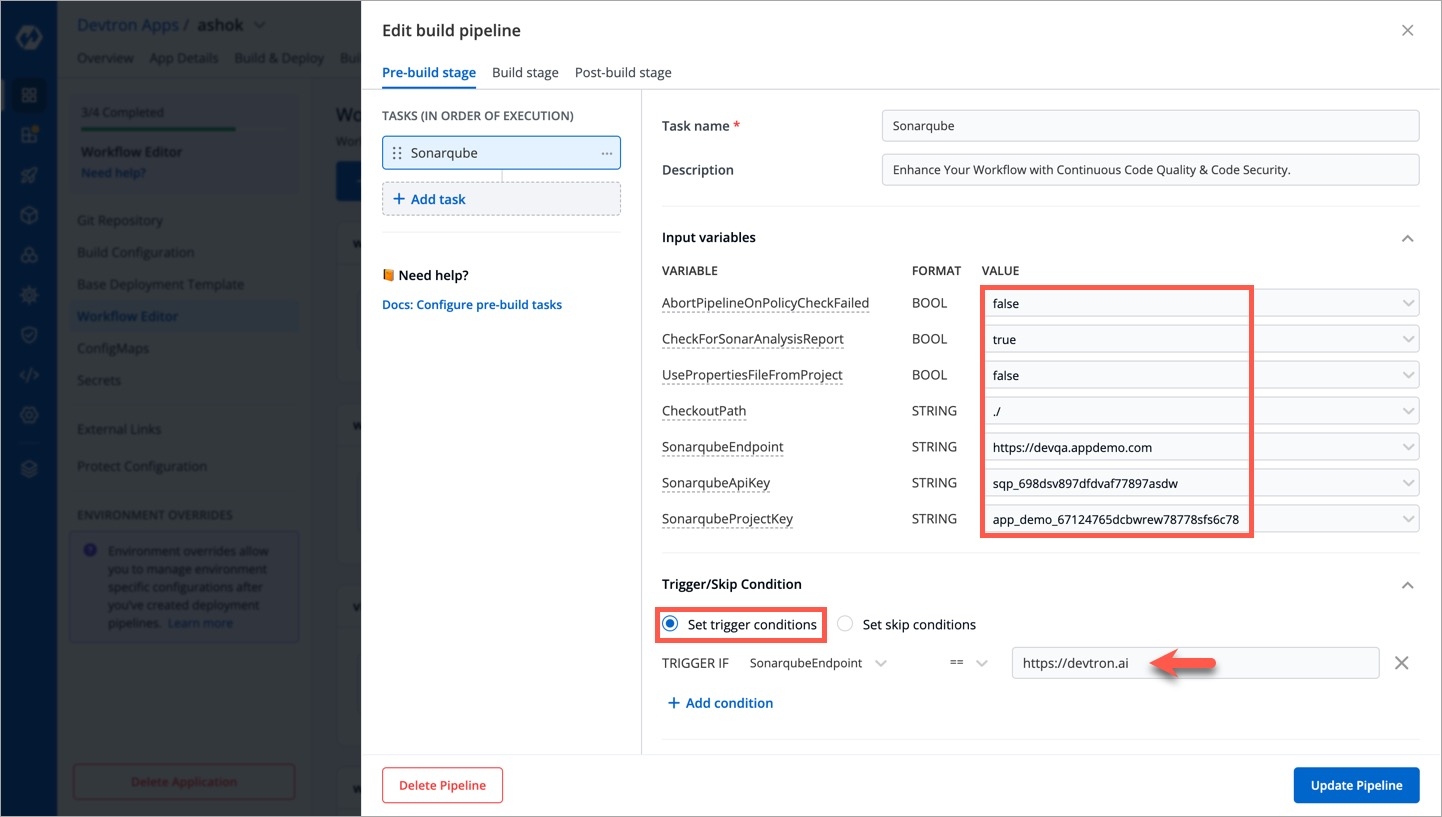
Provide a value for the input variable. Note: The value may be any of the values from the previous build stages, a global variable, or a custom value.
SonarqubeProjectKey
String
Project key of SonarQube account
SonarqubeApiKey
String
API key of SonarQube account
SonarqubeEndpoint
String
API endpoint of SonarQube account
CheckoutPath
String
Checkout path of Git material
UsePropertiesFileFromProject
Boolean
Enter either true or false accordingly whether the configuration file should be fetched from the project's source code
CheckForSonarAnalysisReport
Boolean
Enter either true or false accordingly whether you want poll or actively check for the generation of the SonarQube analysis report
AbortPipelineOnPolicyCheckFailed
Boolean
Enter either true or false accordingly whether you want to check if the policy fails or not
Trigger/Skip Condition refers to a conditional statement to execute or skip the task. You can select either:
Set trigger conditions or
Set skip conditions
Click Update Pipeline.
K6 is an open-source tool and cloud service that makes load testing easy for developers and QA engineers.
Prerequisite: Make sure you have set up an account in k6.io or get the API keys from an admin.
On the Edit build pipeline page, select the Pre-Build Stage (or Post-Build Stage).
Click + Add task.
Select K6 Load Testing from PRESET PLUGINS.
Enter a relevant name in the Task name field. It is a mandatory field.
Enter a descriptive message for the task in the Description field. It is an optional field.
Provide a value for the input variable. Note: The value may be any of the values from the previous build stages, a global variable, or a custom value.
Trigger/Skip Condition refers to a conditional statement to execute or skip the task. You can select either:
Set trigger conditions or
Set skip conditions
Click Update Pipeline.
RelativePathToScript
String
Checkout path + script path along with script name
PrometheusUsername
String
Username of Prometheus account
PrometheusApiKey
String
API key of Prometheus account
PrometheusRemoteWriteEndpoint
String
Remote write endpoint of Prometheus account
OutputType
String
Log or Prometheus
