Loading...
Loading...
Loading...
Loading...
Loading...
Loading...
Loading...
Loading...
Loading...
Loading...
Loading...
Loading...
Loading...
Loading...
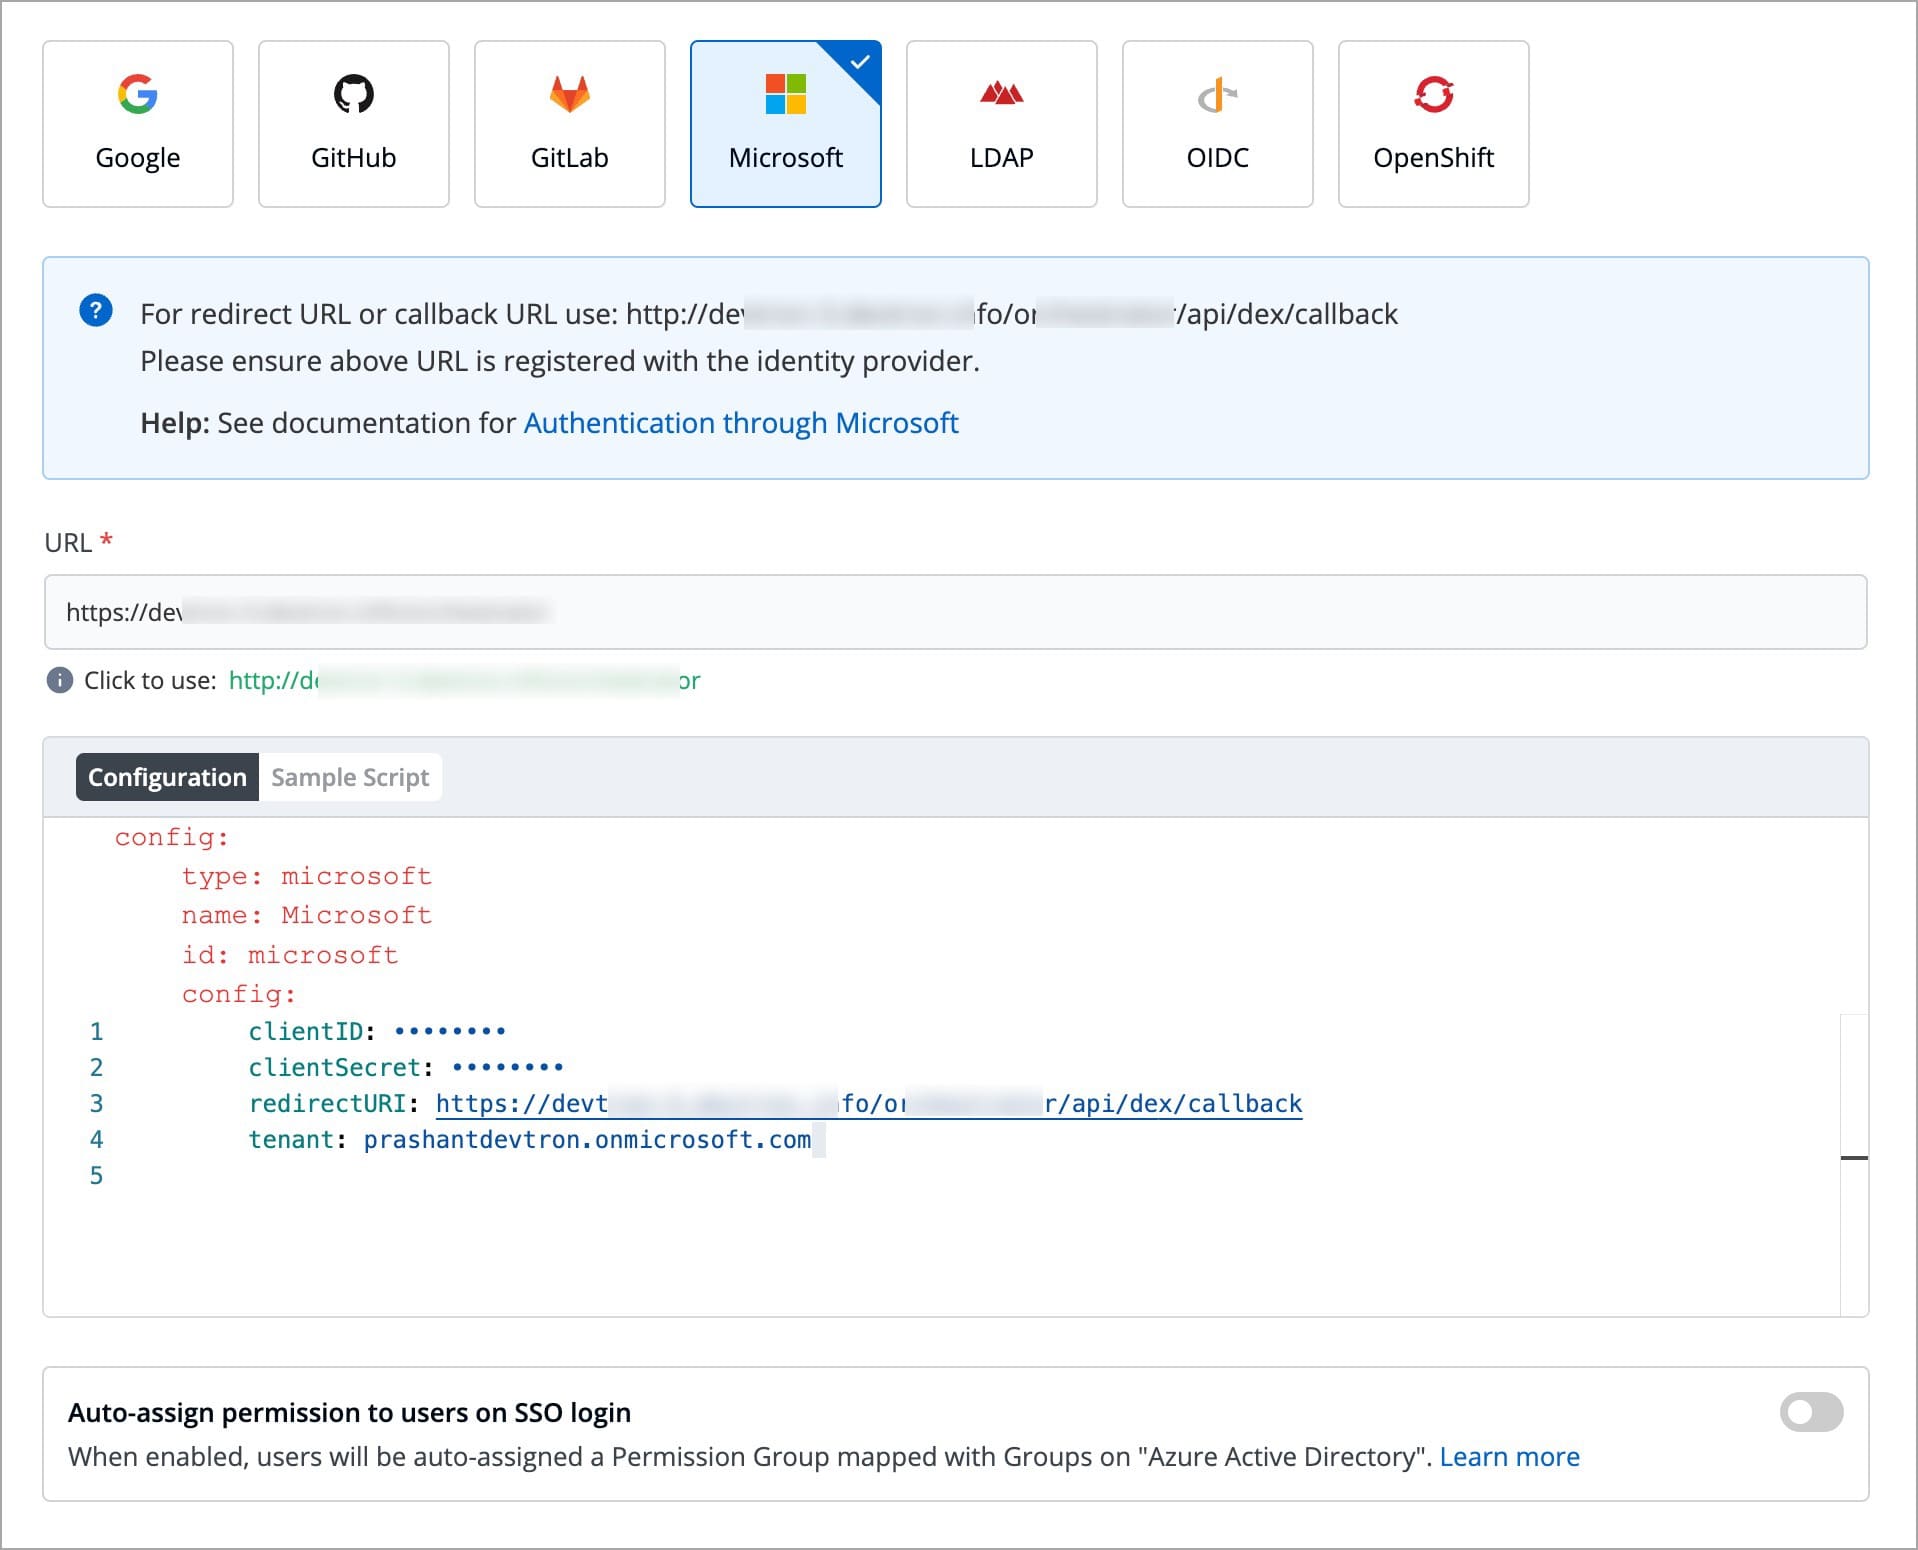
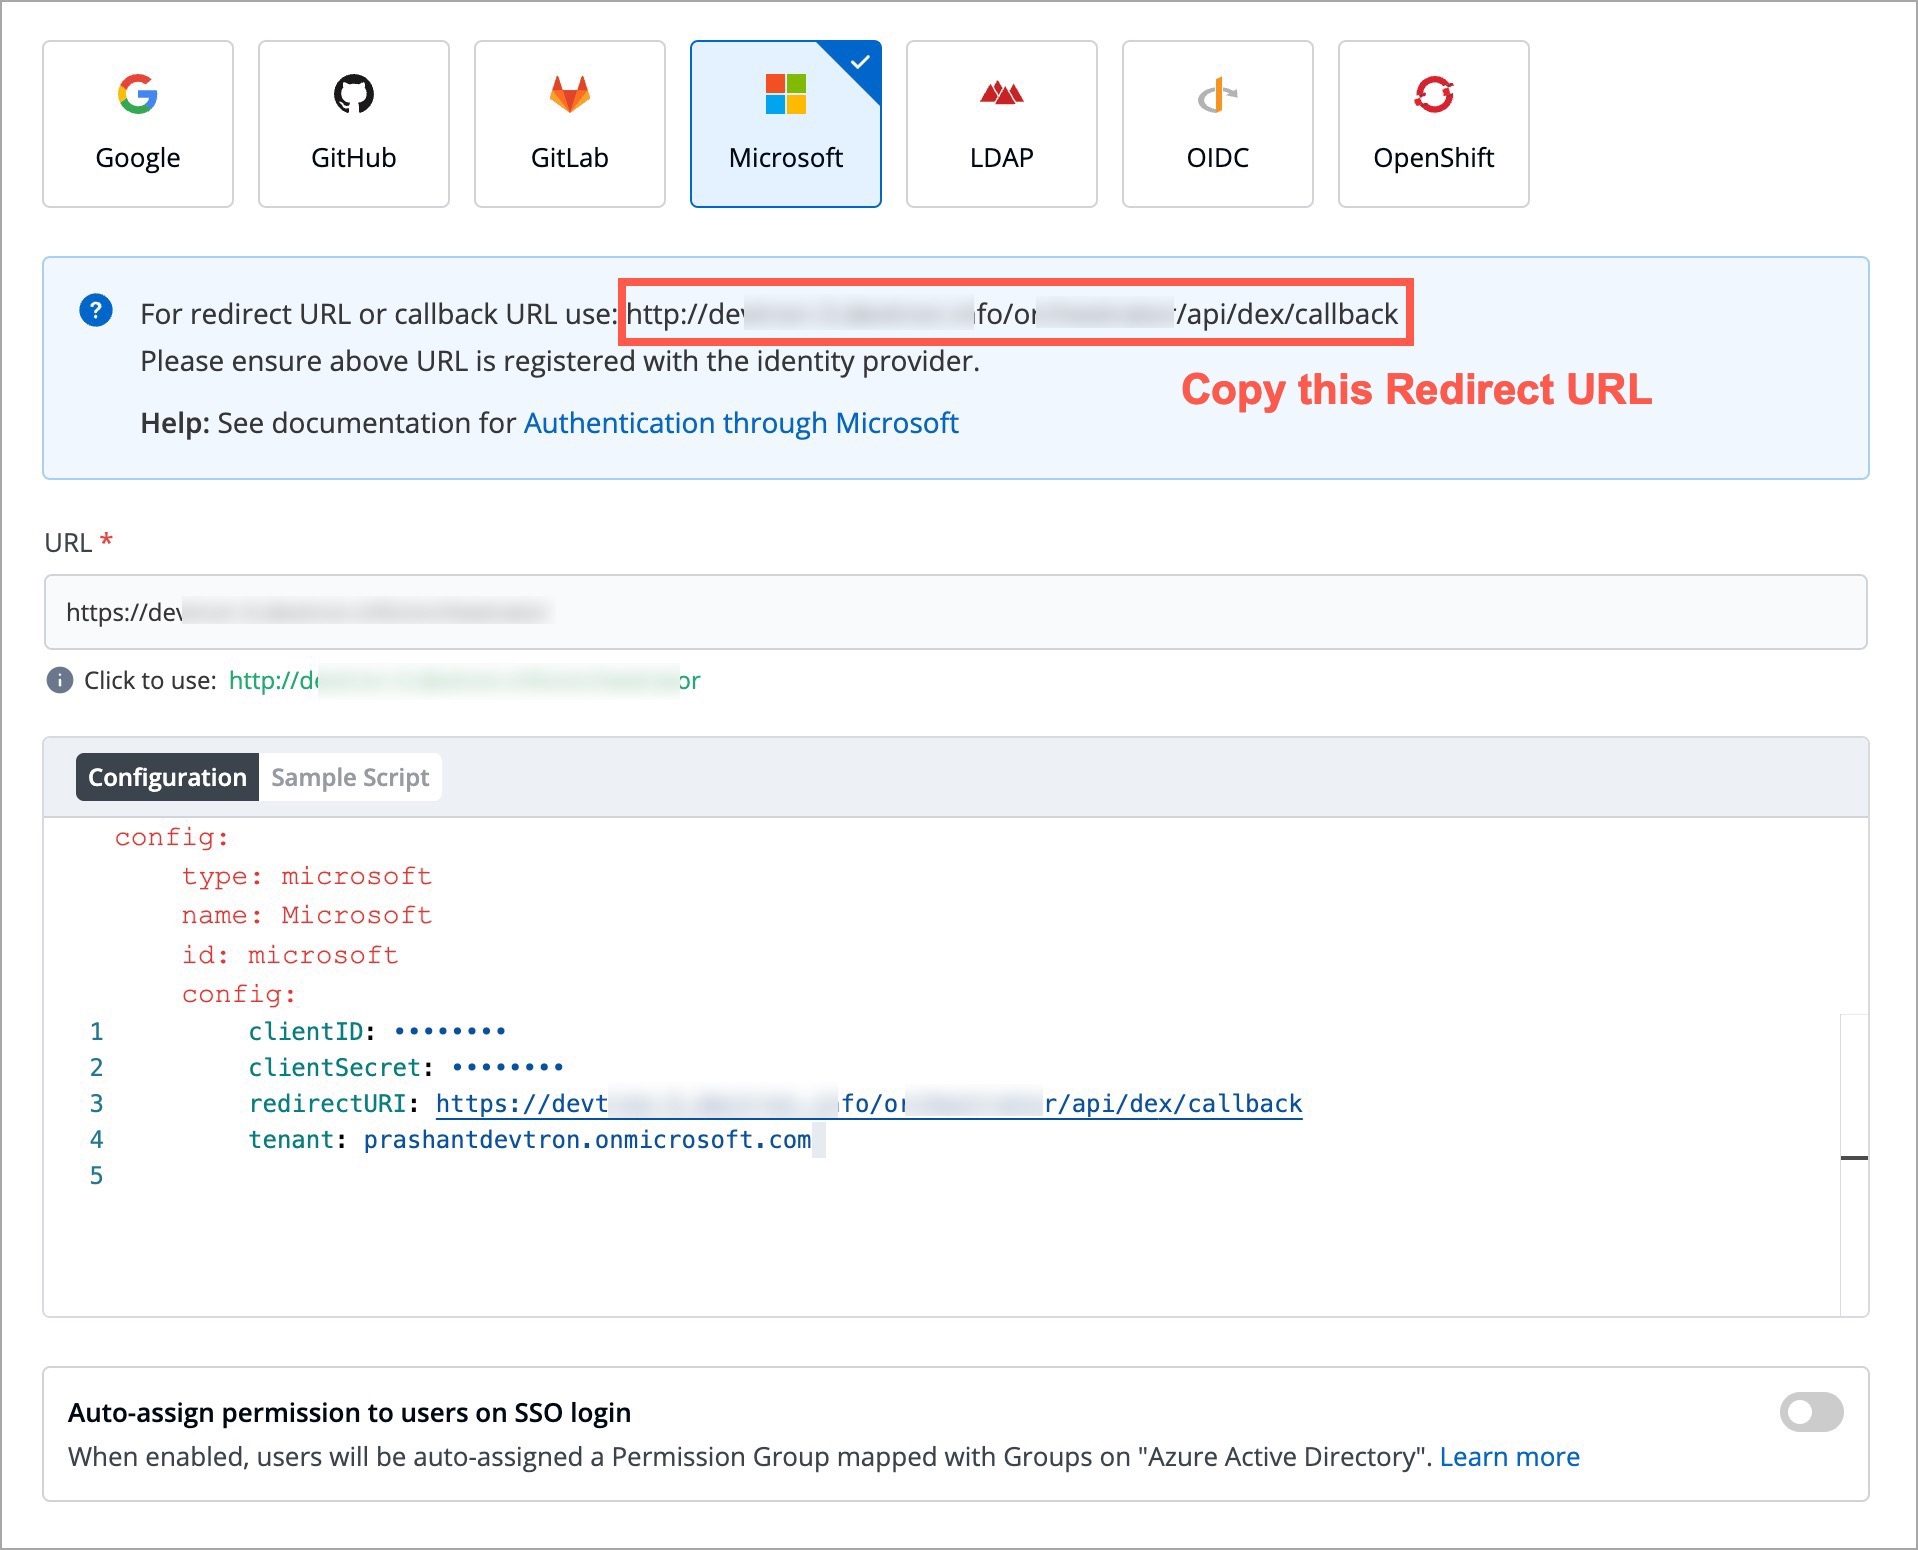
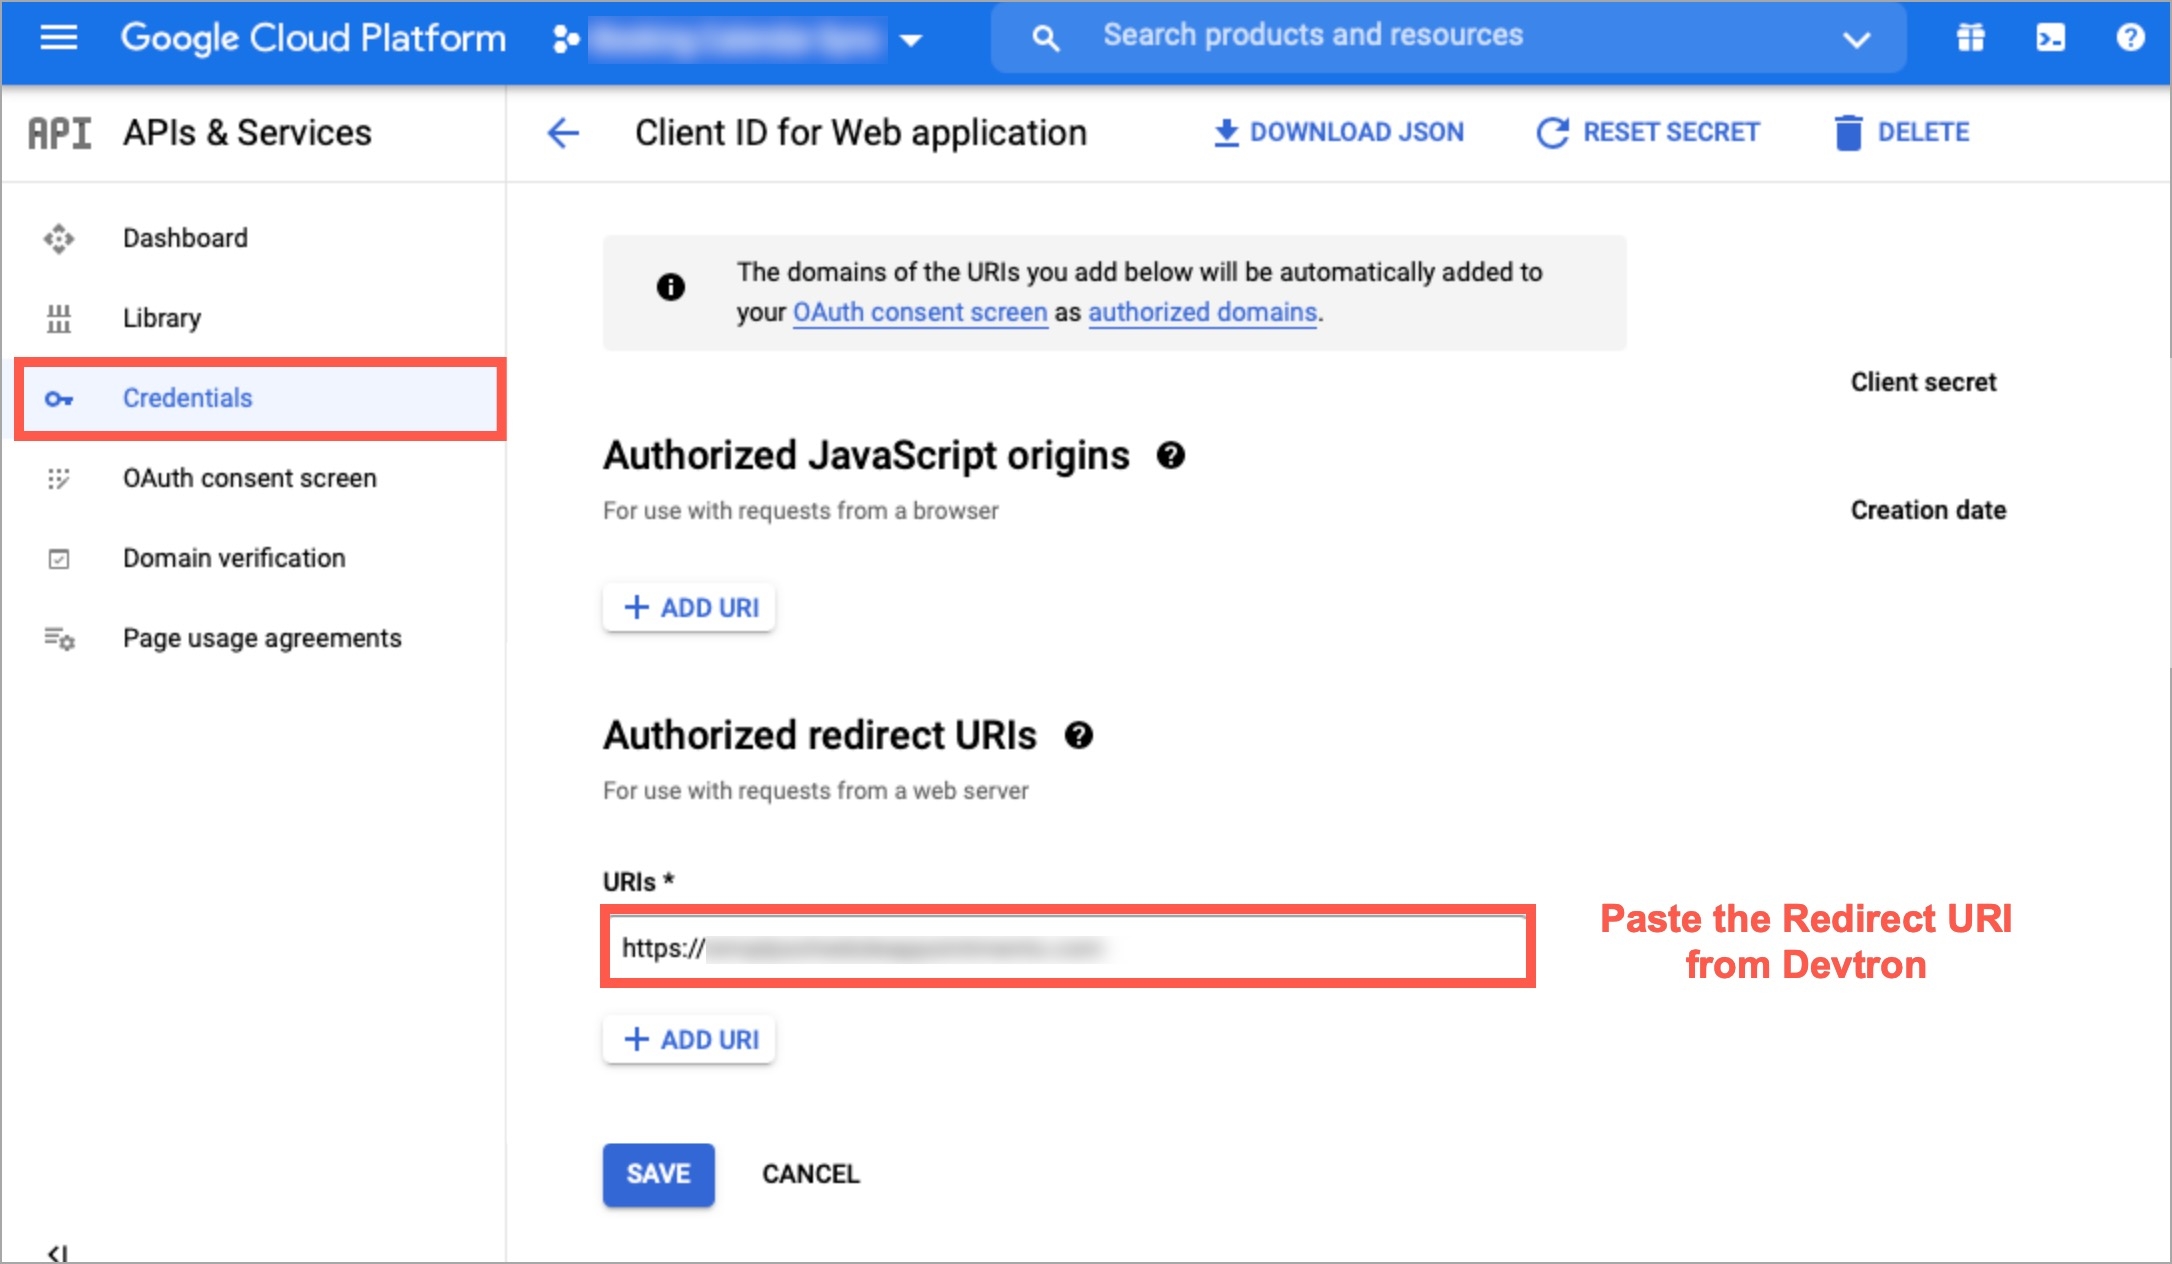
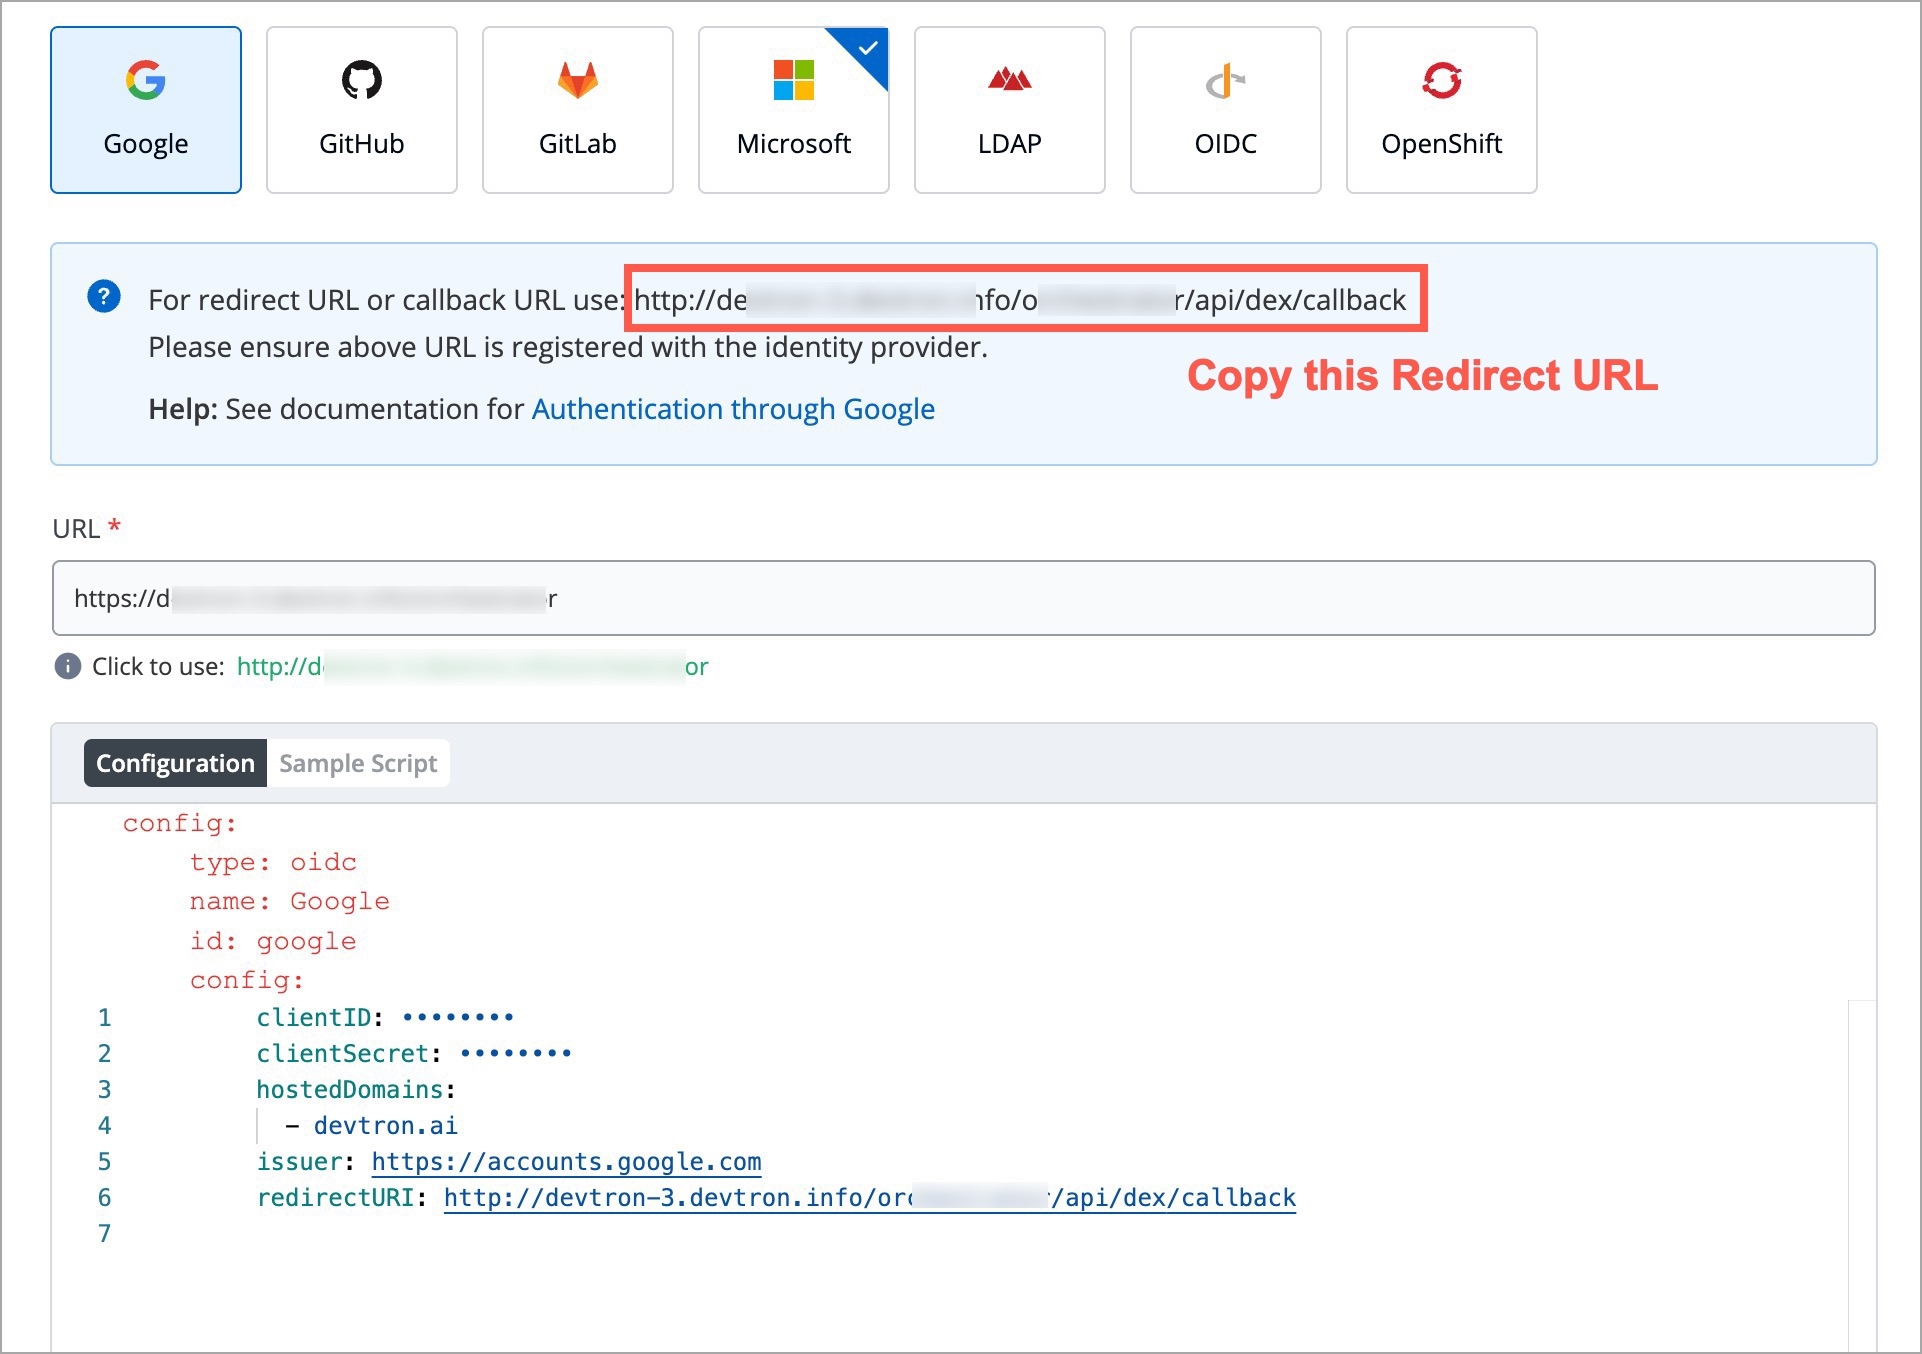
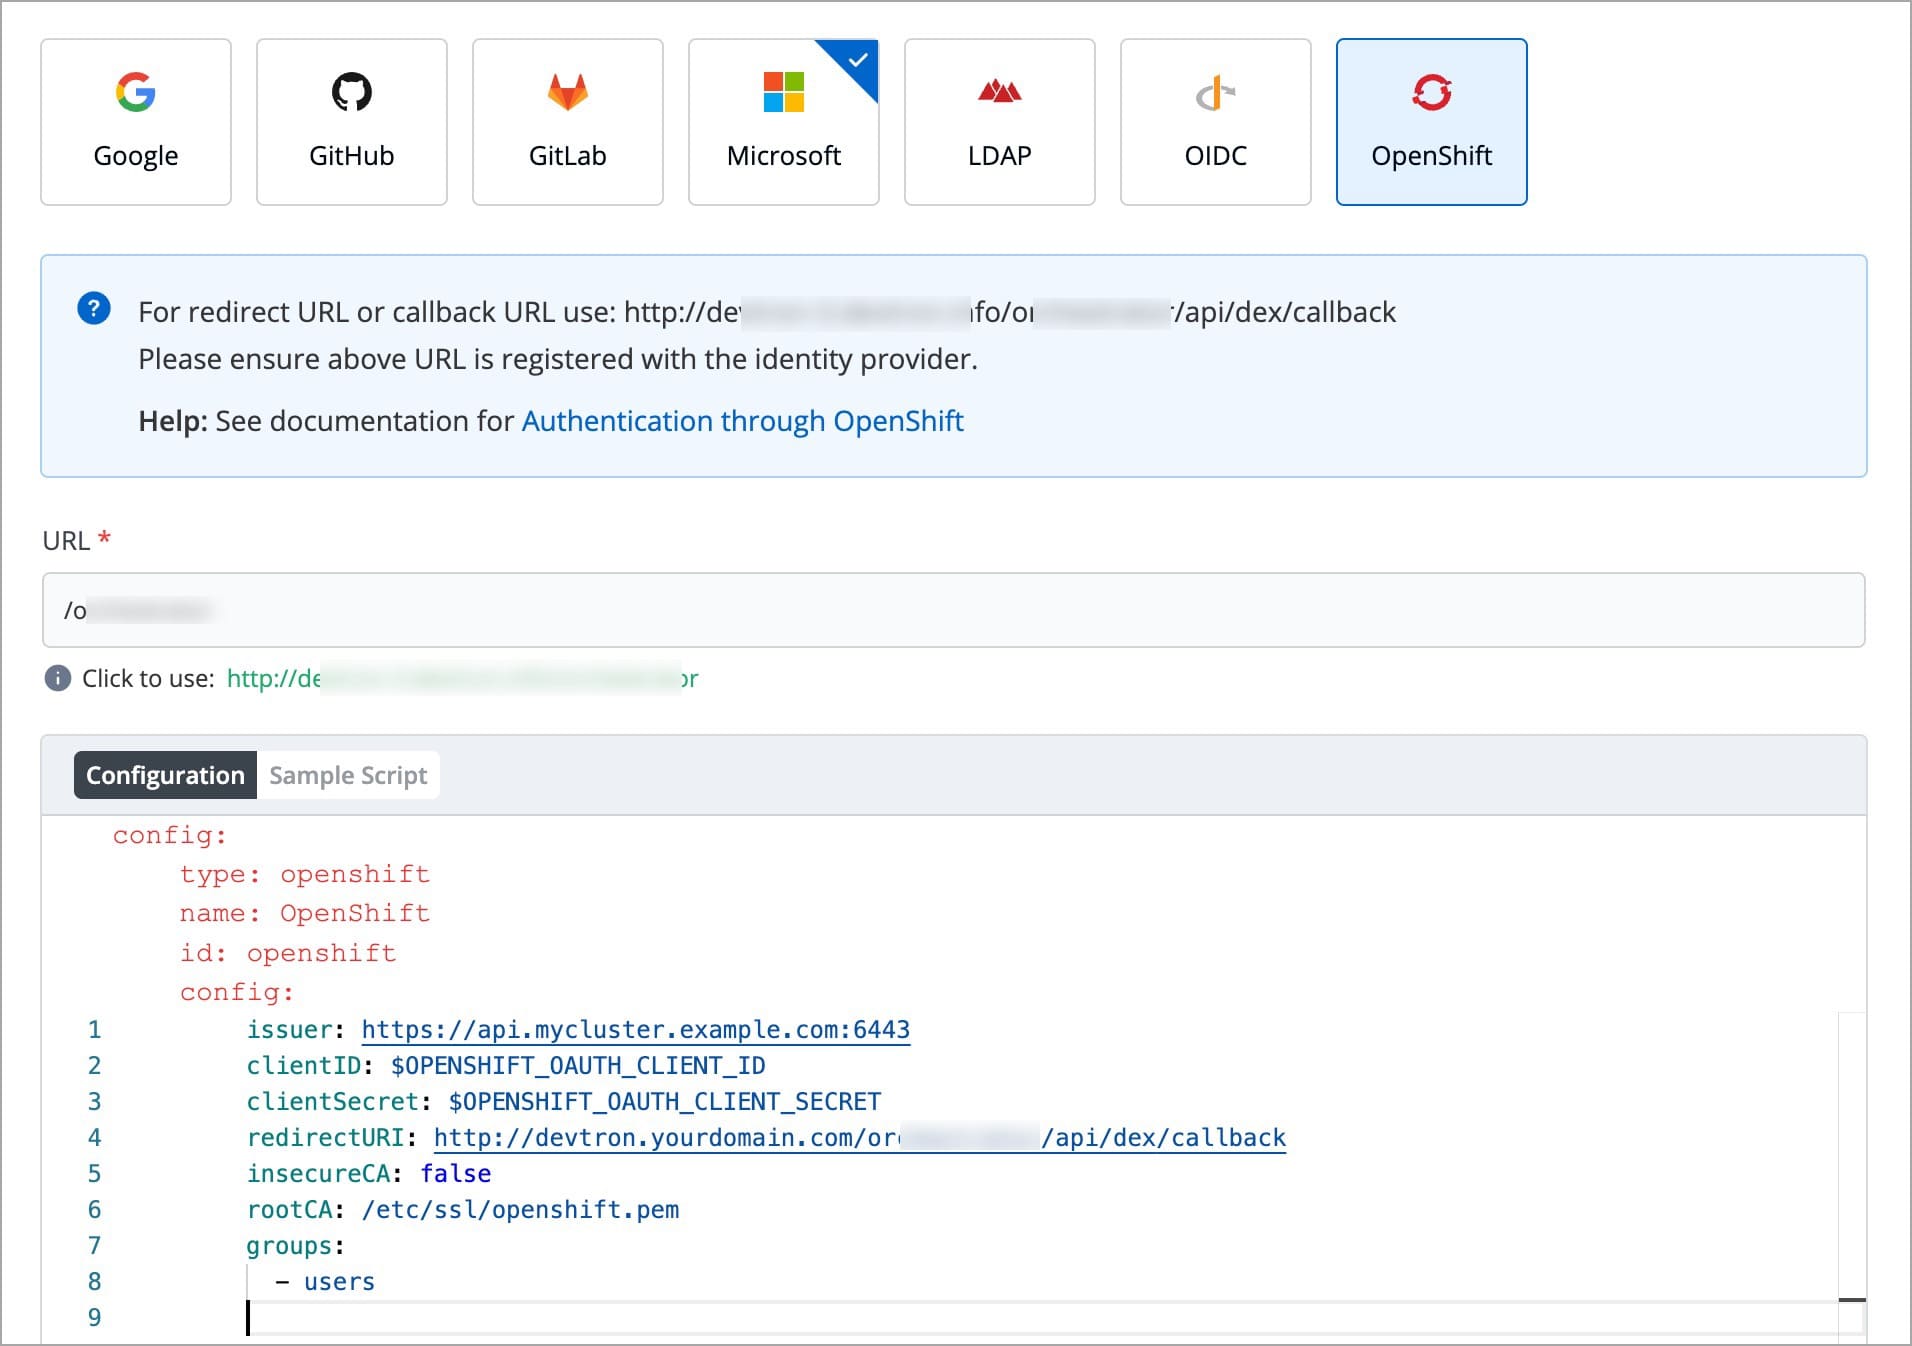
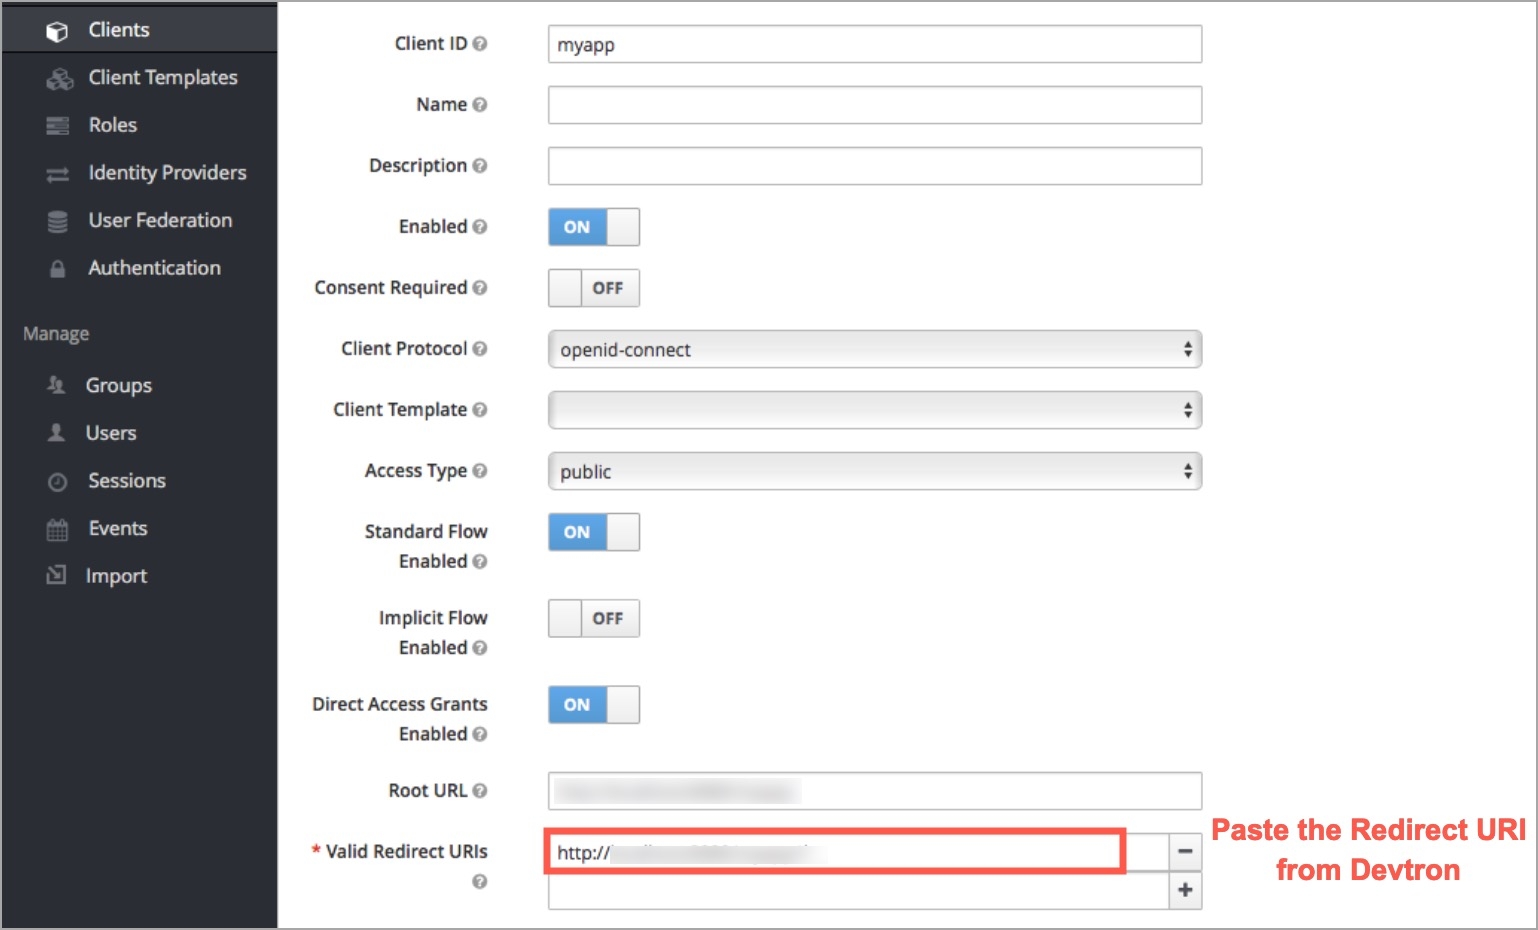
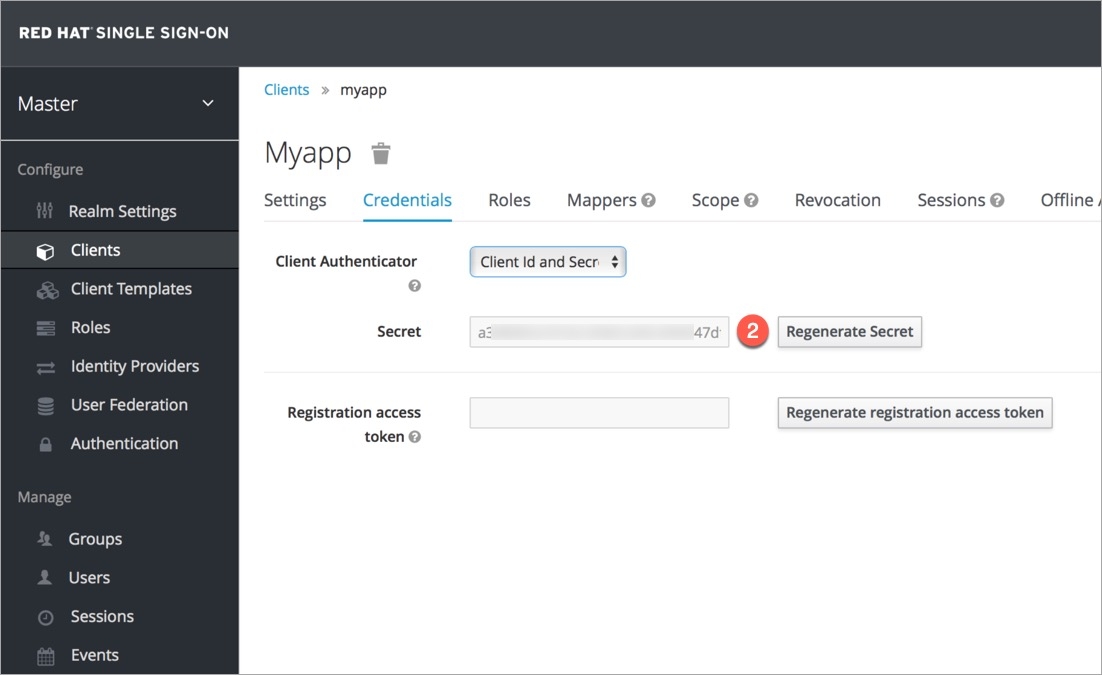
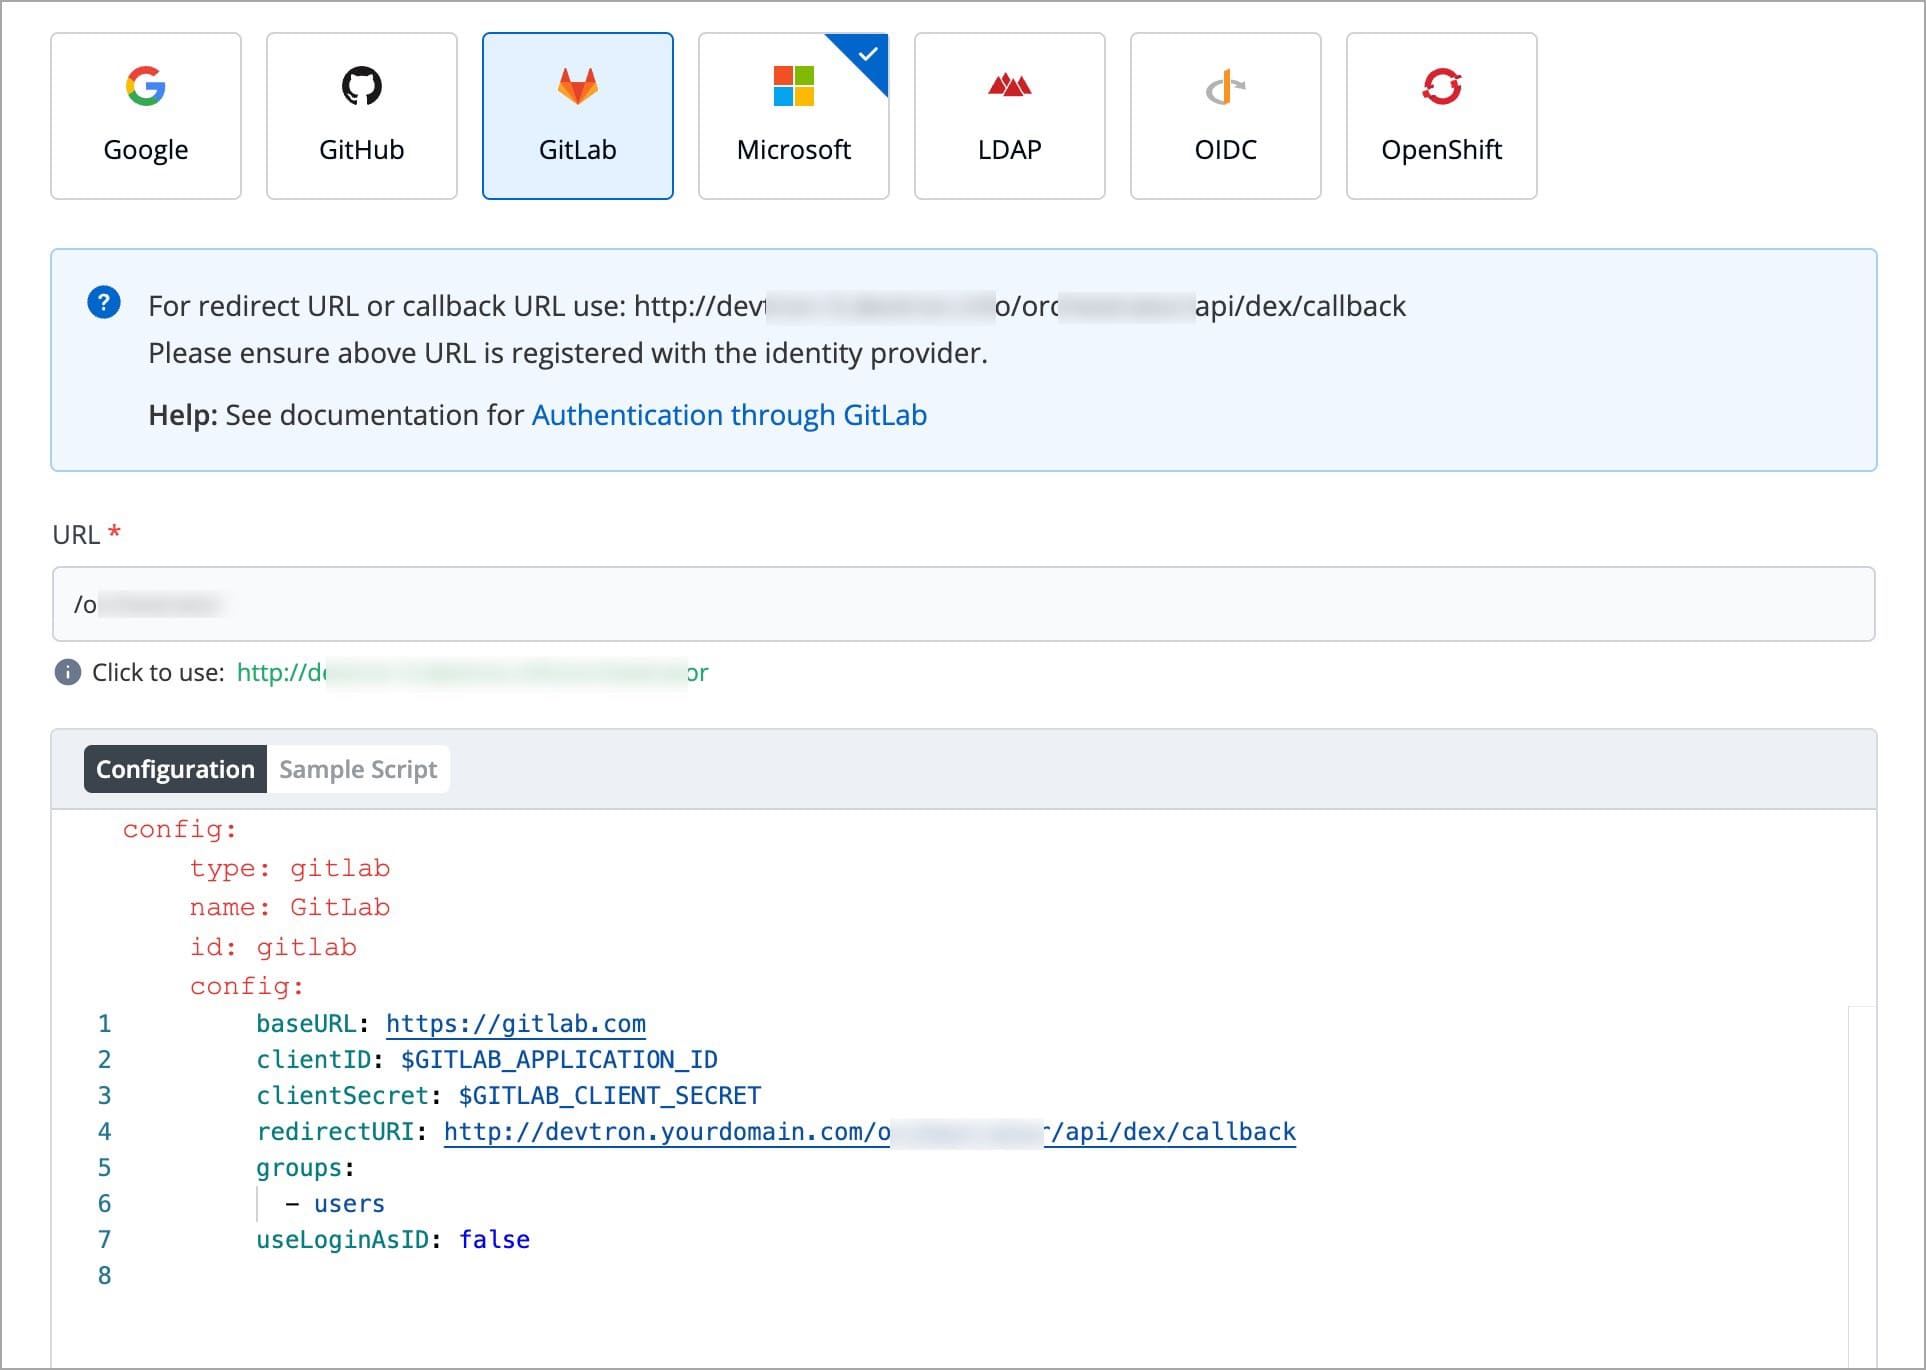
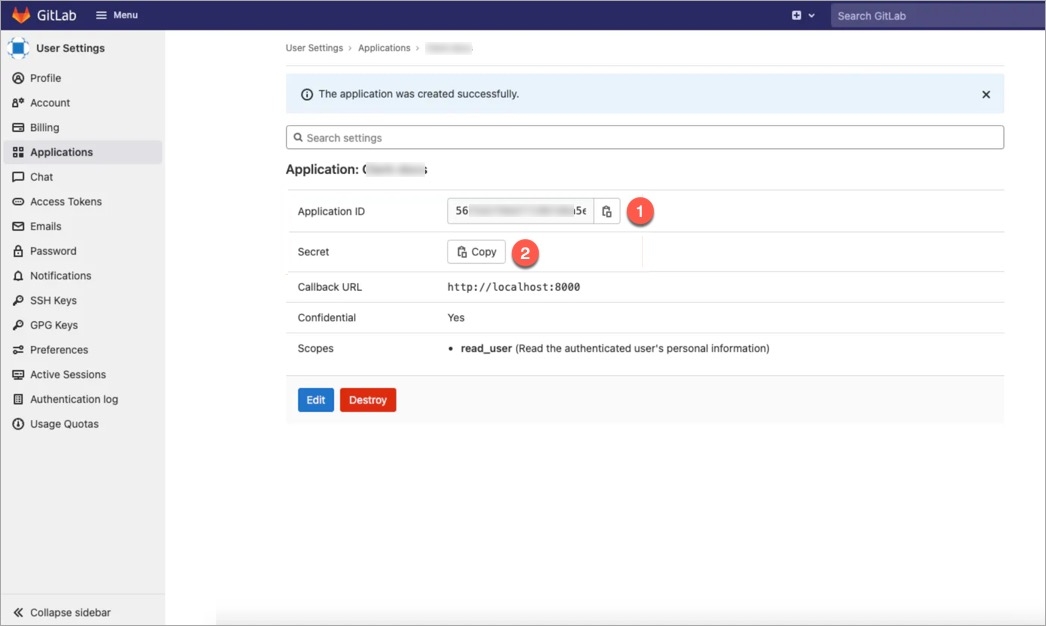
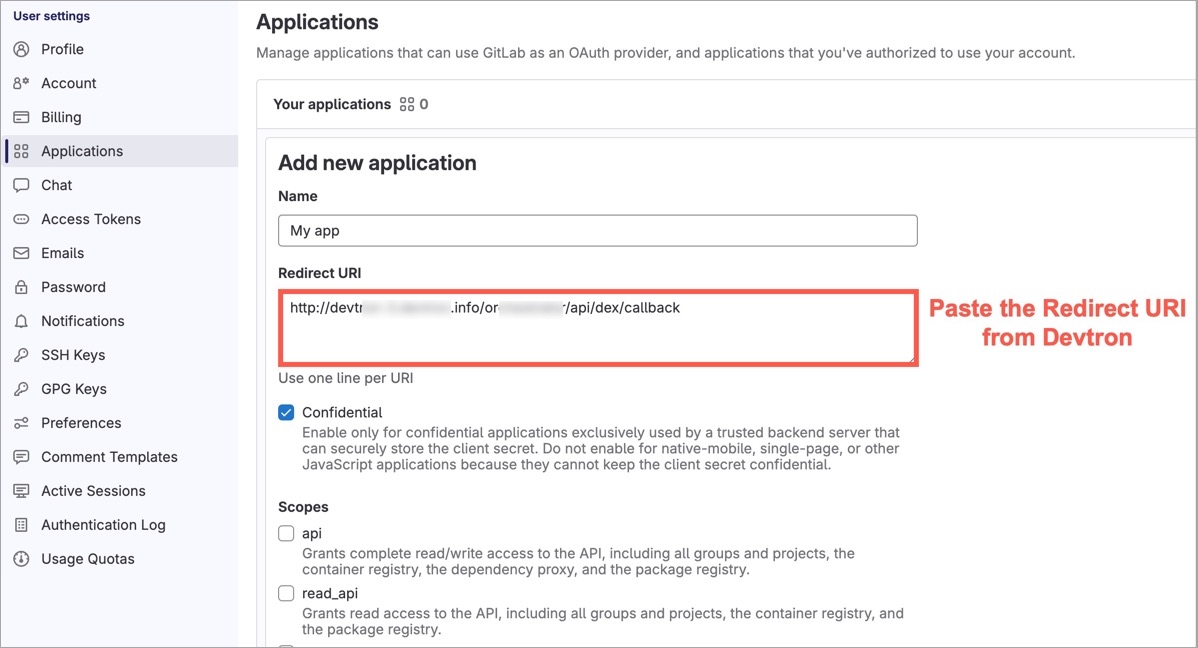
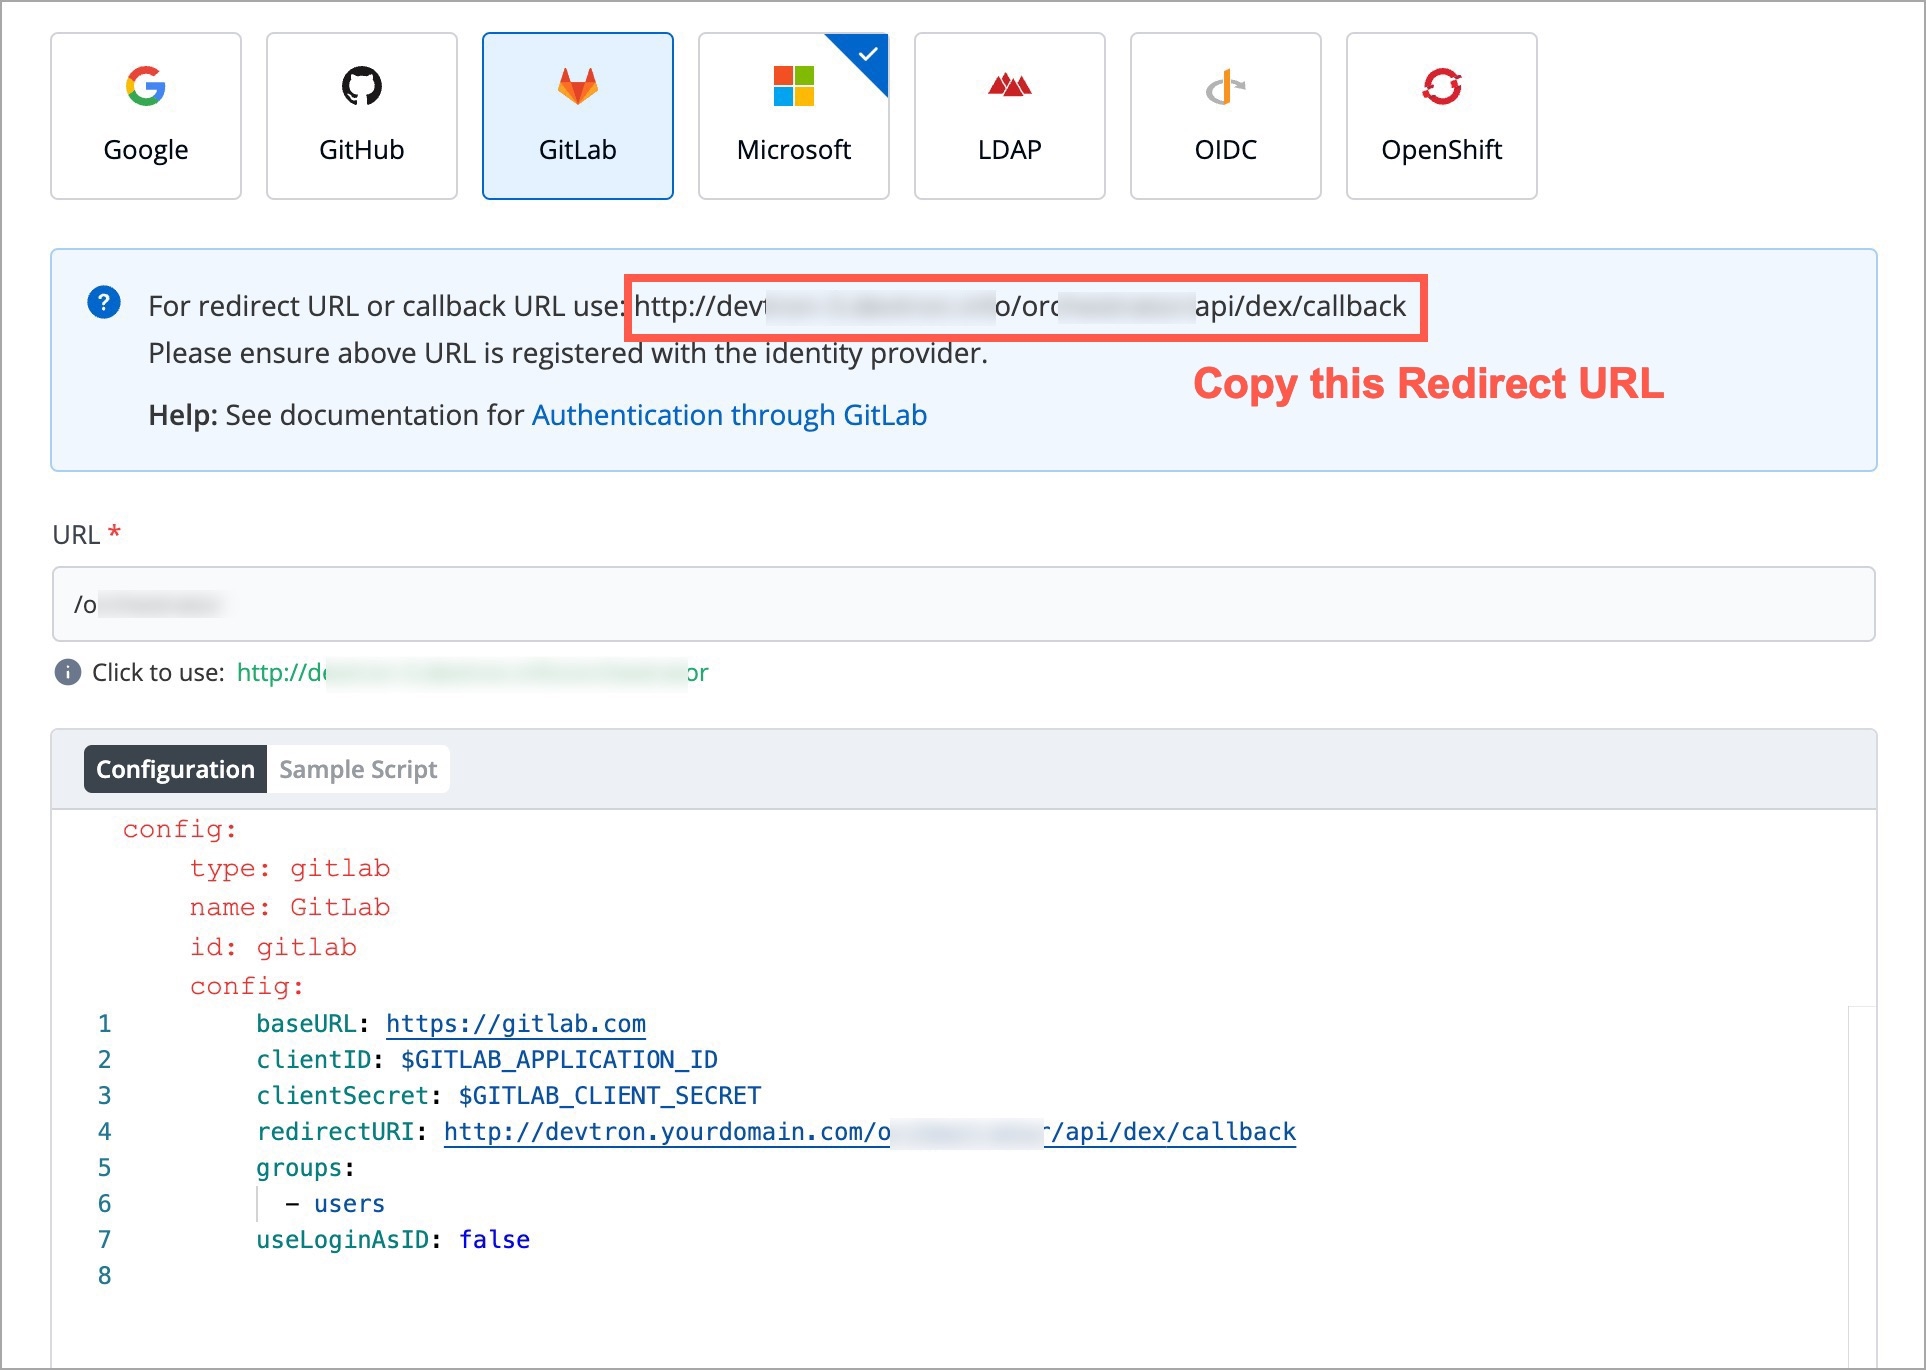
Devtron provides a sample configuration out of the box. There are some values that you need to either get from your SSO provider or give to your SSO provider.
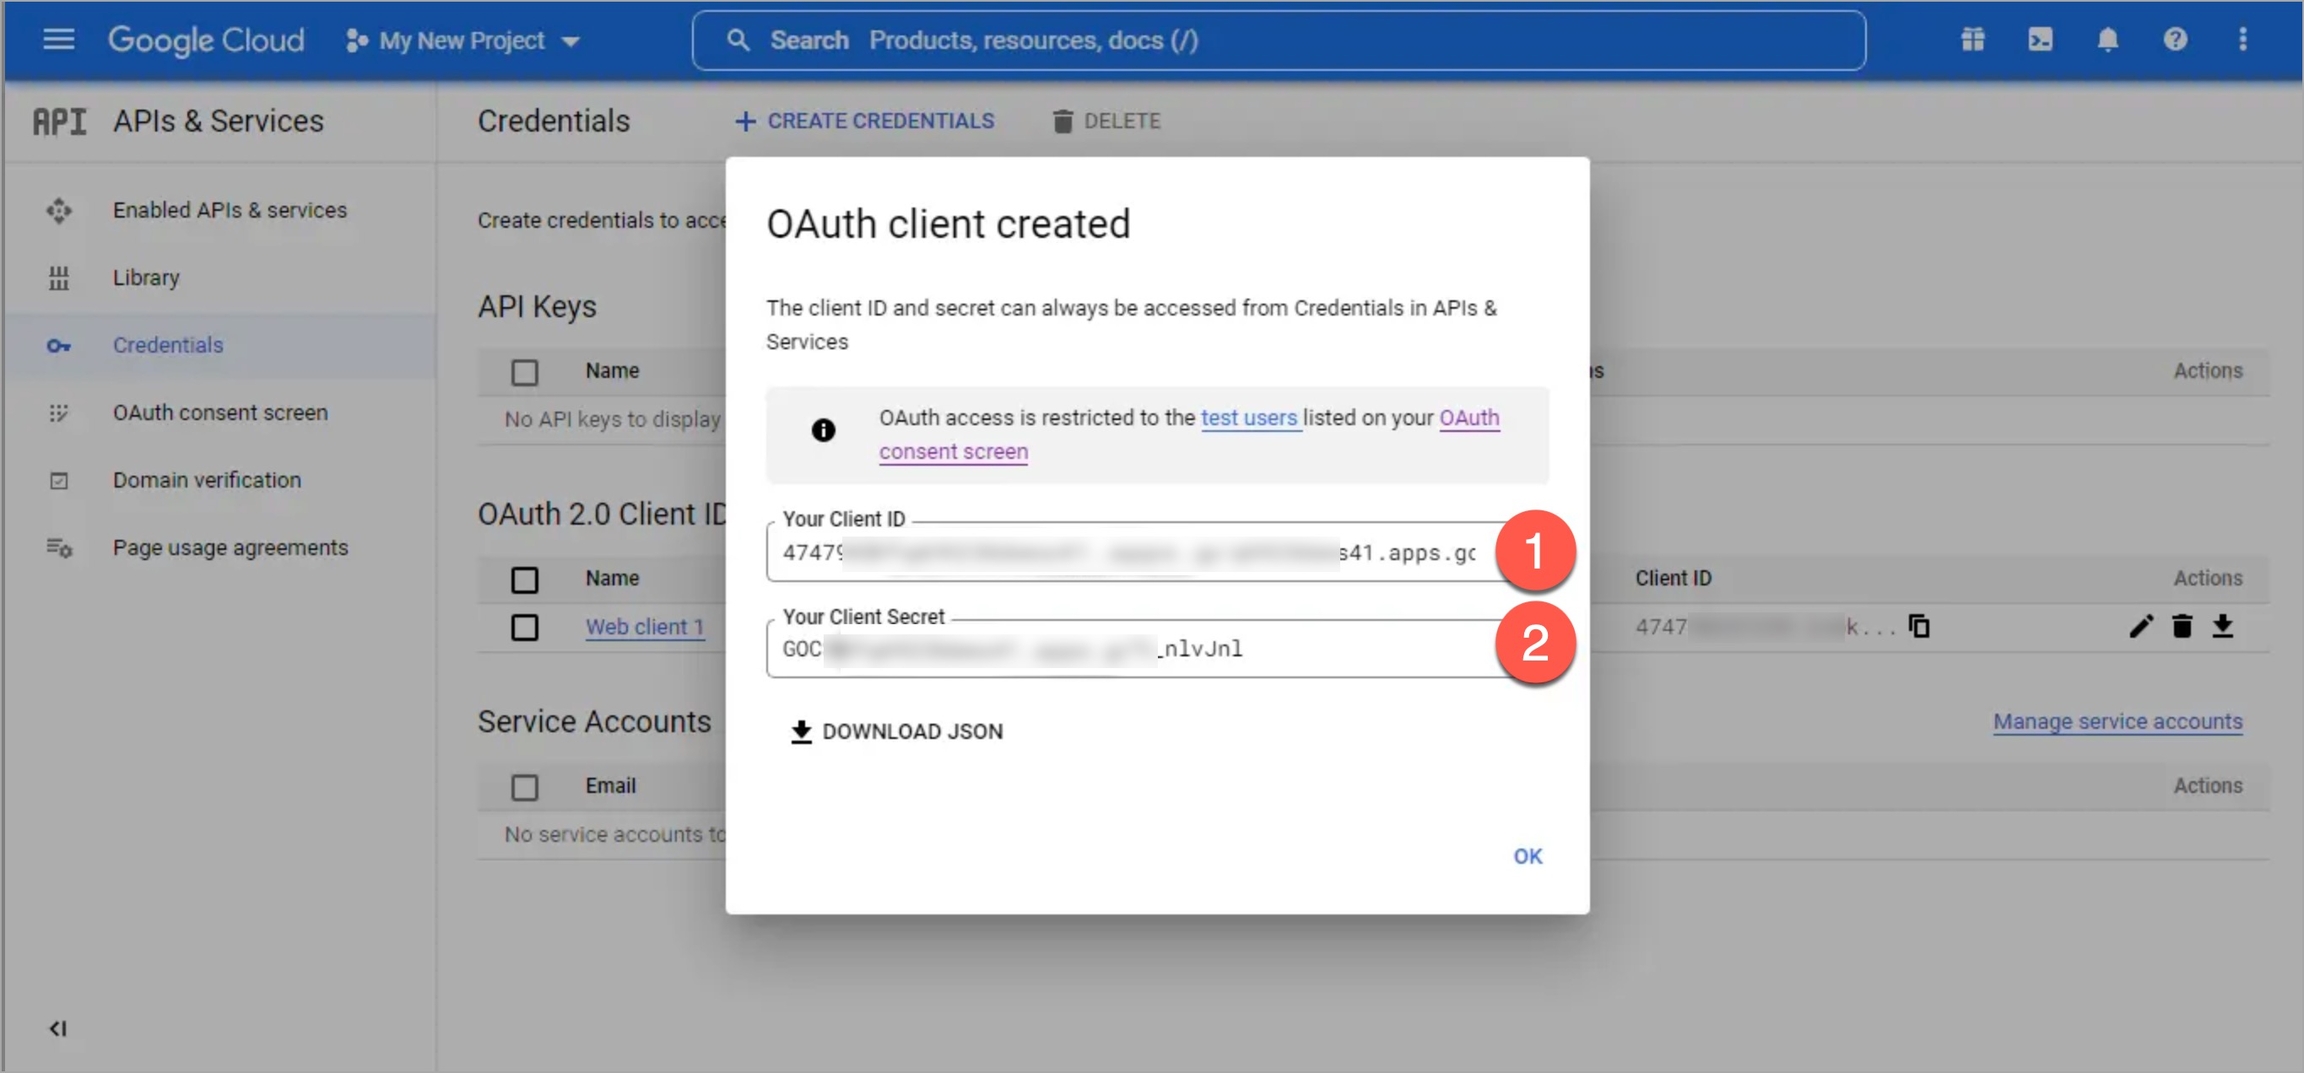
clientID
clientSecret
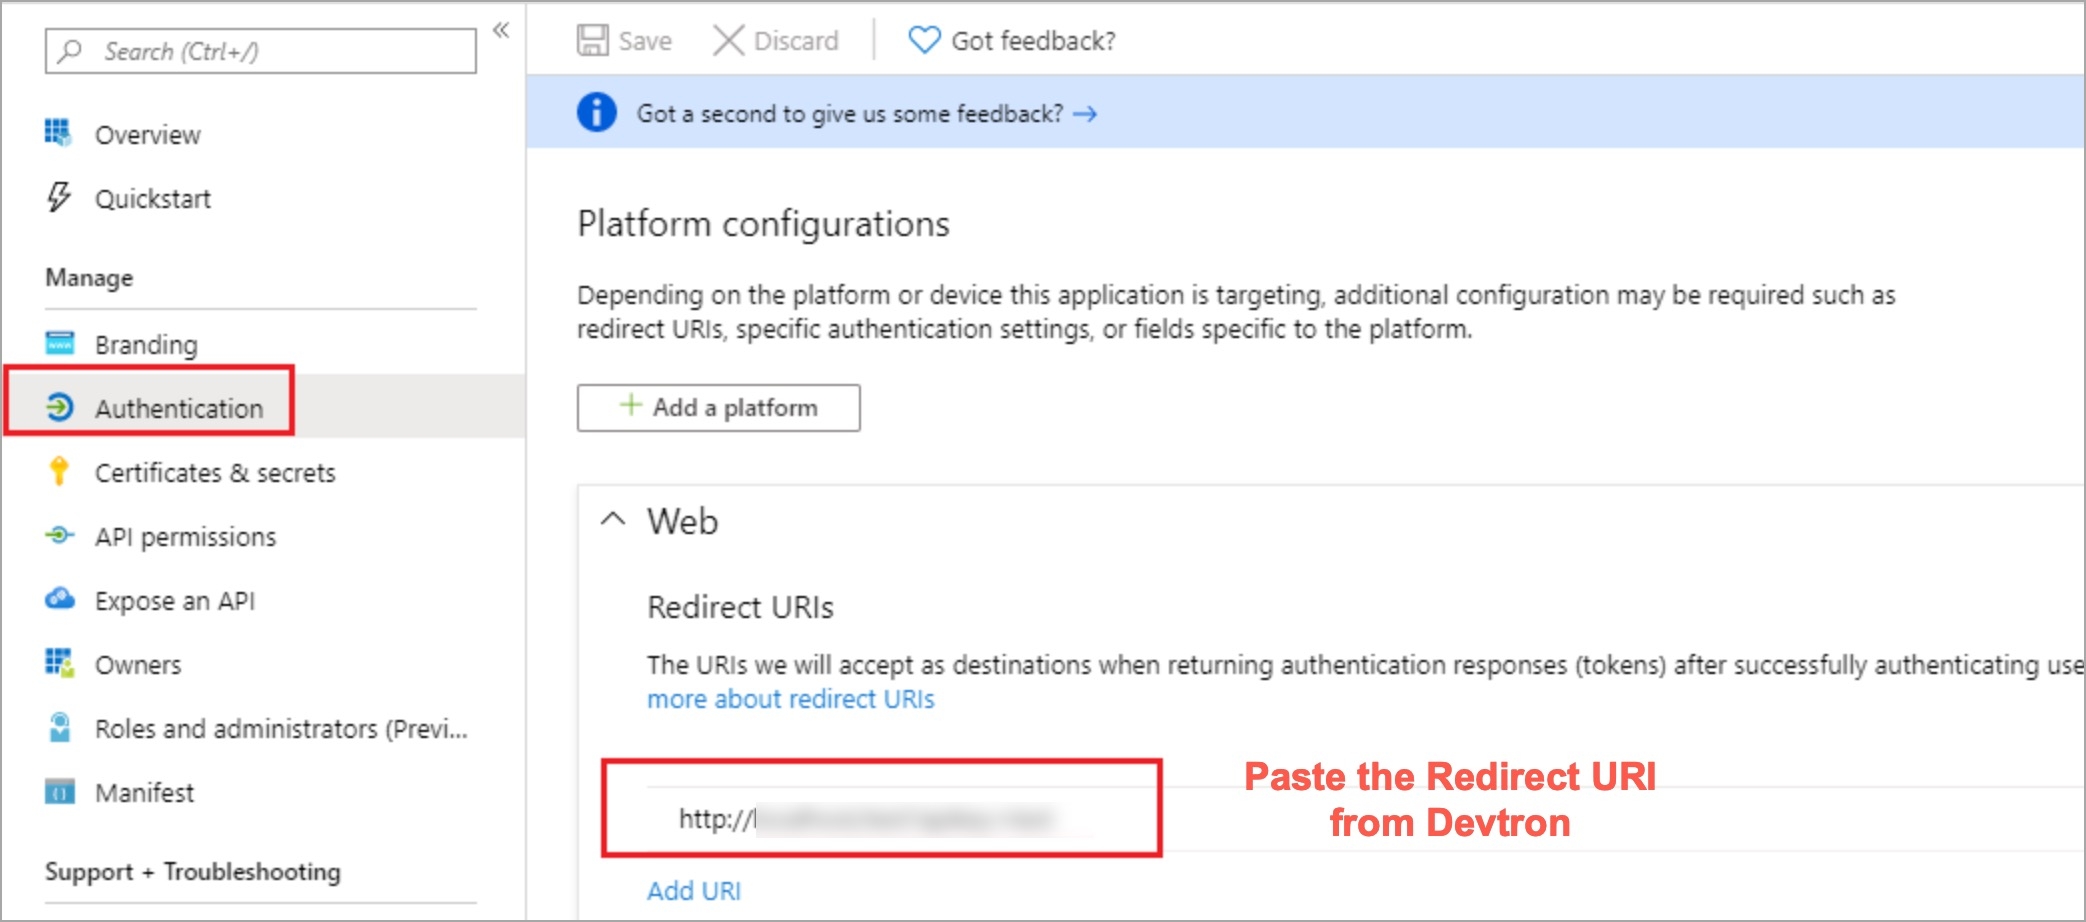
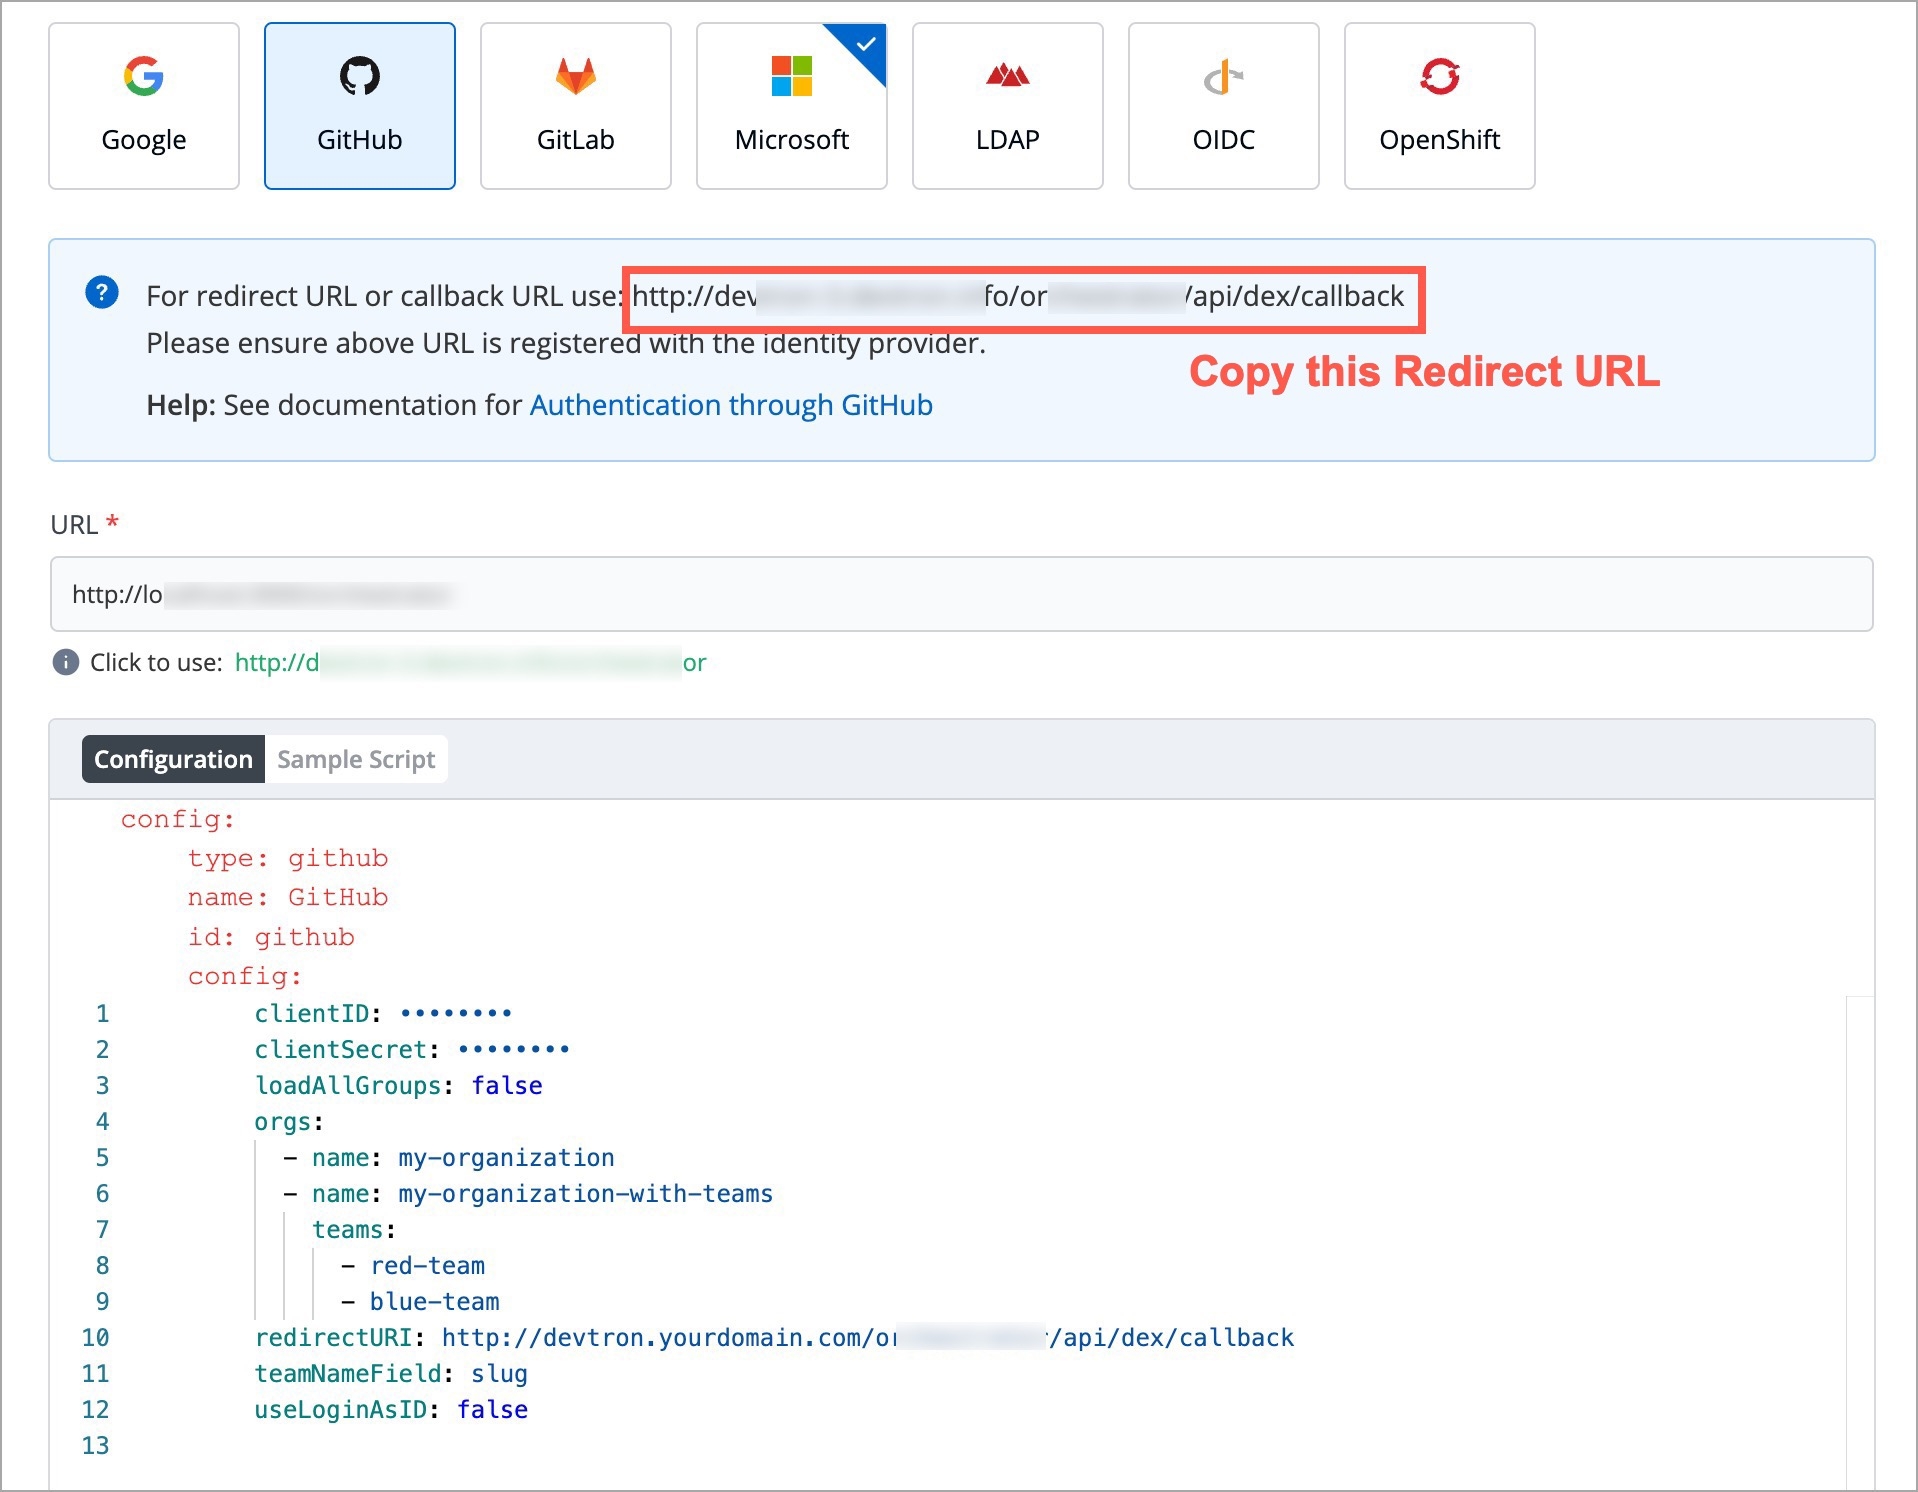
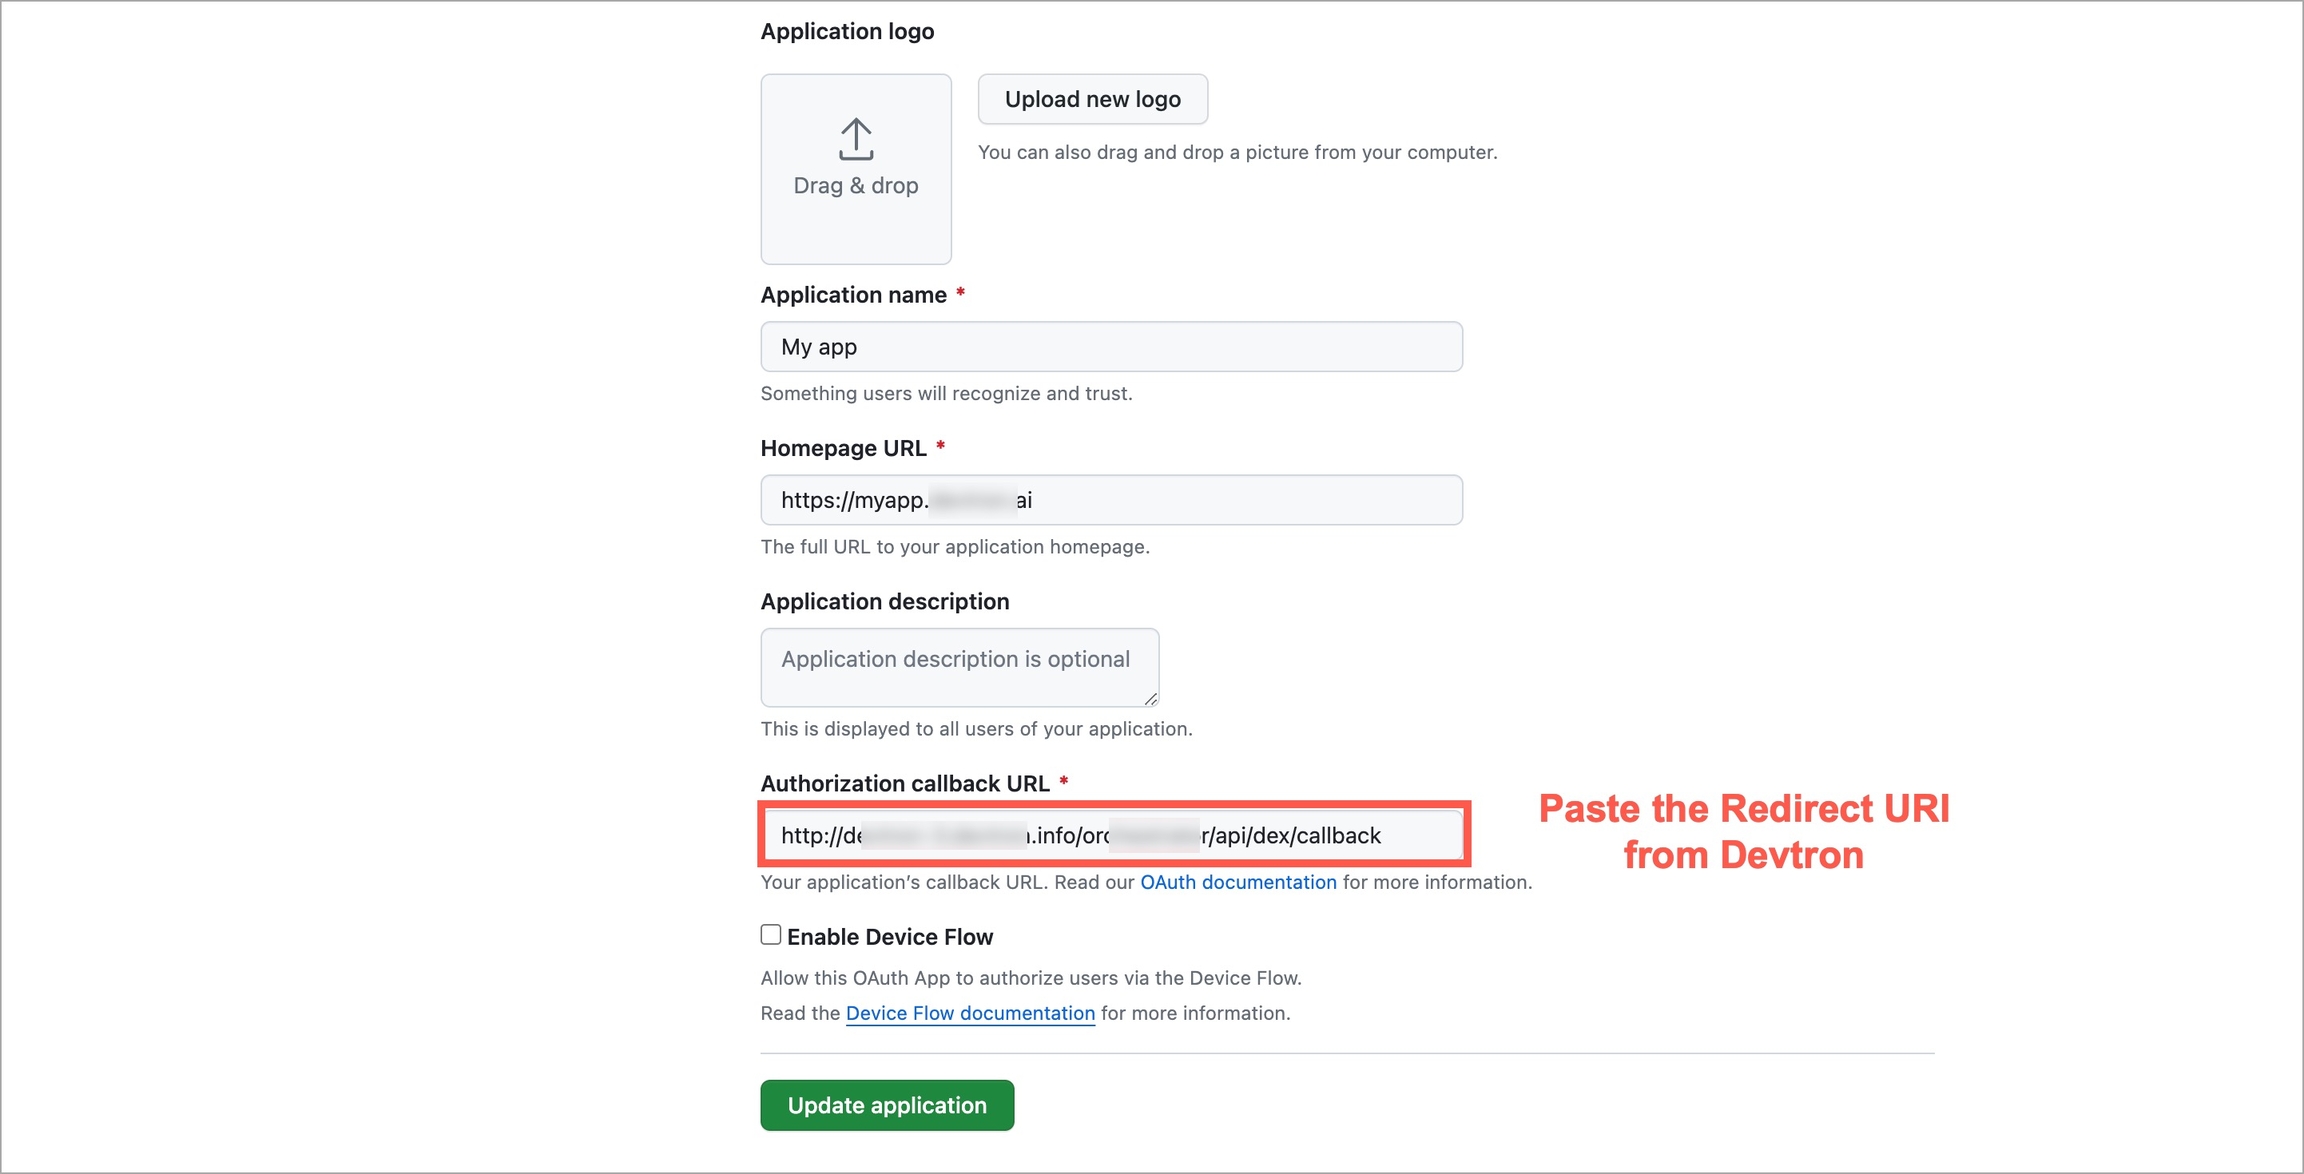
redirectURI (provided in SSO Login Services by Devtron)
Once Devtron is installed, it has a built-in admin user with super admin privileges with unrestricted access to all Devtron resources. We recommended to use a user with super admin privileges for initial and global configurations only and then switch to local users or configure SSO integration.
Only users with super-admin privileges can create SSO configuration. Devtron uses Dex for authenticating a user against the identity provider.
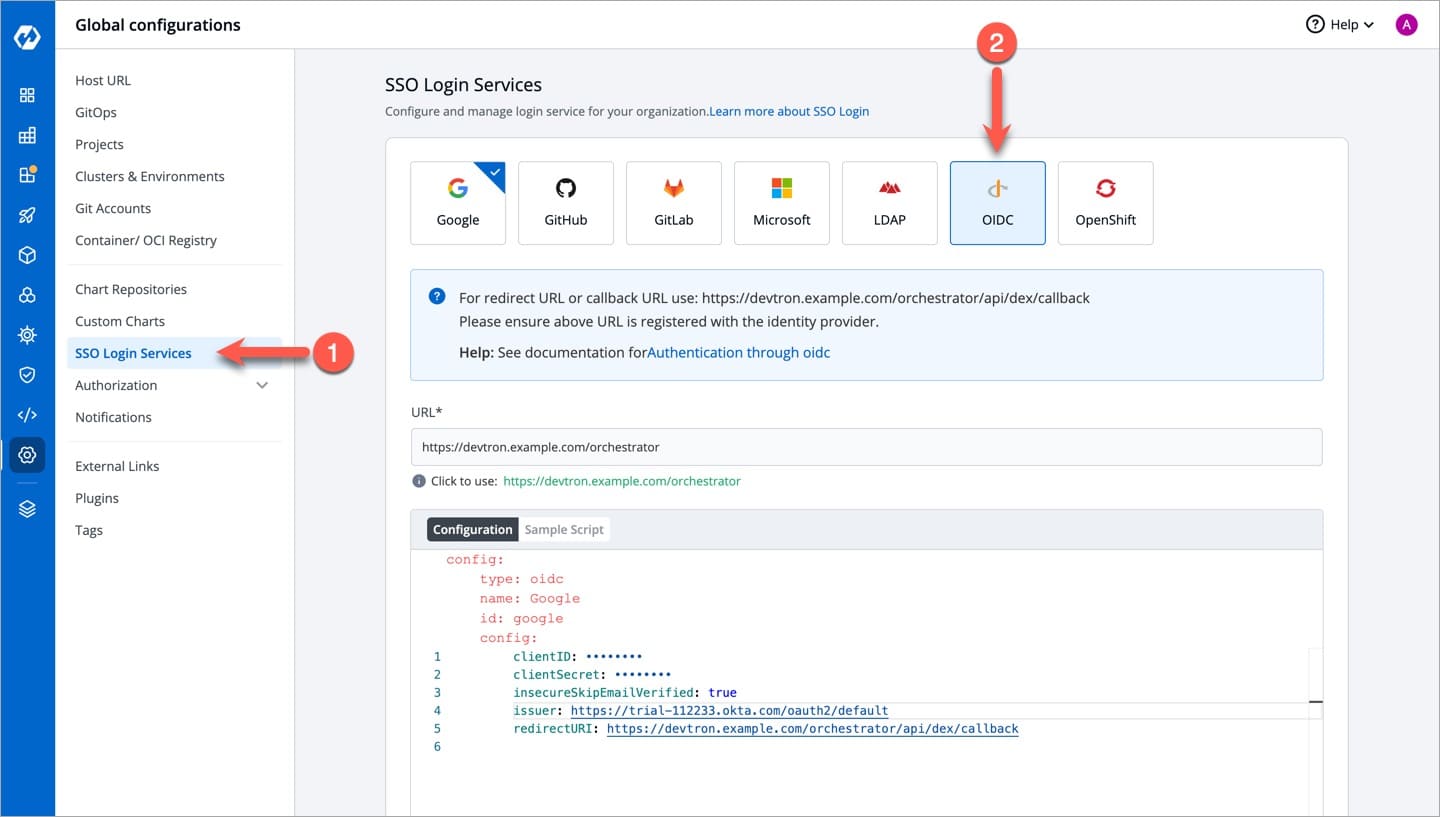
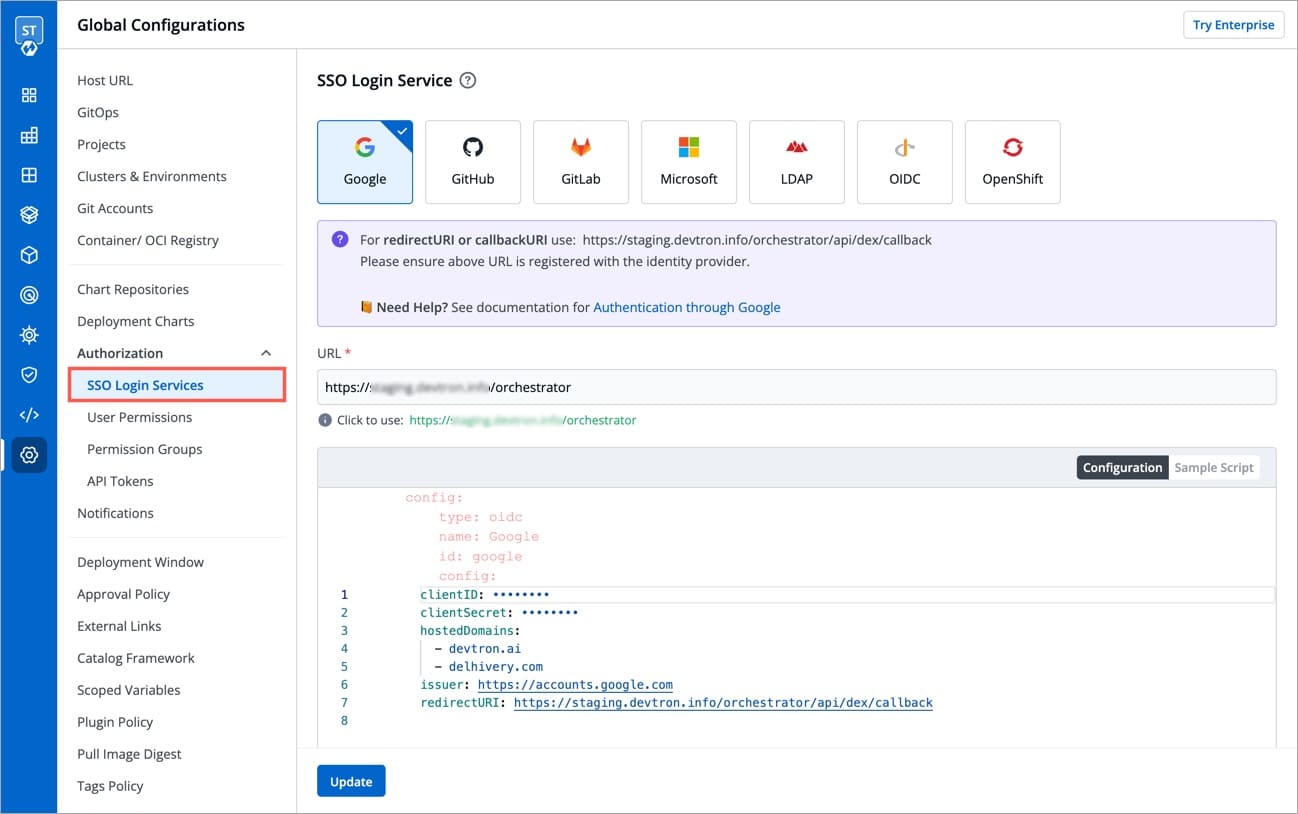
To add/edit SSO configuration, go to the SSO Login Services section of Global Configurations.
Below are the SSO providers which are available in Devtron. Select one of the SSO providers (e.g., GitHub) to configure SSO:
Google GitHub GitLab Microsoft LDAP OpenID Connect OpenShift
Dex implements connectors that target specific identity providers for each connector configuration. You must have a created account for the corresponding identity provider and registered an app for client key and secret.
Refer the following documents for more detail.
https://dexidp.io/docs/connectors/
https://dexidp.io/docs/connectors/google/
Make sure that you have a super admin access.
Go to the Global Configurations → SSO Login Services and click any SSO Provider of your choice.
In the URL field, enter the valid Devtron application URL where it is hosted.
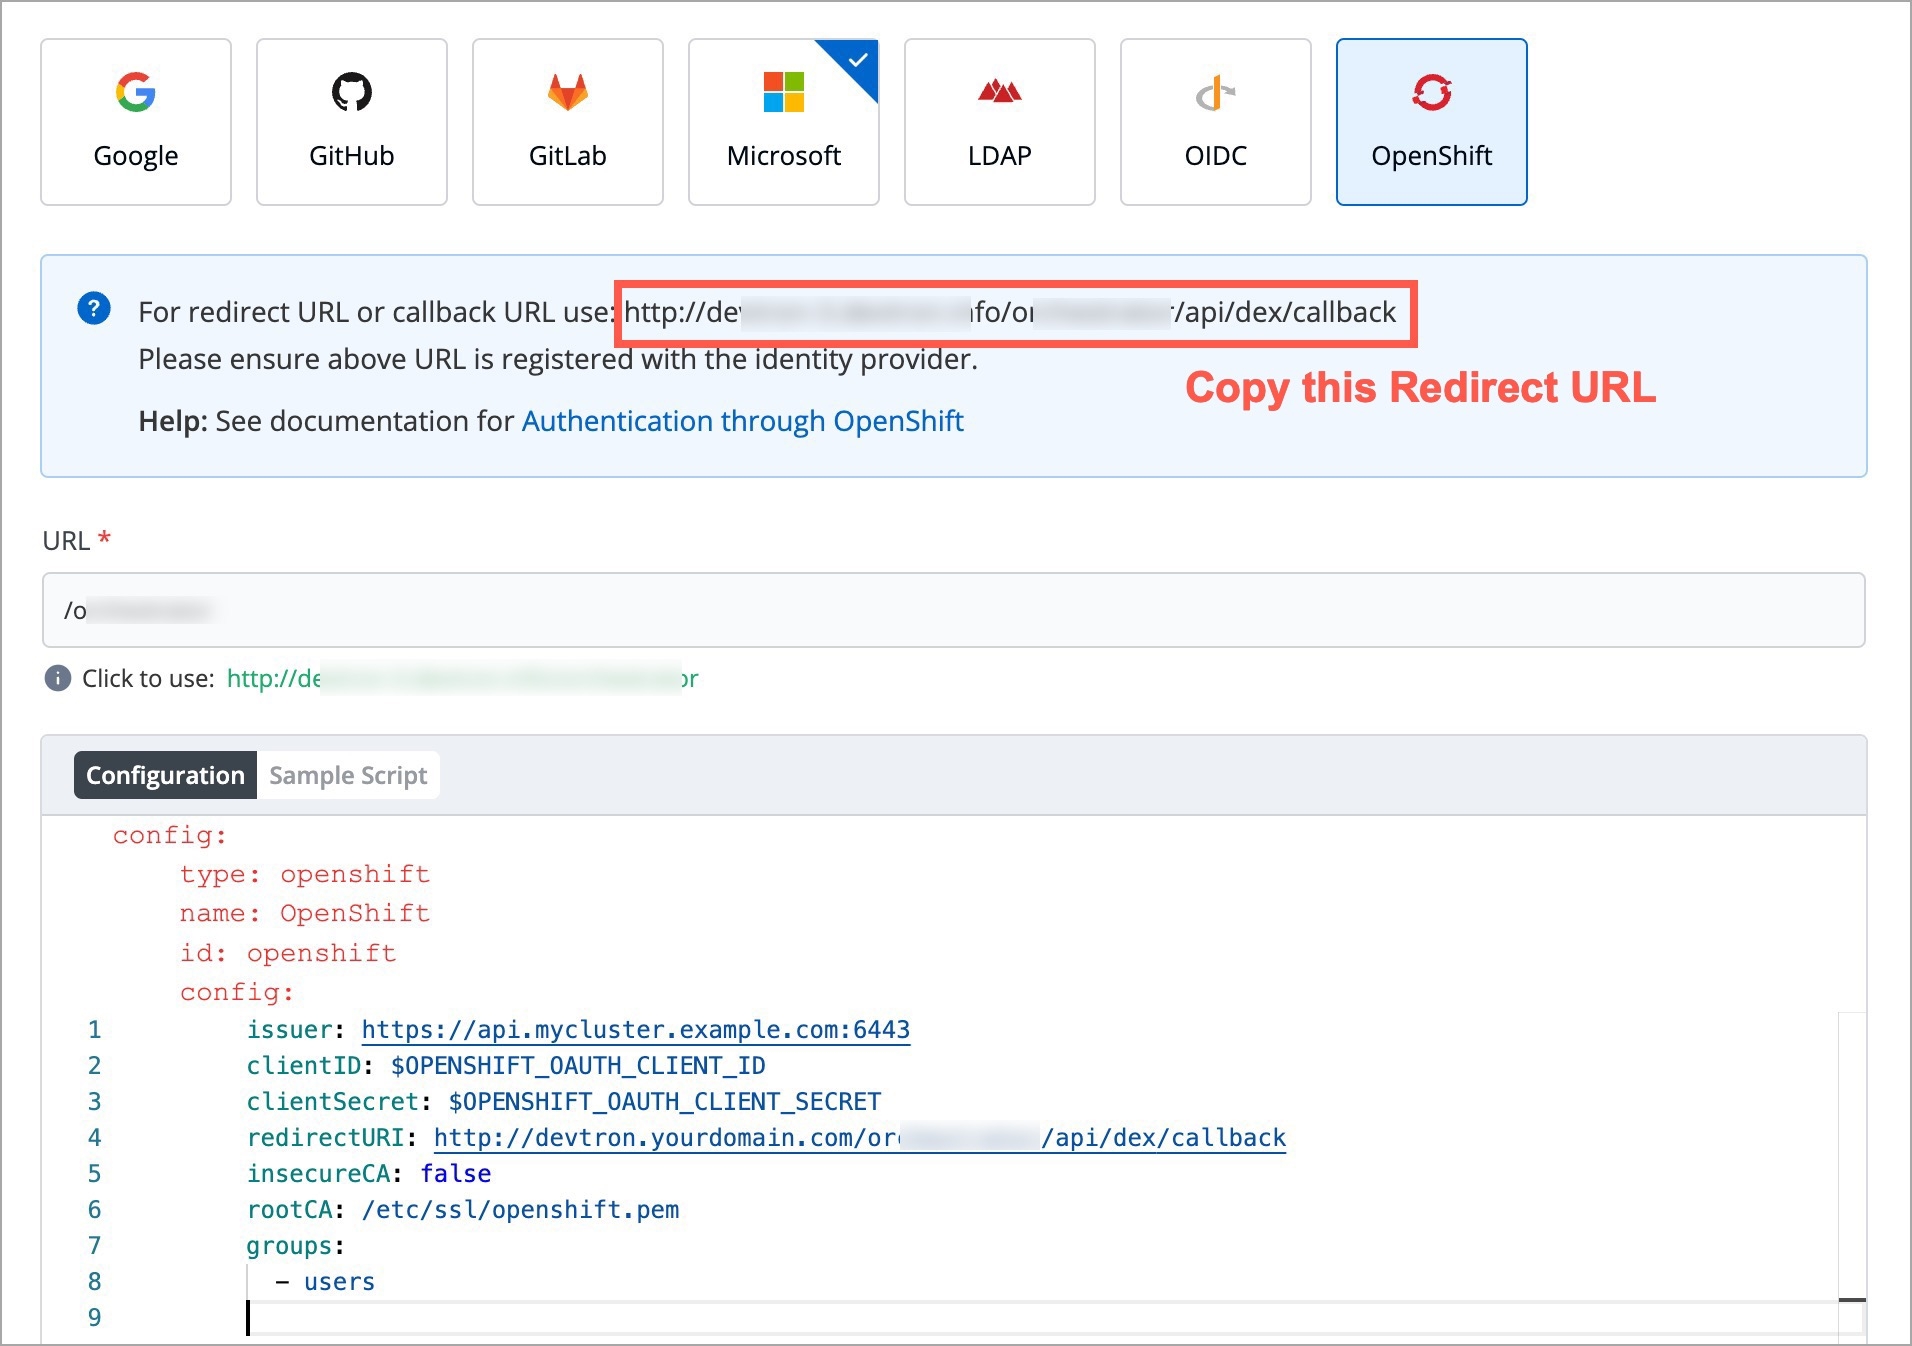
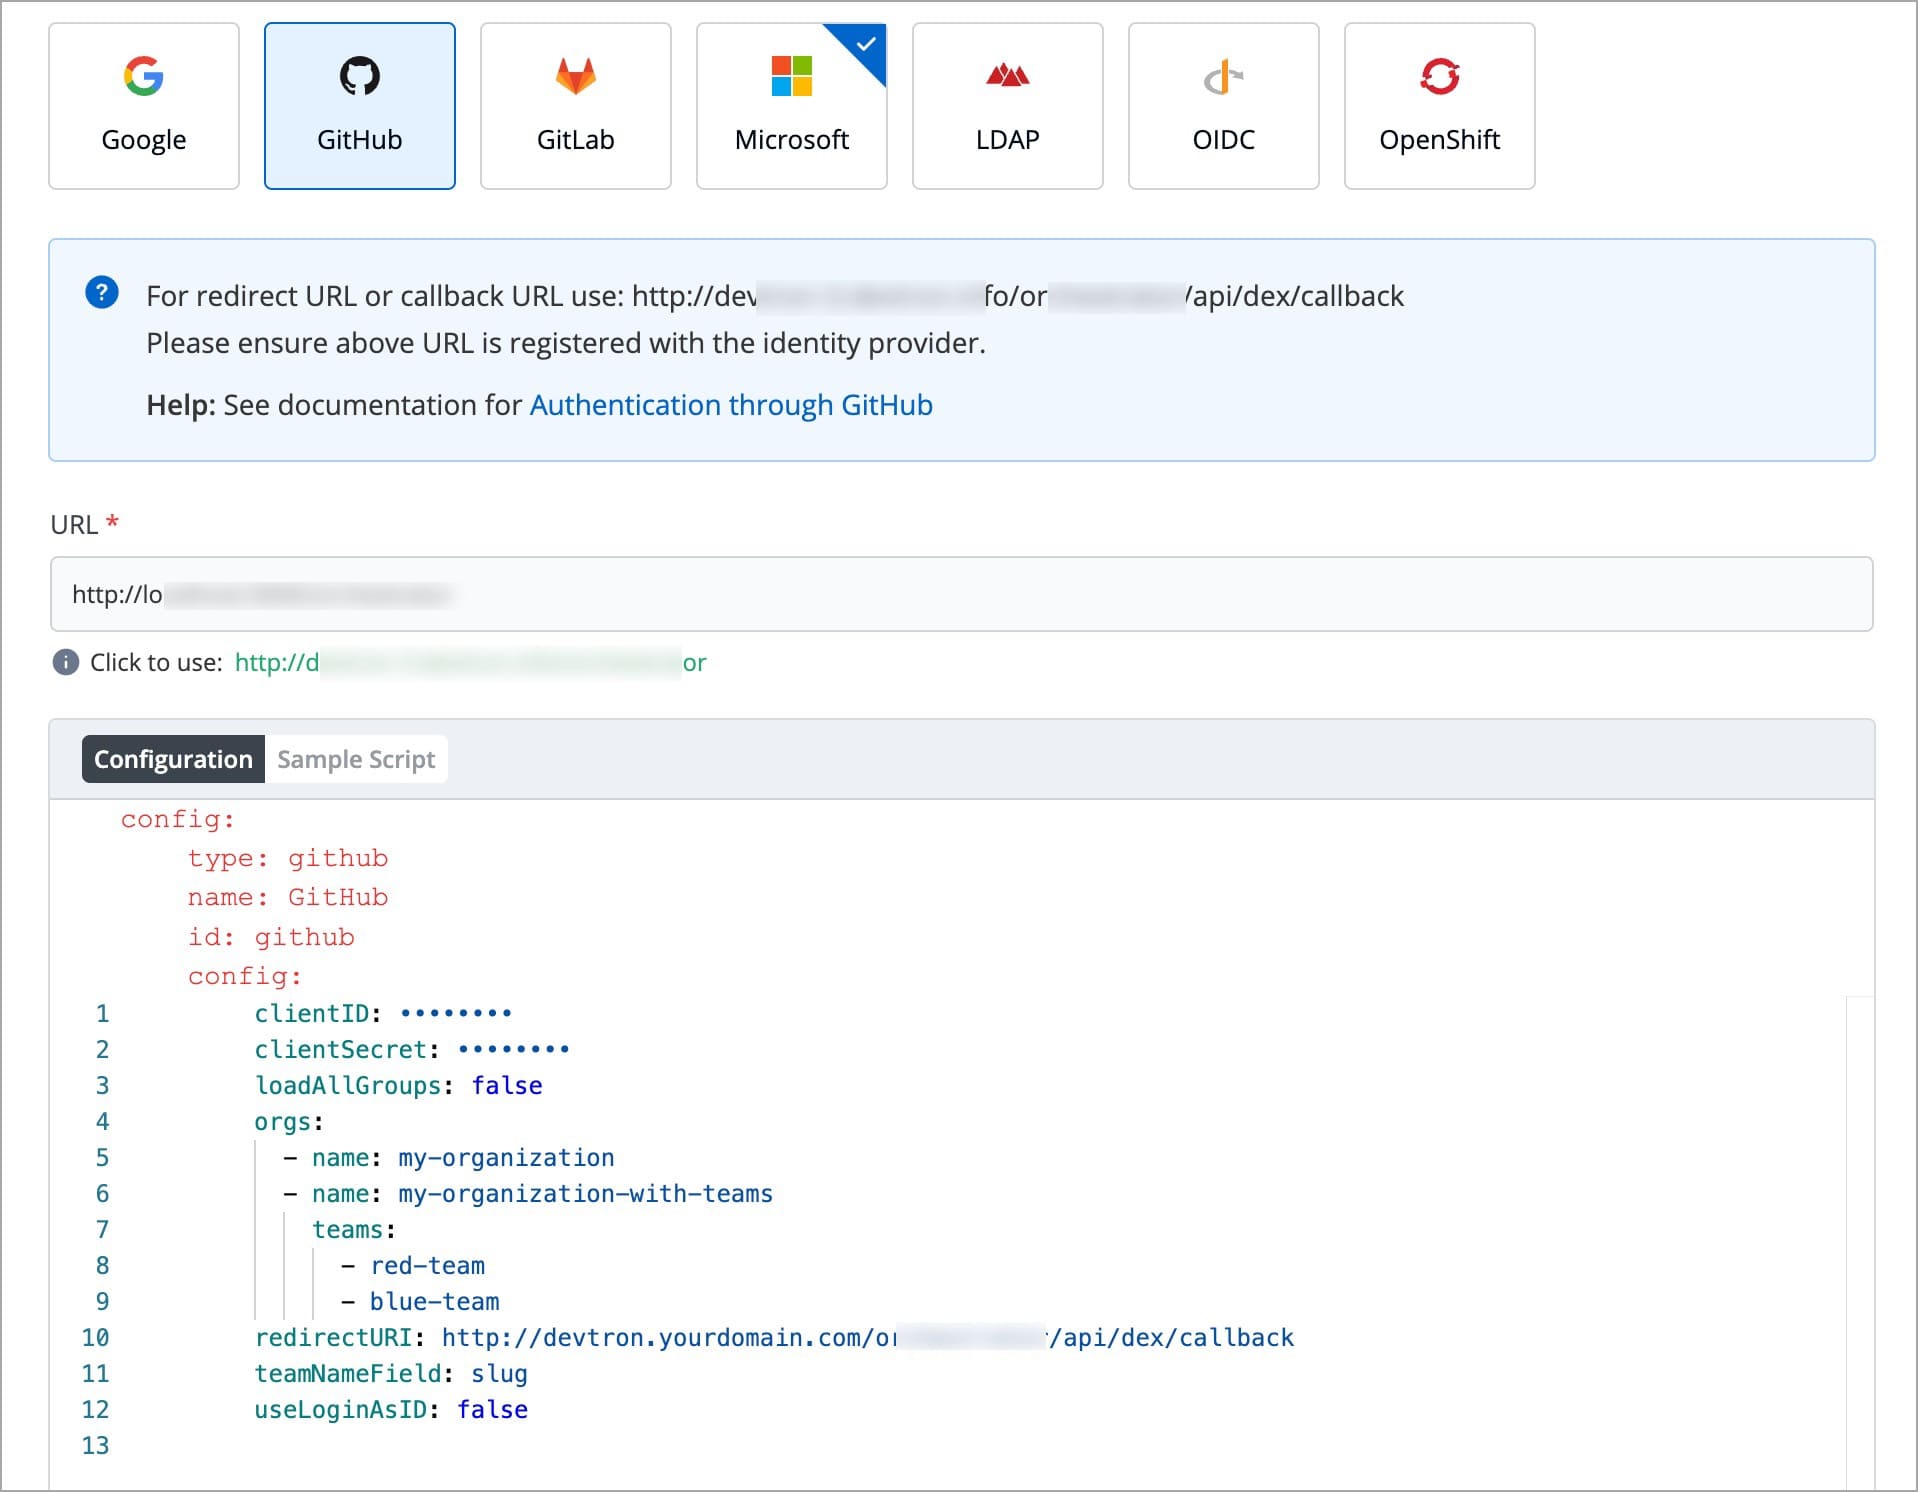
For providing redirectURI or callbackURI registered with the SSO provider, you can either select Configuration or Sample Script.
Provide the client ID and client Secret of your SSO provider (e.g. If you select Google as SSO provider, then you must enter $GOOGLE_CLIENT_ID and $GOOGLE_CLIENT_SECRET in the client ID and client Secret respectively.)
Select Save to create and activate SSO Login Service.
Note:
Only single SSO login configuration can be active at one time. Whenever you create or update any SSO configuration, it will be activated and used by Devtron and previous configurations will be deleted.
Except for the domain substring, URL and redirectURI remains same.
You can change SSO configuration anytime by updating the configuration and click Update. Note: In case of configuration change, all users will be logged out of Devtron and will have to login again.
type : Any platform name such as (Google, GitLab, GitHub etc.)
name : Identity provider platform name
id : Identity provider platform which is a unique ID in string. (Refer to dexidp.io
config : User can put connector details for this key. Platforms may not have same structure but common configurations are clientID, clientSecret, redirectURI.
hostedDomains : Domains authorized for SSO login.
After configuring an SSO for authentication, you need to add users in Devtron, else your users won't be able to log in via SSO.
In case you have enabled auto-assign permissions in Microsoft or LDAP, relevant permission groups must also exist in Devtron for a successful login.
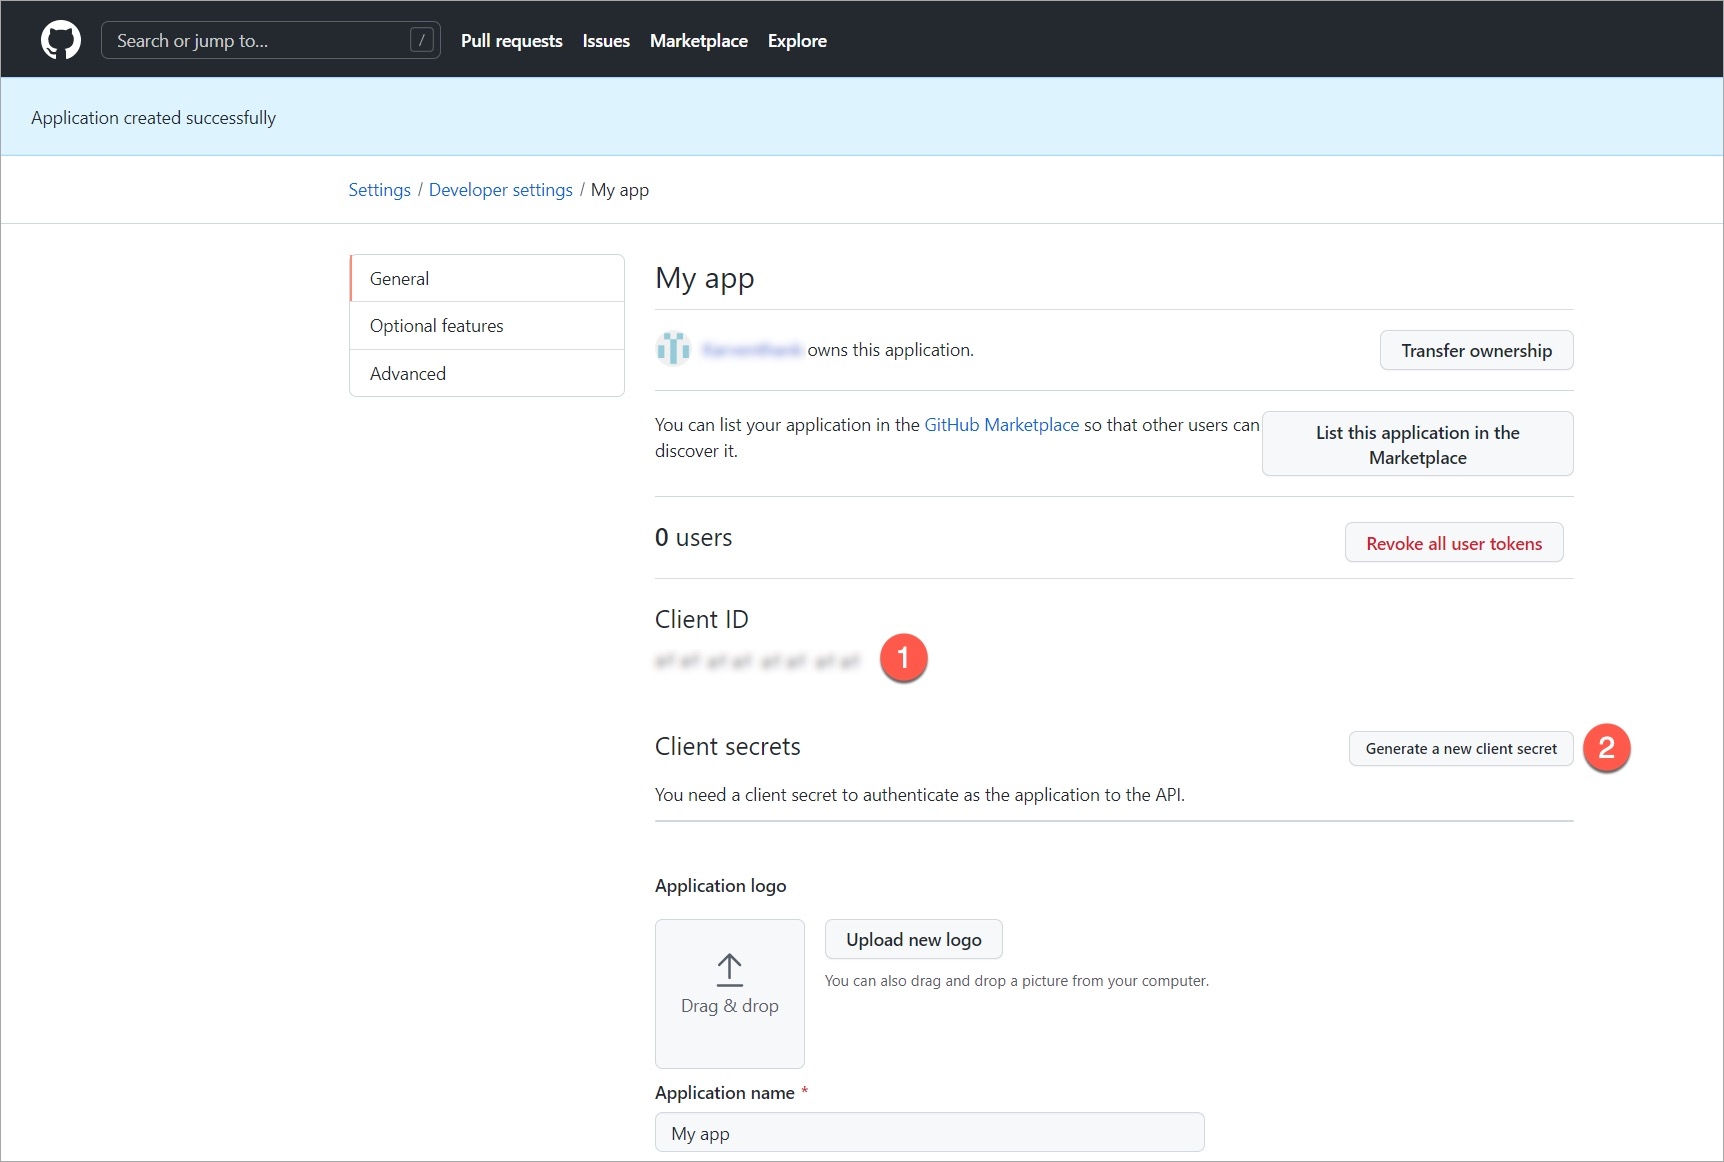
Devtron provides a sample configuration out of the box. There are some values that you need to either get from your SSO provider or give to your SSO provider.
clientID
clientSecret
redirectURI (provided in SSO Login Services by Devtron)
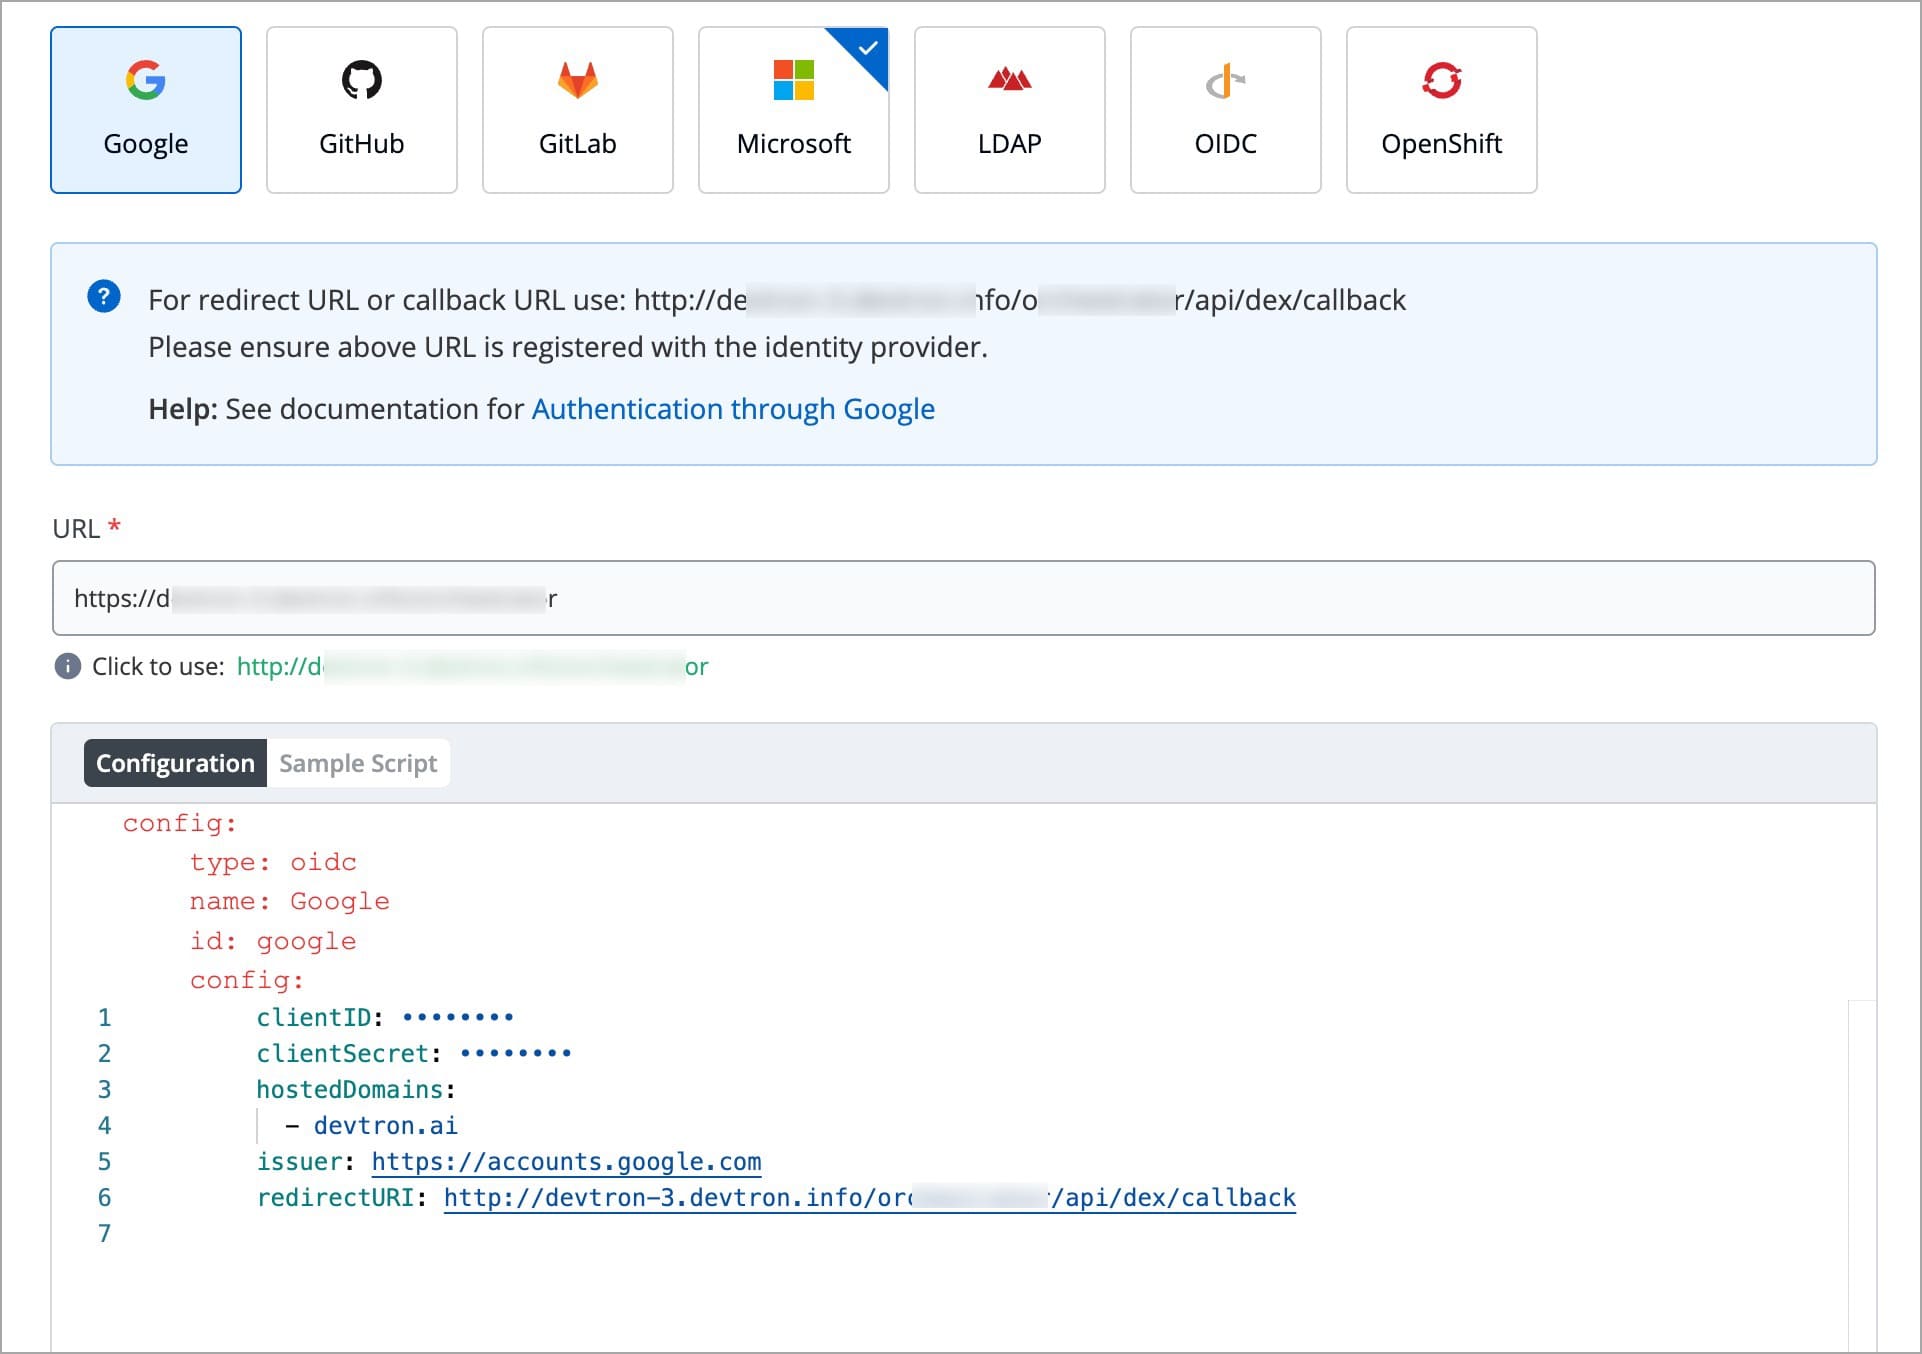
Devtron provides a sample configuration out of the box. There are some values that you need to either get from your SSO provider or give to your SSO provider.
clientID
clientSecret
redirectURI (provided in SSO Login Services by Devtron)
Authorization section describes how to authenticate and authorize access to resources, also managing role-based access levels in Devtron.
Access can be granted to a user via:
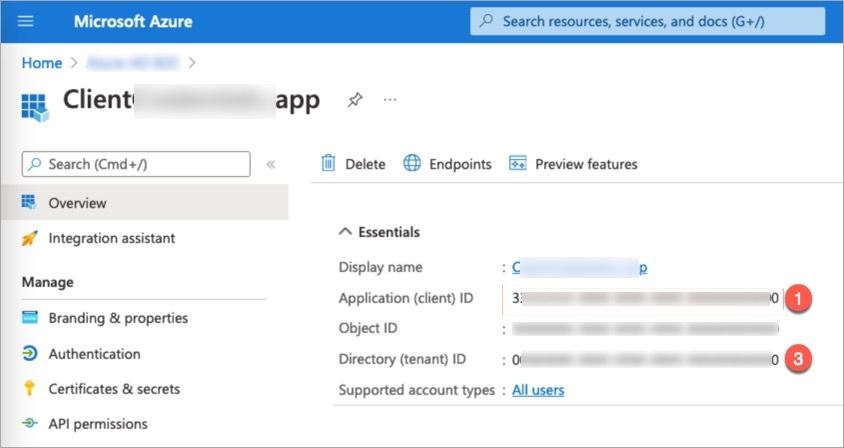
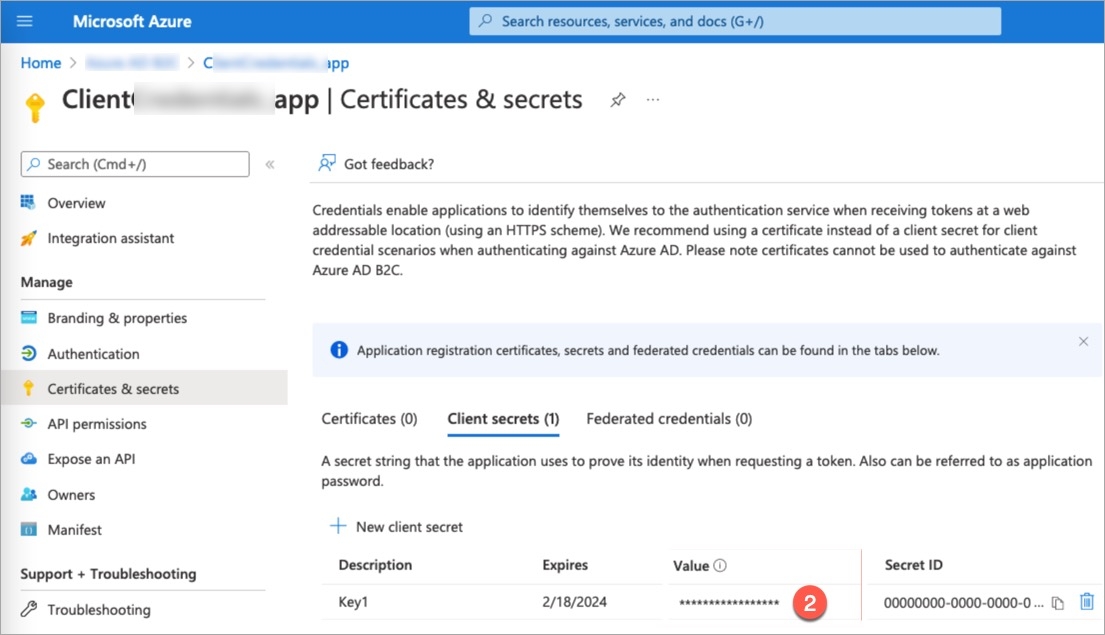
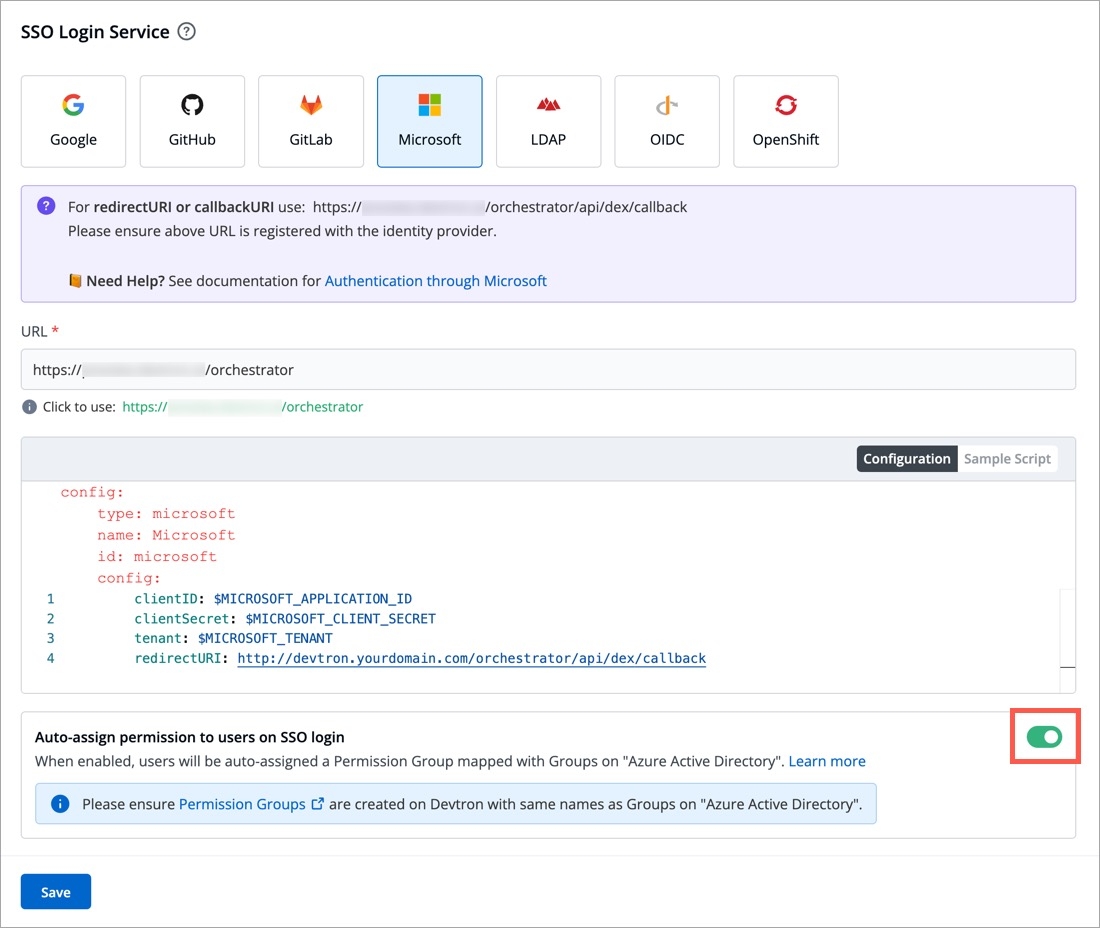
Devtron provides a sample configuration out of the box. There are some values that you need to either get from your SSO provider or give to your SSO provider.
clientID
tenantID (required only if you want to use Azure AD for auto-assigning permissions)
clientSecret
redirectURI (provided in SSO Login Services by Devtron)
Make sure to add tenantID in the SSO configuration field without fail.
SSO login requires exact matching between Devtron permission group names and AD groups. Any discrepancies or missing groups will prevent successful login.
If your AD permissions aren't reflecting in Devtron, a quick sign-out and sign-in can resolve the issue.
Since Microsoft supports , this feature further simplifies the onboarding process of organizations having a large headcount of users. It also eliminates repetitive permission assignment by automatically mapping your Azure AD groups to Devtron's during single sign-on (SSO) login.
If you've defined groups in your Active Directory, you can create corresponding permission groups in Devtron with the same names. When members of those Active Directory groups first log in to Devtron, they'll automatically inherit the permissions from their Devtron permission group. This means you can't manually adjust or add mapped to a permission group.
Once you save the configuration with this feature enabled, existing user permissions will be cleared and the future permissions will be managed through linked to Azure Active Directory (Microsoft Entra ID) groups.

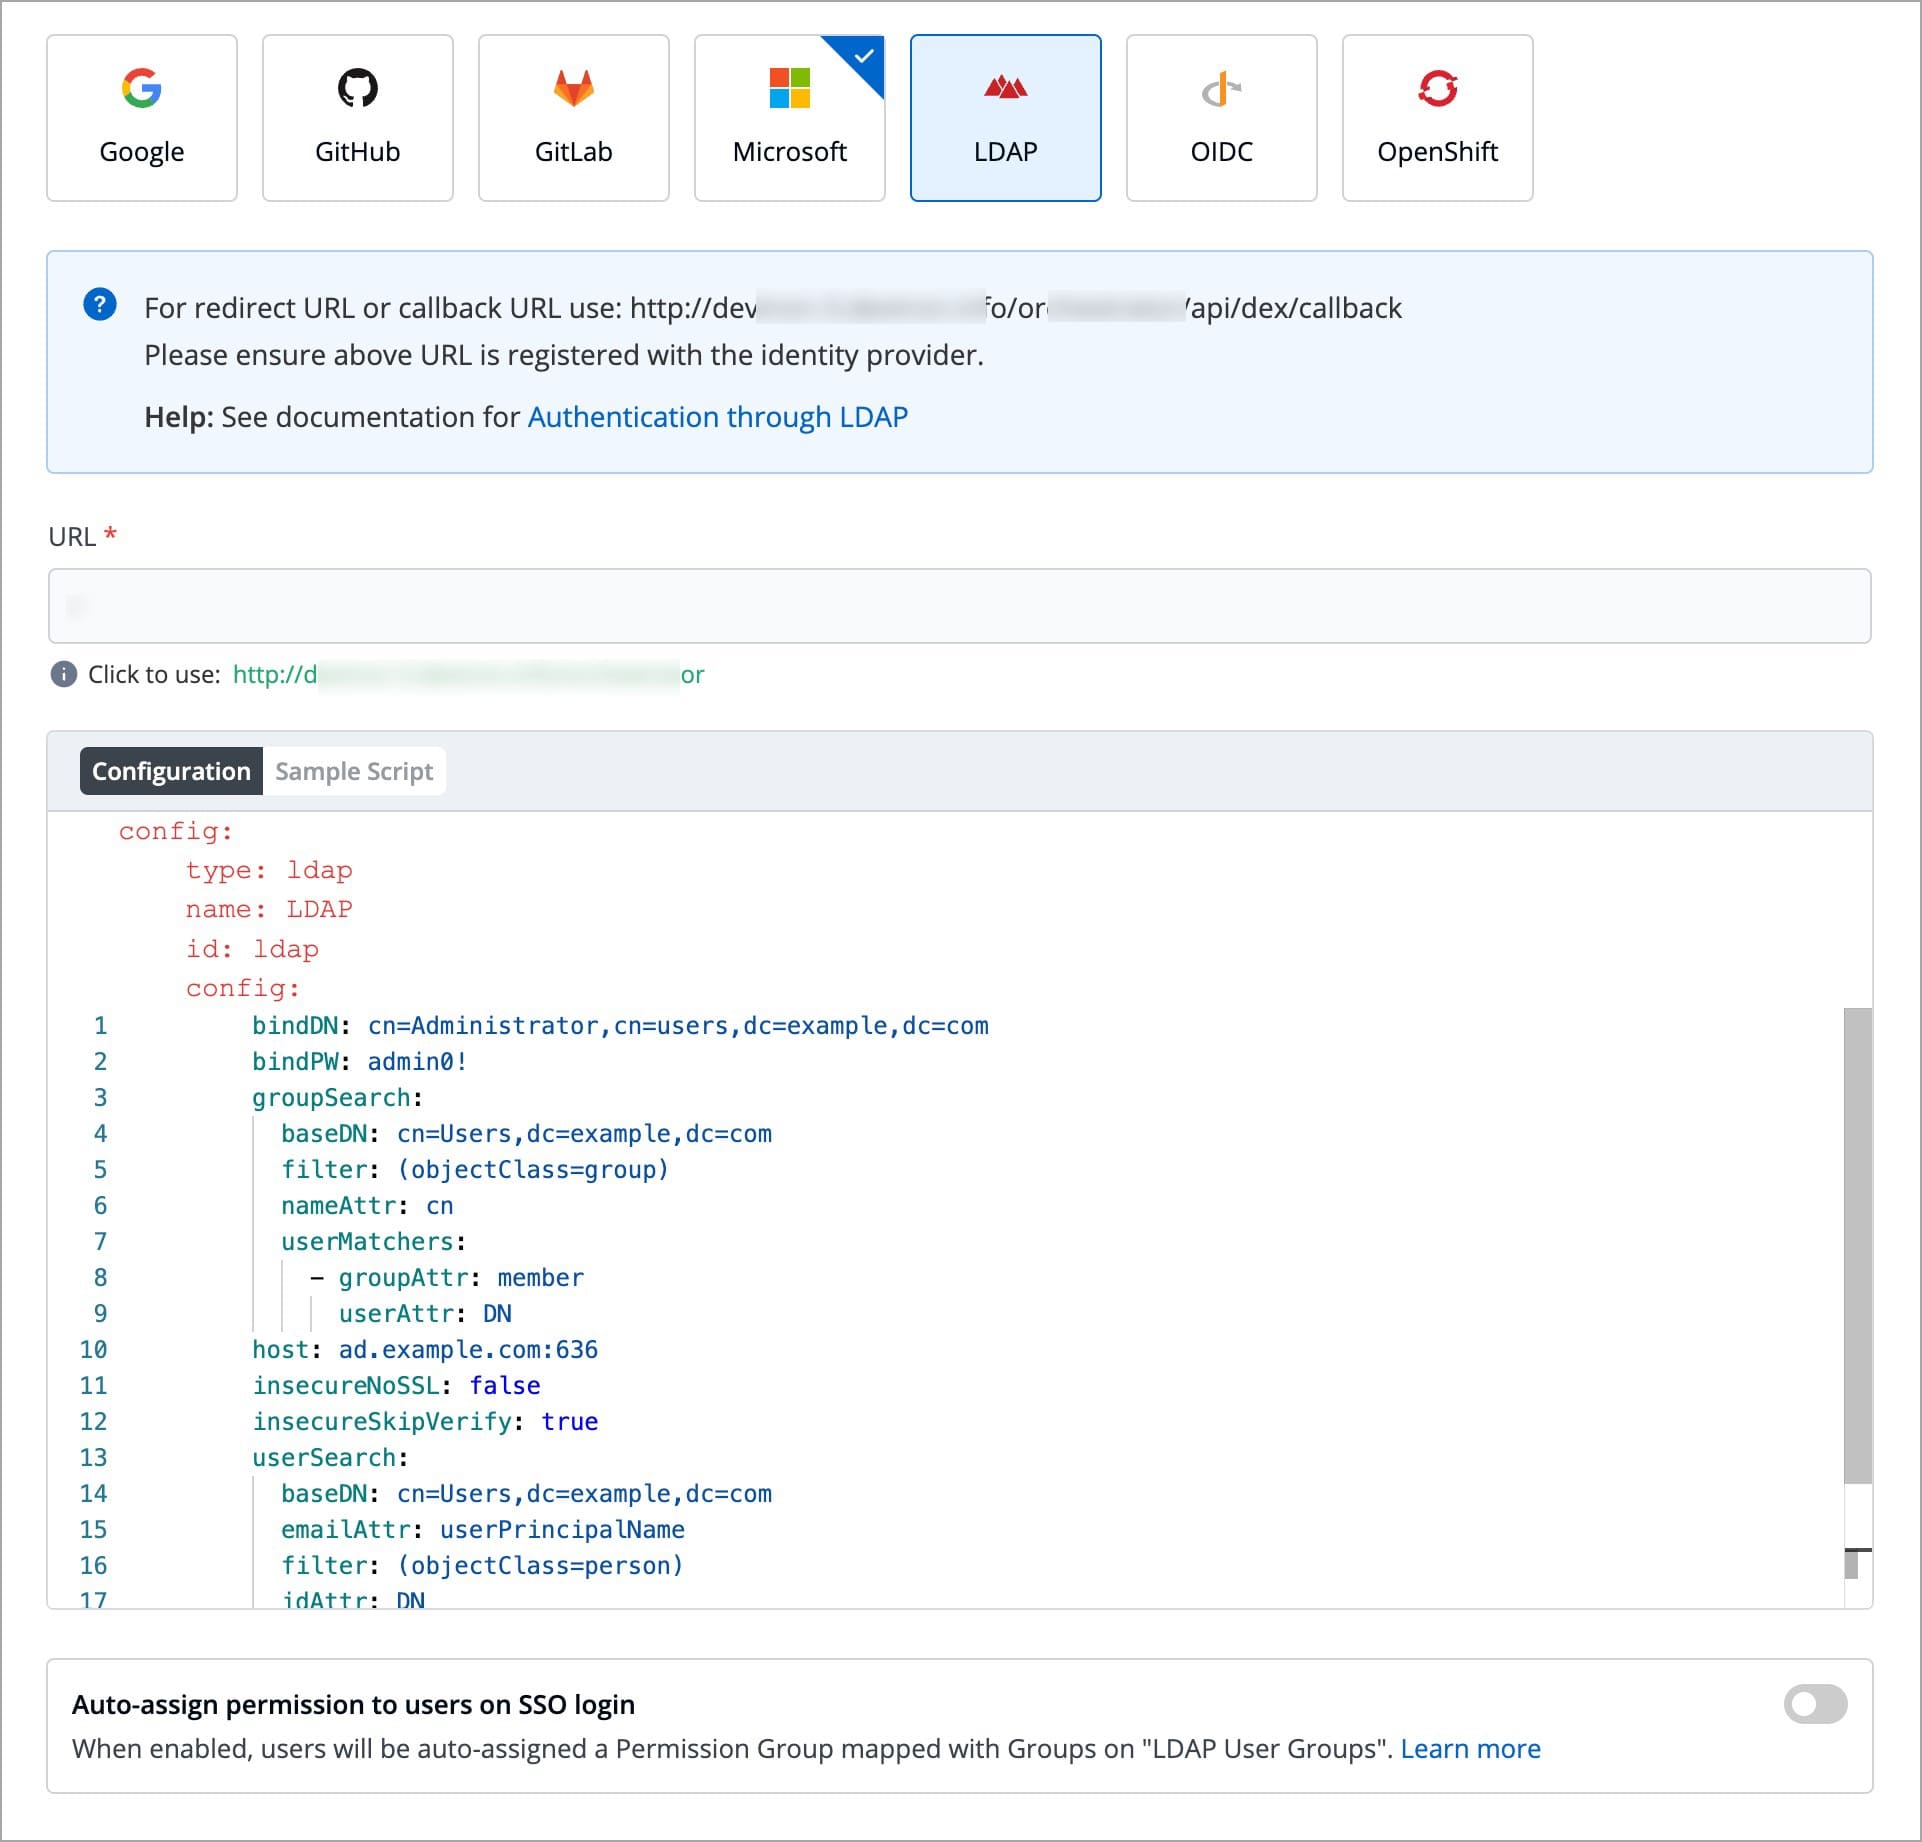
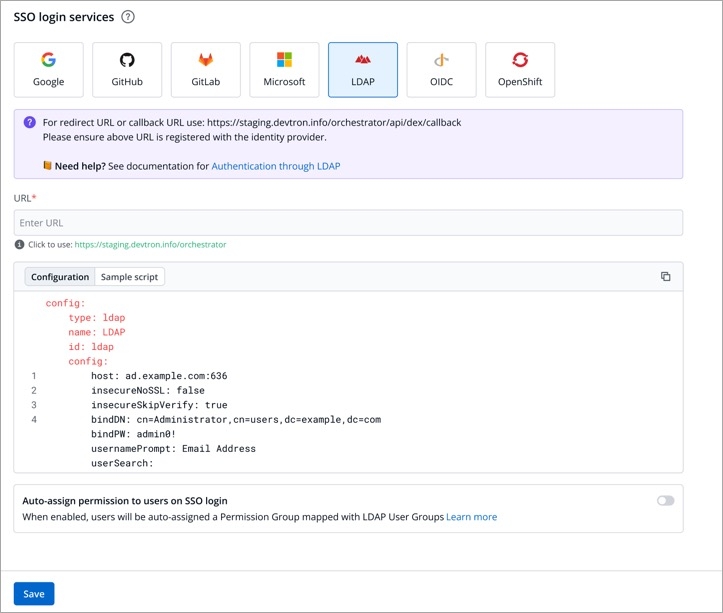
Devtron provides a sample configuration out of the box. Here are some values you need to fetch from your LDAP.
bindDN
bindPW
baseDN
Since LDAP supports creation of User Groups, this feature simplifies the onboarding process of organizations having a large headcount of users. It also eliminates repetitive permission assignment by automatically mapping your LDAP User groups to Devtron's Permission Groups during single sign-on (SSO) login.
If you've created user groups in LDAP, you can create corresponding permission groups in Devtron with the same names. When members of those user groups first log in to Devtron, they'll automatically inherit the permissions from their Devtron permission group. This means you can't manually adjust or add individual permissions for users mapped to a permission group.
SSO login requires exact matching between Devtron permission group names and LDAP user groups. Any discrepancies or missing groups will prevent successful login.
Once you save the configuration with this auto-assign feature enabled, existing user permissions will be cleared and the future permissions will be managed through Permission Groups linked to LDAP user groups.
If you're missing some permissions that you know you should have, try logging out and signing back in to Devtron. This will refresh your permissions based on your latest LDAP user group.
Like any enterprise product, Devtron supports fine grained access control to the resources based on:
Type of action allowed on Devtron resources (Create Vs View)
Sensitivity of the data (Editing image Vs Editing memory)
Access can be added to the User either directly or via Permission groups.
Devtron supports the following levels of access:
View only: User with View only access has the least privilege. This user can only view combination of environments, applications and helm charts on which access has been granted to the user. This user cannot view sensitive data like secrets used in applications or charts.
Build and Deploy: In addition to View only access, user with Build and deploy permission can build and deploy the image of the permitted applications and helm charts to the permitted environments.
Admin: User with Admin access can create, edit, delete and view permitted applications in the permitted projects.
Manager: User with Manager access can do everything that an Admin type user can do, in addition, they can also give and revoke access of users for the applications and environments of which they are Manager.
Super Admin: User with Super admin privilege has unrestricted access to all Devtron resources. Super admin can create, modify, delete and view any Devtron resource without any restriction; its like Superman without the weakness of Kryptonite. Super Admin can also add and delete user access across any Devtron resource, add delete git repository credentials, container registry credentials, cluster and environment.
View
Yes
No
No
No
No
Build and Deploy
Yes
No
No
No
Yes
Admin
Yes
Yes
Yes
Yes
Yes
Manager
Yes
Yes
Yes
Yes
Yes
Super Admin
Yes
Yes
Yes
Yes
Yes
View Only
Yes
No
No
No
View and Edit
Yes
Yes
Yes
No
Admin
Yes
Yes
Yes
Yes
Super Admin
Yes
Yes
Yes
Yes
Manager
Yes
Yes
Yes
Super Admin
Yes
Yes
Yes
Super Admin
Yes
Yes
Yes
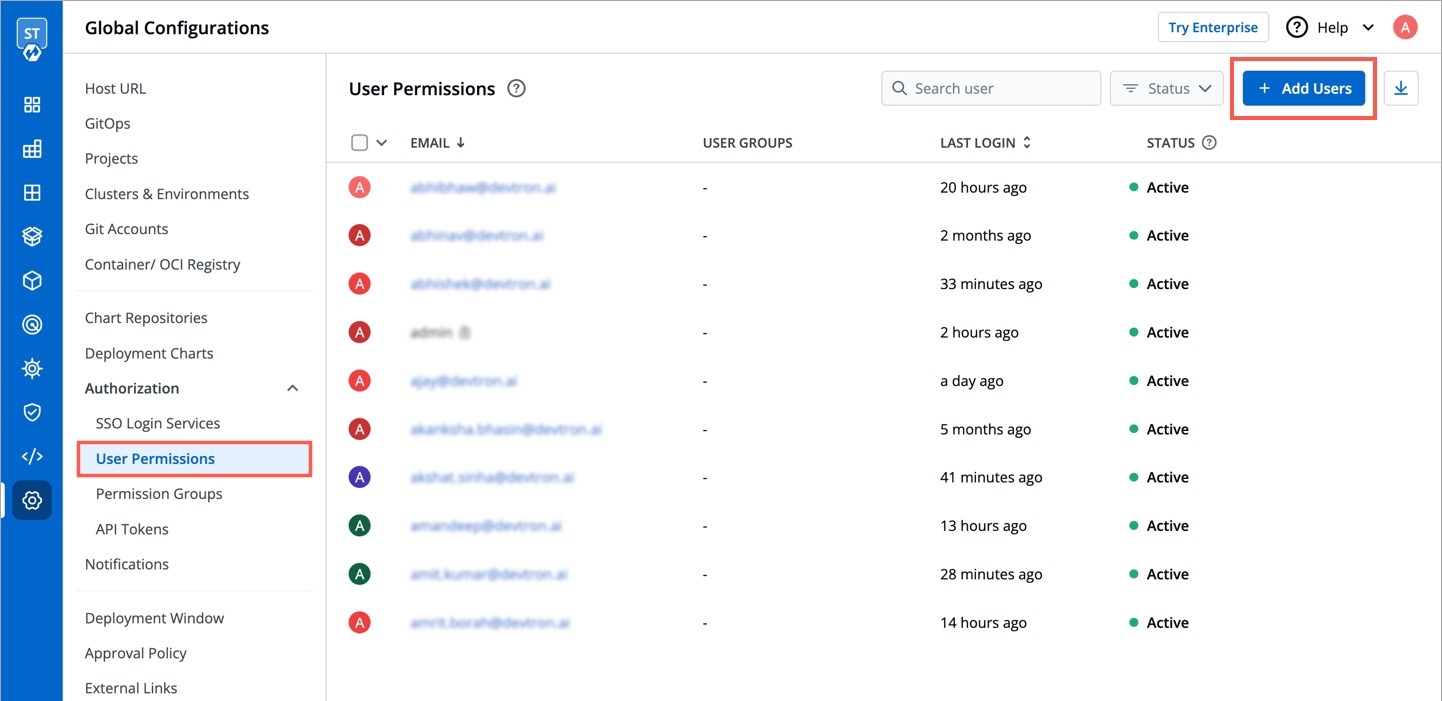
To add a user, go to the Authorization > User Permissions section of Global Configurations. Click Add user.
There are two types of permissions in Devtron:
Specific permissions
Devtron Apps
Helm Apps
Kubernetes Resources
Chart Groups
Super admin permission
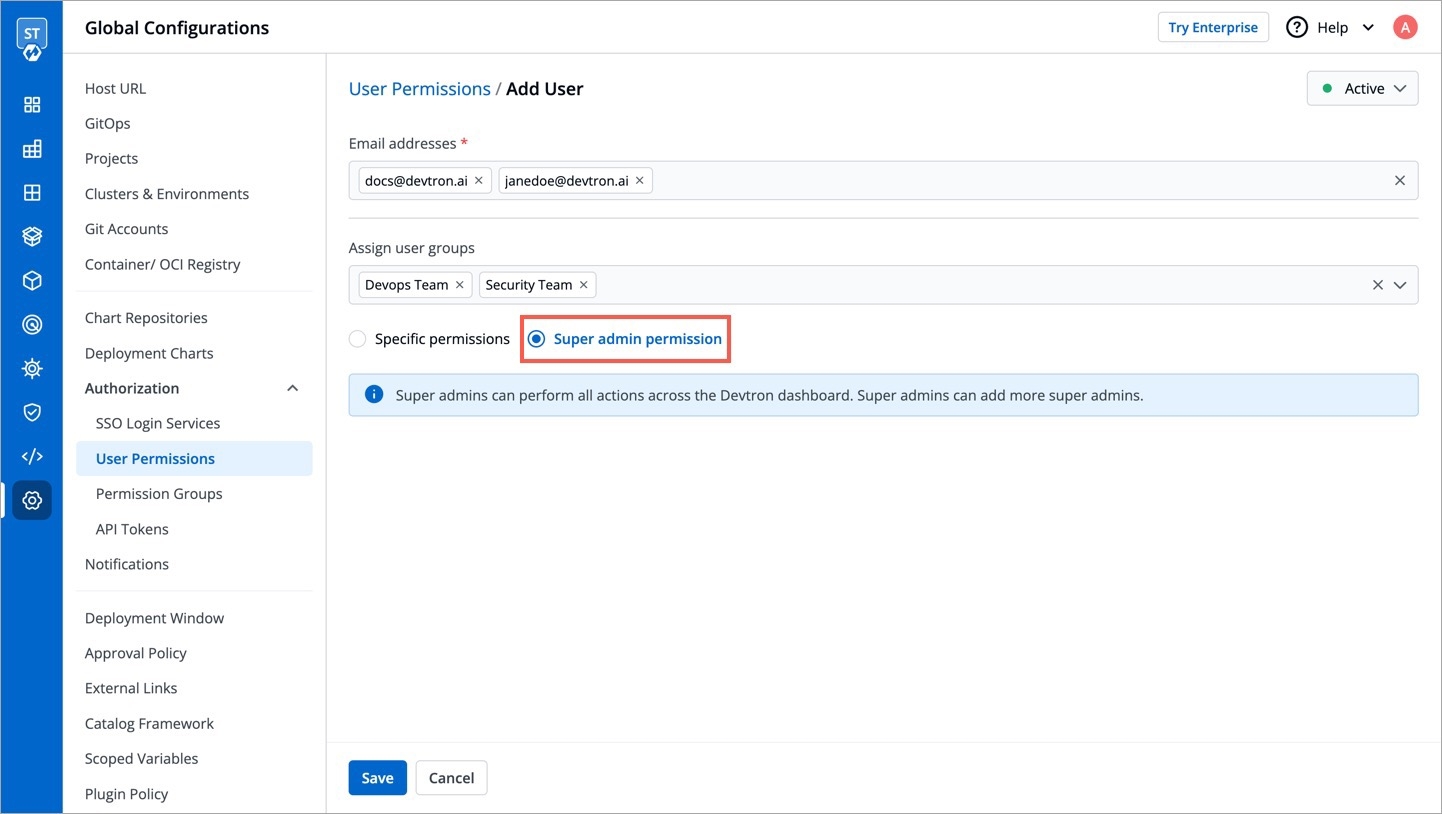
To assign a super admin access, go to the Authorization > User Permissions section of Global Configurations.
Click Add user.
Provide the email address of a user. You can add more than one email address. Please note that email address must be same as that in the email field in the JWT token returned by OIDC provider.
Select Super admin permission and click Save.
A user now will have a Super admin access.
Note:
Only users with Super admin permission can assign super admin permissions to a user.
We suggest that super admin access must be given to the selected users only.
To assign a specific permission, go to the Authorization > User Permissions section of Global Configurations.
Click Add user.
Provide the email address of a user. You can add more than one email address. Please note that email address must be same as that in the email field in the JWT token returned by OIDC provider.
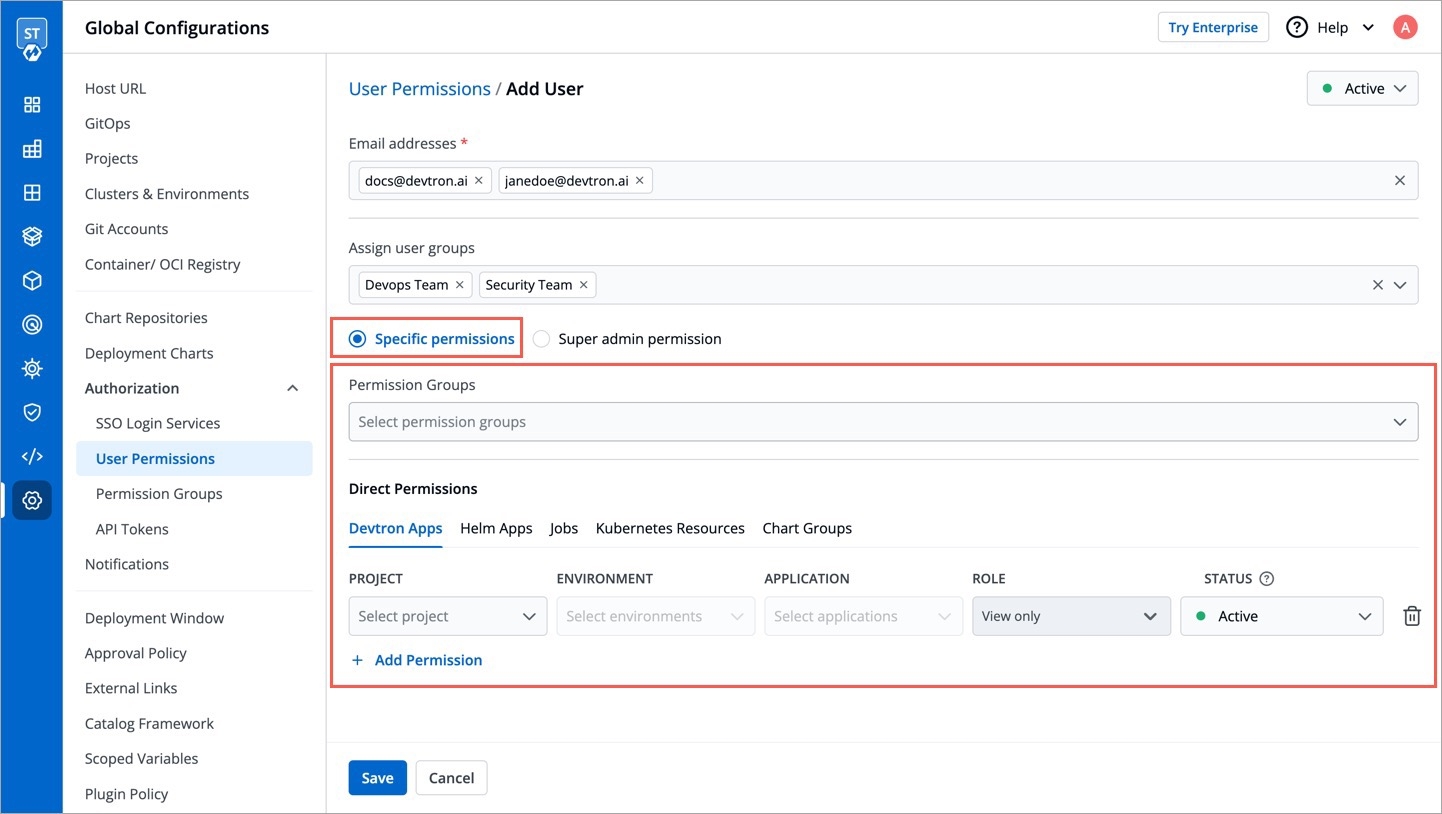
Select Specific permissions.
Select the group permission from the drop-down list, if required.
Selecting Specific permission option allows you to manage access and provide the role-based access accordingly for
In Devtron Apps option, you can provide access to a user to manage permission for custom apps created using Devtron.
Note: The Devtron Apps option will be available only if you install CI/CD integration.
Provide the information in the following fields:
Project
Select a project from the drop-down list to which you want to give permission to the user. You can select only one project at a time.
Note: If you want to select more than one project, then click Add row.
Environment
Select the specific environment or all environments from the drop-down list.
Note: If you select All environments option, then a user gets access to all the current environments including any new environment which gets associated with the application later.
Application
Select the specific applications or all applications from the drop-down list corresponding to your selected Environments.
Note: If you select All applications option, then a user gets access to all the current applications including any new application which gets associated with the project later
.
Role
View only
Build and Deploy
Admin
Manager
You can add multiple rows for Devtron app permission.
Once you have finished assigning the appropriate permissions for the users, Click Save.
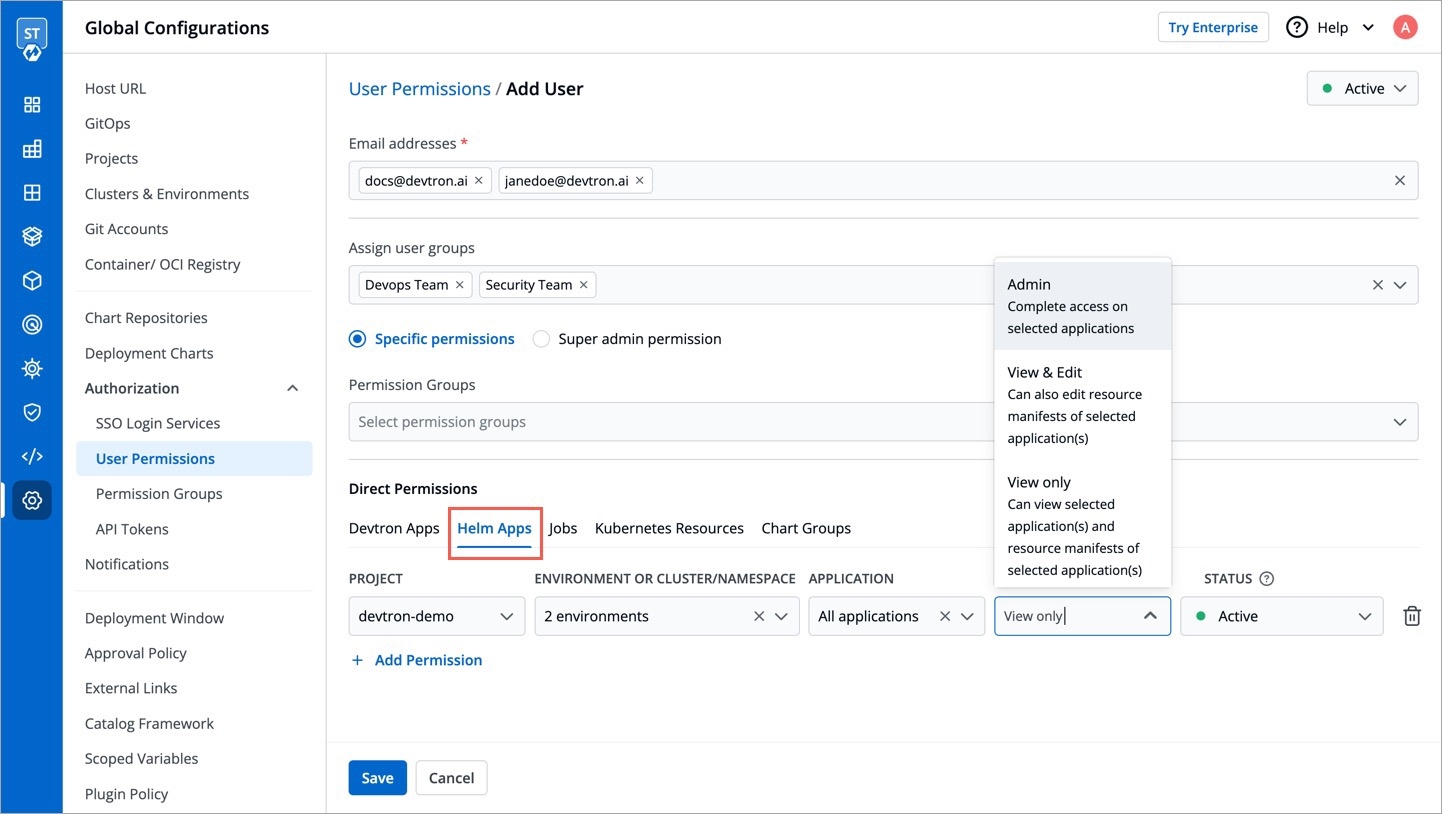
In Helm Apps option, you can provide access to a user to manage permission for Helm apps deployed from Devtron or outside Devtron.
Provide the information in the following fields:
Project
Select a project from the drop-down list to which you want to give permission to the user. You can select only one project at a time.
Note: If you want to select more than one project, then click Add row.
Environment or cluster/namespace
Select the specific environment or all existing environments in default cluster from the drop-down list.
Note: If you select all existing + future environments in default cluster option, then a user gets access to all the current environments including any new environment which gets associated with the application later.
Application
Select the specific application or all applications from the drop-down list corresponding to your selected Environments.
Note: If All applications option is selected, then a user gets access to all the current applications including any new application which gets associated with the project later
.
Role
View only
View & Edit
Admin
You can add multiple rows for Devtron app permission.
Once you have finished assigning the appropriate permissions for the users, Click Save.
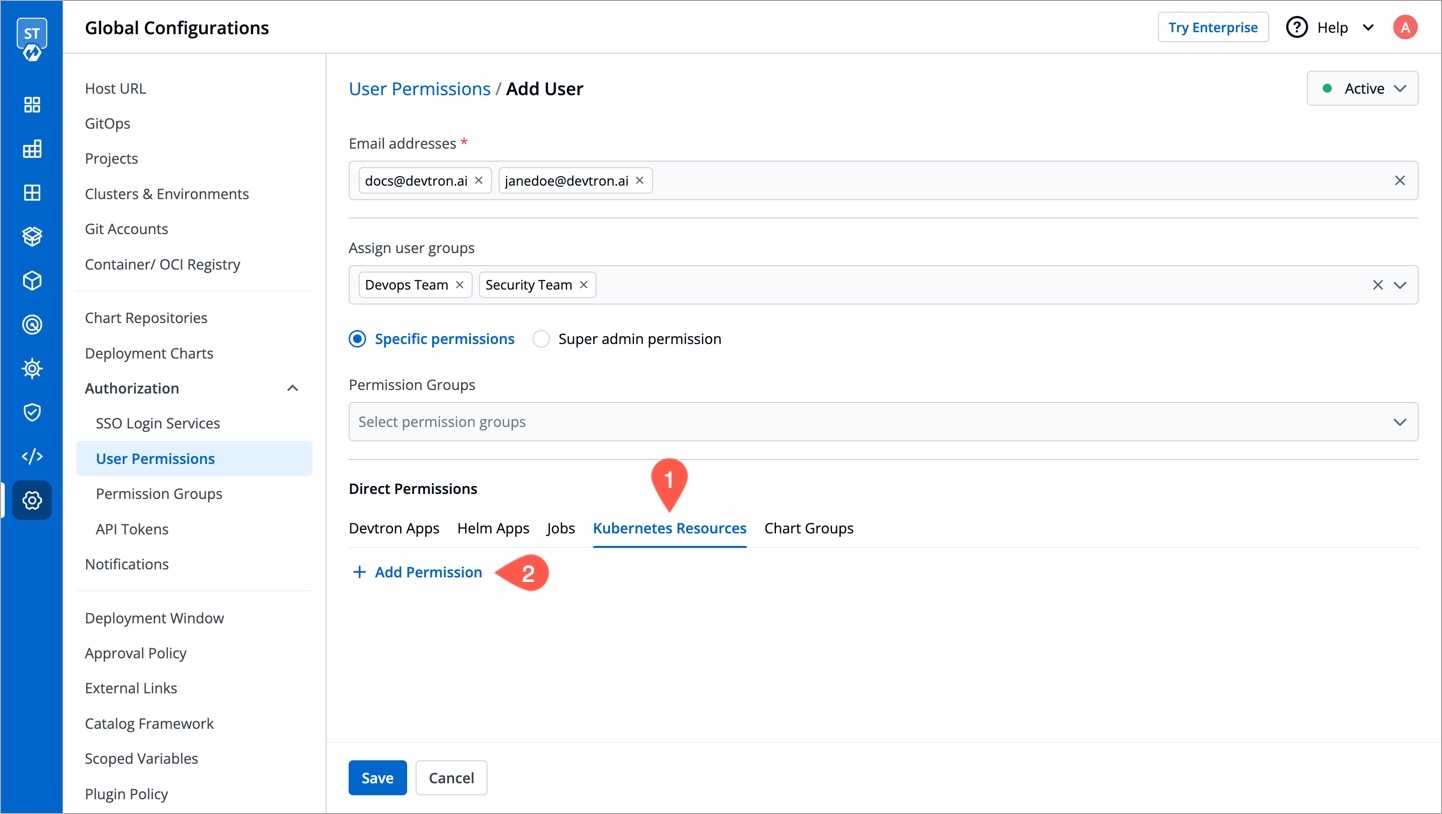
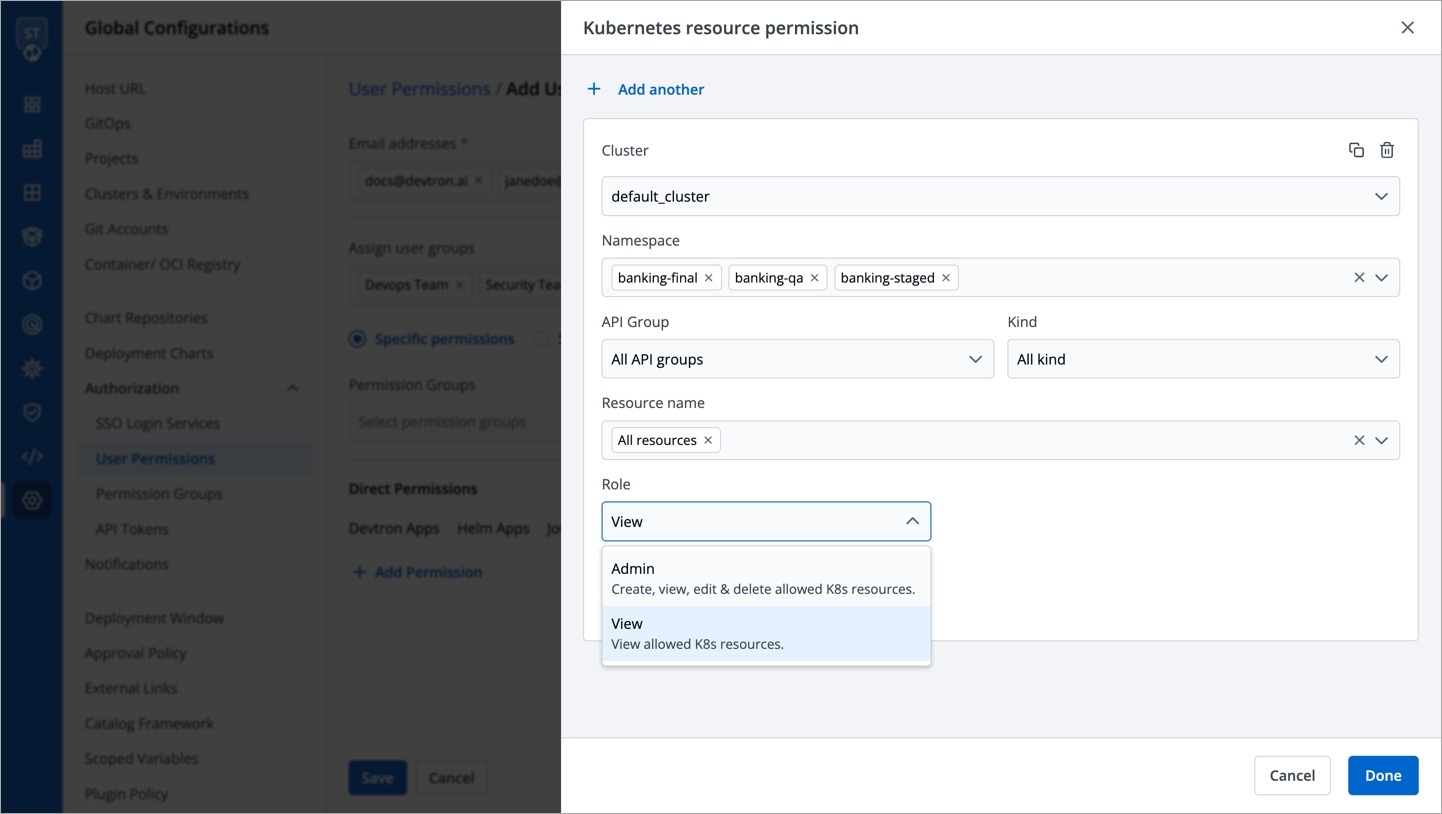
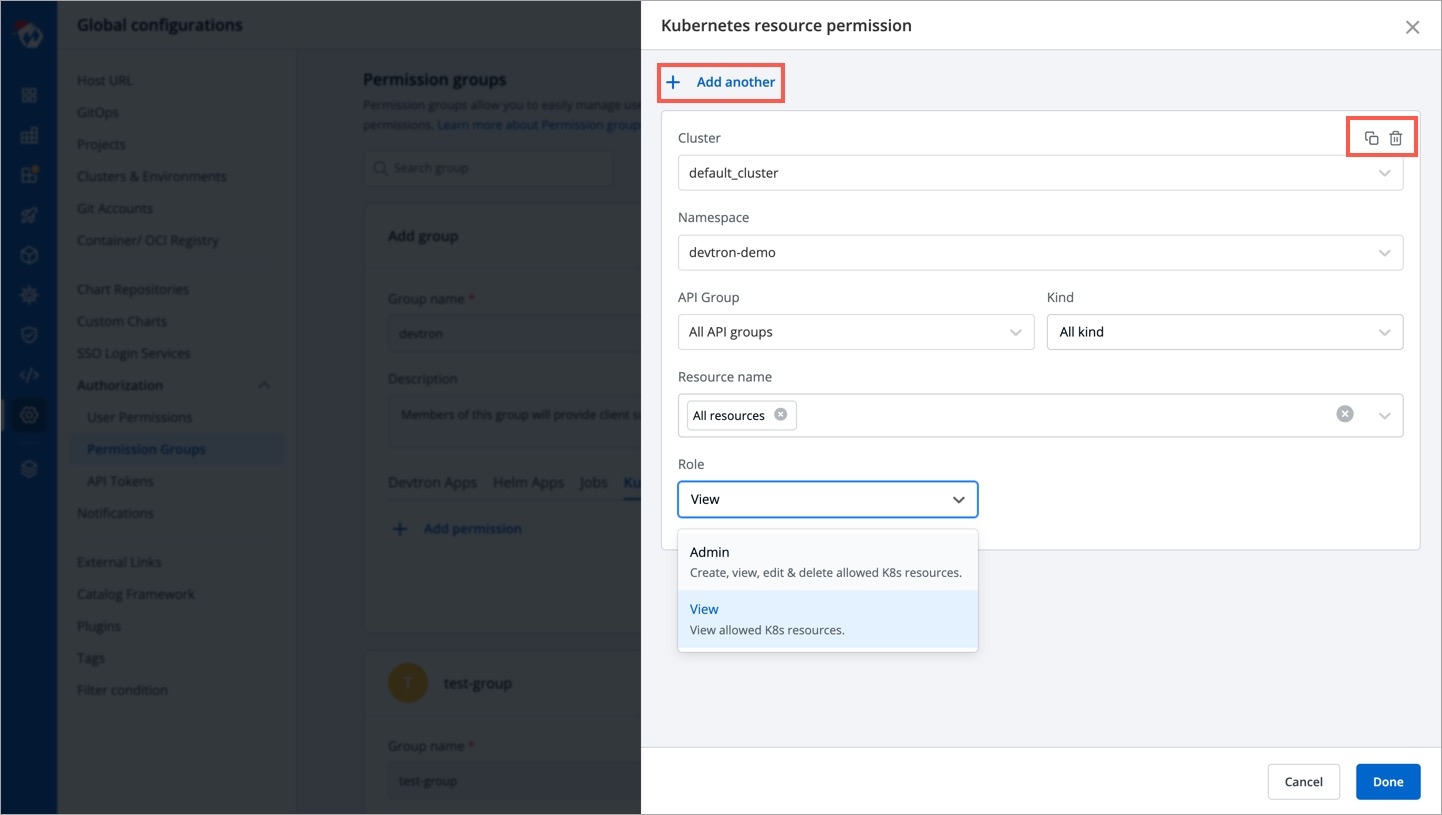
In Kubernetes Resources option, you can provide permission to view, inspect, manage, and delete resources in your clusters from Kubernetes Resource Browser page in Devtron. You can also create resources from the Kubernetes Resource Browser page.
Note: Only super admin users will be able to see Kubernetes Resources tab and provide permission to other users to access Resource Browser.
To provide Kubernetes resource permission, click Add permission.
On the Kubernetes resource permission, provide the information in the following fields:
Cluster
Select a cluster from the drop-down list to which you want to give permission to the user. You can select only one cluster at a time.
Note: To add another cluster, then click Add another.
Namespace
Select the namespace from the drop-down list.
API Group
Select the specific API group or All API groups from the drop-down list corresponding to the K8s resource.
Kind
Select the kind or All kind from the drop-down list corresponding to the K8s resource.
Resource name
Select the resource name or All resources from the drop-down list to which you want to give permission to the user.
Role
View
Admin
You can add multiple rows for Kubernetes resource permission.
Once you have finished assigning the appropriate permissions for the users, Click Save.
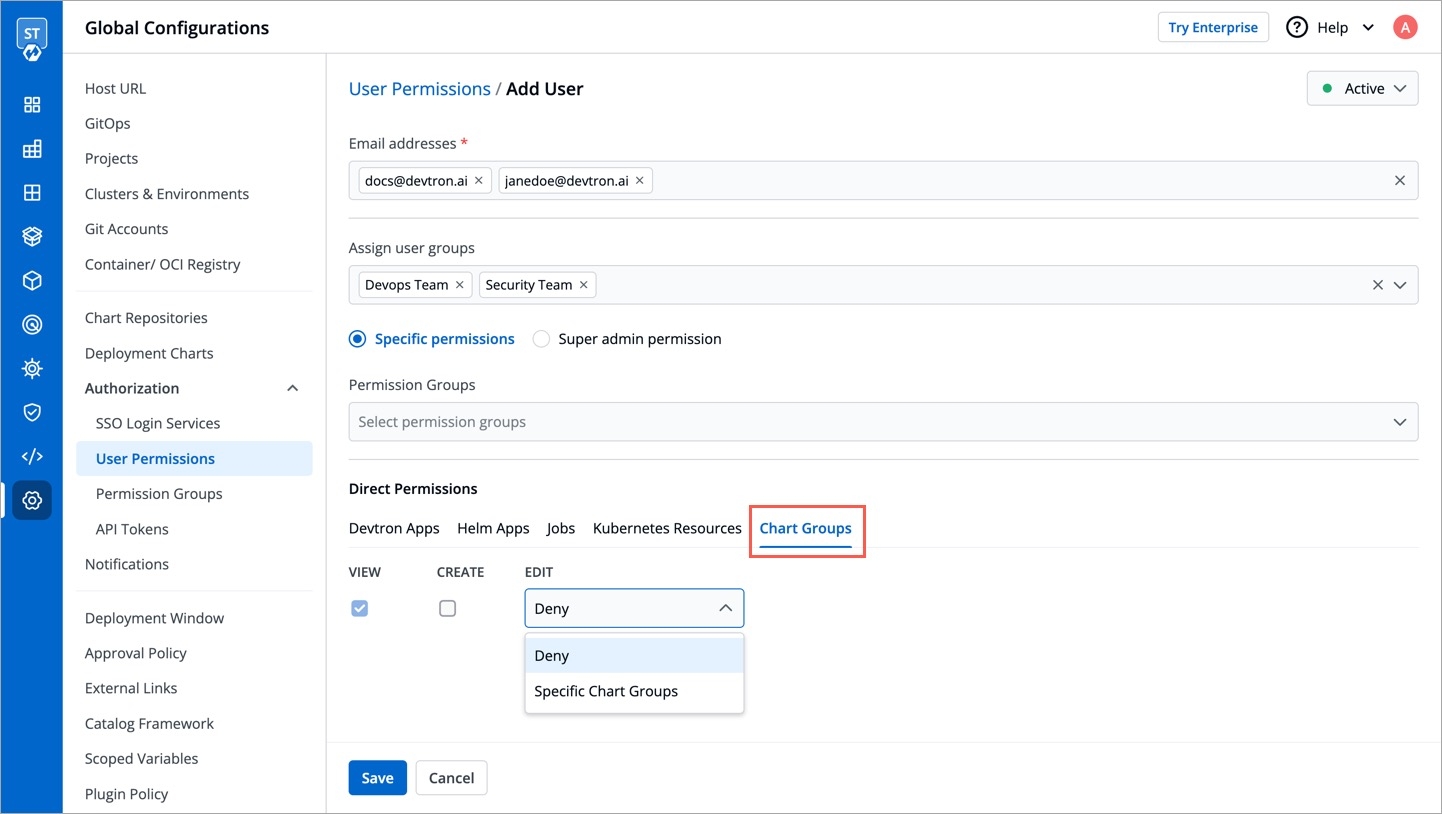
In Chart group permission option, you can manage the access of users for Chart Groups in your project.
Note: The Chart group permission option will be available only if you install CI/CD integration.
NOTE: You can only give users the ability to create or edit, not both.
View
Enable View to view chart groups only.
Create
Enable Create if you want the users to create, view, edit or delete the chart groups.
Edit
Deny: Select Deny option from the drop-down list to restrict the users to edit the chart groups.
Specific chart groups: Select the Specific Charts Groups option from the drop-down list and then select the chart group for which you want to allow users to edit.
Click Saveonce you have configured all the required permissions for the users.
Direct user permissions cannot be edited if you're using LDAP/Microsoft for SSO and 'auto-assign permission' is enabled. Permissions can only be managed via permission groups in such a scenario.
You can edit the user permissions by clicking on the downward arrow.
Edit the user permissions.
After you have done editing the user permissions, click Save.
If you want to delete the user/users with particular permissions, click Delete.
Install and configure Keycloak on your server or cloud environment.
Create a new realm in Keycloak for your application.
Here, we will add Devtron as a client for using Keycloak SSO.
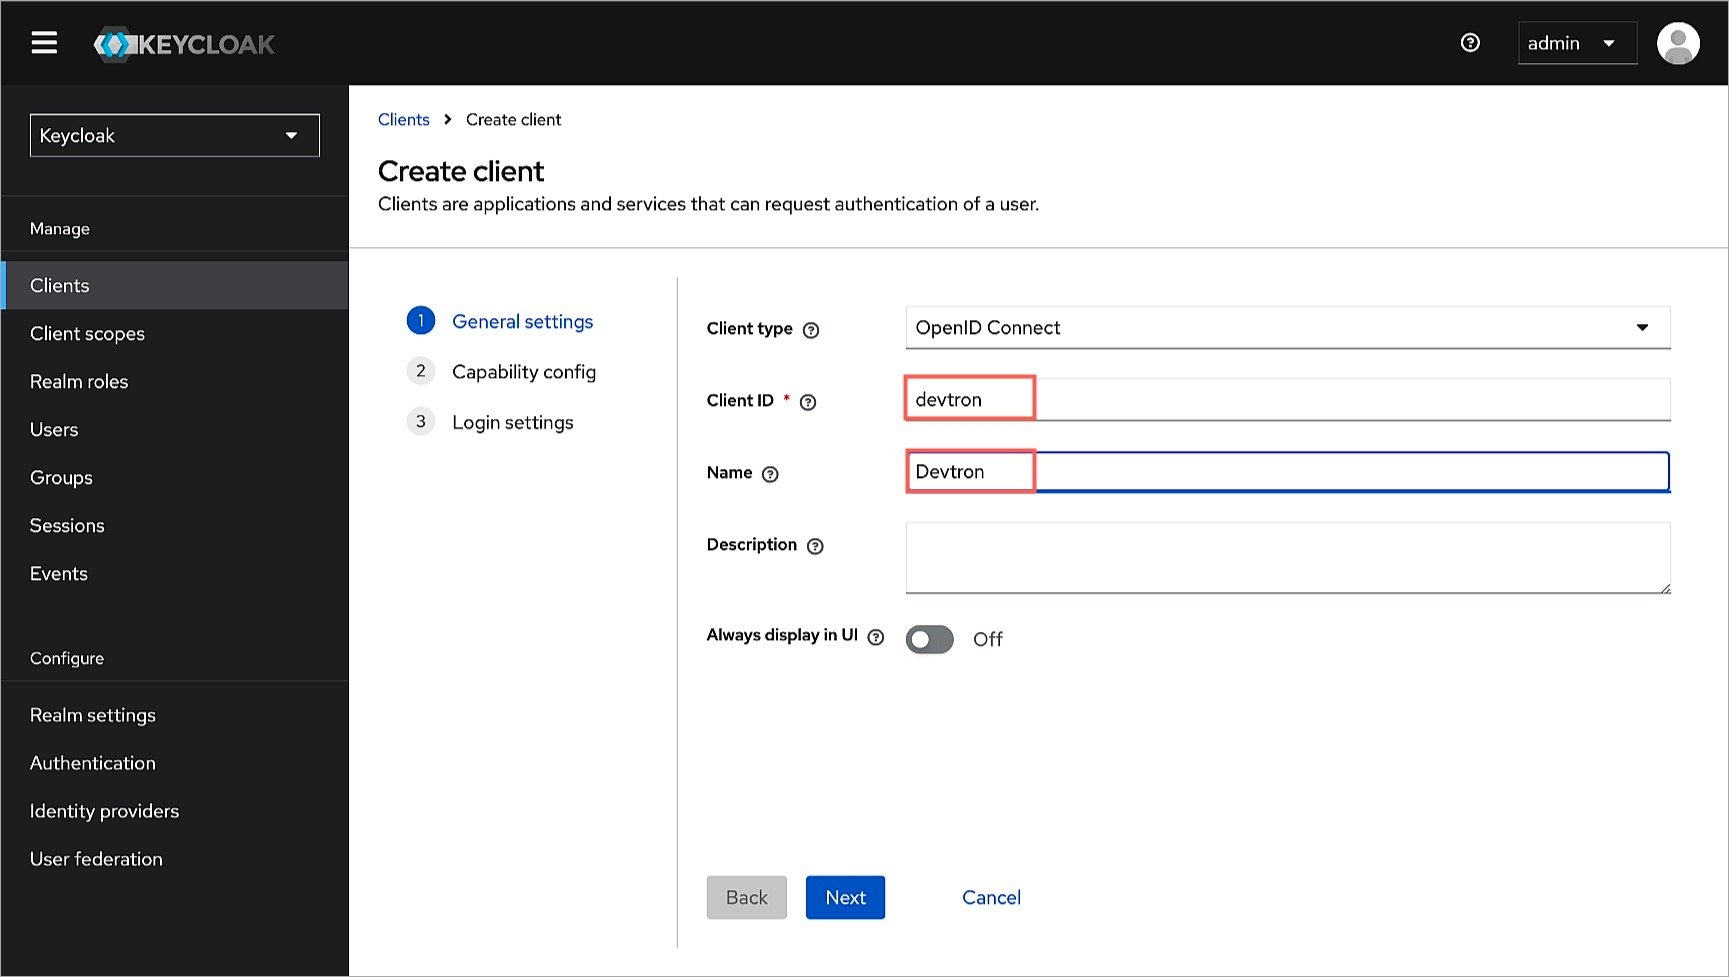
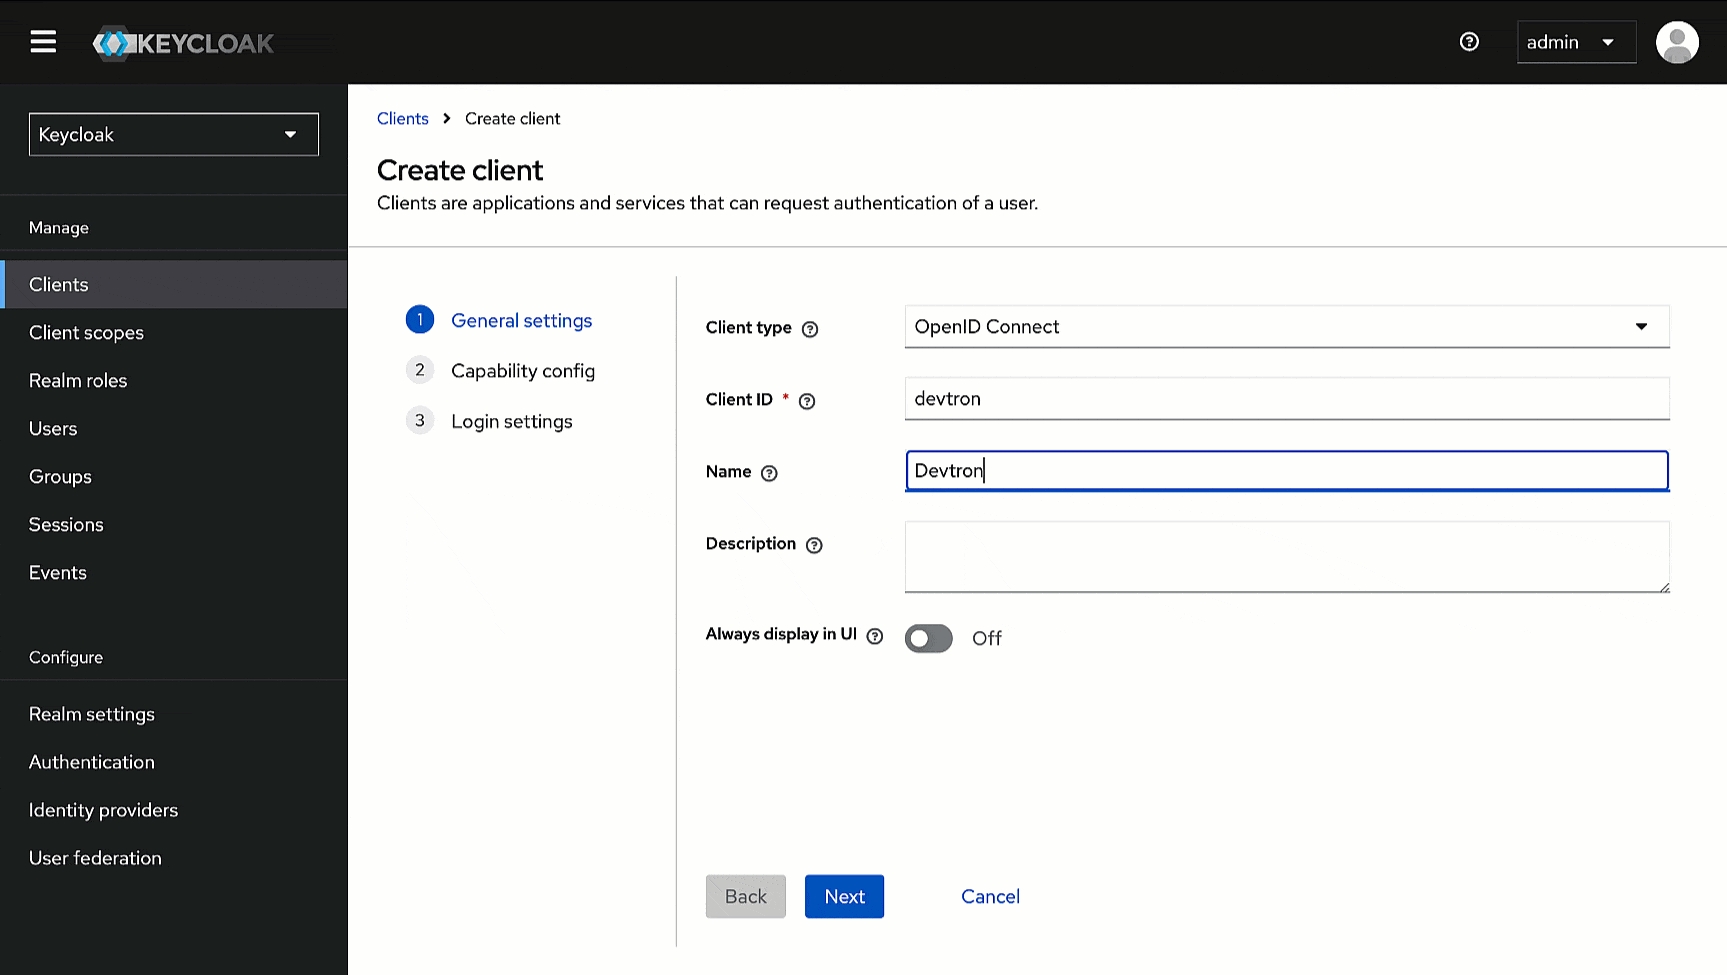
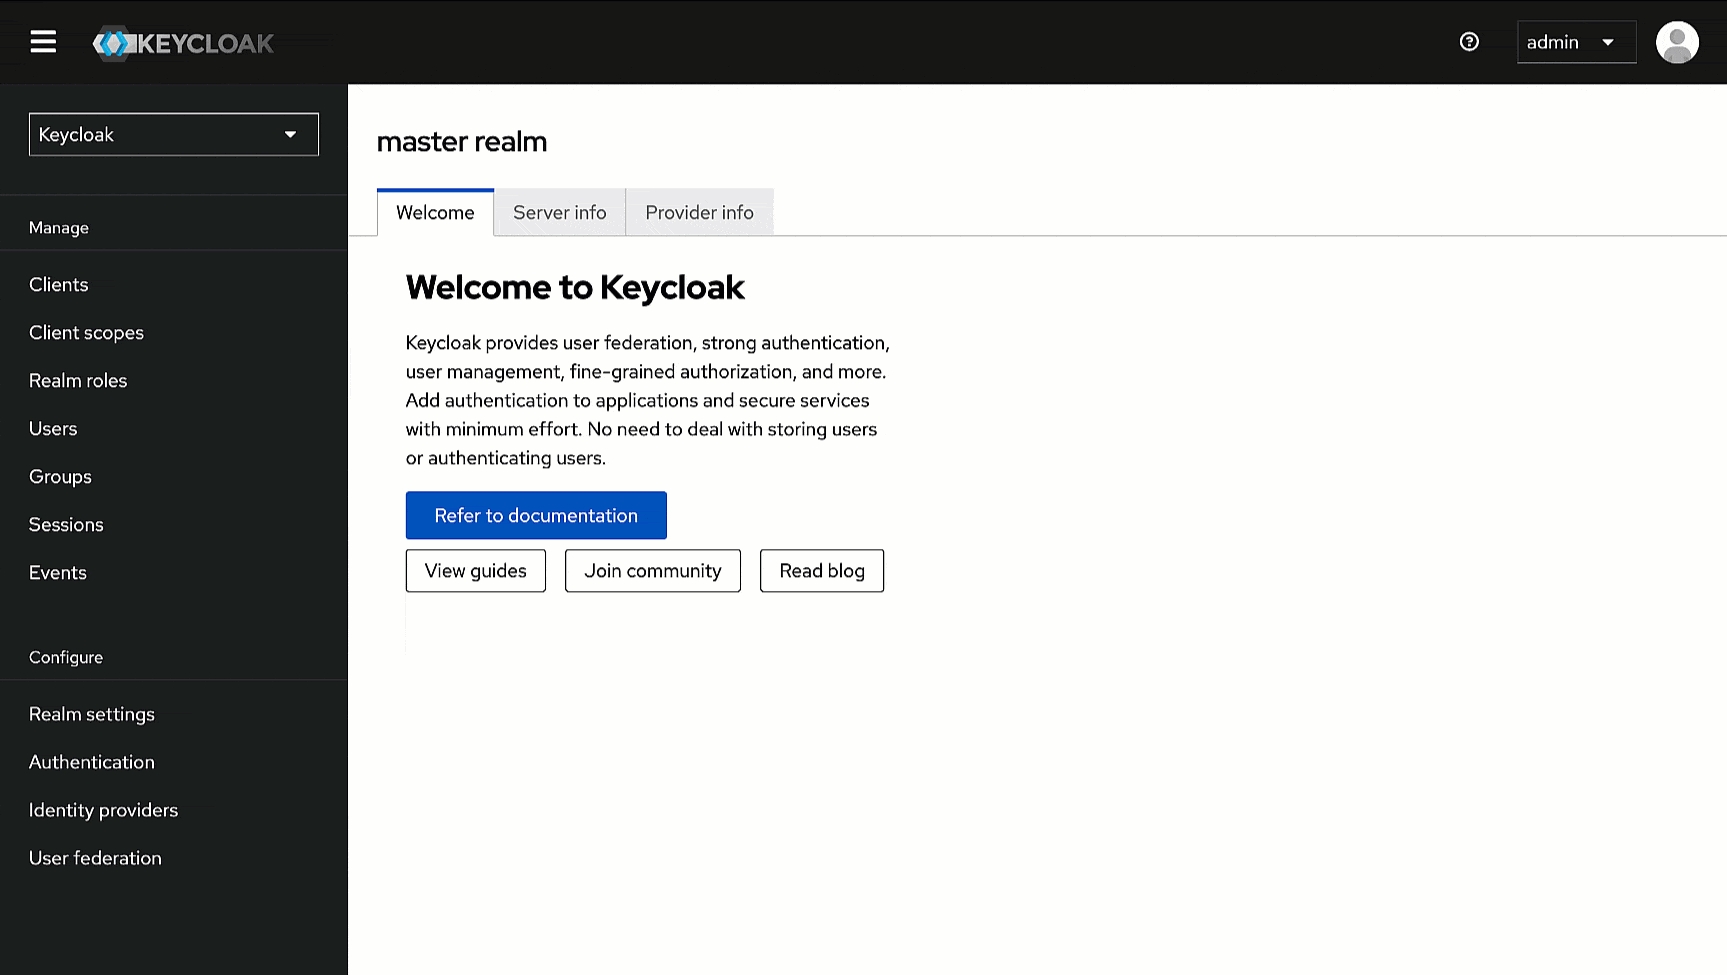
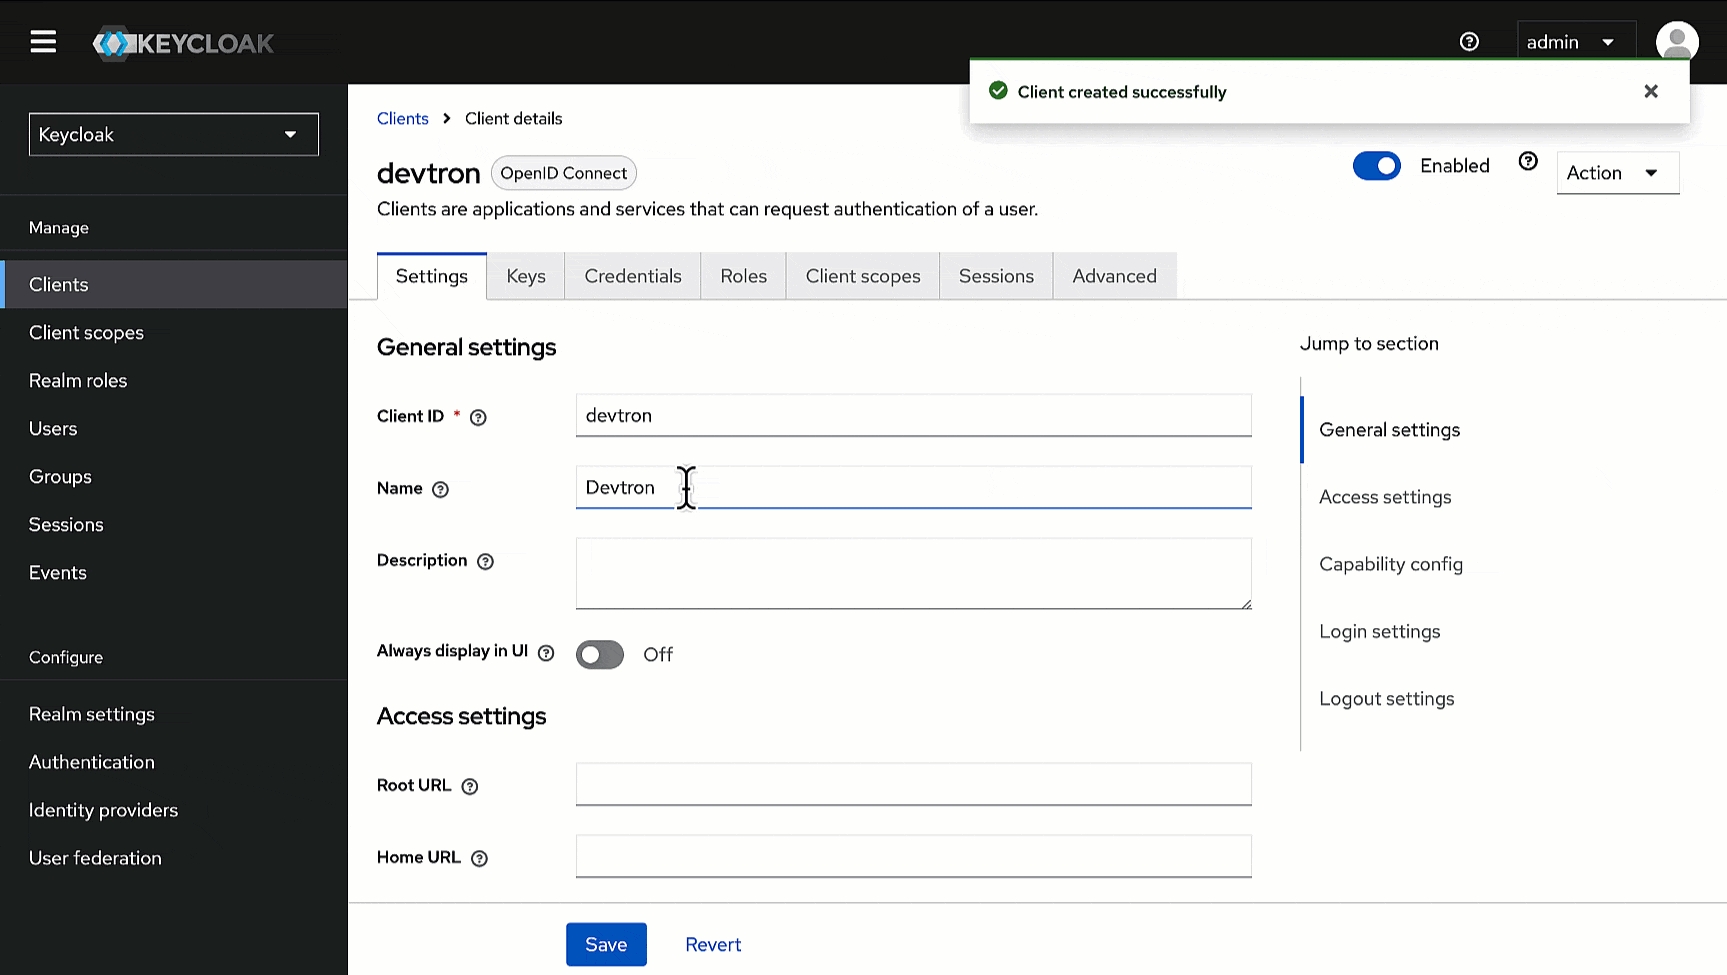
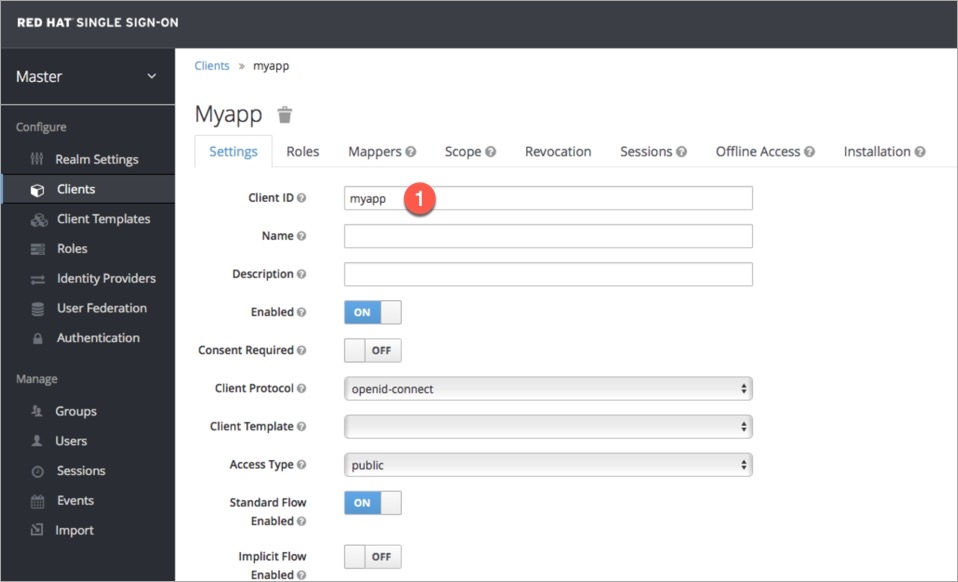
In the Admin Console, go to Clients and click Create client.
Within General Settings:
Enter devtron in the Client ID field. We will use this ID while configuring SSO later in Devtron.
Enter Devtron in the Name field.
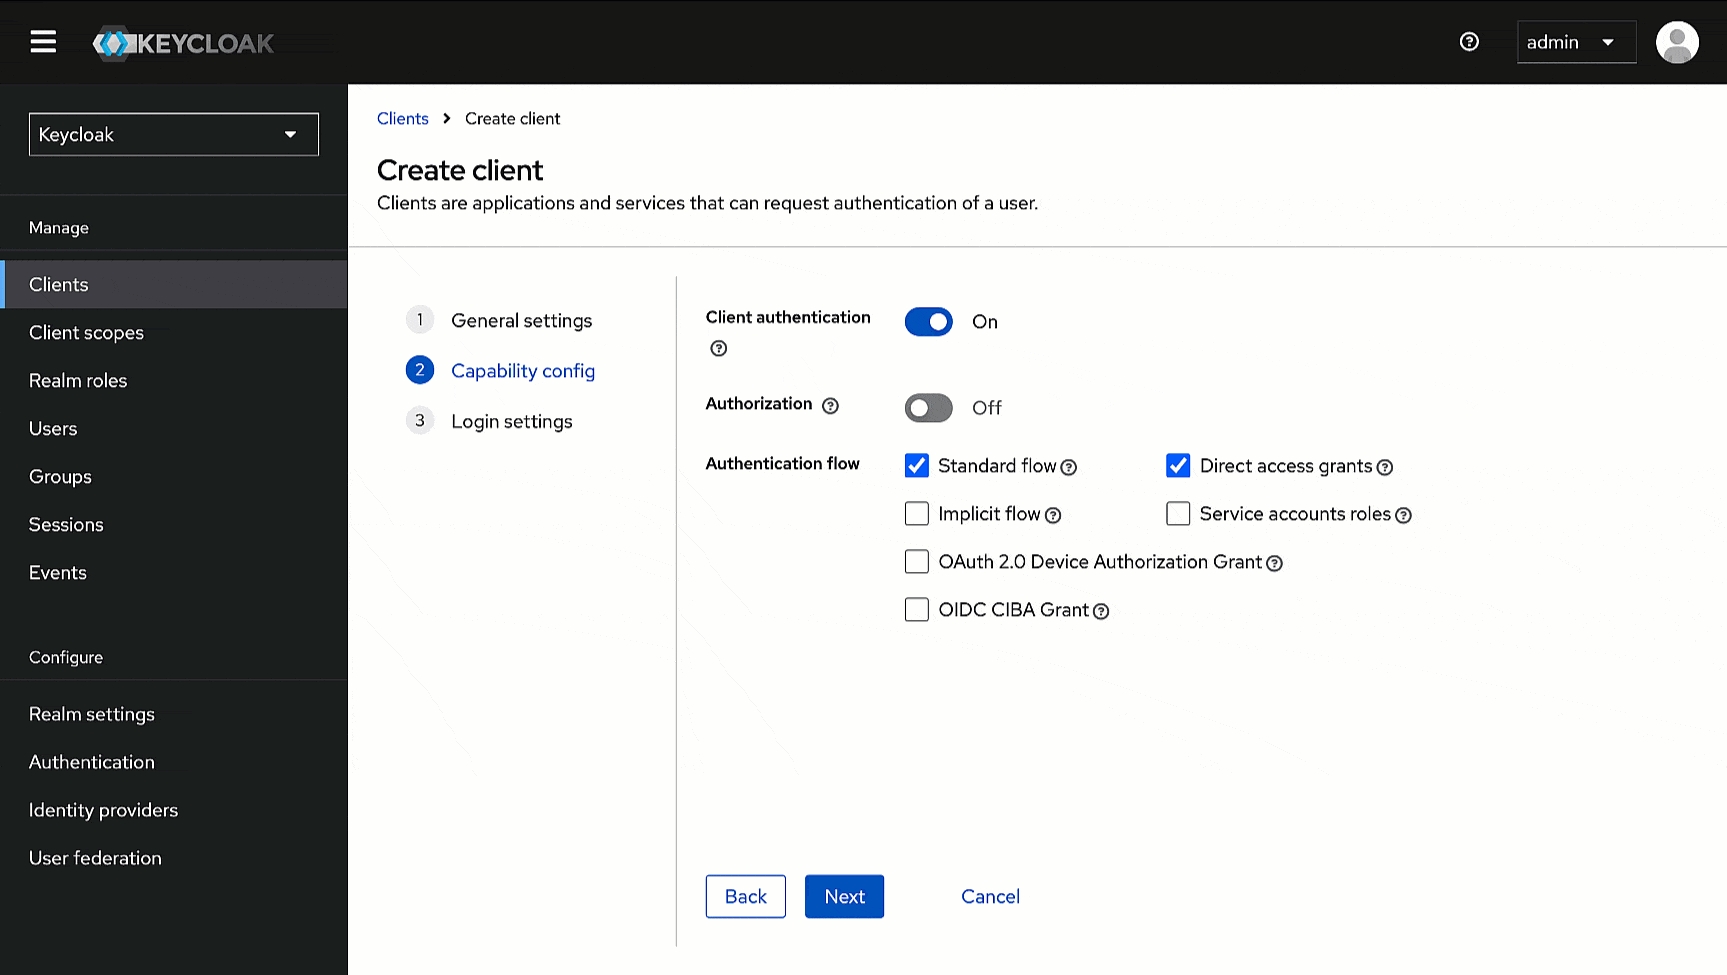
Within Capability config, turn on Client Authentication.
Within Login settings, enter https://<DEVTRON_BASE_URL>/orchestrator/api/dex/callback in the following fields.
Valid redirect URIs
Valid post logout redirect URIs
Web origins
Click here to know where to find DEVTRON_BASE_URL.
Click Save.
Here, we will obtain the secret we need while configuring SSO in Devtron.
Go to the Credentials tab of the client you created.
Use the copy button next to the Client Secret field and paste it somewhere for future reference.
Here, we will create a user that can log in to Devtron via SSO. We will assign a username and password that the user can enter while logging in to Devtron via Keycloak SSO.
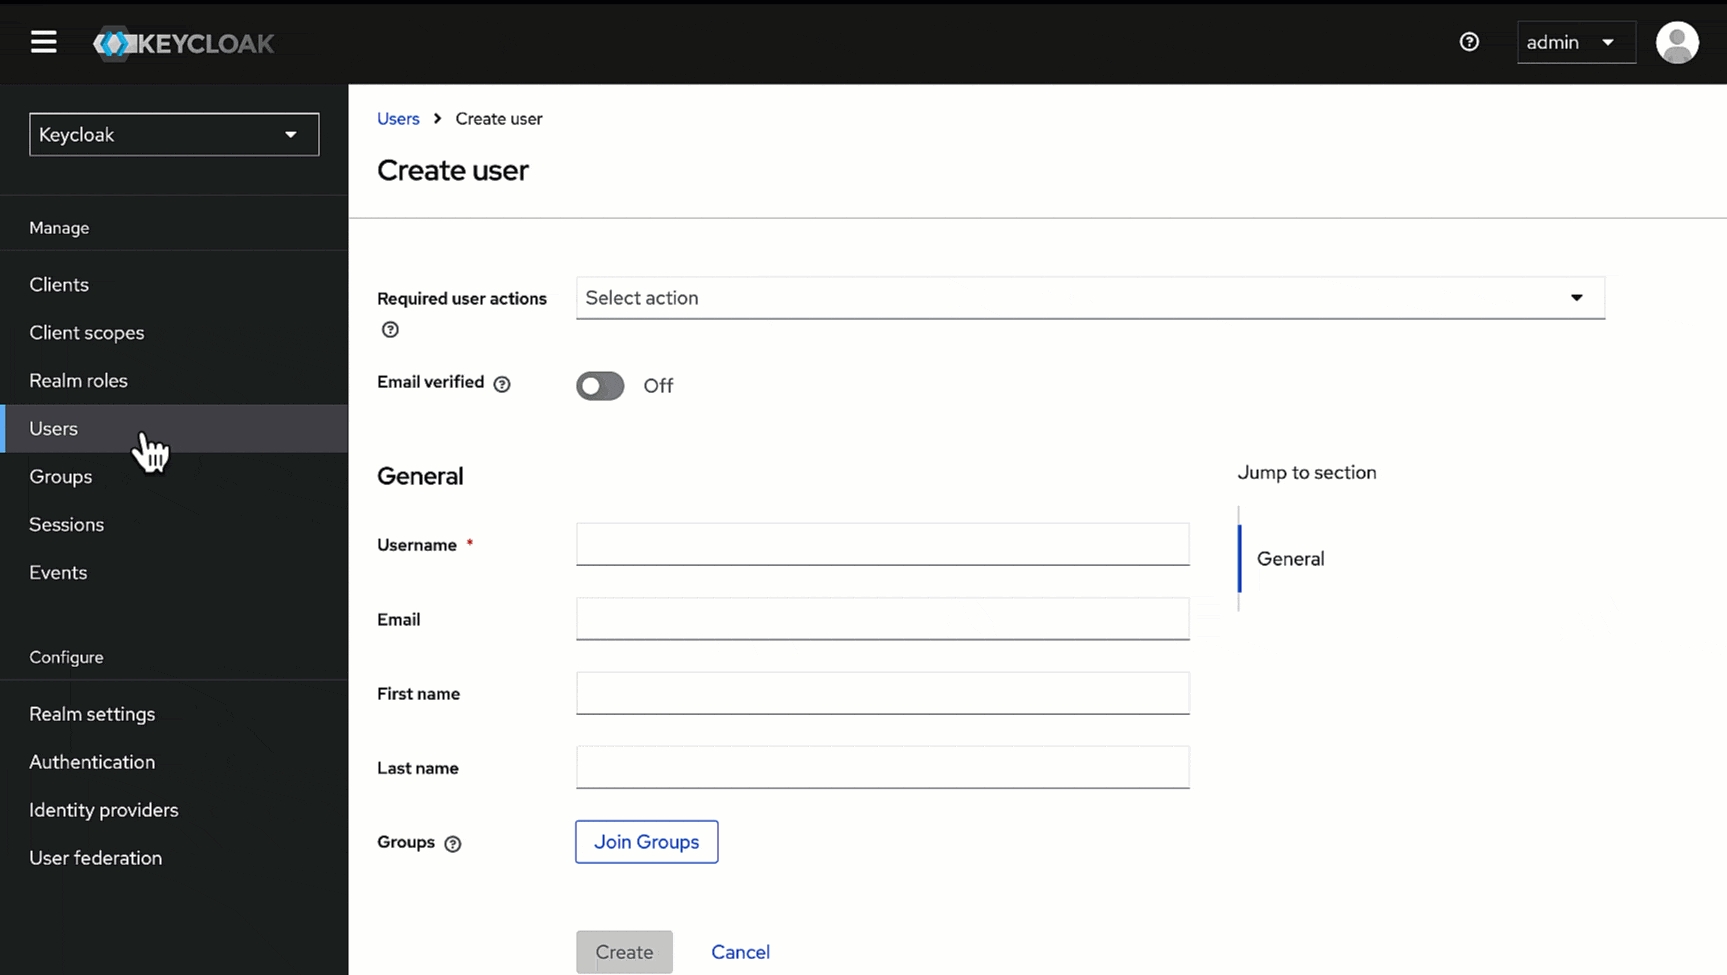
In the Admin Console, go to Users and click Add user.
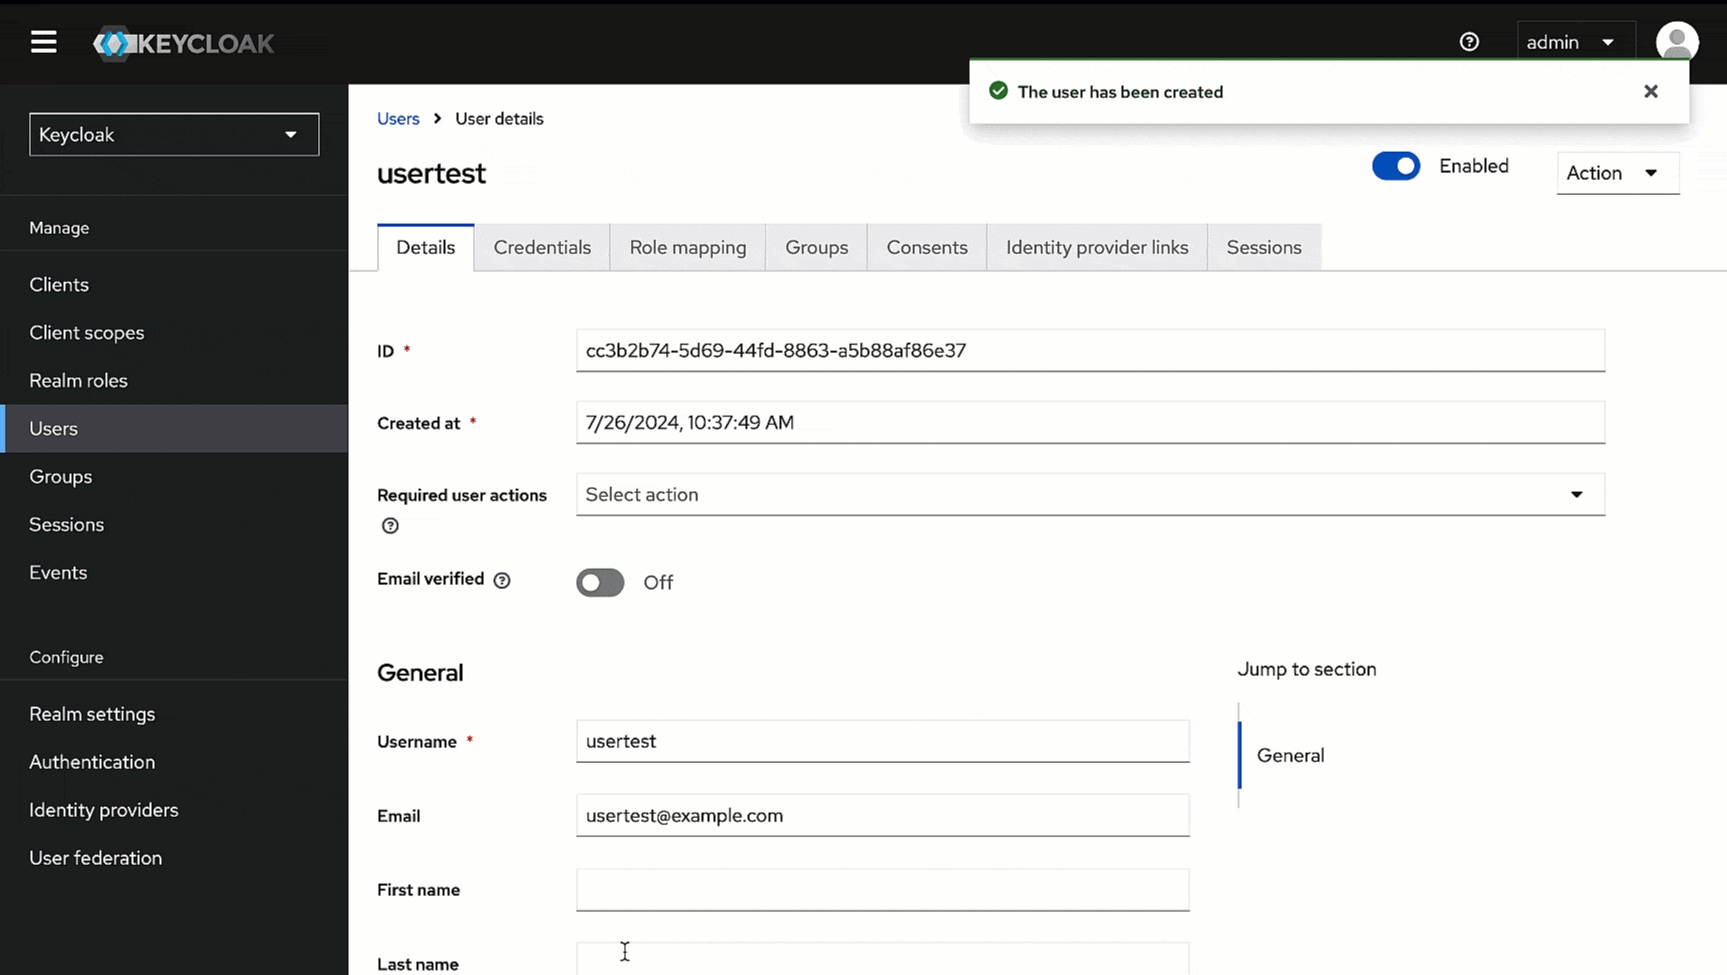
Give a username (e.g., usertest) in the Username field and enter the user's email address (e.g., usertest@example.com) in the Email field.
Click Create. Your user creation will be successful.
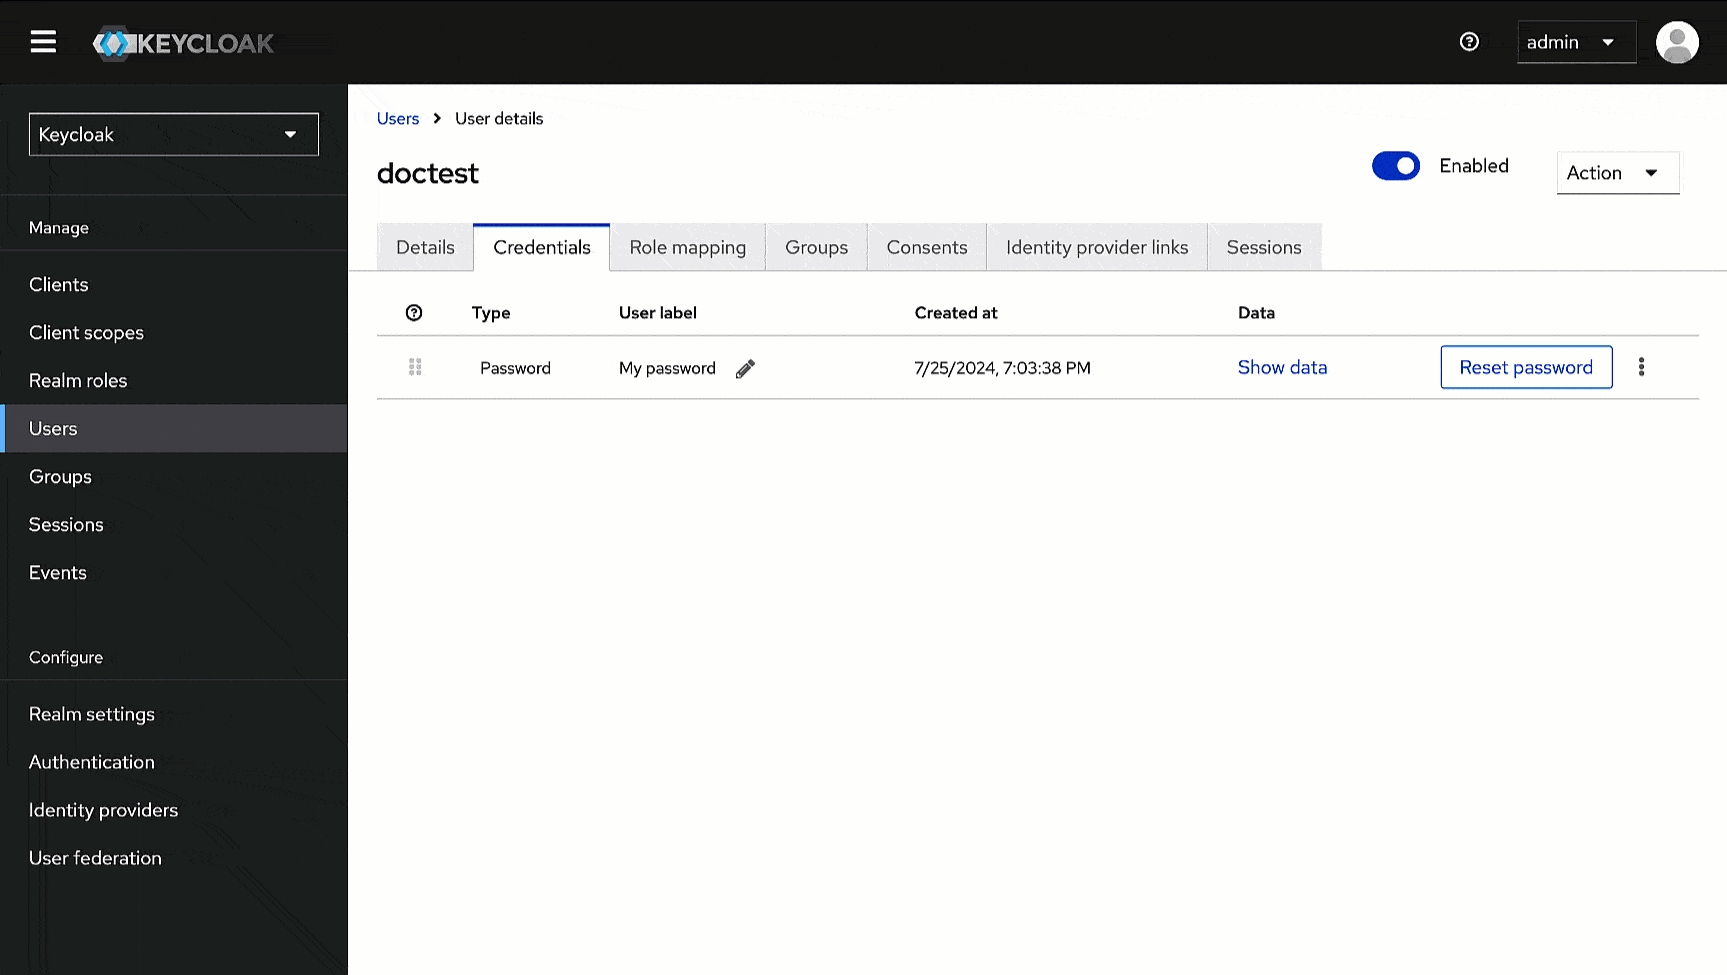
Go to the Credentials tab of the user you created.
Click Set password.
Enter the password and confirm it.
Click Save.
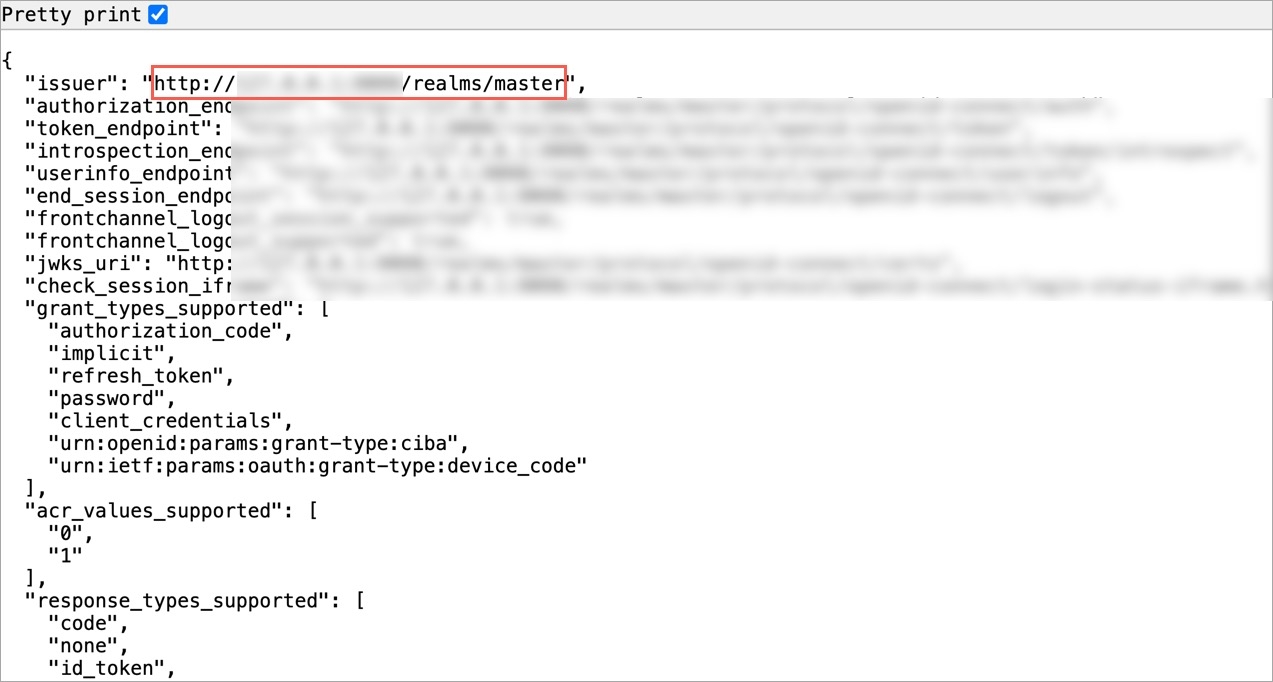
Here, we will obtain the Issuer URL we need while configuring SSO in Devtron.
In the Admin Console, go to Realm settings.
In the General tab, scroll down to the Endpoints field, and click the OpenID Endpoint Configuration link.
This will open a new page, copy the value of the key named issuer, and paste it somewhere for future reference.
Here, we will set up an OIDC SSO and enter the values we obtained in the previous section.
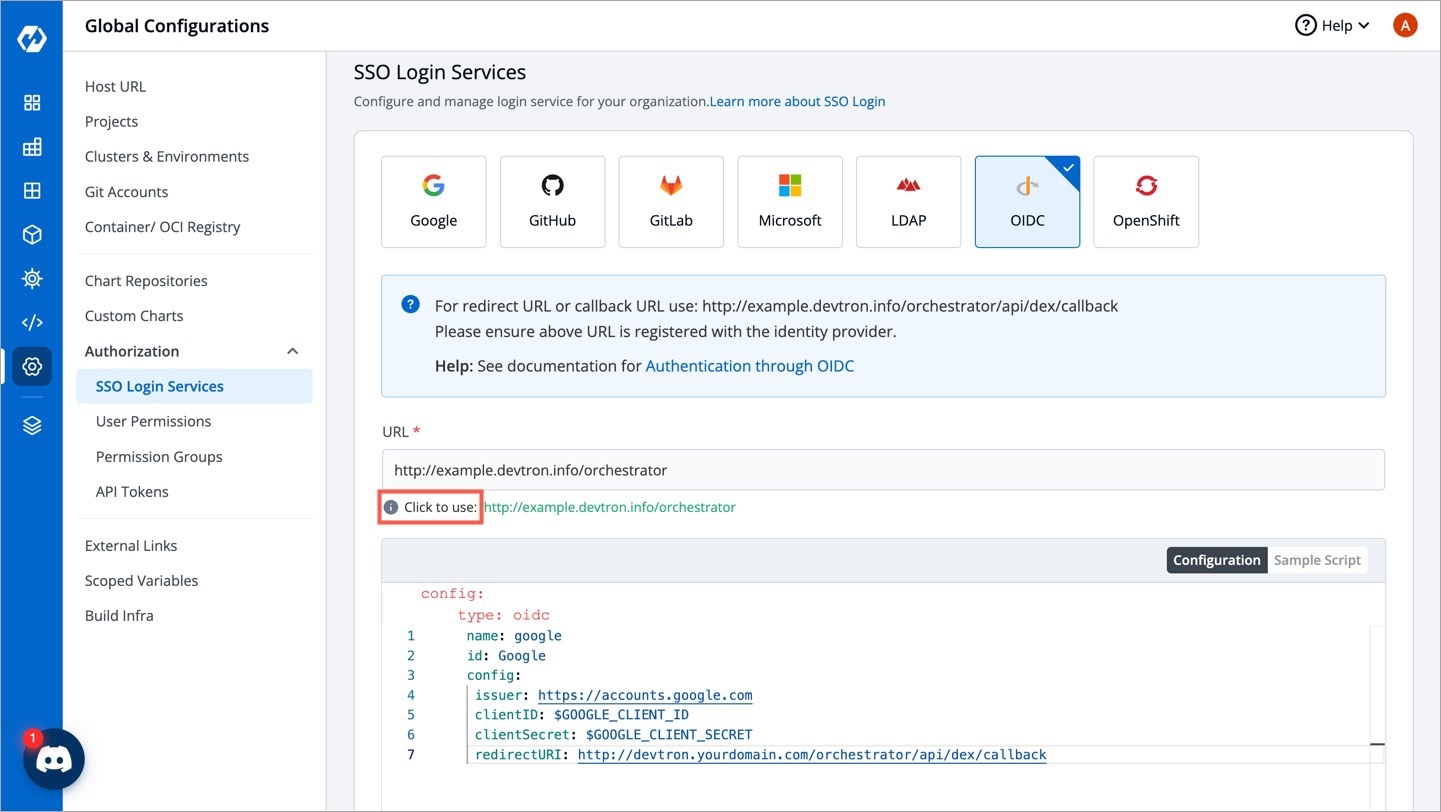
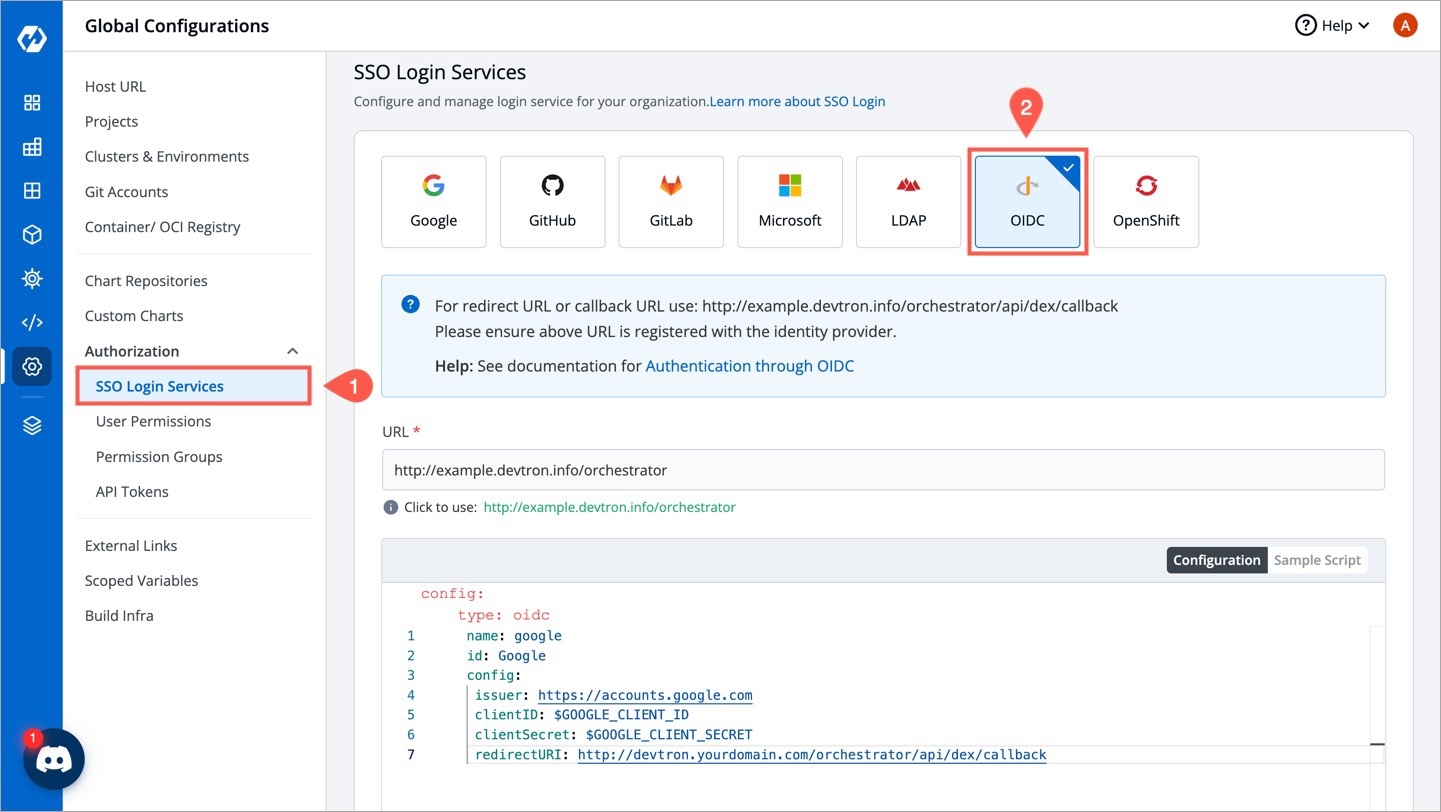
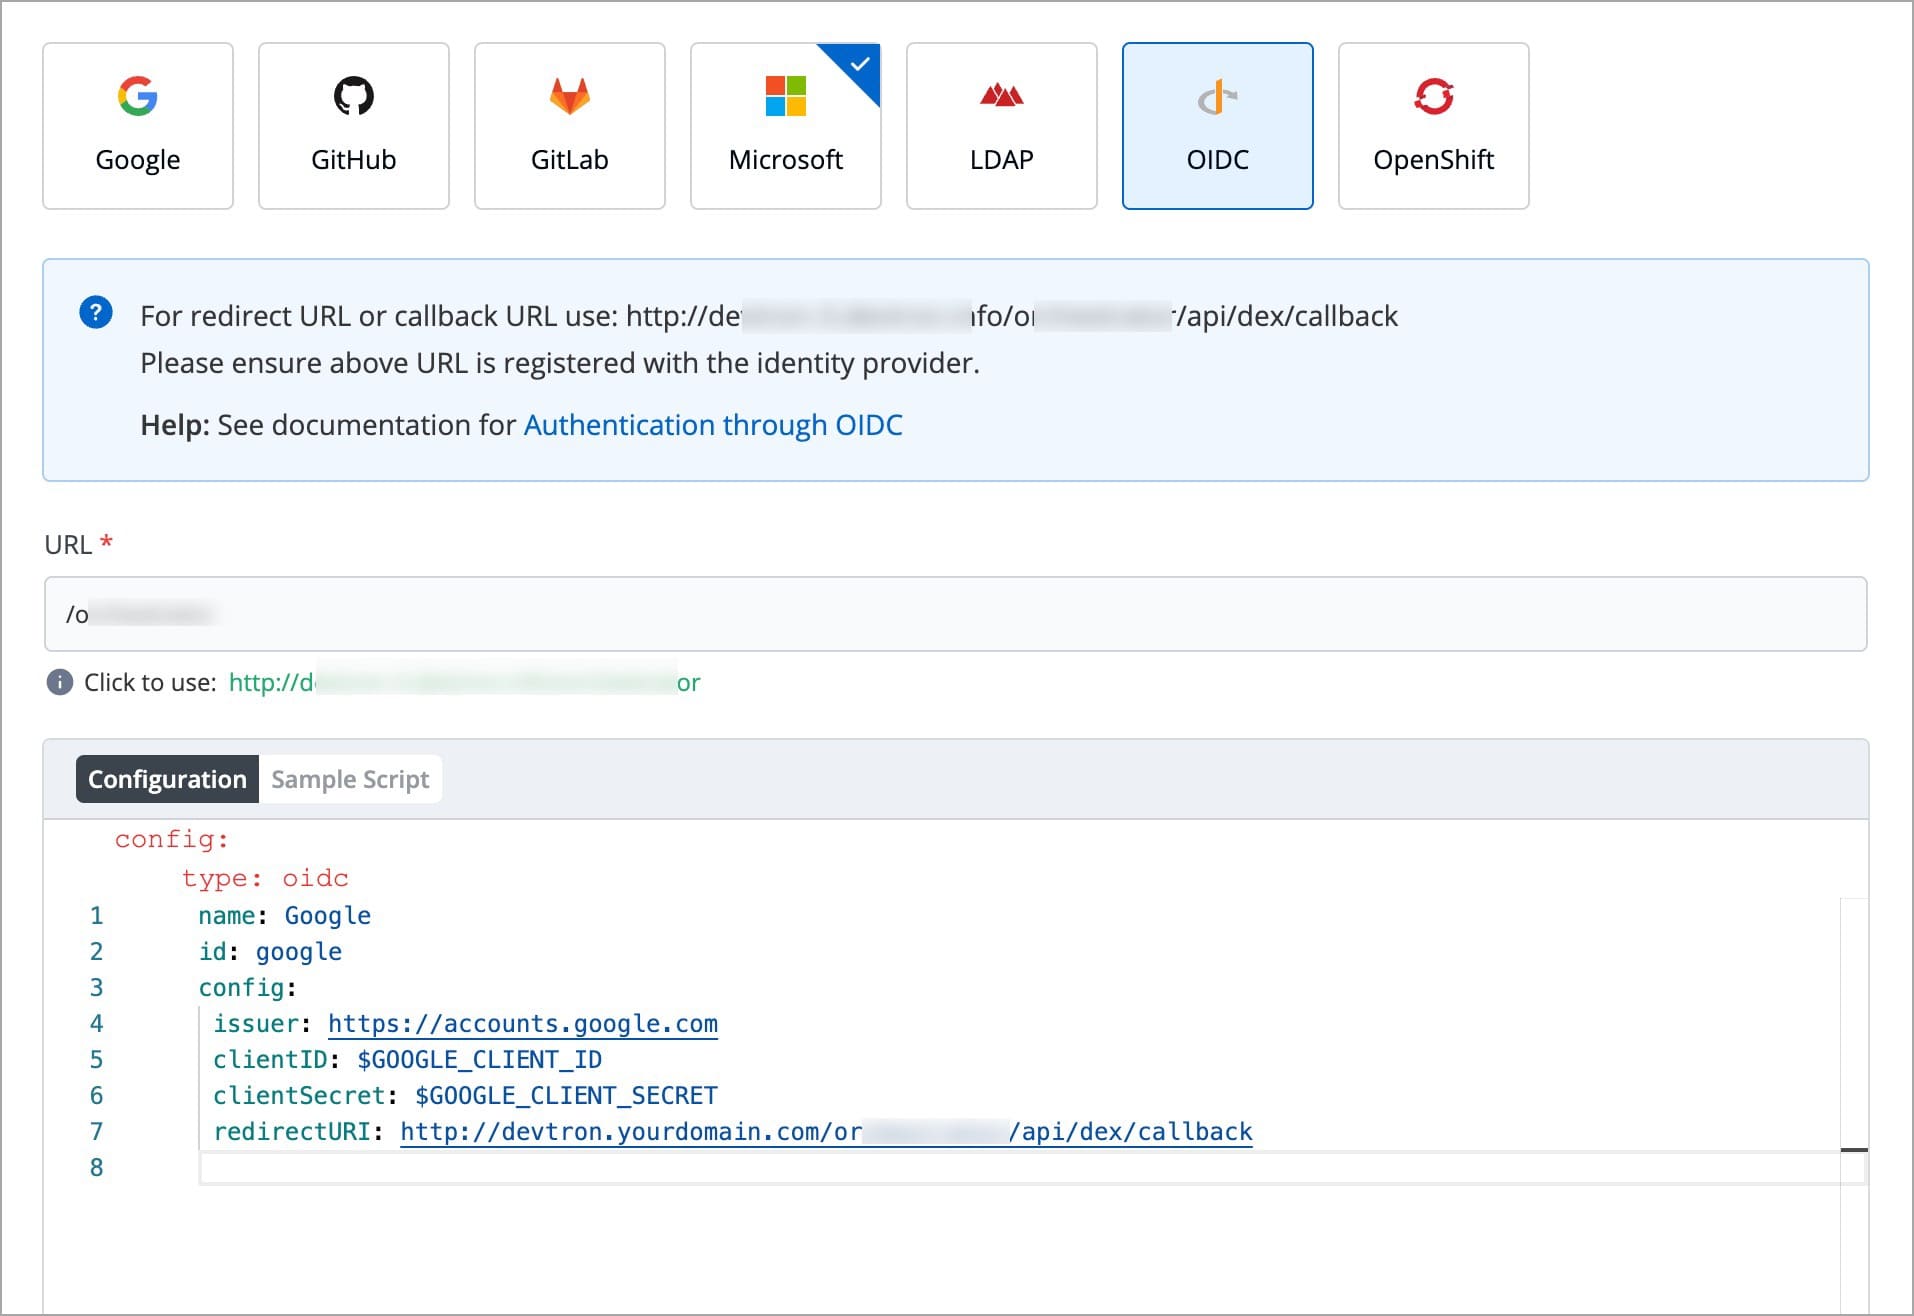
Go to Global Configurations → SSO Login Services → OIDC.
Below the URL field, take the help of the Click to use option to populate the exact URL if the displayed one is incorrect.
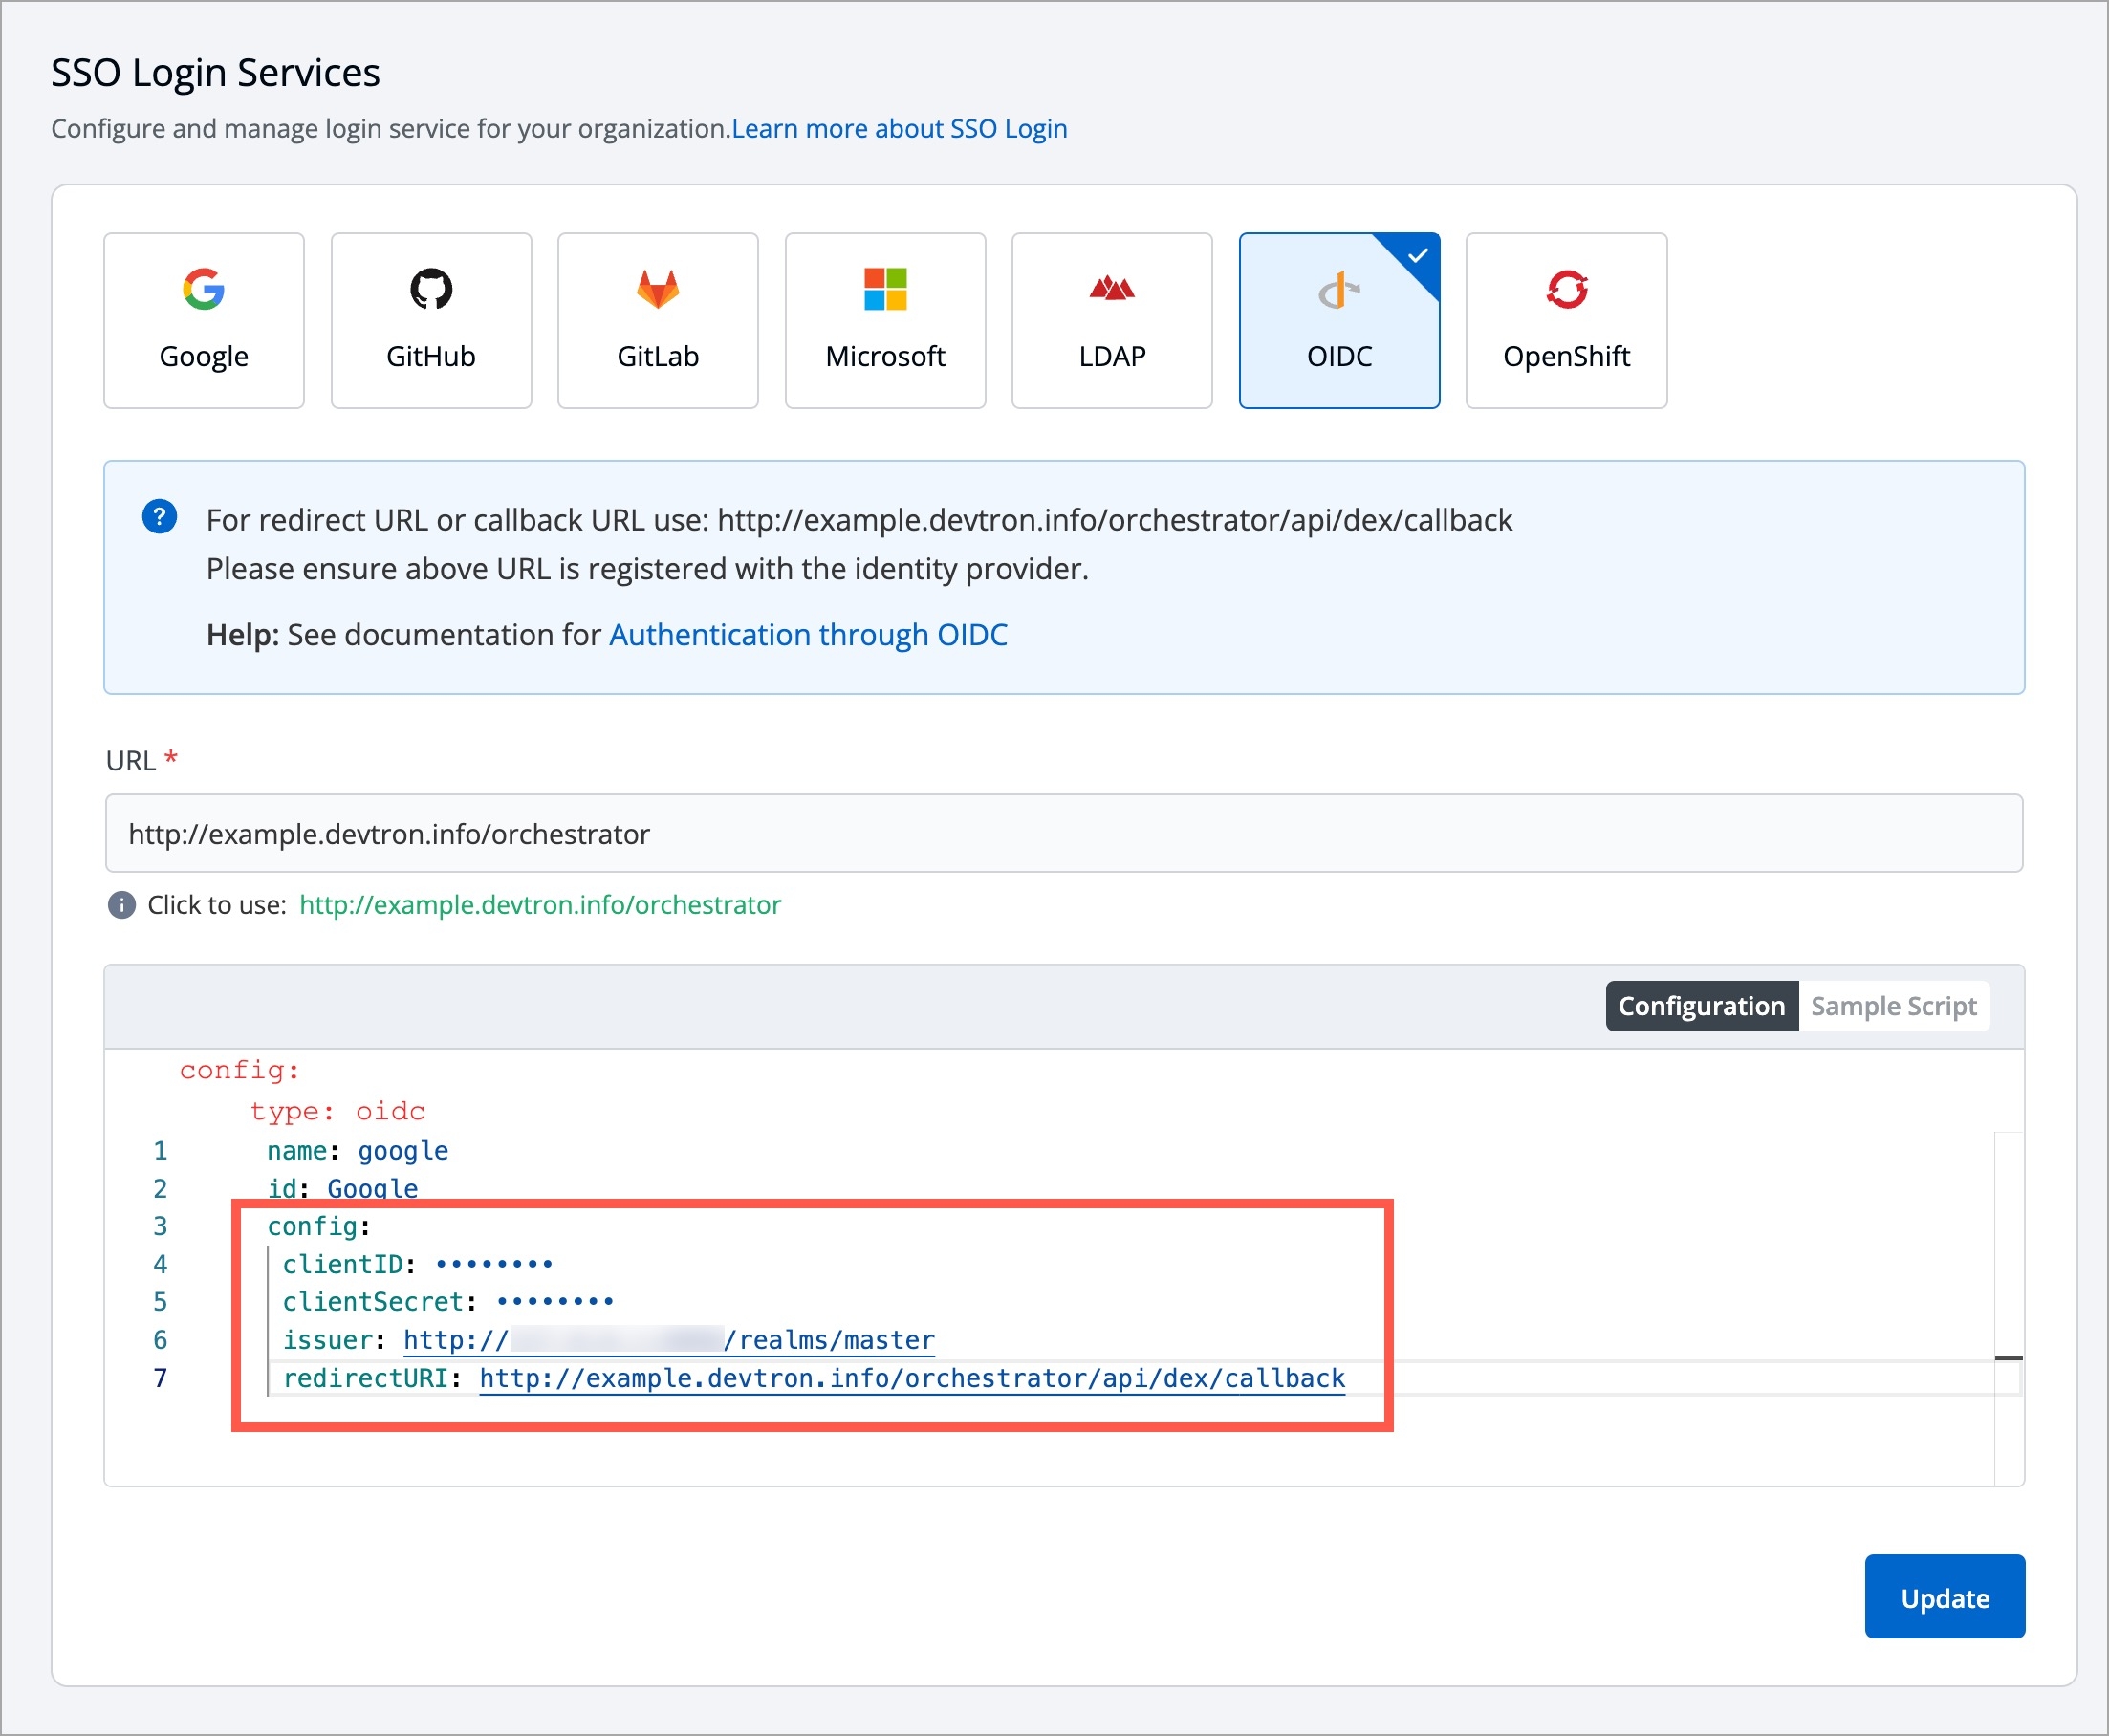
In the Configuration editor, do the following:
In the issuer field, paste the URL you got while retrieving issuer URL.
In the clientID field, paste the ID you entered while creating the client.
In the clientSecret field, paste the secret you got under client credentials tab.
In the redirectURI field, make sure to enter the same redirect URI you gave in step 4 of client creation.
Click Save or Update to activate Keycloak SSO login.
Here, we will add the user we created in the Keycloak Admin Console. If this step is skipped, the user might not be able to log in to Devtron via Keycloak.
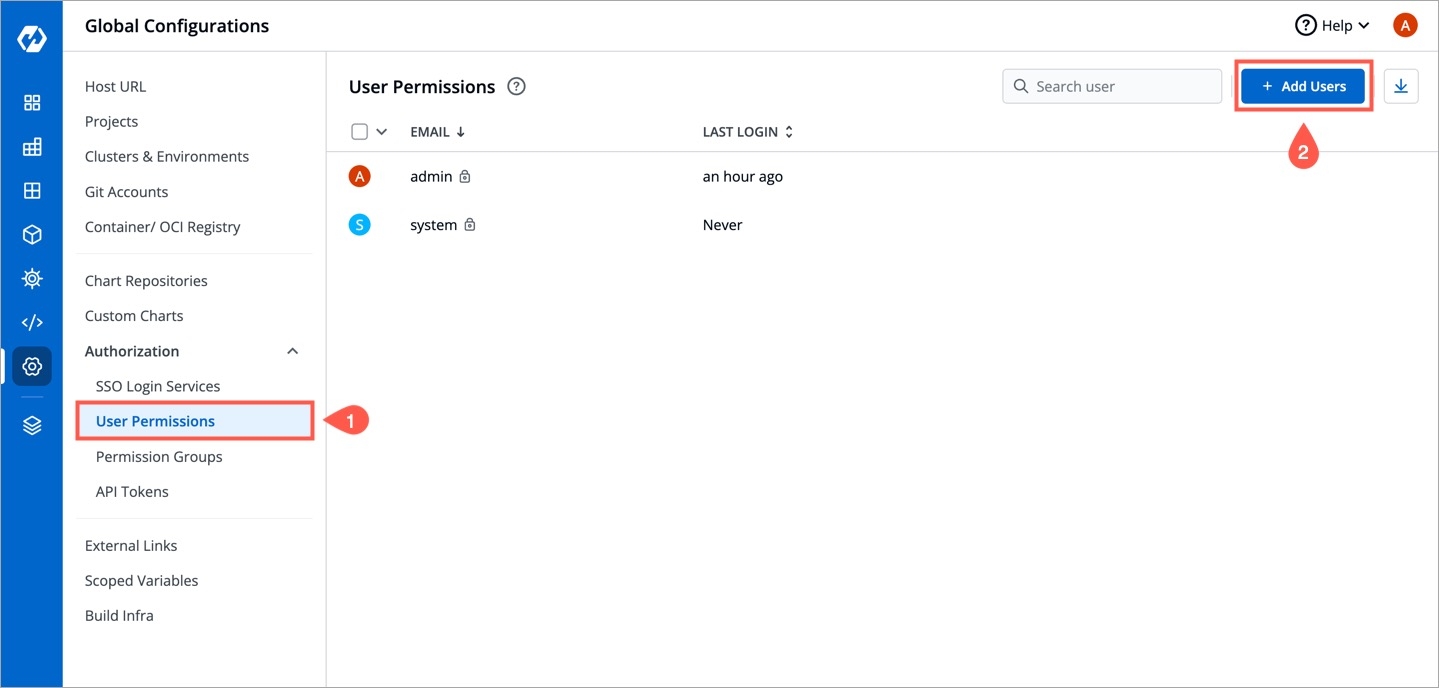
Go to Global Configurations → Authorization → User Permissions.
Click + Add Users.
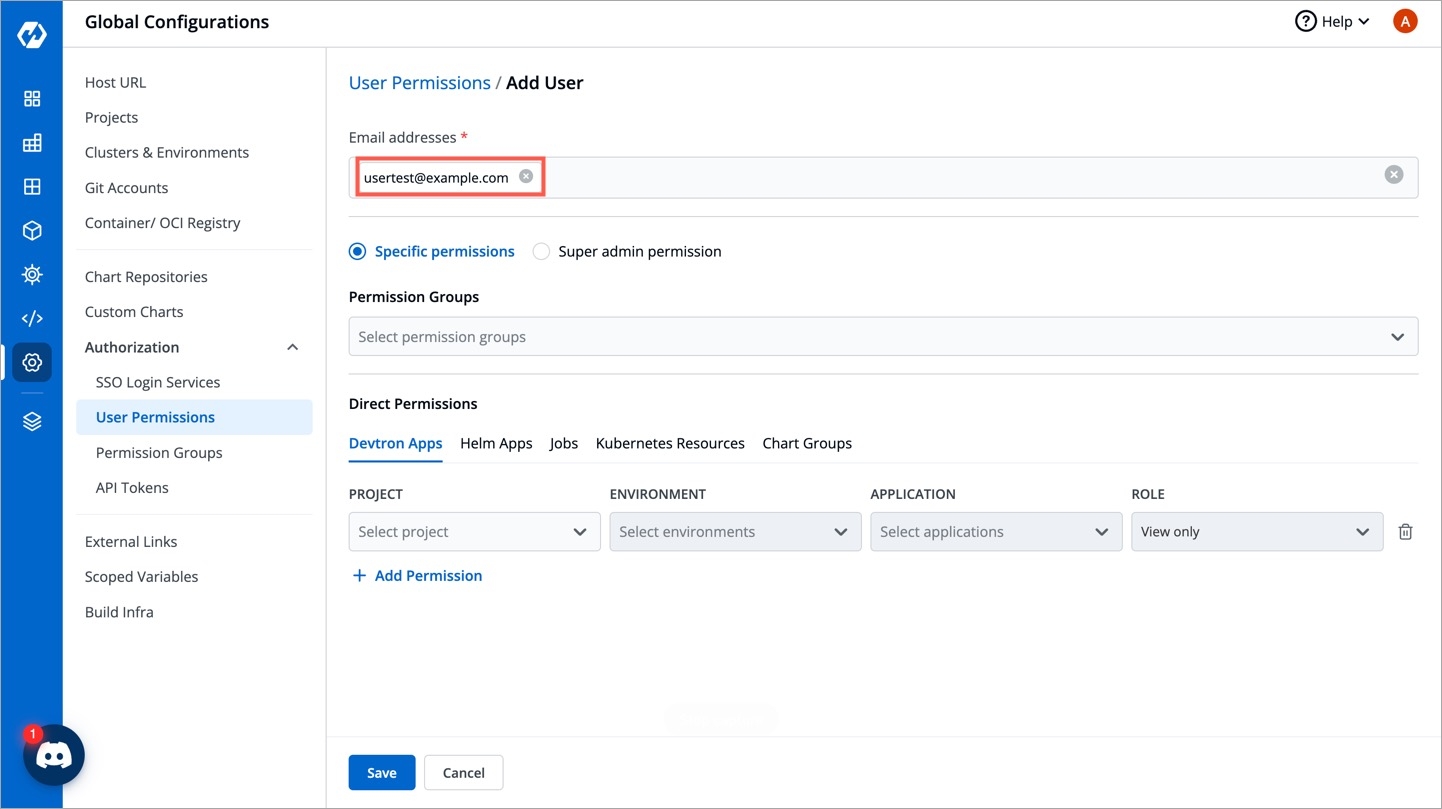
In the Email addresses field, enter the email address of the user you created in Keycloak.
Assign necessary permissions to this new user. Refer user permissions to know more.
Click Save.
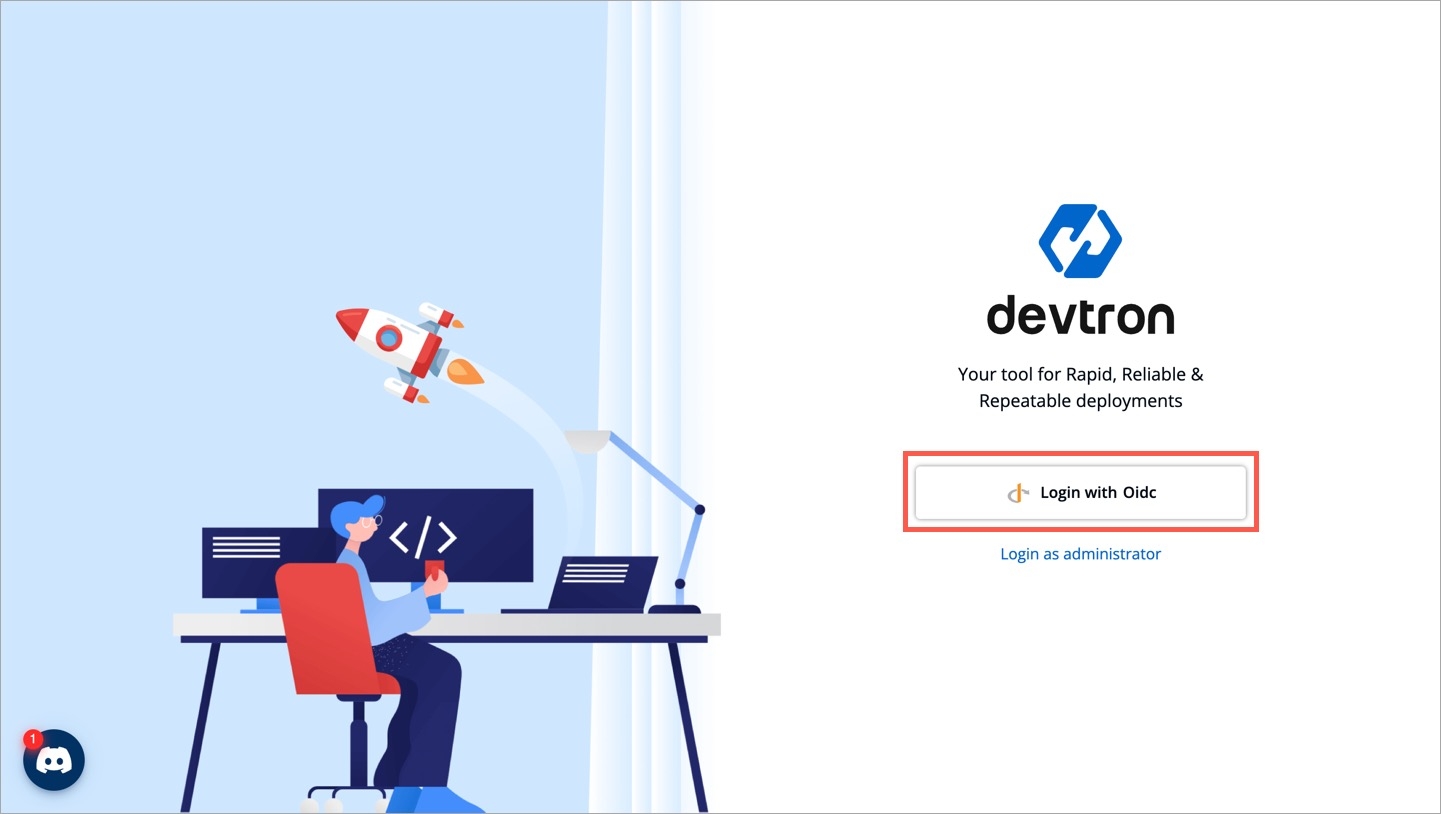
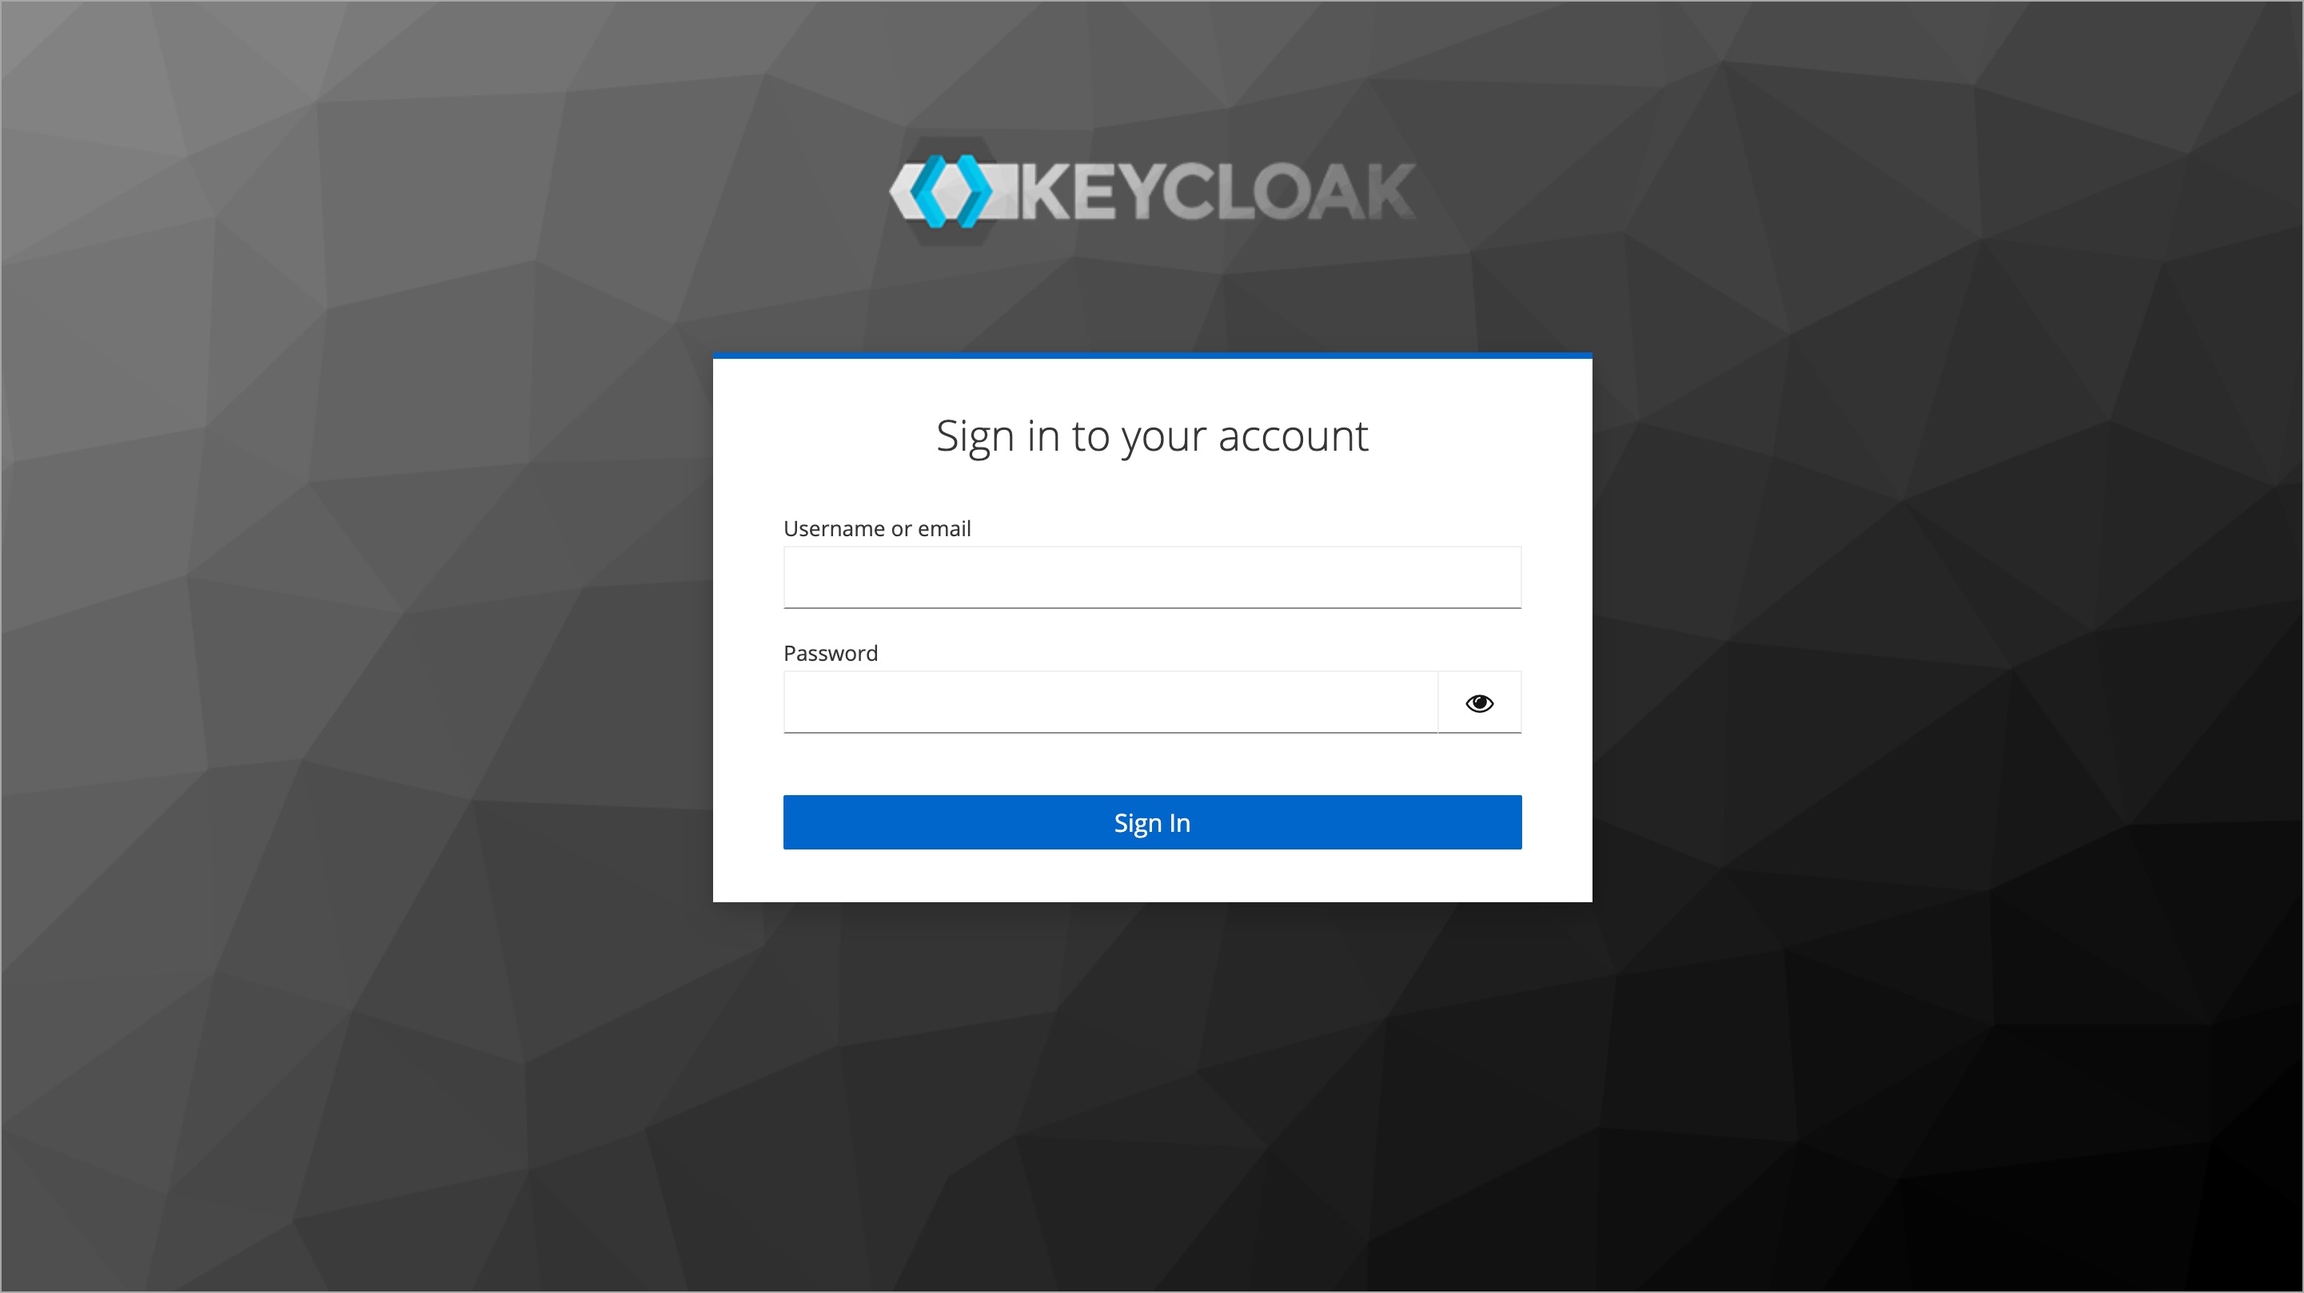
Now, you may log out and test the Keycloak OIDC login method using the user credentials. Clicking the Login with Oidc button will land you on Keycloak's login page.
Devtron provides a sample configuration out of the box. There are some values that you need to either get from your SSO provider or give to your SSO provider.
clientID
clientSecret
redirectURI (already provided in SSO Login Services by Devtron)
Devtron provides a sample configuration out of the box. There are some values that you need to either get from your SSO provider or give to your SSO provider.
clientID
clientSecret
redirectURI (provided in SSO Login Services by Devtron)
API tokens are the access tokens for authentication. Instead of using username and password, it can be used for programmatic access to API. It allows users to generate API tokens with the desired access. Only super admin users can generate API tokens and see the generated tokens.
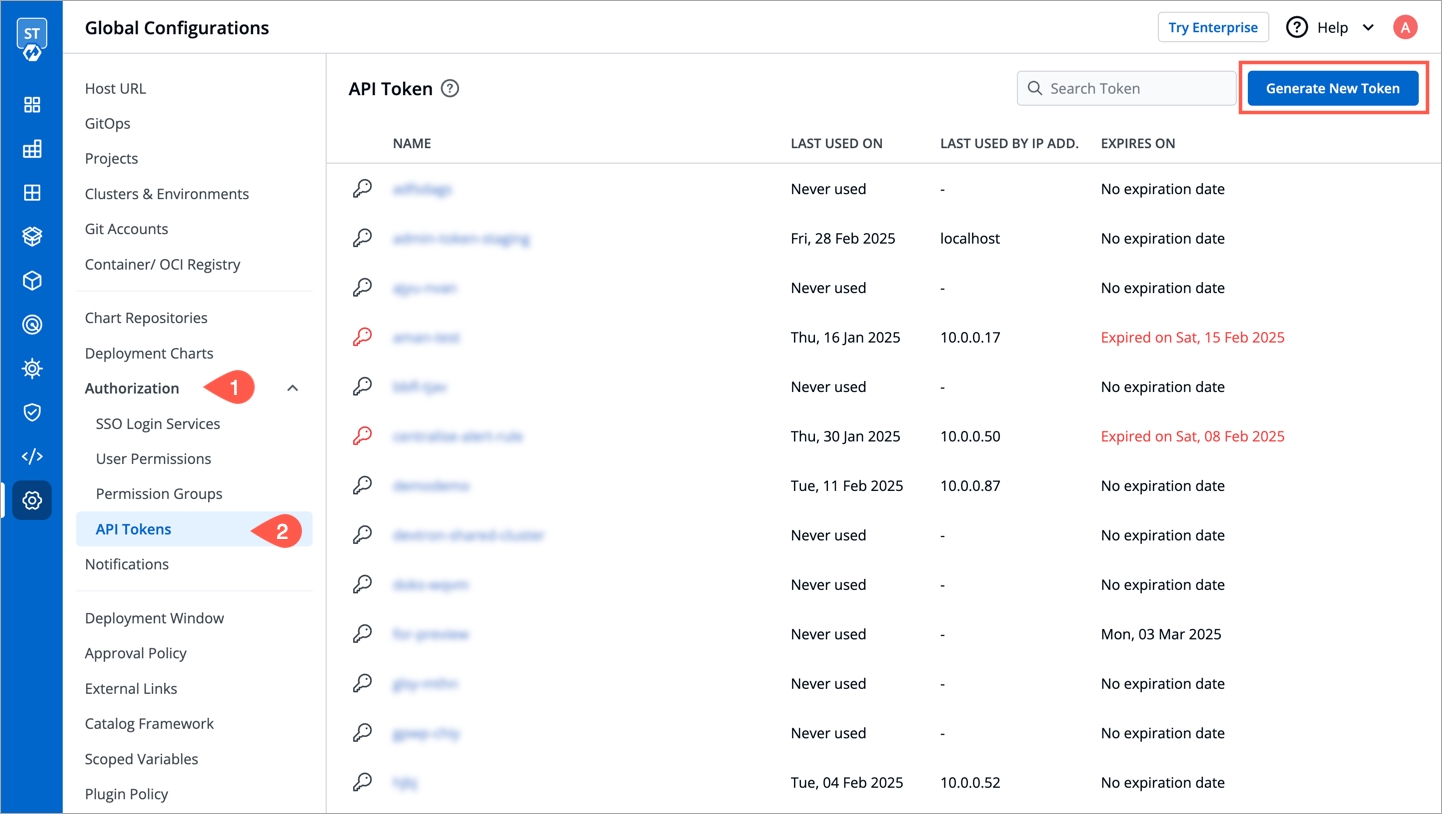
To generate API tokens, go to Global Configurations -> Authorization -> API tokens and click Generate New Token.
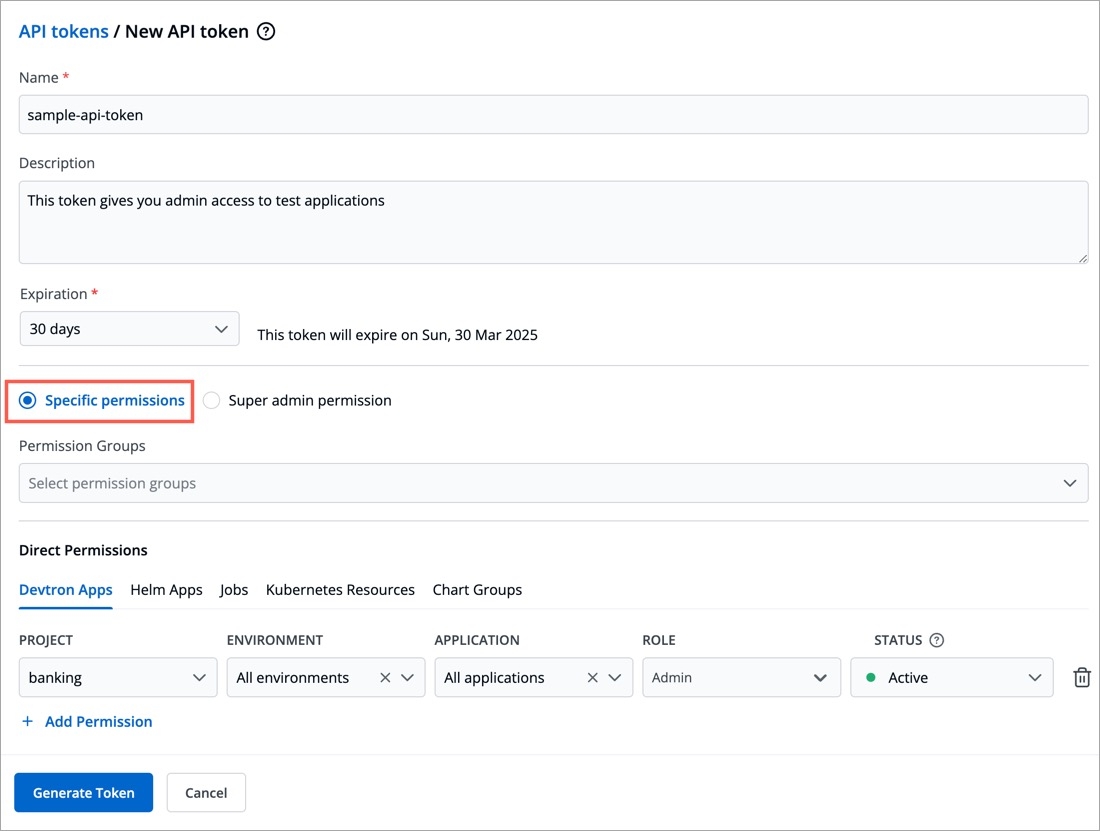
Enter a name for the token.
Add Description.
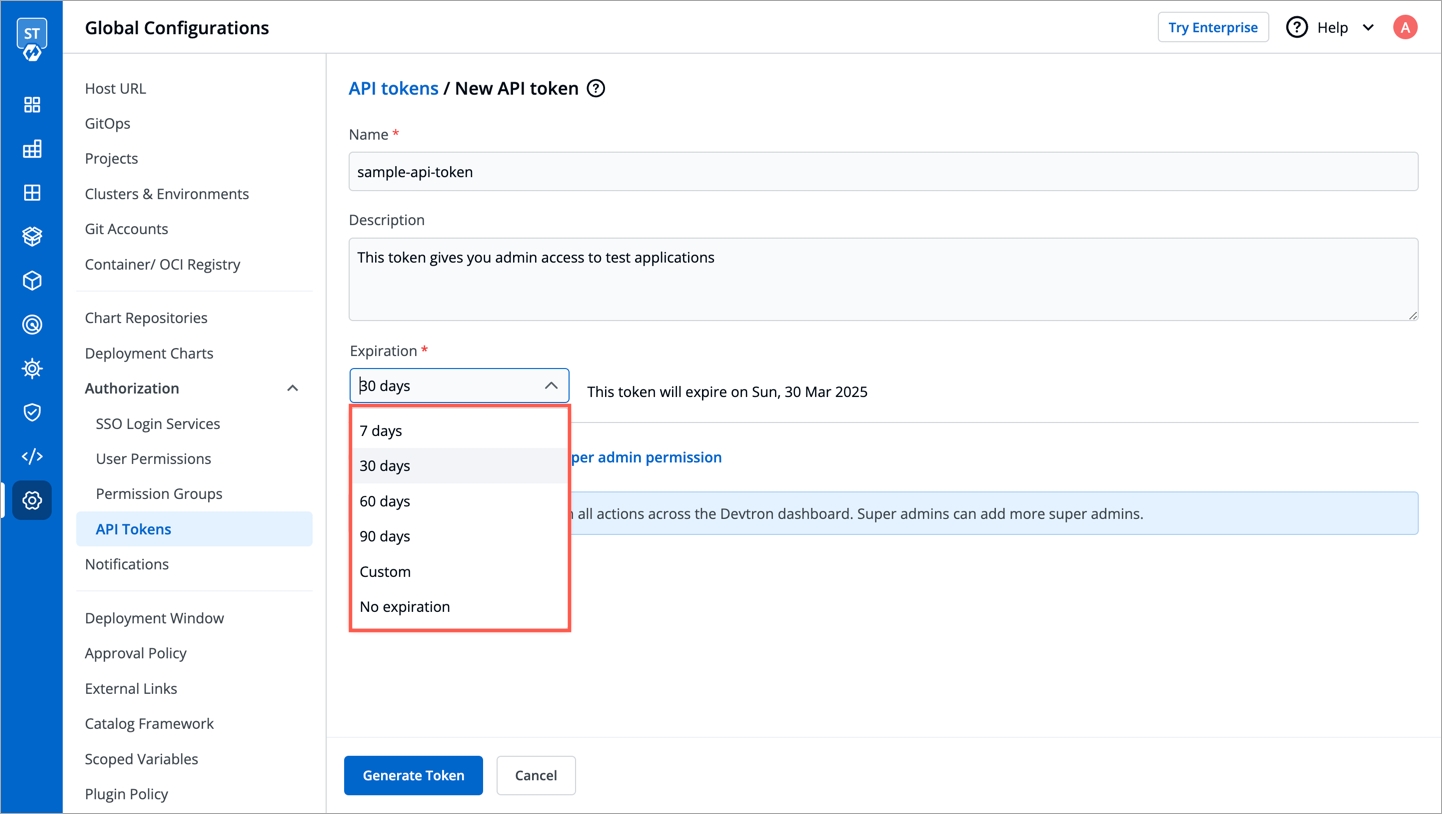
Select an expiration date for the token (7 days, 30 days, 60 days, 90 days, custom and no expiration).
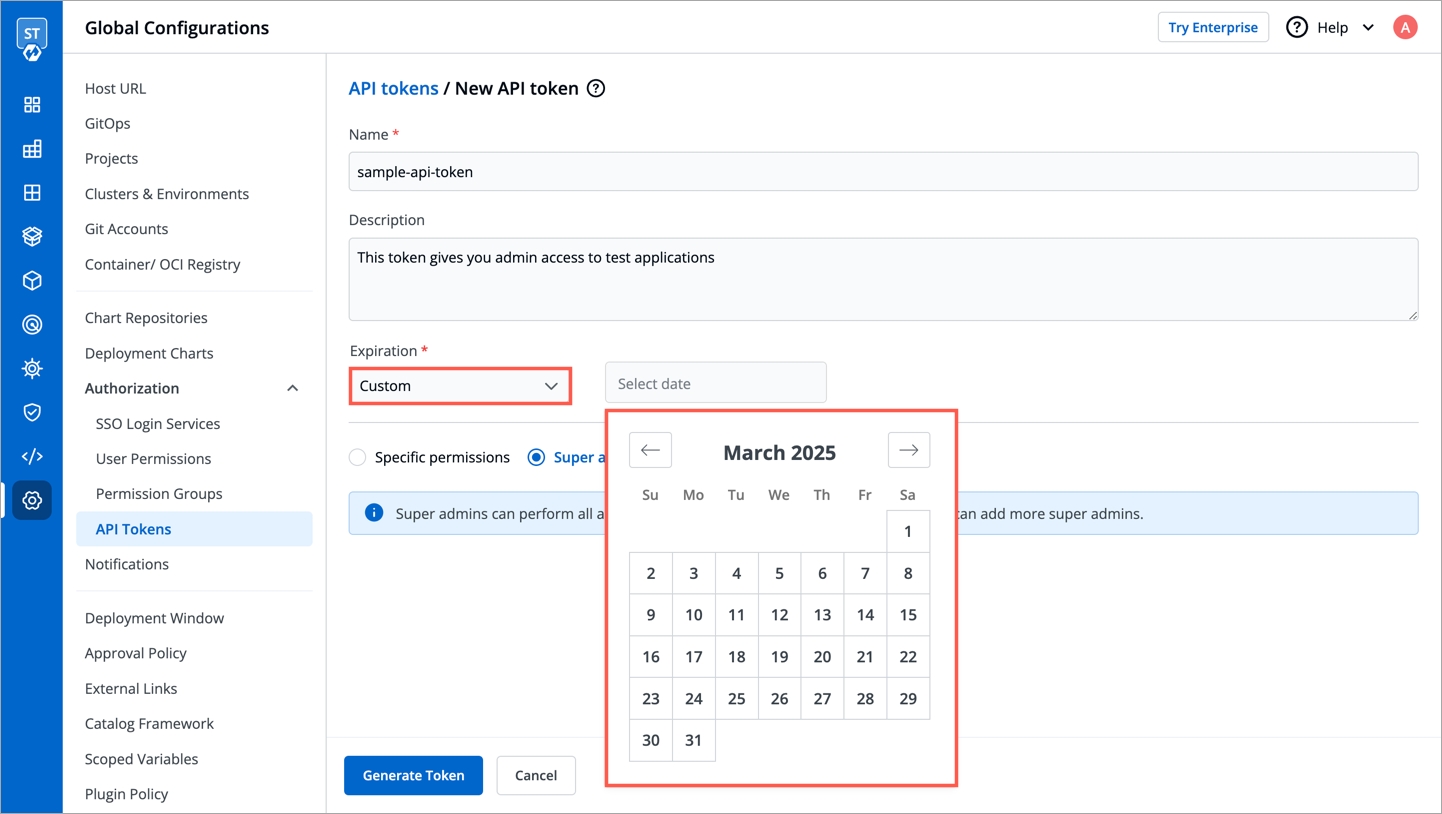
To select a custom expiration date, select Custom from the drop-down list. In the adjacent field, you can select your custom expiration date for the API token.
You can assign permission to the token either with:
Super admin permission: To generate a token with super admin permission, select Super admin permission.
Specific permissions: Selecting Specific permissions option allows you to generate a token with a specific role for:
Devtron Apps
Helm Apps
Kubernetes Resources
Chart Groups
Click Generate Token.
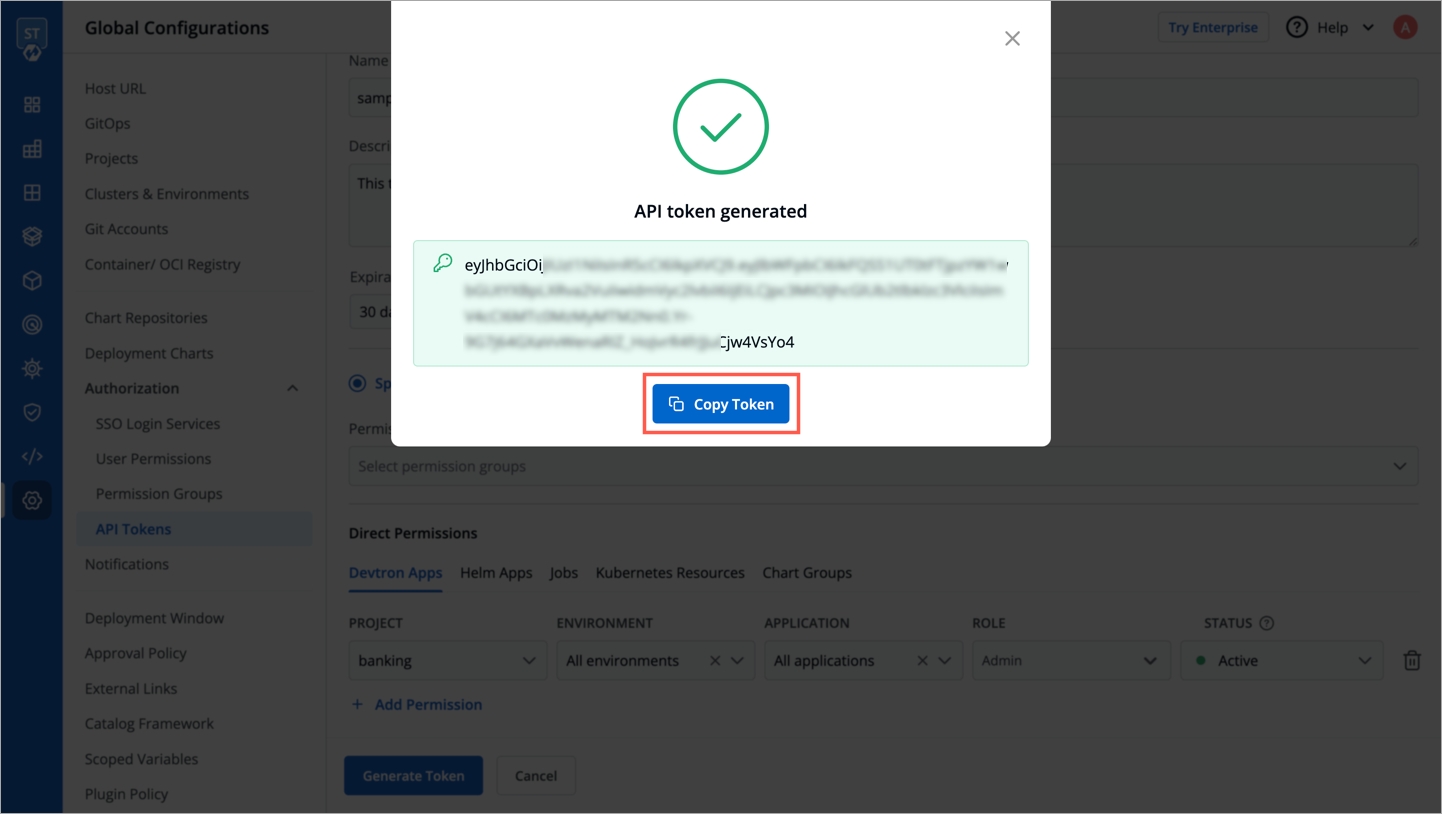
A pop-up window will appear on the screen from where you can copy the API token.
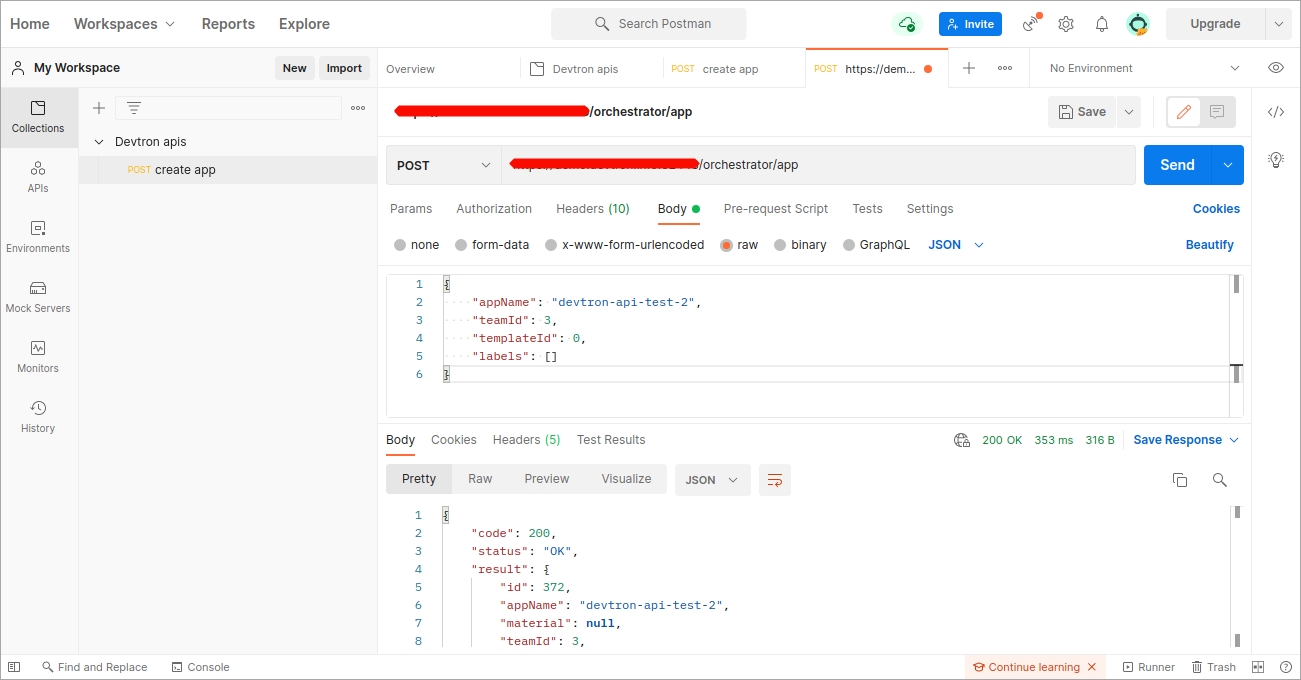
Once Devtron API token has been generated, you can use this token to request Devtron APIs using any API testing tool like Jmeter, Postman, Citrus. Using Postman here as an example.
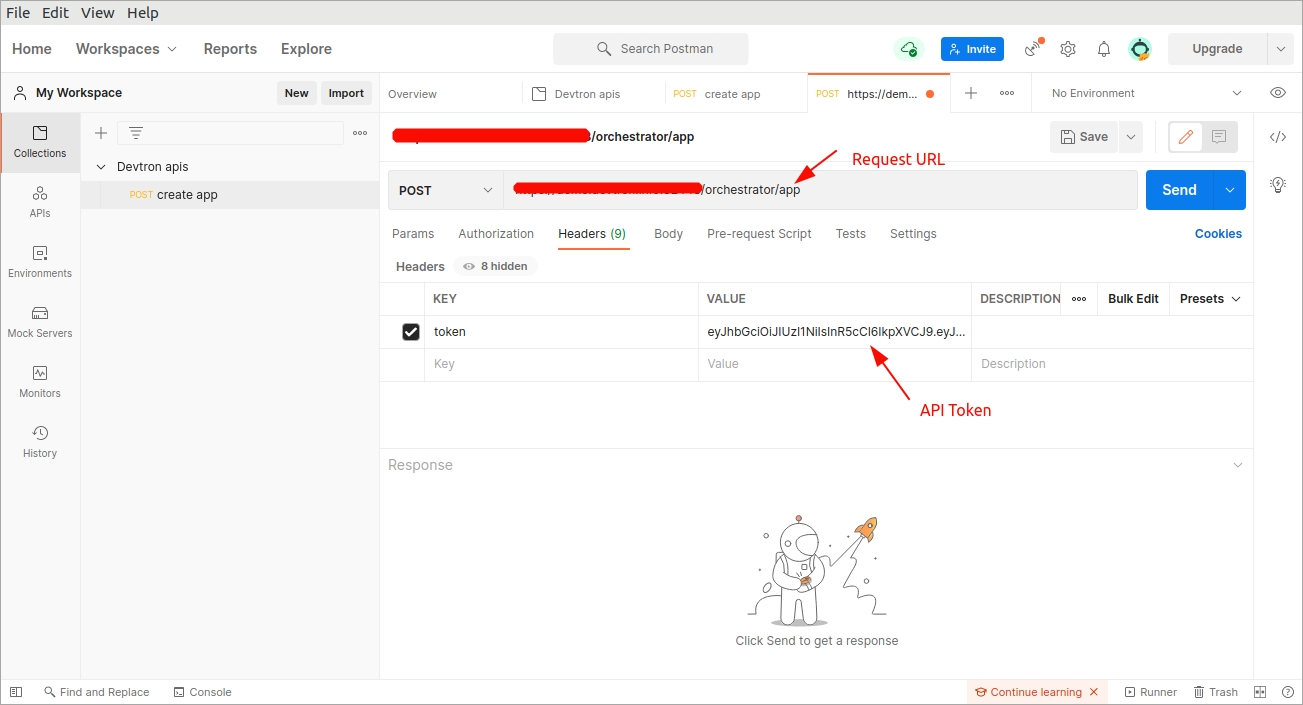
Open Postman. Enter the request URL with POST method and under HEADERS, enter the API token as shown in the image below.
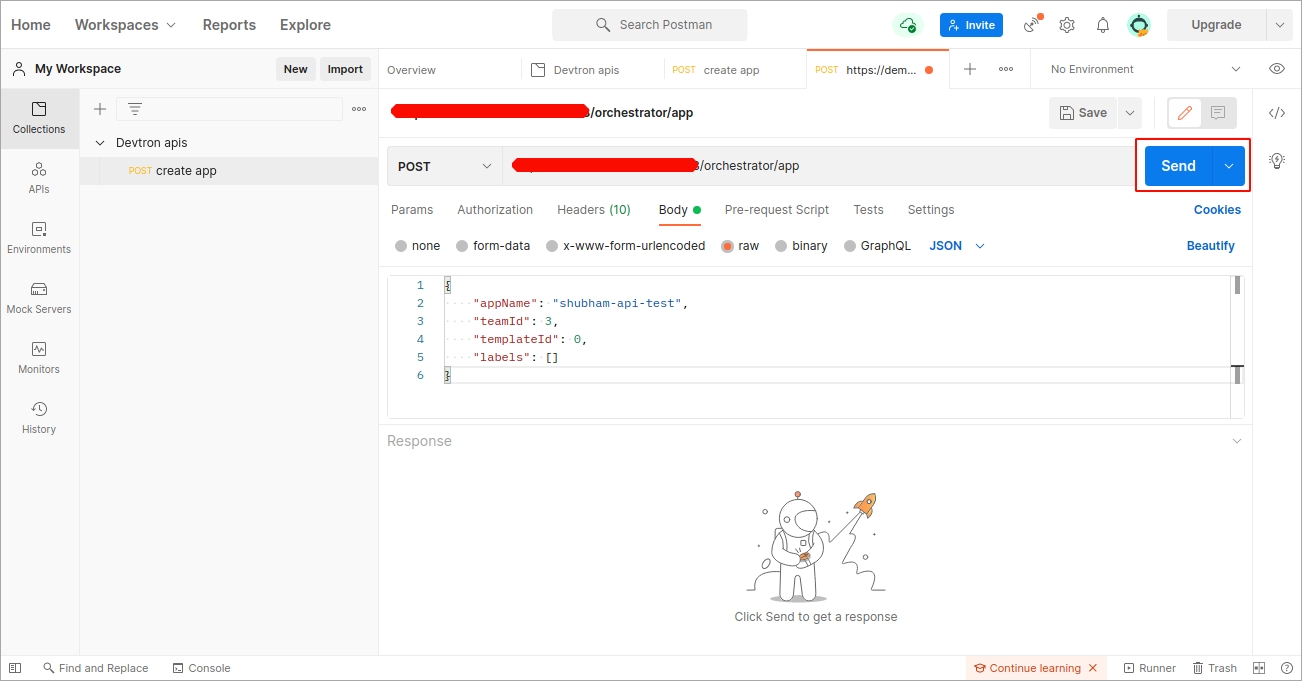
In the Body section, provide the API payload as shown below and click Send.
As soon as you click Send, the created application API will be triggered and a new Devtron app will be created as provided in the payload.
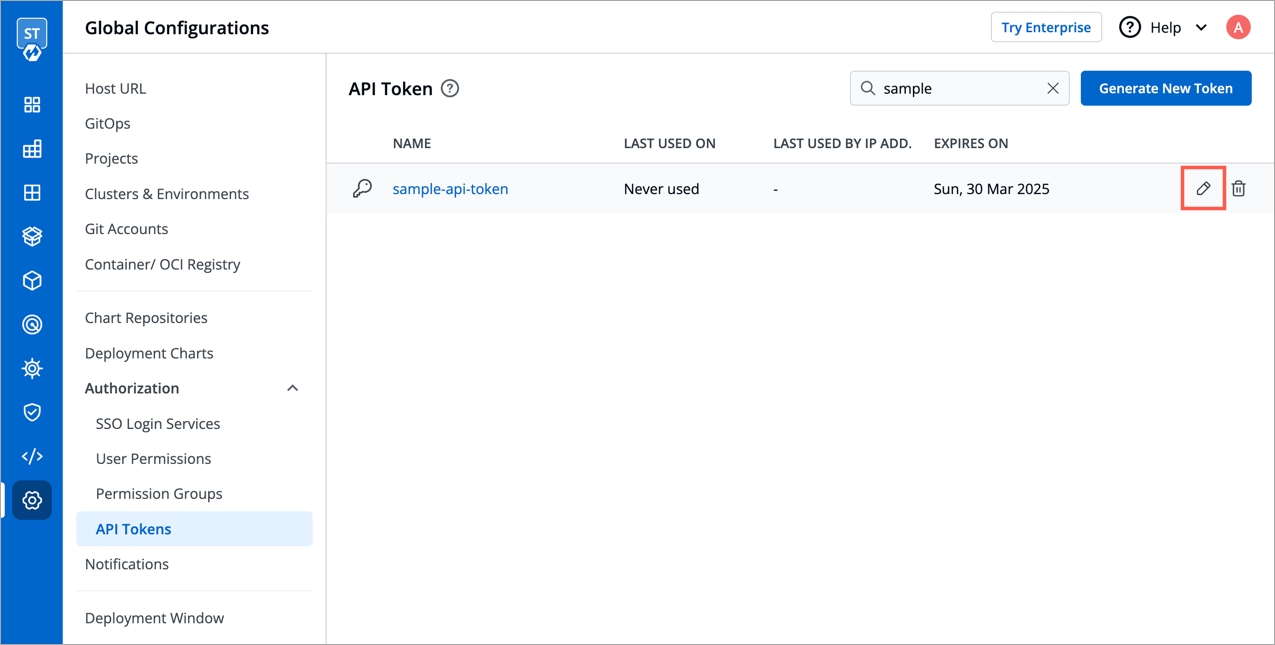
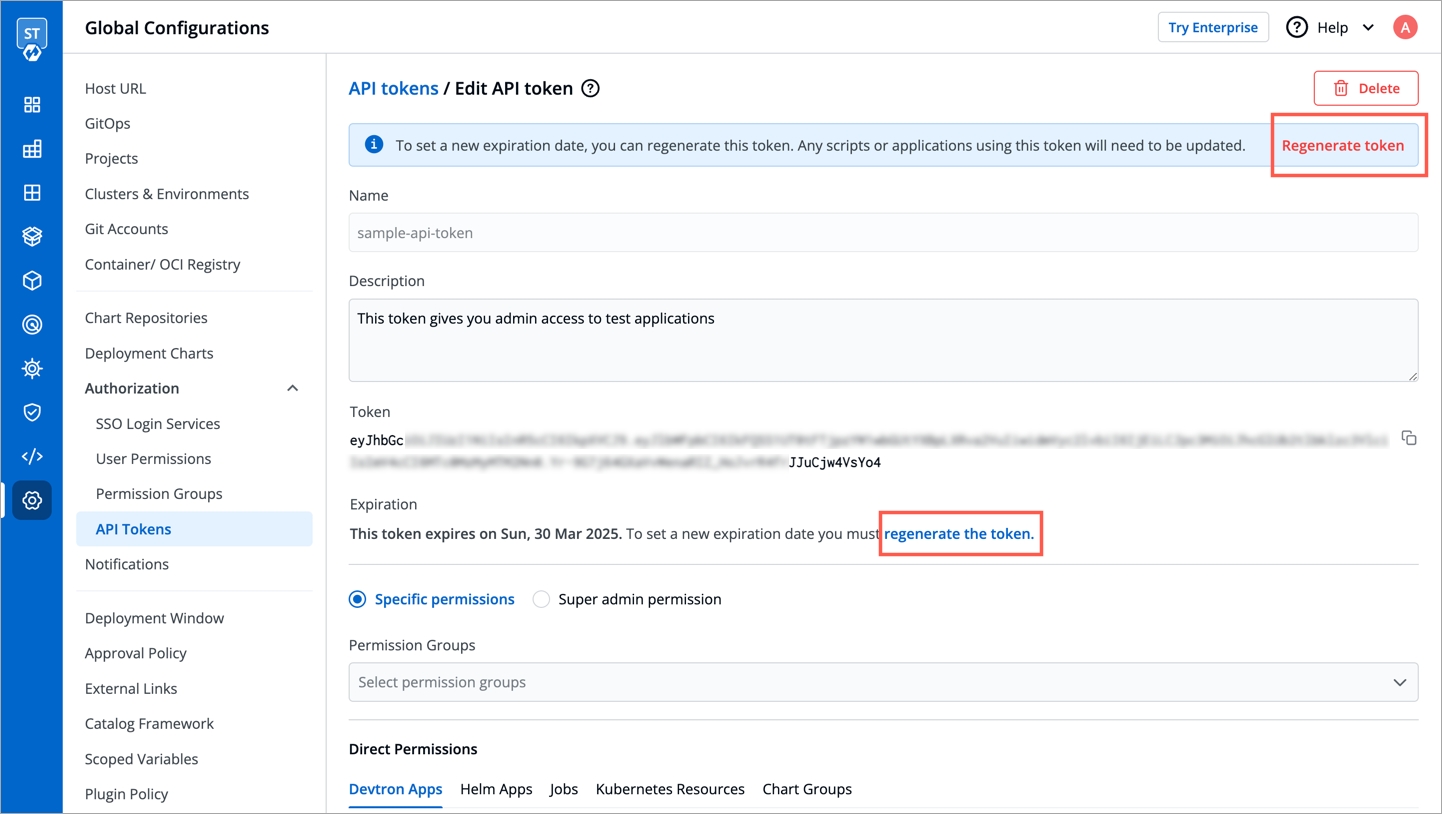
To set a new expiration date or to make changes in permissions assigned to the token, we need to update the API token in Devtron. To update the API token, click the token name or click on the edit icon.
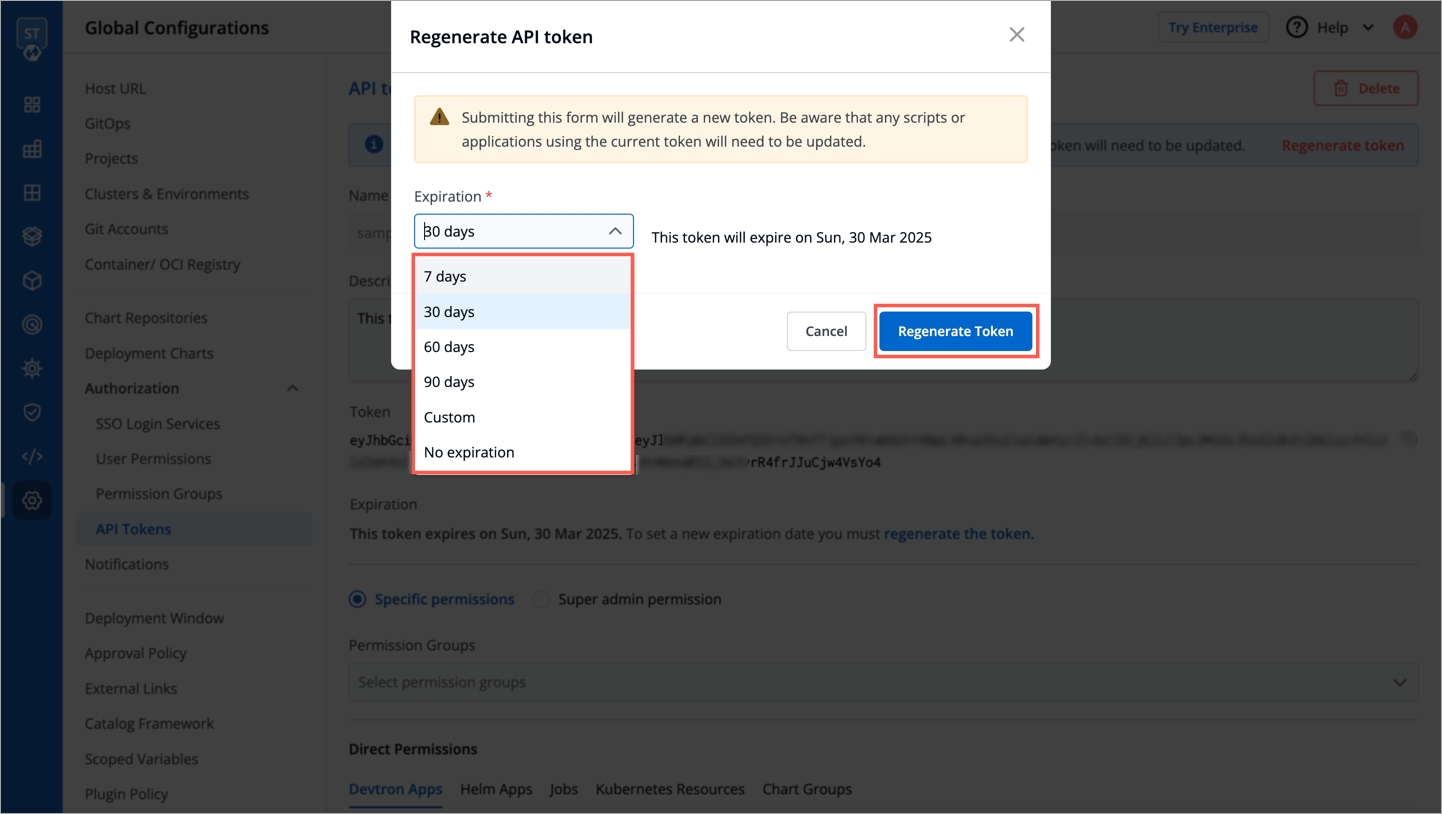
To set a new expiration date, you can regenerate the API token. Any scripts or applications using this token must be updated. To regenerate a token, click Regenerate token.
A pop-up window will appear on the screen from where you can select a new expiration date.
Select a new expiration date and click Regenerate token.
This will generate a new token with a new expiration date.
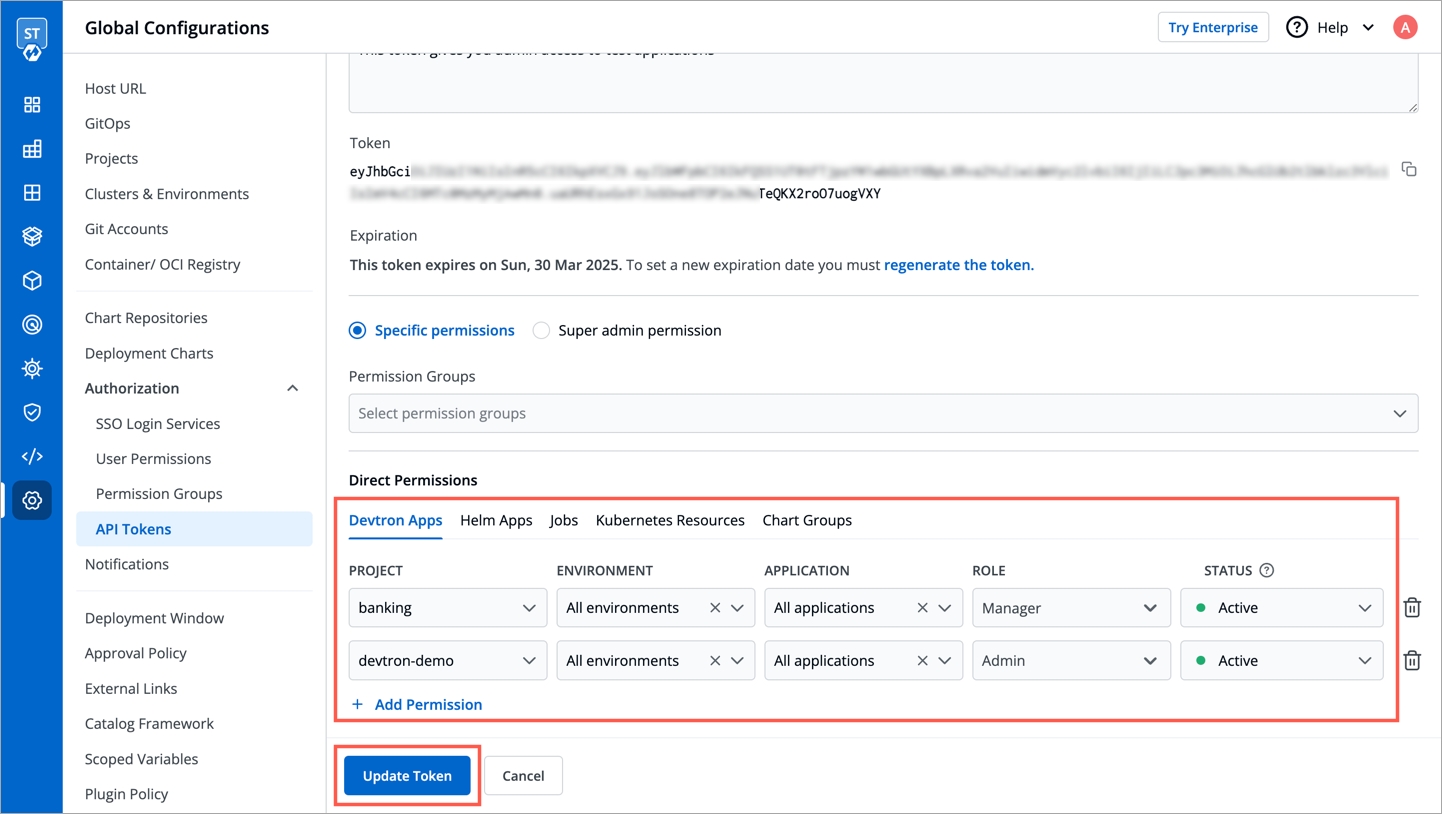
To update API token permissions, give the permissions as you want to and click Update Token.
To delete an API token, click delete icon. Any applications or scripts using this token will no longer be able to access the Devtron API.
A verified account on . Okta activates your account only if email verification is successful.
Here's a reference guide to set up your Okta org and application:
Once your Okta org is set up, create an app integration on Okta to get a Client ID and Client Secret.
In the Admin Console, go to Applications → Applications.
Click Create App Integration.
Select OIDC - OpenID Connect as the Sign-in method.
Select Web as the application type and click Next.
On the App Integration page:
Give a name to your application.
Select the Interaction Code and Refresh Token checkbox.
Now go to Devtron's Global Configurations → SSO Login Services → OIDC.
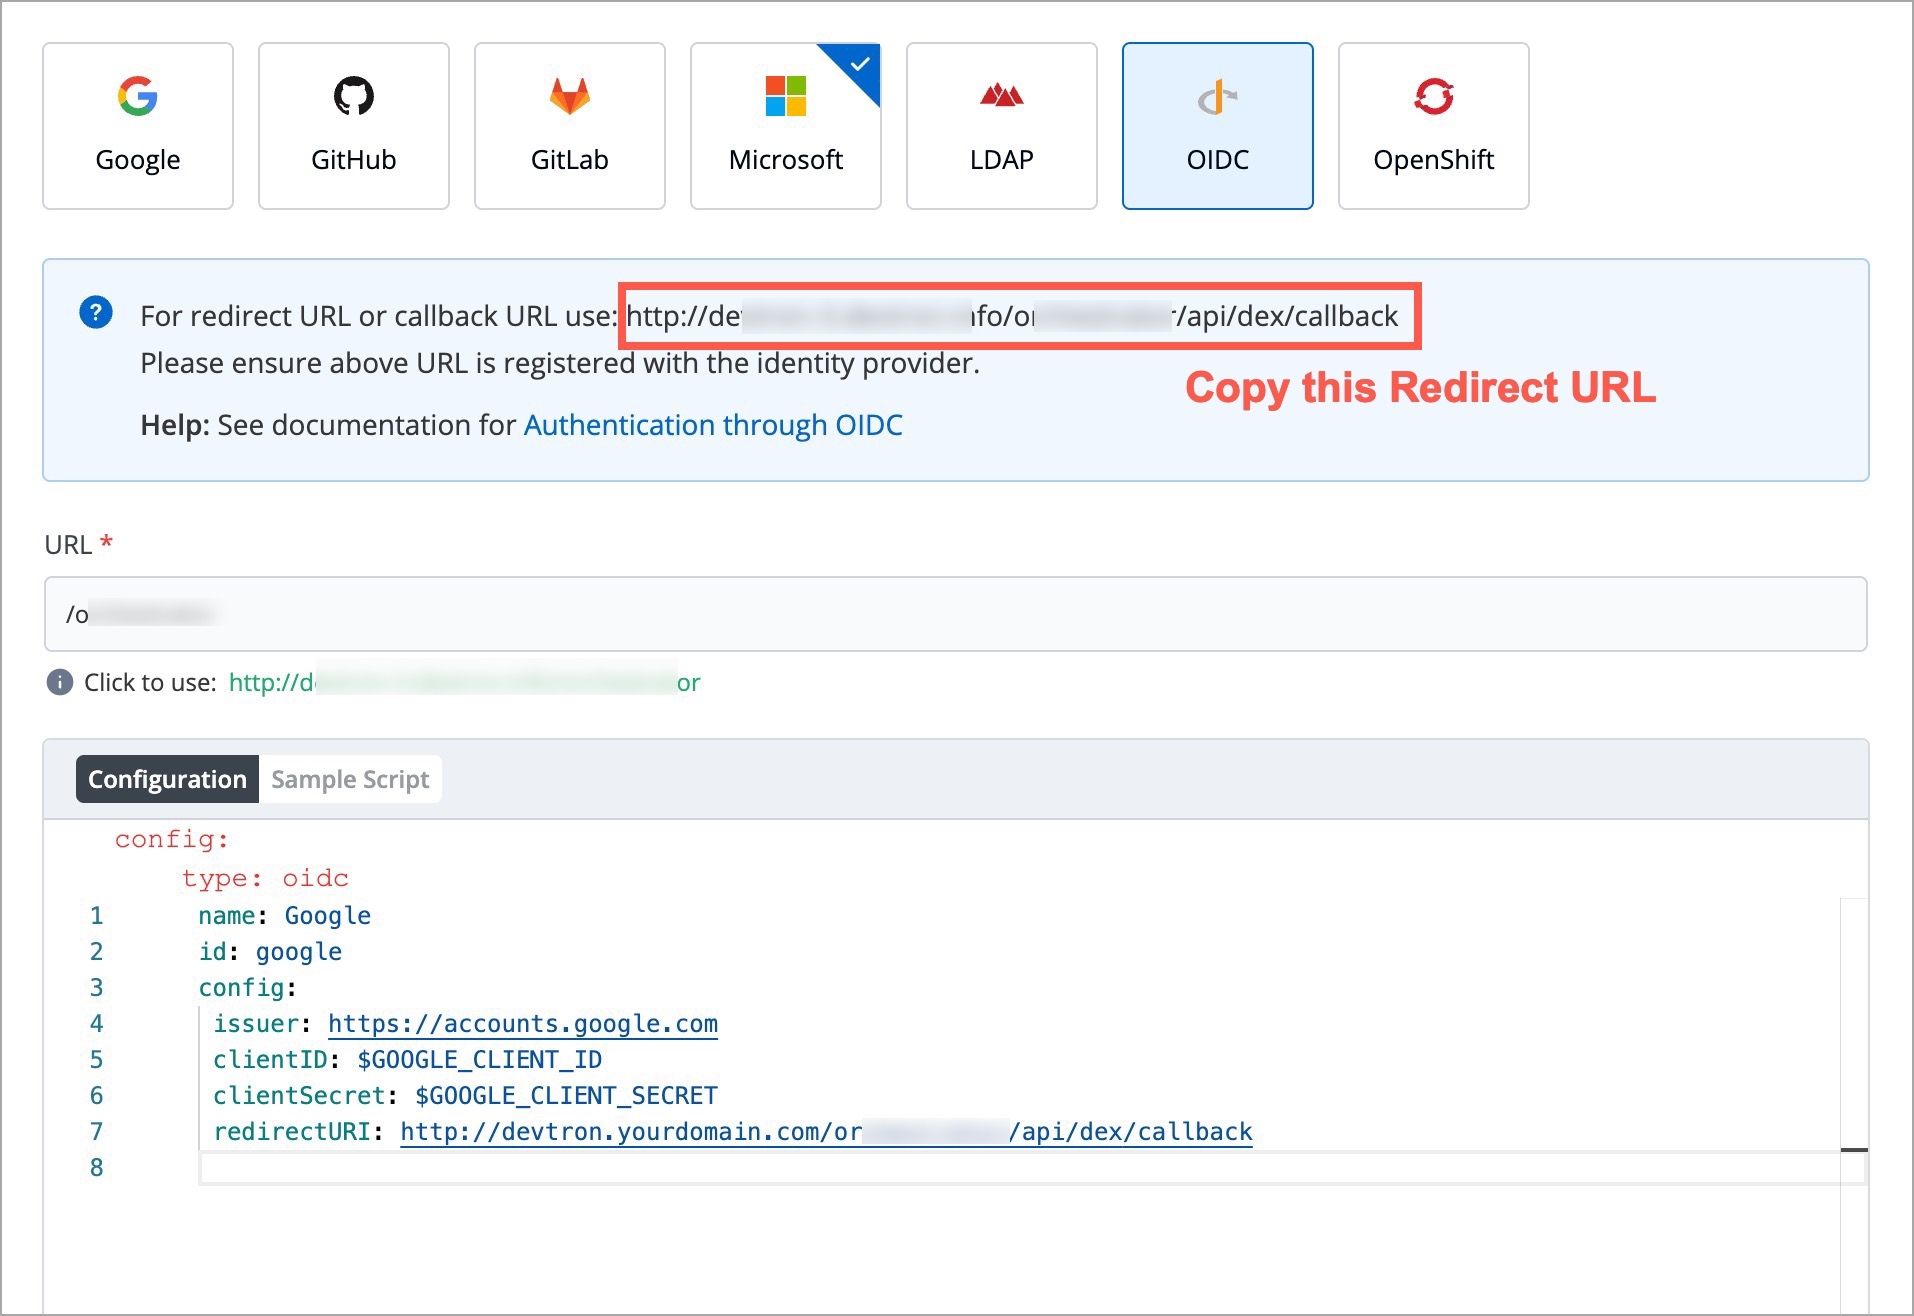
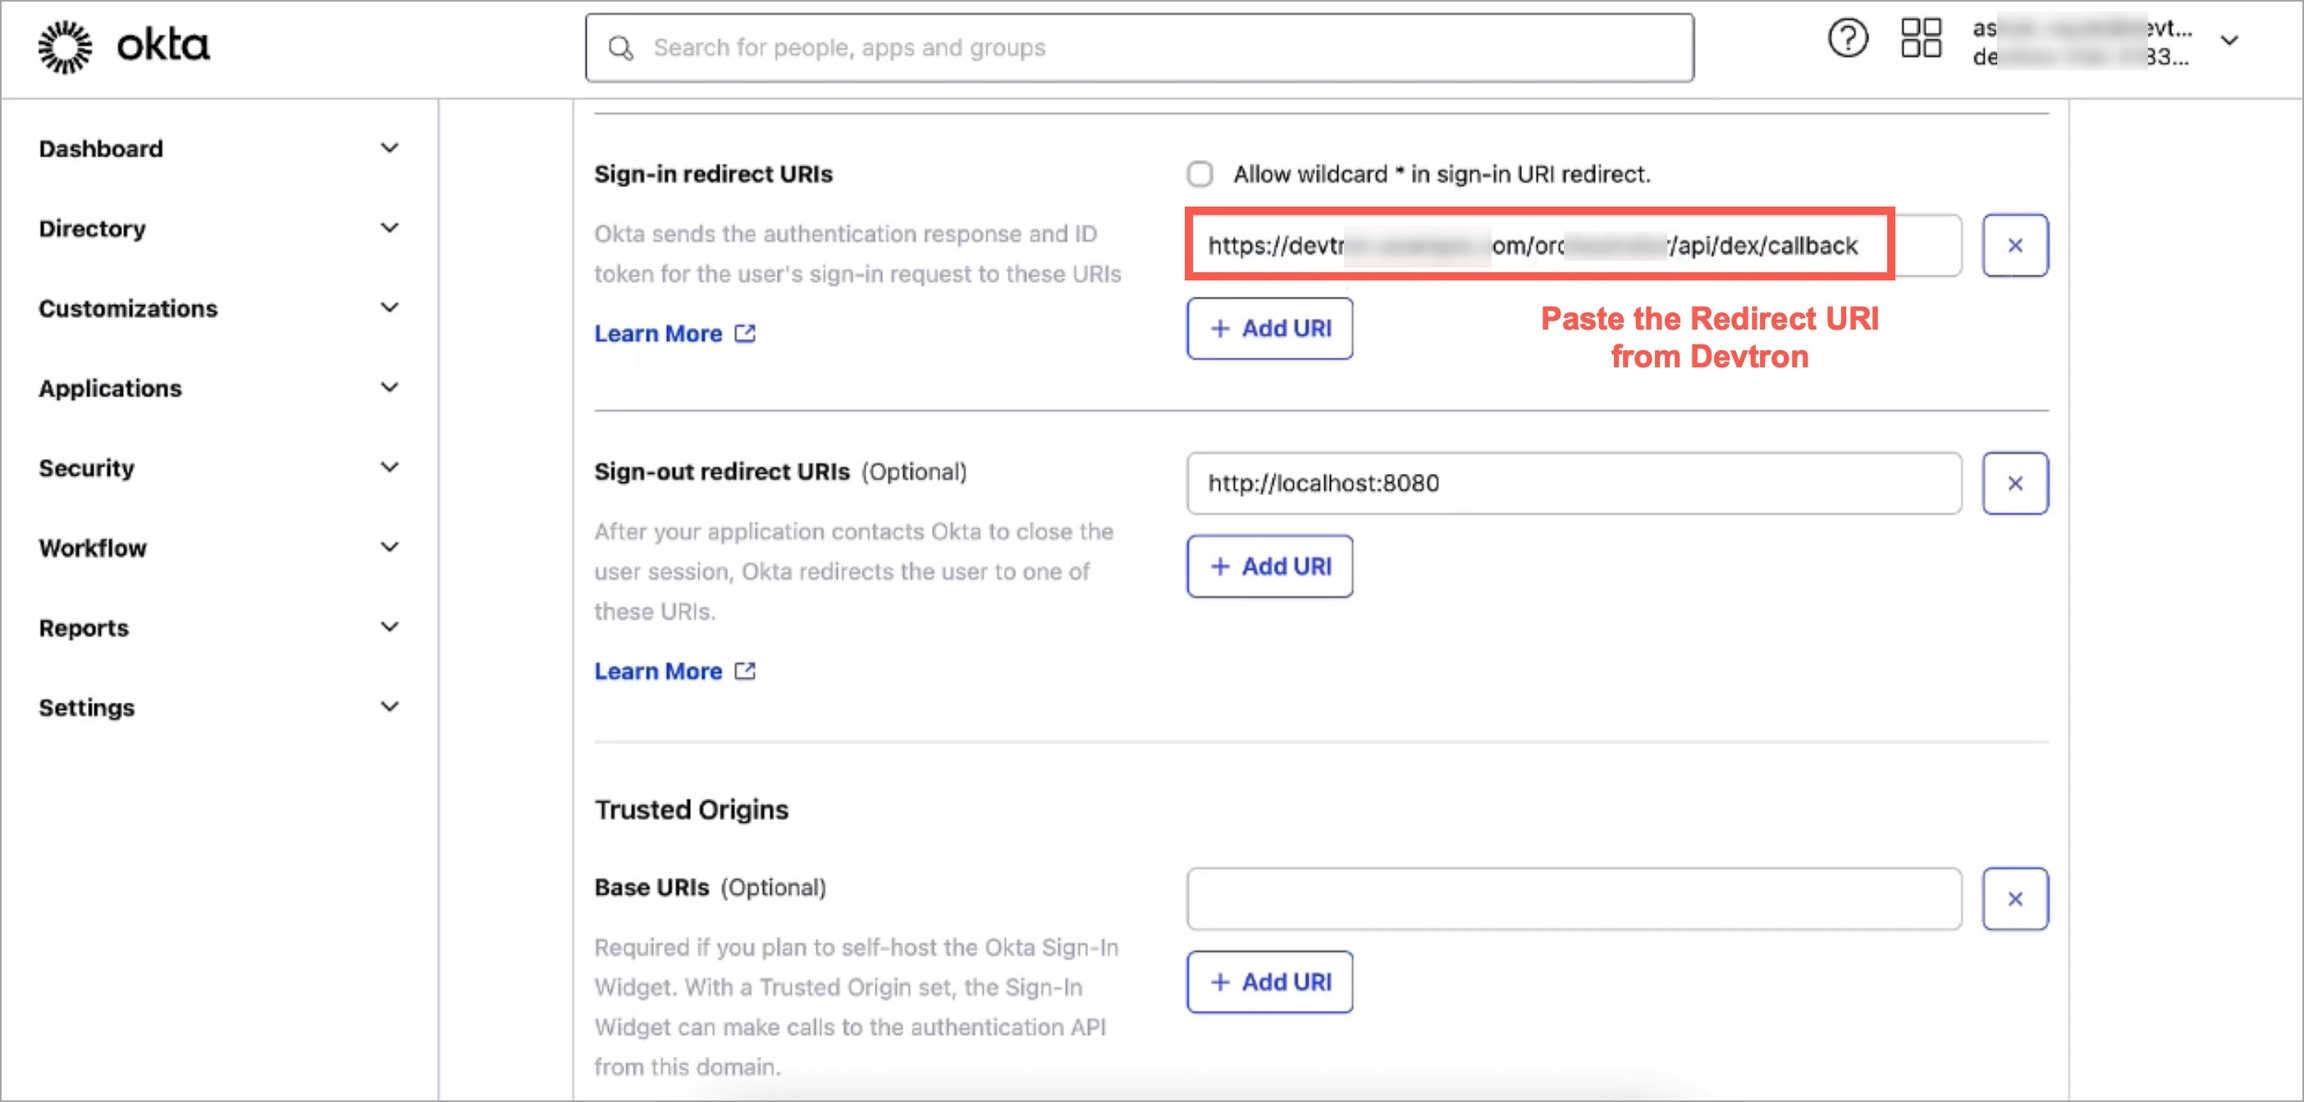
Copy the redirect URI given in the helper text (might look like: https://xxx.xxx.xxx/xxx/callback).
Return to the Okta screen, and remove the prefilled value in Sign-in redirect URIs.
Paste the copied URI in Sign-in redirect URIs.
Click Save.
On the General tab:
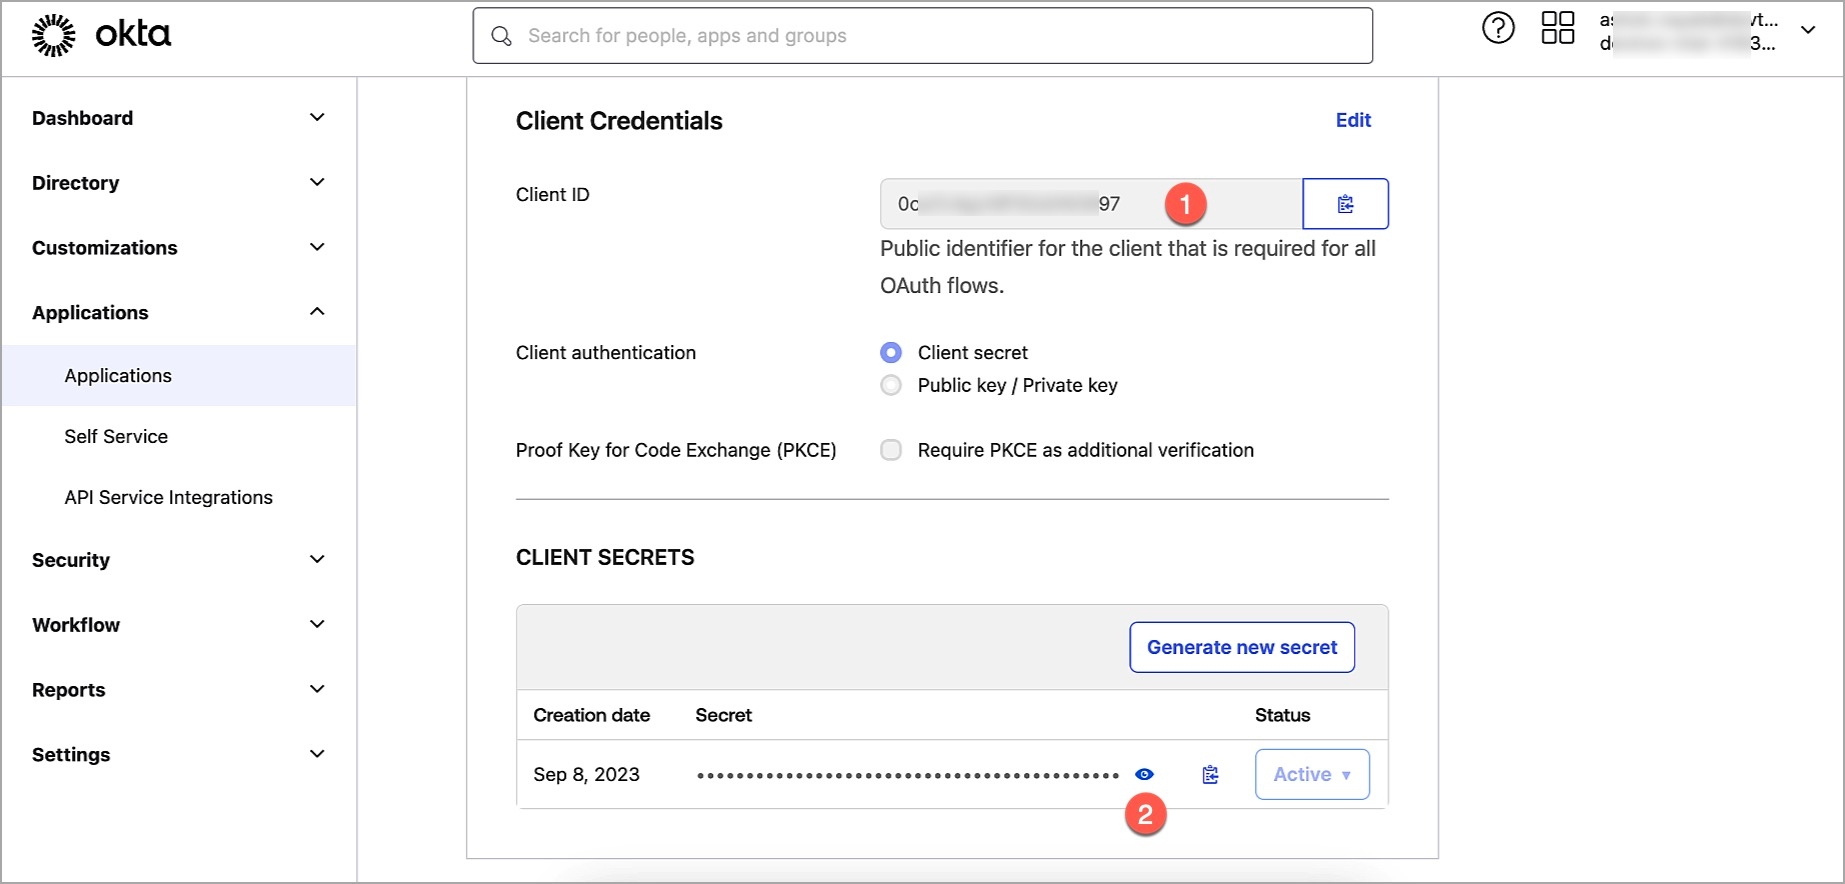
Note the Client ID value.
Click the Edit option.
In Client Authentication, choose Client Secret.
Click Save.
Click Generate new secret.
Note the Client Secret value.
Go to the Global Configurations → SSO Login Services → OIDC.
In the URL field, enter the Devtron application URL (a valid https link) where it is hosted.
Under Configuration tab, locate the config object, and provide the clientID and clientSecret of the app integration you created on Okta.
Provide issuer value as https://${yourOktaDomain}. Replace ${yourOktaDomain} with your domain on Okta as shown in the video.
For providing redirectURI or callbackURI registered with the SSO provider, you can either select Configuration or Sample Script. Note that the redirect URI is already given in the helper text (as seen in the previous section).
Click Save to create and activate Okta SSO login.
Now your users will be able to log in to Devtron using the Okta authentication method. Note that existing signed-in users will be logged out and they have to log in again using their OIDC account.
Selecting option allows you to manage access and provide the accordingly for:
Selecting option will get full access to Devtron resources and the rest of the options will not be available.
Select one of the to which you want to give permission to the user:
Select one of the to which you want to give permission to the user:
Select one of the to which you want to give permission to the user and click Done:
OIDC stands for OpenID Connect. to read more.
Add a key insecureSkipEmailVerified: true. Note that this key is only required for Okta SSO. For other types of OIDC SSO, refer .

Using the Permission groups, you can assign a user to a particular group and a user inherits all the permissions granted to the group.
The advantage of the Permission groups is to define a set of privileges like create, edit, or delete for the given set of resources that can be shared among the users within the group.
The User permissions section for Specific permissions contains a drop-down list of all existing groups for which a user has an access. This is an optional field and more than one groups can be selected for a user.
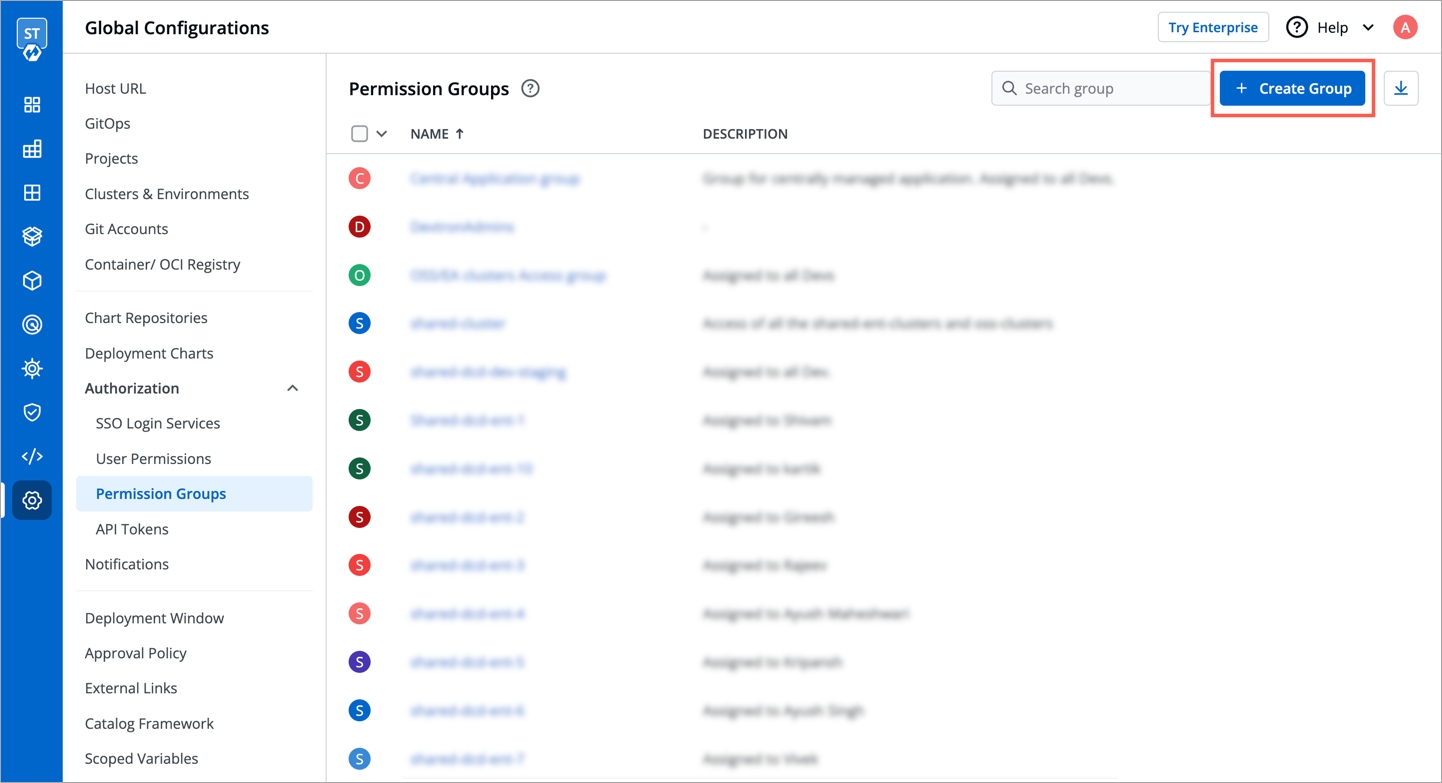
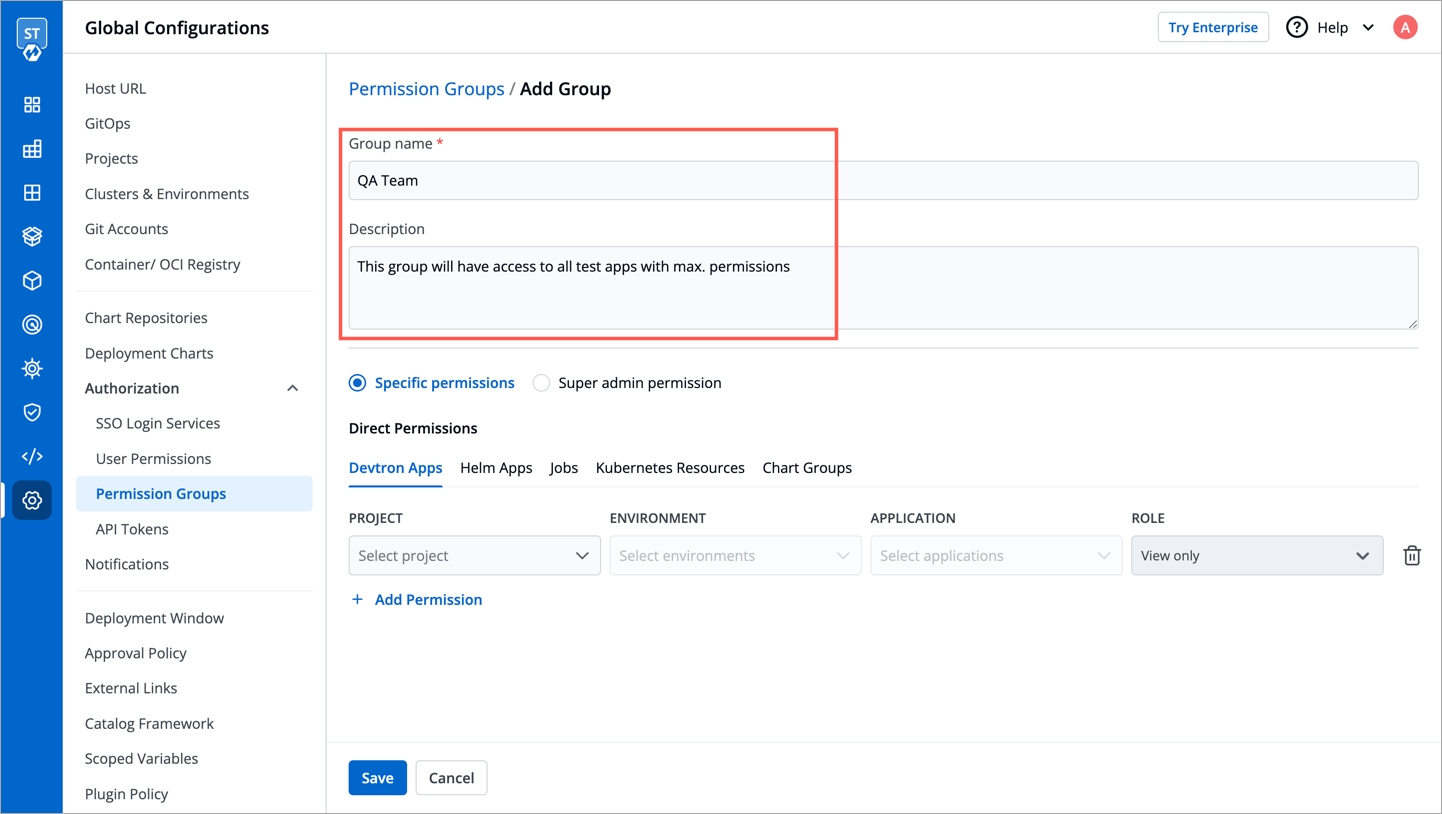
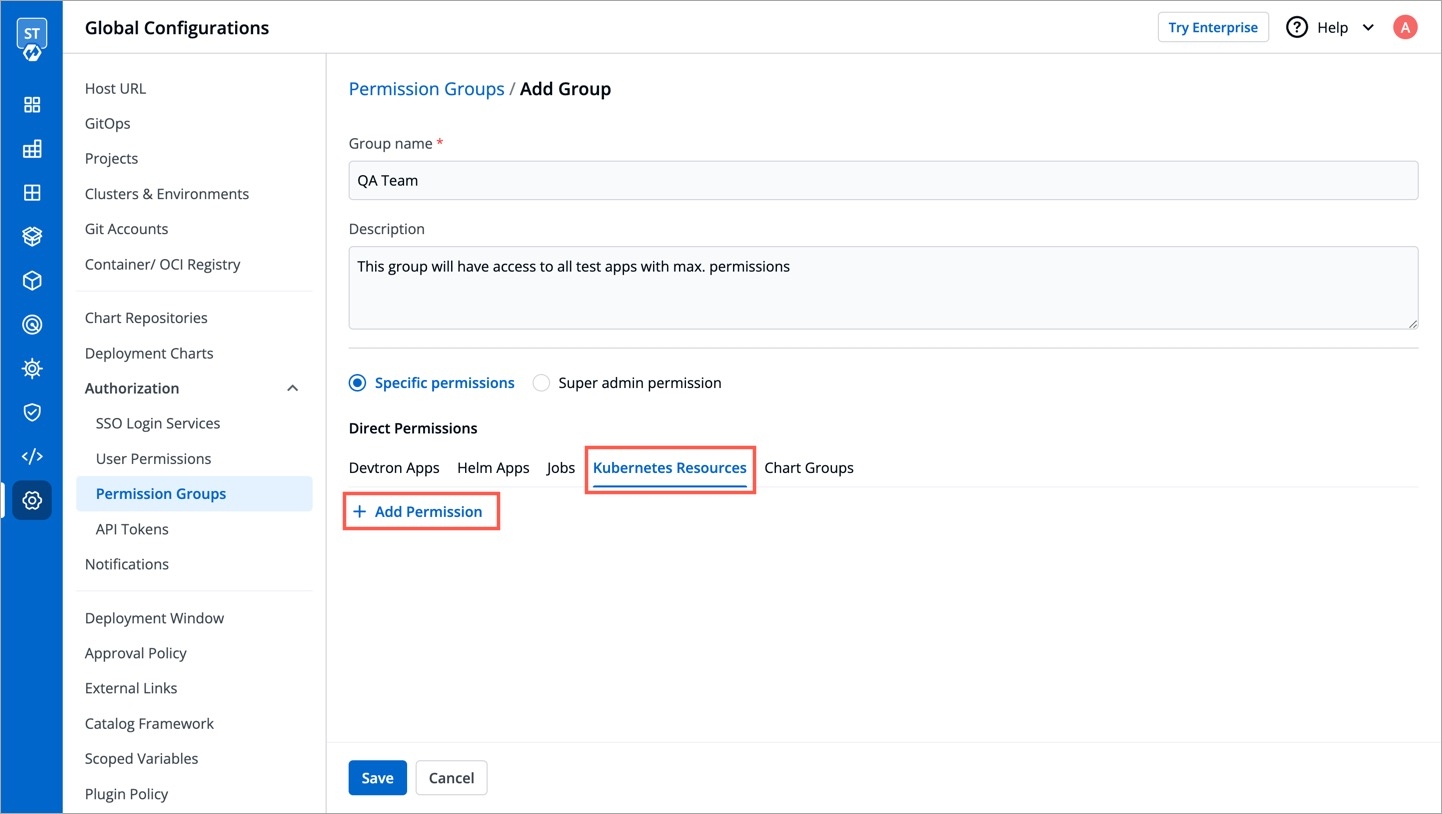
Go to Global Configurations → Authorization → Permissions groups → Add group.
Enter the Group Name and Description.
You can either grant super-admin permission to a user group or specific permissions to manage access for:
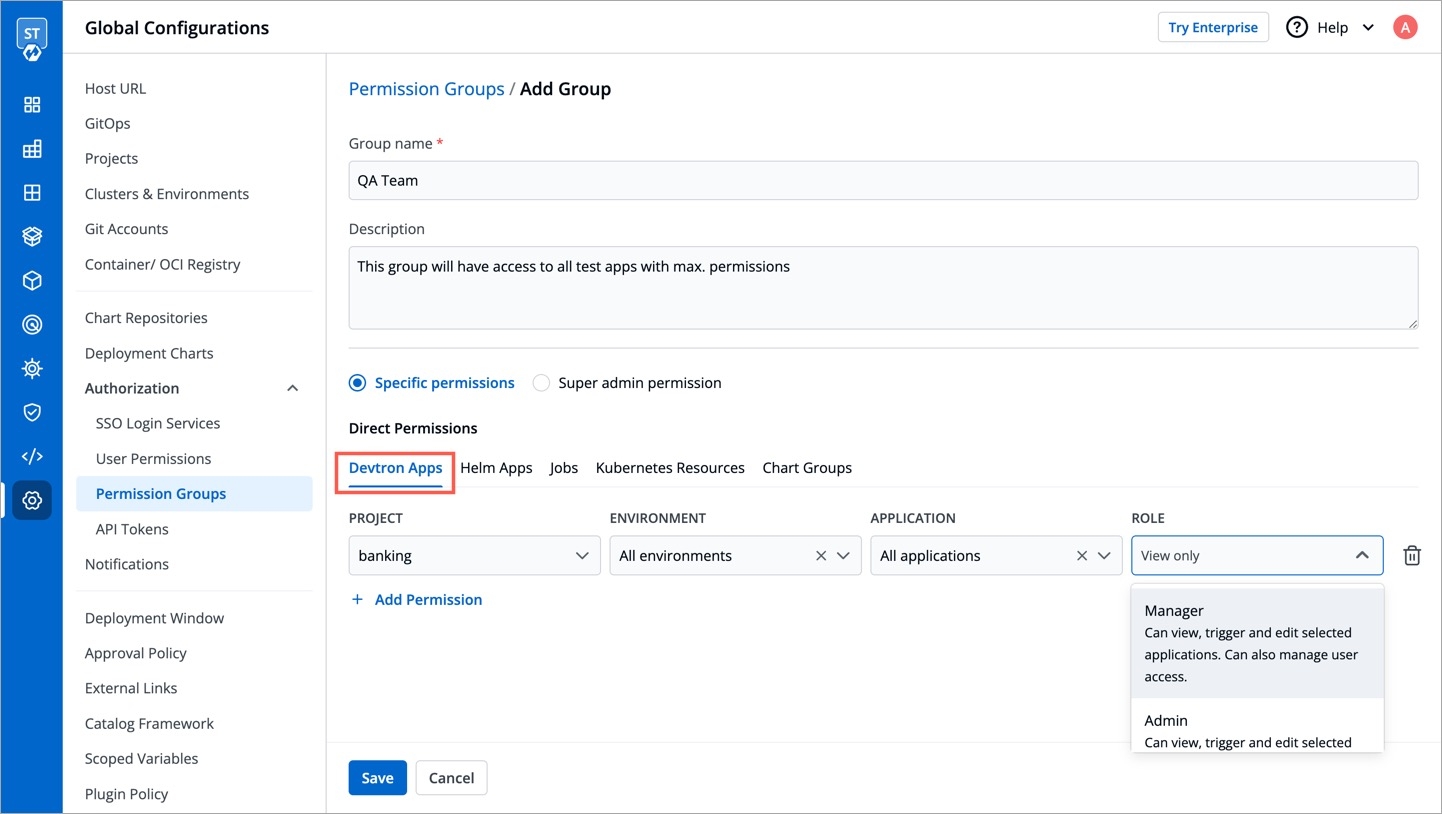
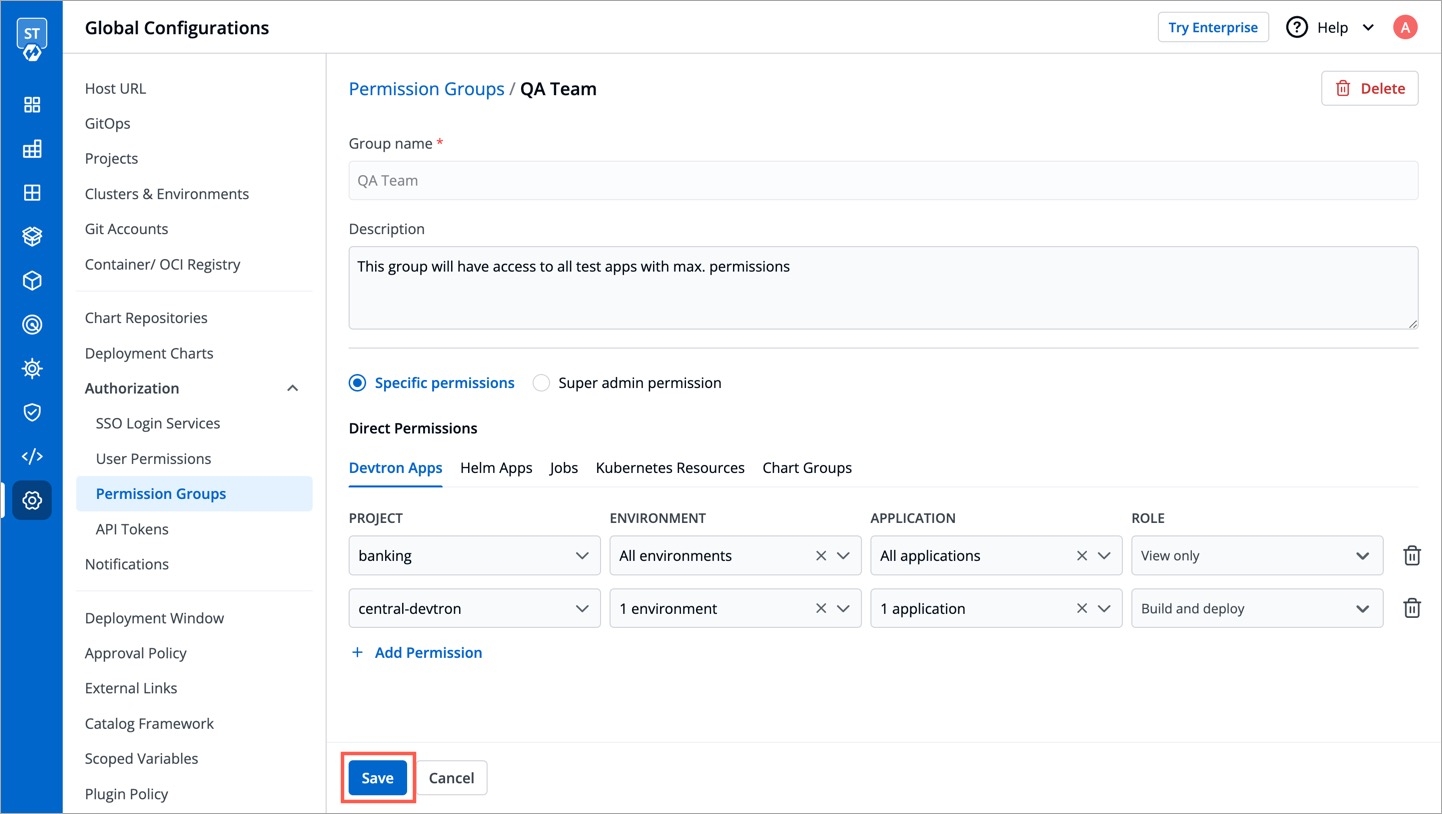
In Devtron Apps option, you can provide access to a group to manage permission for custom apps created using Devtron.
The Devtron Apps option will be available only if you install CI/CD integration.
Provide the information in the following fields:
Project
Select a project from the drop-down list to which you want to give permission to the group. You can select only one project at a time.
Note: If you want to select more than one project, then click Add row.
Environment
Select the specific environment or all environments from the drop-down list.
Note: If you select All environments option, then a user gets access to all the current environments including any new environment which gets associated with the application later.
Application
Select the specific applications or all applications from the drop-down list corresponding to your selected Environments.
Note: If you select All applications option, then a user gets access to all the current applications including any new application which gets associated with the project later
.
Role
View only
Build and Deploy
Admin
Manager
You can add multiple rows for Devtron Apps permission.
Once you have finished assigning the appropriate permissions for the groups, Click Save.
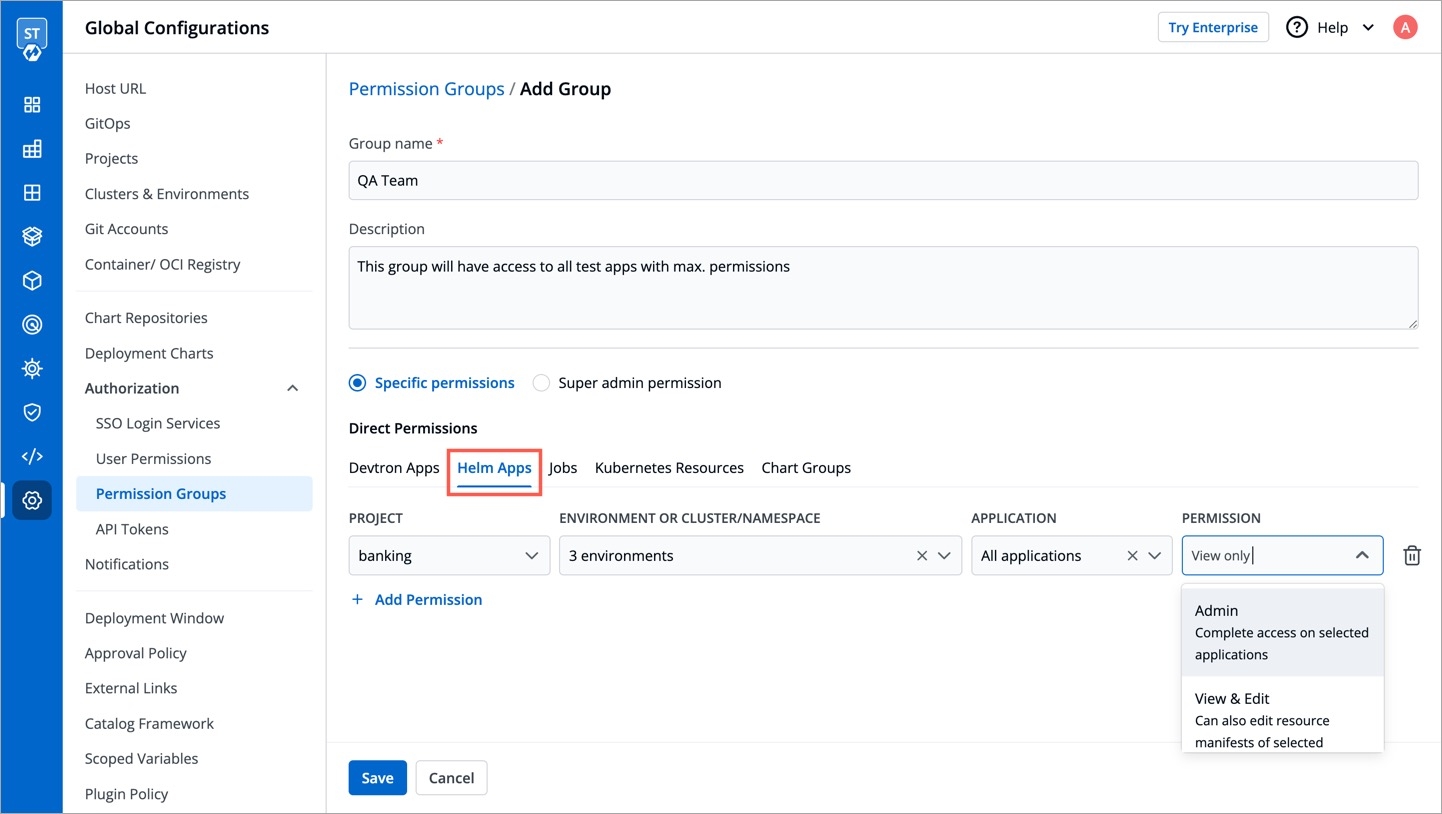
In Helm Apps option, you can provide access to a group to manage permission for Helm apps deployed from Devtron or outside Devtron.
Provide the information in the following fields:
Project
Select a project from the drop-down list to which you want to give permission to the group. You can select only one project at a time.
Note: If you want to select more than one project, then click Add row.
Environment or cluster/namespace
Select the specific environment or all existing environments in default cluster from the drop-down list.
Note: If you select all existing + future environments in default cluster option, then a user gets access to all the current environments including any new environment which gets associated with the application later.
Application
Select the specific application or all applications from the drop-down list corresponding to your selected Environments.
Note: If All applications option is selected, then a user gets access to all the current applications including any new application which gets associated with the project later
.
Role
View only
View & Edit
Admin
You can add multiple rows for Devtron app permission.
Once you have finished assigning the appropriate permissions for the groups, Click Save.
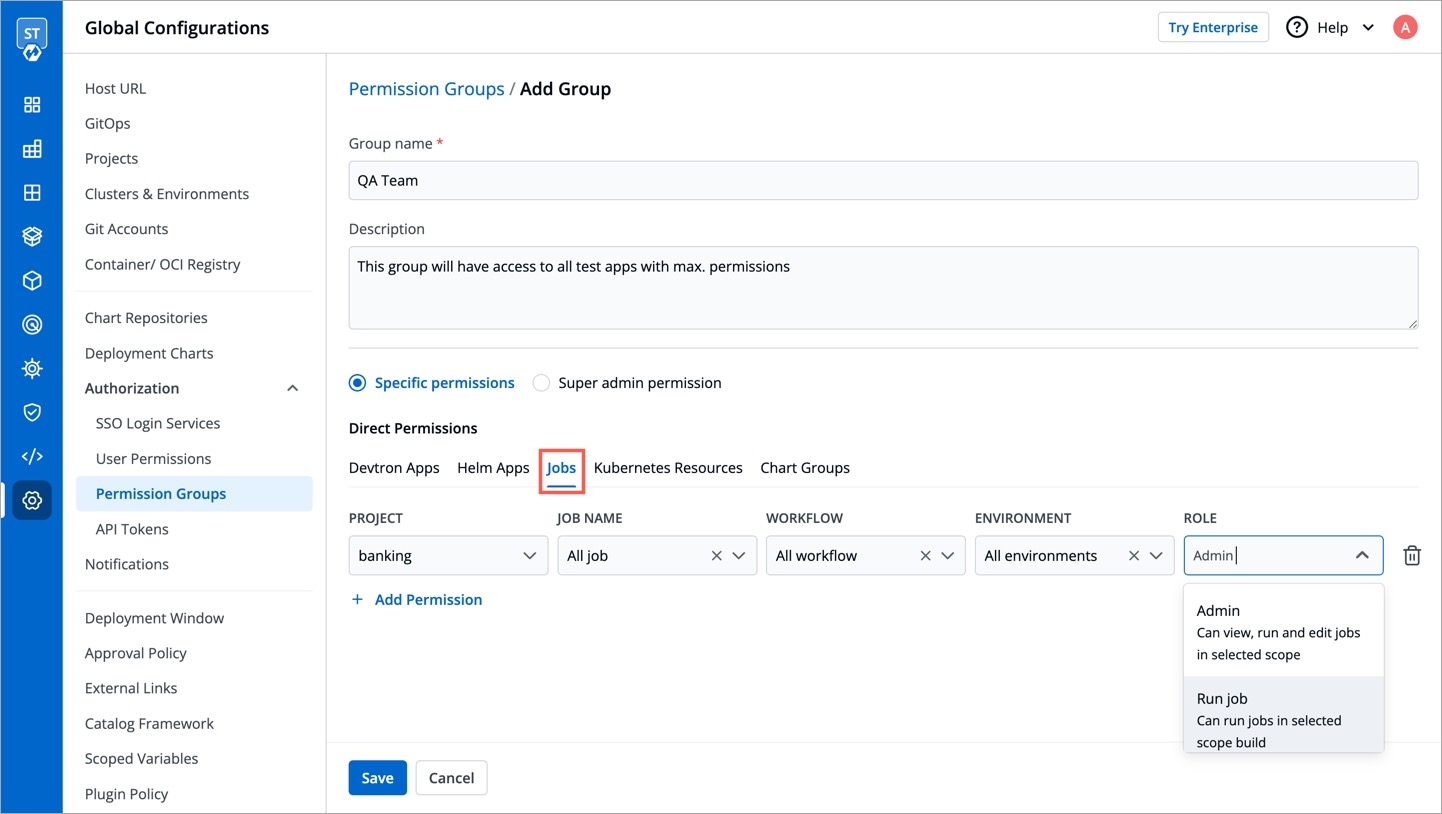
In Jobs option, you can provide access to a group to manage permission for jobs created using Devtron.
Provide the information in the following fields:
Project
Select a project from the drop-down list to which you want to give permission to the group. You can select only one project at a time.
Note: If you want to select more than one project, then click Add row.
Job Name
Select the specific job name or all jobs from the drop-down list.
Note: If you select All Jobs option, then the user gets access to all the current jobs including any new job which gets associated with the project later.
Workflow
Select the specific workflow or all workflows from the drop-down list.
Note: If you select All Workflows option, then the user gets access to all the current workflows including any new workflow which gets associated with the project later.
Environment
Select the specific environment or all environments from the drop-down list.
Note: If you select All environments option, then the user gets access to all the current environments including any new environment which gets associated with the project later.
Role
View only
Run job
Admin
You can add multiple rows for Jobs permission.
Once you have finished assigning the appropriate permissions for the groups, Click Save.
In Kubernetes Resources option, you can provide permission to view, inspect, manage, and delete resources in your clusters from Kubernetes Resource Browser page in Devtron. You can also create resources from the Kubernetes Resource Browser page.
Only super admin users will be able to see Kubernetes Resources tab and provide permission to other users to access Resource Browser.
To provide Kubernetes resource permission, click Add permission.
On the Kubernetes resource permission, provide the information in the following fields:
Cluster
Select a cluster from the drop-down list to which you want to give permission to the user. You can select only one cluster at a time.
Note: To add another cluster, then click Add another.
Namespace
Select the namespace from the drop-down list.
API Group
Select the specific API group or All API groups from the drop-down list corresponding to the K8s resource.
Kind
Select the kind or All kind from the drop-down list corresponding to the K8s resource.
Resource name
Select the resource name or All resources from the drop-down list to which you want to give permission to the user.
Role
View
Admin
You can add multiple rows for Kubernetes resource permission.
Once you have finished assigning the appropriate permissions for the groups, Click Save.
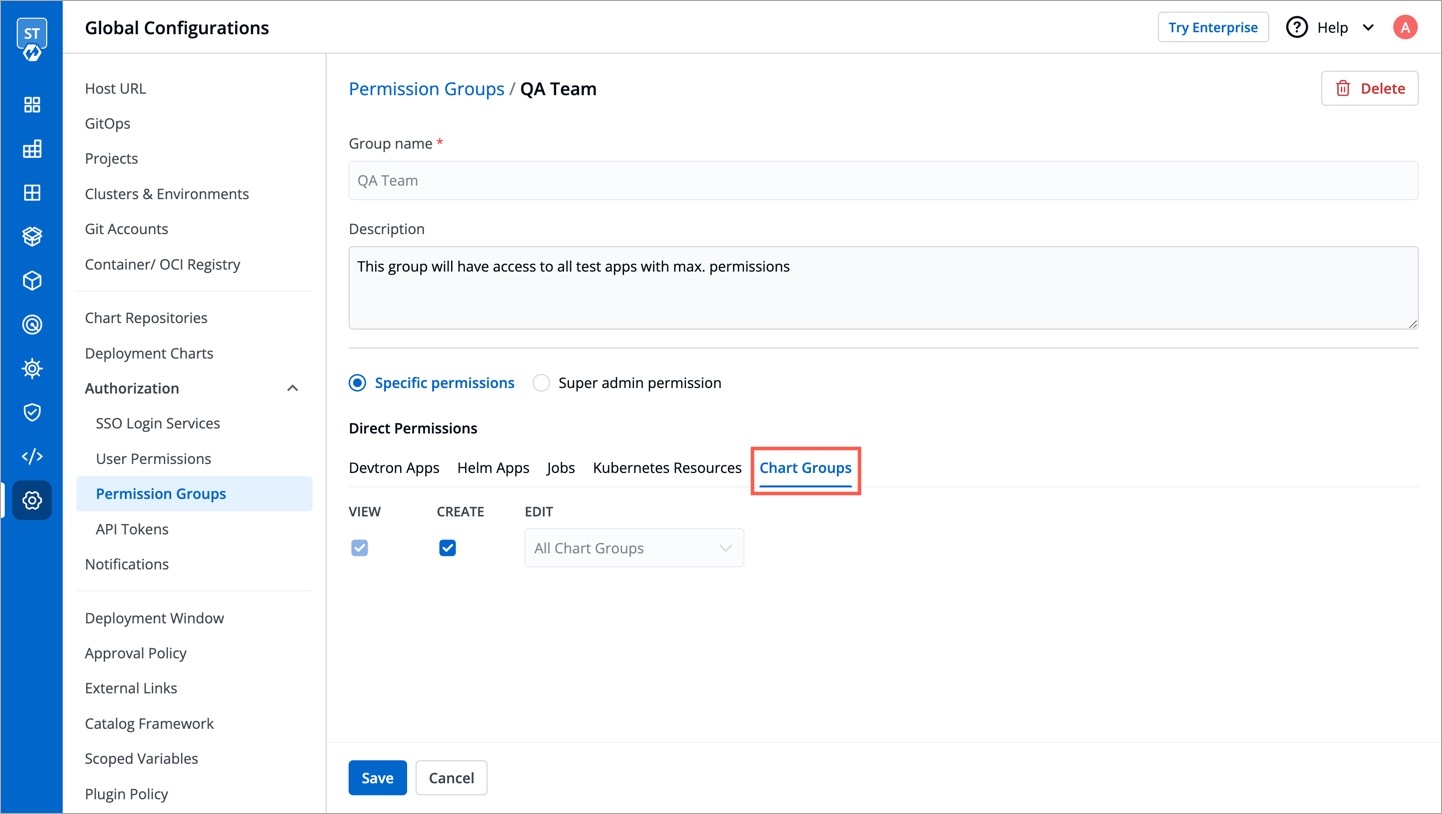
In Chart group permission option, you can manage the access of groups for Chart Groups in your project.
The Chart group permission option will be available only if you install CI/CD integration.
You can only give users the ability to create or edit, not both.
View
Enable View to view chart groups only.
Create
Enable Create if you want the users to create, view, edit or delete the chart groups.
Edit
Deny: Select Deny option from the drop-down list to restrict the users to edit the chart groups.
Specific chart groups: Select the Specific Charts Groups option from the drop-down list and then select the chart group for which you want to allow users to edit.
Click Save once you have configured all the required permissions for the groups.
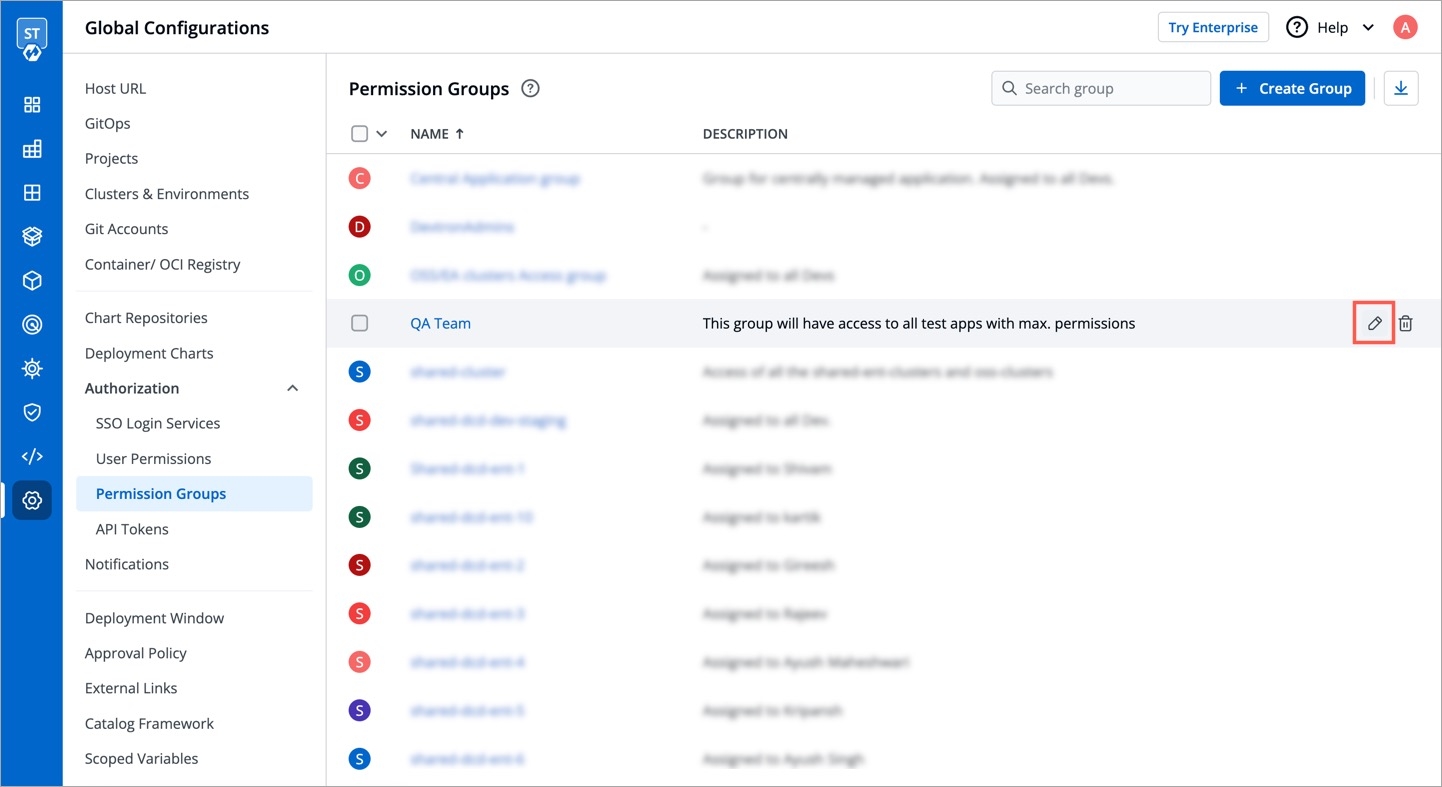
You can edit the permission groups by clicking the downward arrow.
Edit the permission group.
Once you are done editing the permission group, click Save.
If you want to delete the groups with particular permission group, click Delete.
Select one of the to which you want to give permission to the user:
Select one of the to which you want to give permission to the user:
Select one of the to which you want to give permission to the user:
Select one of the to which you want to give permission to the user and click Done:

