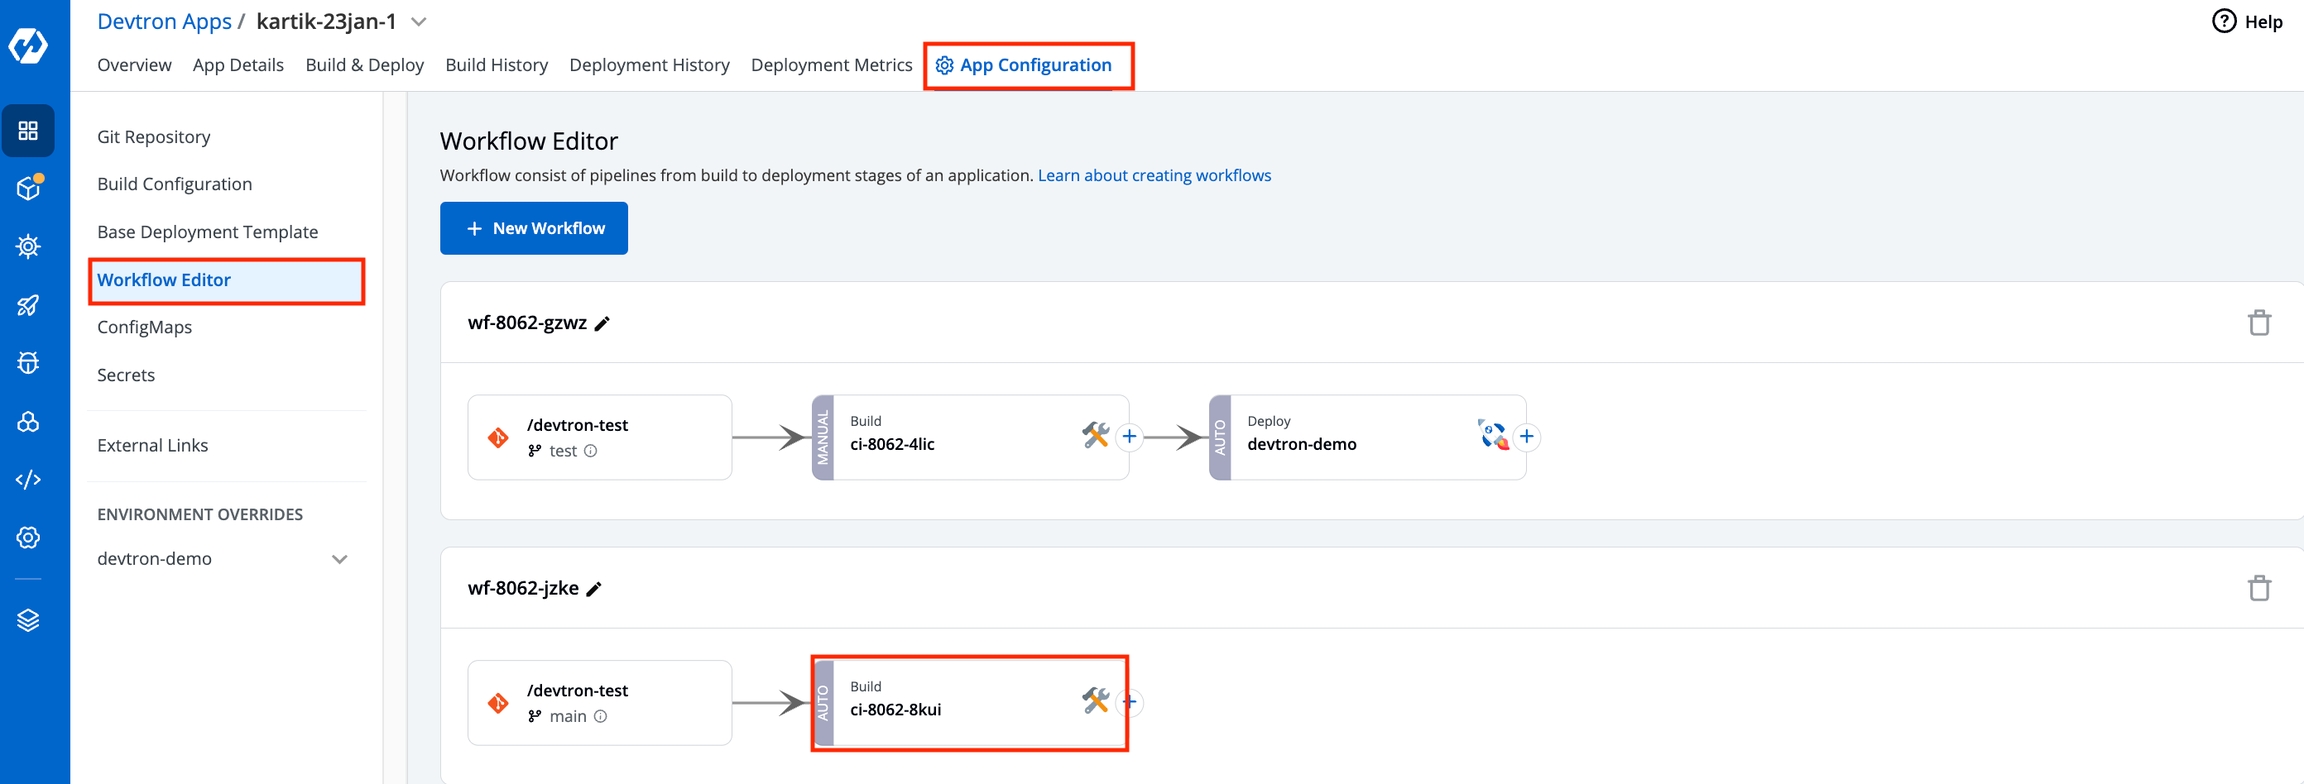
The CI pipeline includes Pre and Post-build steps to validate and introduce checkpoints in the build process. The pre/post plugins allow you to execute some standard tasks, such as Code analysis, Load testing, Security scanning etc. You can build custom pre-build/post-build tasks or select one of the standard preset plugins provided by Devtron.
Preset plugin is an API resource which you can add within the CI build environment. By integrating the preset plugin in your application, it helps your development cycle to keep track of finding bugs, code duplication, code complexity, load testing, security scanning etc. You can analyze your code easily.
Devtron CI pipeline includes the following build stages:
Pre-Build Stage: The tasks in this stage run before the image is built.
Build Stage: In this stage, the build is triggered from the source code (container image) that you provide.
Post-Build Stage: The tasks in this stage are triggered once the build is complete.
Make sure you have CI build pipeline before you start configuring Pre-Build or Post-Build tasks.
Each Pre/Post-build stage is executed as a series of events called tasks and includes custom scripts. You can create one or more tasks that are dependent on one another for execution. In other words, the output variable of one task can be used as an input for the next task to build a CI runner. The tasks will run following the execution order.
The tasks can be re-arranged by drag-and-drop; however, the order of passing the variables must be followed.
You can create a task either by selecting one of the available preset plugins or by creating a custom script.
Pre-Build/Post-Build
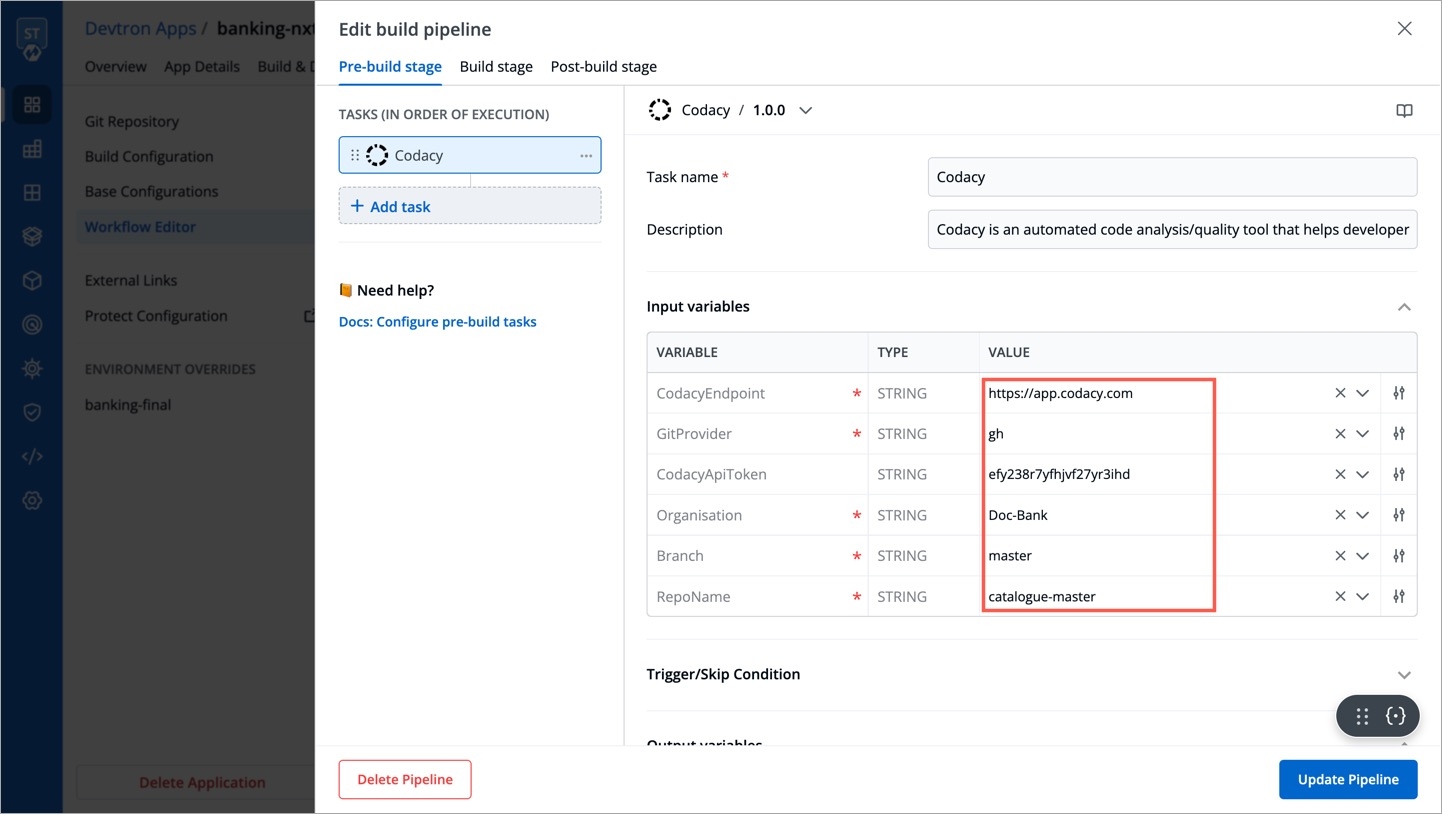
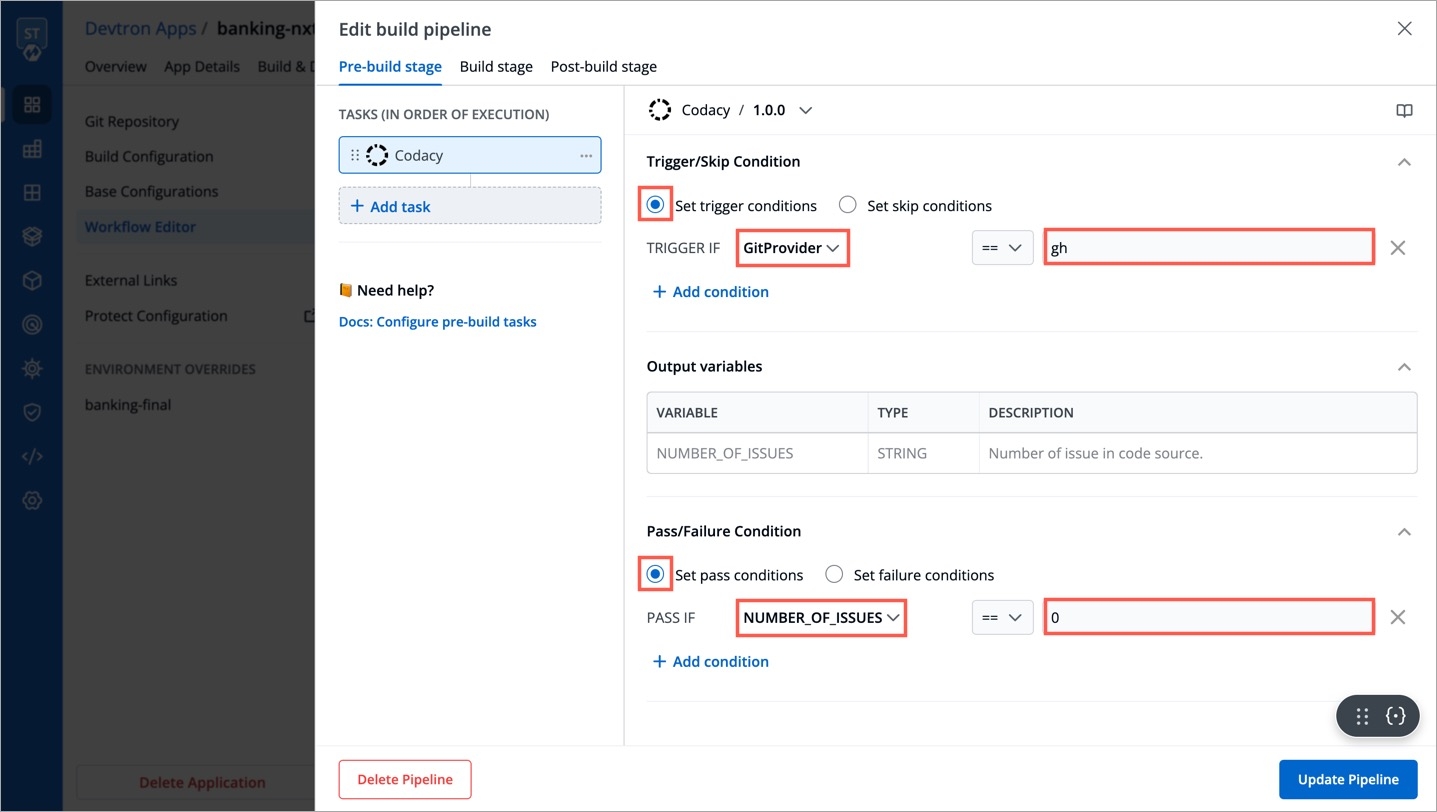
Lets take Codacy as an example and configure it in the Pre-Build stage in the CI pipeline for finding bugs, detecting dependency vulnerabilities, and enforcing code standards.
Go to the Applications and select your application from the Devtron Apps tabs.
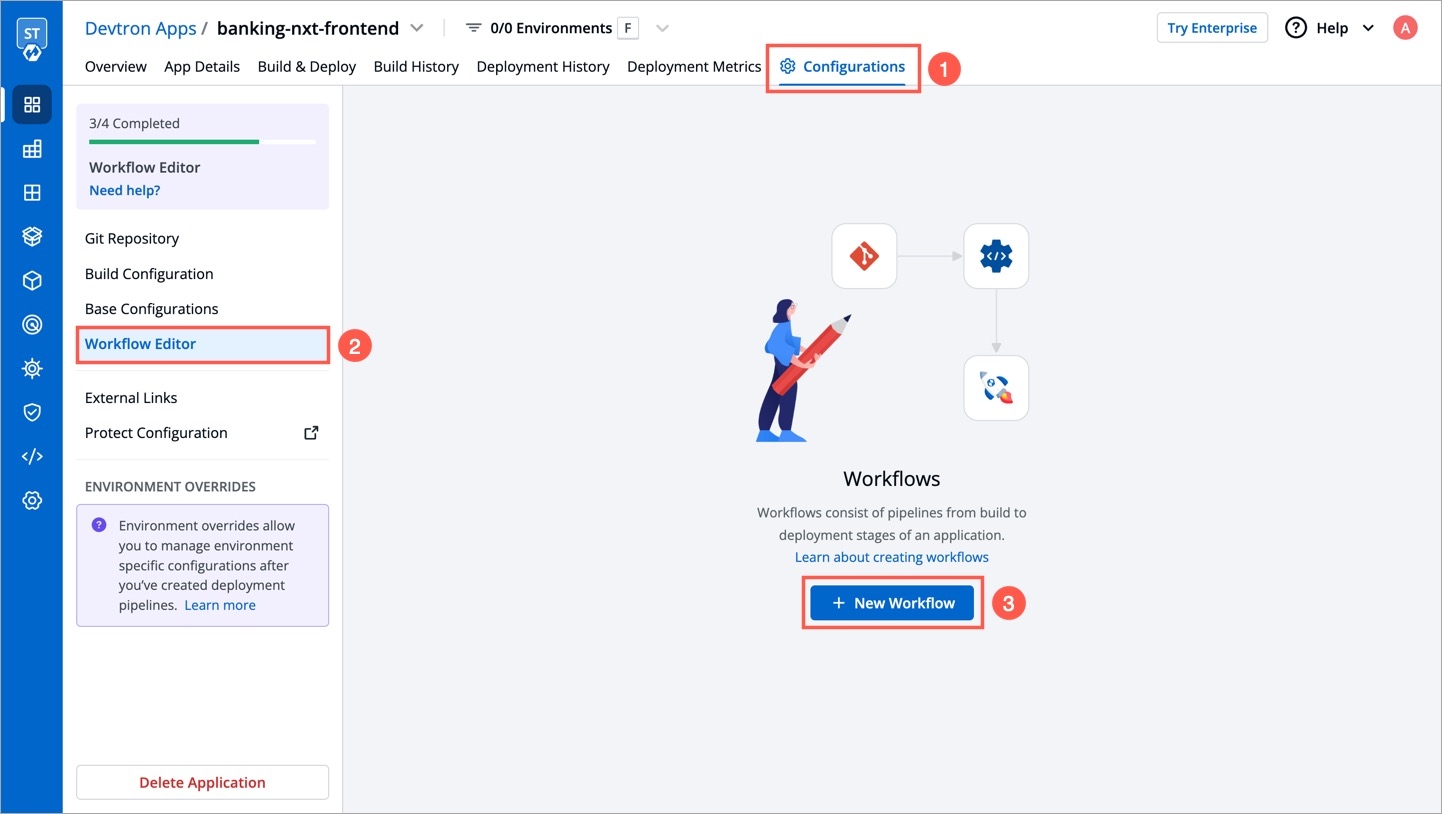
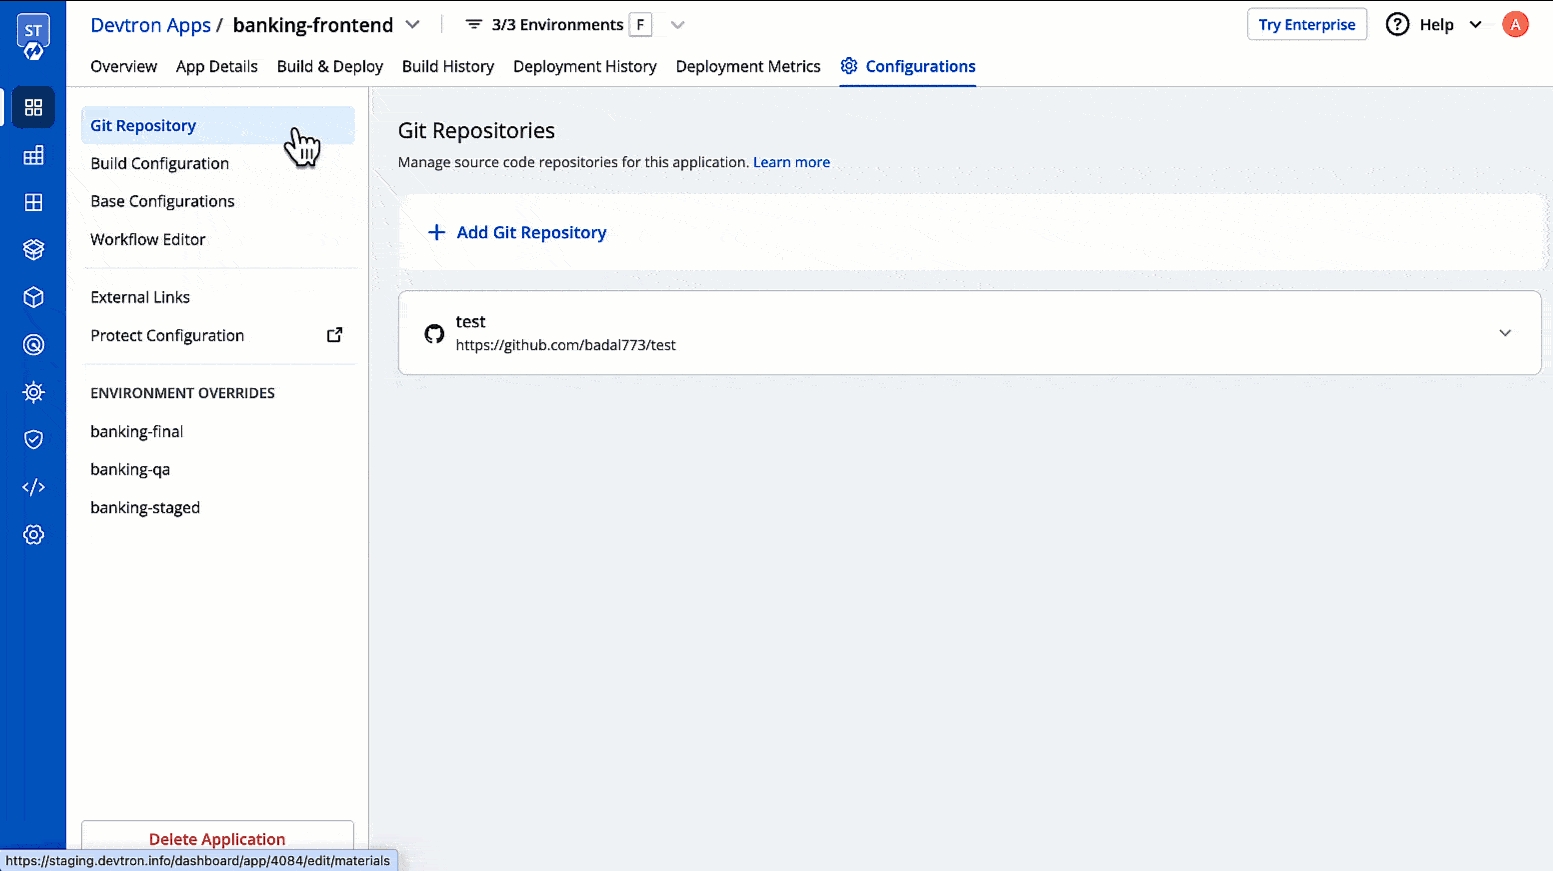
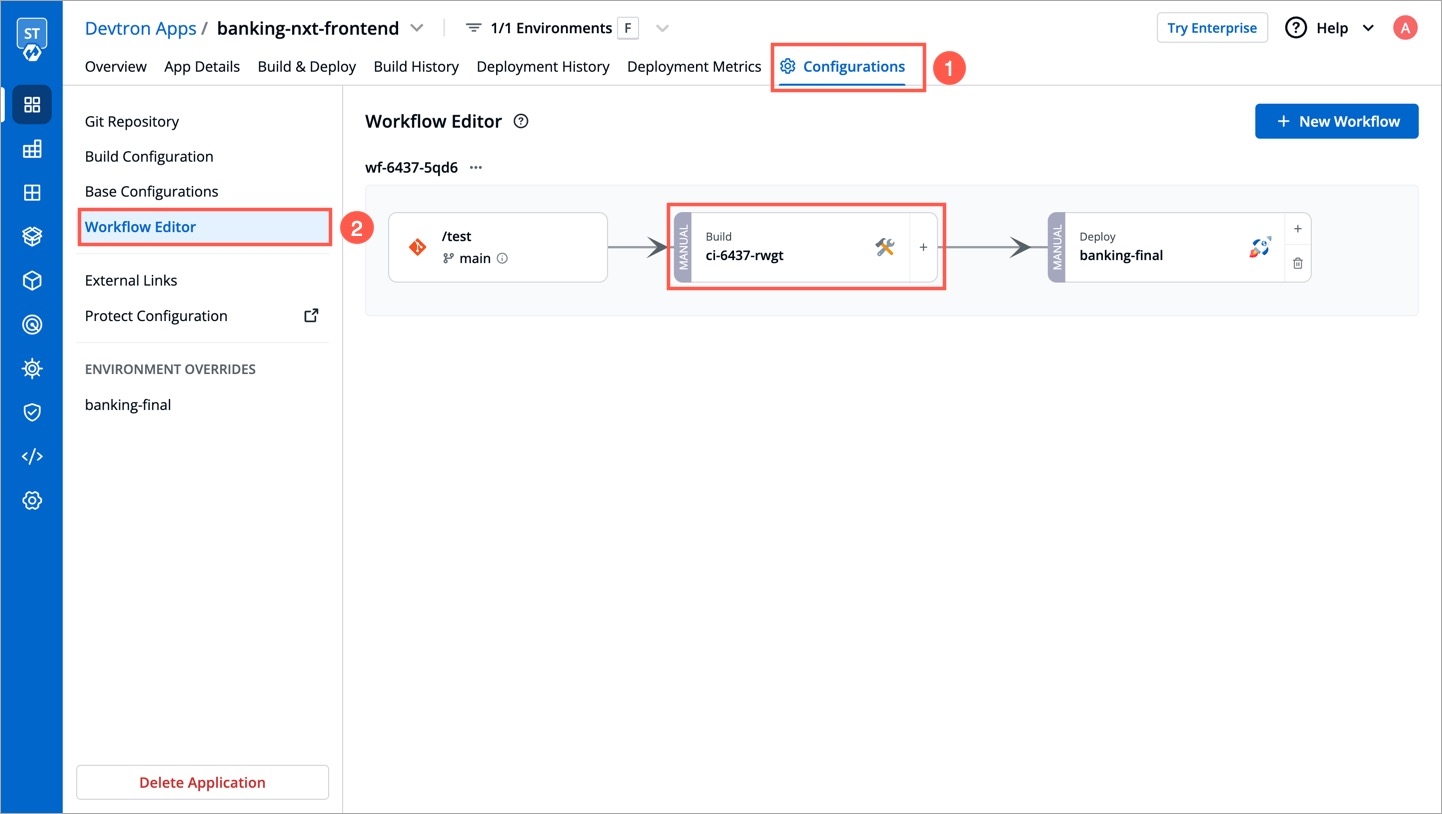
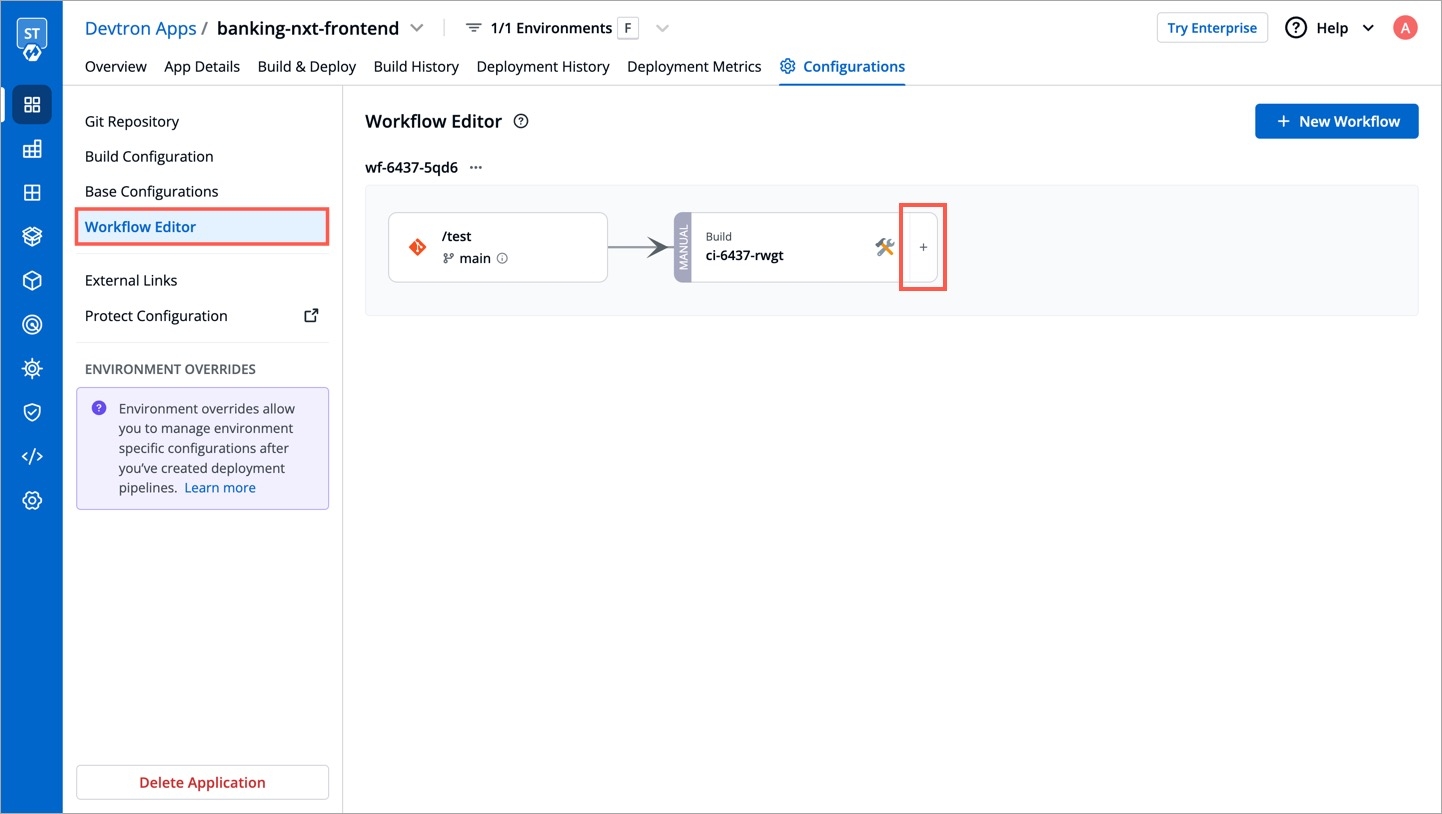
Go to the App Configuration tab, click Workflow Editor.
Select the build pipeline for configuring the pre/post-build tasks.
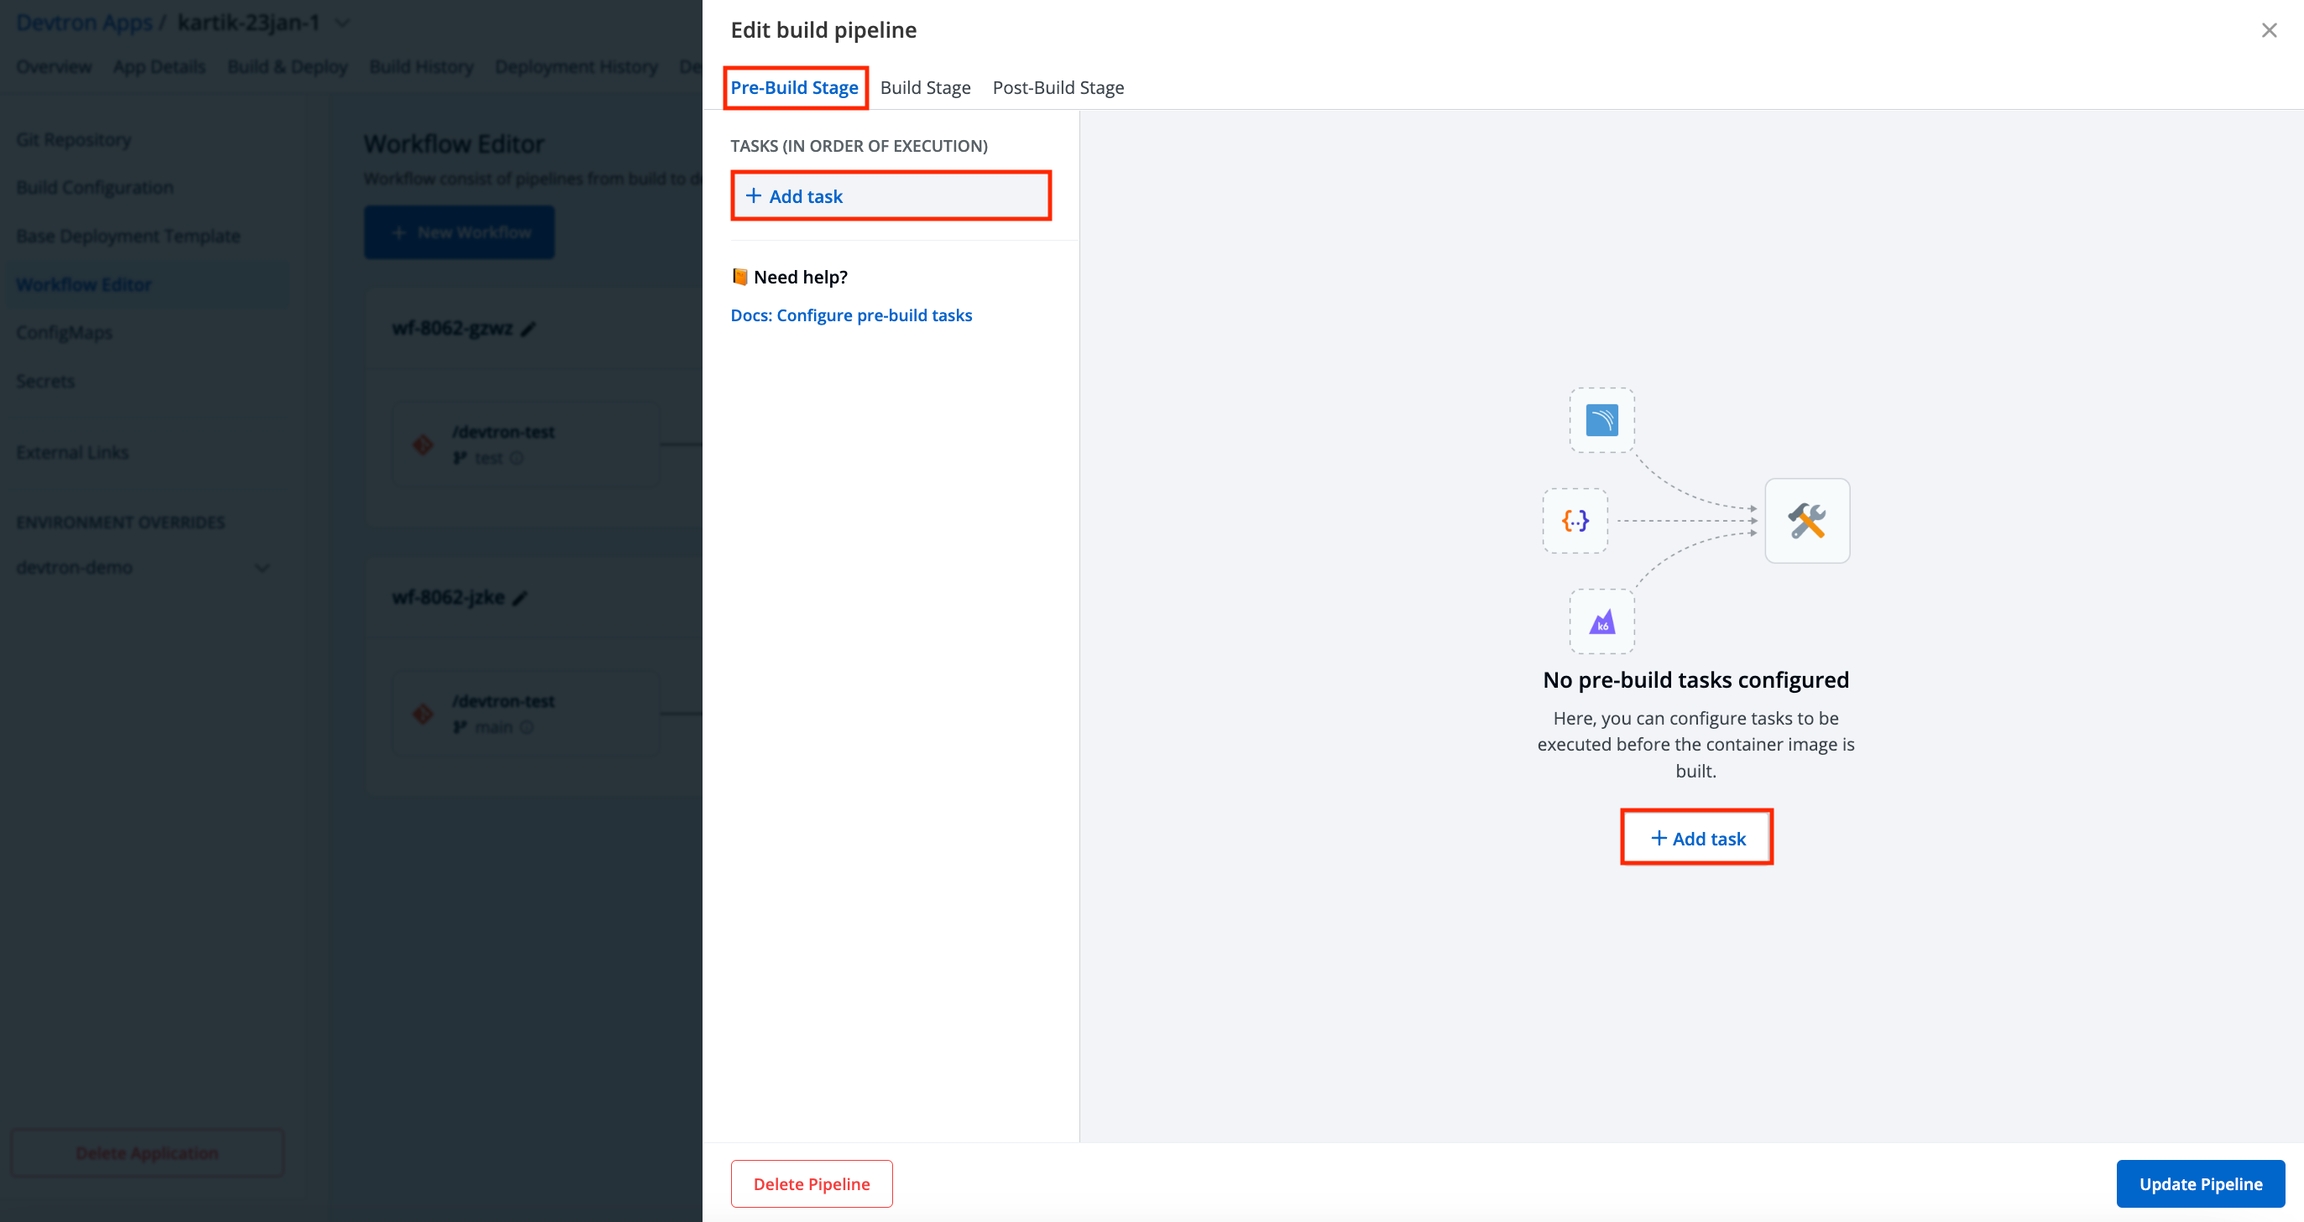
On the Edit build pipeline, in the Pre-Build Stage, click + Add task.
Select Codacy from PRESET PLUGINS.
Enter a relevant name or codacy in the Task name field. It is a mandatory field.
Enter a descriptive message for the task in the Description field. It is an optional field.
Note: The description is available by default.
In the Input Variables, provide the information in the following fields:
CodacyEndpoint
String
API endpoint for Codacy
GitProvider
String
Git provider for the scanning
CodacyApiToken
String
API token for Codacy. If it is provided, it will be used, otherwise it will be picked from Global secret (CODACY_API_TOKEN)
Organisation
String
Your Organization for Codacy
RepoName
String
Your Repository name
Branch
String
Your branch name
In Trigger/Skip Condition, set the trigger conditions to execute a task or Set skip conditions. As an example: CodacyEndpoint equal to https://app.codacy.com.
Note: You can set more than one condition.
In Pass/Failure Condition set the conditions to execute pass or fail of your build. As an example: Pass if number of issues equal to zero.
Note: You can set more than one condition.
Click Update Pipeline.
Go to the Build & Deploy, click the build pipeline and start your build.
Click Details on the build pipeline and you can view the details on the Logs.
On the Edit build pipeline screen, select the Pre-build stage.
Select + Add task.
Select Execute custom script.
The task type of the custom script may be a Shell or a Container image.
Select the Task type as Shell.
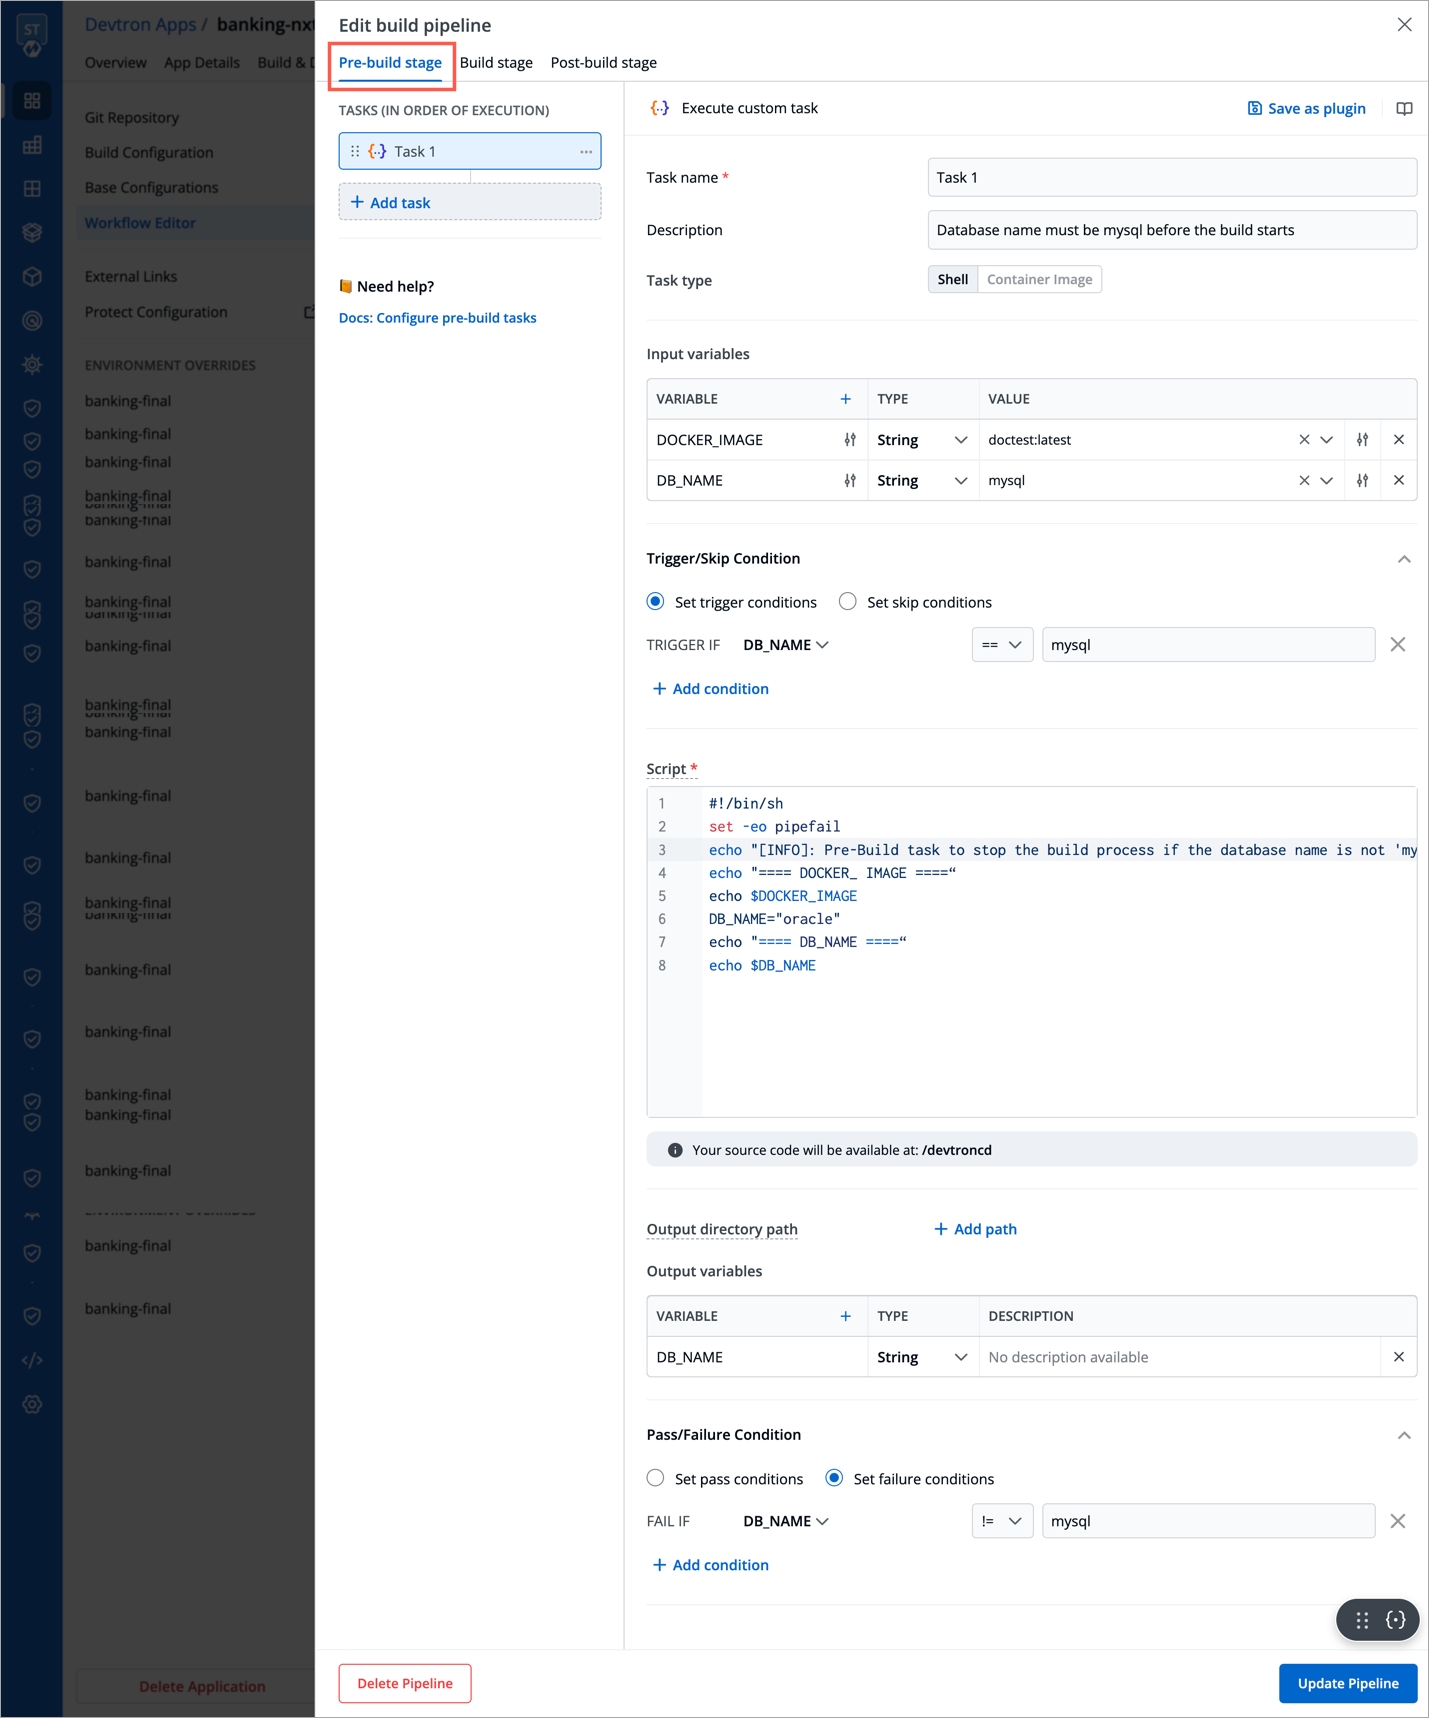
Consider an example that creates a Shell task to stop the build if the database name is not "mysql". The script takes 2 input variables, one is a global variable (DOCKER_IMAGE), and the other is a custom variable (DB_NAME) with a value "mysql". The task triggers only if the database name matches "mysql". If the trigger condition fails, this Pre-build task will be skipped and the build process will start. The variable DB_NAME is declared as an output variable that will be available as an input variable for the next task. The task fails if DB_NAME is not equal to "mysql".
Task name
Required
A relevant name for the task
Description
Optional
A descriptive message for the task
Task type
Optional
Shell: Custom shell script goes here
Input variables
Optional
Variable name: Alphanumeric chars and (_) only
Source or input value: The variable's value can be global, output from the previous task, or a custom value. Accepted data types include: STRING | BOOL | NUMBER | DATE
Description: Relevant message to describe the variable.
Trigger/Skip condition
Optional
A conditional statement to execute or skip the task
Script
Required
Custom script for the Pre/Post-build tasks
Output directory path
Optional
Output variables
Optional
Environment variables that are passed as input variables for the next task.
Pass/Failure Condition (Optional): Conditional statements to determine the success/failure of the task. A failed condition stops the execution of the next task and/or build process
Select Update Pipeline.
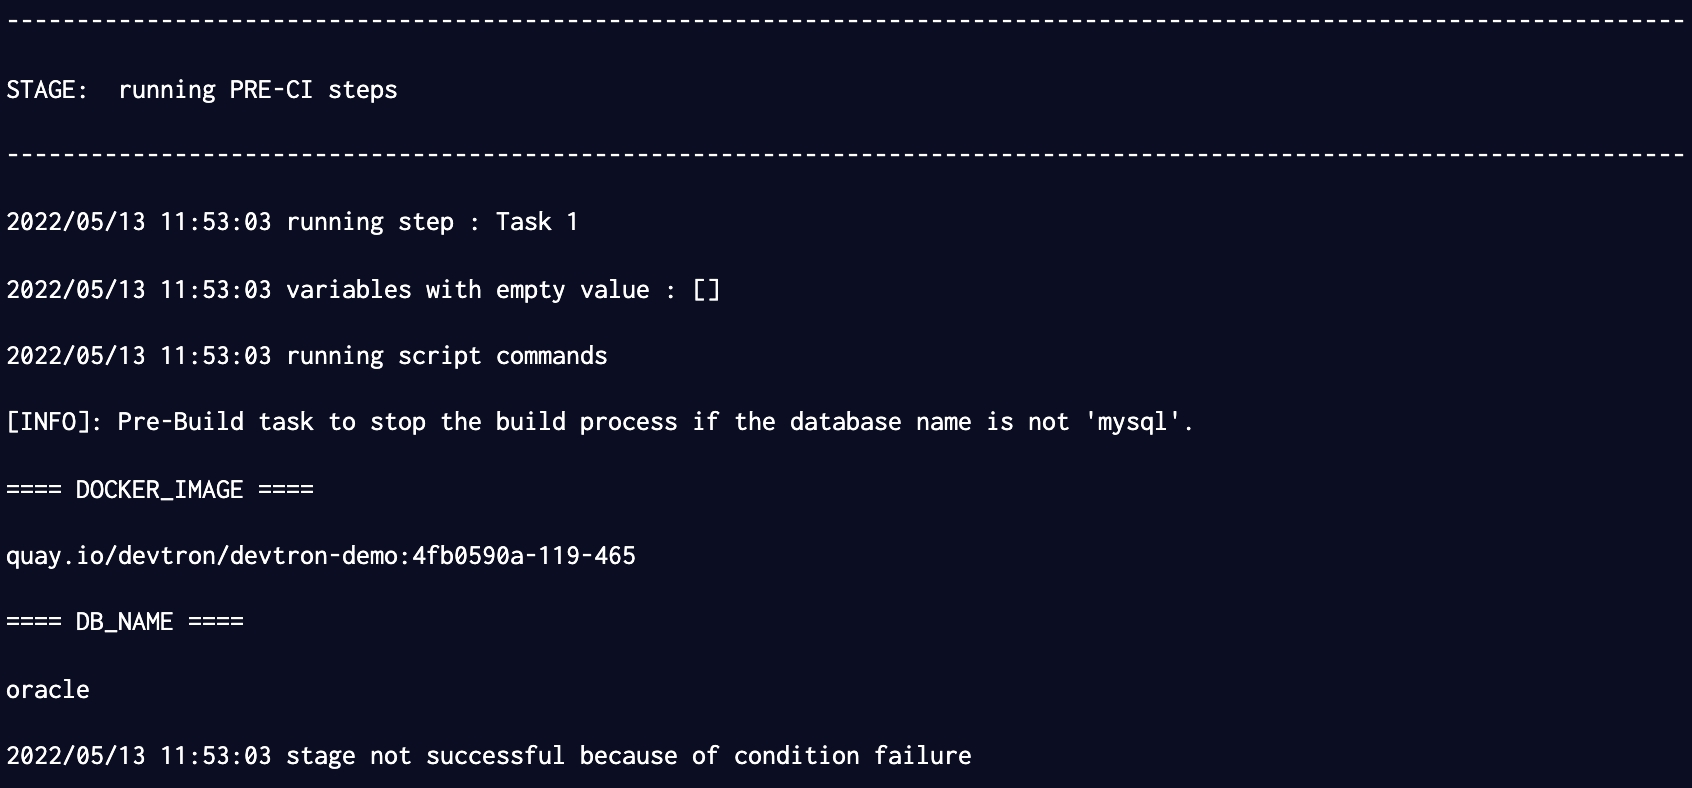
Here is a screenshot with the failure message from the task:
Select the Task type as Container image.
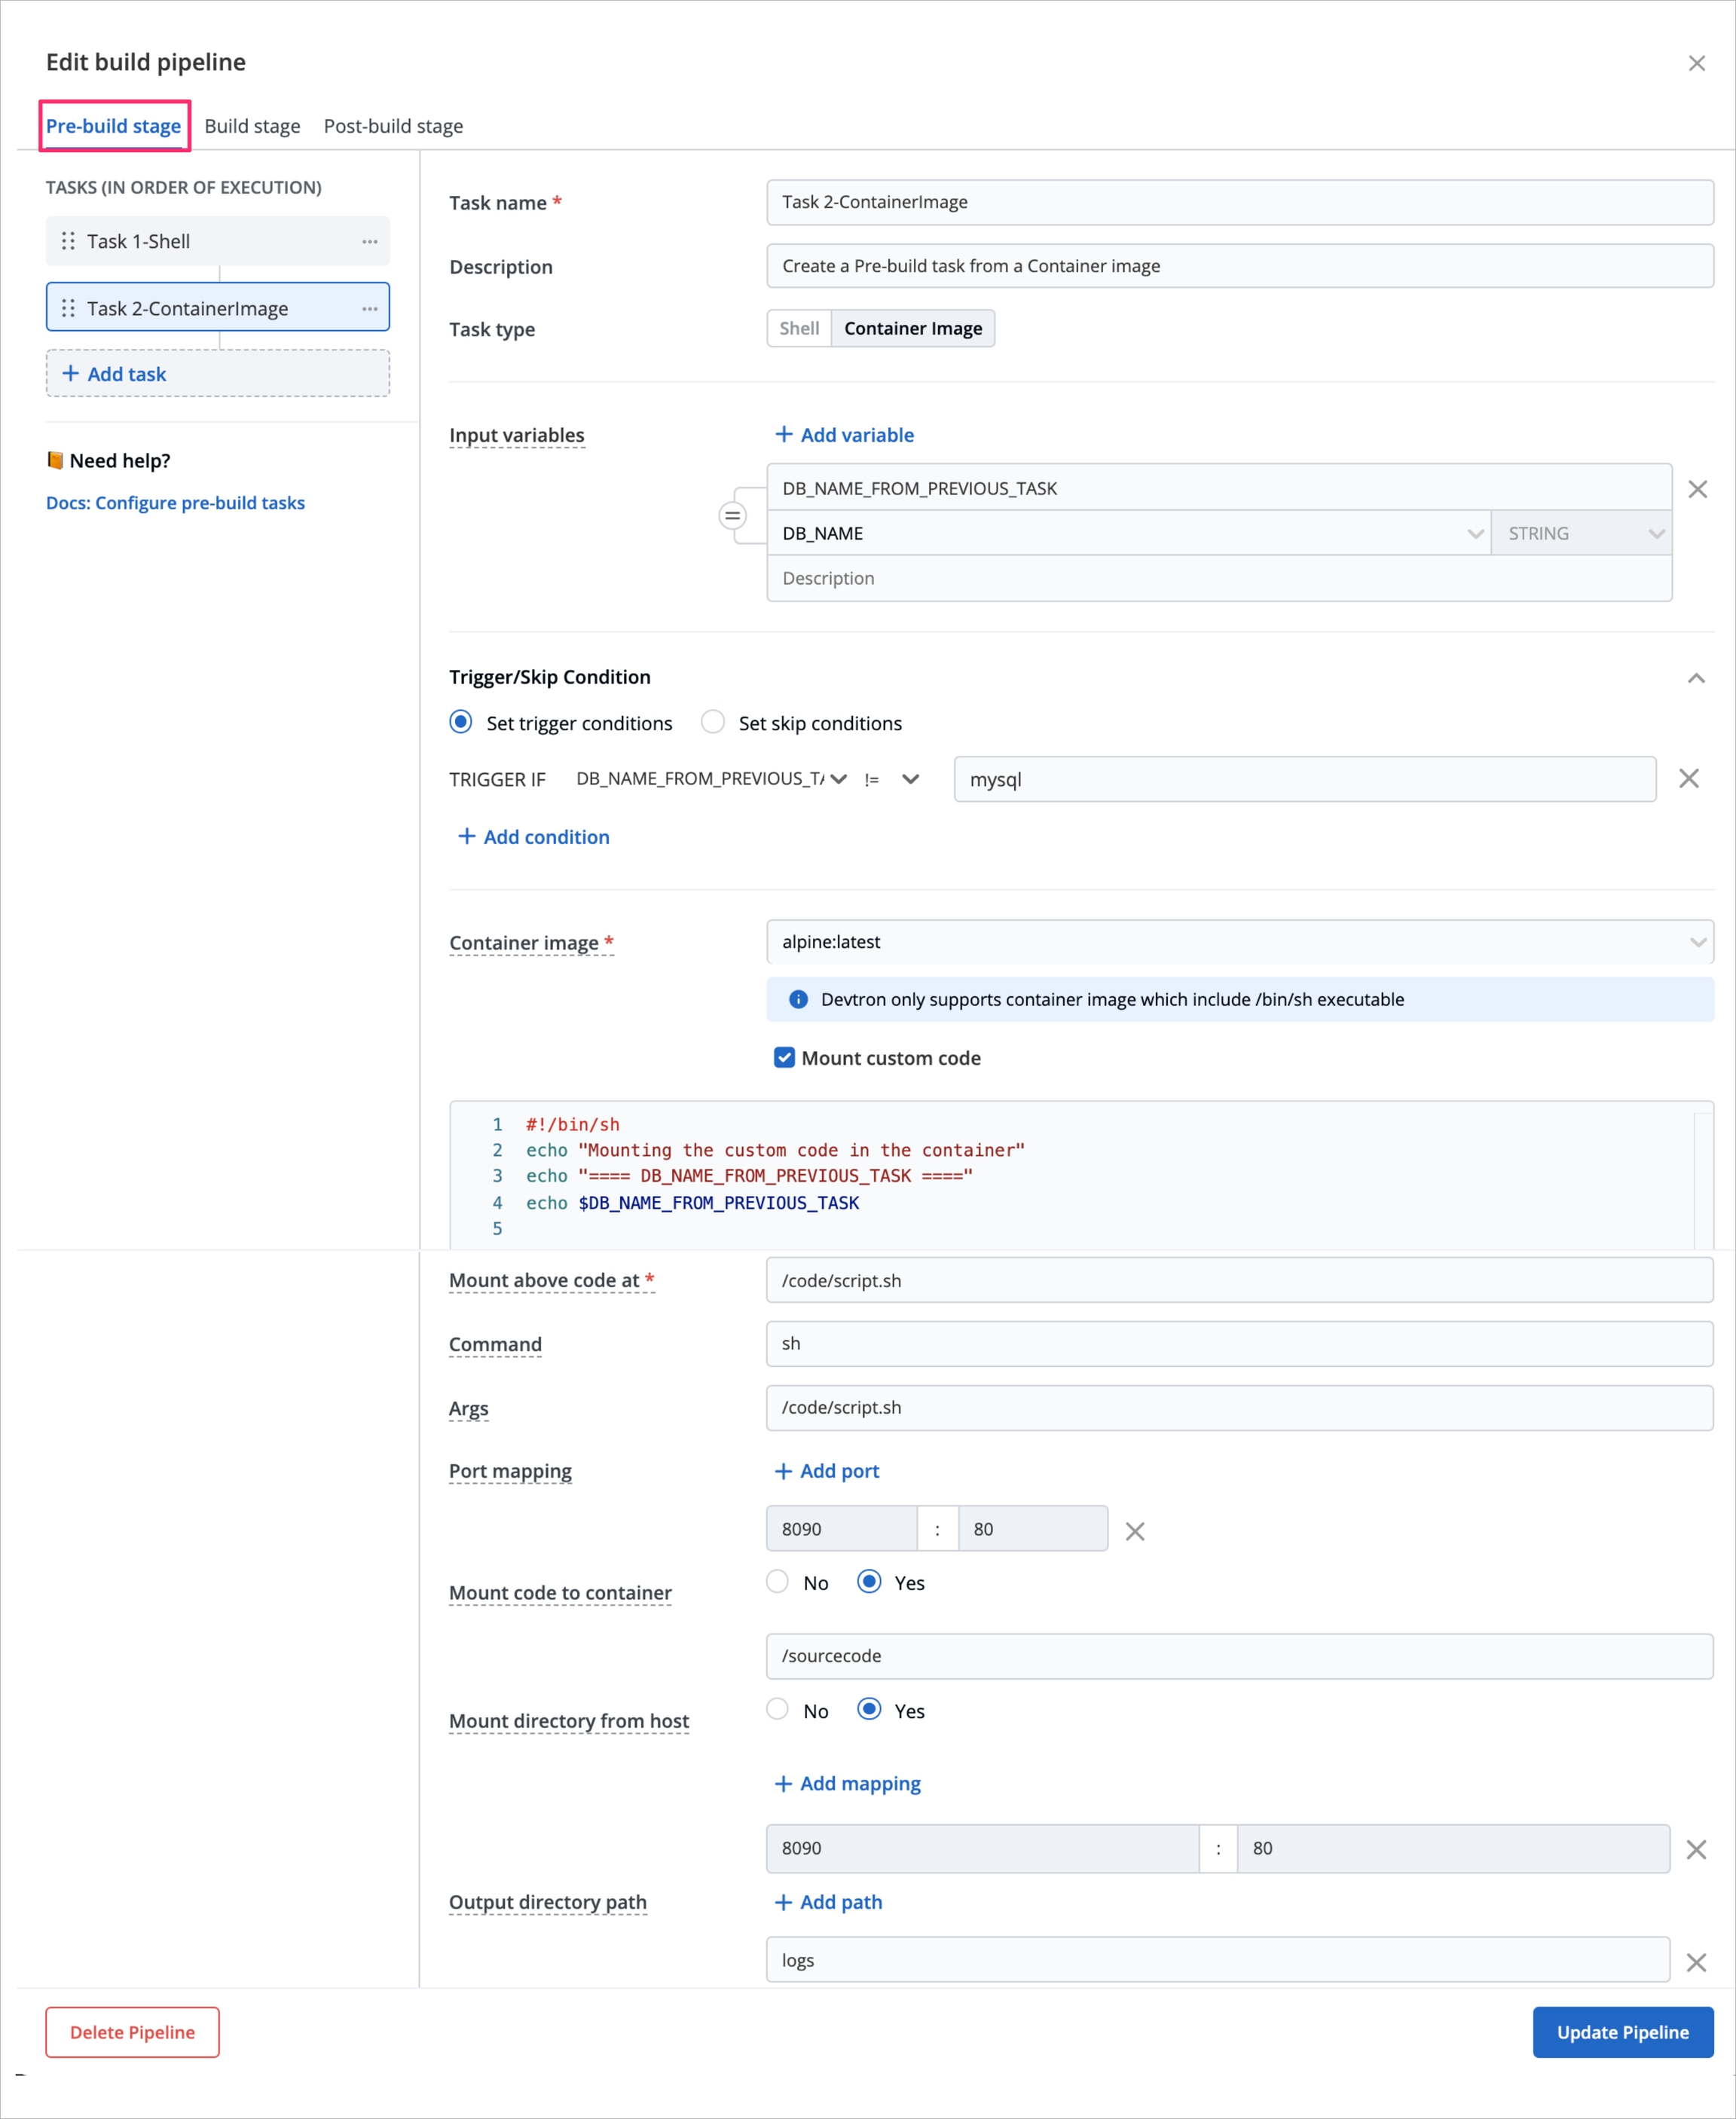
This example creates a Pre-build task from a container image. The output variable from the previous task is available as an input variable.
Task name
Required
A relevant name for the task
Description
Optional
A descriptive message for the task
Task type
Optional
Container image
Input variables
Optional
Variable name: Alphanumeric chars and (_) only
Source or input value: The variable's value can be global, output from the previous task, or a custom value Accepted data types include: STRING | BOOL | NUMBER | DATE
Description: Relevant message to describe the variable
Trigger/Skip condition
Optional
A conditional statement to execute or skip the task
Container image
Required
Select an image from the drop-down list or enter a custom value in the format <image>:<tag>
Mount custom code
Optional
Enable to mount the custom code in the container. Enter the script in the box below.
Mount above code at (required): Path where the code should be mounted
Command
Optional
The command to be executed inside the container
Args
Optional
The arguments to be passed to the command mentioned in the previous field
Port mapping
Optional
The port number on which the container listens. The port number exposes the container to outside services.
Mount code to container
Optional
Mounts the source code inside the container. Default is "No". If set to "Yes", enter the path.
Mount directory from host
Optional
Mount any directory from the host into the container. This can be used to mount code or even output directories.
Output directory path
Optional
Directory path for the script output files such as logs, errors, etc.
Select Update Pipeline.
Go to Preset Plugins section to know more about the available plugins
Trigger the CI pipeline
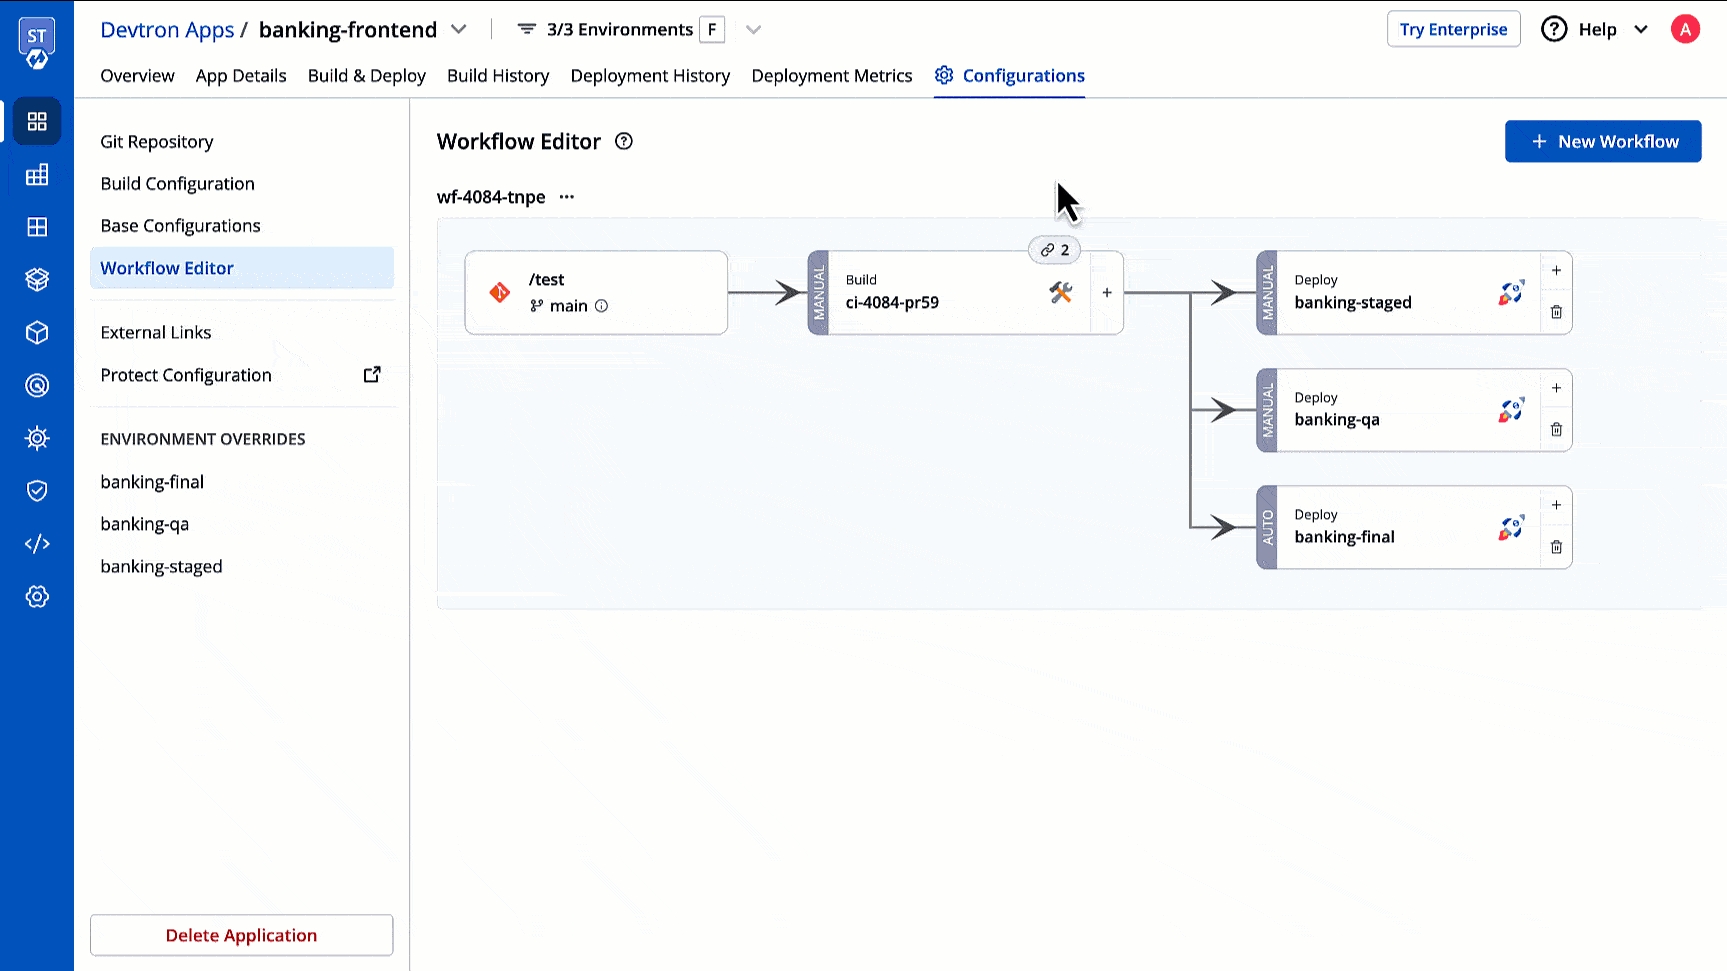
Workflow is a logical sequence of different stages used for continuous integration and continuous deployment of an application.
Click on New Build Pipeline to create a new workflow
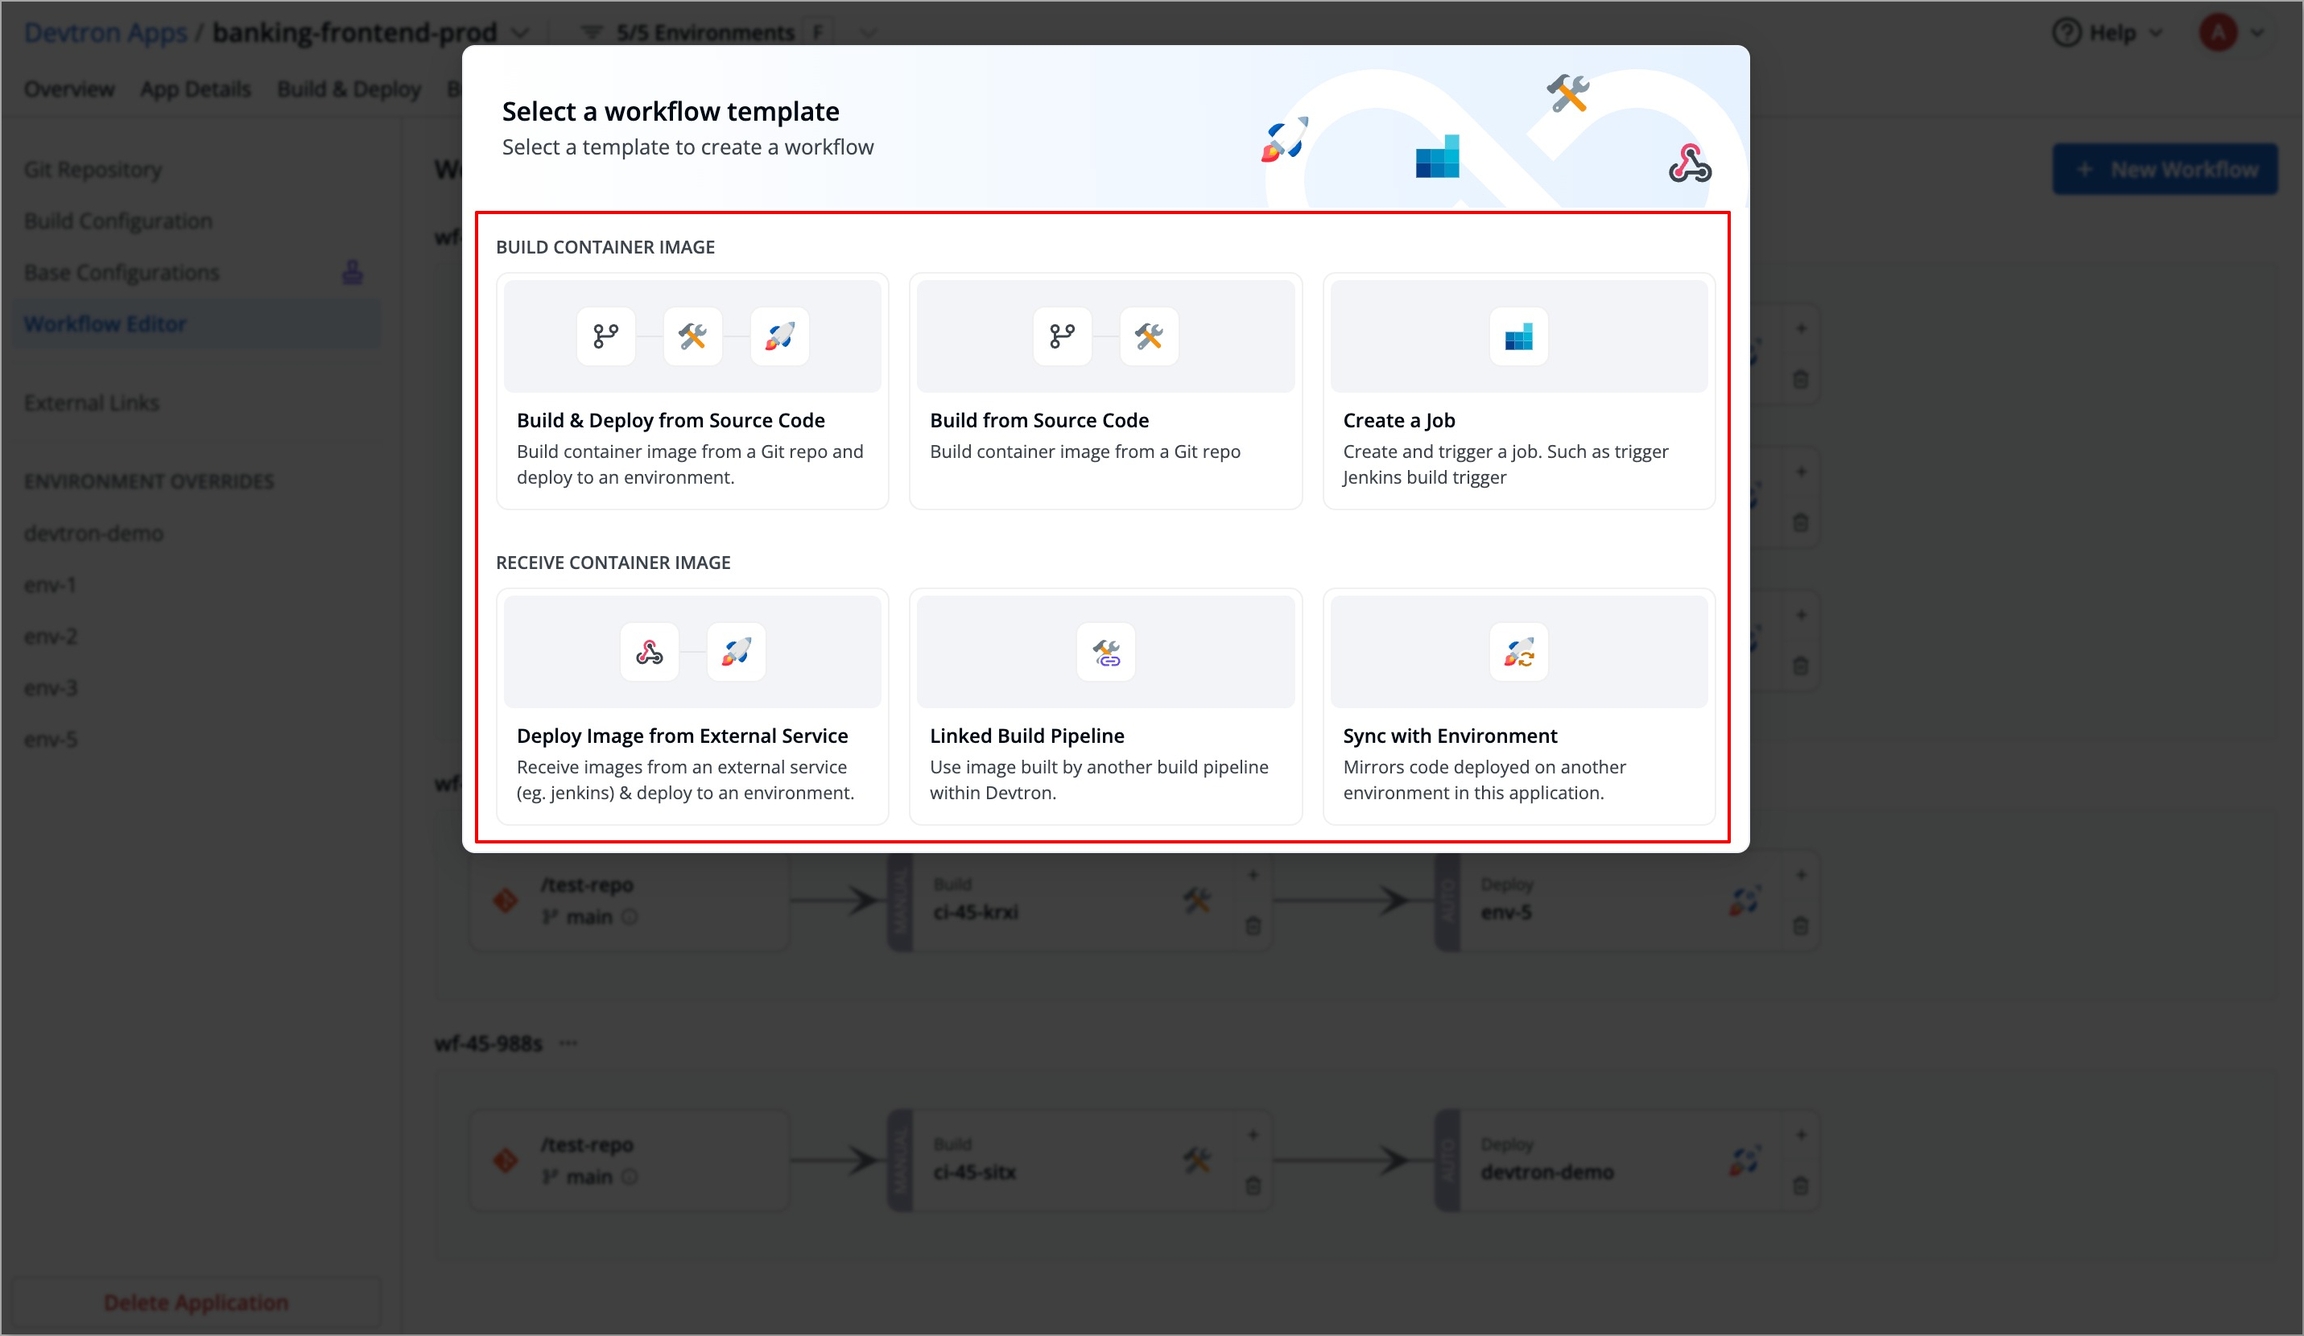
On clicking New Build Pipeline, three options appear as mentioned below:
Continuous Integration: Choose this option if you want Devtron to build the image of source code.
Linked CI Pipeline: Choose this option if you want to use an image created by an existing CI pipeline in Devtron.
Incoming Webhook: Choose this if you want to build your image outside Devtron, it will receive a docker image from an external source via the incoming webhook.
Then, create CI/CD Pipelines for your application.
To know how to create the CI pipeline for your application, click on: Create CI Pipelines
To know how to create the CD pipeline for your application, click on: Create CD Pipelines
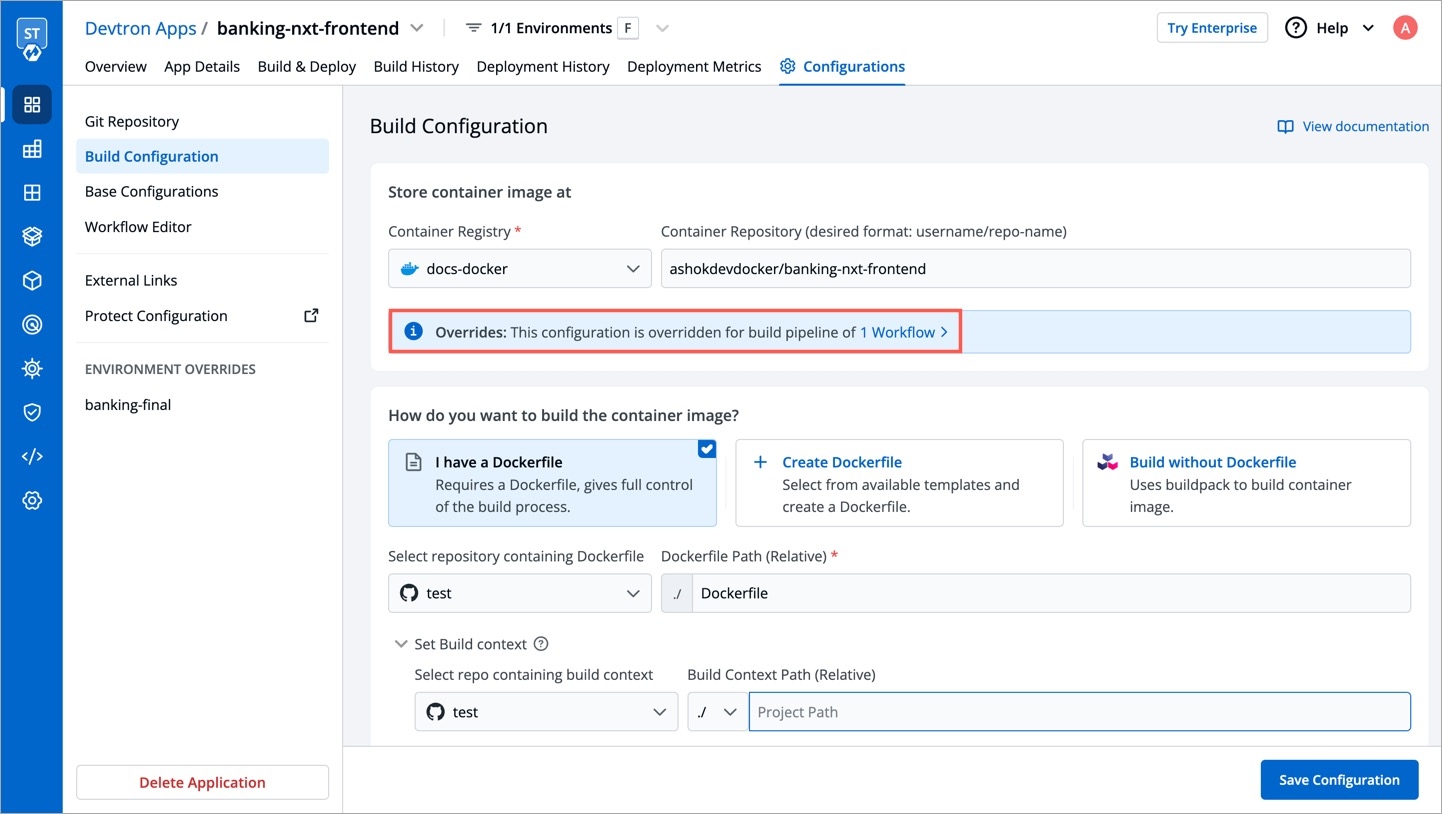
Within the same application, you can override a container registry, container image and target platform during the build pipeline, which means the images built for non-production environment can be included to the non-production registry and the images for production environment can be included to the production registry.
To override a container registry, container image or target platform:
Go to Applications and select your application from the Devtron Apps tabs.
On the App Configuration tab, select Workflow Editor.
Open the build pipeline of your application.
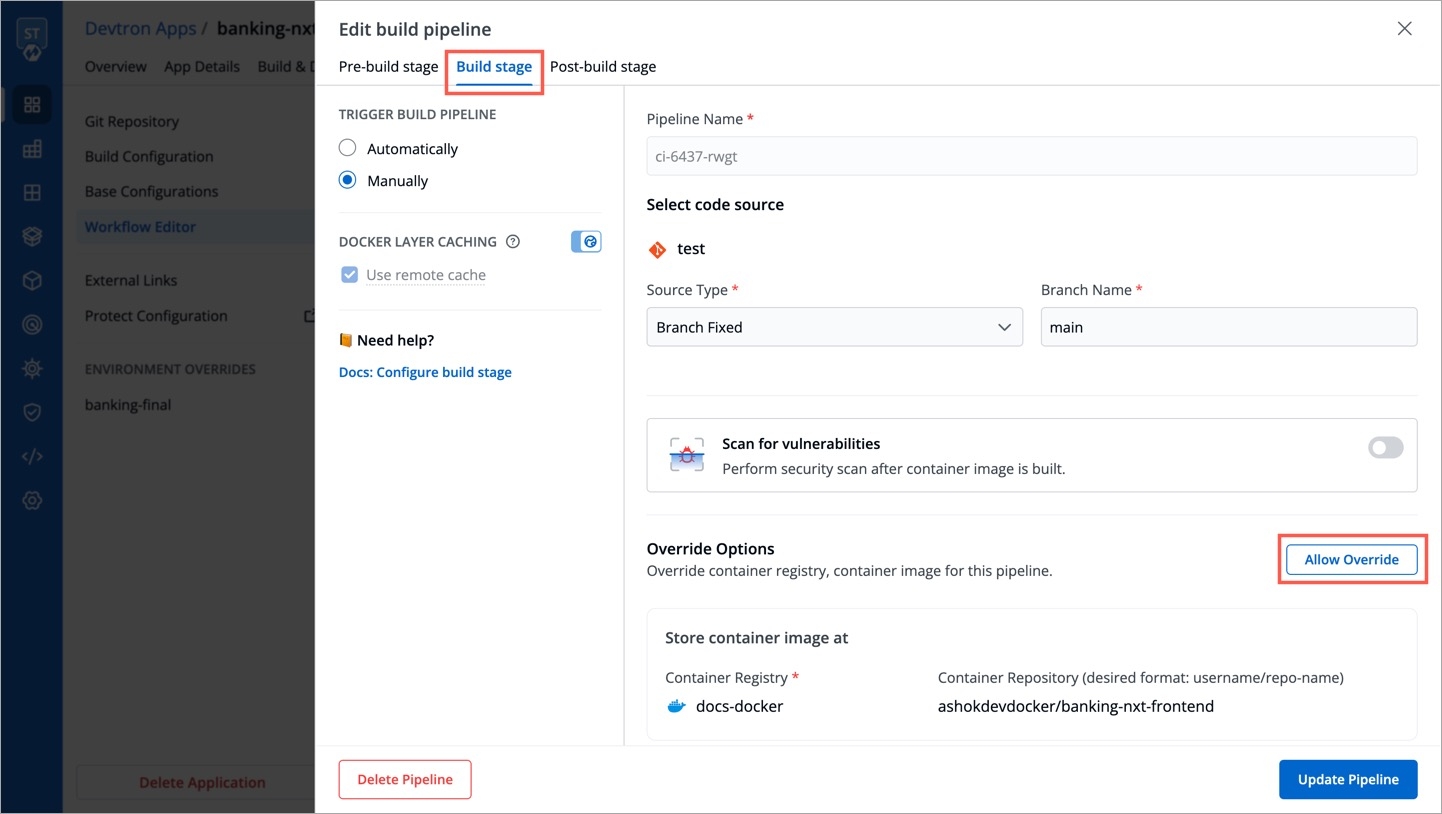
Click Allow Override to:
Select the new container registry from the drop-down list.
Or, create and build the new container image with different options.
Or, set a new target platform from the drop-down list or enter a new target platform.
Click Update Pipeline.
The overridden container registry/container image location/target platform will be reflected on the Build Configuration page. You can also see the number of build pipelines for which the container registry/container image location/target platform is overridden.
Create a task using one of the integrated in Devtron:
Create a task from which you can customize your script with:
Or,
For Devtron version older than v0.4.0, please refer the CI Pipeline (legacy) page.
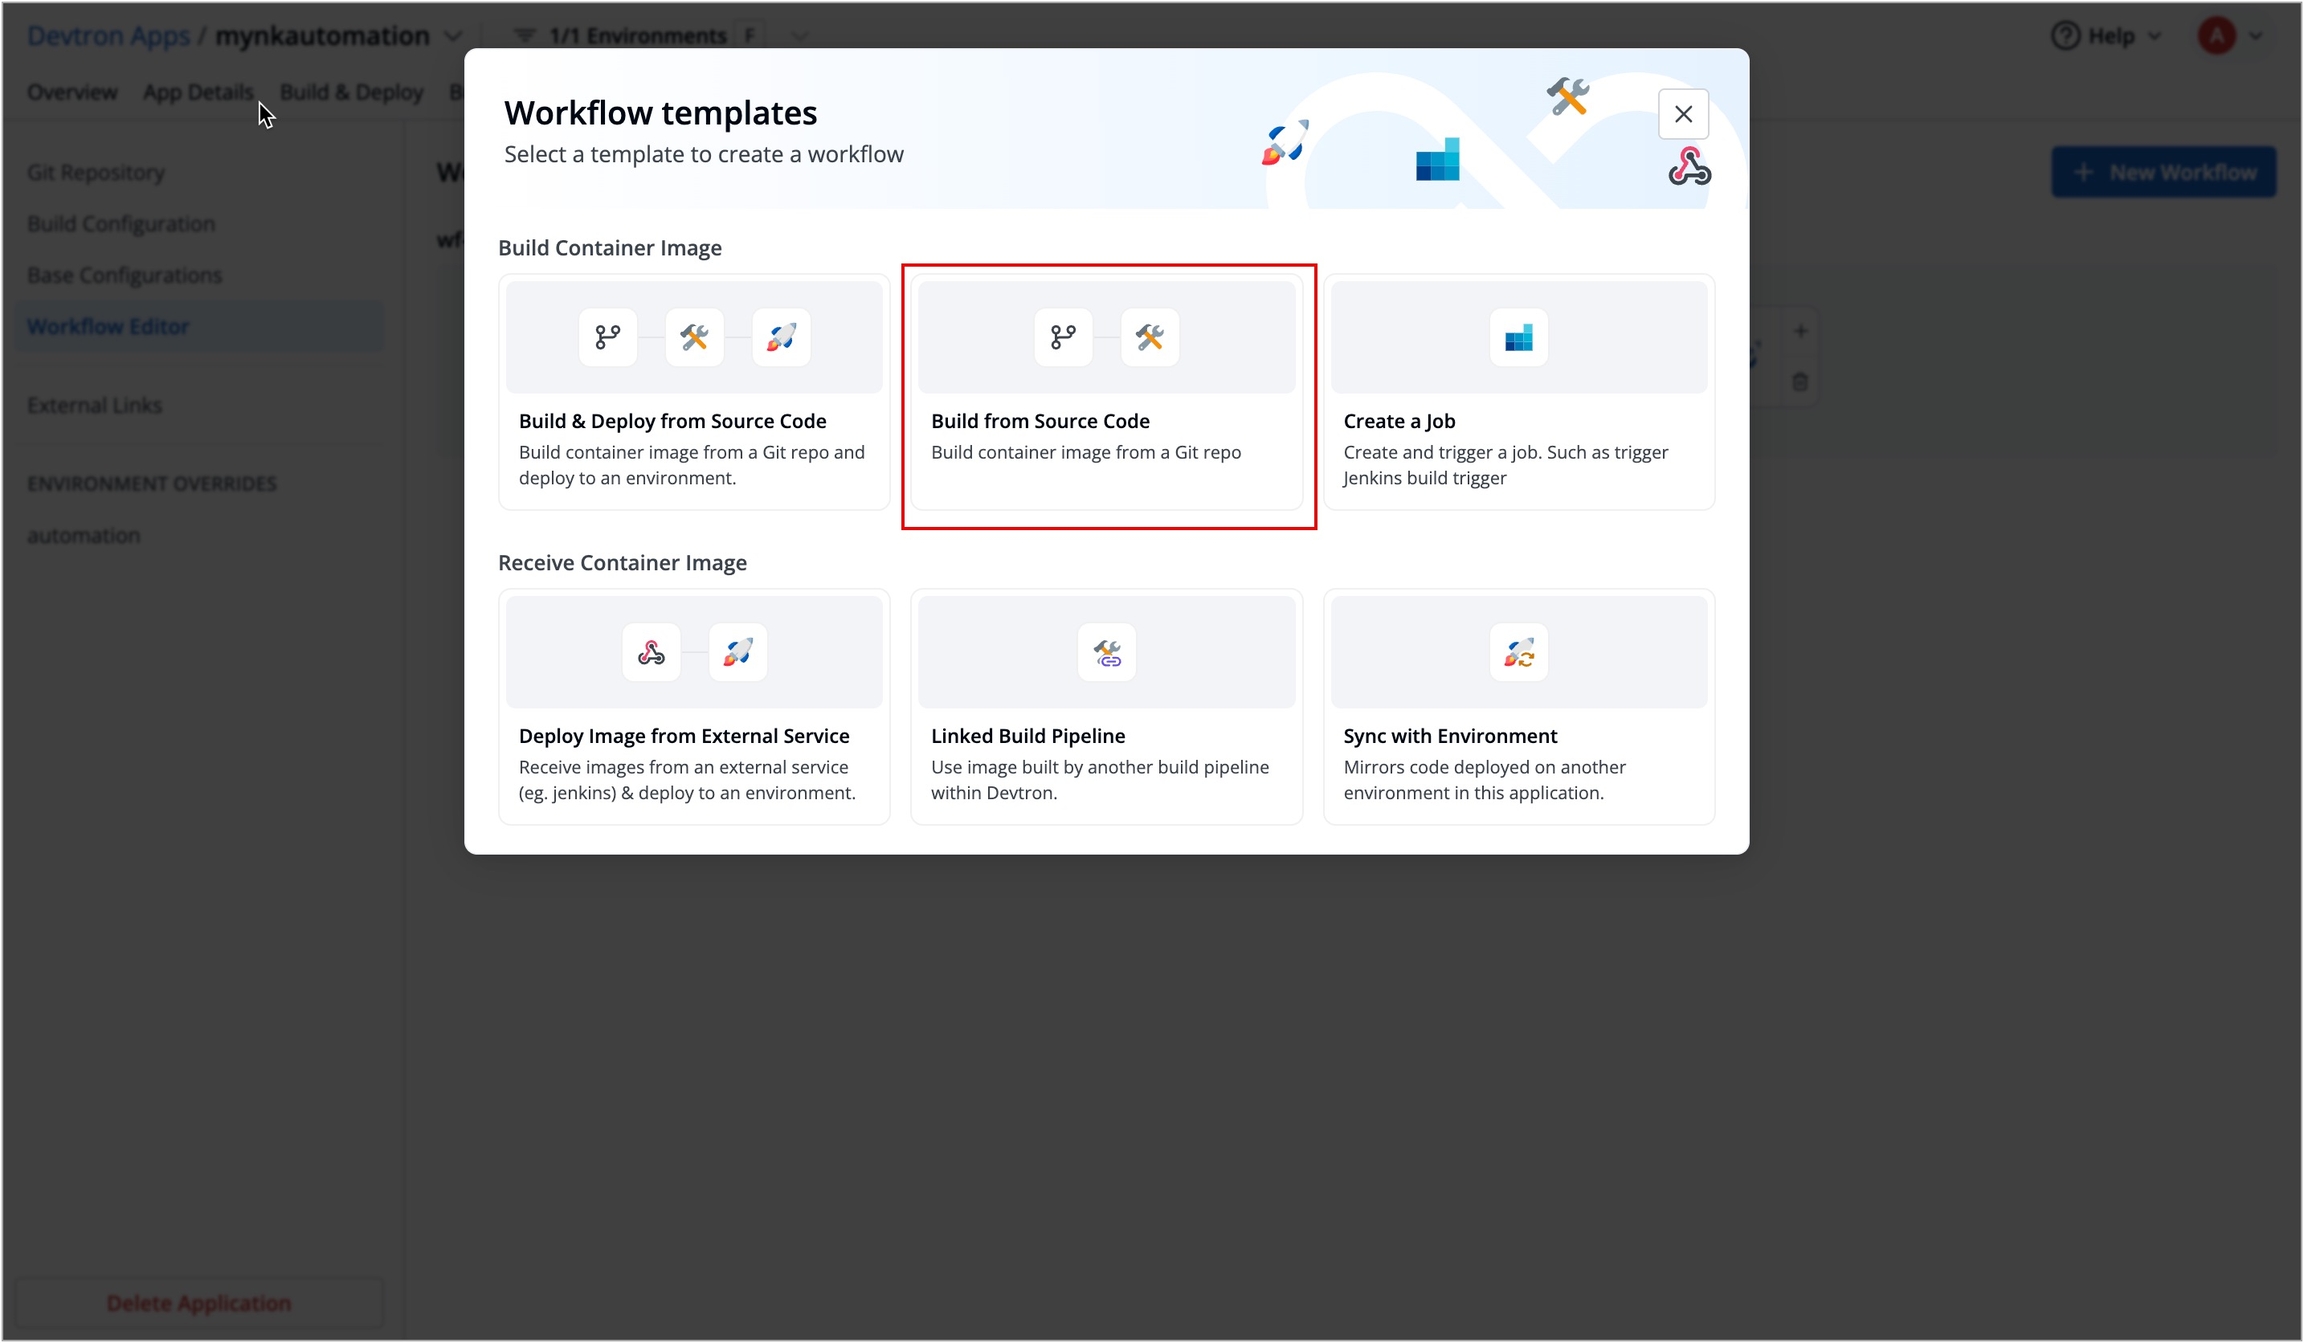
A CI Workflow can be created in one of the following ways:
Create a Job
Each method has different use-cases that can be tailored according the needs of the organization.
Build and Deploy from Source Code workflow allows you to build the container image from a source code repository.
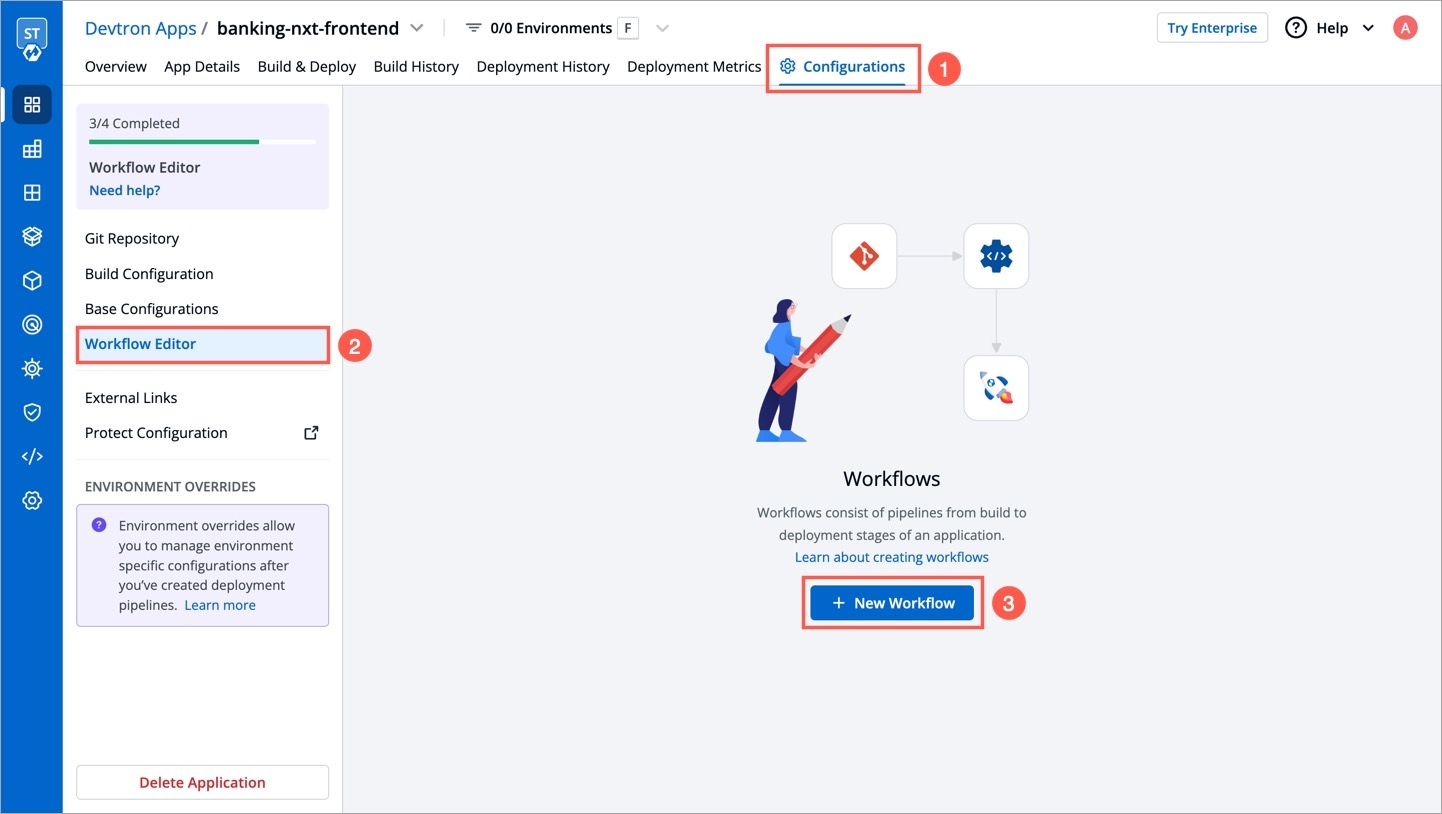
From the Applications menu, select your application.
On the App Configuration page, select Workflow Editor.
Select + New Workflow.
Select Build and Deploy from Source Code.
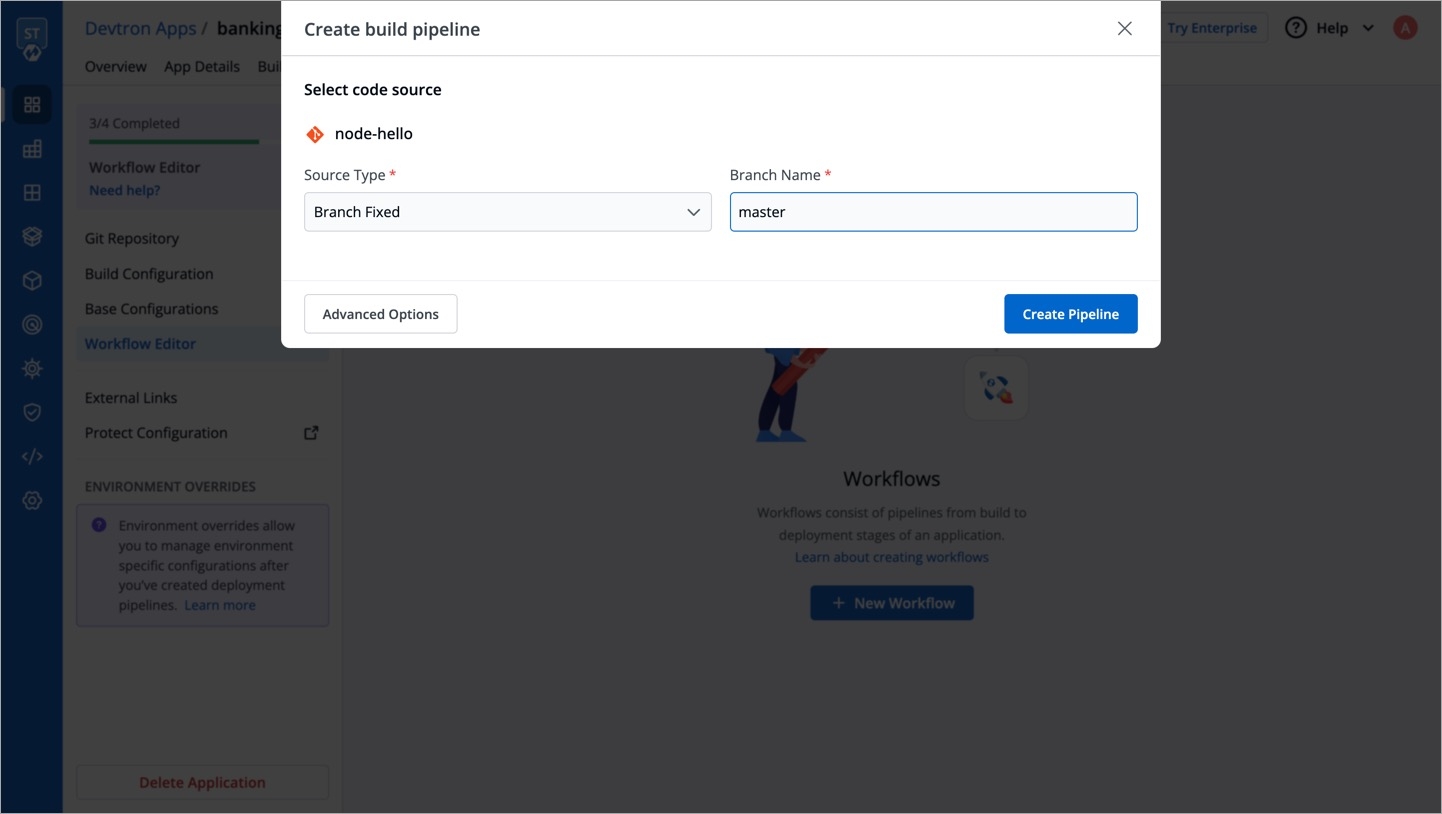
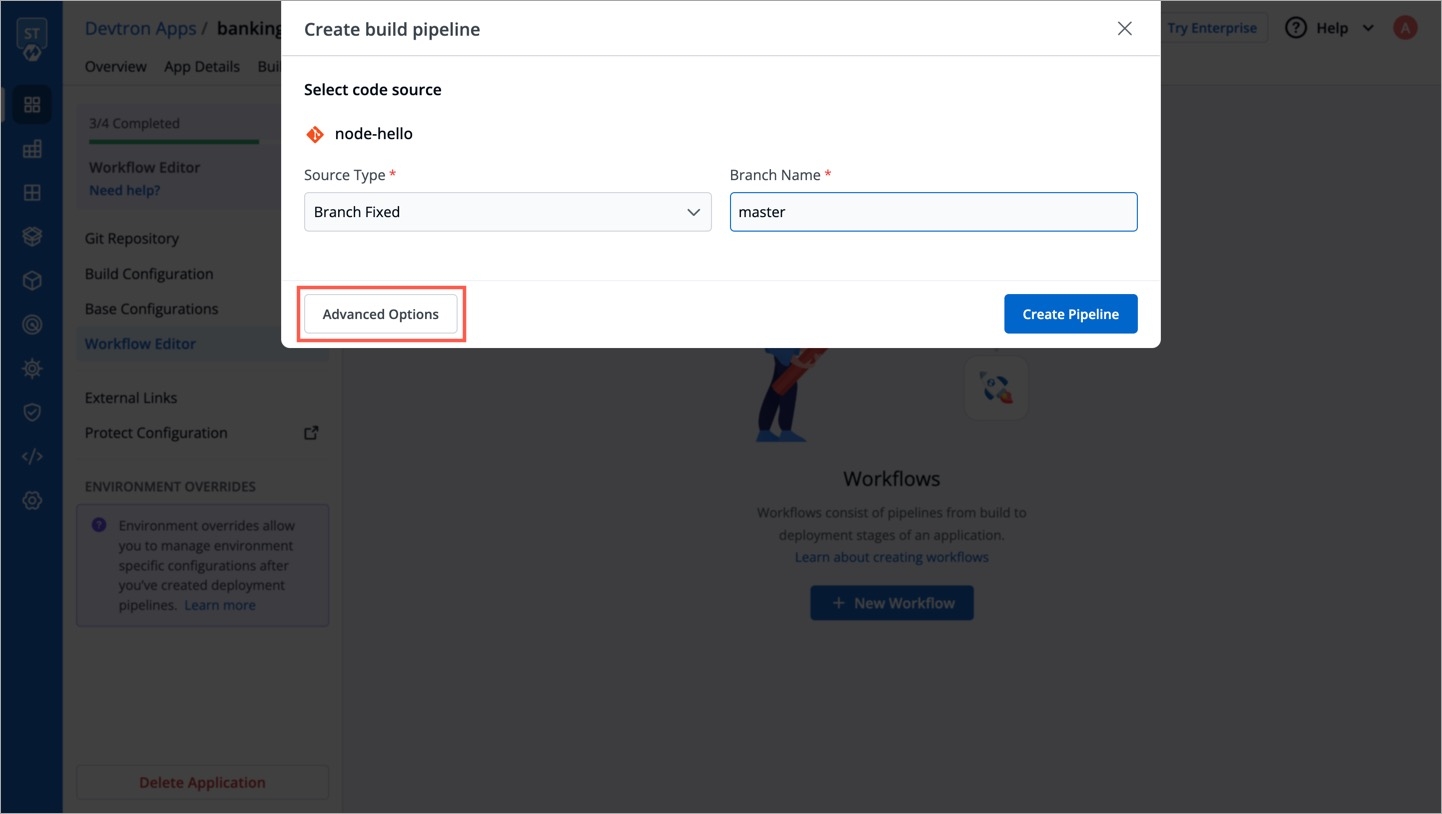
Enter the following fields on the Create build pipeline window:
Source type
Required
Branch Name
Required
Branch that triggers the CI build
Advanced Options
Optional
Create Pre-Build, Build, and Post-Build tasks
The Advanced CI Pipeline includes the following stages:
Pre-build stage: The tasks in this stage are executed before the image is built.
Build stage: In this stage, the build is triggered from the source code that you provide.
Post-build stage: The tasks in this stage will be triggered once the build is complete.
The Pre-build and Post-build stages allow you to create Pre/Post-Build CI tasks as explained here.
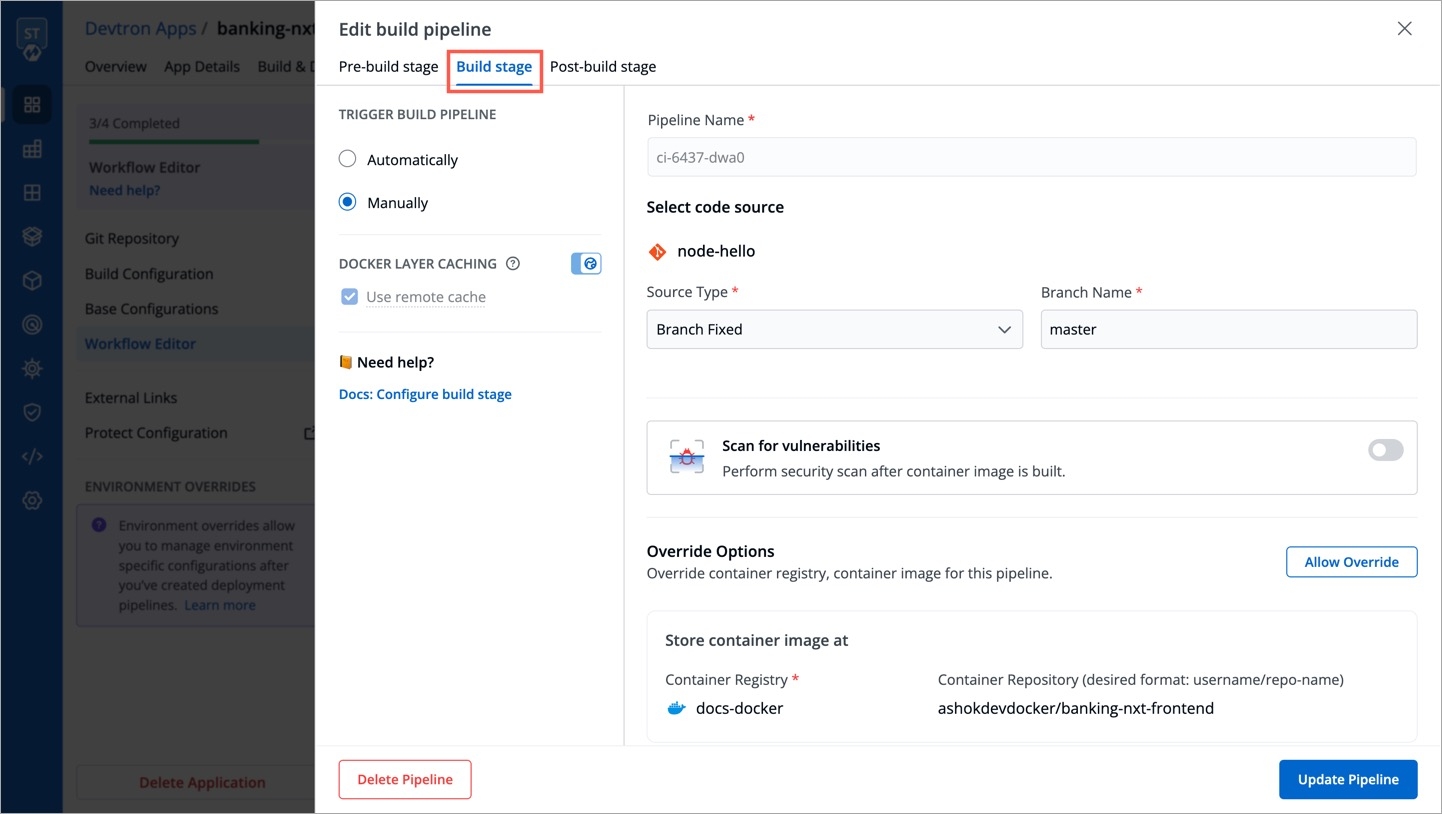
Go to the Build stage tab.
TRIGGER BUILD PIPELINE
Required
The build execution may be set to:
Automatically (default): Build is triggered automatically as the Git source code changes.
Manually: Build is triggered manually.
Pipeline Name
Required
A name for the pipeline
Source type
Required
Branch Name
Required
Branch that triggers the CI build
Docker build arguments
Optional
Override docker build configurations for this pipeline.
Key: Field name
Value: Field value
Source type
Branch Fixed
This allows you to trigger a CI build whenever there is a code change on the specified branch.
Enter the Branch Name of your code repository.
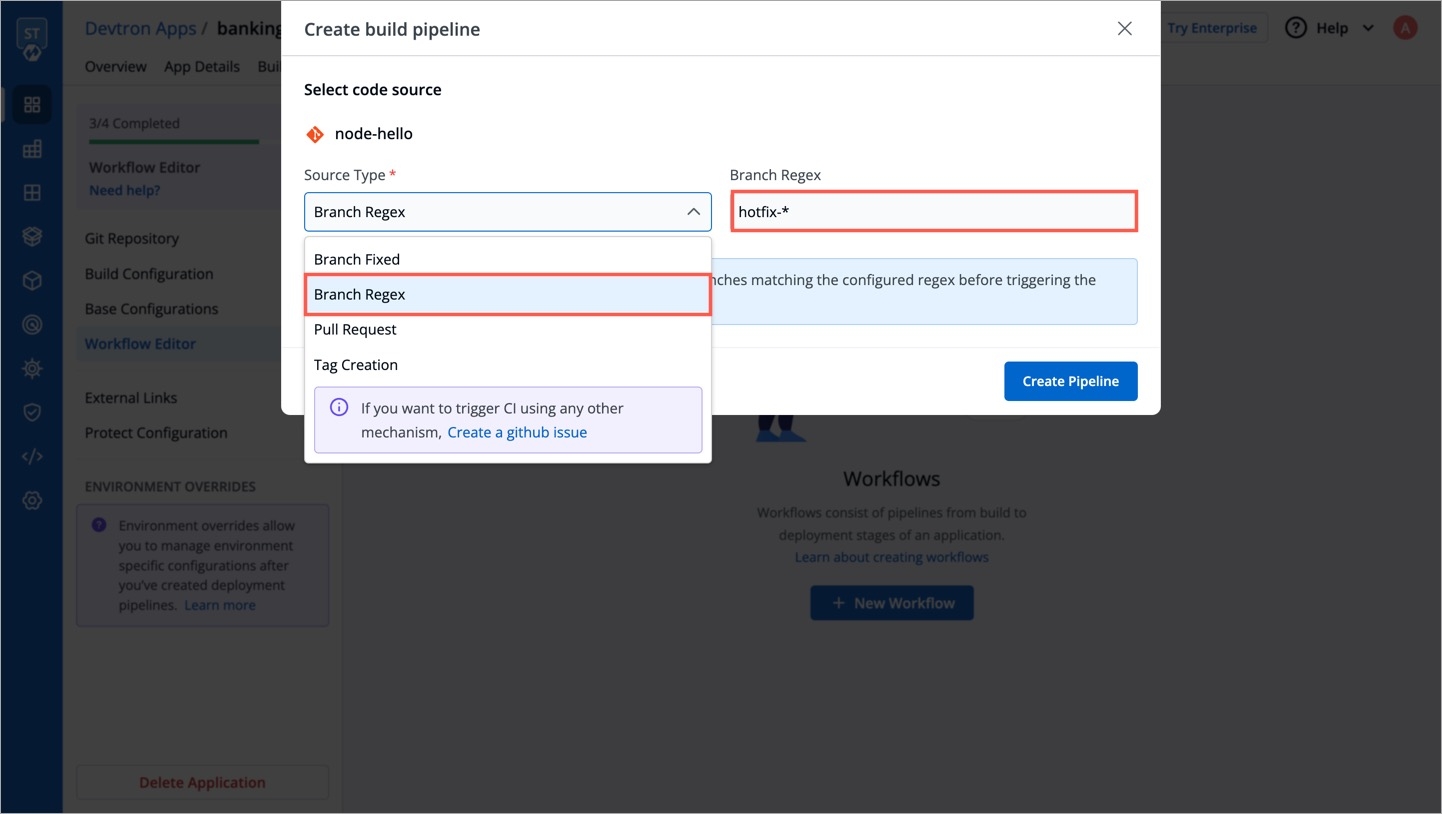
Branch Regex
Branch Regex allows users to easily switch between branches matching the configured Regex before triggering the build pipeline. In case of Branch Fixed, users cannot change the branch name in ci-pipeline unless they have admin access for the app. So, if users with Build and Deploy access should be allowed to switch branch name before triggering ci-pipeline, Branch Regex should be selected as source type by a user with Admin access.
For example if the user sets the Branch Regex as feature-*, then users can trigger from branches such as feature-1450, feature-hot-fix etc.
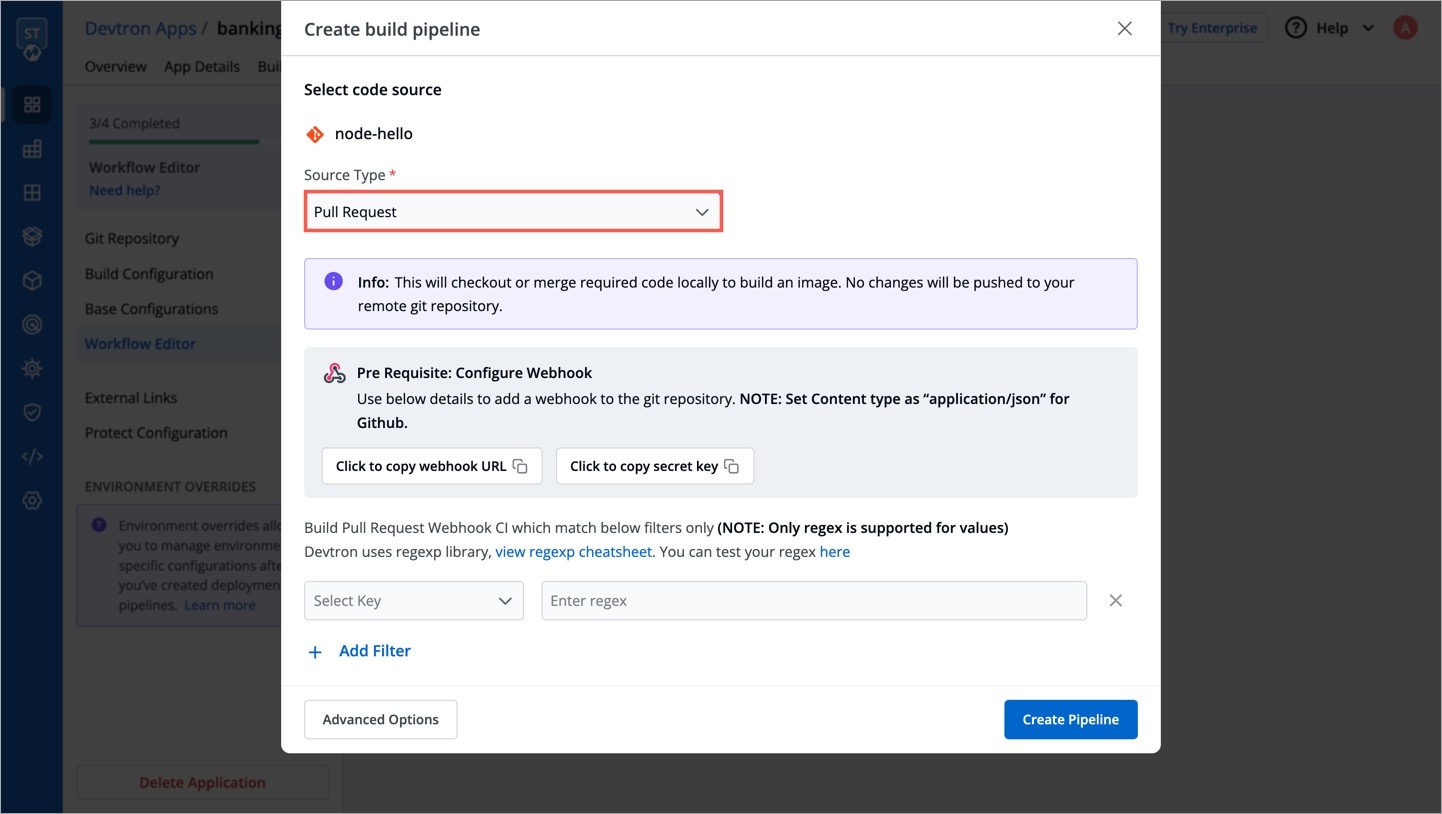
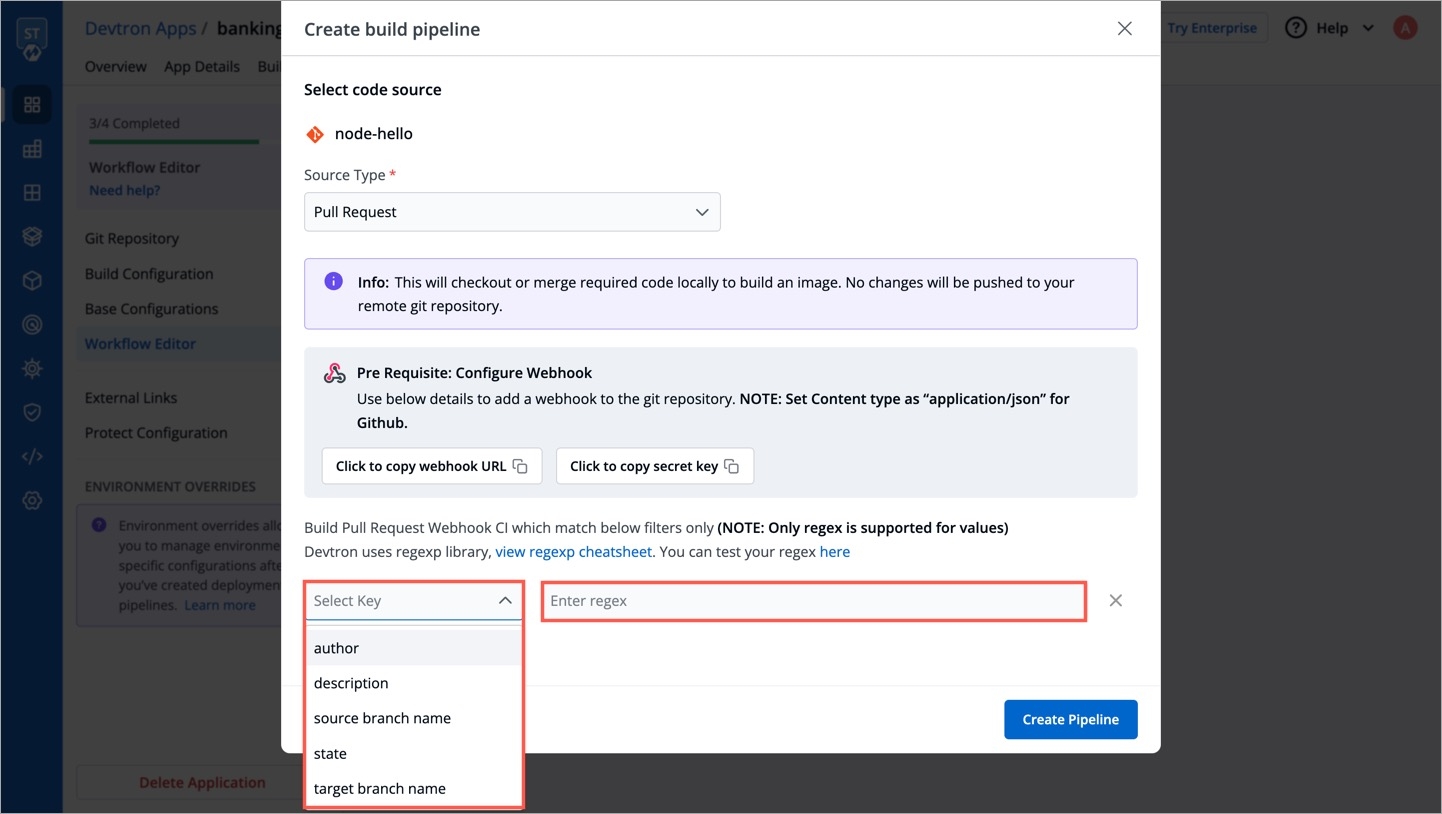
Pull Request
This allows you to trigger the CI build when a pull request is created in your repository.
Prerequisites
Configure the webhook for either GitHub or Bitbucket.
The Pull Request source type feature only works for the host GitHub or Bitbucket Cloud for now. To request support for a different Git host, please create a GitHub issue here.
To trigger the build from specific PRs, you can filter the PRs based on the following keys:
Author
Author of the PR
Source branch name
Branch from which the Pull Request is generated
Target branch name
Branch to which the Pull request will be merged
Title
Title of the Pull Request
State
State of the PR. Default is "open" and cannot be changed
Select the appropriate filter and pass the matching condition as a regular expression (regex).
Devtron uses regexp library, view regexp cheatsheet. You can test your custom regex from here.
Select Create Pipeline.
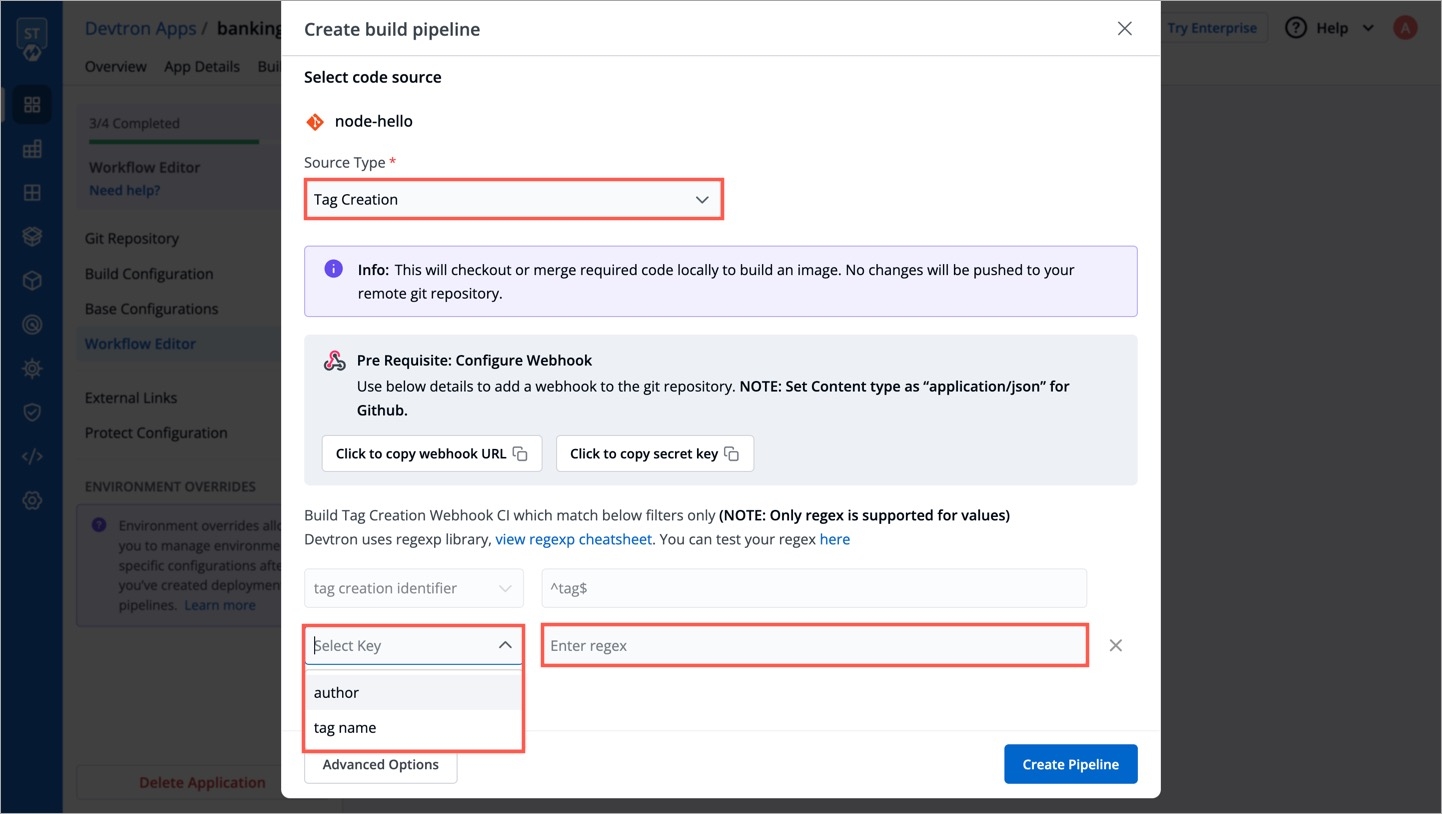
Tag Creation
This allows you to trigger the CI build whenever a new tag is created.
Prerequisites
Configure the webhook for either GitHub or Bitbucket.
To trigger the build from specific tags, you can filter the tags based on the author and/or the tag name.
Author
The one who created the tag
Tag name
Name of the tag for which the webhook will be triggered
Select the appropriate filter and pass the matching condition as a regular expression (regex).
Select Create Pipeline.
The total timeout for the execution of the CI pipeline is by default set as 3600 seconds. This default timeout is configurable according to the use case (refer Build Infra).
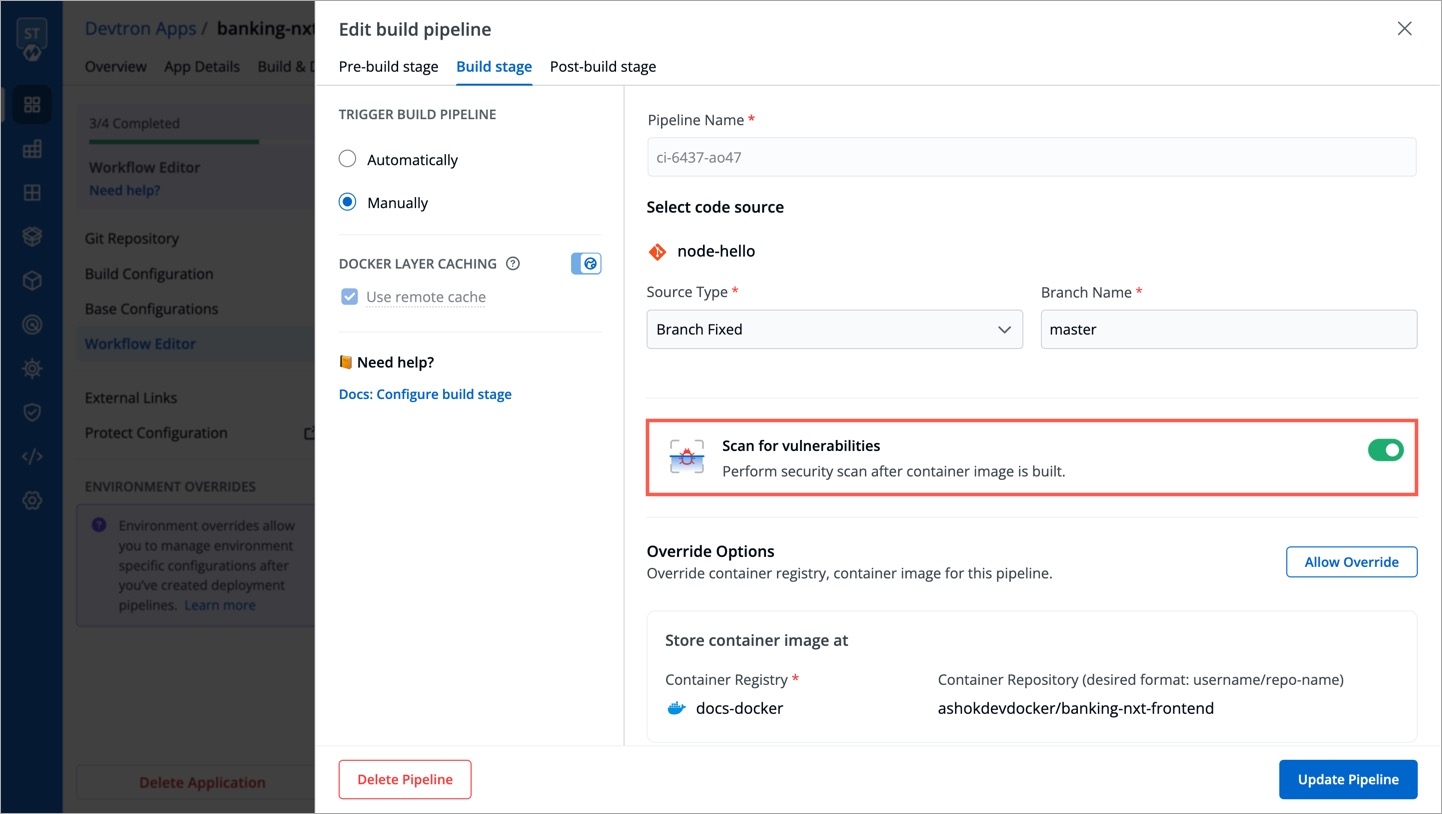
Scan for Vulnerabilities
To perform the security scan after the container image is built, enable the Scan for vulnerabilities toggle in the build stage. Refer Security features to know more.
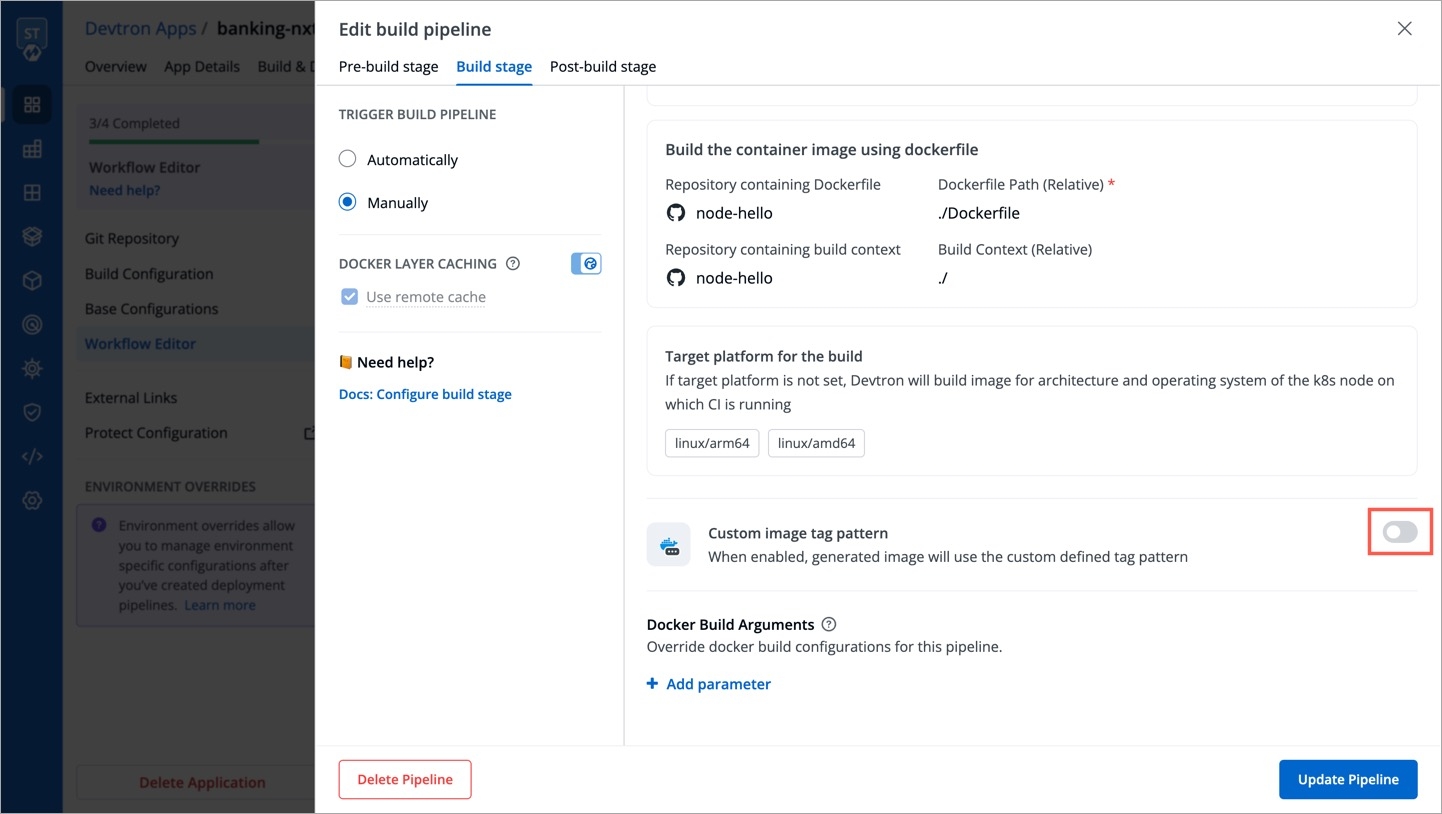
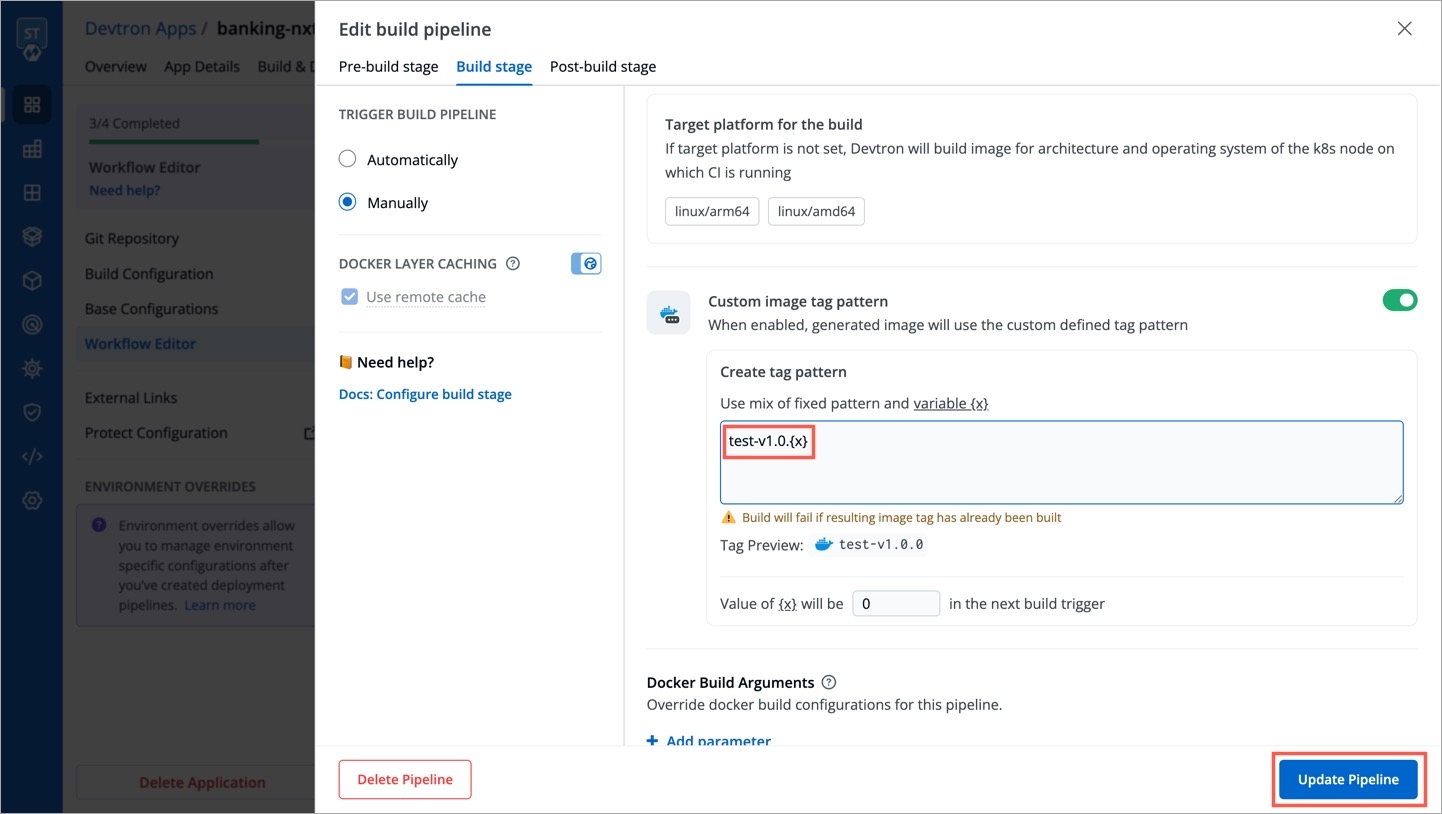
Custom Image Tag Pattern
This feature helps you apply custom tags (e.g., v1.0.0) to readily distinguish container images within your repository.
Enable the toggle button as shown below.
You can write an alphanumeric pattern for your image tag, e.g., test-v1.0.{x}. Here, 'x' is a mandatory variable whose value will incrementally increase with every build. You can also define the value of 'x' for the next build trigger in case you want to change it.
Click Update Pipeline.
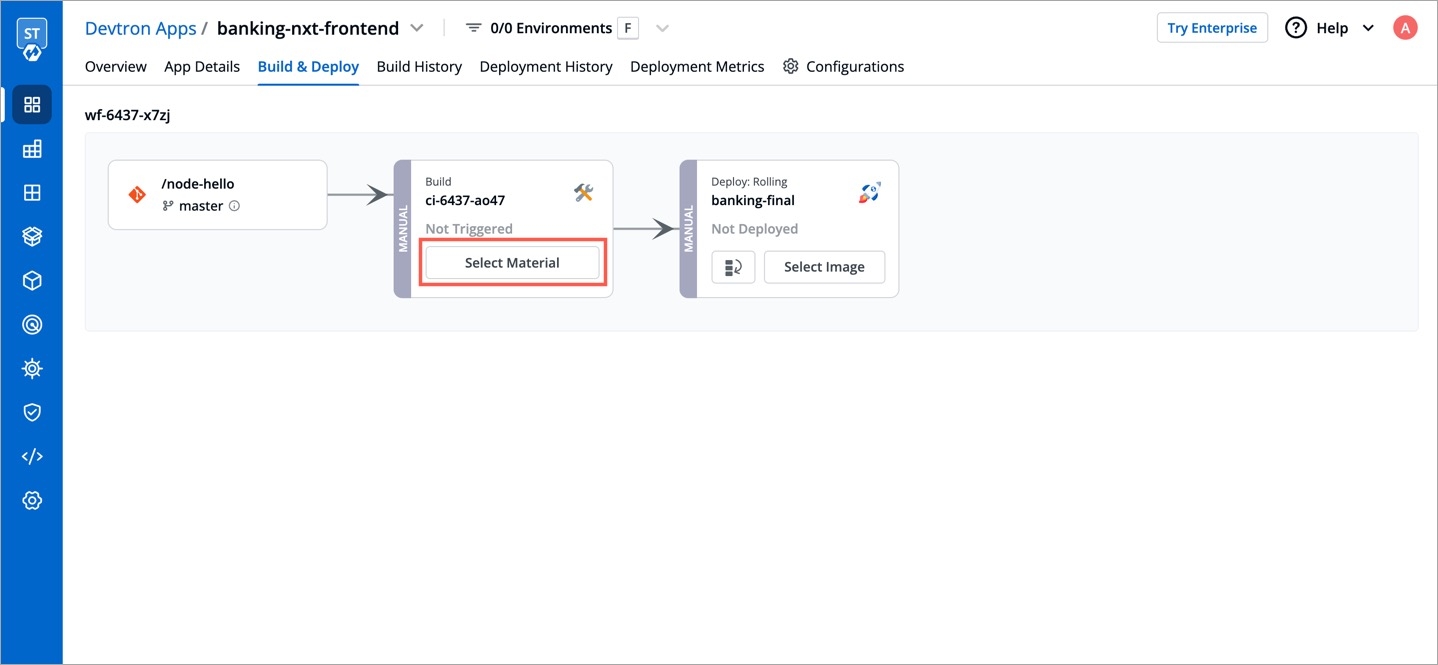
Now, go to Build & Deploy tab of your application, and click Select Material in the CI pipeline.
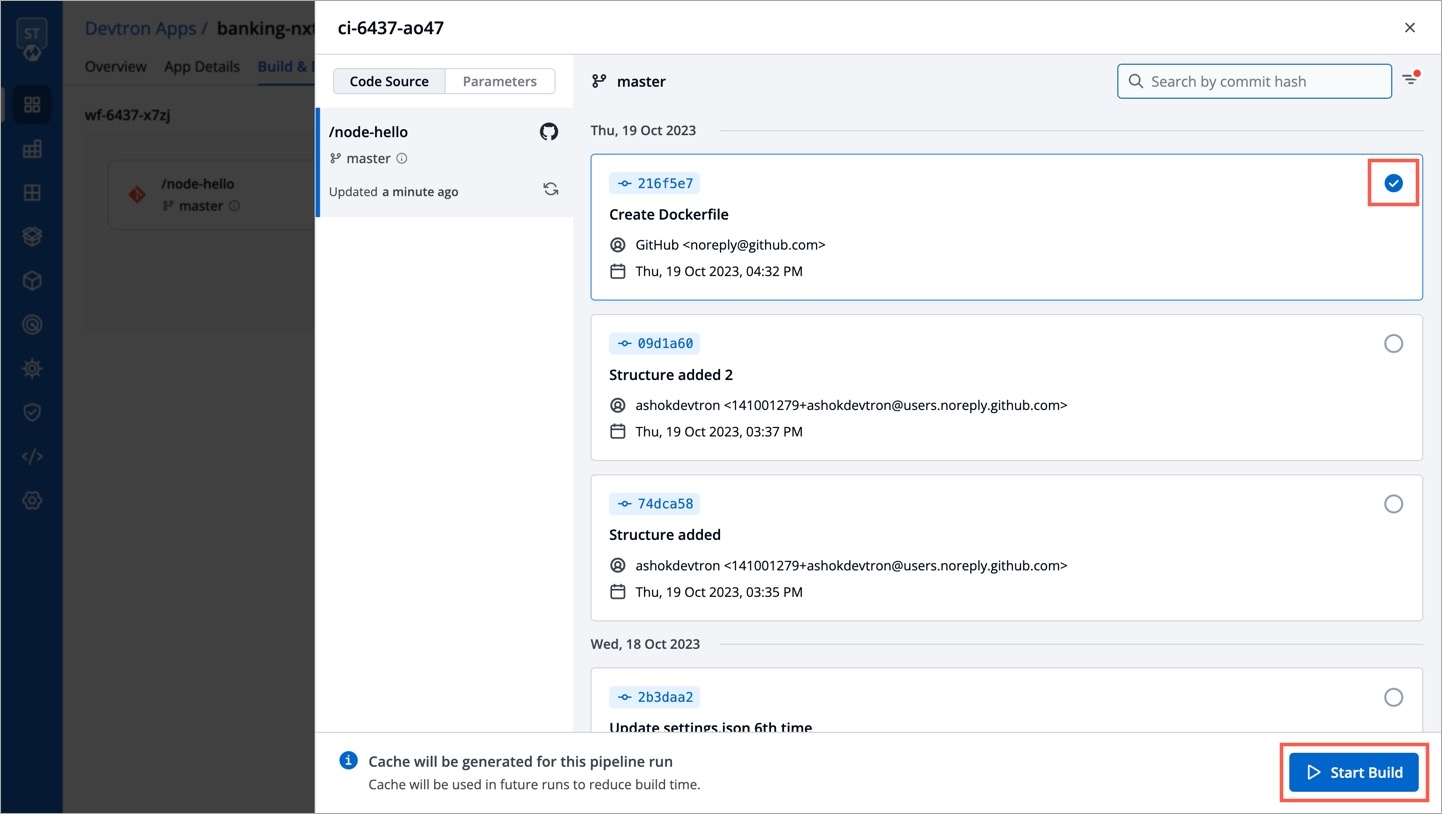
Choose the git commit you wish to use for building the container image. Click Start Build.
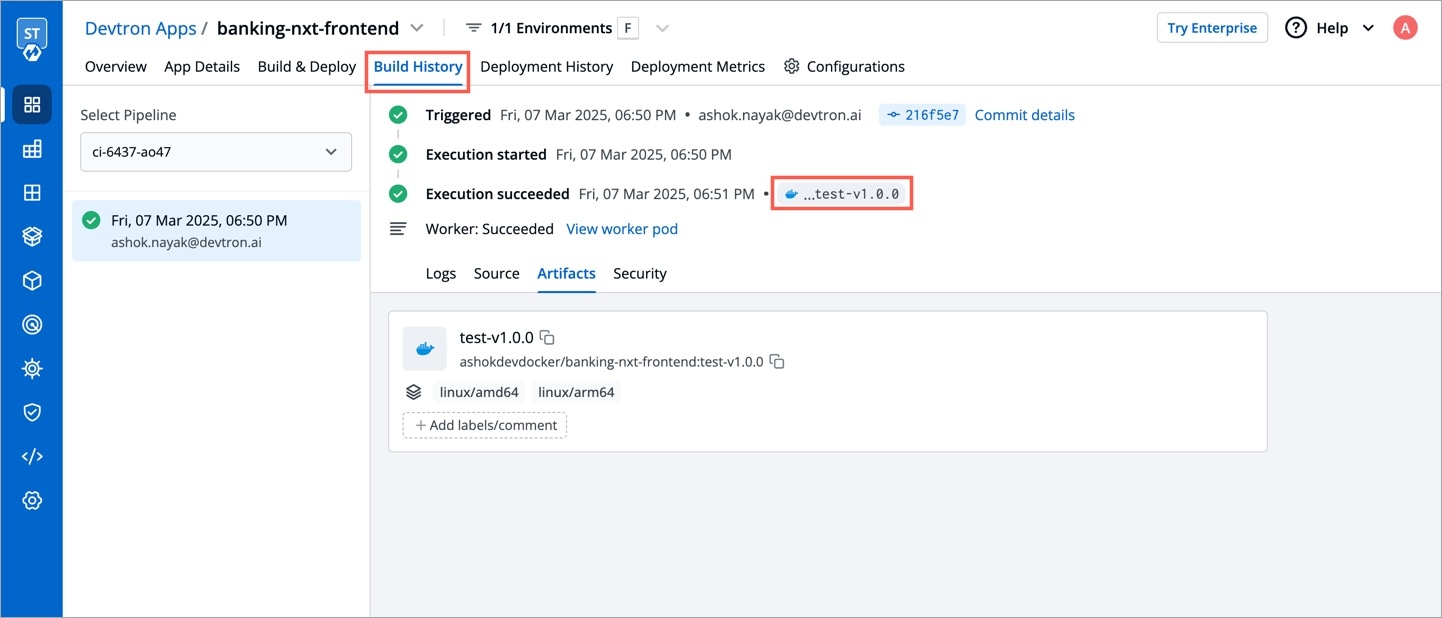
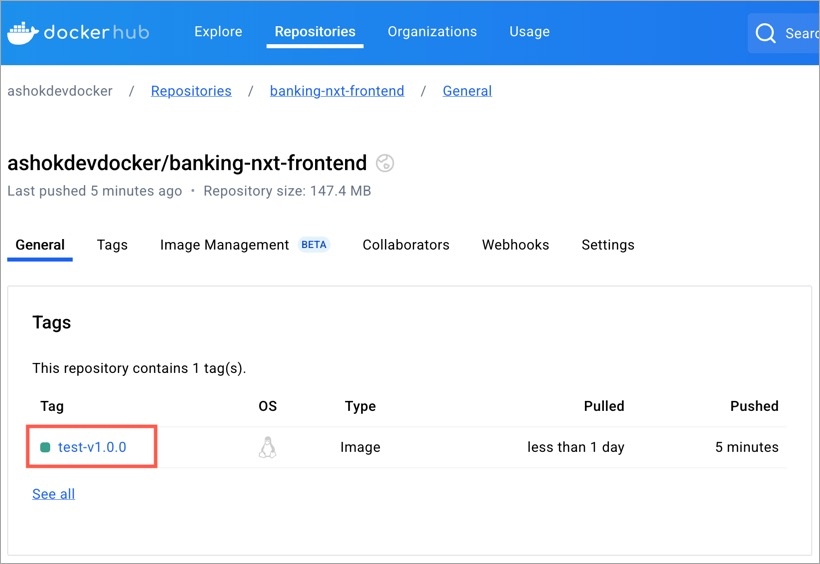
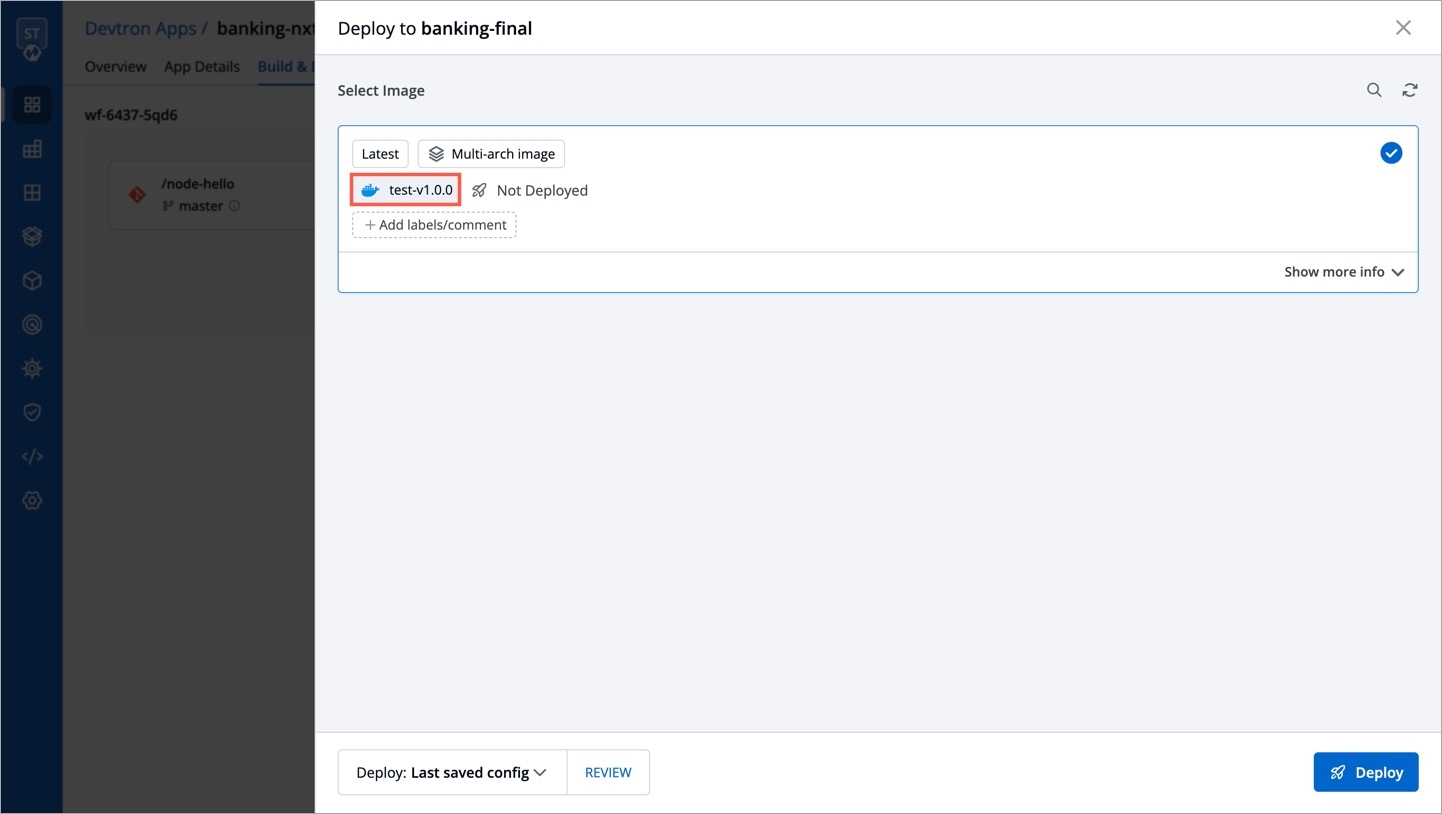
The build will initiate and once it is successful the image tag would reflect at all relevant screens:
Build History
Docker Registry
CD Pipeline (Image Selection)
Build will fail if the resulting image tag has already been built in the past. This means if there is an existing image with tag test-v1.0.0, you cannot build another image having the same tag test-v1.0.0 in the same CI pipeline. This error might occur when you reset the value of the variable x or when you disable/enable the toggle button for Custom image tag pattern.
If one code is shared across multiple applications, Linked Build Pipeline can be used, and only one image will be built for multiple applications because if there is only one build, it is not advisable to create multiple CI Pipelines.
From the Applications menu, select your application.
On the App Configuration page, select Workflow Editor.
Select + New Workflow.
Select Linked Build Pipeline.
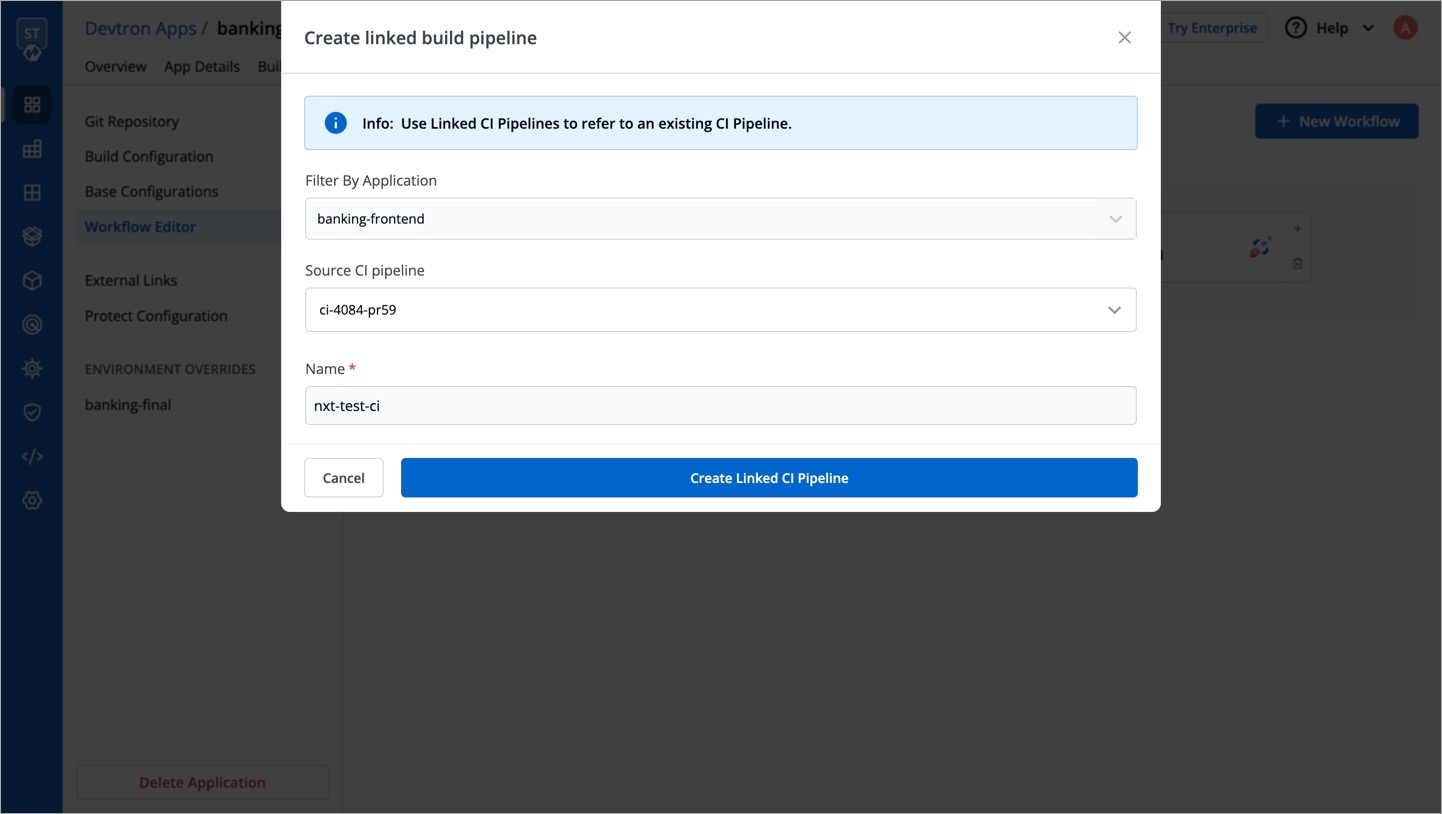
On the Create linked build pipeline screen:
Search for the application in which the source CI pipeline is present.
Select the source CI pipeline from the application that you selected above.
Enter a new name for the linked CI pipeline.
Click Create Linked CI Pipeline.
Thereafter, the source CI pipeline will indicate the number of Linked CI pipelines. Upon clicking it, it will display the child information as shown below. It reveals the applications and environments where Linked CI is used for deployment.
After creating a linked CI pipeline, you can create a CD pipeline.
Linked CI pipelines can't trigger builds. They rely on the source CI pipeline to build images. Trigger a build in the source CI pipeline to see the images available for deployment in the linked CI pipeline's CD stage.
For CI pipeline, you can receive container images from an external services via webhook API.
You can use Devtron for deployments on Kubernetes while using an external CI tool such as Jenkins or CircleCI. External CI feature can be used when the CI tool is hosted outside the Devtron platform. However, by using an external CI, you will not be able to use some of the Devtron features such as Image scanning and security policies, configuring pre-post CI stages etc.
To configure Git Repository, you can add any Git repository account (e.g., dummy account) and click Next.
To configure the Container Registry and Container Repository, you can leave the fields blank or simply add any test repository and click Save & Next.
On the Base Deployment Template page, select the Chart type from the drop-down list and configure as per your requirements and click Save & Next.
On the Workflow Editor page, click New Workflow and select Deploy image from external service.
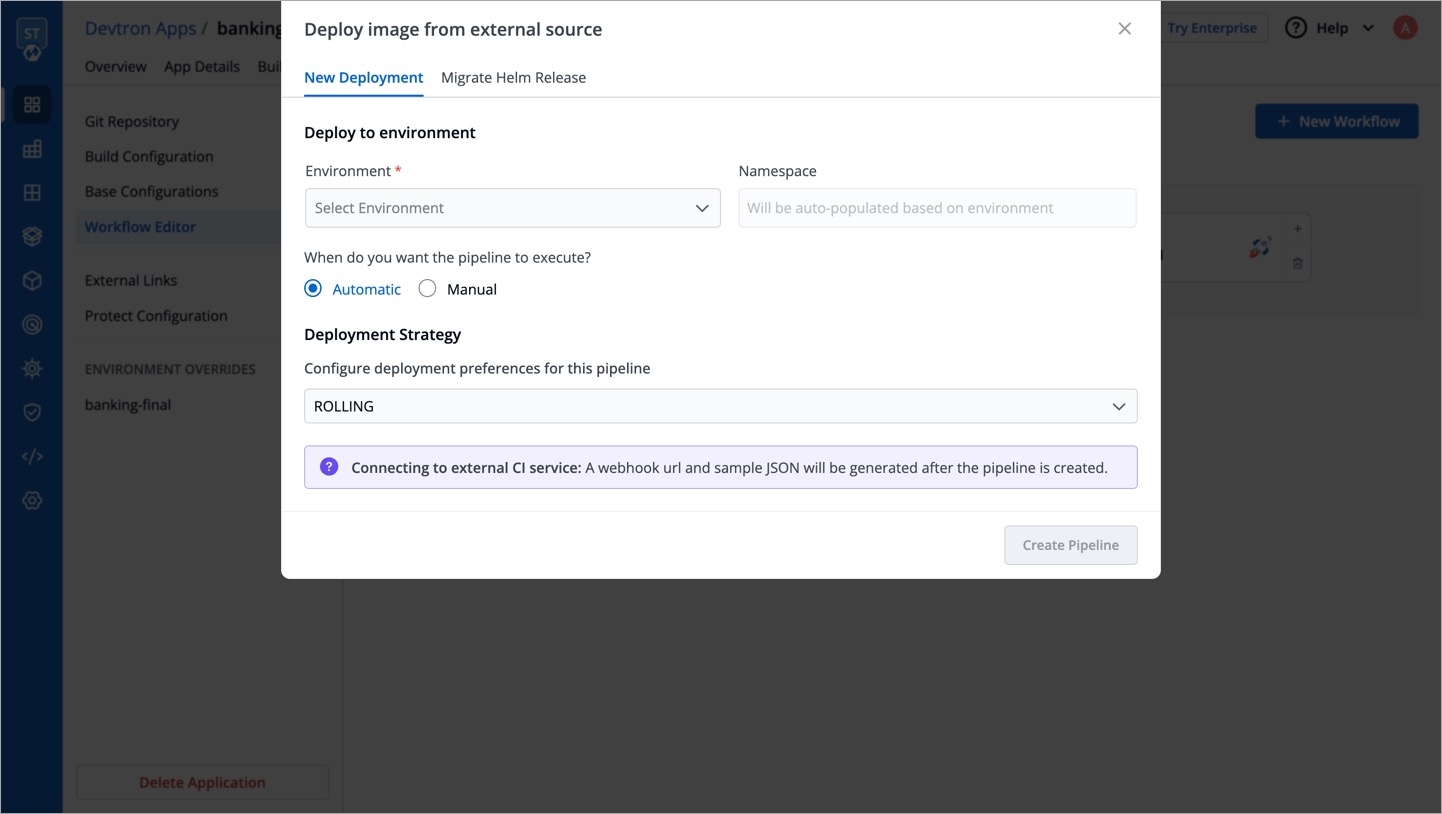
On the Deploy image from external source page, provide the information in the following fields:
Deploy to environment
When do you want to deploy
You can deploy either in one of the following ways:
Automatic: If you select automatic, your application will be deployed automatically everytime a new image is received.
Manual: In case of manual, you have to select the image and deploy manually.
Deployment Strategy
Configure the deployment preferences for this pipeline.
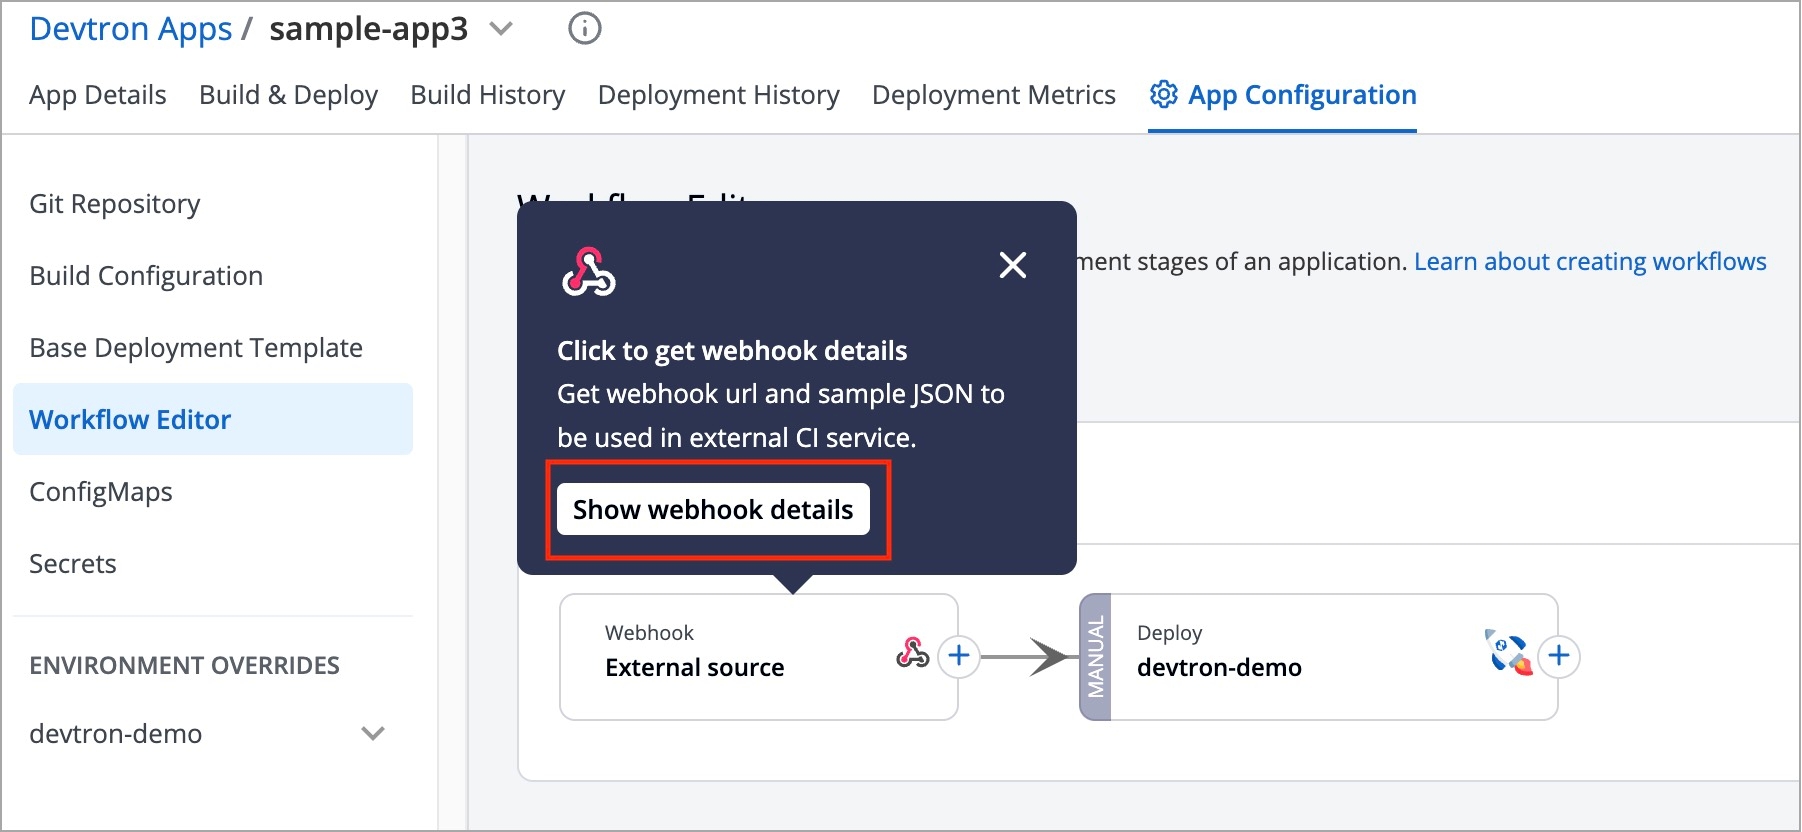
Click Create Pipeline. A new CI pipeline will be created for the external source. To get the webhook URL and JSON sample payload to be used in external CI pipeline, click Show webhook details.
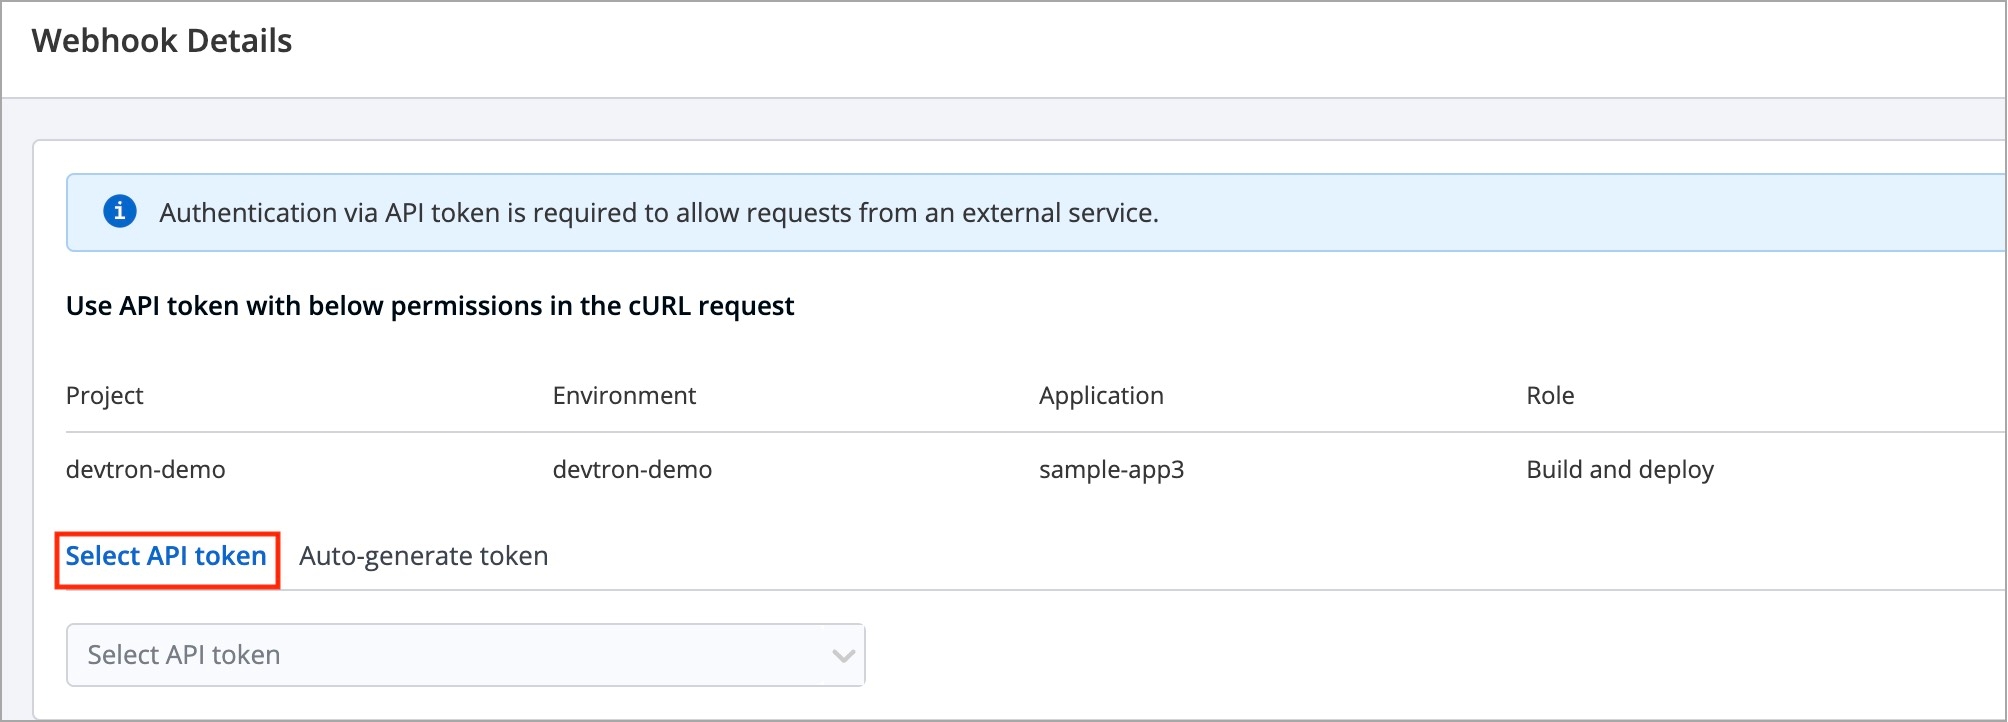
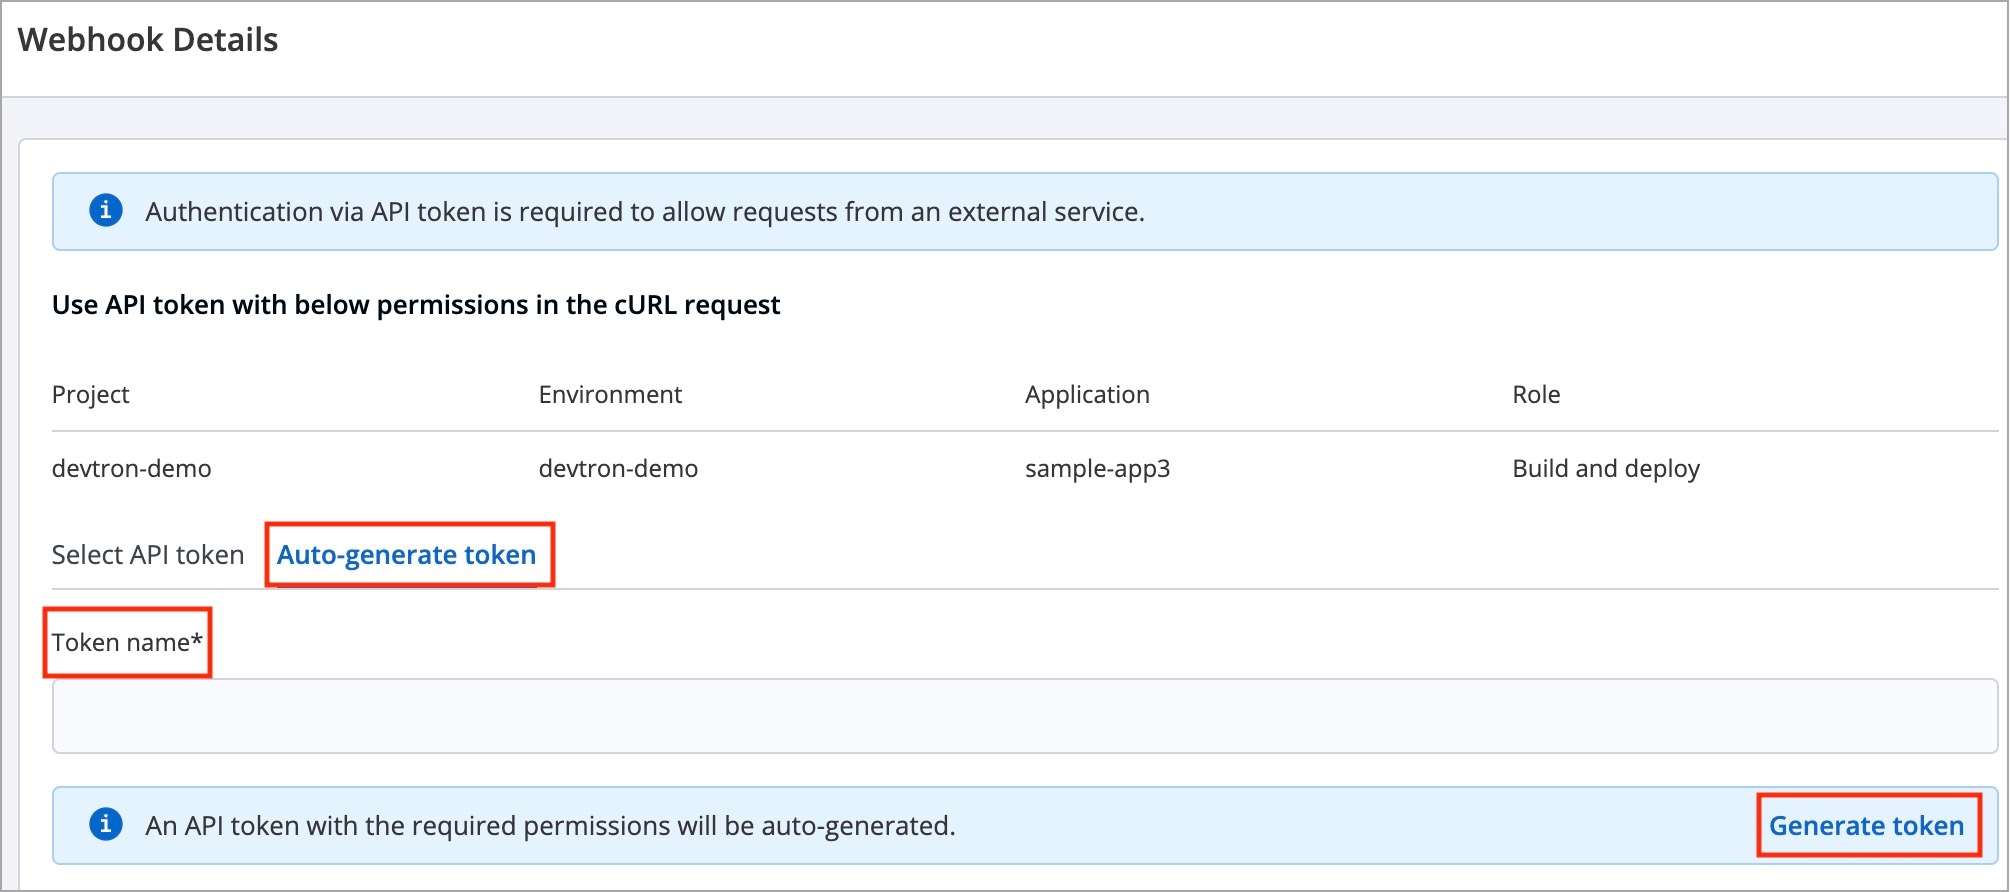
On the Webhook Details page, you have to authenticate via API token to allow requests from an external service (e.g. Jenkins or CircleCI).
For authentication, only users with super-admin permissions can select or generate an API token:
You can either use Select API Token if you have generated an API Token under Global Configurations.
Or use Auto-generate token to generate the API token with the required permissions. Make sure to enter the token name in the Token name field.
To allow requests from the external source, you can request the API by using:
Webhook URL
cURL Request
HTTP Method: POST
API Endpoint: https://{domain-name}/orchestrator/webhook/ext-ci/{pipeline-id}
JSON Payload:
You can also select metadata to send to Devtron. Sample JSON will be generated accordingly. You can send the Payload script to your CI tools such as Jenkins and Devtron will receive the build image every time the CI pipeline is triggered or you can use the Webhook URL, which will build an image every time CI pipeline is triggered using Devtron Dashboard.
200
app detail page url
400
Bad request
401
Unauthorized
On the Jenkins dashboard, select the Jenkins job which you want to integrate with the Devtron dashboard.
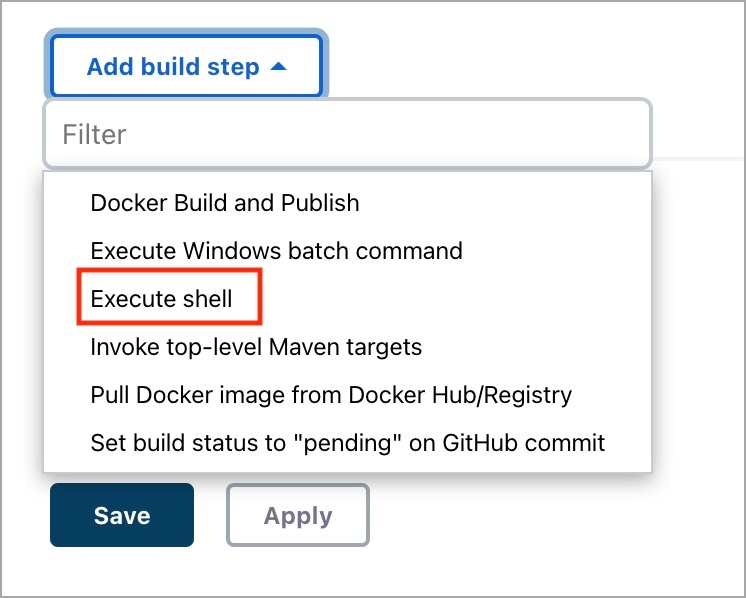
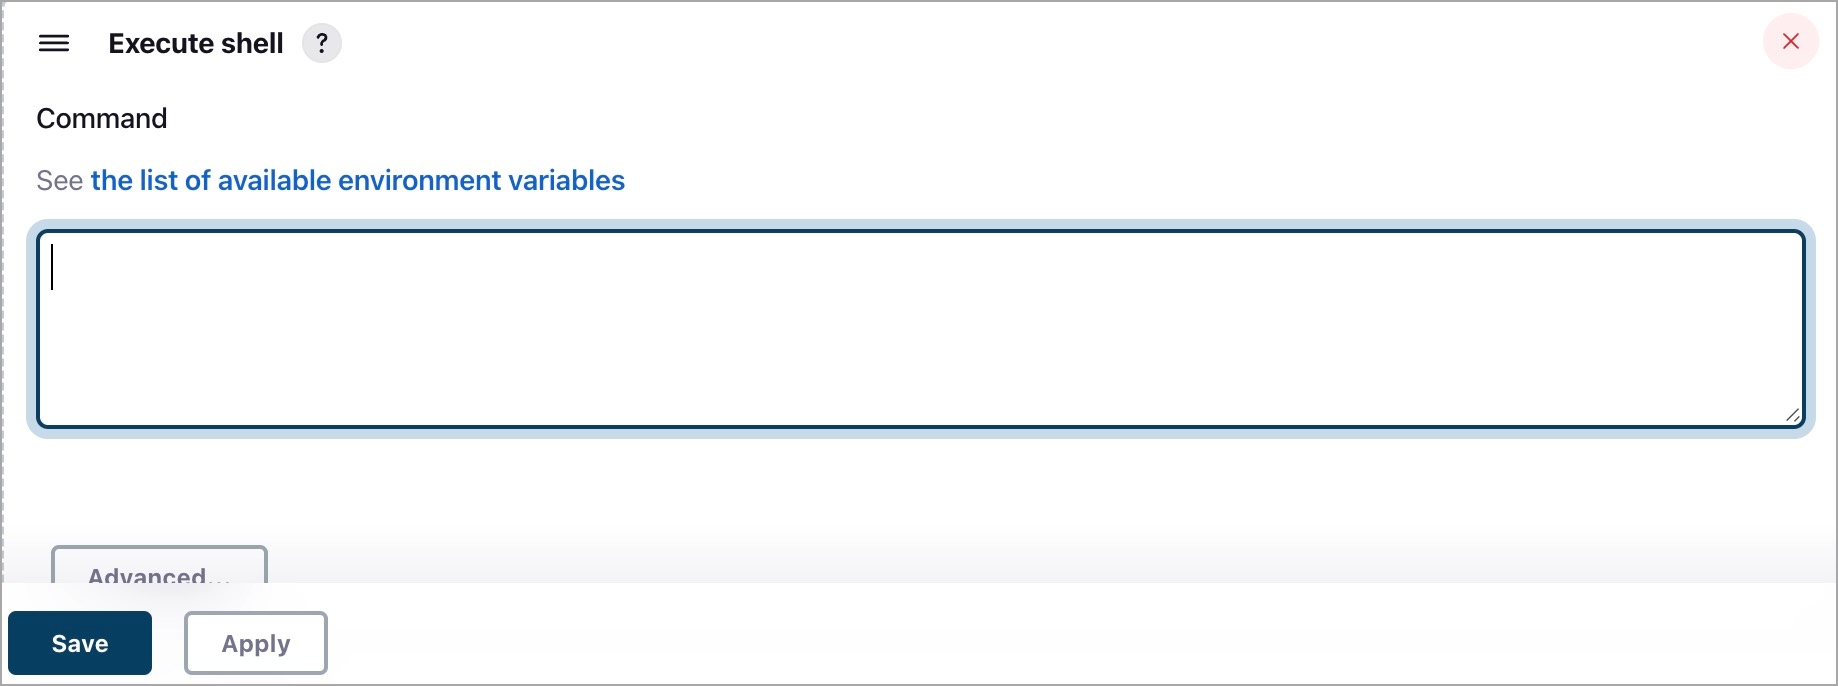
Go to the Configuration > Build Steps, click Add build step, and then click Execute Shell.
Enter the cURL request command.
Make sure to enter the API token and dockerImage in your cURL command and click Save.
Now, you can access the images on the Devtron dashboard and deploy manually. In case, if you select Automatic deployment option, then your application will be deployed automatically everytime a new image is received.
Similarly, you can also integrate with external source such as CircleCI by:
Select the job on the CircleCI dashboard and click Configuration File.
On the respective job, enter the cURL command and update the API token and dockerImage in your cURL command.
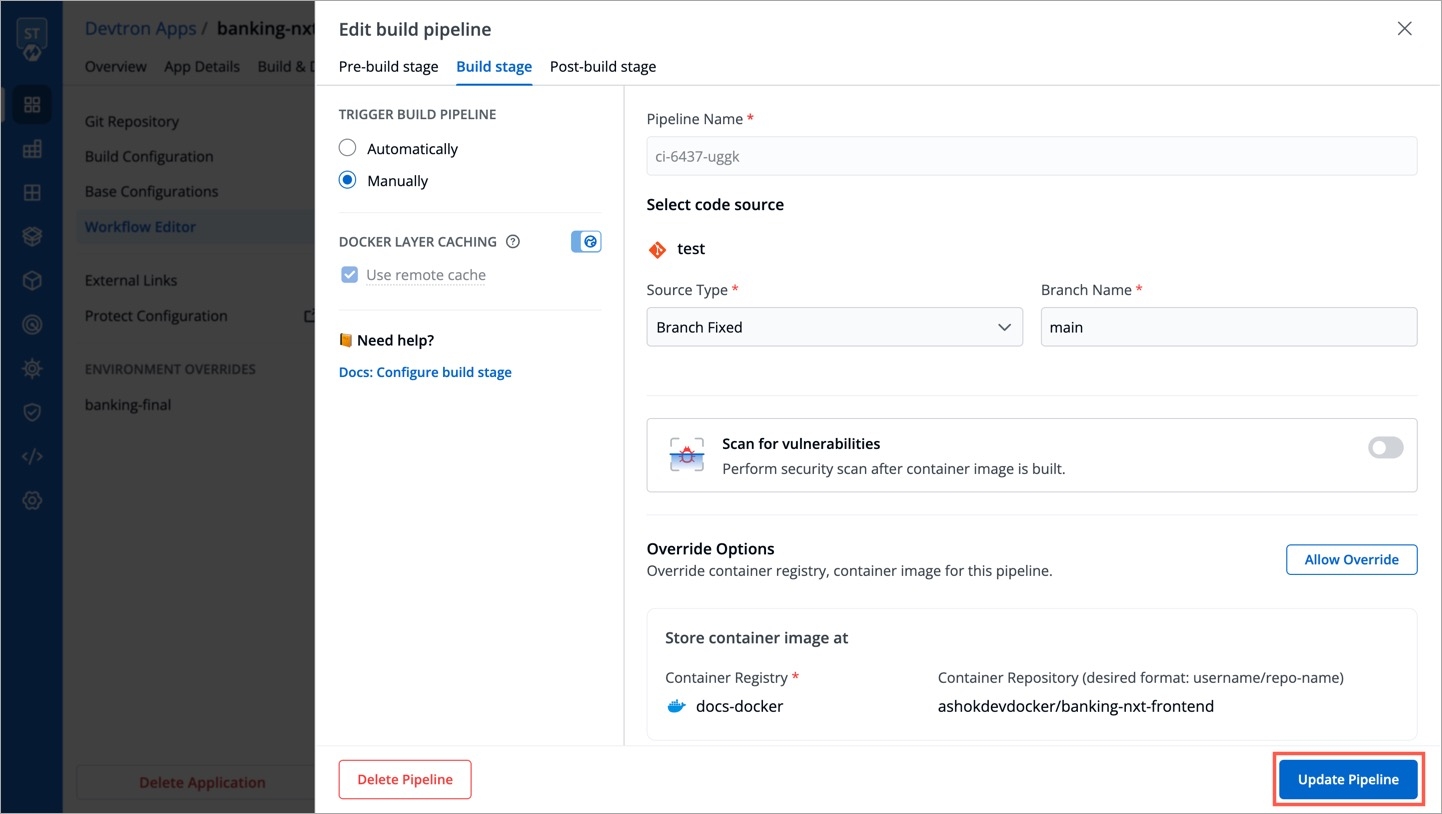
You can update the configurations of an existing CI Pipeline except for the pipeline's name. To update a pipeline, select your CI pipeline. In the Edit build pipeline window, edit the required stages and select Update Pipeline.
You can only delete a CI pipeline if there is no CD pipeline created in your workflow.
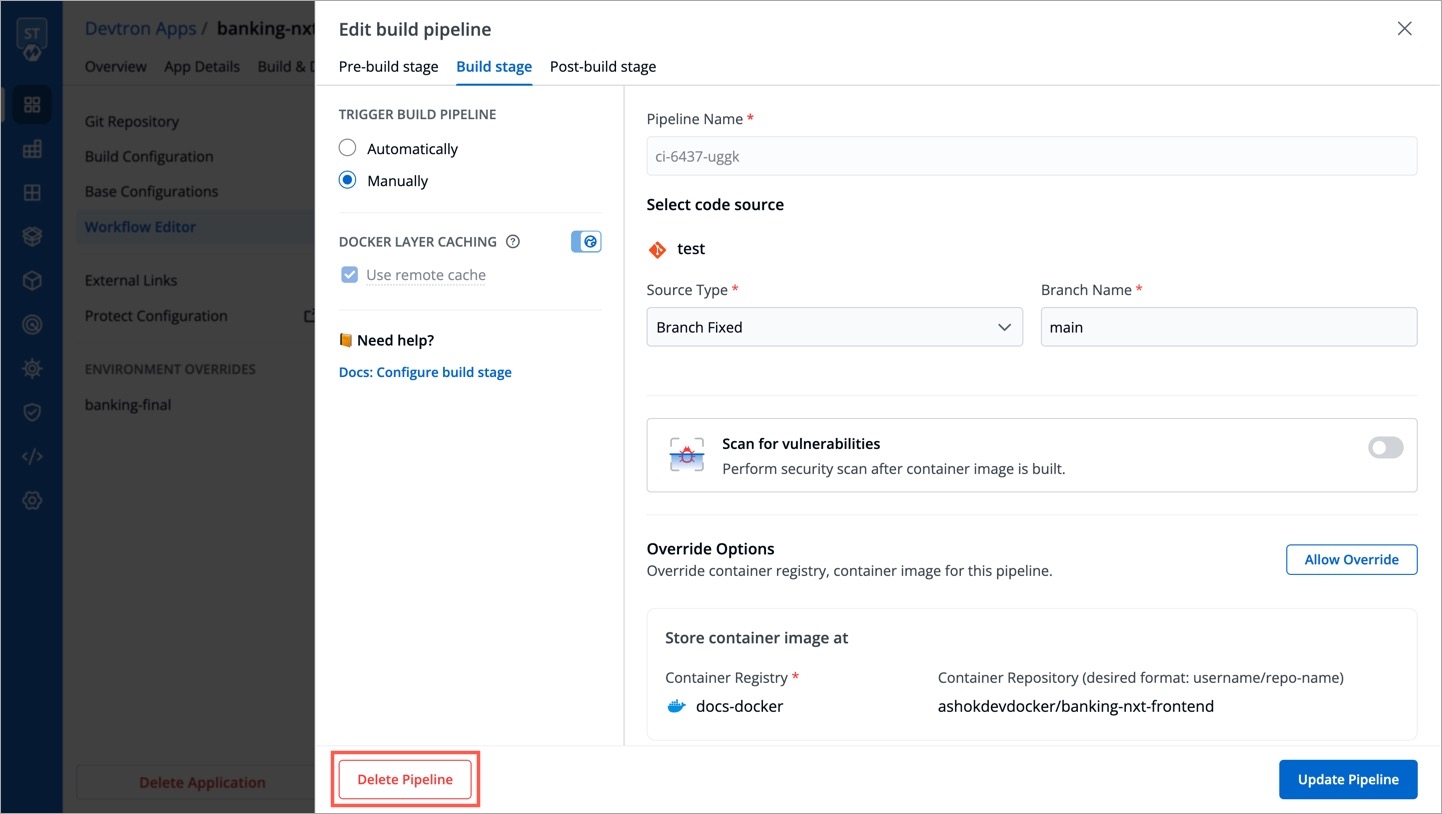
To delete a CI pipeline, go to App Configurations > Workflow Editor and select Delete Pipeline.
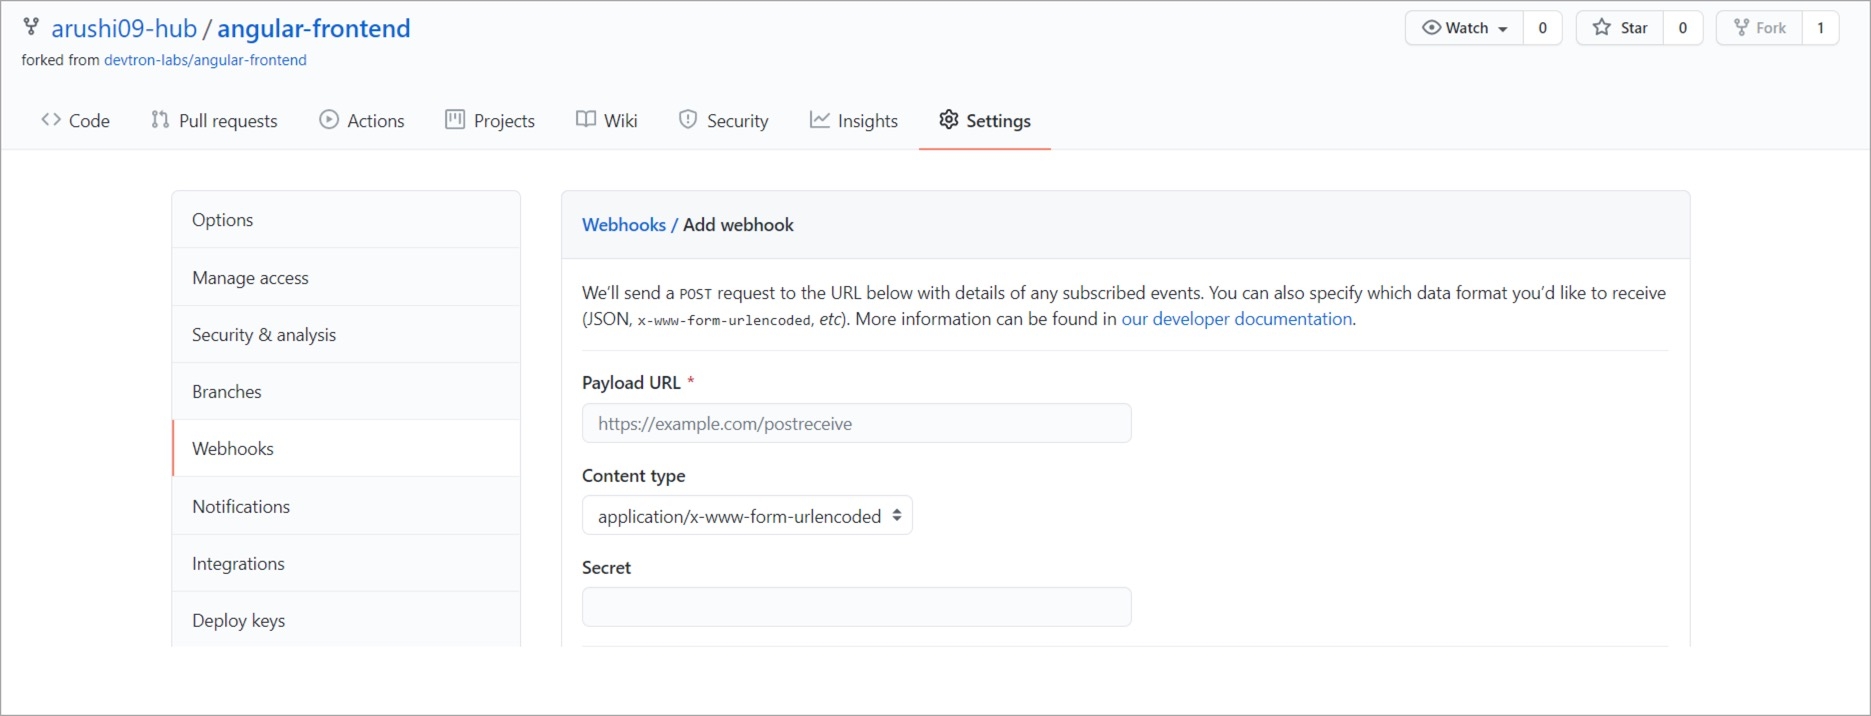
If you choose Pull Request or Tag Creation as the source type, you must first configure the Webhook for GitHub/Bitbucket as a prerequisite step.
Go to the Settings page of your repository and select Webhooks.
Select Add webhook.
In the Payload URL field, enter the Webhook URL that you get on selecting the source type as "Pull Request" or "Tag Creation" in Devtron the dashboard.
Change the Content-type to application/json.
In the Secret field, enter the secret from Devtron the dashboard when you select the source type as "Pull Request" or "Tag Creation".
Under Which events would you like to trigger this webhook?, select Let me select individual events. to trigger the webhook to build CI Pipeline.
Select Branch or tag creation and Pull Requests.
Select Add webhook.
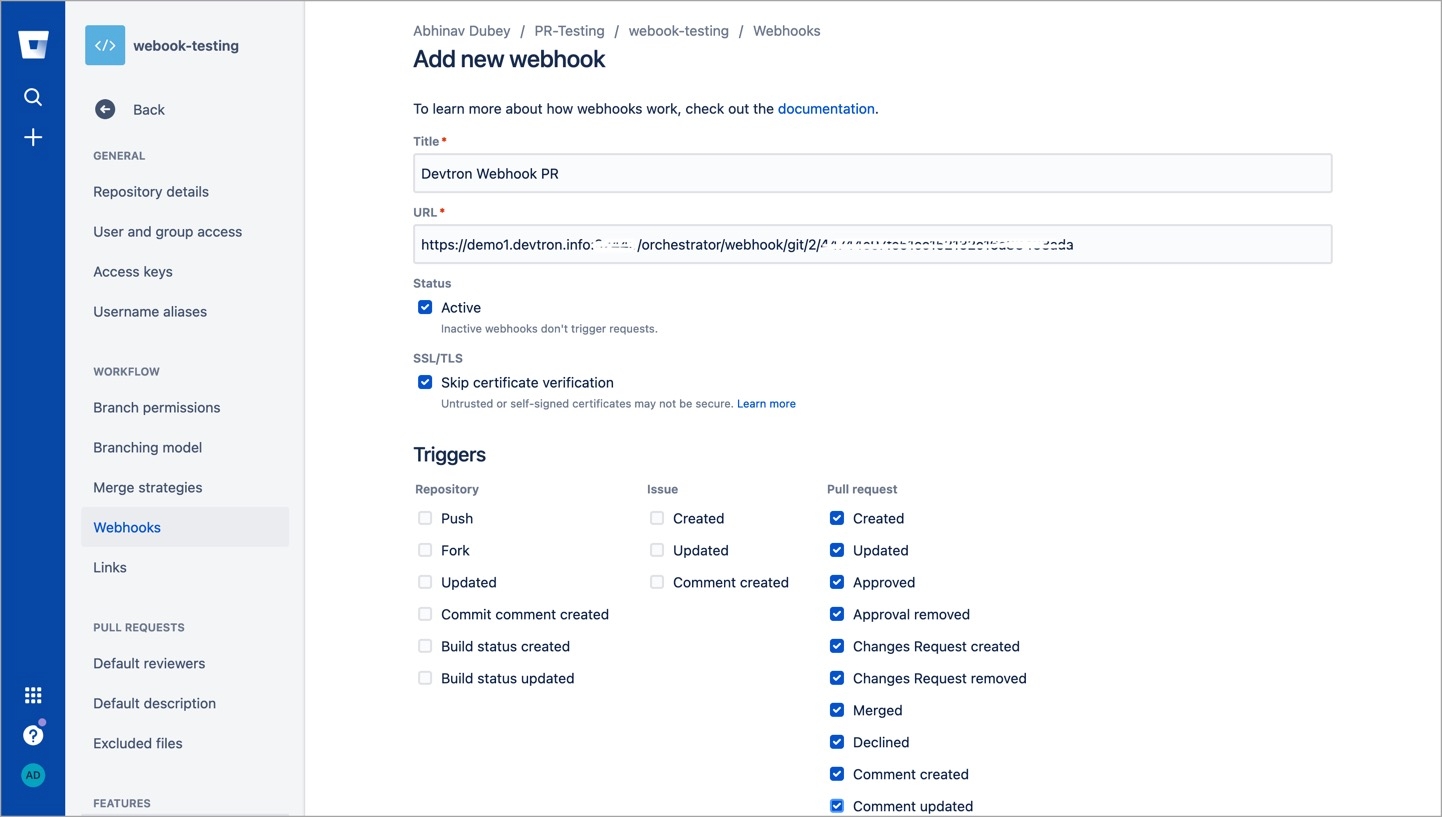
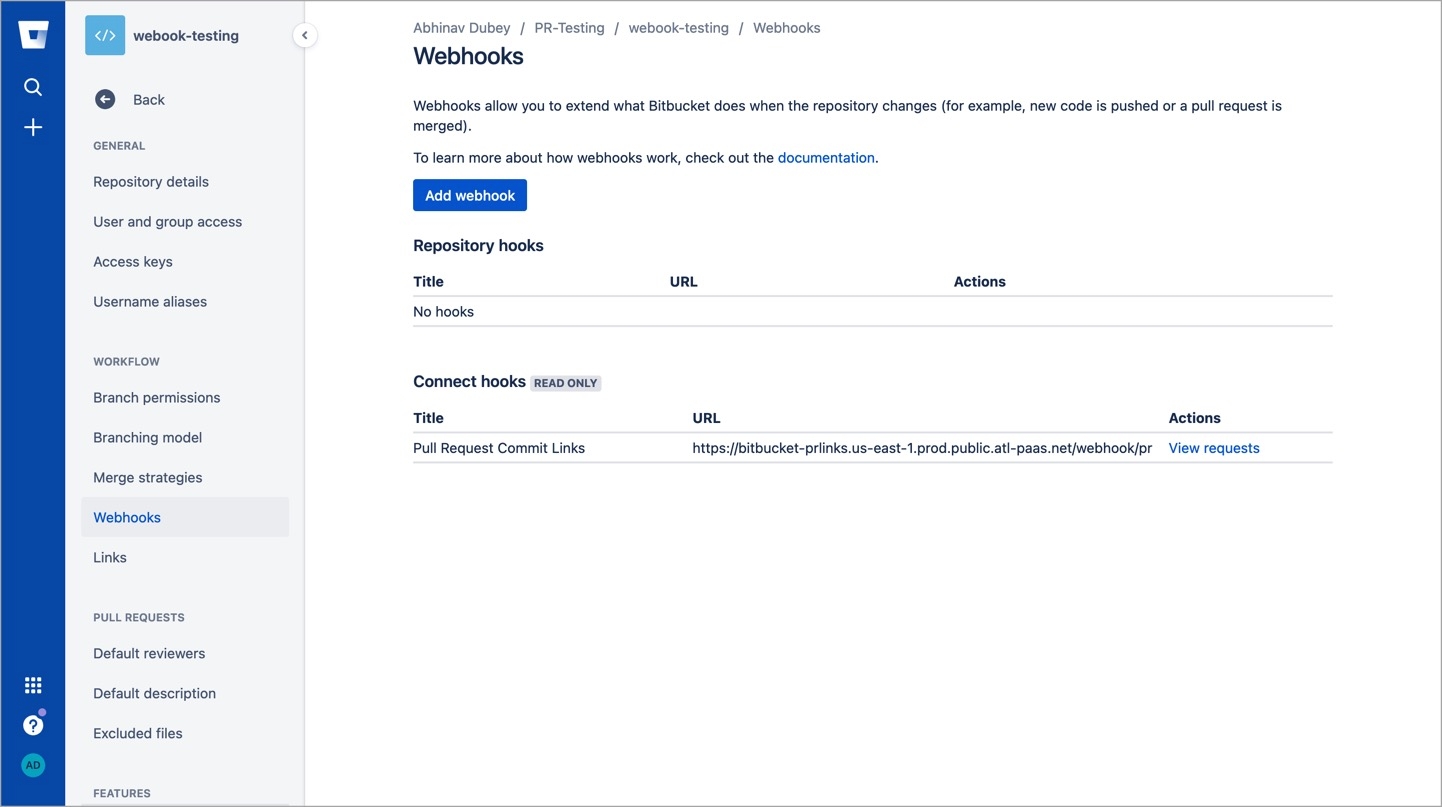
Go to the Repository settings page of your Bitbucket repository.
Select Webhooks and then select Add webhook.
Enter a Title for the webhook.
In the URL field, enter the Webhook URL that you get on selecting the source type as "Pull Request" or "Tag Creation" in the Devtron dashboard.
Select the event triggers for which you want to trigger the webhook.
Select Save to save your configurations.
After your CI pipeline is ready, you can start building your CD pipeline. Devtron enables you to design your CD pipeline in a way that fully automates your deployments. Images from CI stage can be deployed to one or more environments through dedicated CD pipelines.
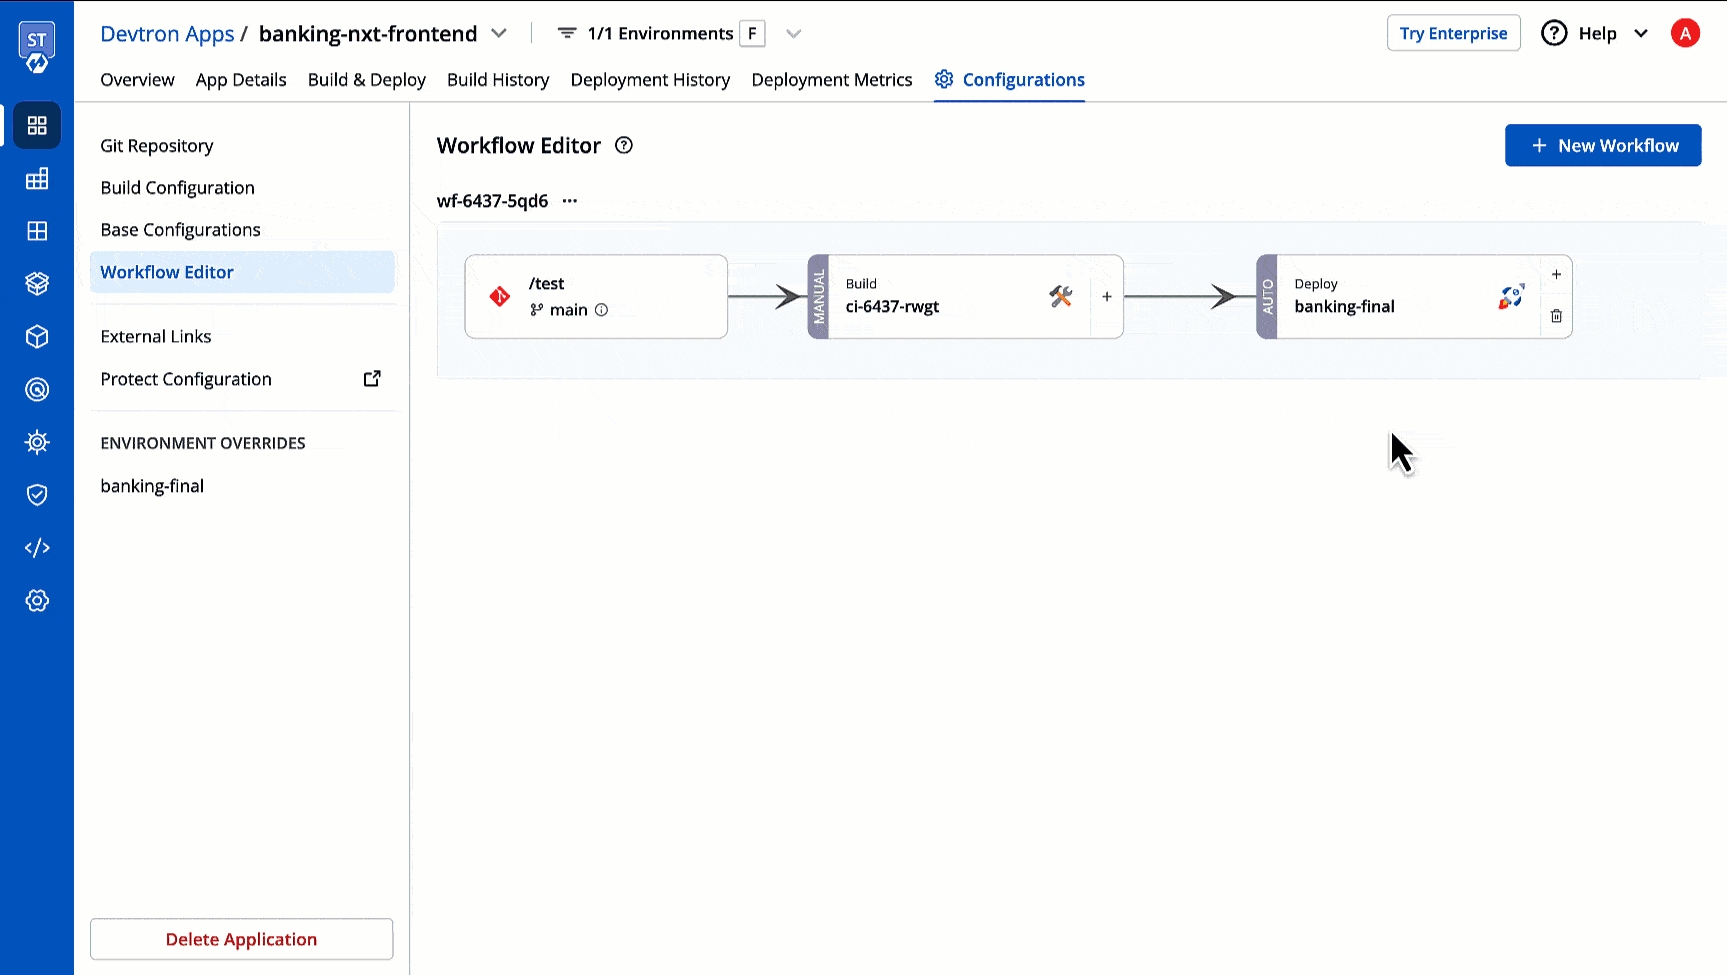
Click the '+' sign on CI Pipeline to attach a CD Pipeline to it.
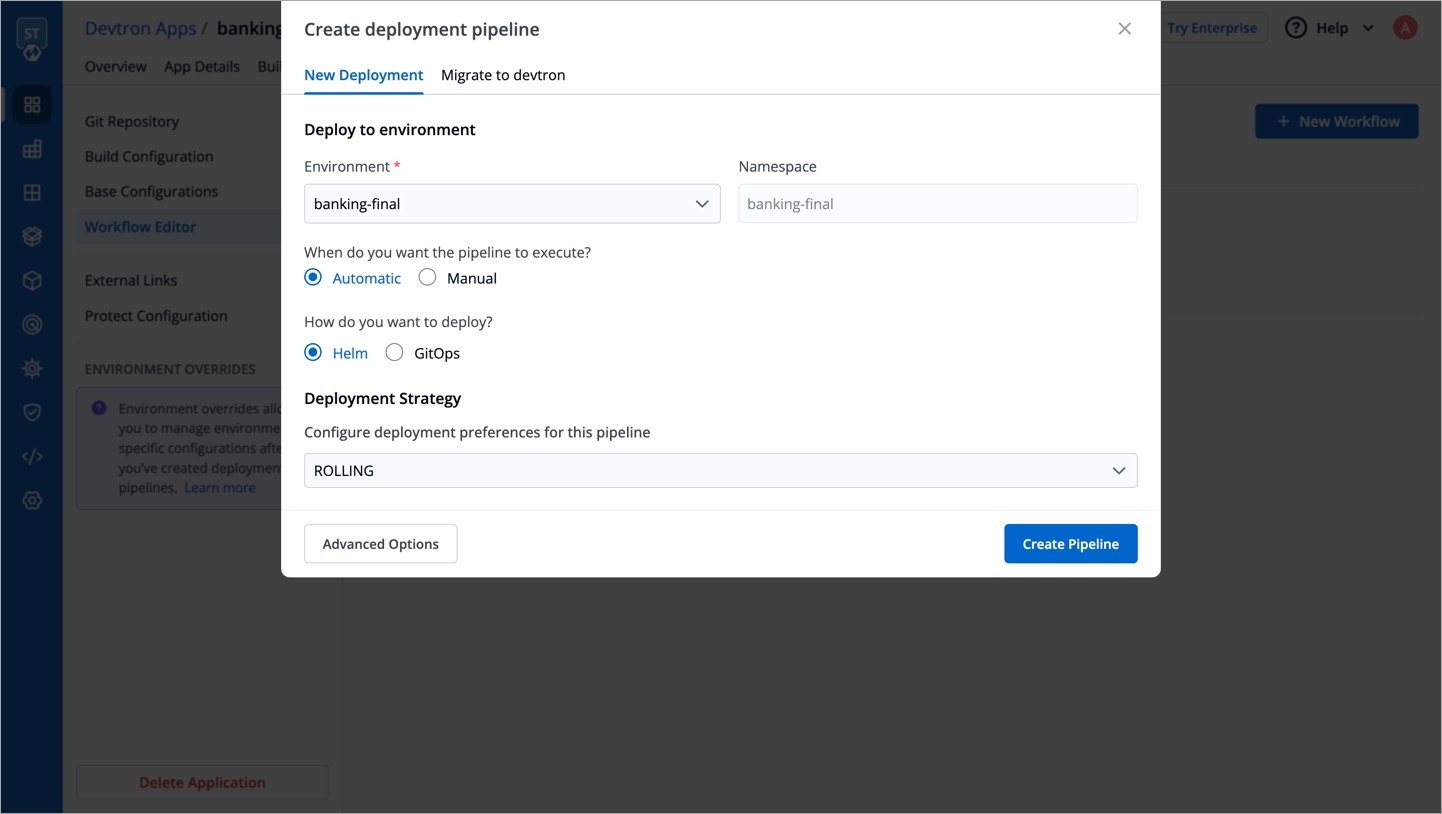
A basic Create deployment pipeline window will pop up.
Here, you get three sections:
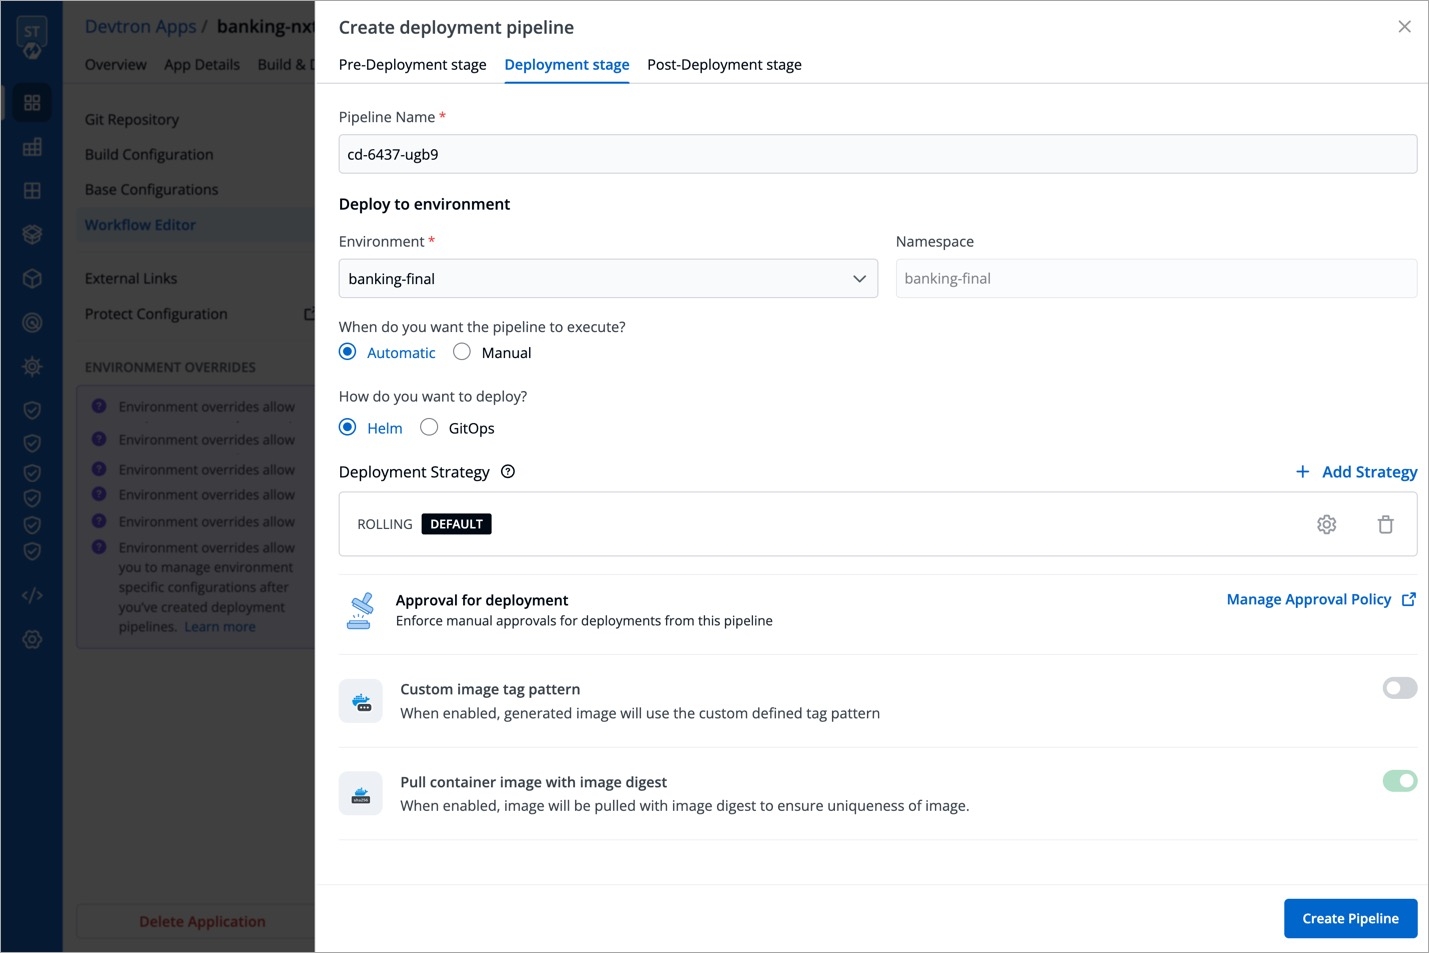
This section expects four inputs from you:
Environment
Select the environment where you want to deploy your application
(List of available environments)
Namespace
Automatically populated based on the selected environment
Not Applicable
Trigger
When to execute the deployment pipeline
Automatic: Deployment triggers automatically when a new image completes the previous stage (build pipeline or another deployment pipeline) Manual: Deployment is not initiated automatically. You can trigger deployment with a desired image.
Deployment Approach
How to deploy the application
Devtron supports multiple deployment strategies depending on the deployment chart type.
Refer Deployment Strategies to know more about each strategy in depth.
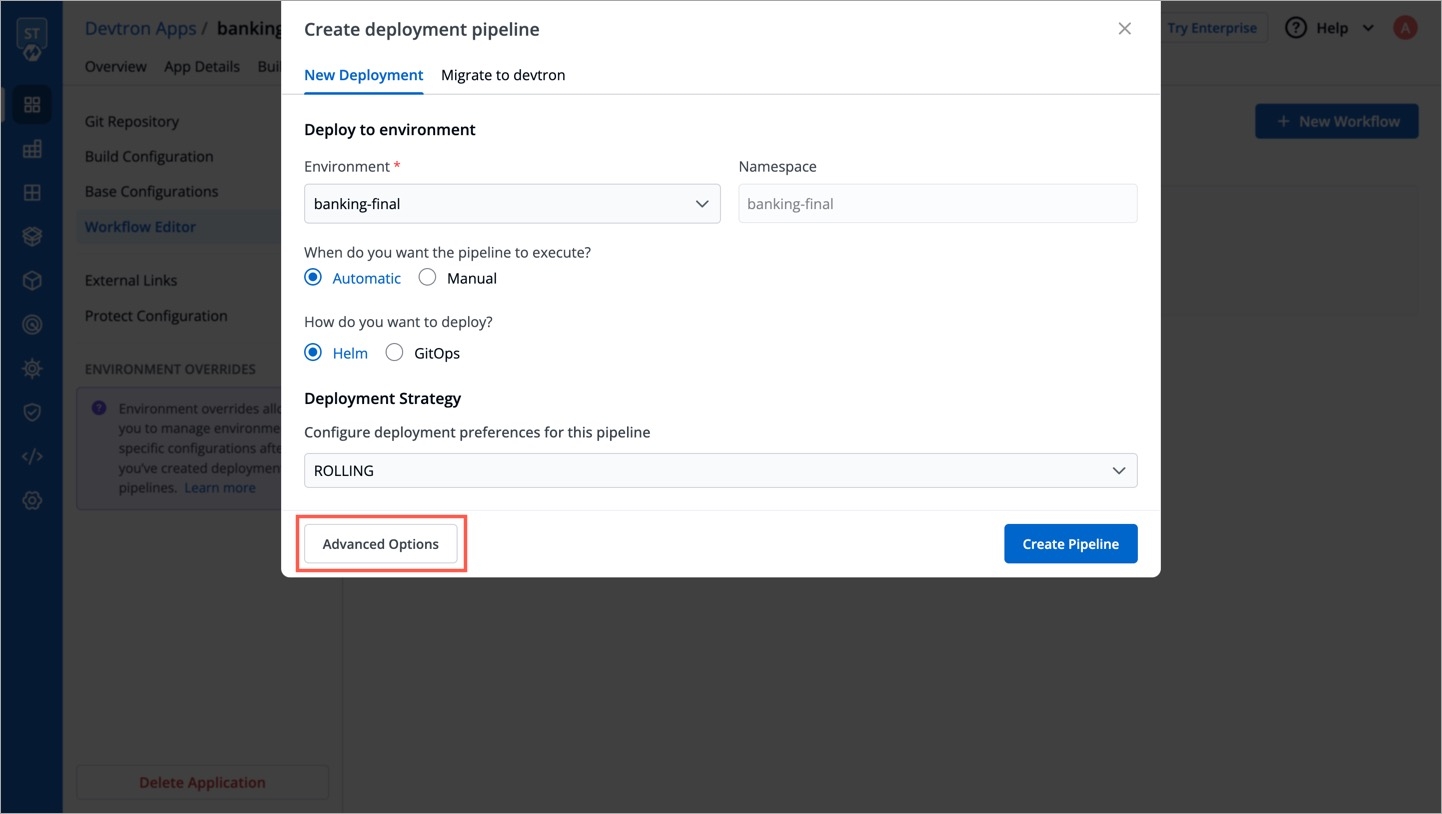
The next section is Advanced Options and it comes with additional capabilities. However, if you don't need them, you may proceed with a basic CD pipeline and click Create Pipeline.
This option is available at the bottom of the Create deployment pipeline window.
Now, the window will have 3 distinct tabs, and you will see the following additions:
You can create or edit a deployment strategy in Advanced Options. Remember, only the default strategy will be used for deployment, so use the SET DEFAULT button to mark your preferred strategy as default after creating it.
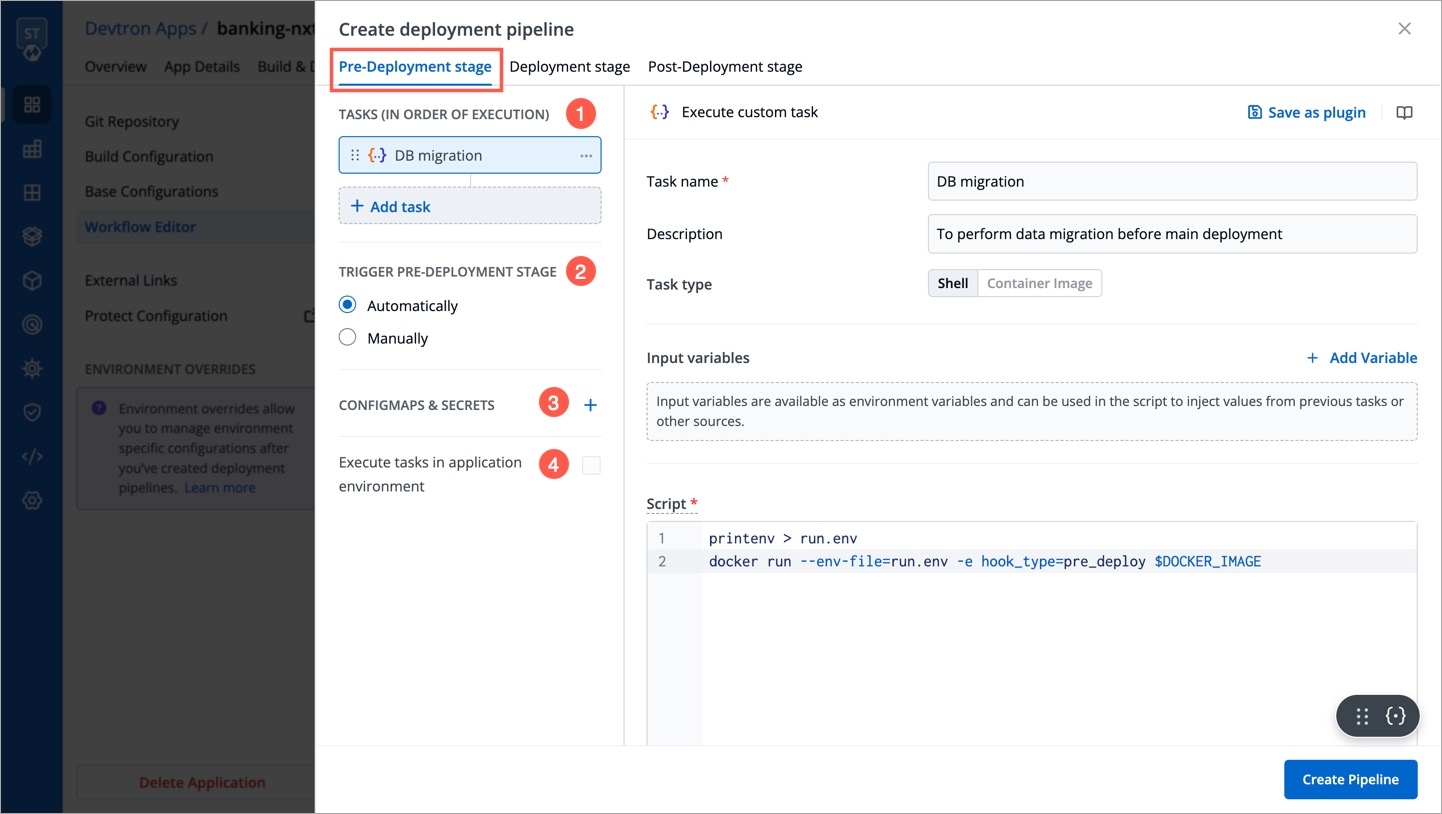
If your deployment requires prior actions like DB migration, code quality check (QC), etc., you can use the Pre-deployment stage to configure such tasks.
Tasks
Here you can add one or more tasks. The tasks can be re-arranged using drag-and-drop and they will be executed sequentially.
Trigger Pre-Deployment Stage
Refer the trigger types from here.
ConfigMaps & Secrets
Make sure you have added ConfigMaps and Secrets in App Configuration.
If you want to use some configuration files and secrets in pre-deployment stages or post-deployment stages, then you can use the ConfigMaps & Secrets options. You will get them as a drop-down in the pre-deployment stage.
Execute tasks in application environment
These Pre-deployment CD / Post-deployment CD pods can be created in your deployment cluster or the devtron build cluster. If your scripts/tasks has some dependency on the deployment environment, you may run these pods in the deployment cluster. Thus, your scripts (if any) can interact with the cluster services that may not be publicly exposed.
Some tasks require extra permissions for the node where Devtron is installed. However, if the node already has the necessary permissions for deploying applications, there is no need to assign them again. Instead, you can enable the Execute tasks in application environment option for the pre-CD or post-CD steps. By default, this option is disabled.
To enable the Execute tasks in application environment option, follow these steps:
Make sure your cluster has devtron-agent installed.
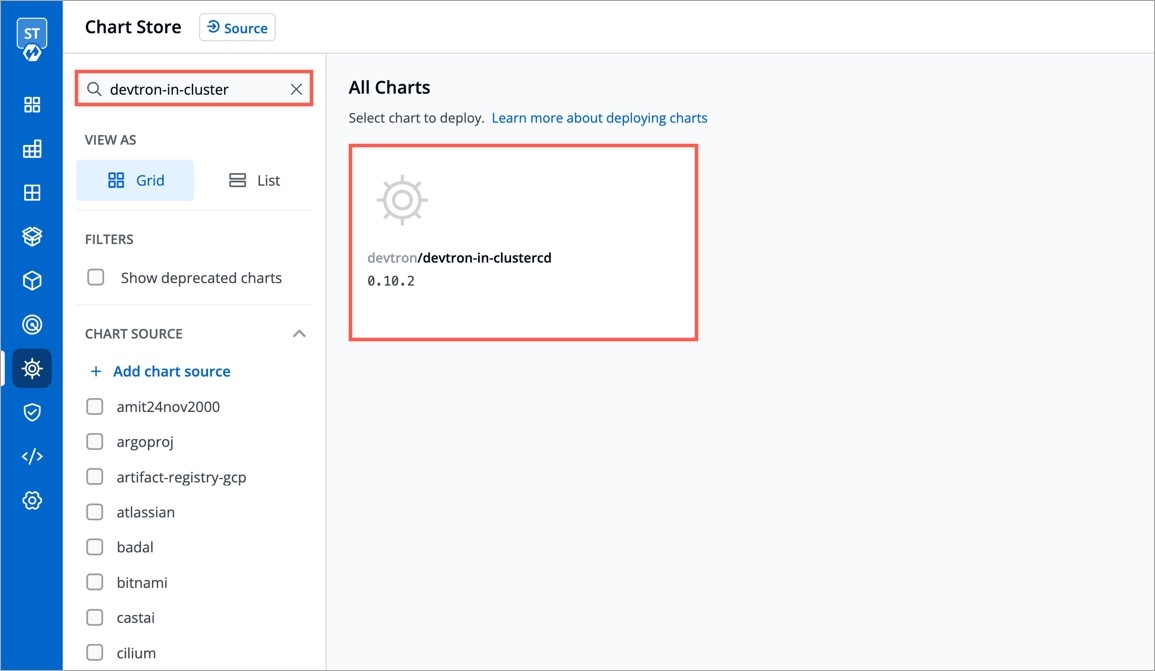
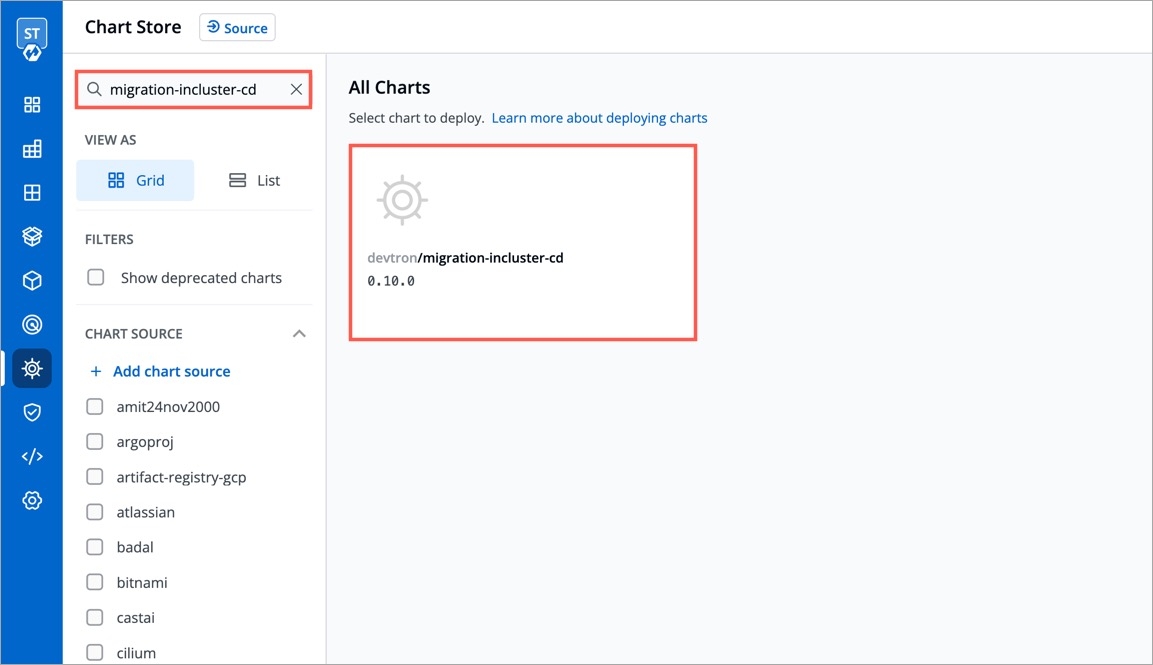
Go to the chart store and search for the devtron-in-clustercd chart.
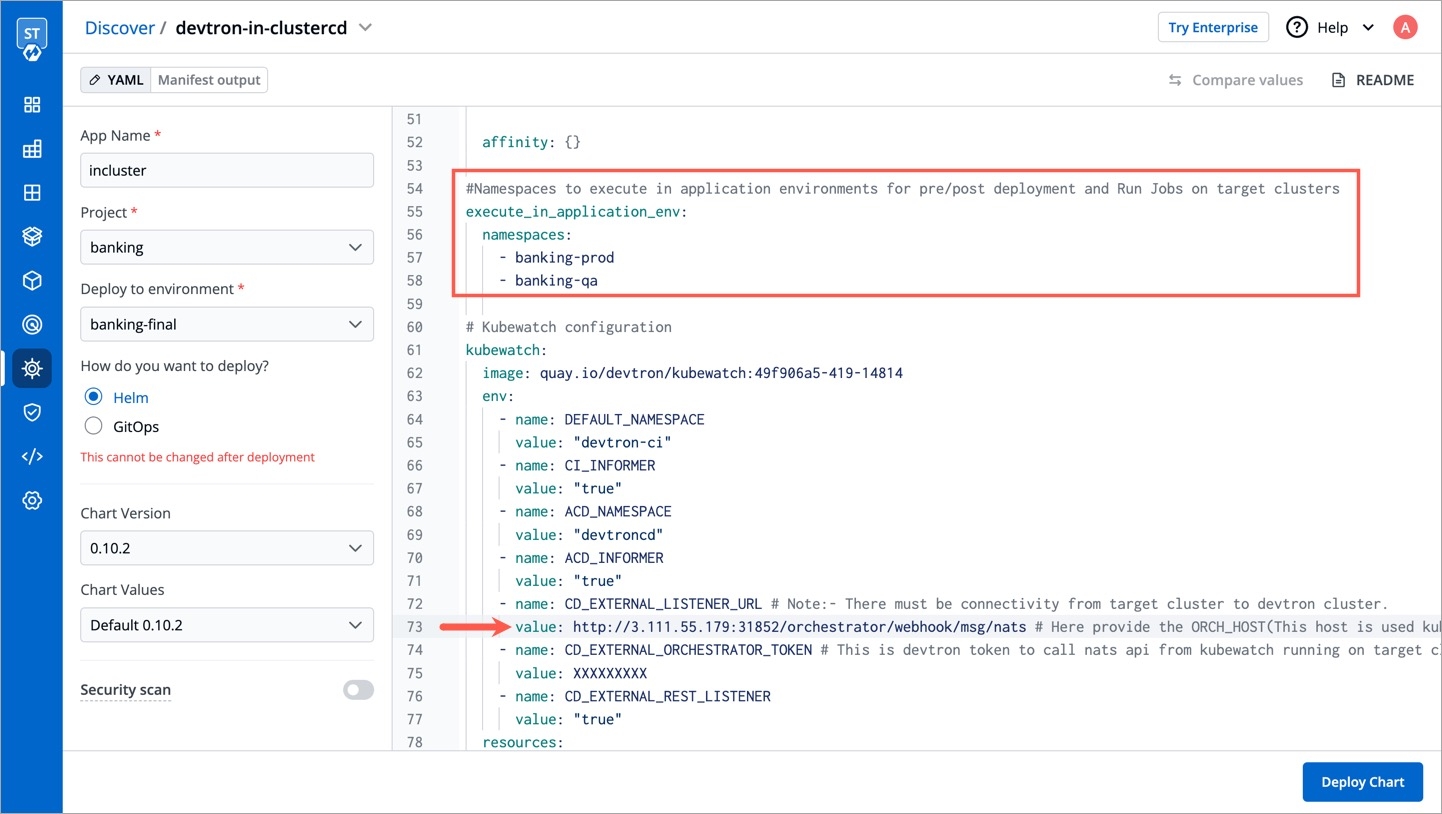
Configure the chart according to your requirements and deploy it in the target cluster.
After the deployment, edit the devtron-cm configmap and add the following key-value pair:
ORCH_HOST value should be same as of CD_EXTERNAL_LISTENER_URL value which is passed in values.yaml.
Delete the Devtron pod using the following command:
Again navigate to the chart store and search for the "migration-incluster-cd" chart.
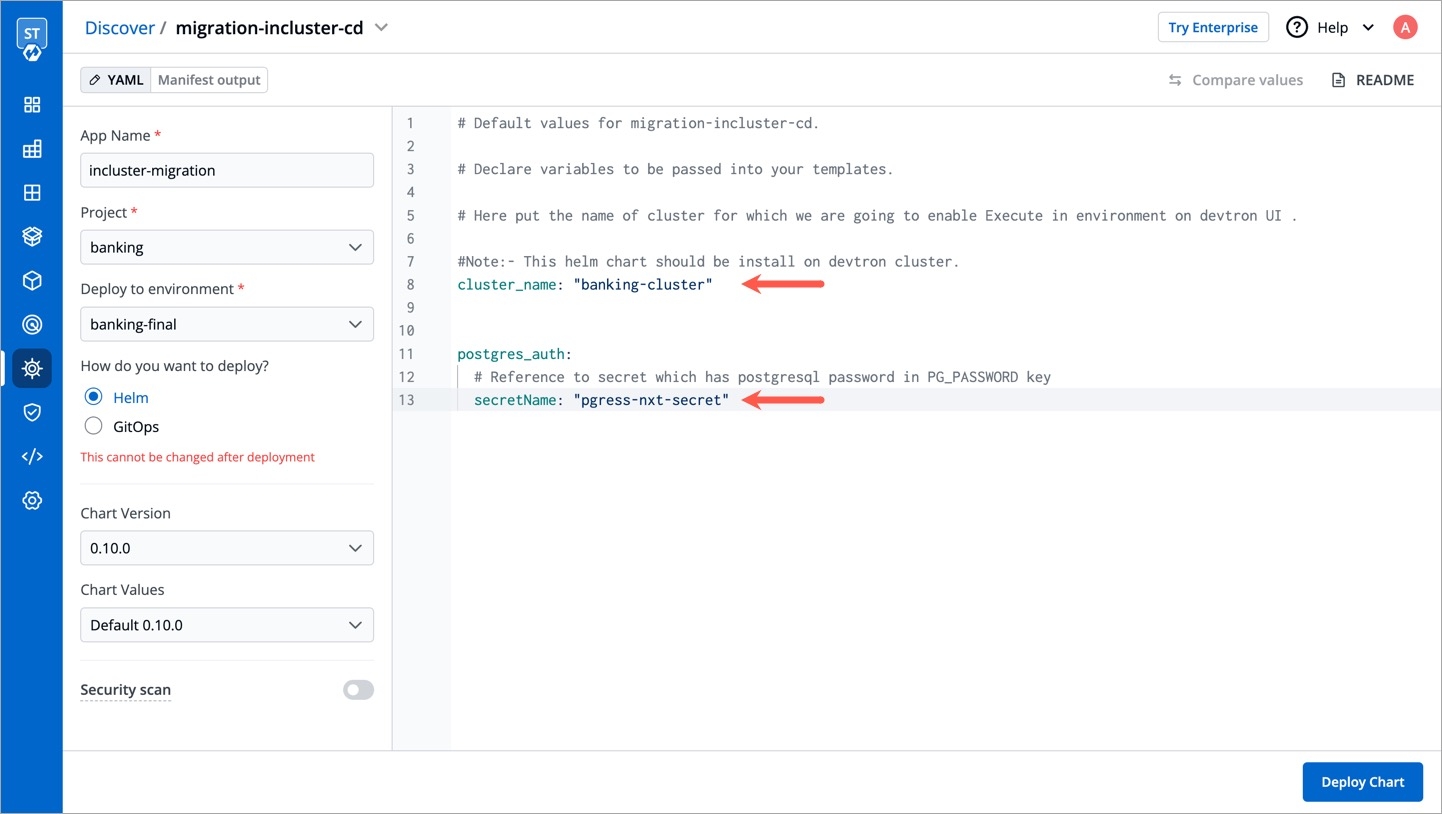
Edit the cluster-name and secret name values within the chart. The cluster name refers to the name used when adding the cluster in the global configuration and for which you are going to enable Execute tasks in application environment option.
Deploy the chart in any environment within the Devtron cluster. Now you should be able to enable Execute tasks in application environment option for an environment of target cluster.
Pipeline name will be auto-generated; however, you are free to modify the name as per your requirement.
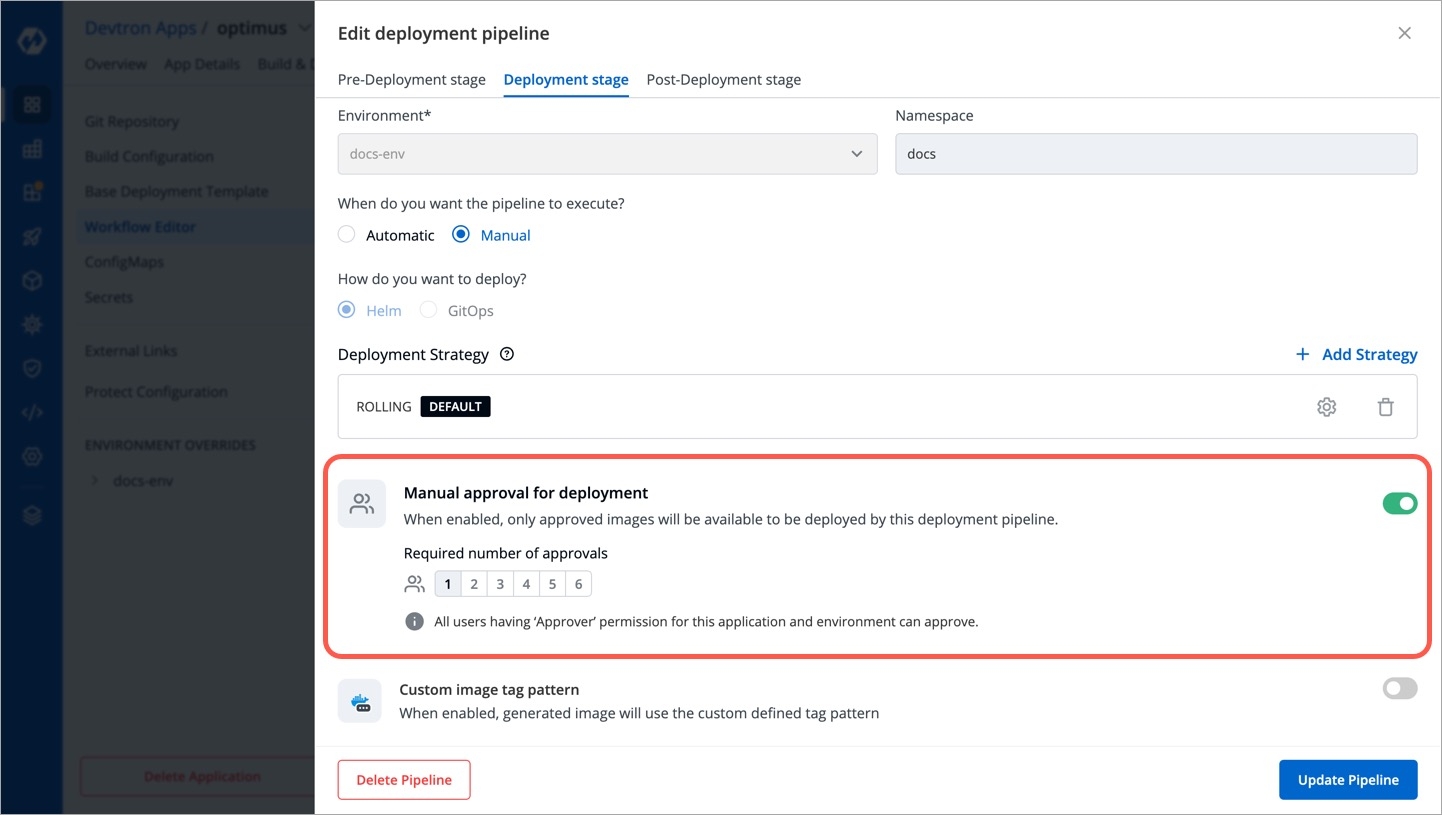
If you want only approved images to be eligible for deployment, enable the Manual approval for deployment option in the respective deployment pipeline. By doing so, unapproved images would be prevented from being deployed for that deployment pipeline.
Currently, only super-admins can enable or disable this option.
Users can also specify the number of approvals required for each deployment, where the permissible limit ranges from one approval (minimum) to six approvals (maximum). In other words, if the image doesn't get the specified number of approvals, it will not be eligible for deployment
To enable manual approval for deployment, follow these steps:
Click the deployment pipeline for which you want to enable manual approval.
Turn on the ‘Manual approval for deployment’ toggle button.
Select the number of approvals required for each deployment.
To know more about the approval process, refer Triggering CD.
This will be utilized only when an existing container image is copied to another repository using the Copy Container Image Plugin. The image will be copied with the tag generated by the Image Tag Pattern you defined.
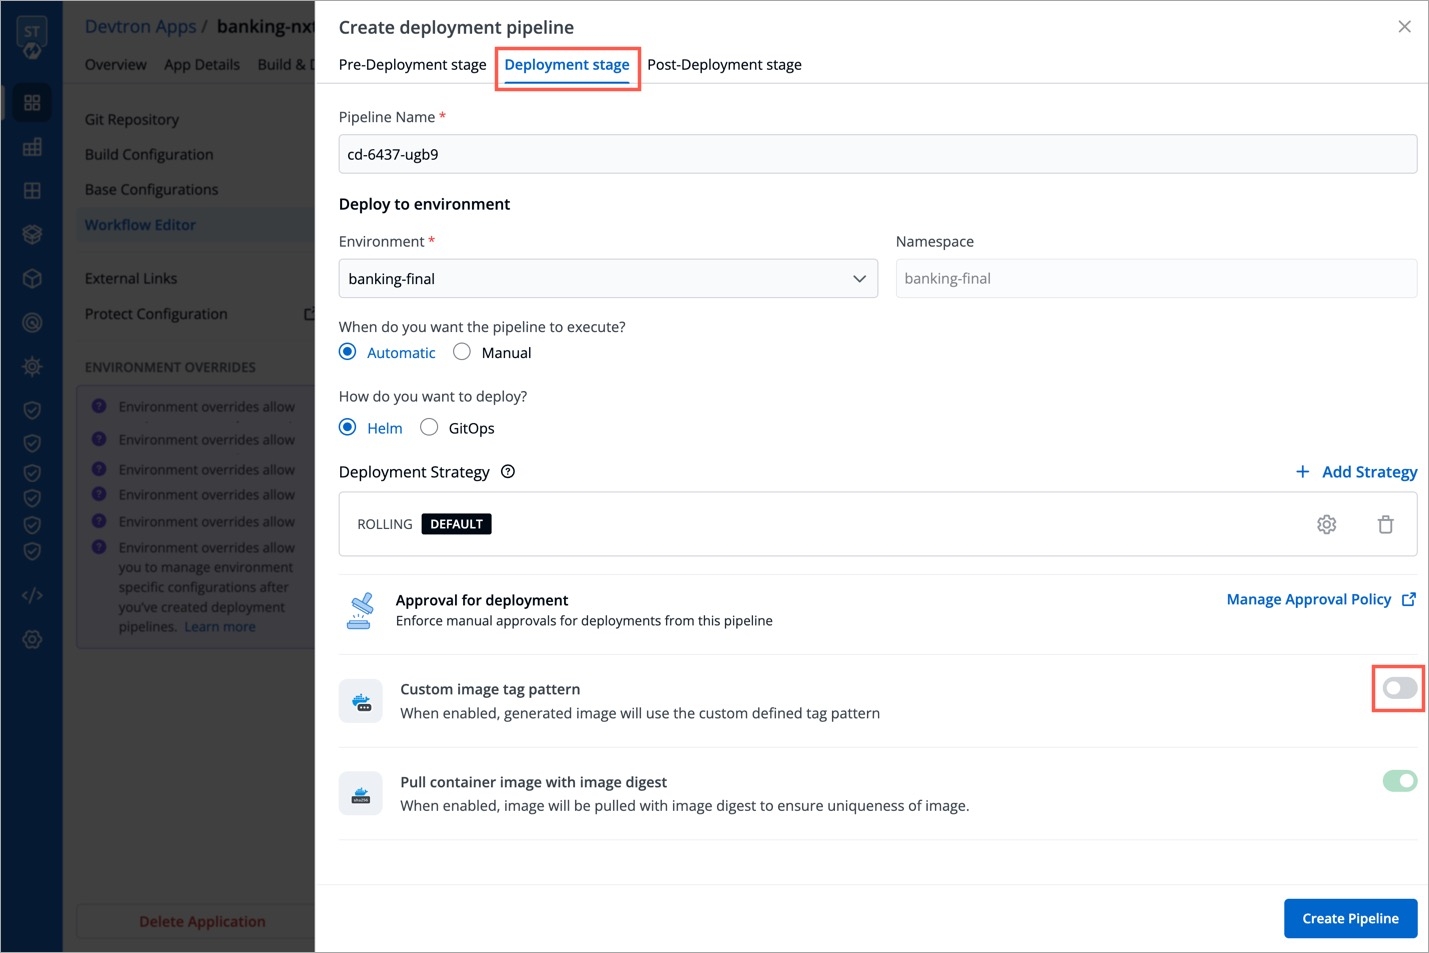
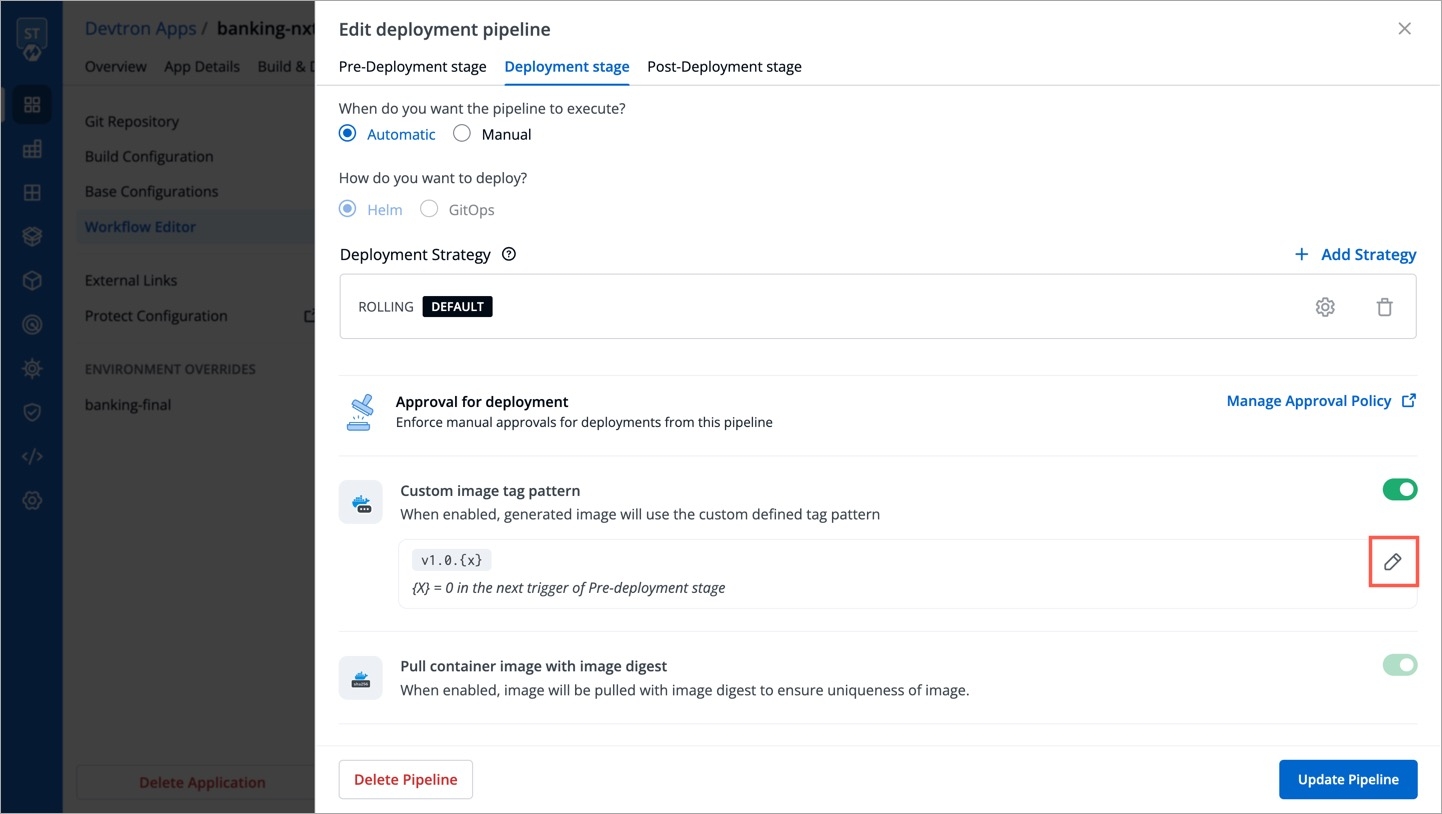
Enable the toggle button as shown below.
Click the edit icon.
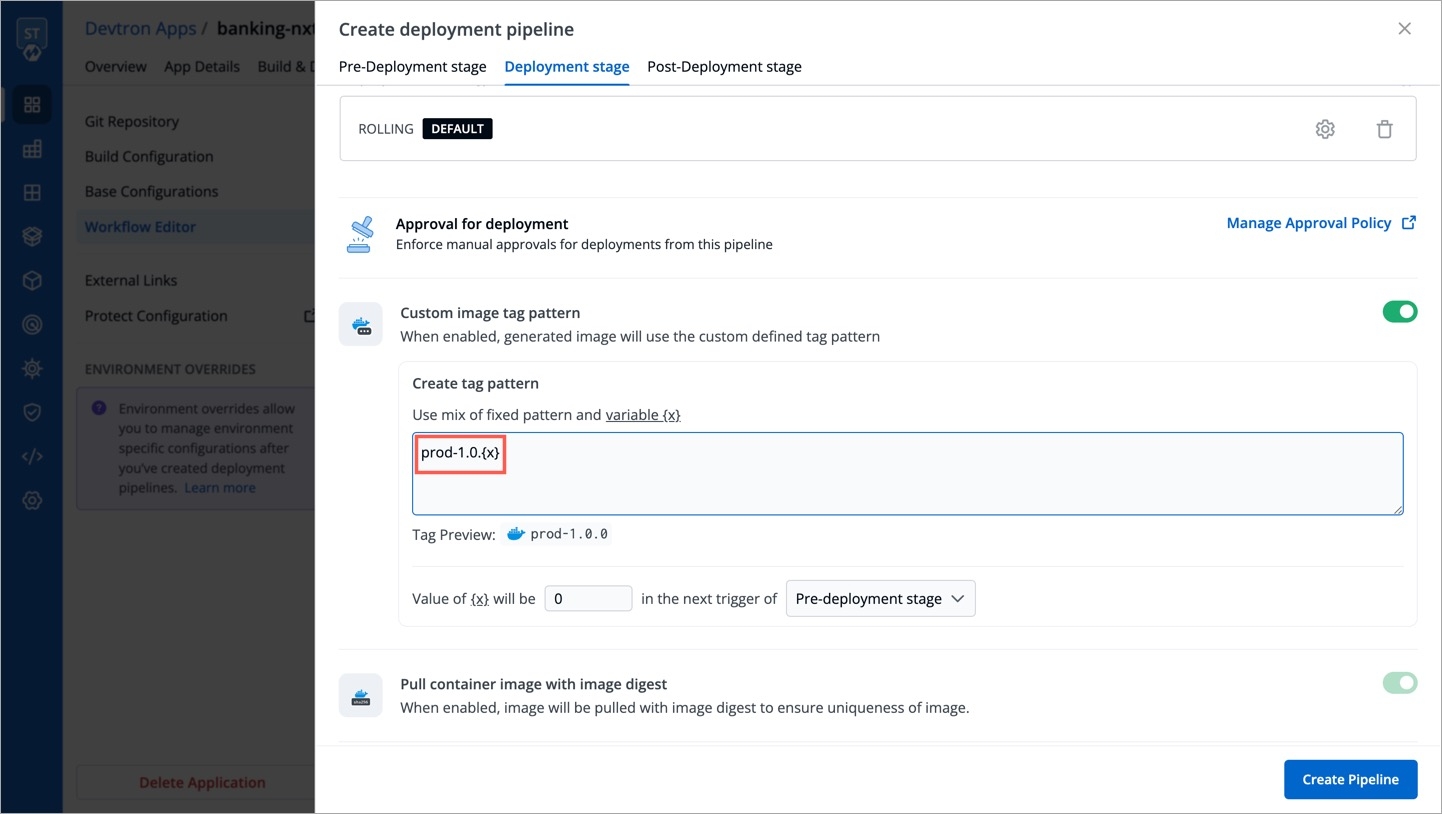
You can write an alphanumeric pattern for your image tag, e.g., prod-v1.0.{x}. Here, 'x' is a mandatory variable whose value will incrementally increase with every pre or post deployment trigger (that option is also available to you). You can also define the value of 'x' for the next trigger in case you want to change it.
Click Update Pipeline.
To know how and where this image tag would appear, refer Copy Container Image Plugin
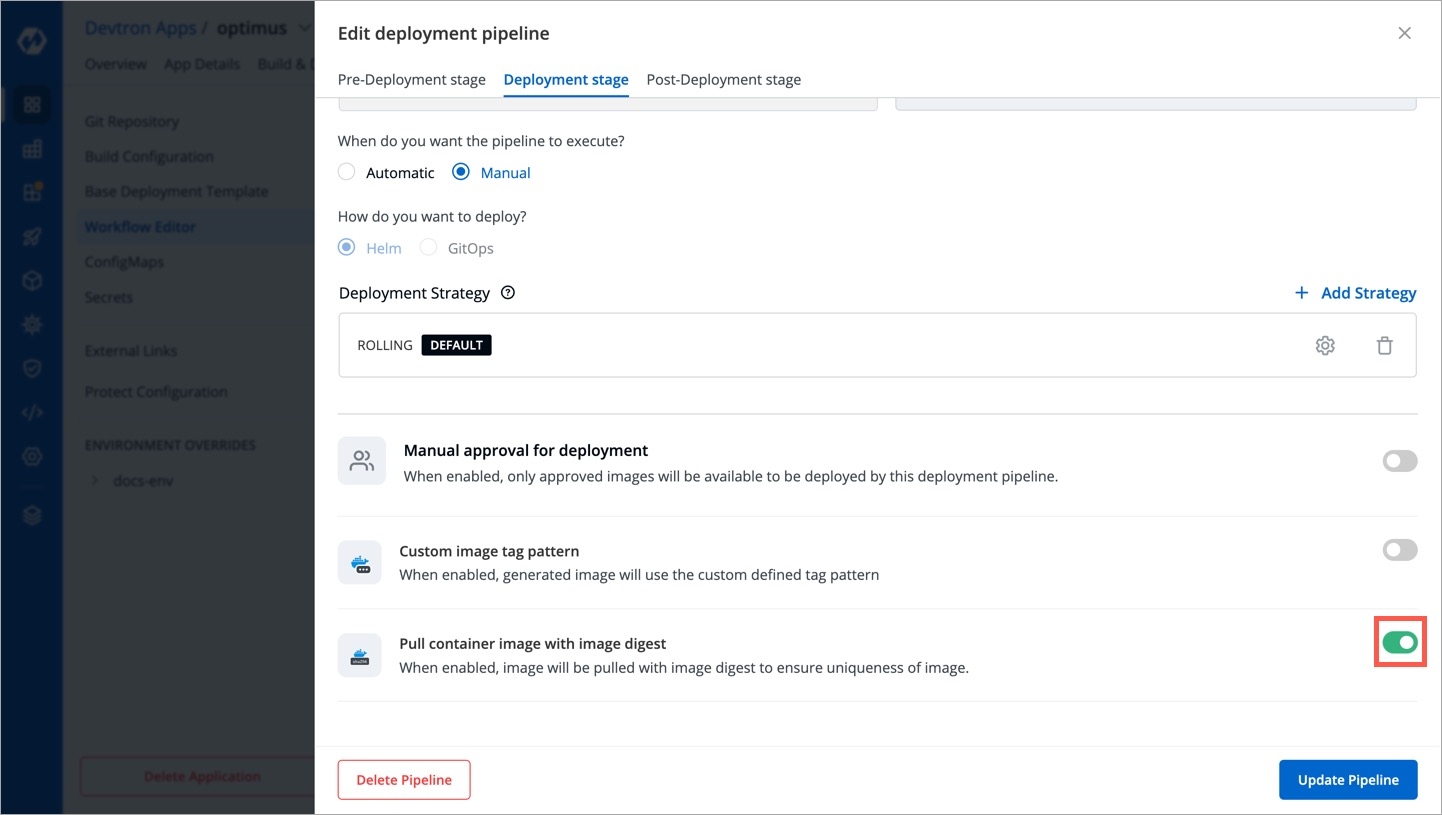
Although Devtron ensures that image tags remain unique, the same cannot be said if images are pushed with the same tag to the same container registry from outside Devtron.
Therefore, to eliminate the possibility of pulling an unintended image, Devtron offers the option to pull container images using digest and image tag.
An image digest is a unique and immutable SHA-256 string returned by the container registry when you push an image. So the image referenced by the digest will never change.
Users need to have Admin permission or above (along with access to the environment and application) to enable this option. However, this option will be non-editable in case the super-admin has enabled pull image digest in Global Configurations.
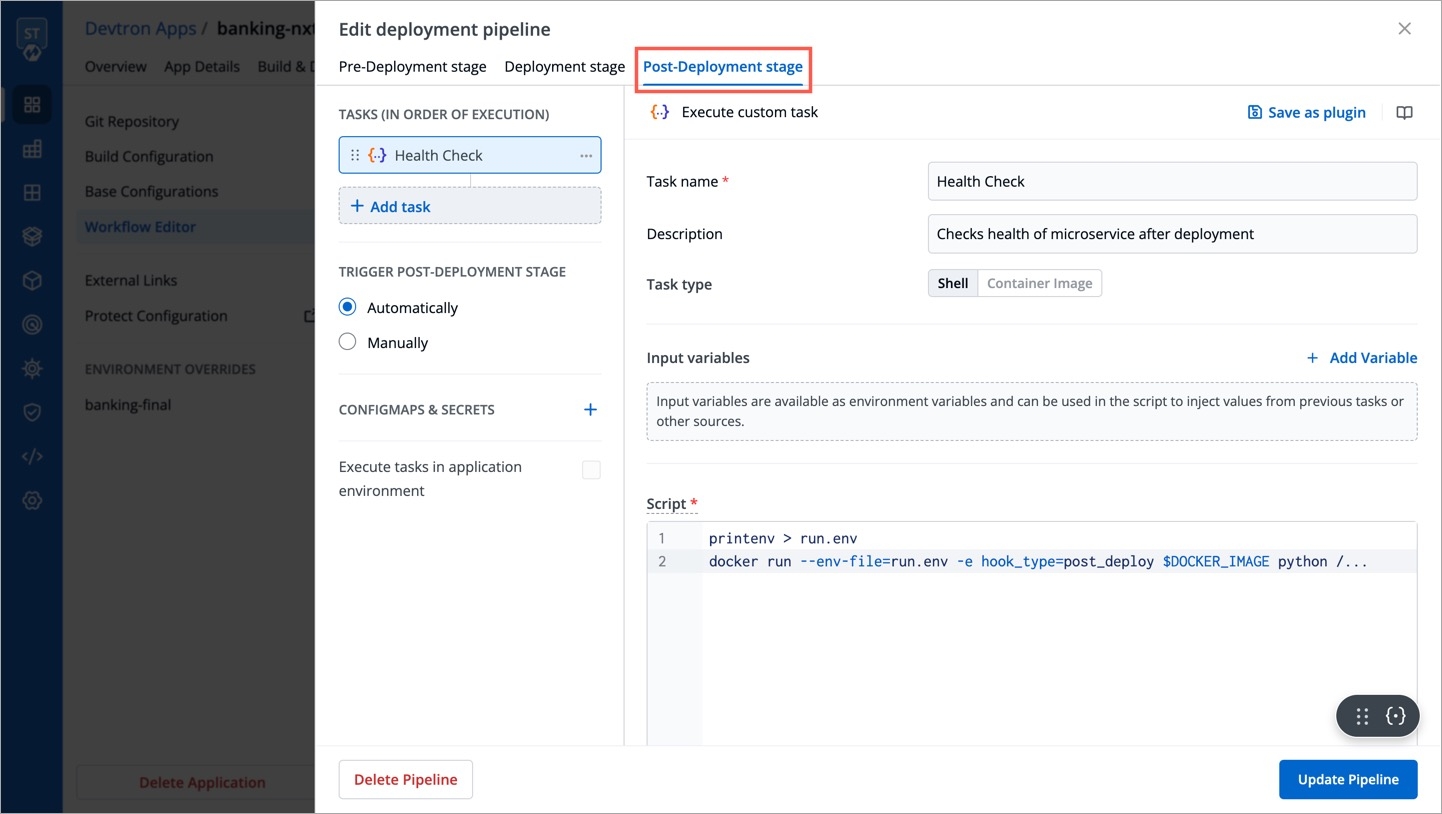
If you need to run any actions for e.g., closure of Jira ticket, load testing or performance testing, you can configure such actions in the post-deployment stages.
Post-deployment stages are similar to pre-deployment stages. The difference is, pre-deployment executes before the deployment, while post-deployment occurs after.
You can use ConfigMap and Secrets in post deployments as well. The option to execute tasks in application environment is available too.
You can update the deployment stages and the deployment strategy of the CD Pipeline whenever you require it. However, you cannot change the name of a CD Pipeline or its Deployment Environment. If you want a new CD pipeline for the same environment, first delete the previous CD pipeline.
To update a CD Pipeline, go to the App Configurations section, Click on Workflow editor and then click on the CD Pipeline you want to Update.
Make changes as needed and click on Update Pipeline to update this CD Pipeline.
If you no longer require the CD Pipeline, you can also delete the Pipeline.
To delete a CD Pipeline, go to the App Configurations and then click on the Workflow editor. Now click on the pipeline you wish to delete. A pop-up having the CD details will appear. Verify the name and the details to ensure that you are not accidentally deleting the wrong CD pipeline and then click Delete Pipeline to delete it.
Deleting a CD pipeline also deletes all the K8s resources associated with it and will bring a disruption in the deployed micro-service. Before deleting a CD pipeline, please ensure that the associated resources are not being used in any production workload.
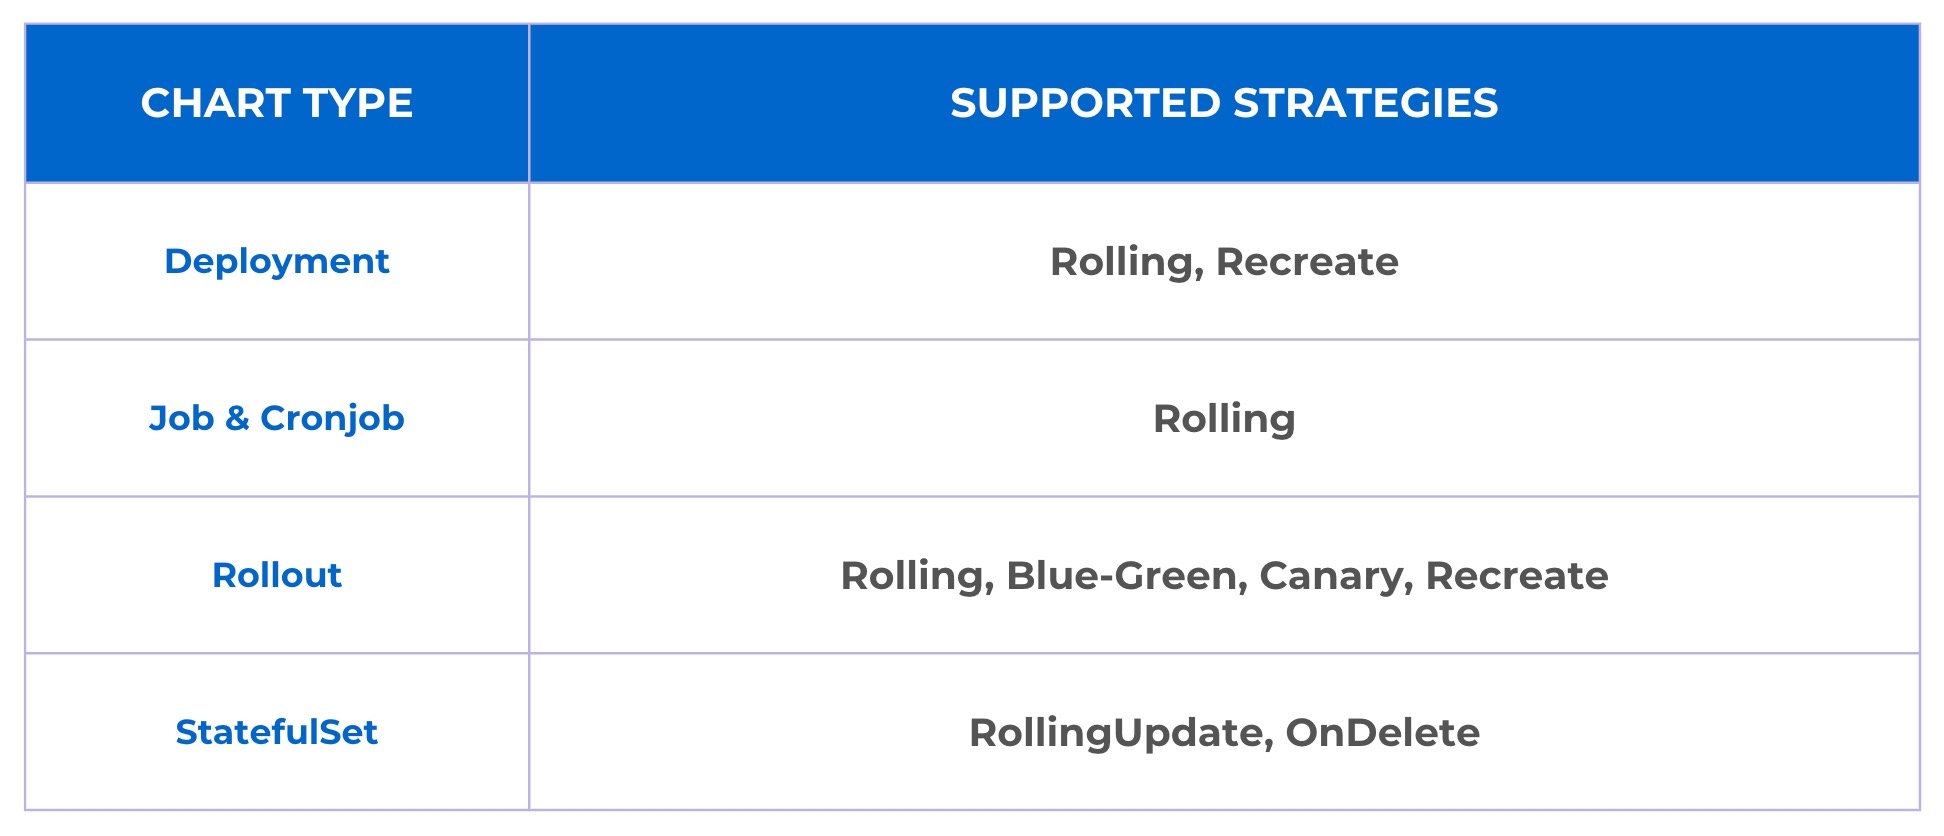
A deployment strategy is a method of updating, downgrading, or creating new versions of an application. The options you see under deployment strategy depend on the selected chart type (see fig 2). Below are some deployment configuration-based strategies.
Blue-green deployments involve running two versions of an application at the same time and moving traffic from the in-production version (the green version) to the newer version (the blue version).
autoPromotionSeconds
It will make the rollout automatically promote the new ReplicaSet to active Service after this time has passed
scaleDownDelaySeconds
It is used to delay scaling down the old ReplicaSet after the active Service is switched to the new ReplicaSet
previewReplicaCount
It will indicate the number of replicas that the new version of an application should run
autoPromotionEnabled
It will make the rollout automatically promote the new ReplicaSet to the active service
A rolling deployment slowly replaces instances of the previous version of an application with instances of the new version of the application. Rolling deployment typically waits for new pods to become ready via a readiness check before scaling down the old components. If a significant issue occurs, the rolling deployment can be aborted.
maxSurge
No. of replicas allowed above the scheduled quantity
maxUnavailable
Maximum number of pods allowed to be unavailable
Canary deployments are a pattern for rolling out releases to a subset of users or servers. The idea is to first deploy the change to a small subset of servers, test it, and then roll the change out to the rest of the servers. The canary deployment serves as an early warning indicator with less impact on downtime: if the canary deployment fails, the rest of the servers aren't impacted.
maxSurge
It defines the maximum number of replicas the rollout can create to move to the correct ratio set by the last setWeight
maxUnavailable
The maximum number of pods that can be unavailable during the update
setWeight
It is the required percent of pods to move to the next step
duration
It is used to set the duration to wait to move to the next step
The recreate strategy is a dummy deployment that consists of shutting down version 'A' and then deploying version 'B' after version 'A' is turned off.
A recreate deployment incurs downtime because, for a brief period, no instances of your application are running. However, your old code and new code do not run at the same time. It terminates the old version and releases the new one.
Unlike other strategies mentioned above, 'Recreate' strategy doesn't contain keys for you to configure.
Does your app have different requirements for different environments? Read Environment Overrides
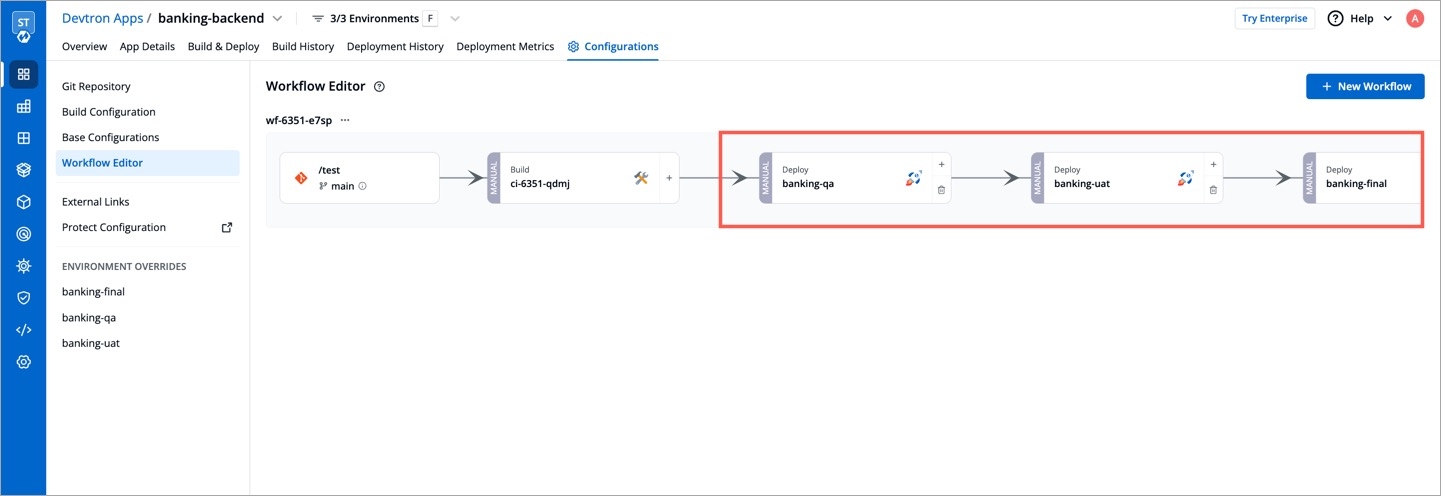
Devtron supports attaching multiple deployment pipelines to a single build pipeline, in its workflow editor. This feature lets you deploy an image first to stage, run tests and then deploy the same image to production.
Please follow the steps mentioned below to create sequential pipelines:
After creating CI/build pipeline, create a CD pipeline by clicking on the + sign on CI pipeline and configure the CD pipeline as per your requirements.
To add another CD Pipeline sequentially after previous one, again click on + sign on the last CD pipeline.
Similarly, you can add multiple CD pipelines by clicking + sign of the last CD pipeline, each deploying in different environments.
If you have multiple applications that already have an existing pipeline (for a given environment) in their workflow, you may clone the same pipeline and its configurations for new environments instead of recreating them in each application. Refer Clone Pipeline Config to know more.
Source type to trigger the CI. Available options: | | |
Select the source type to build the CI pipeline: | | |
Environment: Provide the name of the .
Namespace: Provide the .
Helm or GitOps Refer


