Loading...
Loading...
Loading...
Loading...
Loading...
Loading...
Loading...
Loading...
Loading...
Loading...
Loading...
Loading...
Loading...
Loading...
Loading...
Loading...
Loading...
Loading...
Loading...
Loading...
Loading...
Loading...
Loading...
Loading...
Loading...
Loading...
Loading...
Loading...
Loading...
Loading...
Loading...
Loading...
Authorization section describes how to authenticate and authorize access to resources, also managing role-based access levels in Devtron.
Access can be granted to a user via:
Once Devtron is installed, it has a built-in admin user with super admin privileges with unrestricted access to all Devtron resources. We recommended to use a user with super admin privileges for initial and global configurations only and then switch to local users or configure SSO integration.
Only users with super-admin privileges can create SSO configuration. Devtron uses Dex for authenticating a user against the identity provider.
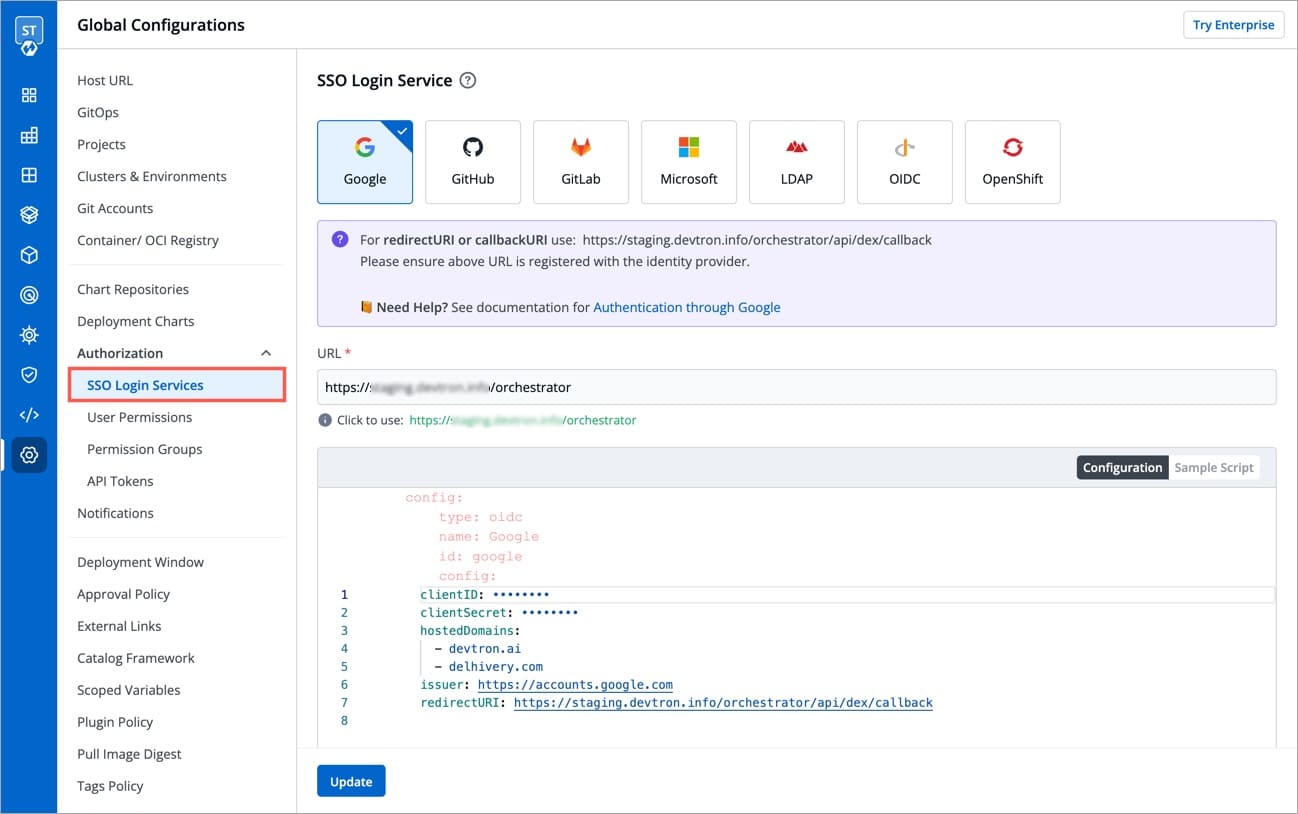
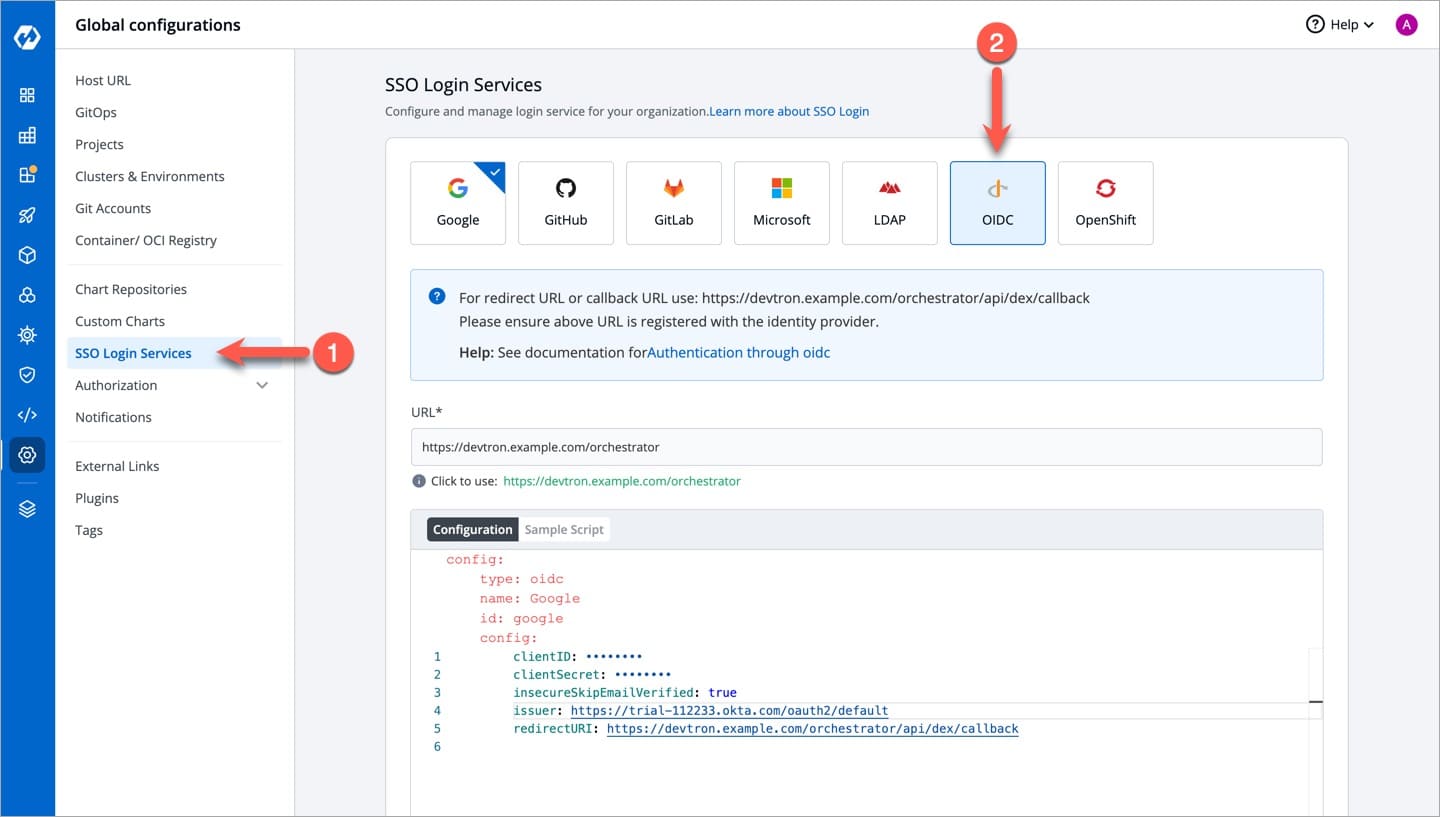
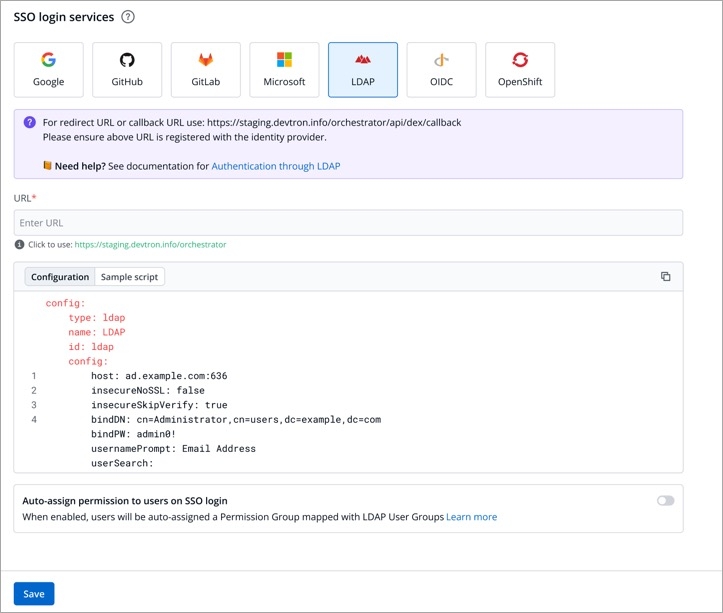
To add/edit SSO configuration, go to the SSO Login Services section of Global Configurations.
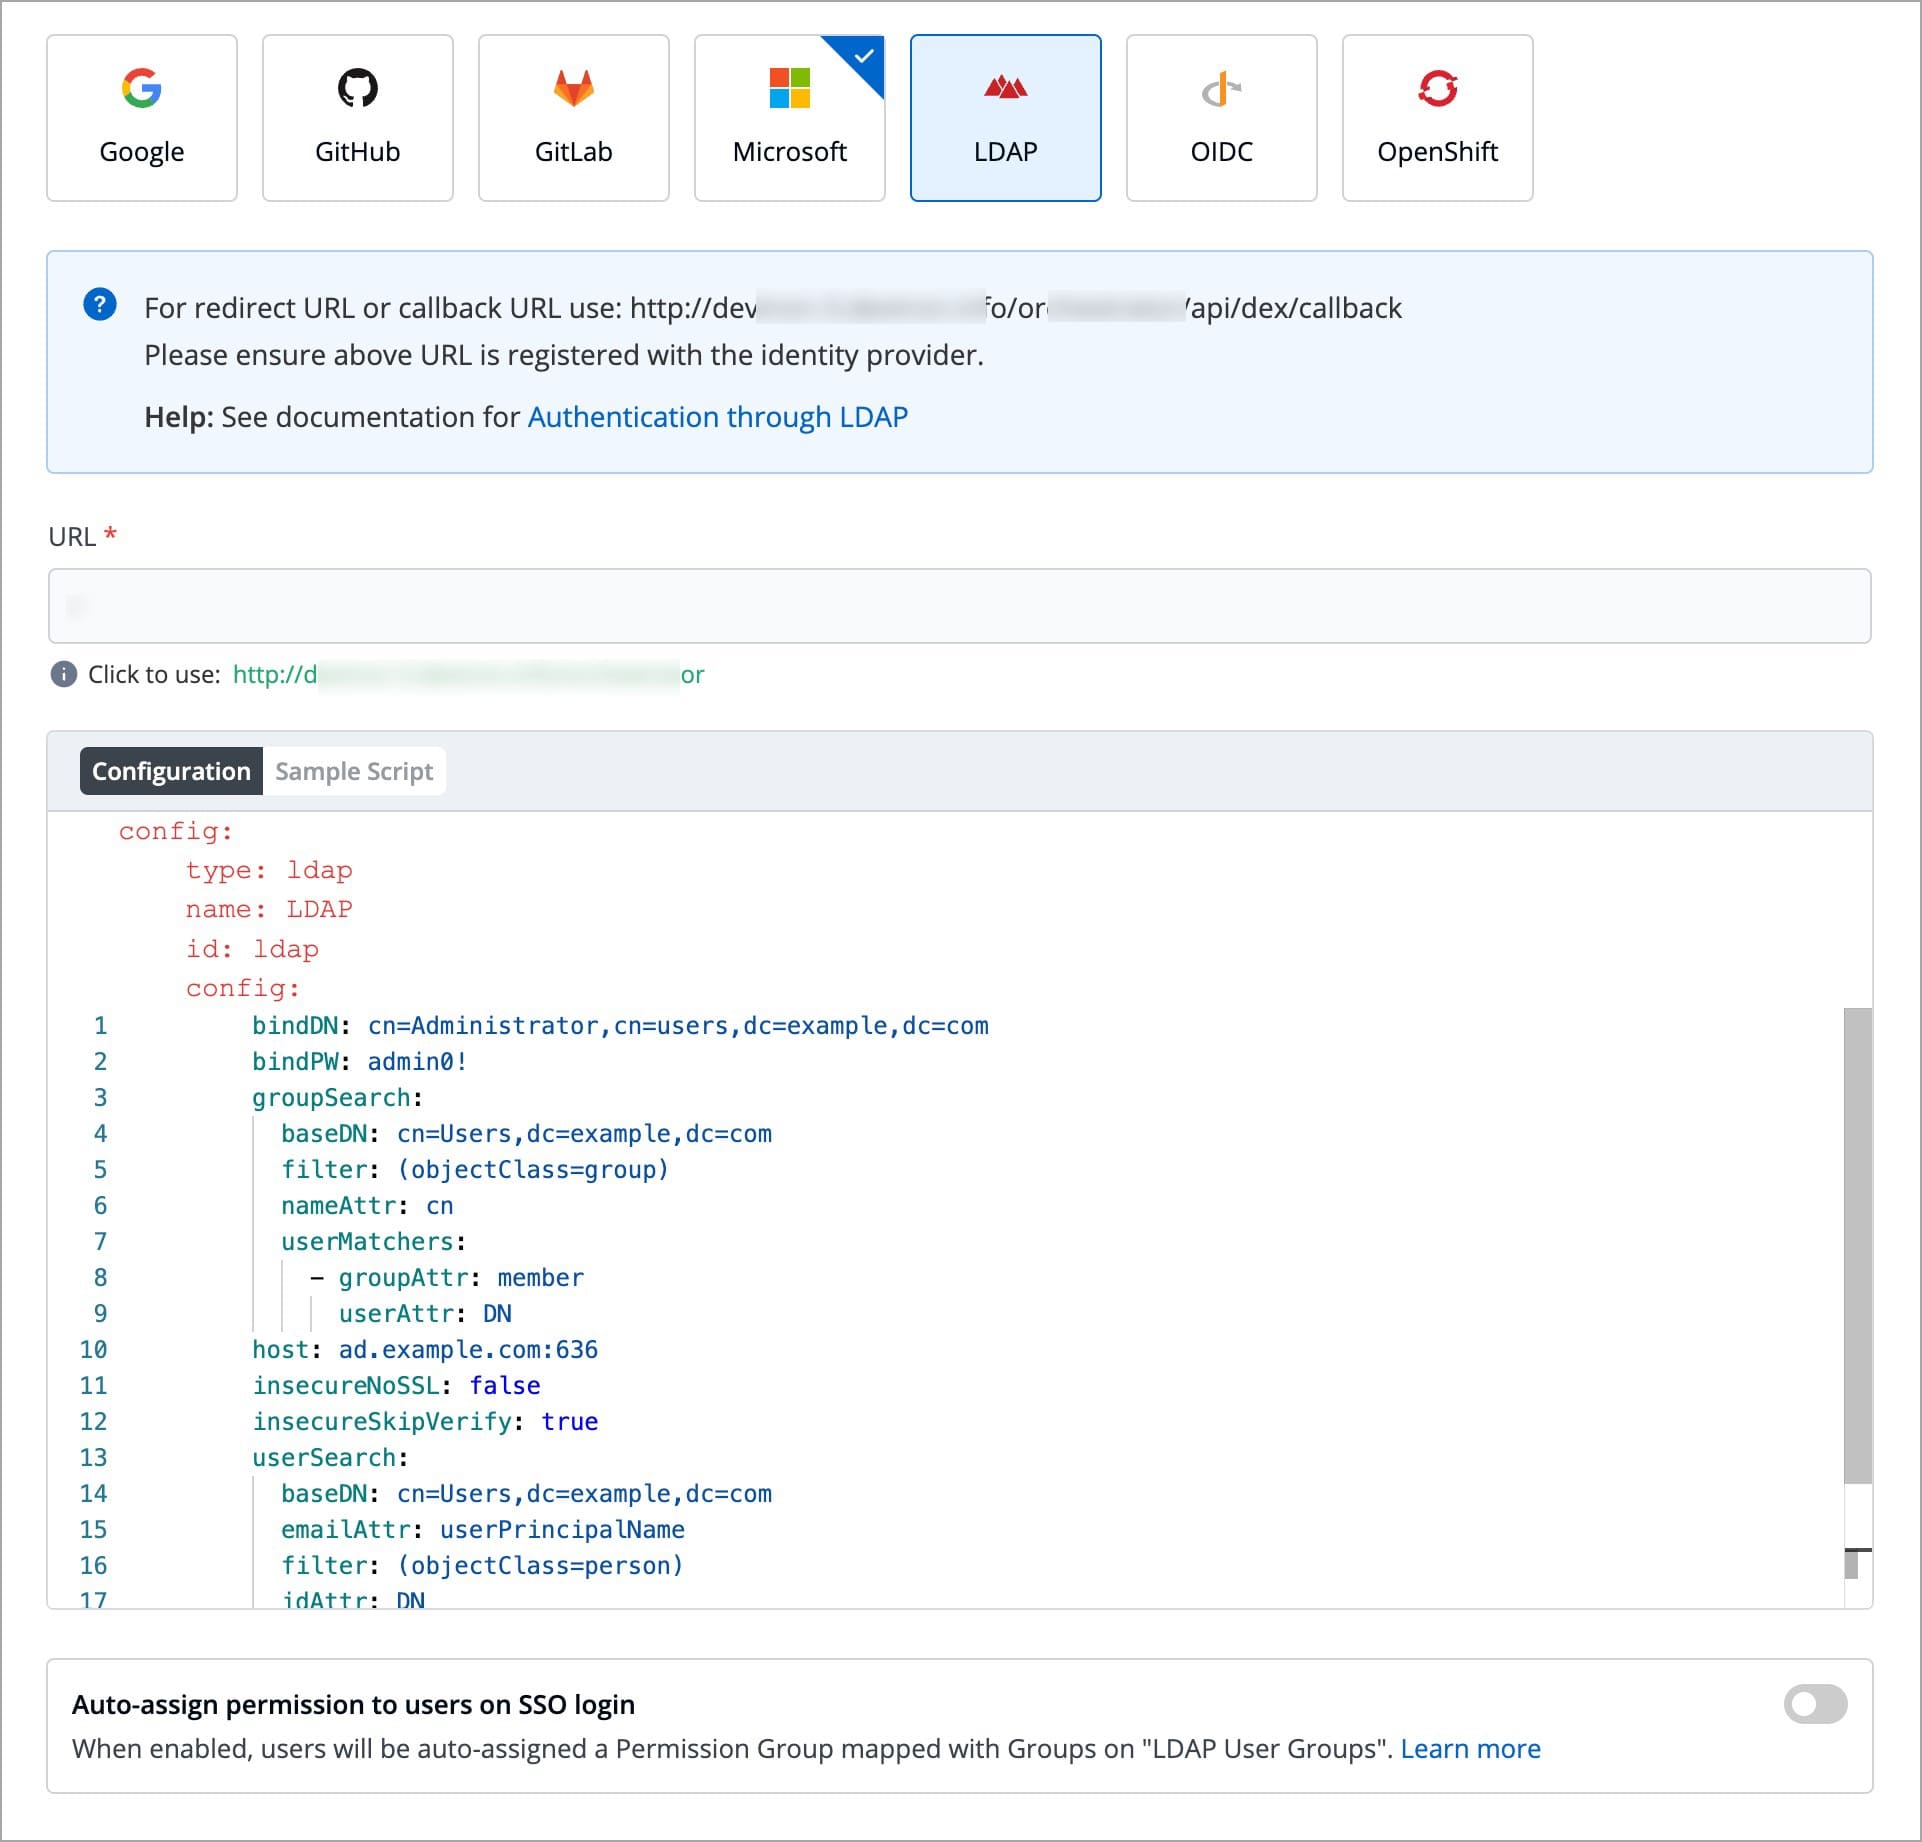
Below are the SSO providers which are available in Devtron. Select one of the SSO providers (e.g., GitHub) to configure SSO:
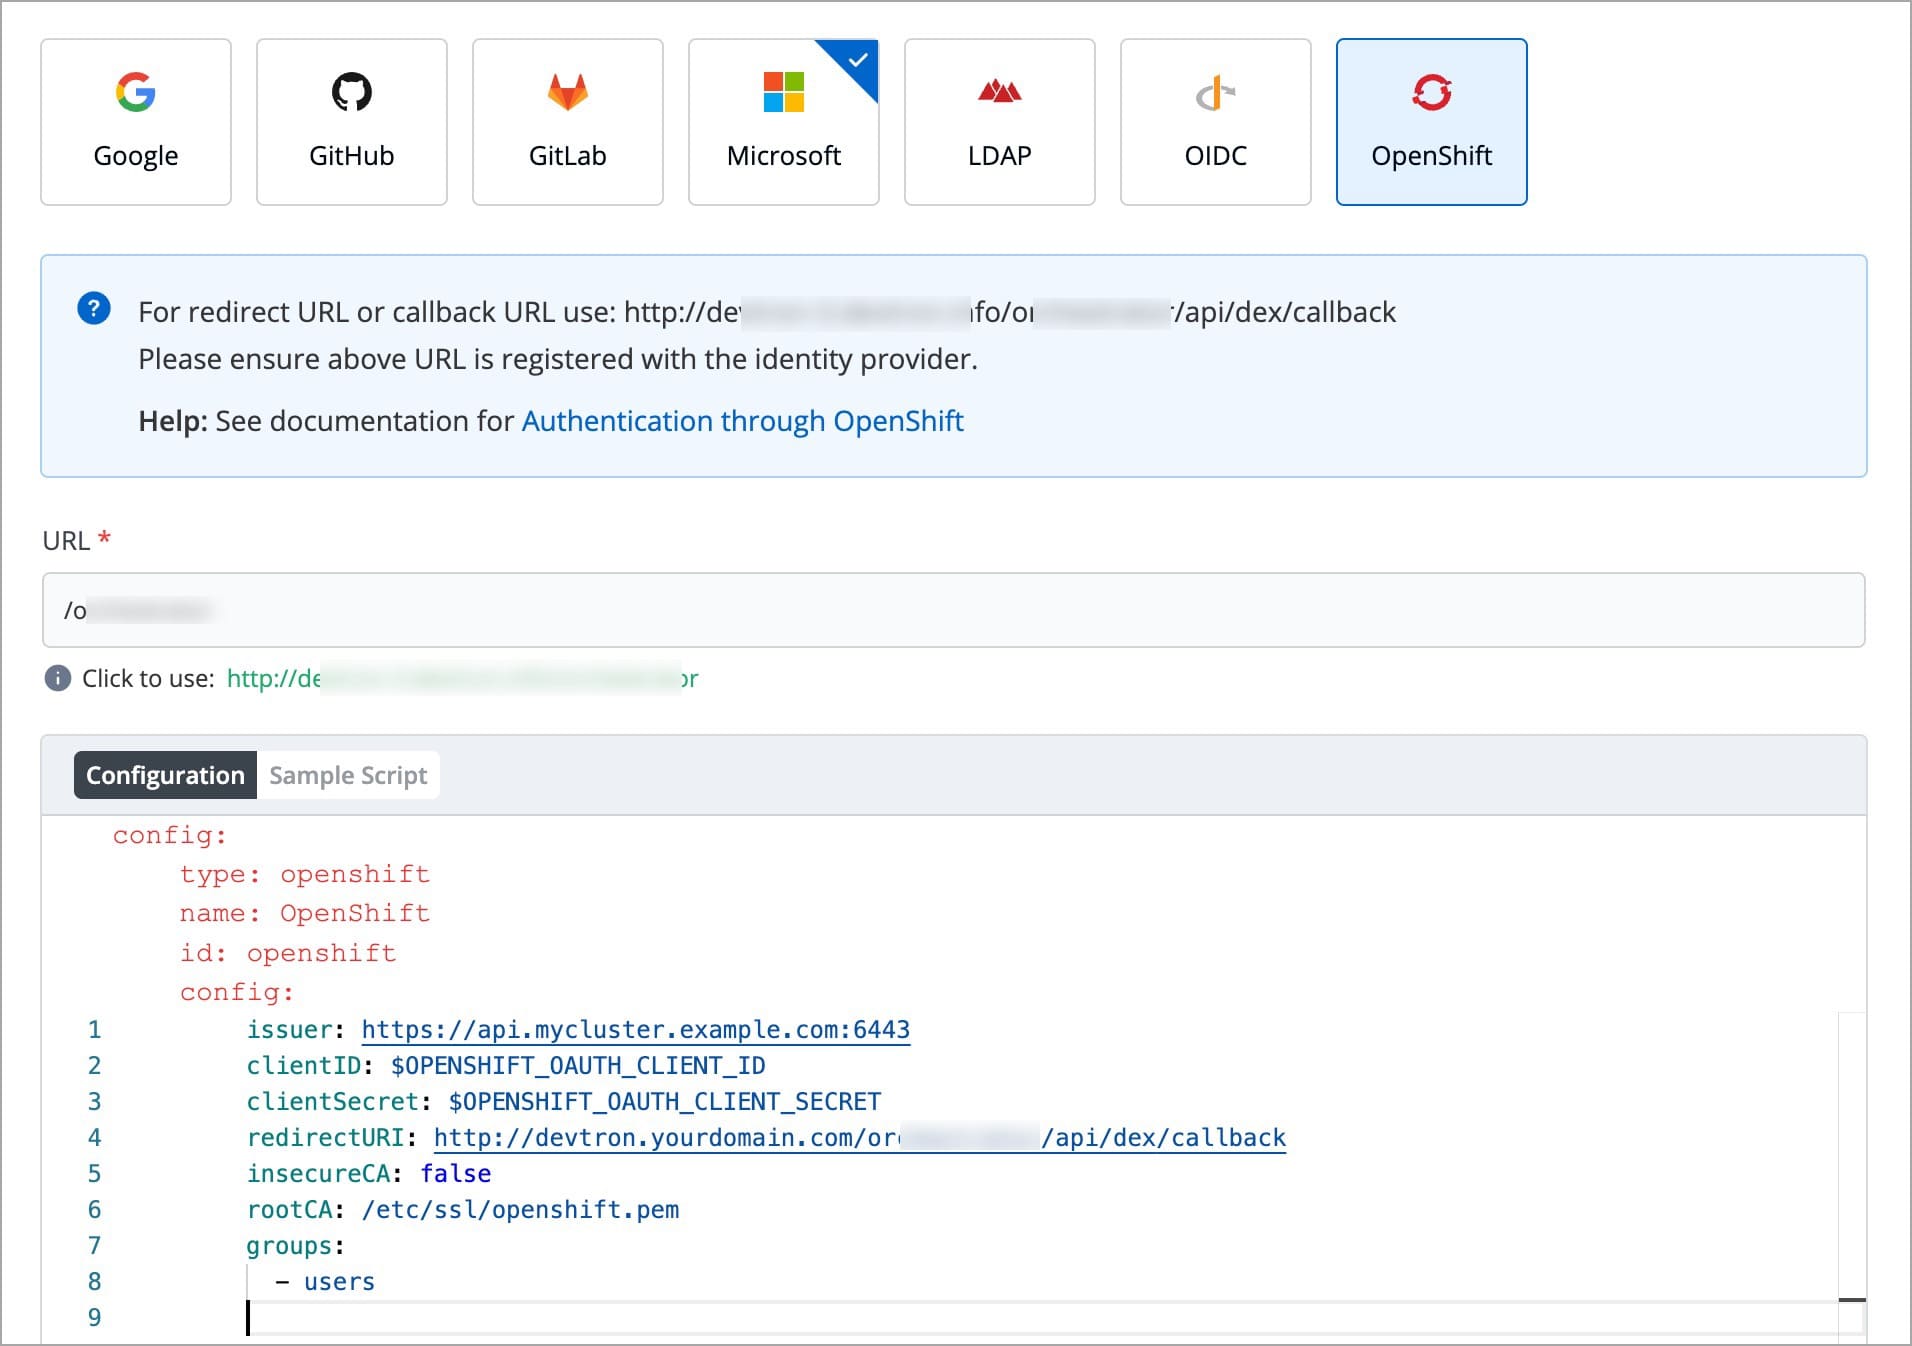
Google GitHub GitLab Microsoft LDAP OpenID Connect OpenShift
Dex implements connectors that target specific identity providers for each connector configuration. You must have a created account for the corresponding identity provider and registered an app for client key and secret.
Refer the following documents for more detail.
https://dexidp.io/docs/connectors/
https://dexidp.io/docs/connectors/google/
Make sure that you have a super admin access.
Go to the Global Configurations → SSO Login Services and click any SSO Provider of your choice.
In the URL field, enter the valid Devtron application URL where it is hosted.
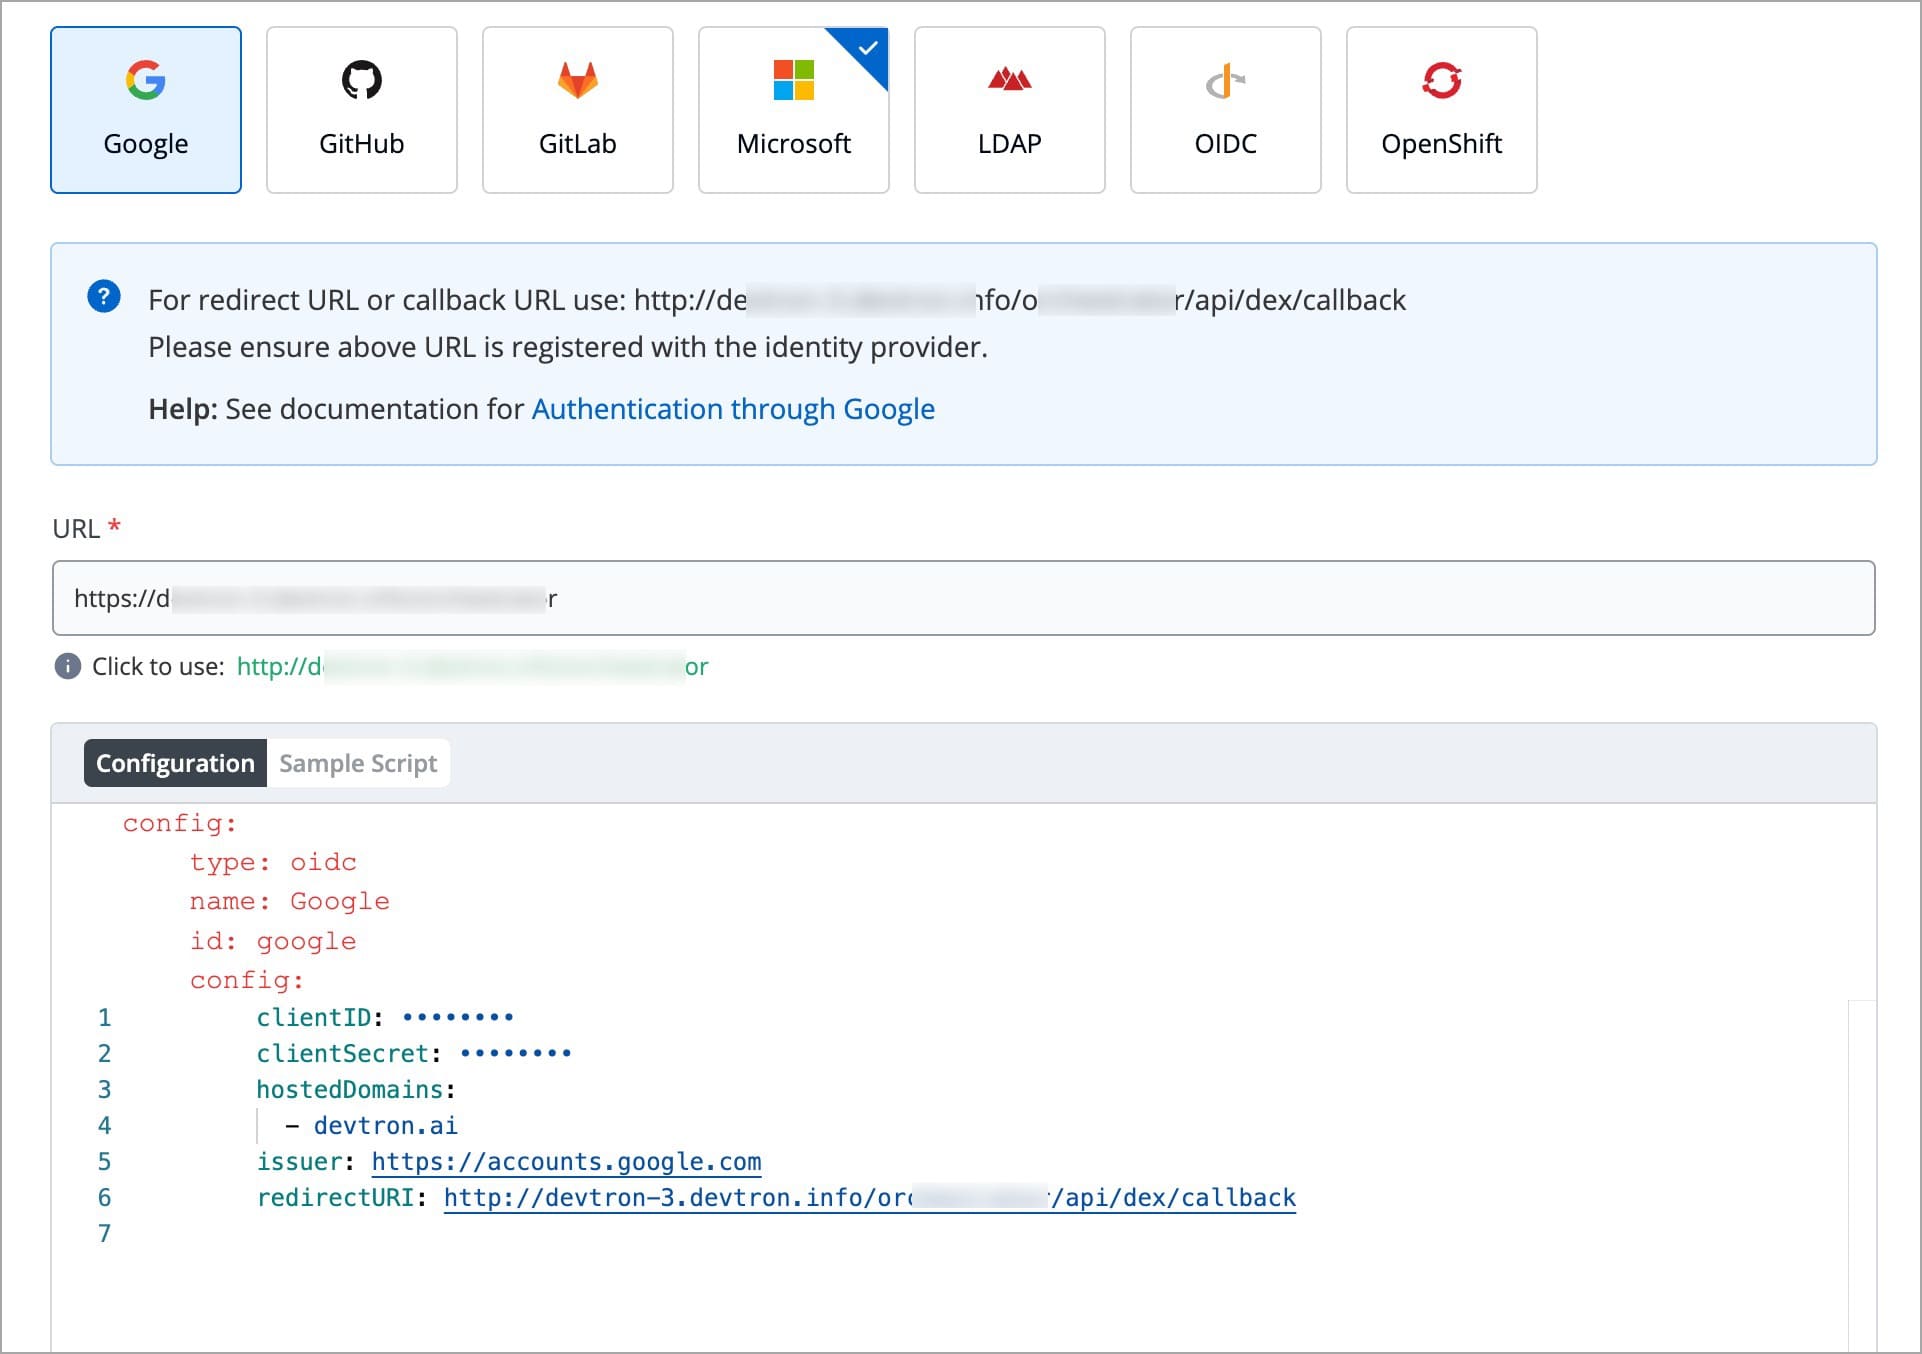
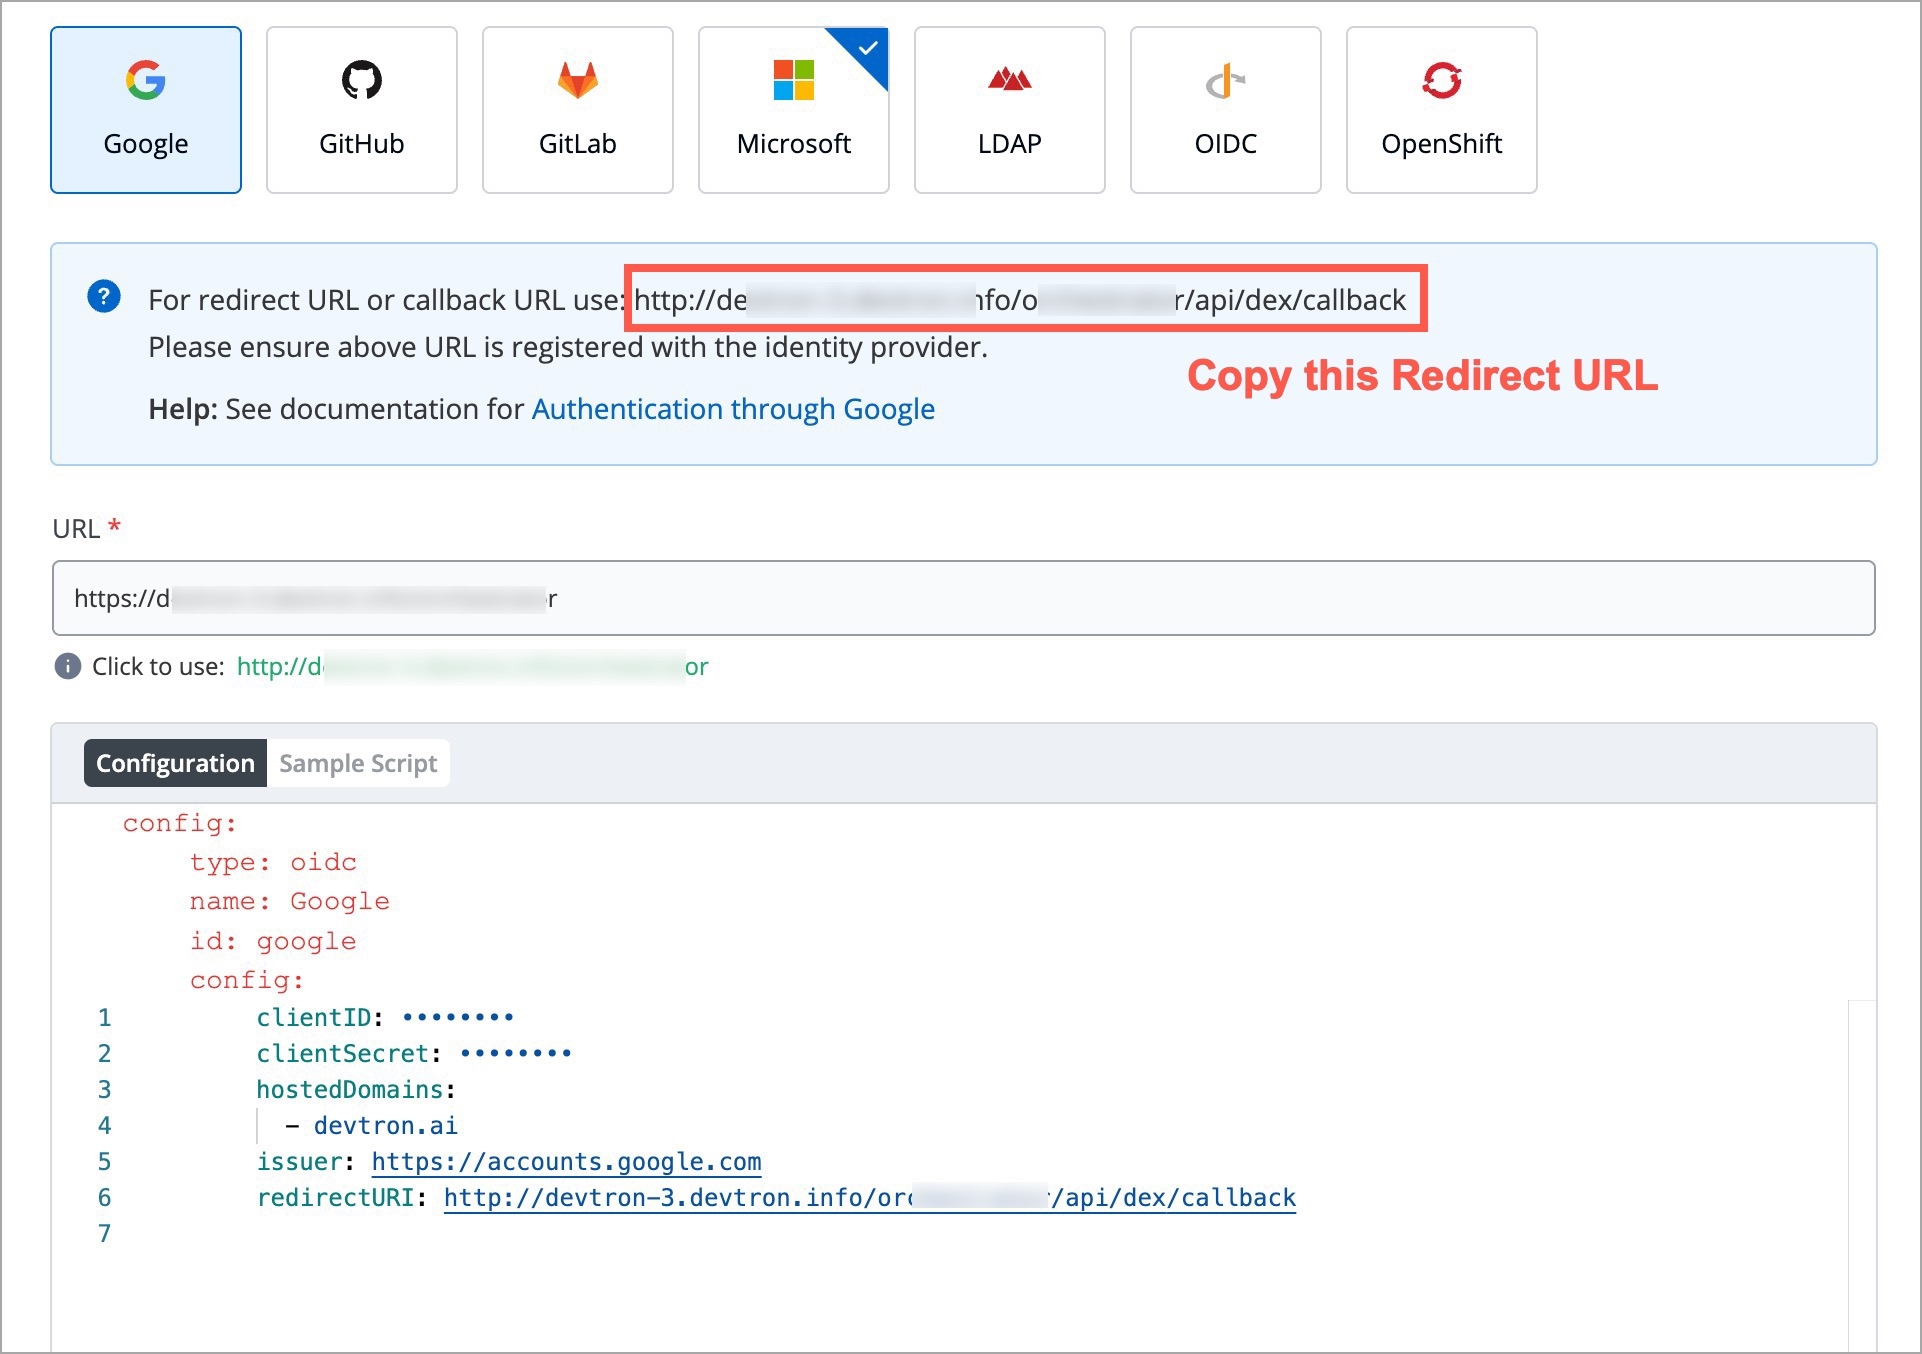
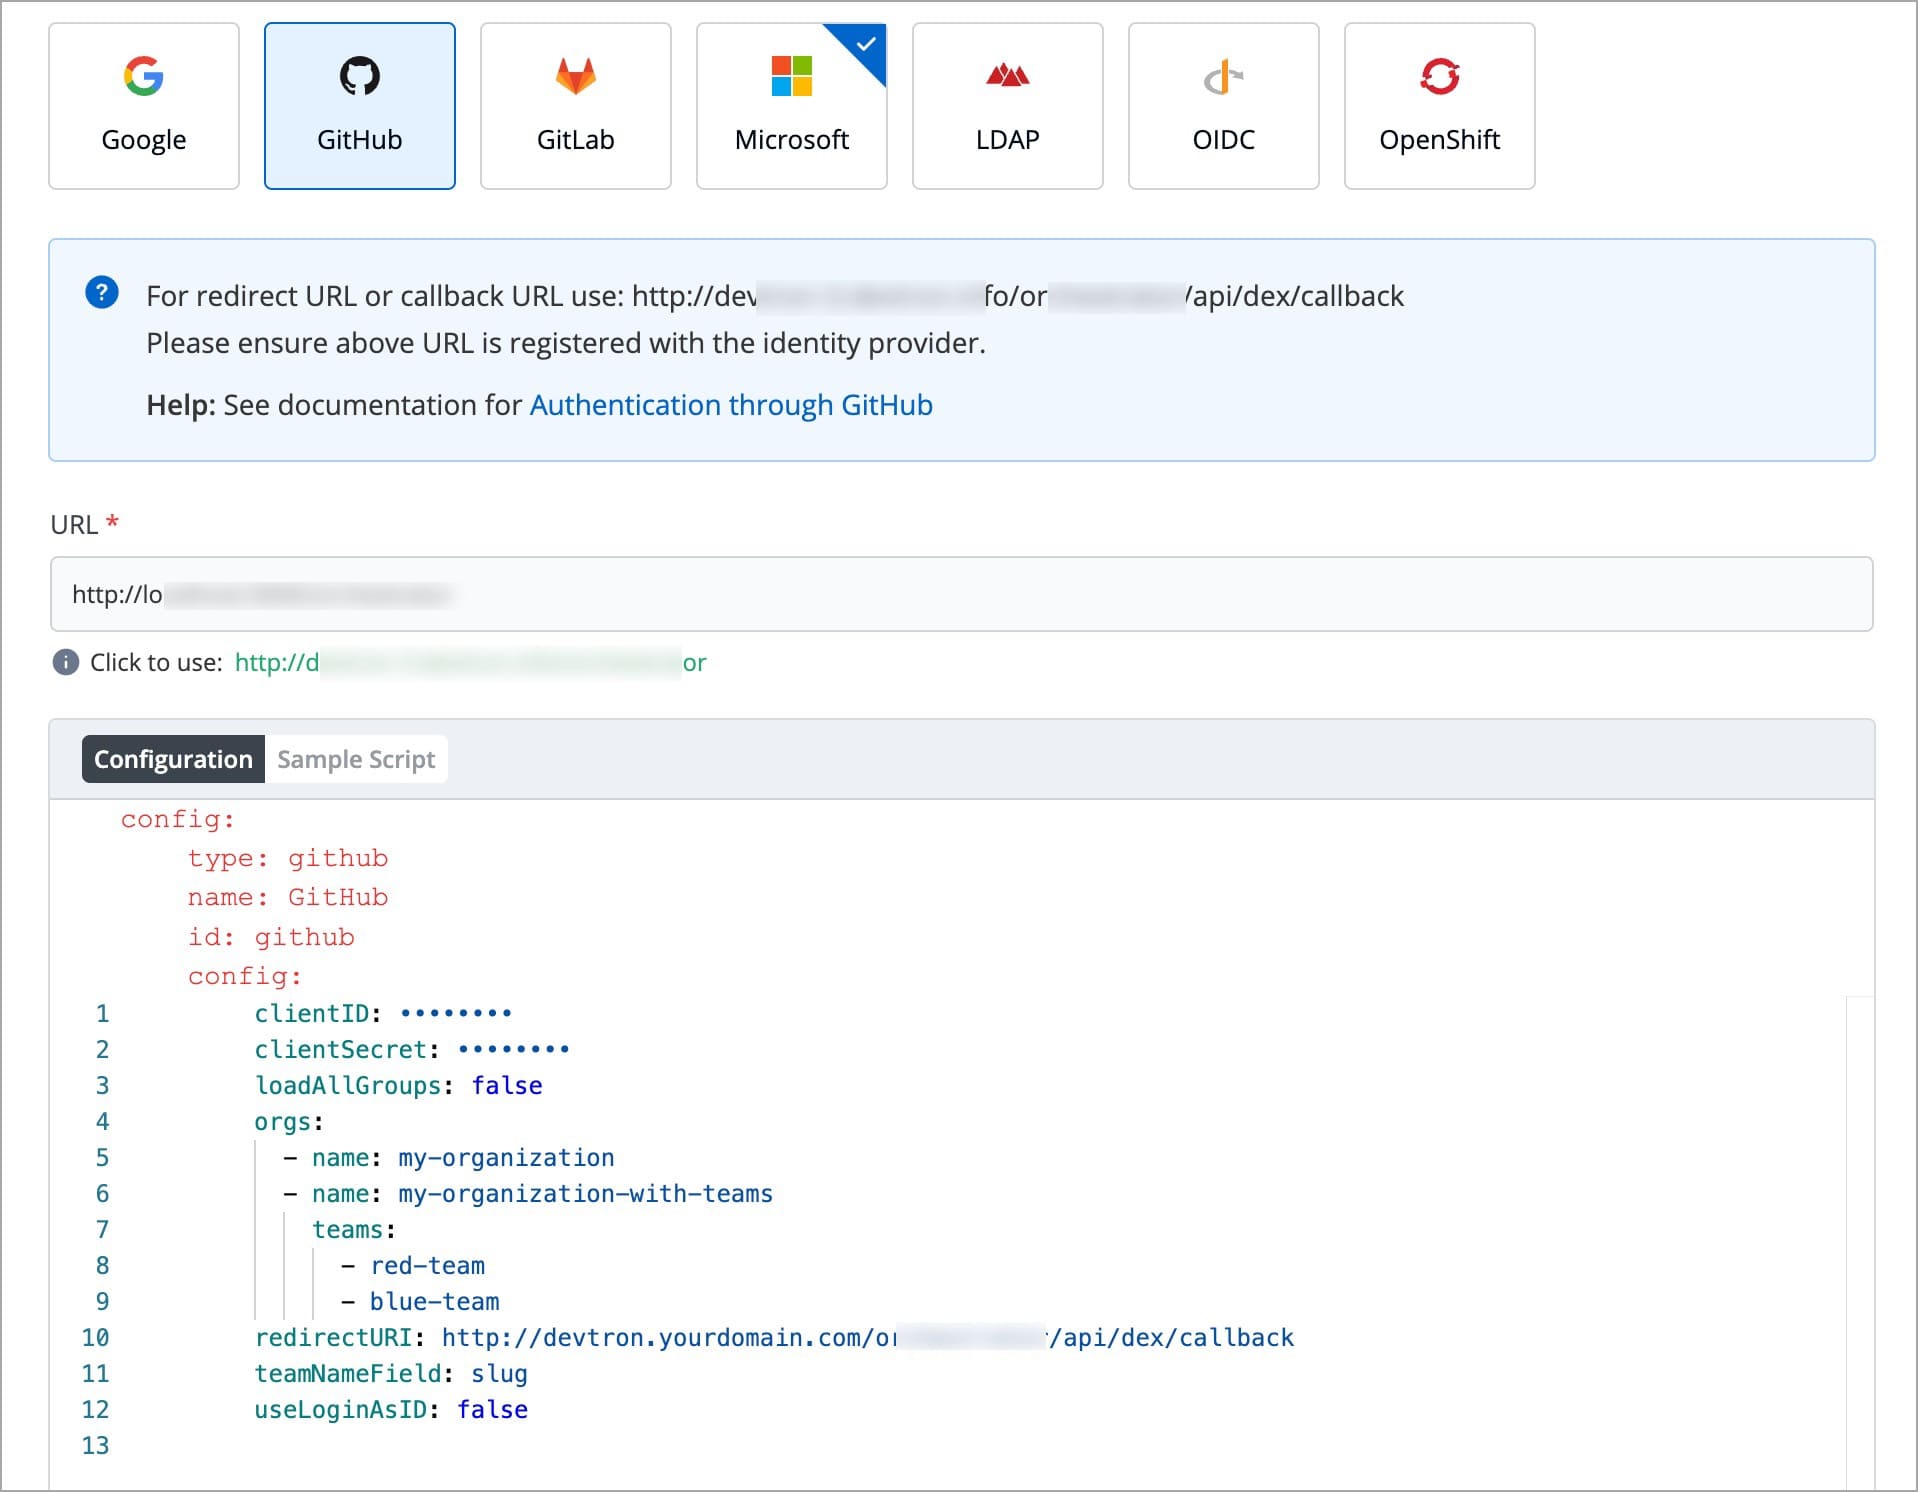
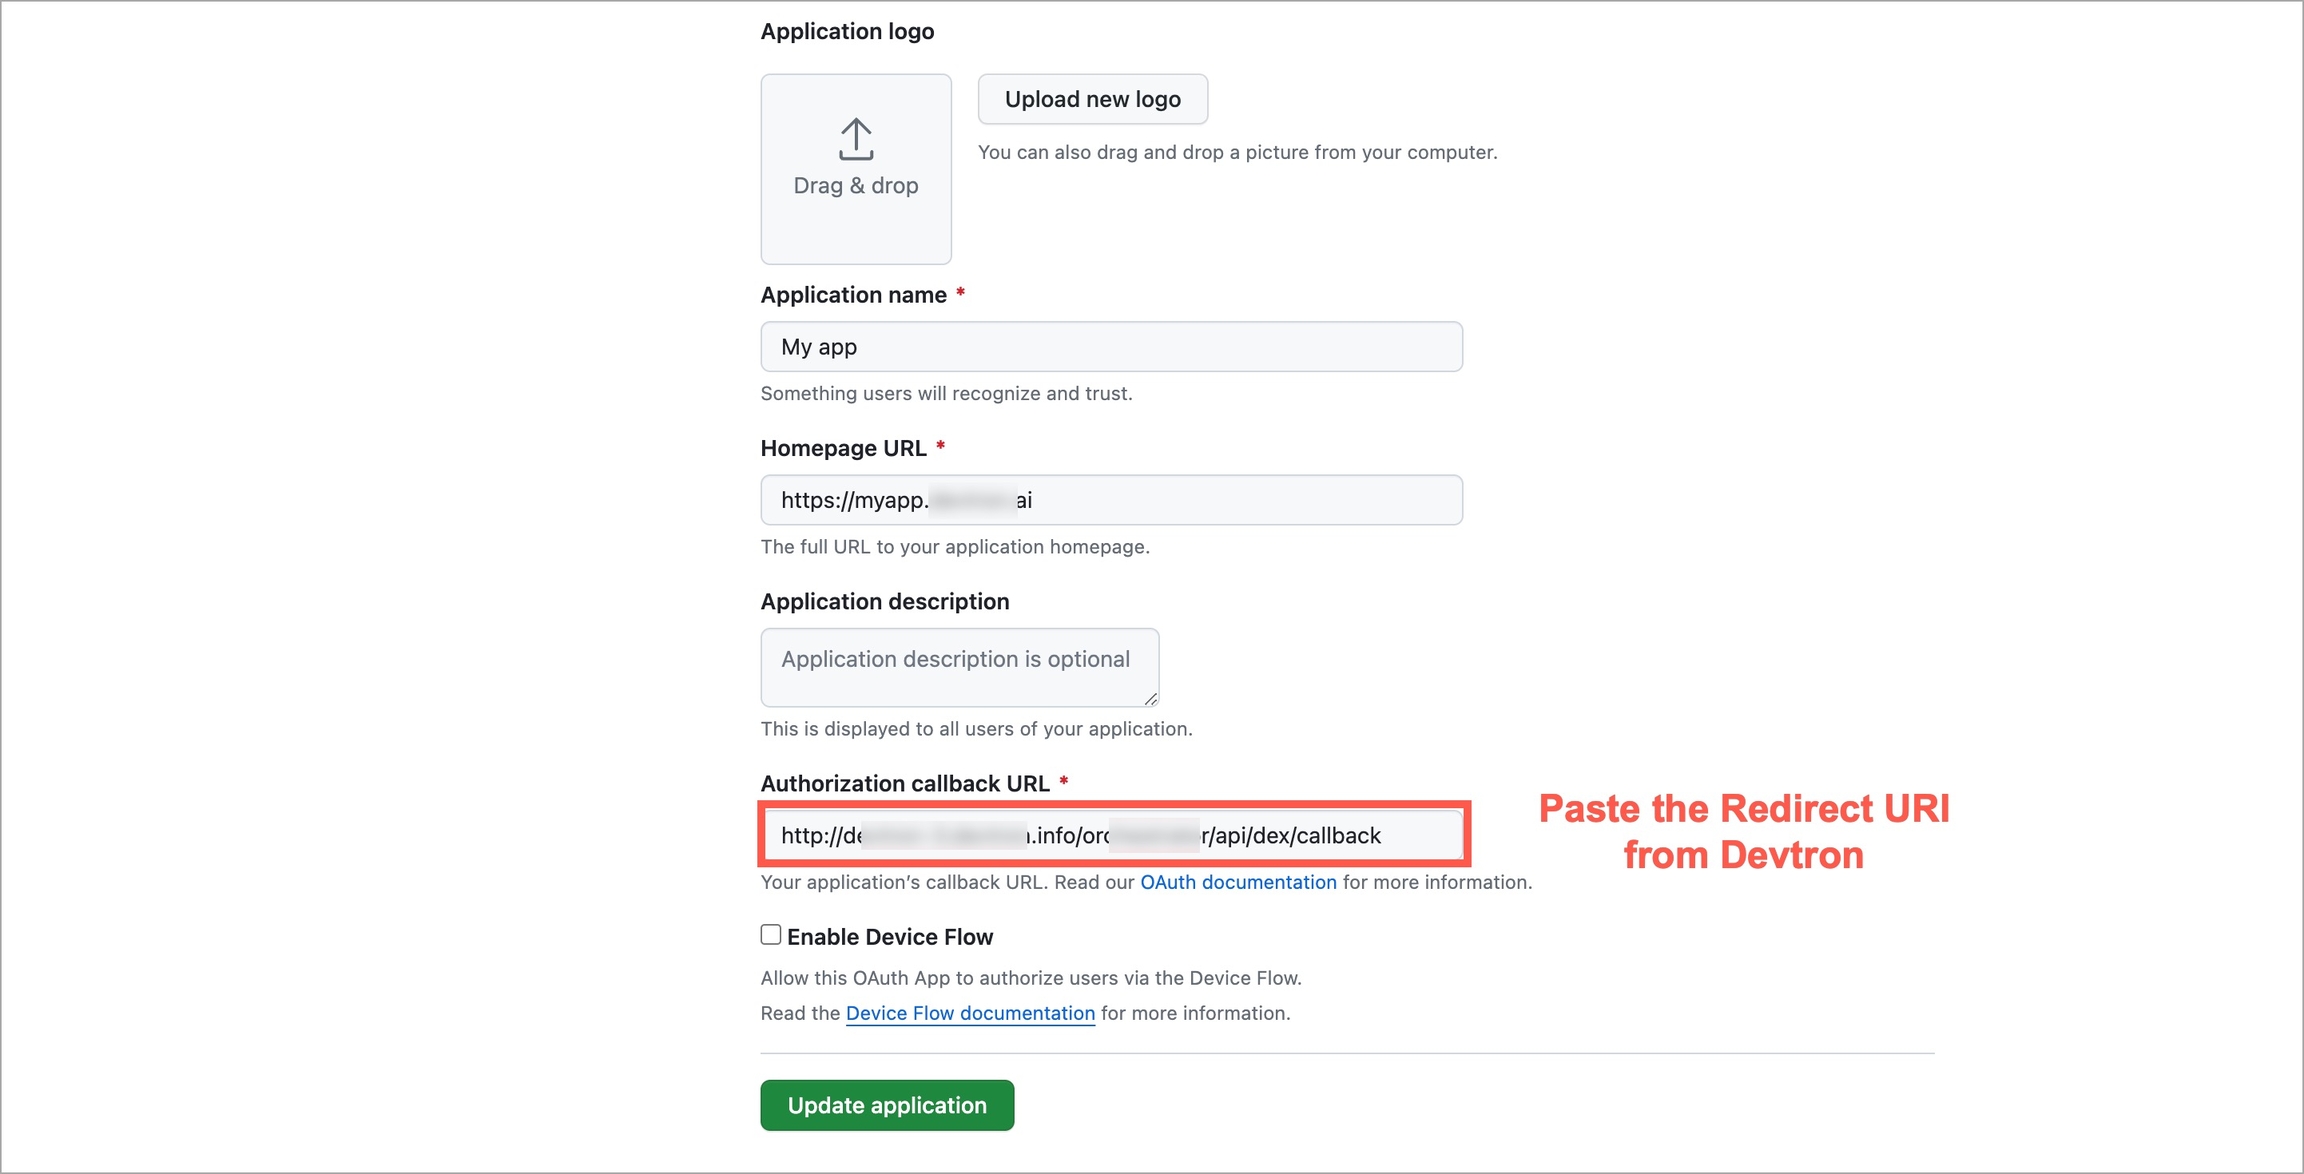
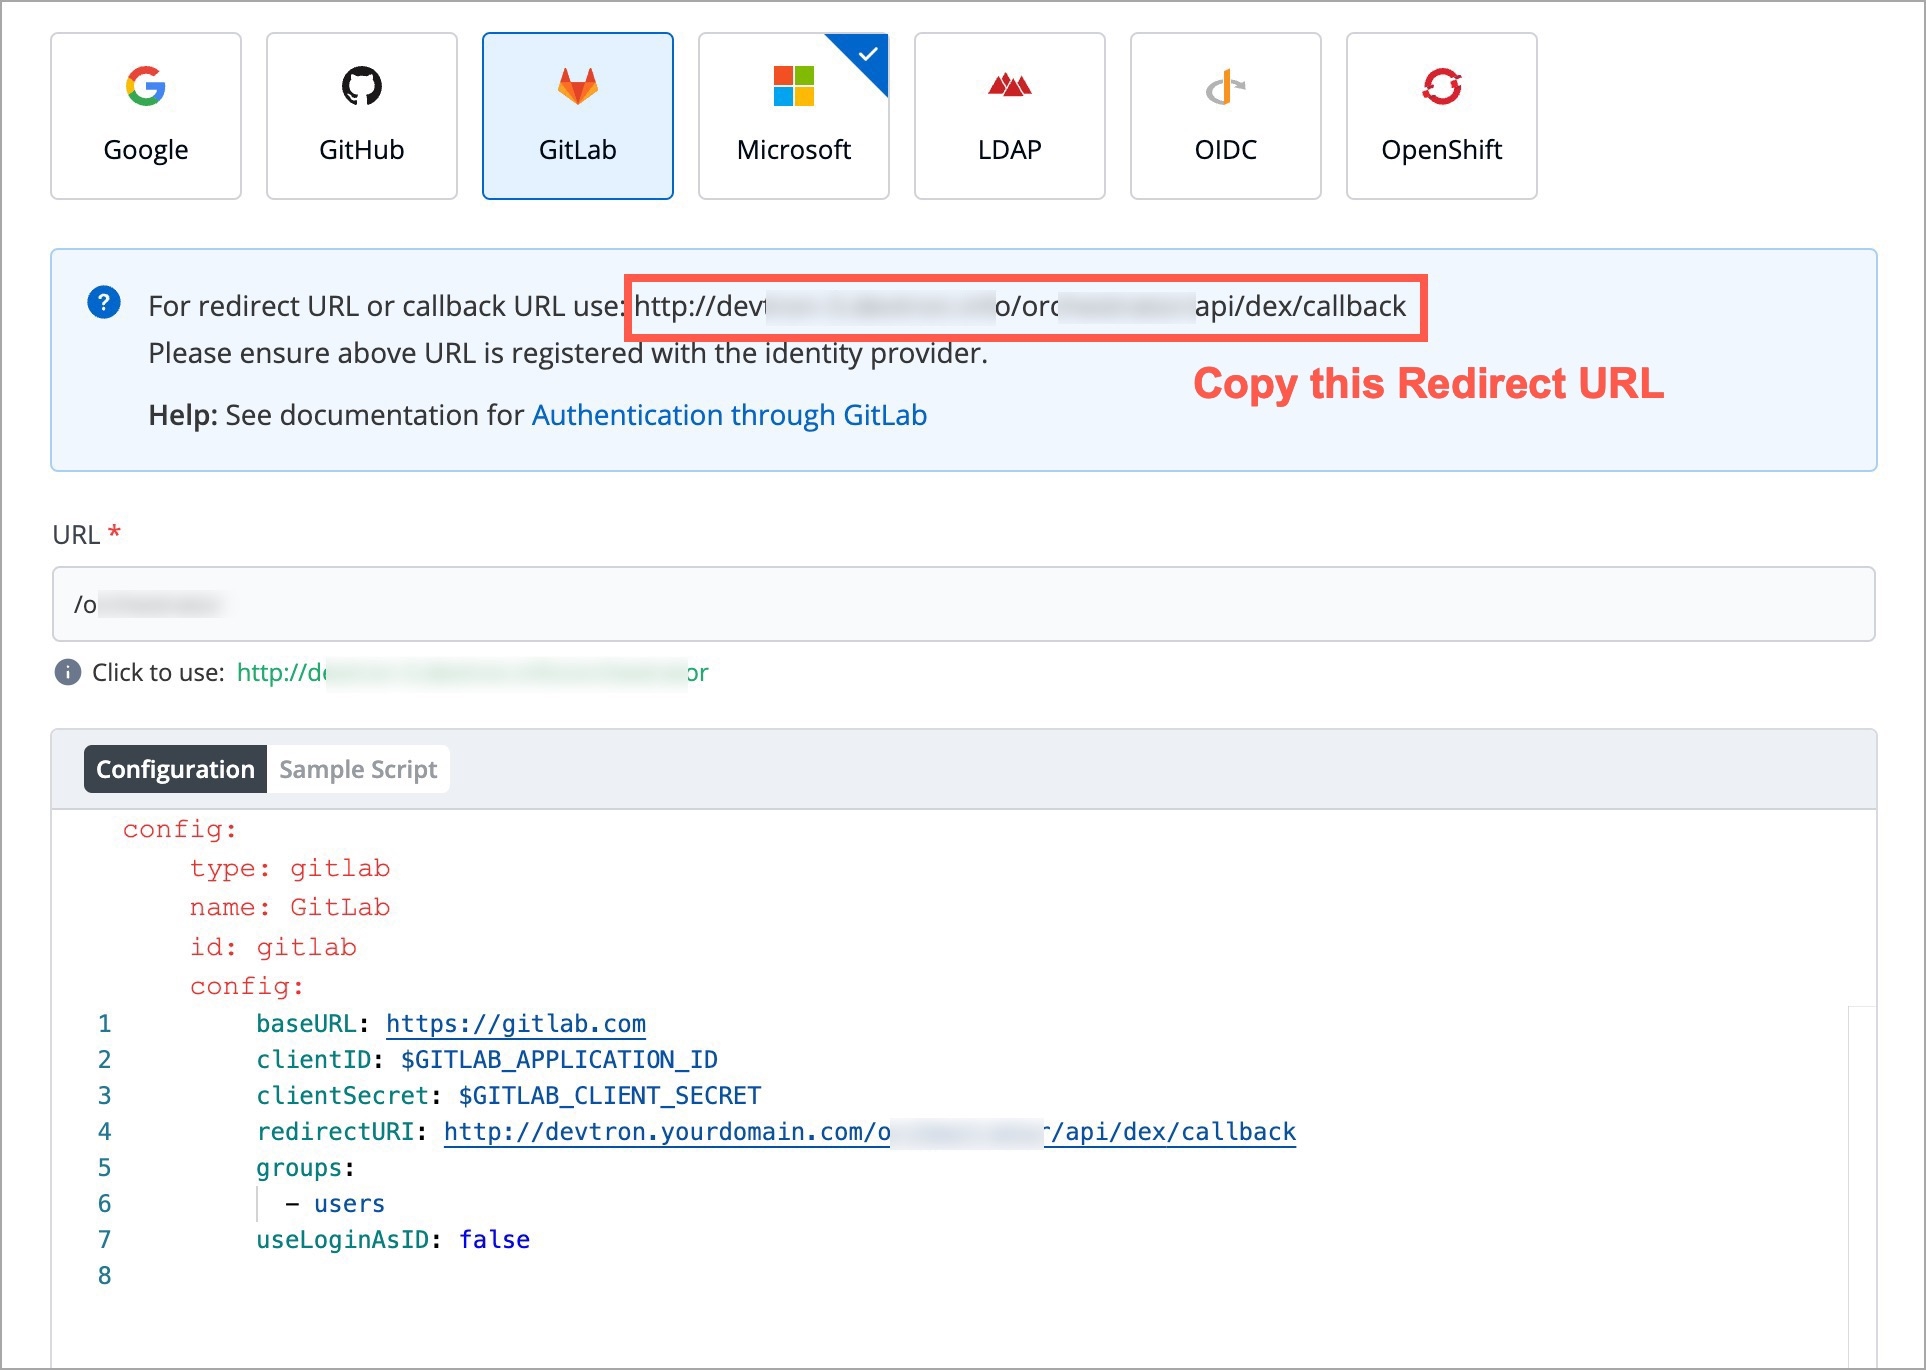
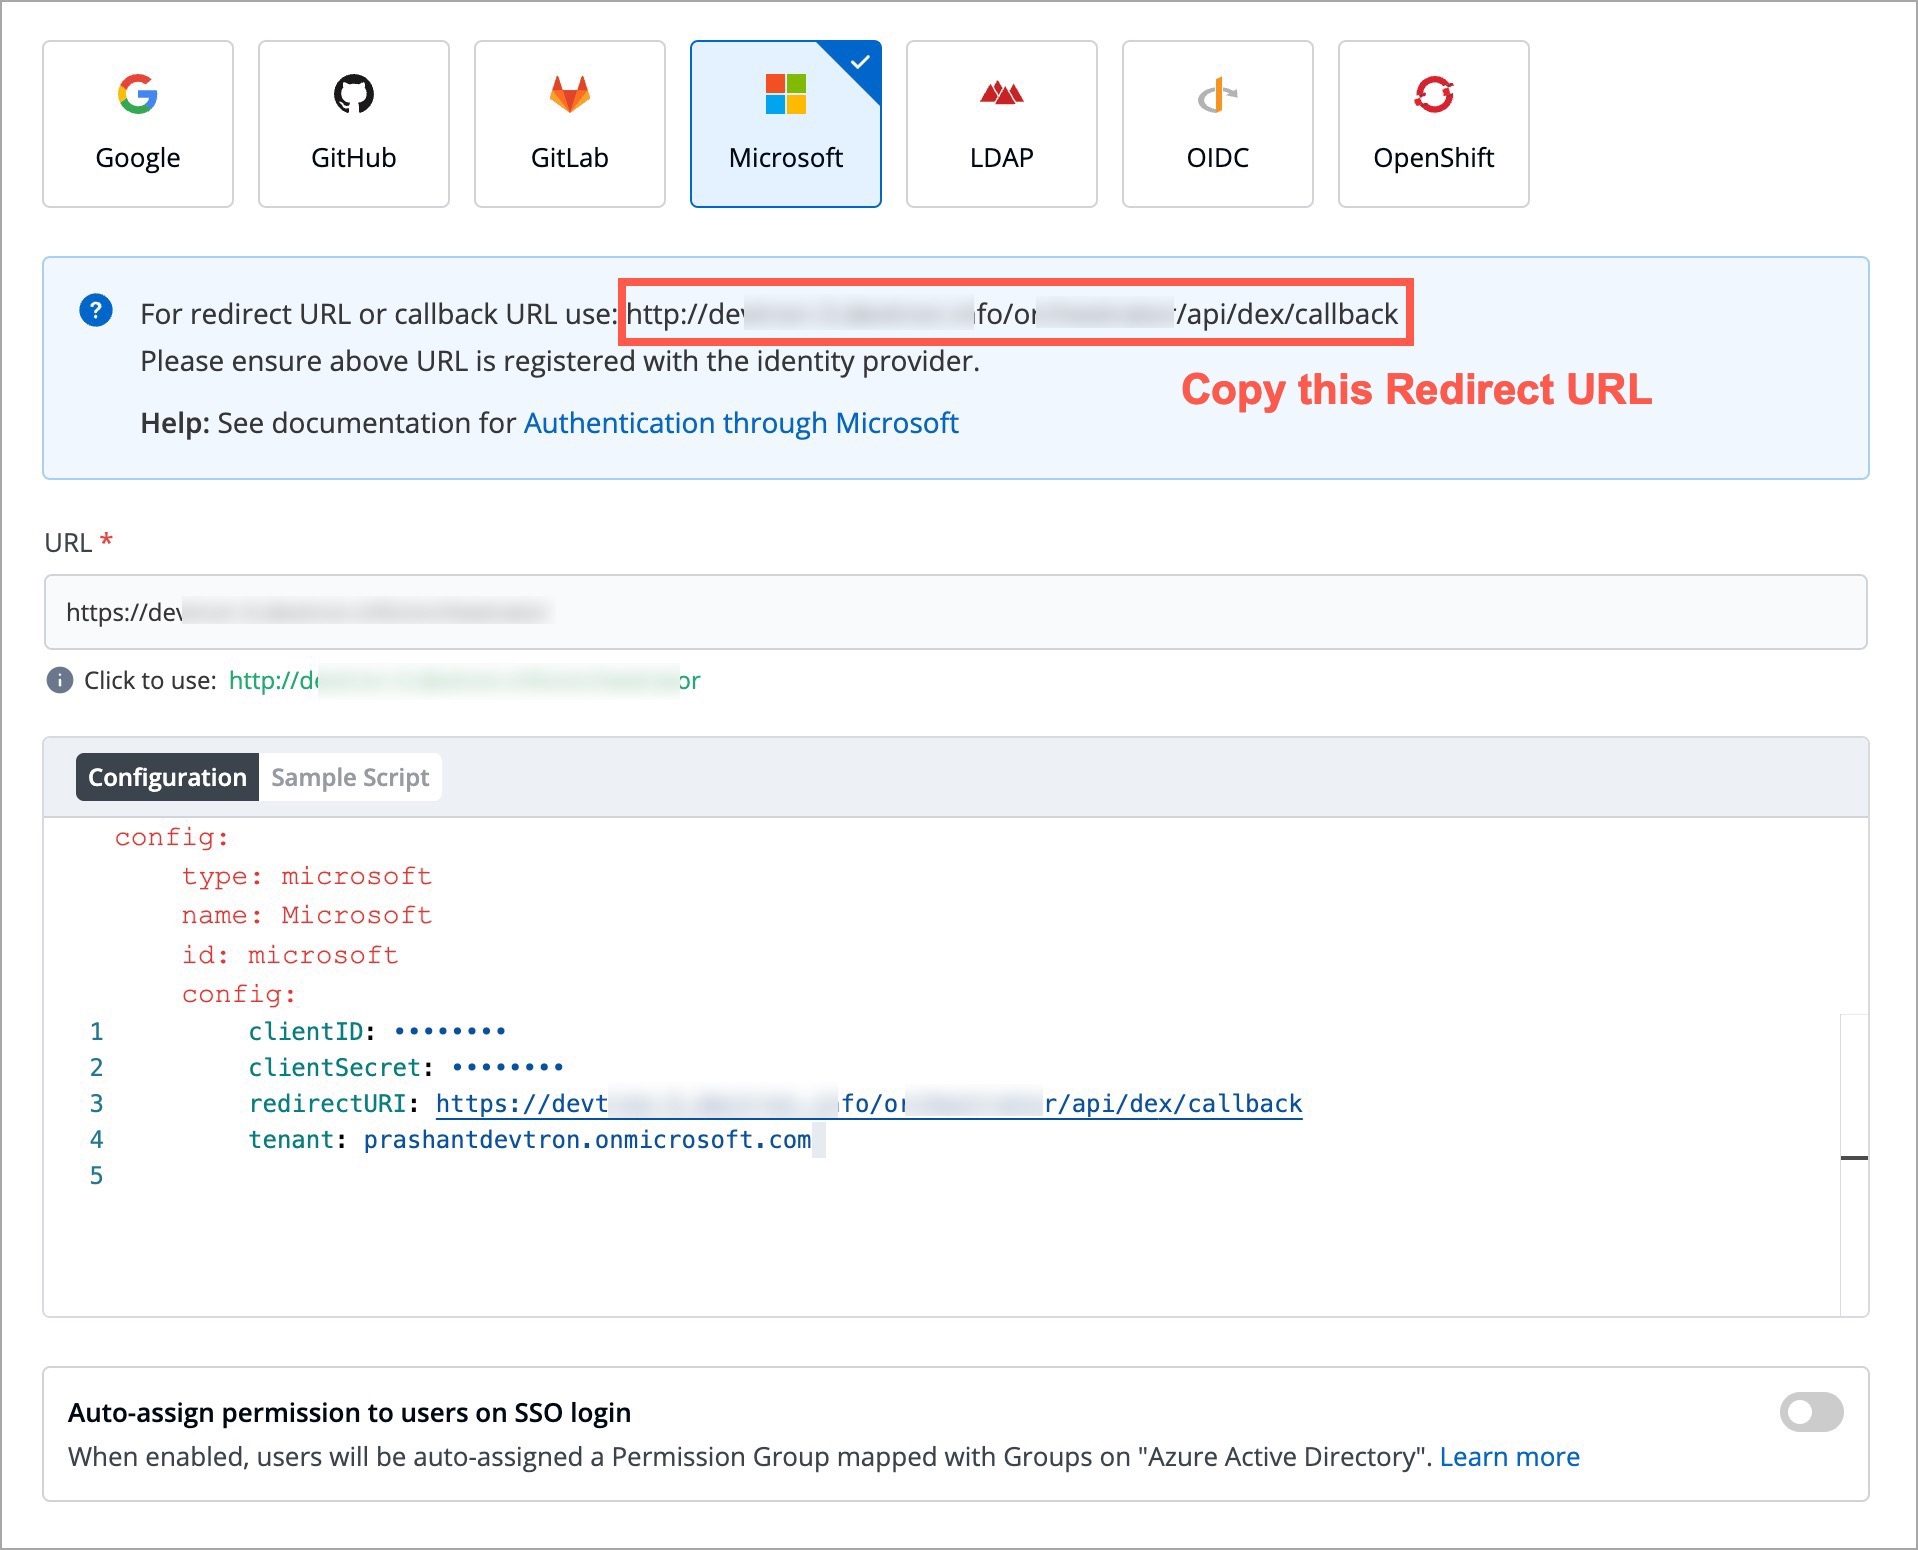
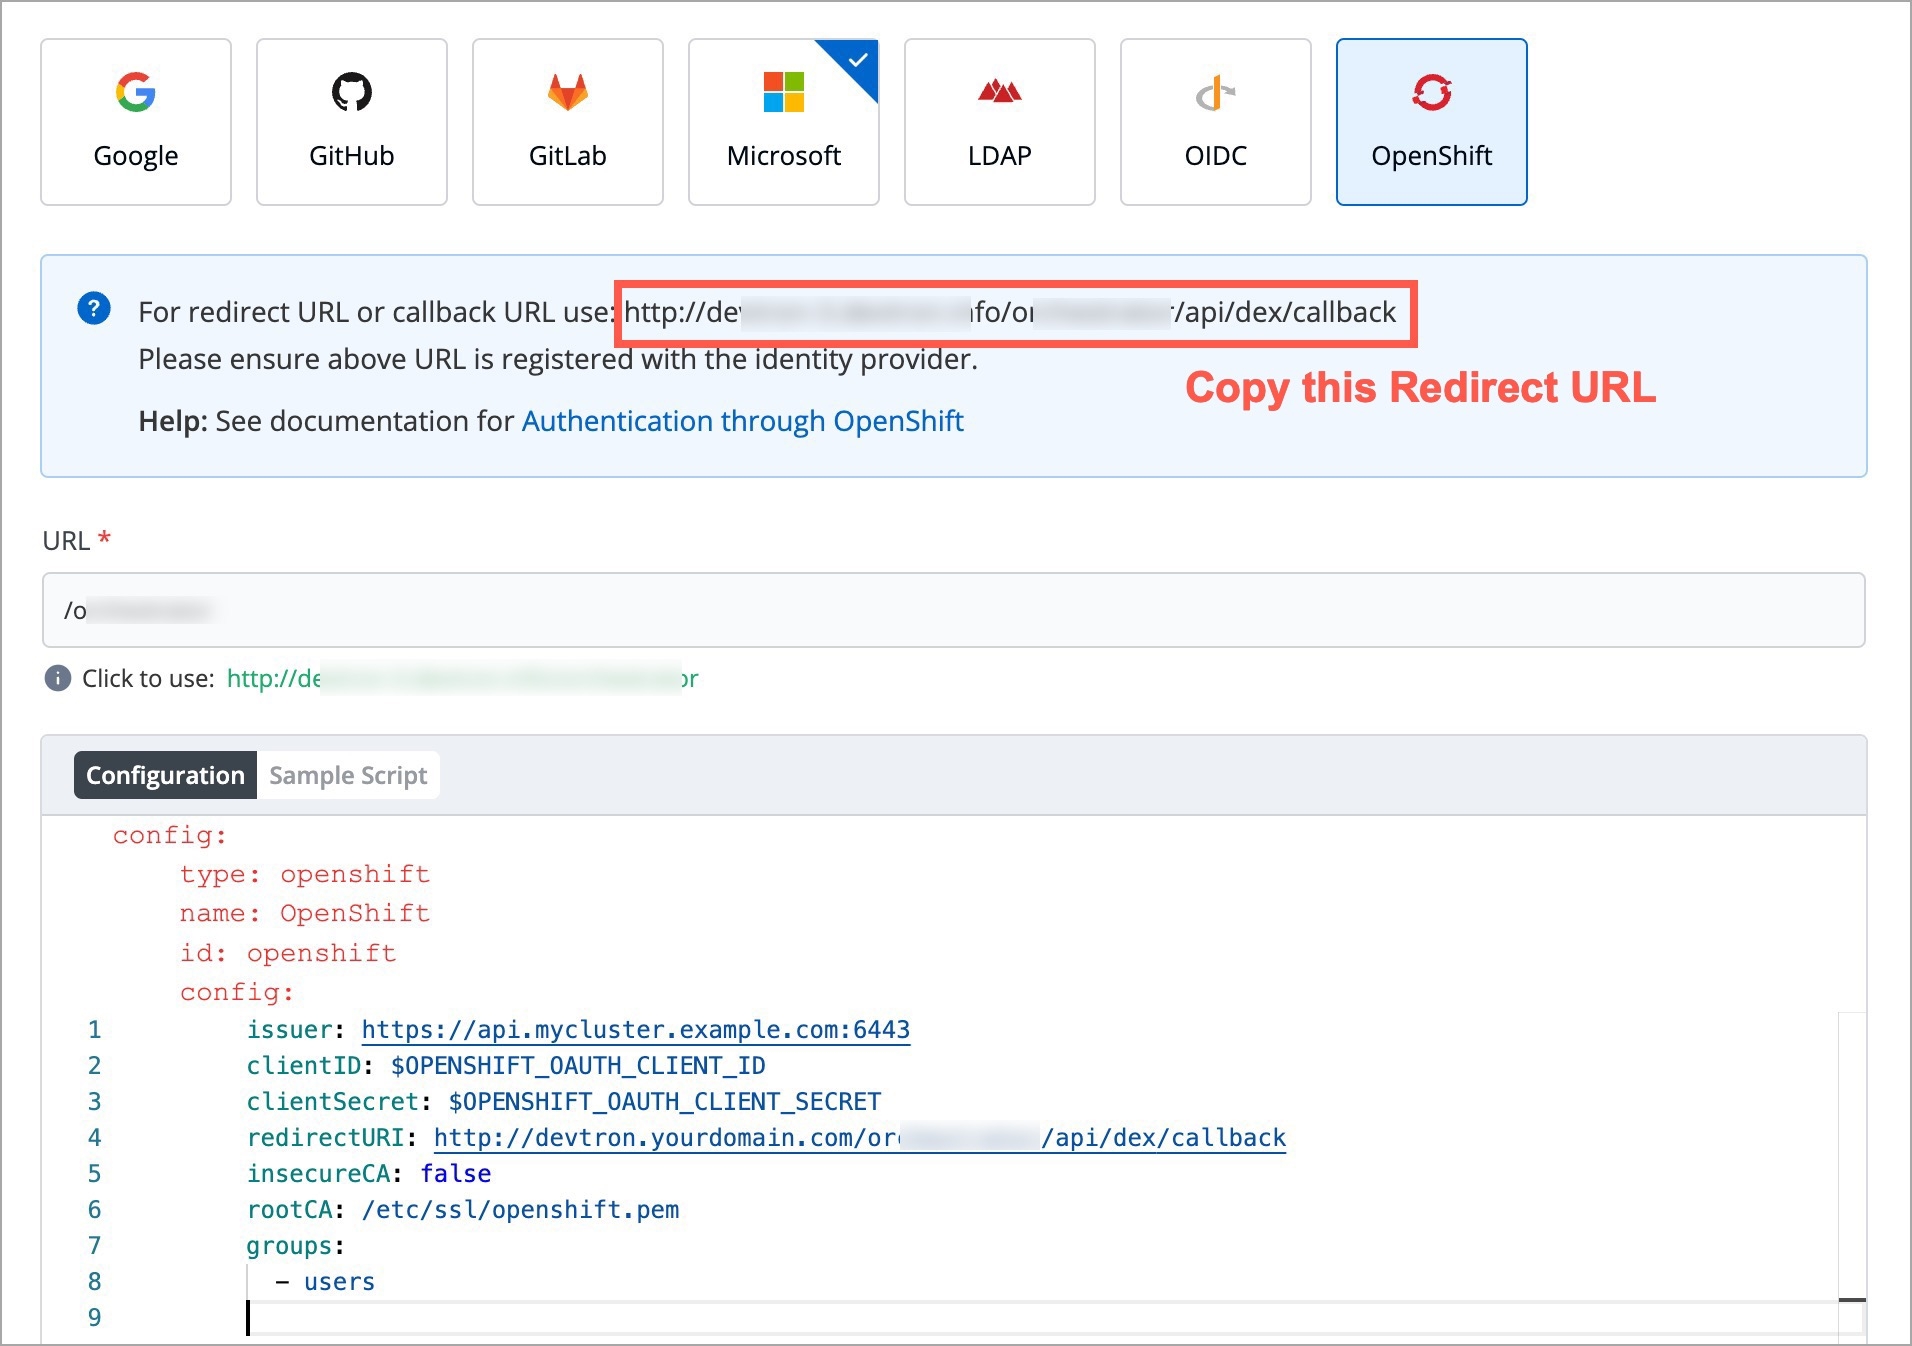
For providing redirectURI or callbackURI registered with the SSO provider, you can either select Configuration or Sample Script.
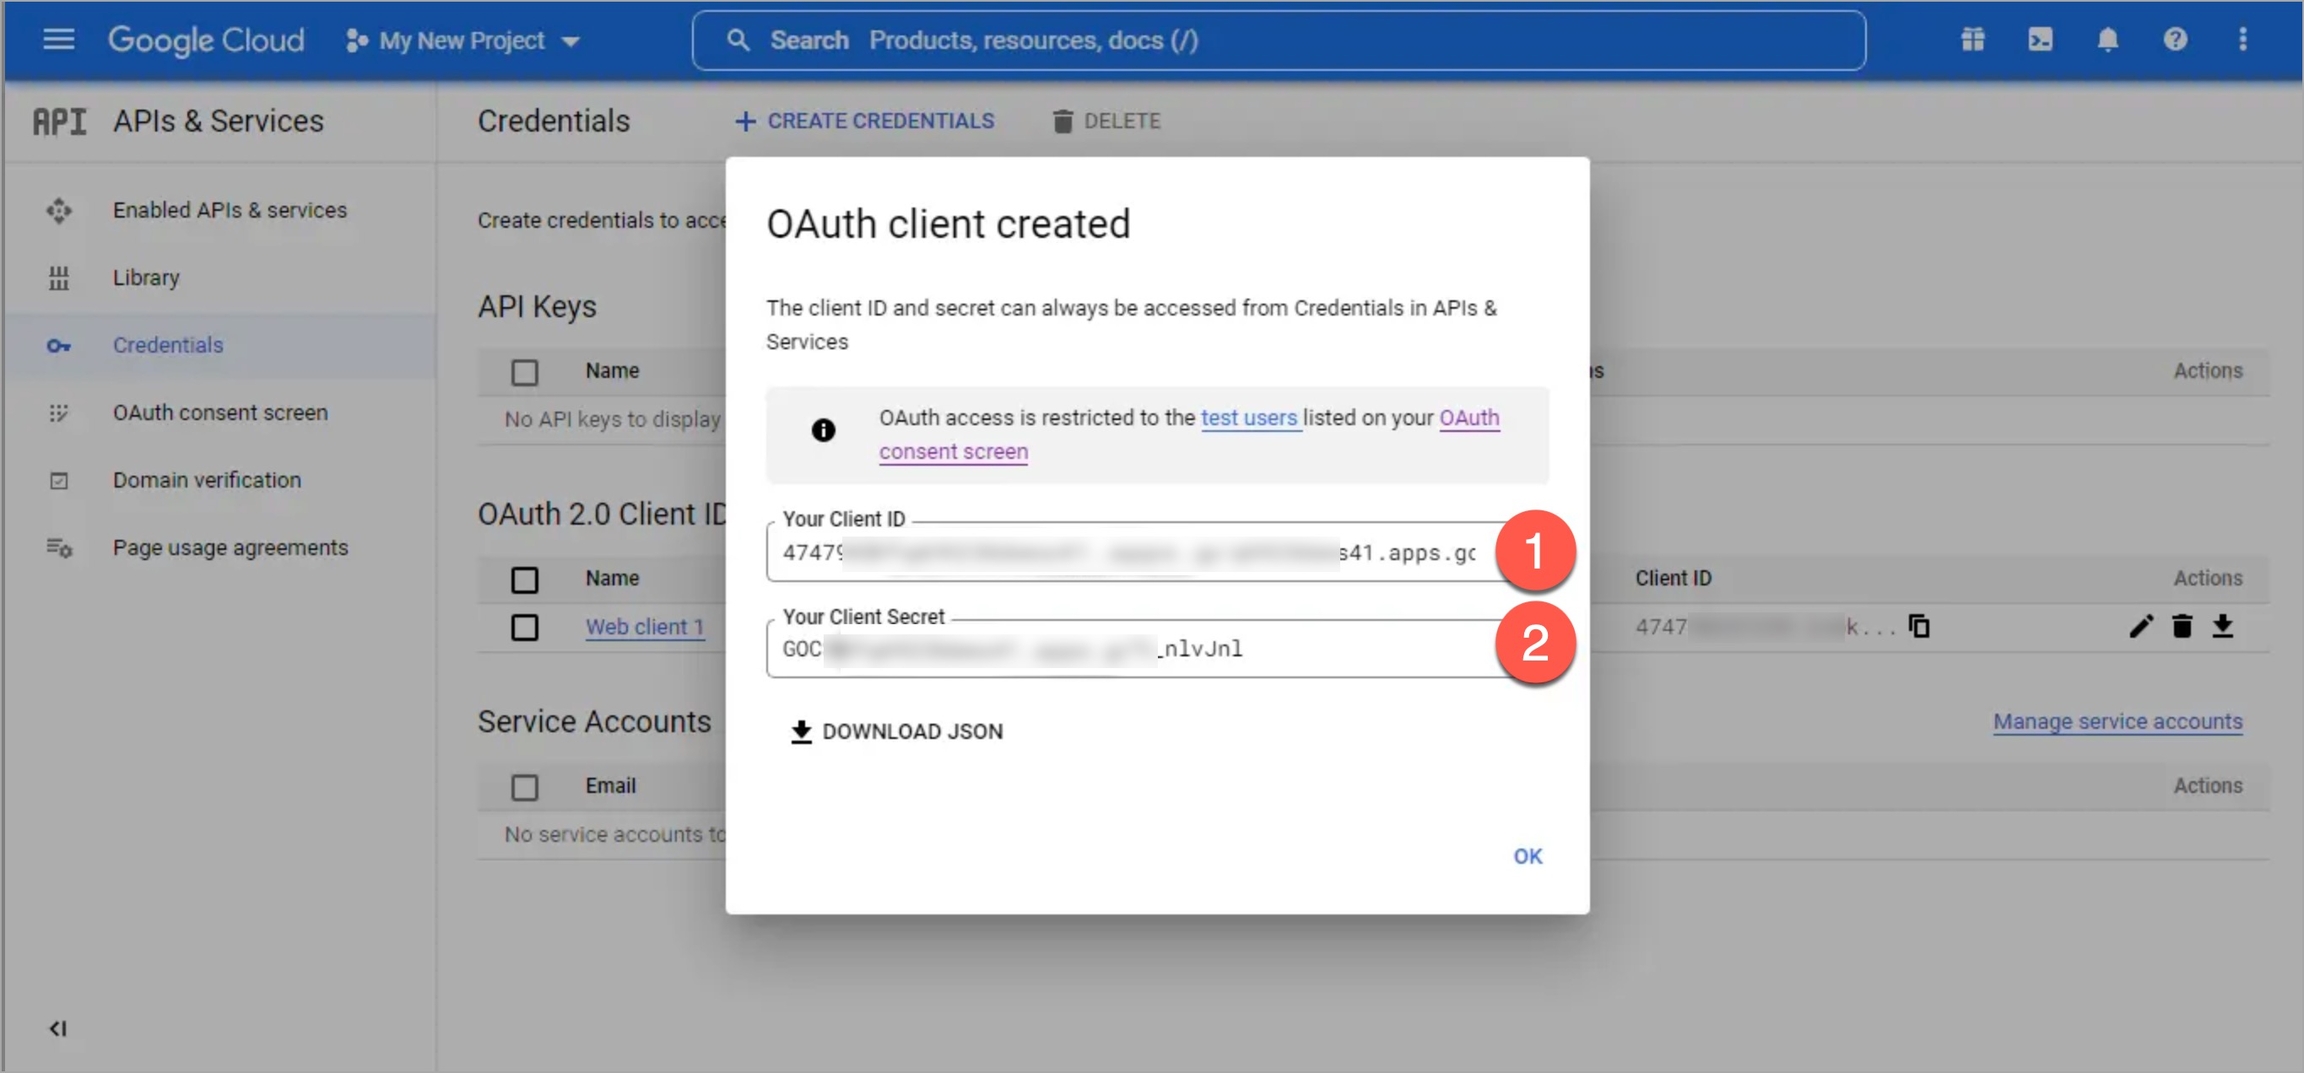
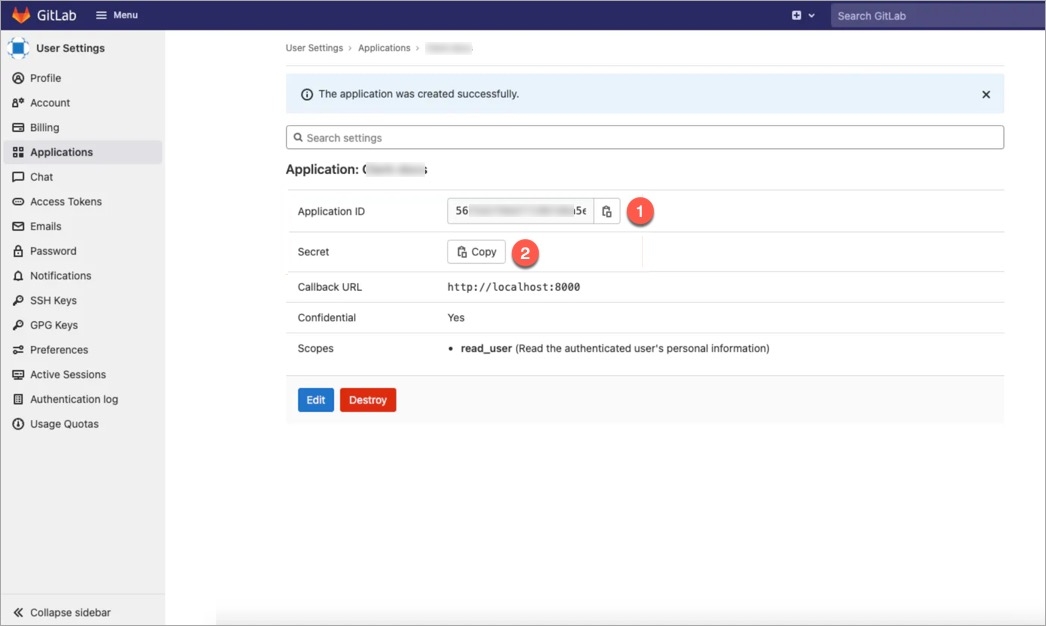
Provide the client ID and client Secret of your SSO provider (e.g. If you select Google as SSO provider, then you must enter $GOOGLE_CLIENT_ID and $GOOGLE_CLIENT_SECRET in the client ID and client Secret respectively.)
Select Save to create and activate SSO Login Service.
Note:
Only single SSO login configuration can be active at one time. Whenever you create or update any SSO configuration, it will be activated and used by Devtron and previous configurations will be deleted.
Except for the domain substring, URL and redirectURI remains same.
You can change SSO configuration anytime by updating the configuration and click Update. Note: In case of configuration change, all users will be logged out of Devtron and will have to login again.
type : Any platform name such as (Google, GitLab, GitHub etc.)
name : Identity provider platform name
id : Identity provider platform which is a unique ID in string. (Refer to dexidp.io
config : User can put connector details for this key. Platforms may not have same structure but common configurations are clientID, clientSecret, redirectURI.
hostedDomains : Domains authorized for SSO login.
After configuring an SSO for authentication, you need to add users in Devtron, else your users won't be able to log in via SSO.
In case you have enabled auto-assign permissions in Microsoft or LDAP, relevant permission groups must also exist in Devtron for a successful login.
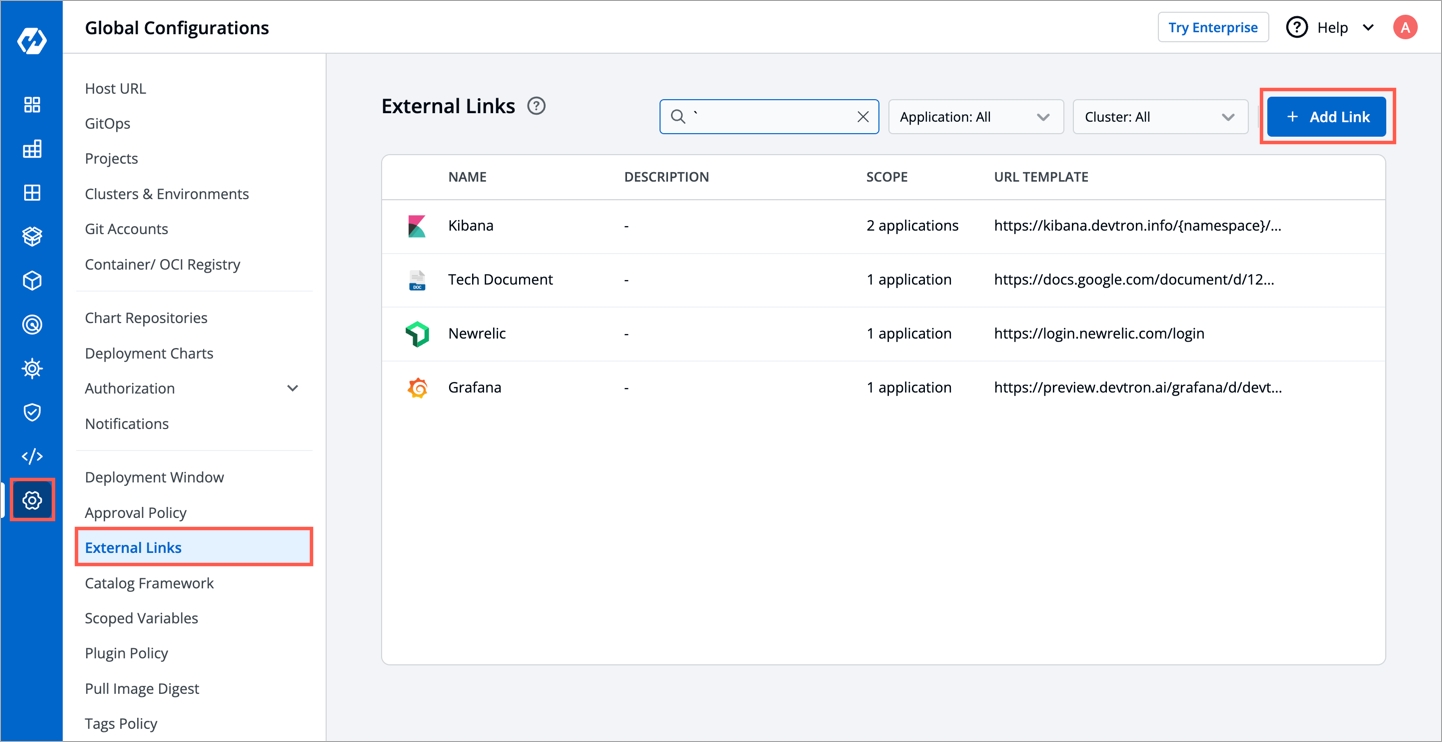
External Links allow you to connect to the third-party applications within your Devtron dashboard for seamlessly monitoring/debugging/logging/analyzing your applications. You can select from the pre-defined third-party applications such as Grafana to link to your application for quick access.
Configured external links will be available on the App details page. You can also integrate Document or Folder using External Links.
Some of the third-party applications which are pre-defined on Devtron Dashboard are:
Grafana
Kibana
Newrelic
Coralogix
Datadog
Loki
Cloudwatch
Swagger
Jira etc.
To monitor/debug an application using a specific Monitoring Tool (such as Grafana, Kibana, etc.), you may need to navigate to the tool's page, then to the respective app/resource page.
External Links can take you directly to the tool's page, which includes the context of the application, environment, pod, and container.
Before you begin, configure an application in the Devtron dashboard.
Super admin access
Monitoring tool URL
Note: External links can only be added/managed by a super admin, but non-super admin users can access the configured external links on the App Configuration page.
On the Devtron dashboard, go to the Global Configurations from the left navigation pane.
Select External links.
Select Add Link.
On the Add Link page, select the external link (e.g. Grafana) which you want to link to your application from Webpage.
The following fields are provided on the Add Link page:
Link name
Provide name of the link.
Description
Description of the link name.
Show link in
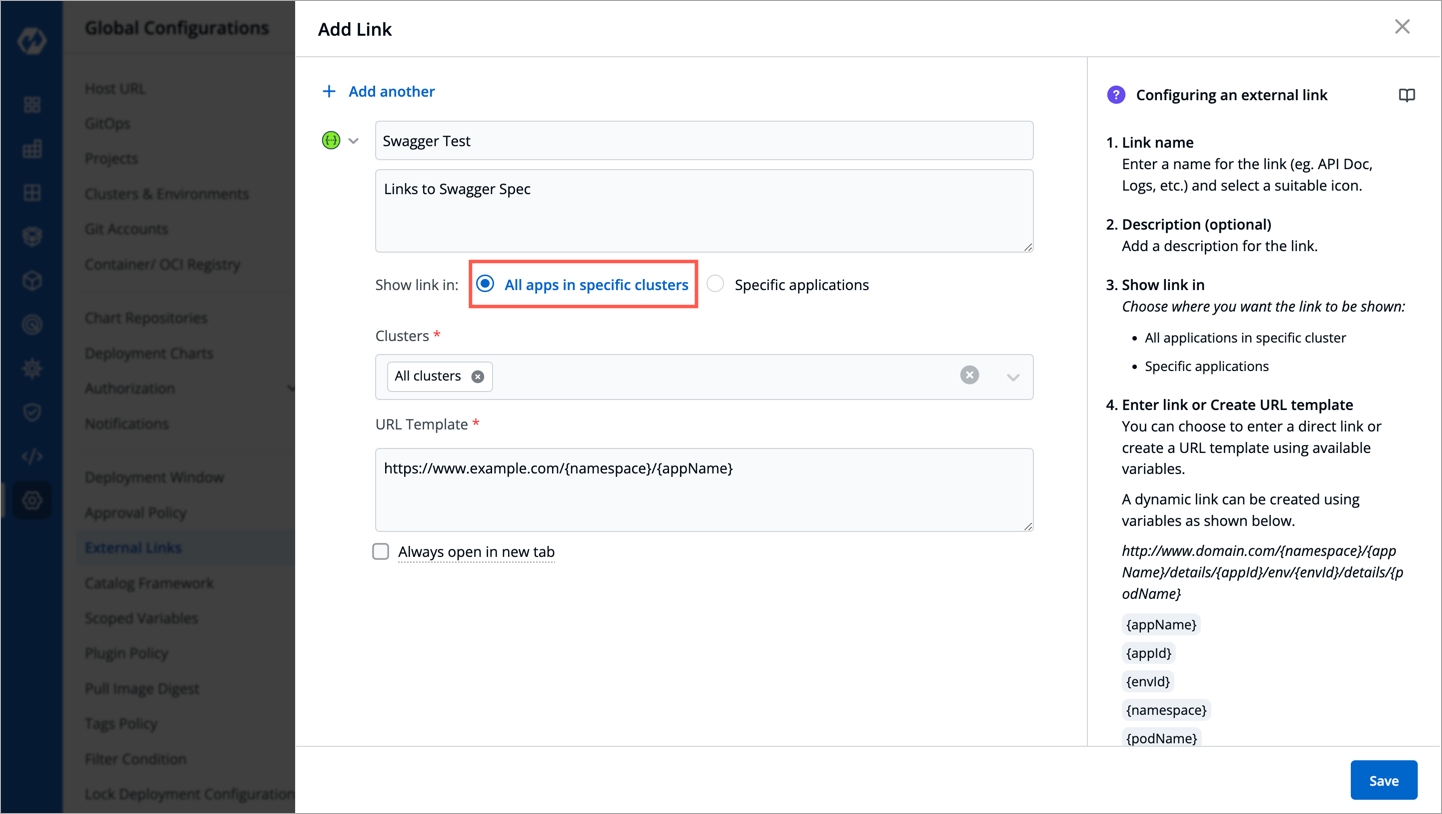
All apps in specific clusters: Select this option to select the cluster.
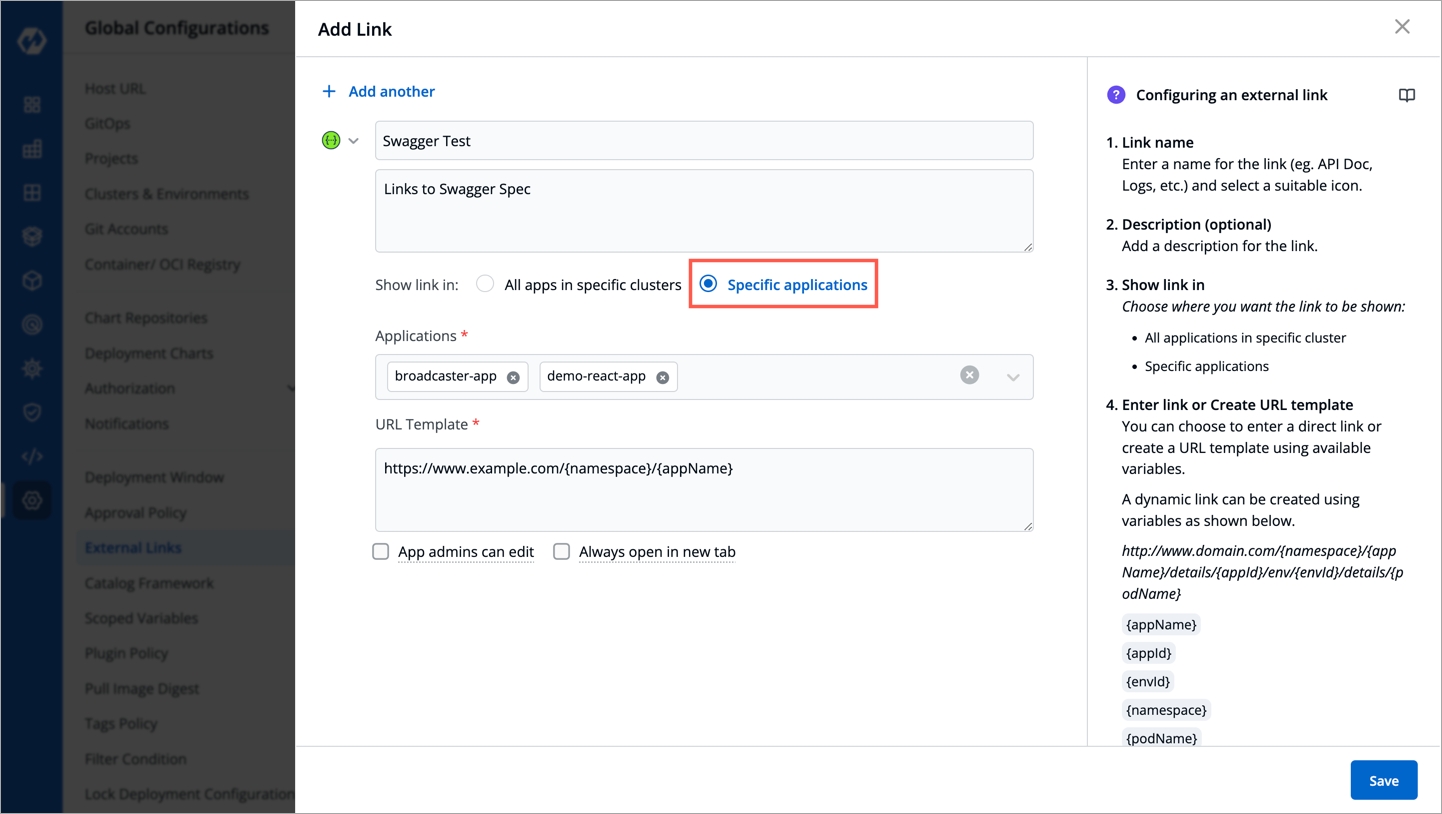
Specific applications: Select this option to select the application.
Clusters
Choose the clusters for which you want to configure the selected external link with.
Select one or more than one cluster to enable the link on the specified clusters.
Select All Clusters to enable the link on all the clusters.
Applications
Choose the application for which you want to configure the selected external link with.
Select one or more than one application to enable the link on the specified application.
Select All applications to enable the link on all the applications. Note: If you enable `App admins can edit`, then you can view the selected links on the App-Details page.
URL Template
The configured URL Template is used by apps deployed on the selected clusters/applications. By combining one or more of the env variables, a URL with the structure shown below can be created: http://www.domain.com/{namespace}/{appName}/details/{appId}/env/{envId}/details/{podName} If you include the variables {podName} and {containerName} in the URL template, then the configured links (e.g. Grafana) will be visible only on the pod level and container level respectively. The env variables:
{appName}
{appId}
{envId}
{namespace}
Note: The env variables will be dynamically replaced by the values that you used to configure the link.
Note: To add multiple links, select + Add another at the top-left corner.
Click Save.
The users (admin and others) can access the configured external link on the App Details page.
Note: If you enable App admins can edit on the External Links page, then only non-super admin users can view the selected links on the App Details page.
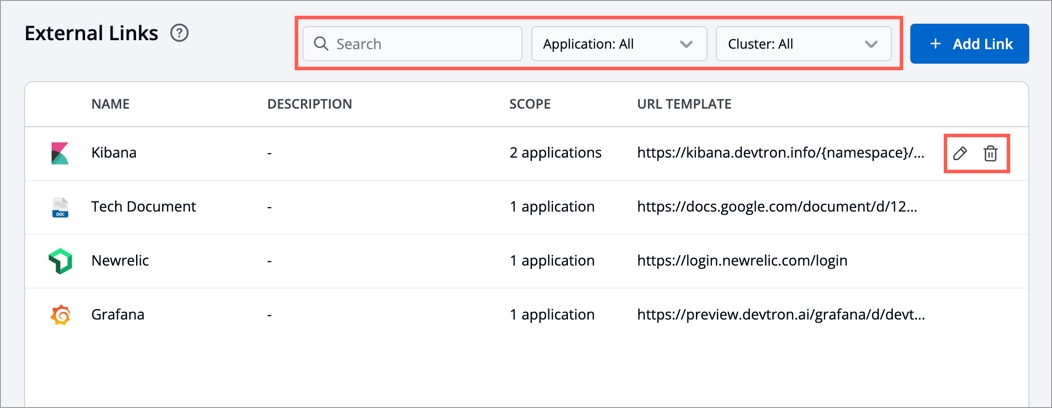
On the External Links page, the configured external links can be filtered/searched, as well as edited/deleted.
Select Global Configurations > External links.
Filter and search the links based on the link's name or a user-defined name.
Edit a link by selecting the edit icon next to an external link.
Delete an external link by selecting the delete icon next to a link. The bookmarked link will be removed in the clusters for which it was configured.
Projects are the logical grouping of your applications so that you can manage and control the access level of users.
Refer user access for more detail.
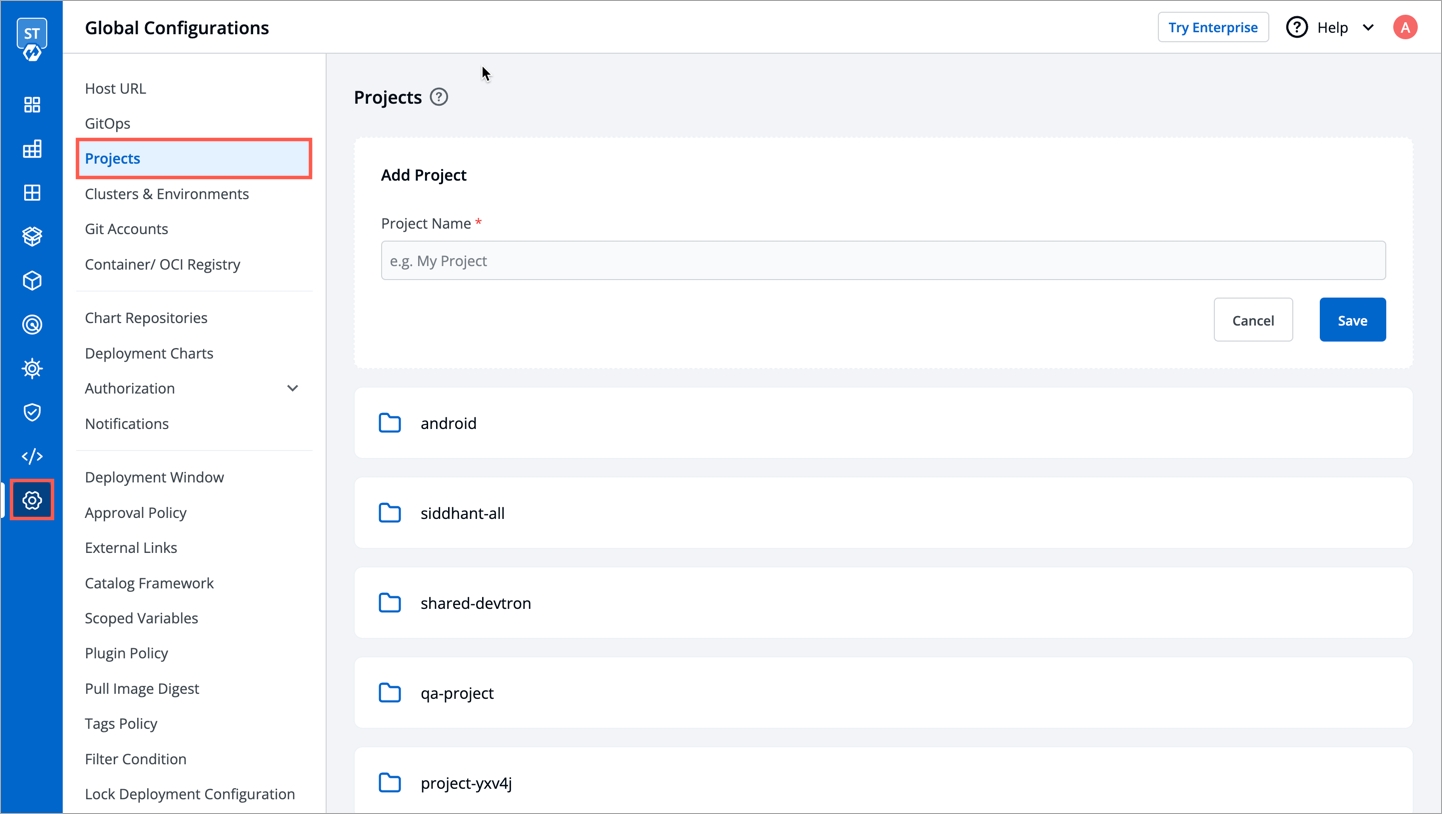
To add a project name, go to the Projects section of Global Configurations.
Click Add Project.
Provide a project name in the field and click Save.
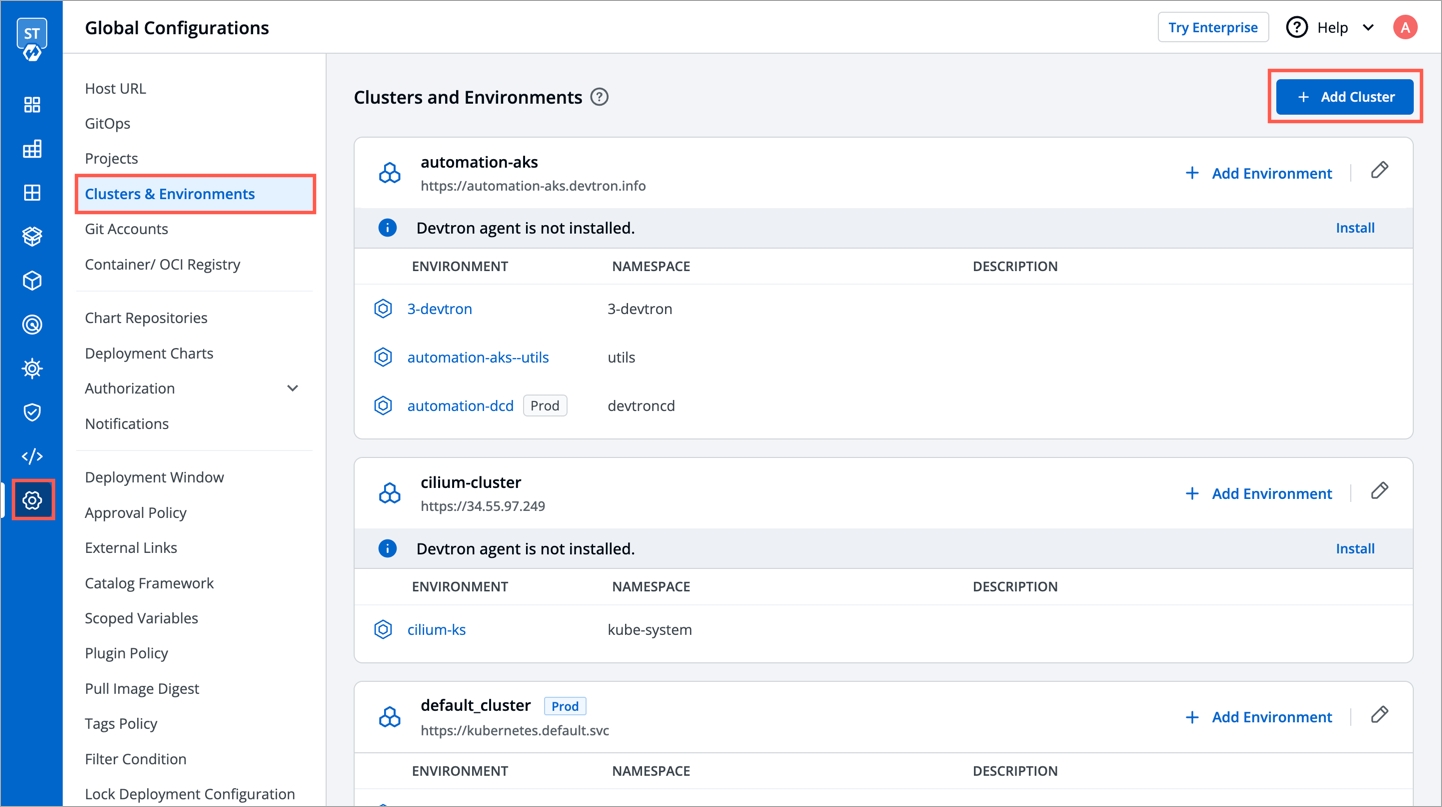
You can add your existing Kubernetes clusters and environments on the Clusters and Environments section. You must have a super admin access to add a cluster.
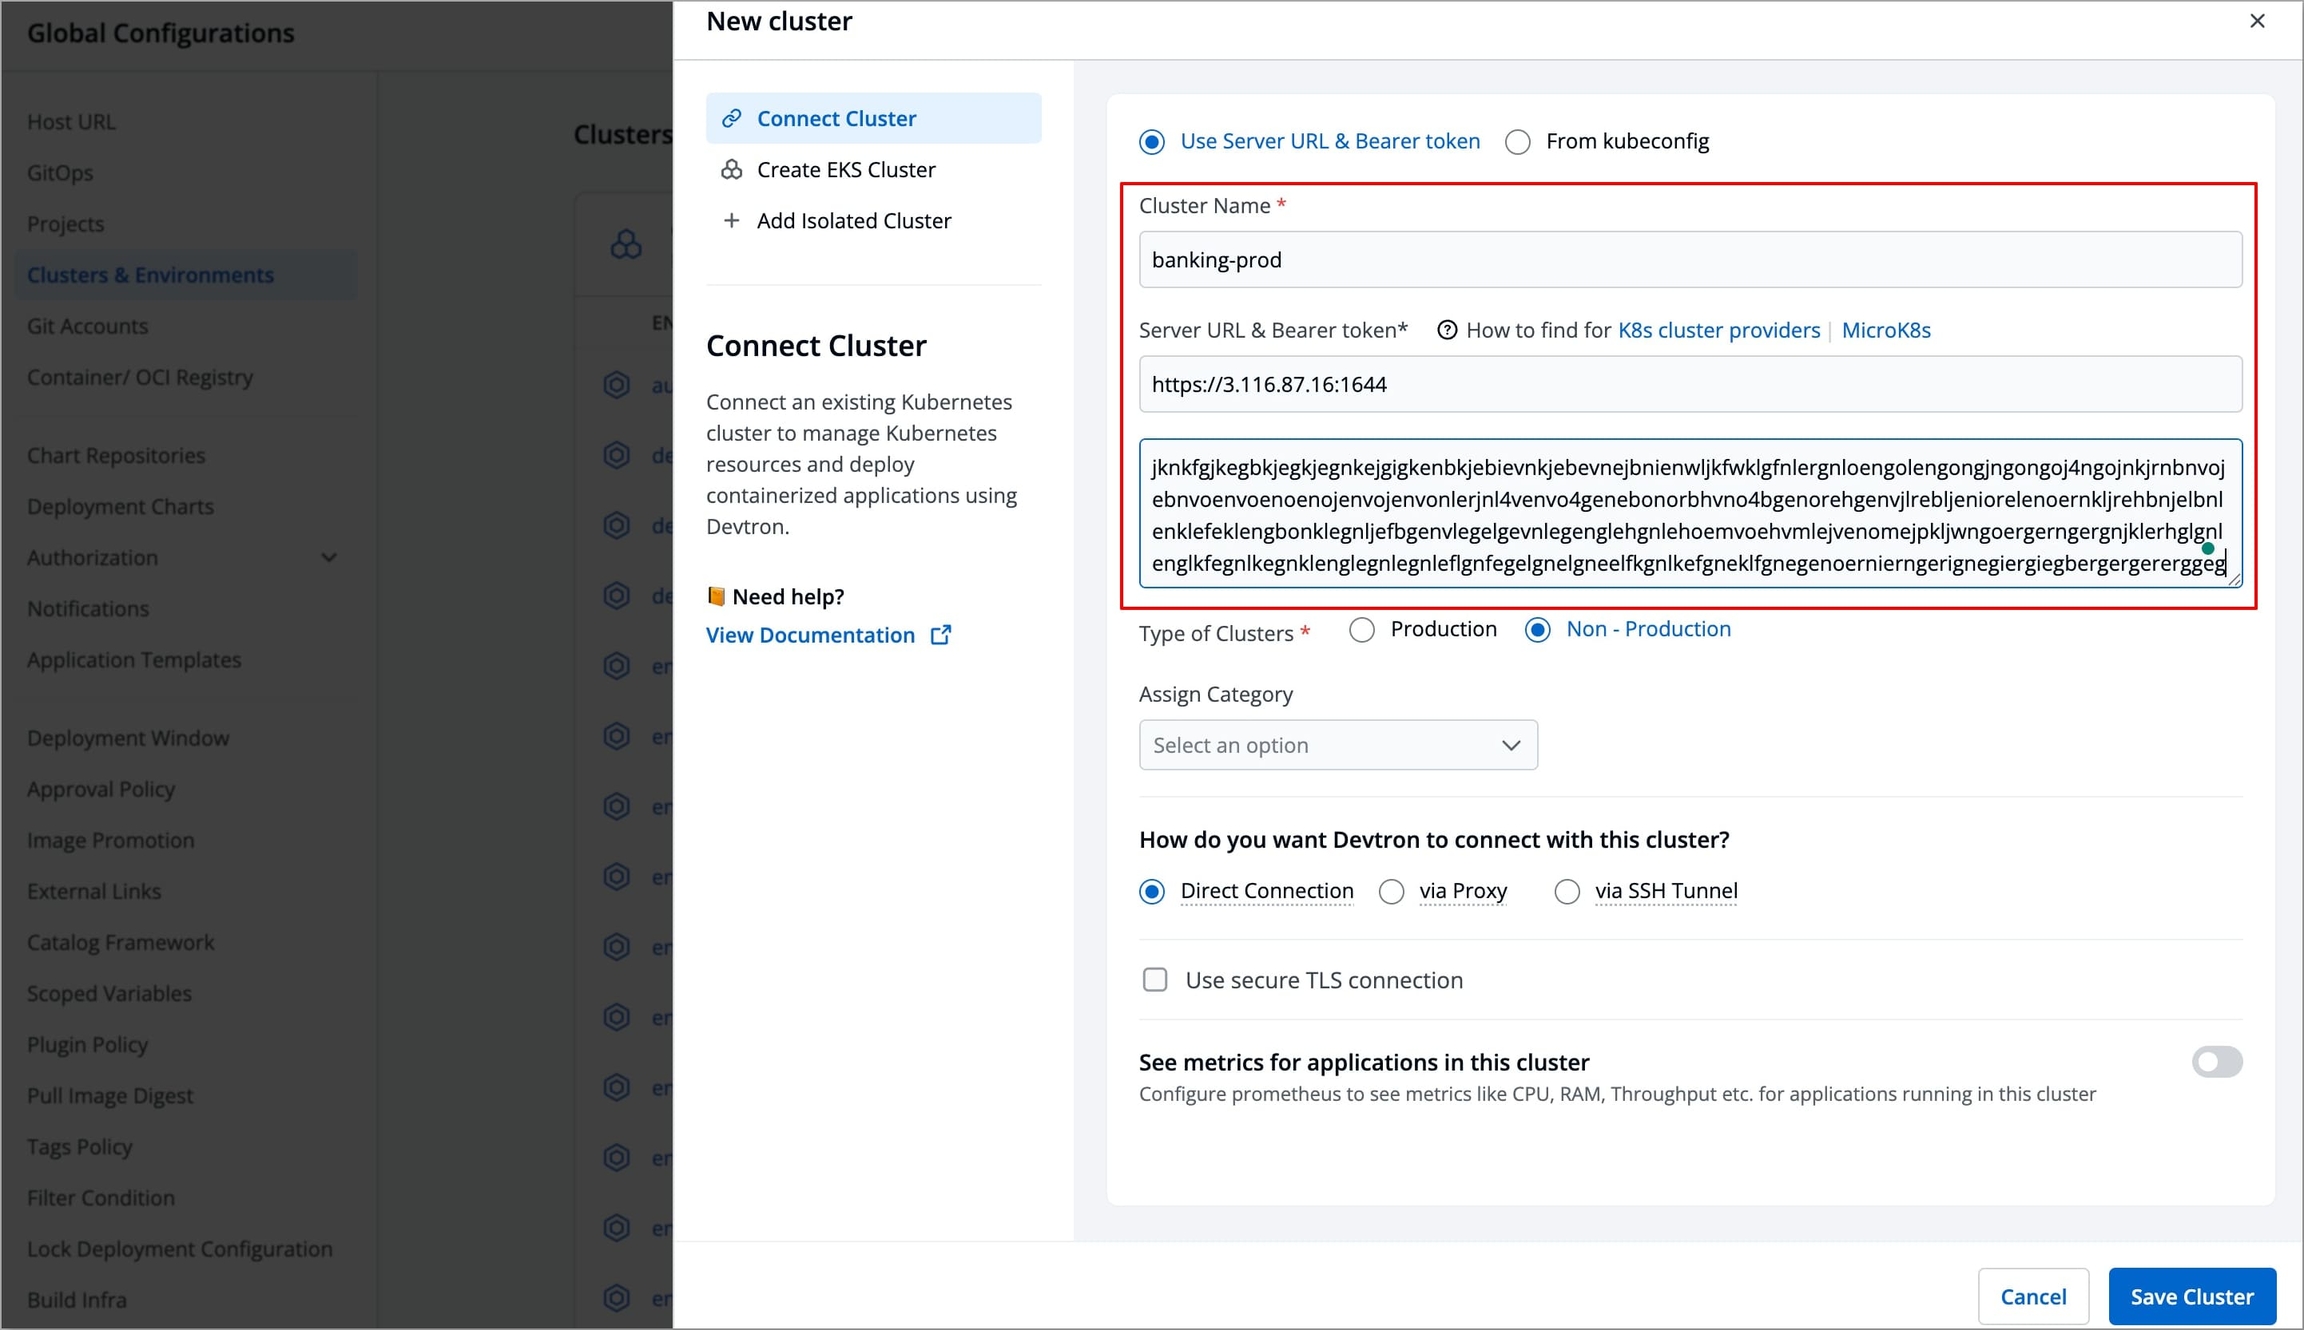
To add cluster, go to the Clusters & Environments section of Global Configurations. Click Add cluster.
To add a Kubernetes cluster on Devtron using server url and the bearer token, provide the information in the following fields:
Name
Enter a name of your cluster.
Server URL
Bearer Token
Bearer token of a cluster.
Prerequisites:
kubectlmust be installed on the bastion.
Note: We recommend to use a self-hosted URL instead of cloud hosted URL. Refer the benefits of self-hosted URL.
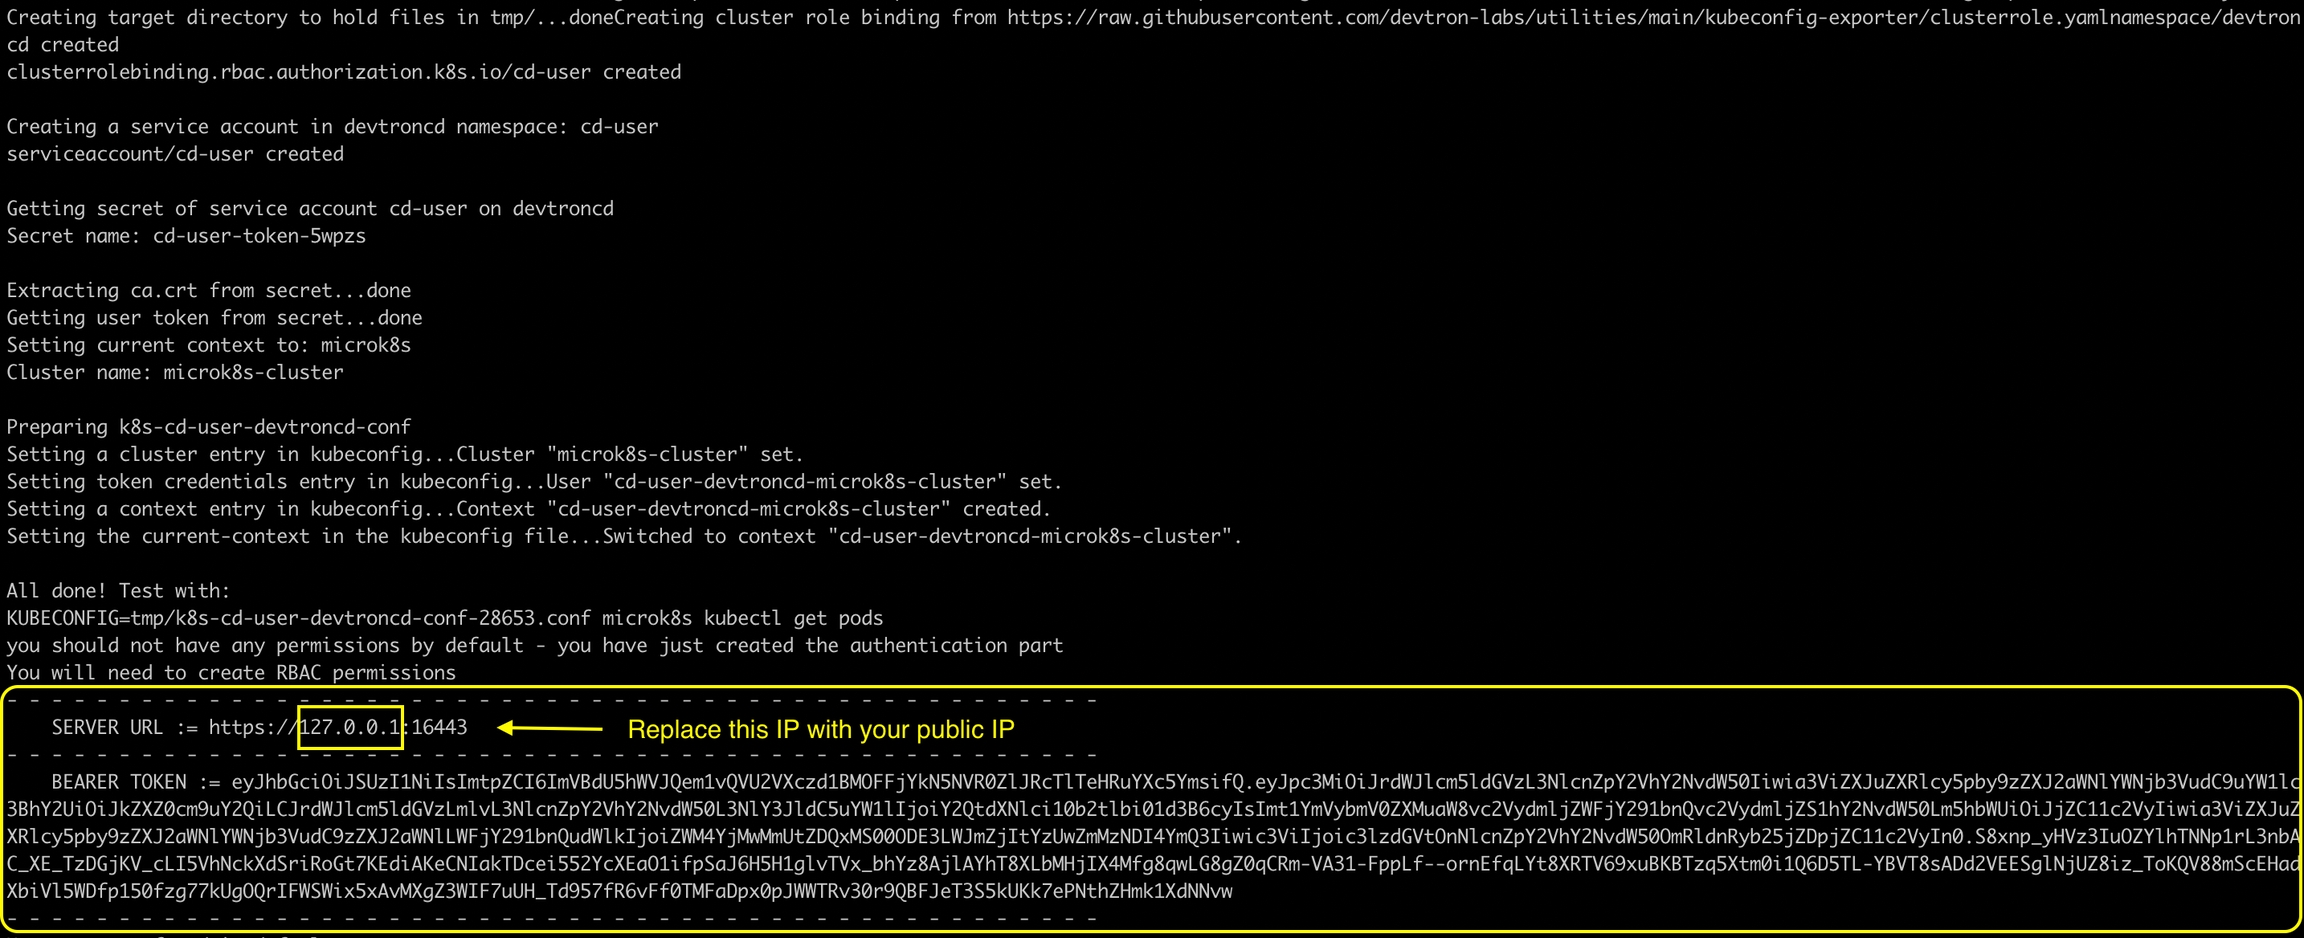
You can get the Server URL & Bearer Token by running the following command depending on the cluster provider:
If you are using EKS, AKS, GKE, Kops, Digital Ocean managed Kubernetes, run the following command to generate the server URL and bearer token:
If you are using a microk8s cluster, run the following command to generate the server URL and bearer token:
Disaster Recovery:
It is not possible to edit the server URL of a cloud specific provider. If you're using an EKS URL (e.g. *****.eu-west-1.elb.amazonaws.com), it will be a tedious task to add a new cluster and migrate all the services one by one.
But in case of using a self-hosted URL (e.g. clear.example.com), you can just point to the new cluster's server URL in DNS manager and update the new cluster token and sync all the deployments.
Easy Cluster Migrations:
In case of managed Kubernetes clusters (like EKS, AKS, GKE etc) which is a cloud provider specific, migrating your cluster from one provider to another will result in waste of time and effort.
On the other hand, migration for a self-hosted URL is easy as the URL is of single hosted domain independent of the cloud provider.
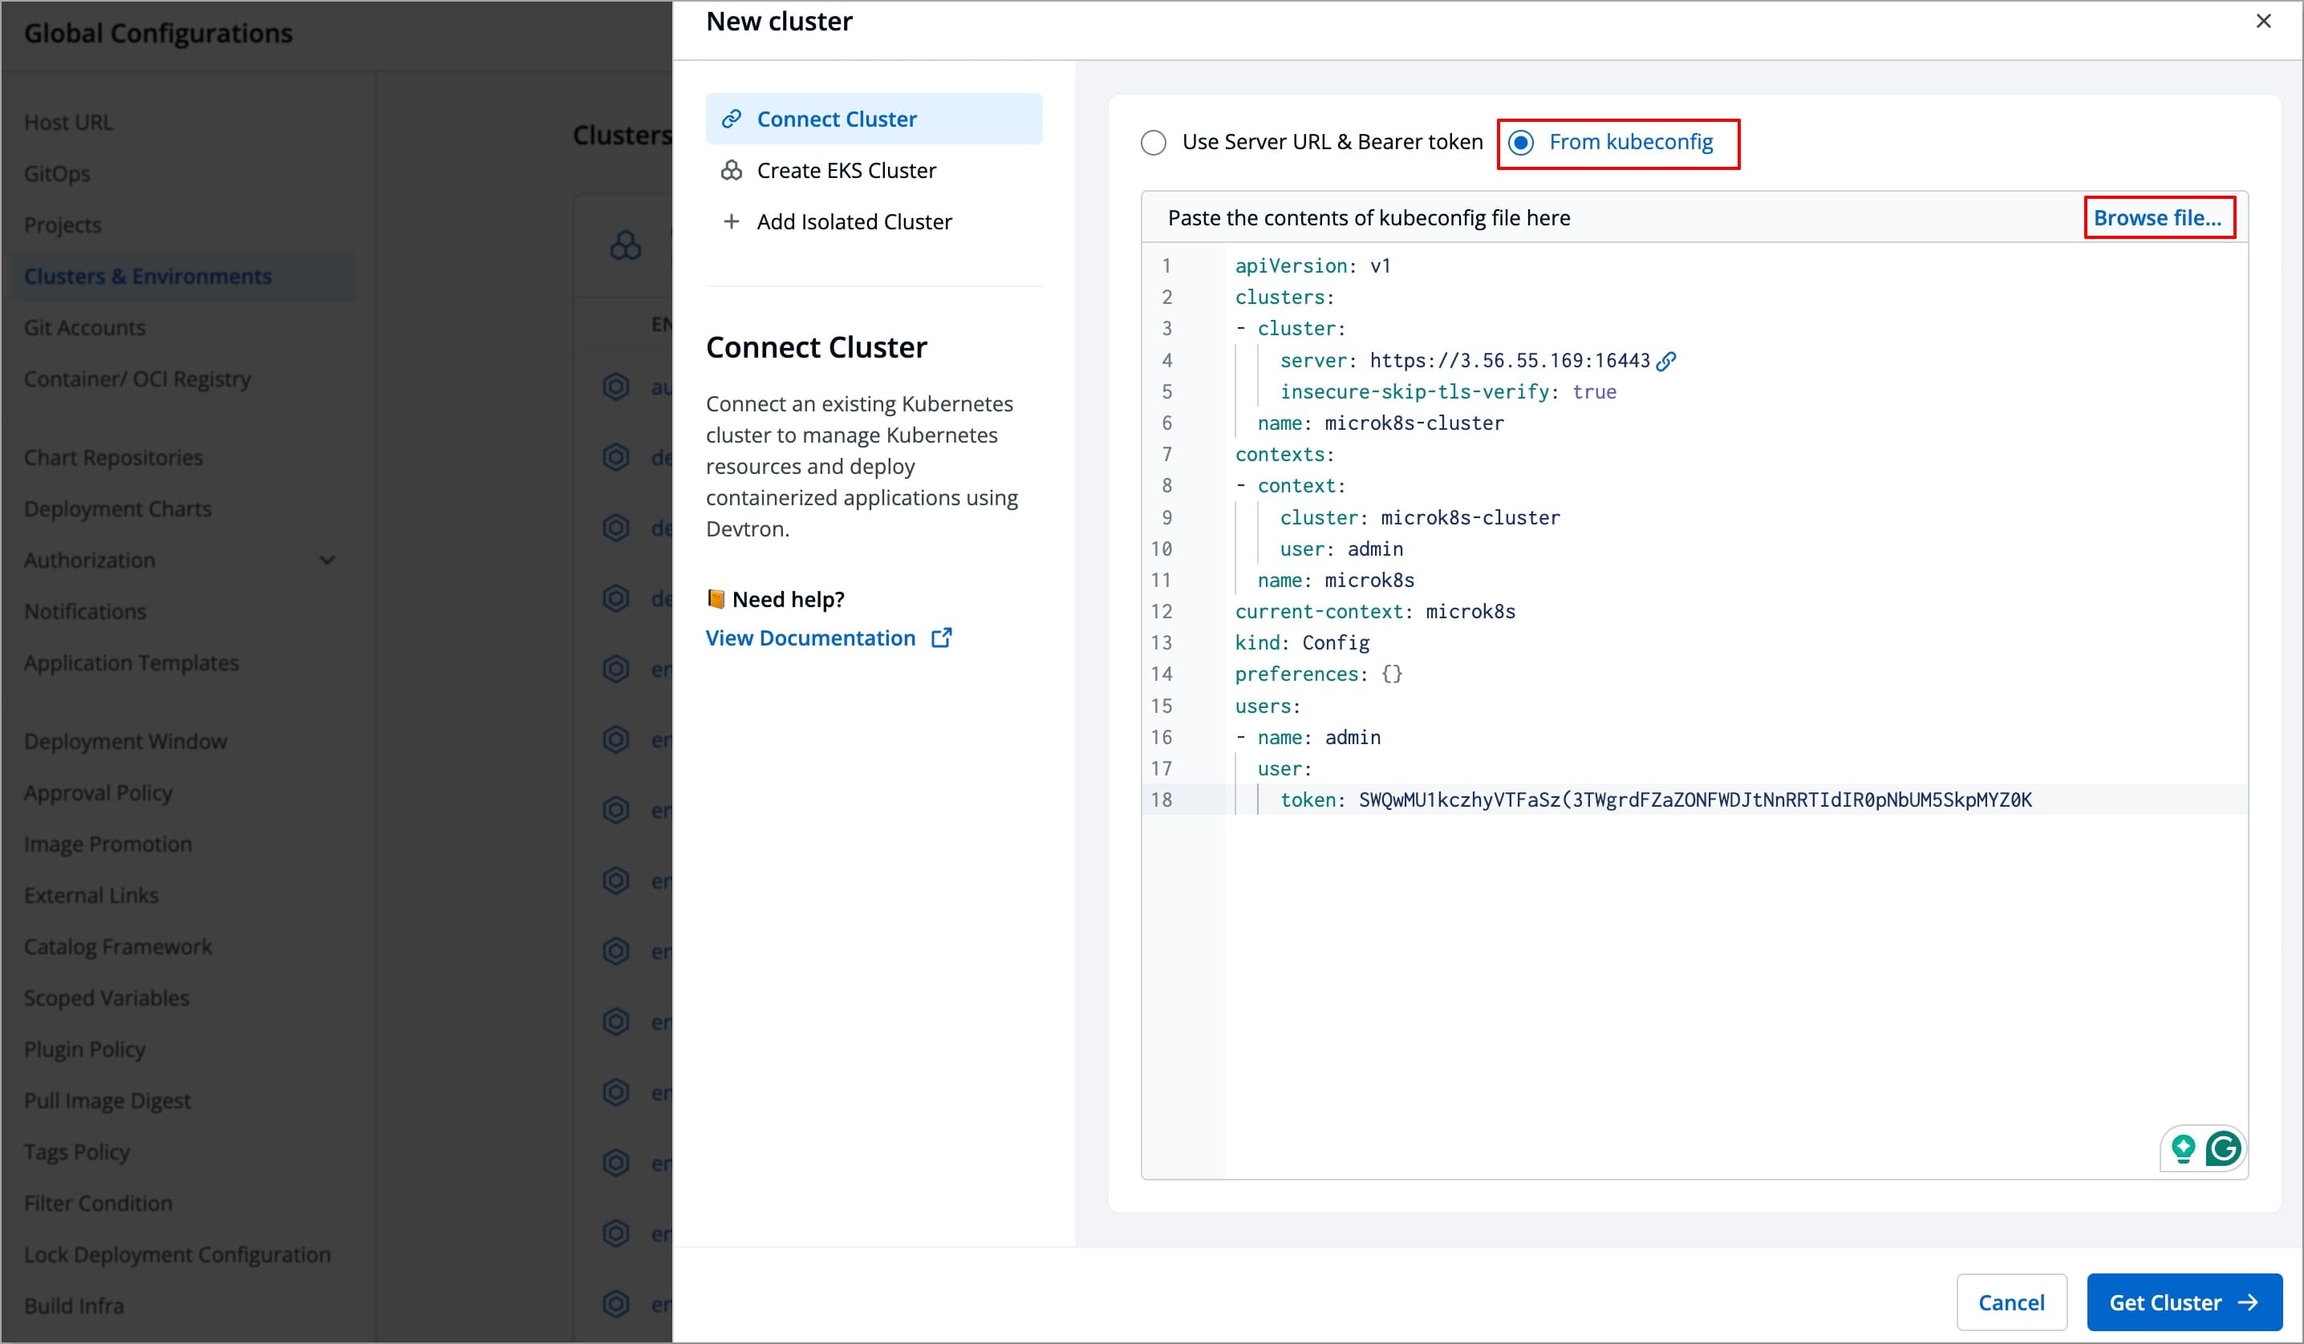
To add clusters using kubeconfig, follow these steps:
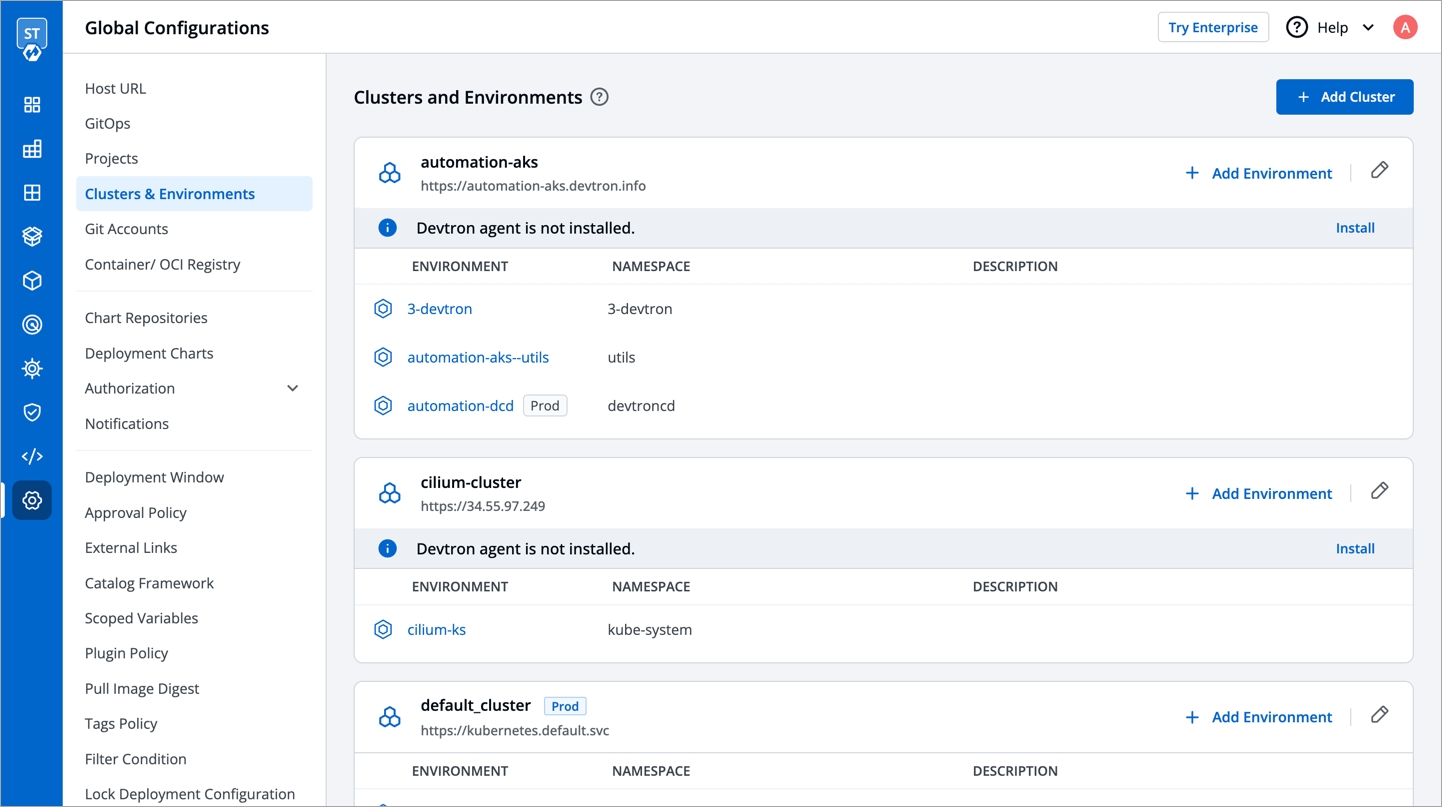
First, navigate to the global configurations menu, and then go to "clusters and environment" section.
Click on the Add cluster button. In the options provided, choose the From kubeconfig option.
Next, either paste the kubeconfig file or browse for it and select the appropriate file.
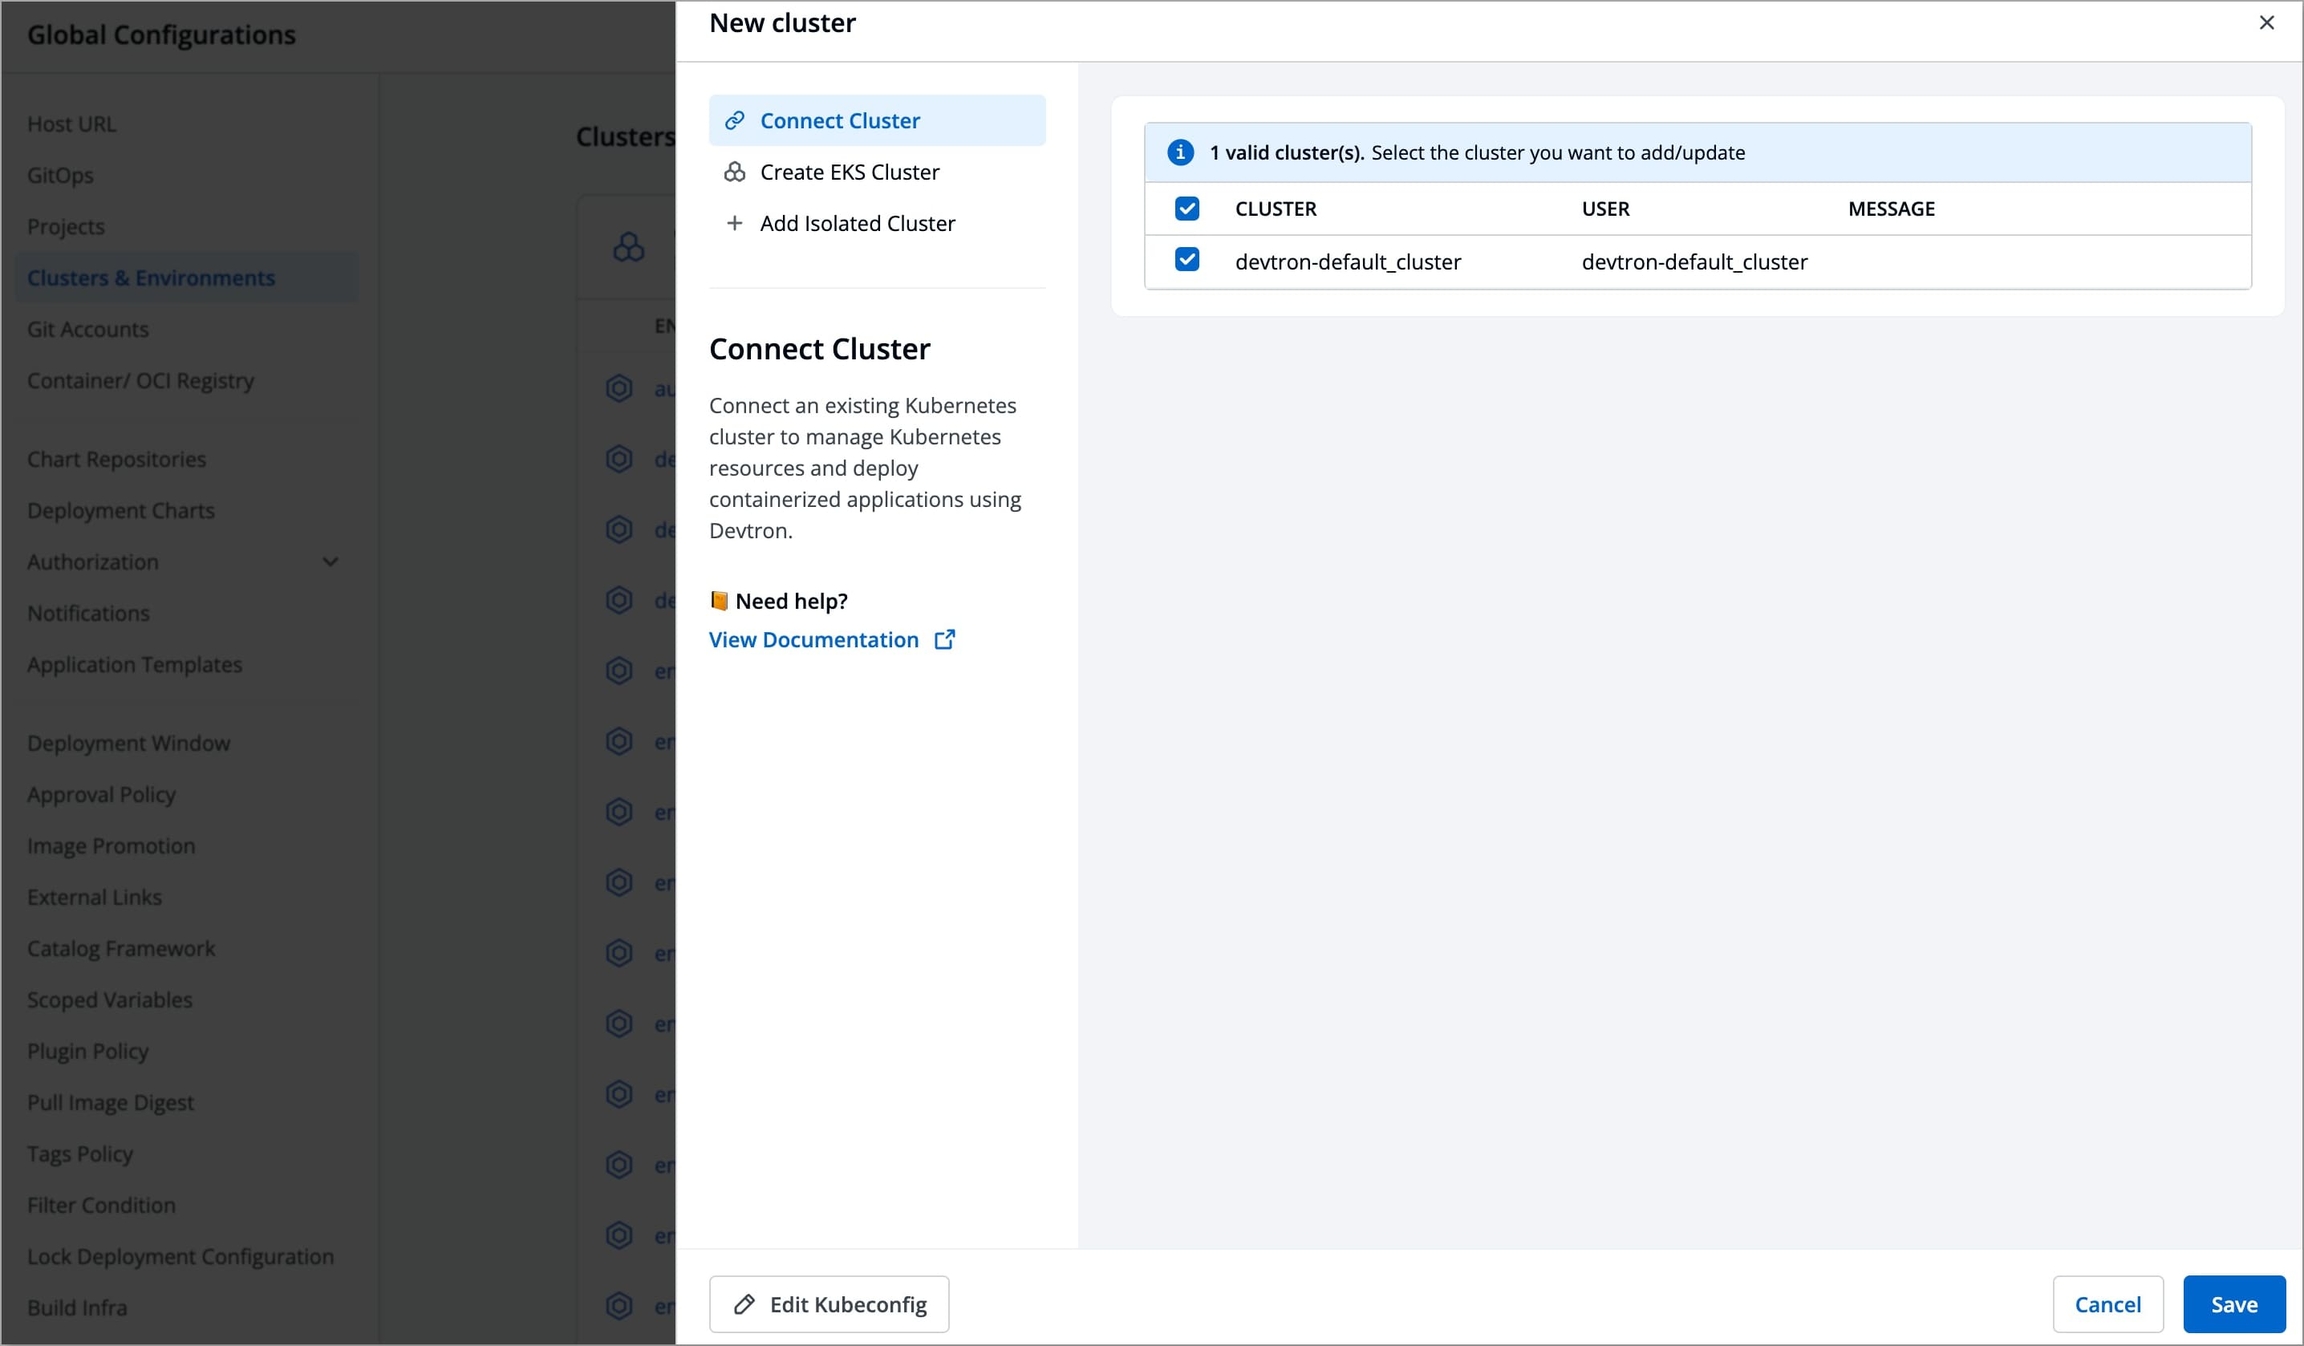
Afterward, click on the Get cluster button. This action will display the cluster details alongside the kubeconfig.
Select the desired cluster and click on Save to successfully add the cluster to Devtron.
Note: Please ensure that the kubeconfig file you use has admin permissions. It is crucial for Devtron to have the necessary administrative privileges; otherwise, it may encounter failures or disruptions during deployments and other operations. Admin permission is essential to ensure the smooth functioning of Devtron and to prevent any potential issues that may arise due to insufficient privileges.
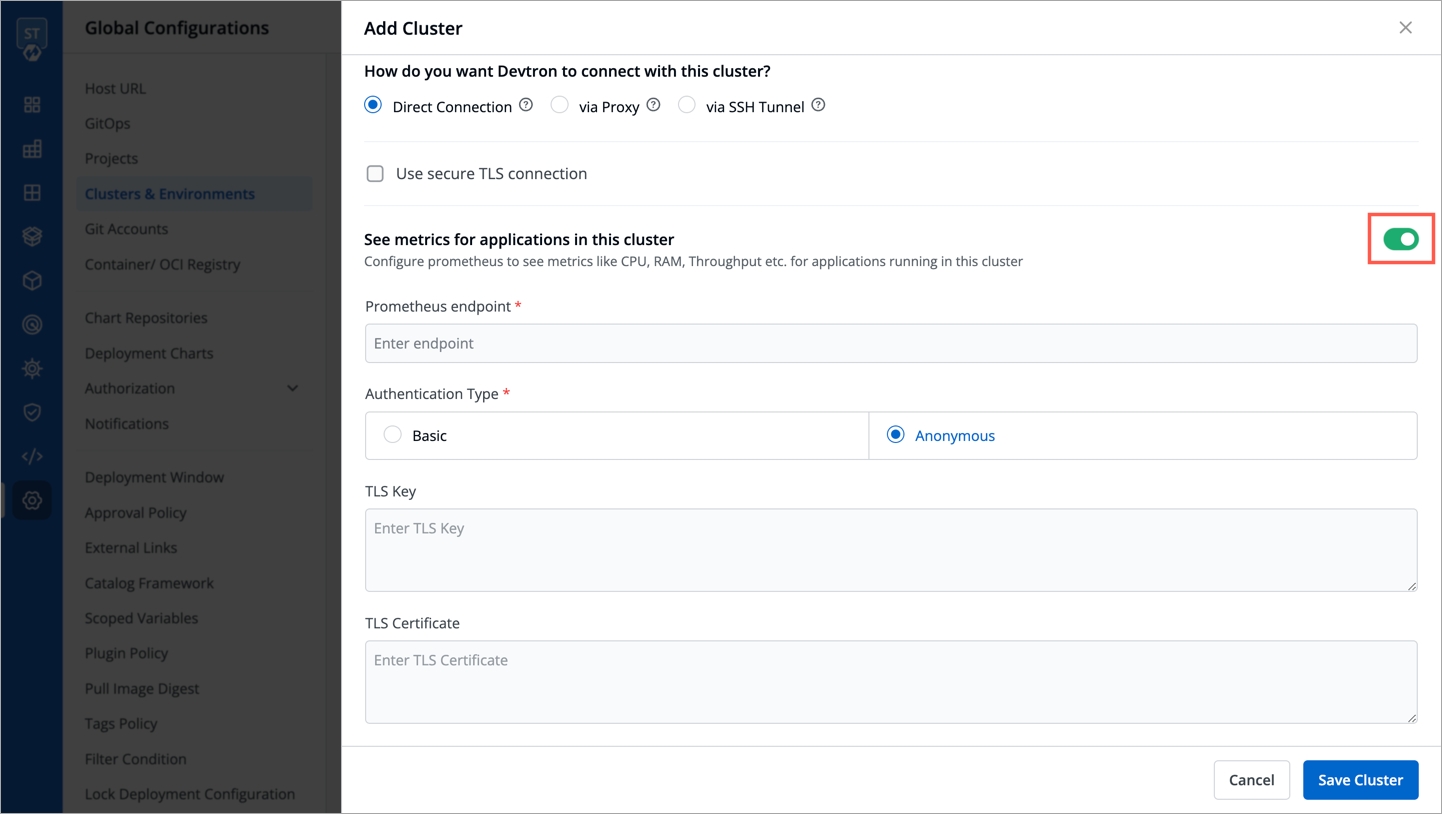
If you want to see application metrics against the applications deployed in the cluster, Prometheus must be deployed in the cluster. Prometheus is a powerful tool to provide graphical insight into your application behavior.
Note: Make sure that you install
Monitoring (Grafana)from theDevtron Stack Managerto configure prometheus. If you do not installMonitoring (Grafana), then the option to configure prometheus will not be available.
Enable the application metrics to configure prometheus and provide the information in the following fields:
Prometheus endpoint
Provide the URL of your prometheus.
Authentication Type
Prometheus supports two authentication types:
Basic: If you select the Basic authentication type, then you must provide the Username and Password of prometheus for authentication.
Anonymous: If you select the Anonymous authentication type, then you do not need to provide the Username and Password.
Note: The fields Username and Password will not be available by default.
TLS Key & TLS Certificate
TLS Key and TLS Certificate are optional, these options are used when you use a customized URL.
Now, click Save Cluster to save your cluster on Devtron.
Your Kubernetes cluster gets mapped with Devtron when you save the cluster configurations. Now, the Devtron agent must be installed on the added cluster so that you can deploy your applications on that cluster.
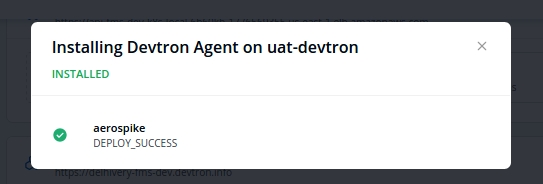
When the Devtron agent starts installing, click Details to check the installation status.
A new window pops up displaying all the details about the Devtron agent.
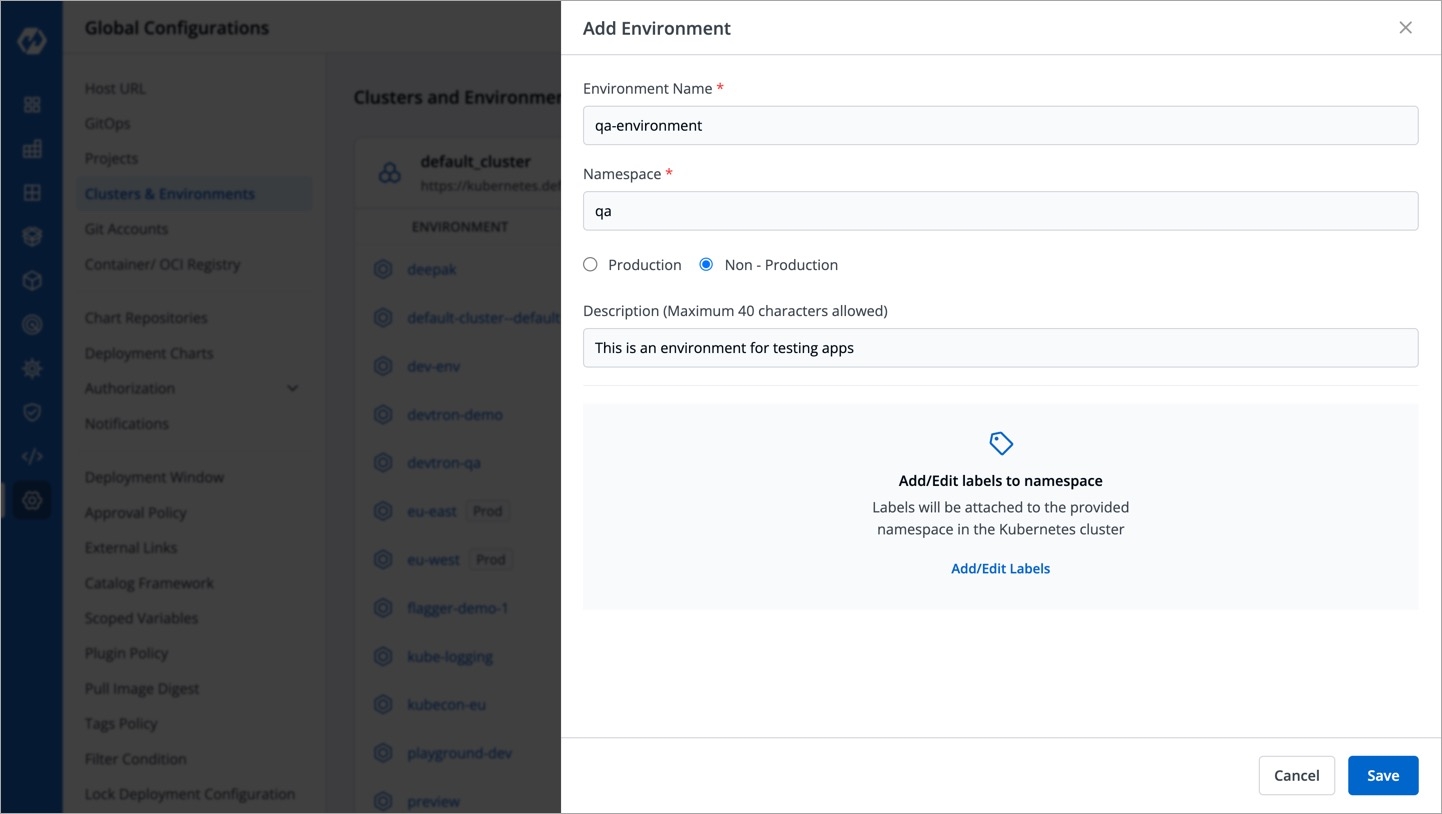
Once you have added your cluster in the Clusters & Environments, you can add the environment by clicking Add environment.
A new environment window pops up.
Environment Name
Enter a name of your environment.
Enter Namespace
Enter a namespace corresponding to your environment. Note: If this namespace does not already exist in your cluster, Devtron will create it. If it exists already, Devtron will map the environment to the existing namespace.
Environment Type
Select your environment type:
Production
Non-production
Note: Devtron shows deployment metrics (DORA metrics) for environments tagged as Production only.
Click Save and your environment will be created.
You can also update an environment by clicking the environment.
You can change Production and Non-Production options only.
You cannot change the Environment Name and Namespace Name.
Make sure to click Update to update your environment.
You can add more chart repositories to Devtron. Once added, they will be available in the All Charts section of the Chart Store.
Note: After the successful installation of Devtron, click Refetch Charts to sync and download all the default charts listed on the dashboard.
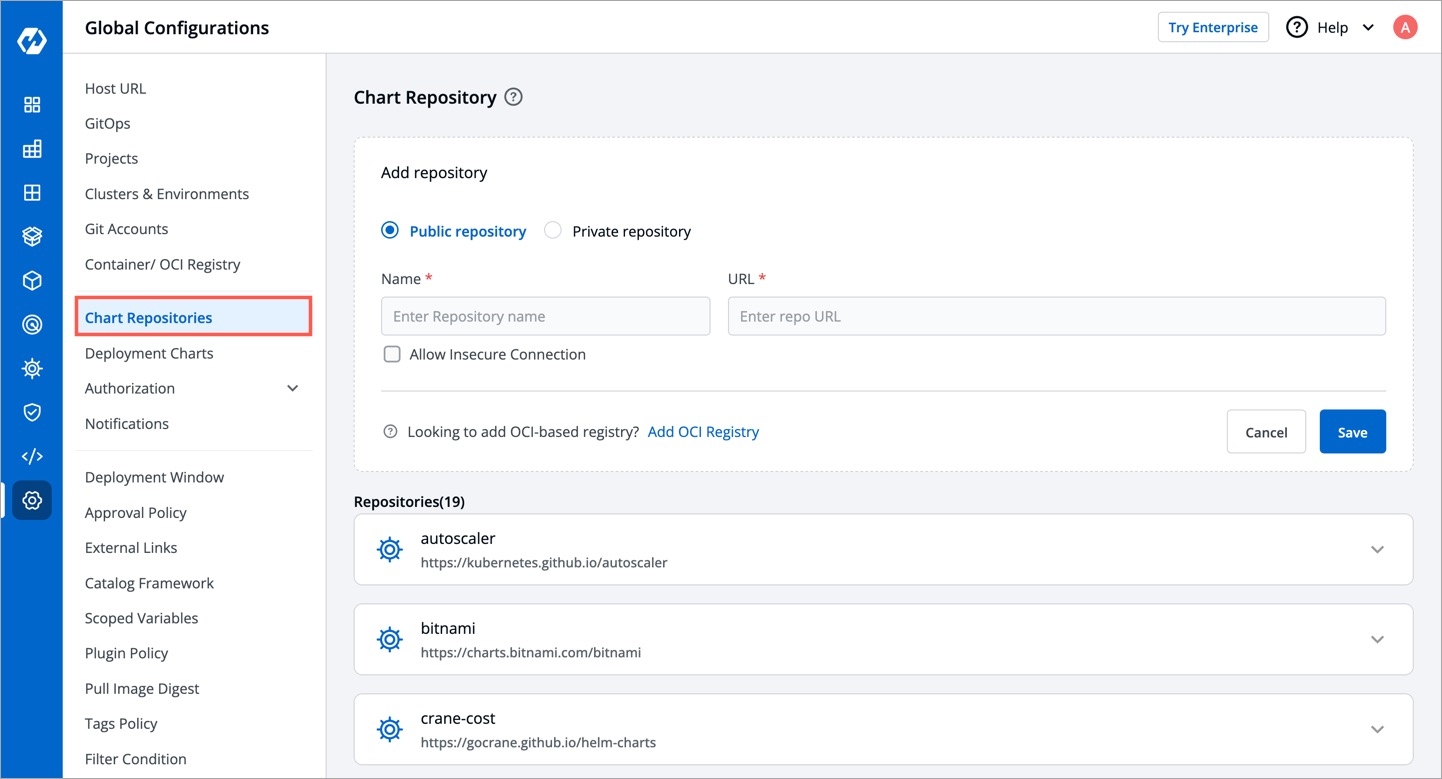
To add chart repository, go to the Chart Repositories section of Global Configurations. Click Add repository.
Note: Only public chart repositories can be connected as of now via Devtron.
Provide below information in the following fields:
Name
Provide a Name of your chart repository. This name is added as prefix to the name of the chart in the listing on the helm chart section of application.
URL
This is the URL of your chart repository. E.g. https://charts.bitnami.com/bitnami
You can also update your saved chart repository settings.
Click the chart repository which you want to update.
Modify the required changes and click Update to save you changes.
Note:
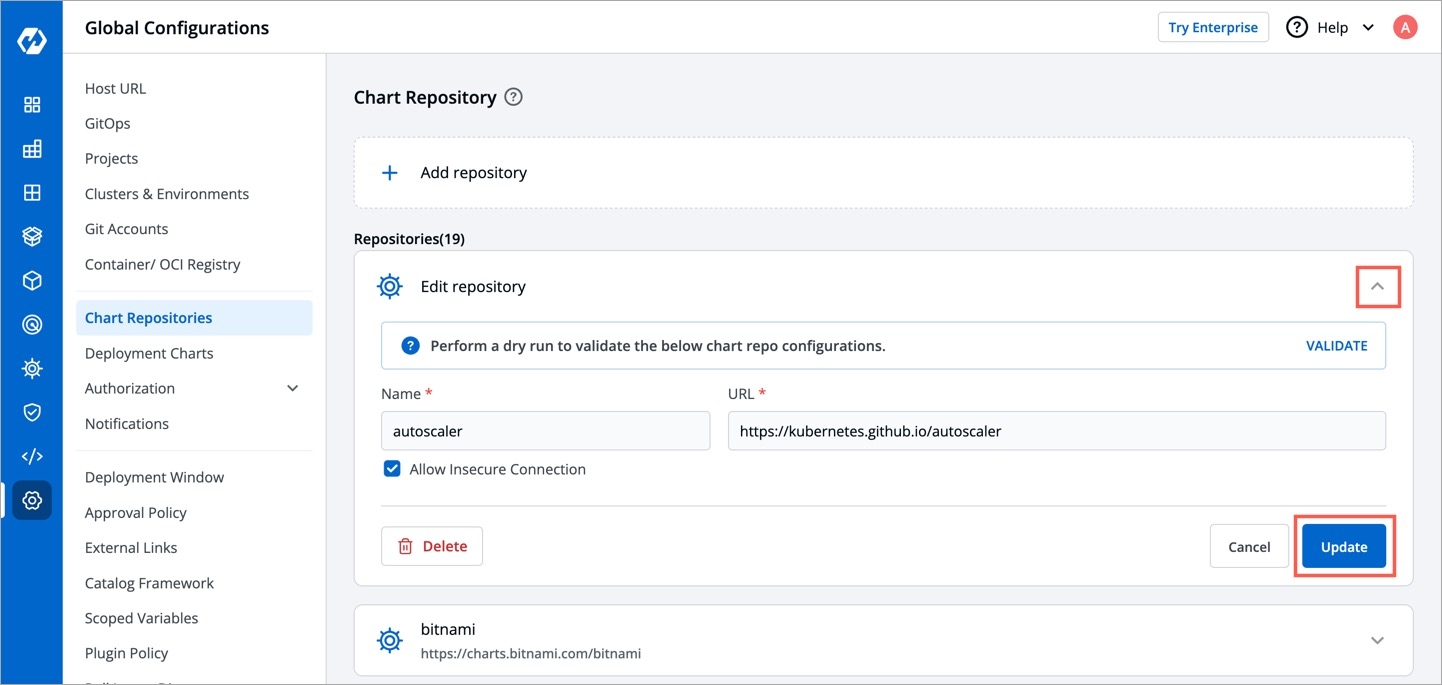
You can perform a dry run to validate the below chart repo configurations by clicking Validate.
You can enable or disable your chart repository. If you enable it, then you will be able to see the enabled chart in All Charts section of the Chart Store.
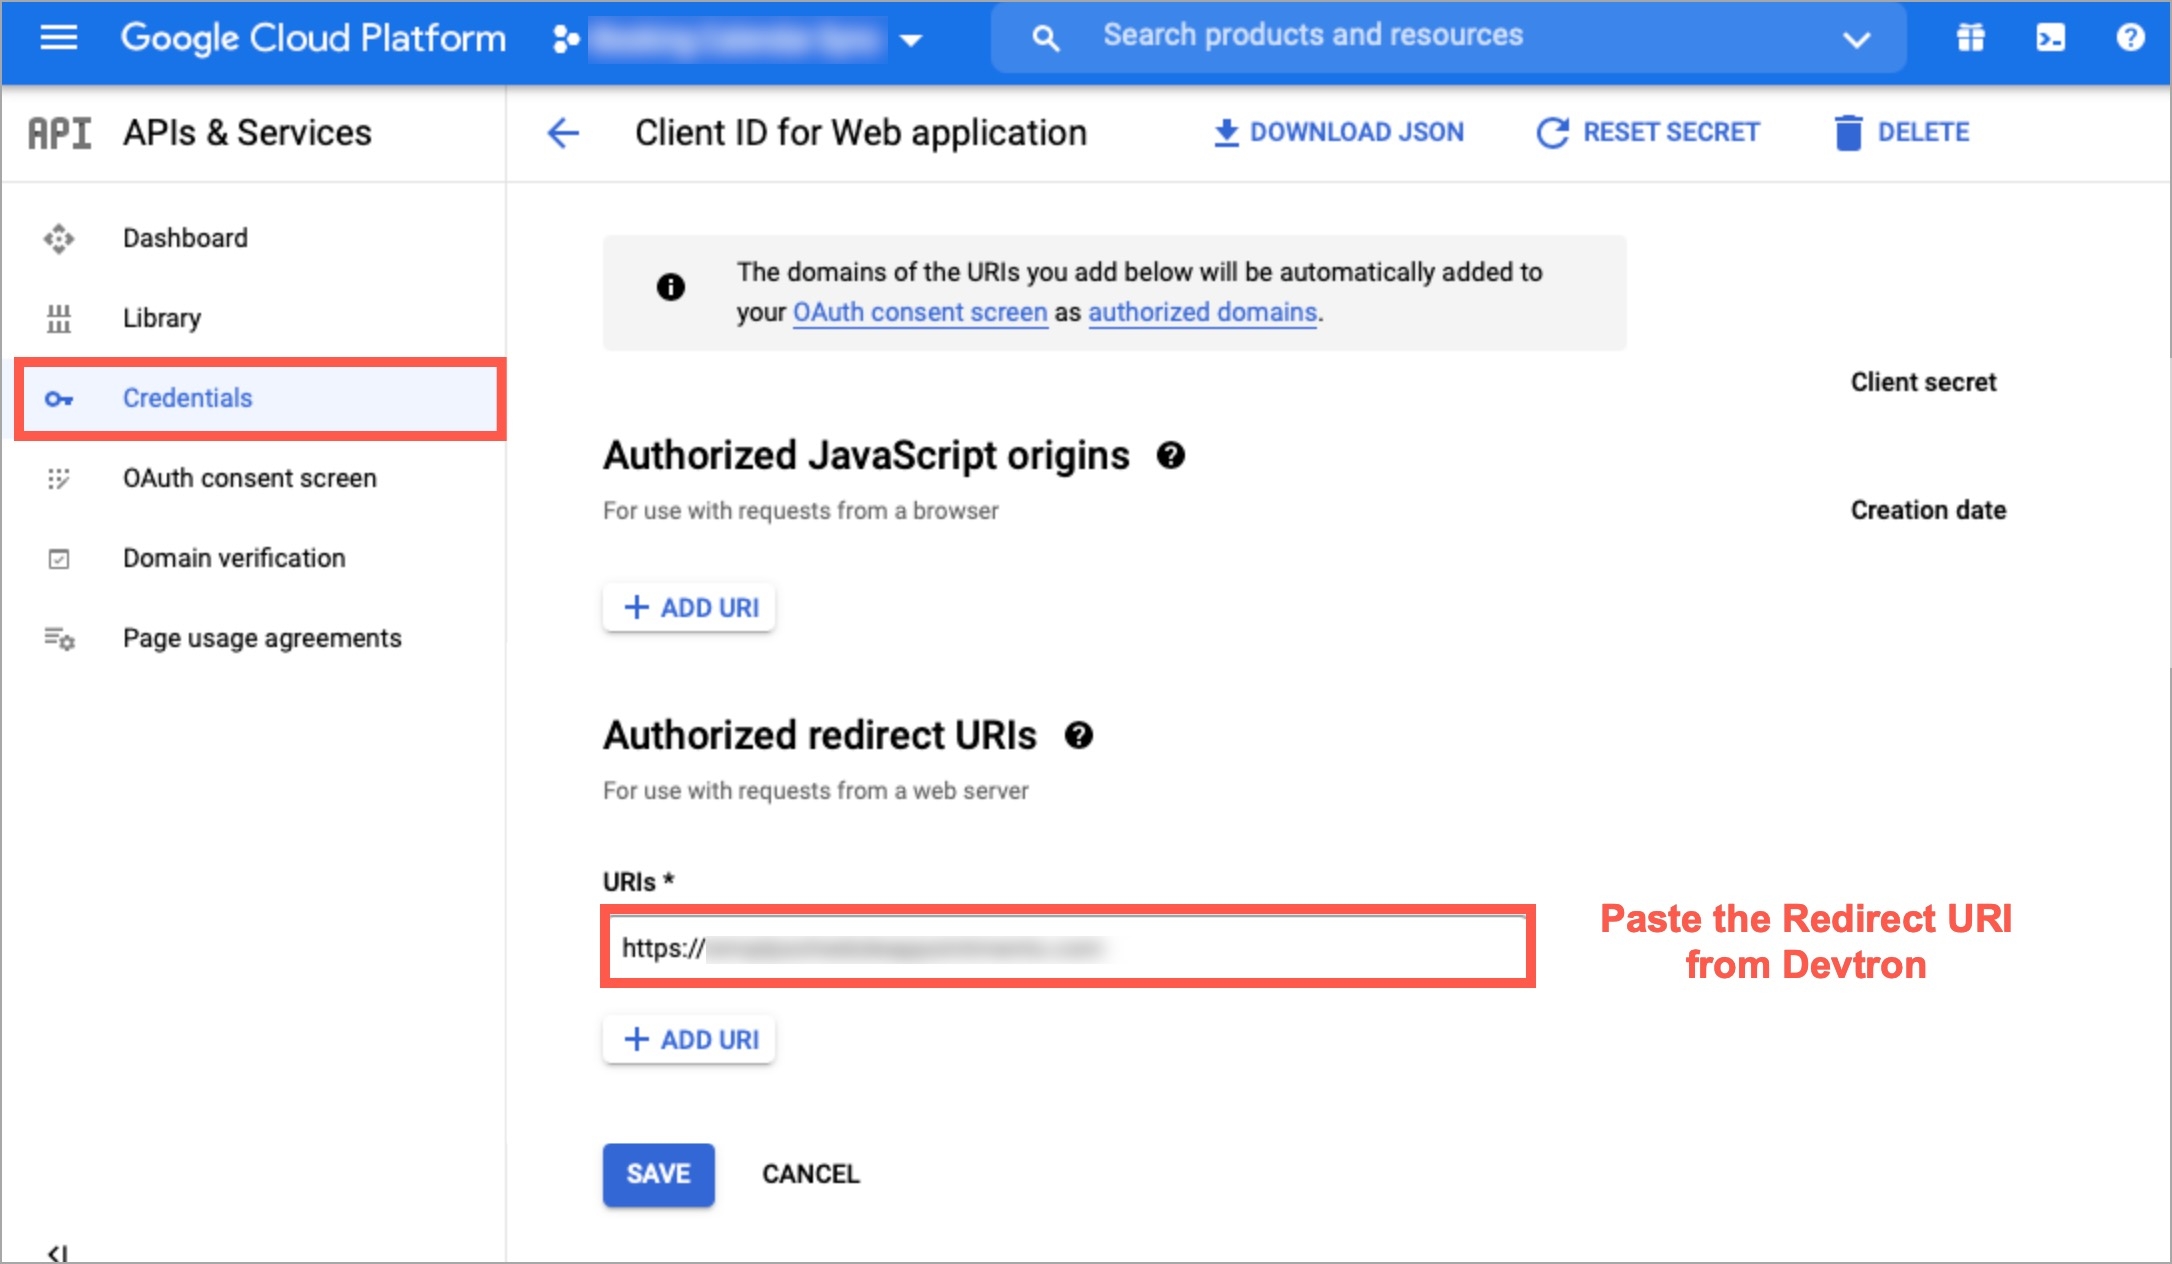
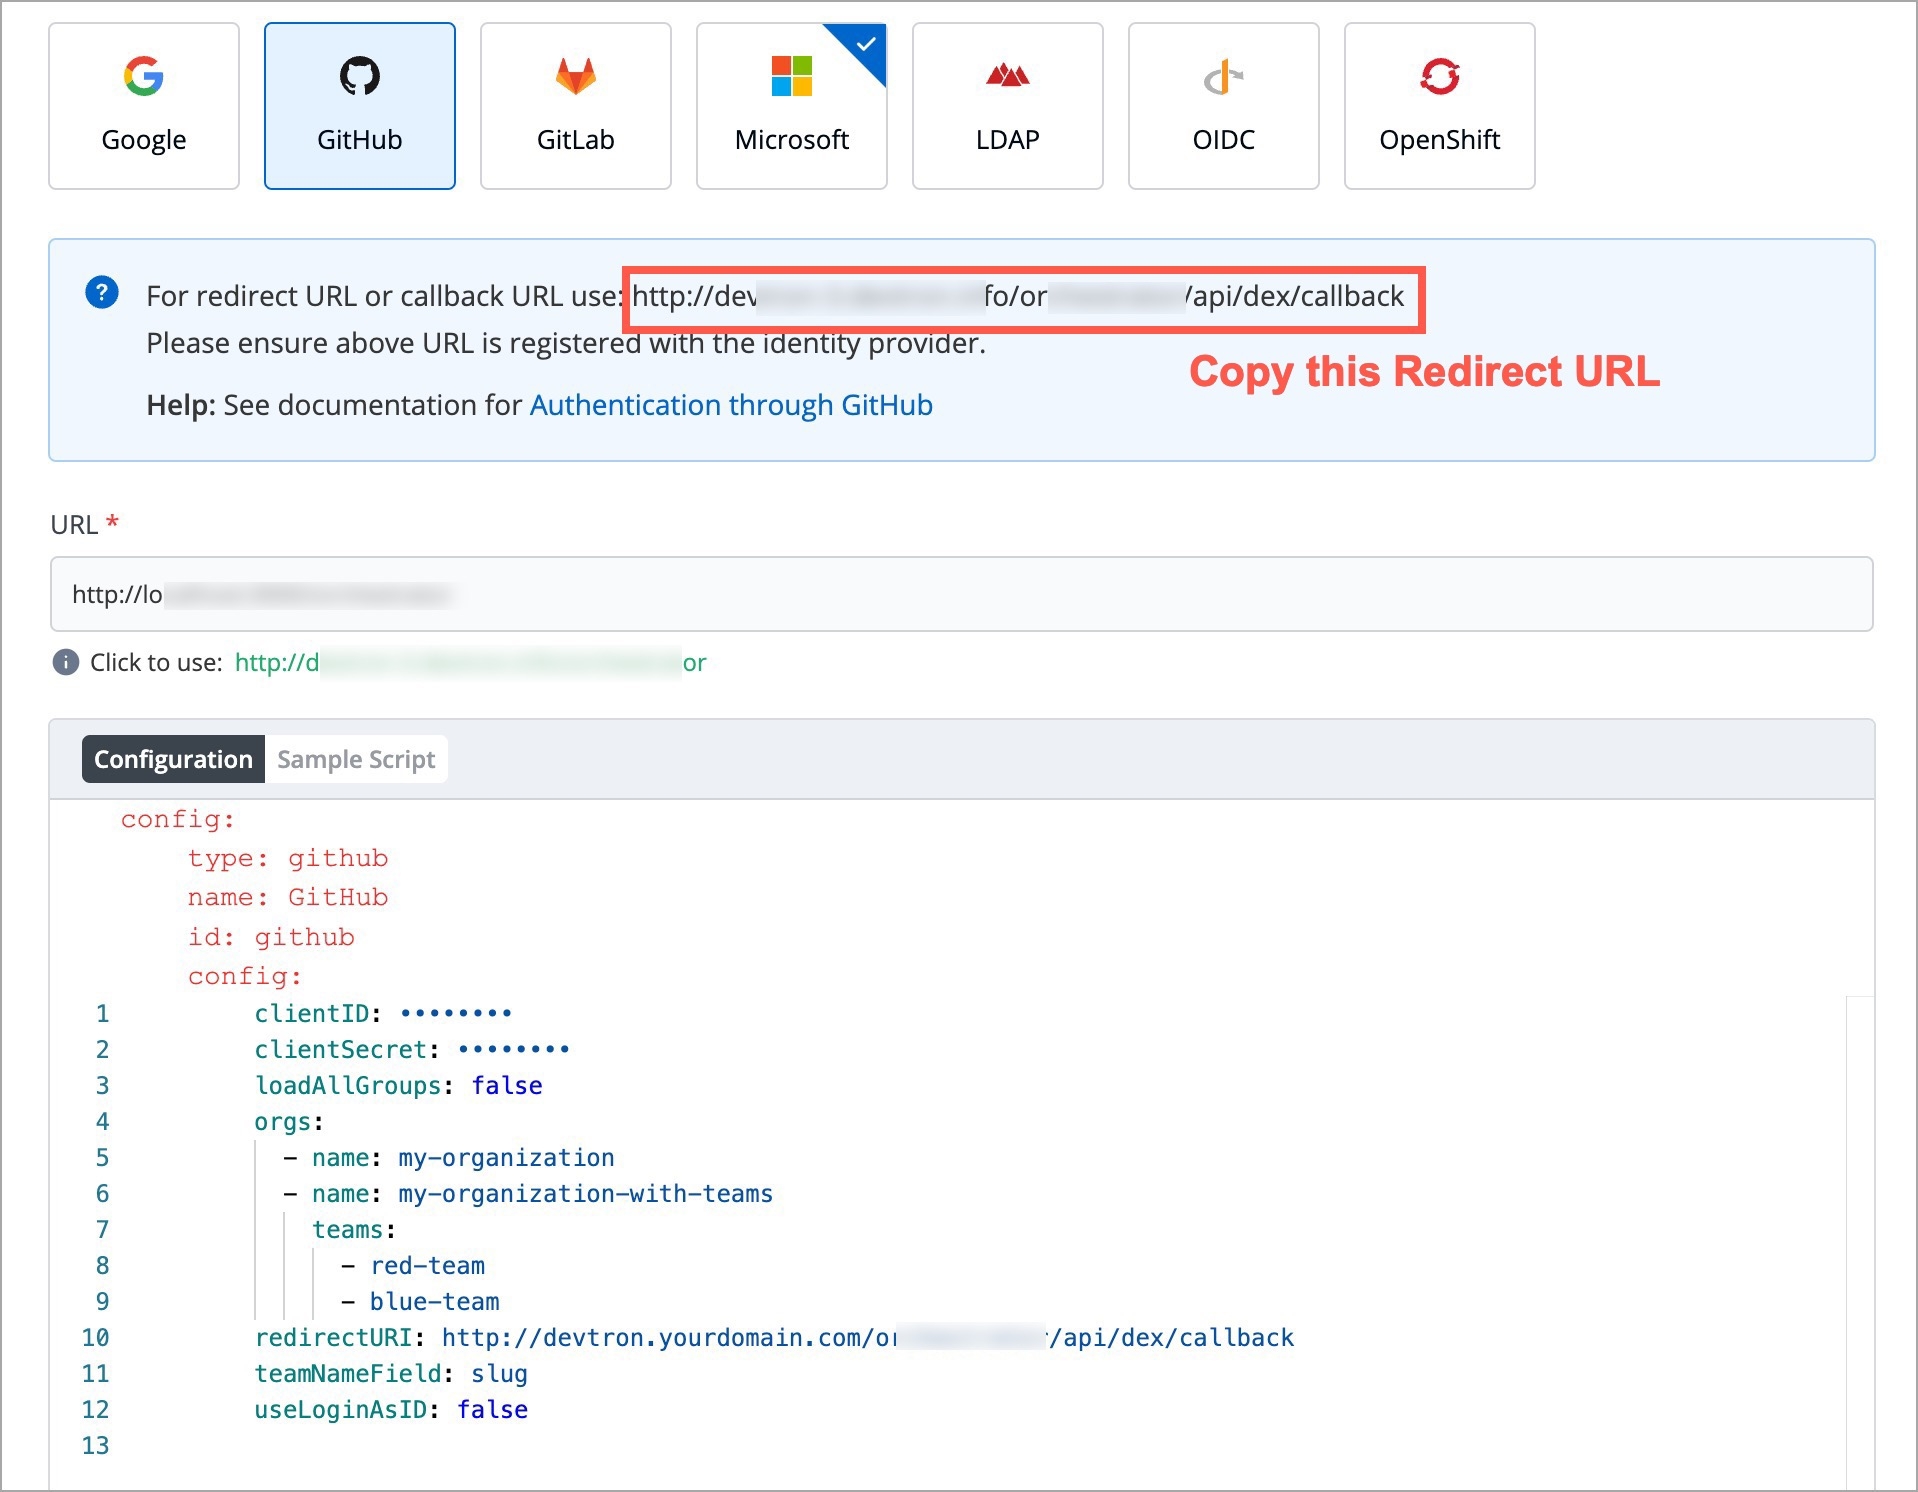
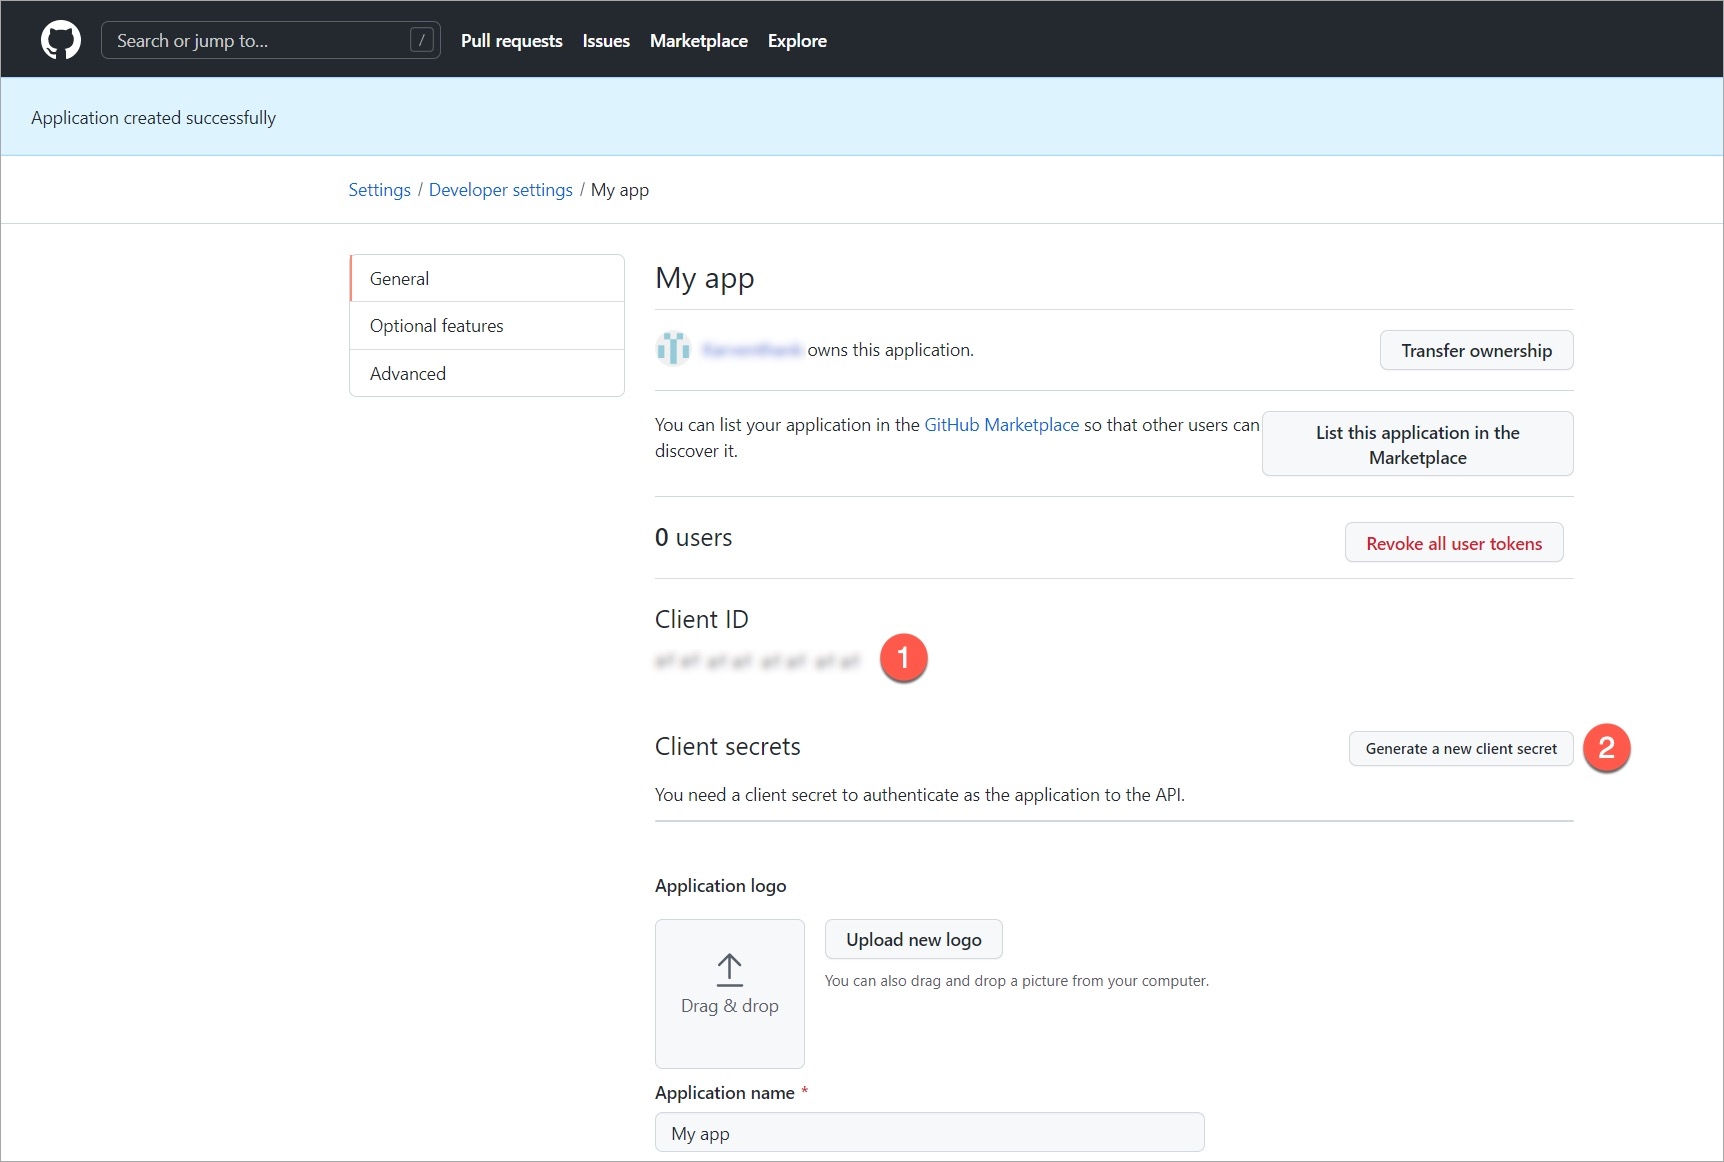
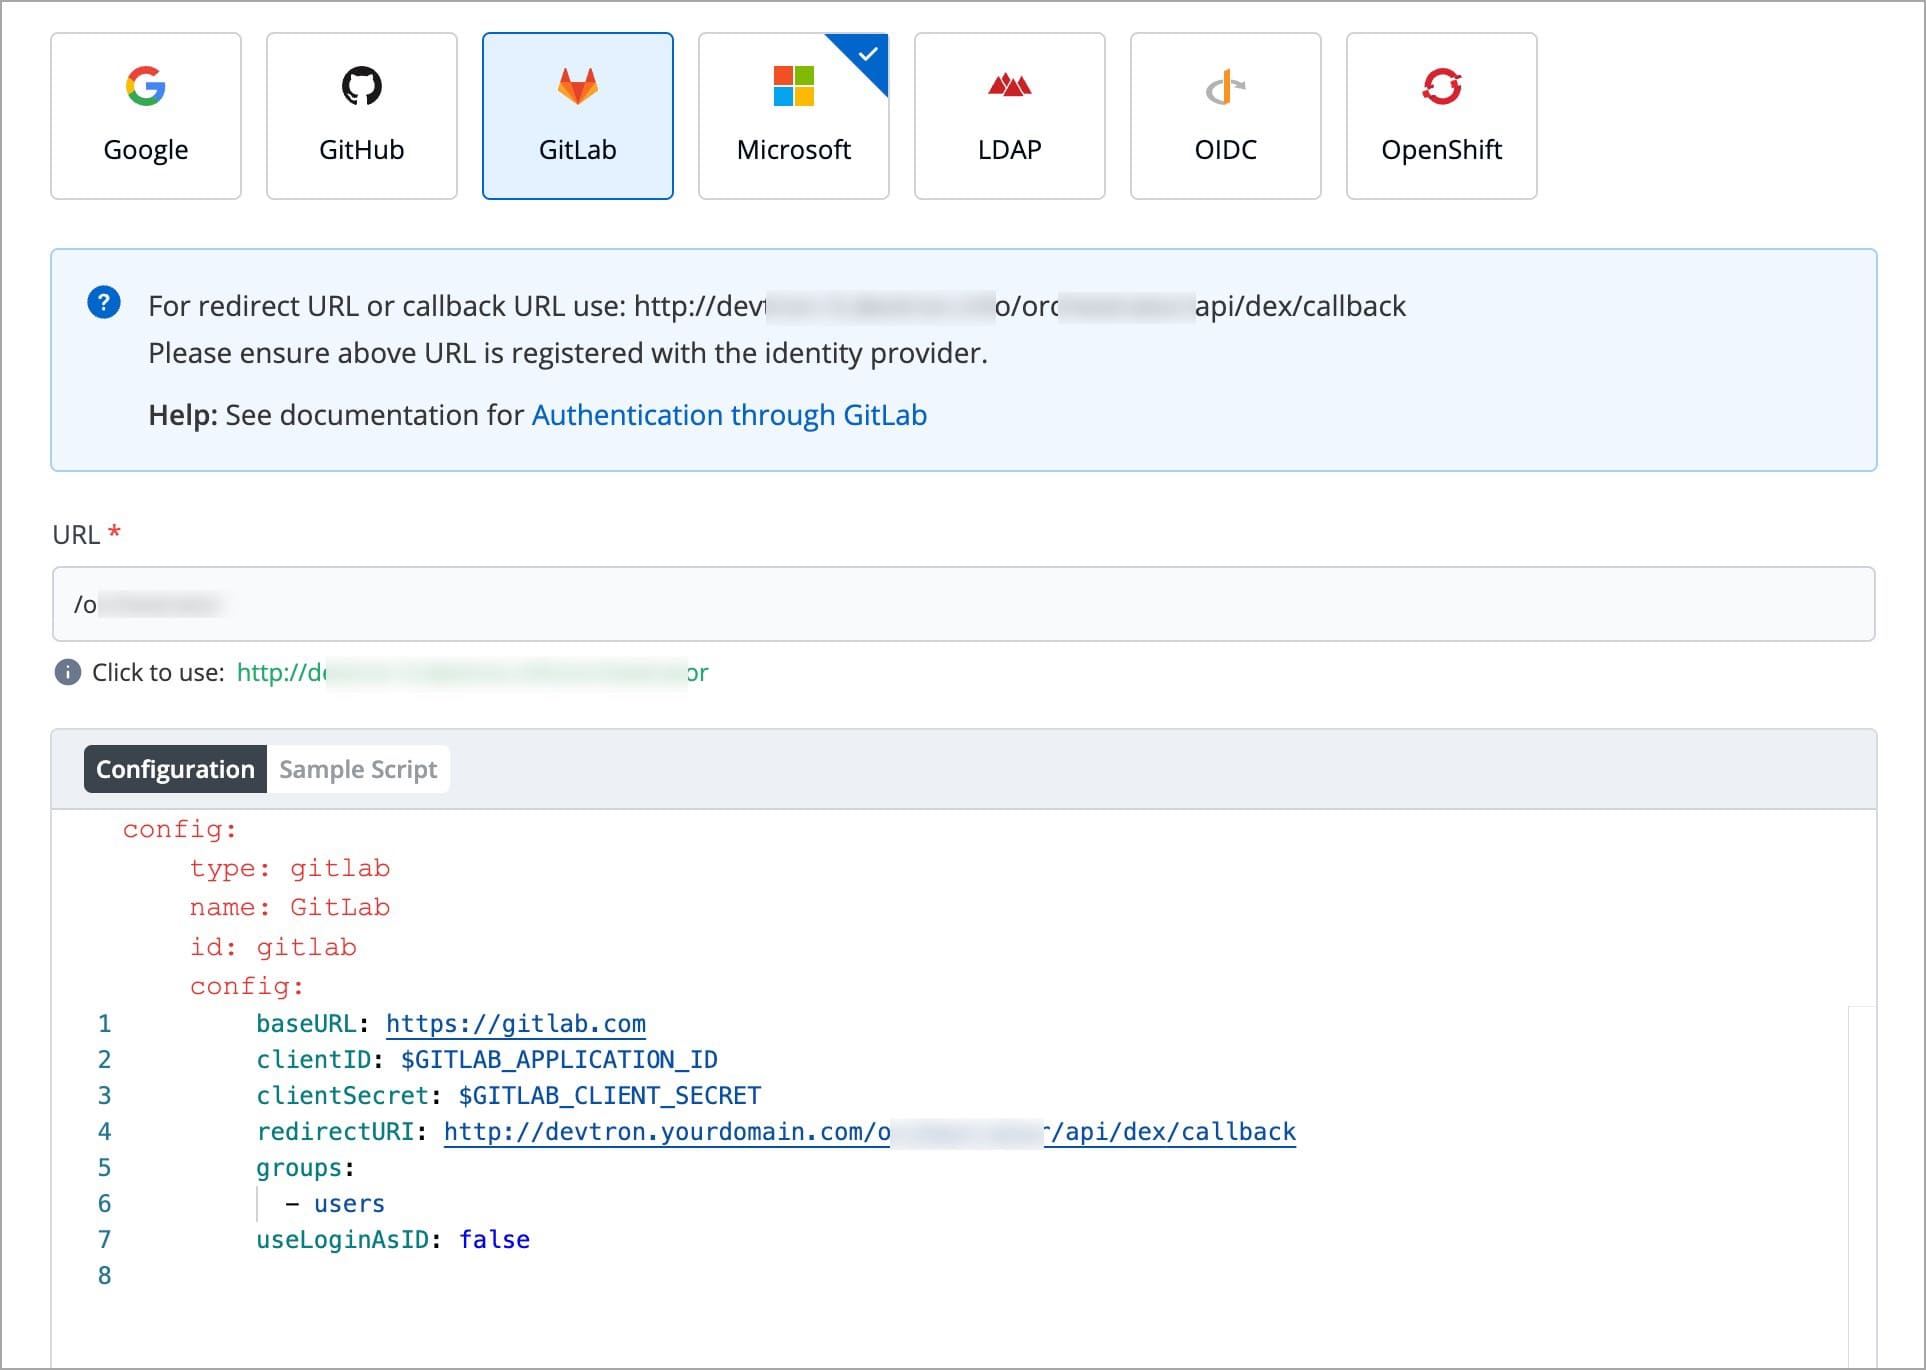
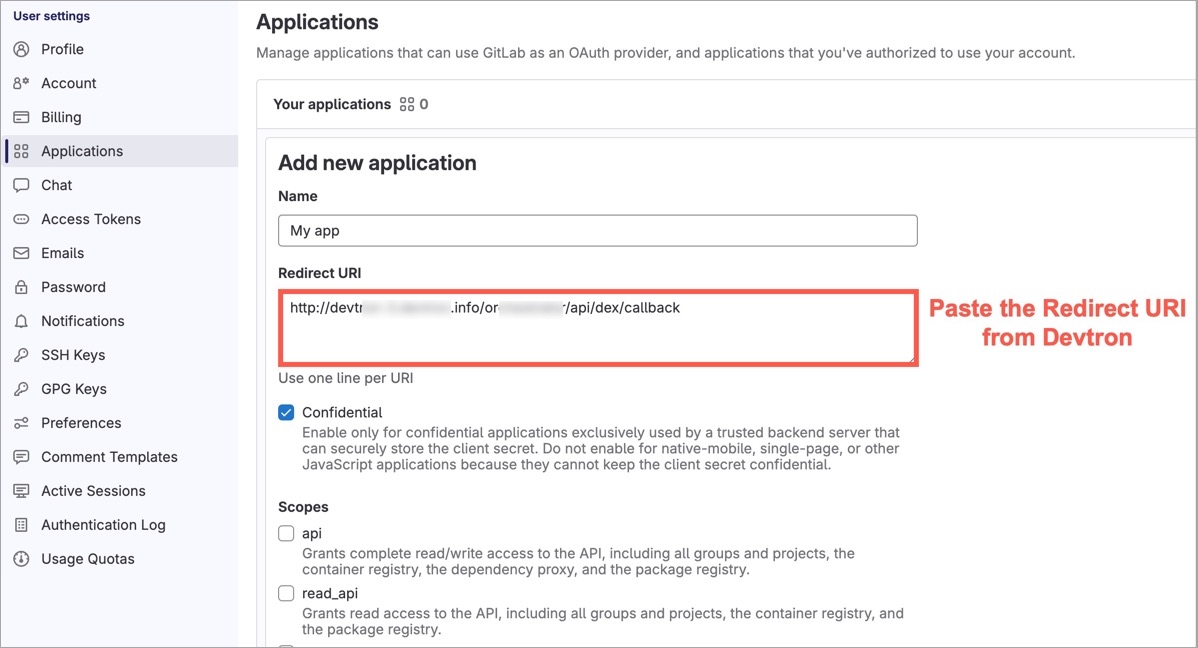
Devtron provides a sample configuration out of the box. There are some values that you need to either get from your SSO provider or give to your SSO provider.
clientID
clientSecret
redirectURI (provided in SSO Login Services by Devtron)
Devtron provides a sample configuration out of the box. There are some values that you need to either get from your SSO provider or give to your SSO provider.
clientID
clientSecret
redirectURI (provided in SSO Login Services by Devtron)
Devtron includes predefined helm charts that cover the majority of use cases. For any use case not addressed by the default helm charts, you can upload your own helm chart and use it as a custom chart in Devtron.
Who can upload a custom chart - Super admins
Who can use the custom chart - All users
A super admin can upload multiple versions of a custom helm chart.
A valid helm chart, which contains Chart.yaml file with name and version fields.
Image descriptor template file .image_descriptor_template.json.
Custom chart packaged in the *.tgz format.
You can use the following command to create the Helm chart:
Note:
Chart.yamlis the metadata file that gets created when you create a helm chart.
Name
Name of the helm chart (Required).
Version
This is the chart version. Update this value for each new version of the chart (Required).
Description
Description of the chart (Optional).
Please see the following example:
.image_descriptor_template.jsonIt's a GO template file that should produce a valid JSON file upon rendering. This file is passed as the last argument in helm install -f myvalues.yaml -f override.yaml command.
Place the .image_descriptor_template.json file in the root directory of your chart.
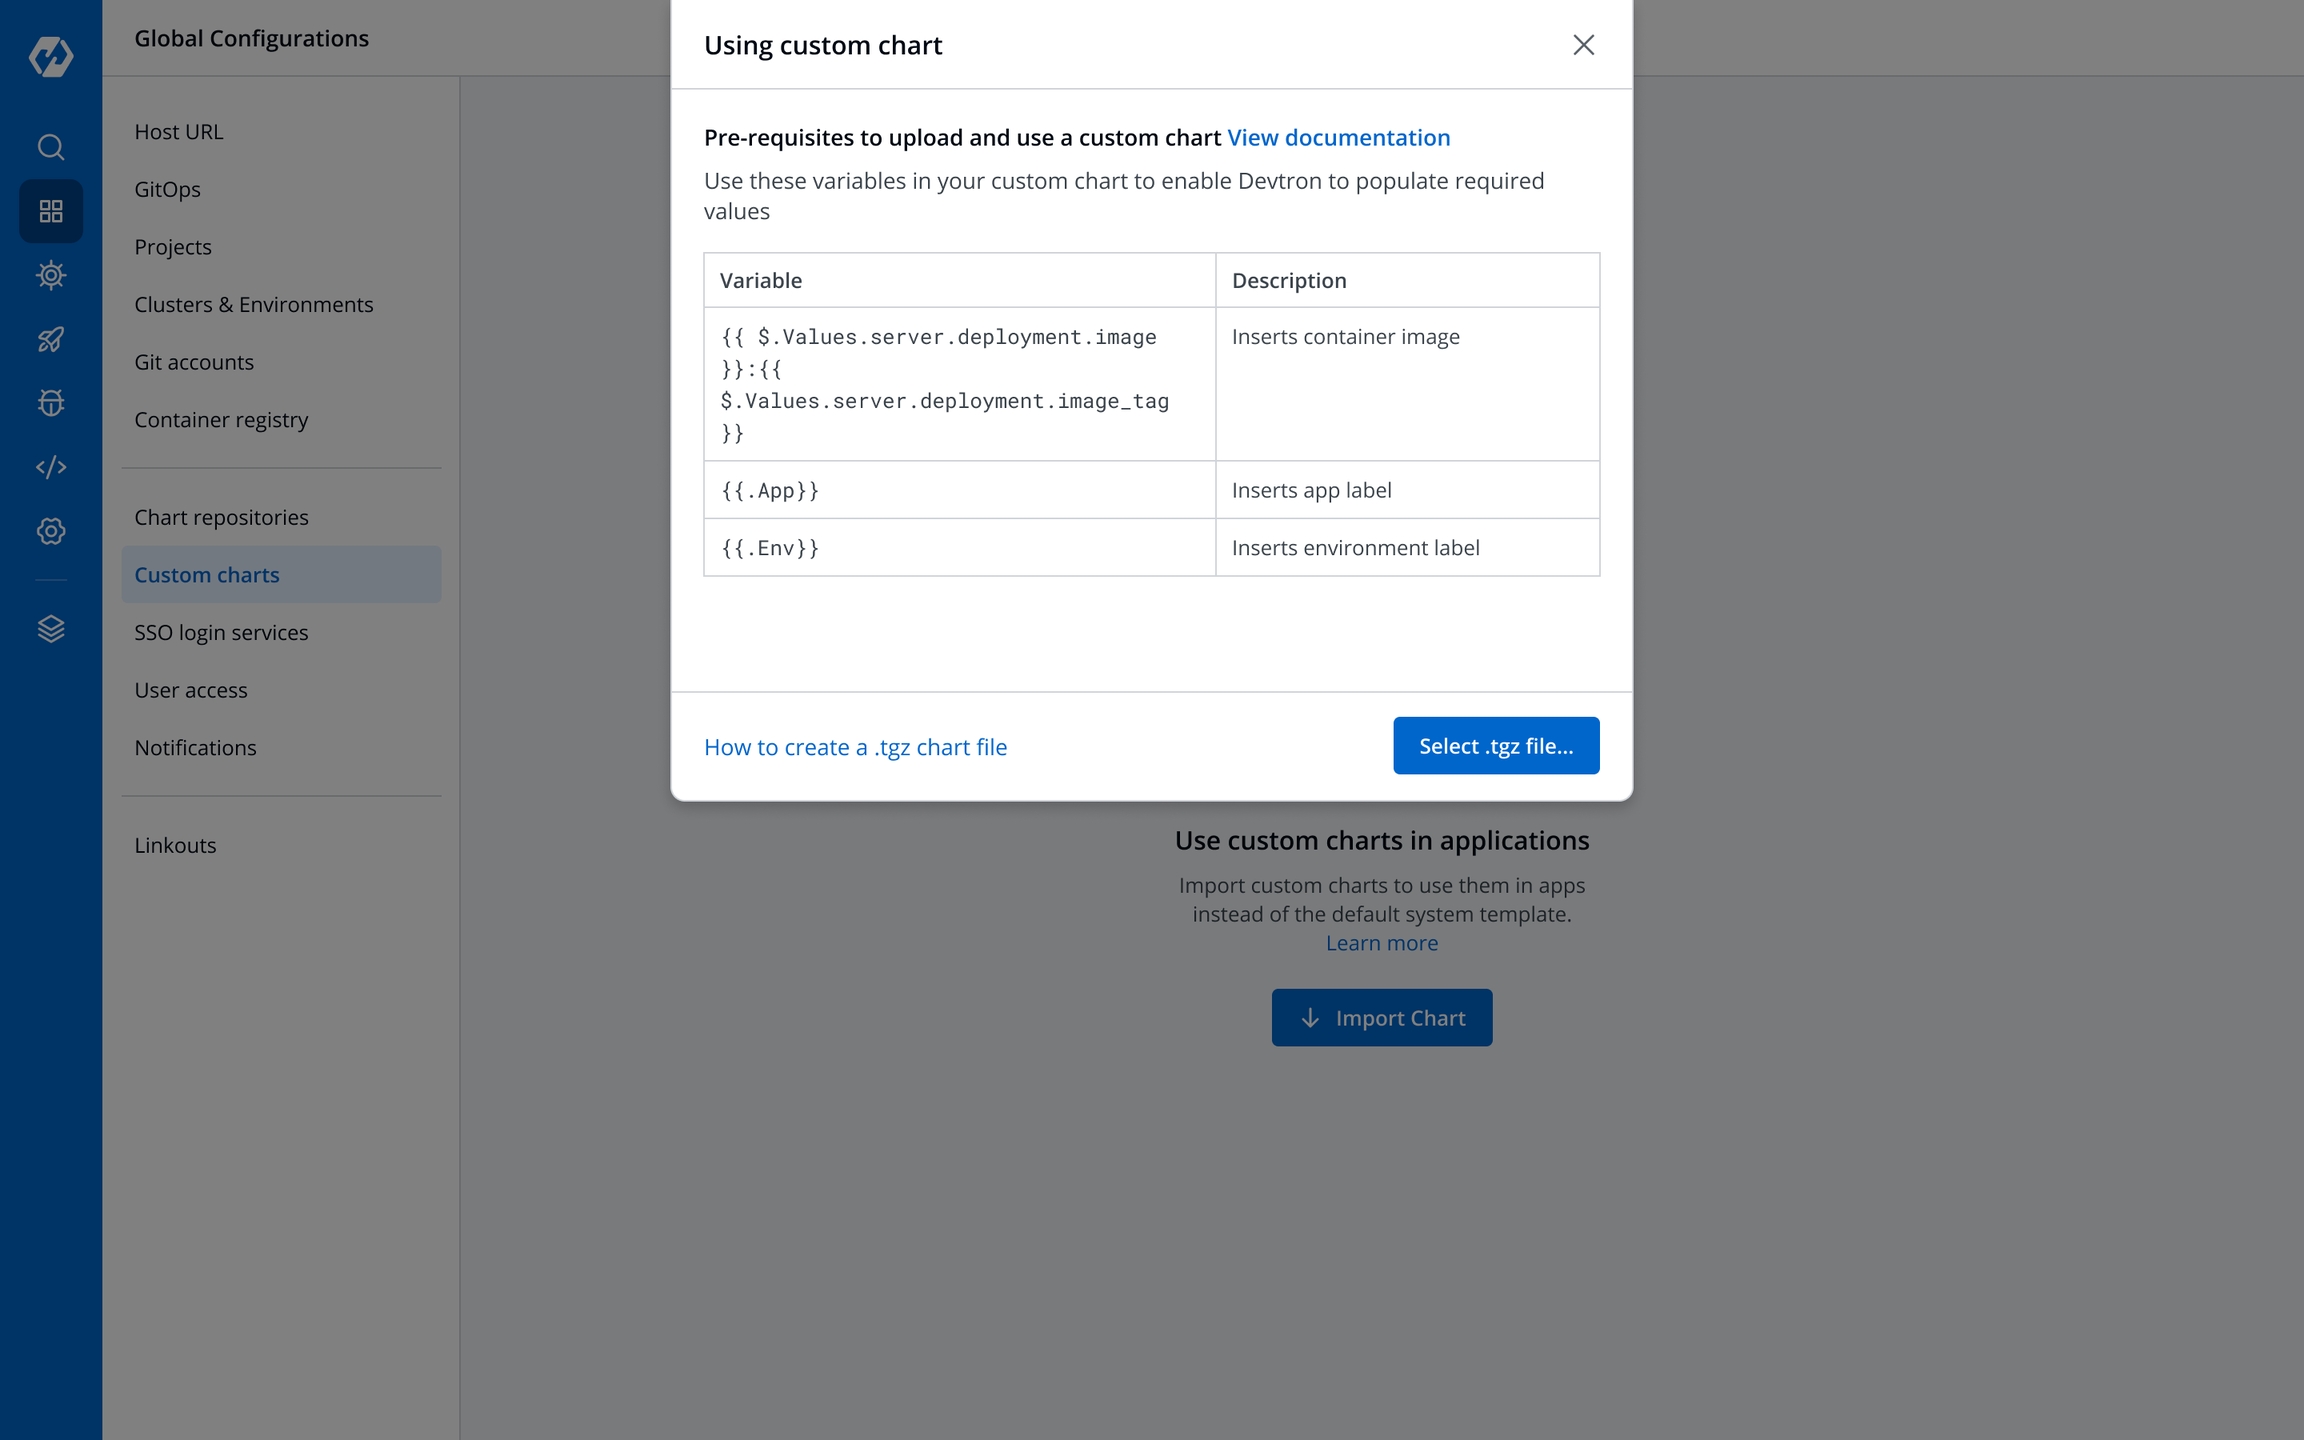
You can use the following variables in the helm template (all the placeholders are optional):
The values from the CD deployment pipeline are injected at the placeholder specified in the
.image_descriptor_template.jsontemplate file.
image_tag
The build image tag
image
Repository name
pipelineName
The CD pipeline name created in Devtron
releaseVersion
Devtron's internal release number
deploymentType
Deployment strategy used in the pipeline
app
Application's ID within the Devtron ecosystem
env
Environment used to deploy the chart
appMetrics
For the App metrics UI feature to be effective, include the appMetrics placeholder.
For example:
To create a template file to allow Devtron to only render the repository name and the tag from the CI/CD pipeline that you created, edit the
.image_descriptor_template.jsonfile as:
*.tgz formatBefore you begin, ensure that your helm chart includes both
Chart.yaml(withnameandversionfields) and.image_descriptor_template.jsonfiles.
The helm chart to be uploaded must be packaged as a versioned archive file in the format <helm-chart-name>-vx.x.x.tgz.
The above command will create a my-custom-chart-0.1.0.tgz file.
A custom chart can only be uploaded by a super admin.
On the Devtron dashboard, select Global Configurations > Custom charts.
Select Import Chart.
Select tar.gz file... and upload the packaged custom chart in the *.tgz format.
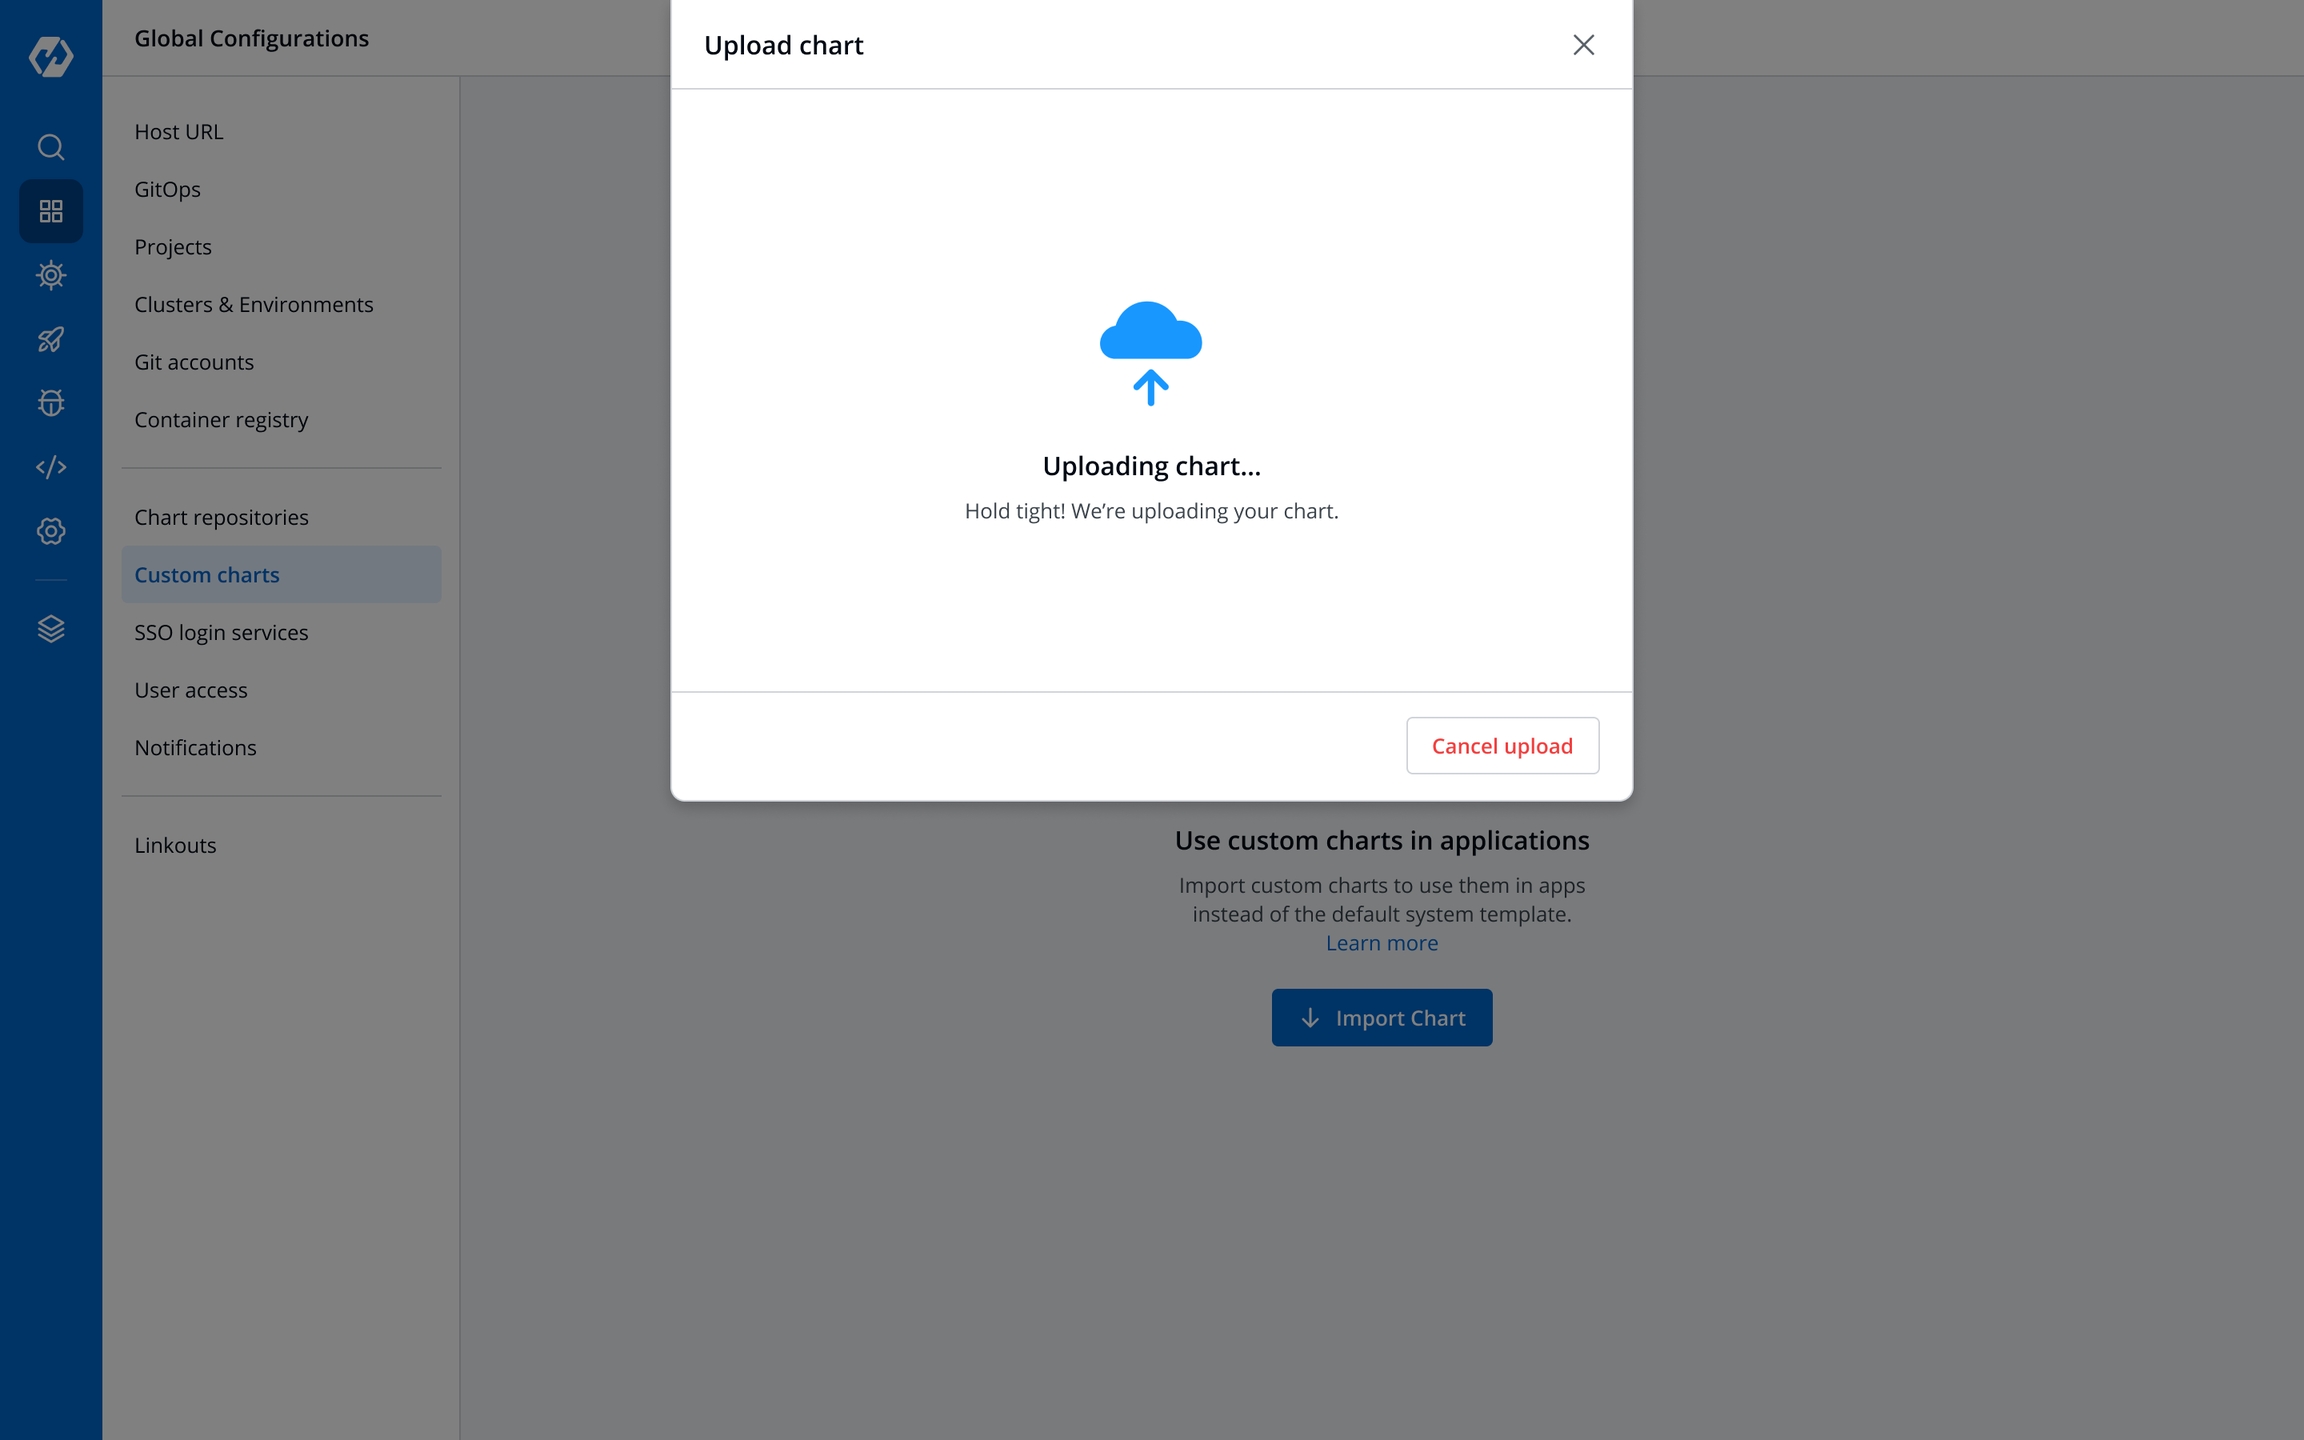
The chart is being uploaded and validated. You may also Cancel upload if required.
The uploaded archive will be validated against:
Supported archive template should be in *.tgz format.
Content of values.yaml should be there in app-values.yaml file.
release-values.yaml file is required.
ConfigMap/Secret template should be same as that of our reference chart.
Chart.yaml must include the name and the version number.
..image_descriptor_template.json file should be present and the field format must match the format listed in the image builder template section.
The following are the validation results:
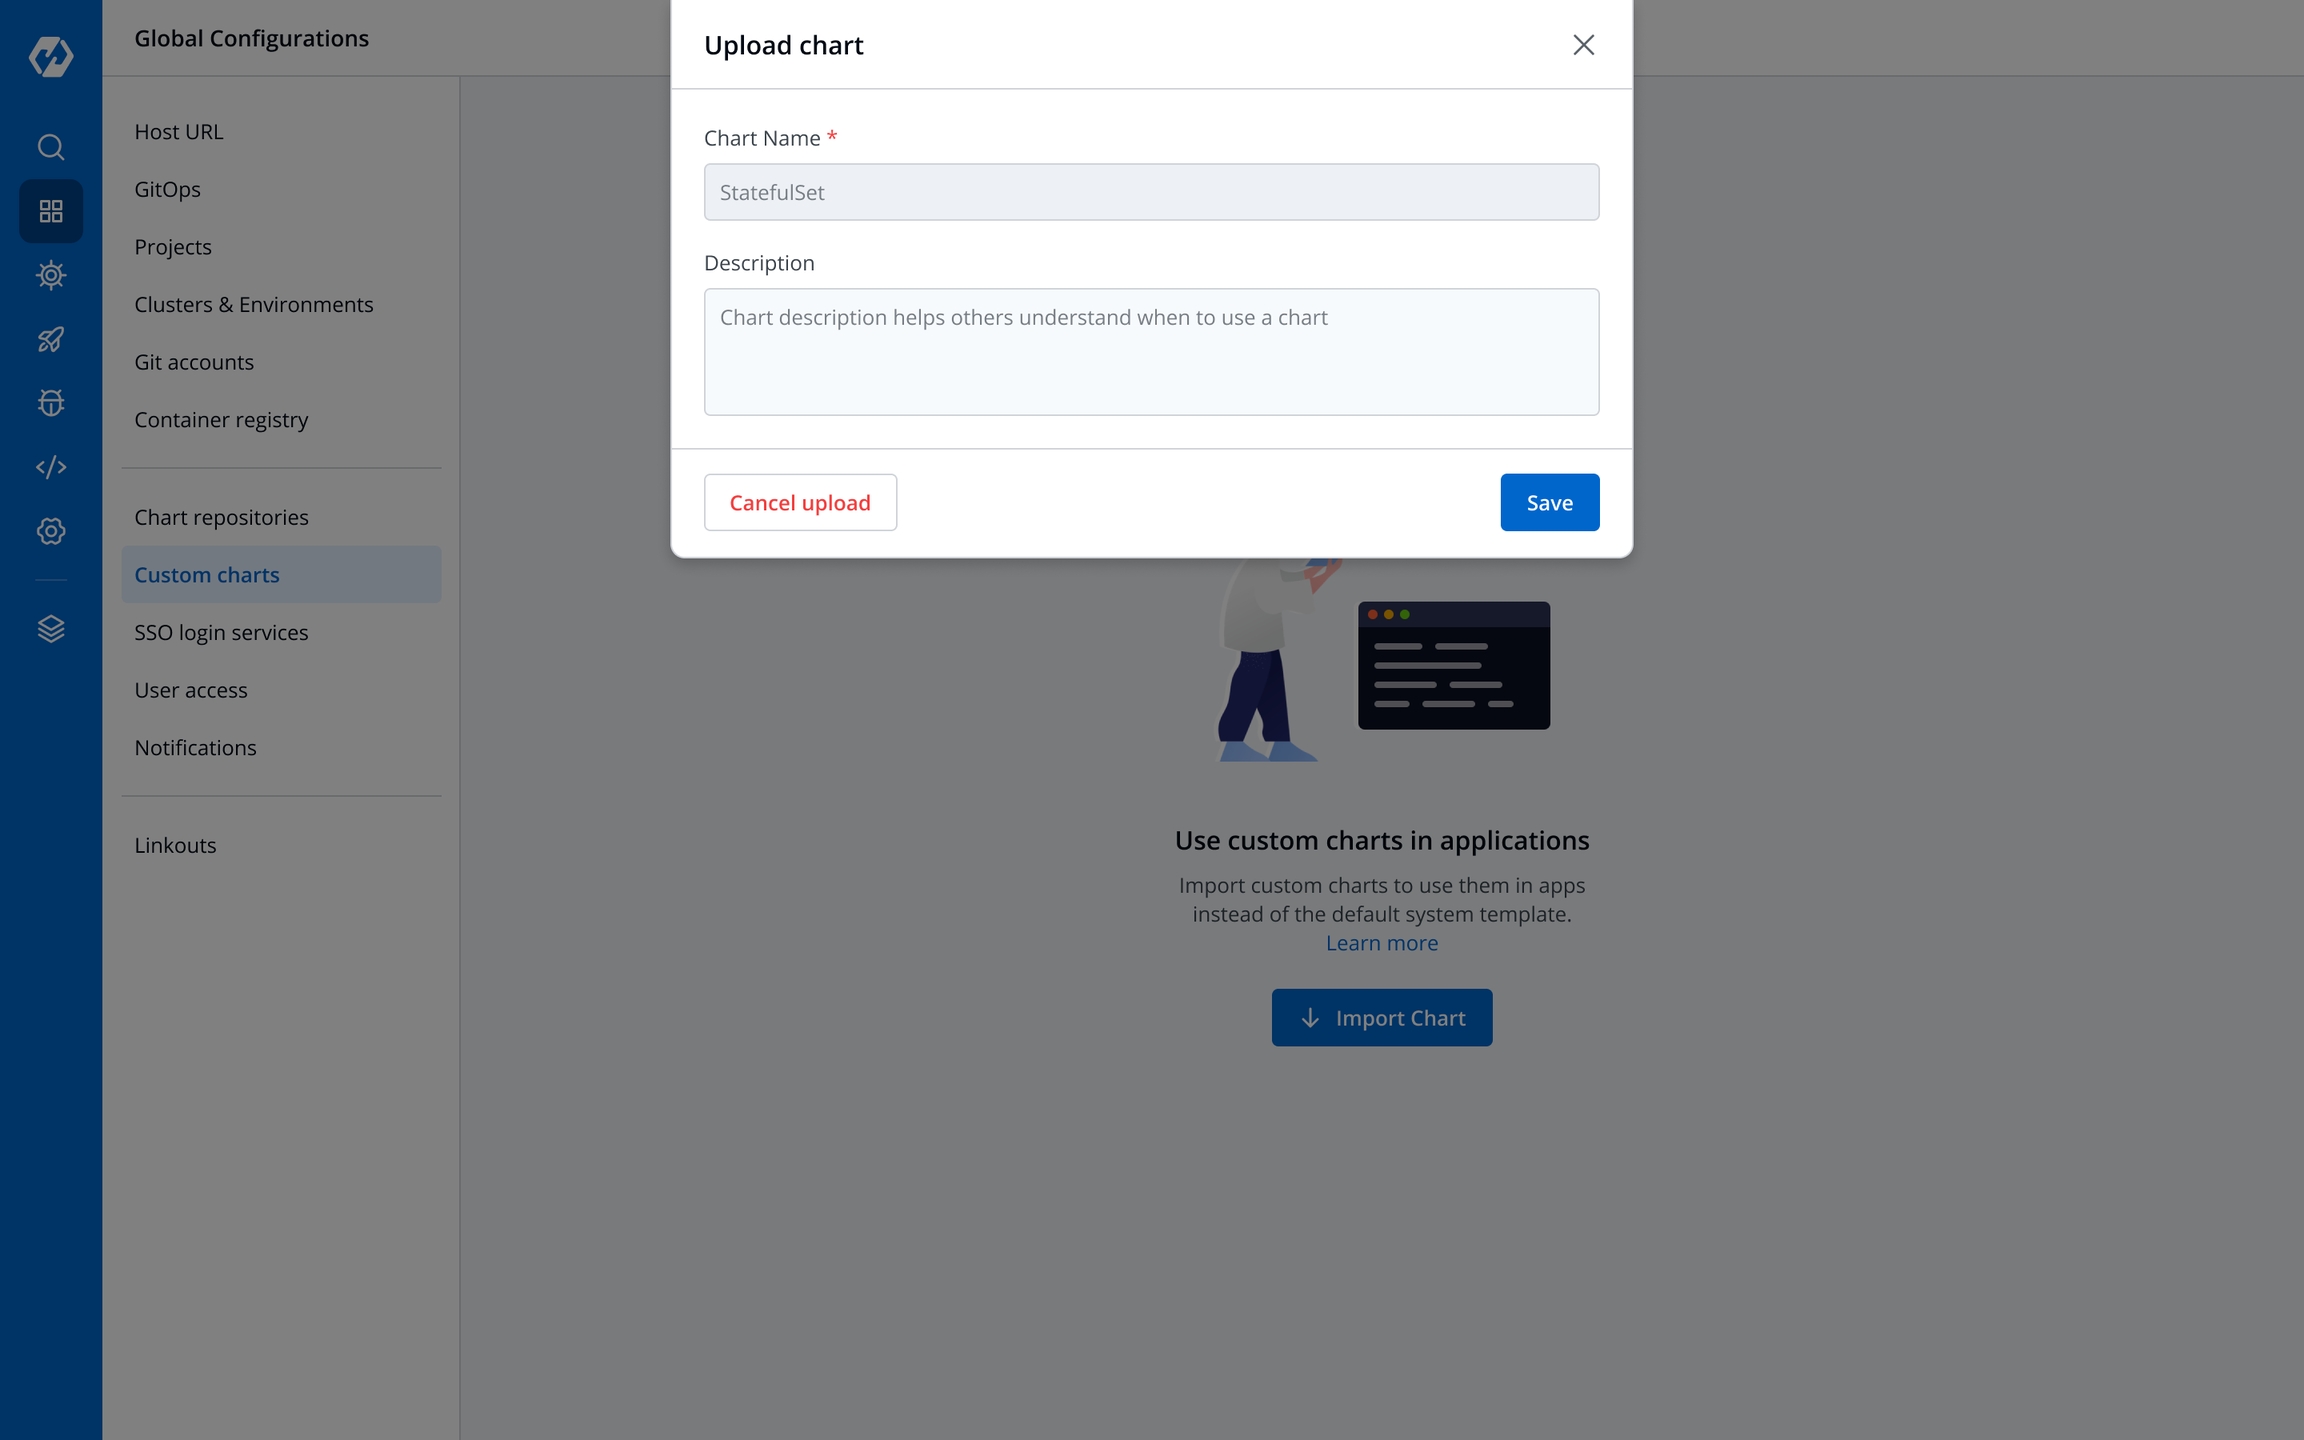
Success
The files uploaded are validated.
Enter a description for the chart and select Save or Cancel upload.
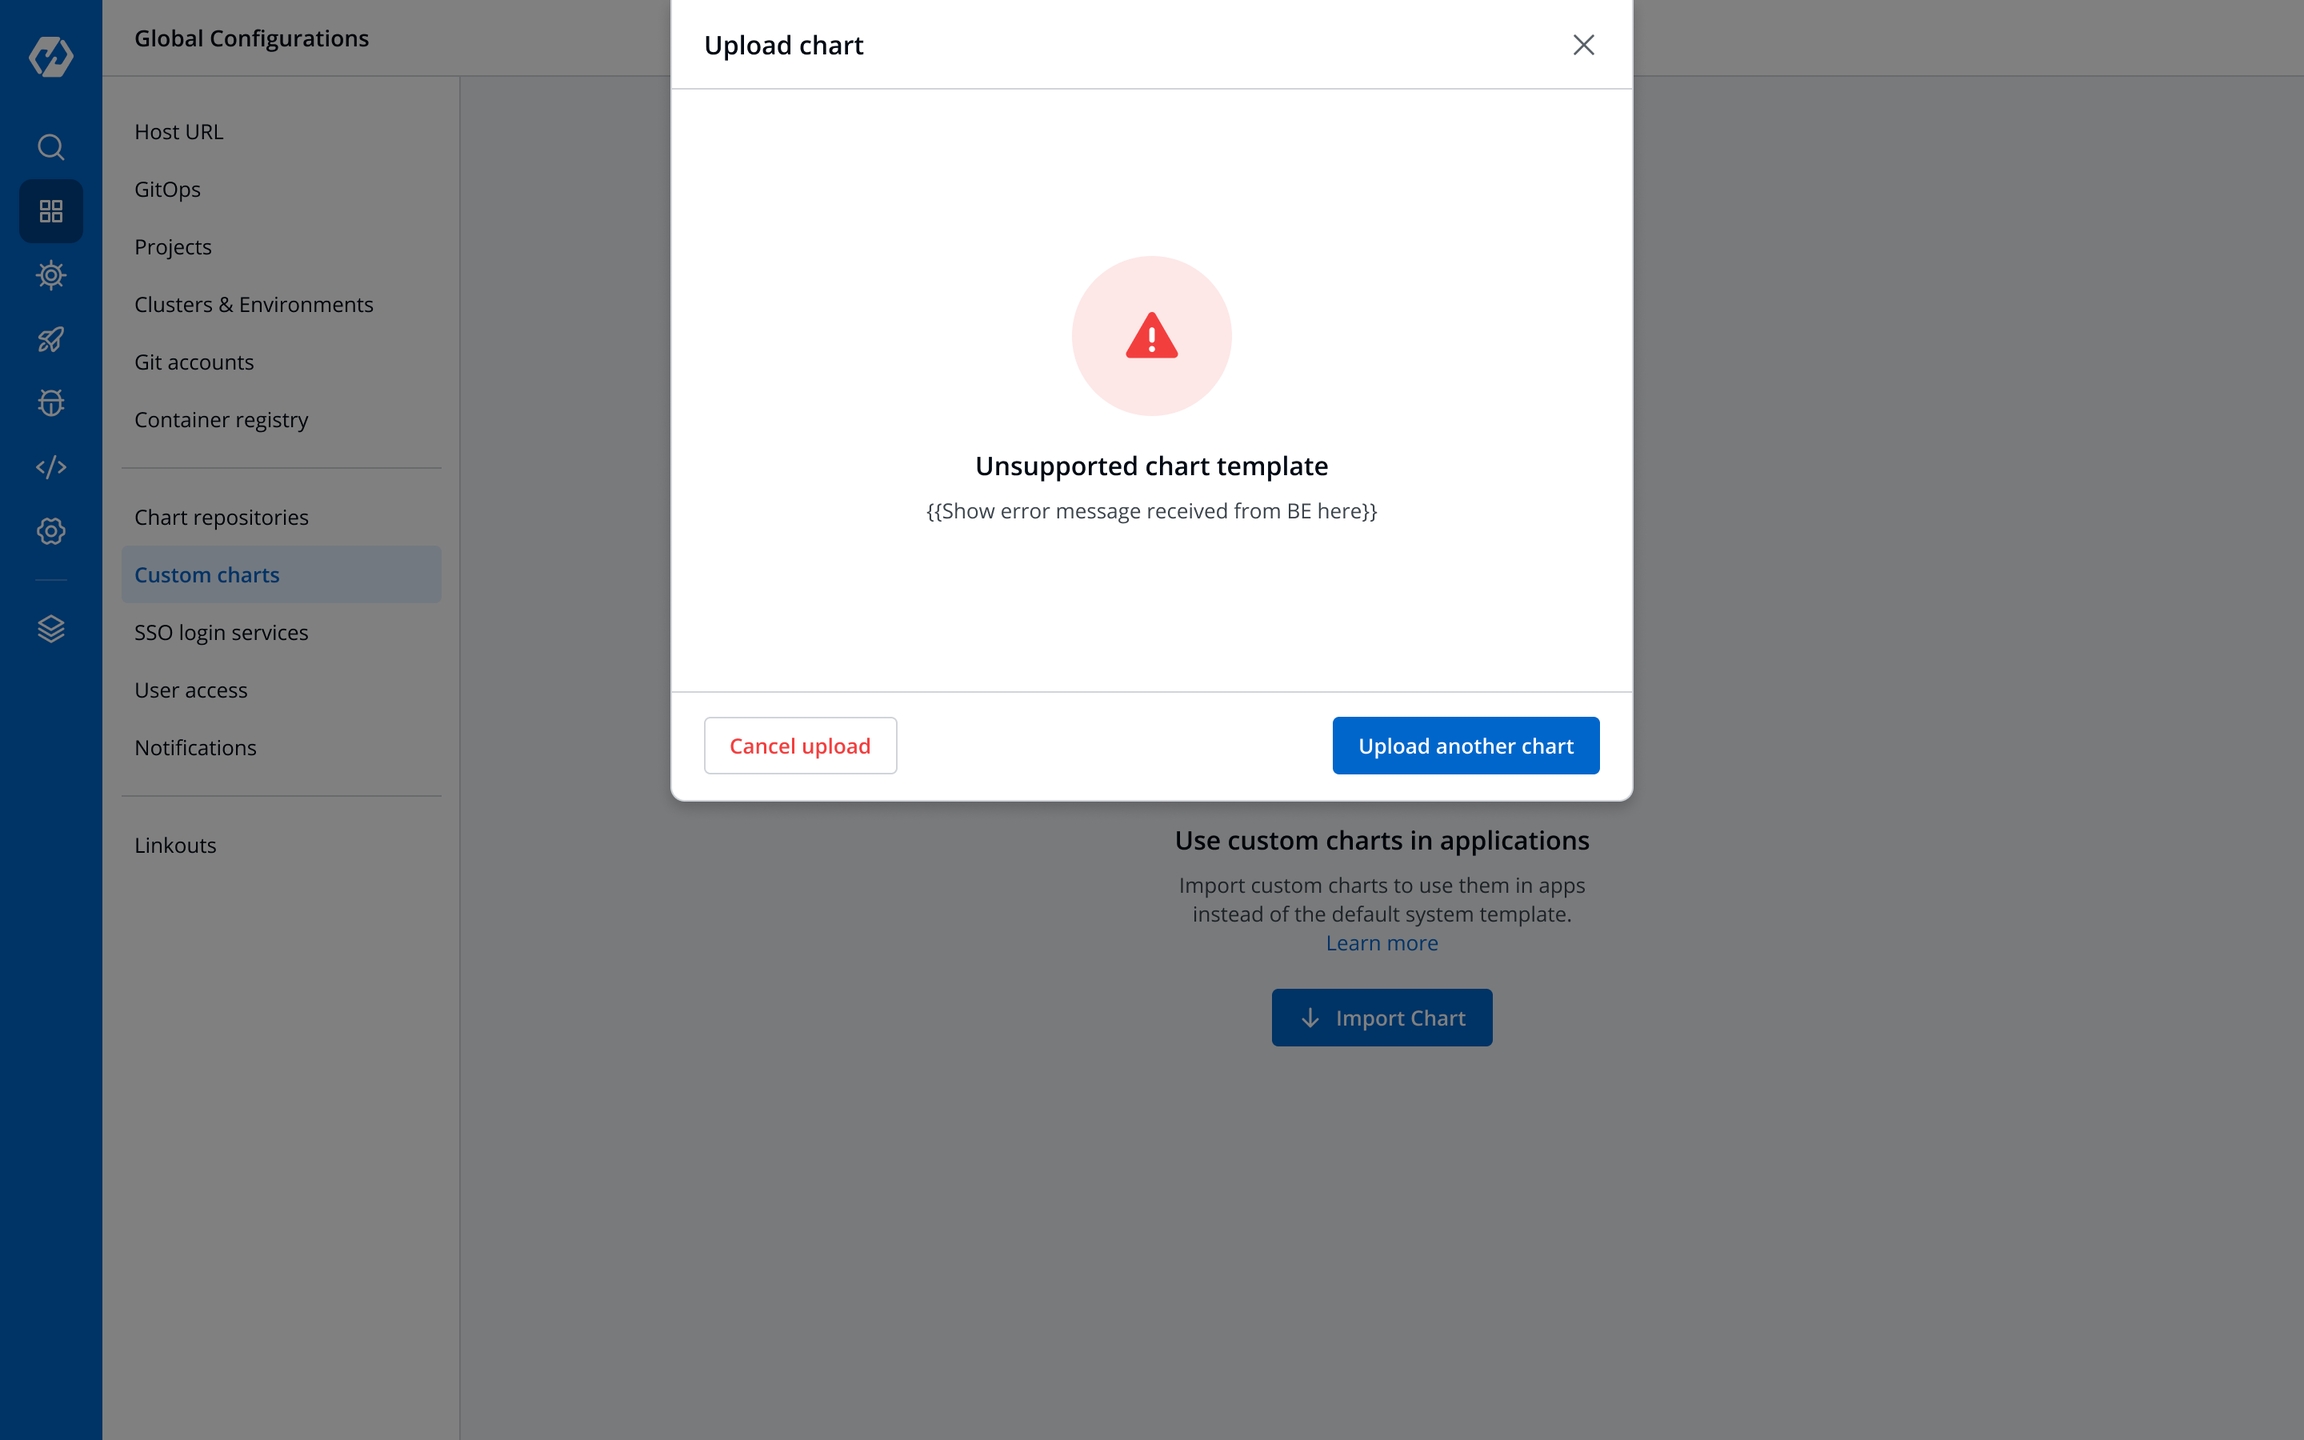
Unsupported template
Upload another chart or Cancel upload.
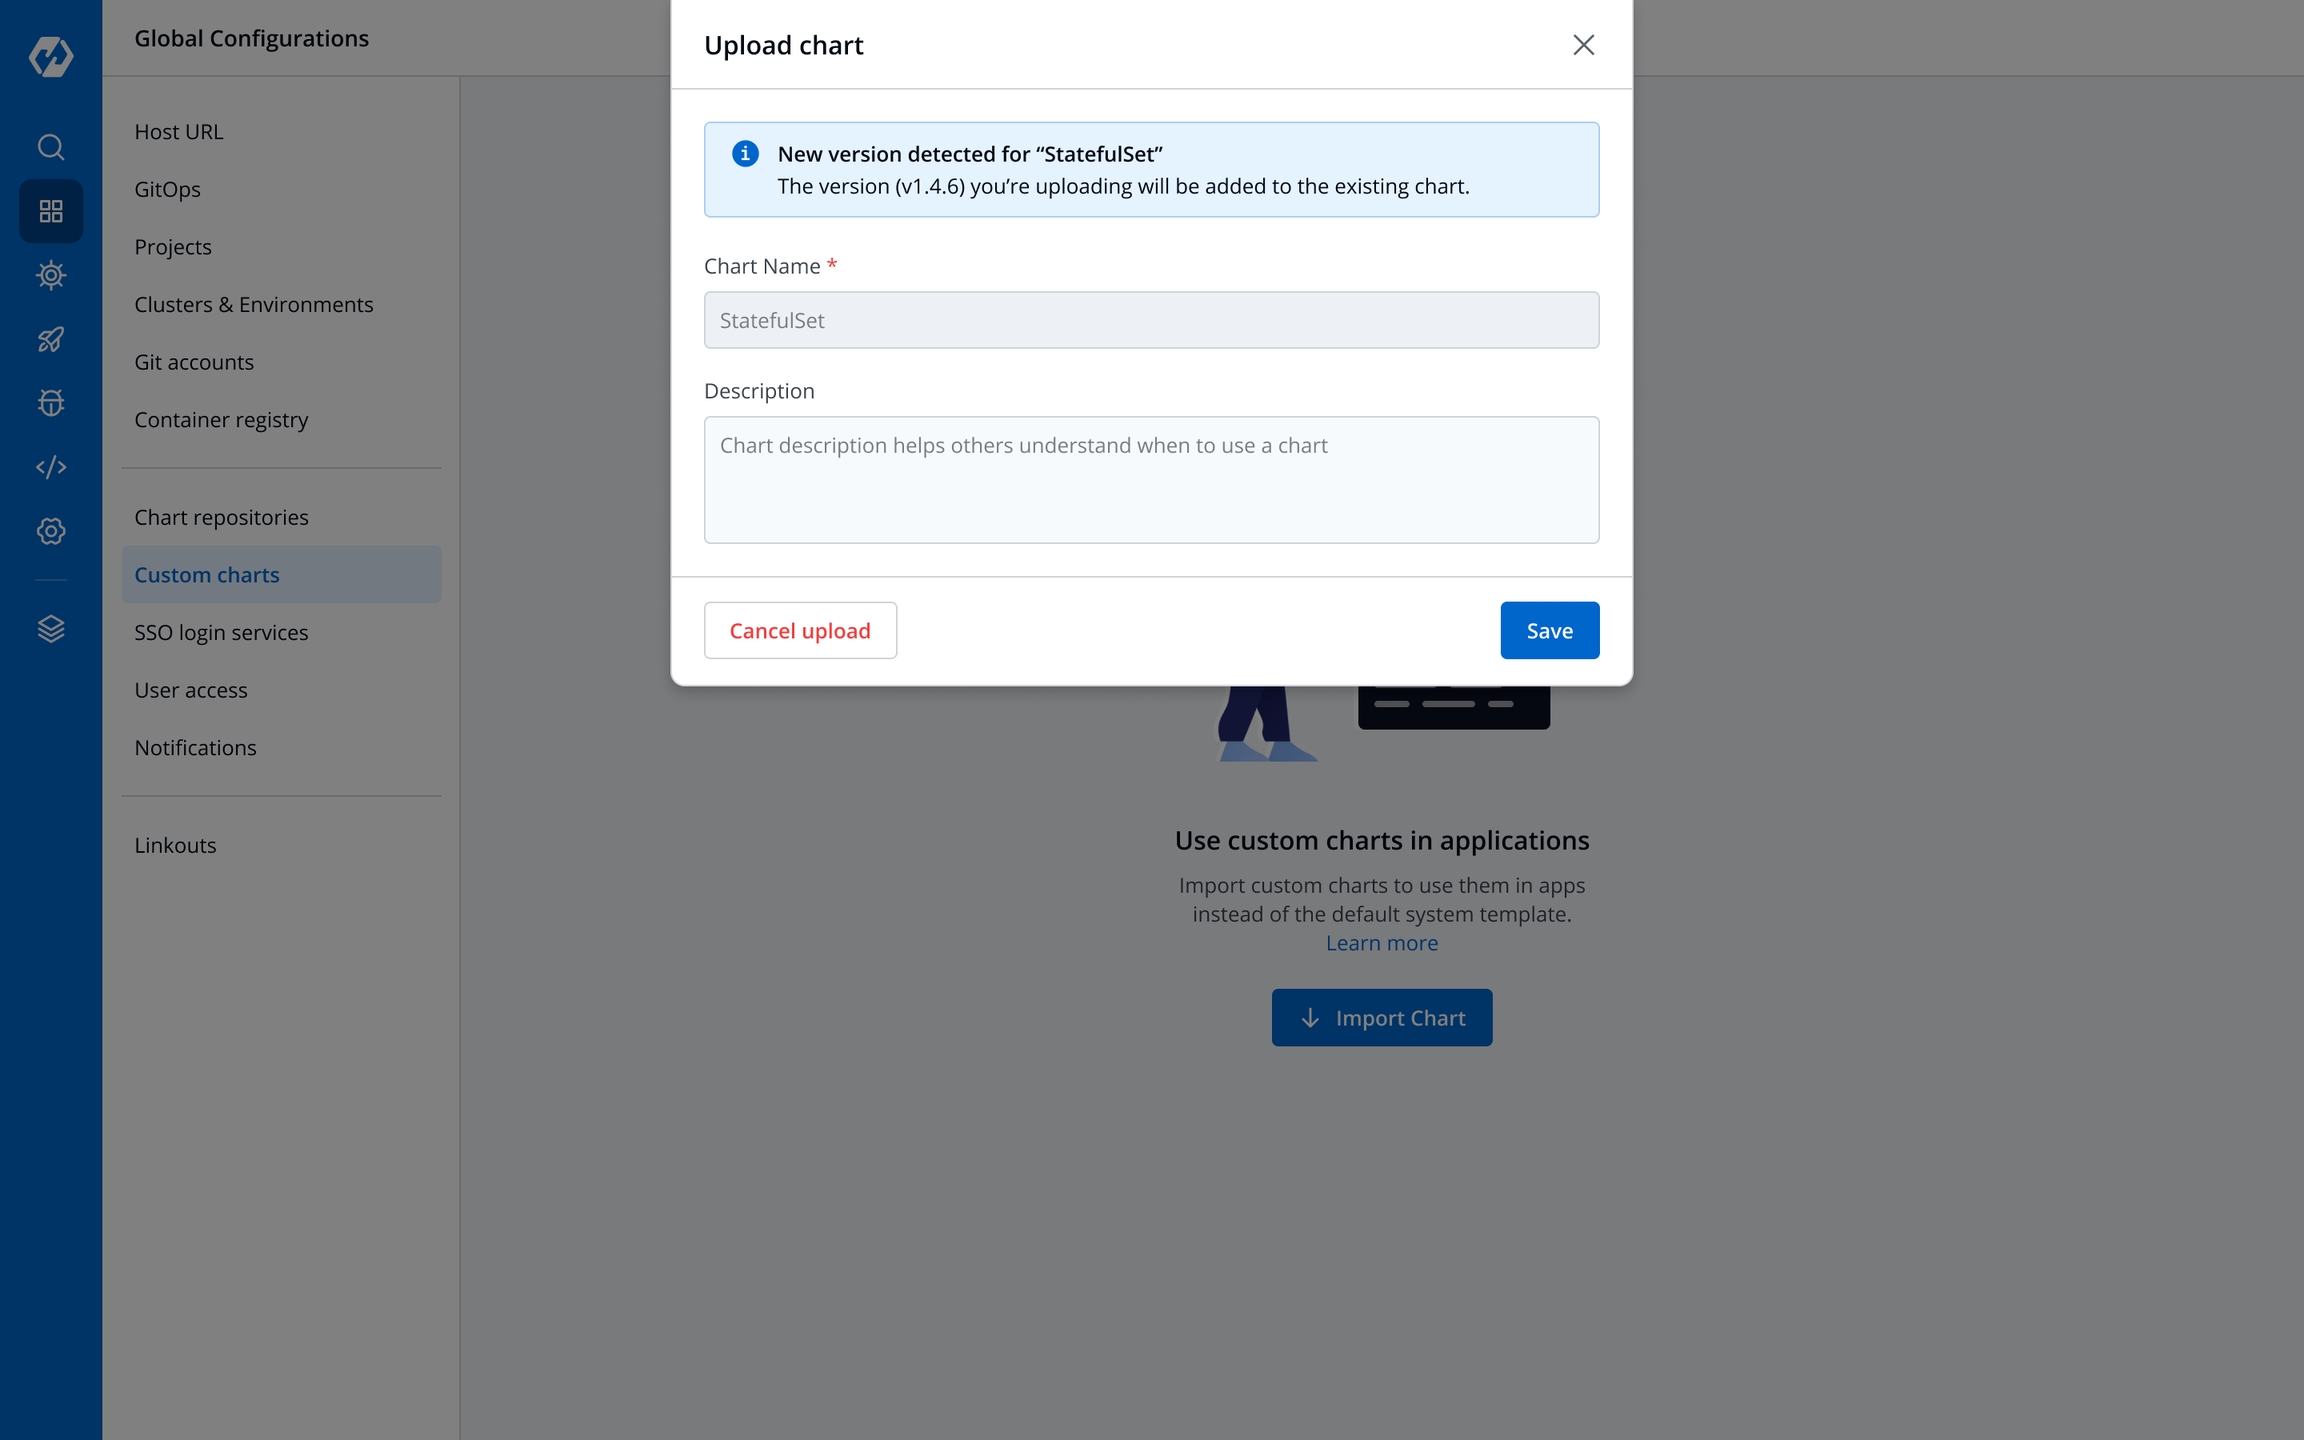
New version detected
You are uploading a newer version of an existing chart
Enter a Description and select Save to continue uploading, or Cancel upload.
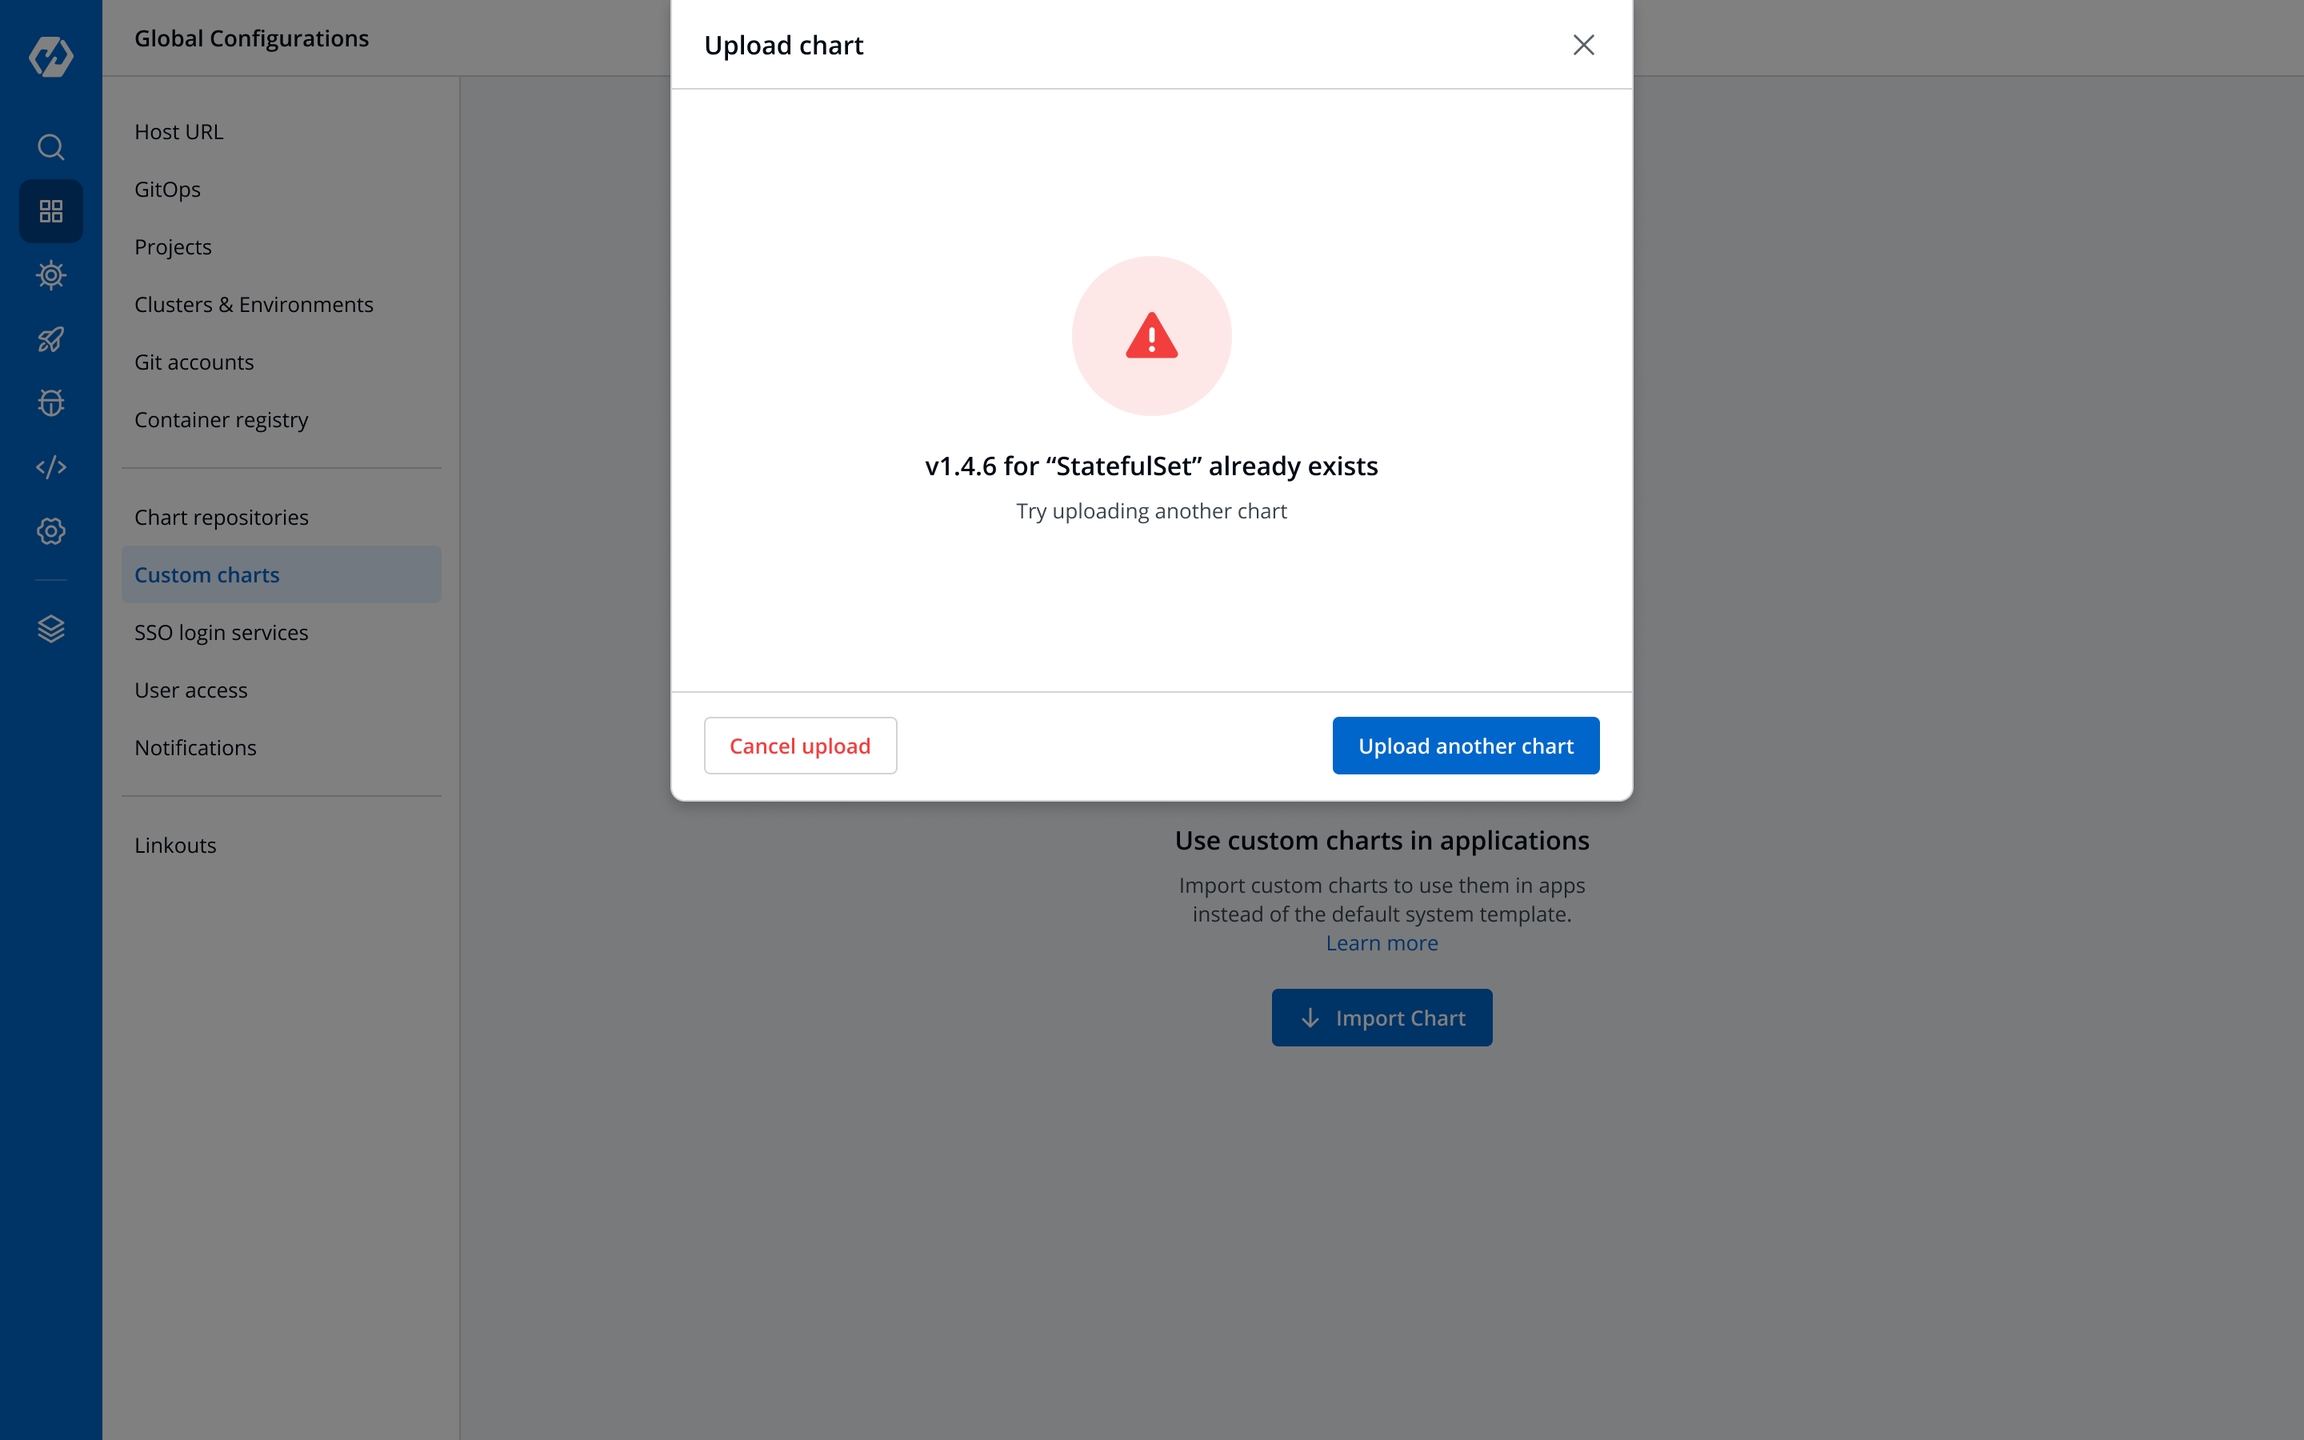
Already exists
There already exists a chart with the same version.
Edit the version and re-upload the same chart using Upload another chart.
Upload a new chart with a new name using Upload another chart.
Cancel upload.
All users can view the custom charts.
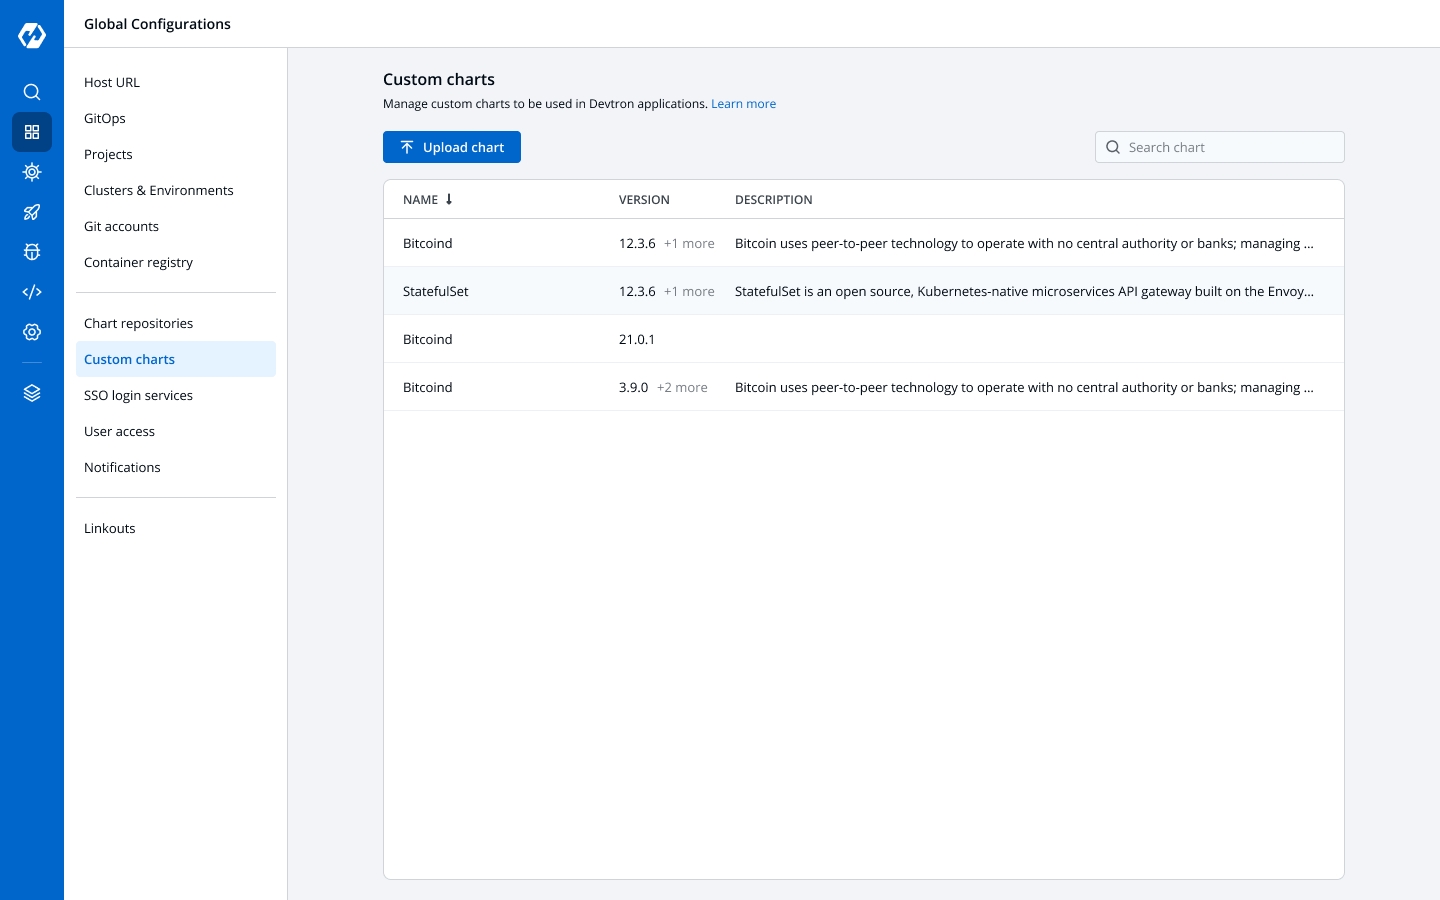
To view a list of available custom charts, go to Global Configurations > Custom charts page.
The charts can be searched with their name, version, or description.
New custom charts can be uploaded by selecting Upload chart.
The custom charts can be used from the Deployment Template section.
Info:
The deployment strategy for a custom chart is fetched from the custom chart template and cannot be configured in the CD pipeline.
Devtron provides a sample configuration out of the box. There are some values that you need to either get from your SSO provider or give to your SSO provider.
clientID
clientSecret
redirectURI (provided in SSO Login Services by Devtron)
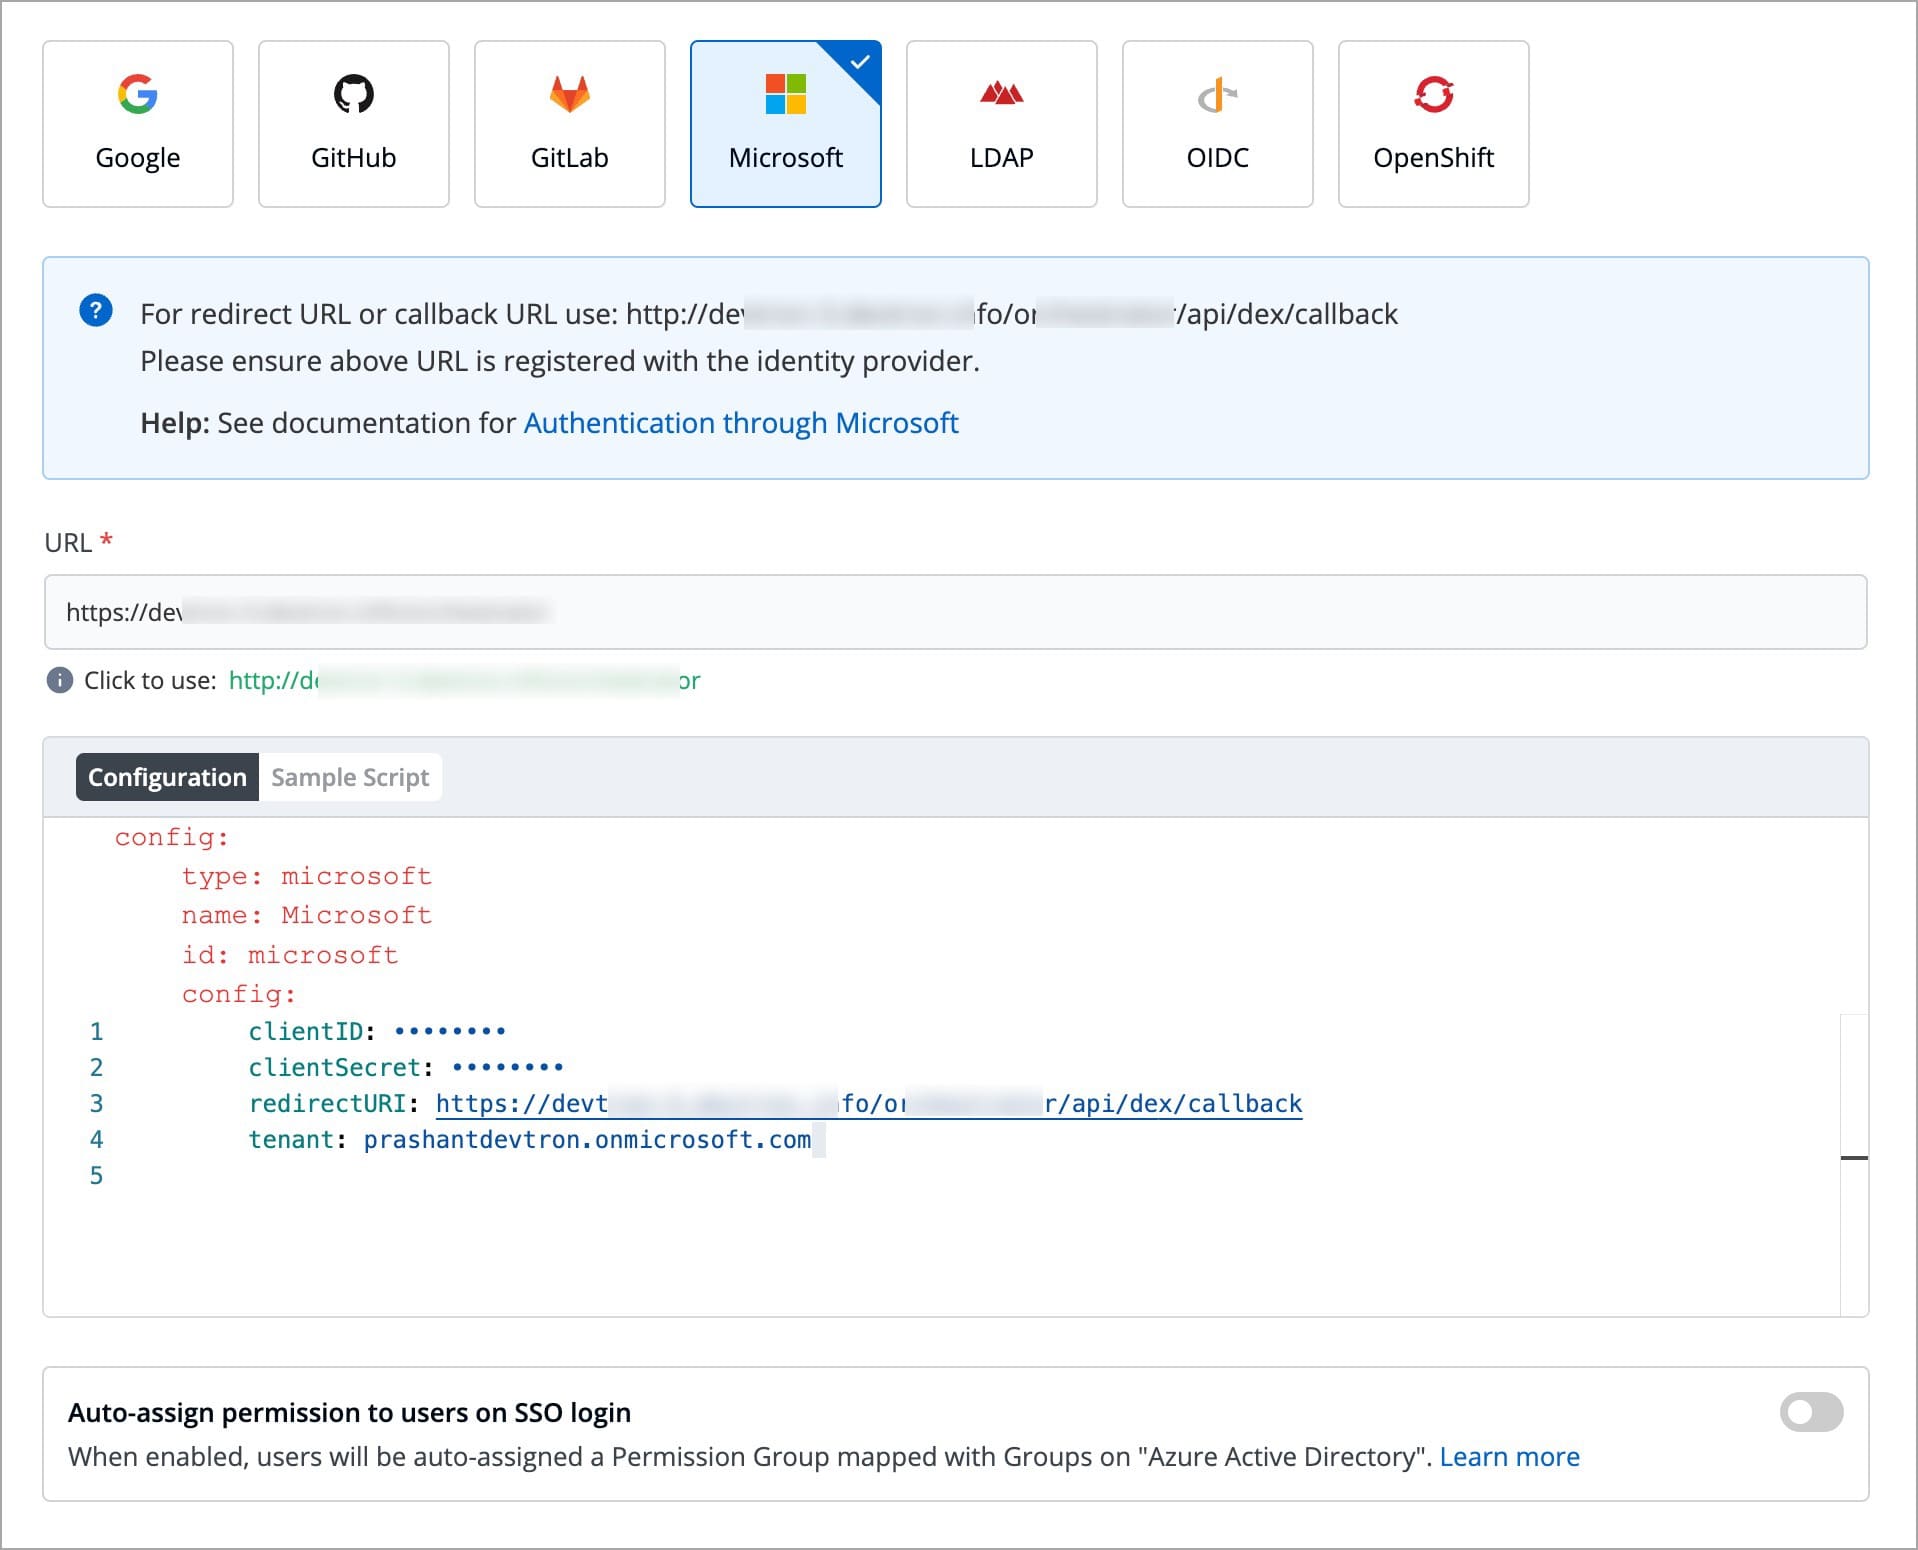
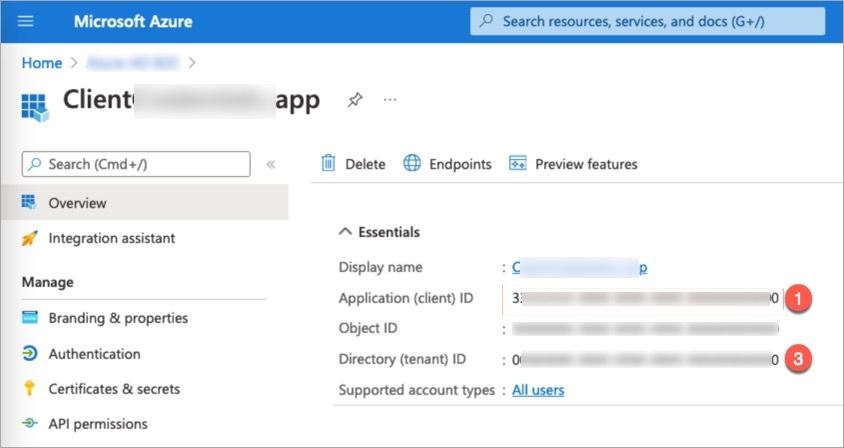
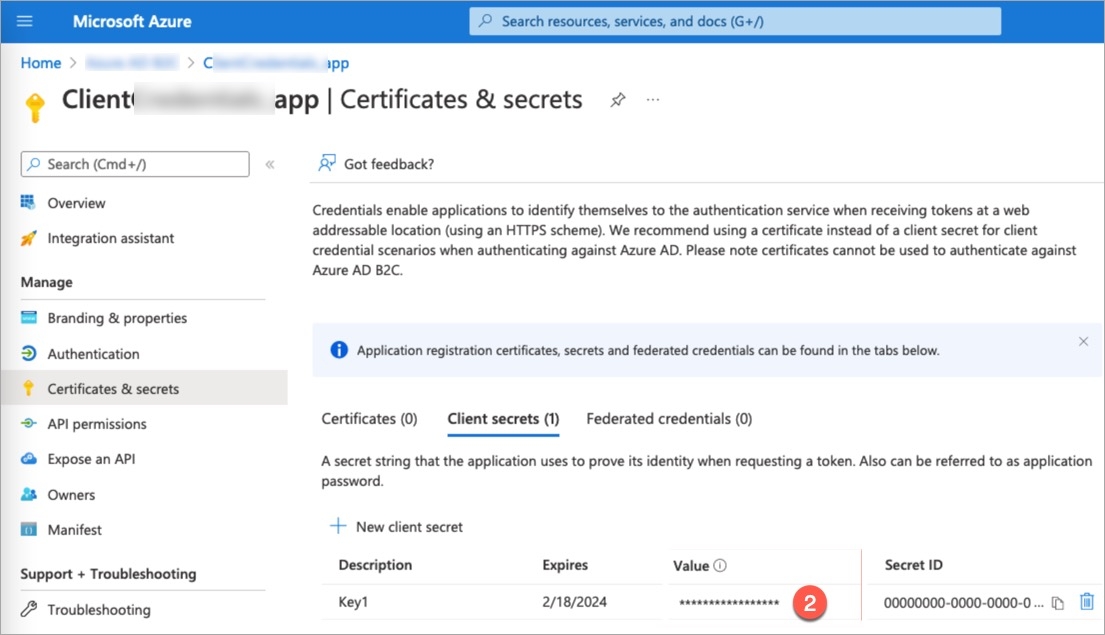
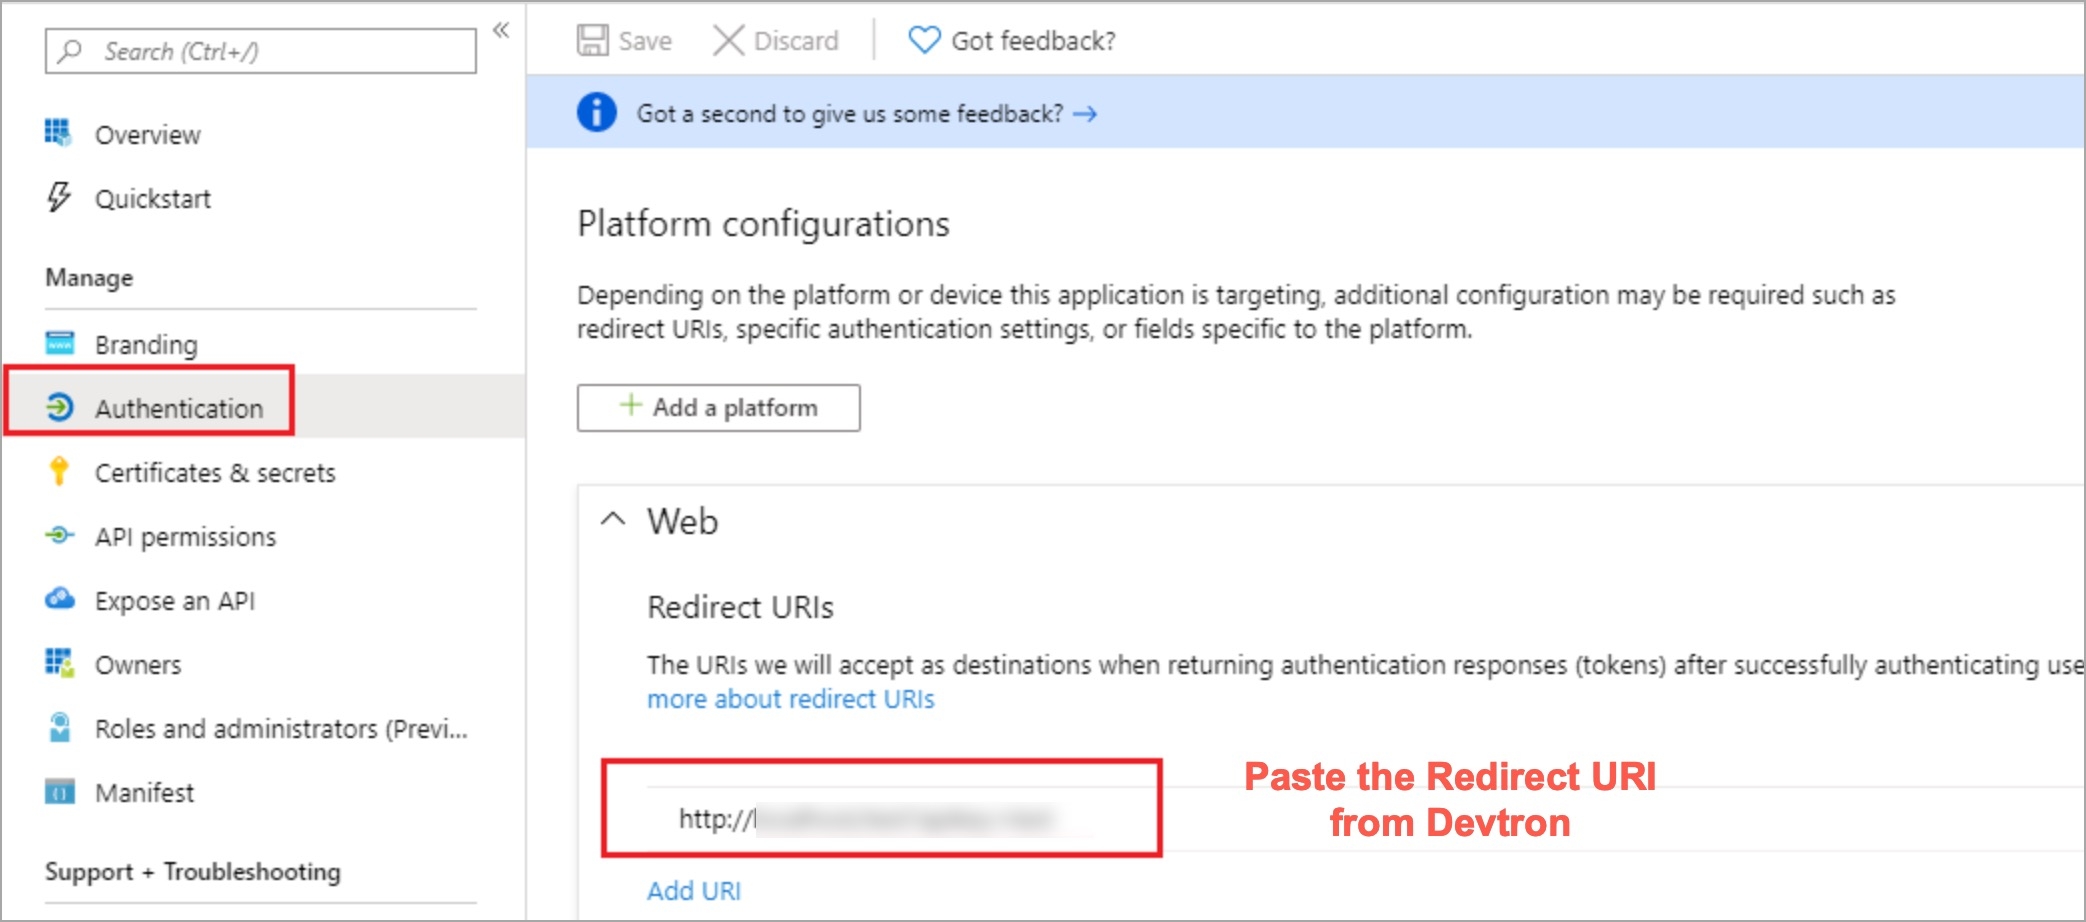
Devtron provides a sample configuration out of the box. There are some values that you need to either get from your SSO provider or give to your SSO provider.
clientID
tenantID (required only if you want to use Azure AD for auto-assigning permissions)
clientSecret
redirectURI (provided in SSO Login Services by Devtron)
Make sure to add tenantID in the SSO configuration field without fail.
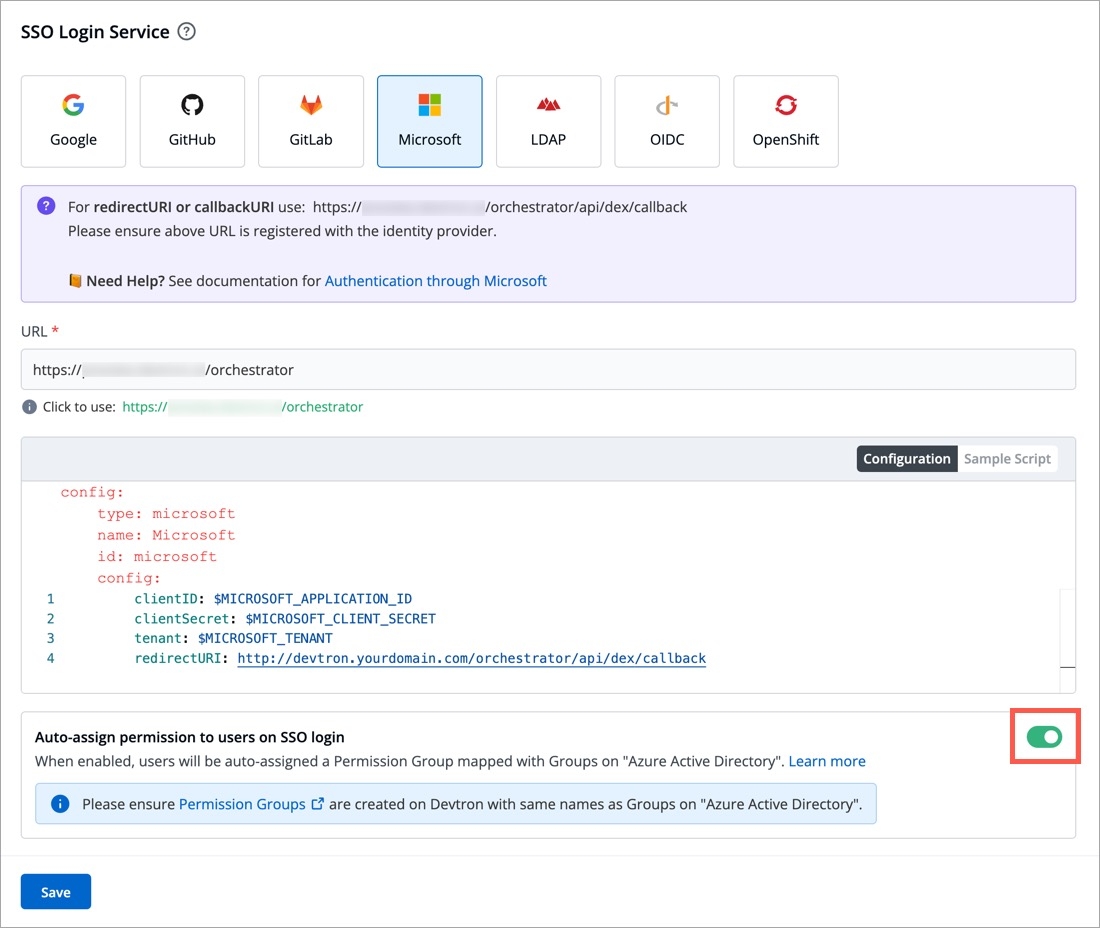
Since Microsoft supports Active Directory (AD) , this feature further simplifies the onboarding process of organizations having a large headcount of users. It also eliminates repetitive permission assignment by automatically mapping your Azure AD groups to Devtron's Permission Groups during single sign-on (SSO) login.
If you've defined groups in your Active Directory, you can create corresponding permission groups in Devtron with the same names. When members of those Active Directory groups first log in to Devtron, they'll automatically inherit the permissions from their Devtron permission group. This means you can't manually adjust or add individual permissions for users mapped to a permission group.
SSO login requires exact matching between Devtron permission group names and AD groups. Any discrepancies or missing groups will prevent successful login.
Once you save the configuration with this feature enabled, existing user permissions will be cleared and the future permissions will be managed through permission groups linked to Azure Active Directory (Microsoft Entra ID) groups.
If your AD permissions aren't reflecting in Devtron, a quick sign-out and sign-in can resolve the issue.
Devtron provides a sample configuration out of the box. There are some values that you need to either get from your SSO provider or give to your SSO provider.
clientID
clientSecret
redirectURI (already provided in SSO Login Services by Devtron)
A verified account on Okta. Okta activates your account only if email verification is successful.
Here's a reference guide to set up your Okta org and application: Link
Once your Okta org is set up, create an app integration on Okta to get a Client ID and Client Secret.
In the Admin Console, go to Applications → Applications.
Click Create App Integration.
Select OIDC - OpenID Connect as the Sign-in method.
OIDC stands for OpenID Connect. Click here to read more.
Select Web as the application type and click Next.
On the App Integration page:
Give a name to your application.
Select the Interaction Code and Refresh Token checkbox.
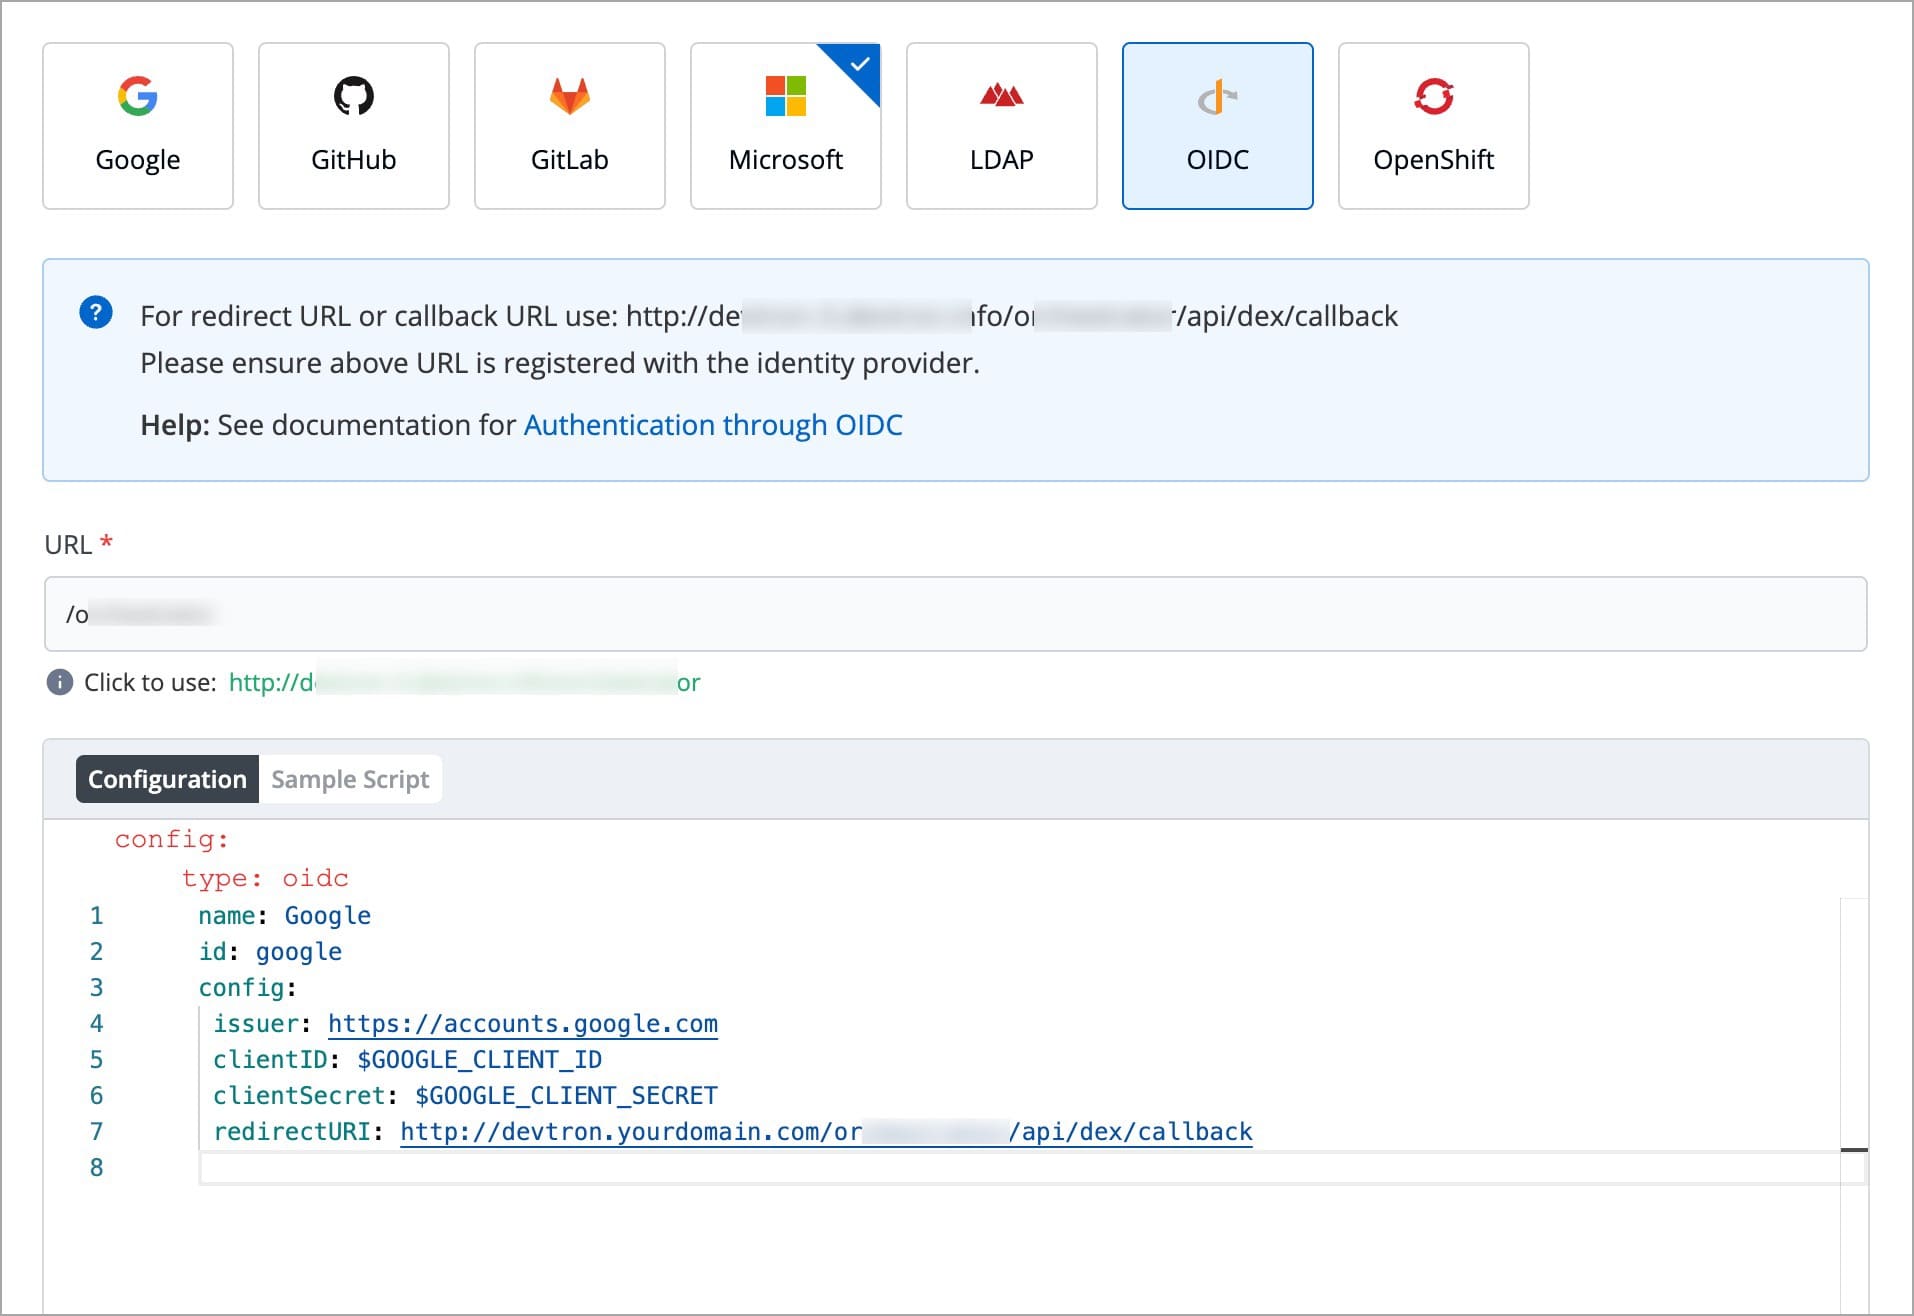
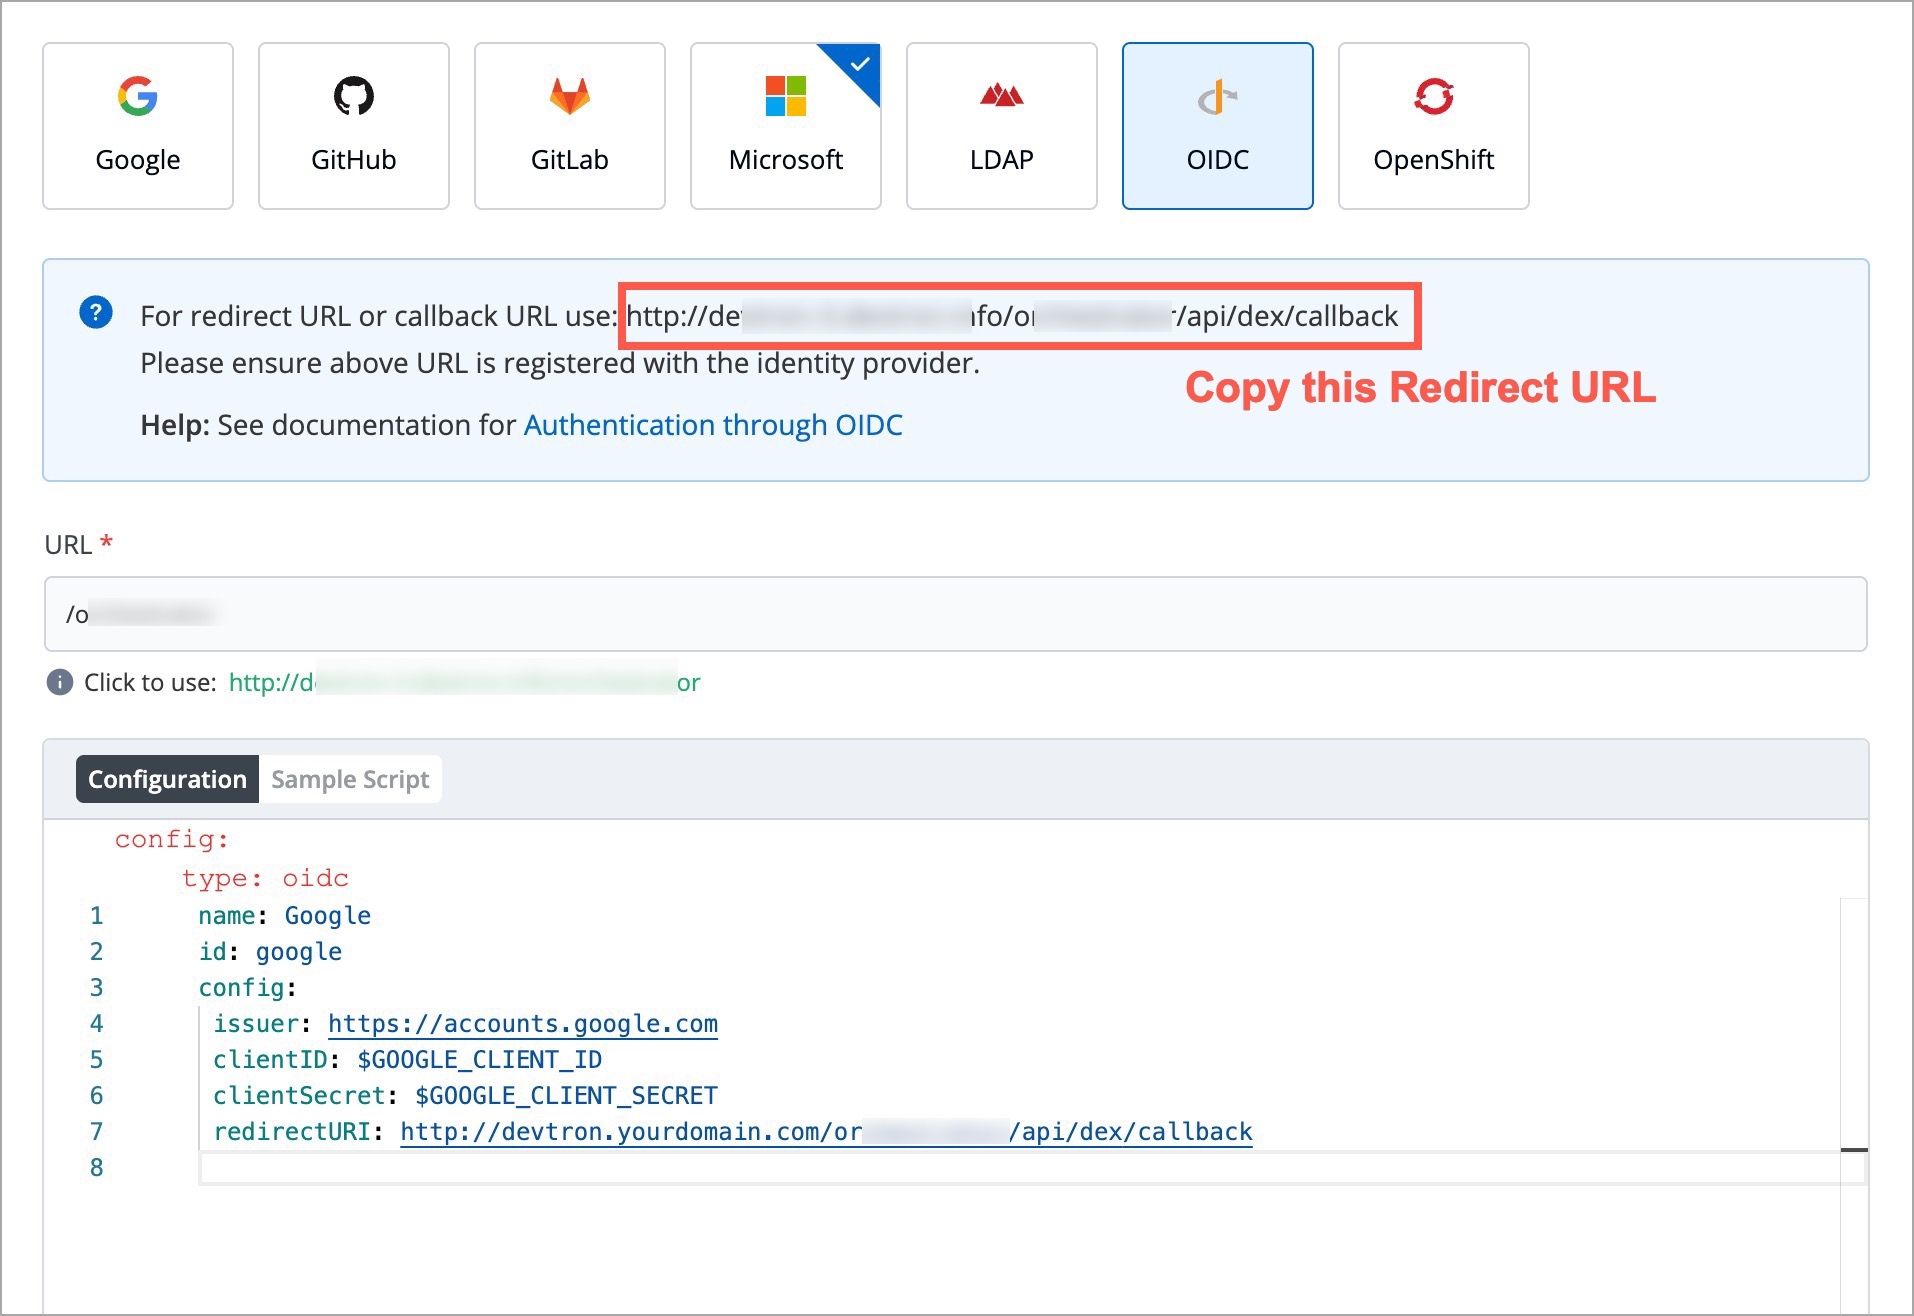
Now go to Devtron's Global Configurations → SSO Login Services → OIDC.
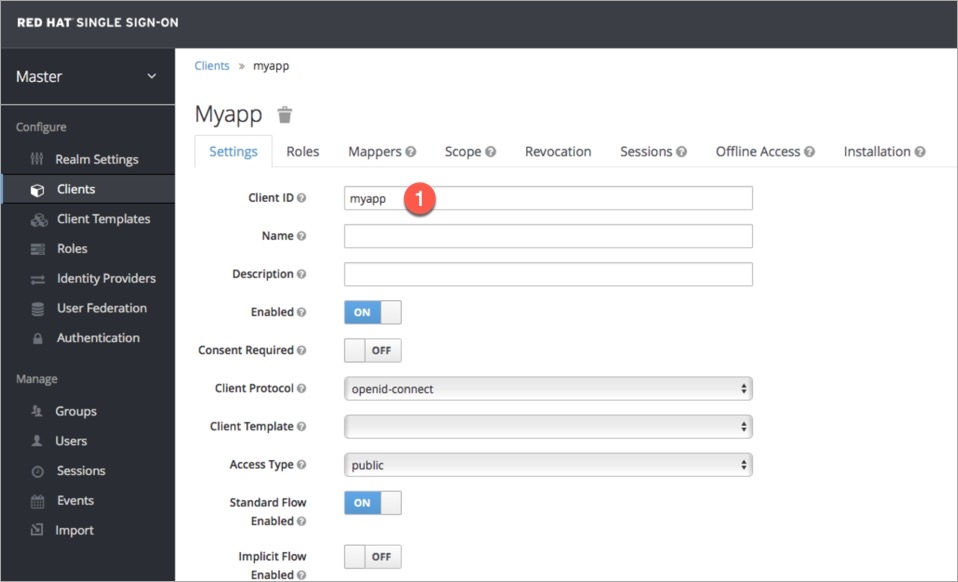
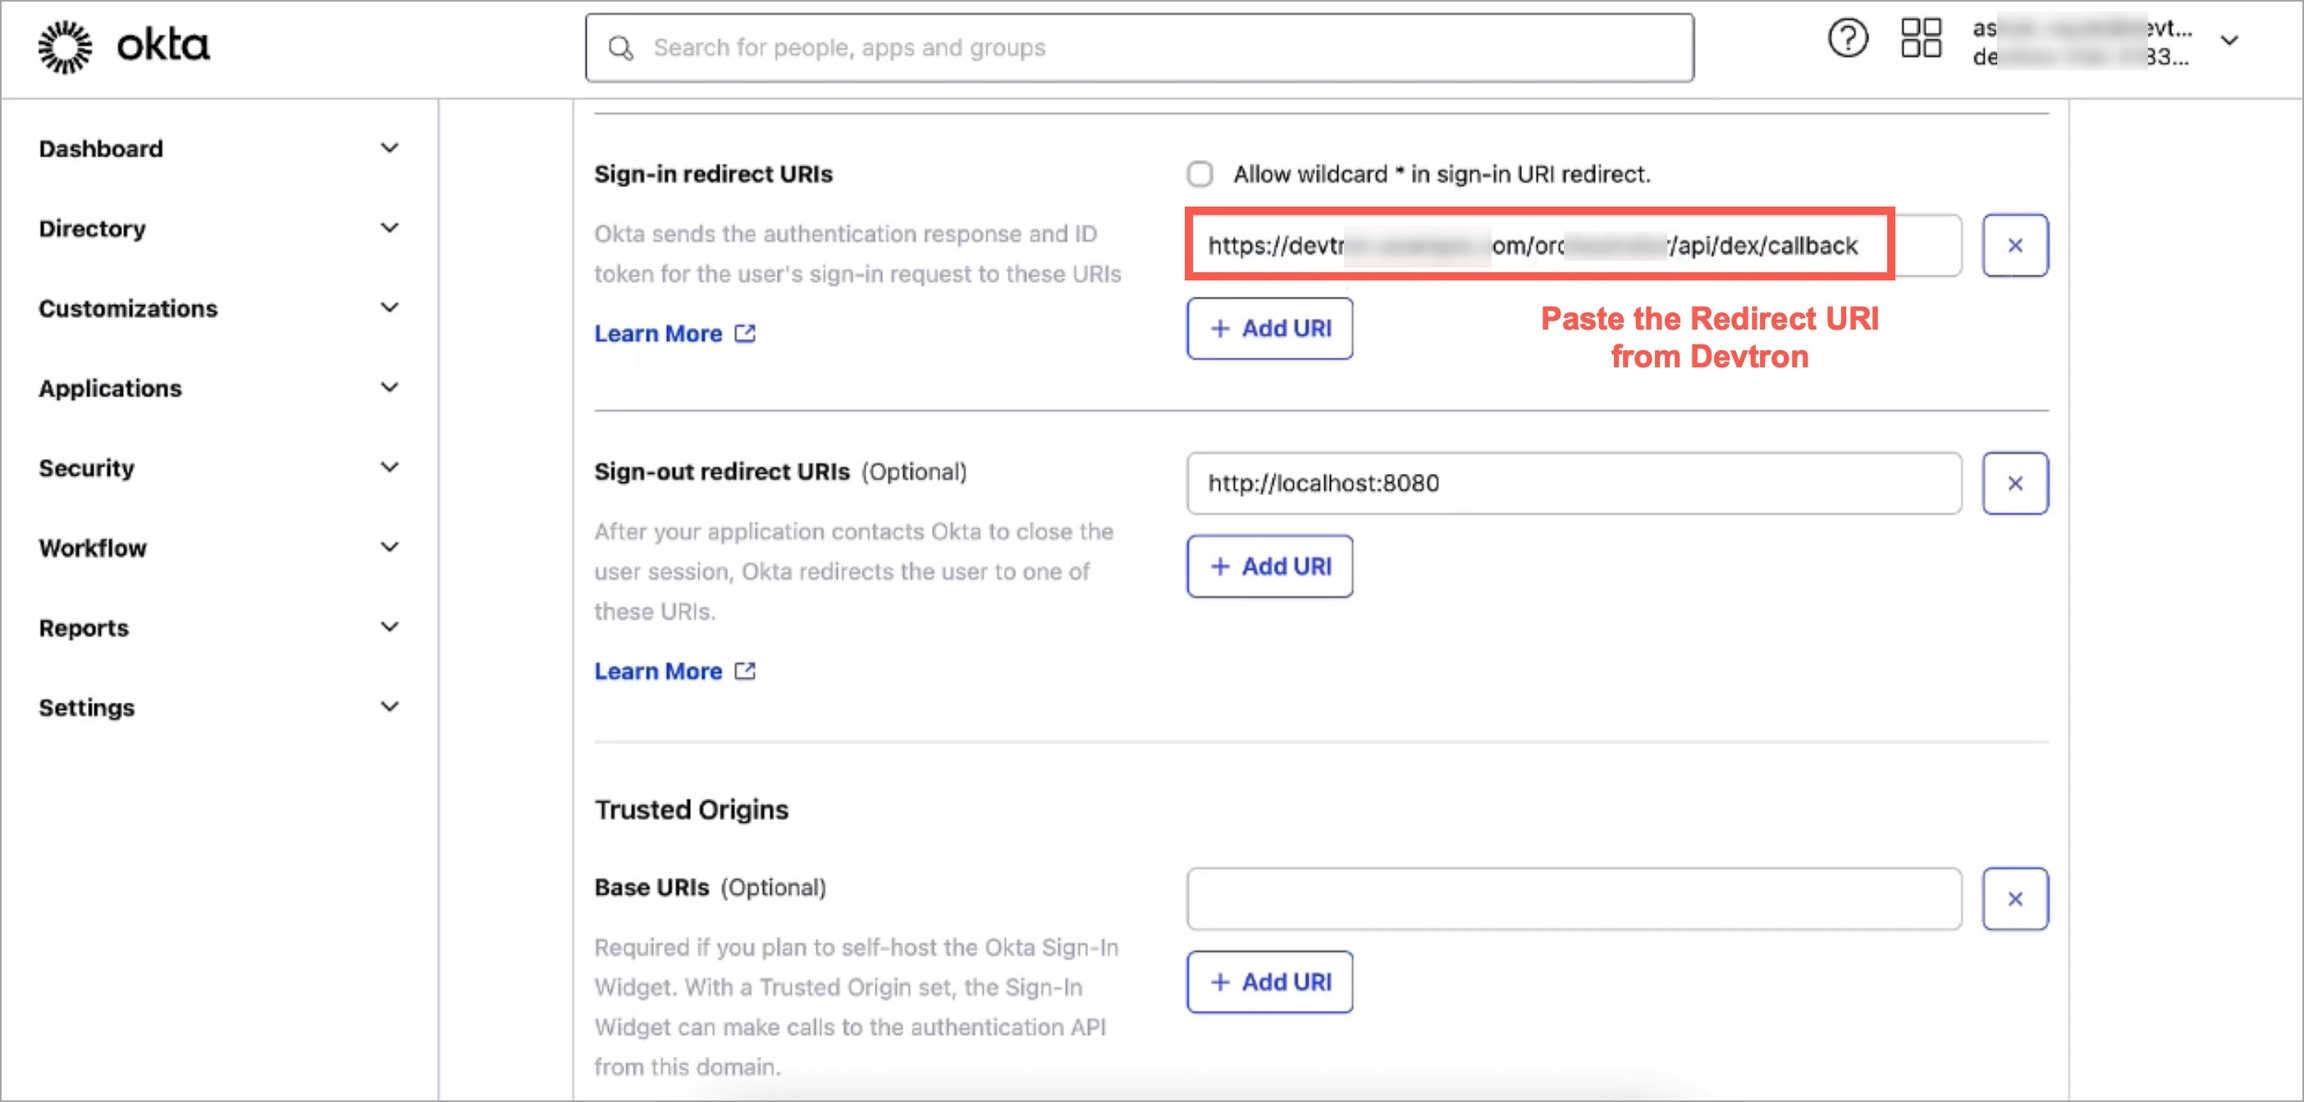
Copy the redirect URI given in the helper text (might look like: https://xxx.xxx.xxx/xxx/callback).
Return to the Okta screen, and remove the prefilled value in Sign-in redirect URIs.
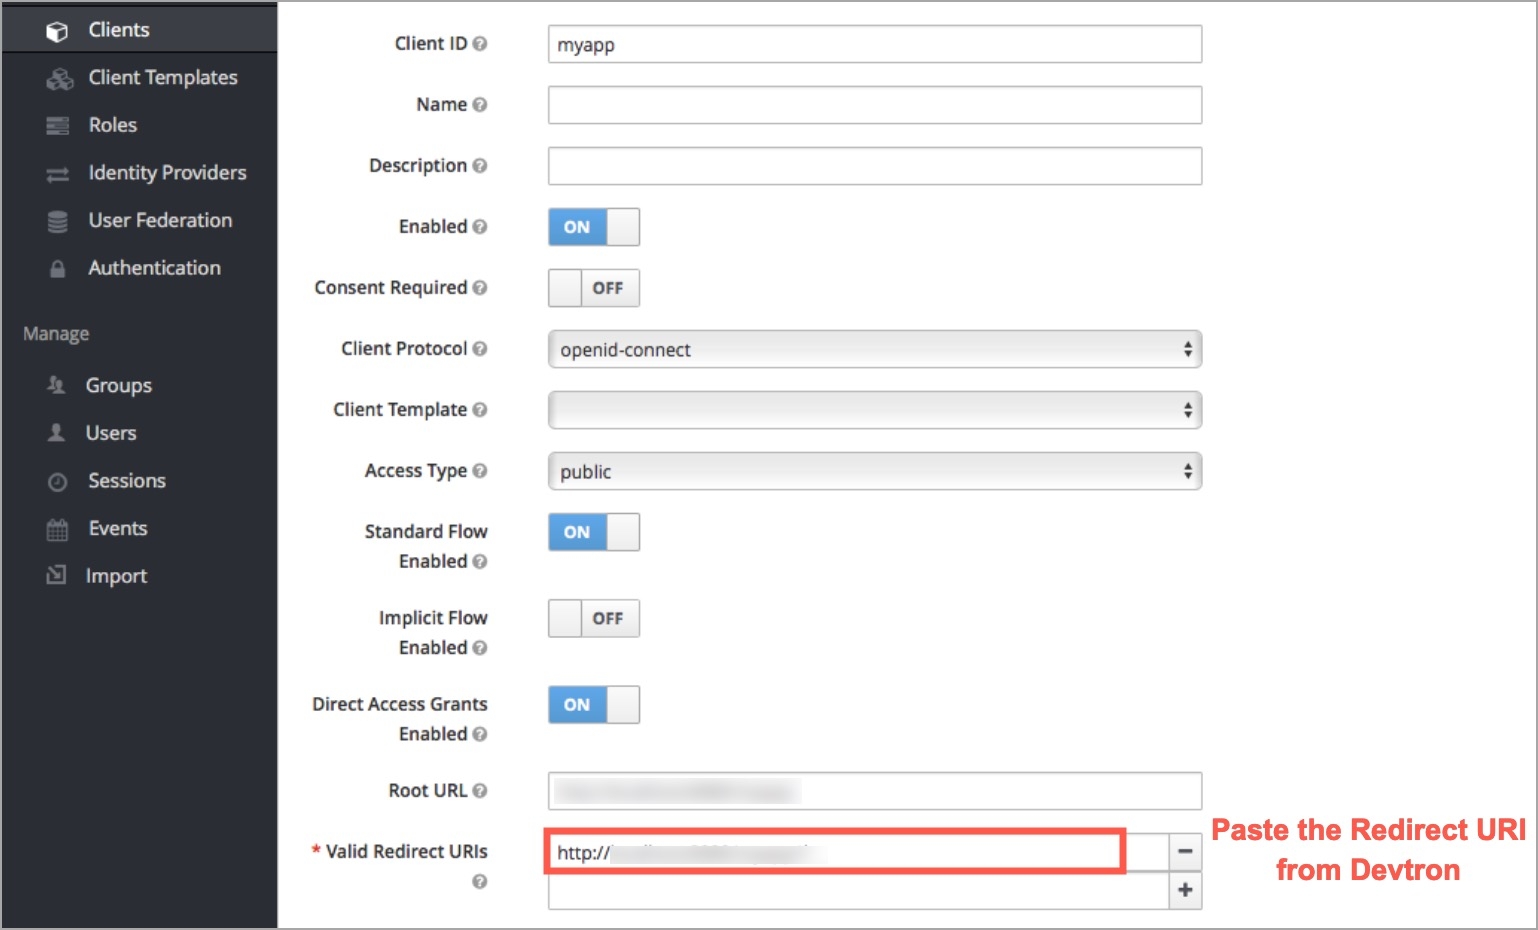
Paste the copied URI in Sign-in redirect URIs.
Click Save.
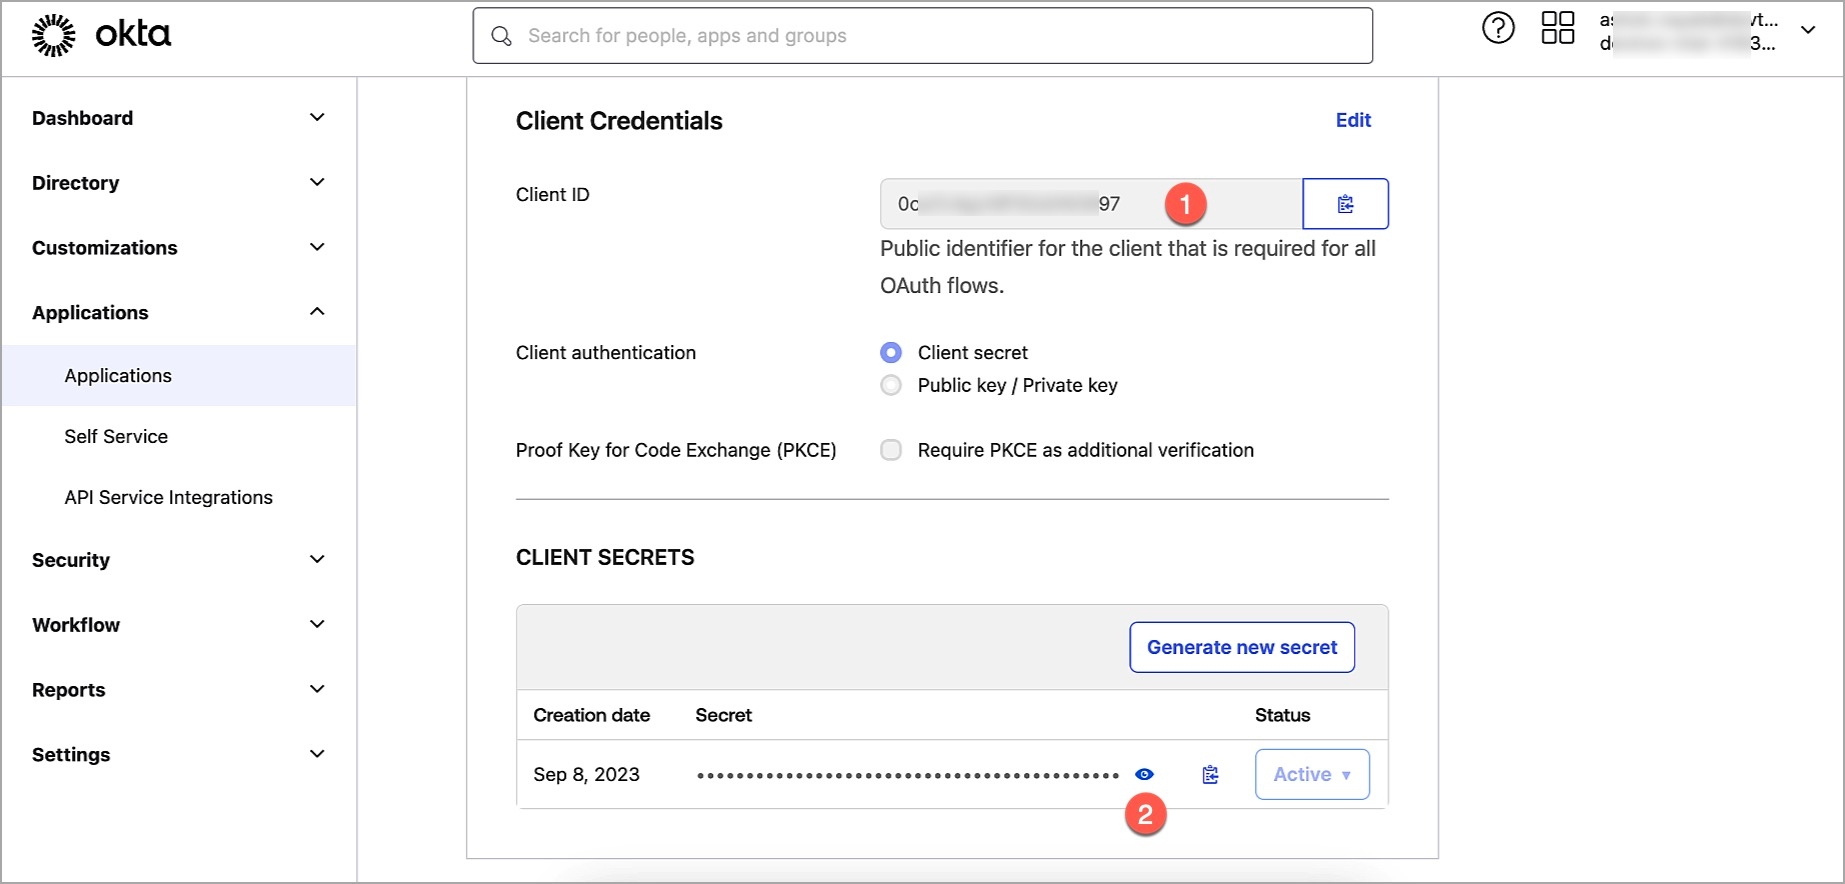
On the General tab:
Note the Client ID value.
Click the Edit option.
In Client Authentication, choose Client Secret.
Click Save.
Click Generate new secret.
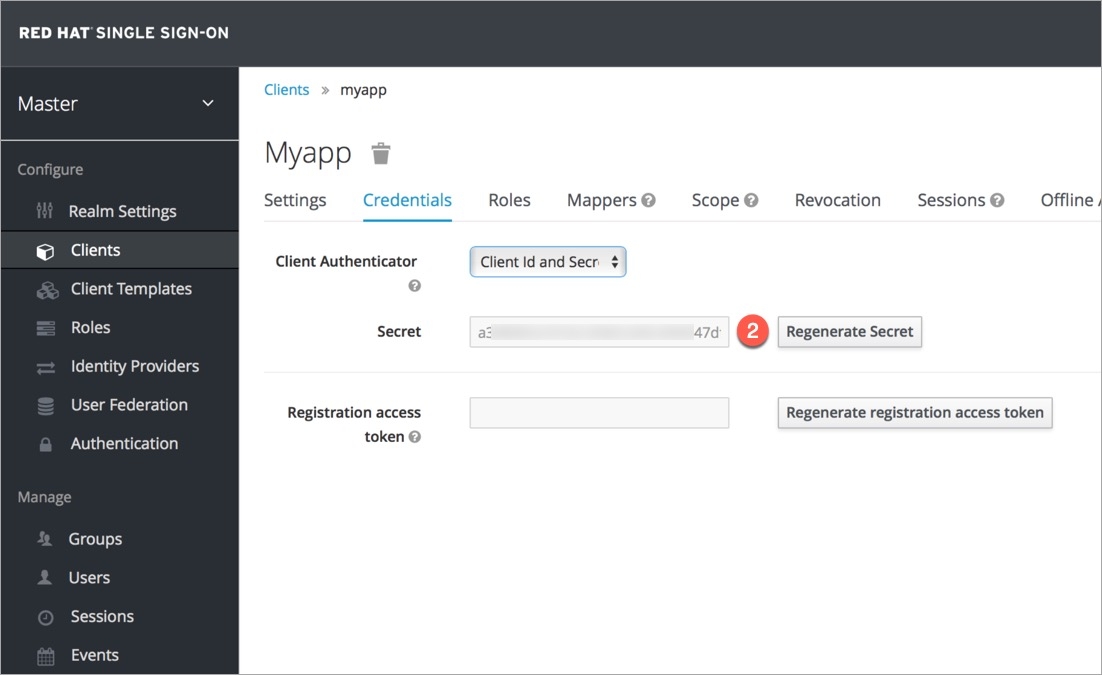
Note the Client Secret value.
Go to the Global Configurations → SSO Login Services → OIDC.
In the URL field, enter the Devtron application URL (a valid https link) where it is hosted.
Under Configuration tab, locate the config object, and provide the clientID and clientSecret of the app integration you created on Okta.
Add a key insecureSkipEmailVerified: true. Note that this key is only required for Okta SSO. For other types of OIDC SSO, refer OIDC supported configurations.
Provide issuer value as https://${yourOktaDomain}. Replace ${yourOktaDomain} with your domain on Okta as shown in the video.
For providing redirectURI or callbackURI registered with the SSO provider, you can either select Configuration or Sample Script. Note that the redirect URI is already given in the helper text (as seen in the previous section).
Click Save to create and activate Okta SSO login.
Now your users will be able to log in to Devtron using the Okta authentication method. Note that existing signed-in users will be logged out and they have to log in again using their OIDC account.
In Devtron, you can either use Helm or GitOps (Argo CD) to deploy your applications and charts. GitOps is a branch of DevOps that focuses on using Git repositories to manage infrastructure and application code deployments.
If you use the GitOps approach, Devtron will store Kubernetes configuration files and the desired state of your applications in Git repositories.
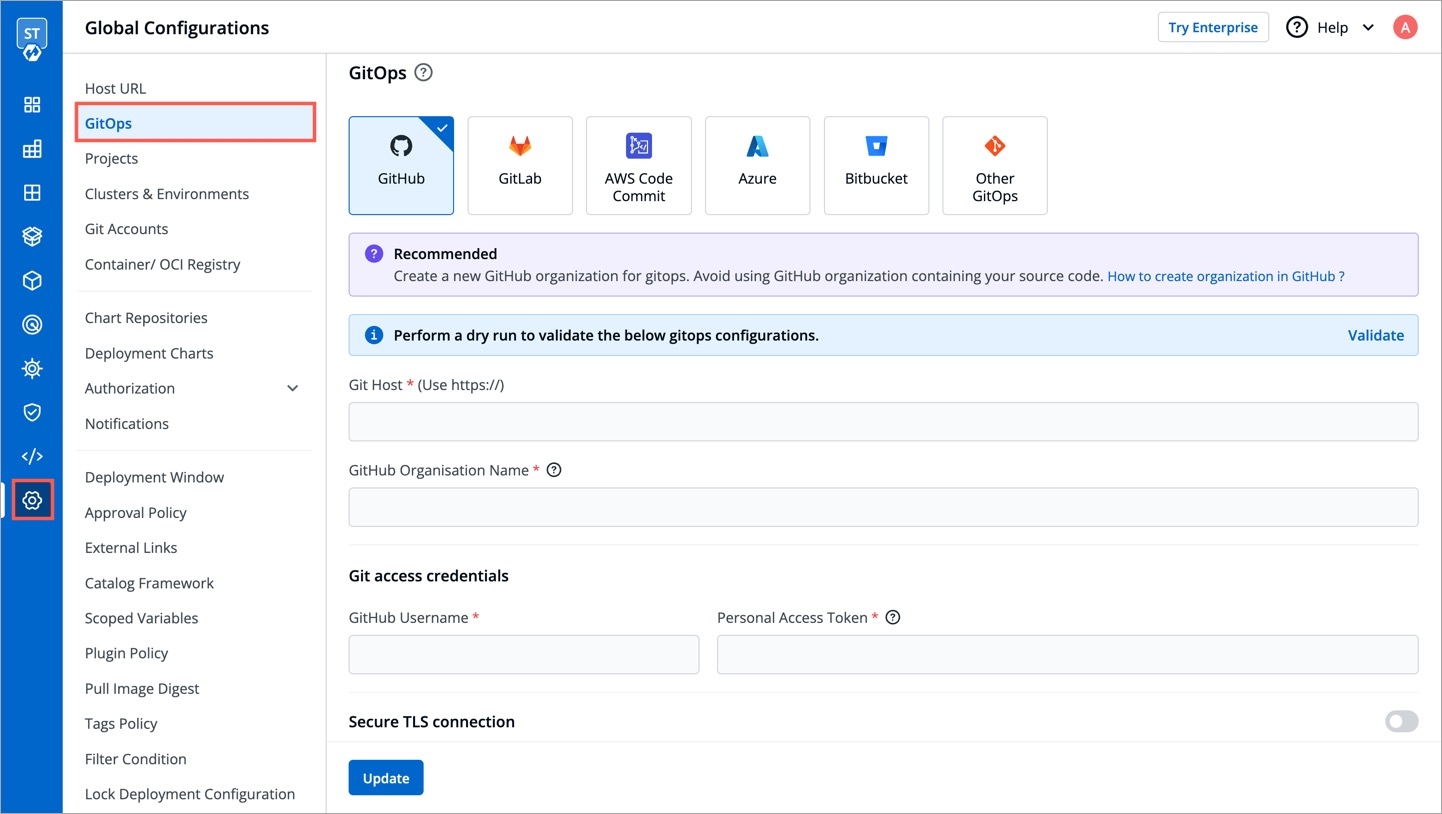
Go to Global Configurations → GitOps
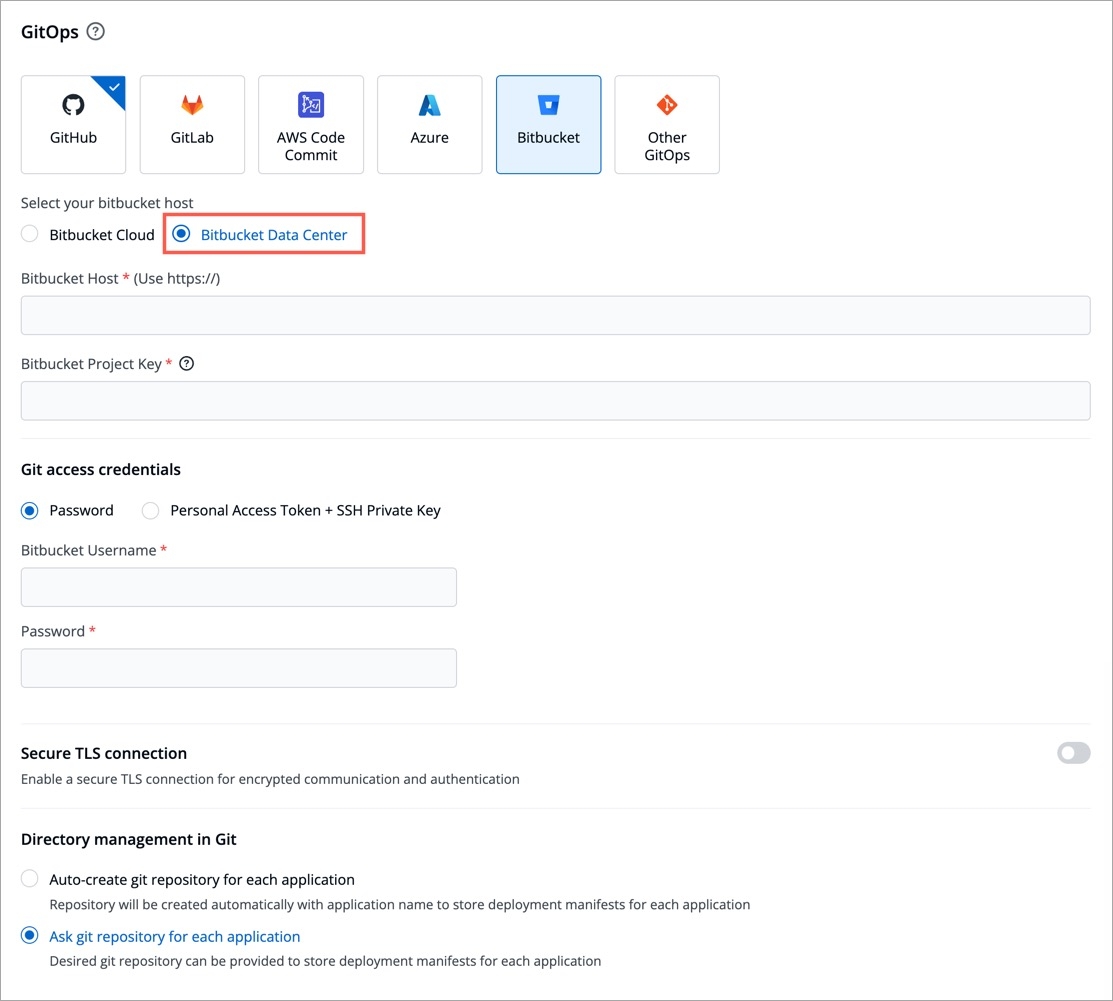
Select any one of the supported Git providers to configure GitOps.
The Git provider you select for configuring GitOps might impact the following sections:
Fill all the mandatory fields. Refer supported Git providers to know more about the respective fields.
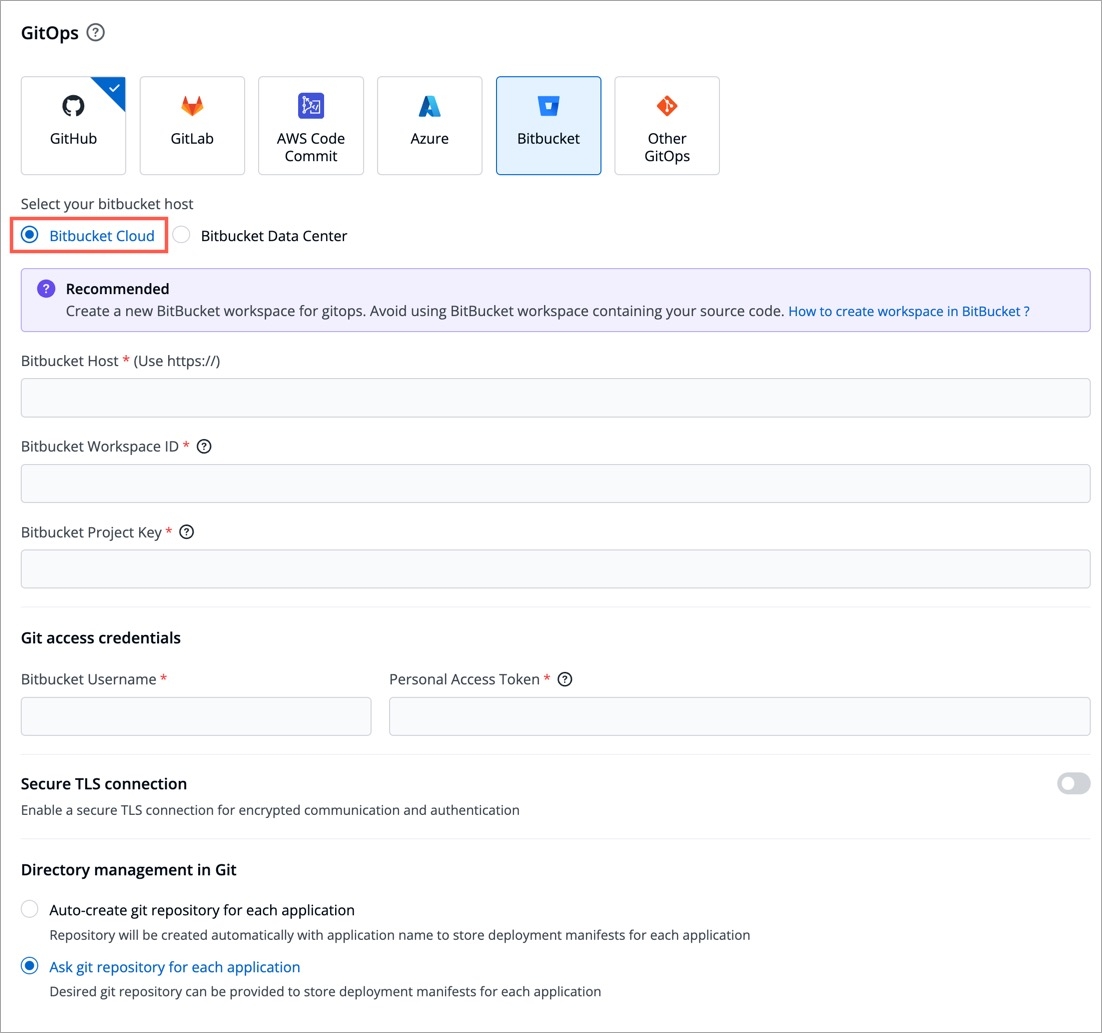
In the Directory Management in Git section, you get the following options:
Use default git repository structure:
This option lets Devtron automatically create a GitOps repository within your organization. The repository name will match your application name, and it cannot be changed. Since Devtron needs admin access to create the repository, ensure the Git credentials you provided in Step 3 have administrator rights.
Allow changing git repository for application:
Select this option if you wish to use your own GitOps repo. This is ideal if there are any confidentiality/security concerns that prevent you from giving us admin access. Therefore, the onus is on you to create a GitOps repo with your Git provider, and then add it to the specific application on Devtron. Make sure the Git credentials you provided in Step 3 have at least read/write access. Choosing this option will unlock a GitOps Configuration page under the App Configuration tab.
Click Save/Update. A green tick will appear on the active Git provider.
Alternatively, you may use the feature flag FEATURE_USER_DEFINED_GITOPS_REPO_ENABLE to enable or disable custom GitOps repo.
For disabling - FEATURE_USER_DEFINED_GITOPS_REPO_ENABLE: "false"
For enabling - FEATURE_USER_DEFINED_GITOPS_REPO_ENABLE: "true"
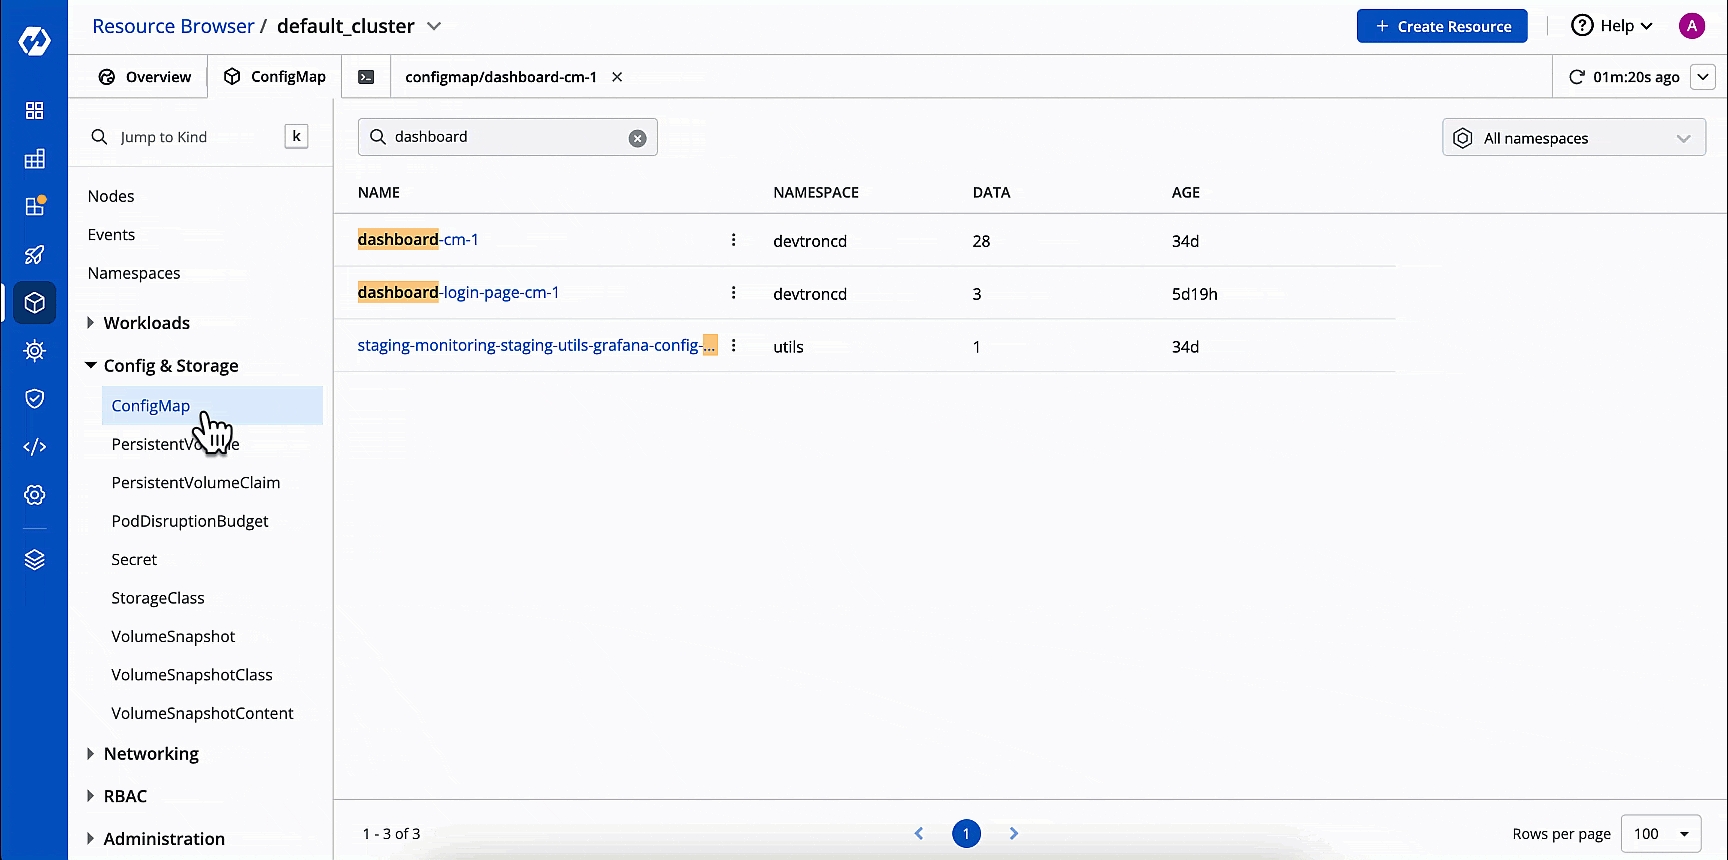
Go to Devtron's Resource Browser.
Select the cluster where Devtron is running, i.e., default_cluster.
Go to the Config & Storage dropdown on the left.
Click ConfigMap.
Use the namespace filter (located on the right-hand side) to select devtroncd namespace. Therefore, it will show only the ConfigMaps related to Devtron, and filter out the rest.
Find the ConfigMap meant for the dashboard of your Devtron instance, i.e., dashboard-cm (with an optional suffix).
Click Edit Live Manifest.
Add the feature flag (with the intended boolean value) within the data dictionary
Click Apply Changes.
Below are the Git providers supported in Devtron for storing configuration files.
A GitHub account
A GitHub organization. If you don't have one, refer Creating Organization in GitHub.
Fill the following mandatory fields:
Git Host
Shows the URL of GitHub, e.g., https://github.com/
GitHub Organisation Name
GitHub Username
Provide the username of your GitHub account
Personal Access Token
A GitLab account
A GitLab group. If you don't have one, refer Creating Group in GitLab.
Fill the following mandatory fields:
Git Host
Shows the URL of GitLab, e.g., https://gitlab.com/
GitLab Group ID
GitLab Username
Provide the username of your GitLab account
Personal Access Token
An organization on Azure DevOps. If you don't have one, refer this link.
A project in your Azure DevOps organization. Refer Creating Project in Azure.
Fill the following mandatory fields:
Azure DevOps Organisation Url*
Azure DevOps Project Name
Azure DevOps Username*
Provide the username of your Azure DevOps account
Azure DevOps Access Token*
Here, you get 2 options:
Bitbucket Cloud - Select this if you wish to store GitOps configuration in a web-based Git repository hosting service offered by Bitbucket.
Bitbucket Data Center - Select this if you wish to store GitOps configuration in a git repository hosted on a self-managed Bitbucket Data Center (on-prem).
A Bitbucket account
A workspace in your Bitbucket account. Refer Creating Workspace in Bitbucket.
Fill the following mandatory fields:
Bitbucket Host
Shows the URL of Bitbucket Cloud, e.g., https://bitbucket.org/
Bitbucket Workspace ID
Bitbucket Project Key
Bitbucket Username*
Provide the username of your Bitbucket account
Personal Access Token
Fill the following mandatory fields:
Bitbucket Host
Enter the URL address of your Bitbucket Data Center, e.g., https://bitbucket.mycompany.com
Bitbucket Project Key
Bitbucket Username*
Provide the username of your Bitbucket Data Center account
Password
Provide the password to authenticate your Bitbucket Data Center account
We do NOT recommend using GitHub organization that contains your source code.
Create a new account on GitHub (if you do not have one).
On the upper-right corner of your GitHub page, click your profile photo, then click Settings.
On the Access section, click Organizations.
On the Organizations section, click New organization.
Pick a plan for your organization. You have the option to select create free organization also.
On the Set up your organization page,
Enter the organization account name, contact email.
Select the option your organization belongs to.
Verify your account and click Next.
Your GitHub organization name will be created.
Go to your profile and click Your organizations to view all the organizations you created.
For more information about the plans available for your team, see GitHub's products. You can also refer GitHub organization official doc page for more detail.
Note:
repo - Full control of private repositories (able to access commit status, deployment status, and public repositories).
admin:org - Full control of organizations and teams (Read and write access).
delete_repo - Grants delete repo access on private repositories.
Create a new account on GitLab (if you do not have one).
You can create a group by going to the 'Groups' tab on the GitLab dashboard and click New group.
Select Create group.
Enter the group name (required) and select the optional descriptions if required, and click Create group.
Your group will be created and your group name will be assigned with a new Group ID (e.g. 61512475).
Note:
api - Grants complete read/write access to the scoped project API.
write_repository - Allows read/write access (pull, push) to the repository.
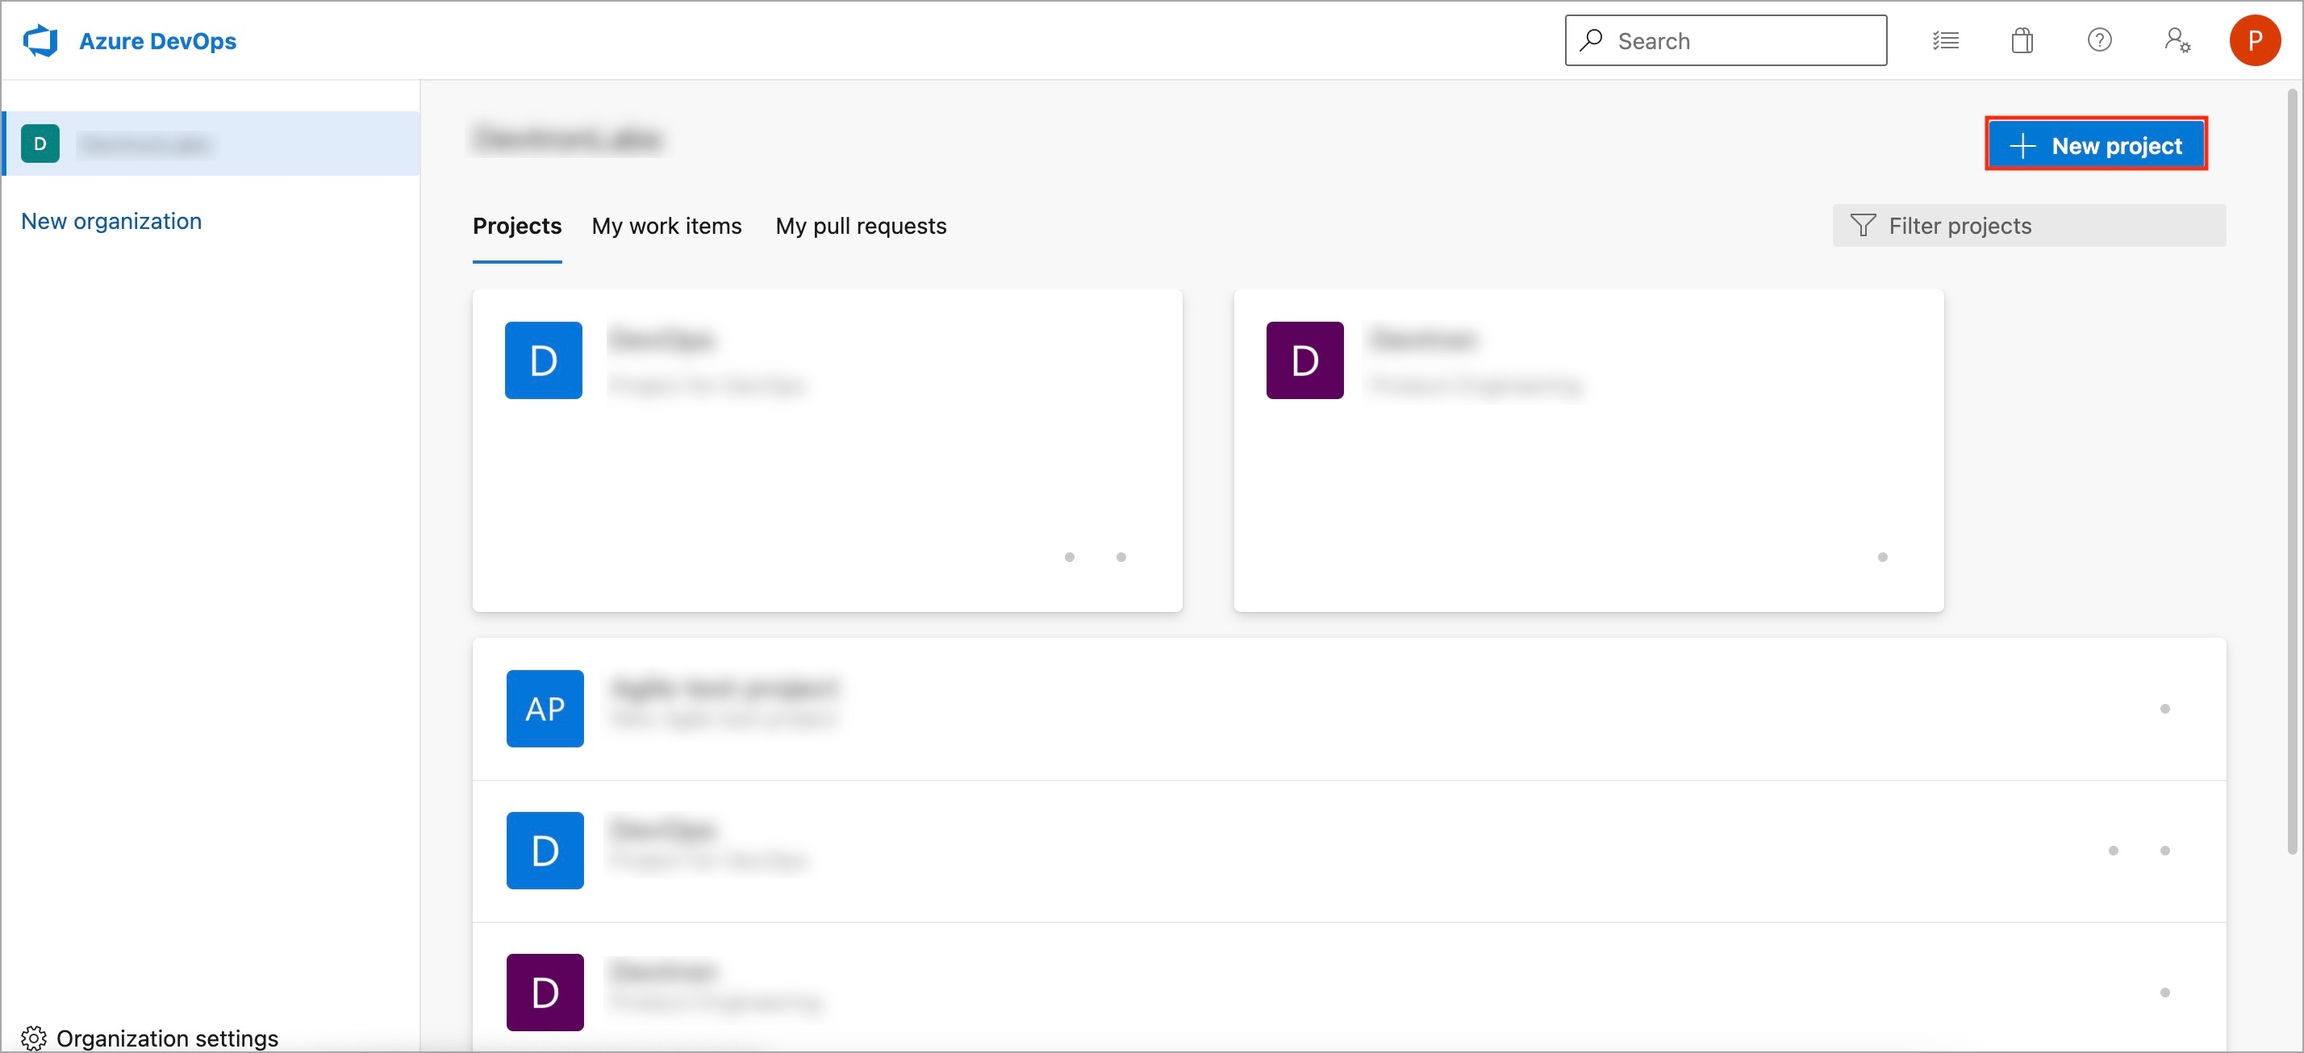
Go to Azure DevOps and navigate to Projects.
Select your organization and click New project.
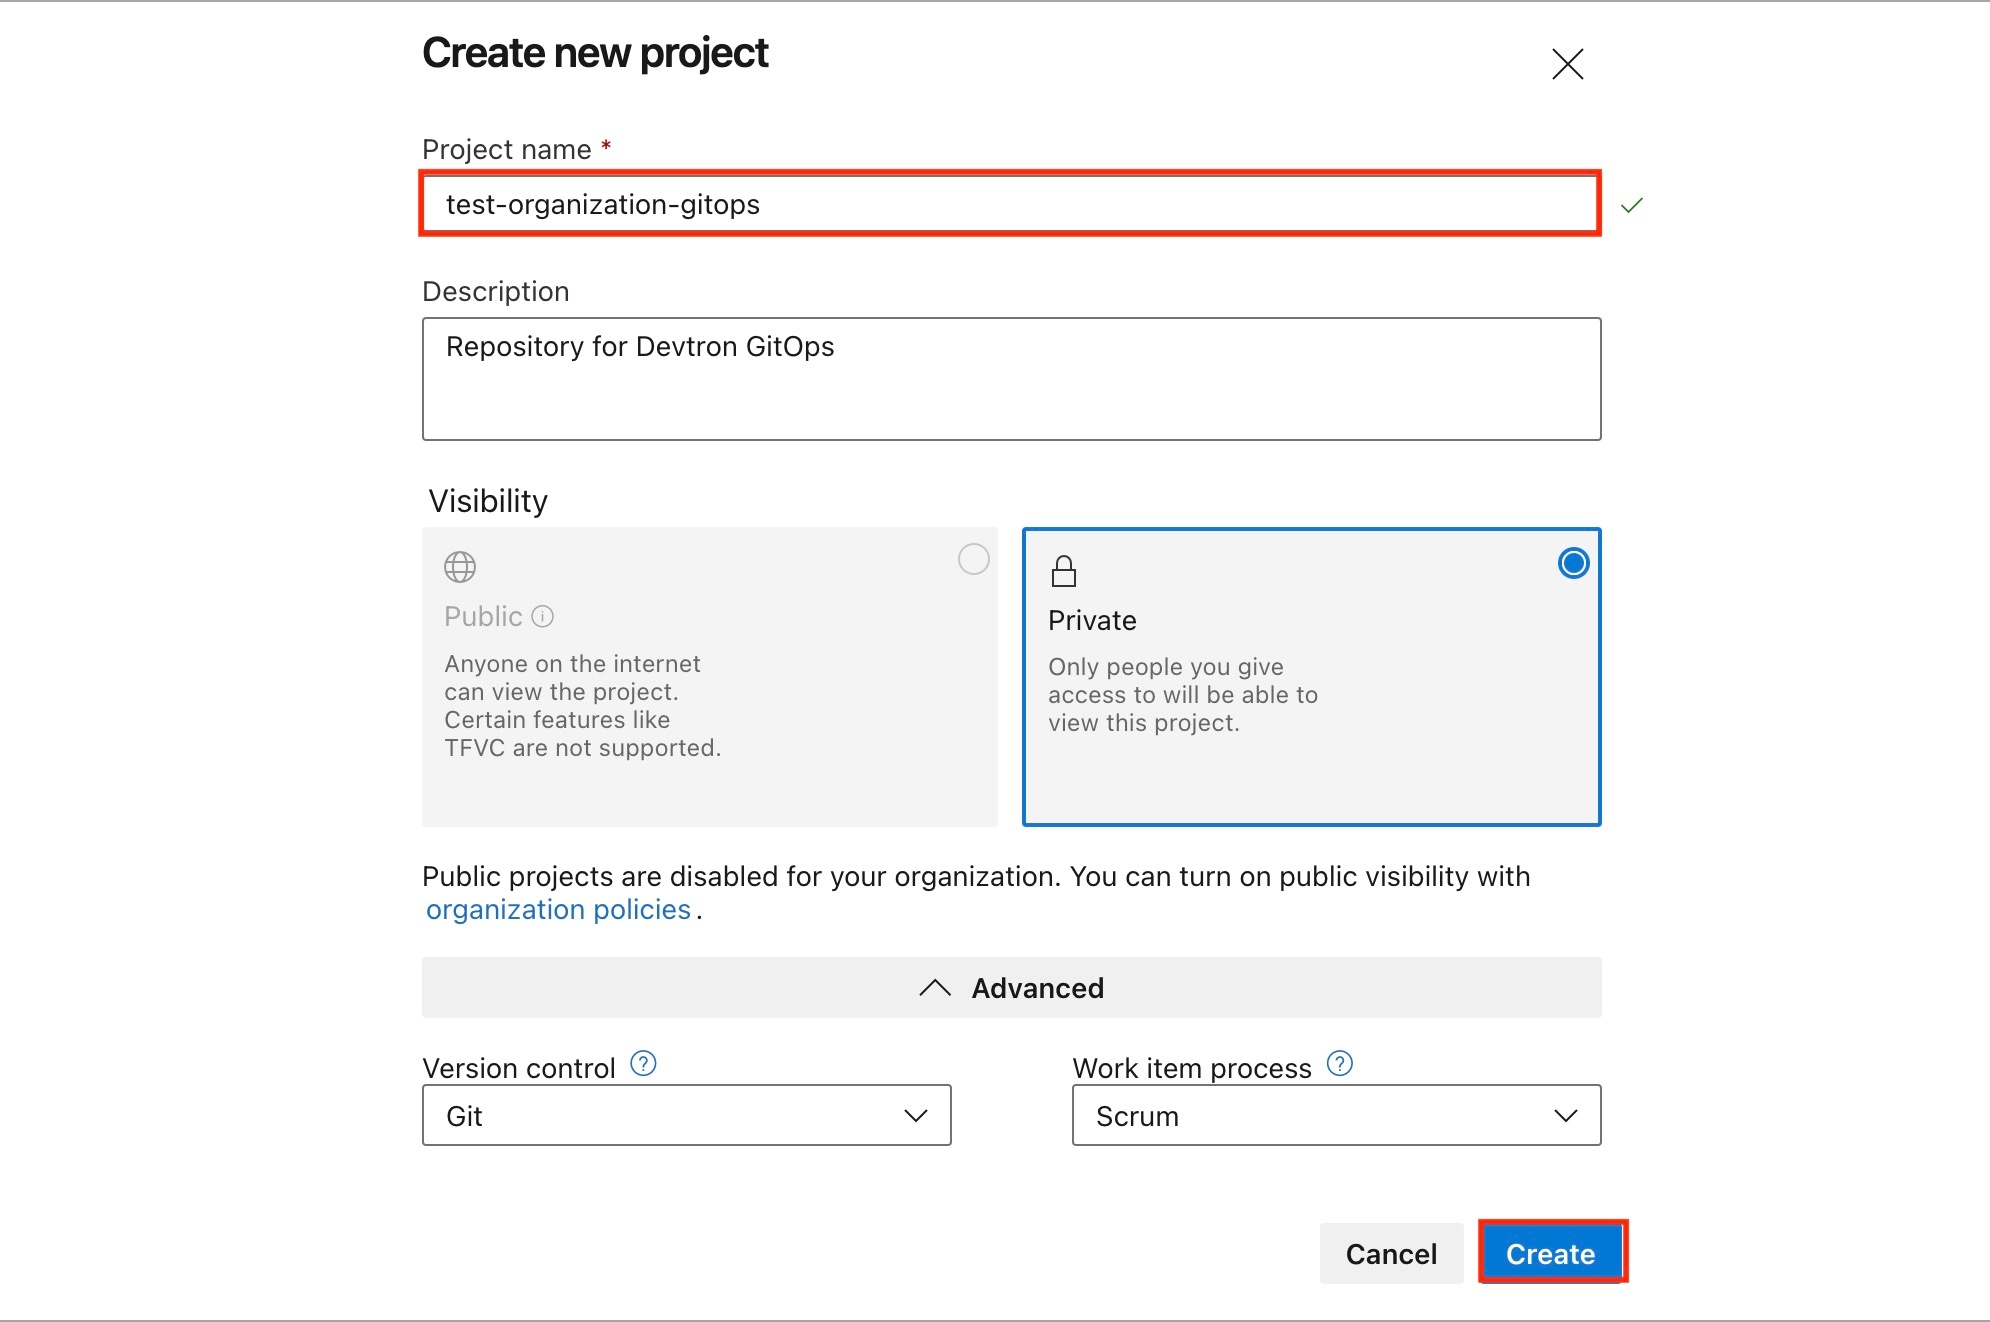
On the Create new project page,
Enter the project name and description of the project.
Select the visibility option (private or public), initial source control type, and work item process.
Click Create.
Azure DevOps displays the project welcome page with the project name.
You can also refer Azure DevOps - Project Creation official page for more details.
Note:
code - Grants the ability to read source code and metadata about commits, change sets, branches, and other version control artifacts. More information on scopes in Azure DevOps.
Create a new individual account on Bitbucket (if you do not have one).
Select your profile and settings avatar on the upper-right corner of the top navigation bar.
Select All workspaces from the dropdown menu.
Select the Create workspace on the upper-right corner of the Workspaces page.
On the Create a Workspace page:
Enter a Workspace name.
Enter a Workspace ID. Your ID cannot have any spaces or special characters, but numbers and capital letters are fine. This ID becomes part of the URL for the workspace and anywhere else where there is a label that identifies the team (APIs, permission groups, OAuth, etc.).
Click Create.
Your Workspace name and Workspace ID will be created.
You can also refer official Bitbucket Workspace page for more details.
Note:
repo - Full control of repositories (Read, Write, Admin, Delete) access.
Devtron provides a sample configuration out of the box. Here are some values you need to fetch from your LDAP.
bindDN
bindPW
baseDN
Since LDAP supports creation of User Groups, this feature simplifies the onboarding process of organizations having a large headcount of users. It also eliminates repetitive permission assignment by automatically mapping your LDAP User groups to Devtron's Permission Groups during single sign-on (SSO) login.
If you've created user groups in LDAP, you can create corresponding permission groups in Devtron with the same names. When members of those user groups first log in to Devtron, they'll automatically inherit the permissions from their Devtron permission group. This means you can't manually adjust or add individual permissions for users mapped to a permission group.
SSO login requires exact matching between Devtron permission group names and LDAP user groups. Any discrepancies or missing groups will prevent successful login.
Once you save the configuration with this auto-assign feature enabled, existing user permissions will be cleared and the future permissions will be managed through Permission Groups linked to LDAP user groups.
If you're missing some permissions that you know you should have, try logging out and signing back in to Devtron. This will refresh your permissions based on your latest LDAP user group.
Devtron provides a sample configuration out of the box. There are some values that you need to either get from your SSO provider or give to your SSO provider.
clientID
clientSecret
redirectURI (provided in SSO Login Services by Devtron)
Git Accounts allow you to connect your code source with Devtron. You will be able to use these git accounts to build the code using the CI pipeline.
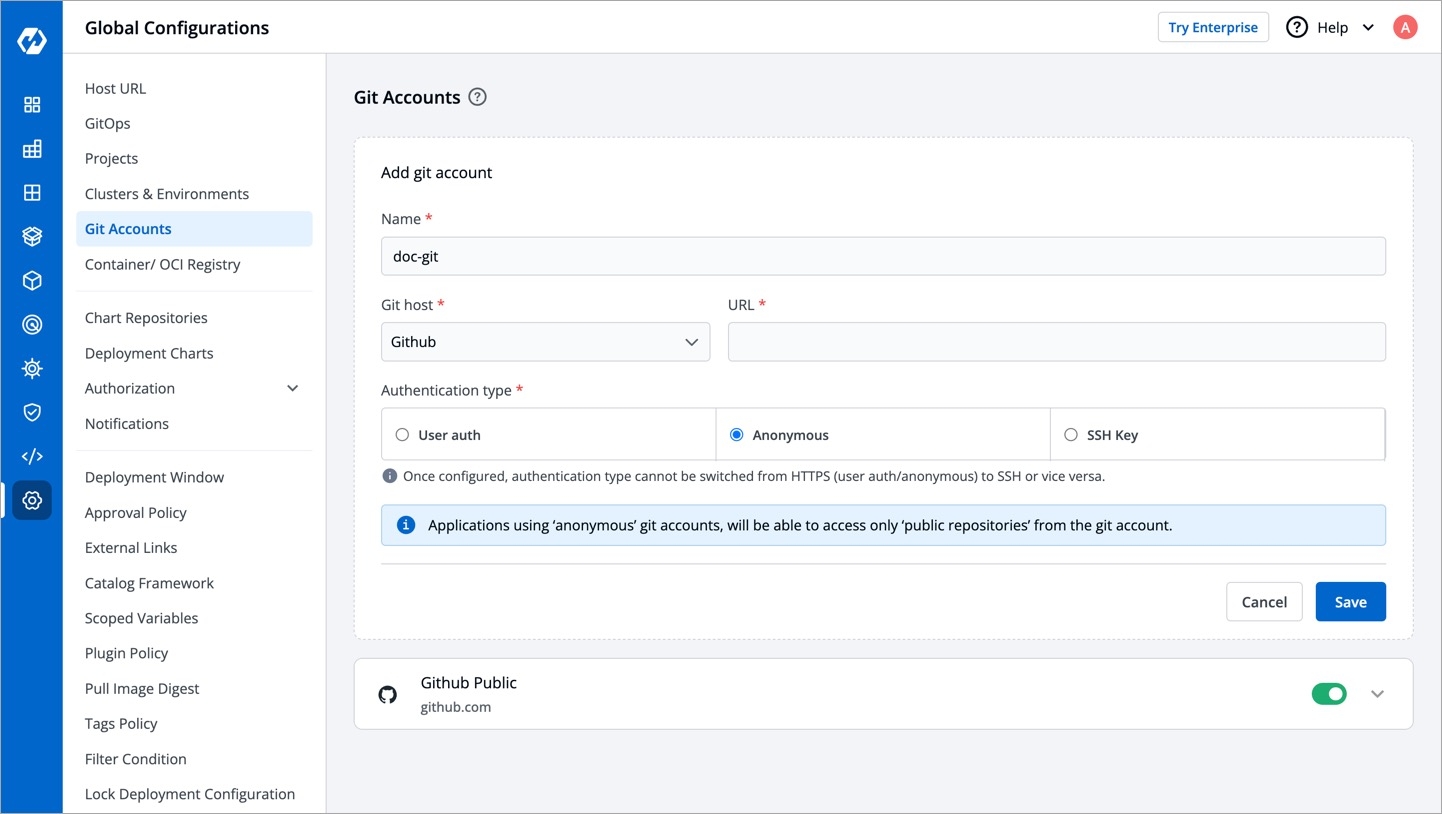
To add git account, go to the Git accounts section of Global Configurations. Click Add git account.
Provide the information in the following fields to add your git account:
Name
Git host
It is the git provider on which corresponding application git repository is hosted.
Note: By default, Bitbucket and GitHub are available in the drop-down list. You can add many as you want by clicking [+ Add Git Host].
URL
Authentication Type
Devtron supports three types of authentications:
User auth: If you select User auth as an authentication type, then you must provide the Username and Passwordor Auth token for the authentication of your version control account.
Anonymous: If you select Anonymous as an authentication type, then you do not need to provide the Username and Password.
Note: If authentication type is set as Anonymous, only public git repository will be accessible.
SSH Key: If you choose SSH Key as an authentication type, then you must provide the Private SSH Key corresponding to the public key added in your version control account.
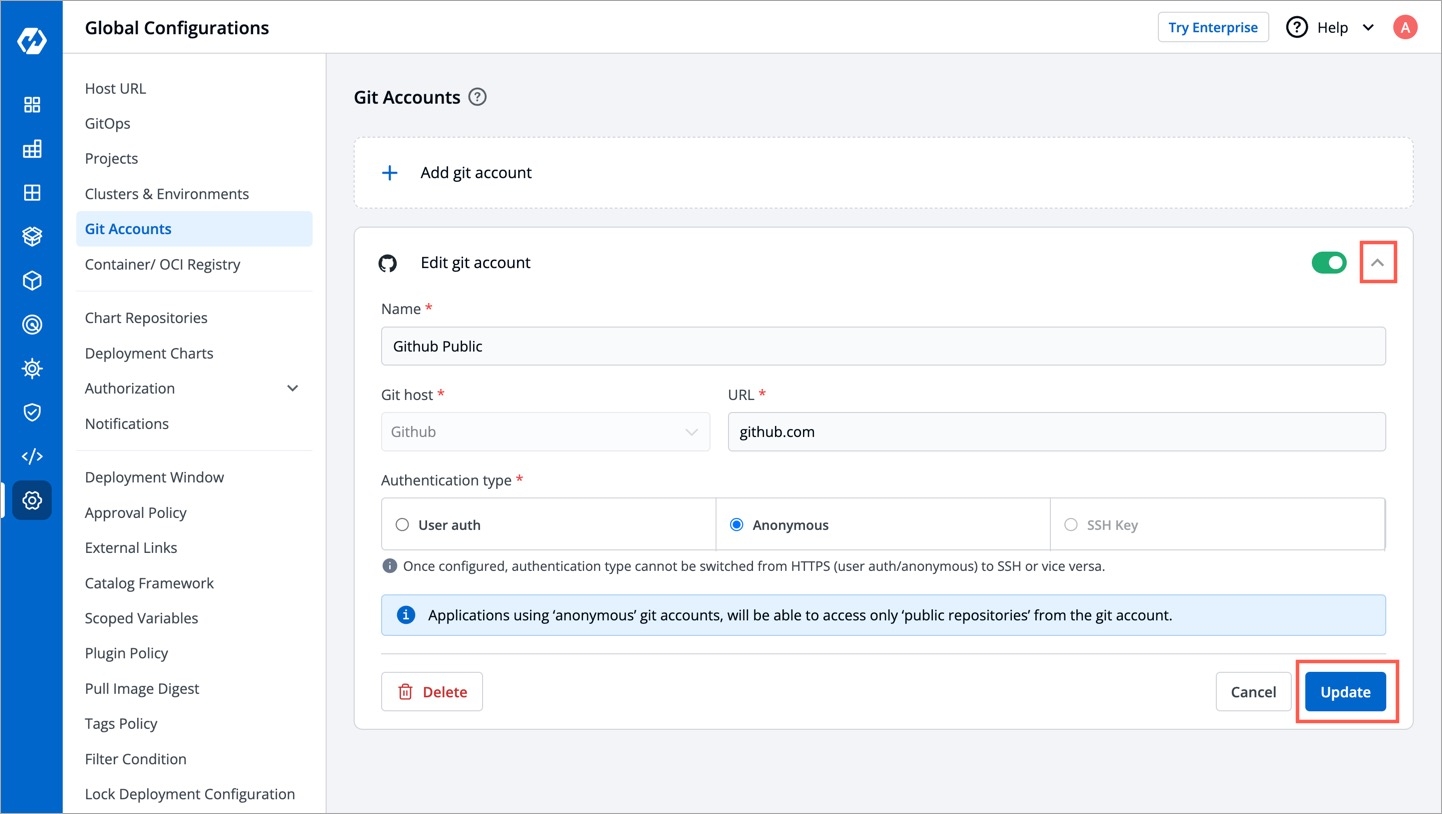
To update the git account:
Click the git account which you want to update.
Update the required changes.
Click Update to save the changes.
Updates can only be made within one Authentication type or one protocol type, i.e. HTTPS (Anonymous or User Auth) & SSH. You can update from Anonymous to User Auth & vice versa, but not from Anonymous or User Auth to SSH and vice versa.
Note:
You can enable or disable a git account. Enabled git accounts will be available on the App Configuration > Git repository.
While container registries are typically used for storing images built by the CI Pipeline, an OCI registry can store container images as well as other artifacts such as helm charts. In other words, all container registries are OCI registries, but not all OCI registries are container registries.
You can configure a container registry using any registry provider of your choice. It allows you to build, deploy, and manage your container images or charts with easy-to-use UI.
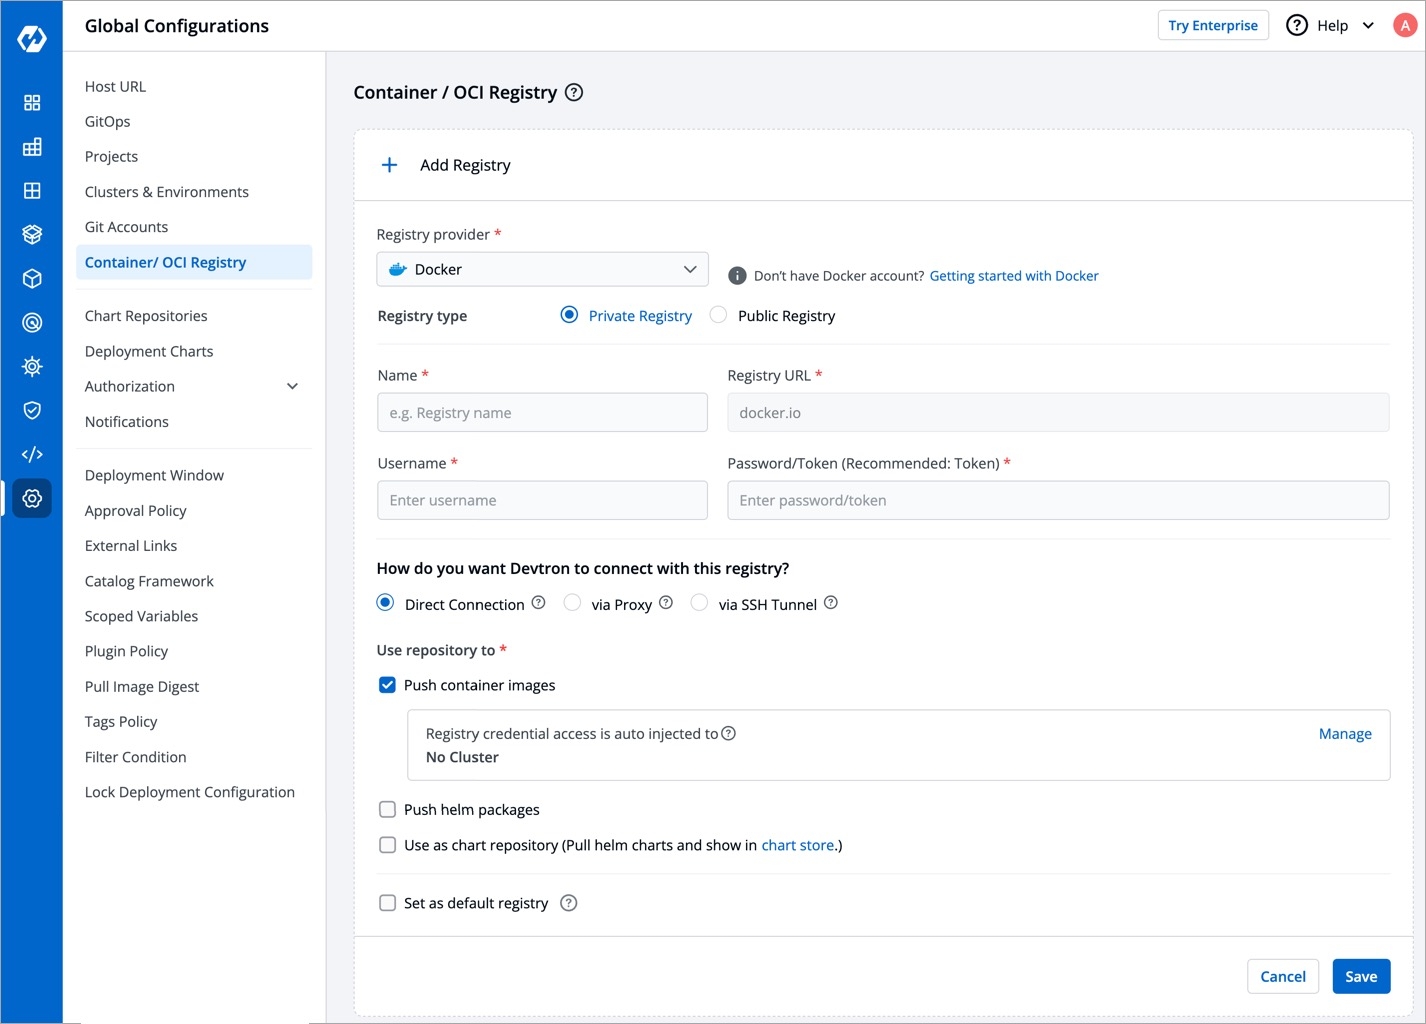
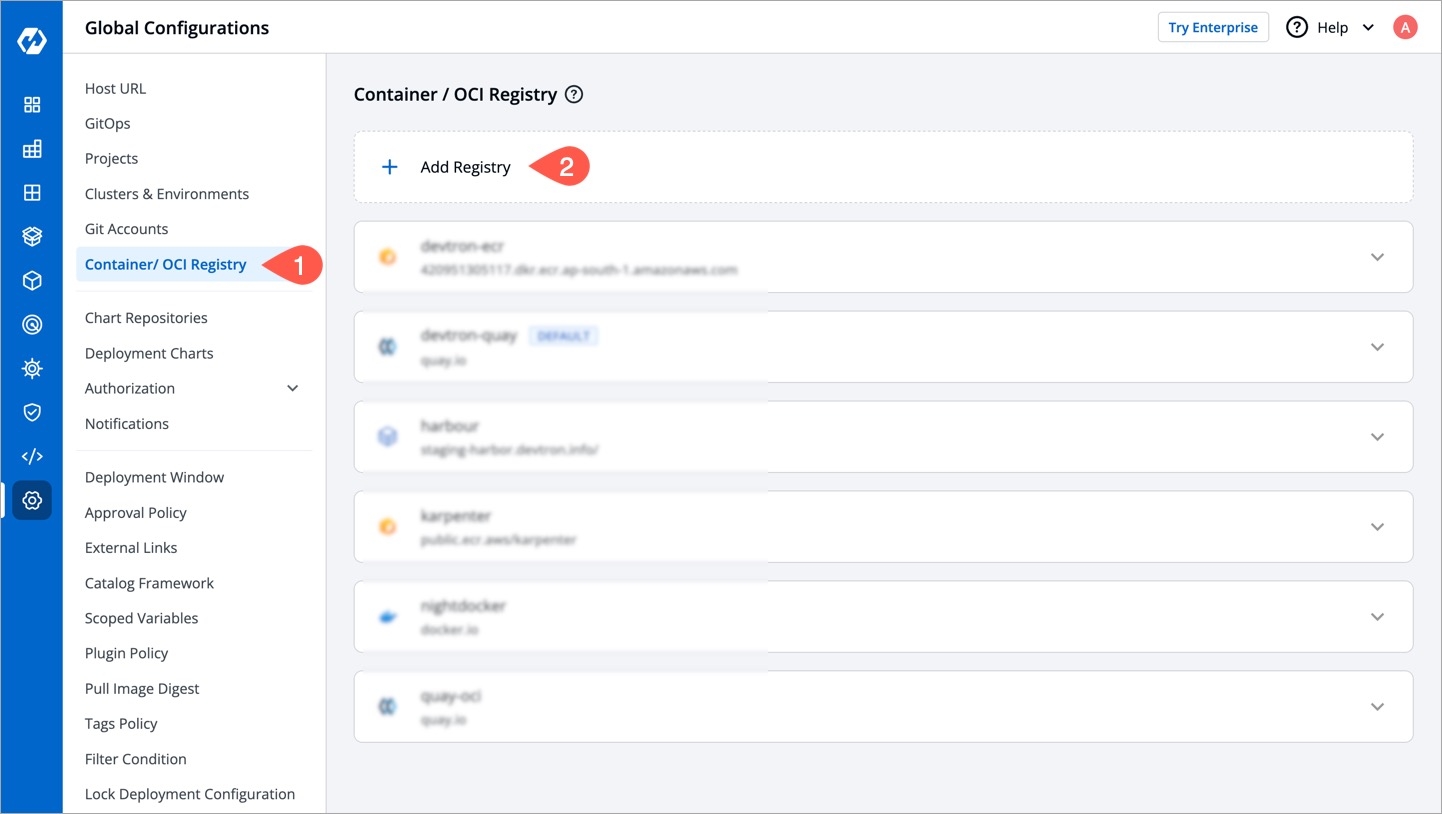
From the left sidebar, go to Global Configurations → Container/OCI Registry.
Click Add Registry.
Choose a provider from the Registry provider dropdown. View the Supported Registry Providers.
Choose the Registry type:
Private Registry: Choose this if your images or artifacts are hosted or should be hosted on a private registry restricted to authenticated users of that registry. Selecting this option requires you to enter your registry credentials (username and password/token).
Public Registry: Unlike private registry, this doesn't require your registry credentials. Only the registry URL and repository name(s) would suffice.
Assuming your registry type is private, here are few of the common fields you can expect:
Name
Registry URL
Provide the URL of your registry in case it doesn't come prefilled (do not include oci://, http://, or /https:// in the URL)
Authentication Type
Push container images
Push helm packages
Tick this checkbox if you wish to push helm charts to your registry
Use as chart repository
Tick this checkbox if you want Devtron to pull helm charts from your registry and display them on its chart store. Also, you will have to provide a list of repositories (present within your registry) for Devtron to successfully pull the helm charts.
Set as default registry
Tick this checkbox to set your registry as the default registry hub for your images or artifacts
Click Save.
Amazon ECR is an AWS-managed container image registry service. The ECR provides resource-based permissions to the private repositories using AWS Identity and Access Management (IAM). ECR allows both Key-based and Role-based authentications.
Before you begin, create an IAM user and attach the ECR policy according to the authentication type.
Provide the following additional information apart from the common fields:
Registry URL
Example of URL format: xxxxxxxxxxxx.dkr.ecr.<region>.amazonaws.com where xxxxxxxxxxxx is your 12-digit AWS account ID
Authentication Type
Select one of the authentication types:
EC2 IAM Role: Authenticate with workernode IAM role and attach the ECR policy (AmazonEC2ContainerRegistryFullAccess) to the cluster worker nodes IAM role of your Kubernetes cluster.
Access key ID: Your AWS access key
Secret access key: Your AWS secret access key ID
Provide the following additional information apart from the common fields:
Username
Provide the username of the Docker Hub account you used for creating your registry.
Password/Token
For Azure, the service principal authentication method can be used to authenticate with username and password. Visit this link to get the username and password for this registry.
Provide the following additional information apart from the common fields:
Registry URL/Login Server
Example of URL format: xxx.azurecr.io
Username/Registry Name
Provide the username of your Azure container registry
Password
Provide the password of your Azure container registry
JSON key file authentication method can be used to authenticate with username and service account JSON file. Visit this link to get the username and service account JSON file for this registry.
Remove all the white spaces from JSON key and wrap it in a single quote before pasting it in Service Account JSON File field
Provide the following additional information apart from the common fields:
Registry URL
Example of URL format: region-docker.pkg.dev
Service Account JSON File
Paste the content of the service account JSON file
JSON key file authentication method can be used to authenticate with username and service account JSON file. Please follow link to get the username and service account JSON file for this registry.
Remove all the white spaces from JSON key and wrap it in single quote before pasting it in Service Account JSON File field
Provide the following additional information apart from the common fields:
Username
Provide the username of your Quay account
Token
Provide the password of your Quay account
Provide below information if you select the registry type as Other.
Registry URL
Enter the URL of your private registry
Username
Provide the username of your account where you have created your registry
Password/Token
Provide the password or token corresponding to the username of your registry
Advanced Registry URL Connection Options
Allow Only Secure Connection: Tick this option for the registry to allow only secure connections
Allow Secure Connection With CA Certificate: Tick this option for the registry to allow secure connection by providing a private CA certificate (ca.crt)
Allow Insecure Connection: Tick this option to make an insecure communication with the registry (for e.g., when SSL certificate is expired)
You can use any registry which can be authenticated using docker login -u <username> -p <password> <registry-url>. However these registries might provide a more secured way for authentication, which we will support later.
You can create a Pod that uses a Secret to pull an image from a private container registry. You can use any private container registry of your choice, for e.g., Docker Hub.
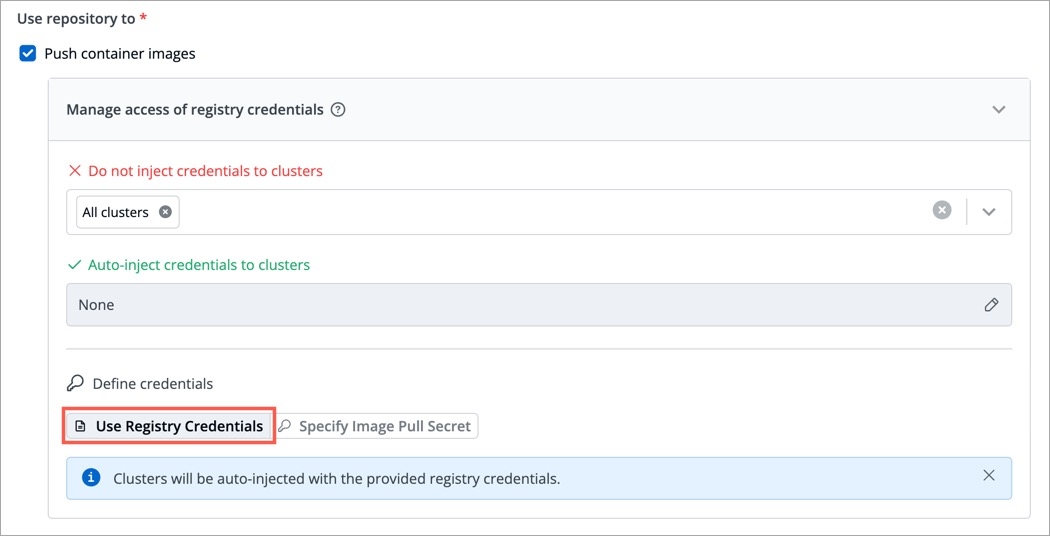
Super-admin users can decide if they want to auto-inject registry credentials or use a secret to pull an image for deployment to environments on specific clusters.
To manage the access of registry credentials, click Manage.
There are two options to manage the access of registry credentials:
Do not inject credentials to clusters
Select the clusters for which you do not want to inject credentials
Auto-inject credentials to clusters
Select the clusters for which you want to inject credentials
You can choose one of the two options for defining credentials:
If you select Use Registry Credentials, the clusters will be auto-injected with the registry credentials of your registry type. As an example, If you select Docker as Registry Type, then the clusters will be auto-injected with the username and password/token which you use on the Docker Hub account.
Click Save.
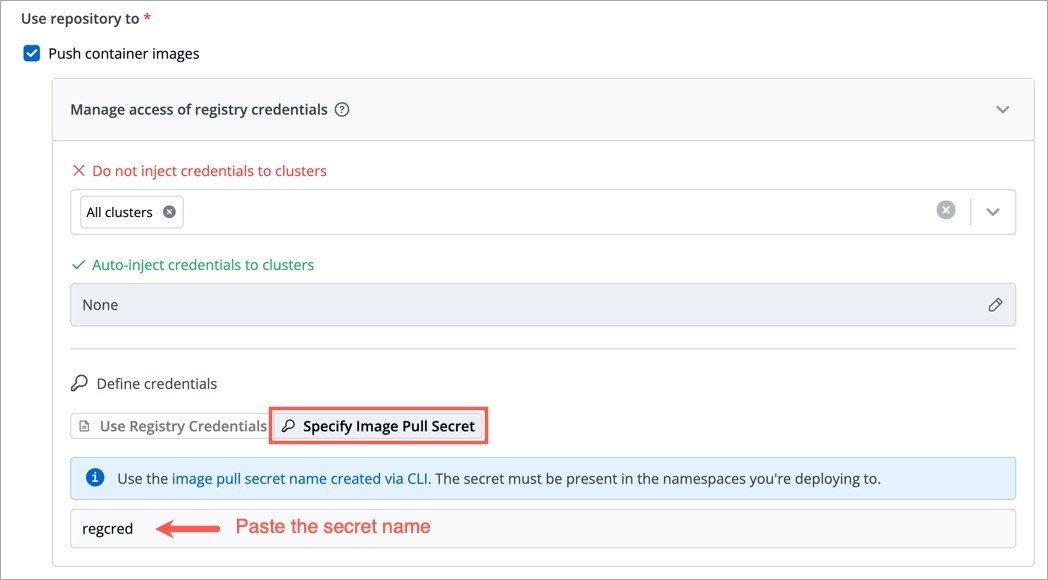
You can create a Secret by providing credentials on the command line.
Create this Secret and name it regcred (let's say):
where,
namespace is your sub-cluster, e.g., devtron-demo
your-registry-server is your Private Docker Registry FQDN. Use https://index.docker.io/v1/ for Docker Hub.
your-name is your Docker username
your-pword is your Docker password
your-email is your Docker email
You have successfully set your Docker credentials in the cluster as a Secret called regcred.
Typing secrets on the command line may store them in your shell history unprotected, and those secrets might also be visible to other users on your PC during the time when kubectl is running.
Enter the Secret name in the field and click Save.
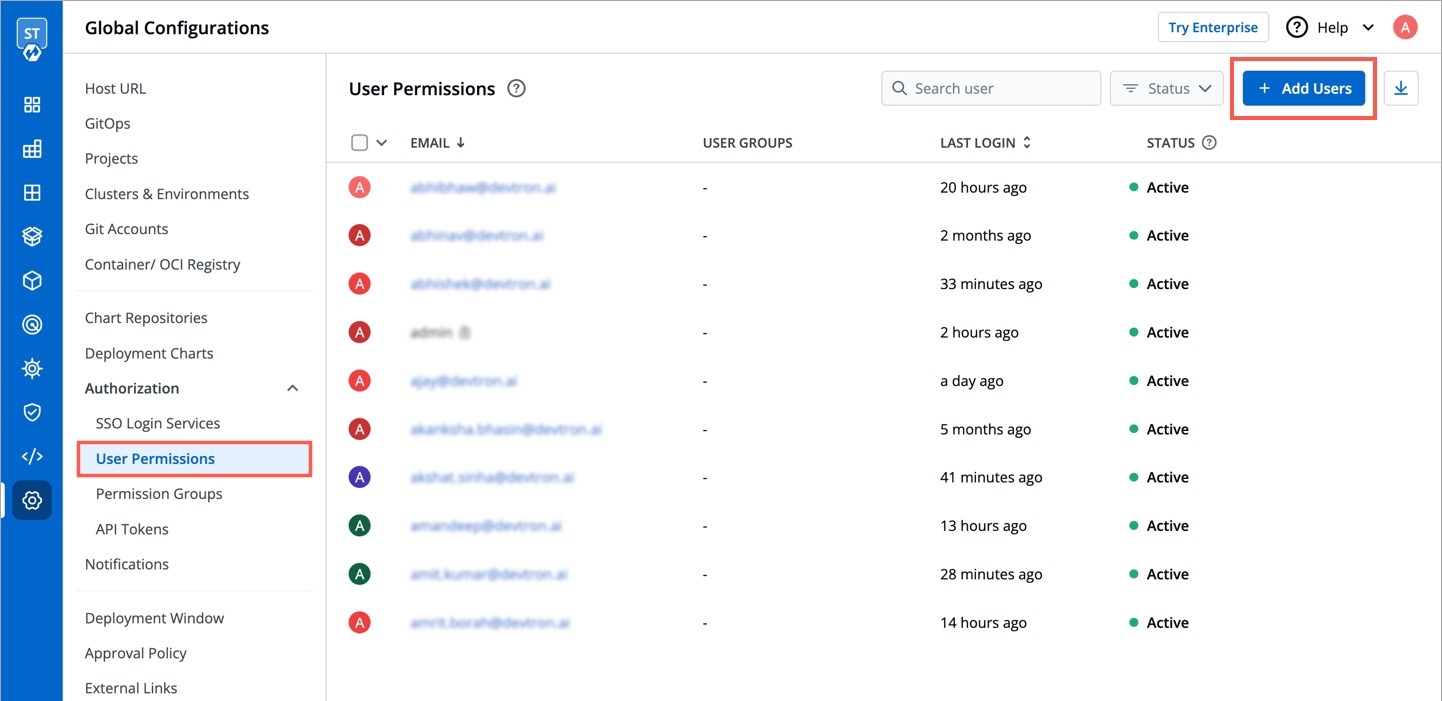
Using the Permission groups, you can assign a user to a particular group and a user inherits all the permissions granted to the group.
The advantage of the Permission groups is to define a set of privileges like create, edit, or delete for the given set of resources that can be shared among the users within the group.
The User permissions section for Specific permissions contains a drop-down list of all existing groups for which a user has an access. This is an optional field and more than one groups can be selected for a user.
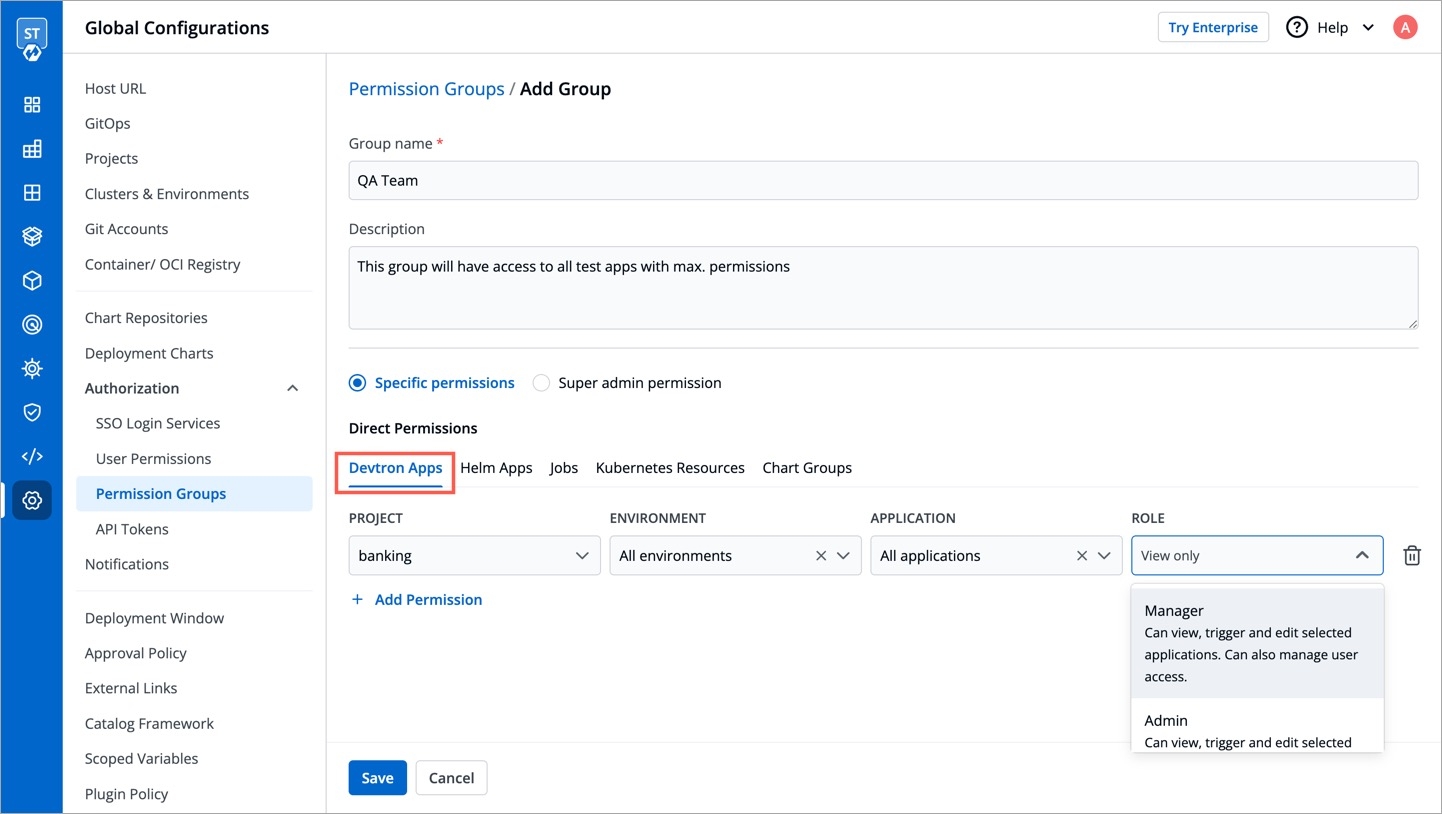
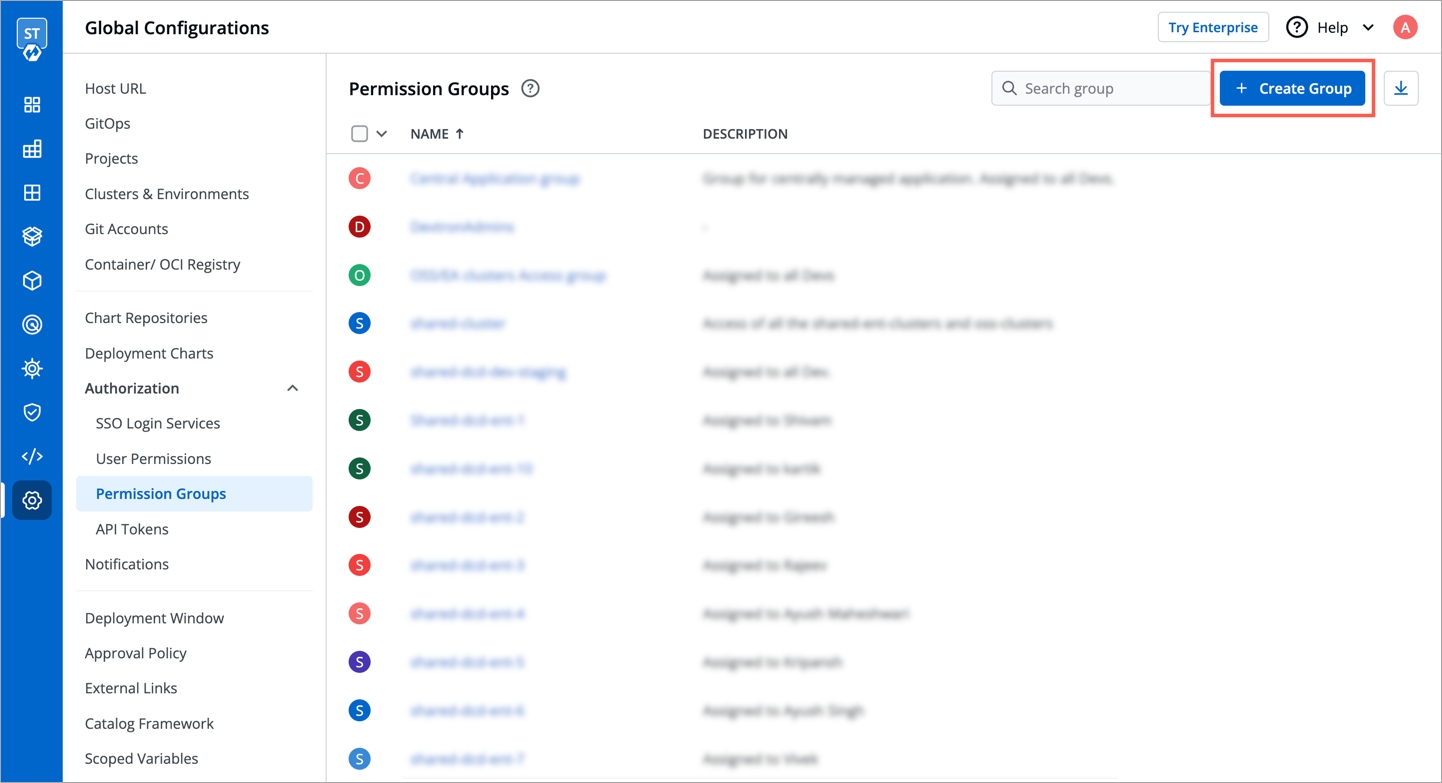
Go to Global Configurations → Authorization → Permissions groups → Add group.
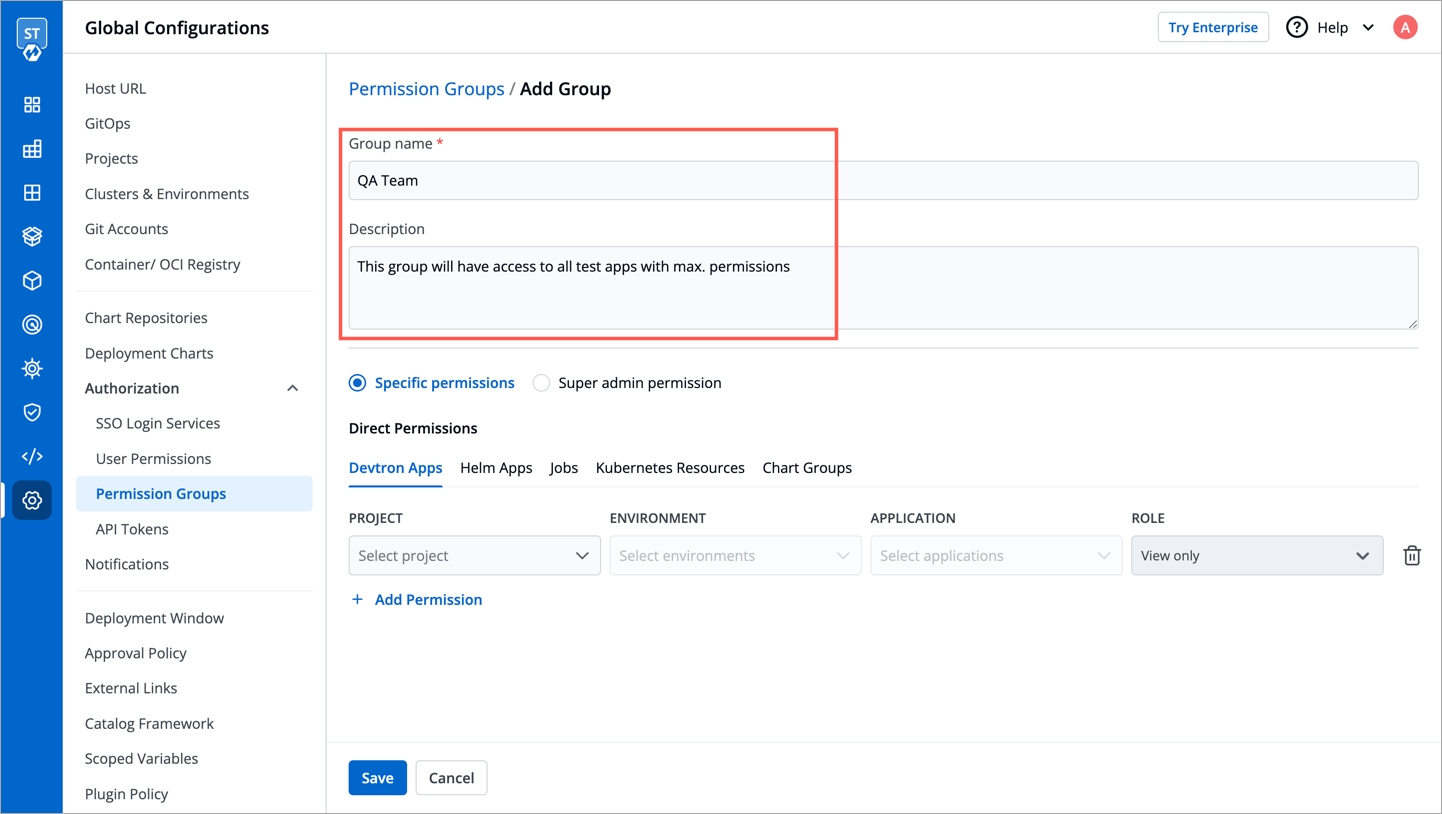
Enter the Group Name and Description.
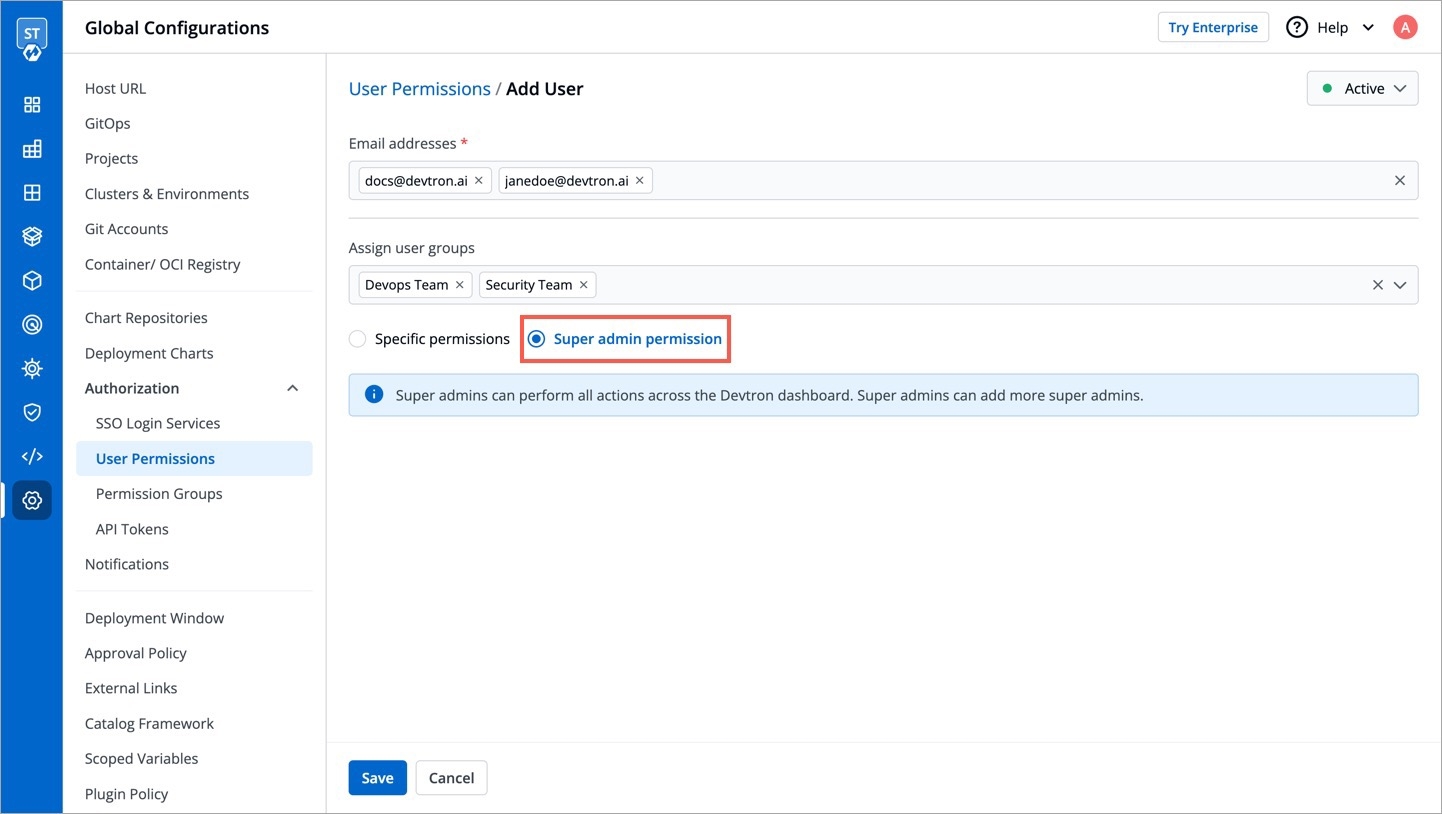
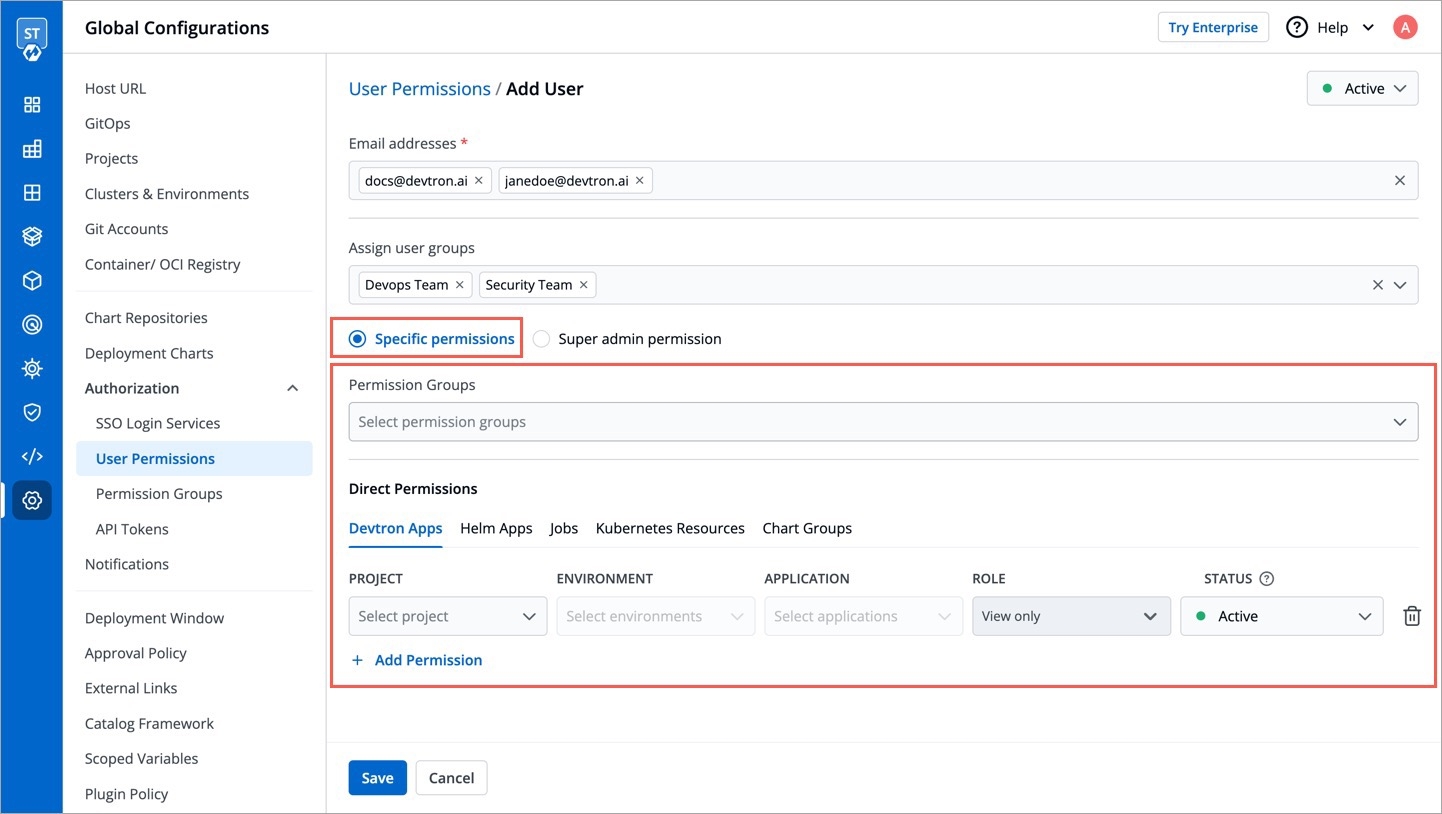
You can either grant super-admin permission to a user group or specific permissions to manage access for:
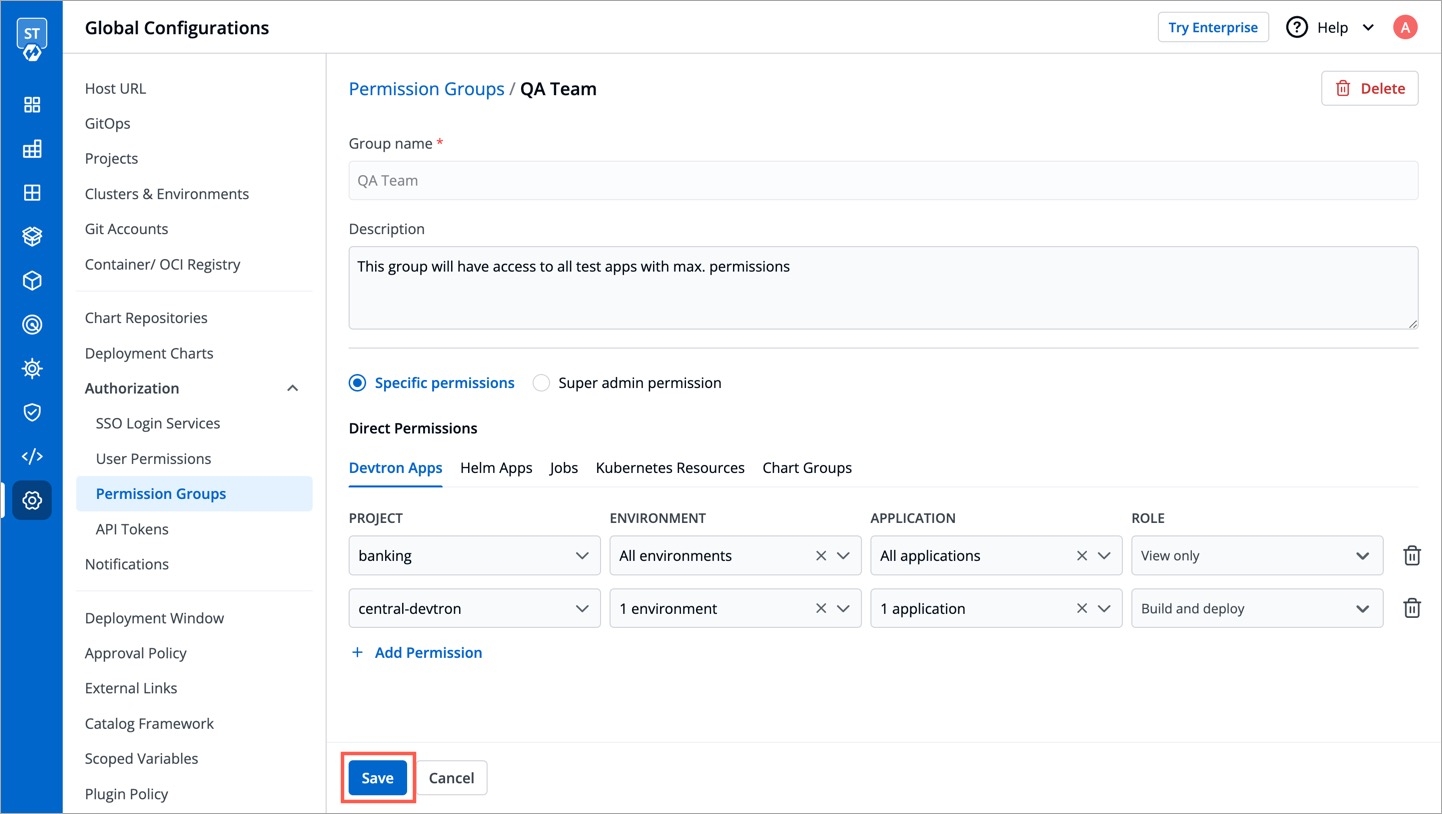
In Devtron Apps option, you can provide access to a group to manage permission for custom apps created using Devtron.
The Devtron Apps option will be available only if you install CI/CD integration.
Provide the information in the following fields:
Project
Select a project from the drop-down list to which you want to give permission to the group. You can select only one project at a time.
Note: If you want to select more than one project, then click Add row.
Environment
Select the specific environment or all environments from the drop-down list.
Note: If you select All environments option, then a user gets access to all the current environments including any new environment which gets associated with the application later.
Application
Select the specific applications or all applications from the drop-down list corresponding to your selected Environments.
Note: If you select All applications option, then a user gets access to all the current applications including any new application which gets associated with the project later
.
Role
View only
Build and Deploy
Admin
Manager
You can add multiple rows for Devtron Apps permission.
Once you have finished assigning the appropriate permissions for the groups, Click Save.
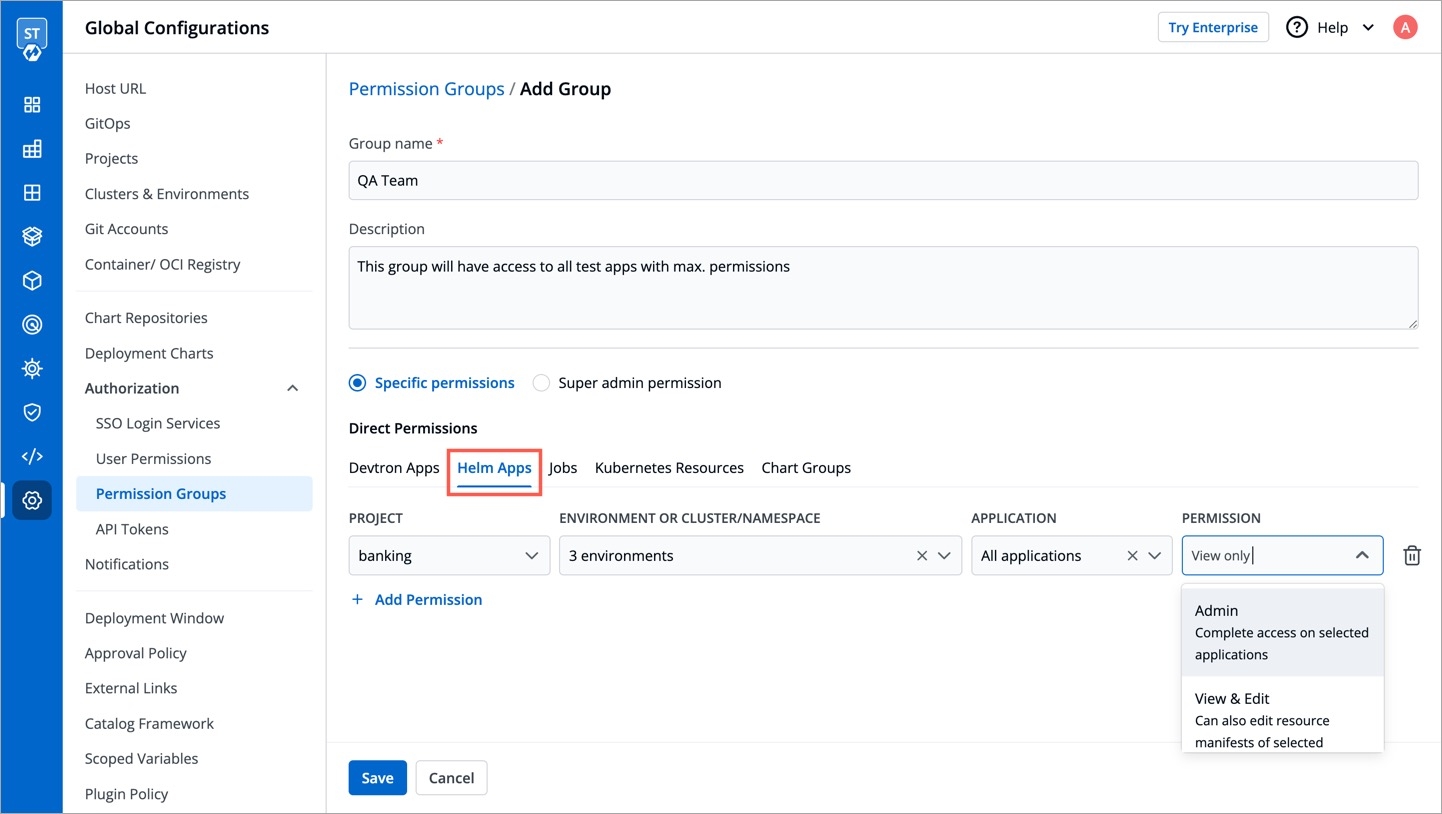
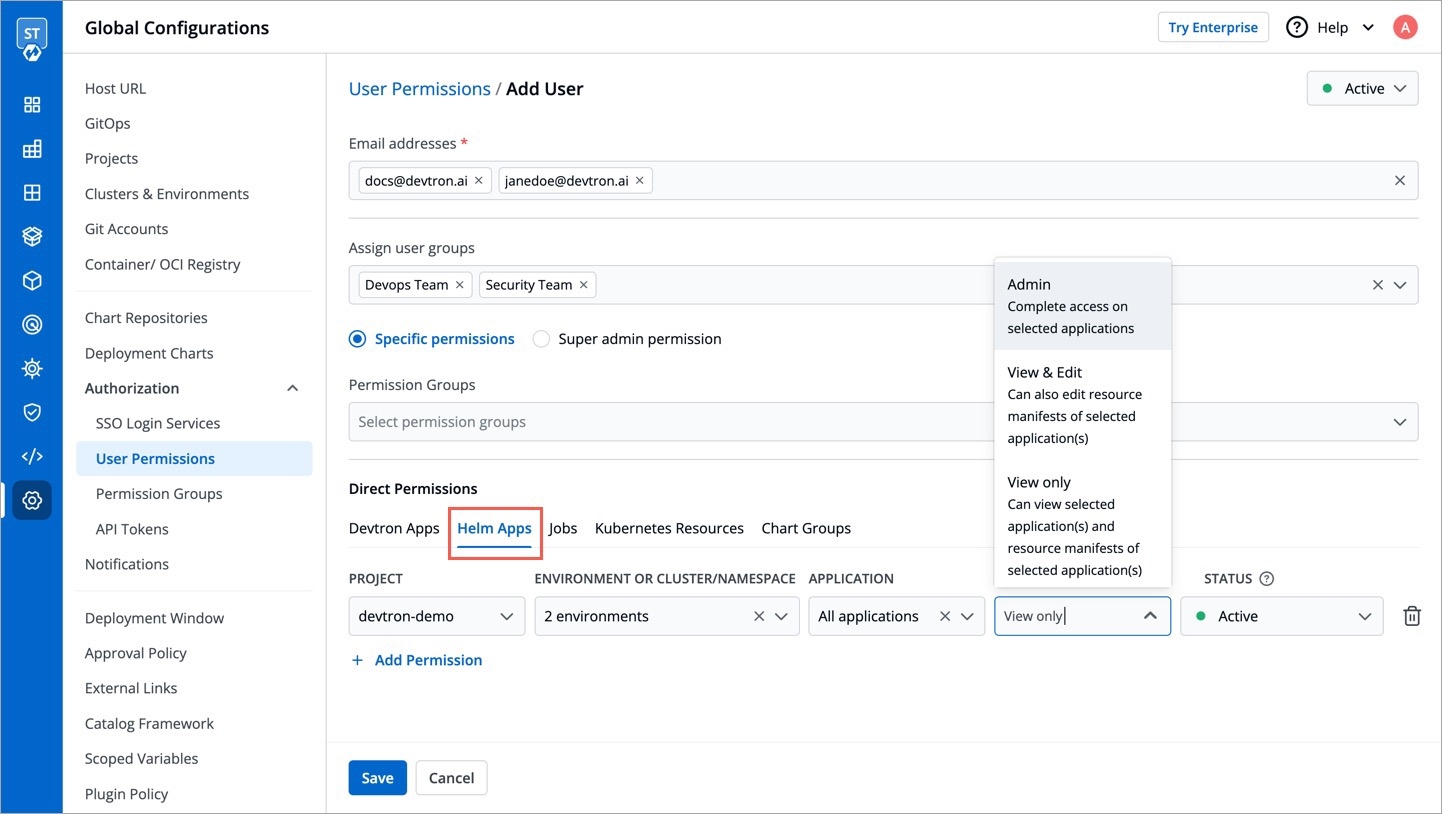
In Helm Apps option, you can provide access to a group to manage permission for Helm apps deployed from Devtron or outside Devtron.
Provide the information in the following fields:
Project
Select a project from the drop-down list to which you want to give permission to the group. You can select only one project at a time.
Note: If you want to select more than one project, then click Add row.
Environment or cluster/namespace
Select the specific environment or all existing environments in default cluster from the drop-down list.
Note: If you select all existing + future environments in default cluster option, then a user gets access to all the current environments including any new environment which gets associated with the application later.
Application
Select the specific application or all applications from the drop-down list corresponding to your selected Environments.
Note: If All applications option is selected, then a user gets access to all the current applications including any new application which gets associated with the project later
.
Role
View only
View & Edit
Admin
You can add multiple rows for Devtron app permission.
Once you have finished assigning the appropriate permissions for the groups, Click Save.
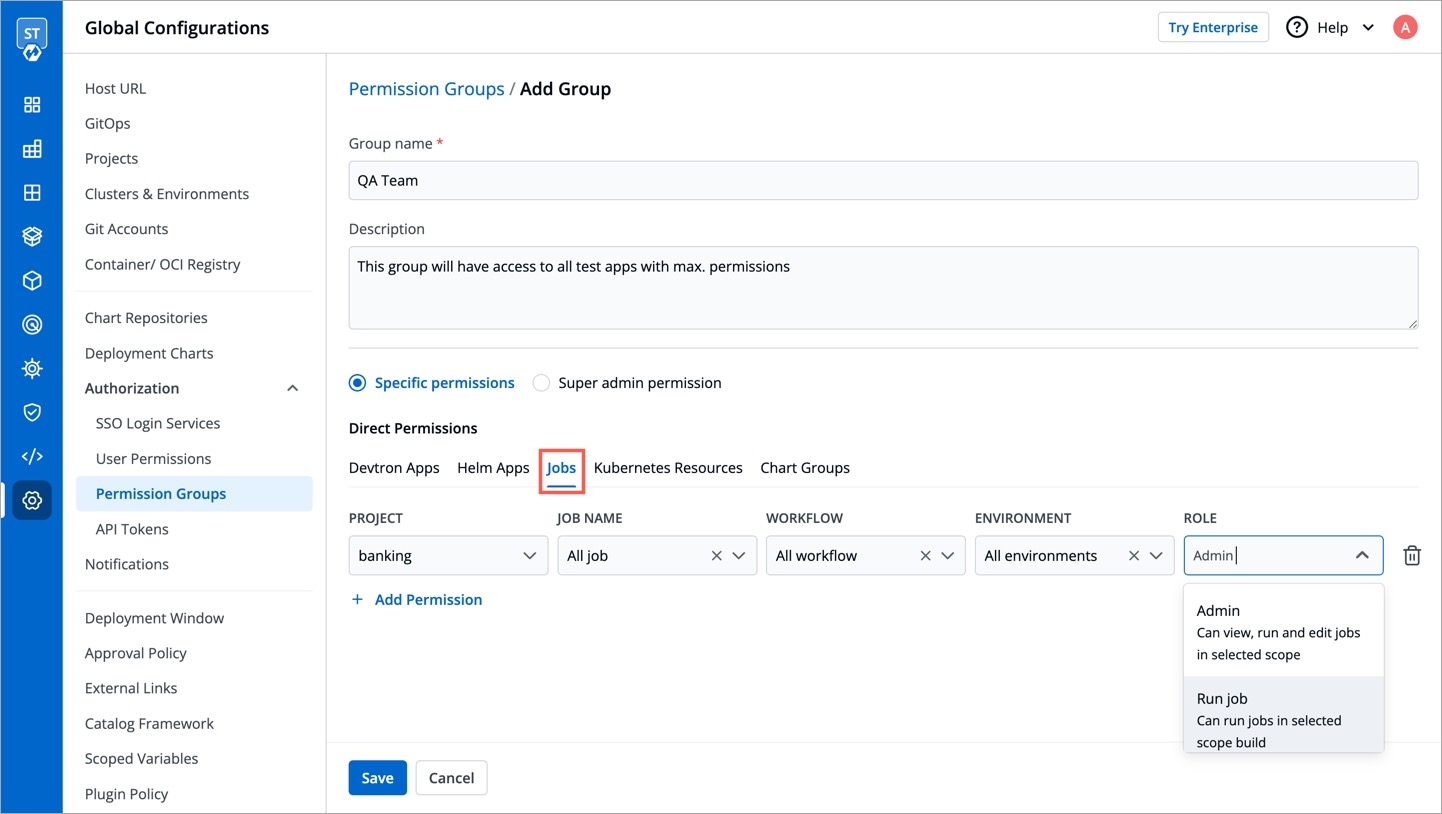
In Jobs option, you can provide access to a group to manage permission for jobs created using Devtron.
Provide the information in the following fields:
Project
Select a project from the drop-down list to which you want to give permission to the group. You can select only one project at a time.
Note: If you want to select more than one project, then click Add row.
Job Name
Select the specific job name or all jobs from the drop-down list.
Note: If you select All Jobs option, then the user gets access to all the current jobs including any new job which gets associated with the project later.
Workflow
Select the specific workflow or all workflows from the drop-down list.
Note: If you select All Workflows option, then the user gets access to all the current workflows including any new workflow which gets associated with the project later.
Environment
Select the specific environment or all environments from the drop-down list.
Note: If you select All environments option, then the user gets access to all the current environments including any new environment which gets associated with the project later.
Role
View only
Run job
Admin
You can add multiple rows for Jobs permission.
Once you have finished assigning the appropriate permissions for the groups, Click Save.
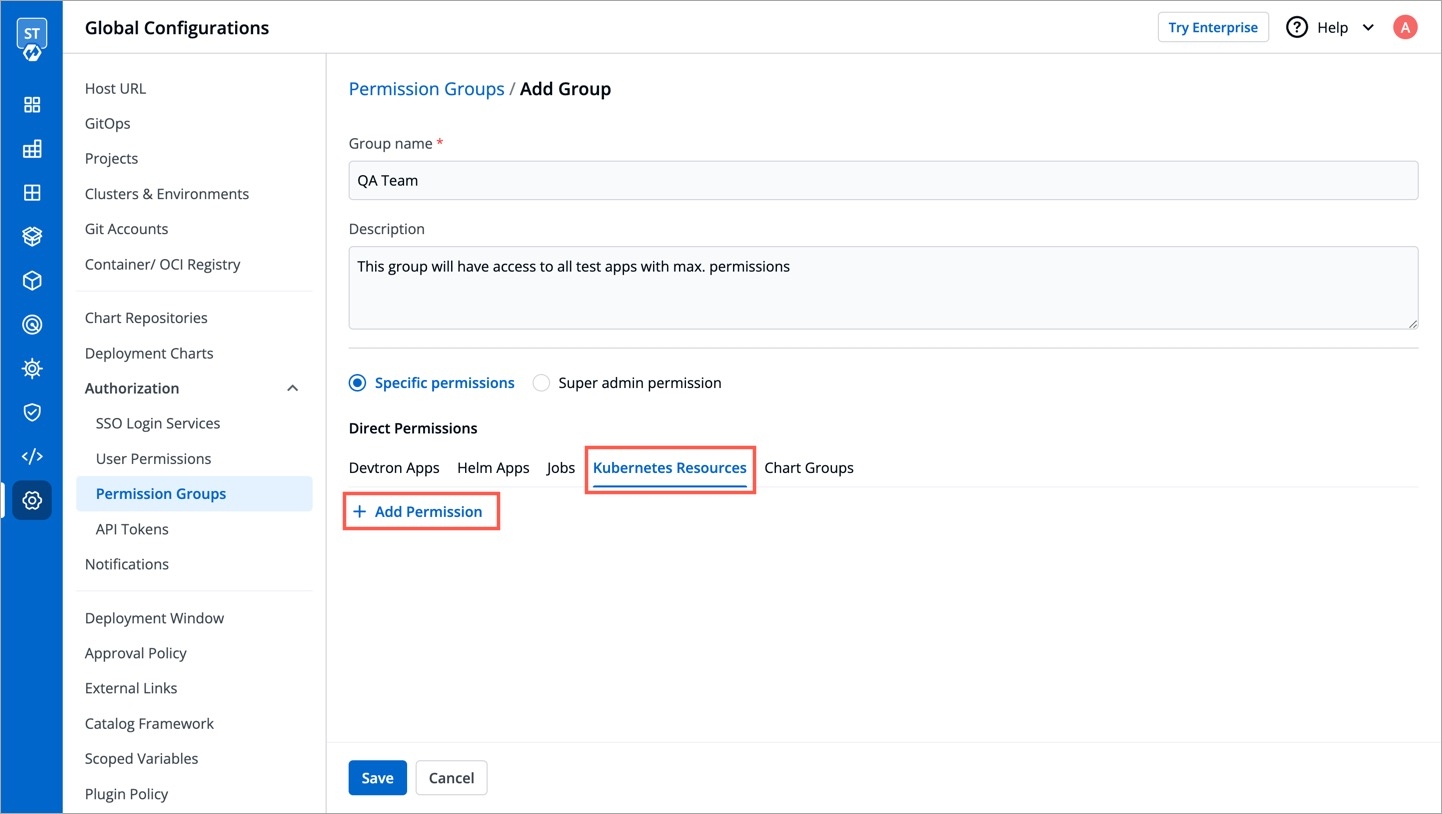
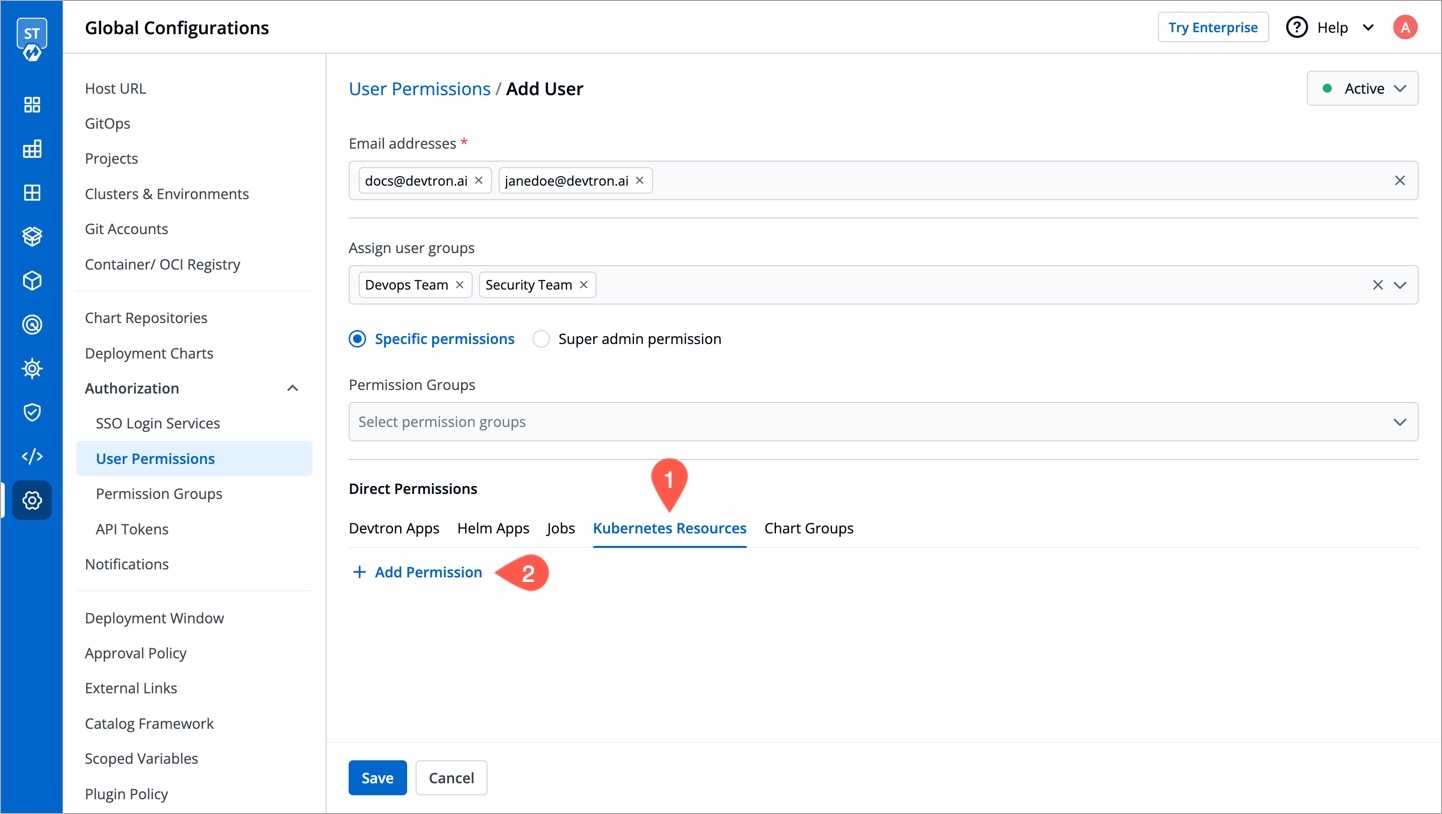
In Kubernetes Resources option, you can provide permission to view, inspect, manage, and delete resources in your clusters from Kubernetes Resource Browser page in Devtron. You can also create resources from the Kubernetes Resource Browser page.
Only super admin users will be able to see Kubernetes Resources tab and provide permission to other users to access Resource Browser.
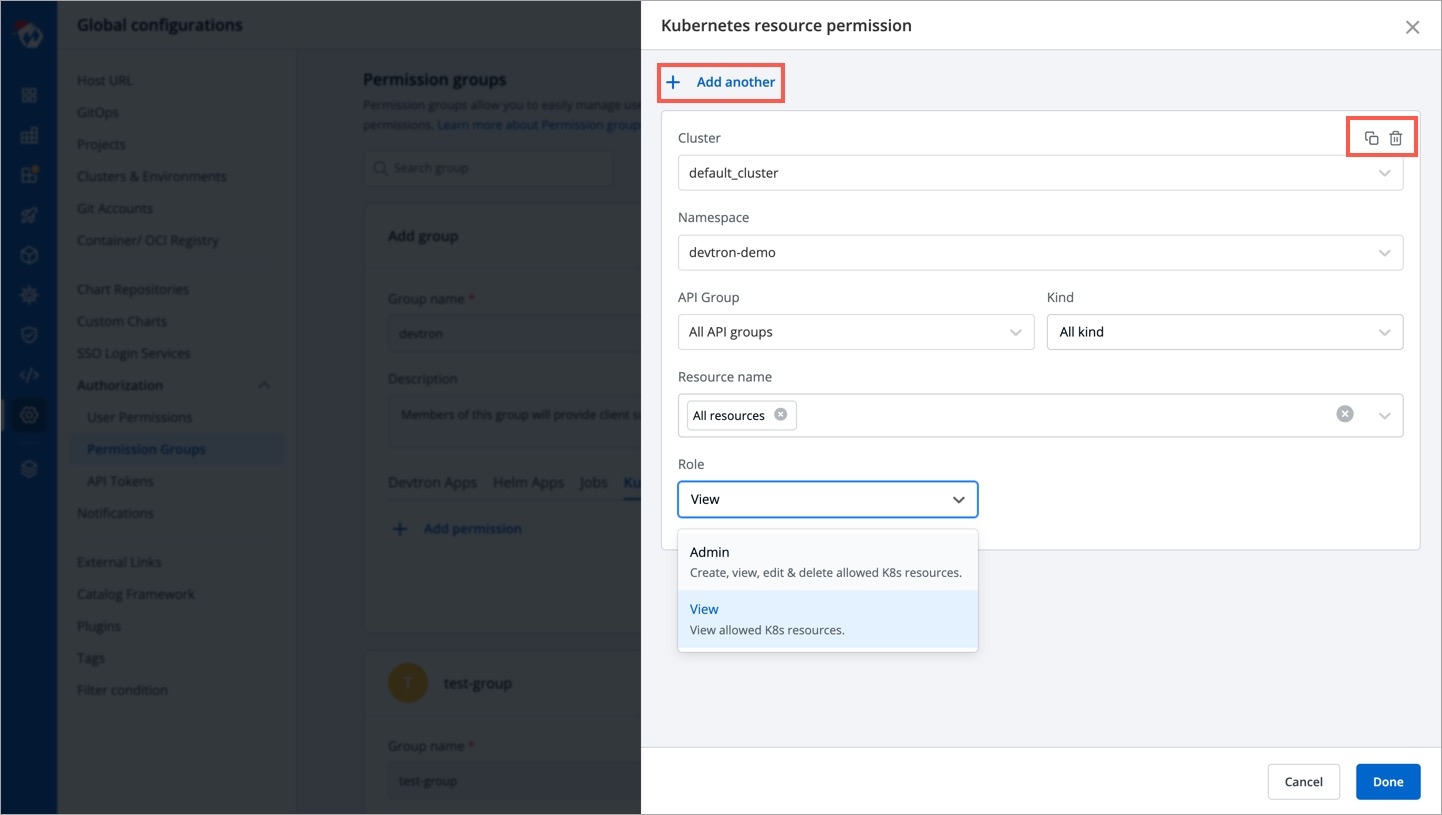
To provide Kubernetes resource permission, click Add permission.
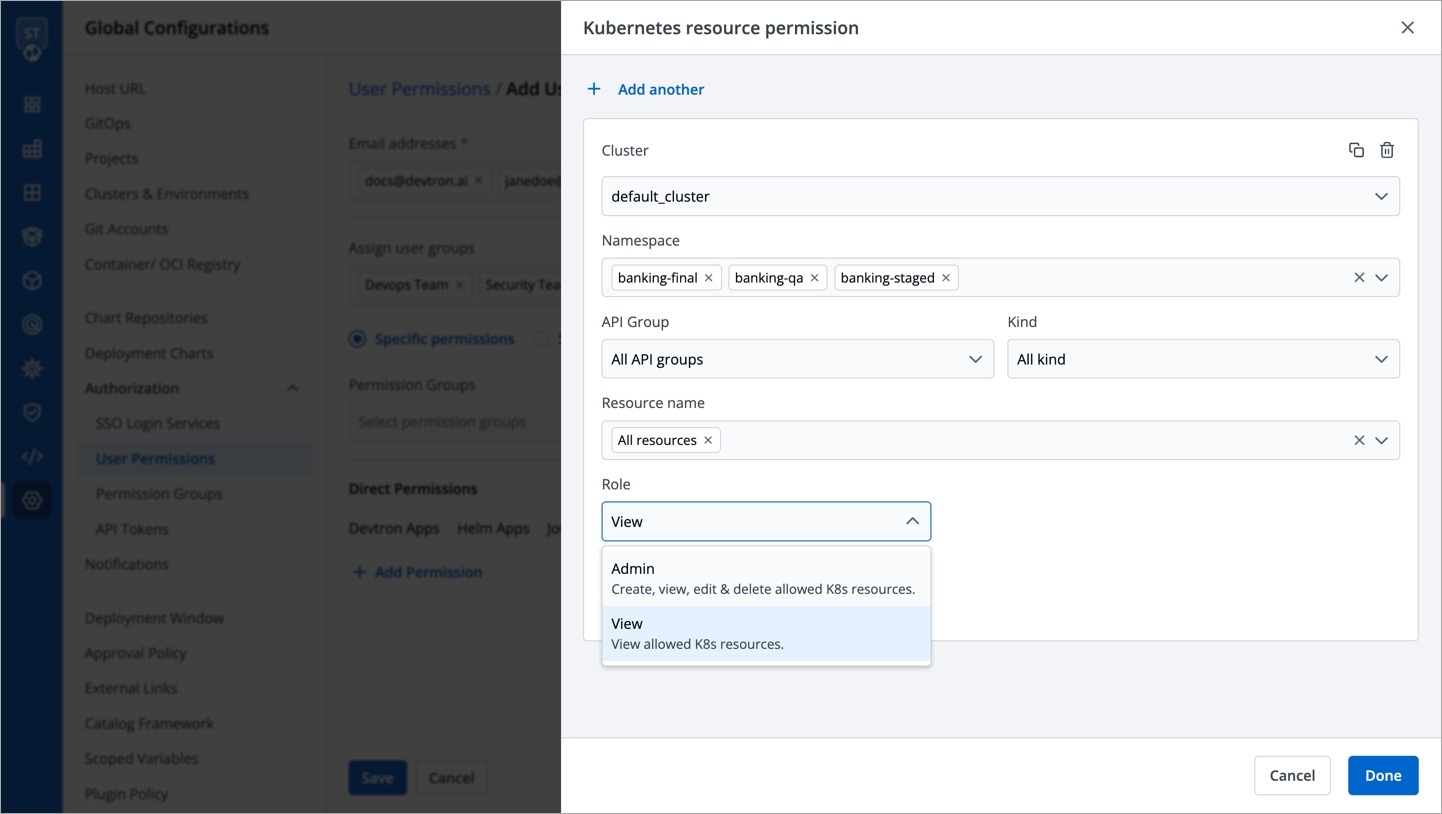
On the Kubernetes resource permission, provide the information in the following fields:
Cluster
Select a cluster from the drop-down list to which you want to give permission to the user. You can select only one cluster at a time.
Note: To add another cluster, then click Add another.
Namespace
Select the namespace from the drop-down list.
API Group
Select the specific API group or All API groups from the drop-down list corresponding to the K8s resource.
Kind
Select the kind or All kind from the drop-down list corresponding to the K8s resource.
Resource name
Select the resource name or All resources from the drop-down list to which you want to give permission to the user.
Role
View
Admin
You can add multiple rows for Kubernetes resource permission.
Once you have finished assigning the appropriate permissions for the groups, Click Save.
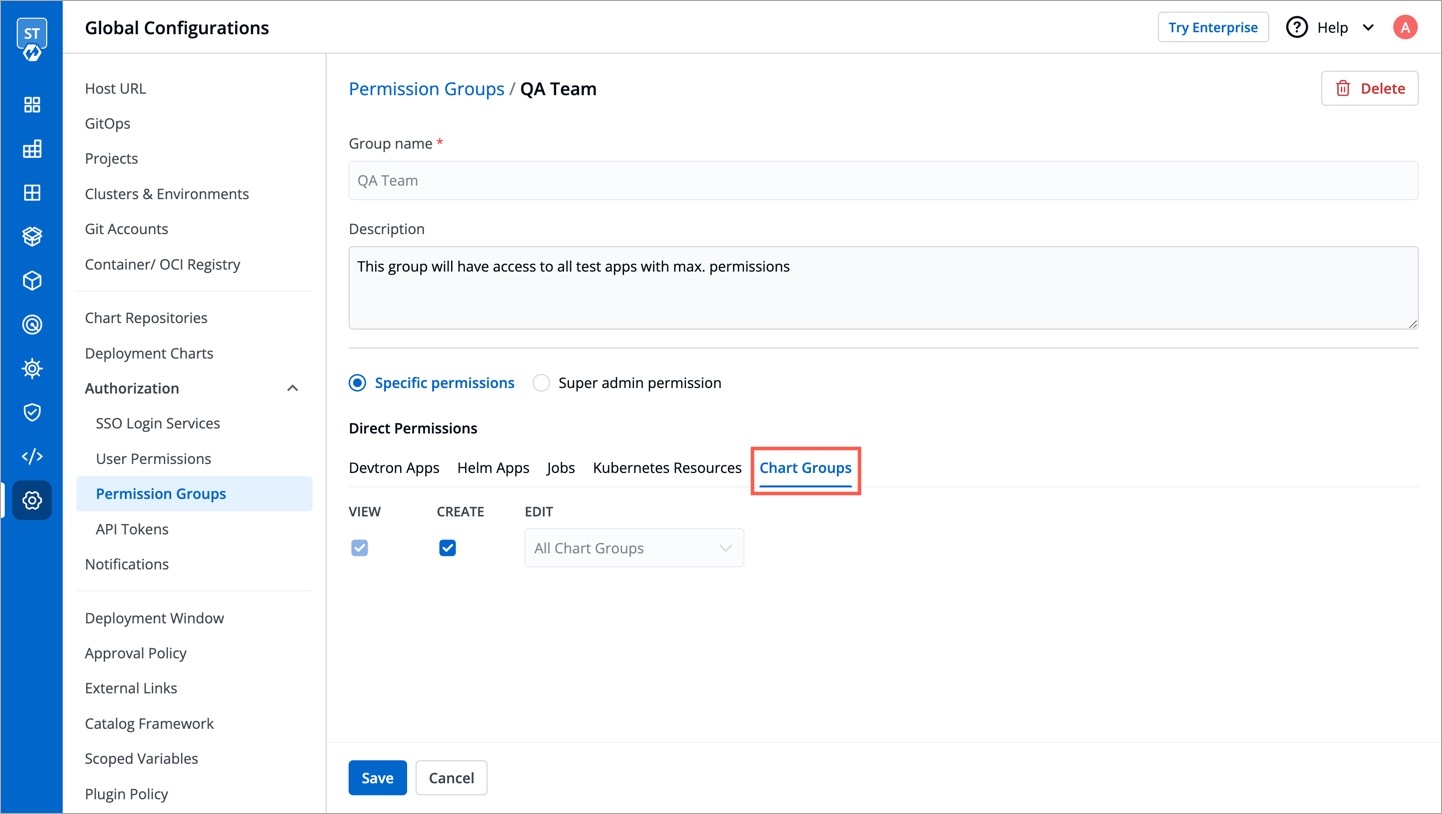
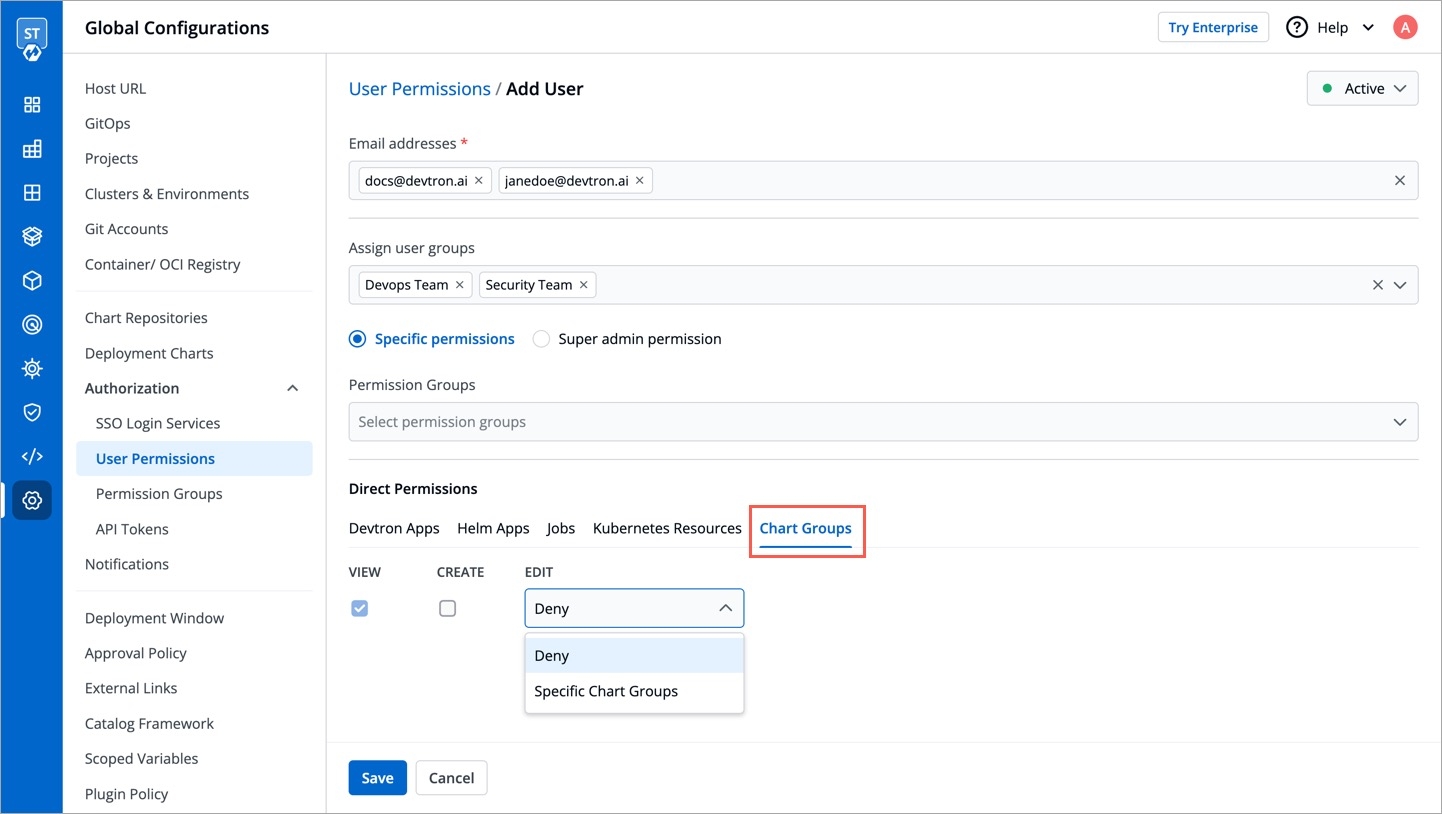
In Chart group permission option, you can manage the access of groups for Chart Groups in your project.
The Chart group permission option will be available only if you install CI/CD integration.
You can only give users the ability to create or edit, not both.
View
Enable View to view chart groups only.
Create
Enable Create if you want the users to create, view, edit or delete the chart groups.
Edit
Deny: Select Deny option from the drop-down list to restrict the users to edit the chart groups.
Specific chart groups: Select the Specific Charts Groups option from the drop-down list and then select the chart group for which you want to allow users to edit.
Click Save once you have configured all the required permissions for the groups.
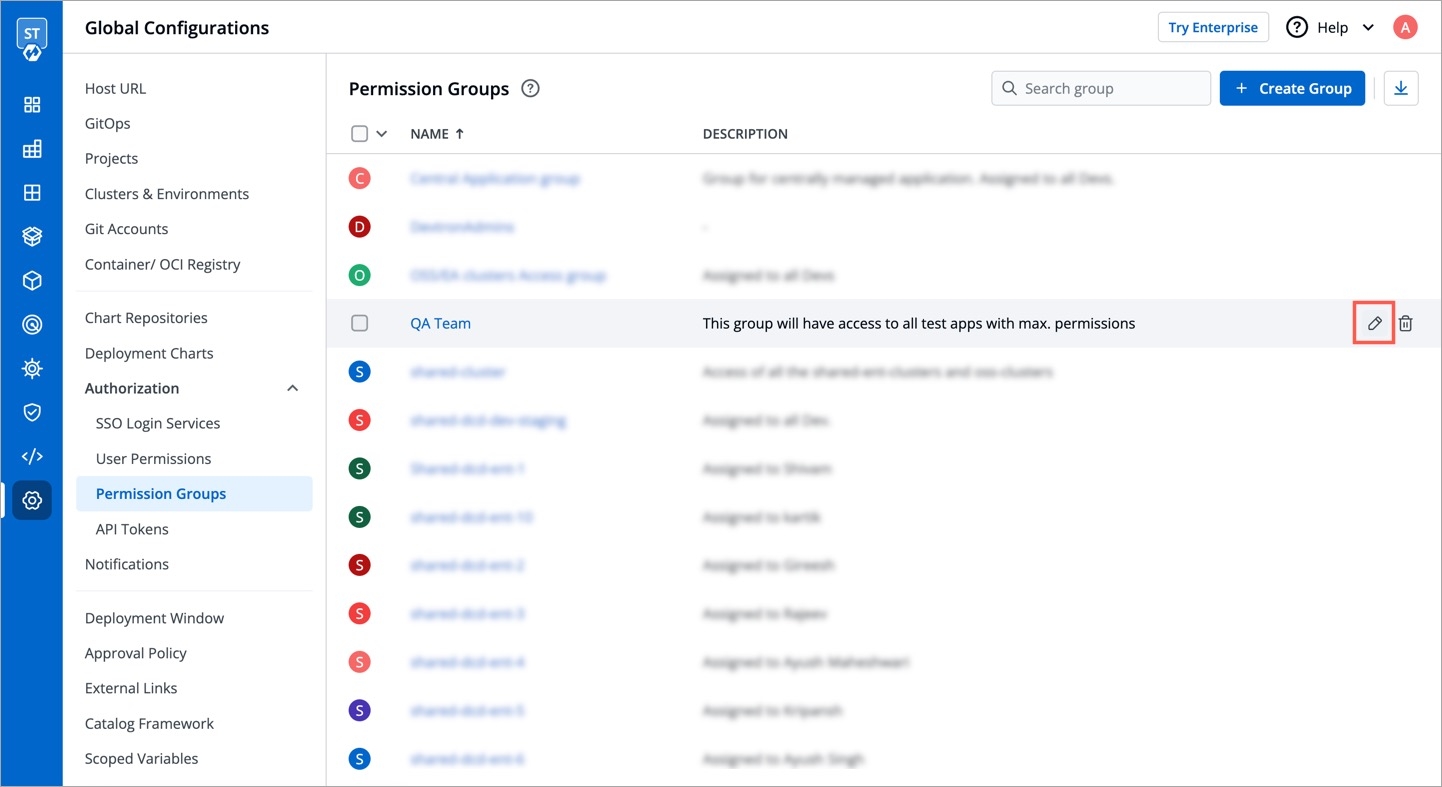
You can edit the permission groups by clicking the downward arrow.
Edit the permission group.
Once you are done editing the permission group, click Save.
If you want to delete the groups with particular permission group, click Delete.
API tokens are the access tokens for authentication. Instead of using username and password, it can be used for programmatic access to API. It allows users to generate API tokens with the desired access. Only super admin users can generate API tokens and see the generated tokens.
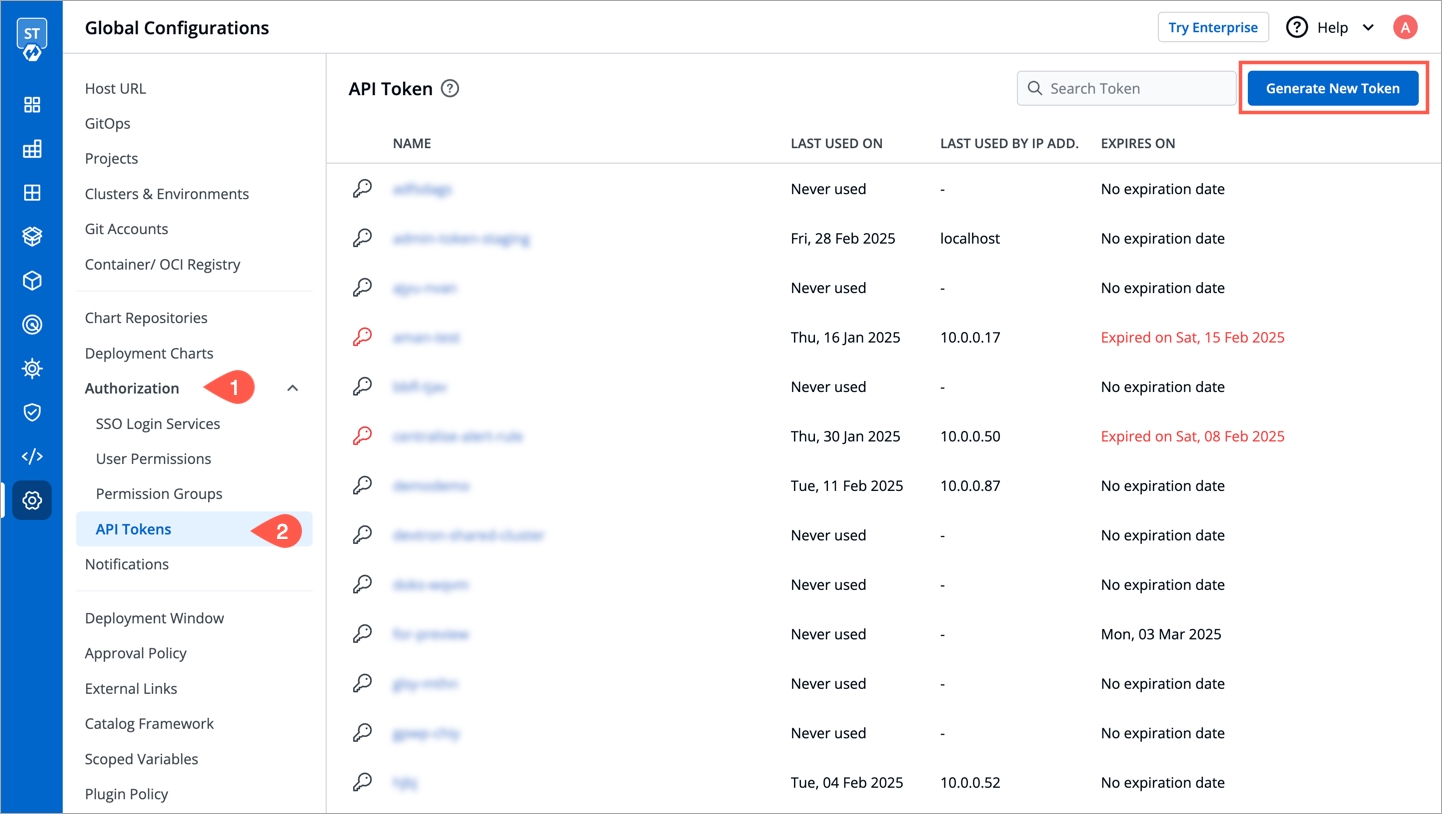
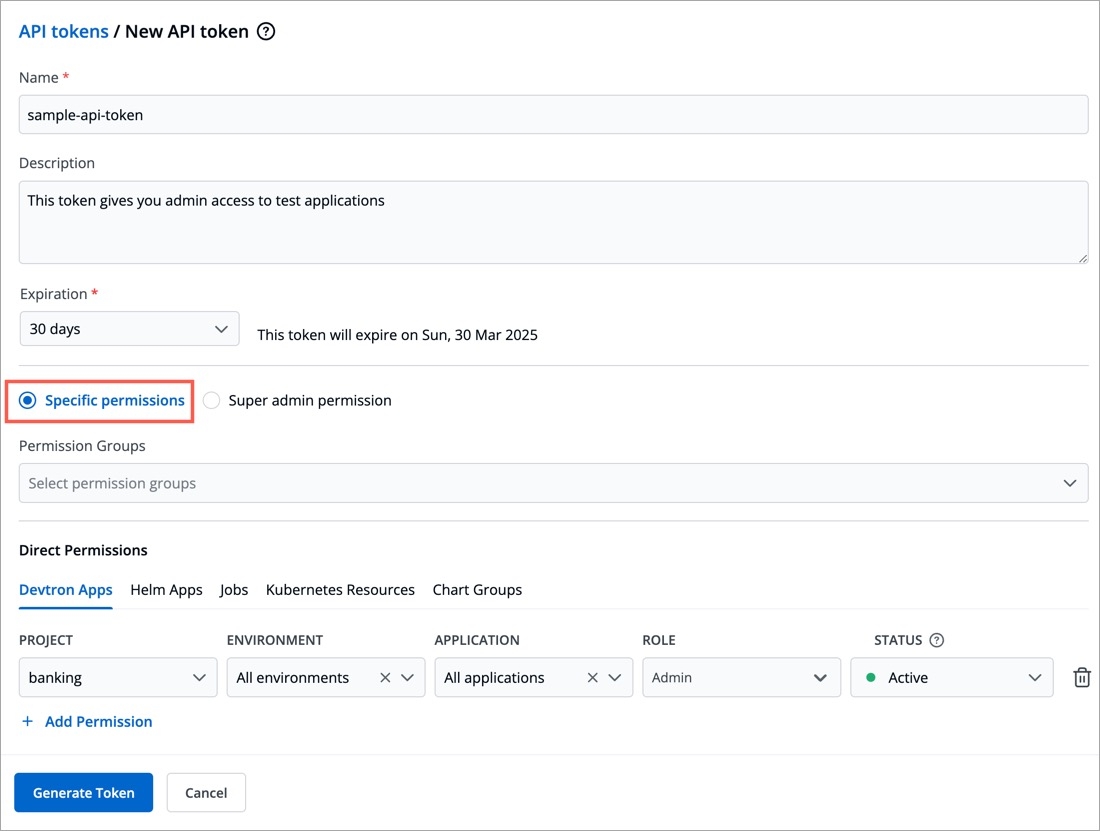
To generate API tokens, go to Global Configurations -> Authorization -> API tokens and click Generate New Token.
Enter a name for the token.
Add Description.
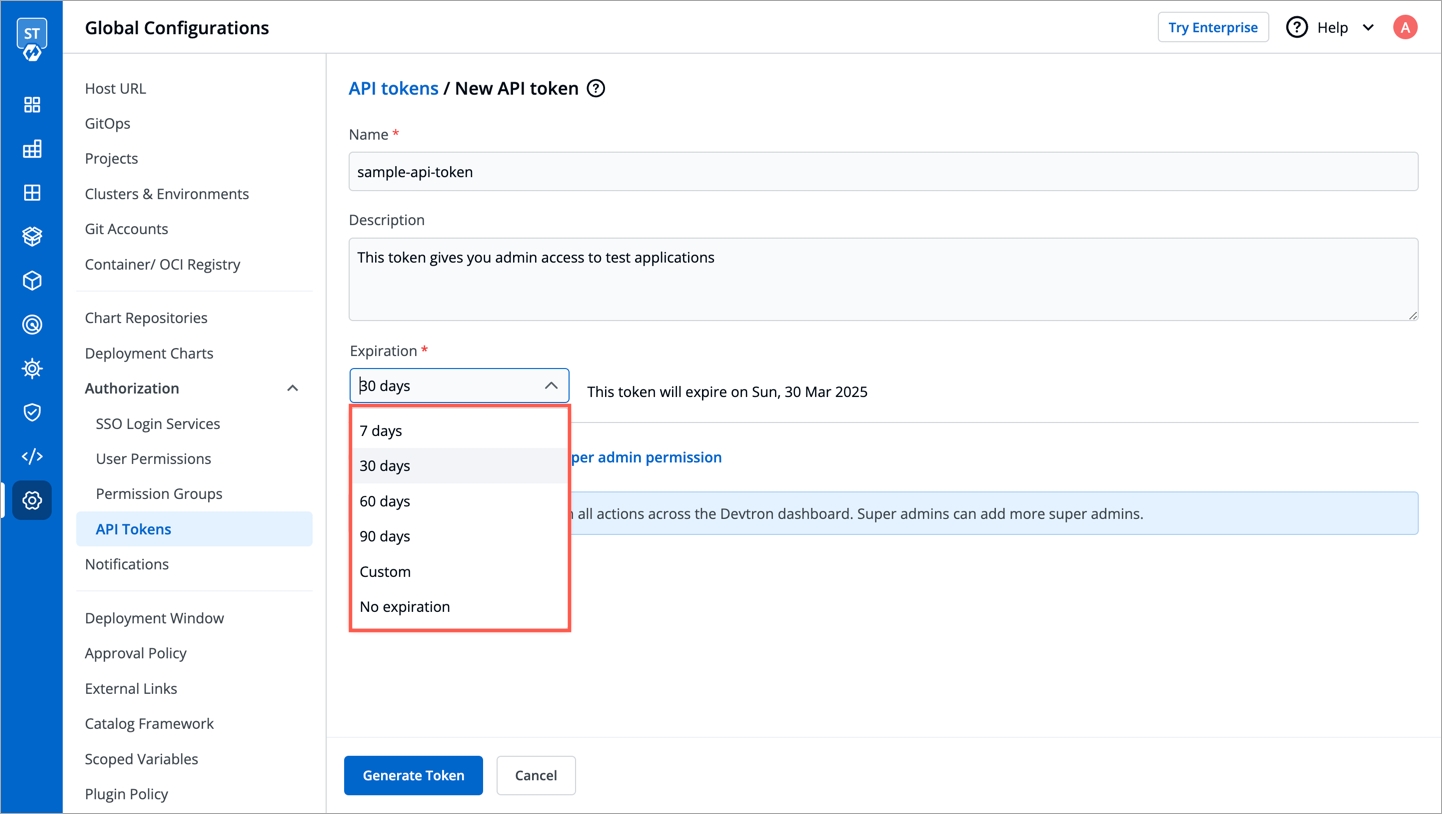
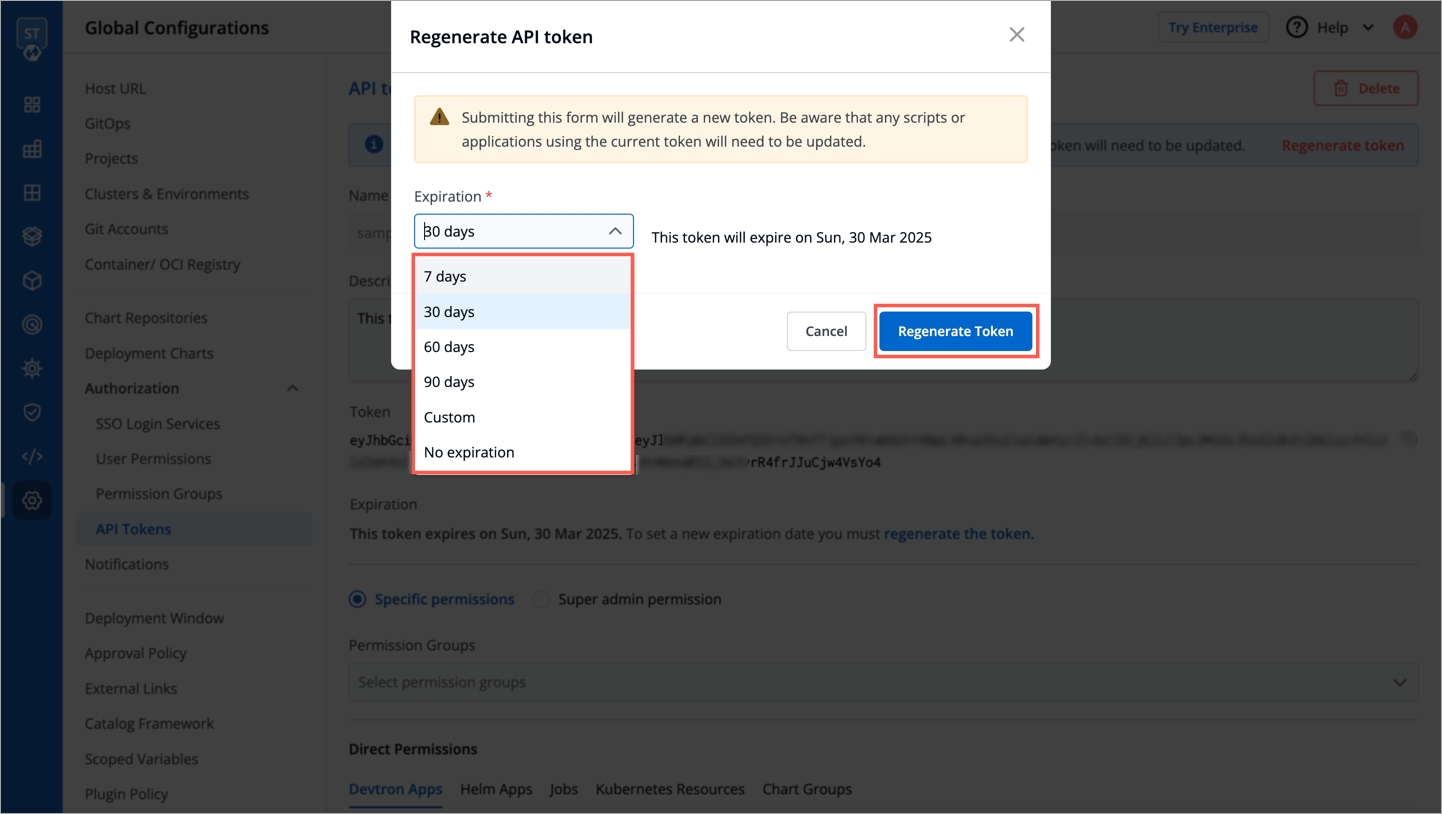
Select an expiration date for the token (7 days, 30 days, 60 days, 90 days, custom and no expiration).
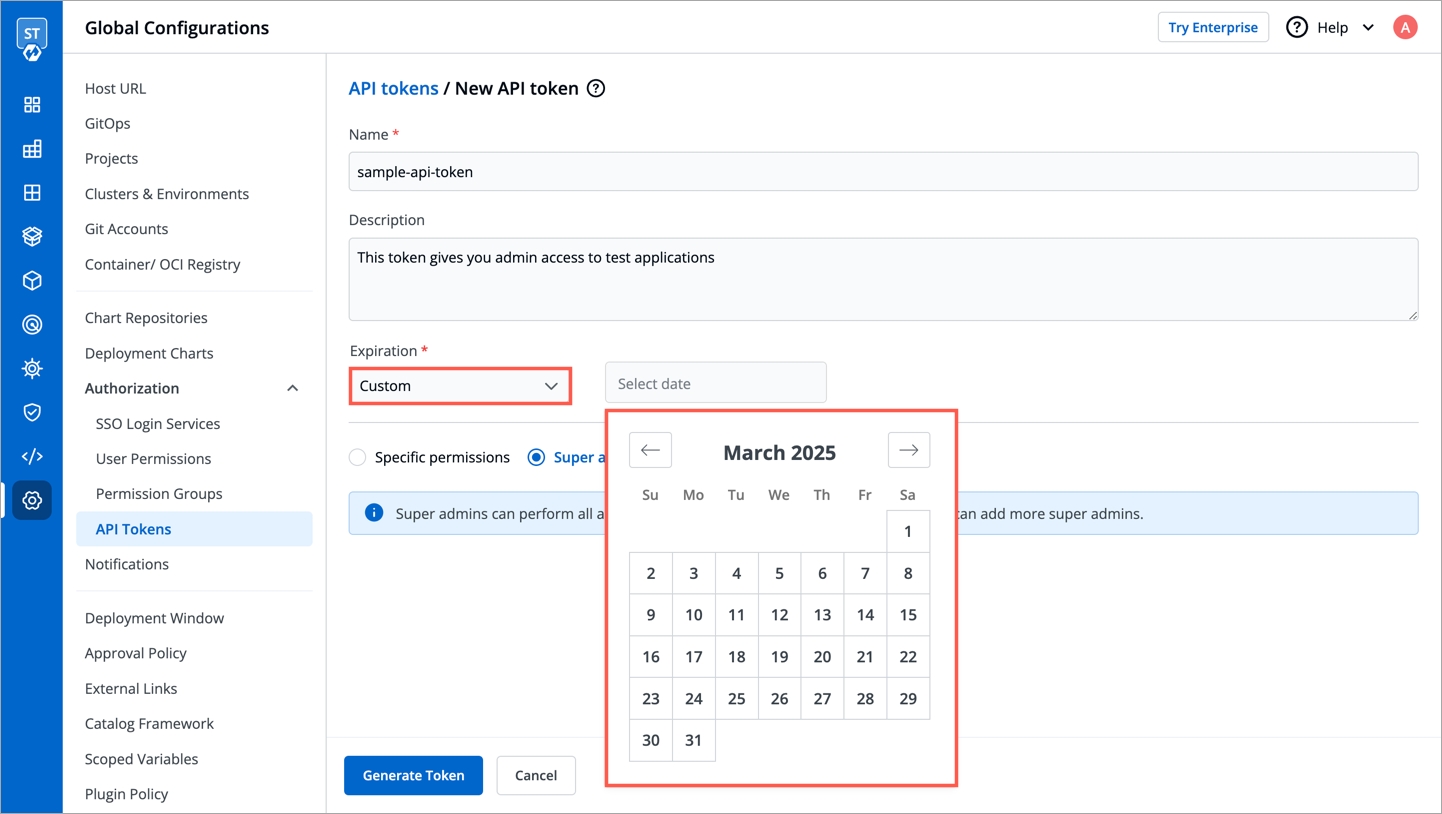
To select a custom expiration date, select Custom from the drop-down list. In the adjacent field, you can select your custom expiration date for the API token.
You can assign permission to the token either with:
Super admin permission: To generate a token with super admin permission, select Super admin permission.
Specific permissions: Selecting Specific permissions option allows you to generate a token with a specific role for:
Devtron Apps
Helm Apps
Kubernetes Resources
Chart Groups
Click Generate Token.
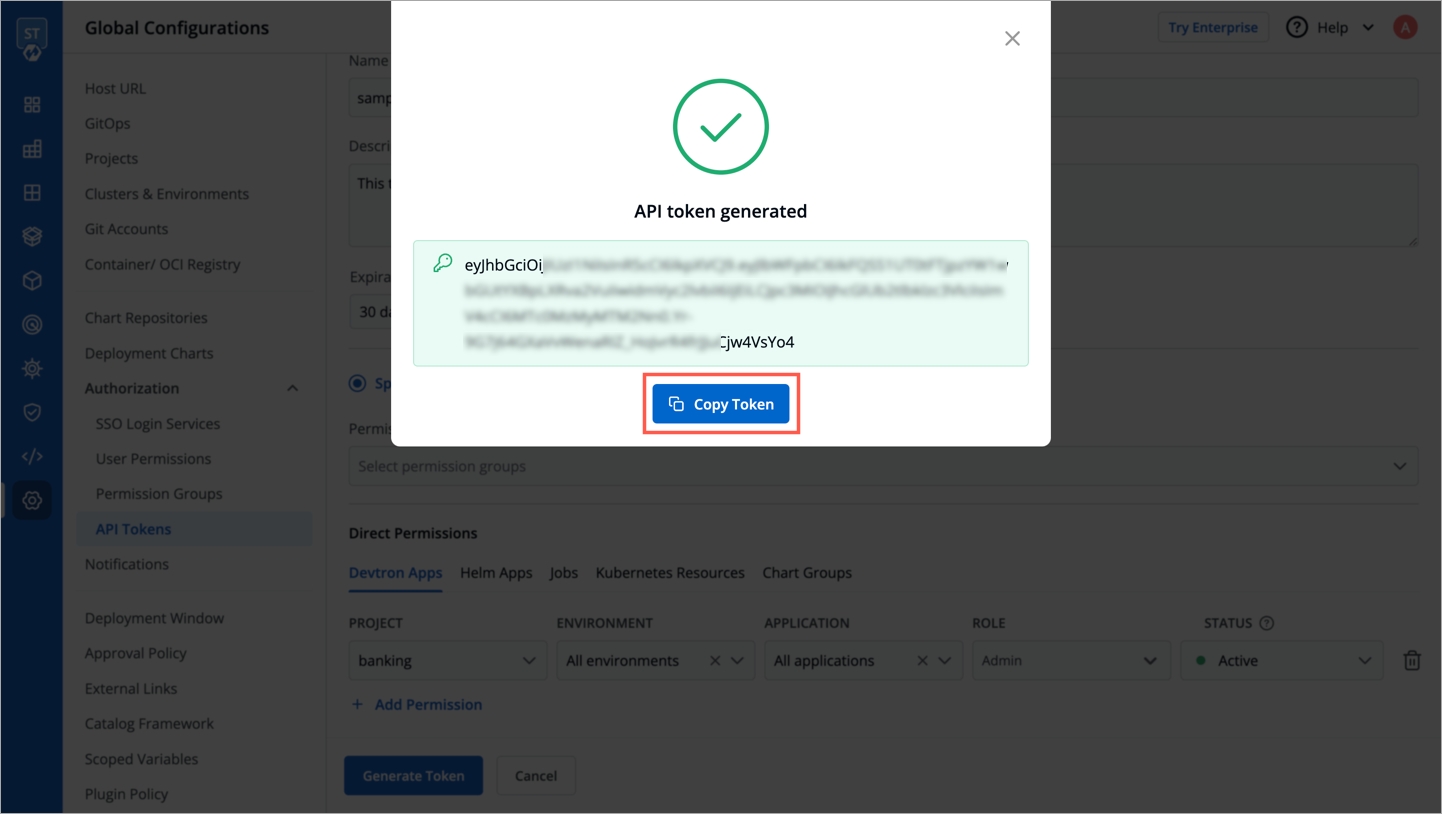
A pop-up window will appear on the screen from where you can copy the API token.
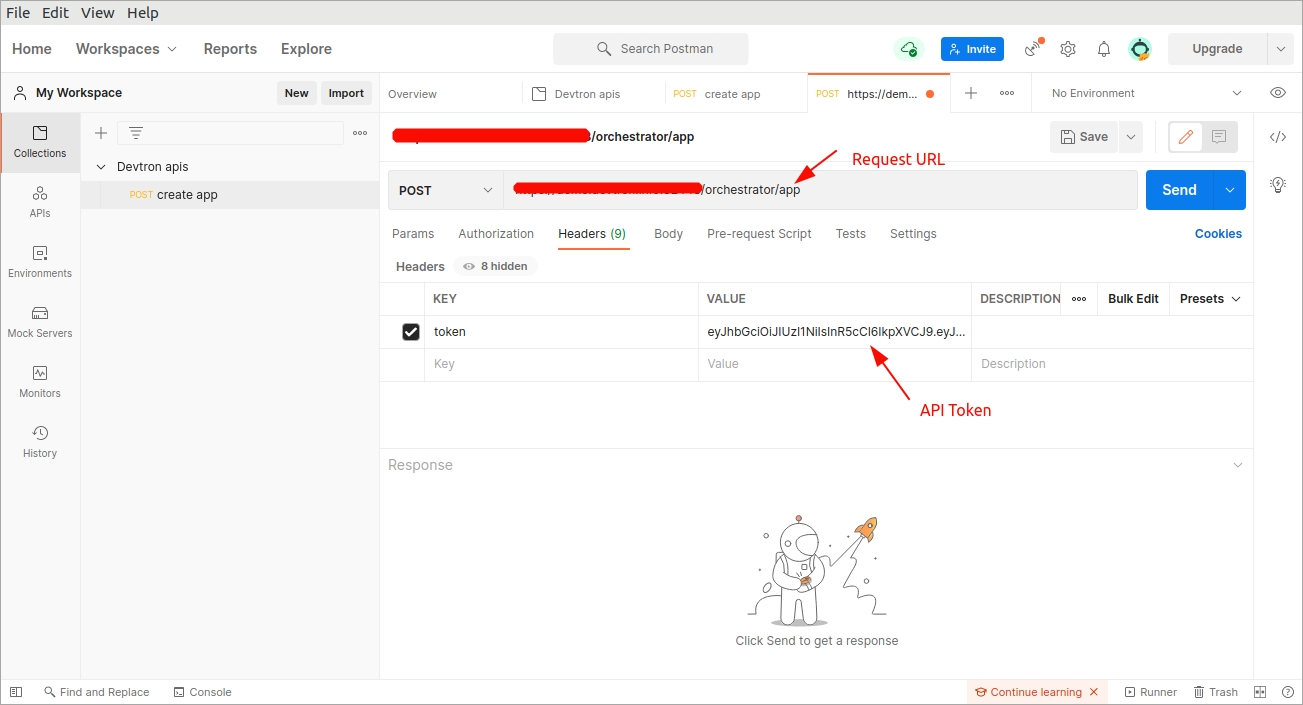
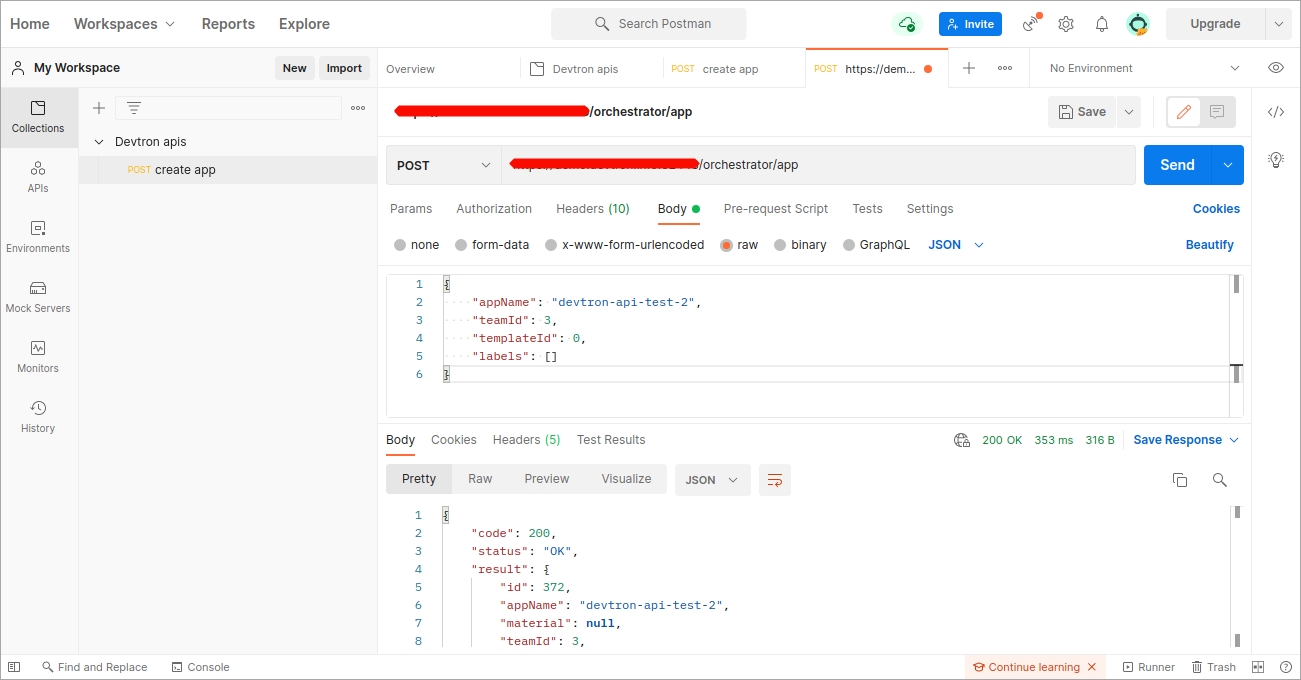
Once Devtron API token has been generated, you can use this token to request Devtron APIs using any API testing tool like Jmeter, Postman, Citrus. Using Postman here as an example.
Open Postman. Enter the request URL with POST method and under HEADERS, enter the API token as shown in the image below.
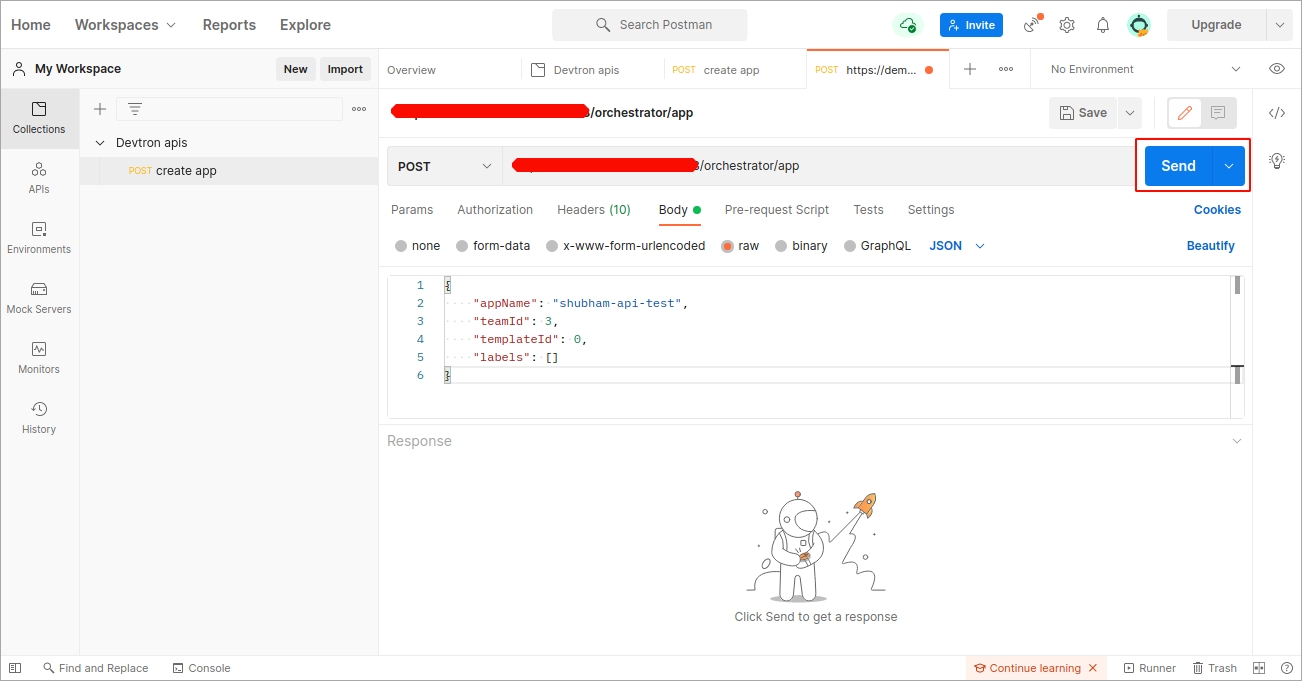
In the Body section, provide the API payload as shown below and click Send.
As soon as you click Send, the created application API will be triggered and a new Devtron app will be created as provided in the payload.
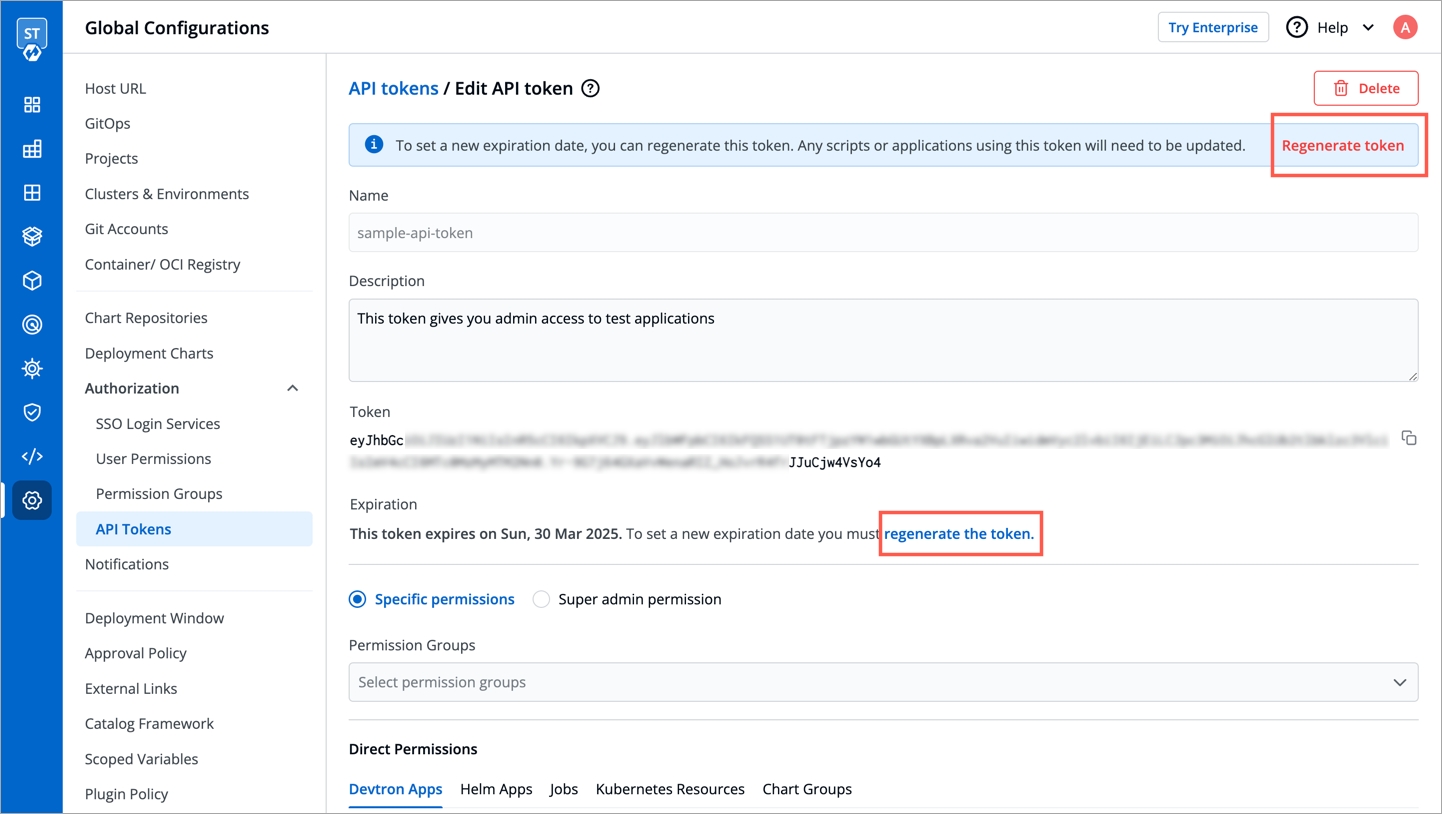
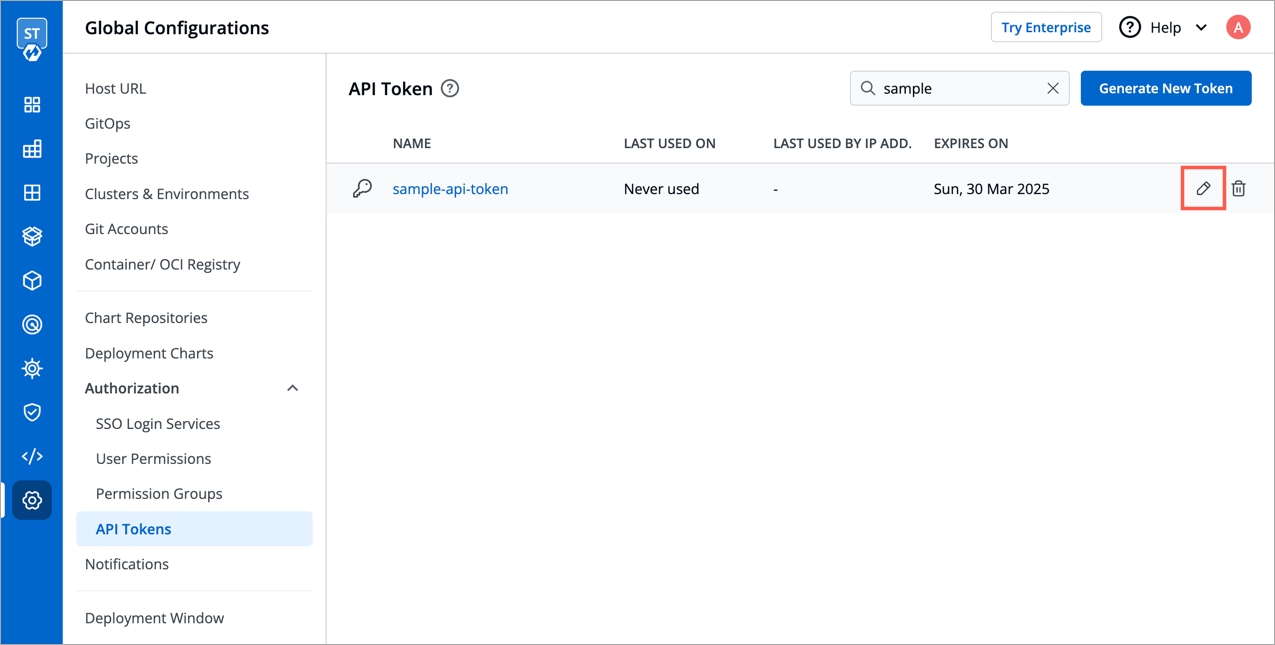
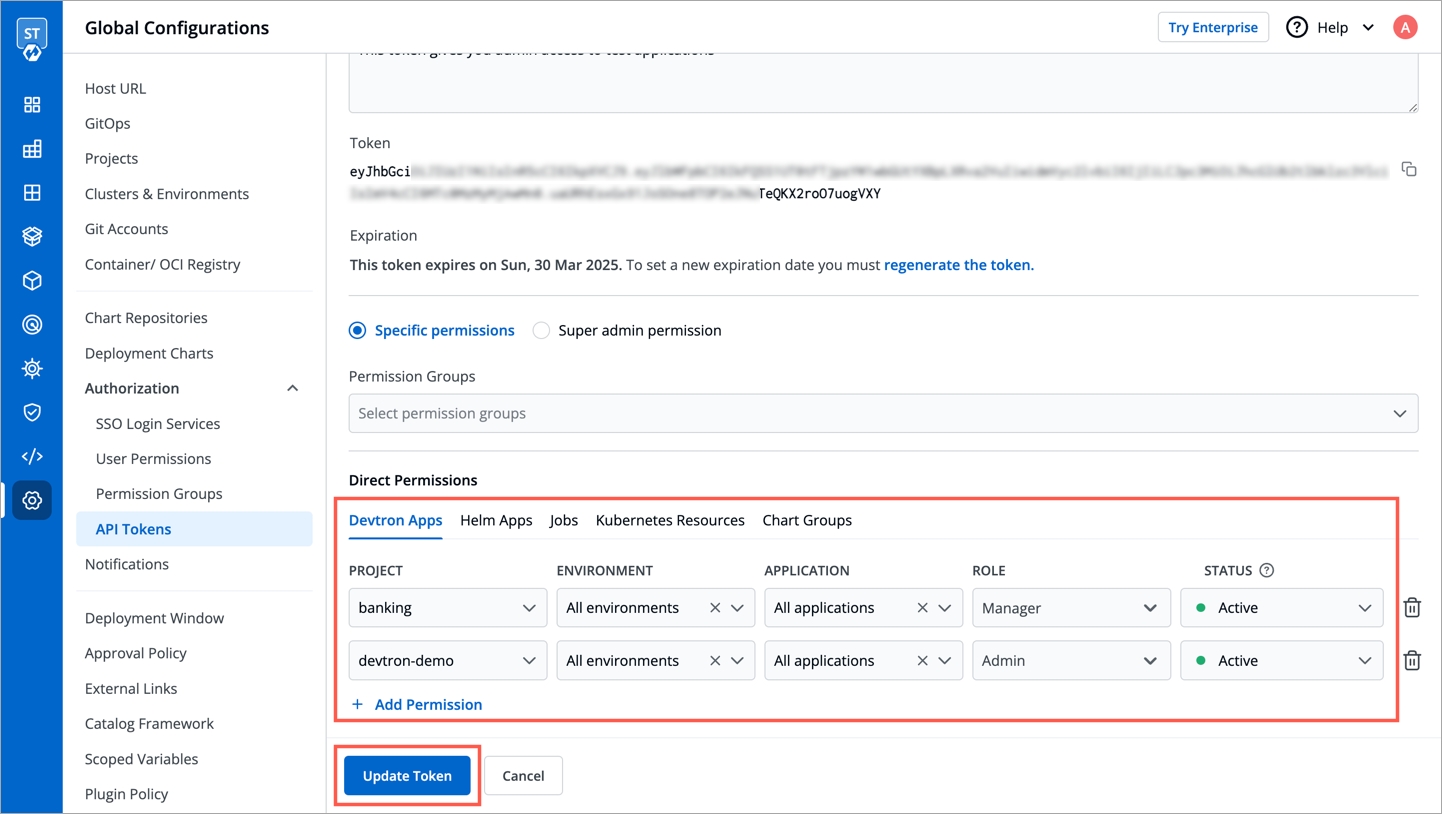
To set a new expiration date or to make changes in permissions assigned to the token, we need to update the API token in Devtron. To update the API token, click the token name or click on the edit icon.
To set a new expiration date, you can regenerate the API token. Any scripts or applications using this token must be updated. To regenerate a token, click Regenerate token.
A pop-up window will appear on the screen from where you can select a new expiration date.
Select a new expiration date and click Regenerate token.
This will generate a new token with a new expiration date.
To update API token permissions, give the permissions as you want to and click Update Token.
To delete an API token, click delete icon. Any applications or scripts using this token will no longer be able to access the Devtron API.
Ideally, all resources such as microservices, clusters, jobs, pods, etc. should contain detailed information so that its users know what each of those resources do, how to use them, as well as all their technical specs. Access to such data makes it easier for engineers to quickly discover and understand the relevant resources.
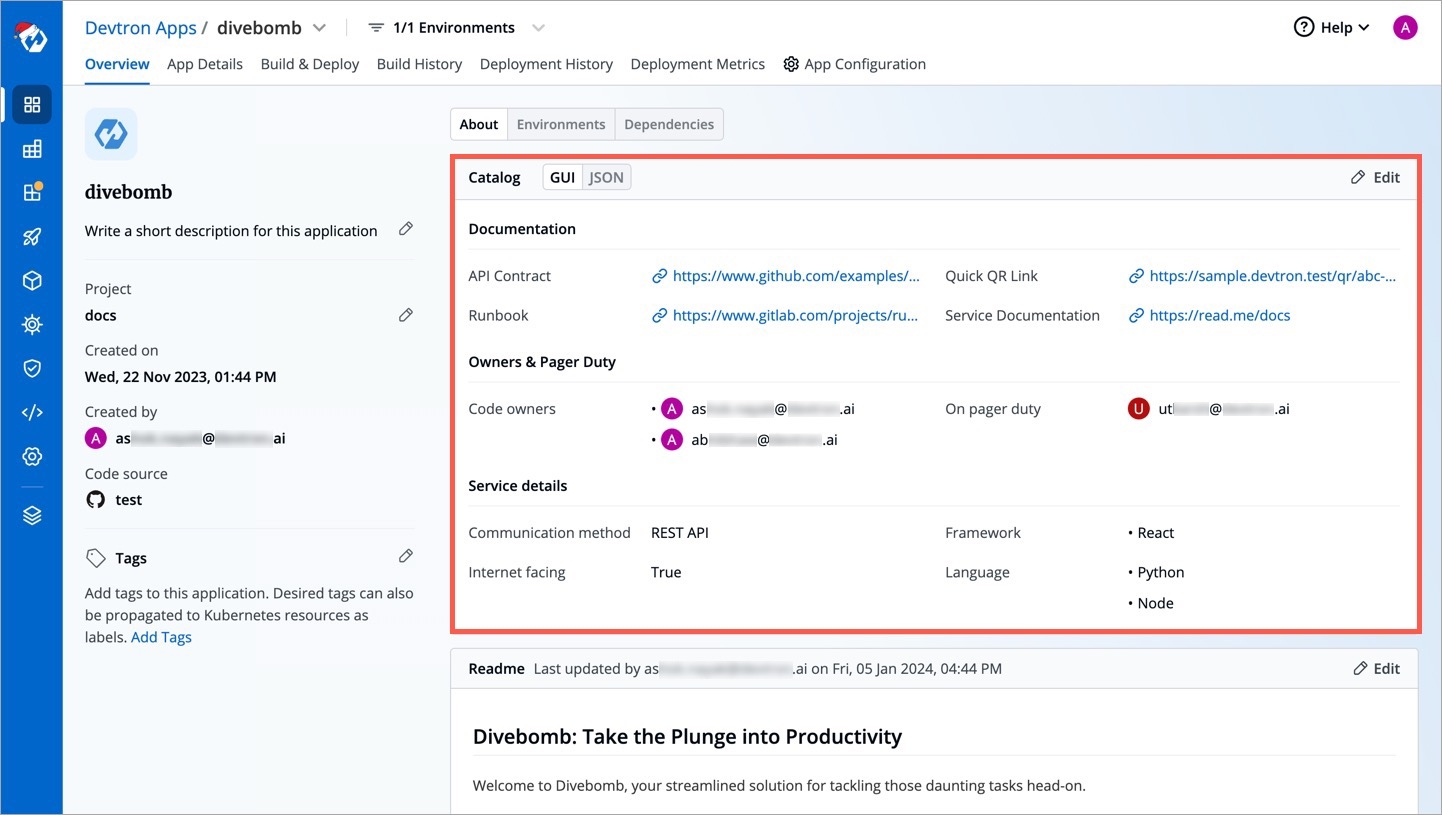
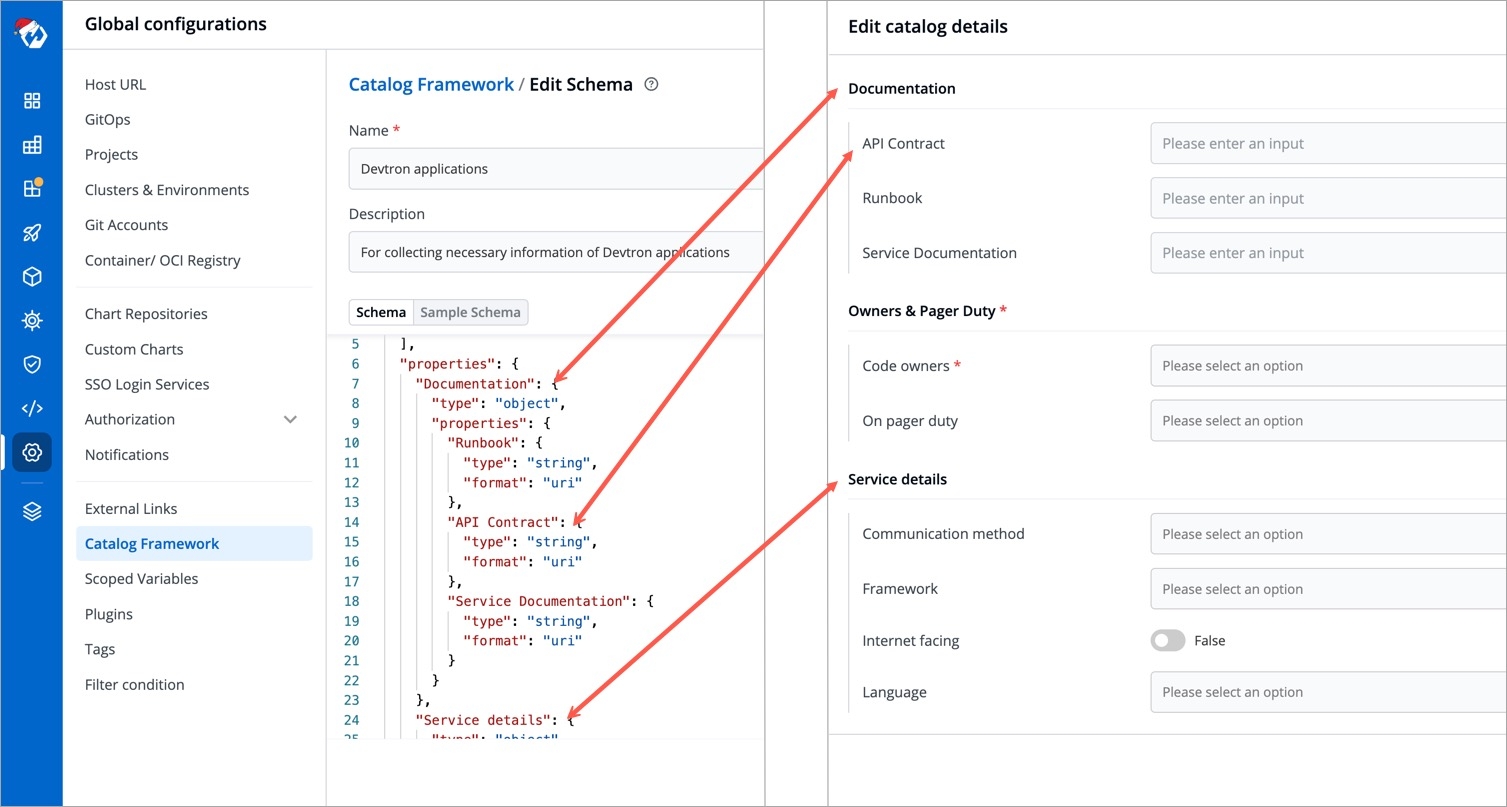
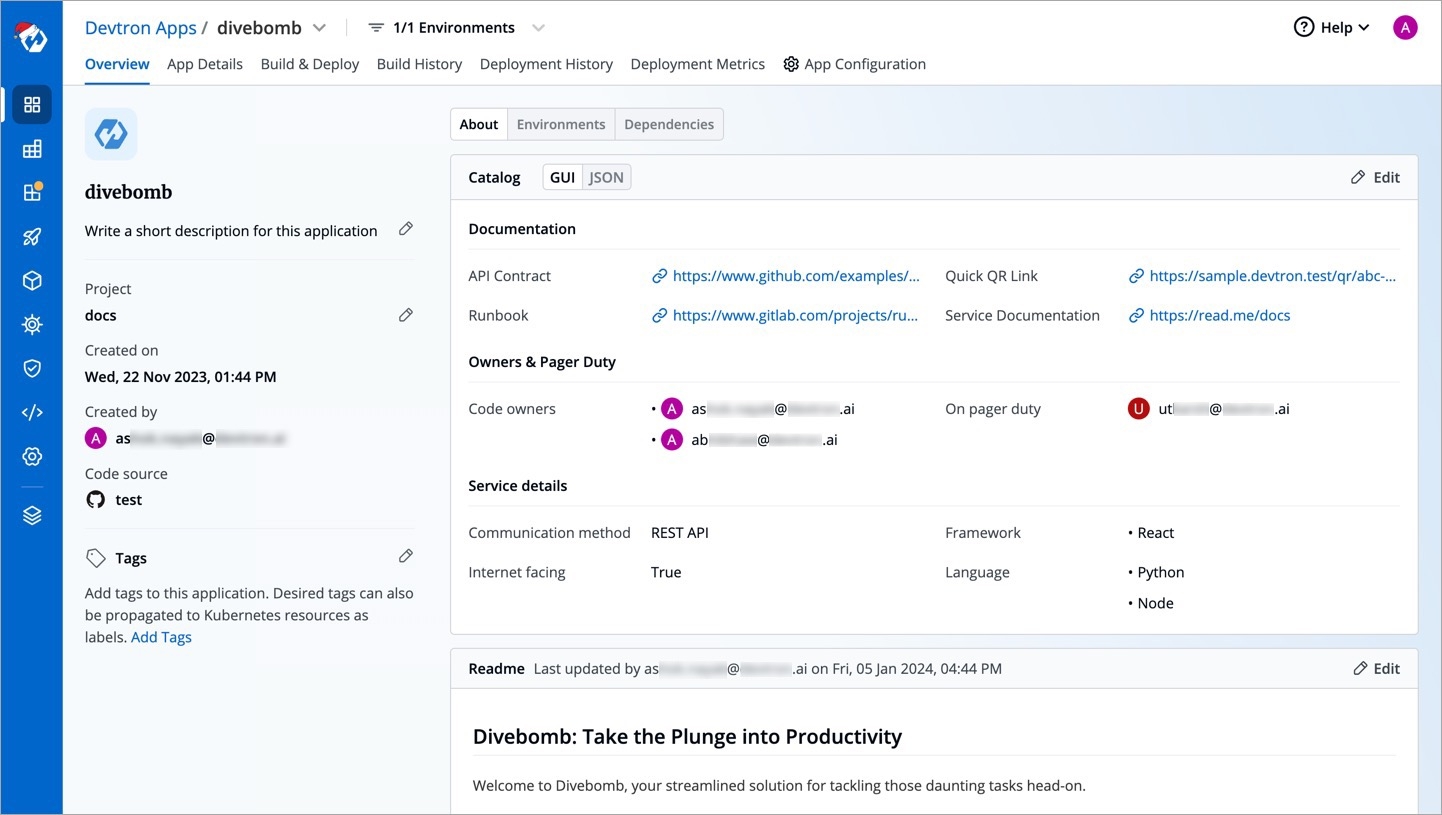
To achieve this, Devtron supports a feature known as Catalog Framework. Using this, you as a super-admin can decide the data you expect from the managers of different resource types. In other words, you can create a custom JSON schema that would ultimately render a form for the resource owners to fill. Once the form is filled, a GUI output will appear as shown below.
Currently, Devtron supports catalog framework for the following resource types (a.k.a. resource kind):
There are two parts involved in the creation of a desirable resource catalog:
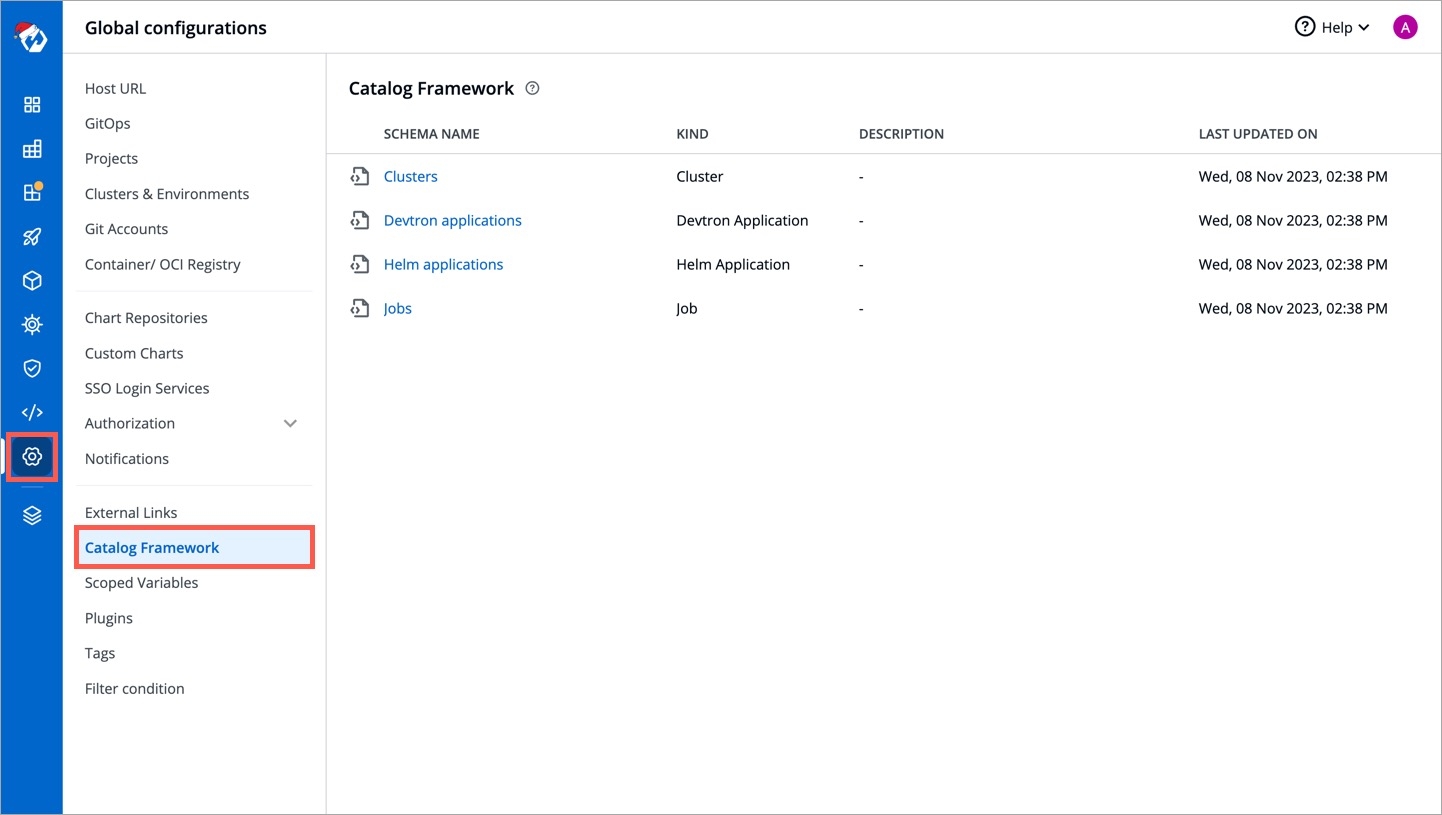
Go to Global Configurations → Catalog Framework.
Choose a resource type, for which you wish to define a schema, for e.g., Devtron applications.
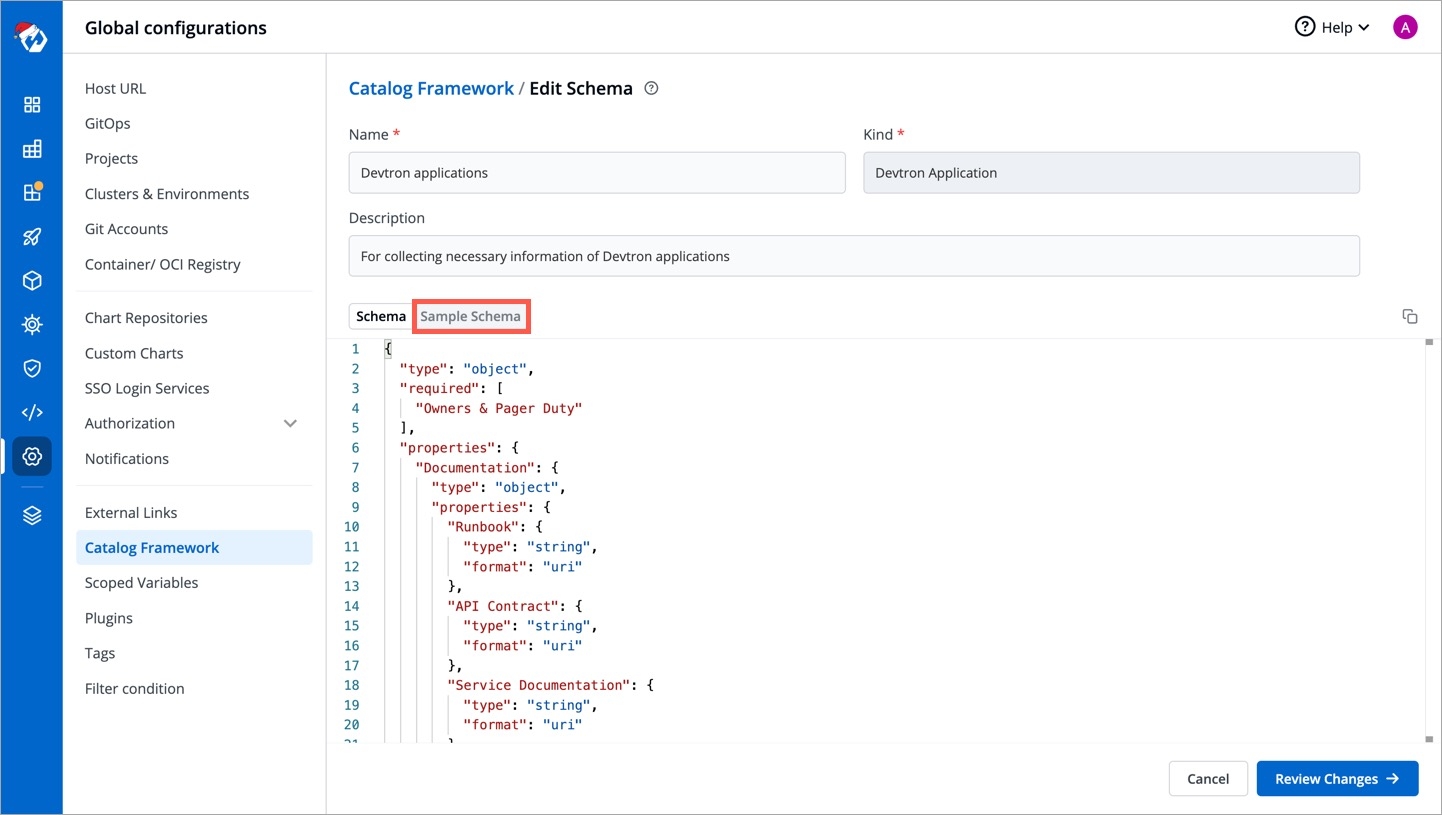
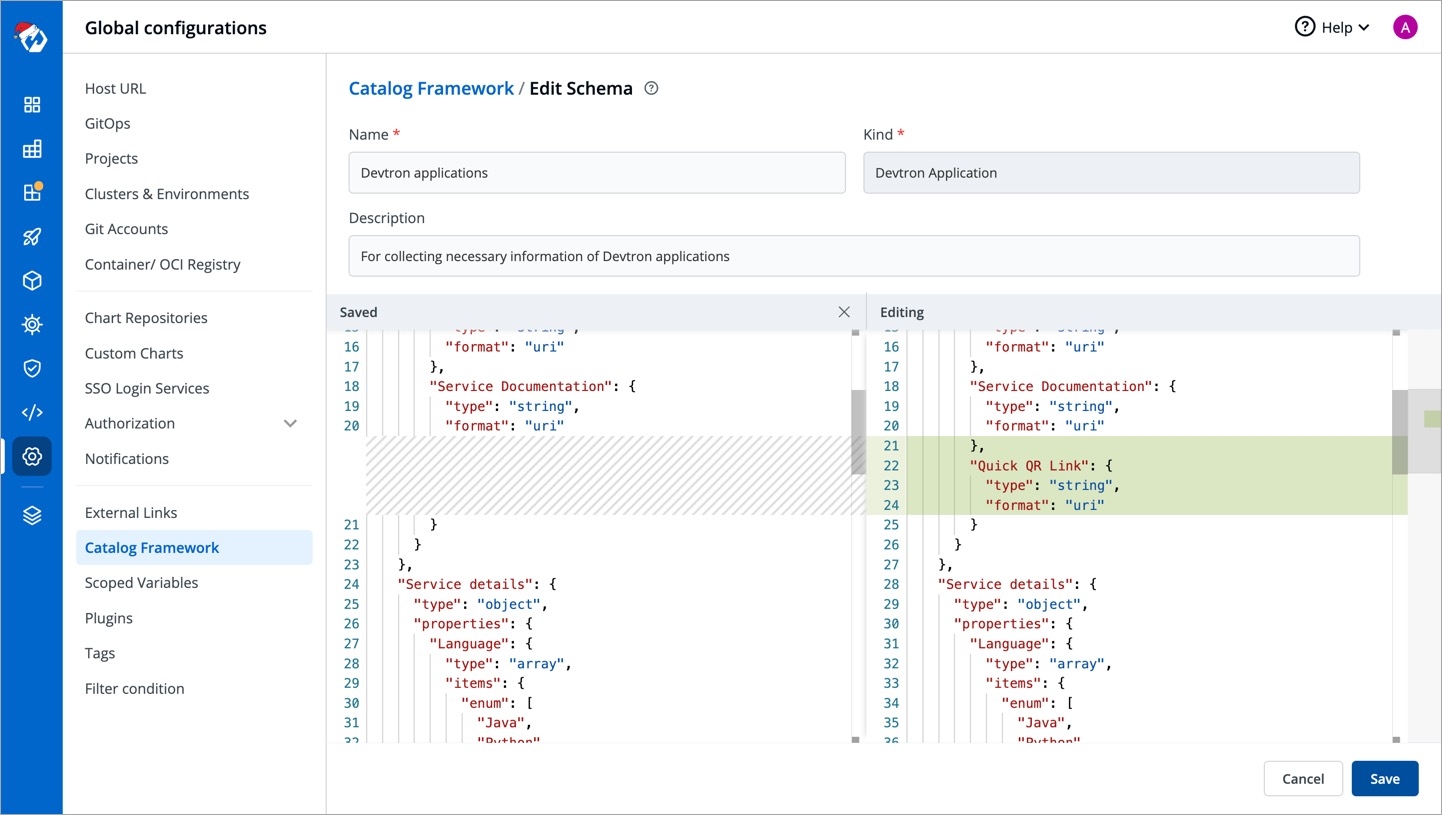
You can edit the schema name and description.
There is a sample schema available for you to create your own customized schema. Using this schema, you can decide the input types that renders within the form, for e.g., a dropdown of enum values, a boolean toggle button, text field, label, and many more.
After defining your schema, click Review Changes.
You get a side-by-side comparison (diff) highlighting the changes you made.
Click Save.
Similarly, you can define schemas for other resource types.
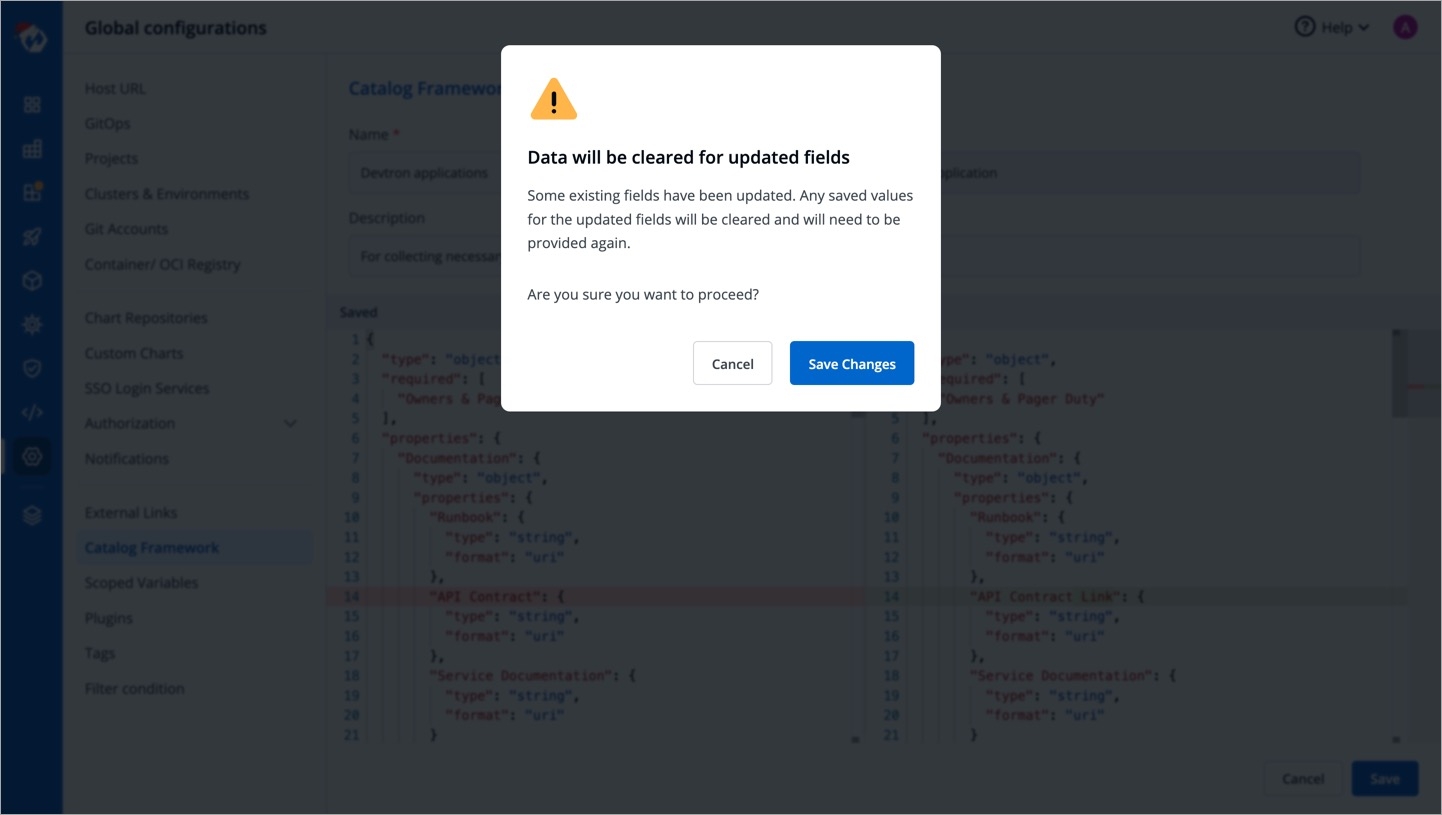
Note: If you edit a field (of an existing schema) for which users have already filled the data, that data will be erased. You will receive a prompt (as shown below) to confirm whether you want to proceed with the changes.
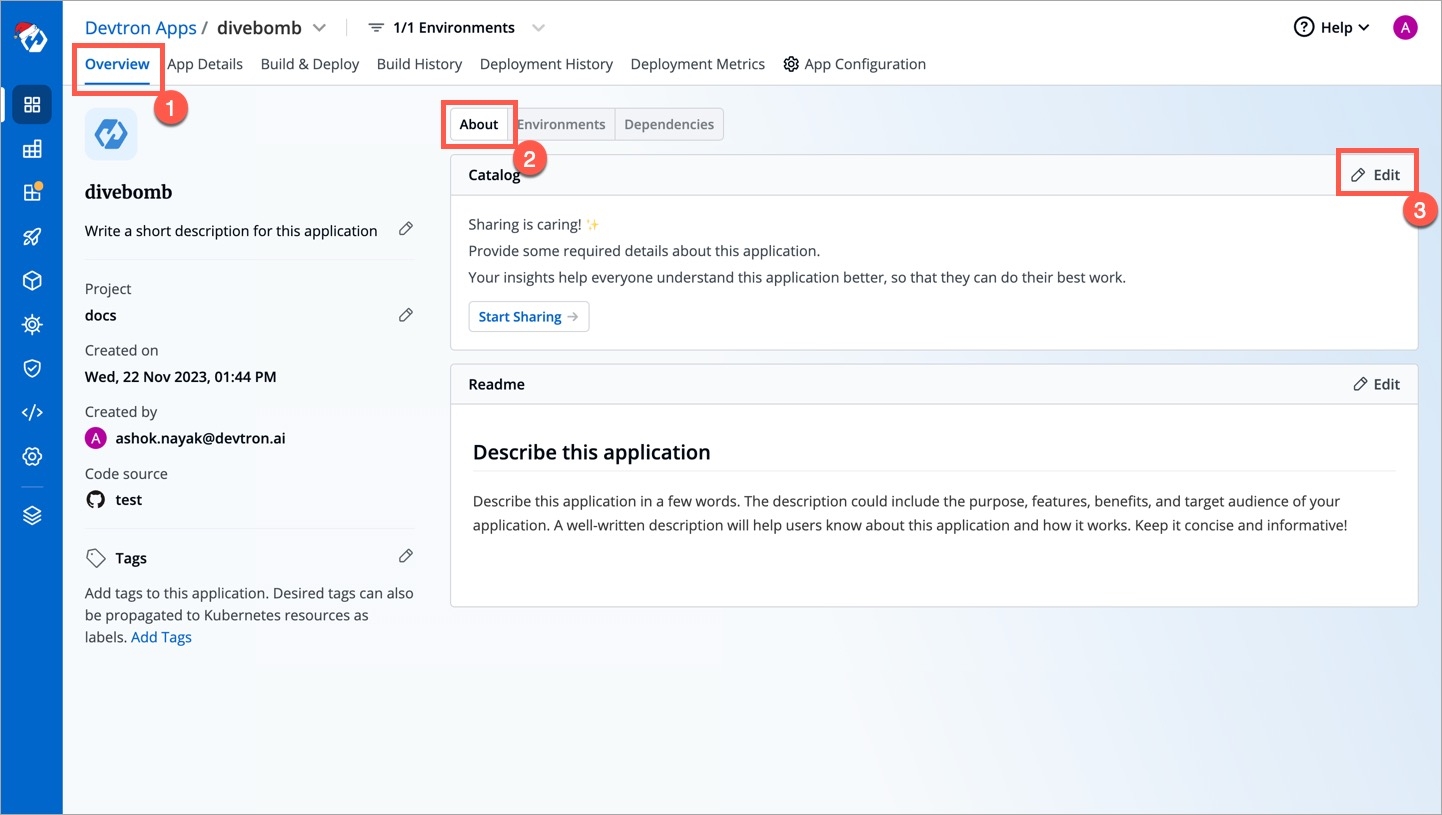
Once a catalog schema exists for a resource type, its corresponding form would be available in the overview section of that resource type.
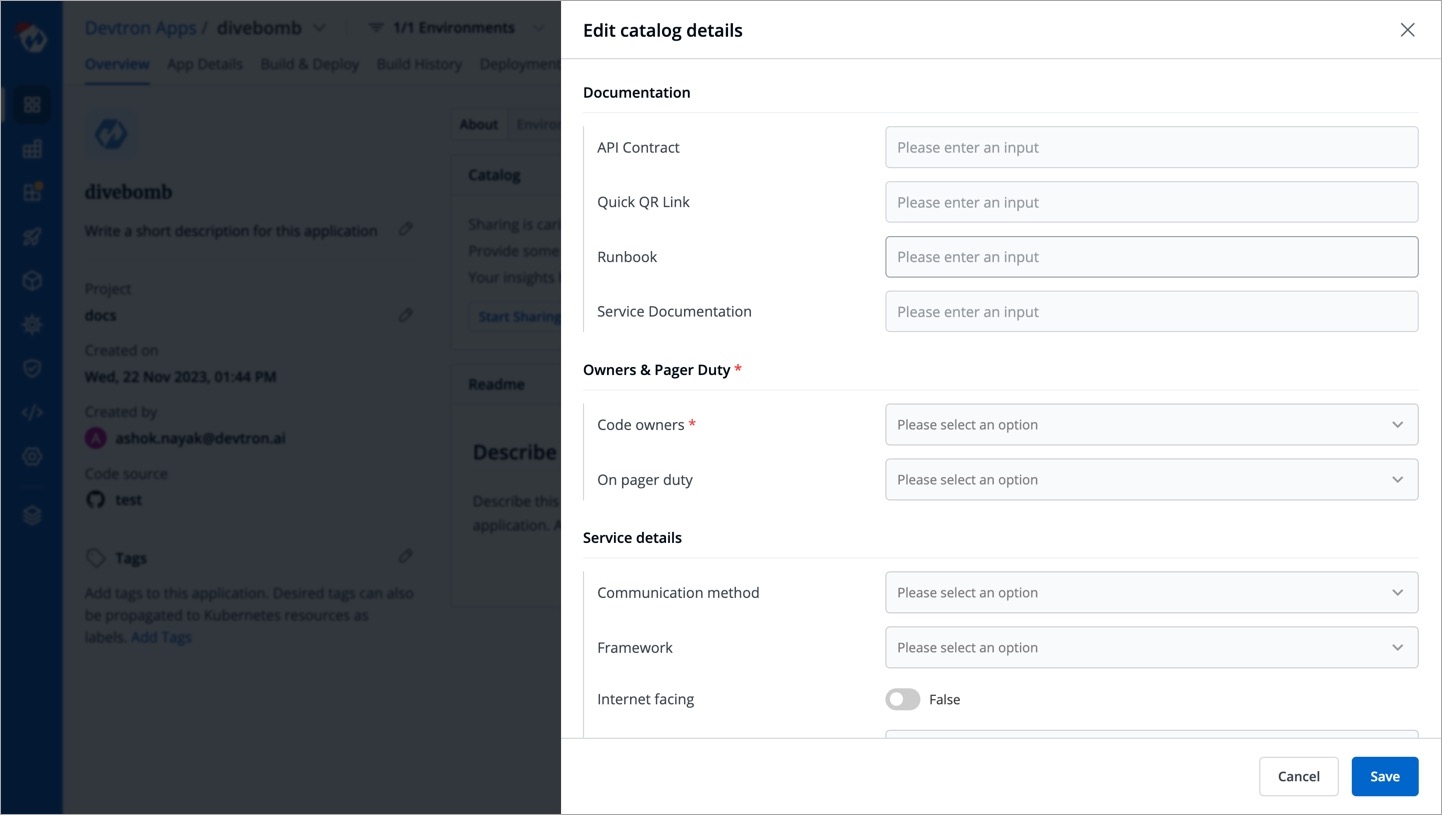
Since we defined a schema for Devtron applications in the above example, go to the Overview tab of your application (any Devtron application). Click the Edit button within the About section.
The schema created for Devtron applications would render into an empty form as shown below.
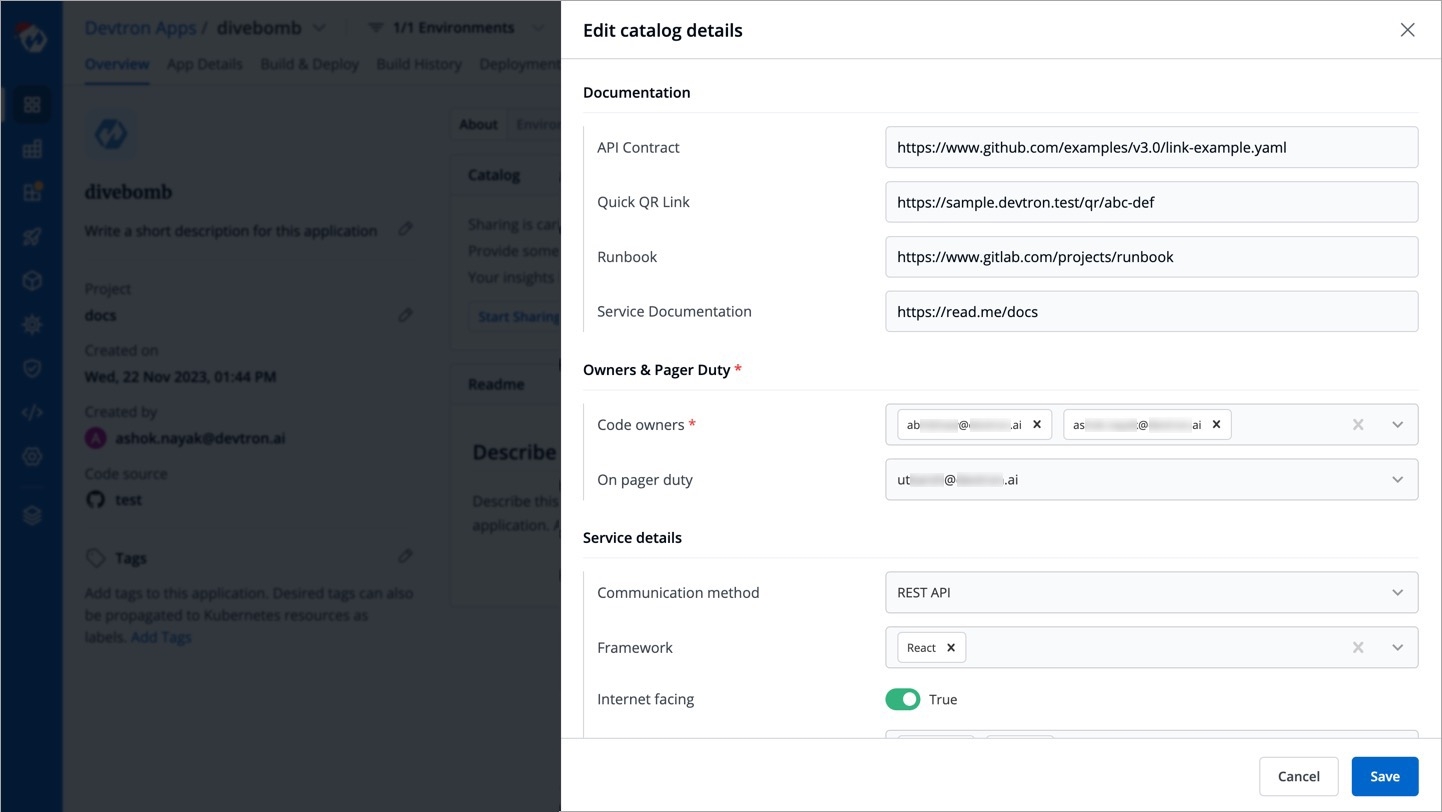
Fill as many details as an application owner to the best of your knowledge and click Save.
Your saved data would be visible in a GUI format (and also in JSON format) as shown below.
This catalog data would be visible to all the users who have access to the application, but its data can be edited only by the resource owners (in this case, application admin/managers).
{podName}: If used, the link will only be visible at the pod level on the page.
{containerName}: If used, the link will only be visible at the container level on the page.
Server URL of a cluster. Note: We recommended to use a instead of cloud hosted URL.
The archive file do not match the .
Enter the GitHub organization name. If you do not have one, refer .
Provide your personal access token (PAT). It is used as an alternate password to authenticate your GitHub account. If you do not have one, create a GitHub PAT .
Enter the GitLab group ID. If you do not have one, refer .
Provide your personal access token (PAT). It is used as an alternate password to authenticate your GitLab account. If you do not have one, create a GitLab PAT .
Enter the Org URL of Azure DevOps. Format should be https://dev.azure.com/<org-name>, where <org-name> represents the organization name, e.g.,
Enter the Azure DevOps project name. If you do not have one, refer .
Provide your Azure DevOps access token. It is used as an alternate password to authenticate your Azure DevOps account. If you do not have one, create a Azure DevOps access token .
Enter the Bitbucket workspace ID. If you do not have one, refer
Enter the Bitbucket project key. If you do not have one, refer . Note: If the project is not provided, the repository is automatically assigned to the oldest project in the workspace.
Provide your personal access token (PAT). It is used as an alternate password to authenticate your Bitbucket Cloud account. If you do not have one, create a Bitbucket Cloud PAT .
Enter the Bitbucket project key. Refer .
Provide a name to your Git provider. Note: This name will be available on the App Configuration > drop-down list.
Provide the Git host URL.
As an example: for Github, for GitLab etc.
Provide a name to your registry, this name will appear in the Container Registry drop-down list available within the section of your application
The credential input fields may differ depending on the registry provider, check
Tick this checkbox if you wish to use the repository to push container images. This comes selected by default and you may untick it if you don't intend to push container images after a CI build. If you wish to to use the same repository to pull container images too, read .
User Auth: It is a key-based authentication, attach the ECR policy (AmazonEC2ContainerRegistryFullAccess) to the .
Provide the password/ corresponding to your docker hub account. It is recommended to use Token for security purpose.
Select one of the to which you want to give permission to the user:
Select one of the to which you want to give permission to the user:
Select one of the to which you want to give permission to the user:
Select one of the to which you want to give permission to the user and click Done:
A global configuration allows you to easily share common configuration between multiple repositories without copy/pasting it to these repositories.
Before you start creating an application, we recommend to provide basic information in different sections of Global Configurations available in Devtron.
You can also refer our YouTube video provided here.
With the Manage Notification feature, you can manage the notifications for your build and deployment pipelines. You can receive the notifications on Slack or via e-mail.
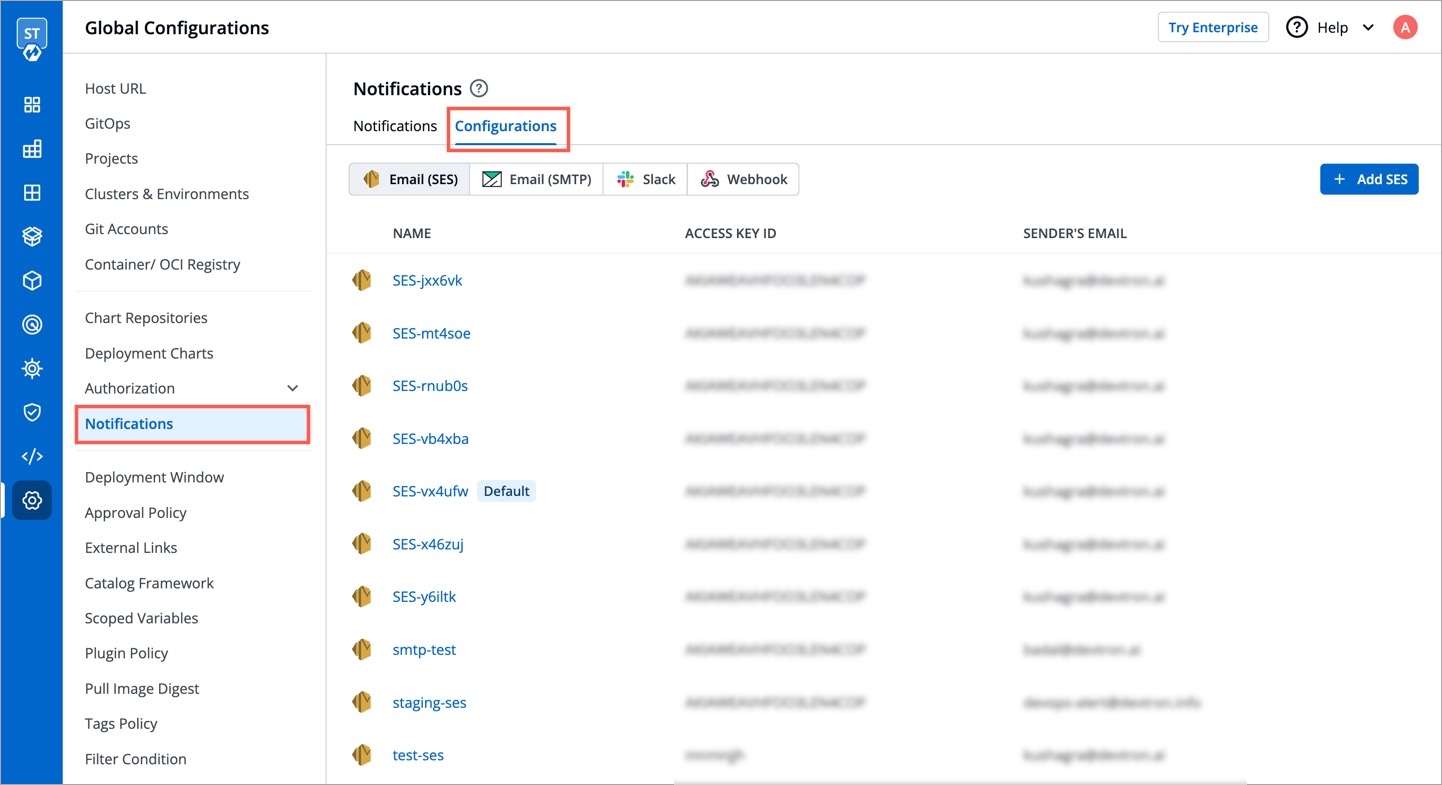
Go to the Global Configurations -> Notifications
Click Configurations to add notification configuration in one of the following options:
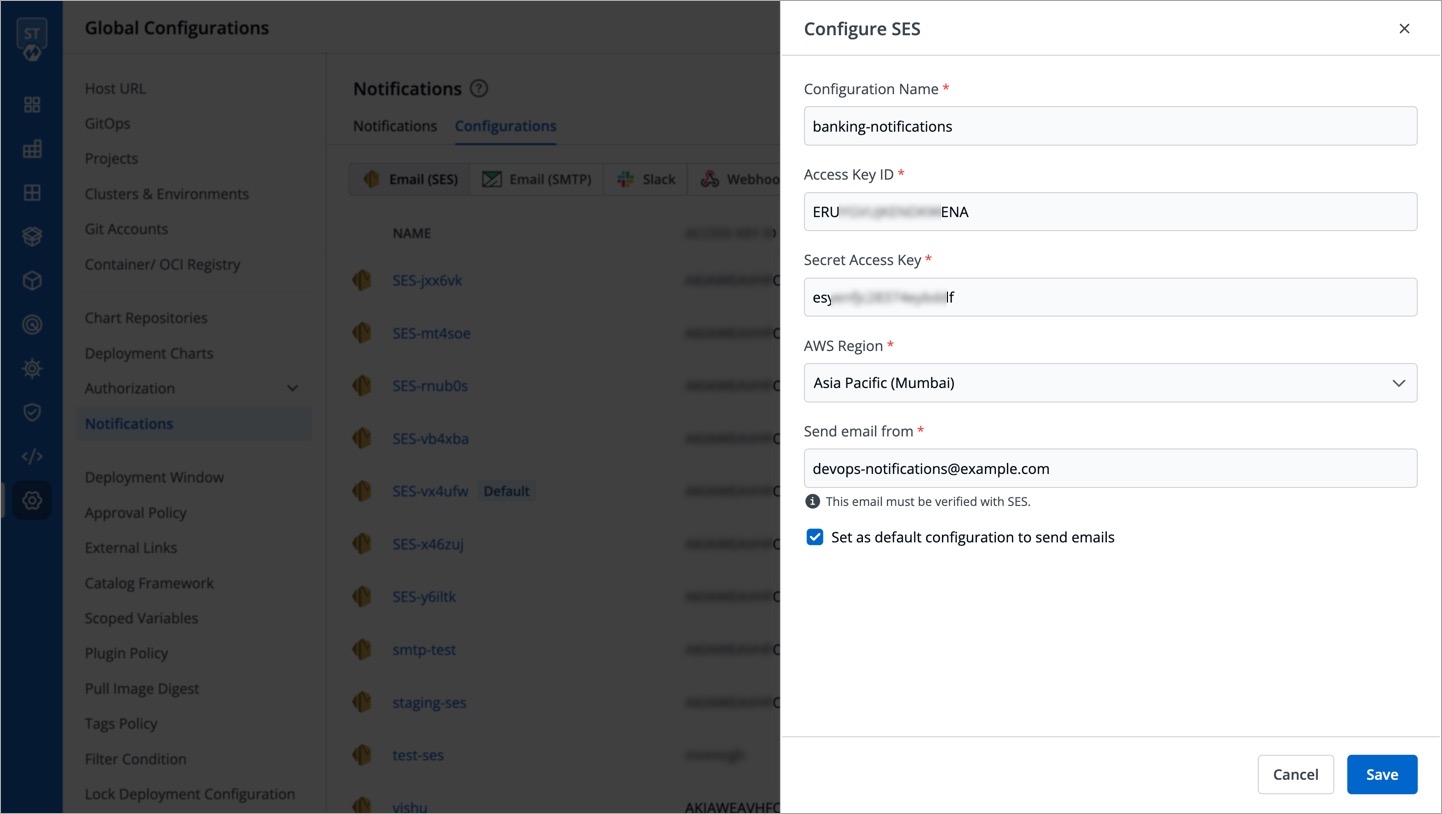
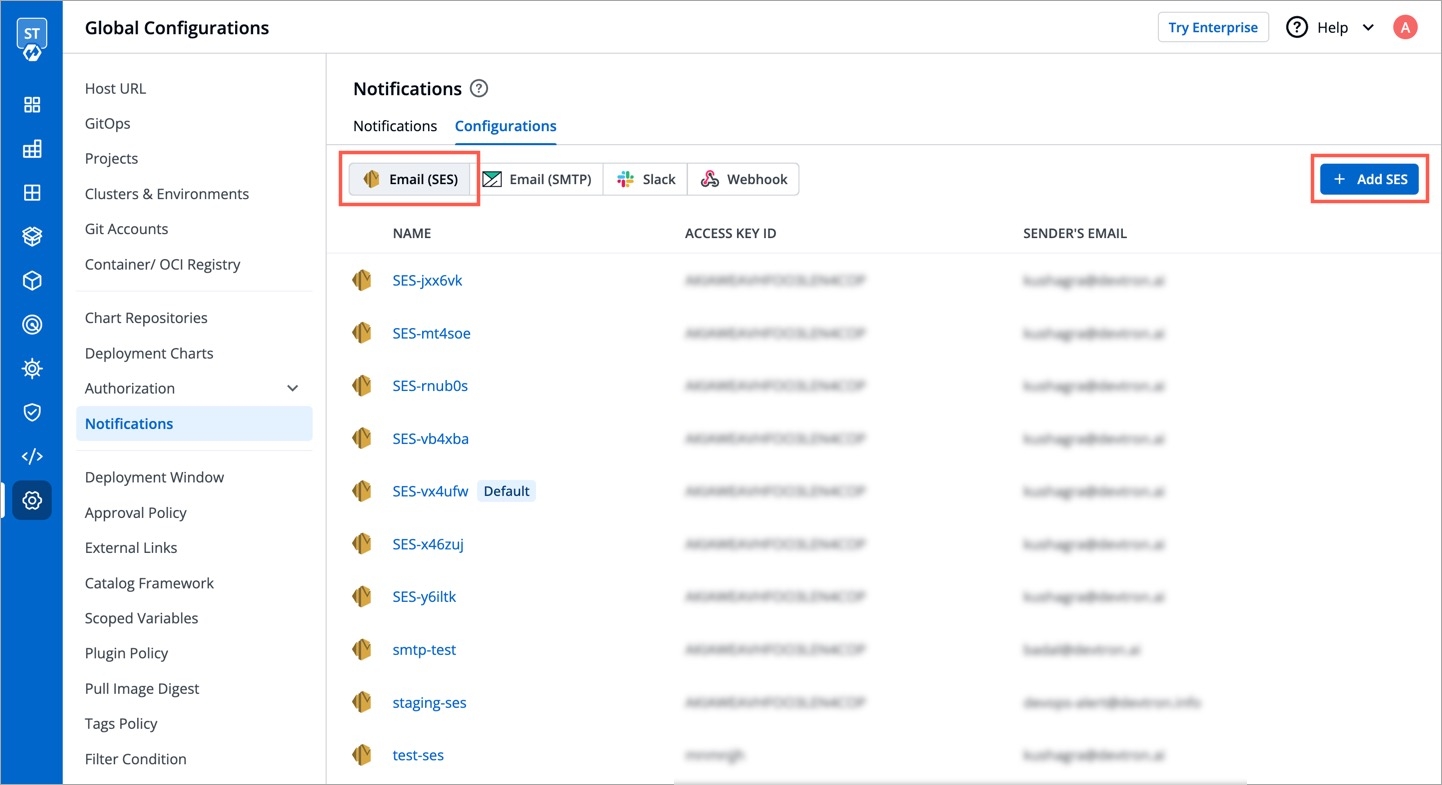
You can manage the SES configuration to receive e-mails by entering the valid credentials. Make sure your e-mail is verified by SES.
Click Add and configure SES.
Configuration Name
Provide a name to the SES Configuration.
Access Key ID
Valid AWS Access Key ID.
Secret Access Key
Valid AWS Secret Access Key.
AWS Region
Select the AWS Region from the drop-down menu.
E-mail
Enter the SES verified e-mail id on which you wish to receive e-mail notifications.
Click Save to save your SES configuration or e-mail ID
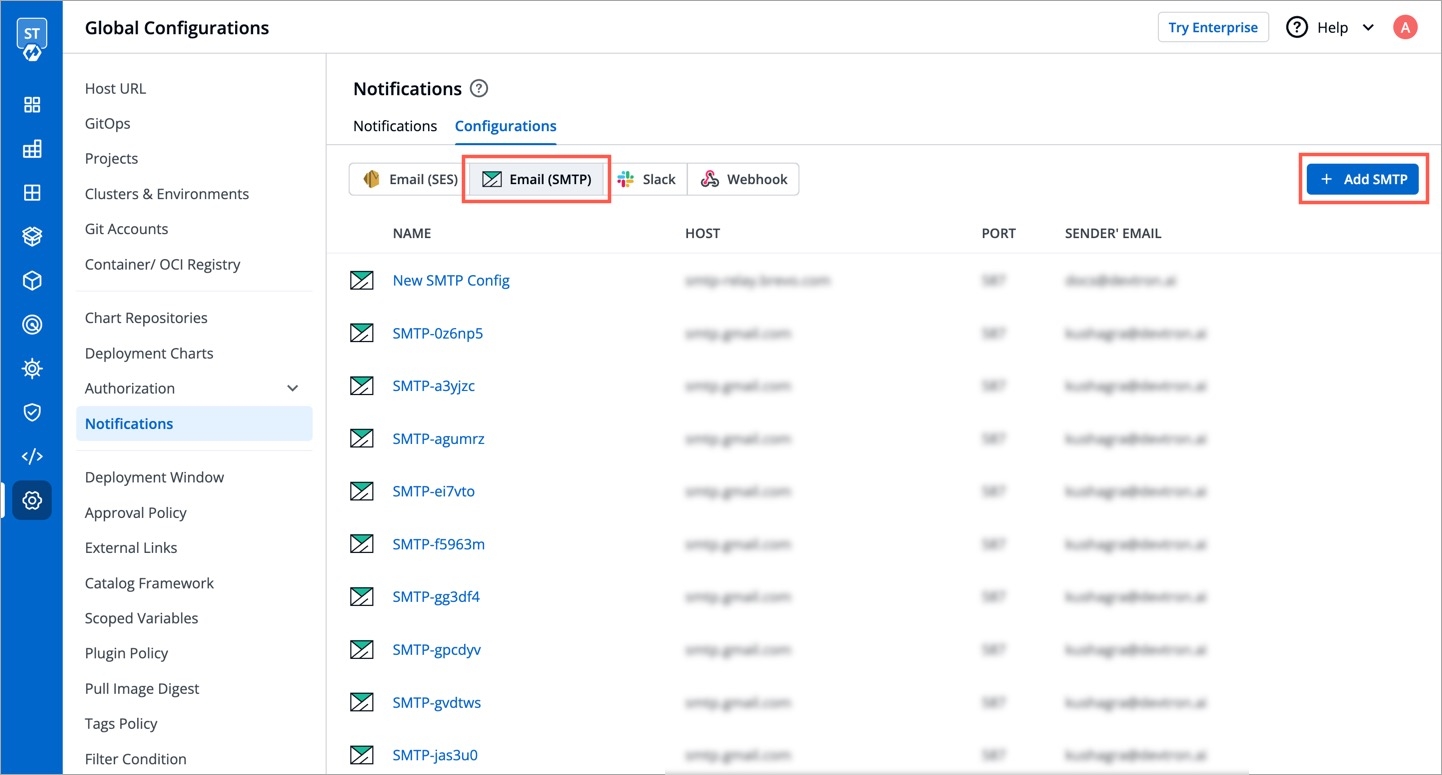
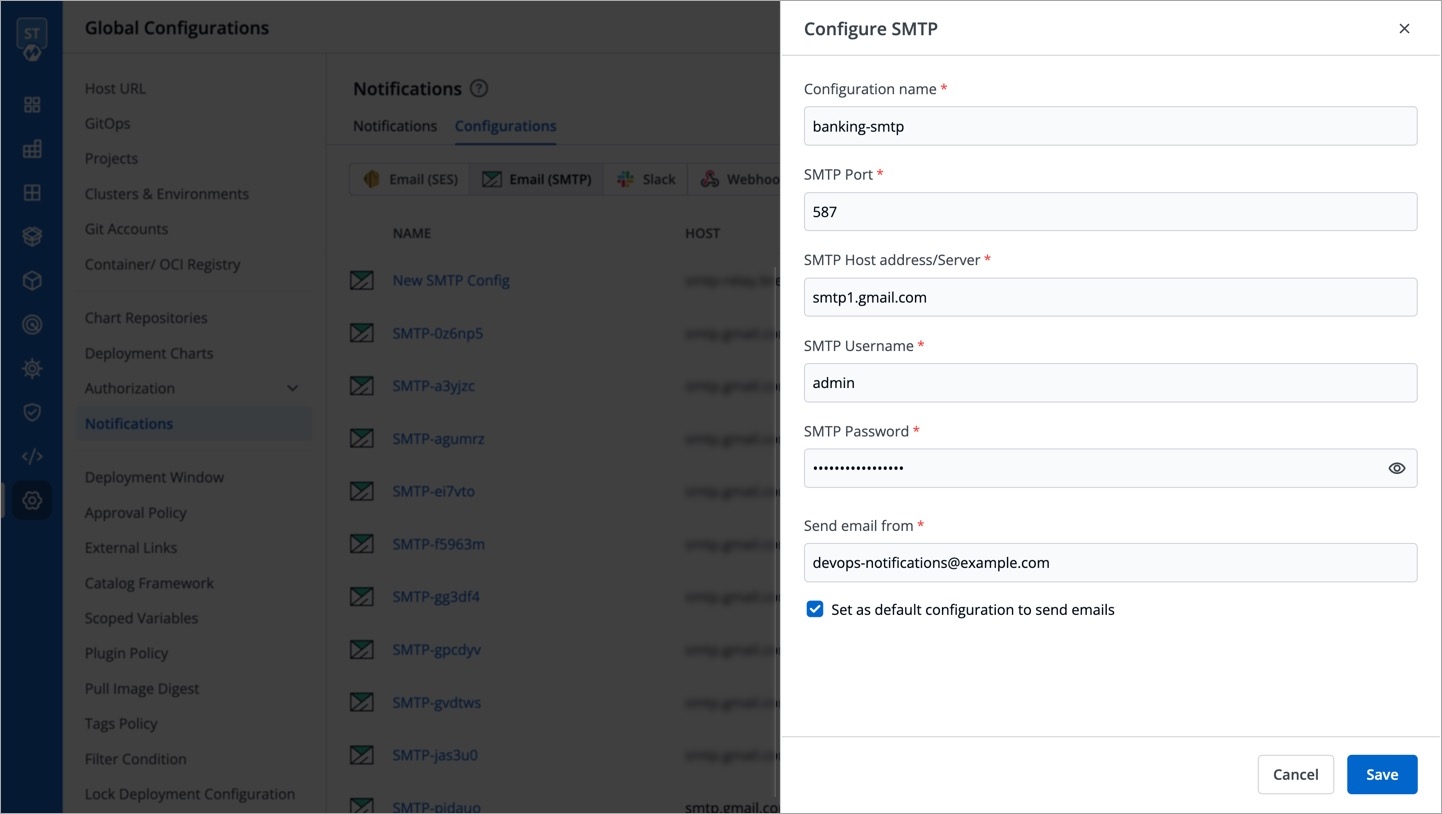
You can manage the SMTP configuration to receive e-mails by entering the valid credentials. Make sure your e-mail is verified by SMTP.
Click Add and configure SMTP.
Configuration Name
Provide a name to the SMTP Configuration
SMTP Host
Host of the SMTP.
SMTP Port
Port of the SMTP.
SMTP Username
Username of the SMTP.
SMTP Password
Password of the SMTP.
E-mail
Enter the SMTP verified e-mail id on which you wish to receive e-mail notifications.
Click Save to save your SMTP configuration or e-mail ID
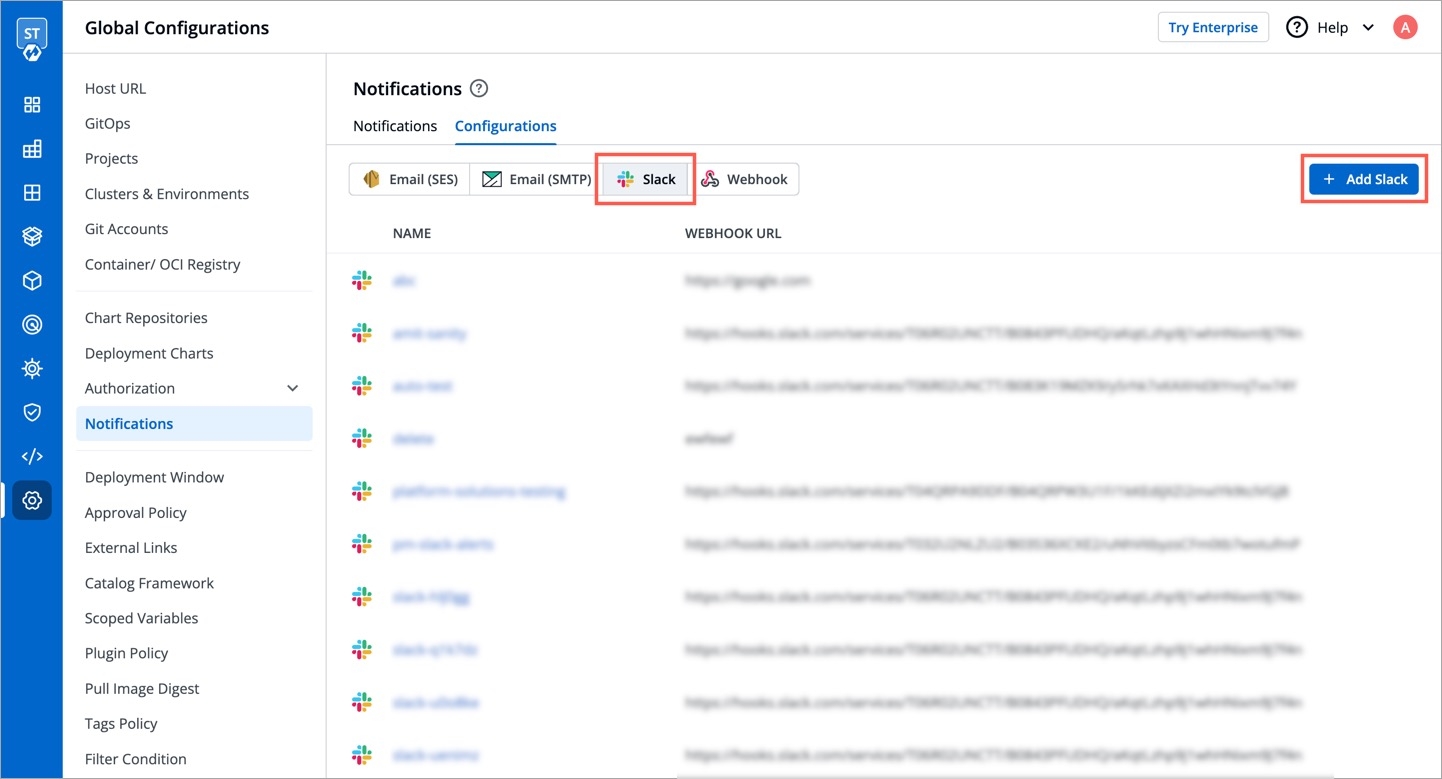
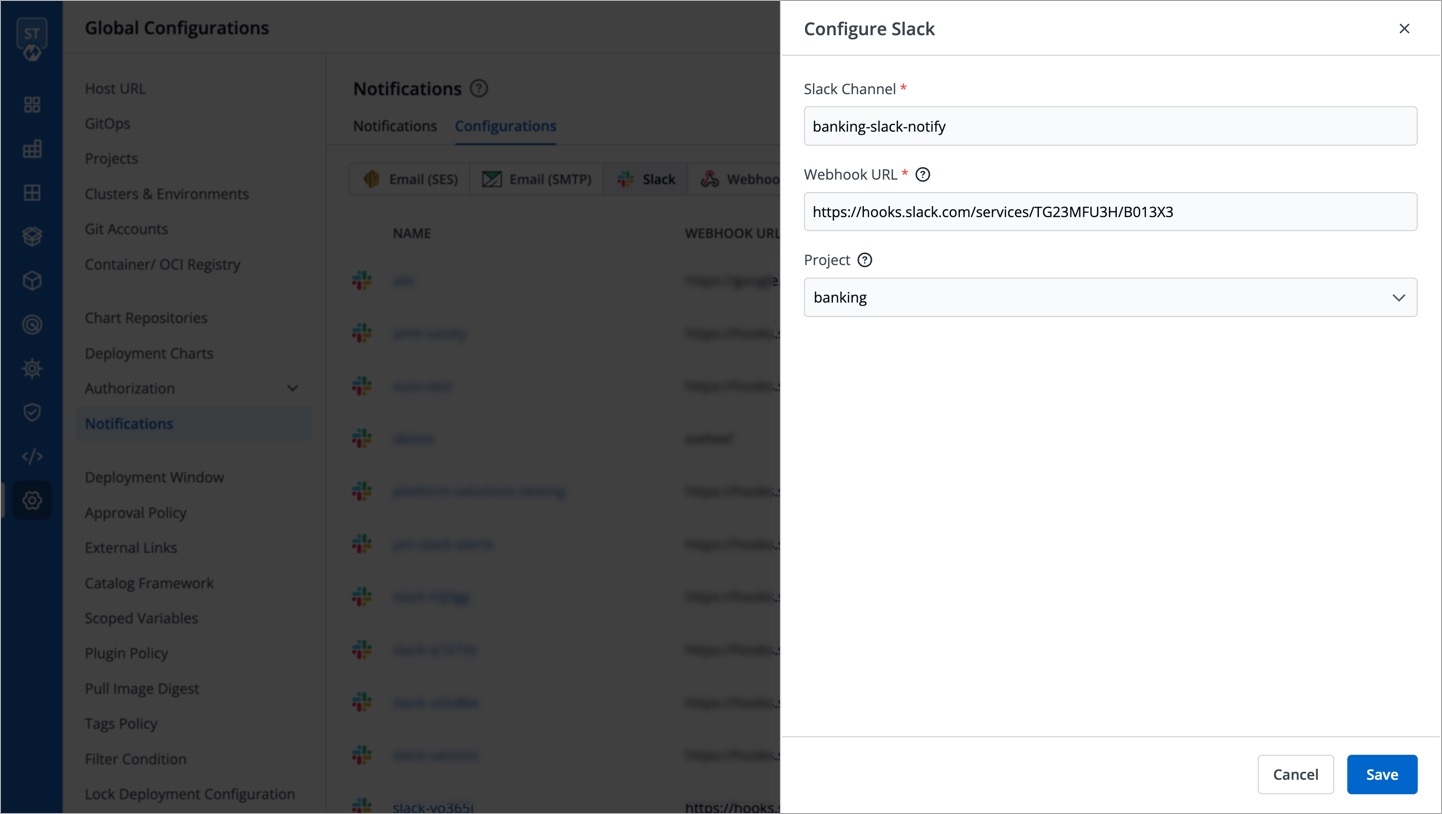
You can manage the Slack configurations to receive notifications on your preferred Slack channel.
Click Add to add new Slack Channel.
Slack Channel
Name of the Slack channel on which you wish to receive notifications.
Webhook URL
Project
Select the project name to control user access.
Click Save and your slack channel will be added.
Click Add New to receive new notification.
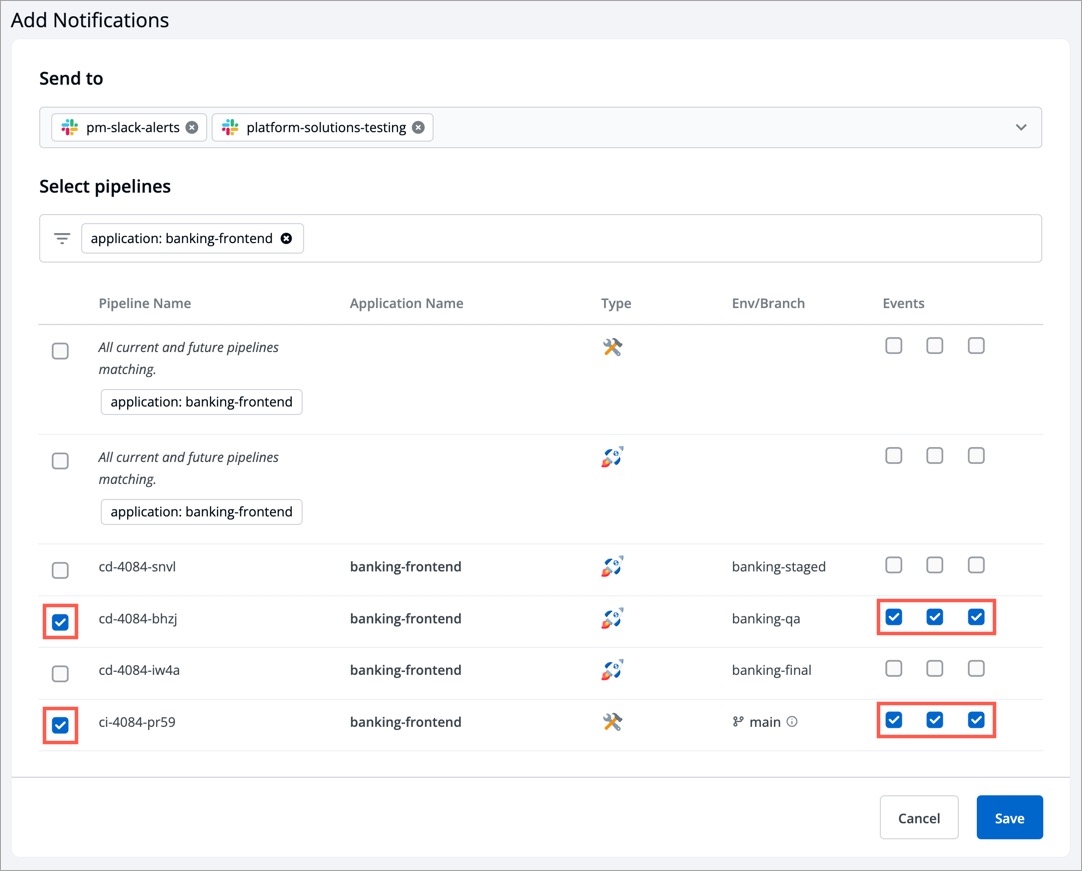
Send To
When you click on the Send to box, a drop-down will appear, select your slack channel name if you have already configured Slack Channel. If you have not yet configured the Slack Channel, Configure Slack Channel
Select Pipelines
Then, to fetch pipelines of an application, project and environment.
Choose a filter type(environment, project or application)
You will see a list of pipelines corresponding to your selected filter type, you can select any number of pipelines. For each pipeline, there are 3 types of events Trigger, Success, and Failure. Click on the checkboxes for the events, on which you want to receive notifications.
Click Save when you are done with your Slack notification configuration.
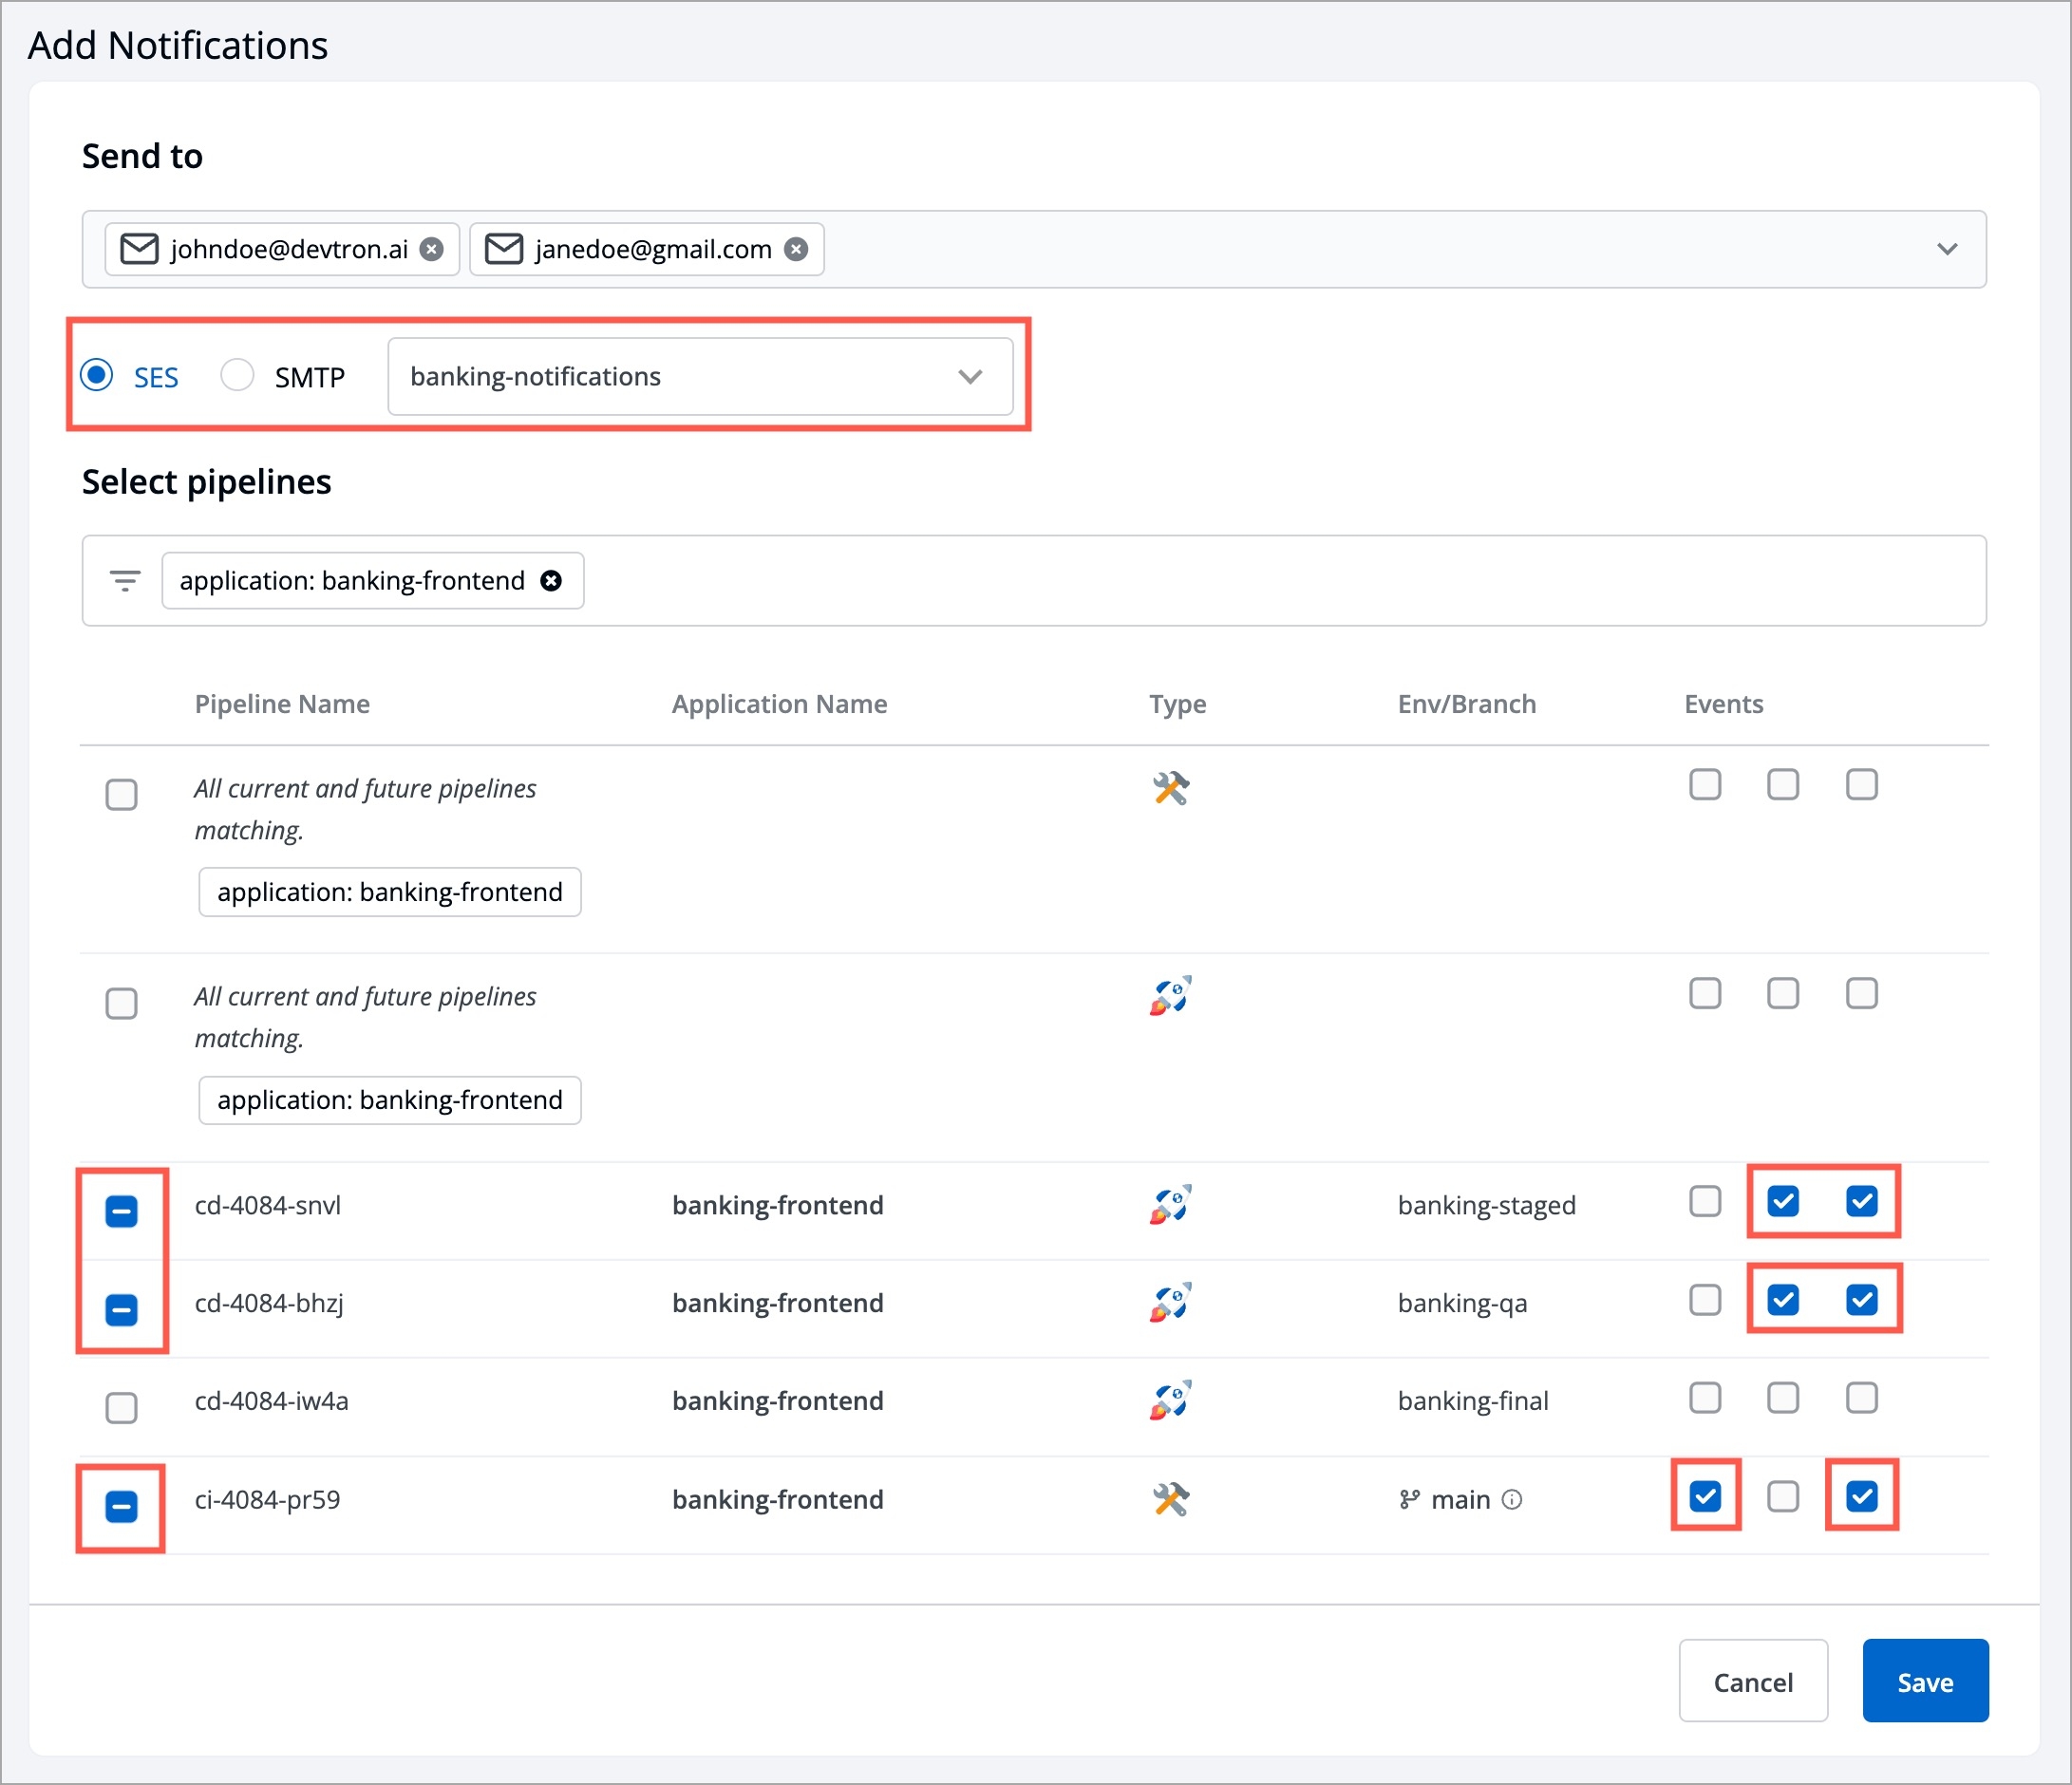
Send To
Click Send To box, select your e-mail address/addresses on which you want to send e-mail notifications. Make sure e-mail id are SES Verified.
If you have not yet configured SES, Configure SES.
Select Pipelines
To fetch pipelines of an application, project and environment.
Choose a filter type(environment, project or application)
You will see a list of pipelines corresponding to your selected filter type, you can select any number of pipelines. For each pipeline, there are 3 types of events Trigger, Success, and Failure. Click on the checkboxes for the events, on which you want to receive notifications.
Click Save once you have configured the SES notification.
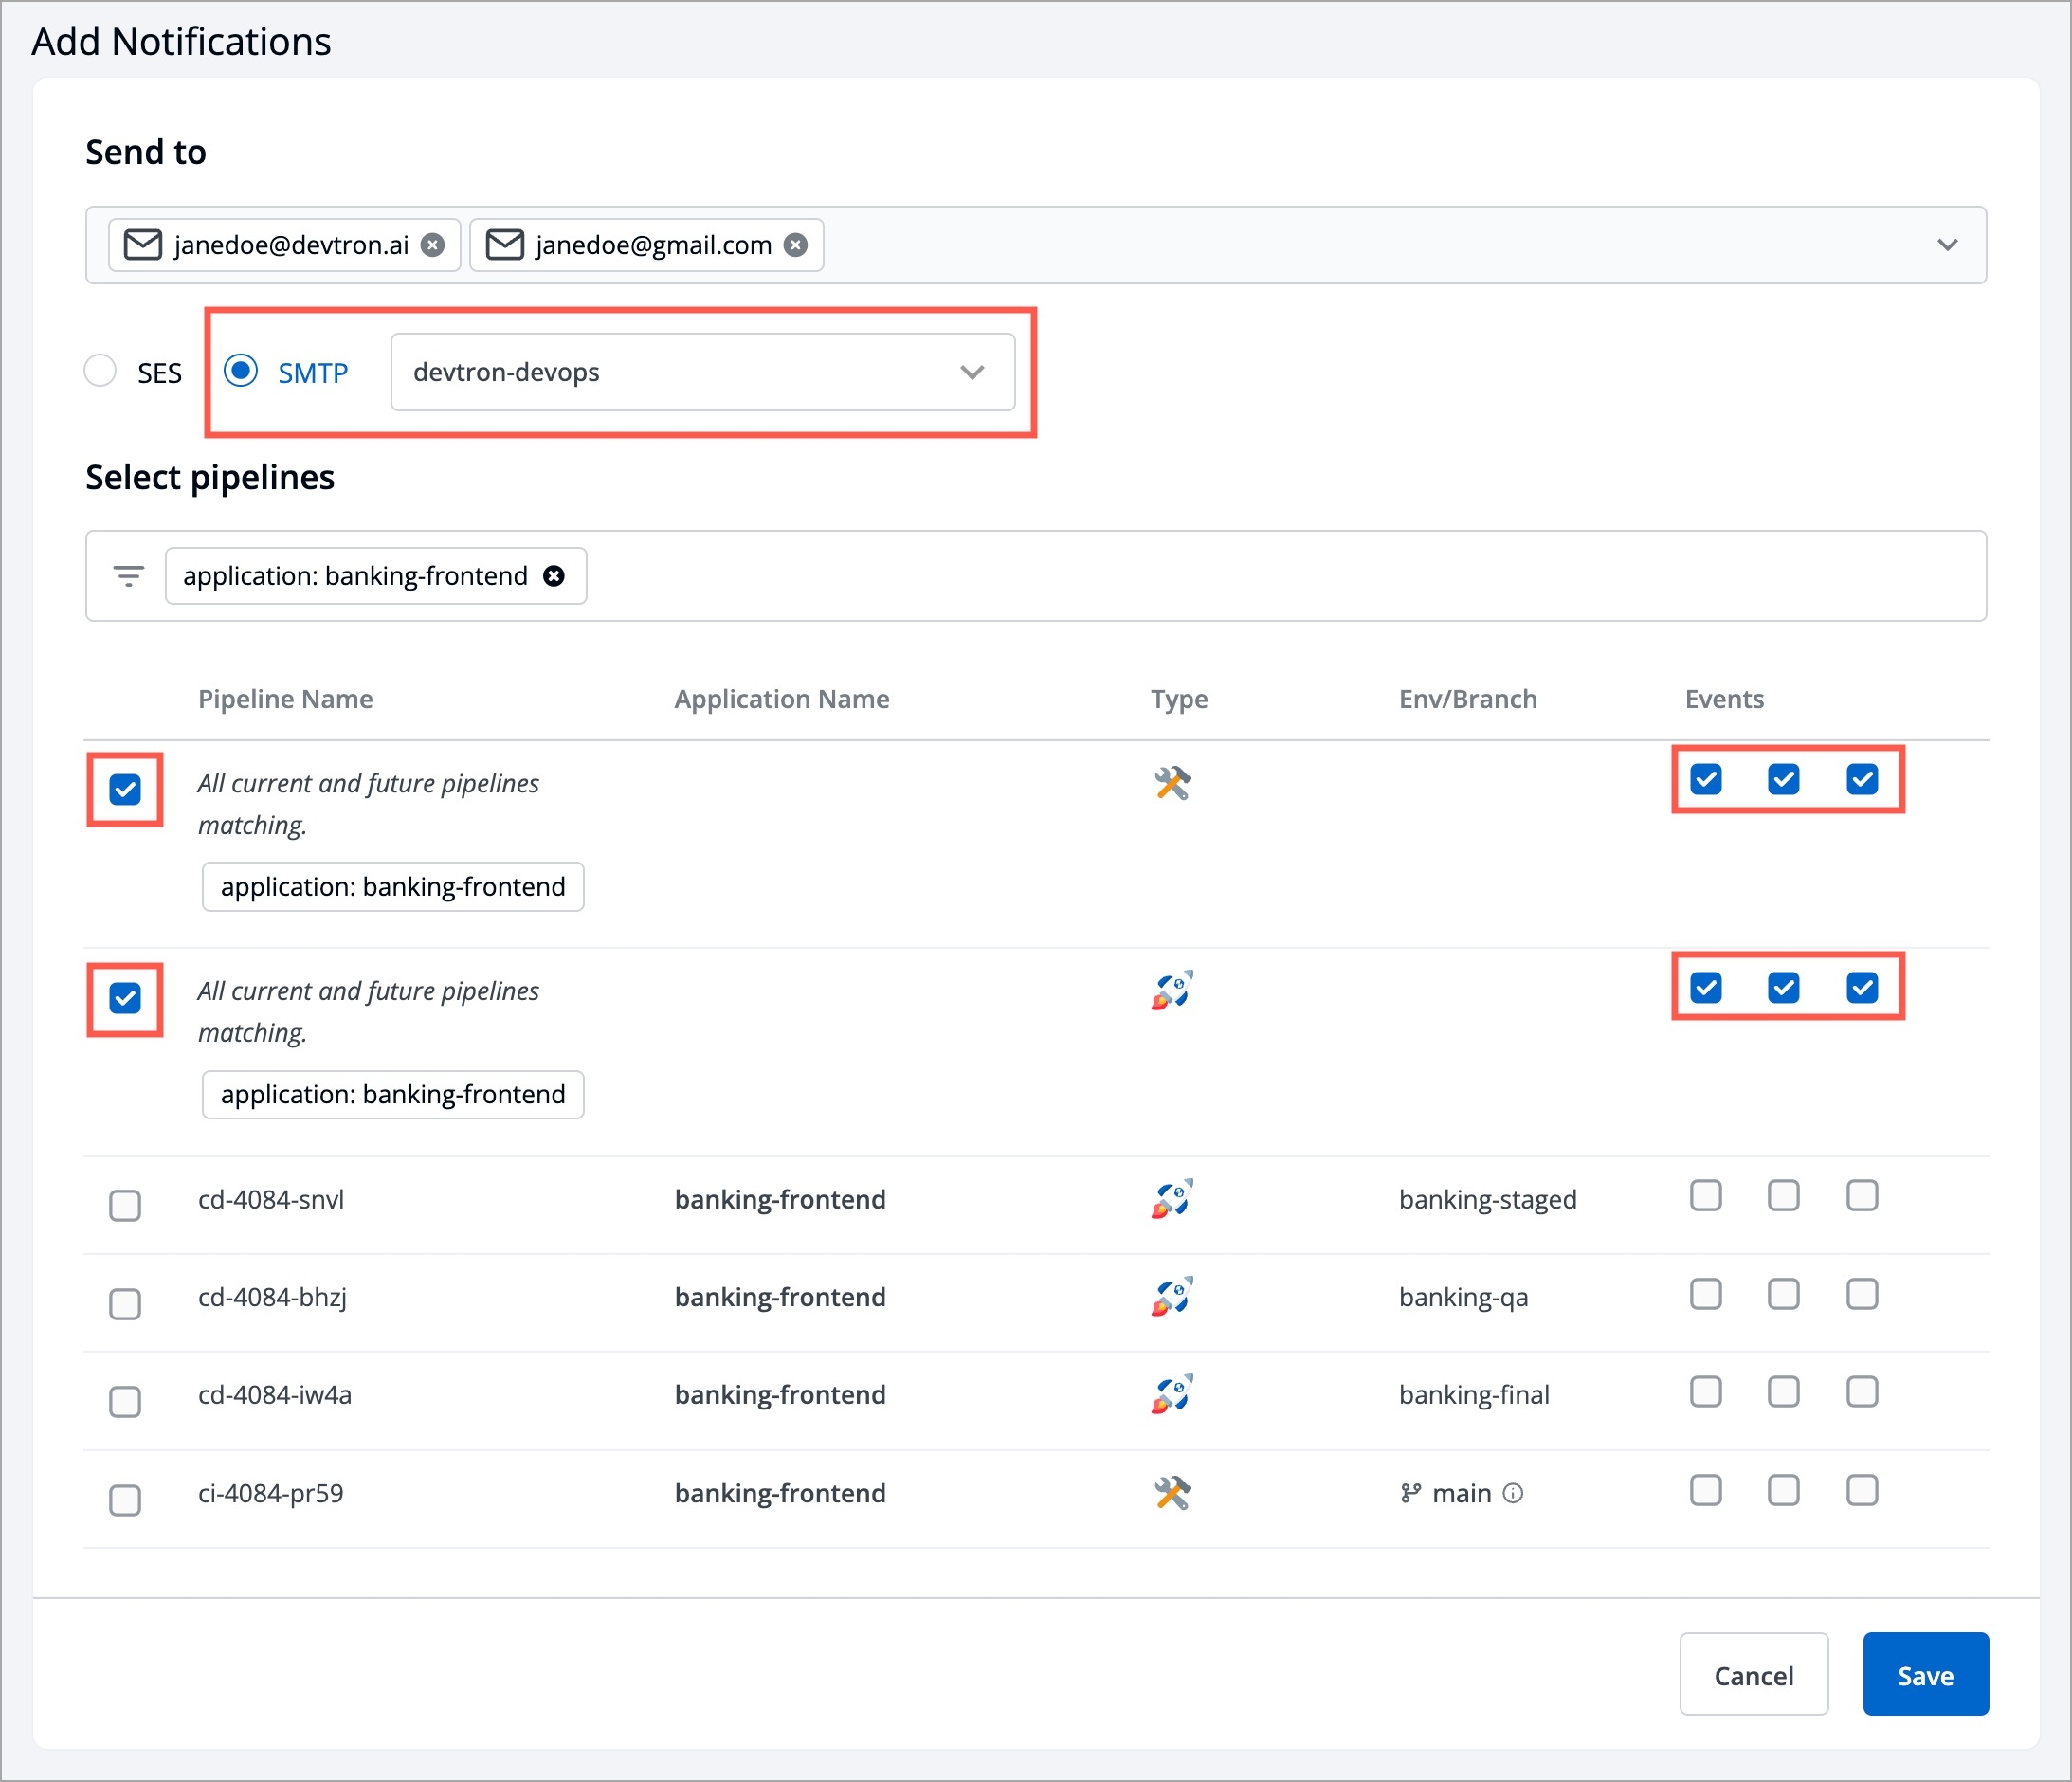
Send To
Click Send To box, select your e-mail address/addresses on which you want to send e-mail notifications. Make sure e-mail IDs are SMTP Verified.
If you have not yet configured SMTP, Configure SMTP.
Select Pipelines
To fetch pipelines of an application, project and environment.
Choose a filter type(environment, project or application)
You will see a list of pipelines corresponding to your selected filter type, you can select any number of pipelines. For each pipeline, there are 3 types of events Trigger, Success, and Failure. Click on the checkboxes for the events, on which you want to receive notifications.
Click Save once you have configured the SMTP notification.
An ideal deployment workflow may consist of multiple stages (e.g., SIT, UAT, Prod environment).
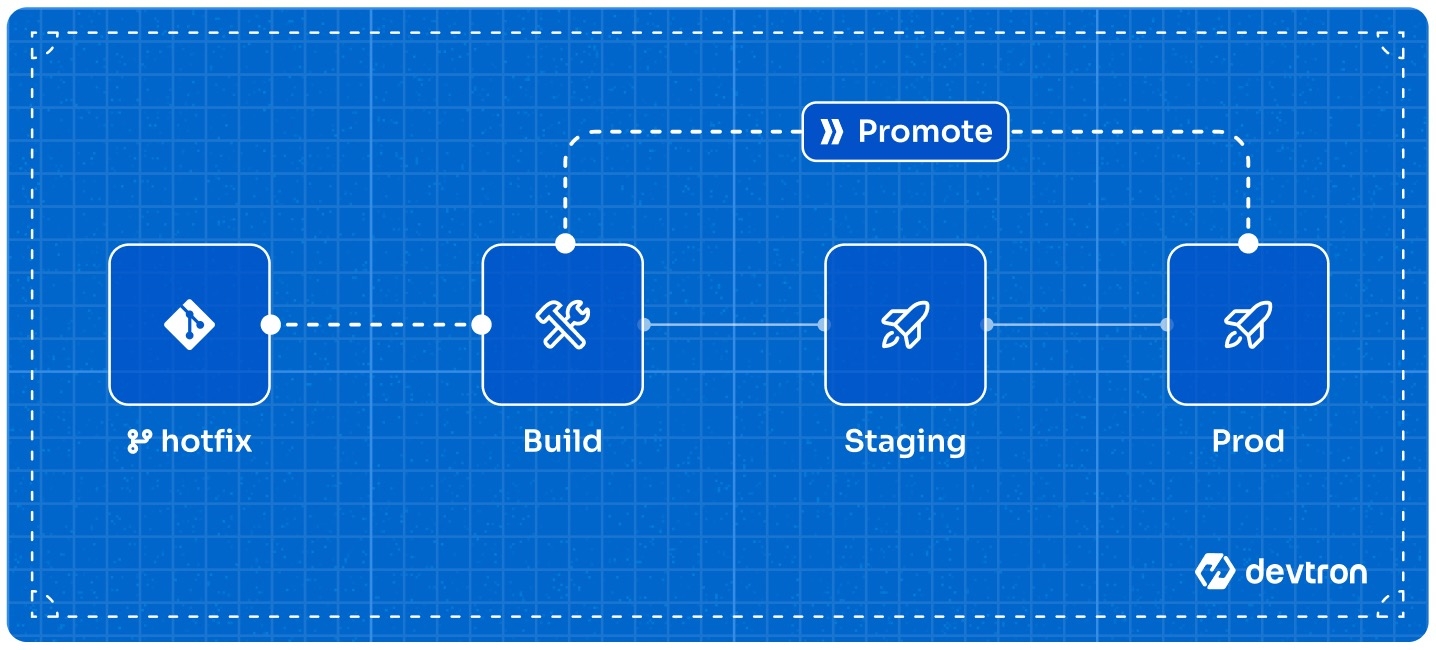
If you have built such a workflow, your CI image will sequentially traverse and deploy to each environment until it reaches the target environment. However, if there's a critical issue you wish to address urgently (through a hotfix) on production, navigating the standard workflow might feel slow and cumbersome.
Therefore, Devtron offers a feature called 'Image Promotion Policy' that allows you to directly promote an image to the target environment, bypassing the intermediate stages in your workflow including:
All approval nodes of the intermediate stages
You can create a policy using our APIs or through Devtron CLI. To get the latest version of the devtctl binary, please contact your enterprise POC or reach out to us directly for further assistance.
Here is the CLI approach:
Syntax:
Arguments:
--name (required): The name of the image promotion policy.
--description (optional): A brief description of the policy, preferably explaining what it does.
--passCondition (optional): Specify a condition using Common Expression Language (CEL). Images that match this condition will be eligible for promotion to the target environment.
--failCondition (optional): Images that match this condition will NOT be eligible for promotion to the target environment.
--approverCount (optional): The number of approvals required to promote an image (0-6). Defaults to 0 (no approvals).
--allowRequestFromApprove (optional): (Boolean) If true, user who raised the image promotion request can approve it. Defaults to false.
--allowImageBuilderFromApprove (optional): (Boolean) If true, user who triggered the build can approve the image promotion request. Defaults to false.
--allowApproverFromDeploy (optional): (Boolean) If true, user who approved the image promotion request can deploy that image. Defaults to false.
--applyPath (optional): Specify the path to the YAML file that contains the list of applications and environments to which the policy should be applicable.
If an image matches both pass and fail conditions, the priority of the fail condition will be higher. Therefore, such image will NOT be eligible for promotion to the target environment.
If you don't define both pass and fail conditions, all images will be eligible for promotion.
You can apply a policy using our APIs or through Devtron CLI. Here is the CLI approach:
Create a YAML file and give it a name (say applyPolicy.yaml). Within the file, define the applications and environments to which the image promotion policy should apply, as shown below.
Apply the policy using the following CLI command:
Here, you can promote images to the target environment(s).
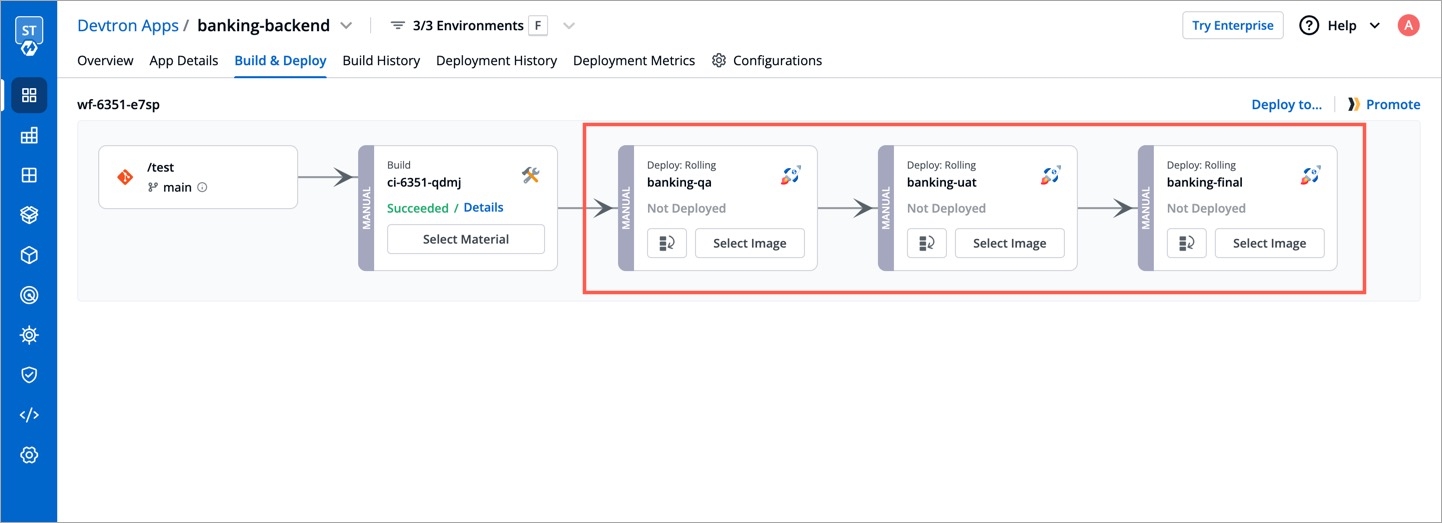
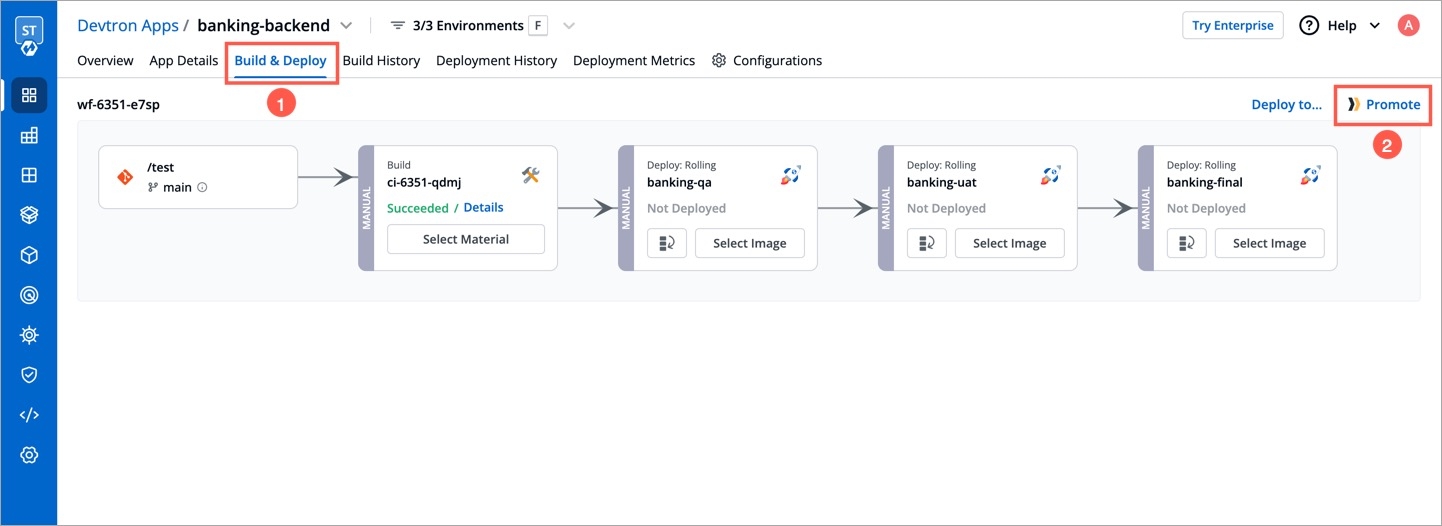
Go to the Build & Deploy tab of your application.
Click the Promote button next to the workflow in which the you wish to promote the image. Please note, the button will appear only if image promotion is allowed for any environment used in that workflow.
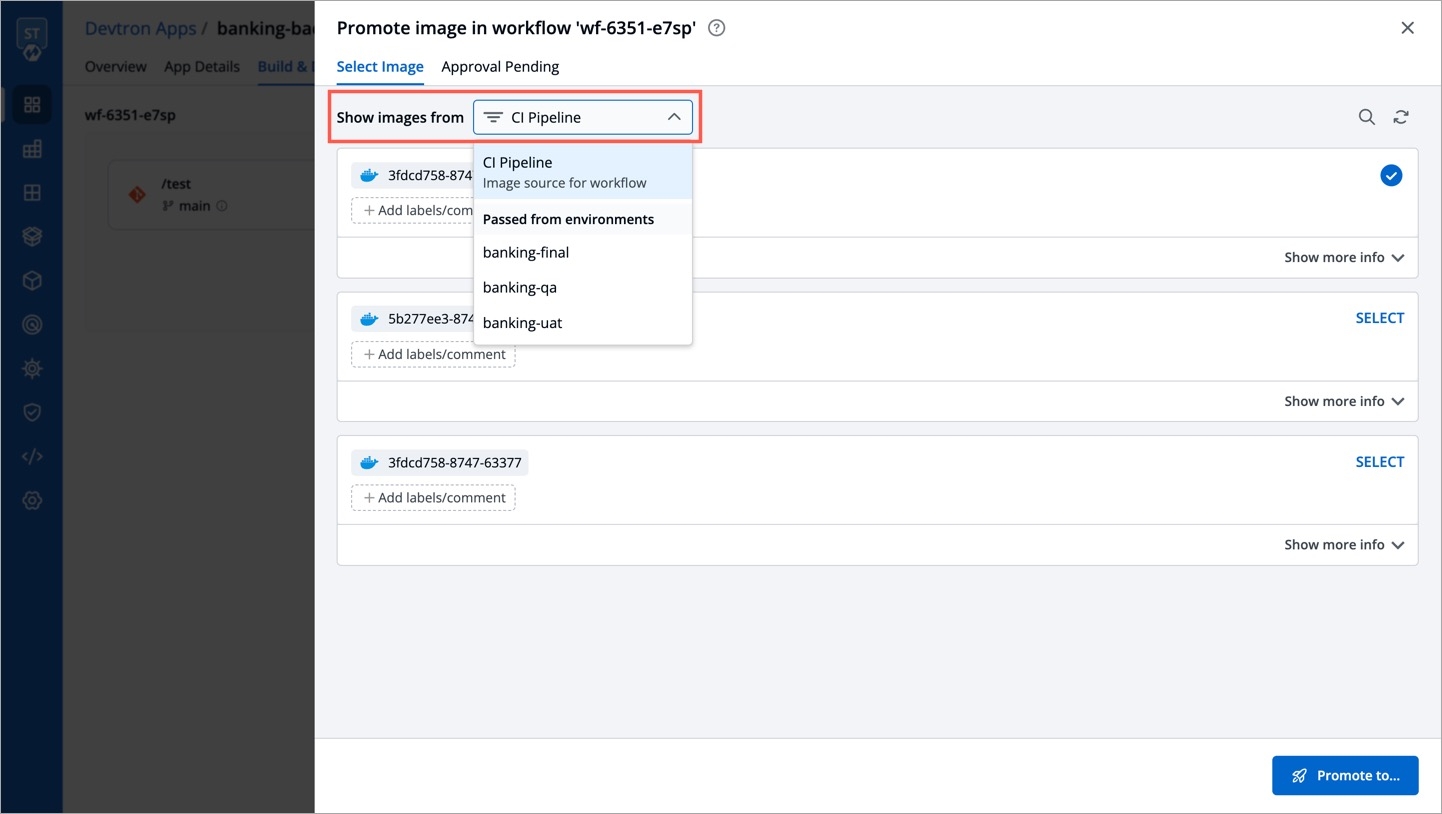
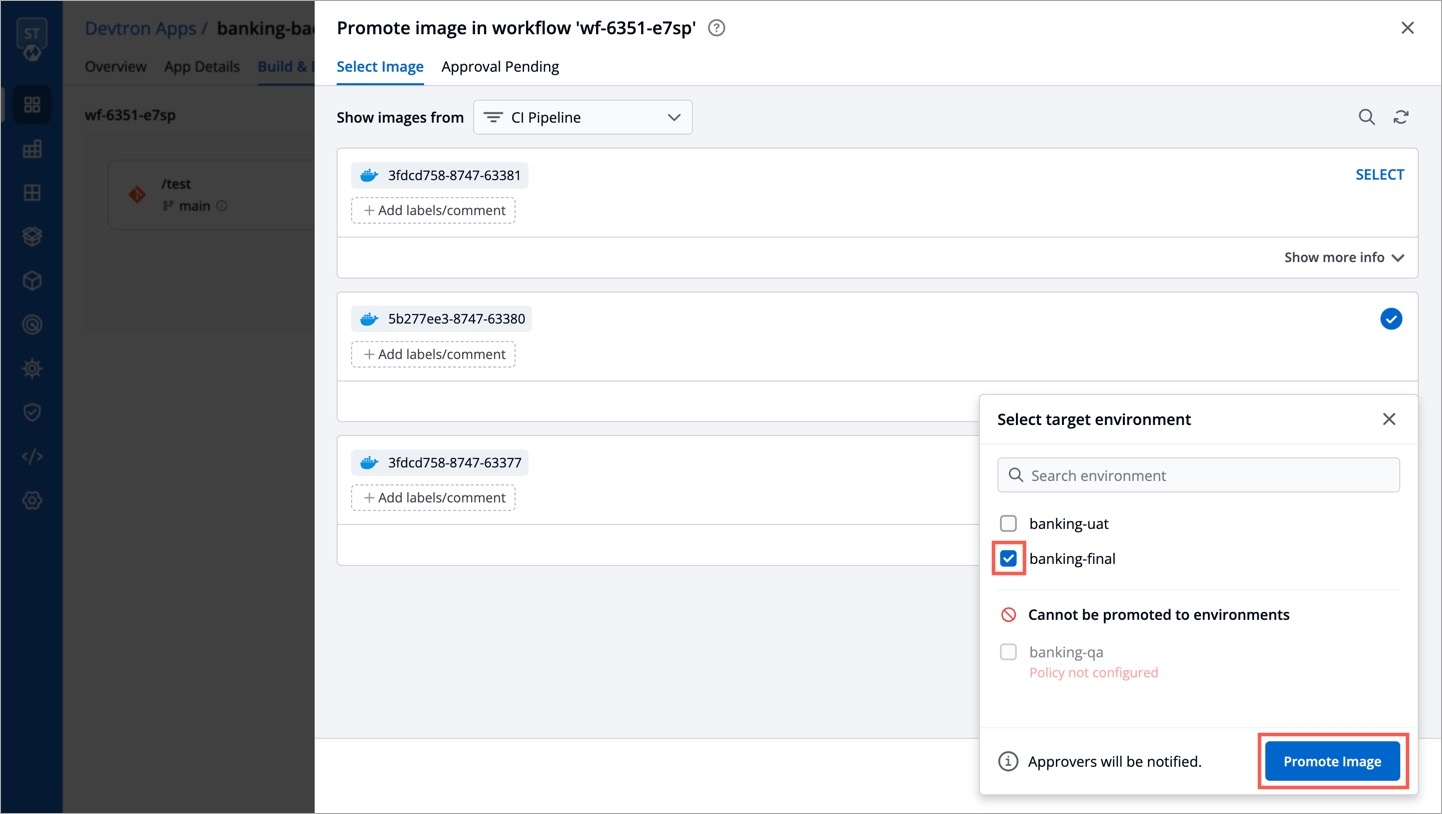
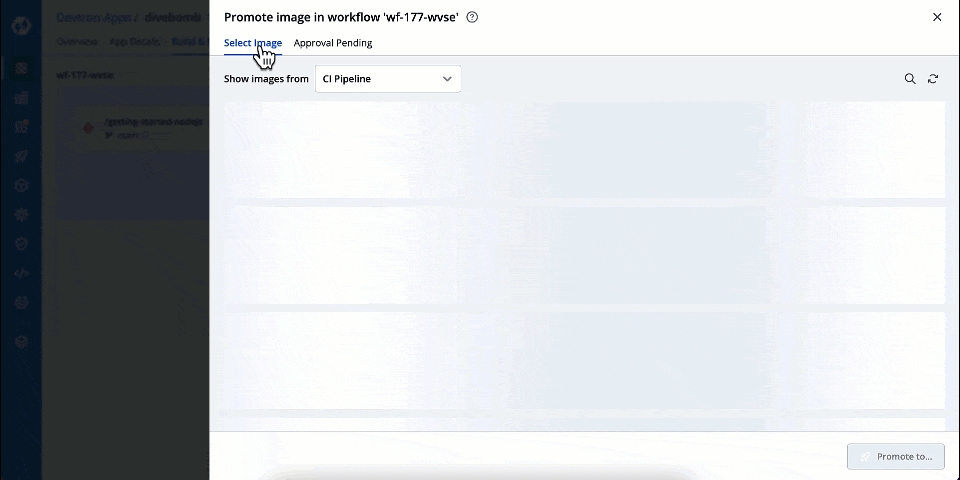
In the Select Image tab, you will see a list of images. Use the Show Images from dropdown to filter the list and choose the image you wish to promote. This can be either be an image from the CI pipeline or one that has successfully passed all stages (e.g., pre, post, if any) of that particular environment.
Use the SELECT button on the image, and click Promote to...
Select one or more target environments using the checkbox.
Click Promote Image.
The image's promotion to the target environment now depends on the approval settings in the image promotion policy. If the super-admin has enforced an approval process, the image requires the necessary number of approvals before promotion. On the other hand, if the super-admin has not enforced approval, the image will be automatically promoted since there is no request phase involved.
In case you have configured SES or SMTP on Devtron, an email notification will be sent to the approvers.
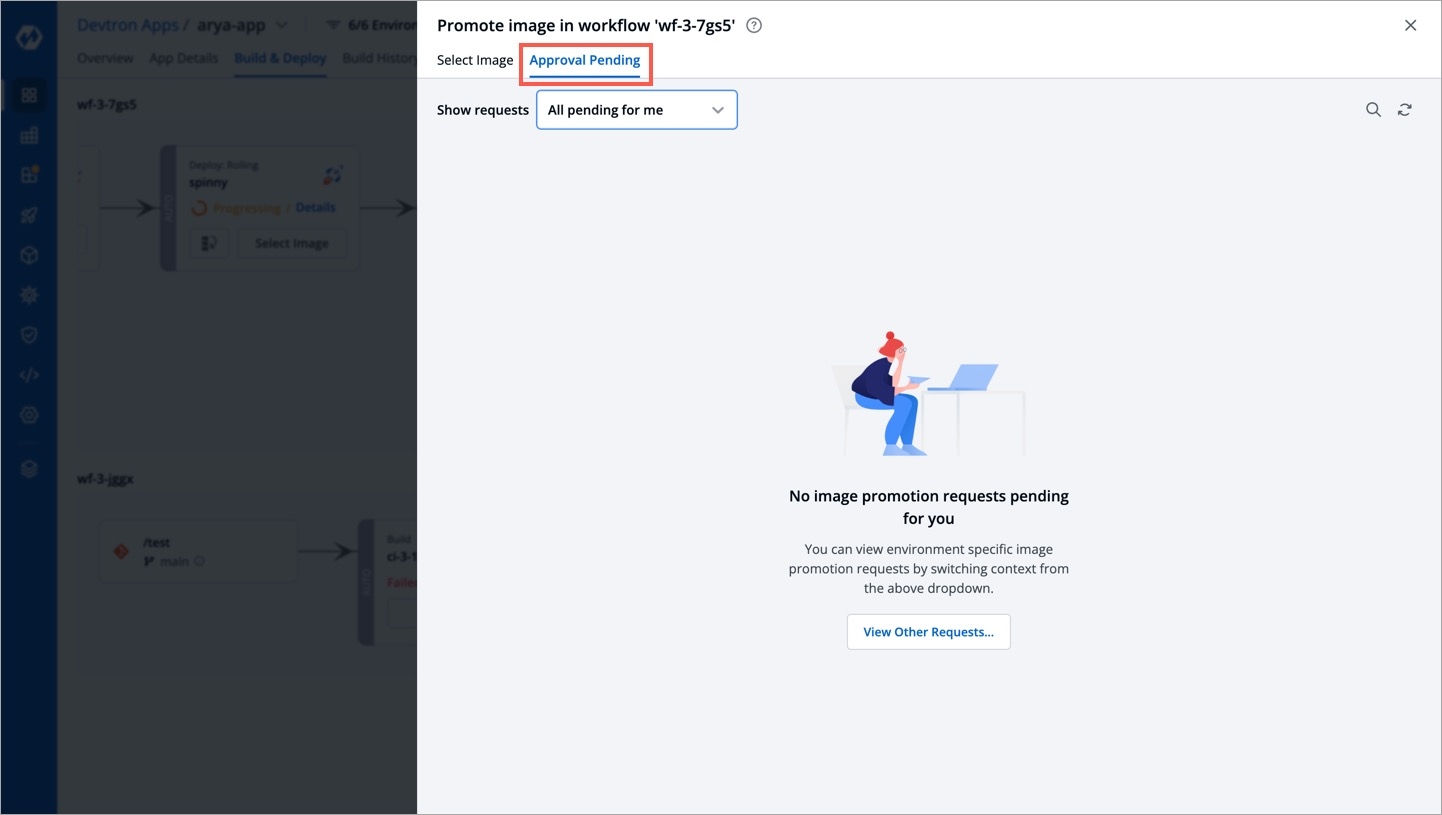
If approval(s) are required for image promotion, you may check the status of your request in the Approval Pending tab.
Only the users having Artifact promoter role (for the application and environment) or superadmin permissions will be able to approve the image promotion request.
Go to the Build & Deploy tab of your application.
Click the Promote button next to the workflow.
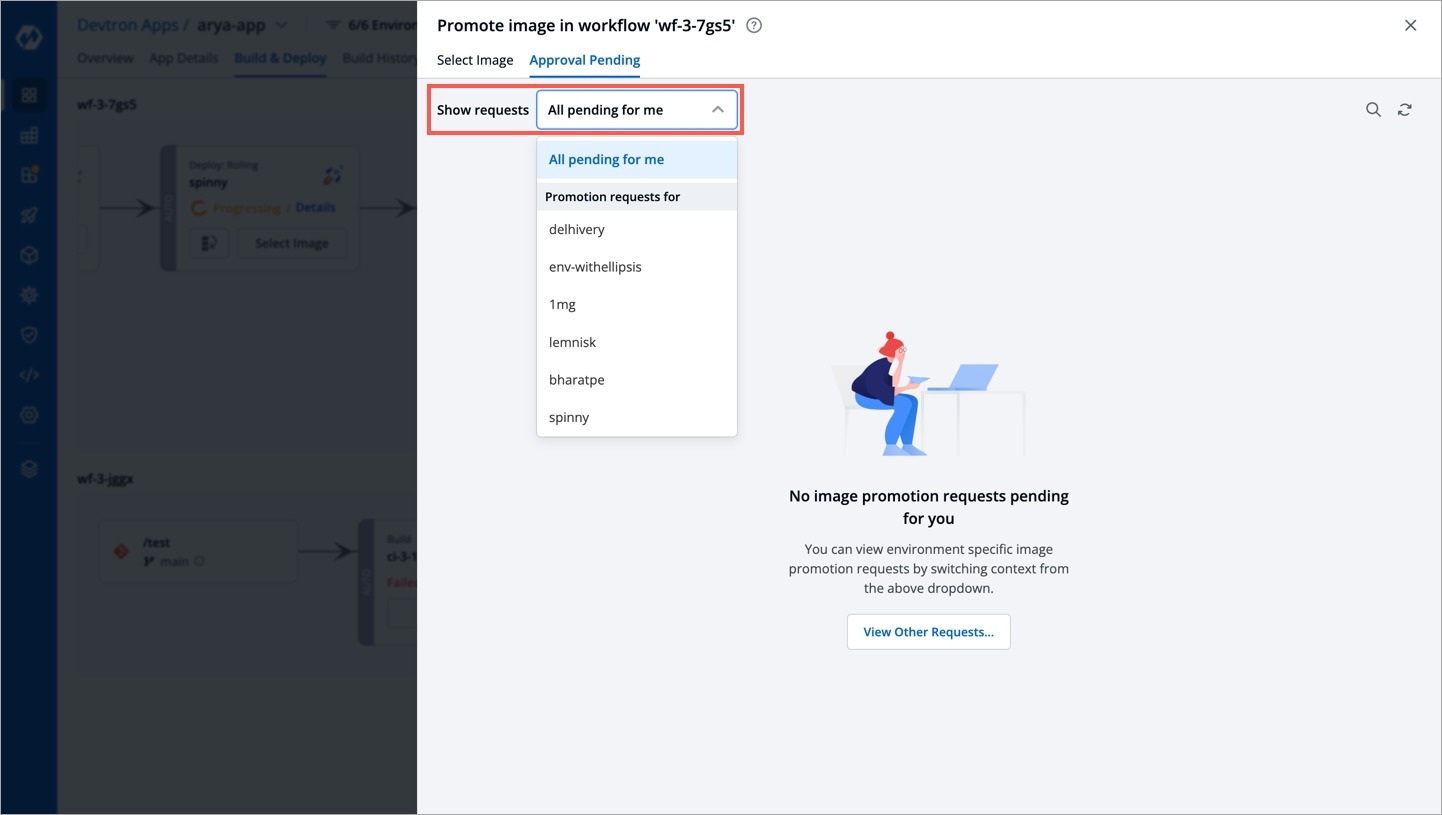
Go to the Approval Pending tab to see the list of images requiring approval. By default, it shows a list of all images whose promotion request is pending with you.
All the images will show the source from which it is being promoted, i.e., CI stage or intermediate stage (environment).
Click Approve for... to choose the target environments to which it can be promoted.
Click Approve.
You can also use the Show requests dropdown to filter the image promotion requests for a specific target environment.
If there are pending promotion requests, you can approve them as shown below:
If a user has approved the promotion request for an image, they may or may not be able to deploy depending upon the policy configuration.
However, a promoted image does not automatically qualify as a deployable image. It must fulfill all configured requirements (Image Deployment Approval, Filter Conditions, etc.) of the target environment for it to be deployed.
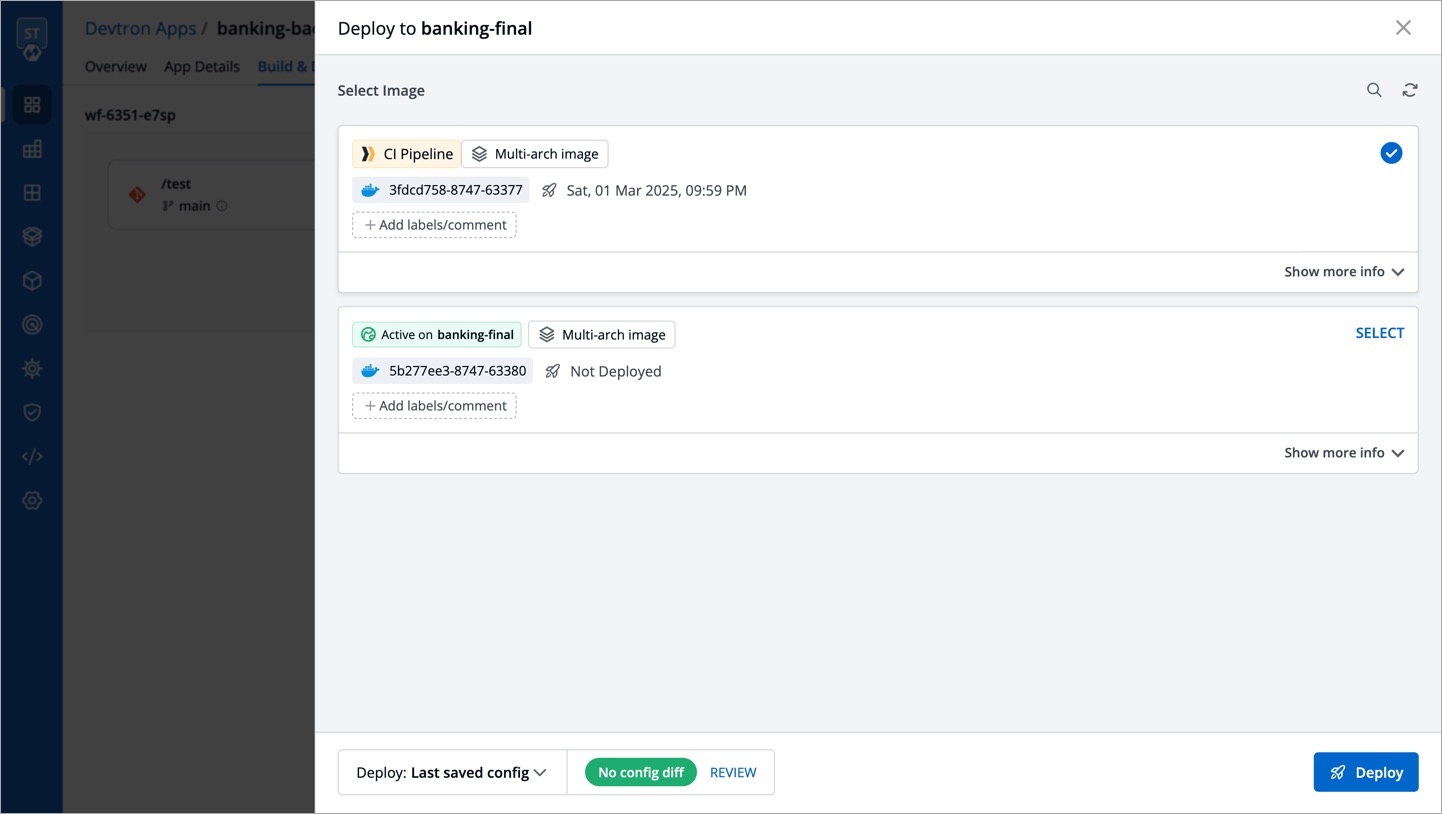
In the Build & Deploy tab of your application, click Select Image for the CD pipeline, and choose your promoted image for deployment.
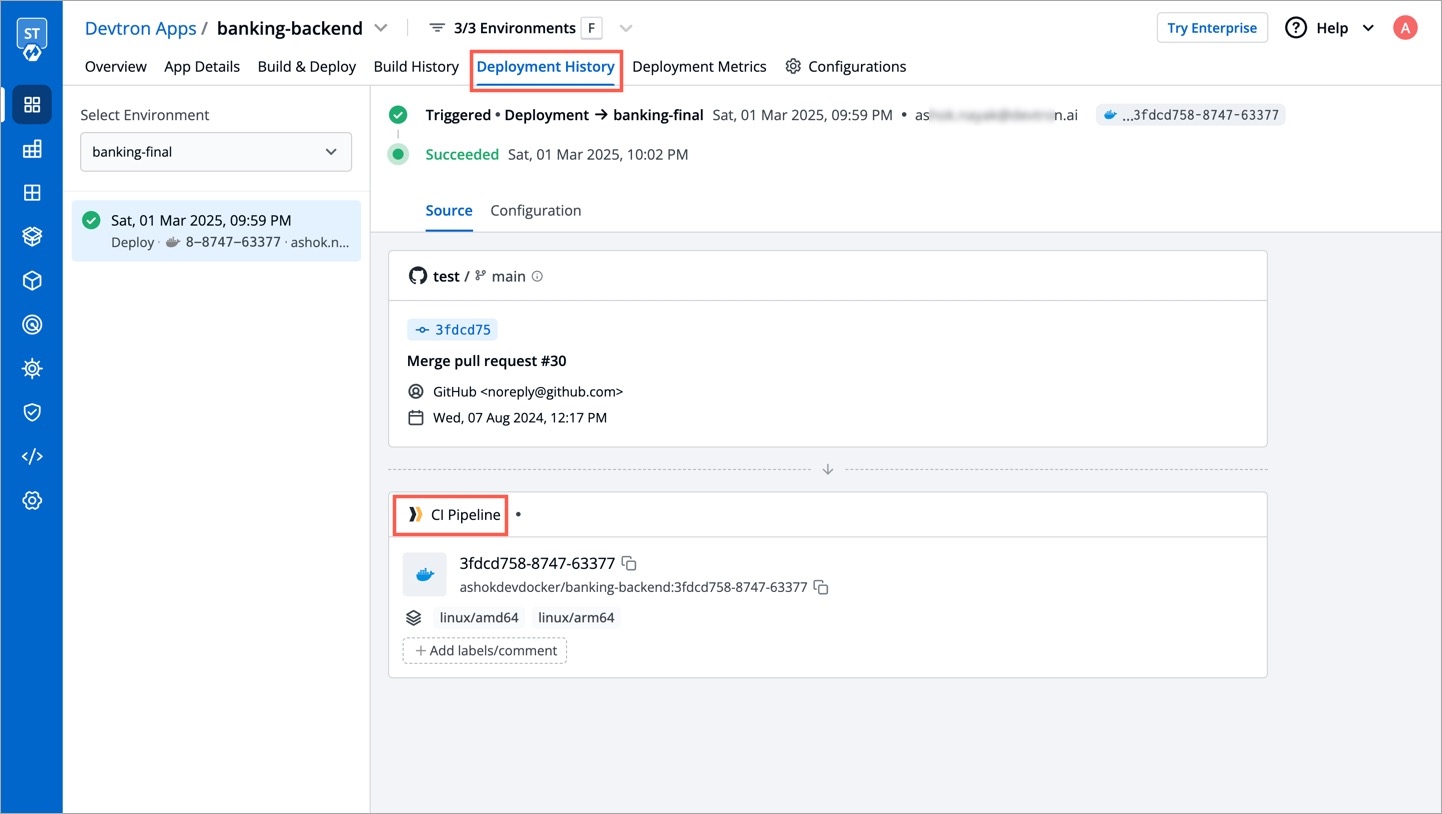
You can check the deployment of promoted images in the Deployment History of your application. It will also indicate the pipeline from which the image was promoted and deployed to the target environment.
Devtron's Tags Policy feature enables you to assign tags to your applications. Devtron also offers the option to propagate the tags assigned to an application as labels within the associated Kubernetes resources.
To add tags, follow these steps:
From the left pane, navigate to the Global Configuration section.
Select Tags within the Global Configuration section.
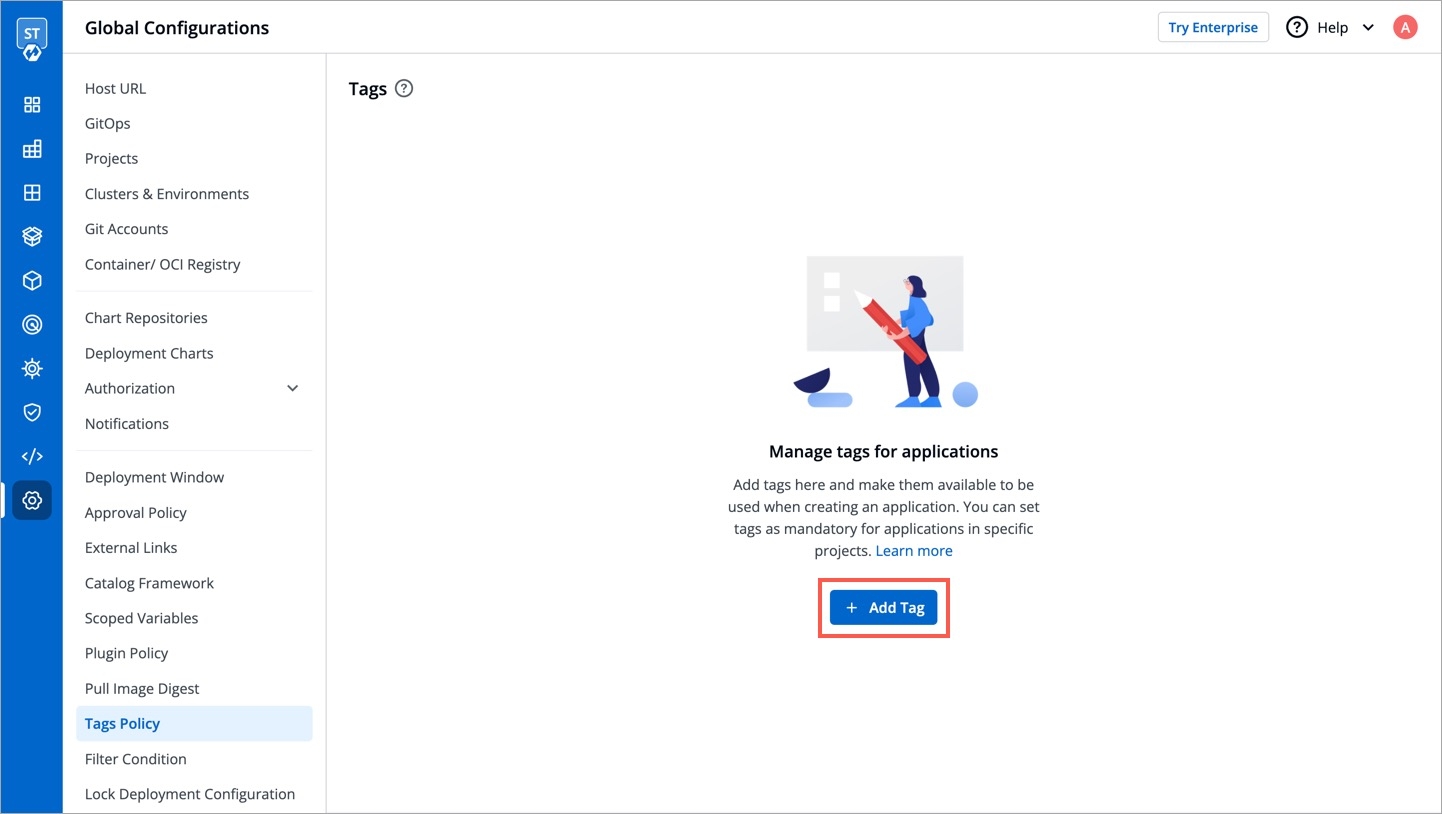
Once you are in the Tags section, locate the Add Tag button in the upper-right corner of the screen and click it.
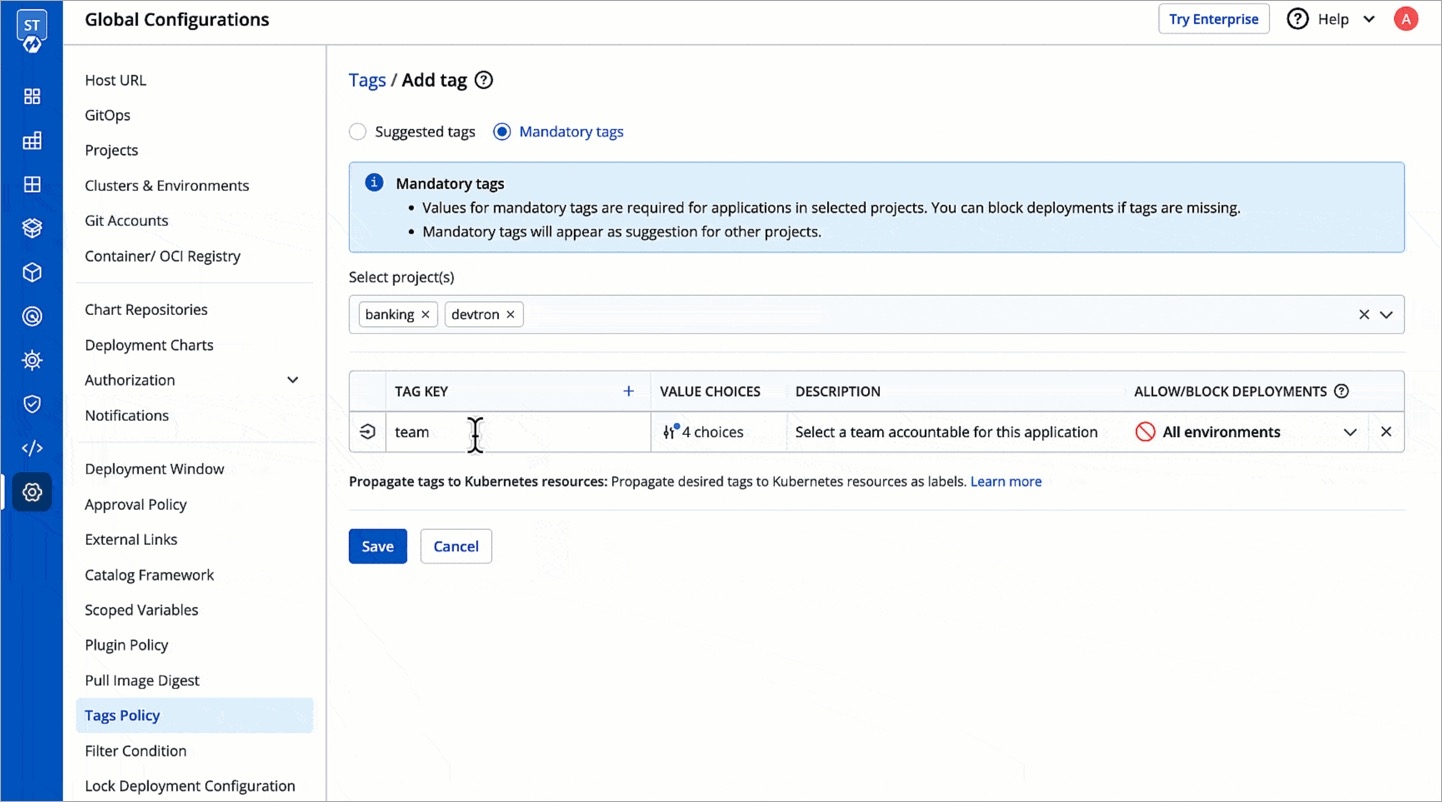
Within the Add Tag section, you will find two options for tags:
Suggested tags: These tags appear as suggestions when adding tags to applications.
Mandatory tags: These tags are required for applications within the selected project.
To create mandatory tags, choose the second option: Mandatory tags. This ensures that the specified tags are mandatory for the applications within the selected project.
Next, choose the project(s) for which you want to create mandatory tags. You can select multiple projects at once (if required).
After selecting the projects, proceed to add the mandatory tags for the selected projects.
By default, tags assigned to applications in Devtron are not automatically propagated to Kubernetes resources as labels. However, Devtron provides the flexibility to enable this feature if desired.
When the propagation is enabled for tags from the global configuration, the tags will be automatically propagated as labels for all applications within the projects where these tags are used. Even if tag propagation is disabled from the global configuration in Devtron, you still have the option to enable propagation at the application level.
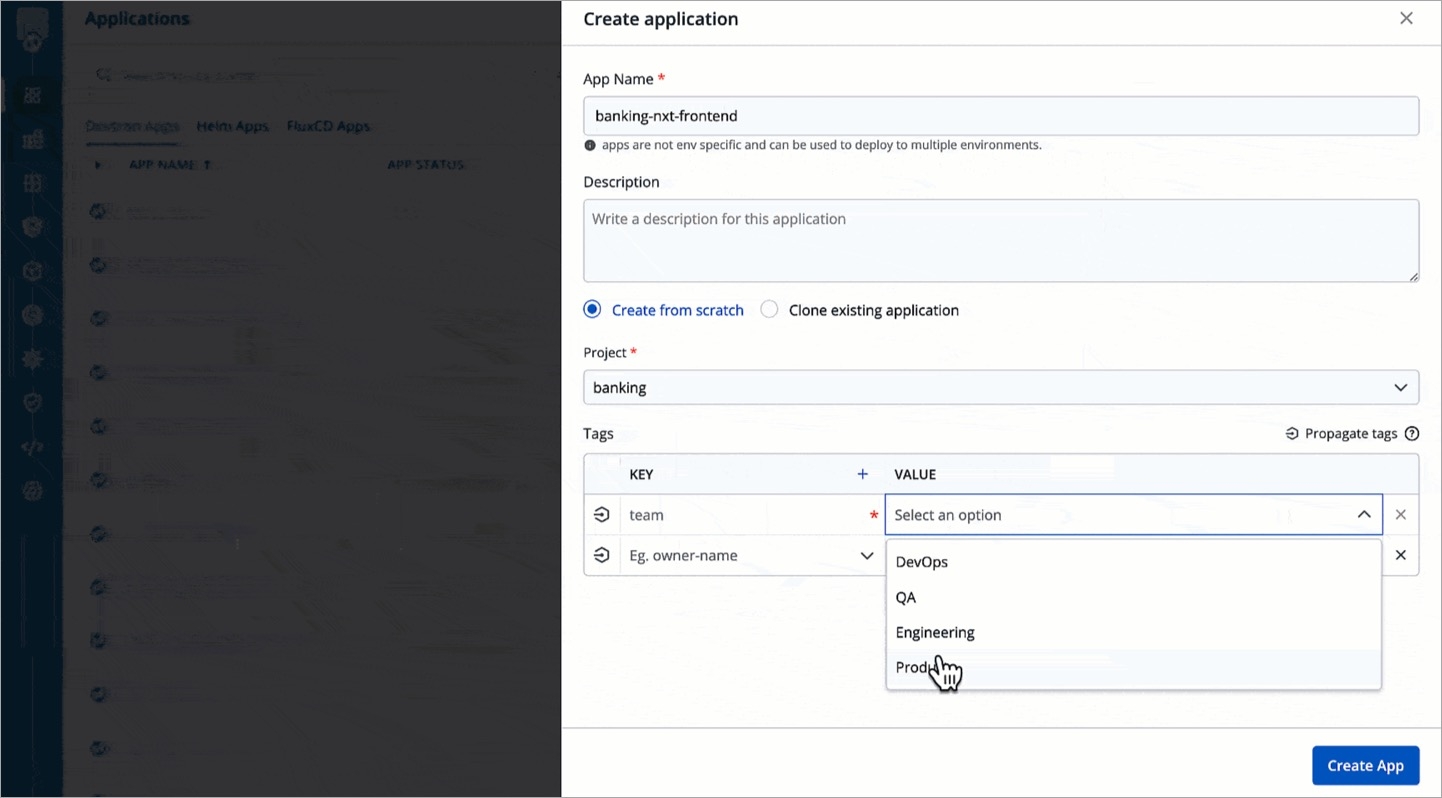
In a project where mandatory tags are enabled, it is required to provide values for those tags when creating new applications. Without providing values for the mandatory tags, it is not possible to create a new application within that project.
When mandatory tags are enabled, Devtron enforces the requirement to specify values for these tags during the application creation process. This ensures that all applications within the project adhere to the specified tag values.
If tag propagation for a project is disabled globally, you can still enable it for individual applications. During the application creation process, you have the option to enable tag propagation specifically for that application. By doing so, the tags assigned to that application will be propagated as labels to the associated Kubernetes resources.
The Deployment Template might contain certain configurations intended for the DevOps team (e.g., ingress), and not meant for developers to modify.
Therefore, Devtron allows super-admins to restrict such fields from modification or deletion.
This stands true for deployment templates in:
How is this different from the Protect Configuration feature?
The 'protect configuration' feature is meant to verify the edits by introducing an approval flow for any changes made to the configuration files, i.e., Deployment template, ConfigMaps, and Secrets. This is performed at application-level.
Whereas, the 'lock deployment configuration' feature goes one step further. It is meant to prevent any edits to specific keys by non-super-admins. This applies only to deployment templates and is performed at global-level.
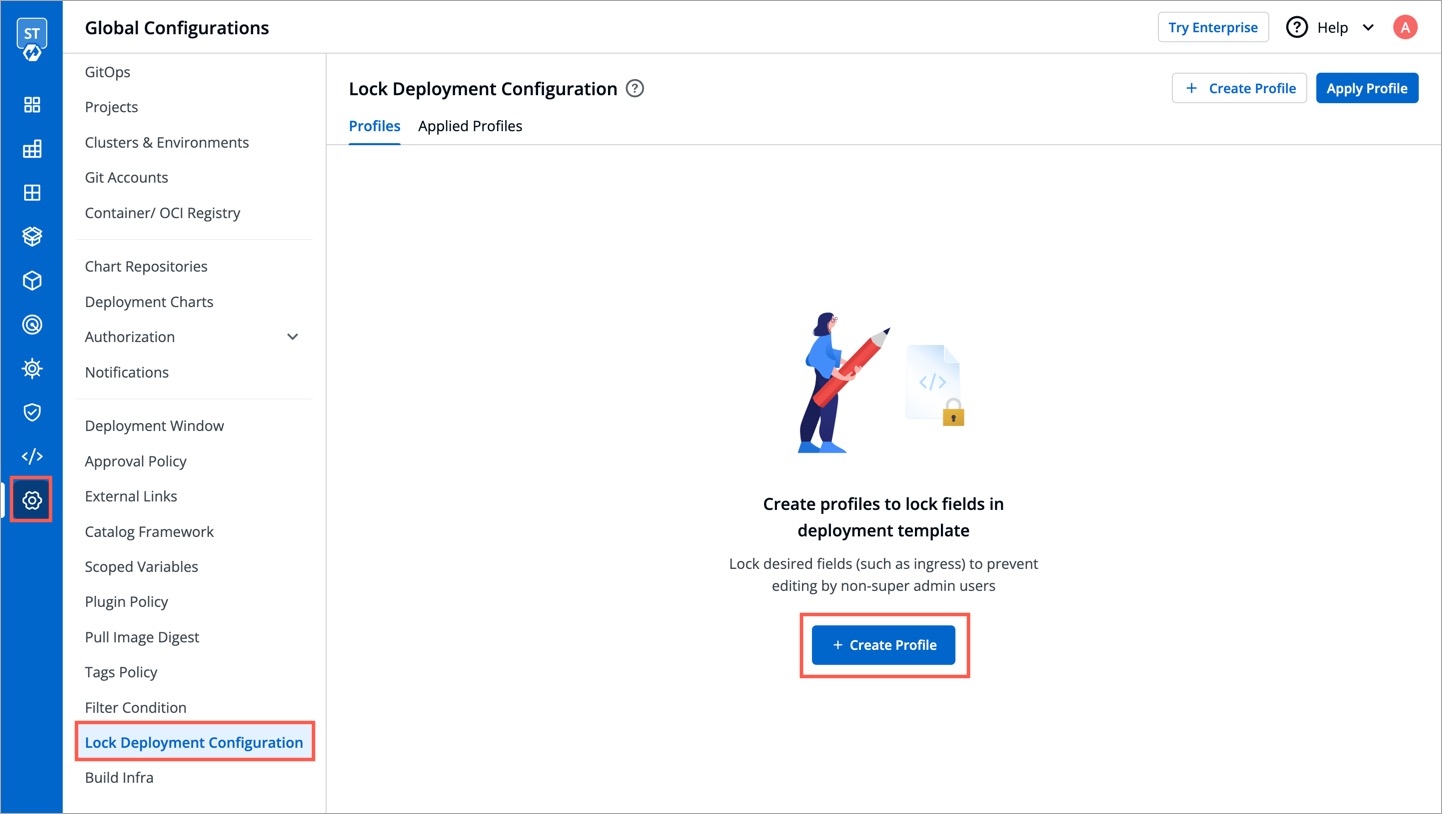
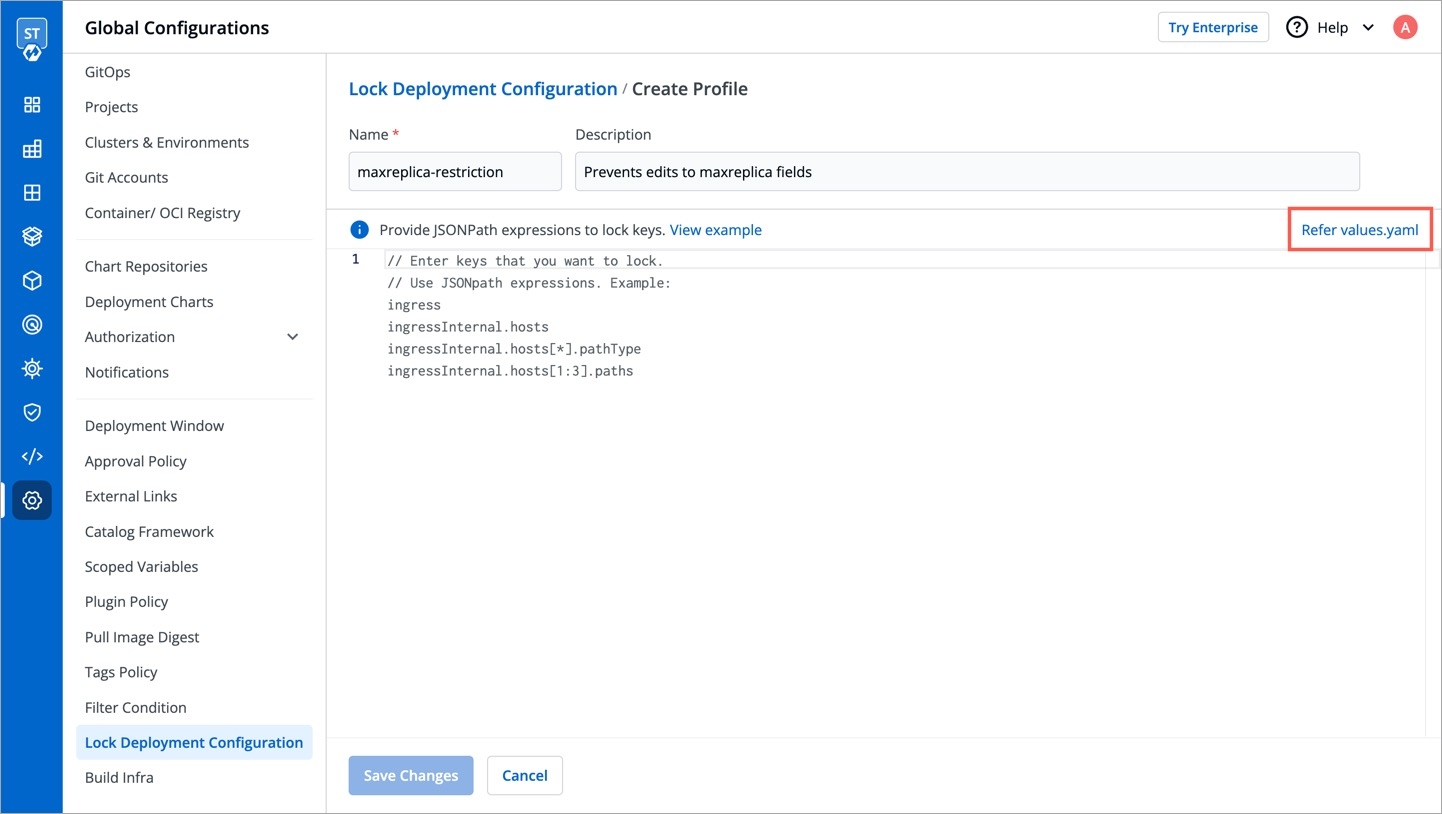
Go to Global Configurations → Lock Deployment Config. Click Configure Lock.
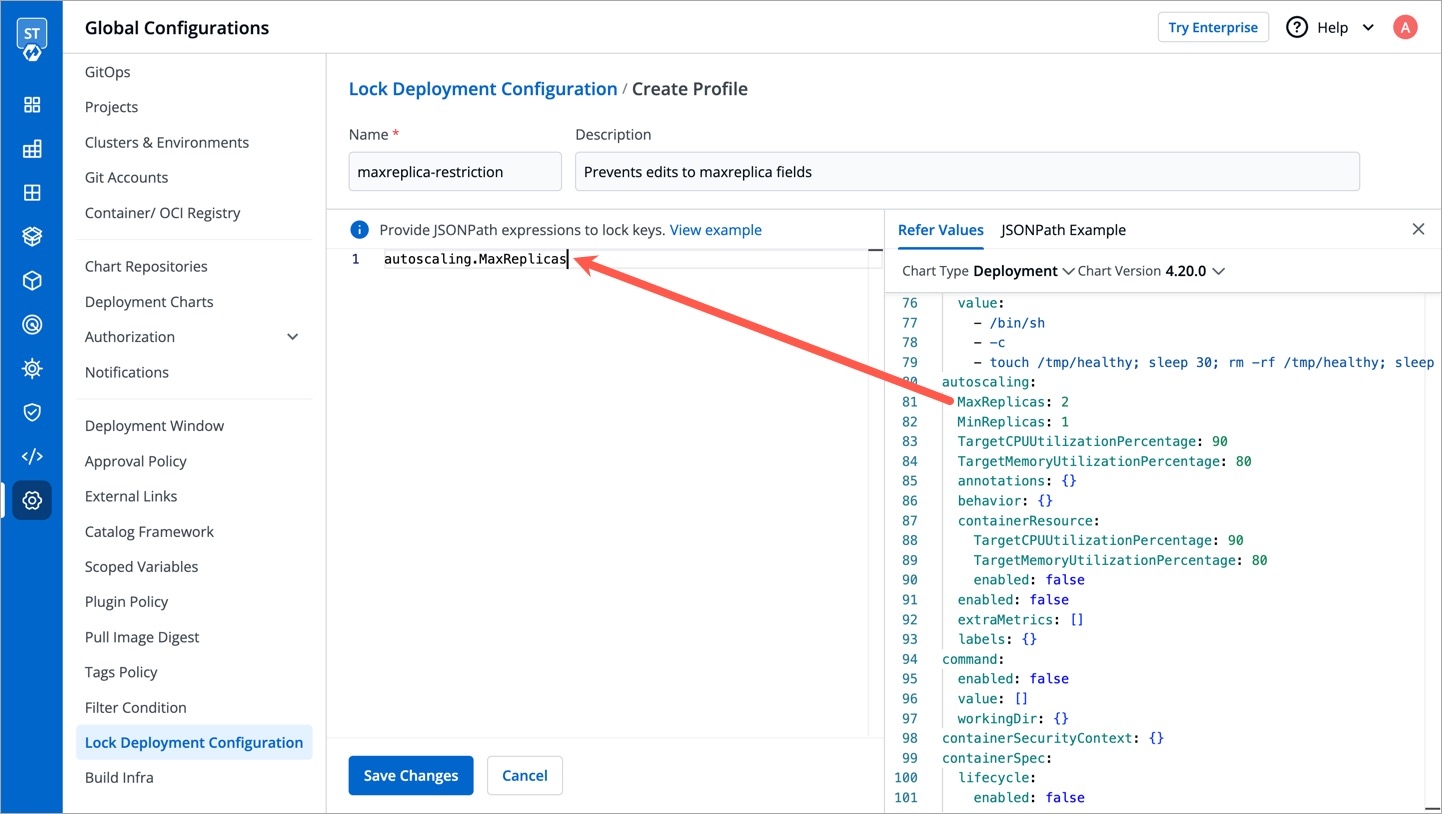
(Optional) Click Refer Values.YAML to check which keys you wish to lock.
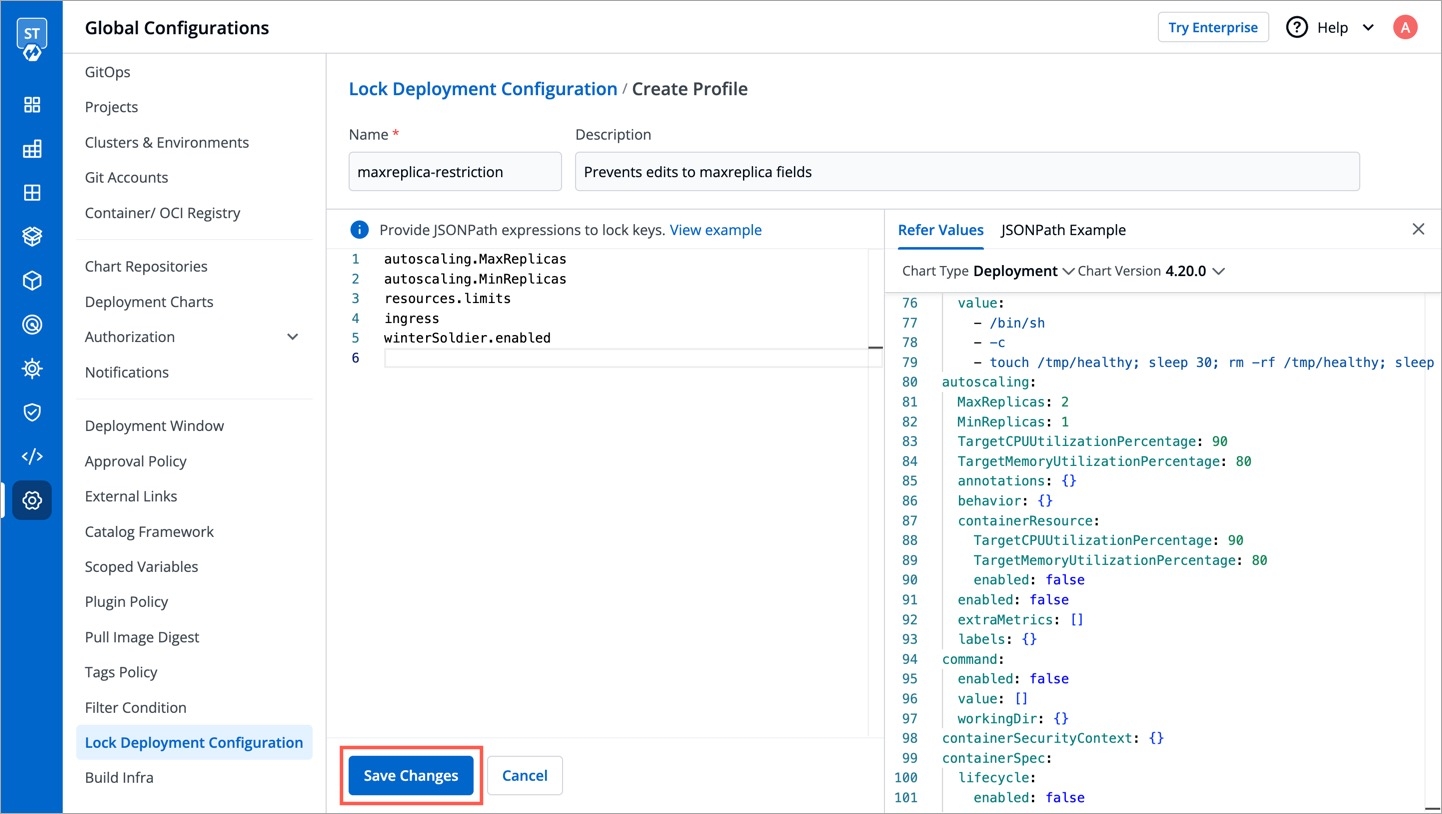
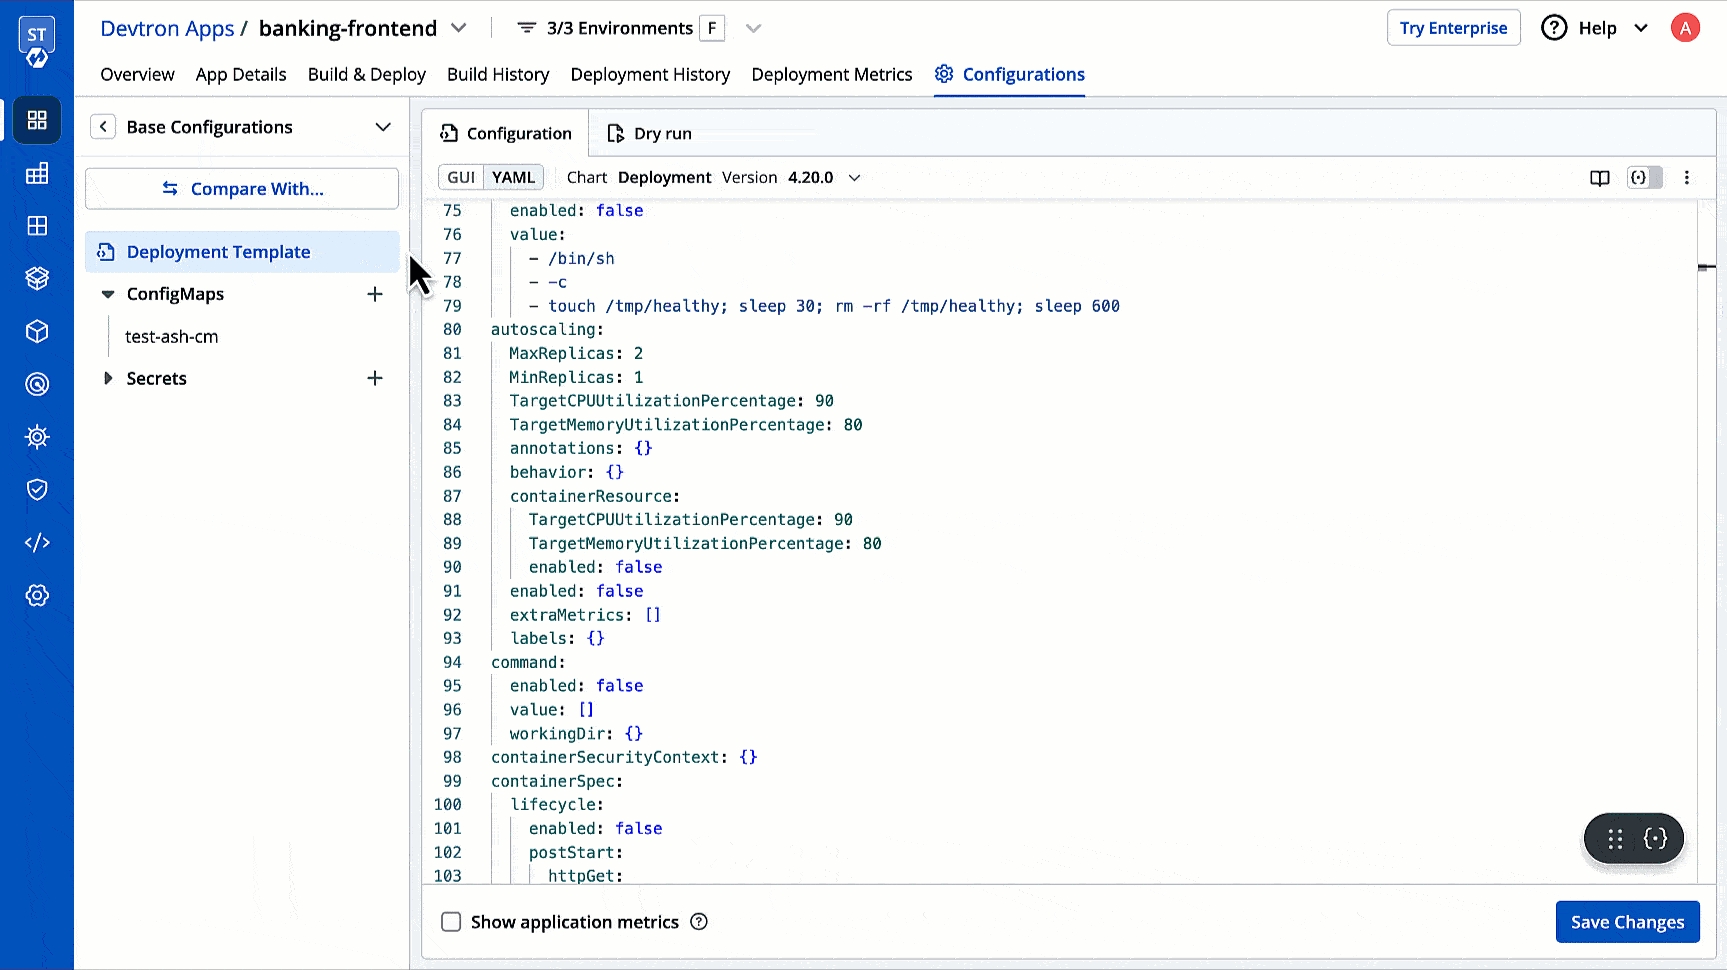
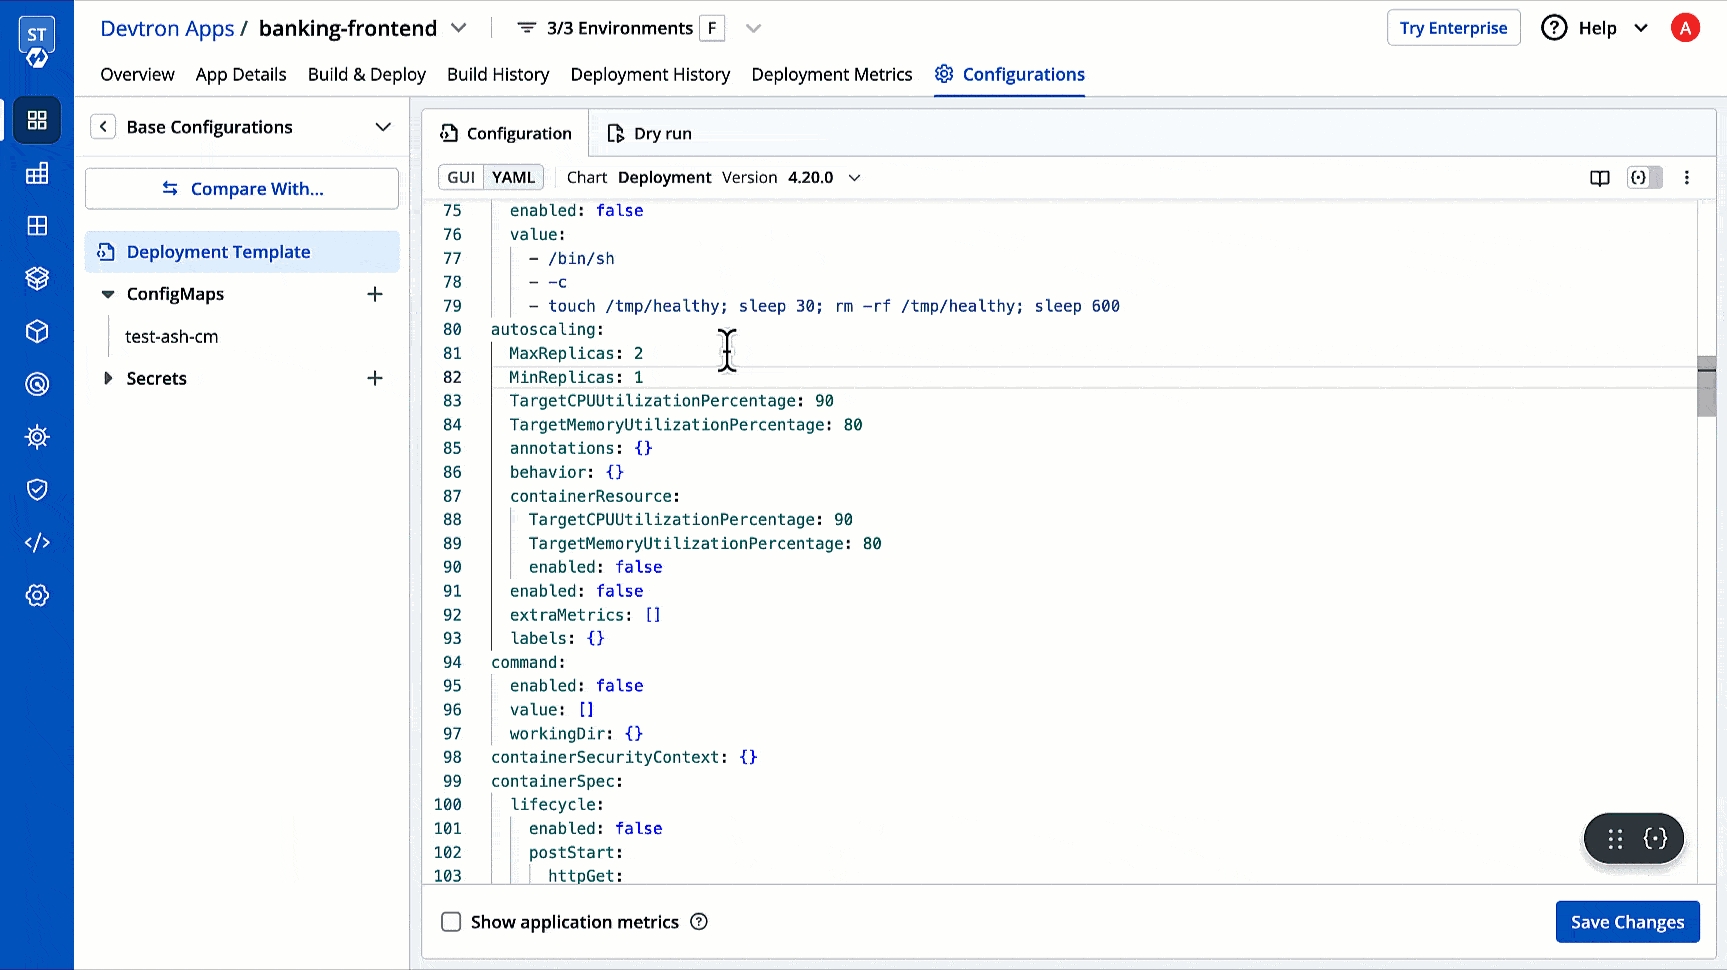
Enter the keys inside the editor on the left-hand side, e.g., autoscaling.MaxReplicas. Use JSONpath expressions to enter specific keys, lists, or objects to lock.
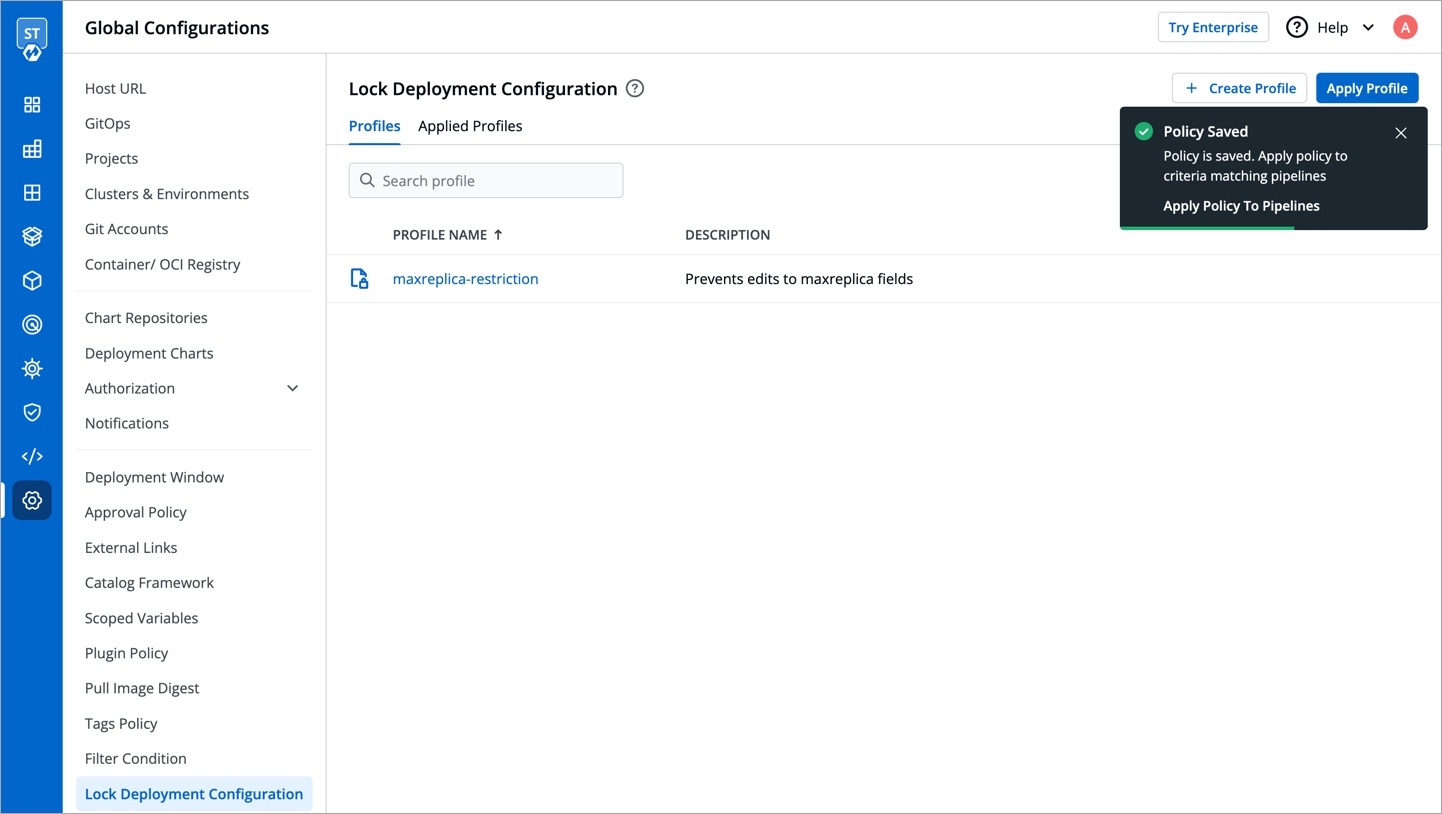
Click Save.
A confirmation dialog box would appear. Read it and click Confirm.
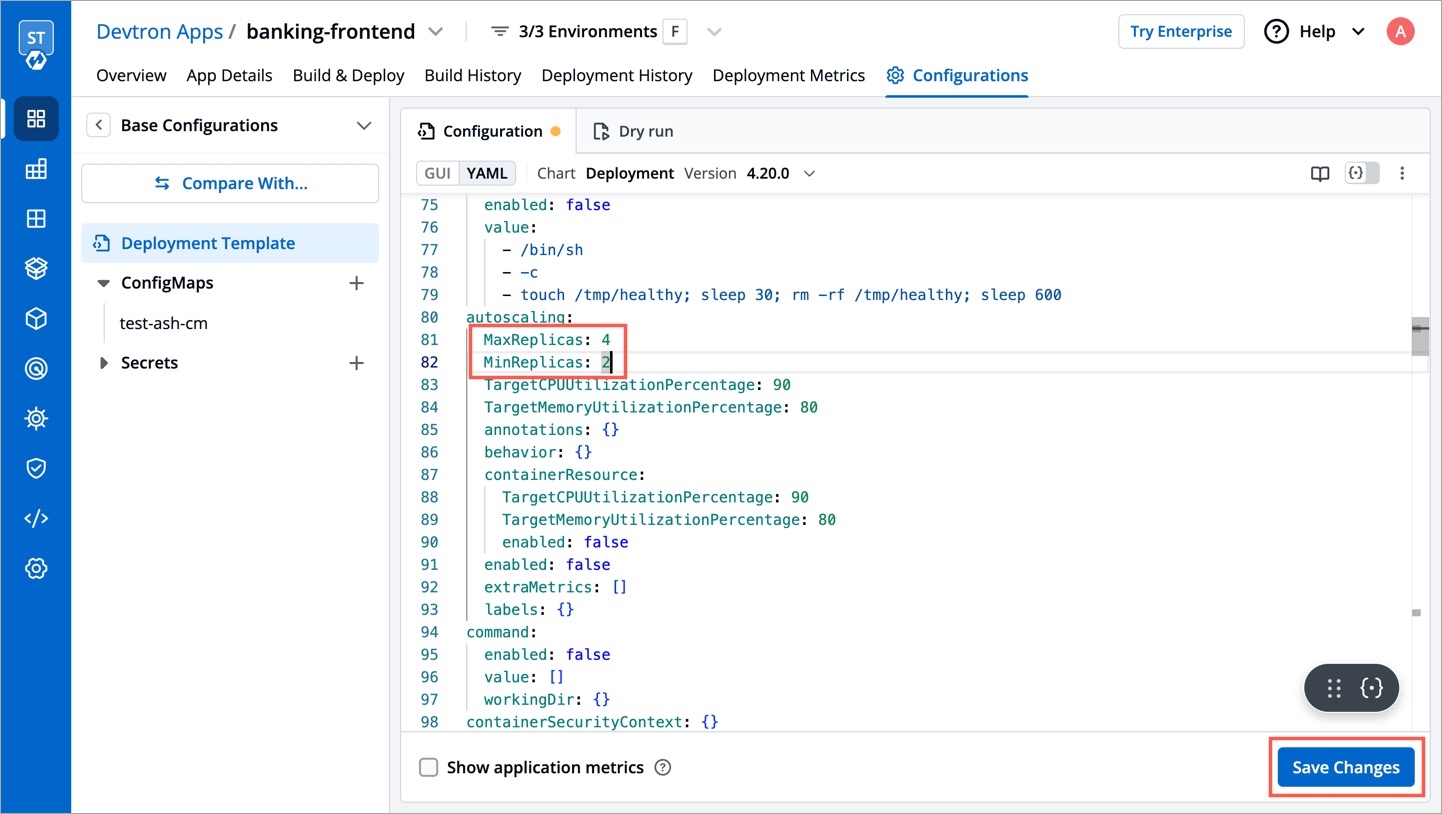
While super-admins can directly edit the locked keys, let's look at a scenario where a user (non-super-admin) tries to edit the same in an unprotected base deployment template.
User can hide/unhide the locked keys as shown below.
Let's assume the user edits one of the locked keys...
...and saves the changes.
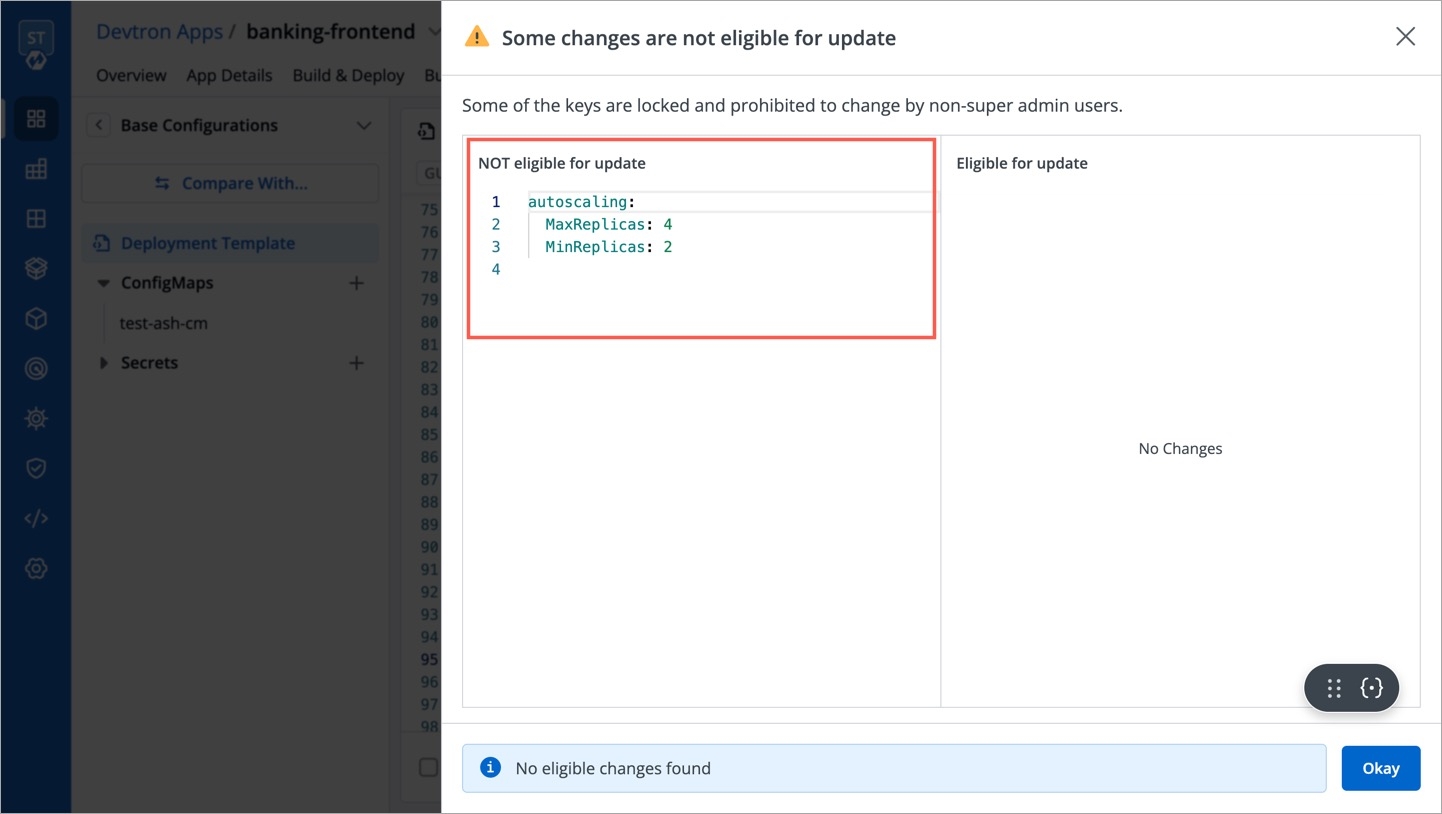
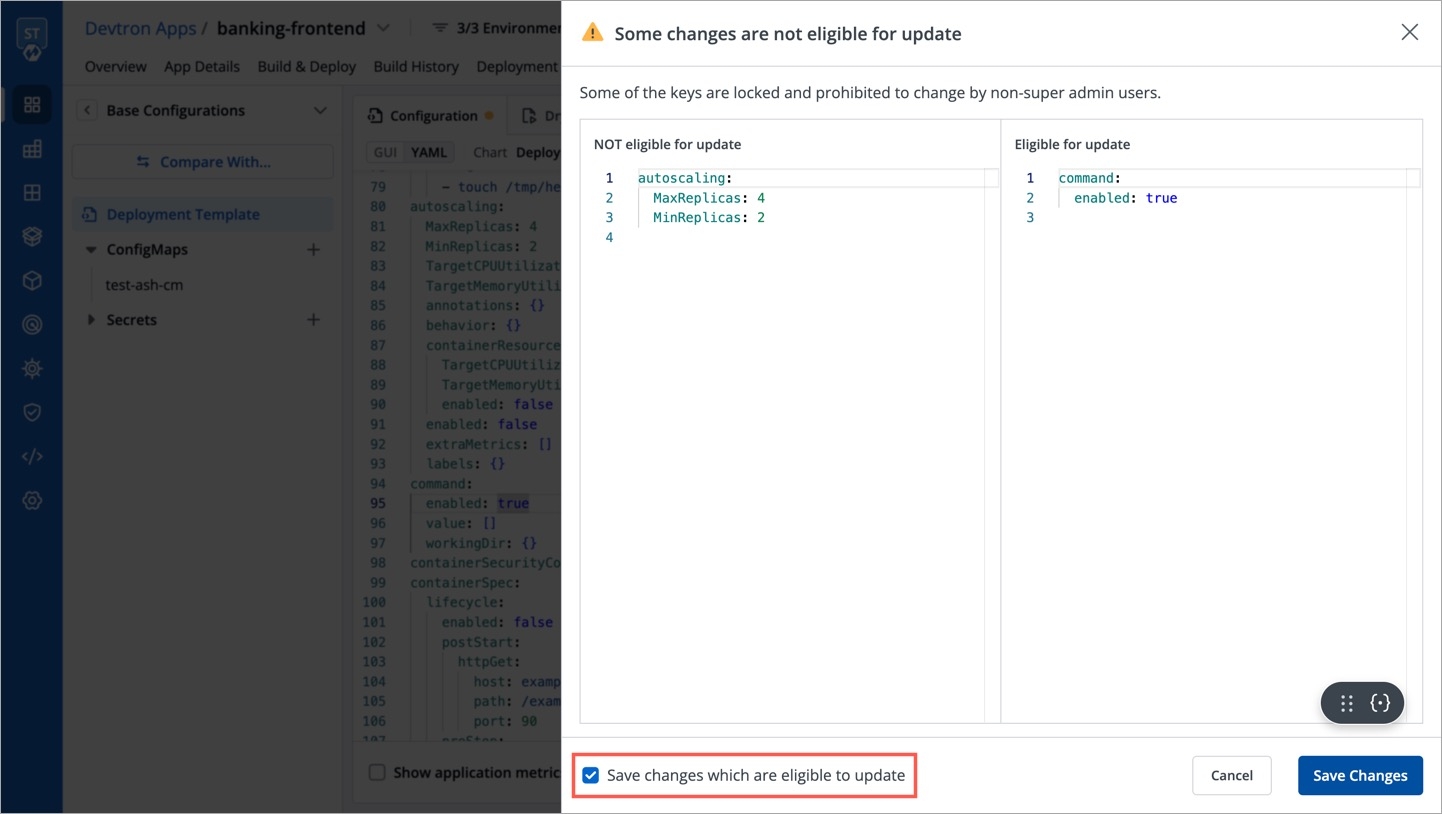
A modal window will appear on the right highlighting the non-eligible edits.
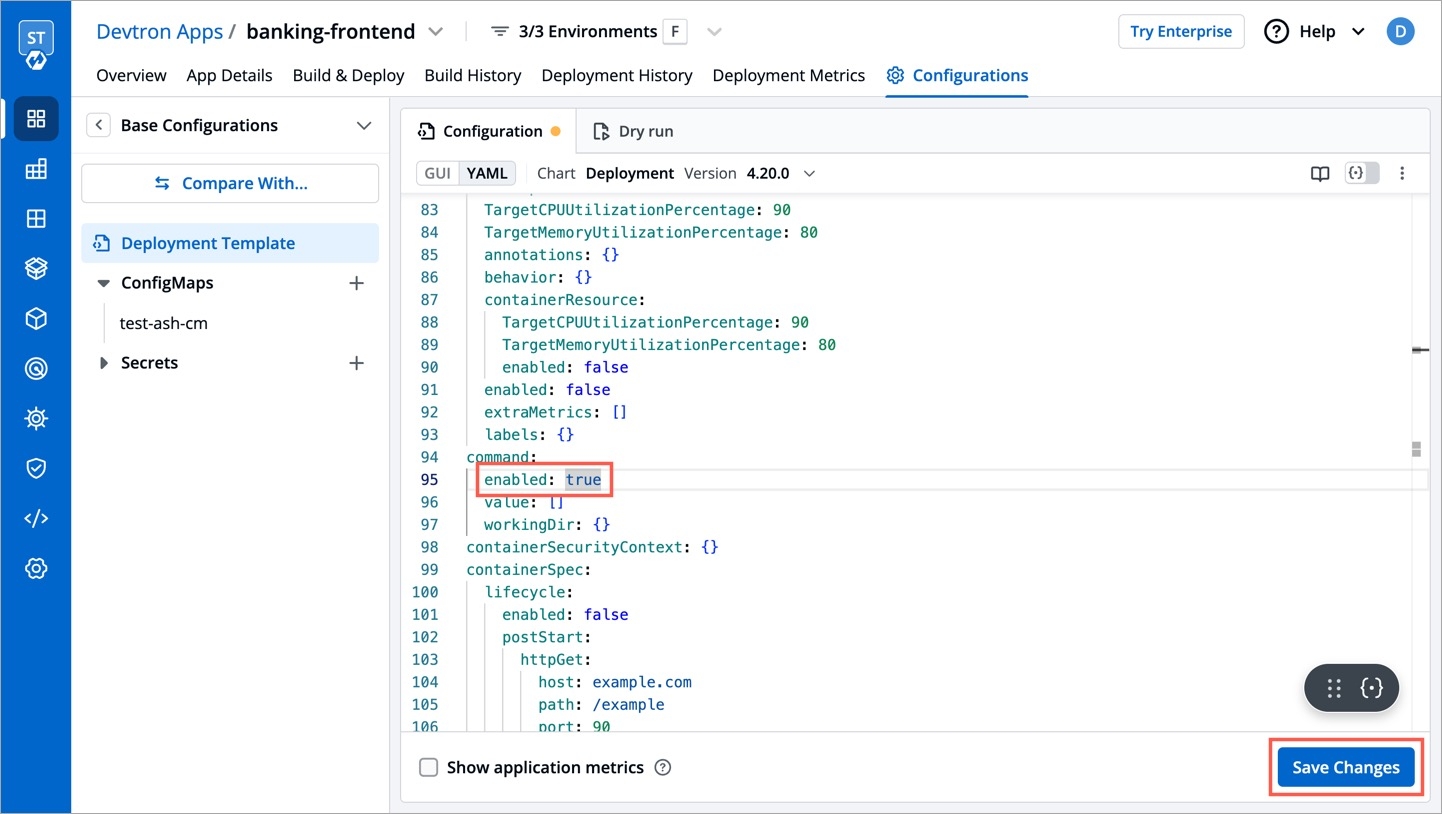
Let's assume the user edits a key that is not locked or adds a new key.
The modal window will highlight the eligible edits. However, it will not let the user save those eligible edits unless the user clicks the checkbox: Save changes which are eligible for update.
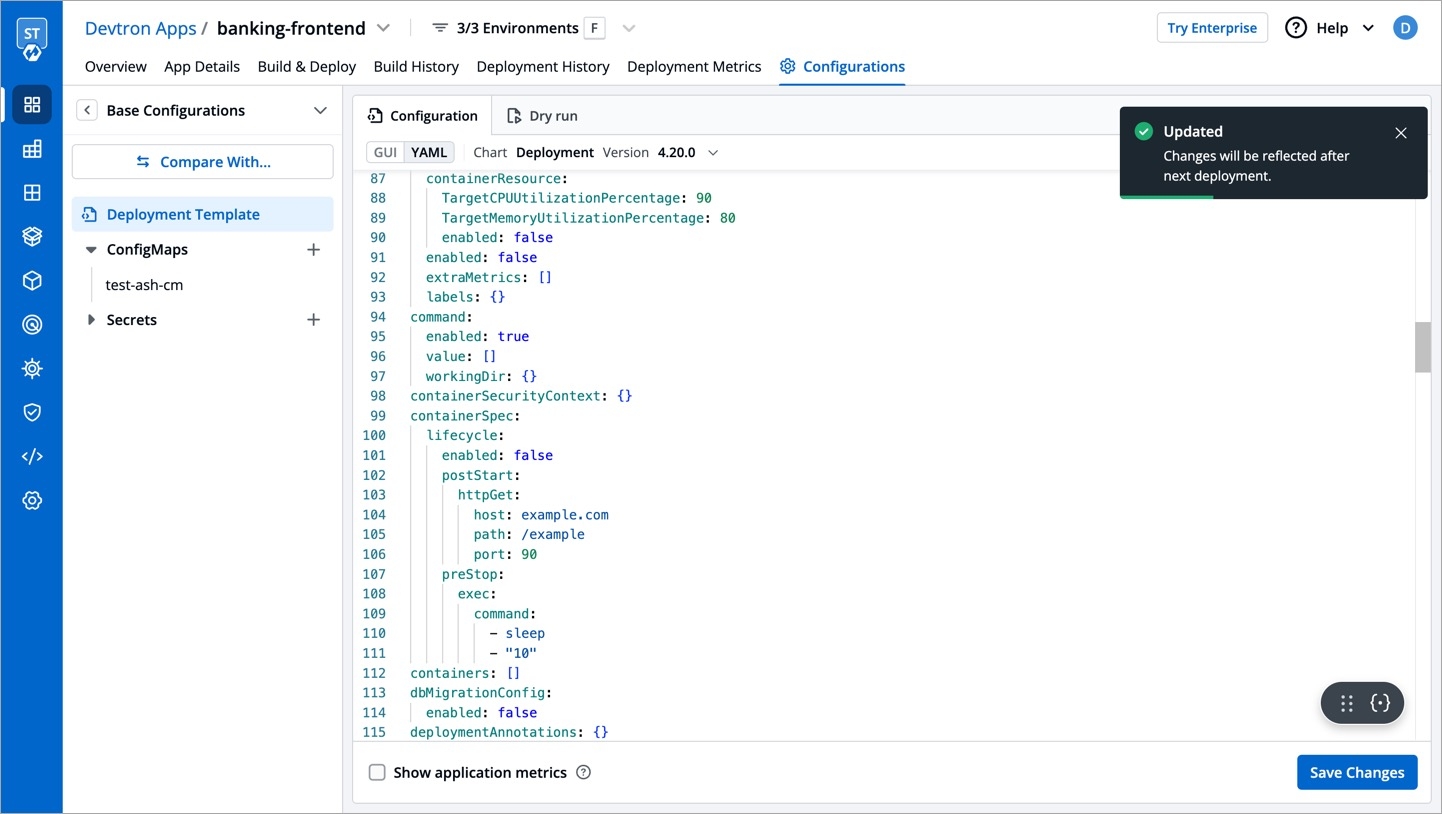
Once the user clicks the Update button, the permissible changes will reflect in the deployment template.
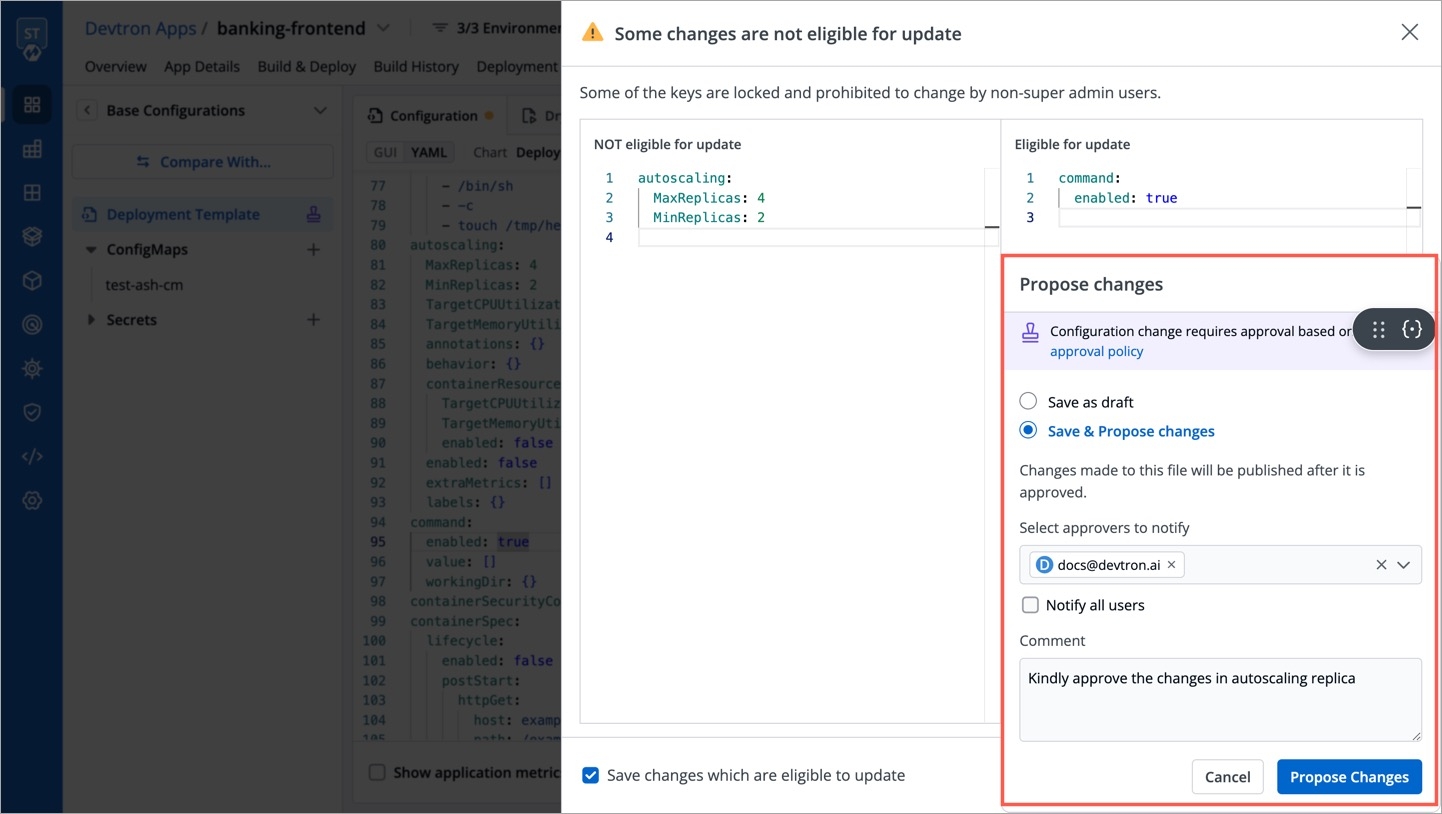
However, if it's a protected template, the user will require the approval of a configuration approver as shown below.
The same result can be seen if the user tries to edit environment-specific deployment templates.
In any piece of software or code, variables are used for holding data such as numbers or strings. Variables are created by declaring them, which involves specifying the variable's name and type, followed by assigning it a value.
Devtron offers super-admins the capability to define scoped variables (key-value pairs). It means, while the key remains the same, its value may change depending on the following context:
Global: Variable value will be universally same throughout Devtron.
Advantages of using scoped variables
Reduces repeatability: Configuration management team can centrally maintain the static data.
Simplifies bulk edits: All the places that use a variable get updated when you change the value of the variable.
Keeps data secure: You can decide the exposure of a variable's value to prevent misuse or leakage of sensitive data.
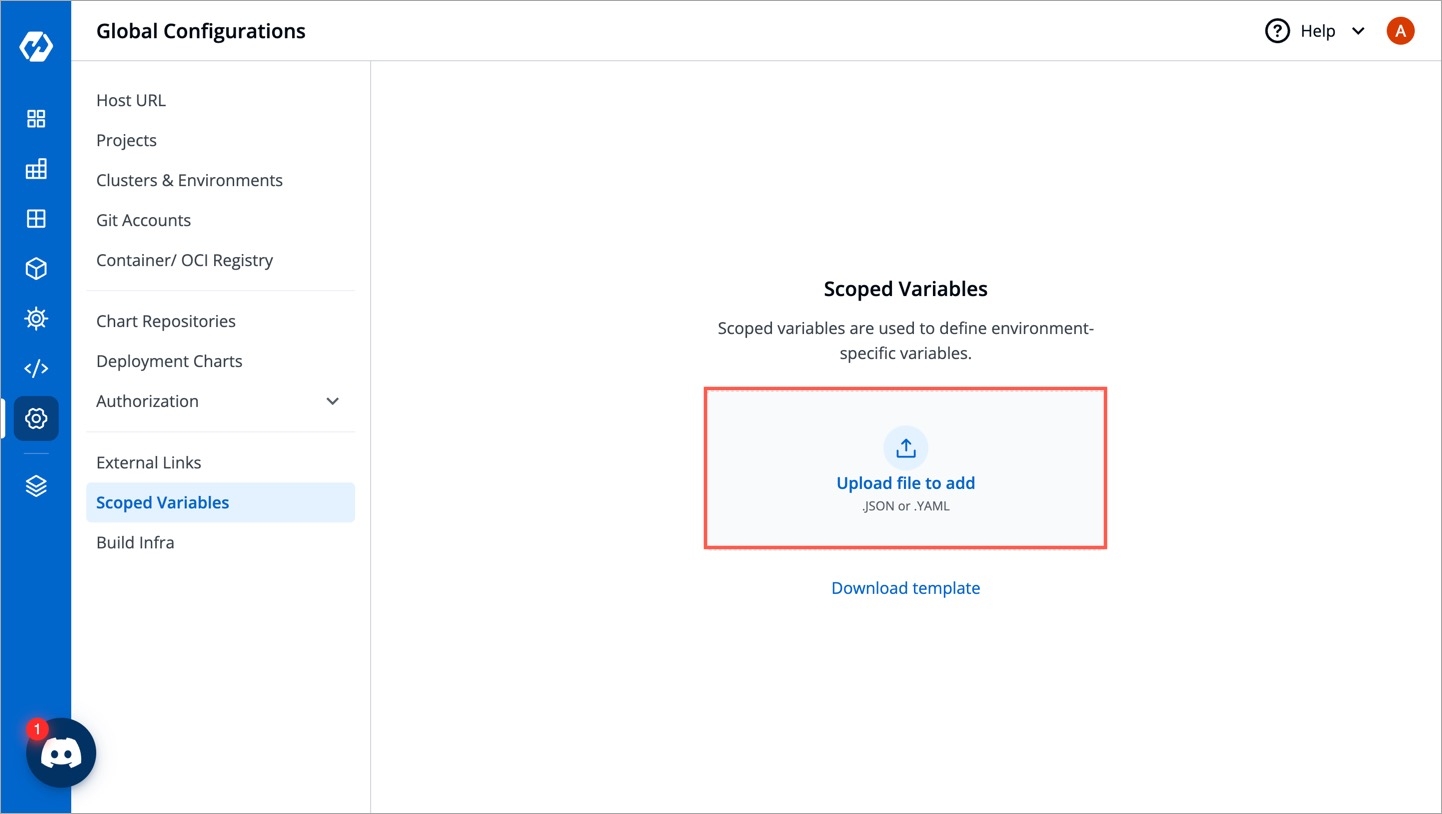
On Devtron, a super-admin can download a YAML template. It will contain a schema for defining the variables.
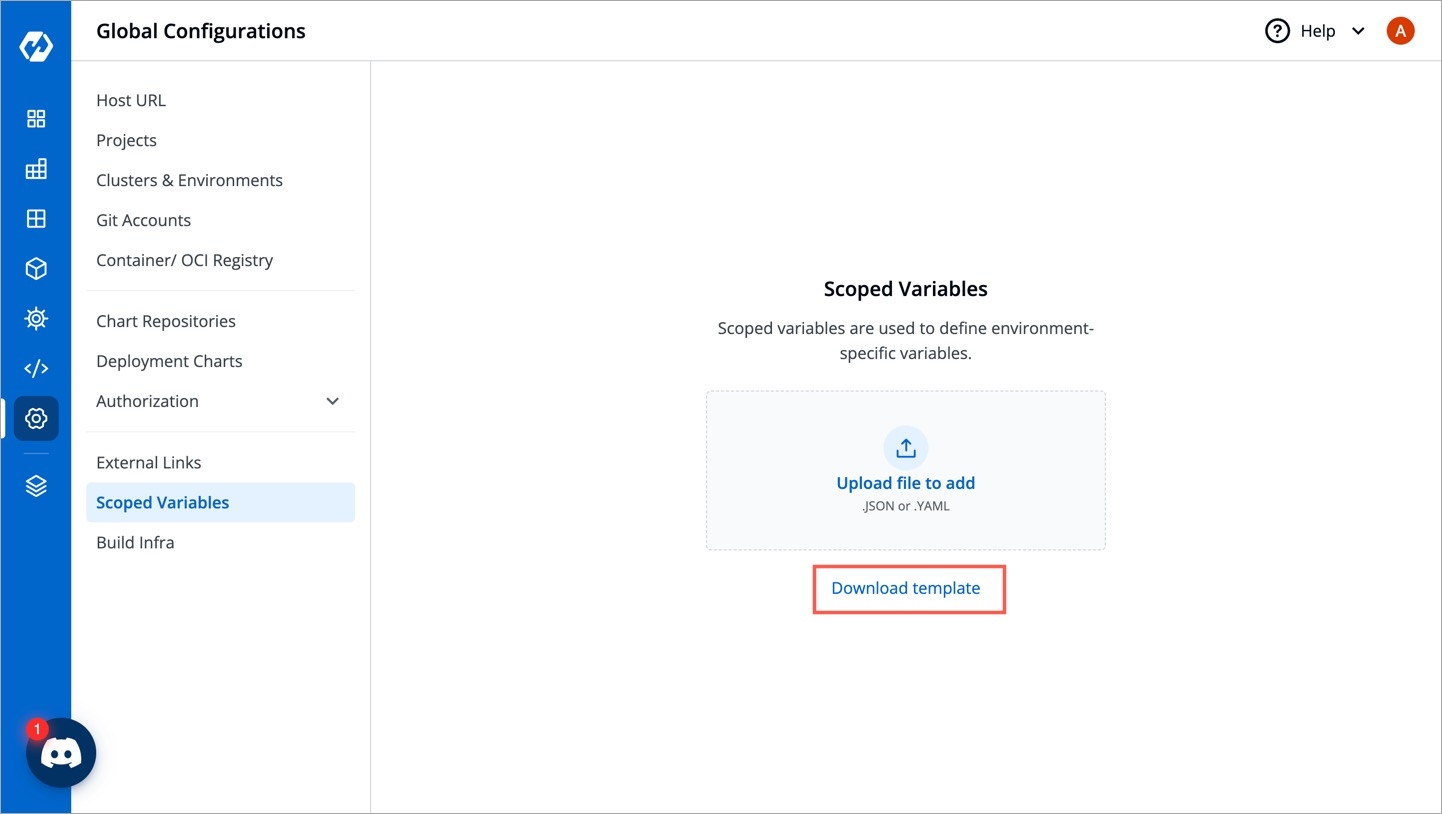
From the left sidebar, go to Global Configurations → Scoped Variables
Click Download template.
Open the downloaded template using any code editor (say VS Code).
The YAML file contains key-value pairs that follow the below schema:
apiVersion
string
The API version of the resource (comes pre-filled)
kind
string
The kind of resource (i.e. Variable, comes pre-filled)
spec
object
The complete specification object containing all the variables
spec.name
string
Unique name of the variable, e.g. DB_URL
spec.shortDescription
string
A short description of the variable (up to 120 characters)
spec.notes
string
Additional details about the variable (will not be shown on UI)
spec.isSensitive
boolean
Whether the variable value is confidential (will not be shown on UI if true)
spec.values
array
The complete values object containing all the variable values as per context
The spec.values array further contains the following elements:
category
string
The context, e.g., Global, Cluster, Application, Env, ApplicationEnv
value
string
The value of the variable
selectors
object
A set of selectors that restrict the scope of the variable
selectors.attributeSelectors
object
A map of attribute selectors to values
selectors.attributeSelectors.<selector_key>
string
The key of the attribute selector, e.g., ApplicationName, EnvName, ClusterName
selectors.attributeSelectors.<selector_value>
string
The value of the attribute selector
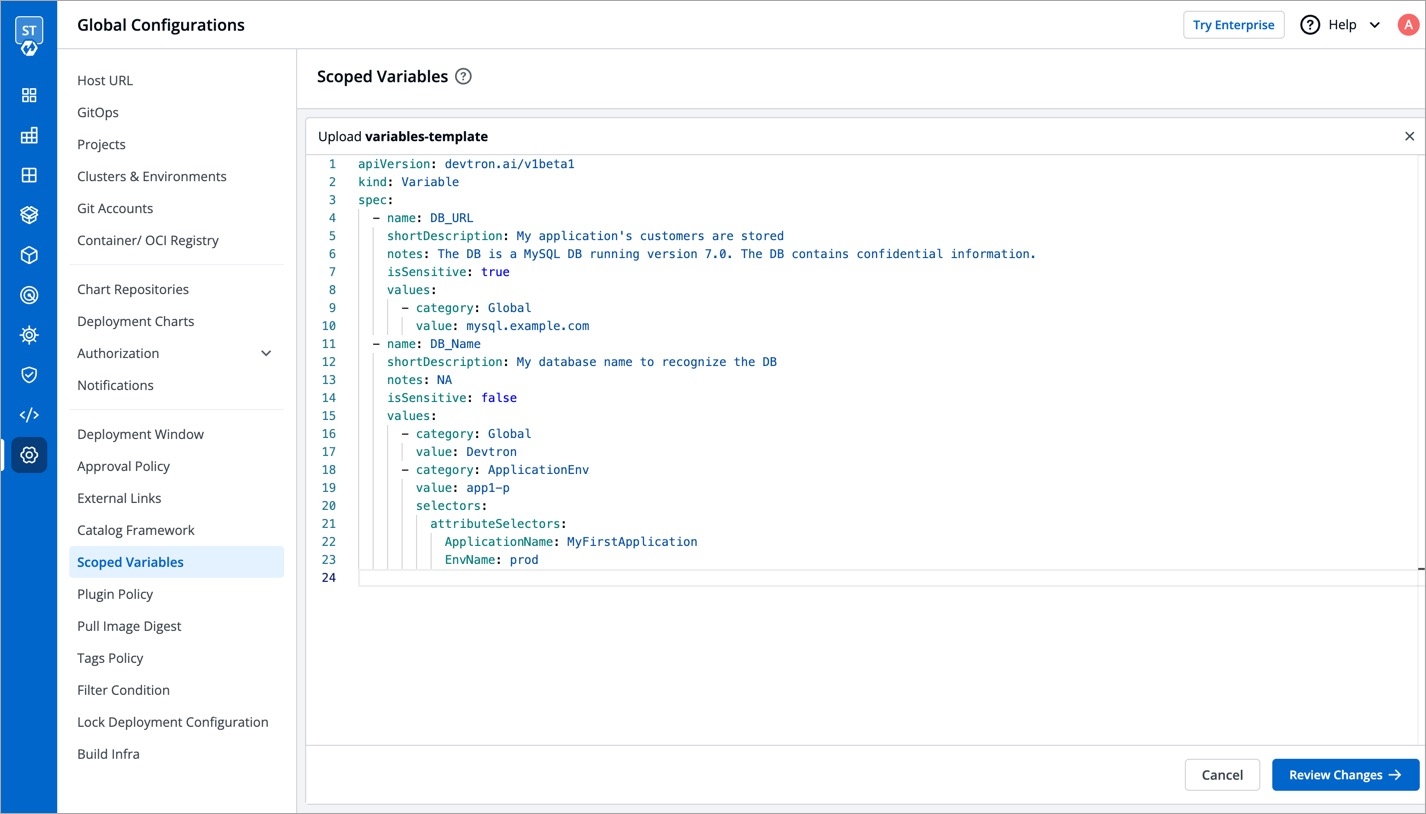
Here's a truncated template containing the specification of two variables for your understanding:
Once you save the YAML file, go back to the screen where you downloaded the template.
Use the file uploader utility to upload your YAML file.
The content of the file will be uploaded for you to review and edit. Click Review Changes.
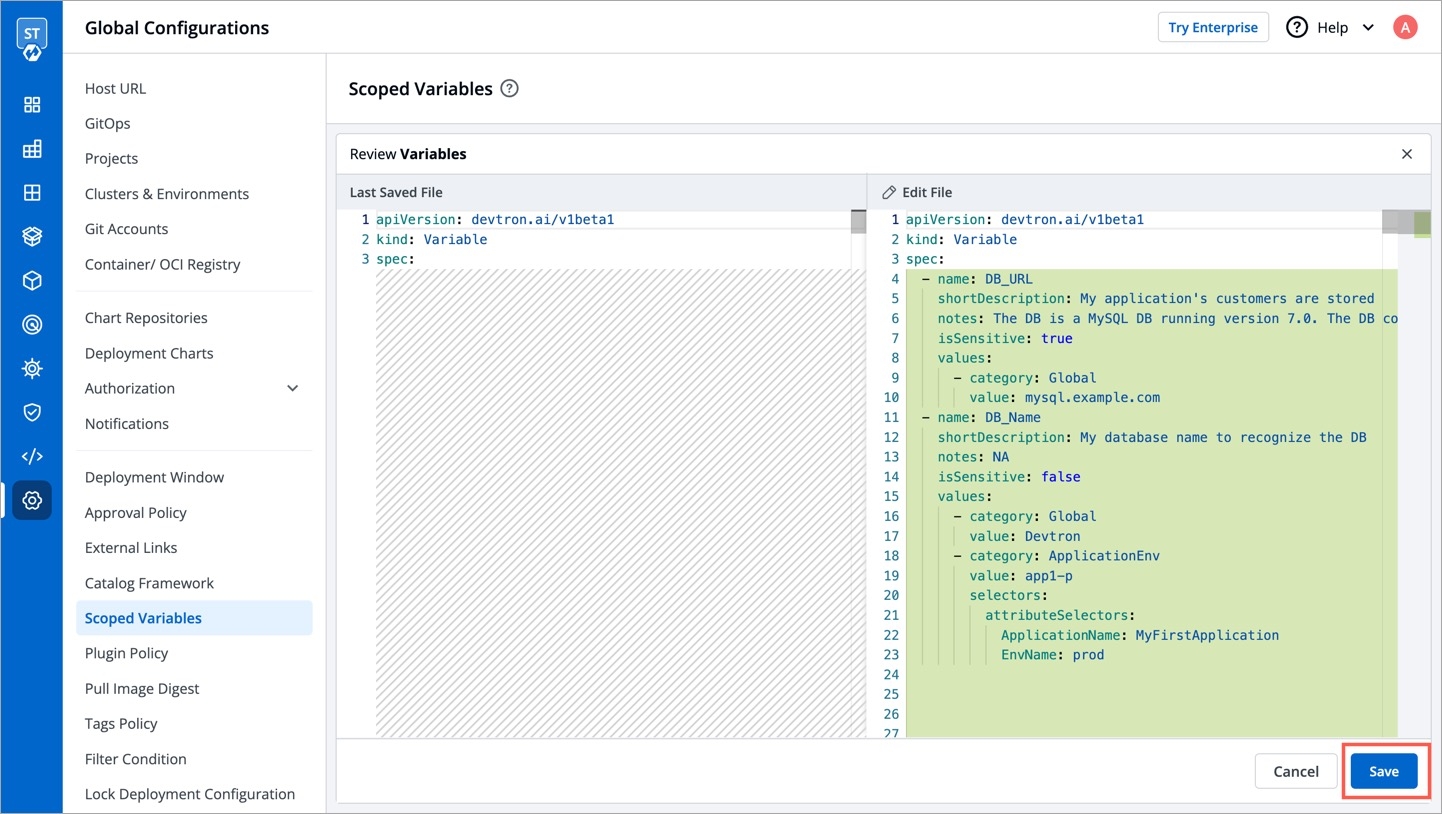
You may check the changes between the last saved file and the current one before clicking Save.
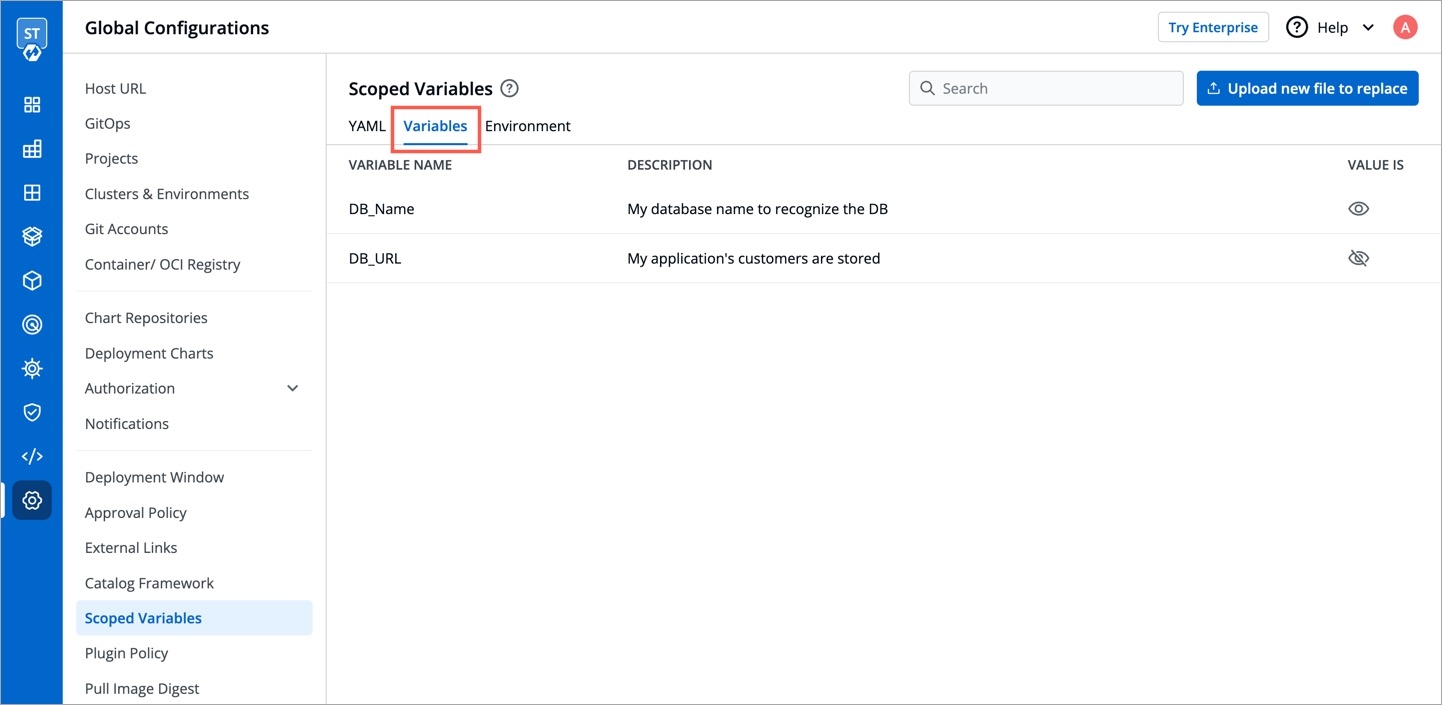
Click the Variable List tab to view the variables. Check the How to Use a Scoped Variable section to know more.
Only a super-admin can edit existing scoped variables.
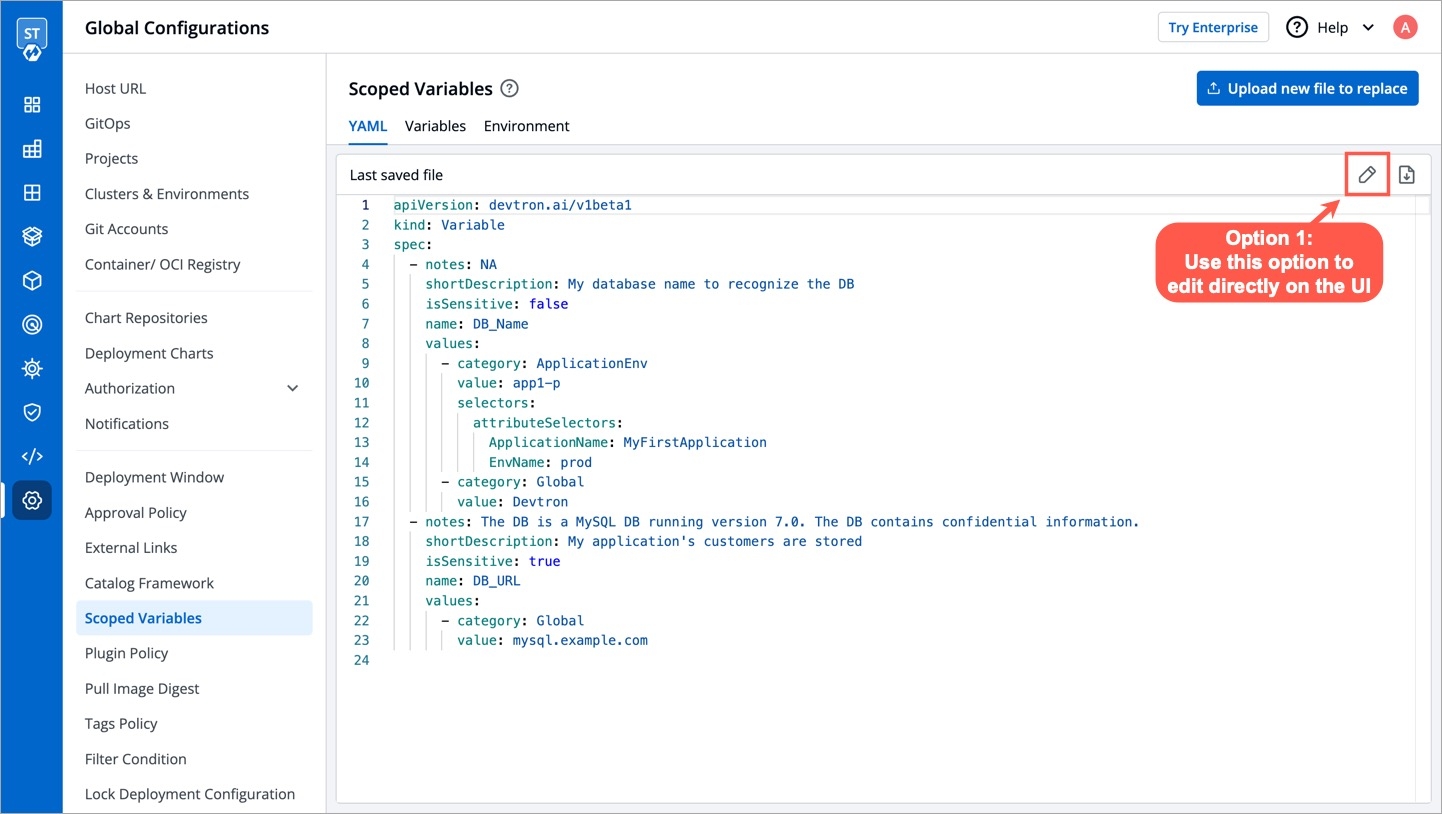
Option 1: Directly edit using the UI
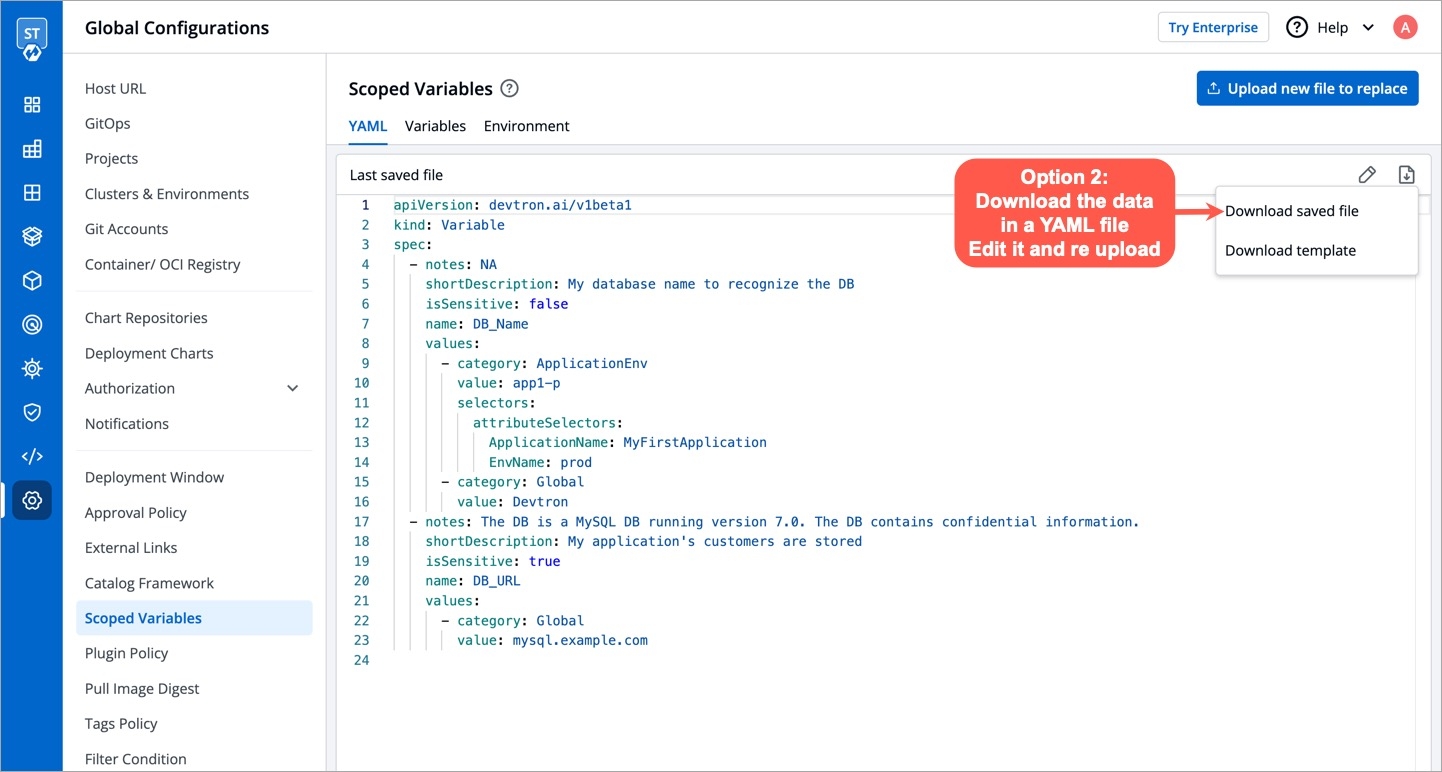
Option 2: Reupload the updated YAML file
Reuploading the YAML file will replace the previous file, so any variable that existed in the previous file but not in the latest one will be lost
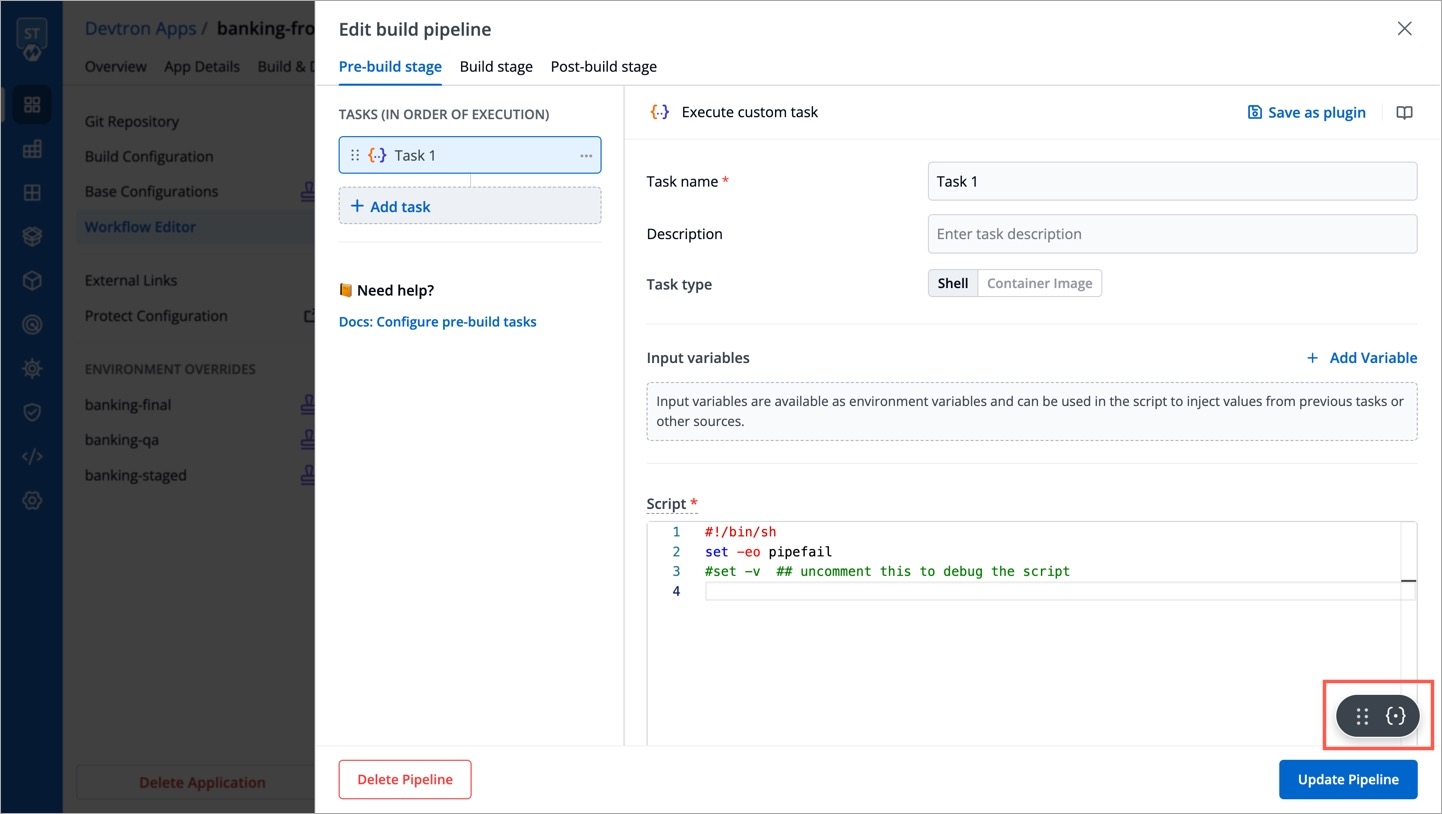
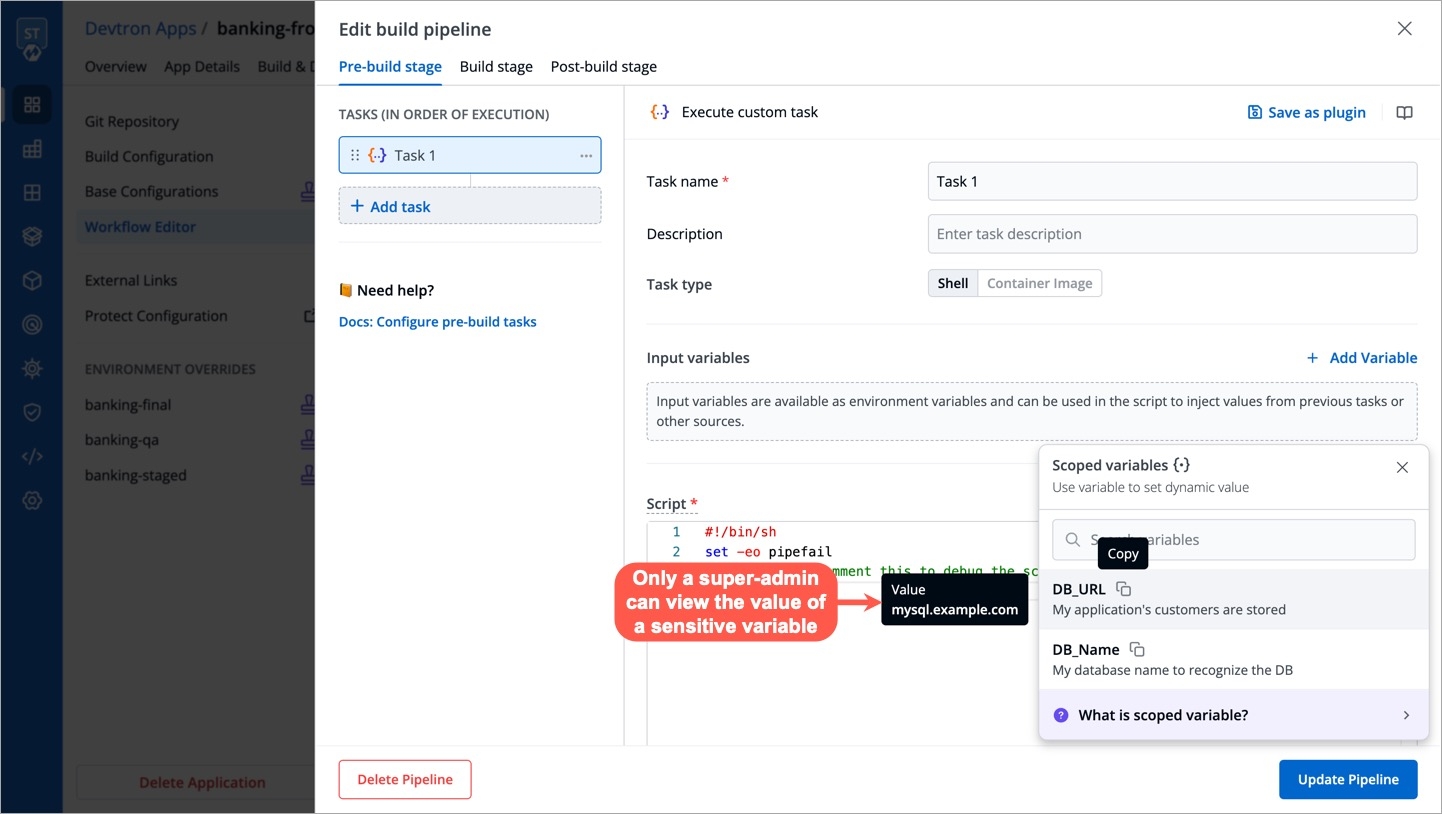
Once a variable is defined, it can be used by your authorized users on Devtron. A scoped variable widget would appear only on the screens that support its usage.
Currently, the widget is shown only on the following screens in App Configuration:
Workflow Editor → Edit build pipeline → Pre-build stage (tab)
Workflow Editor → Edit build pipeline → Post-build stage (tab)
Workflow Editor → Edit deployment pipeline → Post-Deployment stage (tab)
Workflow Editor → Edit deployment pipeline → Post-Deployment stage (tab)
Deployment Template
ConfigMaps
Secrets
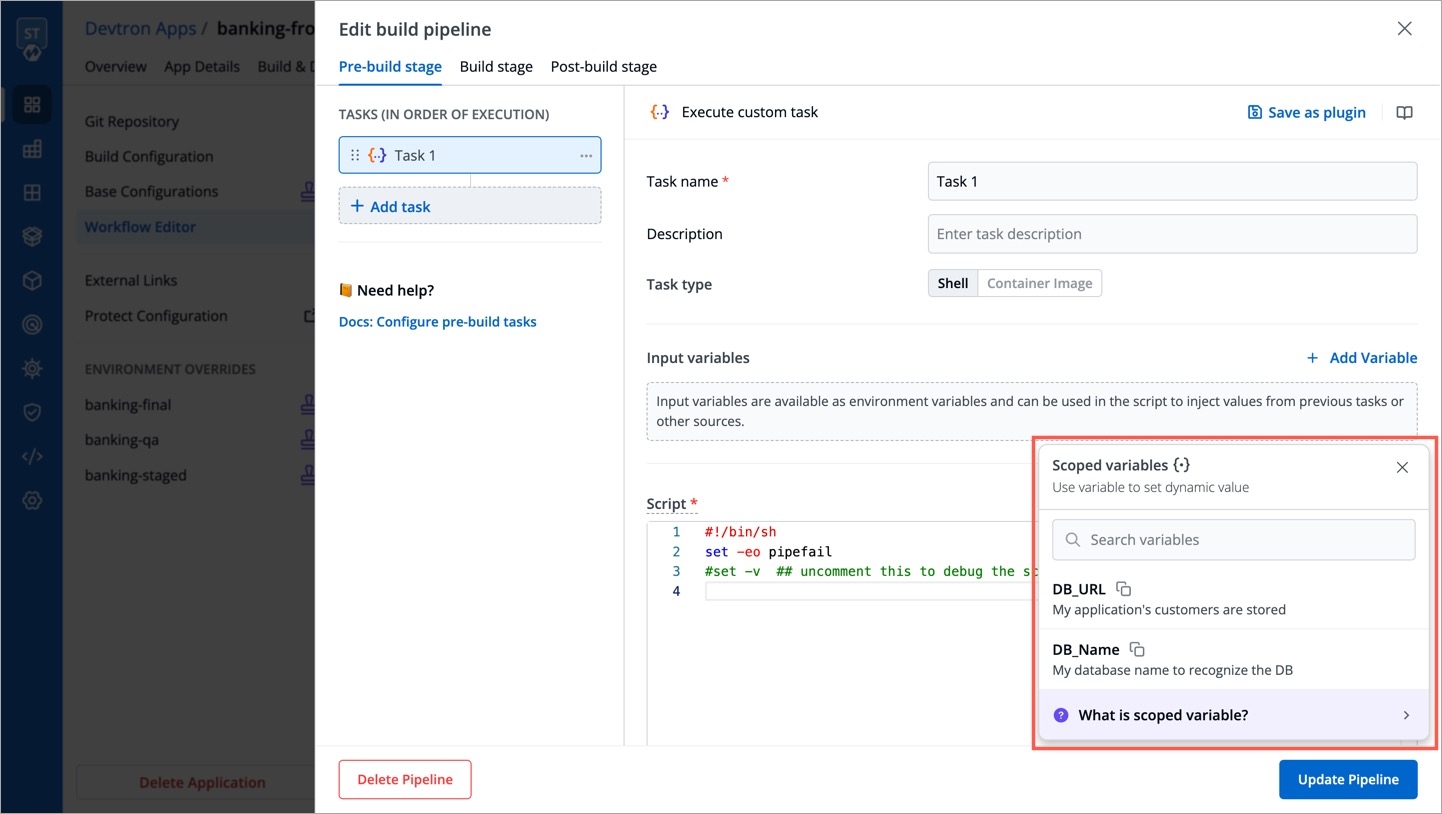
Upon clicking on the widget, a list of variables will be visible.
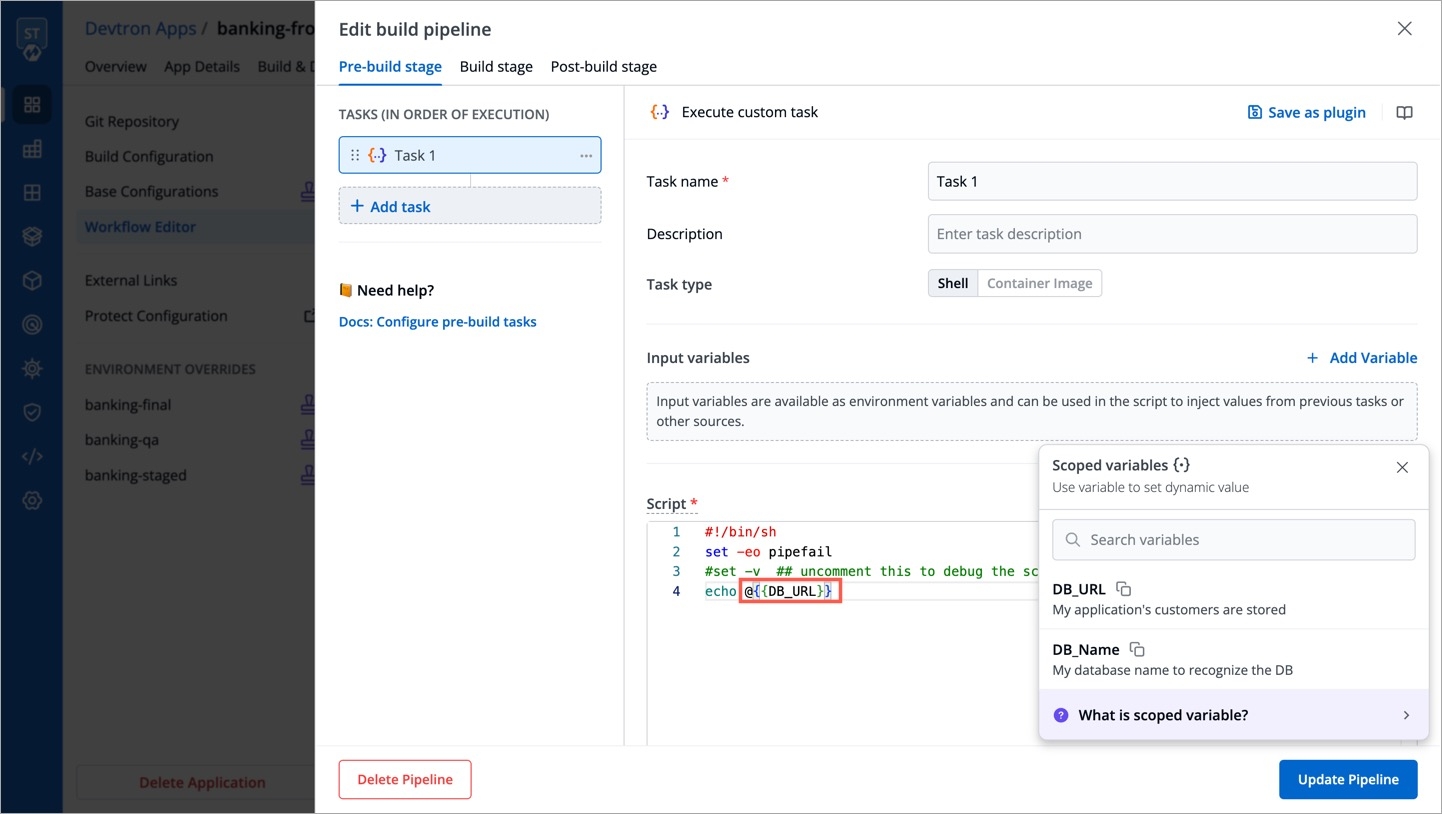
Use the copy button to copy a relevant variable of your choice.
It would appear in the following format upon pasting it within an input field: @{{variable-name}}
When multiple values are associated with a scoped variable, the precedence order is as follows, with the highest priority at the top:
Global
Environment + App: This is the most specific scope, and it will take precedence over all other scopes. For example, the value of DB name variable for the app1 application in the prod environment would be app1-p, even though there is a global DB name variable set to Devtron. If a variable value for this scope is not defined, the App scope will be checked.
App: This is the next most specific scope, and it will take precedence over the Environment, Cluster, and Global scopes. For example, the value of DB name variable for the app1 application would be project-tahiti, even though the value of DB name exists in lower scopes. If a variable value for this scope is not defined, the Environment scope will be checked.
Environment: This is the next most specific scope, and it will take precedence over the Cluster and Global scopes. For example, the value of DB name variable in the prod environment would be devtron-prod, even though the value of DB name exists in lower scopes. If a variable value for this scope is not defined, the Cluster scope will be checked.
Cluster: This is the next most specific scope, and it will take precedence over the Global scope. For example, the value of DB name variable in the gcp-gke cluster would be Devtron-gcp, even though there is a global DB name variable set to Devtron-gcp. If a variable value for this scope is not defined, the Global scope will be checked.
Global: This is the least specific scope, and it will only be used if no variable values are found in other higher scopes. The value of DB name variable would be Devtron.
There are some system variables that exist by default in Devtron that you can readily use if needed:
DEVTRON_NAMESPACE: Provides name of the namespace
DEVTRON_CLUSTER_NAME: Provides name of the cluster configured on Devtron
DEVTRON_ENV_NAME: Provides name of the environment
DEVTRON_IMAGE_TAG: Provides image tag associated with the container image
DEVTRON_IMAGE: Provides full image path of the container image, e.g., gcr.io/k8s-minikube/kicbase:v0.0.39
DEVTRON_APP_NAME: Provides name of the application on Devtron
Currently, these variables do not appear in the scoped variable widget, but you may use them.
The CI process involves activities that require infra resources such as CPU, memory (RAM), and many more. The amount of resources required depends on the complexity of the application. In other words, large applications require more resources compared to small applications.
Therefore, applying a common infra configuration to all applications is not optimal. Since resources incur heavy costs, it's wise to efficiently allocate resources (not more, not less).
With the 'Build Infra' feature, Devtron makes it possible for you to tweak the resources as per the needs of your applications. The build (ci-runner) pod will be scheduled on an available node (considering applied taints and tolerations) in the cluster on which 'Devtron' is installed.
From the left sidebar, go to Global Configurations → Build Infra.
You will see the Default Profile and a list of Custom Profiles (if they exist). Setting up profiles makes it easier for you to manage the build infra configurations, ensuring its reusability in the long term.
This contains the default infra configuration applicable to all the applications, be it large or small.
You may click it to modify the following:
CPU - Processor core allocated to the build process. See CPU units.
Memory - RAM allocated to the build process. See memory units.
Build Timeout - Max. time limit allocated to the build process. See timeout units.
Furthermore, CPU and Memory have 2 fields each:
Request - Use this field to specify the minimum guaranteed amount of CPU/Memory resources your application needs for its CI build. In our example, we required 1500m or 1.5 cores CPU along with 6 GB of RAM.
Limit - Use this field to set the maximum amount of CPU/Memory resources the build process can use, even if there is a lot available in the cluster.
Instead of default profile, you can create custom profiles having different infra configurations. Example: One profile for Python apps, a second profile for large apps, and a third profile for small apps, and many more.
Click Create Profile.
Give a name to the profile along with a brief description, and select the configurations to specify the values.
Click Save. Your custom profile will appear under the list of custom profiles as shown below.
Once you create a profile, attach it to the intended applications, or else the default profile will remain applied.
Go to the Applications tab.
Choose an application and click the dropdown below it.
Choose the profile you wish to apply from the dropdown.
Click Change to apply the profile to your application.
Tip: If you missed creating a profile but selected your application(s), you can use the 'Create Profile' button. This will quickly open a new tab for creating a profile. Once done, you can return and click the refresh icon as shown below.
If you wish to apply a profile to multiple applications at once, you can do that too.
Simply use the checkboxes to select the applications. You can do this even if there are many applications spanning multiple pages. You will see a draggable floating widget as shown below.
Select the profile you wish to apply from the dropdown and confirm the changes.
Once you apply a profile, it will show the count of applications attached to it.
You can edit or delete a custom profile using the respective icons as shown below.
If you delete a profile attached to one or more applications, the default profile will apply from the next build.
If you need extra control on the build infra configuration apart from CPU, memory, and build timeout, feel free to open a GitHub issue for us to help you.
CPU resources are measured in millicore. 1000m or 1000 millicore is equal to 1 core. If a node has 4 cores, the node's CPU capacity would be represented as 4000m.
Memory is measured in bytes. You can enter memory with suffixes (E, P, T, G, M, K, and Ei, Pi, Ti, Gi, Mi, Ki).
m
-
0.001 byte
byte
-
1 byte
k
Kilo
1,000 bytes
Ki
Kibi
1,024 bytes
M
Mega
1,000,000 bytes
Mi
Mebi
1,048,576 bytes
G
Giga
1,000,000,000 bytes
Gi
Gibi
1,073,741,824 bytes
T
Tera
1,000,000,000,000 bytes
Ti
Tebi
1,099,511,627,776 bytes
P
Peta
1,000,000,000,000,000 bytes
Pi
Petabi
1,125,899,906,842,624 bytes
E
Exa
1,000,000,000,000,000,000 bytes
Ei
Exabi
1,152,921,504,606,846,976 bytes
You can specify timeouts in the following units, beyond which the build process would be marked as failed:
seconds
minutes
hours
The workflows you create in Devtron for managing the CI-CD of your application can be made flexible or restricting with the help of CD filter conditions, for e.g., not all events (such as image builds) generated during the CI stage require progression to the CD stage. Therefore, instead of creating multiple workflows that cater to complex requirements, Devtron provides you the option of defining filters to tailor your workflow according to your specific needs.
Using filter conditions, you can control the progression of events. Here are a few general examples:
Images containing the label "test" should not be eligible for deployment in production environment
Only images having tag versions greater than v0.7.4 should be eligible for deployment
Images hosted on Docker Hub should be eligible but not the rest
From the left sidebar, go to Global Configurations → Filter Condition.
Add a filter condition.
In the Define Filter condition section, you get the following fields:
Filter For: Choose the pipeline upon which the filter should apply. Currently, you can use filter conditions for CD pipelines only. Support for CI pipelines is underway.
Filter Name: Give a name to the filter.
Description: (Optional) Add a description to the filter, preferably explaining what it does.
Filter Condition: You can specify either a pass condition, fail condition, or both the conditions:
Pass Condition: Events that satisfy the pass condition are eligible to trigger your CD pipeline.
Fail Condition: Events that satisfy the fail condition are not eligible to trigger your CD pipeline.
Use CEL Expression: You can use Common Expression Language (CEL) to define the conditions. Currently, you can create conditions with the help of following variables:
containerImage: Package that contains all the necessary files and instructions to run an application in a container, e.g., gcr.io/k8s-minikube/kicbase:v0.0.39. It returns a string value in the following format: <registry>/<repository>:<tag>
containerRepository: Storage location for container images, e.g., kicbase
containerImageTag: Versioning of image to indicate its release, e.g., v0.0.39
imageLabels: The label(s) you assign to an image in the CD pipeline, e.g., ["PROD","Stage"]. It returns an array of strings.
Click View filter criteria to check the supported criteria. You get a copy button and a description of each criterion upon hovering. Moreover, you can go to CEL expression to learn more about the rules and supported syntax. Check Examples to know more.
Click Next.
In the Apply to section, you get the following fields:
Application: Choose one or more applications to which your filter condition must apply.
Environment: Choose one or more environments to which your filter condition must apply.
Click Save. You have successfully created a filter.
Here's a sample pipeline we will be using for our explanation of pass condition and fail condition.
Consider a scenario where you wish to make an image eligible for deployment only if its tag version is greater than v0.0.7
The CEL Expression should be containerImageTag > "v0.0.7"
Go to the Build & Deploy tab. The filter condition was created specifically for test environment, therefore the filter condition would be evaluated only at the relevant CD pipeline, i.e., test
Click Select Image for the test CD pipeline. The first tab Eligible images shows the list and count of images that have satisfied the pass condition since their tag versions were greater than v0.0.7. Hence, they are marked eligible for deployment.
The second tab Latest images shows the latest builds (up to 10 images) irrespective of whether they have satisfied the filter condition(s) or not. The ones that have not satisfied the filter conditions get marked as Excluded. In other words, they are not eligible for deployment.
Clicking the filter icon at the top-left shows the filter condition(s) applied to the test CD pipeline.
Consider a scenario where you wish to exclude an image from deployment if its tag starts with the word trial or ends with the word testing
The CEL Expression should be containerImageTag.startsWith("trial") || containerImageTag.endsWith("testing")
Go to the Build & Deploy tab. The filter condition was created specifically for devtron-demo environment, therefore the filter condition would be evaluated only at the relevant CD pipeline, i.e., devtron-demo
Click Select Image for the devtron-demo CD pipeline. The first tab Eligible images shows the list and count of images that have not met the fail condition. Hence, they are marked eligible for deployment.
The second tab Latest images shows the latest builds (up to 10 images) irrespective of whether they have satisfied the filter condition(s) or not. The ones that have satisfied the filter conditions get marked as Excluded. In other words, they are not eligible for deployment.
Clicking the filter icon at the top-left shows the filter condition(s) applied to the devtron-demo CD pipeline.
Devtron offers the option to pull container images using digest. Refer CD Pipeline - Image Digest to know the purpose it serves.
Though it can be enabled by an application-admin for a given CD Pipeline, Devtron also allows super-admins to enable pull image digest at environment level.
This helps in better governance and less repetitiveness if you wish to manage pull image digest for multiple applications across environments.
From the left sidebar, go to Global Configurations → Pull Image Digest.
As a super-admin, you can decide whether you wish to enable pull image digest for all environments or for specific environments.
This is for enabling pull image digest for deployment to all environments.
Enable the toggle button next to Pull image digest for all existing & future environments.
Click Save Changes.
This is for enabling pull image digest for specific environments. Therefore, only those applications deploying to selected environment(s) will have pull image digest enabled in its CD pipeline.
Use the checkbox to choose one or more environments present within the list of clusters you have on Devtron.
Click Save Changes.
Once you enable pull image digest for a given environment in Global Configurations, users won't be able to modify the image digest setting in the CD pipeline. The toggle button would appear disabled for that environment as shown below.
Like any enterprise product, Devtron supports fine grained access control to the resources based on:
Type of action allowed on Devtron resources (Create Vs View)
Sensitivity of the data (Editing image Vs Editing memory)
Access can be added to the User either directly or via Permission groups.
Devtron supports the following levels of access:
View only: User with View only access has the least privilege. This user can only view combination of environments, applications and helm charts on which access has been granted to the user. This user cannot view sensitive data like secrets used in applications or charts.
Build and Deploy: In addition to View only access, user with Build and deploy permission can build and deploy the image of the permitted applications and helm charts to the permitted environments.
Admin: User with Admin access can create, edit, delete and view permitted applications in the permitted projects.
Manager: User with Manager access can do everything that an Admin type user can do, in addition, they can also give and revoke access of users for the applications and environments of which they are Manager.
Super Admin: User with Super admin privilege has unrestricted access to all Devtron resources. Super admin can create, modify, delete and view any Devtron resource without any restriction; its like Superman without the weakness of Kryptonite. Super Admin can also add and delete user access across any Devtron resource, add delete git repository credentials, container registry credentials, cluster and environment.
View
Yes
No
No
No
No
Build and Deploy
Yes
No
No
No
Yes
Admin
Yes
Yes
Yes
Yes
Yes
Manager
Yes
Yes
Yes
Yes
Yes
Super Admin
Yes
Yes
Yes
Yes
Yes
View Only
Yes
No
No
No
View and Edit
Yes
Yes
Yes
No
Admin
Yes
Yes
Yes
Yes
Super Admin
Yes
Yes
Yes
Yes
Manager
Yes
Yes
Yes
Super Admin
Yes
Yes
Yes
Super Admin
Yes
Yes
Yes
To add a user, go to the Authorization > User Permissions section of Global Configurations. Click Add user.
There are two types of permissions in Devtron:
Specific permissions
Devtron Apps
Helm Apps
Kubernetes Resources
Chart Groups
Super admin permission
To assign a super admin access, go to the Authorization > User Permissions section of Global Configurations.
Click Add user.
Provide the email address of a user. You can add more than one email address. Please note that email address must be same as that in the email field in the JWT token returned by OIDC provider.
Select Super admin permission and click Save.
A user now will have a Super admin access.
Note:
Only users with Super admin permission can assign super admin permissions to a user.
We suggest that super admin access must be given to the selected users only.
To assign a specific permission, go to the Authorization > User Permissions section of Global Configurations.
Click Add user.
Provide the email address of a user. You can add more than one email address. Please note that email address must be same as that in the email field in the JWT token returned by OIDC provider.
Select Specific permissions.
Select the group permission from the drop-down list, if required.
Selecting Specific permission option allows you to manage access and provide the role-based access accordingly for
In Devtron Apps option, you can provide access to a user to manage permission for custom apps created using Devtron.
Note: The Devtron Apps option will be available only if you install CI/CD integration.
Provide the information in the following fields:
Project
Select a project from the drop-down list to which you want to give permission to the user. You can select only one project at a time.
Note: If you want to select more than one project, then click Add row.
Environment
Select the specific environment or all environments from the drop-down list.
Note: If you select All environments option, then a user gets access to all the current environments including any new environment which gets associated with the application later.
Application
Select the specific applications or all applications from the drop-down list corresponding to your selected Environments.
Note: If you select All applications option, then a user gets access to all the current applications including any new application which gets associated with the project later
.
Role
View only
Build and Deploy
Admin
Manager
You can add multiple rows for Devtron app permission.
Once you have finished assigning the appropriate permissions for the users, Click Save.
In Helm Apps option, you can provide access to a user to manage permission for Helm apps deployed from Devtron or outside Devtron.
Provide the information in the following fields:
Project
Select a project from the drop-down list to which you want to give permission to the user. You can select only one project at a time.
Note: If you want to select more than one project, then click Add row.
Environment or cluster/namespace
Select the specific environment or all existing environments in default cluster from the drop-down list.
Note: If you select all existing + future environments in default cluster option, then a user gets access to all the current environments including any new environment which gets associated with the application later.
Application
Select the specific application or all applications from the drop-down list corresponding to your selected Environments.
Note: If All applications option is selected, then a user gets access to all the current applications including any new application which gets associated with the project later
.
Role
View only
View & Edit
Admin
You can add multiple rows for Devtron app permission.
Once you have finished assigning the appropriate permissions for the users, Click Save.
In Kubernetes Resources option, you can provide permission to view, inspect, manage, and delete resources in your clusters from Kubernetes Resource Browser page in Devtron. You can also create resources from the Kubernetes Resource Browser page.
Note: Only super admin users will be able to see Kubernetes Resources tab and provide permission to other users to access Resource Browser.
To provide Kubernetes resource permission, click Add permission.
On the Kubernetes resource permission, provide the information in the following fields:
Cluster
Select a cluster from the drop-down list to which you want to give permission to the user. You can select only one cluster at a time.
Note: To add another cluster, then click Add another.
Namespace
Select the namespace from the drop-down list.
API Group
Select the specific API group or All API groups from the drop-down list corresponding to the K8s resource.
Kind
Select the kind or All kind from the drop-down list corresponding to the K8s resource.
Resource name
Select the resource name or All resources from the drop-down list to which you want to give permission to the user.
Role
View
Admin
You can add multiple rows for Kubernetes resource permission.
Once you have finished assigning the appropriate permissions for the users, Click Save.
In Chart group permission option, you can manage the access of users for Chart Groups in your project.
Note: The Chart group permission option will be available only if you install CI/CD integration.
NOTE: You can only give users the ability to create or edit, not both.
View
Enable View to view chart groups only.
Create
Enable Create if you want the users to create, view, edit or delete the chart groups.
Edit
Deny: Select Deny option from the drop-down list to restrict the users to edit the chart groups.
Specific chart groups: Select the Specific Charts Groups option from the drop-down list and then select the chart group for which you want to allow users to edit.
Click Saveonce you have configured all the required permissions for the users.
Direct user permissions cannot be edited if you're using LDAP/Microsoft for SSO and 'auto-assign permission' is enabled. Permissions can only be managed via permission groups in such a scenario.
You can edit the user permissions by clicking on the downward arrow.
Edit the user permissions.
After you have done editing the user permissions, click Save.
If you want to delete the user/users with particular permissions, click Delete.
Enter the valid .
If you select 'Basic' mode instead of 'Advanced (YAML)', all the keys meant for basic mode will be displayed in the GUI even if some are locked. While users can modify these keys, they cannot save the changes made to the locked keys.
Selecting option allows you to manage access and provide the accordingly for:
Selecting option will get full access to Devtron resources and the rest of the options will not be available.
Select one of the to which you want to give permission to the user:
Select one of the to which you want to give permission to the user:
Select one of the to which you want to give permission to the user and click Done:


