Loading...
Loading...
Loading...
Loading...
Loading...
Loading...
Loading...
Loading...
Loading...
Loading...
Loading...
Loading...
Loading...
Loading...
Loading...
Loading...
Loading...
Loading...
Loading...
Loading...
Loading...
Loading...
Loading...
Loading...
Loading...
Loading...
Loading...
Loading...
Loading...
After Devtron is installed, Devtron is accessible through service devtron-service. If you want to access devtron through ingress, edit devtron-service and change the loadbalancer to ClusterIP. You can do this using kubectl patch command like :
After that create ingress by applying the ingress yaml file. You can use this yaml file to create ingress to access devtron:
You can access devtron from any host after applying this yaml. For k8s versions <1.19, apply this yaml:
Optionally you also can access devtron through a specific host like :
In certain cases, you may want to override default configurations provided by Devtron. For example, for deployments or statefulsets you may want to change the memory or CPU requests or limit or add node affinity or taint tolerance. Say, for ingress, you may want to add annotations or host. Samples are available inside the manifests/updates directory.
To modify a particular object, it looks in namespace devtroncd for the corresponding configmap as mentioned in the mapping below:
argocd
argocd-override-cm
GitOps
clair
clair-override-cm
container vulnerability db
clair
clair-config-override-cm
Clair configuration
dashboard
dashboard-override-cm
UI for Devtron
gitSensor
git-sensor-override-cm
microservice for Git interaction
guard
guard-override-cm
validating webhook to block images with security violations
postgresql
postgresql-override-cm
db store of Devtron
imageScanner
image-scanner-override-cm
image scanner for vulnerability
kubewatch
kubewatch-override-cm
watches changes in ci and cd running in different clusters
lens
lens-override-cm
deployment metrics analysis
natsOperator
nats-operator-override-cm
operator for nats
natsServer
nats-server-override-cm
nats server
natsStreaming
nats-streaming-override-cm
nats streaming server
notifier
notifier-override-cm
sends notification related to CI and CD
devtron
devtron-override-cm
core engine of Devtron
devtronIngress
devtron-ingress-override-cm
ingress configuration to expose Devtron
workflow
workflow-override-cm
component to run CI workload
externalSecret
external-secret-override-cm
manage secret through external stores like vault/AWS secret store
grafana
grafana-override-cm
Grafana config for dashboard
rollout
rollout-override-cm
manages blue-green and canary deployments
minio
minio-override-cm
default store for CI logs and image cache
minioStorage
minio-storage-override-cm
db config for minio
Let's take an example to understand how to override specific values. Say, you want to override annotations and host in the ingress, i.e., you want to change devtronIngress, copy the file devtron-ingress-override.yaml. This file contains a configmap to modify devtronIngress as mentioned above. Please note the structure of this configmap, data should have the key override with a multiline string as a value.
apiVersion, kind, metadata.name in the multiline string is used to match the object which needs to be modified. In this particular case it will look for apiVersion: extensions/v1beta1, kind: Ingress and metadata.name: devtron-ingress and will apply changes mentioned inside update: as per the example inside the metadata: it will add annotations owner: app1 and inside spec.rules.http.host it will add http://change-me.
In case you want to change multiple objects, for eg in argocd you want to change the config of argocd-dex-server as well as argocd-redis then follow the example in devtron-argocd-override.yaml.
Once we have made these changes in our local system we need to apply them to a Kubernetes cluster on which Devtron is installed currently using the below command:
Run the following command to make these changes take effect:
Our changes would have been propagated to Devtron after 20-30 minutes.
To use Devtron for production deployments, use our recommended production overrides located in manifests/updates/production. This configuration should be enough for handling up to 200 microservices.
The overall resources required for the recommended production overrides are:
cpu
6
memory
13GB
The production overrides can be applied as pre-devtron installation as well as post-devtron installation in the respective namespace.
If you want to install a new Devtron instance for production-ready deployments, this is the best option for you.
Create the namespace and apply the overrides files as stated above:
After files are applied, you are ready to install your Devtron instance with production-ready resources.
If you have an existing Devtron instance and want to migrate it for production-ready deployments, this is the right option for you.
In the existing namespace, apply the production overrides as we do it above.
Devtron is installed over a Kubernetes cluster and can be installed standalone or along with CI/CD integration:
Devtron with CI/CD: Devtron installation with the CI/CD integration is used to perform CI/CD, security scanning, GitOps, debugging, and observability.
Devtron: The Devtron installation includes functionalities to deploy, observe, manage, and debug existing Helm applications in multiple clusters and deeply integrate with multiple tools using extensions.
The minimum requirements for Devtron and Devtron with CI/CD integration in production and non-production environments include:
Non-production
Devtron with CI/CD
2
6 GB
Devtron
1
1 GB
Production (assumption based on 5 clusters)
Devtron with CI/CD
6
13 GB
Devtron
2
3 GB
Refer to the Override Configurations section for more information.
Create a Kubernetes cluster (preferably K8s 1.16 or higher) if you haven't done that already!
Refer to the Creating a Production grade EKS cluster using EKSCTL article to set up a cluster in the production environment.
This documentation consists of the Global Configurations available in Devtron.
Parts of the Documentation
Devtron integrations extend the functionality of your Devtron stack.
The current release of Devtron supports the Build and Deploy (CI/CD) integration. More integrations will be available soon; to request one, please
Integrations can be installed by super admins; However other user roles can browse and request super admins to install the required integrations.
Integrations are updated along with .
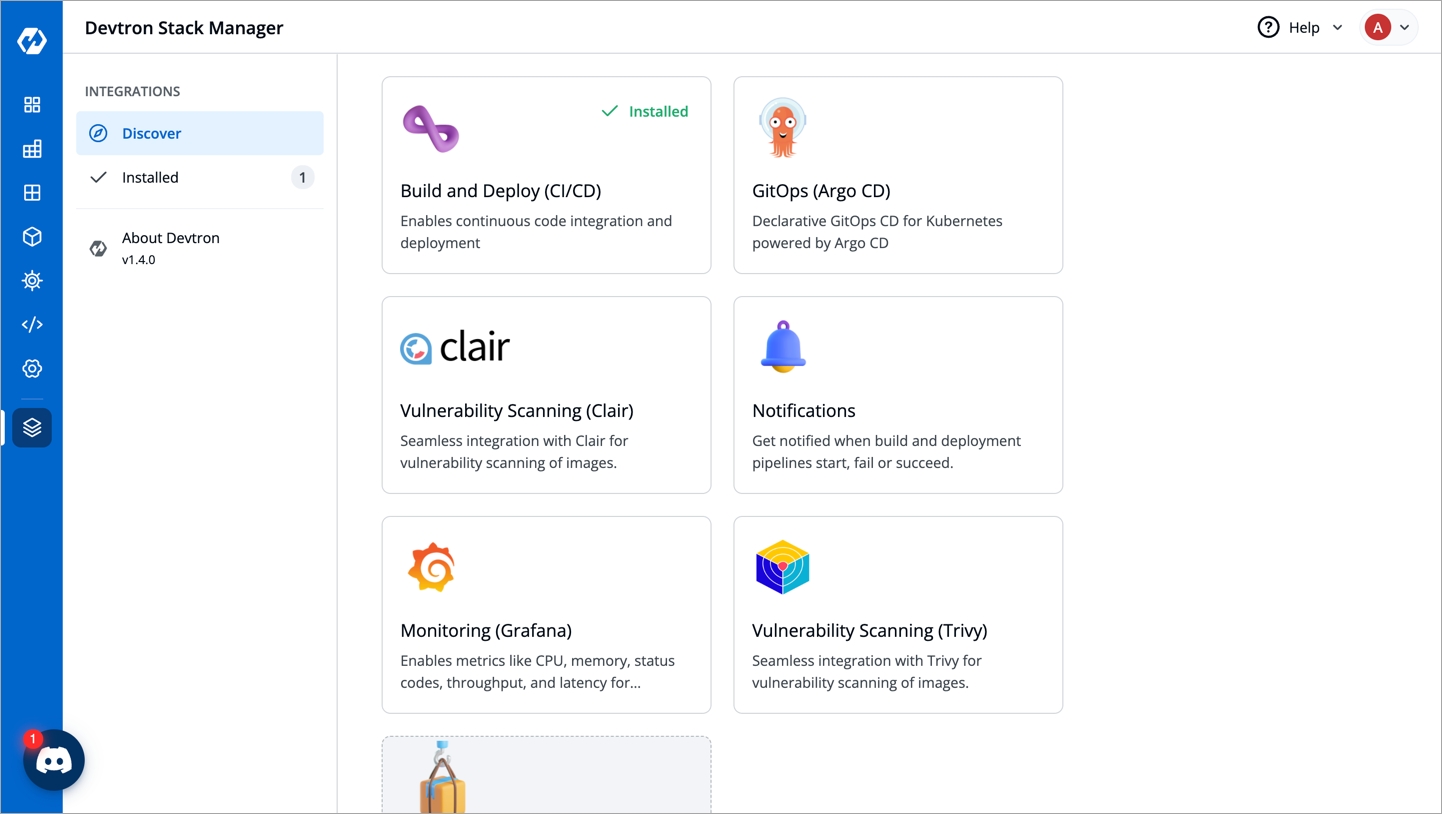
Select Devtron Stack Manager from the left navigation bar. Under INTEGRATIONS, select Discover.
Devtron CI/CD integration enables software development teams to automate the build and deployment process, allowing them to focus on meeting the business requirements, maintaining code quality, and ensuring security.
Features
Leverages Kubernetes auto-scaling and centralized caching to give you unlimited cost-efficient CI workers.
Supports pre-CI and post-CI integrations for code quality monitoring.
Seamlessly integrates with Clair for image vulnerability scanning.
Supports different deployment strategies: Blue/Green, Rolling, Canary, and Recreate.
Implements GitOps to manage the state of Kubernetes applications.
Integrates with ArgoCD for continuous deployment.
Check logs, events, and manifests or exec inside containers for debugging.
Provides deployment metrics like; deployment frequency, lead time, change failure rate, and mean-time recovery.
Seamless integration with Grafana for continuous application metrics like CPU and memory usage, status code, throughput, and latency on the dashboard.
On the Devtron Stack Manager > Discover page, select the Build and Deploy (CI/CD) integration.
On the Discover integrations/Build and Deploy (CI/CD) page, select Install.
The installation status may be one of the following:
A list of installed integrations can be viewed on the Devtron Stack Manager > Installed page.
Install .
Add Devtron repository
Install Devtron
This installation will use Minio for storing build logs and cache.
This installation will use AWS s3 buckets for storing build logs and cache. Refer to the AWS specific parameters on the page.
This installation will use Azure Blob Storage for storing build logs and cache. Refer to the Azure specific parameters on the page.
Append the command with
--set installer.release="vX.X.X"to install a particular version of Devtron. Wherevx.x.xis the .
For those countries/users where Github is blocked, you can use Gitee as the installation source:
The install commands start Devtron-operator, which takes about 20 minutes to spin up all of the Devtron microservices one by one. You can use the following command to check the status of the installation:
The command executes with one of the following output messages, indicating the status of the installation:
To check the installer logs, run the following command:
Use the following command to get the dashboard URL:
You will get an output similar to the one shown below:
The hostname aaff16e9760594a92afa0140dbfd99f7-305259315.us-east-1.elb.amazonaws.com as mentioned above is the Loadbalancer URL where you can access the Devtron dashboard.
If you don't see any results or receive a message that says "service doesn't exist," it means Devtron is still installing; please check back in 5 minutes.
Note: You can also do a
CNAMEentry corresponding to your domain/subdomain to point to this Loadbalancer URL to access it at a custom domain.
For admin login, use the username:admin, and run the following command to get the admin password:
Please make sure that you do not have anything inside namespaces devtroncd, devtron-cd, devtron-ci, and devtron-demo as the below steps will clean everything inside these namespaces:
Although the integrations are installed separately, they cannot be upgraded separately. Integrations update happens automatically with .
To update an installed integration, please .
If you are planning to use Devtron for production deployments, please refer to our recommended overrides for .
Next,
Still facing issues, please reach out to us on .
Install
The integration is not yet installed.
Initializing
The installation is being initialized.
Installing
The installation is in progress. The logs are available to track the progress.
Failed
Installation failed and the logs are available to troubleshoot. You could retry the installation or contact support.
Installed
The integration is successfully installed and available on the Installed page.
Request timed out
The request to install has hit the maximum number of retries. You may retry the installation or contact support for further assistance.
Downloaded
The installer has downloaded all the manifests, and the installation is in progress.
Applied
The installer has successfully applied all the manifests, and the installation is complete.
devtron.yourdomain.com
CNAME
aaff16e9760594a92afa0140dbfd99f7-305259315.us-east-1.elb.amazonaws.com

Configure Secrets
For helm installation this section referes to secrets.env section of values.yaml. For kubectl based installation it refers to kind: secret in install/devtron-operator-configs.yaml.
Configure the following properties:
POSTGRESQL_PASSWORD
Using this parameter the auto-generated password for Postgres can be edited as per requirement(Used by Devtron to store the app information)
WEBHOOK_TOKEN
If you want to continue using Jenkins for CI then provide this for authentication of requests should be base64 encoded
Configure ConfigMaps
For helm installation this section refers to configs section of values.yaml. For kubectl based installation it refers to kind: ConfigMap in install/devtron-operator-configs.yaml.
Configure the following properties:
BASE_URL_SCHEME
Either of HTTP or HTTPS (required)
HTTP
BASE_URL
URL without scheme and trailing slash, this is the domain pointing to the cluster on which the Devtron platform is being installed. For example, if you have directed domain devtron.example.com to the cluster and the ingress controller is listening on port 32080 then URL will be devtron.example.com:32080 (required)
change-me
DEX_CONFIG
EXTERNAL_SECRET_AMAZON_REGION
AWS region for the secret manager to pick (required)
PROMETHEUS_URL
URL of Prometheus where all cluster data is stored; if this is wrong, you will not be able to see application metrics like CPU, RAM, HTTP status code, latency, and throughput (required)
While installing Devtron and using the AWS-S3 bucket for storing the logs and caches, the below parameters are to be used in the ConfigMap.
NOTE: For using the S3 bucket it is important to add the S3 permission policy to the IAM role attached to the nodes of the cluster.
DEFAULT_CACHE_BUCKET
AWS bucket to store docker cache, it should be created beforehand (required)
DEFAULT_BUILD_LOGS_BUCKET
AWS bucket to store build logs, it should be created beforehand (required)
DEFAULT_CACHE_BUCKET_REGION
AWS region of S3 bucket to store cache (required)
DEFAULT_CD_LOGS_BUCKET_REGION
AWS region of S3 bucket to store CD logs (required)
While installing Devtron using Azure Blob Storage for storing logs and caches, the below parameters will be used in the ConfigMap.
NOTE: For using the storage containers it is mandatory to enable versioning on the storage account. Refer this guide to enable the same.
AZURE_ACCOUNT_NAME
Account name for AZURE Blob Storage
AZURE_BLOB_CONTAINER_CI_LOG
AZURE Blob storage container for storing ci-logs after running the CI pipeline
AZURE_BLOB_CONTAINER_CI_CACHE
AZURE Blob storage container for storing ci cache after running the CI pipeline
To convert string to base64 use the following command:
Note:
Ensure that the cluster has read and write access to the S3 buckets/Azure Blob storage container mentioned in DEFAULT_CACHE_BUCKET, DEFAULT_BUILD_LOGS_BUCKET or AZURE_BLOB_CONTAINER_CI_LOG, or AZURE_BLOB_CONTAINER_CI_CACHE.
Ensure that the cluster has read access to AWS secrets backends (SSM & secrets manager).
The following tables contain parameters and their details for Secrets and ConfigMaps that are configured during the installation of Devtron. While installing Devtron using kubectl the following parameters can be tweaked in devtron-operator-configs.yaml file. If the installation is proceeded using helm3, the values can be tweaked in values.yaml file.
We can use the --set flag to override the default values when installing with Helm. For example, to update POSTGRESQL_PASSWORD and BLOB_STORAGE_PROVIDER, use the install command as:
ACD_PASSWORD
ArgoCD Password for CD Workflow
Auto-Generated
Optional
AZURE_ACCOUNT_KEY
Account key to access Azure objects such as BLOB_CONTAINER_CI_LOG or CI_CACHE
""
Mandatory (If using Azure)
GRAFANA_PASSWORD
Password for Grafana to display graphs
Auto-Generated
Optional
POSTGRESQL_PASSWORD
Password for your Postgresql database that will be used to access the database
Auto-Generated
Optional
AZURE_ACCOUNT_NAME
Azure account name which you will use
""
Mandatory (If using Azure)
AZURE_BLOB_CONTAINER_CI_LOG
Name of container created for storing CI_LOG
ci-log-container
Optional
AZURE_BLOB_CONTAINER_CI_CACHE
Name of container created for storing CI_CACHE
ci-cache-container
Optional
BLOB_STORAGE_PROVIDER
Cloud provider name which you will use
MINIO
Mandatory (If using any cloud other than MINIO), MINIO/AZURE/S3
DEFAULT_BUILD_LOGS_BUCKET
S3 Bucket name used for storing Build Logs
devtron-ci-log
Mandatory (If using AWS)
DEFAULT_CD_LOGS_BUCKET_REGION
Region of S3 Bucket where CD Logs are being stored
us-east-1
Mandatory (If using AWS)
DEFAULT_CACHE_BUCKET
S3 Bucket name used for storing CACHE (Do not include s3://)
devtron-ci-cache
Mandatory (If using AWS)
DEFAULT_CACHE_BUCKET_REGION
S3 Bucket region where Cache is being stored
us-east-1
Mandatory (If using AWS)
EXTERNAL_SECRET_AMAZON_REGION
Region where the cluster is setup for Devtron installation
""
Mandatory (If using AWS)
ENABLE_INGRESS
To enable Ingress (True/False)
False
Optional
INGRESS_ANNOTATIONS
Annotations for ingress
""
Optional
PROMETHEUS_URL
Existing Prometheus URL if it is installed
""
Optional
CI_NODE_LABEL_SELECTOR
Label of CI worker node
""
Optional
CI_NODE_TAINTS_KEY
Taint key name of CI worker node
""
Optional
CI_NODE_TAINTS_VALUE
Value of taint key of CI node
""
Optional
CI_DEFAULT_ADDRESS_POOL_BASE_CIDR
CIDR ranges used to allocate subnets in each IP address pool for CI
""
Optional
CI_DEFAULT_ADDRESS_POOL_SIZE
The subnet size to allocate from the base pool for CI
""
Optional
CD_NODE_LABEL_SELECTOR
Label of CD node
kubernetes.io/os=linux
Optional
CD_NODE_TAINTS_KEY
Taint key name of CD node
dedicated
Optional
CD_NODE_TAINTS_VALUE
Value of taint key of CD node
ci
Optional
CD_LIMIT_CI_CPU
CPU limit for pre and post CD Pod
0.5
Optional
CD_LIMIT_CI_MEM
Memory limit for pre and post CD Pod
3G
Optional
CD_REQ_CI_CPU
CPU request for CI Pod
0.5
Optional
CD_REQ_CI_MEM
Memory request for CI Pod
1G
Optional
CD_DEFAULT_ADDRESS_POOL_BASE_CIDR
CIDR ranges used to allocate subnets in each IP address pool for CD
""
Optional
CD_DEFAULT_ADDRESS_POOL_SIZE
The subnet size to allocate from the base pool for CD
""
Optional
GITOPS_REPO_PREFIX
Prefix for Gitops repository
devtron
Optional
RECOMMEND_SECURITY_SCANNING
If True, security scanning is enabled by default for a new build pipeline. Users can however turn it off in the new or existing pipelines.
FORCE_SECURITY_SCANNING
If set to True, security scanning is forcefully enabled by default for a new build pipeline. Users can not turn it off for new as well as for existing build pipelines. Old pipelines that have security scanning disabled will remain unchanged and image scanning should be enabled manually for them.
HIDE_DISCORD
Hides discord chatbot from the dashboard.
Container registries are used to store images built by the CI Pipeline. Here you can configure the container registry you want to use for storing images.
When configuring an application, you can choose which registry and repository it should use in the App Configuration > Docker Build Config section.
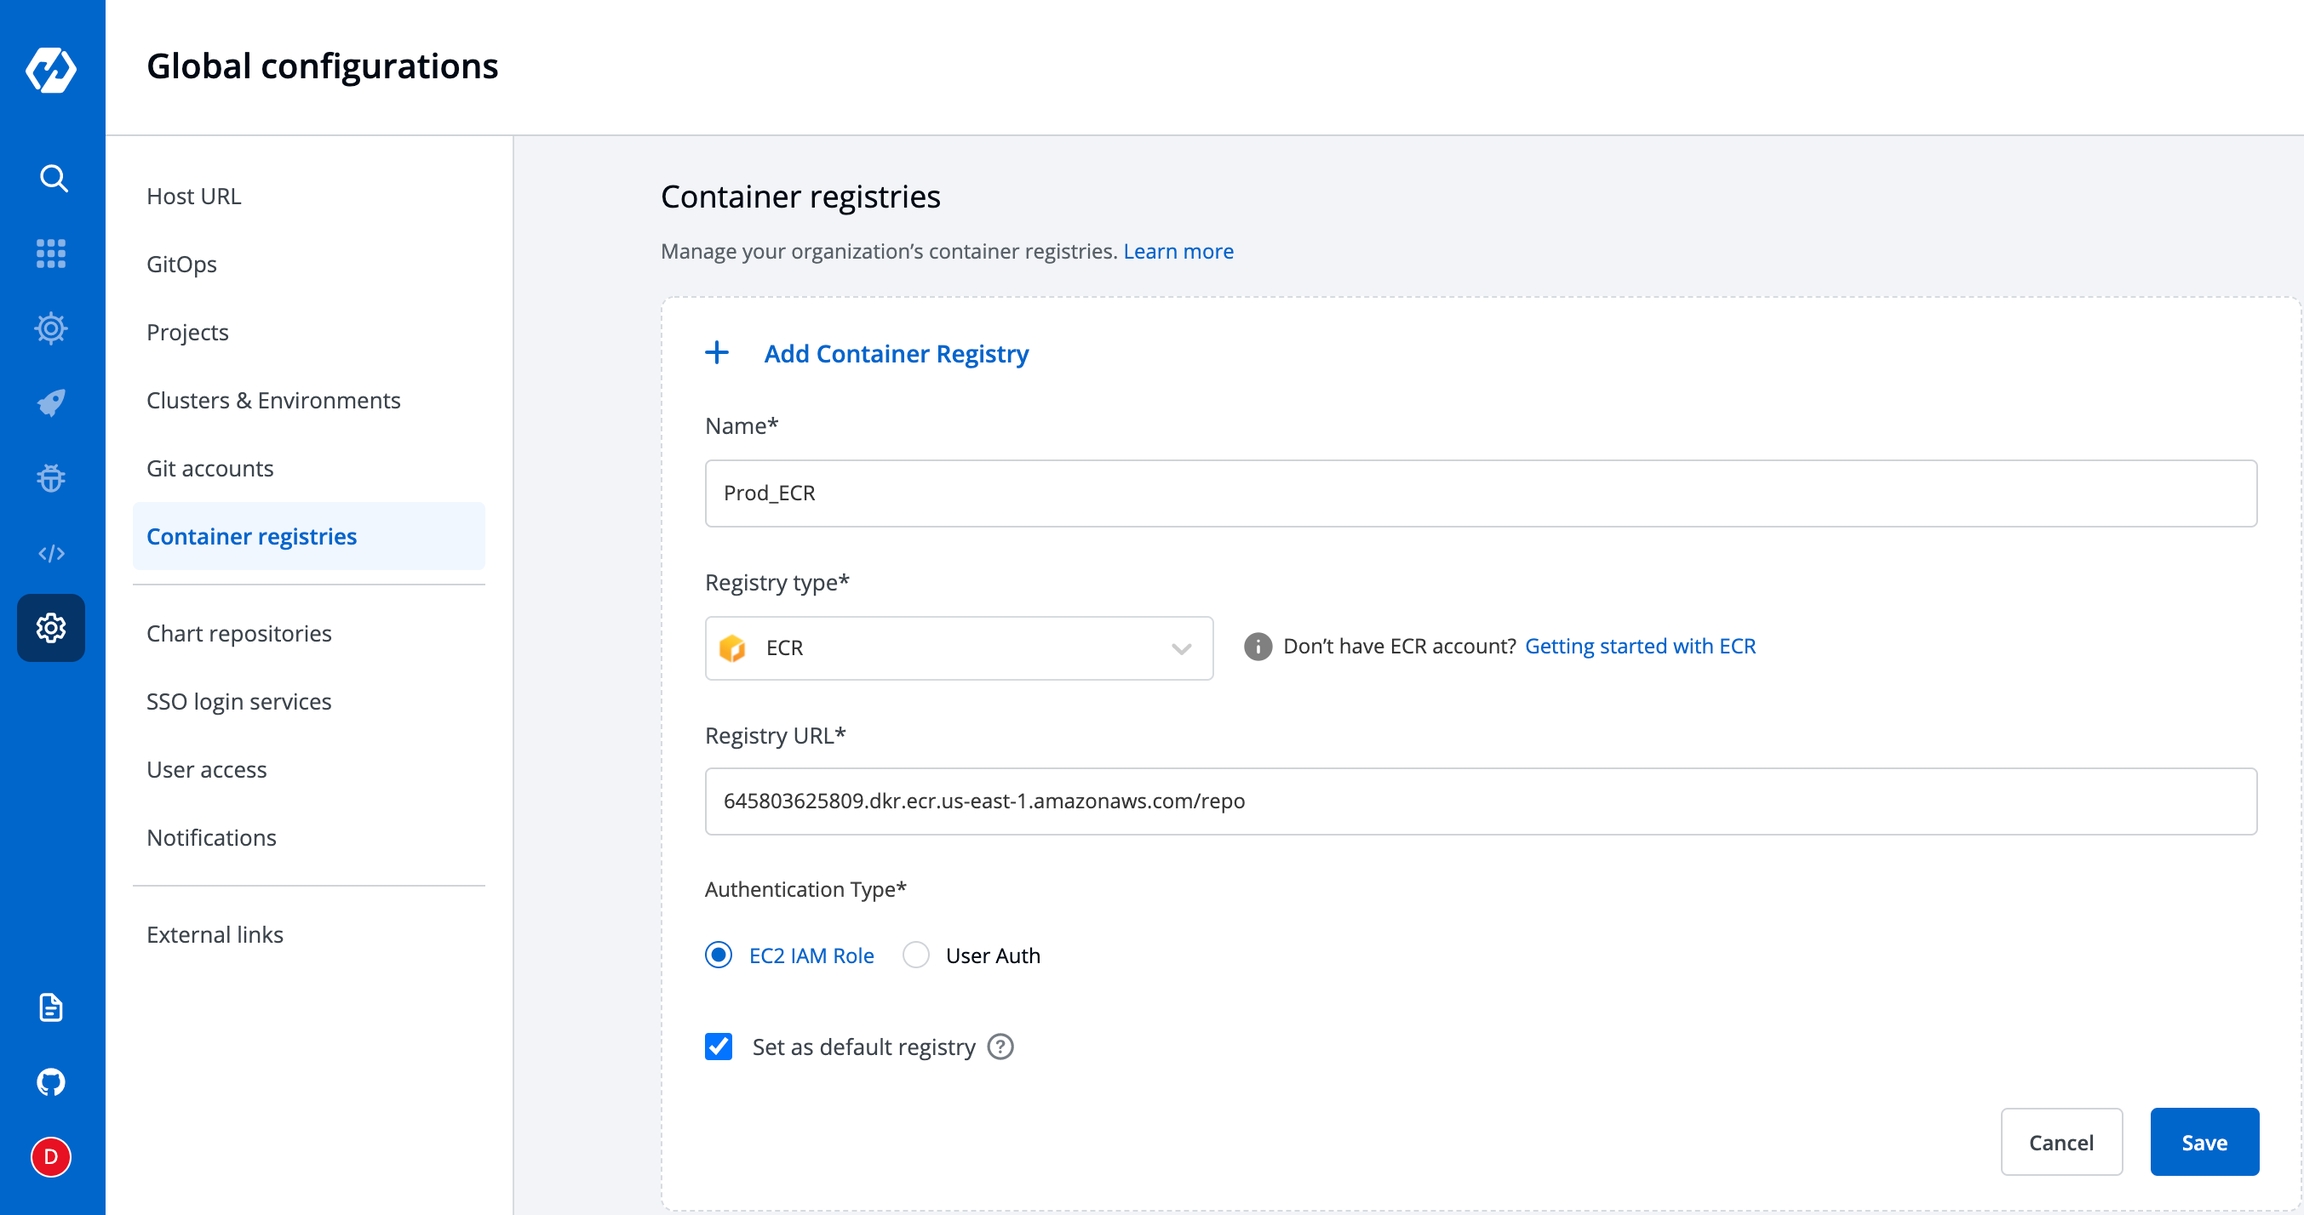
Go to the Container Registry section of Global Configuration. Click on Add container registry.
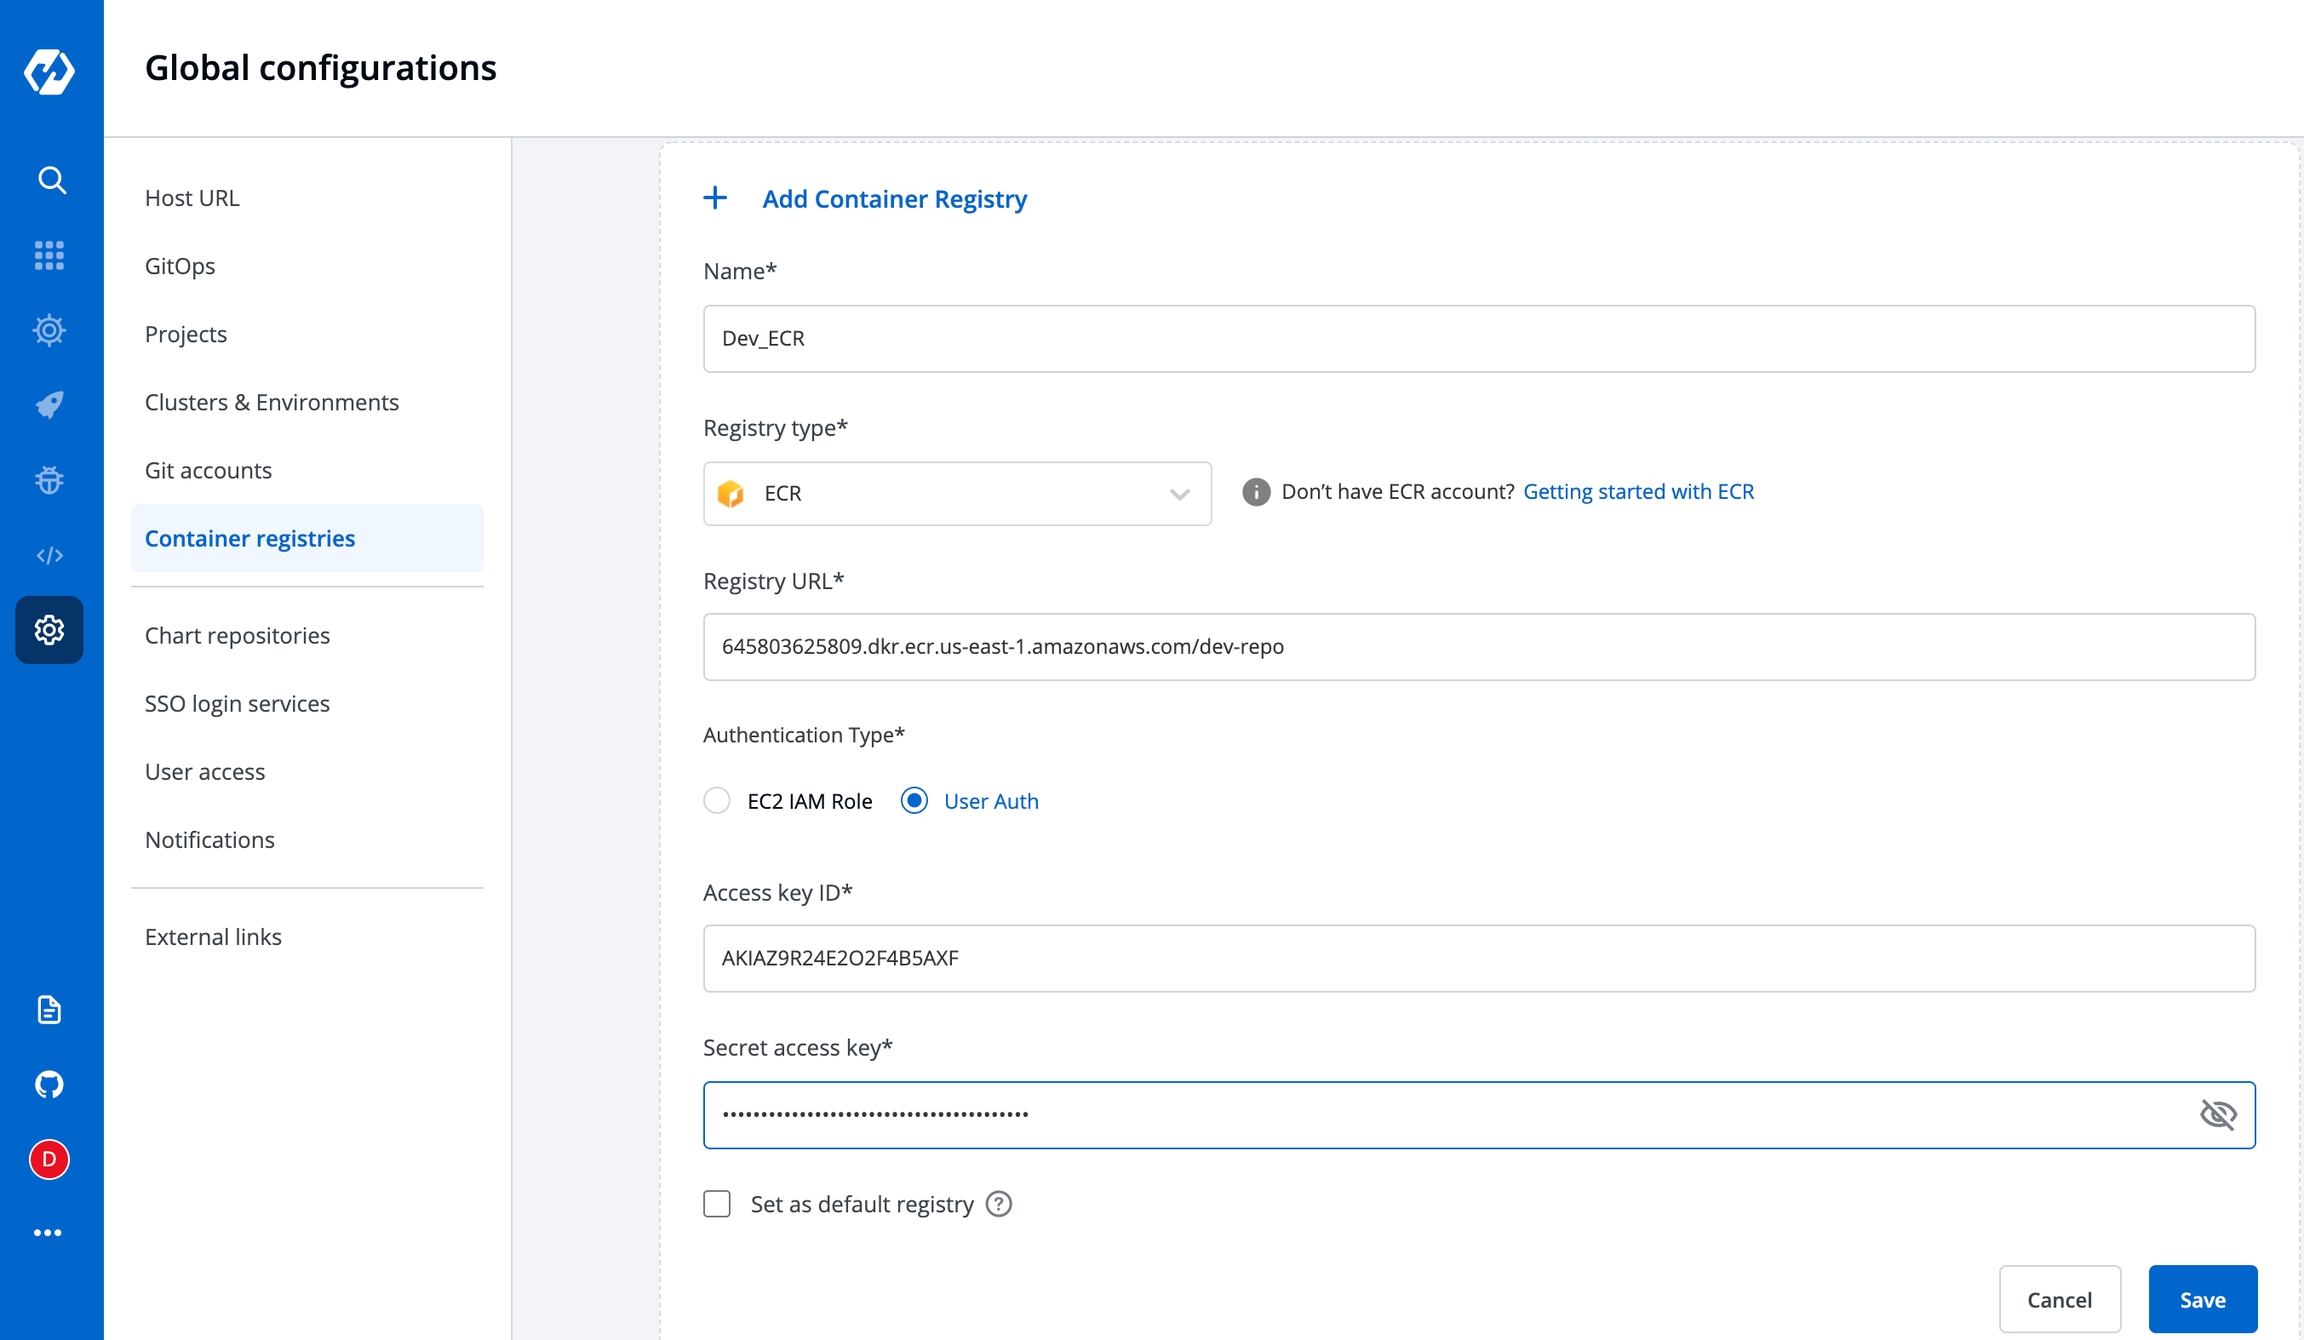
You will see below the input fields to configure the container registry.
Name
Registry type
ecr
AWS region
Access key ID
Secret access key
docker hub
Username
Password
Others
Username
password
Registry URL
Set as default
Provide a name to your registry, this name will be shown to you in Docker Build Config as a drop-down.
Here you can select the type of the Registry. We are supporting three types- docker hub, ecr and others. You can select any one of them from the drop-down. By default, this value is ecr. If you select ecr then you have to provide some information like- AWS region, Access Key, and Secret Key. If you select docker hub then you have to provide Username and Password. And if you select others then you have to provide the Username and Password.
Select any type of Registry from the drop-down, you have to provide the URL of your registry. Create your registry and provide the URL of that registry in the URL box.
To add an Amazon Elastic Container Registry (ECR), select the ECR Registry type. Amazon ECR is an AWS-managed container image registry service. The ECR provides resource-based permissions to the private repositories using AWS Identity and Access Management (IAM). ECR allows both Key-based and Role-based authentications.
Before you begin, create an IAM user, and attach only ECR policy ( AmazonEC2ContainerRegistryFullAccess ) if using Key-based auth. Or attach the ECR policy ( AmazonEC2ContainerRegistryFullAccess) to the cluster worker nodes IAM role of your Kubernetes cluster if using Role-based access.
Name
User-defined name for the registry in Devtron
Registry Type
Select ECR
Registry URL
This is the URL of your private registry in AWS.
For example, the URL format is: https://xxxxxxxxxxxx.dkr.ecr.<region>.amazonaws.com.
xxxxxxxxxxxx is your 12-digit AWS account Id.
Authentication Type
* EC2 IAM role: Authenticate with workernode IAM role. * User Auth: Authenticate with an authorization token - Access key ID: Your AWS access key - Secret access key: Your AWS secret access key ID
To set this ECR as the default registry hub for your images, select [x] Set as default registry.
Select Save.
To use the ECR container image, go to the Applications page and select your application, and then select App Configuration > Docker Build Config.
You have to provide the below information if you select the registry type as Docker Hub.
Username
Give the username of the docker hub account you used for creating your registry in.
Password
Give the password/token corresponding to your docker hub account.
You have to provide the below information if you select the registry type as others.
Username
Give the username of your account, where you have created your registry in.
Password
Give the password corresponding to the username of your registry.
If you enable the Set as default option, then this registry name will be set as default in the Container Registry section inside the Docker build config page. This is optional. You can keep it disabled.
If you enable the Allow Only Secure Connection option, then this registry allows only secure connections.
If you enable the Allow Secure Connection With CA Certificate option, then you have to upload/provide private CA certificate (ca.crt).
If the container registry is insecure (for eg : SSL certificate is expired), then you enable the Allow Insecure Connection option.
Now click on Save to save the configuration of the Container registry.
You can use any registry which can be authenticated using docker login -u <username> -p <password> <registry-url>. However these registries might provide a more secured way for authentication, which we will support later. Some popular registries which can be used using username and password mechanism:
Google Container Registry (GCR) : JSON key file authentication method can be used to authenticate with username and password. Please follow link for getting username and password for this registry. Please remove all the white spaces from json key and wrap it in single quote while putting in password field.
Google Artifact Registry (GAR) : JSON key file authentication method can be used to authenticate with username and password. Please follow link for getting username and password for this registry. Please remove all the white spaces from json key and wrap it in single quote while putting in password field.
Azure Container Registry (ACR) : Service principal authentication method can be used to authenticate with username and password. Please follow link for getting username and password for this registry.
If you want to use a private registry for container registry other than ecr, this will be used to push image and then create a secret in same environment to pull the image to deploy. To create secret, go to charts section and search for chart ‘dt-secrets’ and configure the chart. Provide an App Name and select the Project and Environment in which you want to deploy this chart and then configure the values.yaml as shown in example. The given example is for DockerHub but you can configure similarly for any container registry that you want to use.
The name that you provide in values.yaml ie. regcred is name of the secret that will be used as imagePullSecrets to pull the image from docker hub to deploy. To know how imagePullSecrets will be used in the deployment-template, please follow the documentation.
The Global configuration provides a feature of Cluster & Environment in which you can add your Kubernetes clusters and environment.
Select the Cluster & Environment section of global configuration and click on Add Cluster to add your cluster.
To add a cluster on devtron, you must have superadmin access.
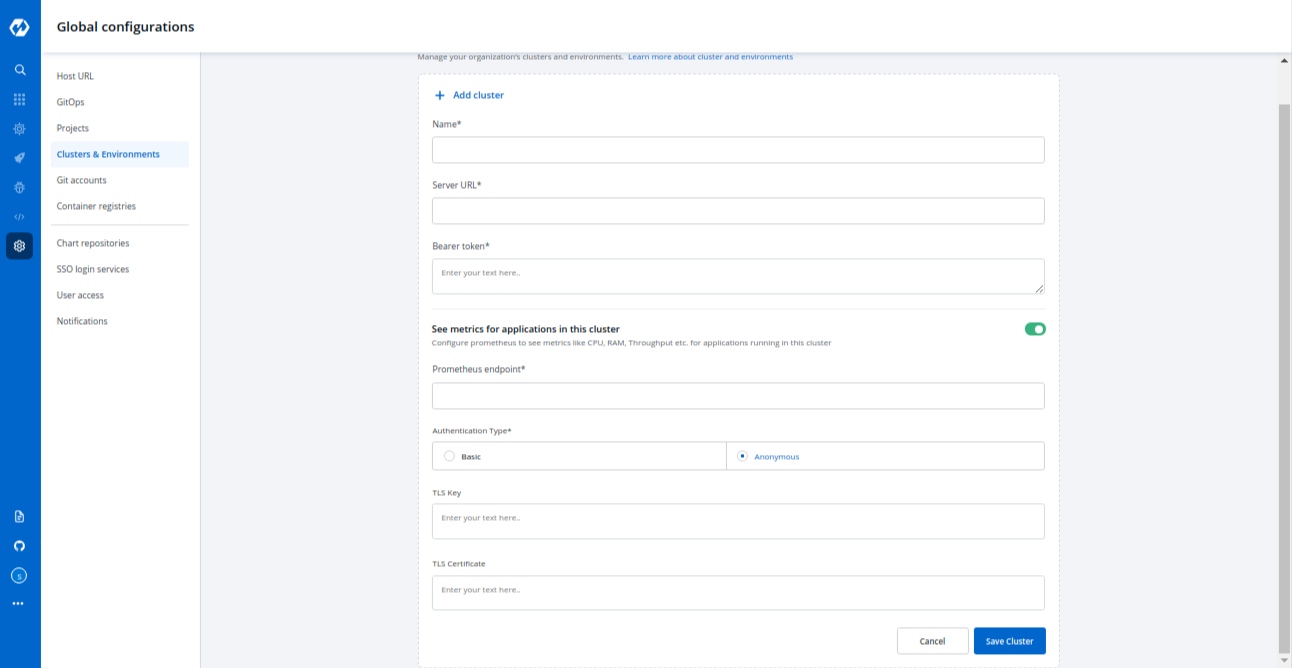
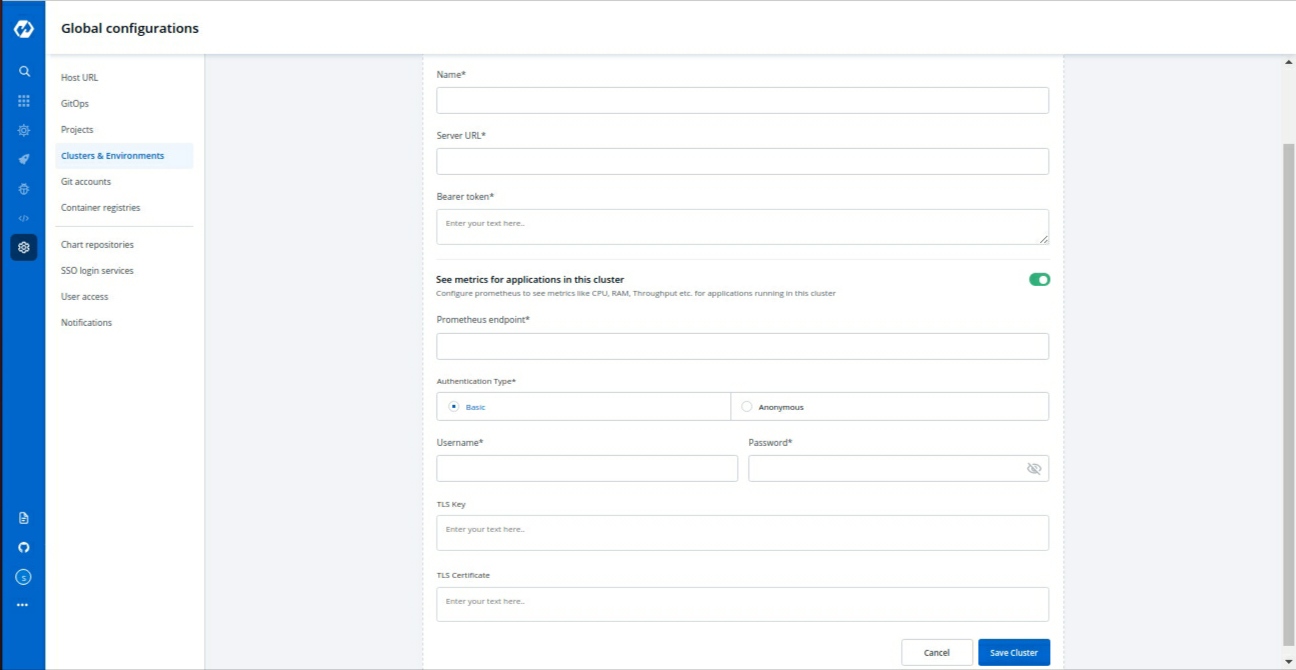
Navigate to the Global Configurations → Clusters and Environments on devtron and click on Add Cluster. Provide the below informations to add your kubernetes cluster:
Name
Kubernetes Cluster Info
Server URL
Bearer token
Prometheus Info
Prometheus endpoint
Basic
Username
Password
Anonymous
TLS Key
TLS Certificate
Give a name to your cluster inside the name box.
Provide your kubernetes cluster’s credentials.
Server URL
Provide the endpoint/URL of your kubernetes cluster.It is recommended to use a self-hosted URL instead of cloud hosted. Self-hosted URL will provide the following benefits.
(a) Disaster Recovery - It is not possible to edit the server-url of a cluster. So if you're using an eks url, For eg- *****.eu-west-1.elb.amazonaws.com it will be a tedious task to add a new cluster and migrate all the services one by one. While using a self-hosted url For eg- clear.example.com you can just point to the new cluster's server url in DNS manager and update the new cluster token and sync all the deployments.
(b) Easy cluster migrations - Cluster url is given in the name of the cloud provider used, so migrating your cluster from one provider to another will result in waste of time and effort. On the other hand, if using a self-hosted url migrations will be easy as the url is of single hosted domain independent of the cloud provider.
Bearer token
Provide your kubernetes cluster’s Bearer token for authentication purposes so that Devtron is able to communicate with your kubernetes cluster and can deploy your application in your kubernetes cluster.
Get the server url and generate the bearer token by running the following command:
Please ensure that kubectl and jq are installed on the bastion on which you’re running the command.
Prometheus is a powerful solution to provide graphical insight into your application behavior. If you want to see your application matrix against your applications deployed in kubernetes, install Prometheus in your kubernetes cluster. The below inputs are required to configure your prometheus into Devtron’s tool.
Prometheus endpoint
Provide the URL of your prometheus. Prometheus supports two types of authentication Basic and Anonymous. Select the authentication type for your Prometheus setup.
Basic
If you select the basic type of authentication then you have to provide the Username and Password of prometheus for authentication.
Anonymous
If you select Anonymous then you do not have to provide any username and password for authentication.
TLS Key & TLS Certificate
TLS key and TLS certificate both options are optional, these options are used when you use a custom URL, in that case, you can pass your TLS key and TLS certificate.
on saving or update a cluster there is a call to fetch k8s version, it will store corresponding to cluster on db. used in listing api's and app detail page for grafana url.
Check the below screenshots to know how it looks like If you select the Basic authentication type
If you select the Anonymous authentication type
Now click on Save Cluster to save your cluster information.
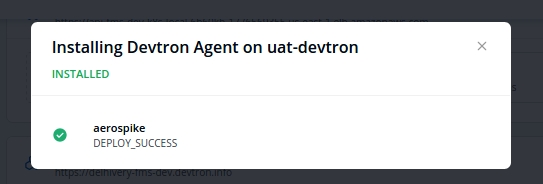
Your kubernetes cluster gets mapped with the Devtron when you save your kubernetes cluster Configuration. Now the agents of devtron will be installed on your cluster so that the components of devtron can communicate to your cluster. When the agent starts installing on your cluster, you can check the status of the agents in the Cluster & Environment tab also.
Click on Details to check what got installed inside the agents. A new window will be popped up displaying all the details about these agents.
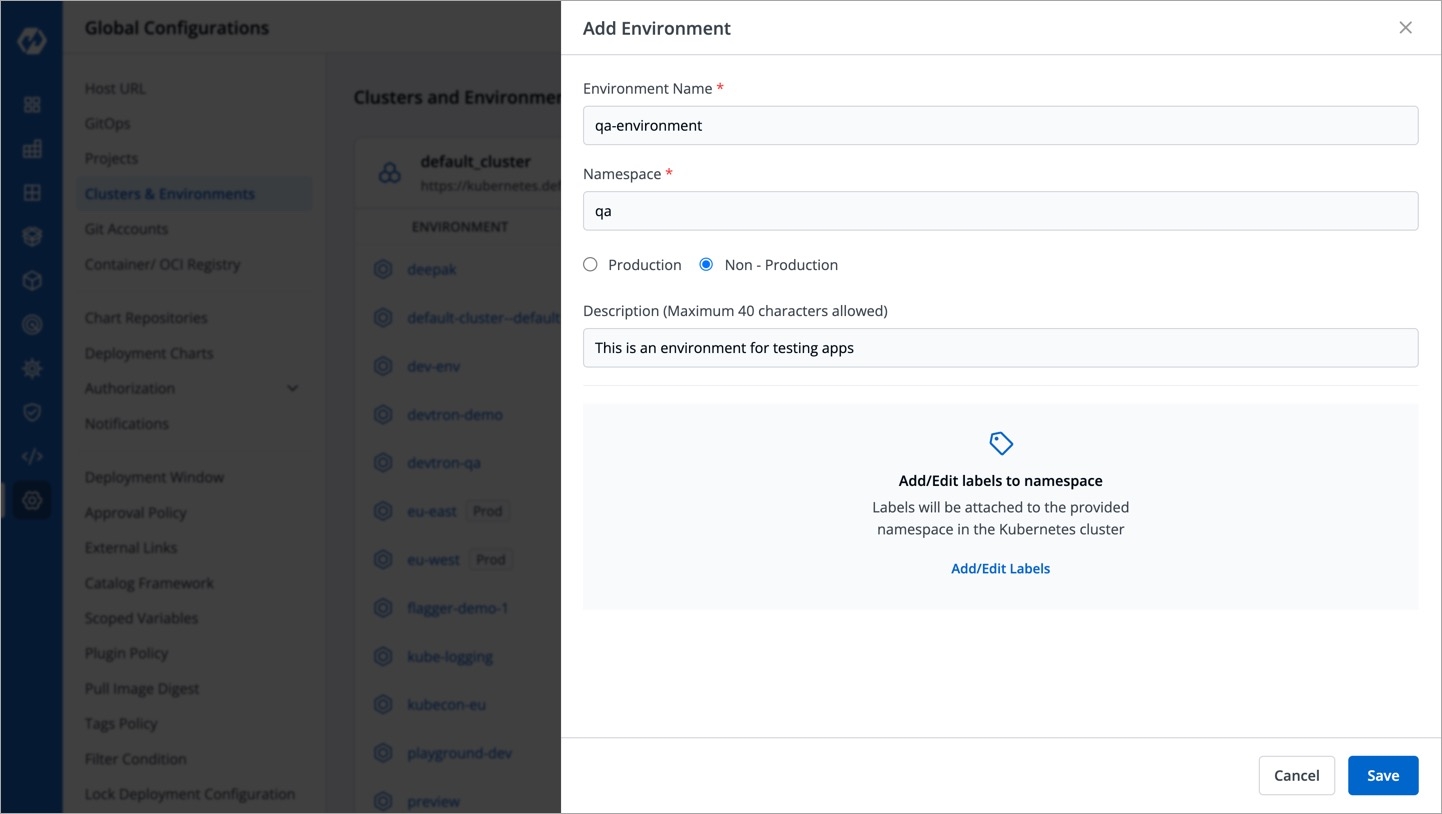
Once you have added your cluster in Cluster & Environment, you can add the environment also. Click on Add Environment, a window will be opened. Give a name to your environment in the Environment Name box and provide a namespace corresponding to your environment in the Namespace input box. Now choose if your environment is for Production purposes or for Non-production purposes. Production and Non-production options are only for tagging purposes. Click on Save and your environment will be created.
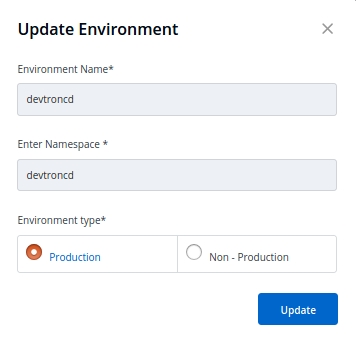
You can update an already created environment, Select and click on the environment which you want to update. You can only change Production and Non-production options here.
Note
You can not change the Environment name and Namespace name.
Click on Update to update your environment.
Once installed Devtron has one built-in admin user with super-admin privileges that has complete access to the system. It is recommended to use admin user only for initial and global configuration and then switch to local users or configure SSO integration.
Only users with super-admin privileges have access to create SSO configuration. Devtron uses dex for authenticating a user against the identity provider.
To add/edit SSO configuration please go to the left main panel -> Select Global Configurations -> Select SSO Login Services
LDAP GitHub OpenID Connect Google Microsoft OpenShift
Dex implements connectors that target specific identity providers, for each connector configuration user must have created account for the corresponding identity provider and registered an app for client key and secret. For examples see
https://dexidp.io/docs/connectors/
https://dexidp.io/docs/connectors/google/
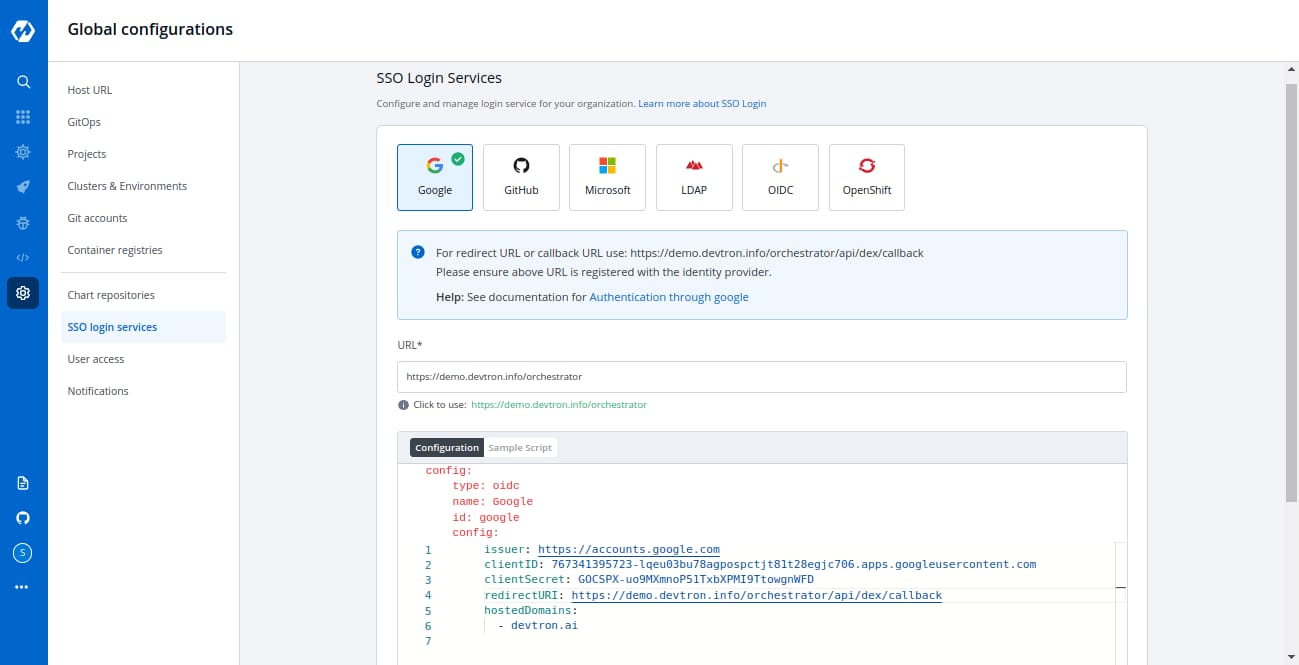
Login as a user with super-admin privileges and go to Global Configurations -> SSO Login Services and click on any Identity Provider and fill the configuration.
Add valid devtron application URL where it is hosted.
Fill correct redirect URL or callback URL from which you have registered with the identity provider in the previous step along with the client id and client secret shared by the identity provider.
Only single SSO login configuration can be active at one time. Whenever you create or update any SSO config, it will be activated and used by the system and previous configurations will be deleted.
Except for the domain substring, URL and redirectURI should be the same as in the screenshots.
Select Save to create and activate SSO login.
SSO configuration can be changed by the user at any later point in time by updating the configuration and clicking on the Save button at the bottom right. In case of configuration change all users will be logged out of the system and will have to login again.
type : oidc or any platform name such as (google, gitlab, github etc)
name : identity provider platform name
id : identity provider platform unique id in string. (refer to dexidp.io)
config : user can put connector details into this key. platforms may not have same structure but commons are clientID, clientSecret, redirectURI.
hostedDomains : domains authorized for SSO login.
Devtron uses GitOps and stores configurations in git; Git Credentials can be entered at Global Configuration > GitOps which is used by Devtron for configuration management and storing desired state of the application configuration. In case GitOps is not configured, Devtron cannot deploy any application or charts.
Areas impacted by GitOps are:
Deployment Template, click here to learn more.
Charts, click here to learn more.
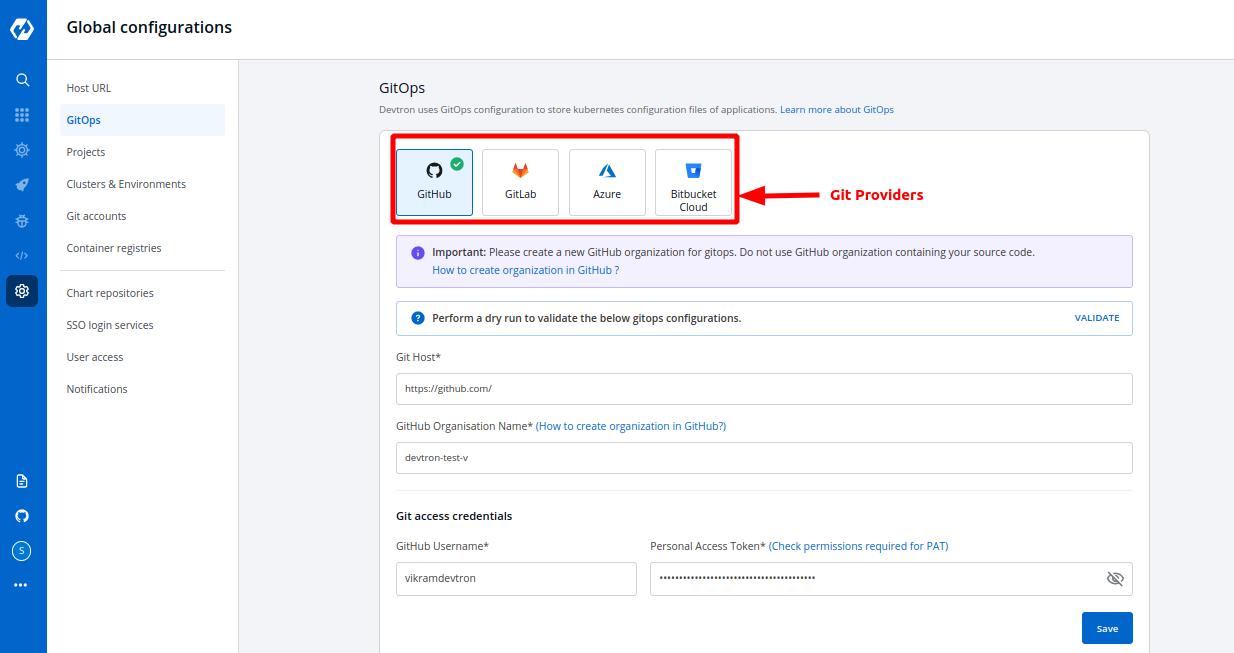
Select the GitOps section of global configuration. At the top of the section, four Git providers are available.
GitHub
GitLab
Azure
BitBucket Cloud
Select one of the Git providers. To add git account, You need to provide the following inputs as given below:
Git Host / Azure DevOps Organisation Url / BitBucket Host
GitHub Organization Name / Gitlab Group id / Azure DevOps Project Name / BitBucket Workspace ID
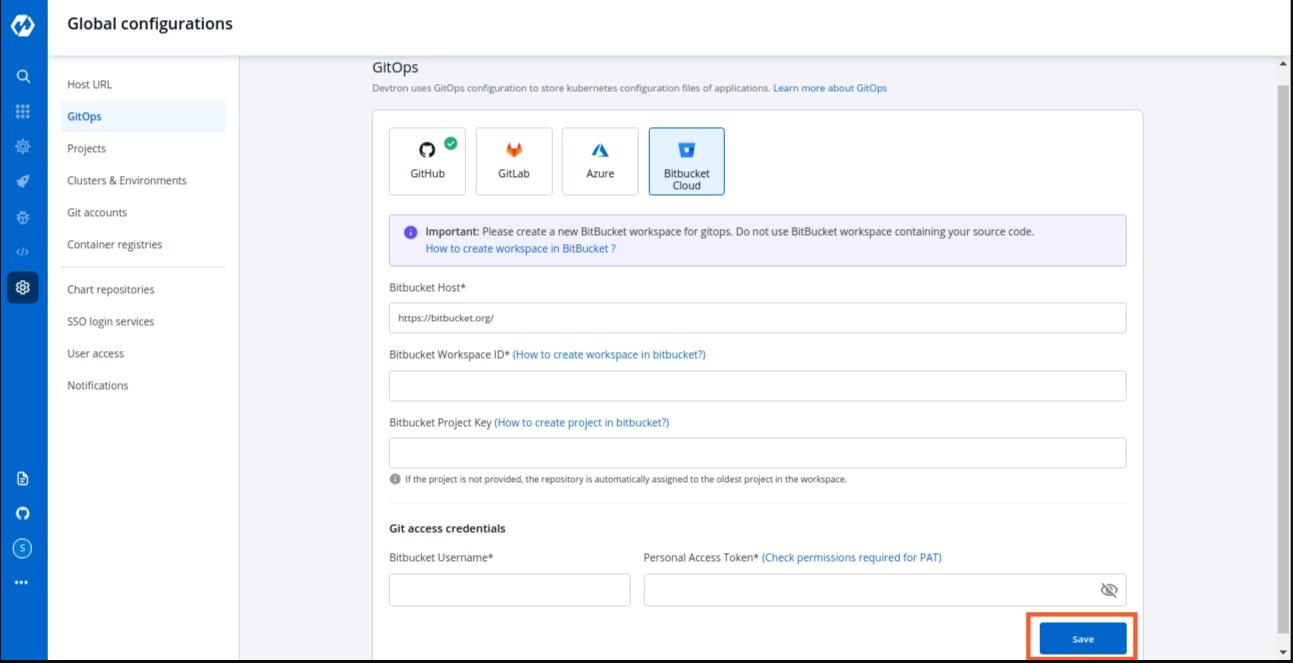
BitBucket Project Key (only for BitBucket Cloud)
Git access credential
This field is filled by default, Showing the URL of the selected git providers. For example- https://github.com for GitHub, https://gitlab.com for GitLab, https://dev.azure.com/ for Azure & https://bitbucket.org for BitBucket. Please replace them(not available for GitHub & BitBucket) if they are not the url you want to use.
In the case of GitHub provide Github Organization Name*. Learn more about Github organization Name.
In the case of Gitlab provide Gitlab group Id*. Learn more about Gitlab group Id.
Similarly in the case of Azure provide Azure DevOps Project Name*. Learn more about Azure DevOps Project Name.
For Bitbucket Cloud, provide Bitbucket Workspace Id*. Learn more about Bitbucket Workspace Id.
This field is non-mandatory and is only to be filled when you have chosen Bitbucket Cloud as your git provider. If not provided, the oldest project in the workspace will be used. Learn more about Bitbucket Project Key.
Provide Git Username and Personal Access Token of your git account.
(a) Username Username for your git account.
(b) Personal Access Token A personal access token (PAT) is used as an alternate password to authenticate into your git accounts.
repo - Full control of private repositories(Access commit status , Access deployment status and Access public repositories).
admin:org - Full control of organizations and teams(Read and write access).
delete_repo - Grants delete repo access on private repositories.
api - Grants complete read/write access to the scoped project API.
write_repository - Allows read-write access (pull, push) to the repository.
code - Grants the ability to read source code and metadata about commits, change sets, branches, and other version control artifacts. More Information on scopes in Azure devops.
repo - Full control of repositories (Read, Write, Admin, Delete access).
Click on Save to save your gitOps configuration details.
Note: A Green tick will appear on the active gitOps provider.
This feature allows you to add more chart repositories to Devtron. Once added they will be available in the Discover section of the Chart Store.
Learn more about Discover chart link
Note : After the successfull installation of Devtron, click on
Refresh Chartsto sync & download all the default charts listed on the dashboard.
Select the Chart Repository section of global configuration and click on Add Repository button at the top of the Chart Repository Section. To add new chart, you need to provide three inputs as below:
Name
URL
Authentication type
Provide a Name to your Chart Repository. This name is added as prefix to the name of the chart in the listing on the helm chart section of application.
Provide the URL. For example- github.com for Github, https://gitlab.com for GitLab, etc.
Here you have to provide the type of Authentication required by your version controller. We support three types of authentications, You can choose the one that suits you the best.
Anonymous
If you select Anonymous then you do not have to provide any username, password, or authentication token. Just click on Save to save your chart repository details.
Password/Auth token
If you select Password/Auth token, then you have to provide the Access Token for the authentication of your version controller account inside the Access token box. Click on Save to save your chart repository details.
User Auth
If you choose User Auth then you have to provide the Username and Password of your version controller account. Click on Save to save your chart repository details.
You can update your saved chart repository settings at any point in time. Just click on the chart repository which you want to update. Make the required changes and click on Update to save you changes.
Note: You can enable and disable your chart repository setting. If you enable it, then you will be able to see that enabled chart in
Discoversection ofChart Store.
Learn more about Discover chart link
Devtron includes predefined helm charts that cover the majority of use cases. For any use case not addressed by the default helm charts, you can upload your own helm chart and use it as a custom chart in Devtron.
Who can upload a custom chart - Super admins
Who can use the custom chart - All users
A super admin can upload multiple versions of a custom helm chart.
A valid helm chart, which contains Chart.yaml file with name and version fields.
Image descriptor template file - .image_descriptor_template.json.
Custom chart packaged in the *.tgz format.
Chart.yaml is the metadata file that gets created when you create a helm chart.
Name
Required. Name of the helm chart.
Version
Required. This is the chart version. Update this value for each new version of the chart.
Description
Optional. Description of the chart.
.image_descriptor_template.jsonIt's a GO template file that should produce a valid JSON file upon rendering. This file is passed as the last argument in helm install -f myvalues.yaml -f override.yaml command.
Place the .image_descriptor_template.json file in the root directory of your chart.
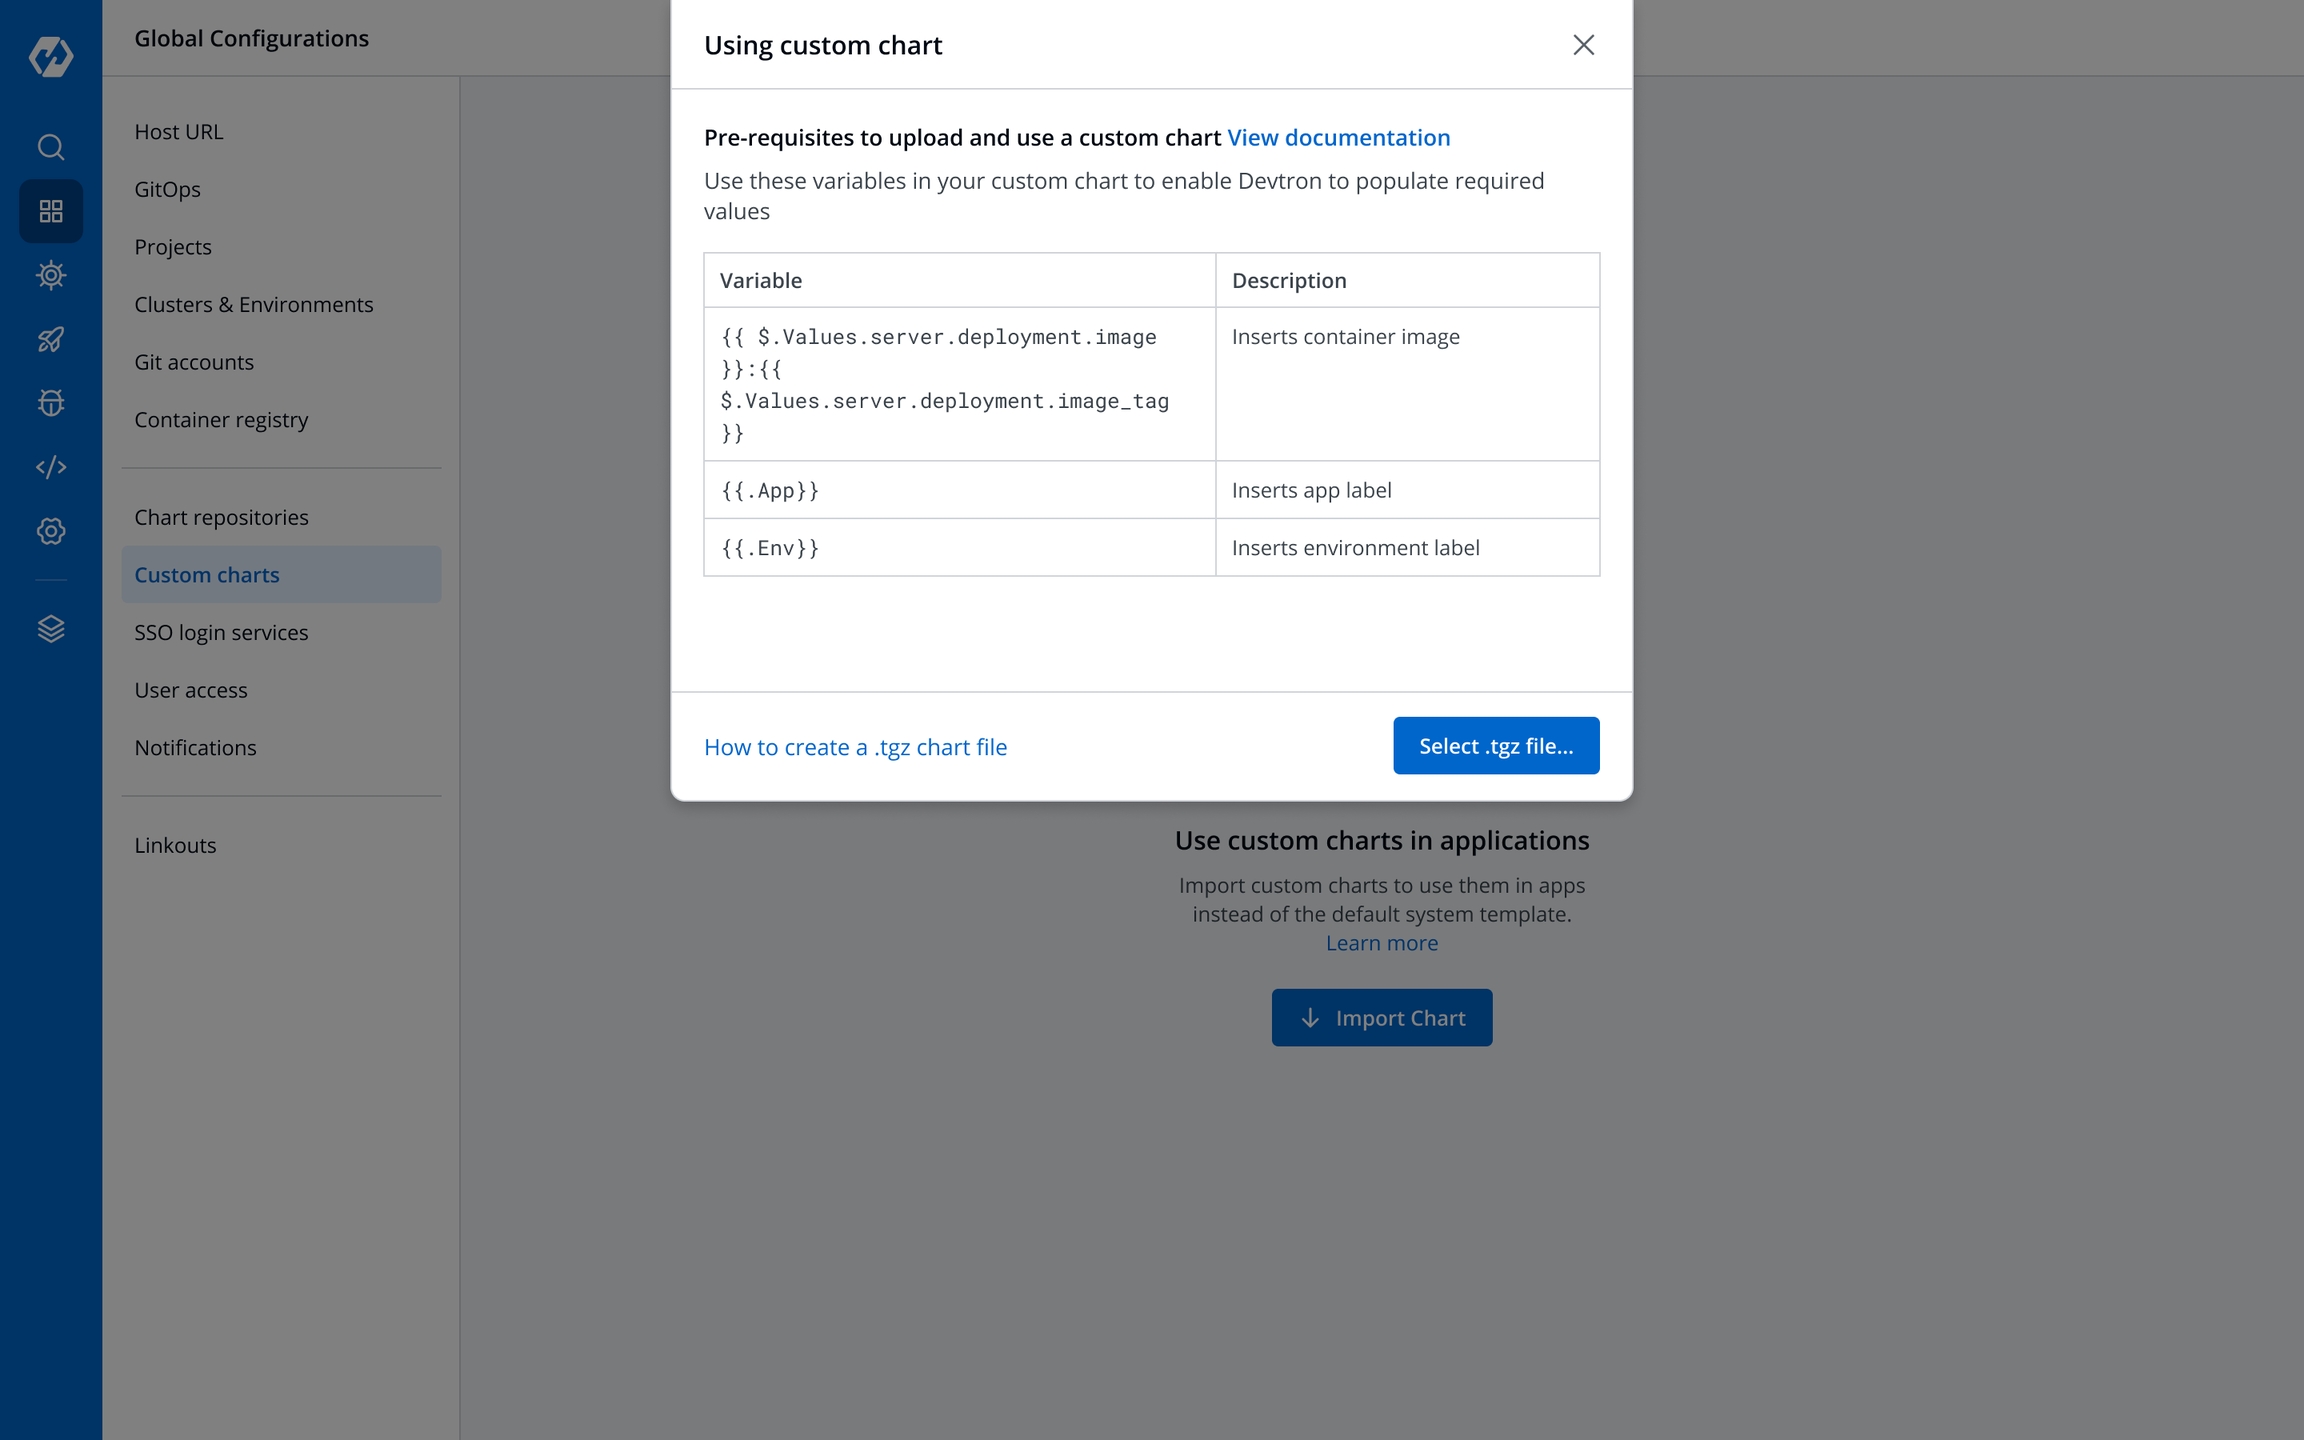
You can use the following variables in the helm template (all the placeholders are optional):
The values from the CD deployment pipeline are injected at the placeholder specified in the
.image_descriptor_template.jsontemplate file.
image_tag
The build image tag
image
Repository name
pipelineName
The CD pipeline name created in Devtron
releaseVersion
Devtron's internal release number
deploymentType
Deployment strategy used in the pipeline
app
Application's ID within the Devtron ecosystem
env
Environment used to deploy the chart
appMetrics
For the App metrics UI feature to be effective, include the appMetrics placeholder.
For example:
To create a template file to allow Devtron to only render the repository name and the tag from the CI/CD pipeline that you created, edit the
.image_descriptor_template.jsonfile as:
*.tgz formatBefore you begin, ensure that your helm chart includes both
Chart.yaml(withnameandversionfields) and.image_descriptor_template.jsonfiles.
The helm chart to be uploaded must be packaged as a versioned archive file in the format - <helm-chart-name>-vx.x.x.tgz.
The above command will create a my-custom-chart-0.1.0.tgz file.
A custom chart can only be uploaded by a super admin.
On the Devtron dashboard, select Global Configurations > Custom charts.
Select Import Chart.
Choose Select tar.gz file... and upload the packaged custom chart in the *.tgz format.
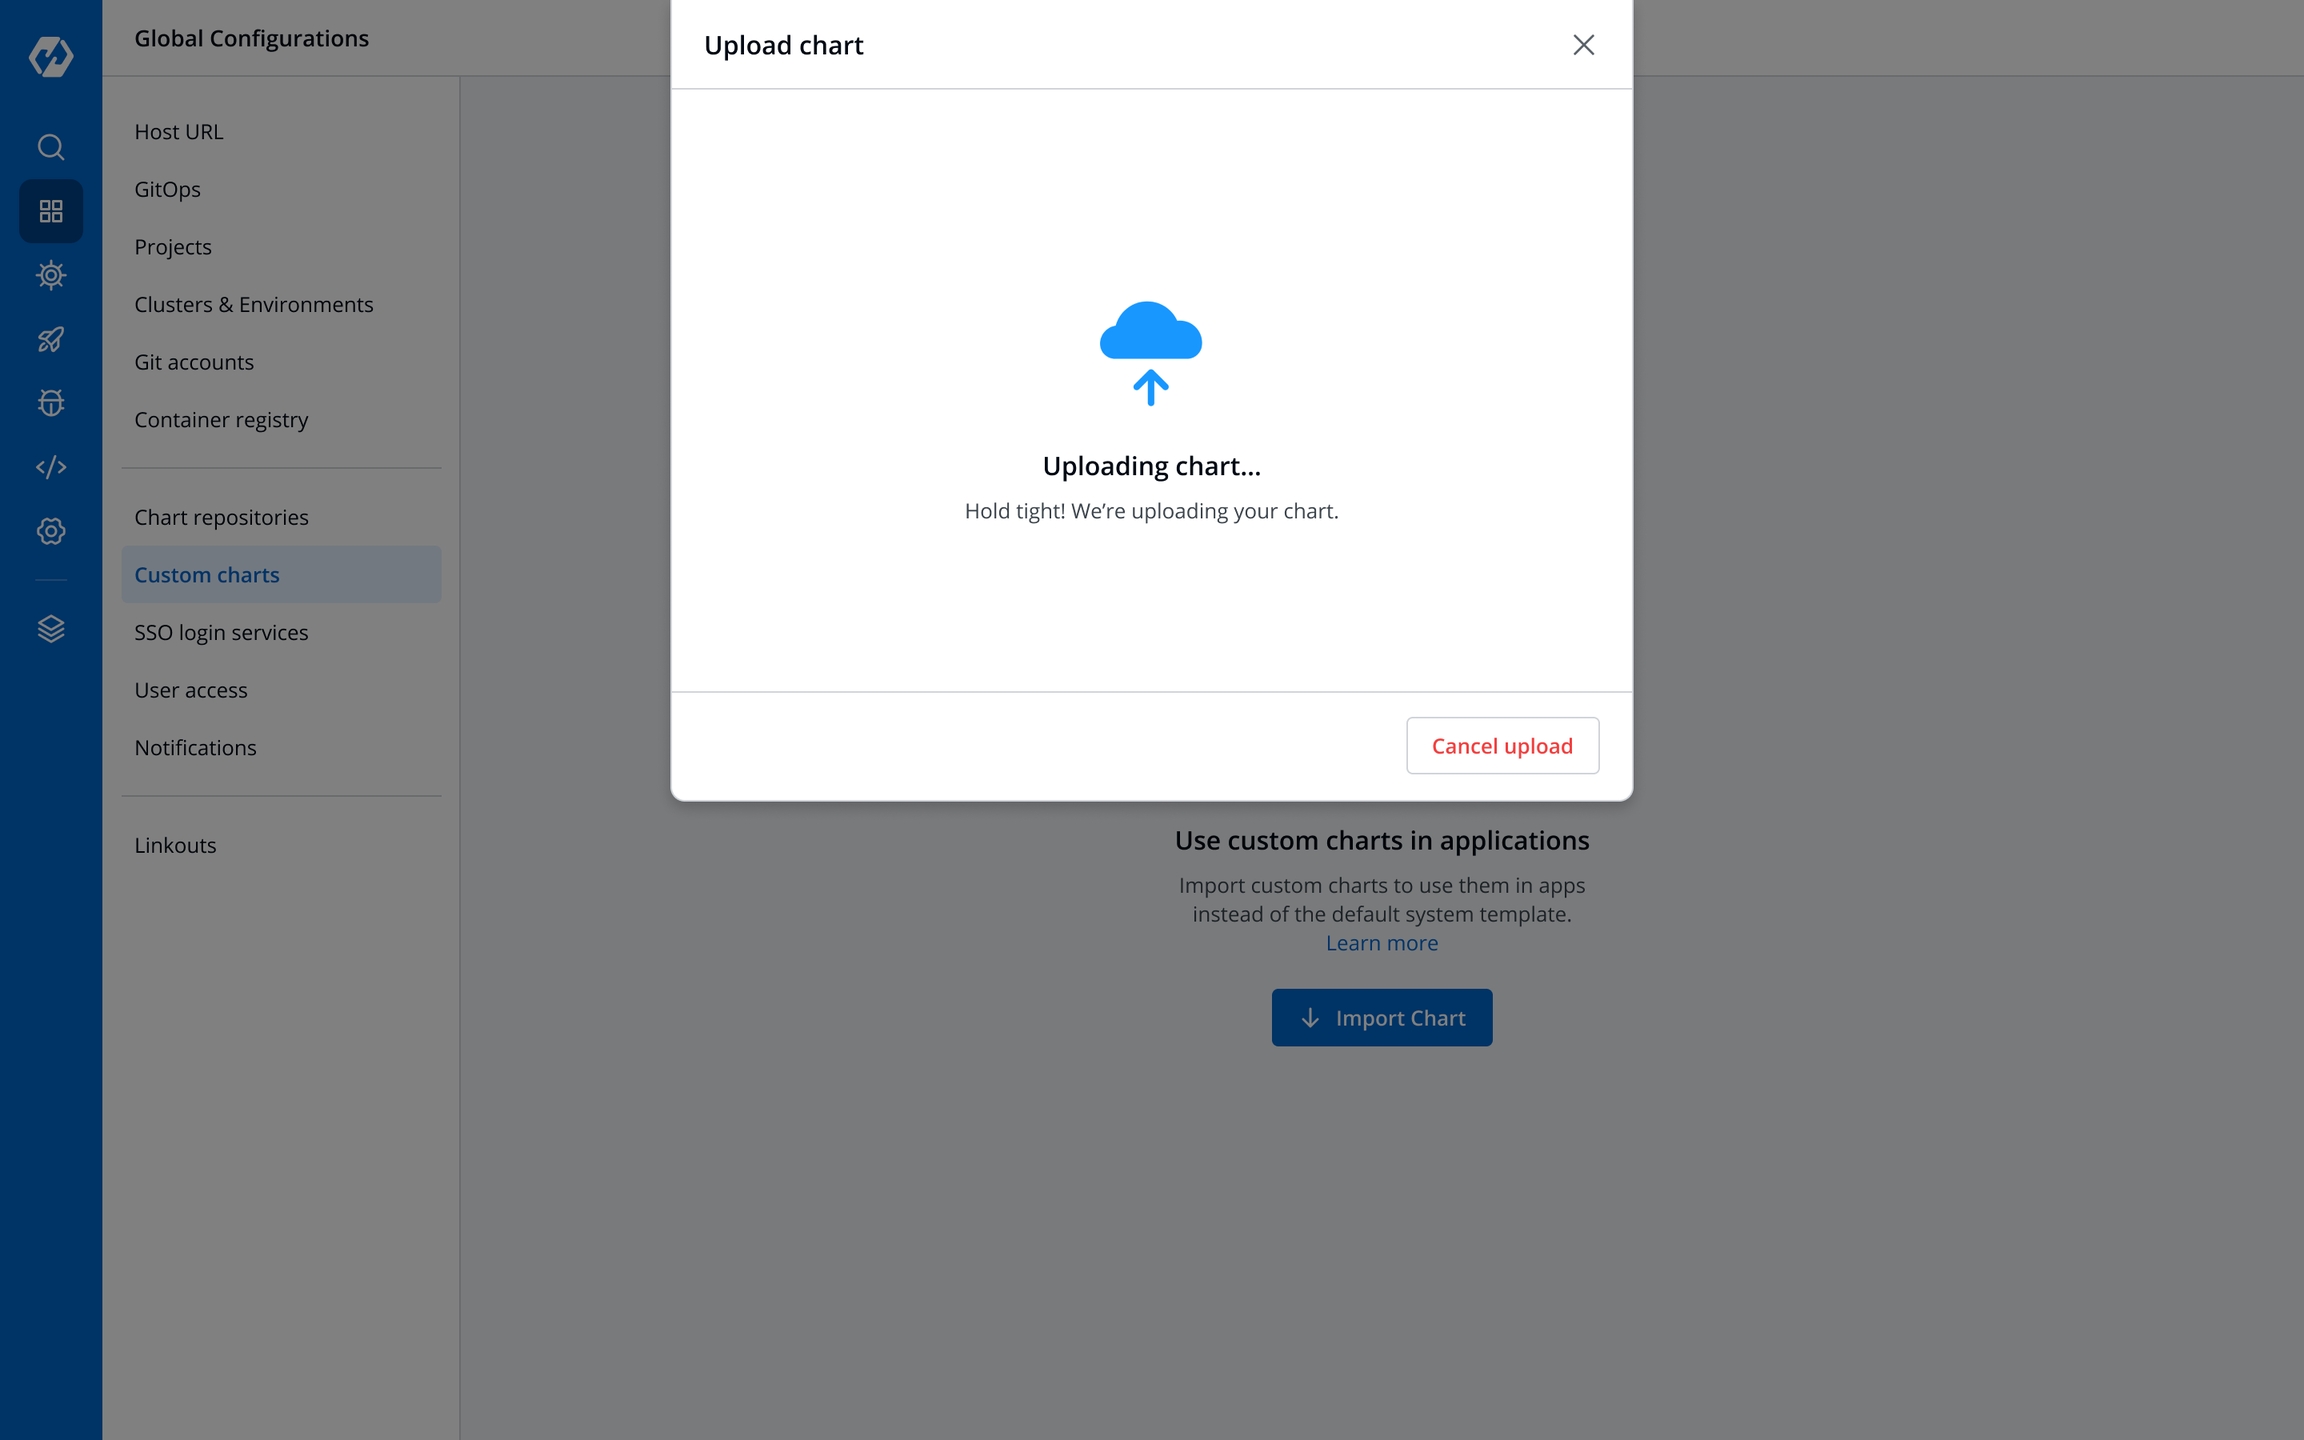
The chart is being uploaded and validated. You may also Cancel upload if required.
The uploaded archive will be validated against:
Supported archive template should be in *.tgz format.
Chart.yaml must include the name and the version number.
image_descriptor_template.json file should be present and the field format must match the format listed in the image builder template section.
The following are the validation results:
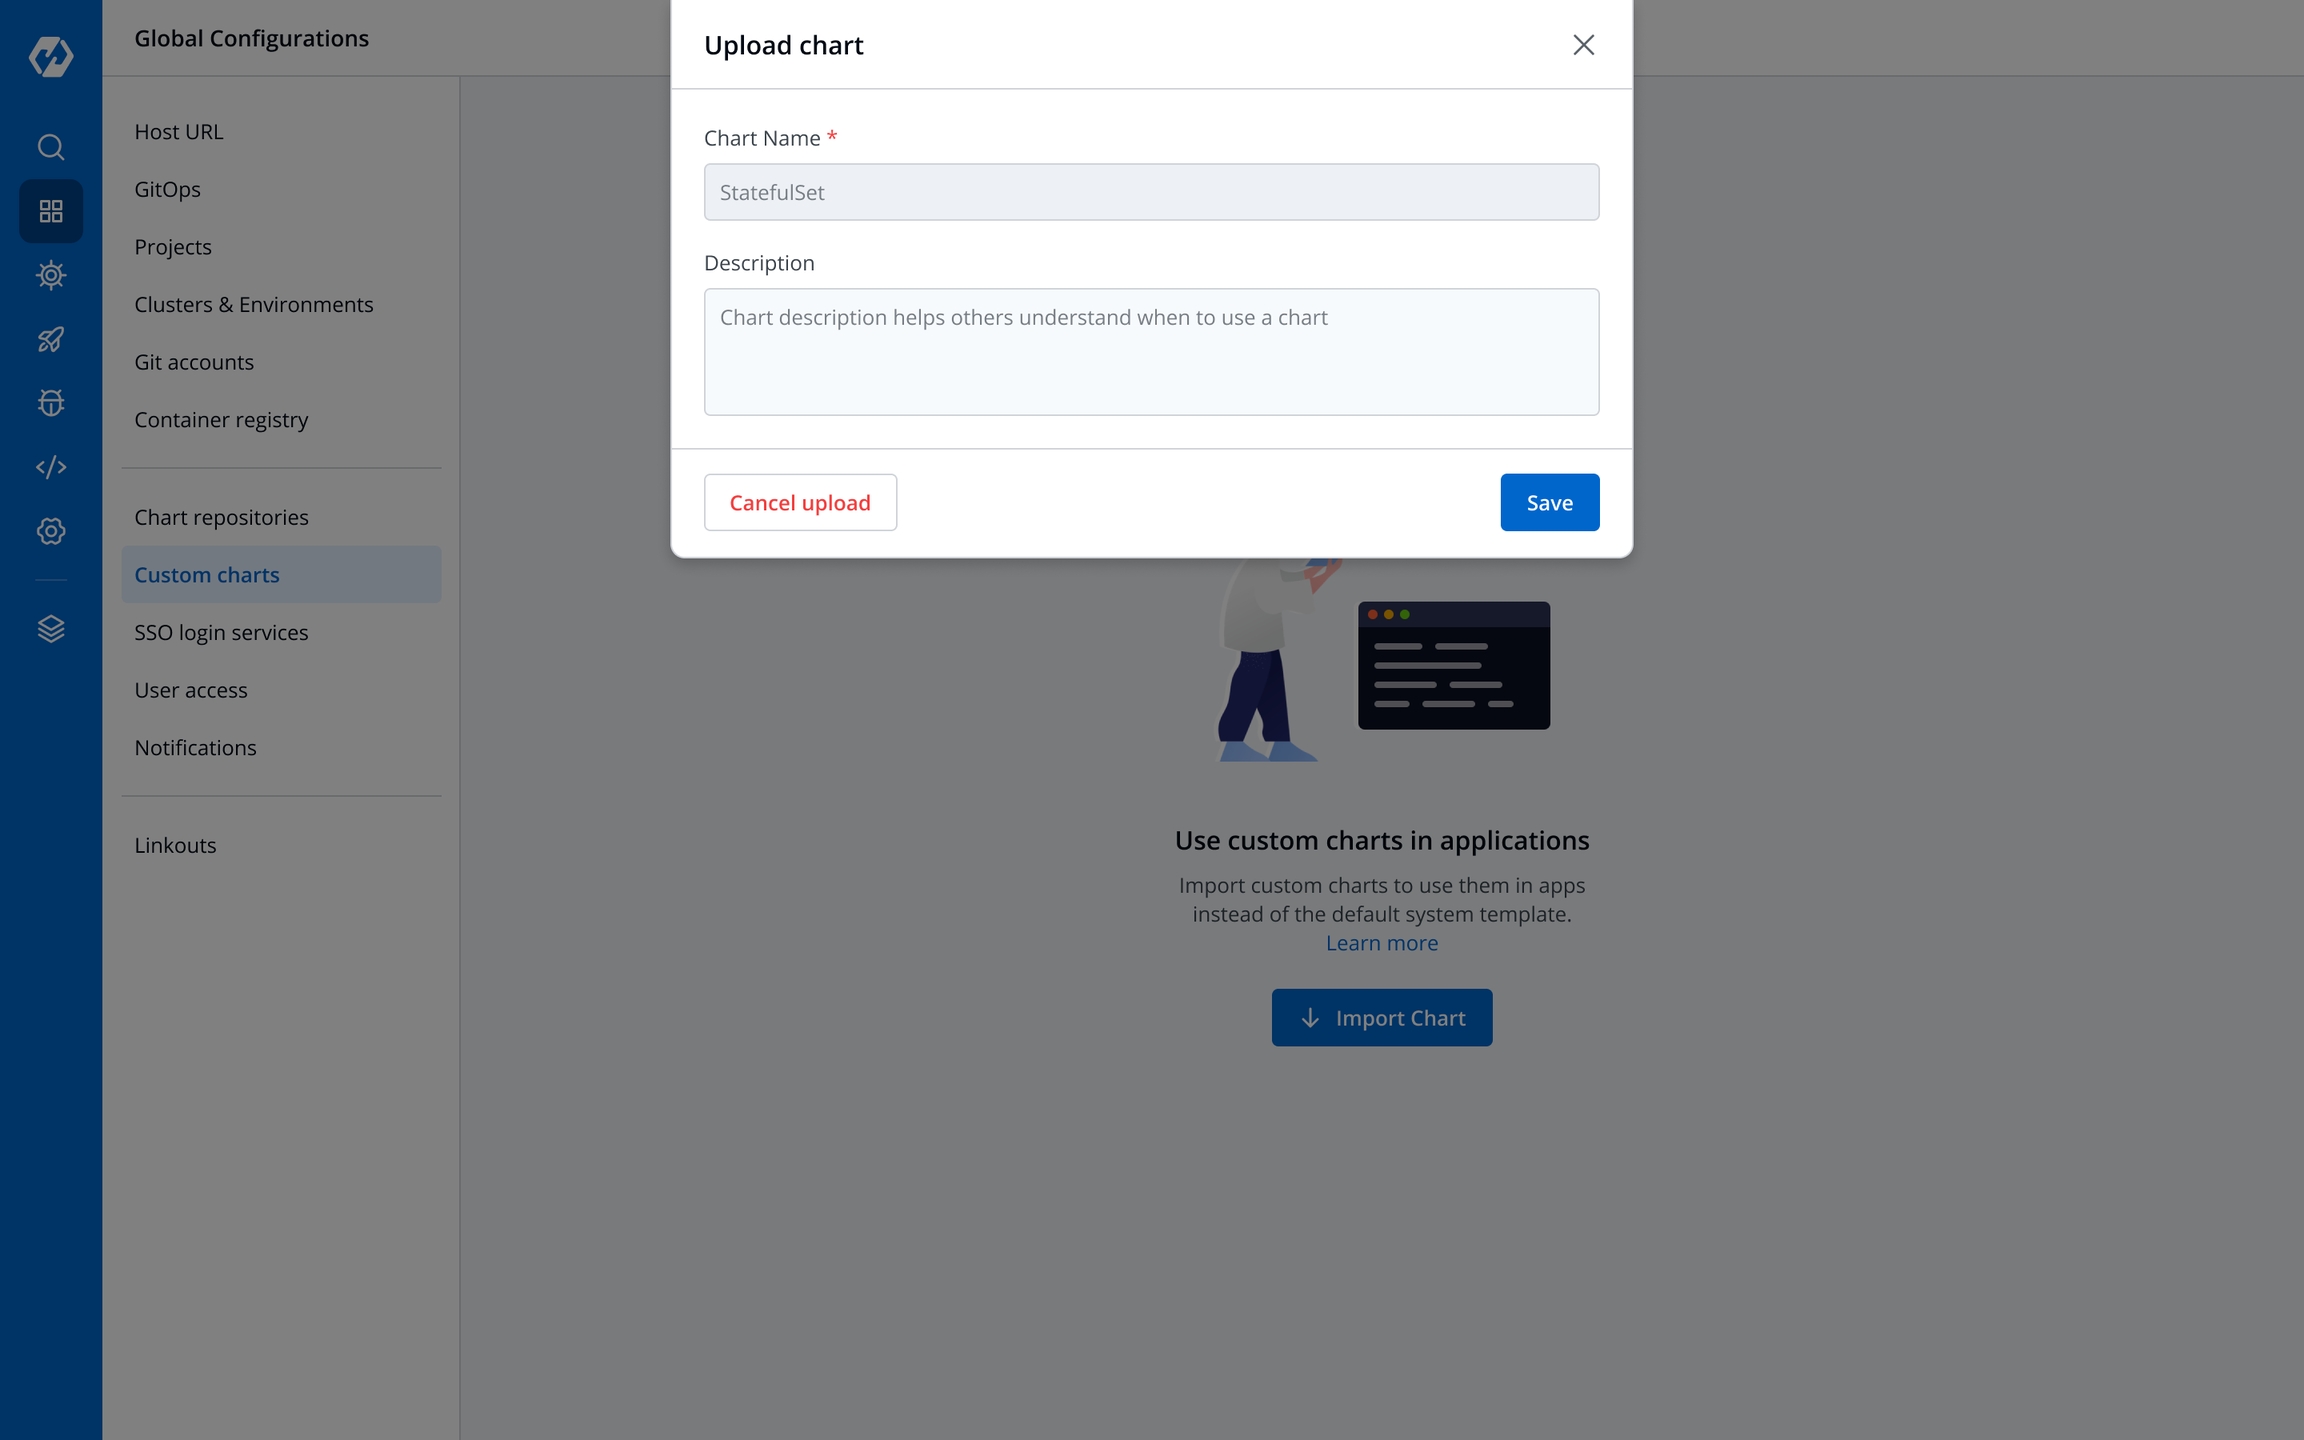
Success
The files uploaded are validated.
Enter a description for the chart and select Save or Cancel upload.
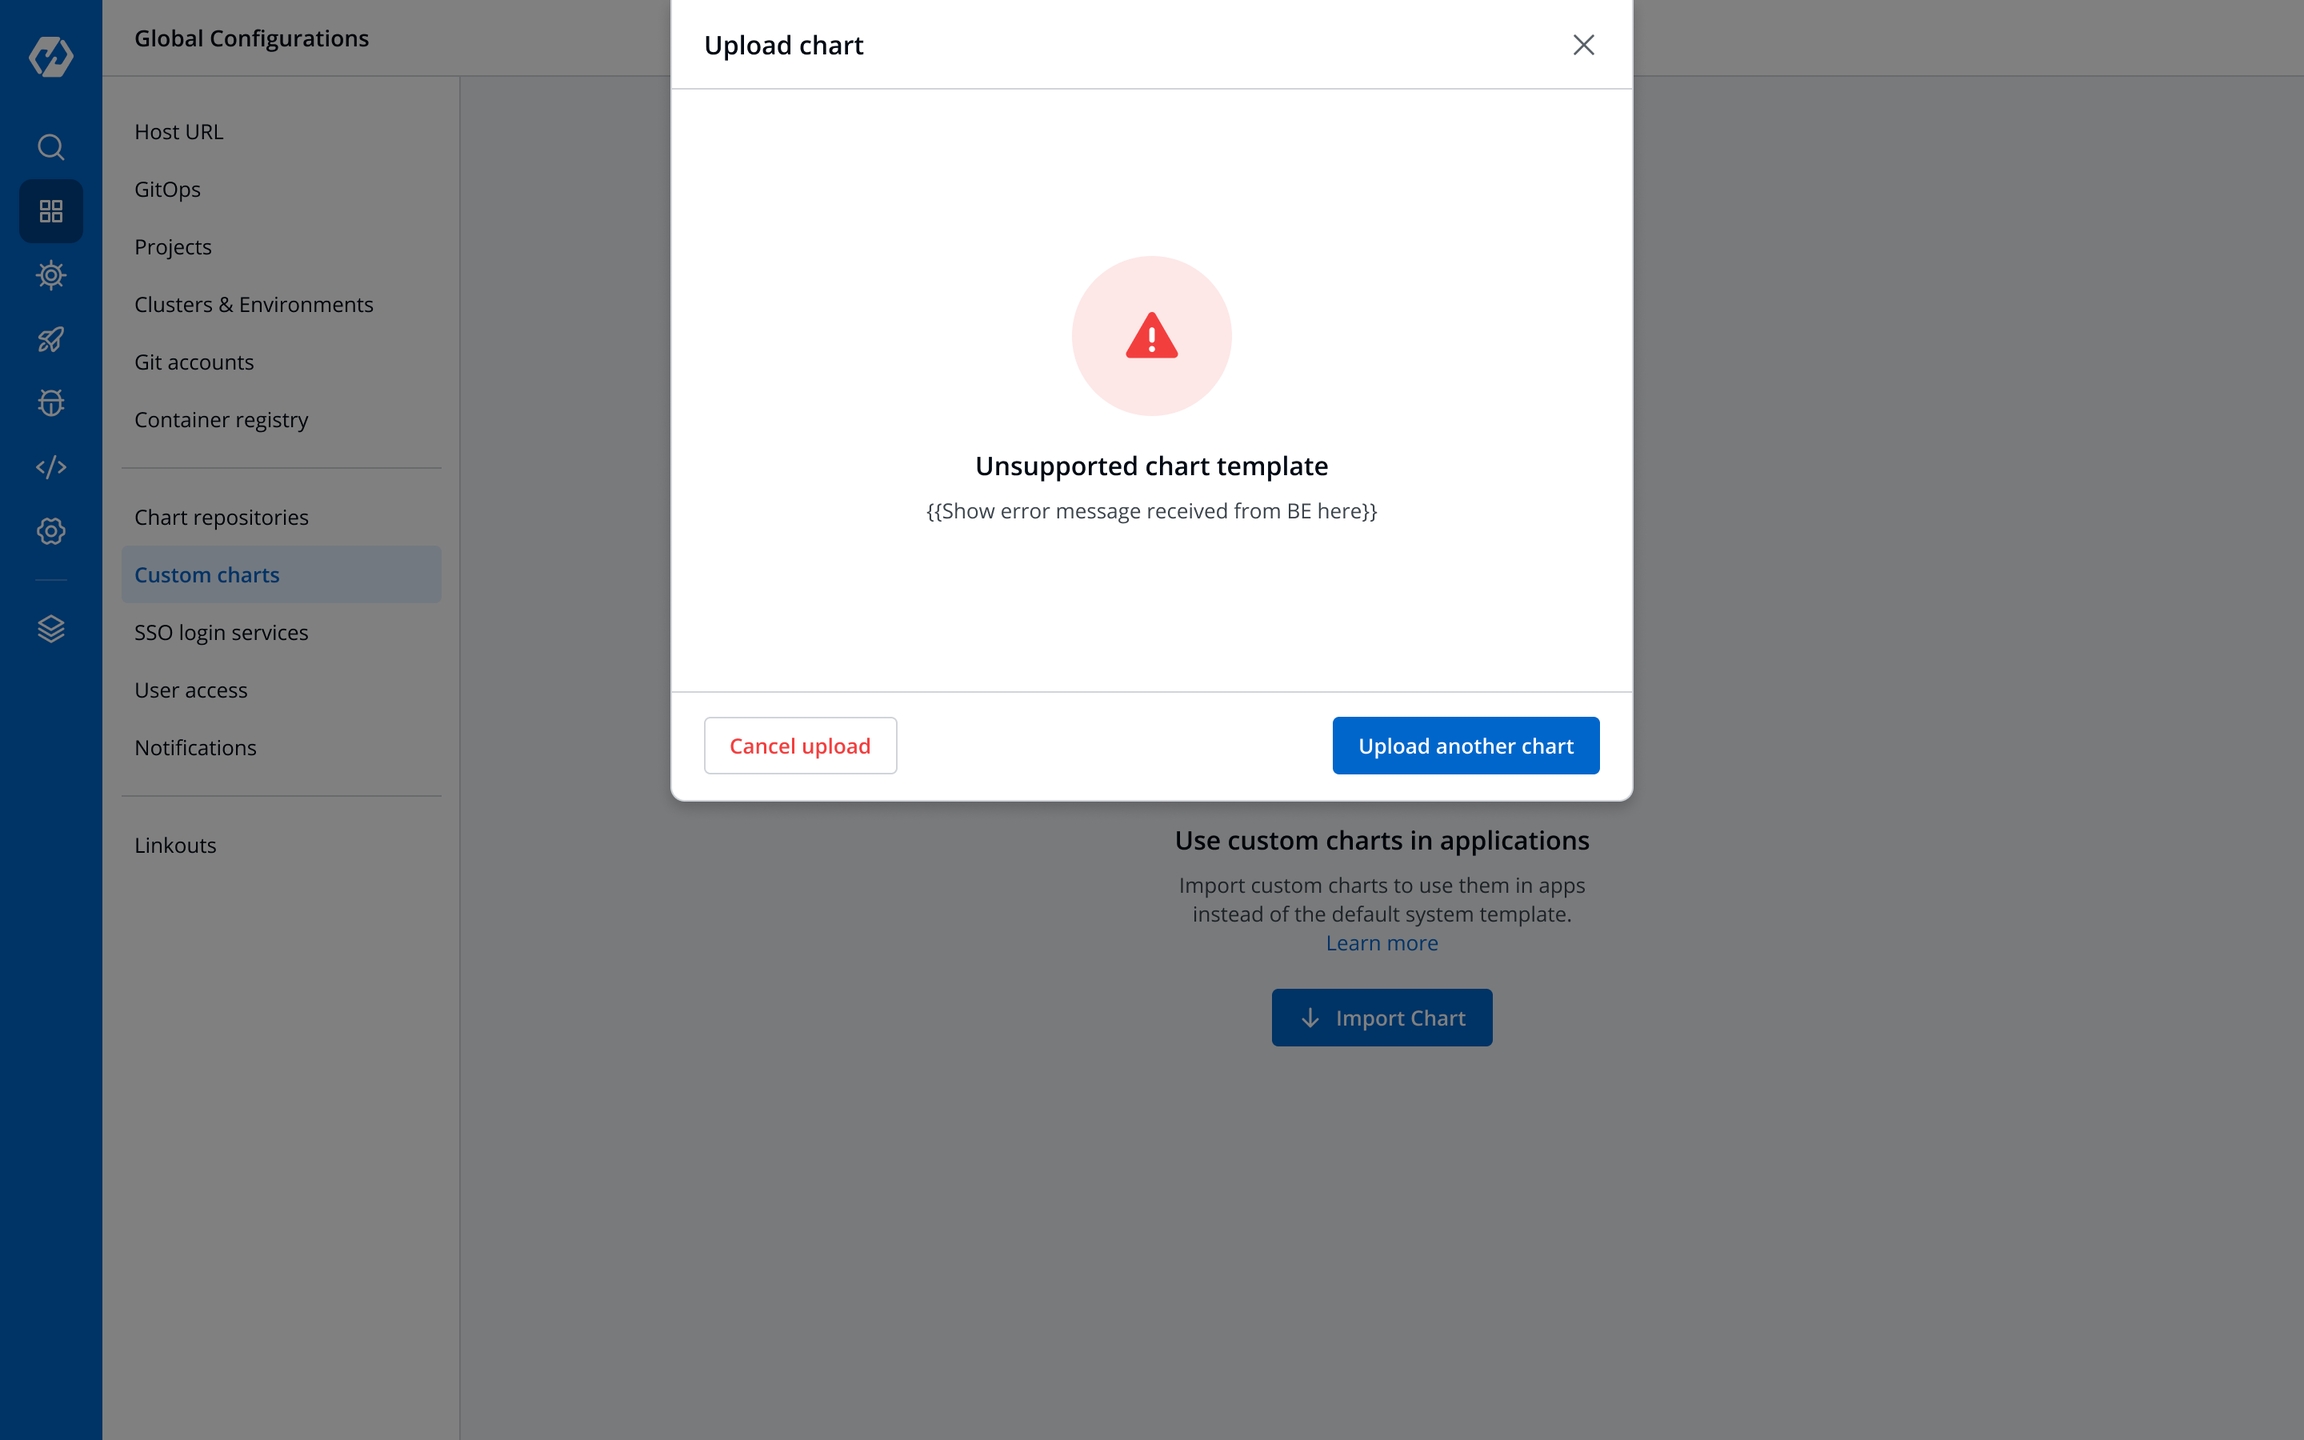
Unsupported template
Upload another chart or Cancel upload.
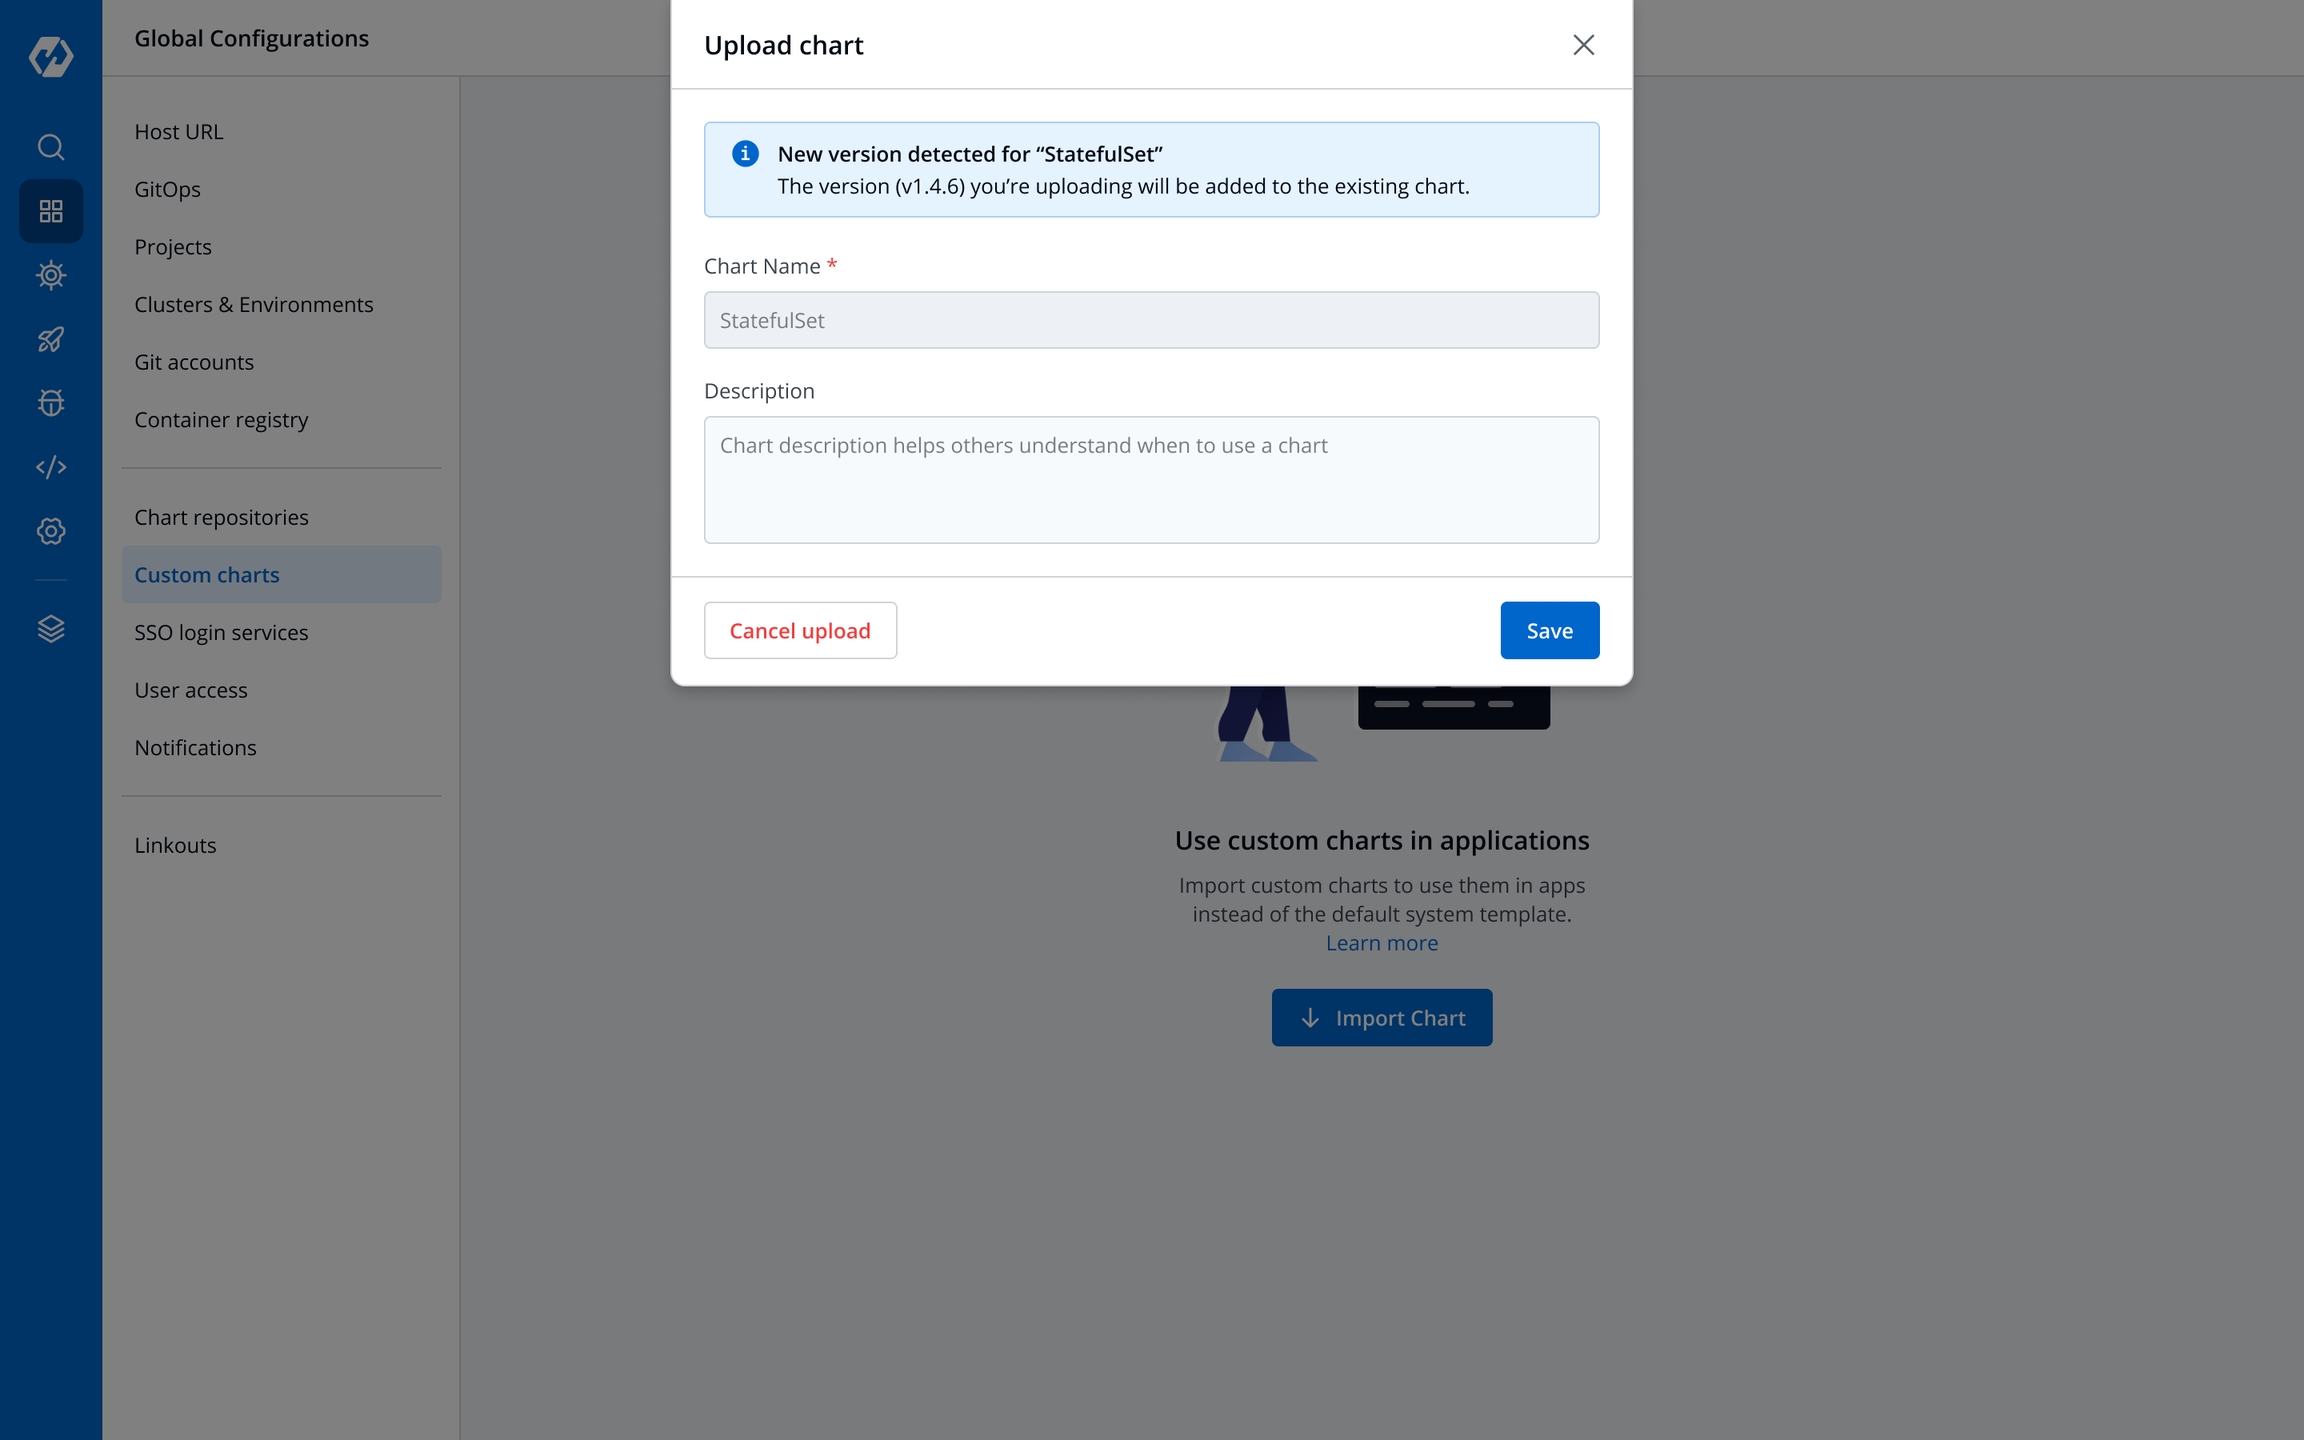
New version detected
You are uploading a newer version of an existing chart
Enter a Description and select Save to continue uploading, or Cancel upload.
Already exists
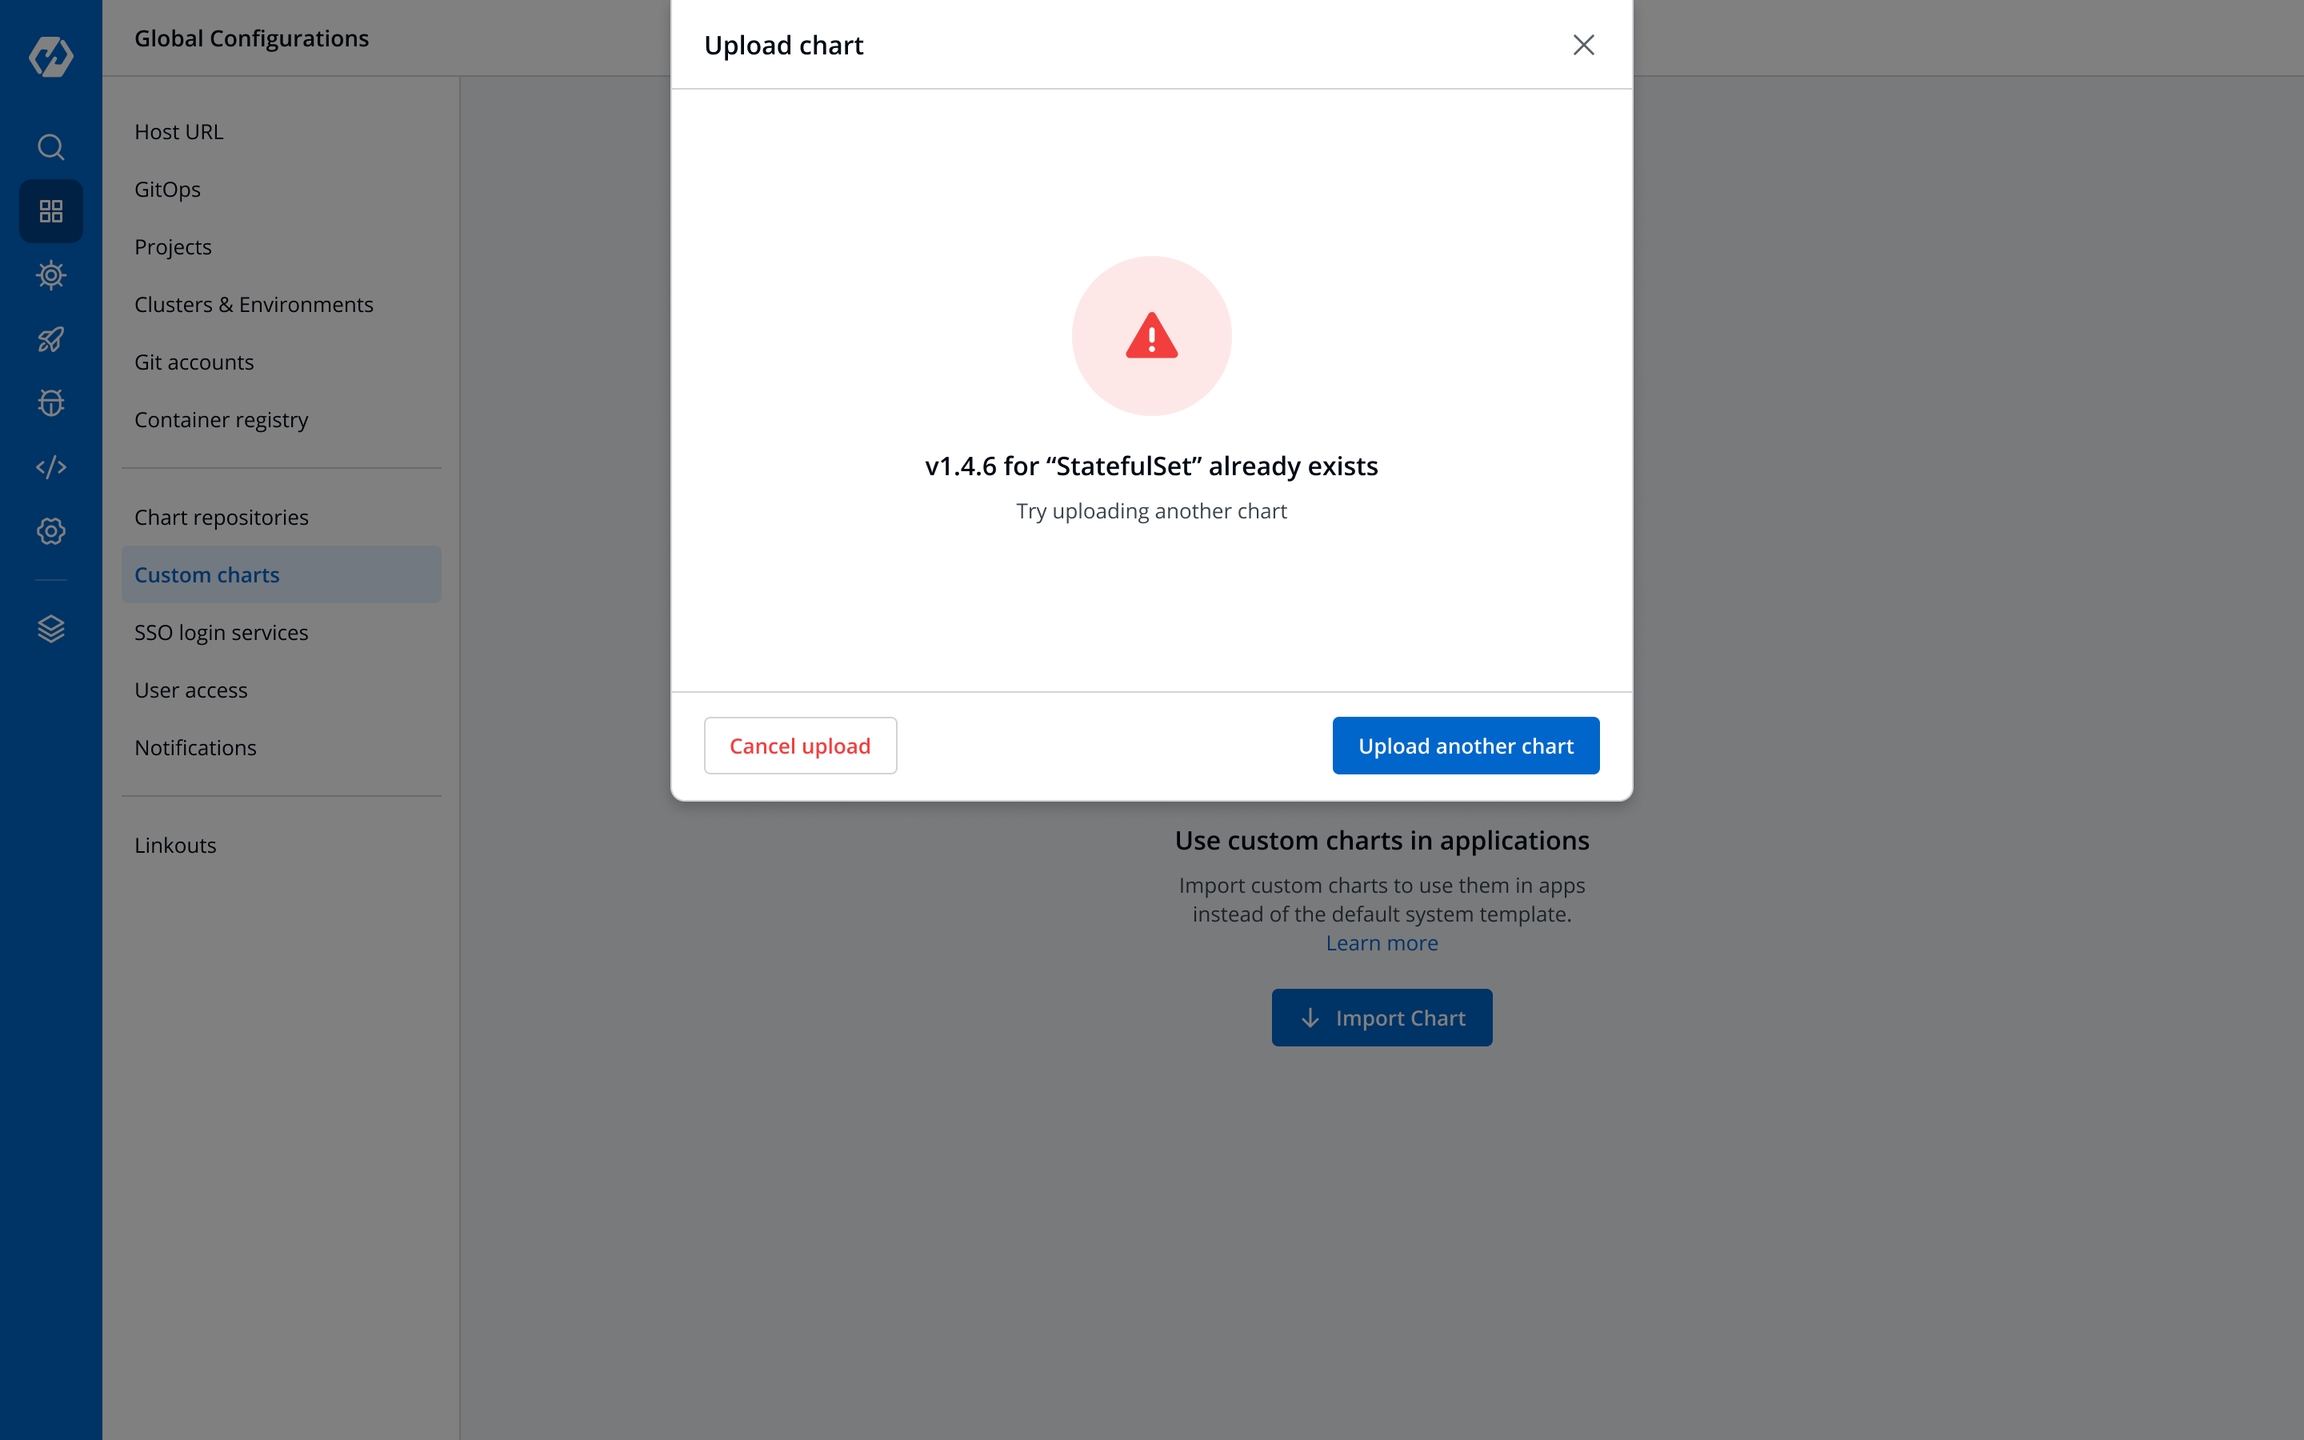
There already exists a chart with the same version.
Edit the version and re-upload the same chart using Upload another chart.
Upload a new chart with a new name using Upload another chart.
Cancel upload.
All users can view the custom charts.
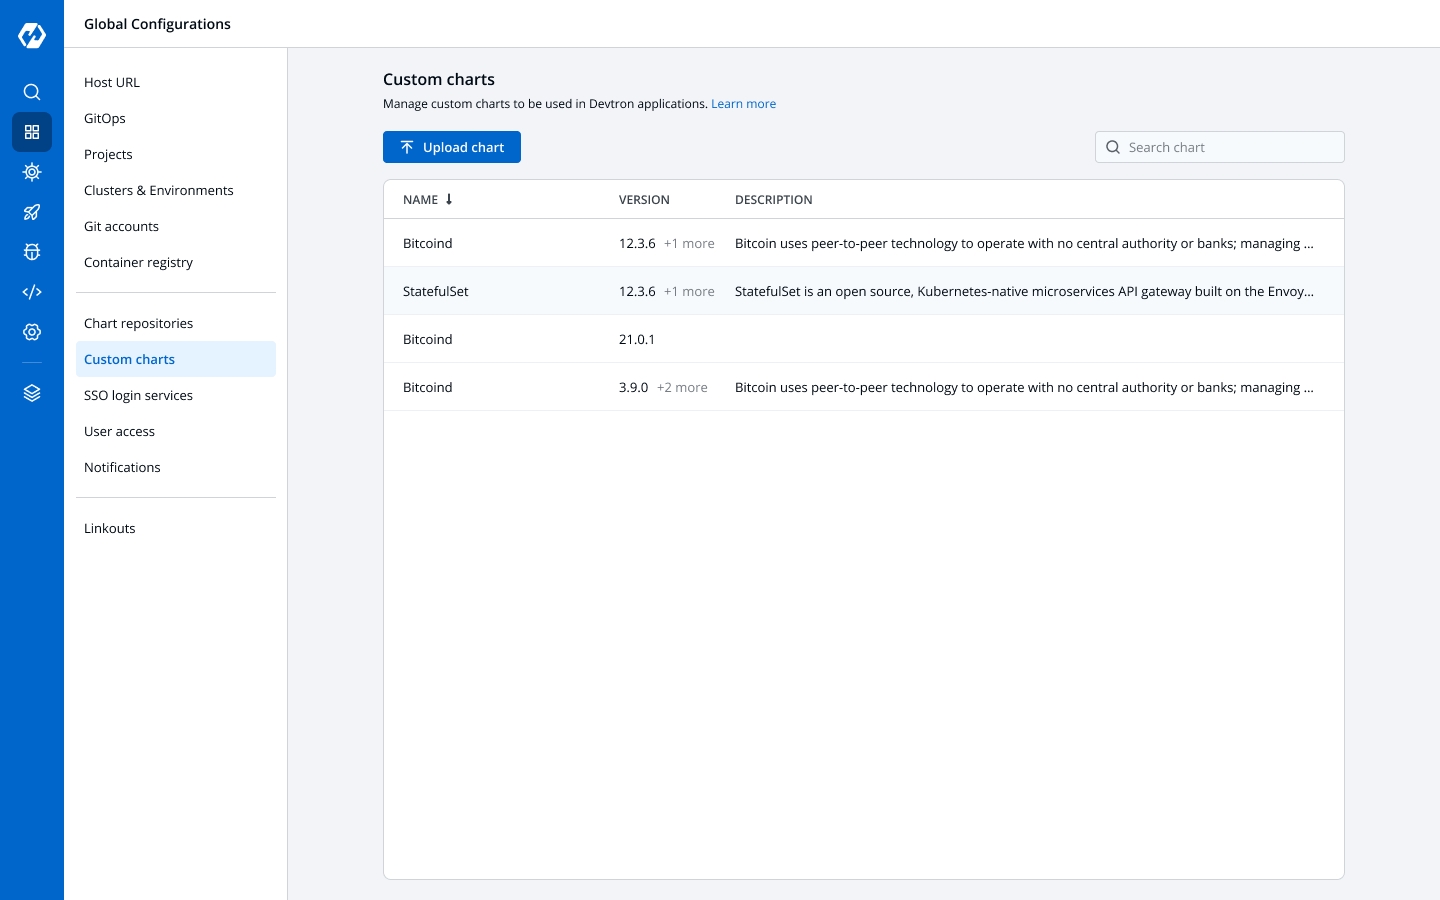
To view a list of available custom charts, go to Global Configurations > Custom charts page.
The charts can be searched with their name, version, or description.
New custom charts can be uploaded by selecting Upload chart.
The custom charts can be used from the Deployment Template section.
Info:
The deployment strategy for a custom chart is fetched from the custom chart template and cannot be configured in the CD pipeline.
Git Accounts allow you to connect your code source with Devtron. You will be able to use these git accounts to build the code using the CI pipeline.
Global Configuration helps you to add a Git provider. Click on Add git account button at the top of the Git Account Section. To add a new git provider, add the details as mentioned below.
Name
Git Host
URL
Authentication type
Provide a Name to your Git provider. This name will be displayed in the the Git Provider drop-down inside the Git Material configuration section.
It is the git provider on which corresponding application git repository is hosted. By default you will get Bitbucket and GitHub but you can add many as you want clicking on [+ Add Git Host].
Provide the URL. For example- https://github.com for Github, https://gitlab.com for GitLab, etc.
Here provide the type of authentication required by your version controller. Devtron supports three types of authentications. You can choose the one that suits you the best.
Anonymous
If authentication type is set as Anonymous then you do not need to provide any username, password/authentication token or SSH key. Just click on Save to save the git account provider details.
If authentication type is set as
Anonymous, only public git repository will be accessible.
User Auth
If you select User Auth then you have to provide the Username and either of Password or Auth Token for the authentication of your version controller account. Click on Save to save the git account provider details.
SSH Key
If you choose SSH Key then you have to provide the Private SSH Key corresponding to the public key added in your version controller account. Click on Save to save the git account provider details.
You can update your saved git account settings at anytime. To update the git account:
Click on the git account which you want to update.
Make the required changes
Click on Update to save the changes.
Updates can only be made within one Authentication type or one protocol type, i.e. HTTPS(Anonymous or User Auth) & SSH. You can update from Anonymous to User Auth & vice versa, but not from Anonymous/User Auth to SSH or reverse.
You can enable or disable a git account. Enabled git accounts will be available to be used in Application configuration > Git repository.
Disabled git accounts will be unavailable for use in future applications. Applications already using a disabled git account will not be affected.
API tokens are like ordinary OAuth access tokens. They can be used instead of username and password for programmatic access to API. API token allows users to generate API tokens with the desired access. Only super admin users can generate tokens and see generated tokens.
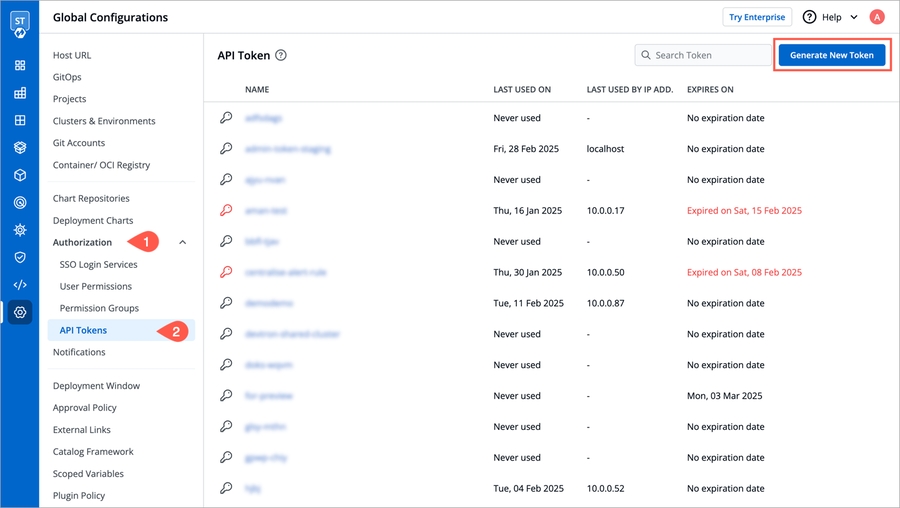
To generate API tokens, go to global configurations -> Authorizations -> API tokens and click on Generate New Token.
Enter a name for the token
Add Description.
Select an Expiration date for the token(7 days, 30 days, 60 days, 90 days, custom and no expiration) To select a custom expiration date, select Custom from the drop-down. This will pop-up a calender from where you can select your custom expiration date for the API token.
Assign permissions to the token. To generate a token with super admin permission, select super admin permission. Or select specific permission if you want to generate a token with a specific role over a particular Devtron app or Helm app or chart group.
Now click on Generate Token.
A pop-up window will appear over the screen from where you can copy the API token.
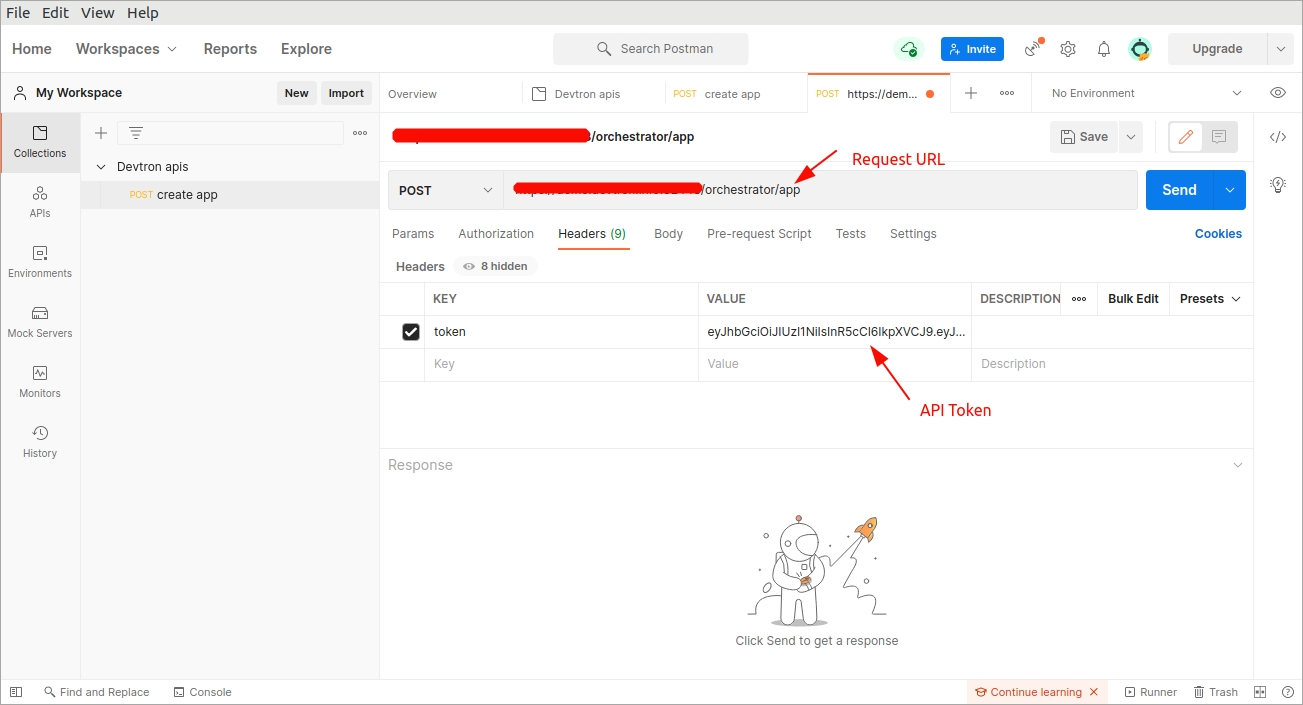
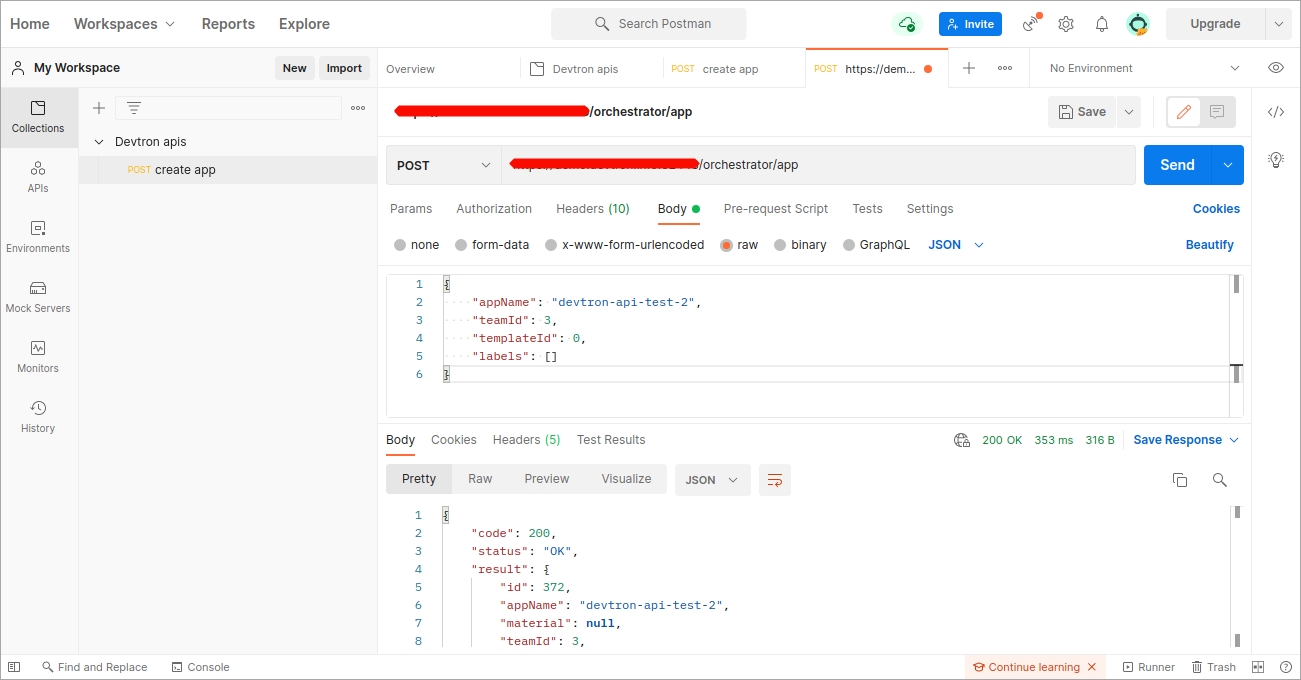
Once devtron api token has been generated, you can use this token to hit devtron apis using any api testing tool like Jmeter, postman, citrus. Using postman here.
Open postman. Enter the request URL with POST method and under HEADERS, enter the API token as shown in the image below.
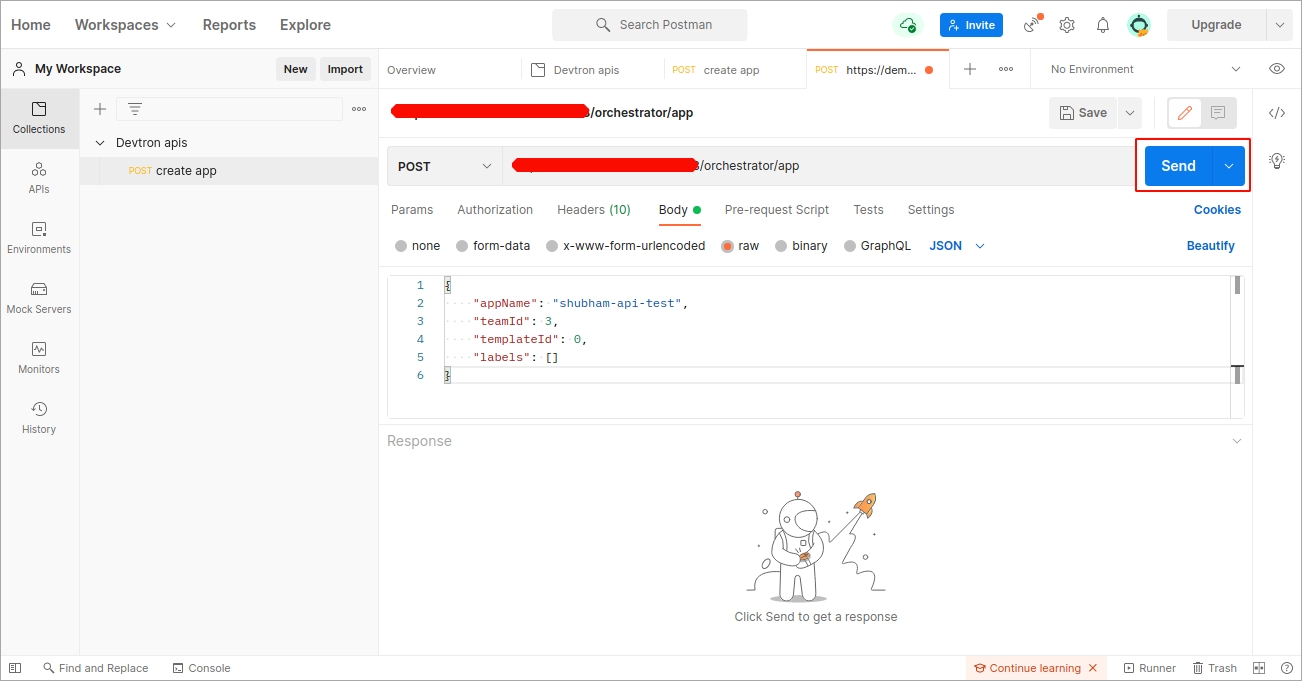
Now, under body, provide the api payload as shown below and click on Send.
As soon as you click on send, the create application api will be triggered and a new devtron app will be created as you mentioned in the payload.
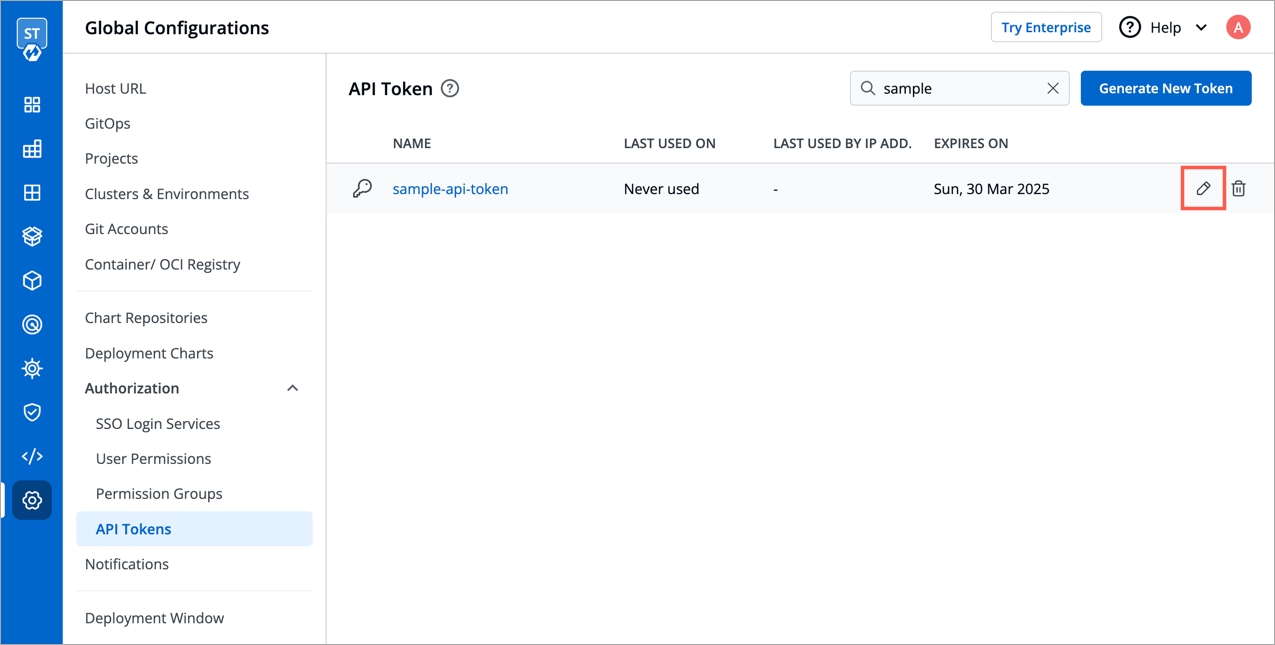
To set a new expiration date or to make changes in permissions assigned to the token, we need to update the API token. To update the API token, click over the token name or click on the edit icon.
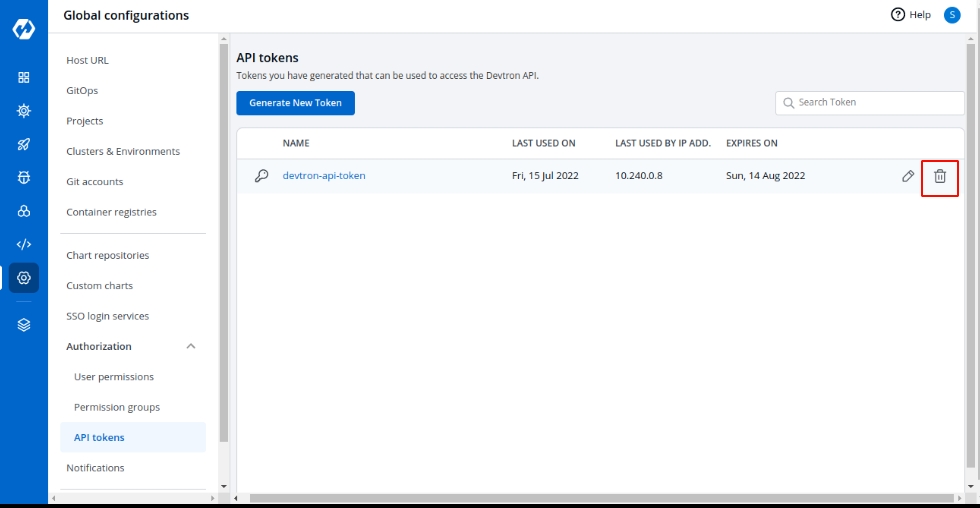
To delete an API token, click on the delete icon. Any applications or scripts using this token will no longer be able to access the Devtron API.
This is used to assign user to a particular group and user inherits all the permissions granted to this group. The Permission groups section contains a drop-down of all existing groups on which you have access. This is optional field and more than one groups can be selected for a user.
The advantage of the groups is to define a set of privileges like create, edit, or delete for the given set of resources that can be shared among the users within the group. Users can be added to an existing group to utilize the privileges that it grants. Any access change to group is reflected immediately in user access.
You can select the group which you are creating in the Group permissions section inside Add users.
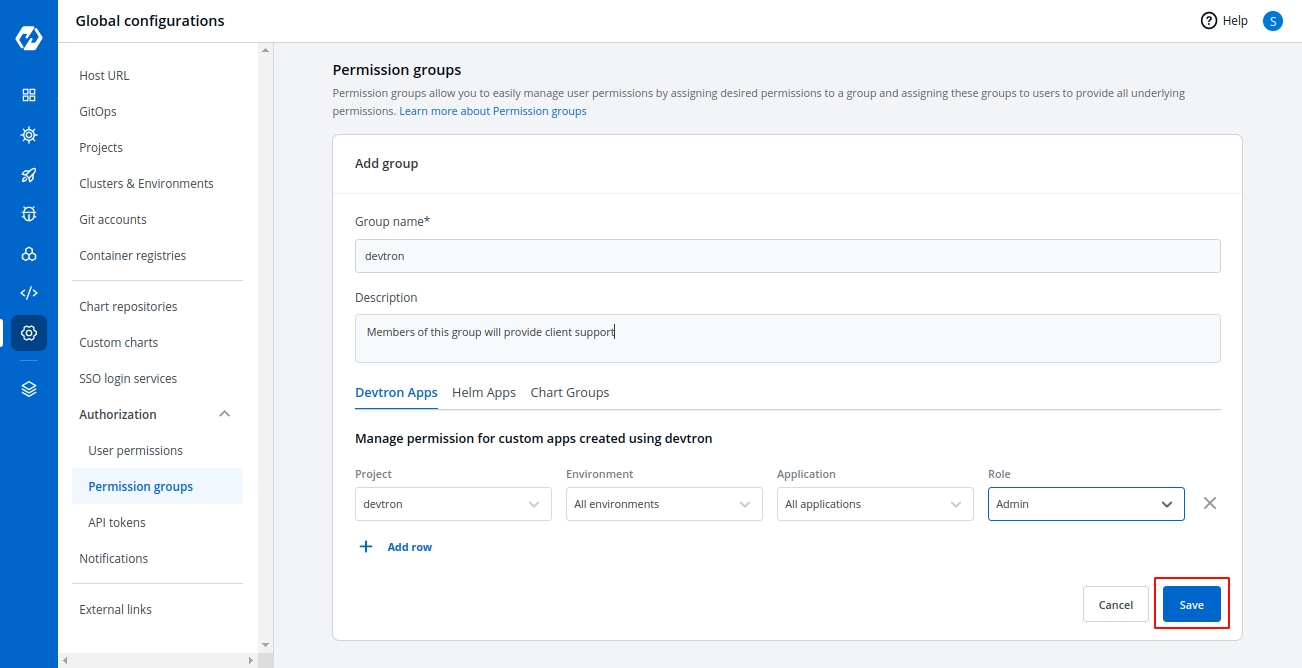
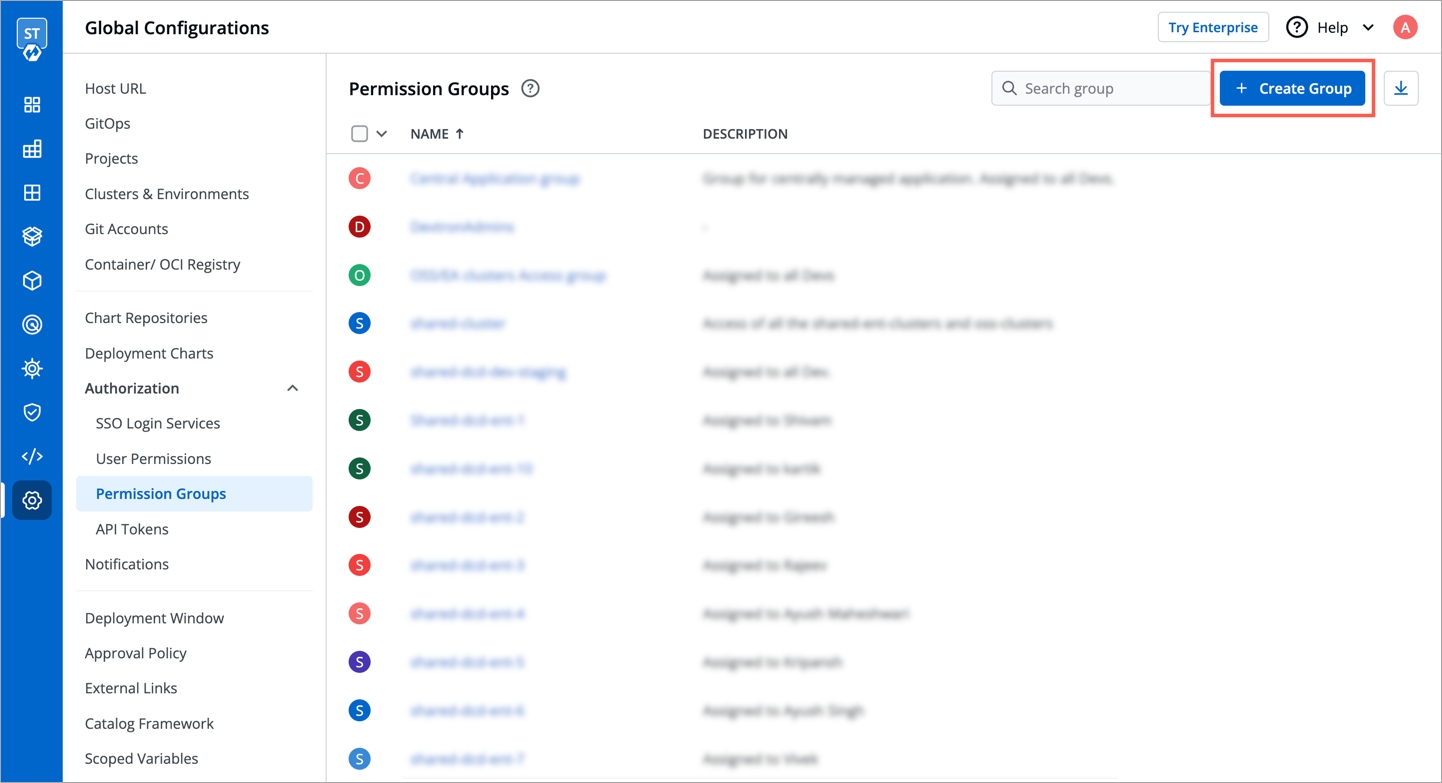
Go to Global configurations -> Authorization -> Permission group and click on Add Group to create a new group.
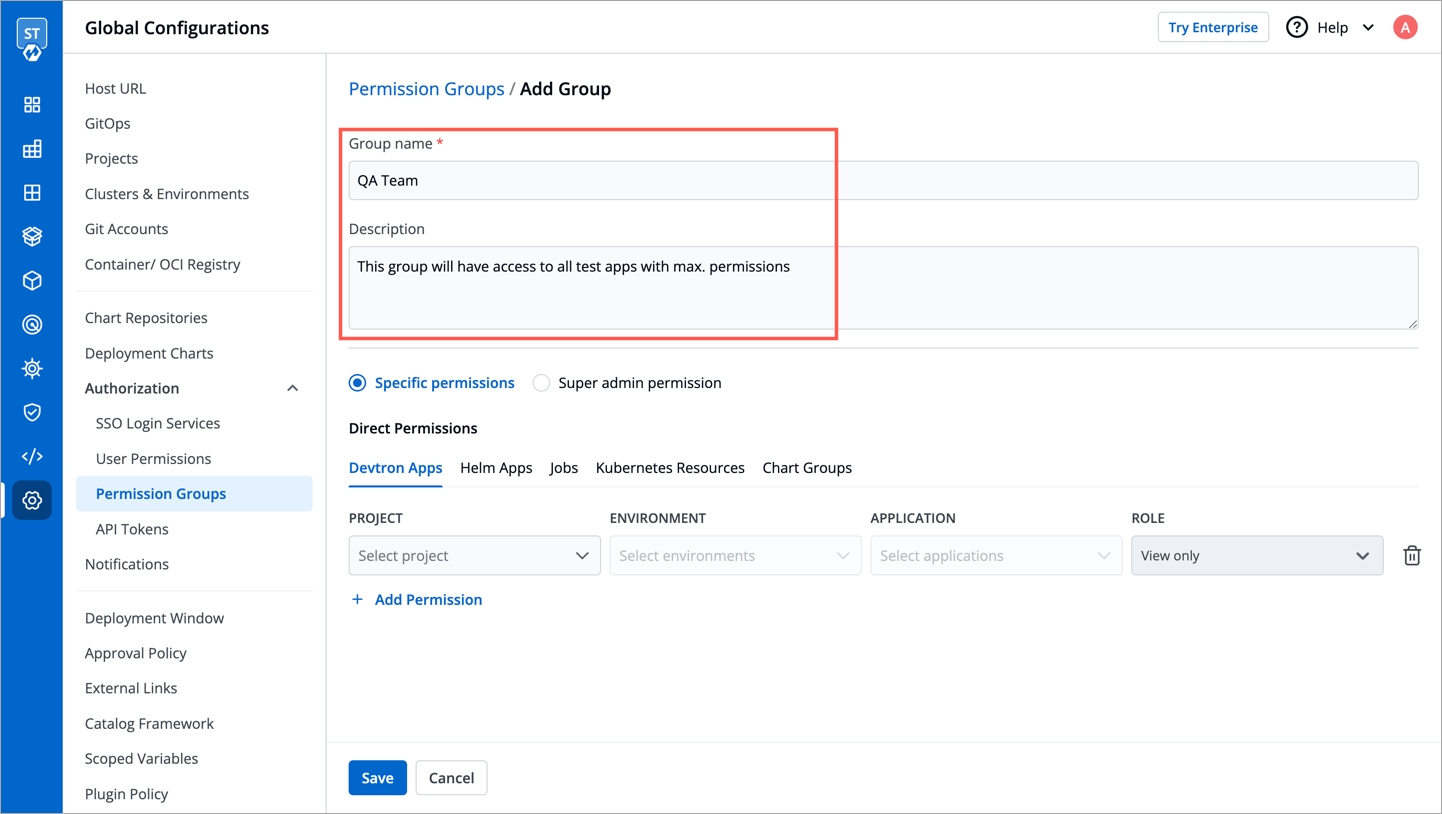
Enter the Group Name and Description.
Once you have given the group name and group description.
Assign the permissions of groups in the Devtron Apps, Helm Apps or Group Chart permissions section. Manage the project, environment, application and role access the same as we discuss in the user permissions section.
You can add multiple rows for the Devtron Apps and Helm Apps Permissions section.
Once you have finished assigning the appropriate permissions for the permission group, click on Save.
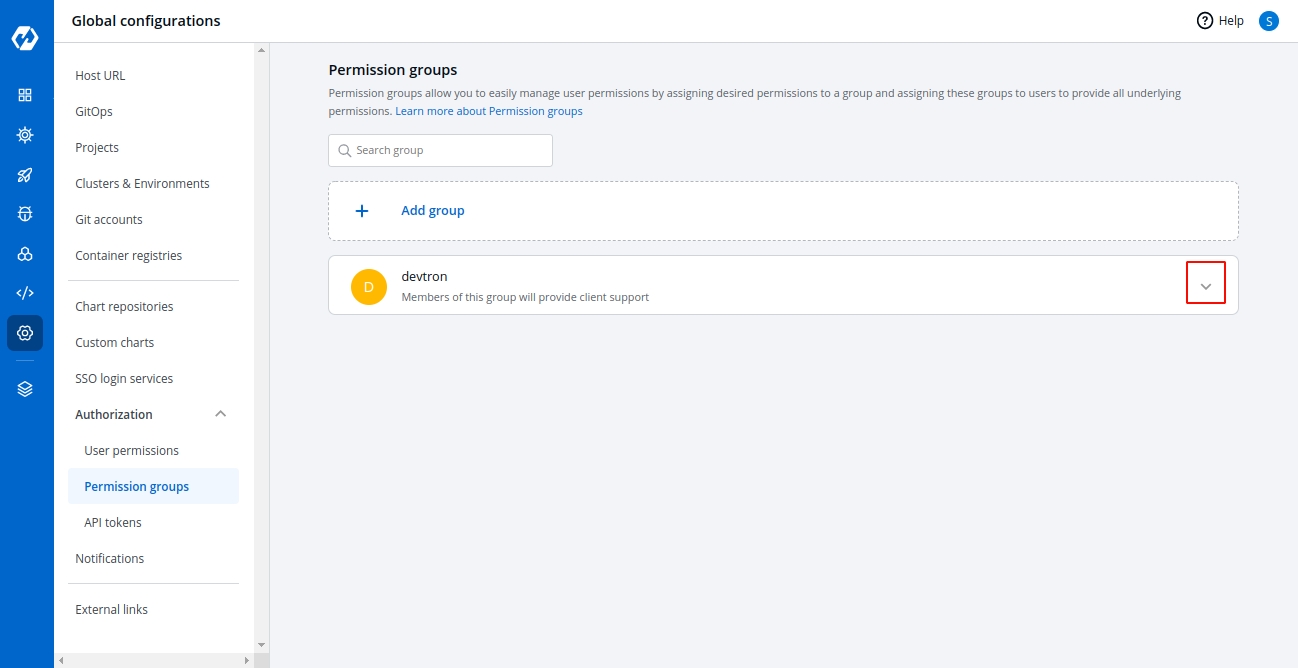
You can edit the permission groups by clicking on the downward arrow.
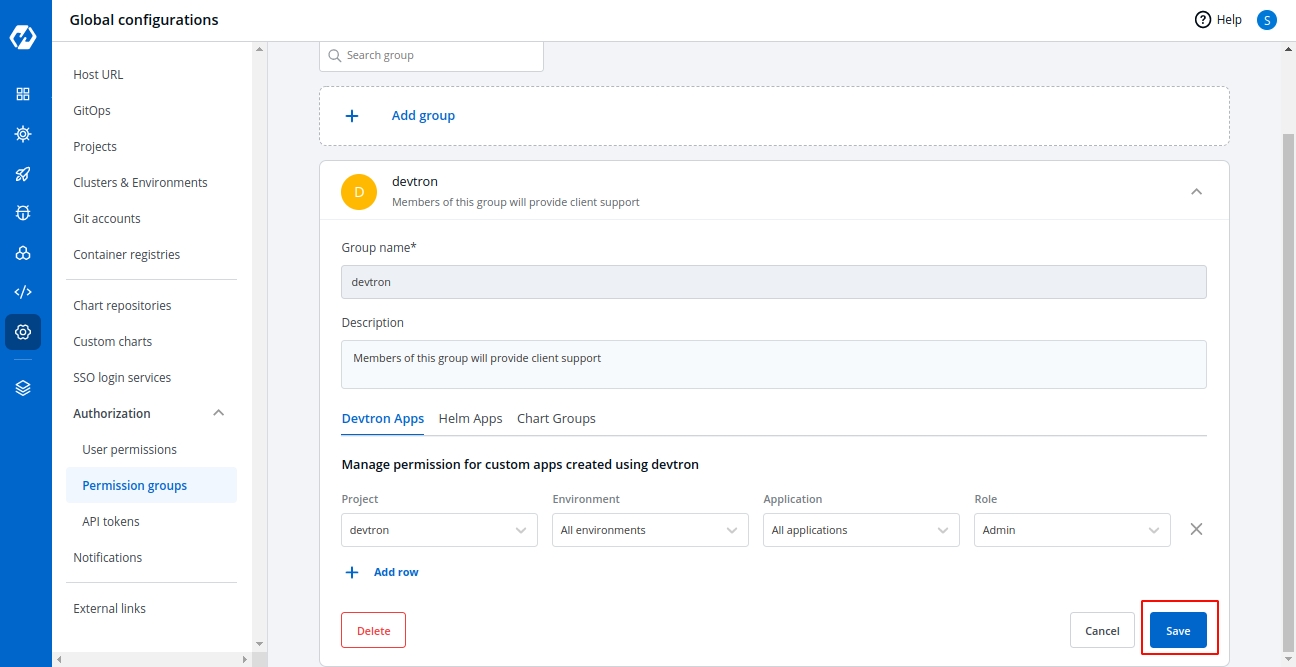
Then you can edit the permission group here.
Once you are done editing the permission group, click on Save.
If you want to delete the groups with particular permission group, click on Delete.
The chart group permissions for the permission groups will be managed in the same way as for the users. For reference, check Manage chart group permissions for users.
This documentaion consist of authorizations available in Devtron
Parts of the documentaion
Like any enterprise product, Devtron supports fine grained access control to the resources based on
Type of action allowed on the Devtron resources (Create Vs View)
Sensitivity of the data (Editing image Vs Editing memory)
Access can be added to the User either directly or via Groups.
Devtron supports 5 levels of access:
View: User with view only access has the least privilege. This user can only view combination of environments, applications and helm charts on which access has been granted to the user. This user cannot view sensitive data like secrets used in applications or charts.
Build and Deploy: In addition to view privilege mentioned in above, user with build and deploy permission can build and deploy the image of permitted applications and helm charts to permitted environments.
Admin: User with admin access can create, edit, delete and view permitted applications in permitted projects.
Manager: User with manager access can do everything that an admin type user can do, in addition they can also give and revoke access of users for the applications and environments of which they are manager.
Super Admin: User with super admin privilege has unrestricted access to all Devtron resources. Super admin can create, modify, delete and view any Devtron resource without any restriction; its like Superman without the weakness of Kryptonite. Super Admin can also add and delete user access across any Devtron resource, add delete git repository credentials, container registry credentials, cluster and environment.
To control the access of User and Group-
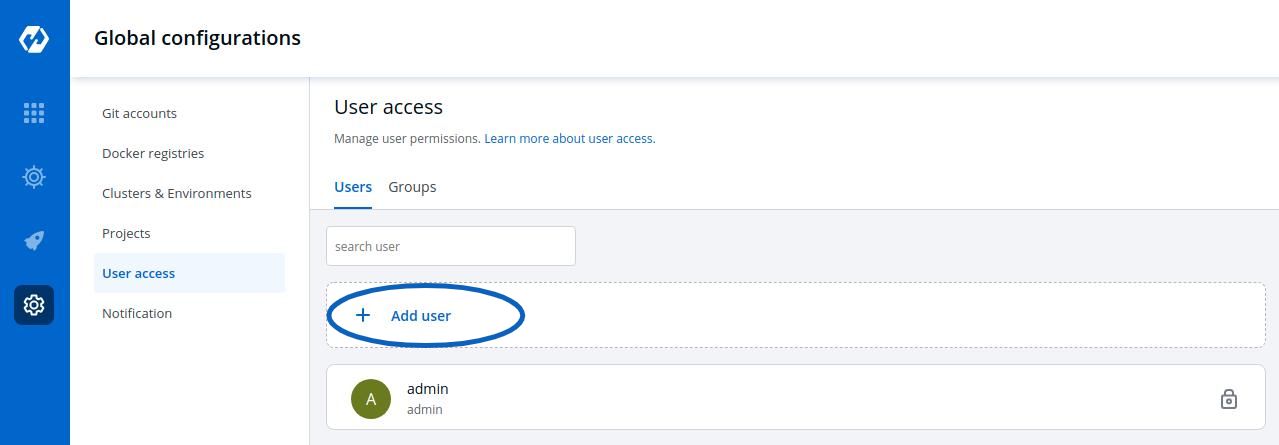
Go to the left main panel -> Select Global Configurations -> Select User Access
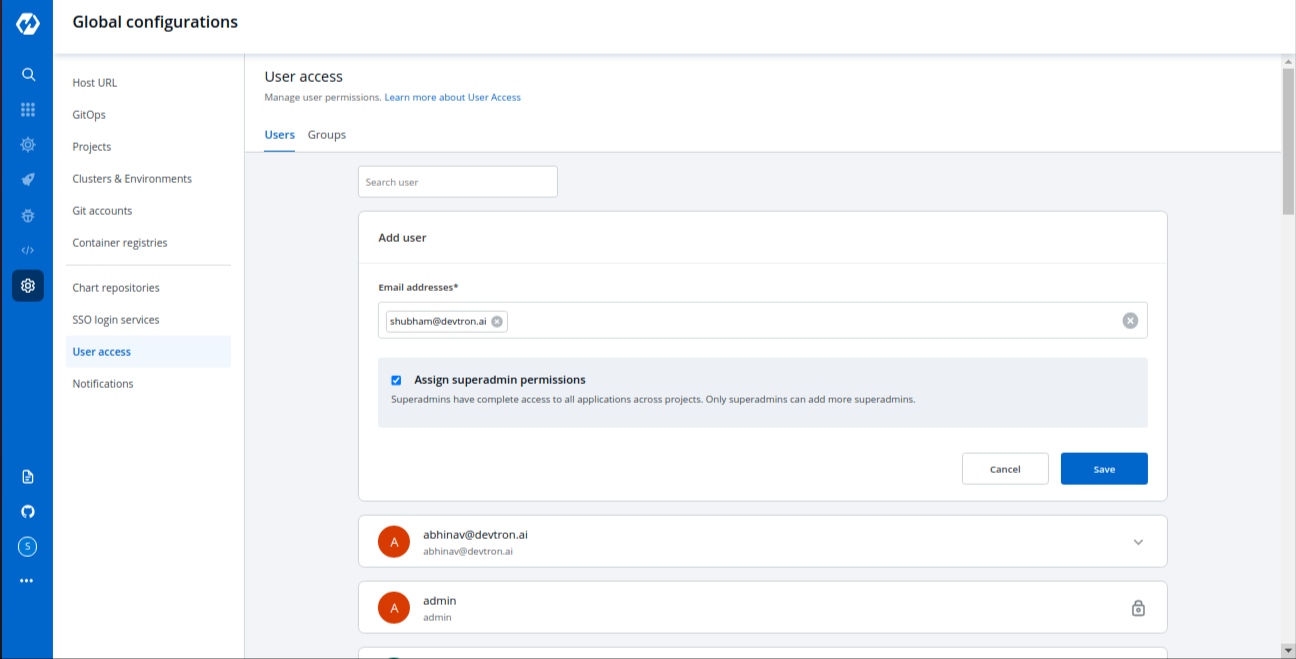
Click on Add User, to add one or multiple users.
When you click on Add User, you will see 6 options to set permission for users which are as follow:
Email addresses
Assign super admin permissions
Group Permissions
Devtron Apps Permissions
Project
Environment
Applications
Roles
Helm Apps Permissions
Project
Environment or cluster/namespace
Applications
Permission
Chart group permissions
In the Email address box, you have to provide the mail ID of the user to whom you want to give access to your applications.
IMP Please note that Email address should be same as that in the email field in the JWT token returned by OIDC provider.
Click on Save and your user will be saved with super admin permissions.
We suggest that super admin privileges should be given to only select few.
If you don’t want to assign super admin permissions then you have to provide the rest of the information.
Access to devtron applications can be given to user by attaching permission directly to his/her email id through the Devtron Apps section. This section has 4 options to manage the permissions of your users.
Project
Select a project from the drop-down to which you want to give permission to the users. You can select only one project at a time if you want to select more than one project then click Add row.
Environment
In the Environment section, you can select one or more than one or all environments at a time. Click on the environment section, you will see a drop-down of your environments and select any environment on which you want to give permission to the user.
IMP If all environments option is selected then user gets access to all current environments and any new environment which gets associated with this application later.
Applications
Similarly, you can select Applications from the drop-down corresponding to your selected Environments. In this section, you can also give permissions to one or more than one or to all applications at a time.
IMP If all applications option is selected then user gets access to all current applications and any new application which gets associated with this project later.
Roles
Inside the Role, you actually choose which type of permissions you want to give to the users.
You can add multiple rows, for Devtron app permission.
Once you have finished assigning the appropriate permissions for the listed users, Click on Save.
Access to devtron applications can be given to user by attaching permission directly to his/her email id through the Devtron Apps section. This section has 4 options to manage the permissions of your users.
Project
Select a project from the drop-down to which you want to give permission to the users. You can select only one project at a time if you want to select more than one project then click Add row.
Environment or cluster/namespace
In the Environment section, you can select one or more than one or all environments at a time. Click on the environment section, you will see a drop-down of your environments and select any environment on which you want to give permission to the user.
IMP If all environments option is selected then user gets access to all current environments and any new environment which gets associated with this application later.
Applications
Similarly, you can select Applications from the drop-down corresponding to your selected Environments. In this section, you can also give permissions to one or more than one or to all applications at a time.
IMP If all applications option is selected then user gets access to all current applications and any new application which gets associated with this project later.
Permission
Inside the Role, you actually choose which type of permissions you want to give to the users.
You can also manage the access of users to Chart Groups in your project.
NOTE: You can only give users the ability to create or edit, not both.
Click on the checkbox of Create, if you want the users to create, view, edit, or delete the chart groups.
To permit a user to only edit the chart groups, check Specific chart group from Edit drop-down. In the following field, select the chart group for which you want to grant the user edit permission.
Go to Edit drop-down, if you want to allow or deny users to edit the chart groups.
Select on Deny option from the drop-down, if you want to restrict the users to edit the chart groups.
Select the Specific Charts option from the drop-down and then select the chart groups for which you want to allow users to edit, from the other drop-down menu.
Click on Save, once you have configured all the required permissions for the users.
You can edit the user permissions, by clicking on the downward arrow.
Then you can edit the user permissions here.
After you have done editing the user permissions, click on Save.
If you want to delete the user/users with particular permissions, click on Delete.
Projects are nothing but a logical grouping of your applications so that you can manage and control the access level of users. We will discuss User Access in the next step.
Click on the Projects inside the Global configuration tab. Click on Add projects and give a name to your project and press the Save button to save your project
dex config if you want to integrate login with SSO (optional) for more information check
The archive file do not match the .
To set a new expiration date, you can regenerate the API token. Any scripts or applications using this token will need to be updated. To regenerate a token, click on regenerate token. A pop-up window will appear on the screen from where you can select a new expiration date and then click on regenerate token.
Select a new expiration date and click on regenerated token. This will generated a new token with new expiration date.
To update API token permissions, give the permissions as you want to and click on update token.
If you check the option Assign super admin permissions, the user will get full access to your system and the rest of the options will disappear. Please check to see permission levels. Only users with super admin permissions can assign super admin permissions to a user.
There are four different view access levels/Role available for both User and Group as described :
There are four different view access levels/Role available for both User and Group as described :
View
Yes
No
No
No
No
Build and Deploy
Yes
No
No
No
Yes
Admin
Yes
Yes
Yes
Yes
Yes
Manager
Yes
Yes
Yes
Yes
Yes
Super Admin
Yes
Yes
Yes
Yes
Yes
View Only
Yes
No
No
No
Build and Deploy
Yes
No
No
No
Admin
Yes
Yes
Yes
Yes
Manager
Yes
Yes
Yes
Yes
Super Admin
Yes
Yes
Yes
Yes
Manager
Yes
Yes
Yes
Super Admin
Yes
Yes
Yes
Super Admin
Yes
Yes
Yes
View
Only can view chart groups
Create
Can create, view, edit or delete
Edit
Deny: Can't edit chart groups
Specific chart groups: can edit specific chart group
Hurray! Your Devtron stack is completely setup. Let's get started by deploying a simple application on it.
This is a sample Nodejs application which we are going to deploy using Devtron. For a detailed step-wise procedure, please have a look at the link below -
If you want to check the current version of Devtron you are using, please use the following command.
5.1 Upgrade Devtron to latest version
OR
5.2 Upgrade Devtron to a custom version. You can find the latest releases from Devtron on Github https://github.com/devtron-labs/devtron/releases
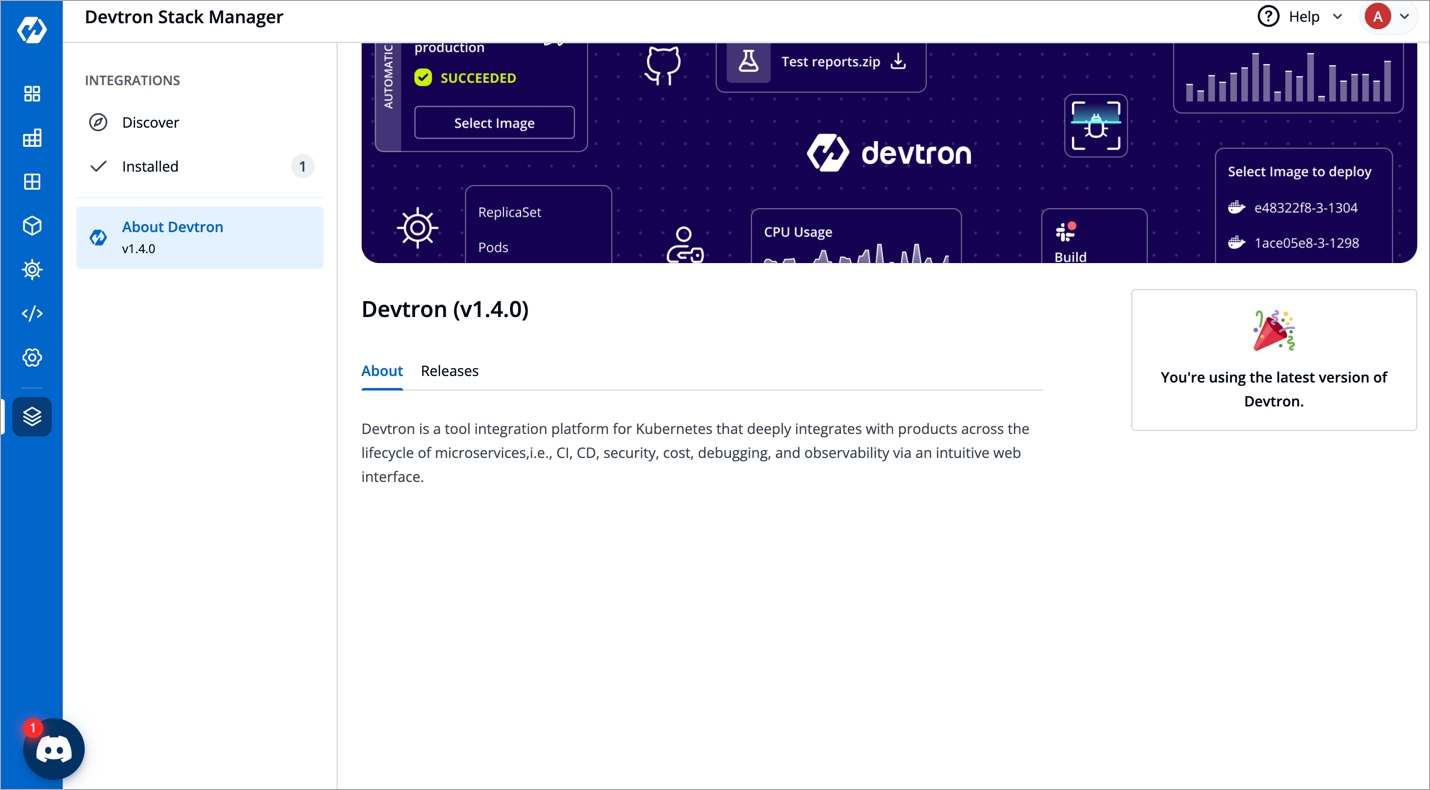
Devtron can be updated from the Devtron Stack Manager > About Devtron section.
Select Update to Devtron
The update process may show one of the following statuses, with details available for tracking, troubleshooting, and additional information:
Initializing
The update is being initialized.
Updating
Devtron is being updated to the latest version.
Failed
Unknown
Status is unknown at the moment and will be updated shortly.
Request timed out
Updating Devtron also updates the installed integrations.
If you want to check the current version of Devtron you are using, please use the following command.
Fetch the latest Devtron helm chart
Input the target Devtron version that you want to upgrade to. You can find the latest releases from Devtron on Github https://github.com/devtron-labs/devtron/releases
Upgrade Devtron
Input the target Devtron version that you want to upgrade to. You can find the latest releases from Devtron on Github https://github.com/devtron-labs/devtron/releases
Patch Devtron Installer
Update failed. You may retry the upgrade or .
The request to install has hit the maximum number of retries. You may retry the installation or for further assistance.
Delete the respective resources i.e, nats-operator , nats-streaming and nats-server using the following commands.
Verify the deletion of resources using the following commands.
Set reSync: true in the installer object, this will initiate upgrade of the entire Devtron stack, you can use the following command to do this.
This page helps you to install Devtron without any integrations. Integrations can be added later using Devtron Stack Manager.
Install Helm if you haven't done that already!
Use the following command to get the dashboard URL:
You will get the result something as shown below:
The hostname aaff16e9760594a92afa0140dbfd99f7-305259315.us-east-1.elb.amazonaws.com as mentioned above is the Loadbalancer URL where you can access the Devtron dashboard.
You can also do a CNAME entry corresponding to your domain/subdomain to point to this Loadbalancer URL to access it at a custom domain.
devtron.yourdomain.com
CNAME
aaff16e9760594a92afa0140dbfd99f7-305259315.us-east-1.elb.amazonaws.com
For admin login, use the username as admin, and run the following command to get the admin password:
Please make sure that you do not have anything inside namespaces devtroncd, devtron-cd devtron-ci, and devtron-demo as the below steps will clean everything inside these namespaces
To use the CI/CD capabilities with Devtron, users can Install the CI/CD integration.
If you want to check the current version of Devtron you are using, please use the following command.
5.1 Upgrade Devtron to latest version
OR
5.2 Upgrade Devtron to a custom version. You can find the latest releases from Devtron on Github https://github.com/devtron-labs/devtron/releases




his feature helps you manage the notifications for your build and deployment pipelines. You can receive the notifications on Slack or via e-mail.
Click on Global Configurations -> Notifications
Click on Configurations and you will see Devtron support two types of configurations SES Configurations or Slack Configurations.
You can manage the SES configuration to receive e-mails by entering the valid credentials. Make sure your e-mail is verified by SES.
Click on Add and configure SES.
Configuration Name
Give a name to the SES Configuration
Access Key ID
Valid AWS Access Key ID
Secret Access Key
Valid AWS Secret Access Key
AWS Region
Select the AWS Region from the drop-down menu
E-mail
Enter the SES verified e-mail id on which you wish to receive e-mail notifications
Click on Save to save your SES configuration or e-mail ID
You can manage the Slack configurations to receive notifications on your preferred Slack channel.
Click on Add to add new Slack Channel.
Slack Channel
Name of the Slack channel on which you wish to receive notifications.
Webhook URL
Project
Select the project name to control user access
Click on Save and your slack channel will be added.
Click on Add New to receive new notification.
Send To
When you click on the Send to box, a drop-down will appear, select your slack channel name if you have already configured Slack Channel. If you have not yet configured the Slack Channel, Click on Configure Slack Channel
Select Pipelines
Then, to fetch pipelines of an application, project and environment.
Choose a filter type(environment, project or application)
You will see a list of pipelines corresponding to your selected filter type, you can select any number of pipelines. For each pipeline, there are 3 types of events Trigger, Success, and Failure. Click on the checkboxes for the events, on which you want to receive notifications.
Click on Save when you are done with your Slack notification configuration.
Send To
Click on the Send To box, select your e-mail address/addresses on which you want to send e-mail notifications. Make sure e-mail id are SES Verified.
If you have not yet configured SES, Click on Configure SES
Select Pipelines
To fetch pipelines of an application, project and environment.
Choose a filter type(environment, project or application)
You will see a list of pipelines corresponding to your selected filter type, you can select any number of pipelines. For each pipeline, there are 3 types of events Trigger, Success, and Failure. Click on the checkboxes for the events, on which you want to receive notifications.
Click on Save once you have configured the e-mail notification.
Enter the valid
External links allow you to connect to the third-party Monitoring Tools within your Devtron dashboard for seamlessly monitoring/debugging/logging/analyzing your applications. The Monitoring Tool is available as a bookmark at various component levels, such as application, pods, and container.
To monitor/debug an application using a specific Monitoring Tool (such as Grafana, Kibana, etc.), you may need to navigate to the tool's page, then to the respective app/resource page.
External links take you directly to the tool's page, which includes the context of the application, environment, pod, and container.
Before you begin, configure an application in the Devtron dashboard.
Super admin access*
Monitoring tool URL
*External links can only be added/managed by a super admin, but other users can access the configured Monitoring tools on their app's page.
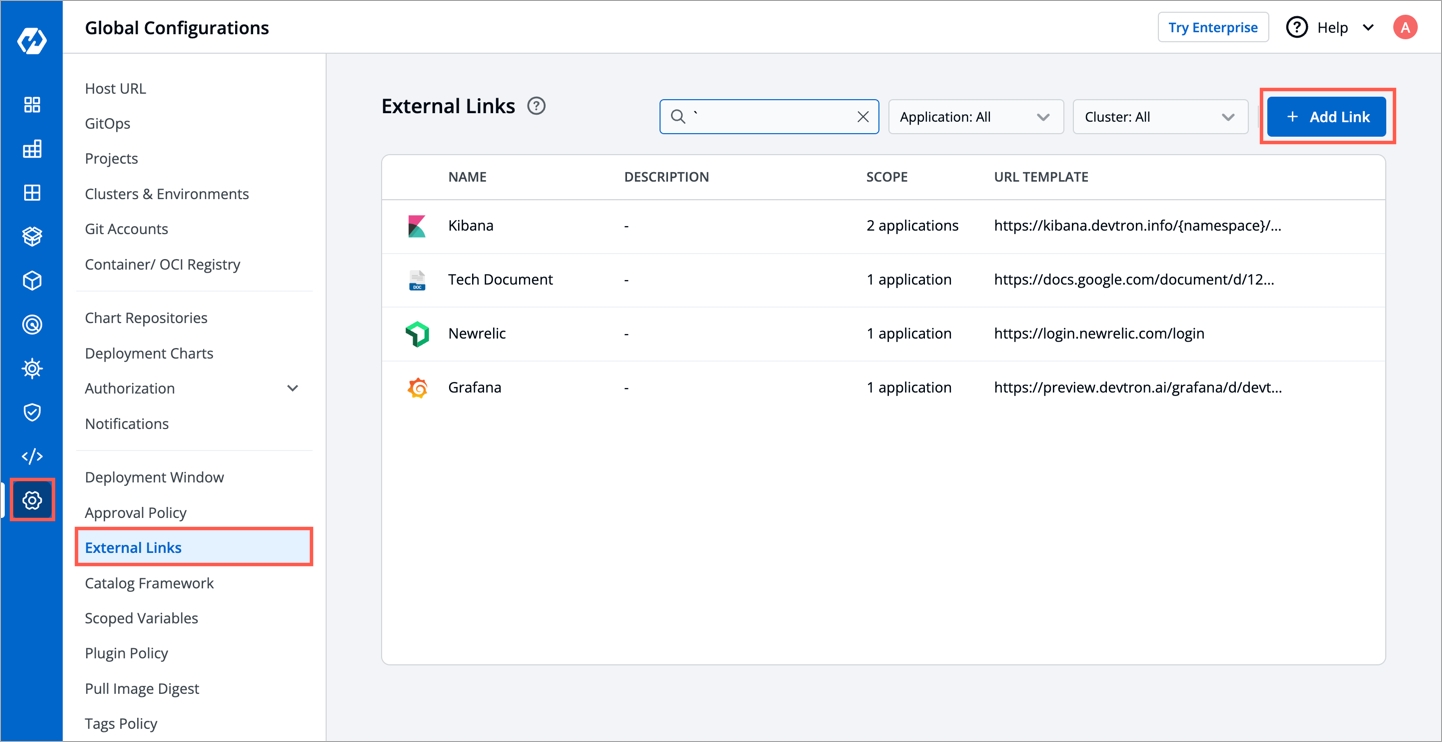
On the Devtron dashboard, select Global Configurations from the left navigation pane.
Select External links.
Select Add link.
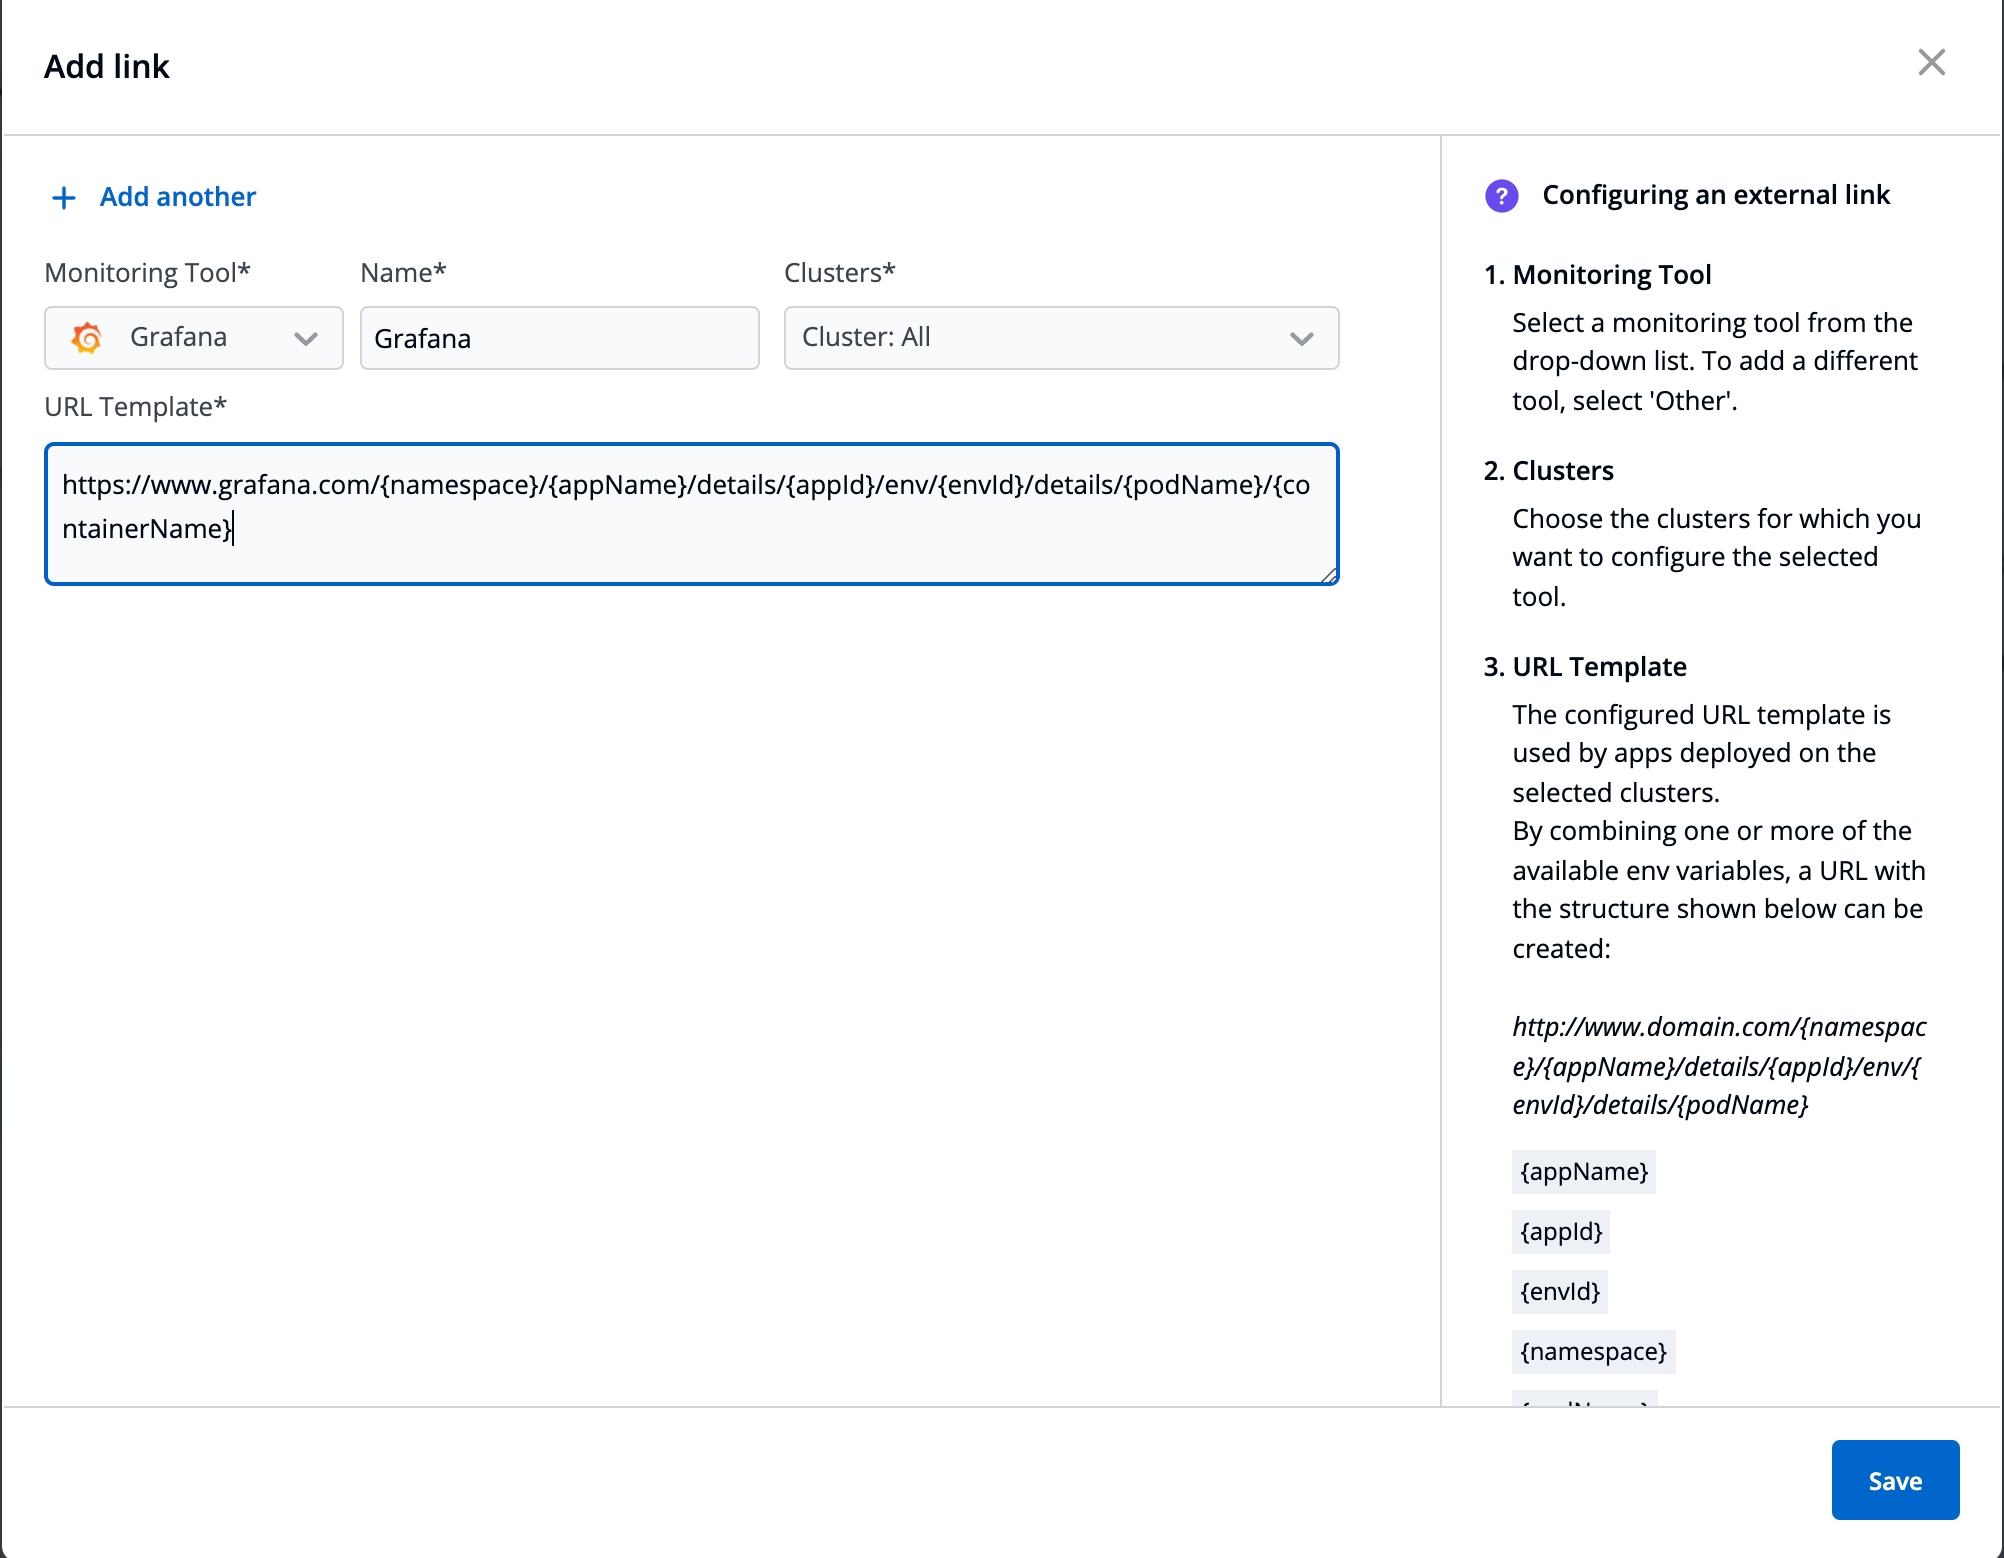
On the Add link page, enter the following fields:
Monitoring Tool
Select a Monitoring Tool from the drop-down list. To add a different tool, select 'Other'.
Name
Enter a user-defined name for the Monitoring Tool
Clusters
Choose the clusters for which you want to configure the selected tool.
Select more than one cluster name, to enable the link on multiple clusters
Select 'Cluster: All', to enable the link on the existing clusters and future clusters
URL Template
The configured URL Template is used by apps deployed on the selected clusters. By combining one or more of the env variables, a URL with the structure shown below can be created: http://www.domain.com/{namespace}/{appName}/details/{appId}/env/{envId}/details/{podName} The env variables:
{appName}
{appId}
{envId}
{namespace}
Note: The env variables will be dynamically replaced by the values that you used to configure the link.
Note: To add multiple links, select + Add another at the top-left corner.
Select Save.
The users (admin and others) can access the configured external link from the App details page.
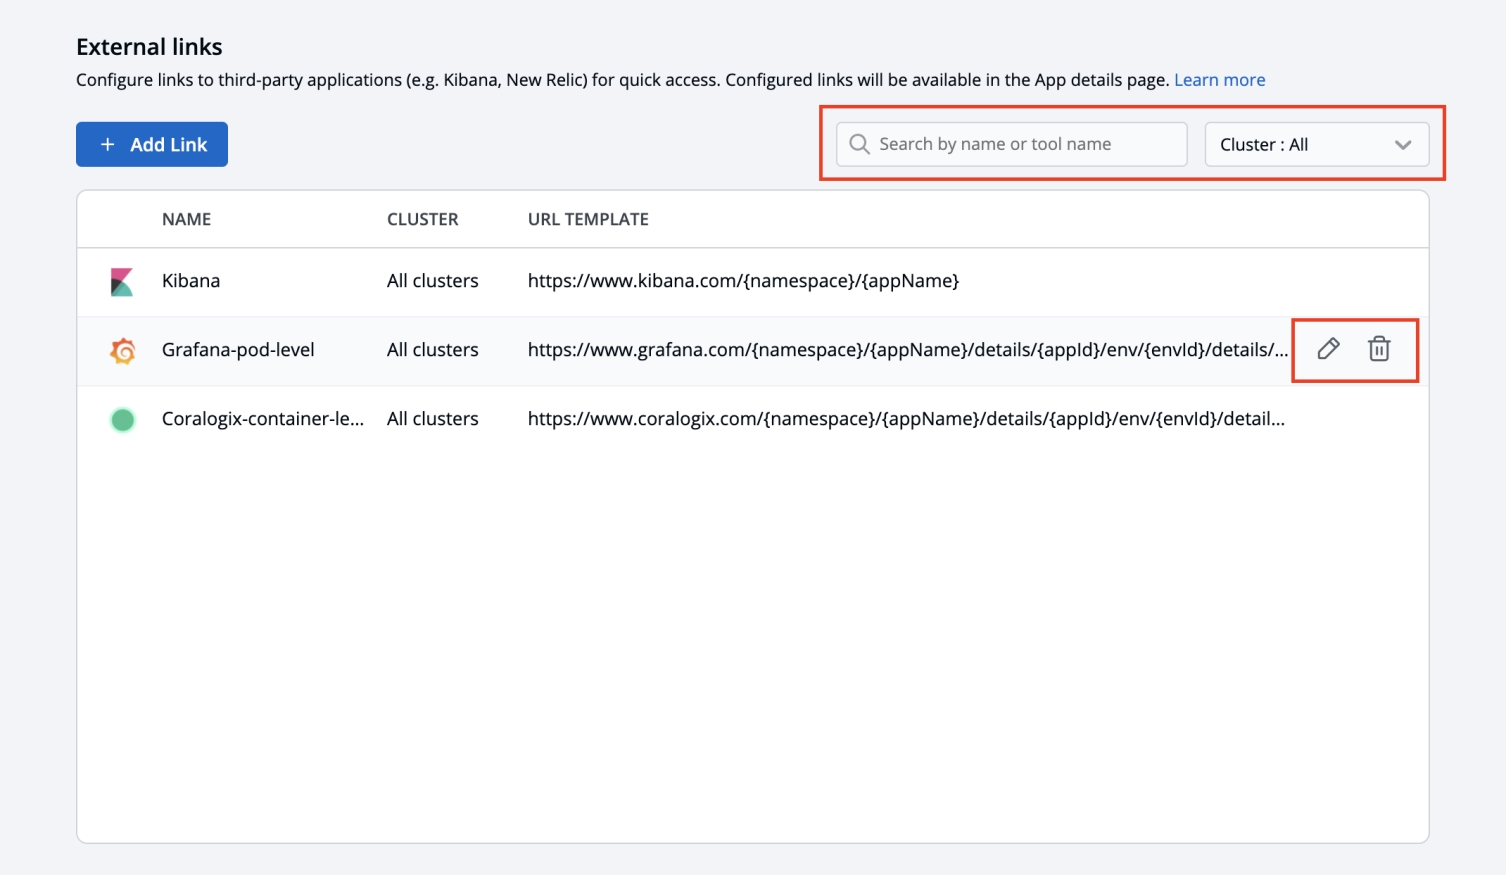
On this page, the configured external links can be filtered/searched, as well as edited/deleted.
Select Global Configurations > External links.
Filter and search the links based on the tool's name or a user-defined name.
Edit a link by selecting the edit icon next to an external link.
Delete an external link by selecting the delete icon next to a link. The bookmarked link will be removed in the clusters for which it was configured.
{podName}: If used, the link will only be visible at the pod level on the page.
{containerName}: If used, the link will only be visible at the container level on the page.
