Build and Deploy
Each time you push a change to your application through GitHub, your application goes through a process to be built and deployed.
There are two main steps for building and deploying applications:
You can also rollback the deployment. Refer Rollback Deployment for detail.
Triggering CI
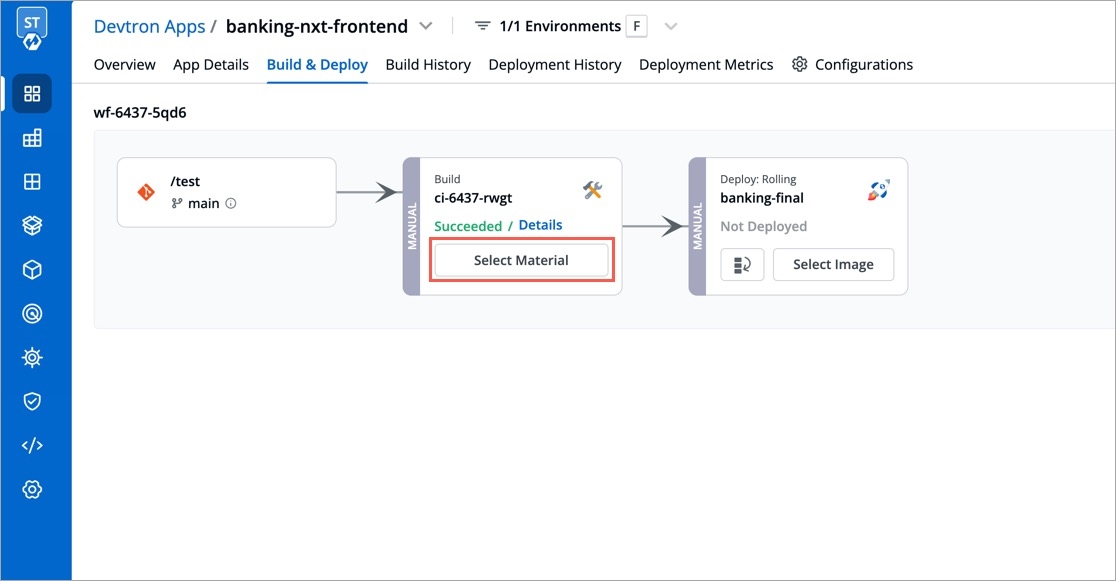
To trigger the CI pipeline, first you need to select a Git commit. To select a Git commit, click the Select Material button present on the CI pipeline.
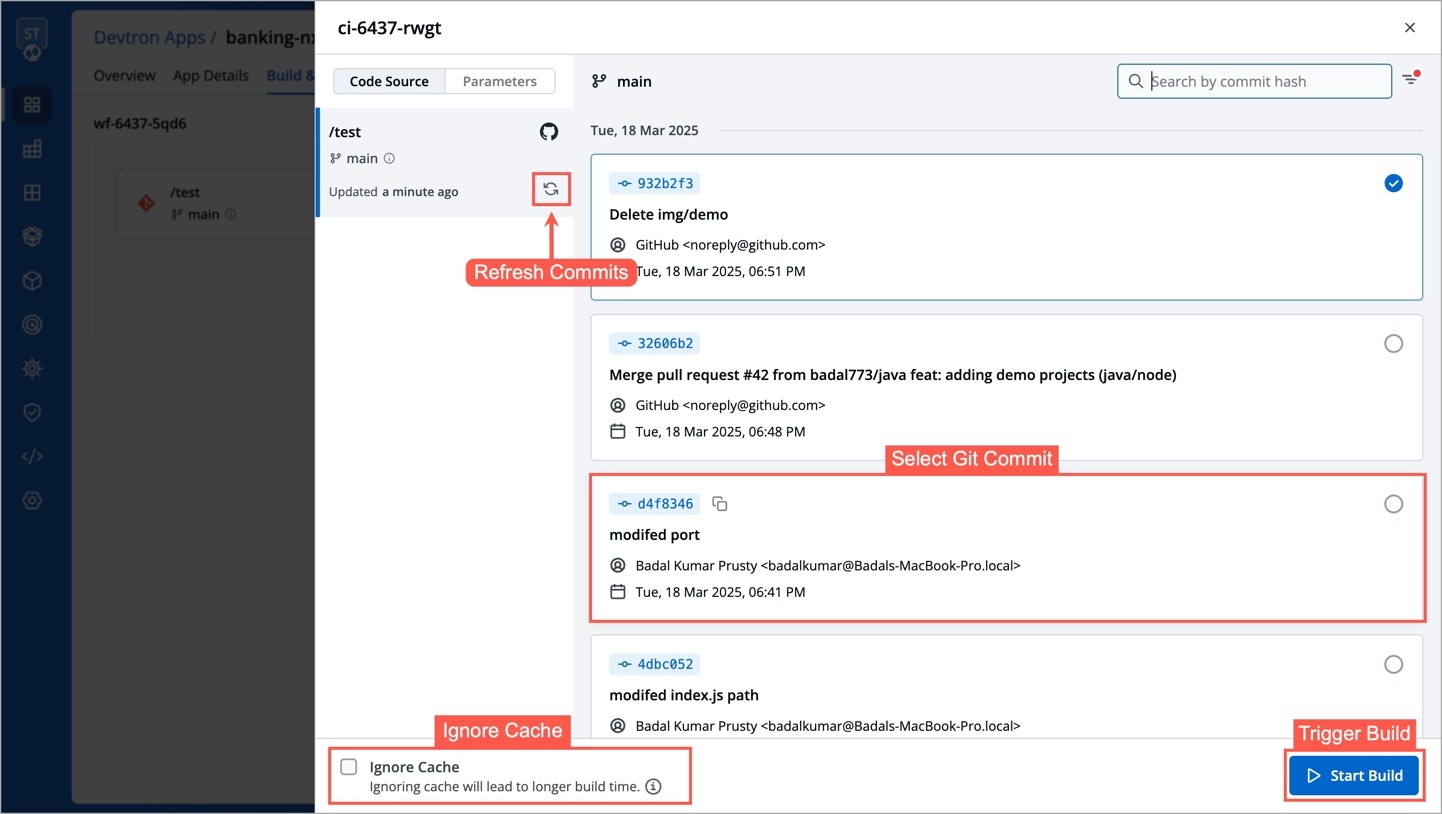
Once clicked, a list will appear showing various commits made in the repository, it includes details such as the author name, commit date, time, etc. Choose the desired commit for which you want to trigger the pipeline, and then click Start Build to initiate the CI pipeline.
CI Pipelines with automatic trigger enabled are triggered immediately when a new commit is made to the git branch. If the trigger for a build pipeline is set to manual, it will not be automatically triggered and requires a manual trigger.
CI builds can be time-consuming for large repositories, especially for enterprises. However, Devtron's partial cloning feature significantly increases cloning speed, reducing the time it takes to clone your source code and leading to faster build times.
Advantages
Smaller image sizes
Reduced resource usage and costs
Faster software releases
Improved productivity
Get in touch with us if you are looking for a way to improve the efficiency of your software development process.
The Refresh icon updates the Git Commits section in the CI Pipeline by fetching the latest commits from the repository. Clicking on the refresh icon ensures that you have the most recent commit available.
The Ignore Cache option ignores the previous build cache and creates a fresh build. If selected, will take a longer build time than usual.
Who Can Perform This Action?
Users need to have Build & deploy permission or above (along with access to the environment and application) to pass build parameters.
If you wish to pass runtime parameters for a build job, you can provide key-value pairs before triggering the build. Thereafter, you can access those passed values by referencing the corresponding keys in the environment variable dictionary.
Steps
Go to the Parameters tab available on the screen where you select the commit.
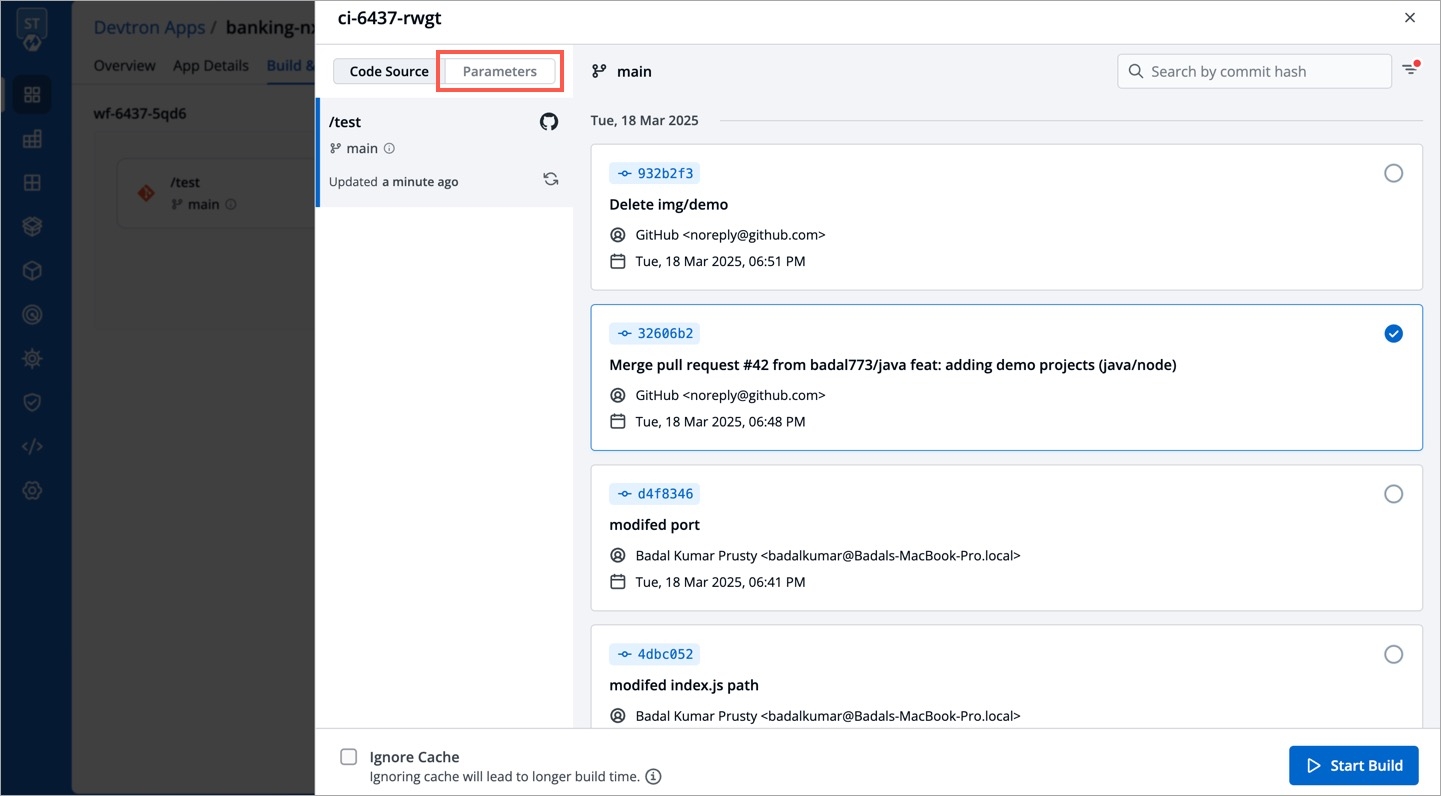
Click + Add parameter.
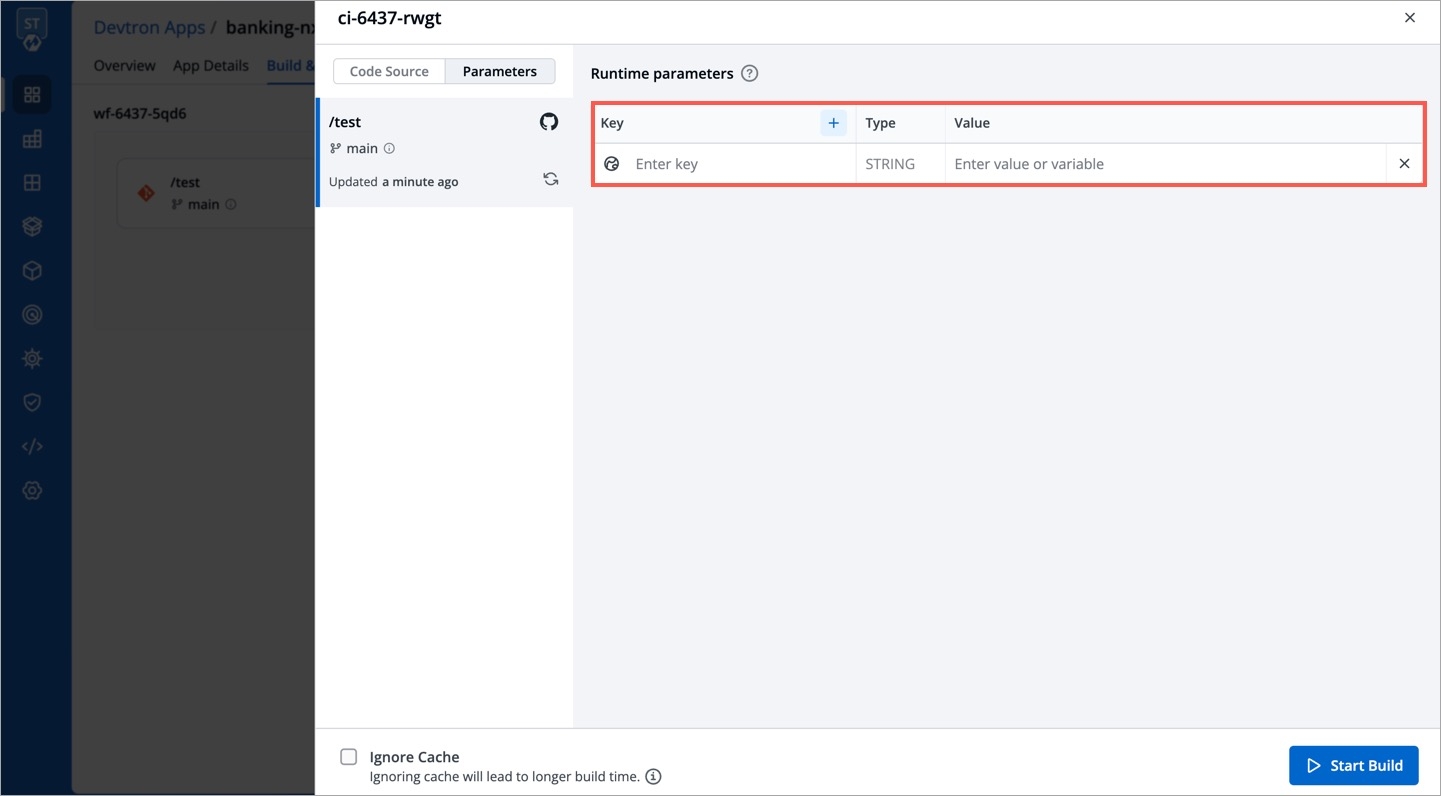
Enter your key-value pair as shown below.
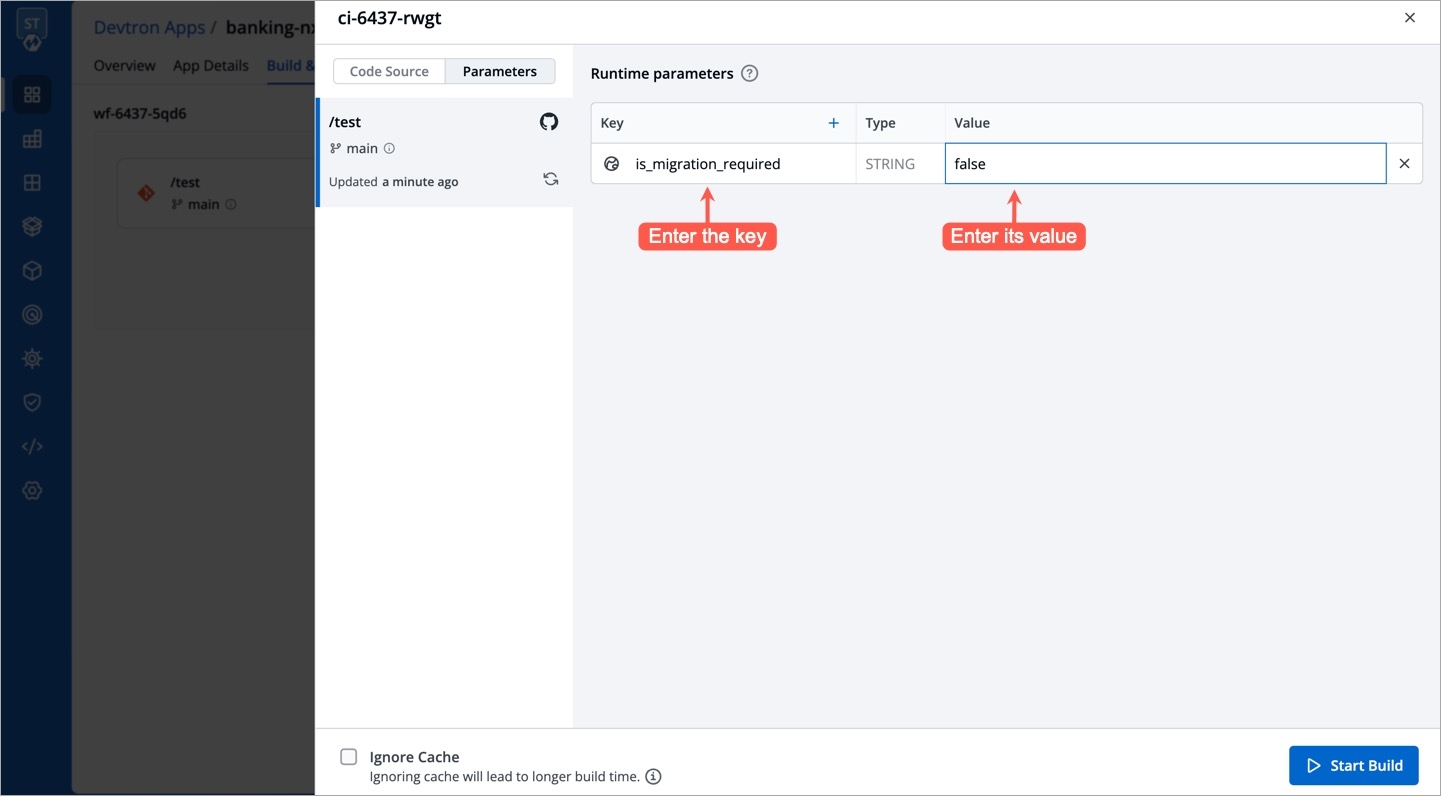
Similarly, you may add more than one key-value pair by using the + Add Parameter button.
Click Start Build.
Fetching Logs and Reports
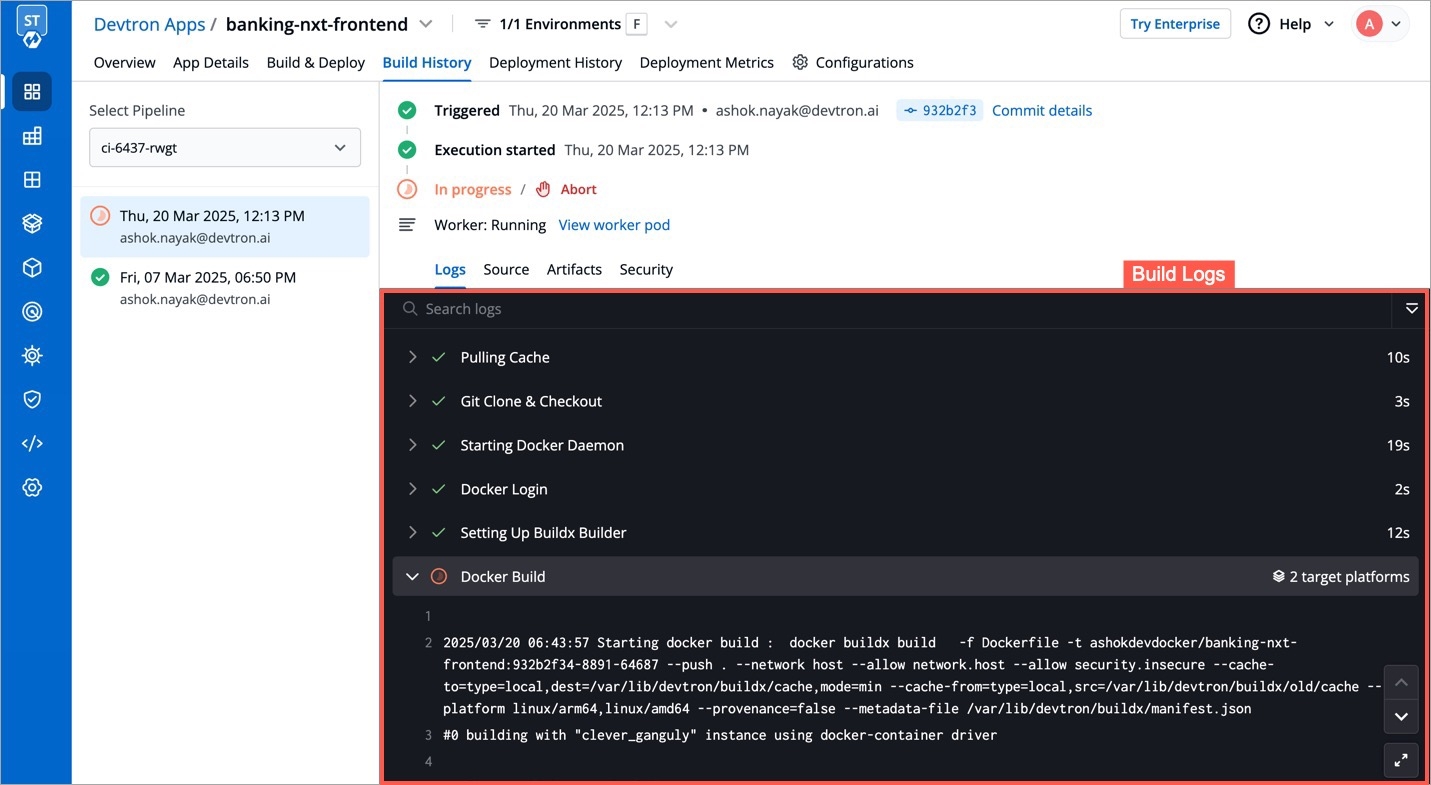
Click the CI Pipeline or navigate to the Build History to get the CI pipeline details such as build logs, source code details, artifacts, and vulnerability scan reports.
To access the logs of the CI Pipeline, simply click Logs.
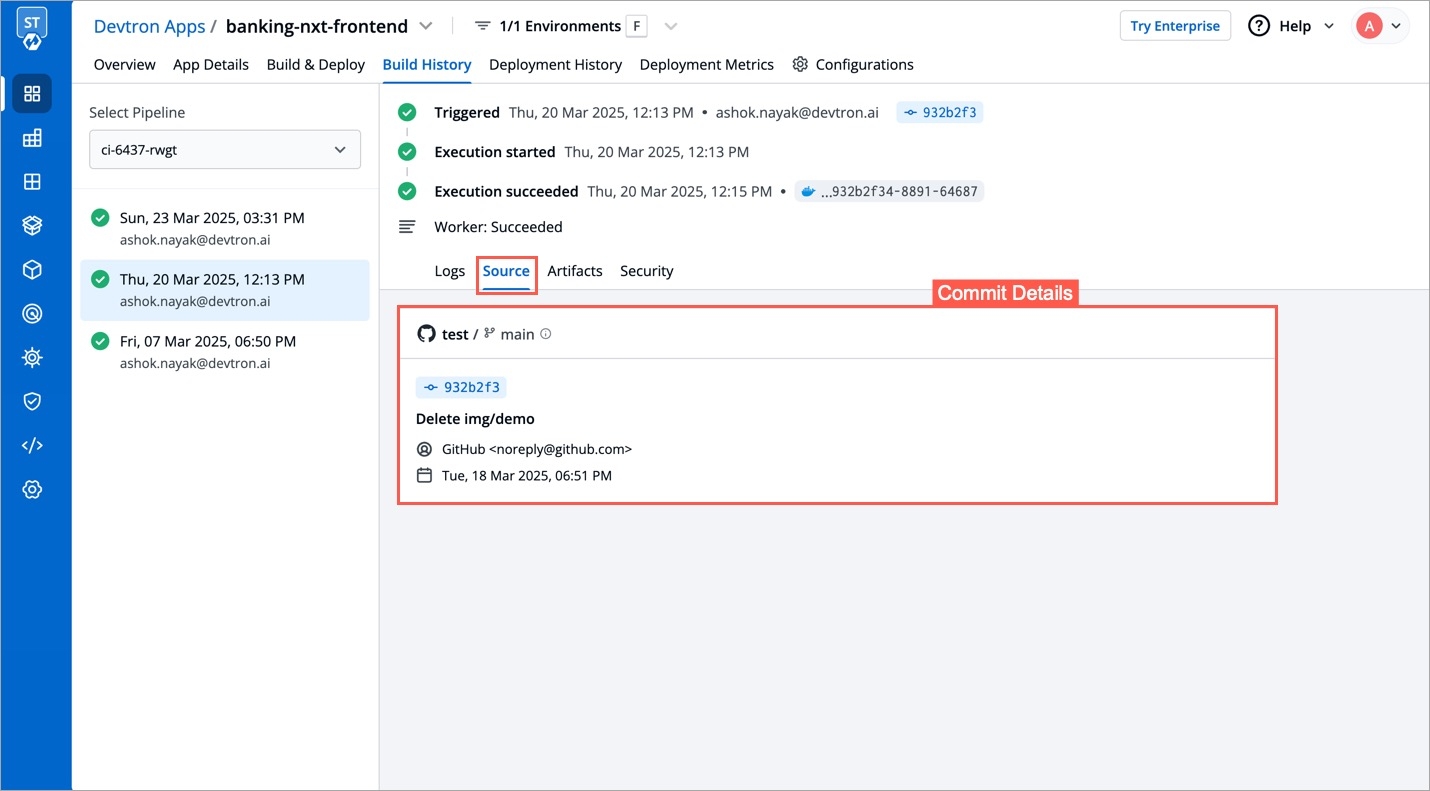
To view specific details of the Git commit you've selected for the build, click on Source. This will provide you with information like the commit ID, author, and commit message associated with that particular commit.
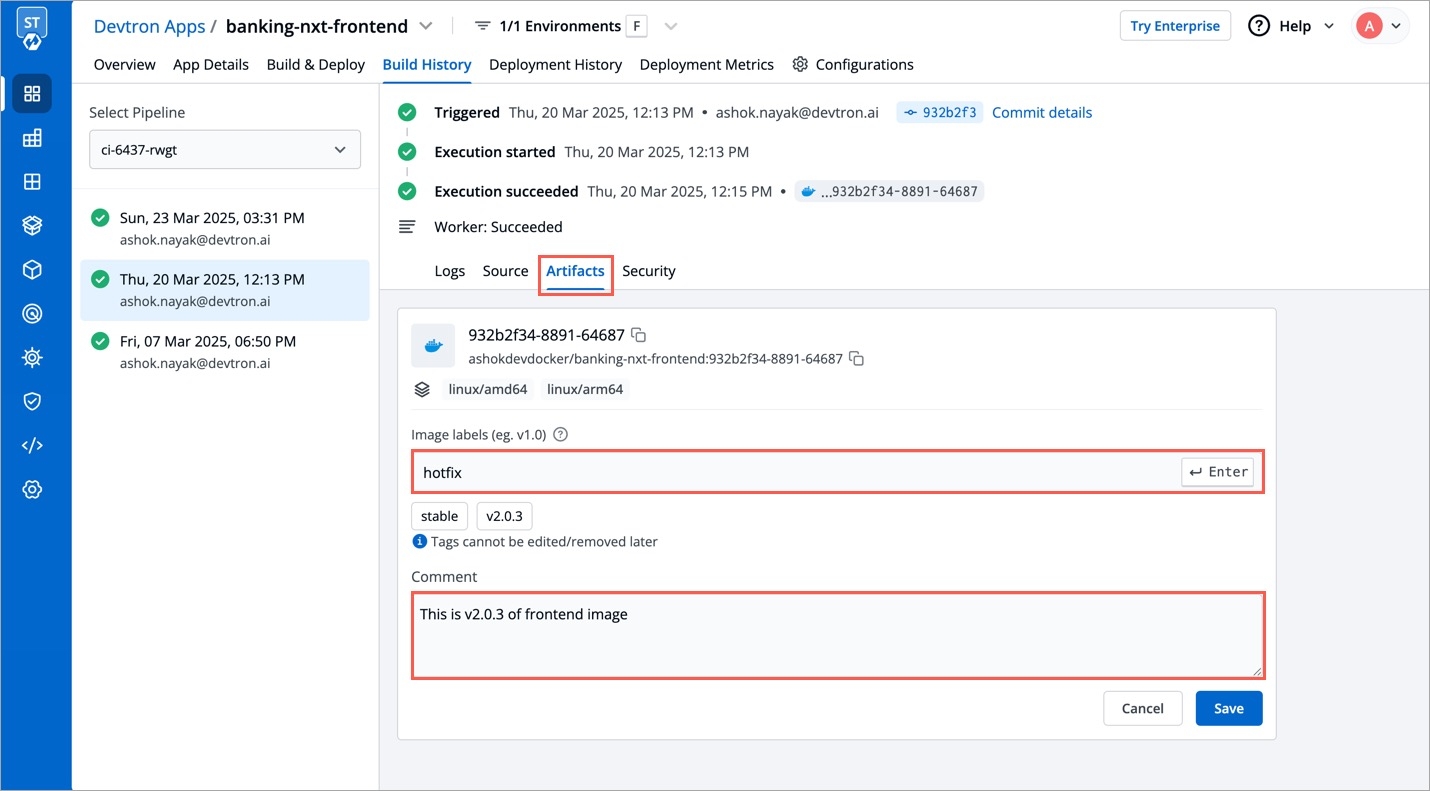
By selecting the Artifacts option, you can download reports related to the tasks performed in the Pre-CI and Post-CI stages. This will allow you to access and retrieve the generated reports, if any, related to these stages. Additionally, you have the option to add tags or comments to the image directly from this section.
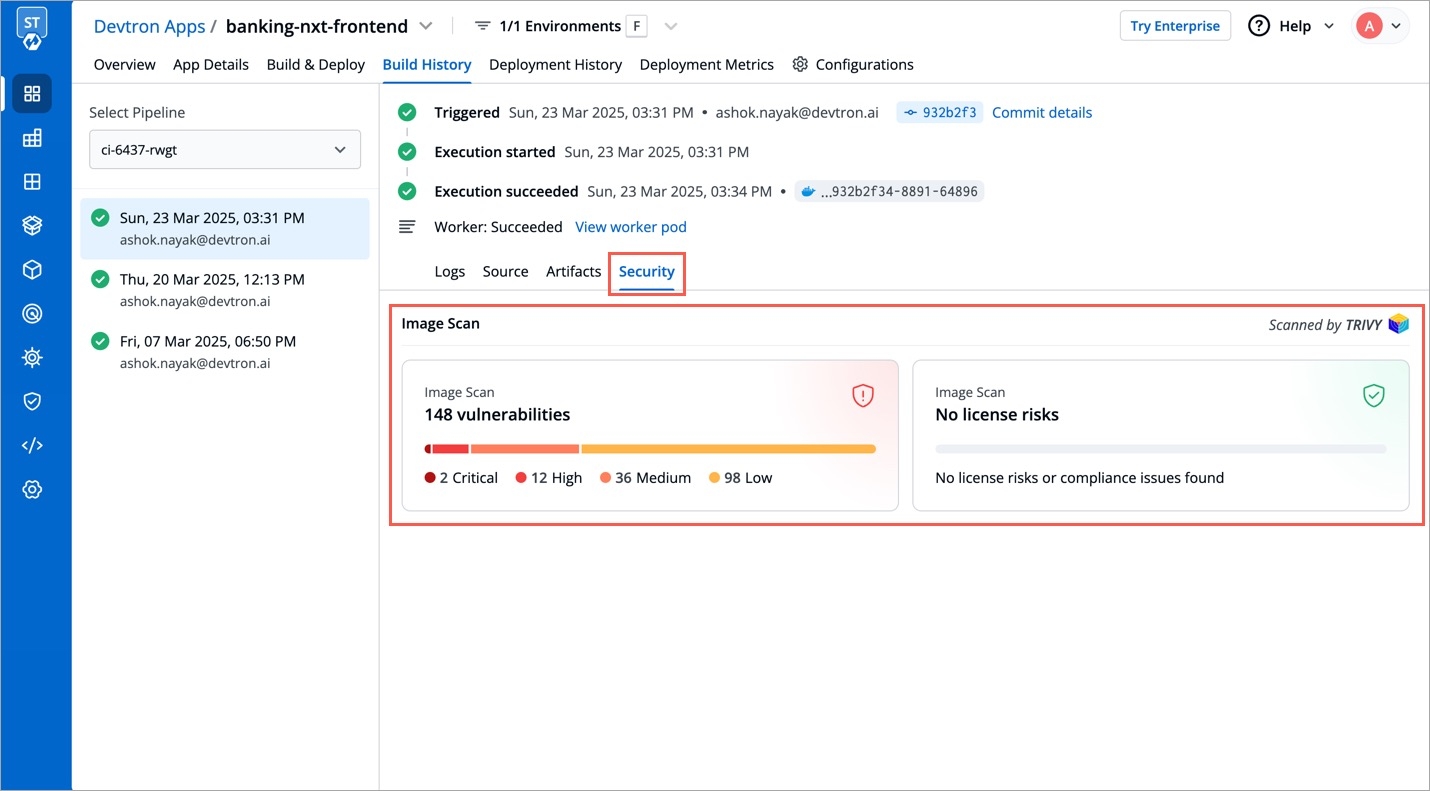
To check for any vulnerabilities in the build image, click on Security. Please note that vulnerabilities will only be visible if you have enabled the Scan for vulnerabilities option in the advanced options of the CI pipeline before building the image. For more information about this feature, please refer to this documentation.
Triggering CD
After the CI pipeline is complete, you can trigger the CD pipeline.
Go to the
Build & Deploytab of your application and click Select Image in the CD pipeline.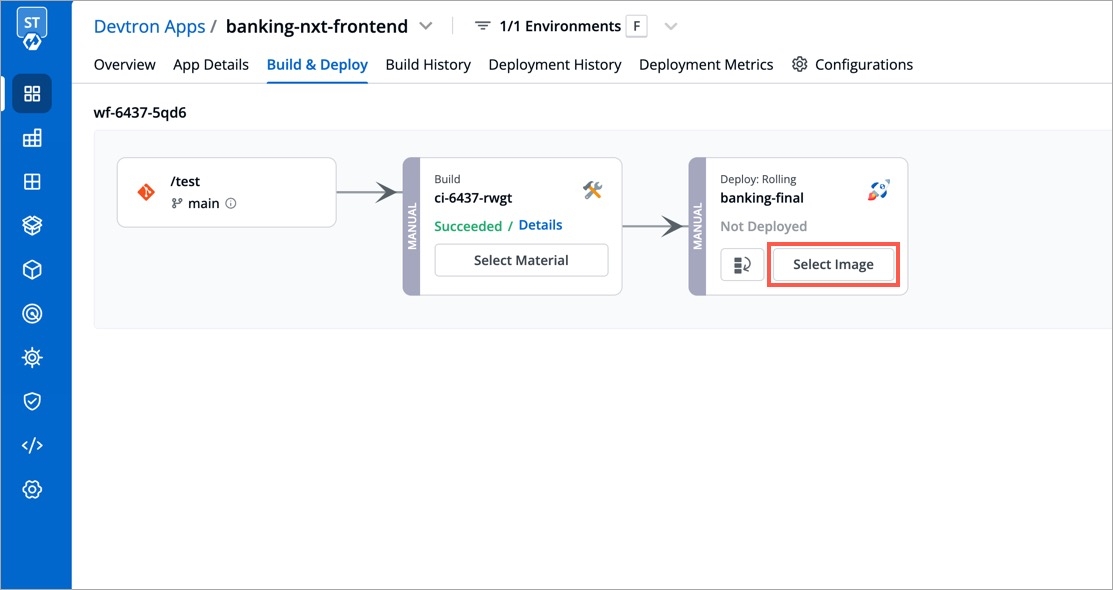
Figure 1: 'Select Image' Button Select an image to deploy and then click Deploy to trigger the CD pipeline.
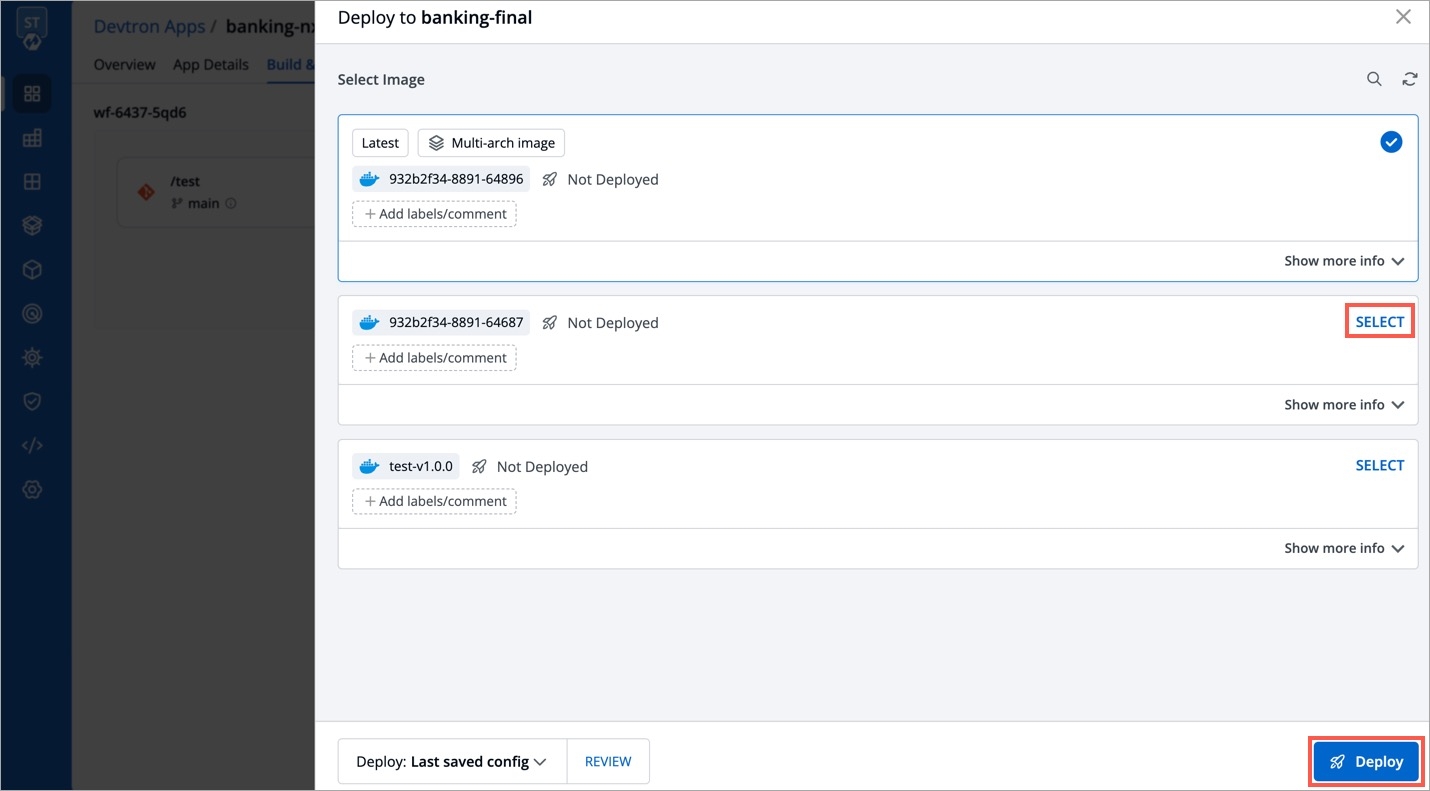
Figure 2: Selecting an Image for Deployment
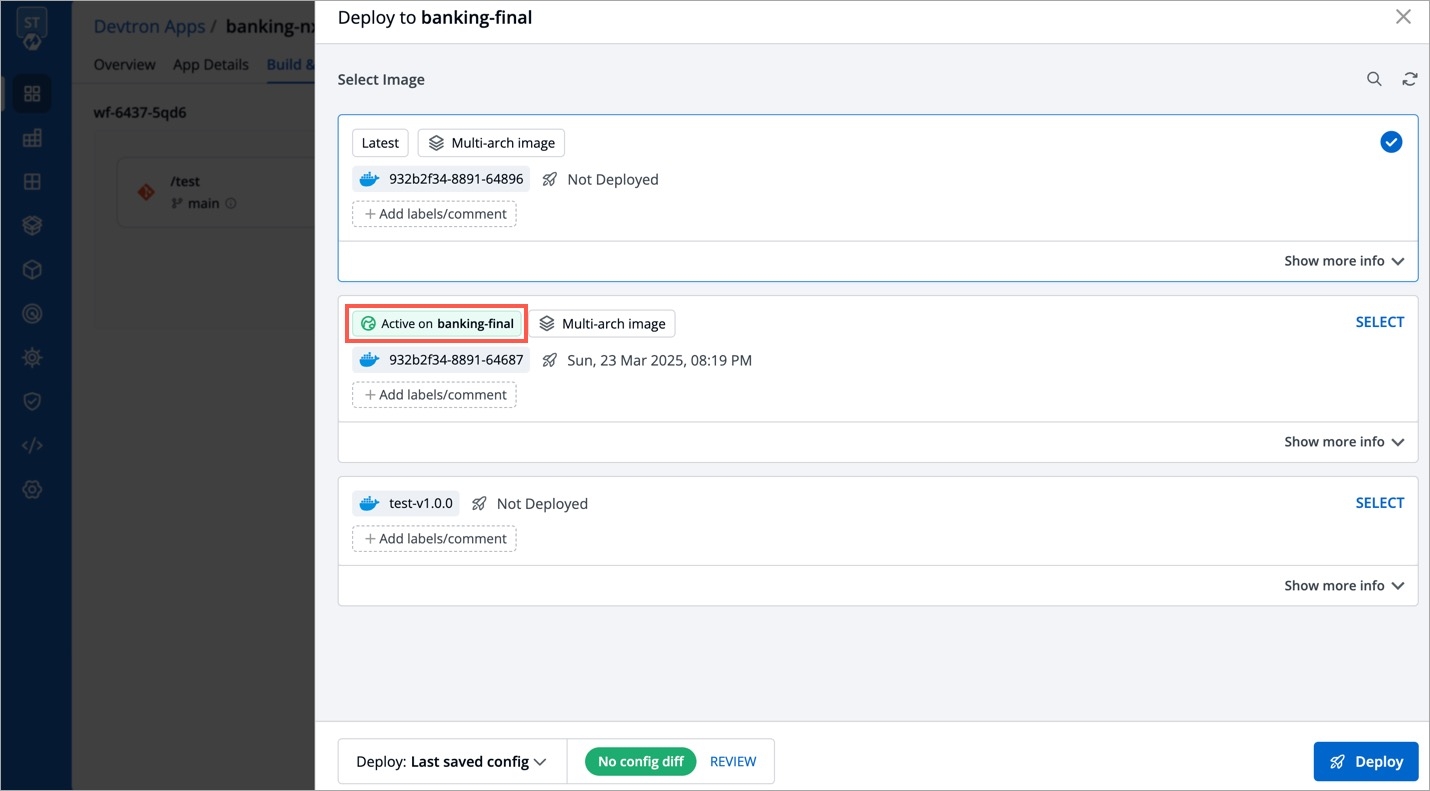
However, if an image is already deployed, you can identify it by the tag Active on <Environment name>.
Manual Approval for Deployment
When manual approval is enabled for the deployment pipeline configured in the workflow, you are expected to request for an image approval before each deployment. Alternatively, you can deploy images that have already been approved once.
If no approved images are available or the current image is already deployed, you won't see any images for deployment when clicking Select Image.
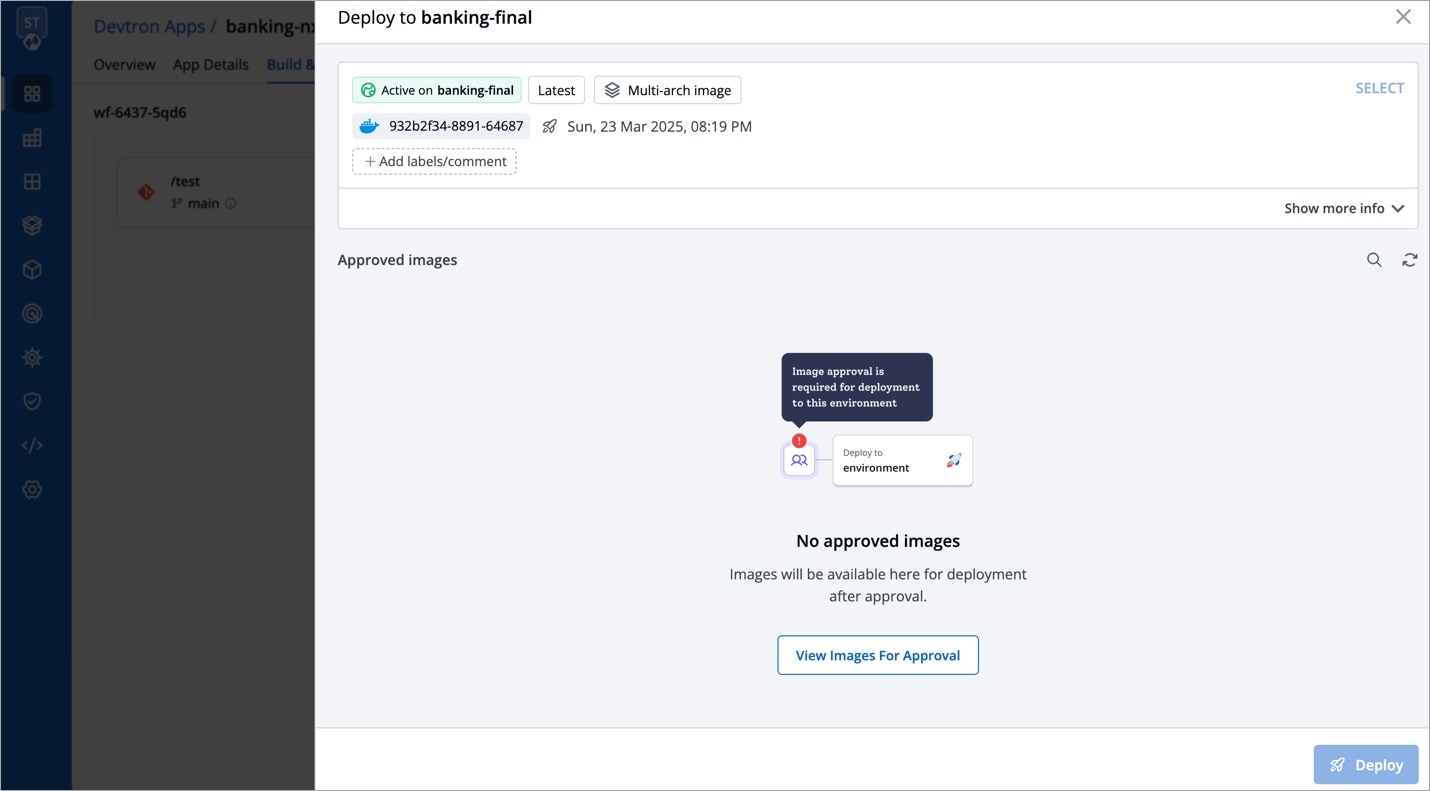
Requesting for Image Approval
Users need to have Build & deploy permission or above (along with access to the environment and application) to request for an image approval.
To request an image approval, follow these steps:
Navigate to the
Build & Deploypage, and click the Approval for deployment icon.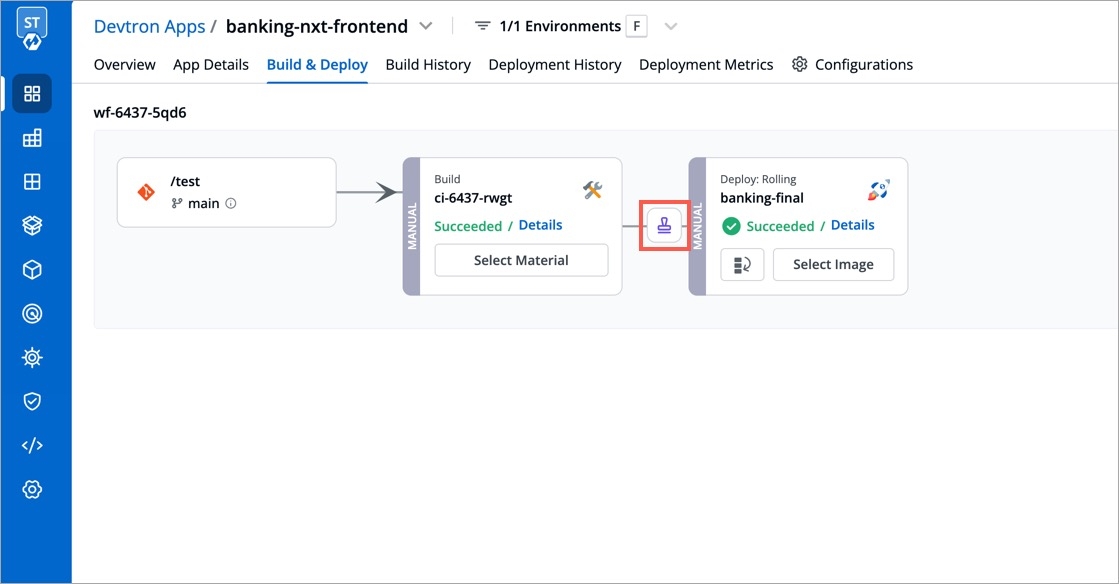
Figure 4: Approval Button Click the Request Approval button present on the image for which you want to request an approval and click Submit Request.
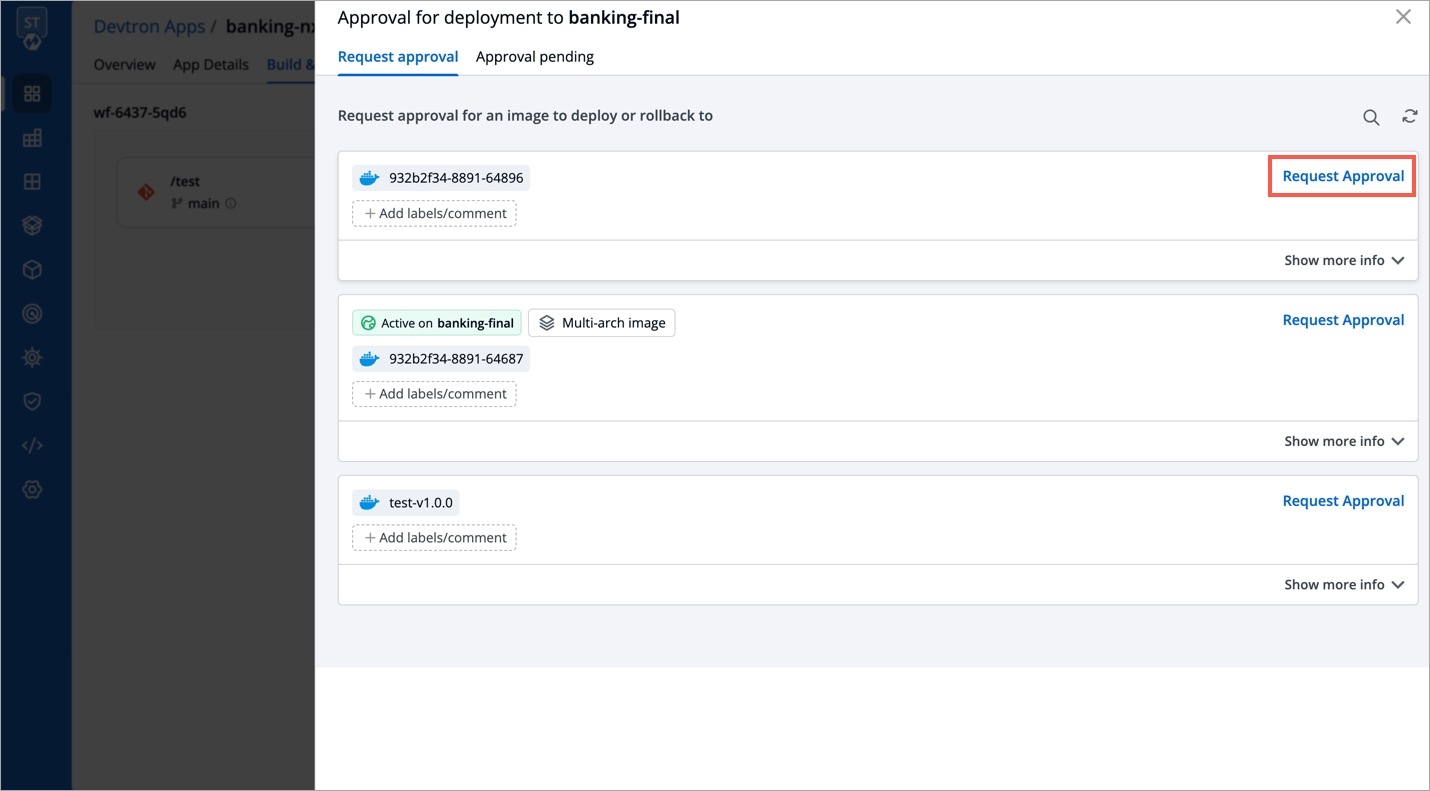
Figure 5: Requesting Approval In case you have configured SES or SMTP on Devtron, you can directly choose the approver(s) from the list of approvers as shown below.
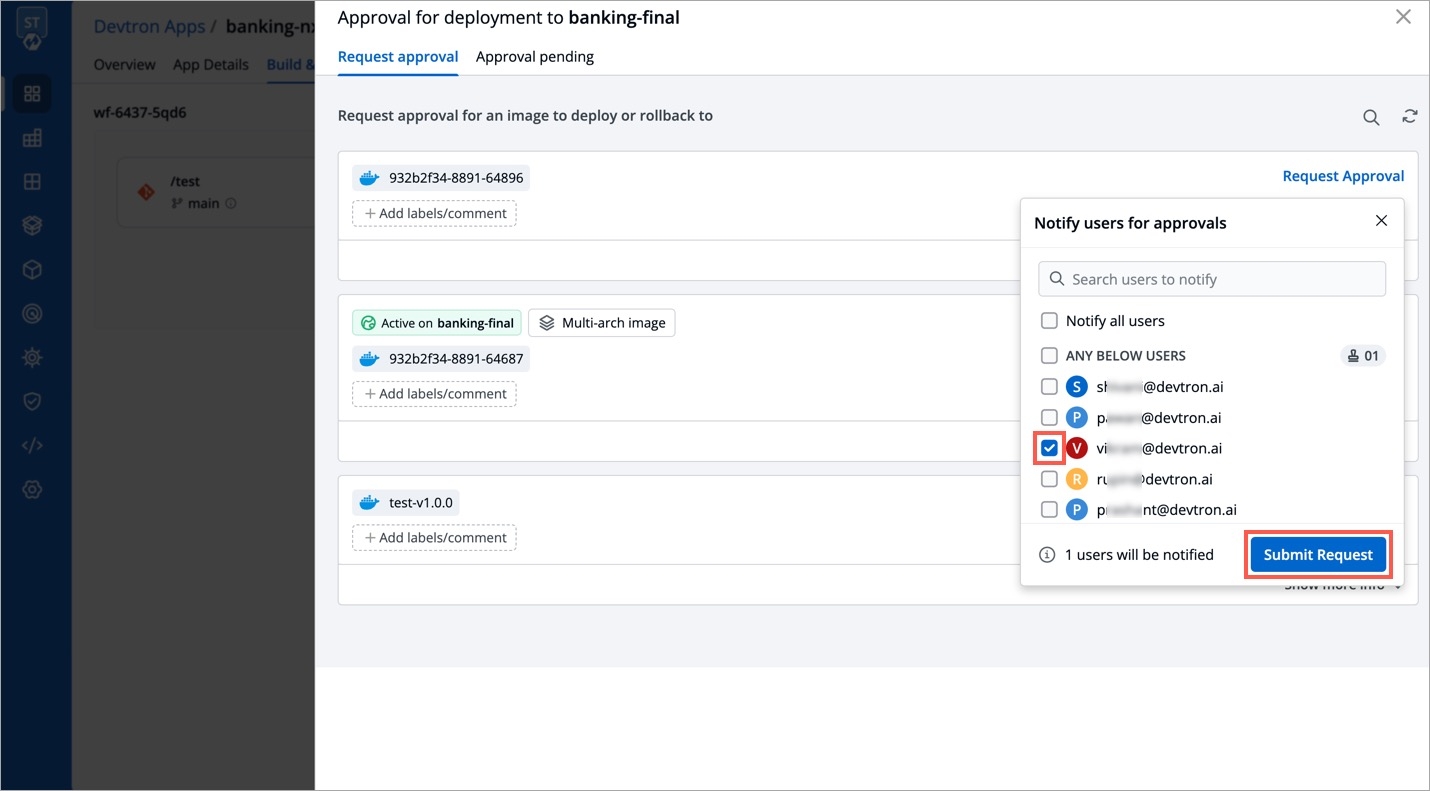
Figure 6: Choosing Approvers The users you selected will receive an approval request via email. Any user with 'Image approver' permission alongwith access to the given application and given environment would be able to approve the image.
Extras
In case you wish to cancel the image approval request, you can do so from the
Approval pendingtab as shown in the below image.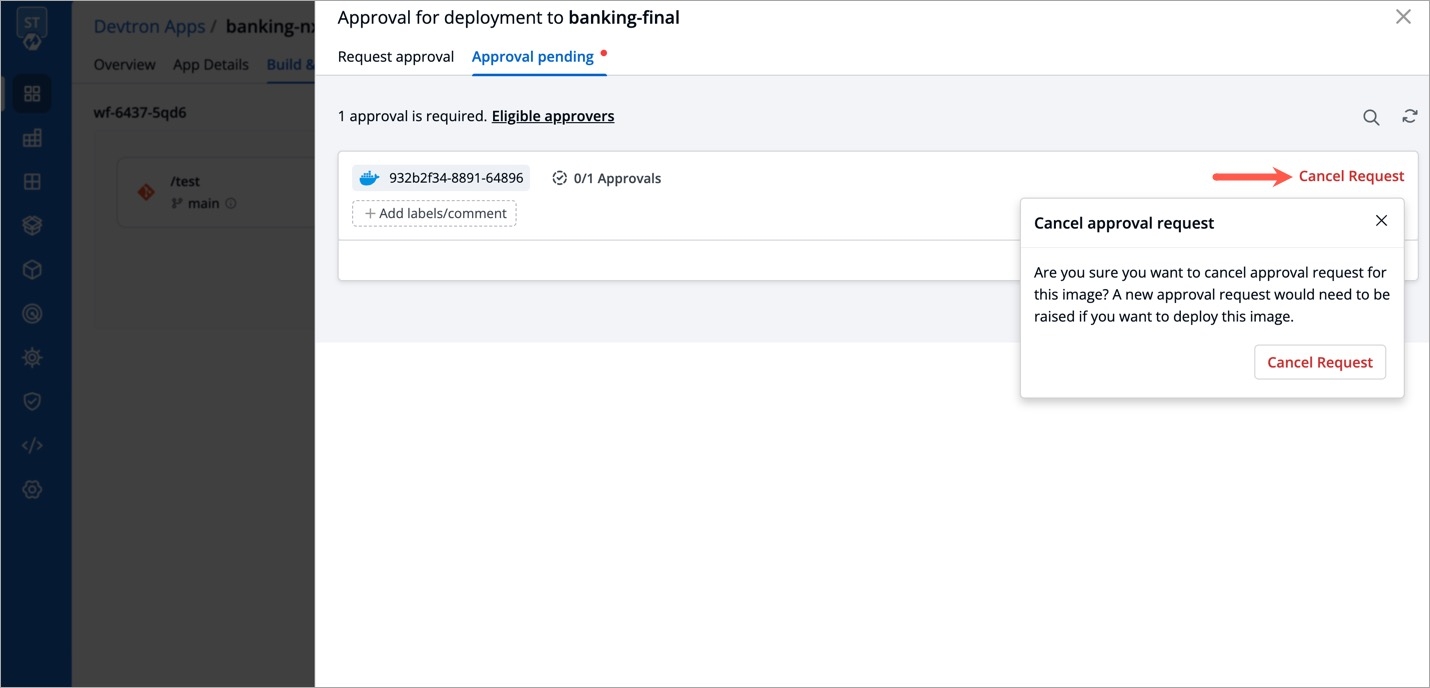
Figure 7: Cancelling Request If you've received an approval but no longer want the image to be deployable, you can let the approval expire.
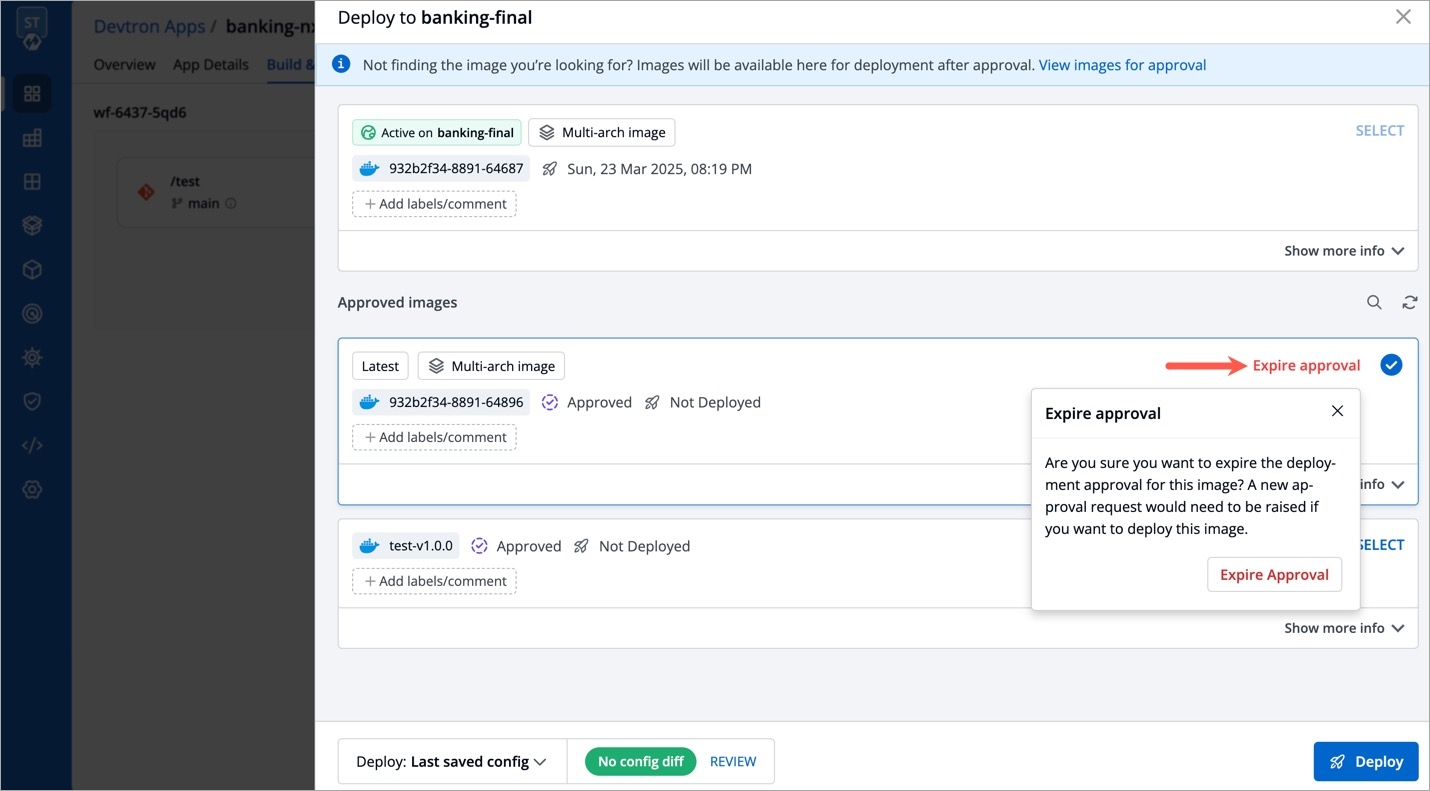
Figure 8: Expiring an Approval
Accepting Image Approval Request
By default, super-admin users are considered as the default approvers. Users who build the image and/or request for its approval, cannot self-approve it even if they have super-admin privileges.
Users with Approver permission (for the specific application and environment) can also approve a deployment. This permission can be granted to users from User Permissions present in Global Configurations.
In case SES or SMTP was configured in Devtron, and the user chose the approvers while raising an image approval request, the approvers would receive an email notification as shown below:
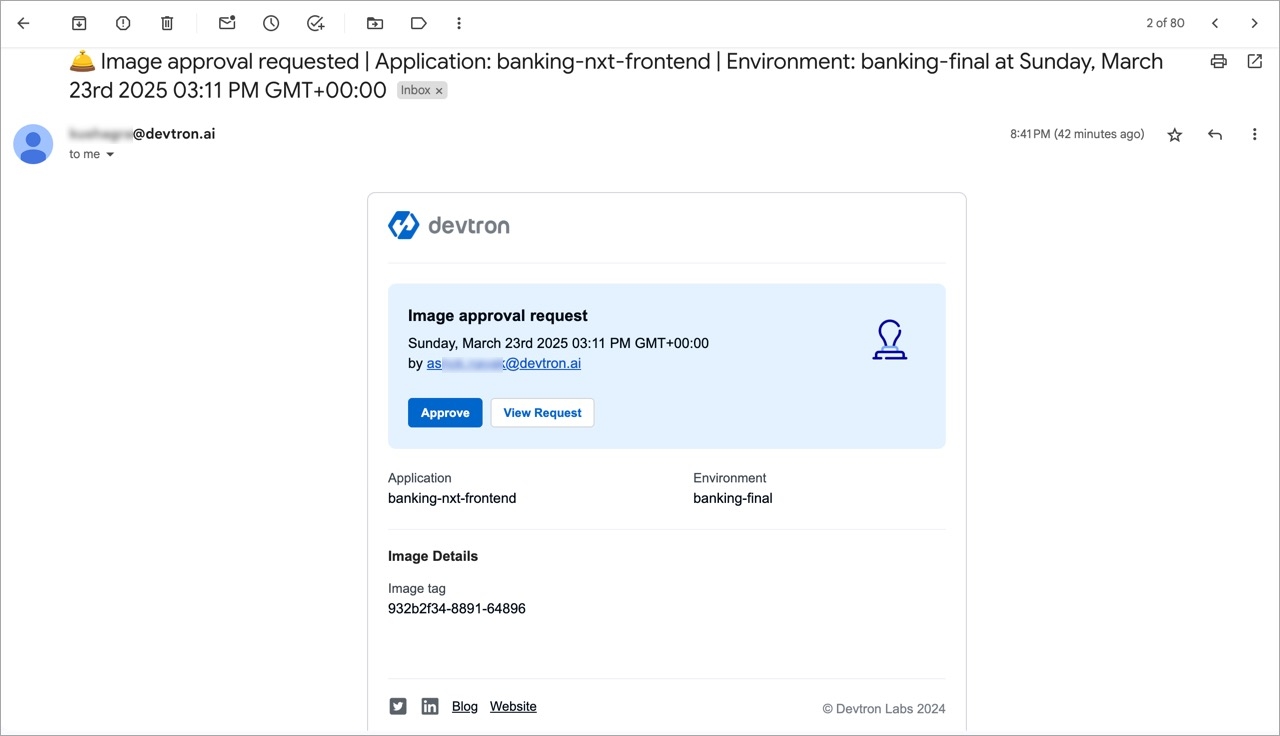
To approve an image approval request, follow these steps:
Go to the
Build & Deploypage and click theApproval for deploymentbutton.
Figure 10: Approval Button Switch to the
Approval pendingtab. Here, you will get a list of images that are awaiting approval.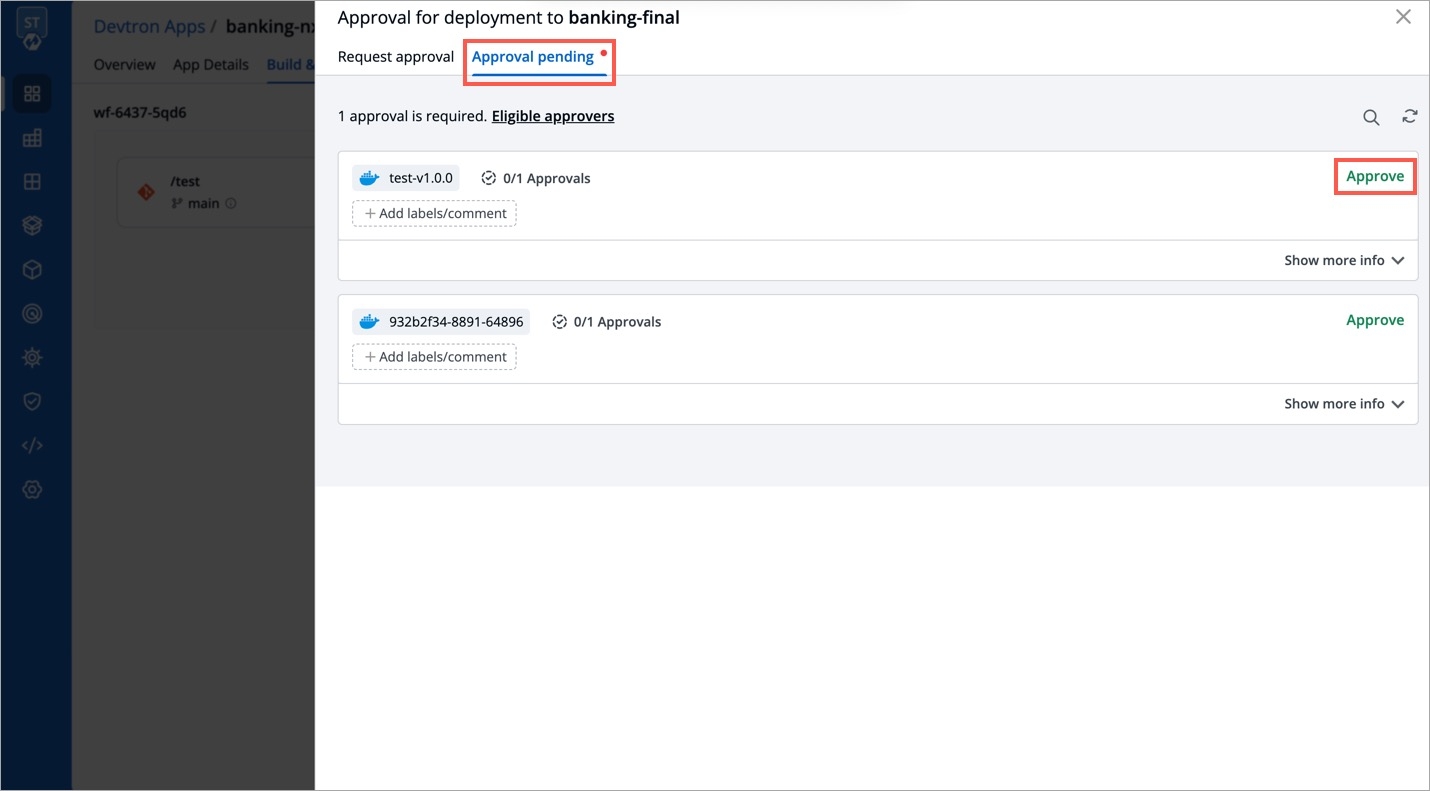
Figure 11: List of Pending Approvals Click Approve followed by Approve Request button.
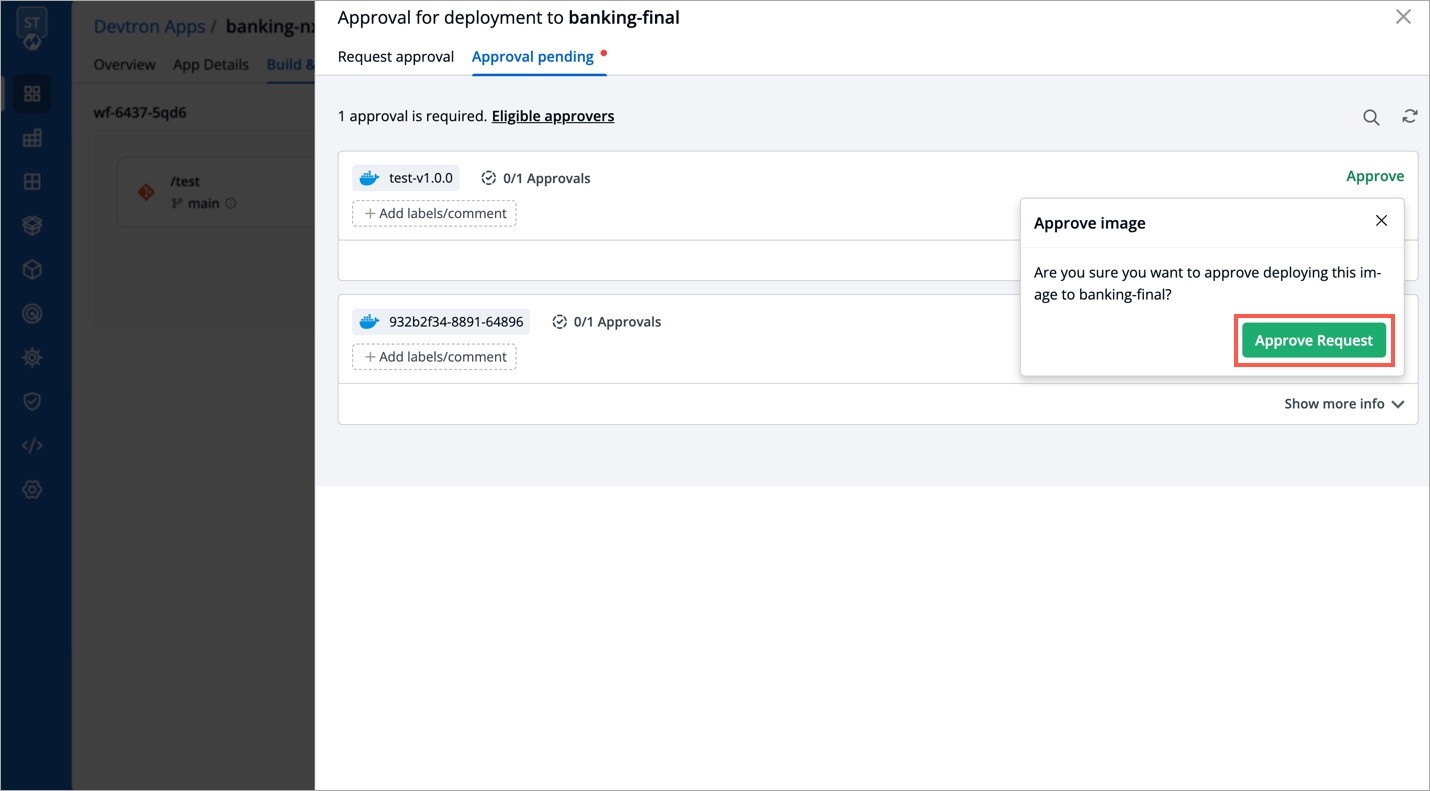
Figure 12: Approving a Request
Deploying Approved Image
Users need to have Build & deploy permission or above (along with access to the respective environment and application) to select and deploy an approved image.
In case the super-admin has set the minimum number of approval to more than 1 (in workflow), you must wait for all approvals before deploying the image. In other words, partially approved image will not be eligible for deployment.
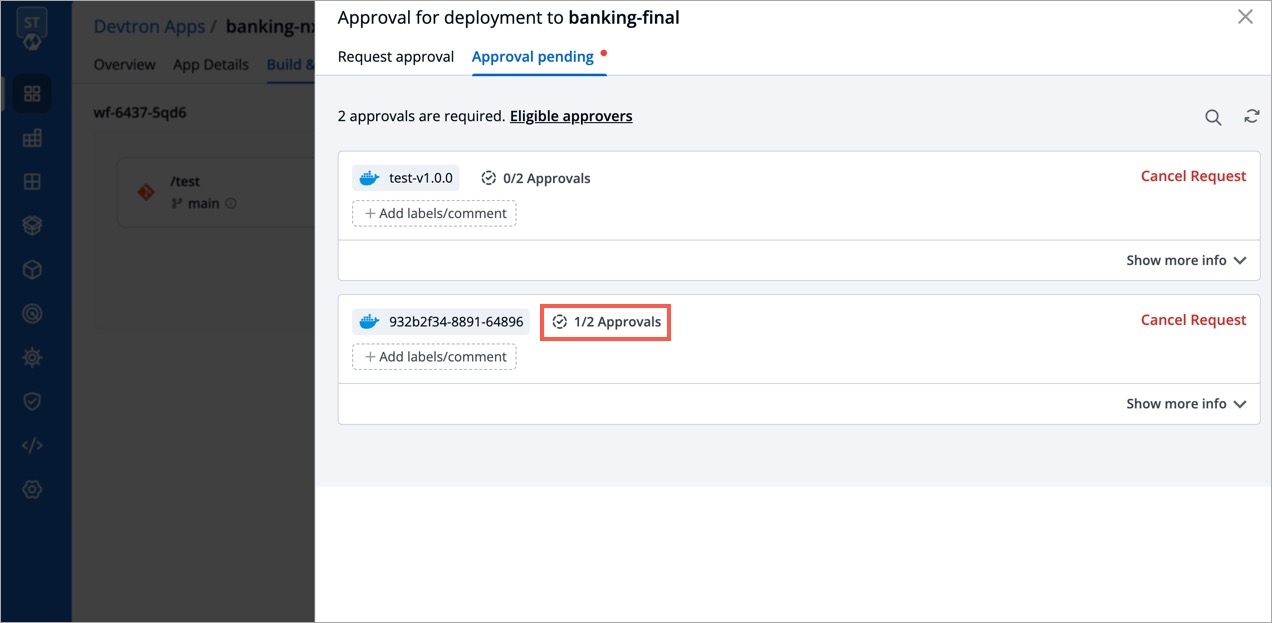
To deploy an approved image, follow these steps:
Navigate to the
Build & Deploytab and click Select Image.
Figure 14: Select Image Button You will find all the approved images listed under the
Approved imagessection. From the list, you can select the desired image and deploy it to your environment.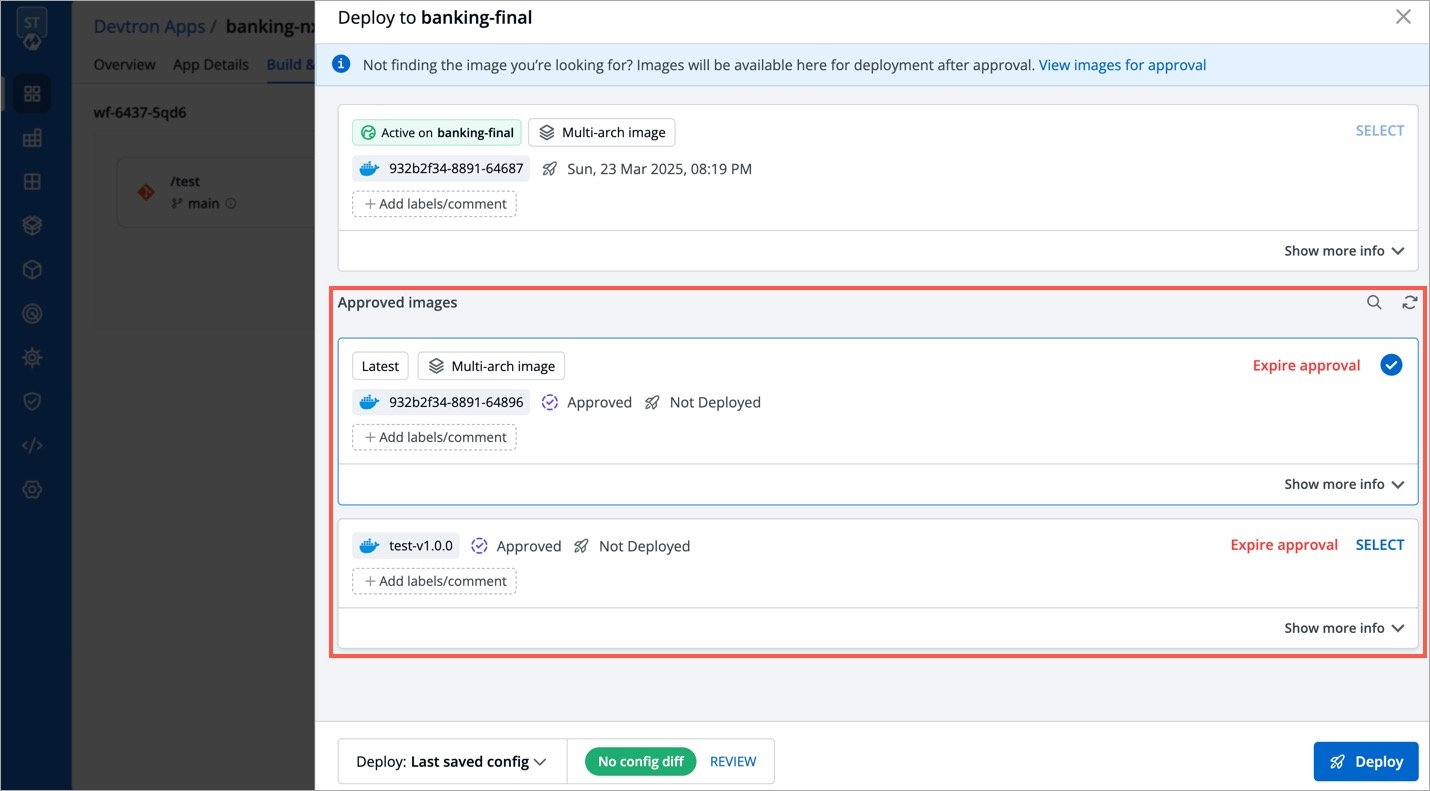
Figure 15: List of Approved Images You can view the status of current deployment in the
App Detailstab.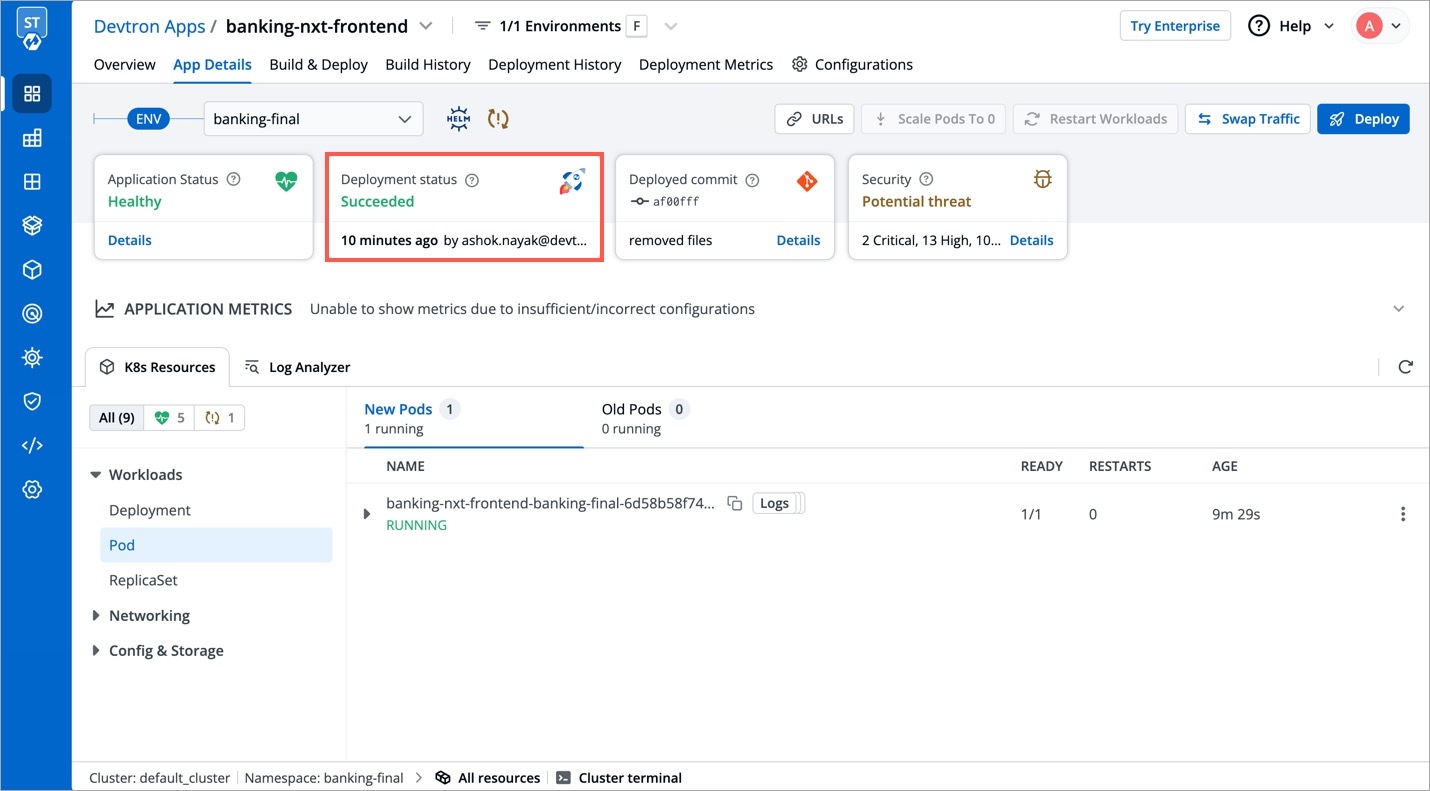
Figure 16: 'App Details' Screen
The status initially appears as Progressing for approximately 1-2 minutes, and then gradually transitions to Healthy state based on the deployment strategy.
Here, our CD pipeline trigger was successful and the deployment is in Healthy state.
To further diagnose the deployments, click here
Rollback Deployment
Deployments can be rolled back manually. After a deployment is completed, you can manually rollback to a previously deployed image by retaining the same configuration or changing the configuration.
As an example, You have deployed four different releases as follows:
V1
C1
R1
V2
C2
R2
V3
C2
R3
V3
C3
R4
V3
C4 (saved but not deployed)
-
If you want to roll back from V3 image to V2 image, then you have the following options:
Config deployed with selected image
V2
C2
Last deployed config
V2
C3
Last saved config
V2
C4
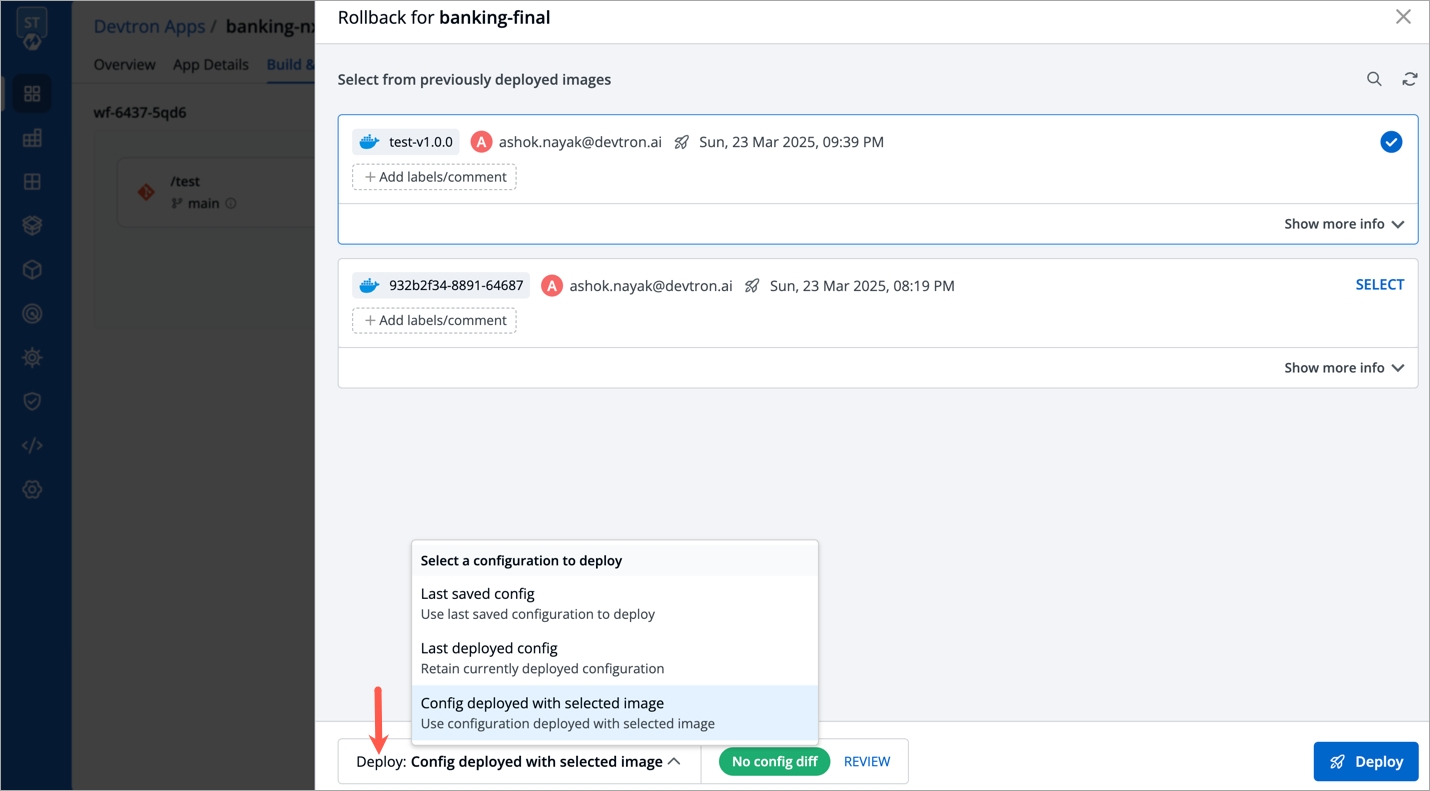
Select
Rollbackin your deployed pipeline.On the
Rollbackpage, select a configuration to deploy from the list:
Last saved config
Deploy the image with the latest saved configuration.
Last deployed config
Deploy the image with the last deployed configuration. As an example: The configuration C3.
Config deployed with selected image
Deploy the configuration which was deployed with the selected image. As an example: The configuration C2.
Once you select the previously deployed image and the configuration, review the difference between
Last Deployed Configurationand the selected configuration.Click
Deploy.
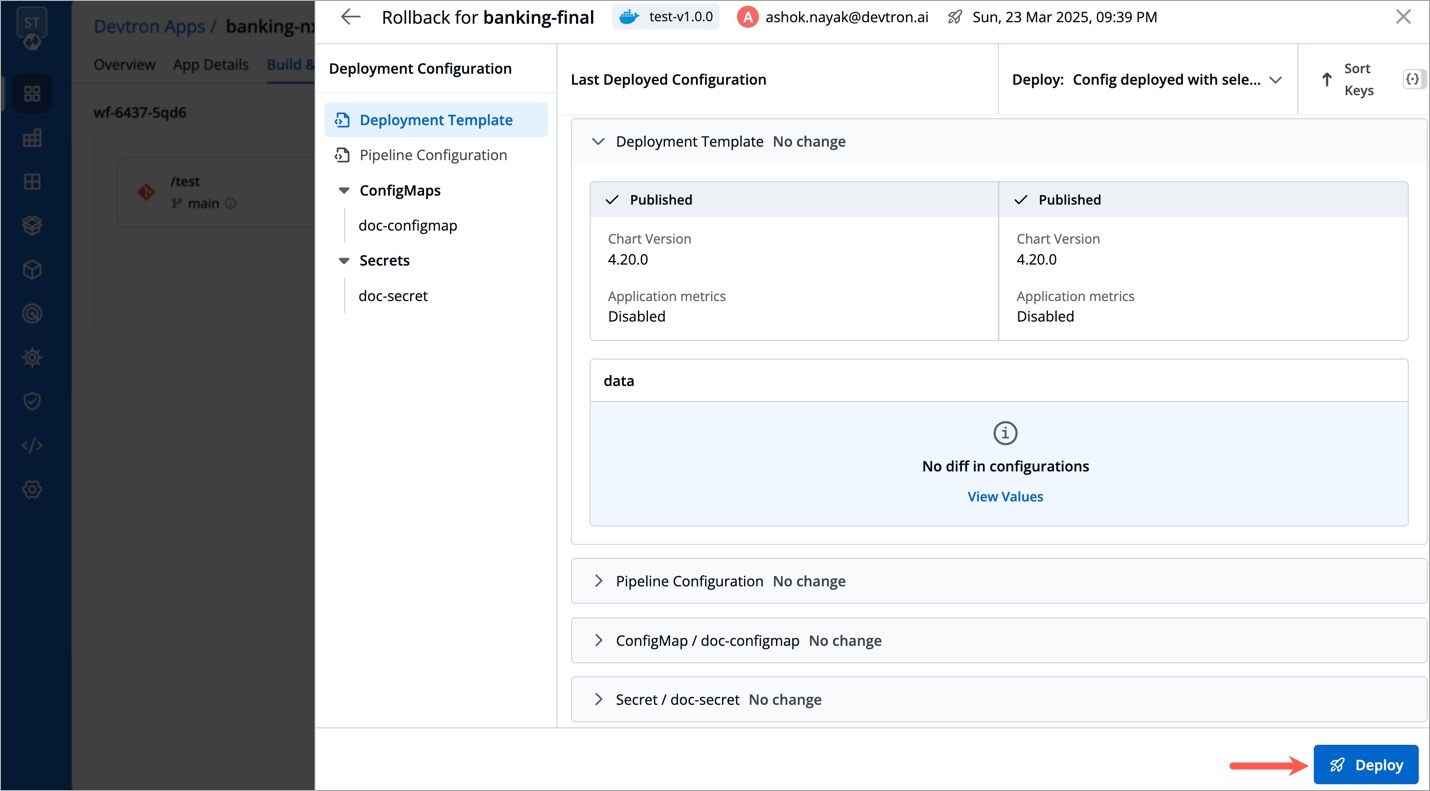
The selected previously deployed image will be deployed.
Note:
There will be no difference in the configuration if you select
Last deployed configfrom the list.When you select
Config deployed with selected imageand if the configuration is missing in the selected previously deployed image, it will show asConfig Not Available. In such cases, you can select eitherLast saved configorLast deployed config.
