Info:
For Devtron version older than v0.4.0, please refer the CI Pipeline (legacy) page.
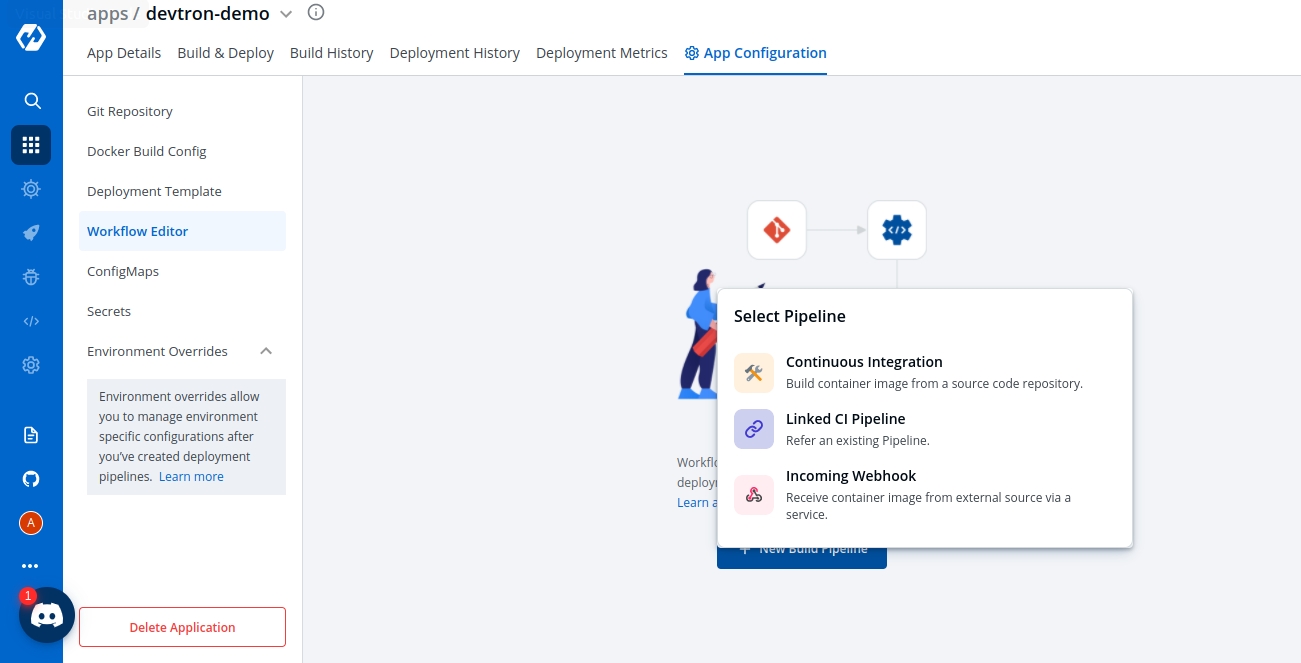
A CI Pipeline can be created in one of the three ways:
Each of these methods has different use-cases that can be tailored to the needs of the organization.
Continuous Integration Pipeline allows you to build the container image from a source code repository.
From the Applications menu, select your application.
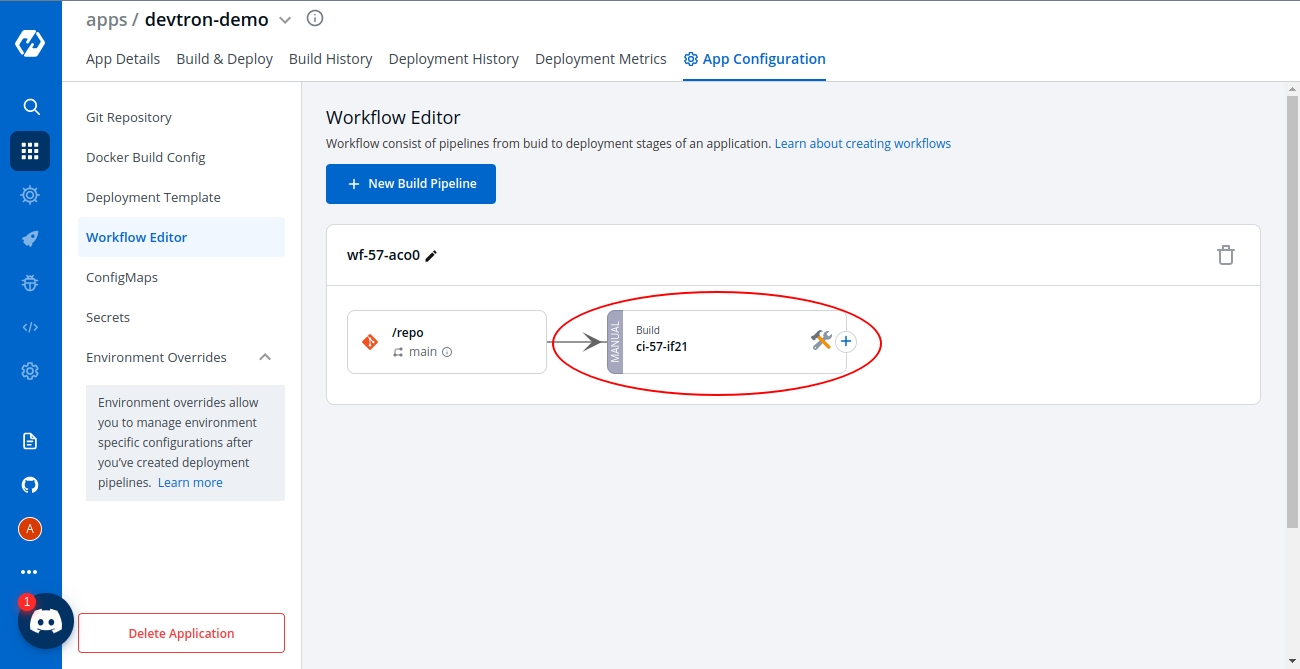
On the App Configuration page, select Workflow Editor.
Select + New Build Pipeline.
Select Continuous Integration.
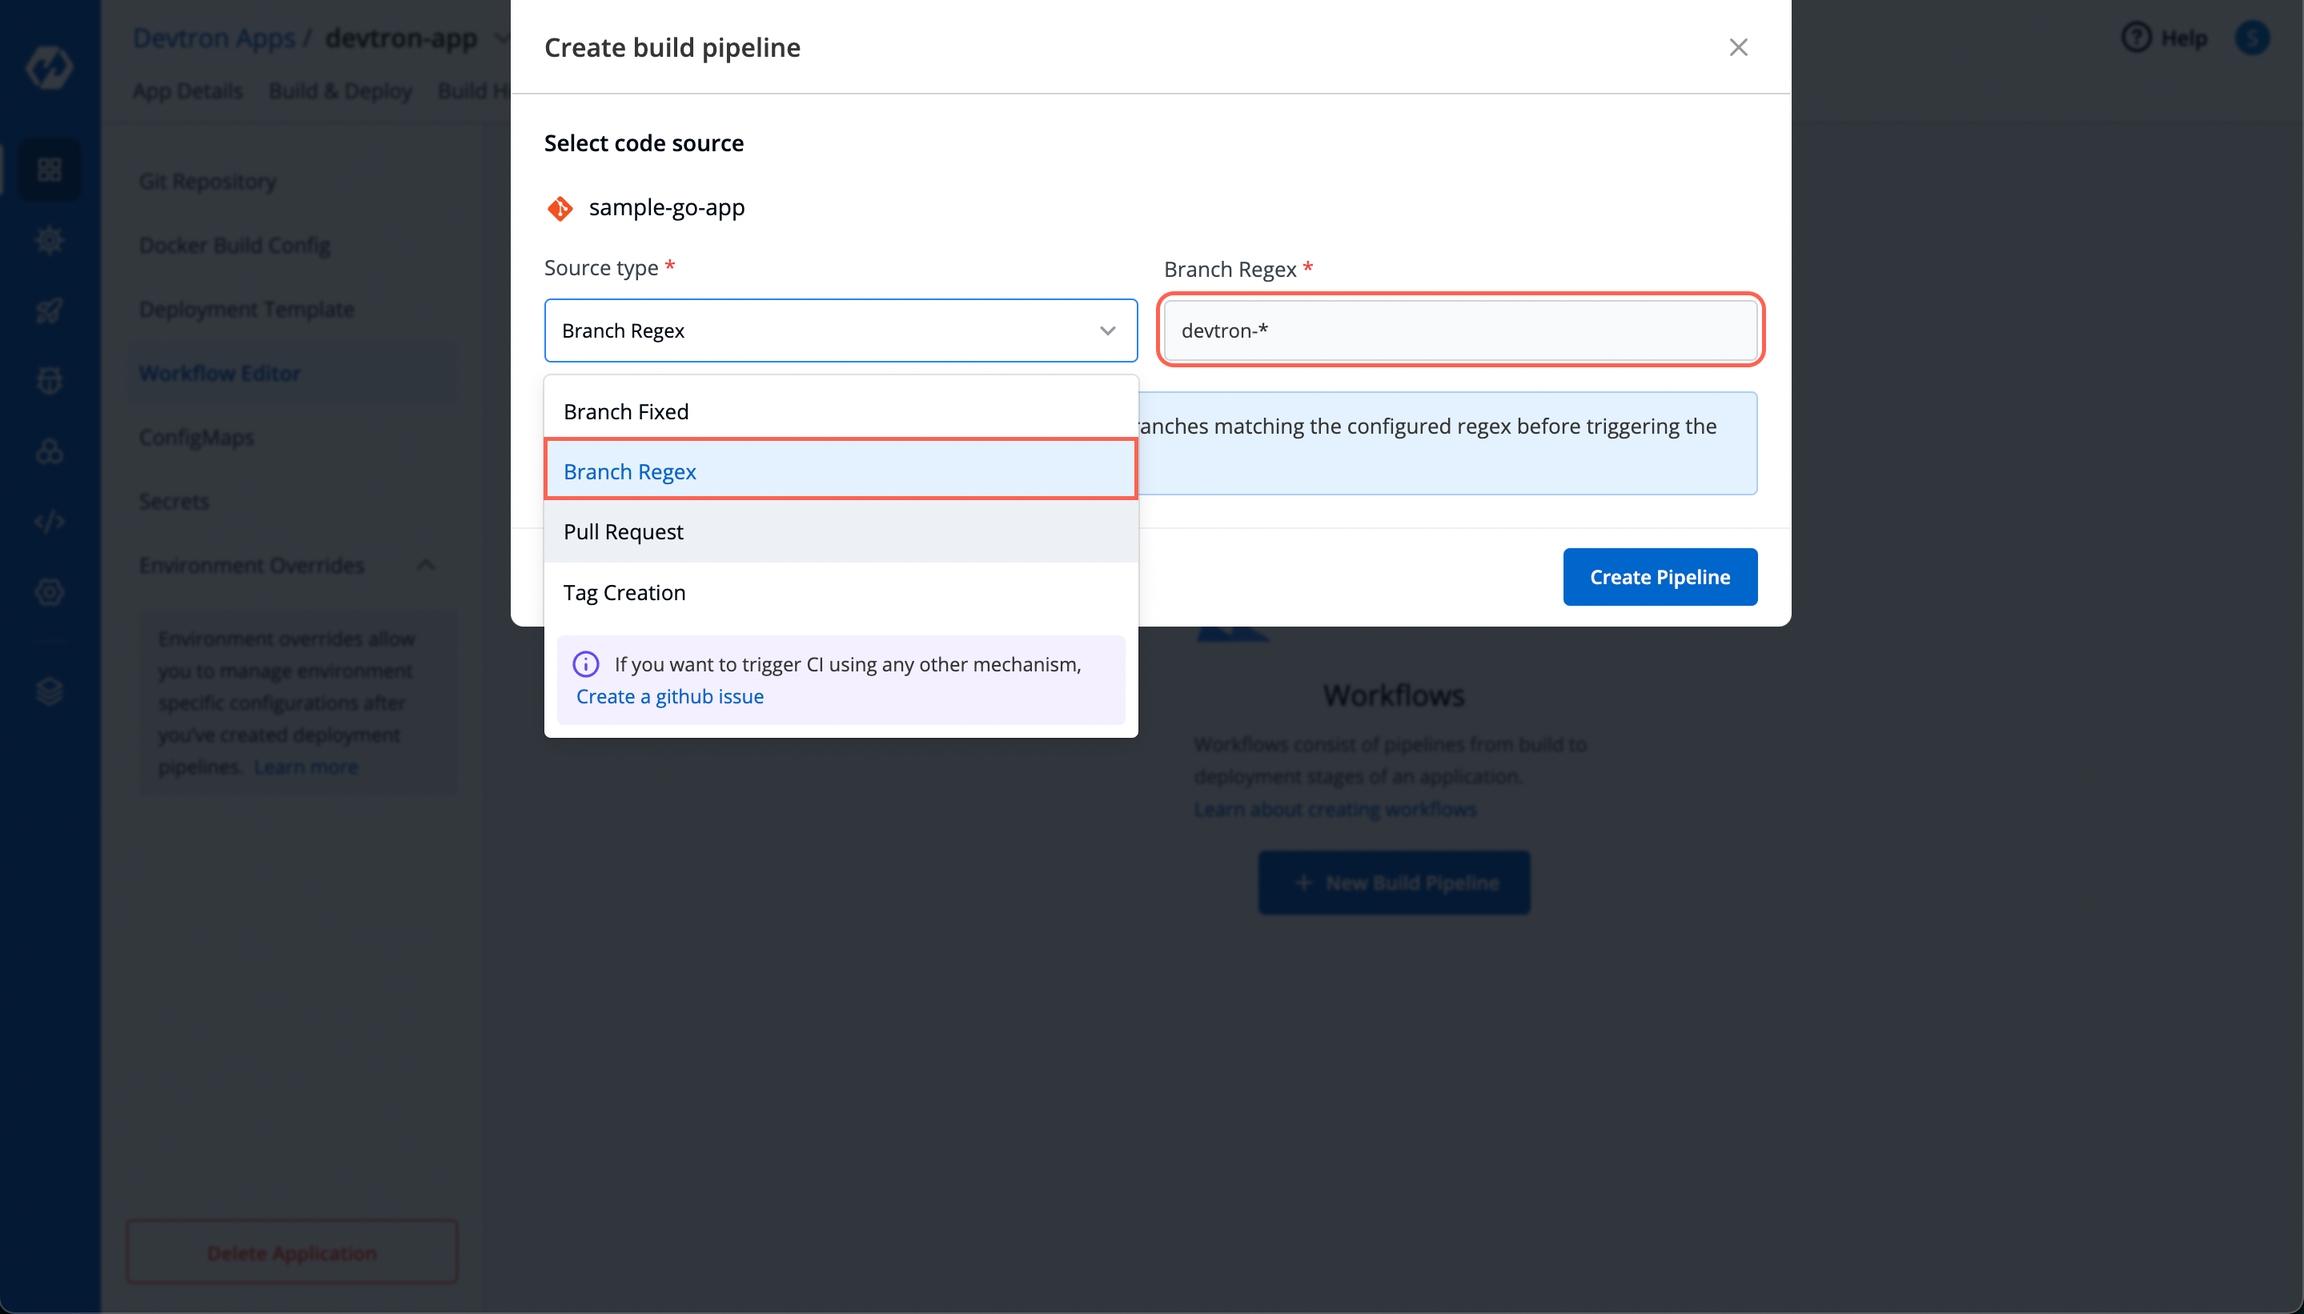
Enter the following fields on the Create build pipeline screen:
Source type
Required
Branch Name
Required
Branch that triggers the CI build
Advanced Options
Optional
Create Pre-Build, Build, and Post-Build tasks
The advanced CI Pipeline includes the following stages:
Pre-build stage: The tasks in this stage run before the image is built.
Build stage: In this stage, the build is triggered from the source code that you provide.
Post-build stage: The tasks in this stage are triggered once the build is complete.
The Pre-Build and Post-Build stages allow you to create Pre/Post-Build CI tasks as explained here.
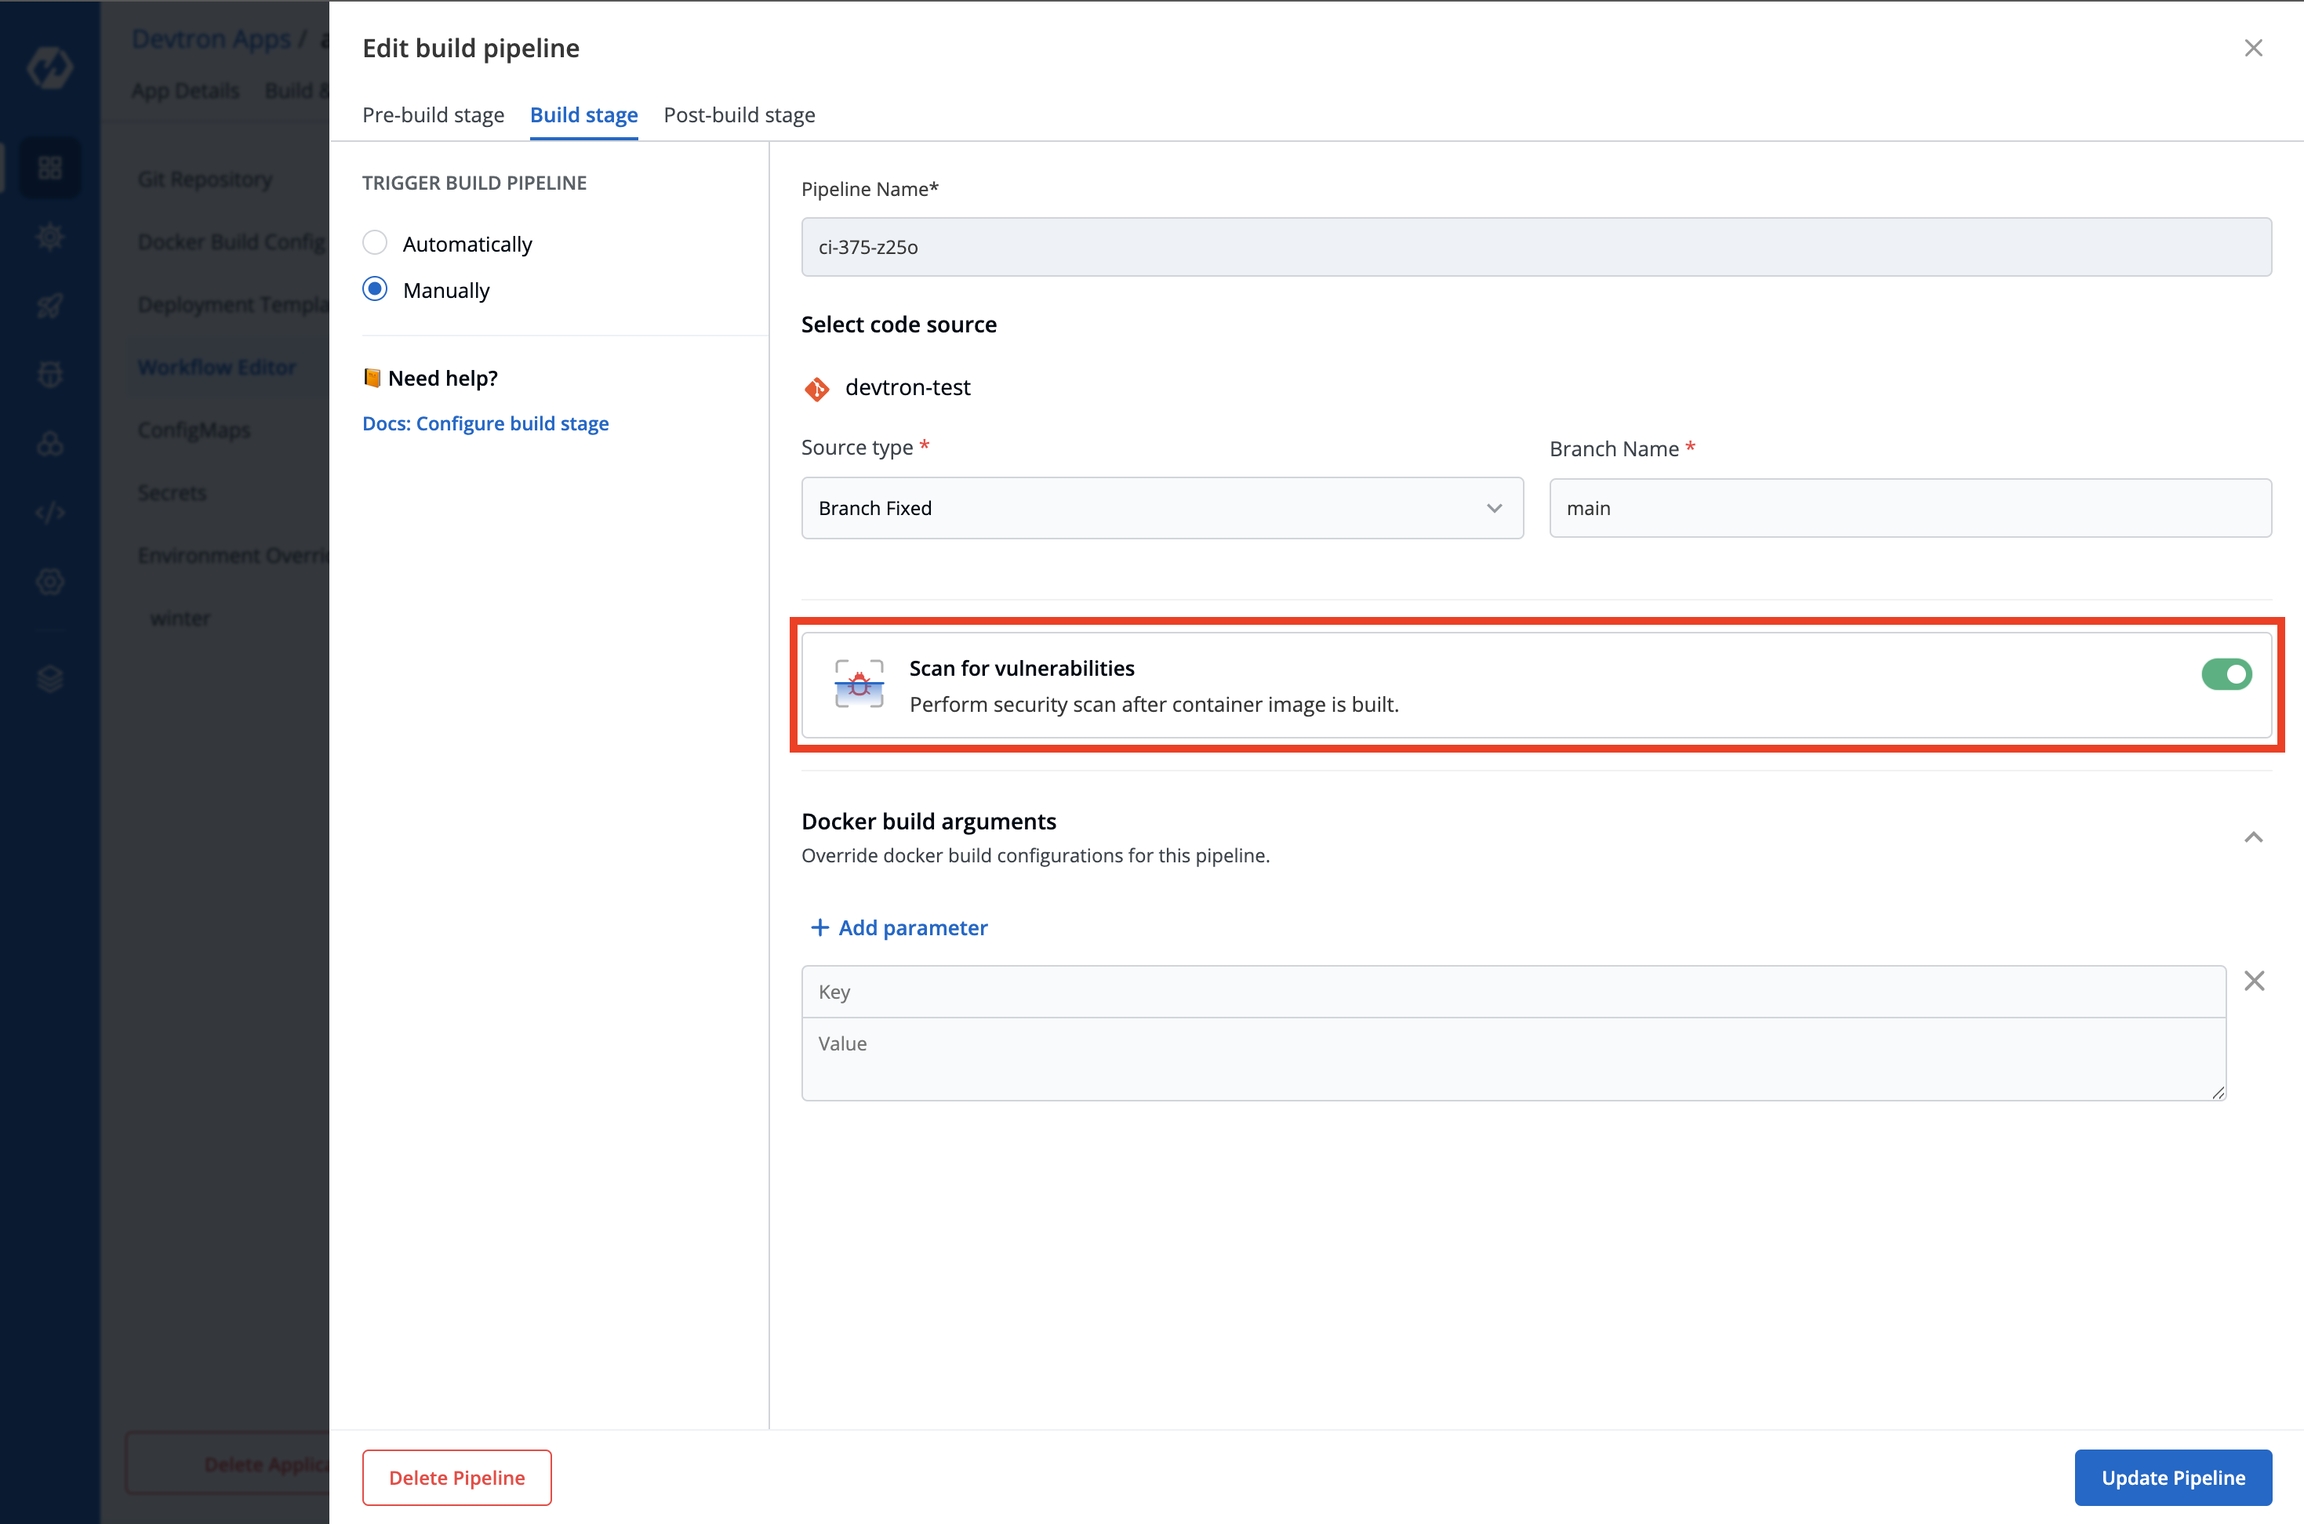
To Perform the security scan after the container image is built, enable the Scan for vulnerabilities toggle in the build stage.
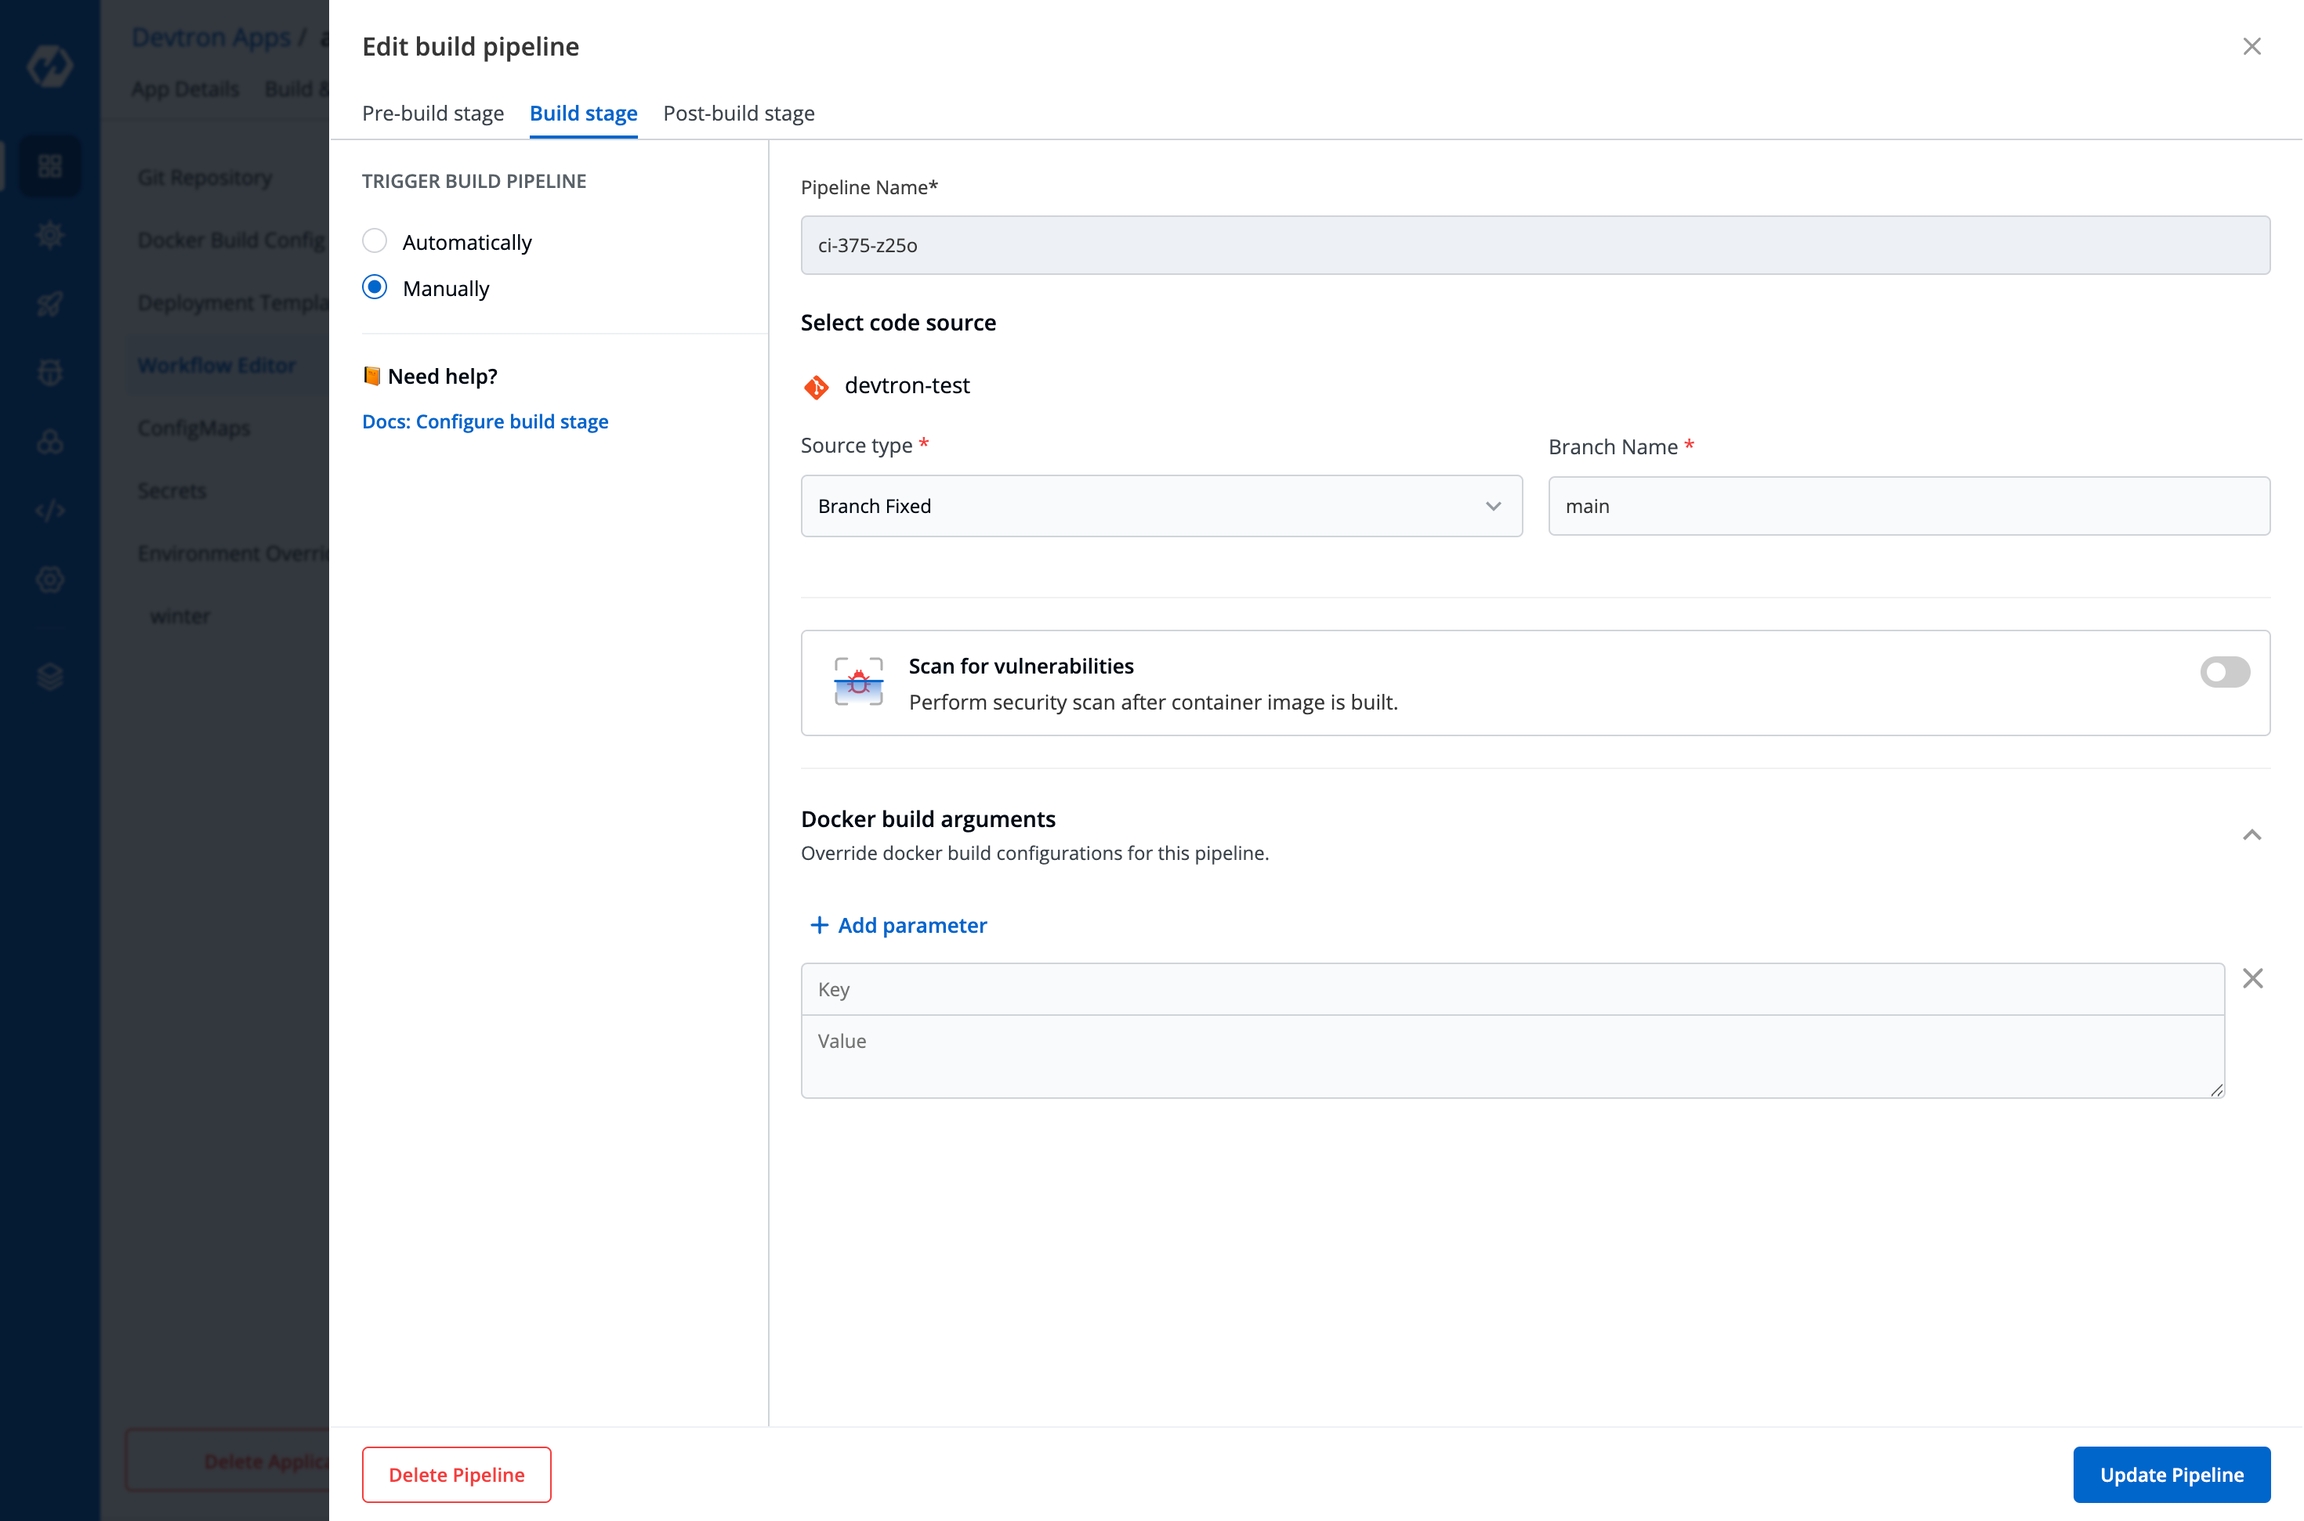
The Build stage allows you to configure a build pipeline from the source code.
From the Create build pipeline screen, select Advanced Options.
Select Build stage.
TRIGGER BUILD PIPELINE
Required
The build execution may be set to:
Automatically (default): Build is triggered automatically as the Git source code changes.
Manually: Build is triggered manually.
Pipeline Name
Required
A name for the pipeline
Source type
Required
Branch Name
Required
Branch that triggers the CI build
Docker build arguments
Optional
Override docker build configurations for this pipeline.
Key: Field name
Value: Field value
Select Update Pipeline.
The Source type - "Branch Fixed" allows you to trigger a CI build whenever there is a code change on the specified branch.
Select the Source type as "Branch Fixed" and enter the Branch Name.
Branch Regex allows users to easily switch between branches matching the configured Regex before triggering the build pipeline. In case of Branch Fixed, users cannot change the branch name in ci-pipeline unless they have admin access for the app. So, if users with Build and Deploy access should be allowed to switch branch name before triggering ci-pipeline, Branch Regex should be selected as source type by a user with Admin access.
For example if the user sets the Branch Regex as feature-*, then users can trigger from branches such as feature-1450, feature-hot-fix etc.
Info: If you choose "Pull Request" or "Tag Creation" as the source type, you must first configure the Webhook for GitHub/Bitbucket as a prerequisite step.
Go to the Settings page of your repository and select Webhooks.
Select Add webhook.
In the Payload URL field, enter the Webhook URL that you get on selecting the source type as "Pull Request" or "Tag Creation" in Devtron the dashboard.
Change the Content-type to application/json.
In the Secret field, enter the secret from Devtron the dashboard when you select the source type as "Pull Request" or "Tag Creation".
Under Which events would you like to trigger this webhook?, select Let me select individual events. to trigger the webhook to build CI Pipeline.
Select Branch or tag creation and Pull Requests.
Select Add webhook.
Go to the Repository settings page of your Bitbucket repository.
Select Webhooks and then select Add webhook.
Enter a Title for the webhook.
In the URL field, enter the Webhook URL that you get on selecting the source type as "Pull Request" or "Tag Creation" in the Devtron dashboard.
Select the event triggers for which you want to trigger the webhook.
Select Save to save your configurations.
The Source type - "Pull Request" allows you to configure the CI Pipeline using the PR raised in your repository.
Before you begin, configure the webhook for either GitHub or Bitbucket.
The "Pull Request" source type feature only works for the host GitHub or Bitbucket cloud for now. To request support for a different Git host, please create a github issue here.
To trigger the build from specific PRs, you can filter the PRs based on the following keys:
Author
Author of the PR
Source branch name
Branch from which the Pull Request is generated
Target branch name
Branch to which the Pull request will be merged
Title
Title of the Pull Request
State
State of the PR. Default is "open" and cannot be changed
Select the appropriate filter and pass the matching condition as a regular expression (regex).
Devtron uses regexp library, view regexp cheatsheet. You can test your custom regex from here.
Select Create Pipeline.
The Source type - "Tag Creation" allows you to build the CI pipeline from a tag.
Before you begin, configure the webhook for either GitHub or Bitbucket.
To trigger the build from specific tags, you can filter the tags based on the author and/or the tag name.
Author
The one who created the tag
Tag name
Name of the tag for which the webhook will be triggered
Select the appropriate filter and pass the matching condition as a regular expression (regex).
Select Create Pipeline.
Note
(a) You can provide pre-build and post-build stages via the Devtron tool’s console or can also provide these details by creating a file
devtron-ci.yamlinside your repository. There is a pre-defined format to write this file. And we will run these stages using this YAML file. You can also provide some stages on the Devtron tool’s console and some stages in the devtron-ci.yaml file. But stages defined through theDevtrondashboard are first executed then the stages defined in thedevtron-ci.yamlfile.(b) The total timeout for the execution of the CI pipeline is by default set as 3600 seconds. This default timeout is configurable according to the use case. The timeout can be edited in the configmap of the orchestrator service in the env variable as
env:"DEFAULT_TIMEOUT" envDefault:"3600"
If one code is shared across multiple applications, Linked CI Pipeline can be used, and only one image will be built for multiple applications because if there is only one build, it is not advisable to create multiple CI Pipelines.
From the Applications menu, select your application.
On the App Configuration page, select Workflow Editor.
Select + New Build Pipeline.
Select Linked CI Pipeline.
Enter the following fields on the Create linked build pipeline screen:
Select the application in which the source CI pipeline is present.
Select the source CI pipeline from the application that you selected above.
Enter a name for the linked CI pipeline.
Select Create Linked CI Pipeline.
After creating a linked CI pipeline, you can create a CD pipeline. Builds cannot be triggered from a linked CI pipeline; they can only be triggered from the source CI pipeline. There will be no images to deploy in the CD pipeline created from the 'linked CI pipeline' at first. To see the images in the CD pipeline of the linked CI pipeline, trigger build in the source CI pipeline. The build images will now be listed in the CD pipeline of the 'linked CI pipeline' whenever you trigger a build in the source CI pipeline.
The CI pipeline receives container images from an external source via a webhook service.
You can use Devtron for deployments on Kubernetes while using your CI tool such as Jenkins. External CI features can be used when the CI tool is hosted outside the Devtron platform.
From the Applications menu, select your application.
On the App Configuration page, select Workflow Editor.
Select + New Build Pipeline.
Select Incoming Webhook.
Pipeline Name
Required
Name of the pipeline
Source Type
Required
‘Branch Fixed’ or ‘Tag Regex’
Branch Name
Required
Name of the branch
Select Save and Generate URL. This generates the Payload format and Webhook URL.
You can send the Payload script to your CI tools such as Jenkins and Devtron will receive the build image every time the CI Service is triggered or you can use the Webhook URL which will build an image every time CI Service is triggered using Devtron Dashboard.
You can update the configurations of an existing CI Pipeline except for the pipeline's name. To update a pipeline, select your CI pipeline. In the Edit build pipeline window, edit the required stages and select Update Pipeline.
You can only delete a CI pipeline if there is no CD pipeline created in your workflow.
To delete a CI pipeline, go to App Configurations > Workflow Editor and select Delete Pipeline.
Source type to trigger the CI. Available options: | | |
Select the source type to build the CI pipeline: | | |
The CI pipeline includes Pre and Post-build steps to validate and introduce checkpoints in the build process.
The pre/post plugins allow you to execute some standard tasks, such as Code analysis, Load testing, Security scanning, and so on. You can build custom pre/post tasks or use one from the standard preset plugins provided by Devtron.
Create a CI build pipeline if you haven't done that already!
Each Pre/Post-build stage is executed as a series of events called tasks and includes custom scripts. You could create one or more tasks that are dependent on one another for execution. In other words, the output variable of one task can be used as an input for the next task to build a CI runner.
The tasks will run following the execution order.
The tasks may be re-arranged by using drag-and-drop; however, the order of passing the variables must be followed.
Pre-Build/Post-Build
Sonarqube
K6 Load testing
Go to Applications and select your application from the Devtron Apps tabs.
From the App Configuration tab select Workflow Editor.
Select the build pipeline for editing the stages.
Devtron CI pipeline includes the following build stages:
Pre-build stage: The tasks in this stage run before the image is built.
Build stage: In this stage, the build is triggered from the source code that you provide.
Post-build stage: The tasks in this stage are triggered once the build is complete.
You can create a task either by selecting one of the available preset plugins or by creating a custom script.
Preset plugins | Execute custom script
Prerequisite: Set up Sonarqube, or get the API keys from an admin.
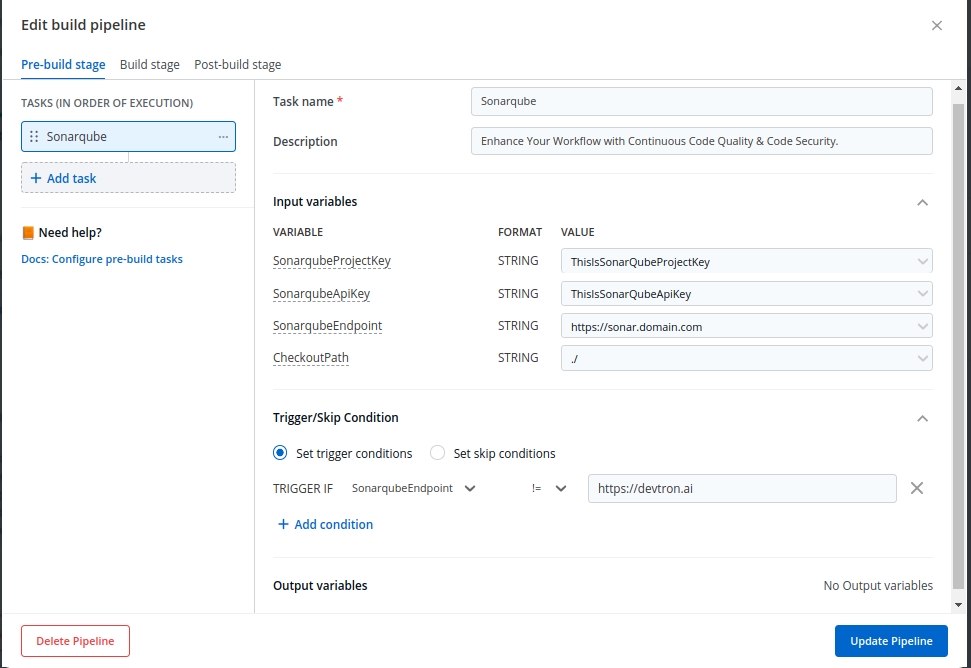
The example shows a Post-build stage with a task created using a preset plugin - Sonarqube.
On the Edit build pipeline screen, select the Post-build stage (or Pre-build).
Select + Add task.
Select Sonarqube from PRESET PLUGINS.
Task name
Required
A relevant name for the task
Description
Optional
A descriptive message for the task
Input variables
Optional
VALUE: A value for the input variable. The value may be any of the values from the previous build stages, a global variable, or a custom value
Trigger/Skip Condition
Optional
A conditional statement to execute or skip the task
SonarqubeProjectKey
String
Project key of sonarqube account.
SonarqubeApiKey
String
Api key of sonarqube account.
SonarqubeEndpoint
String
Api endpoint of sonarqube account.
CheckoutPath
String
Checkout path of git material.
Select Update Pipeline.
On the Edit build pipeline screen, select the Pre-build stage.
Select + Add task.
Select Execute custom script.
The task type of the custom script may be a Shell or a Container image.
Select the Task type as Shell.
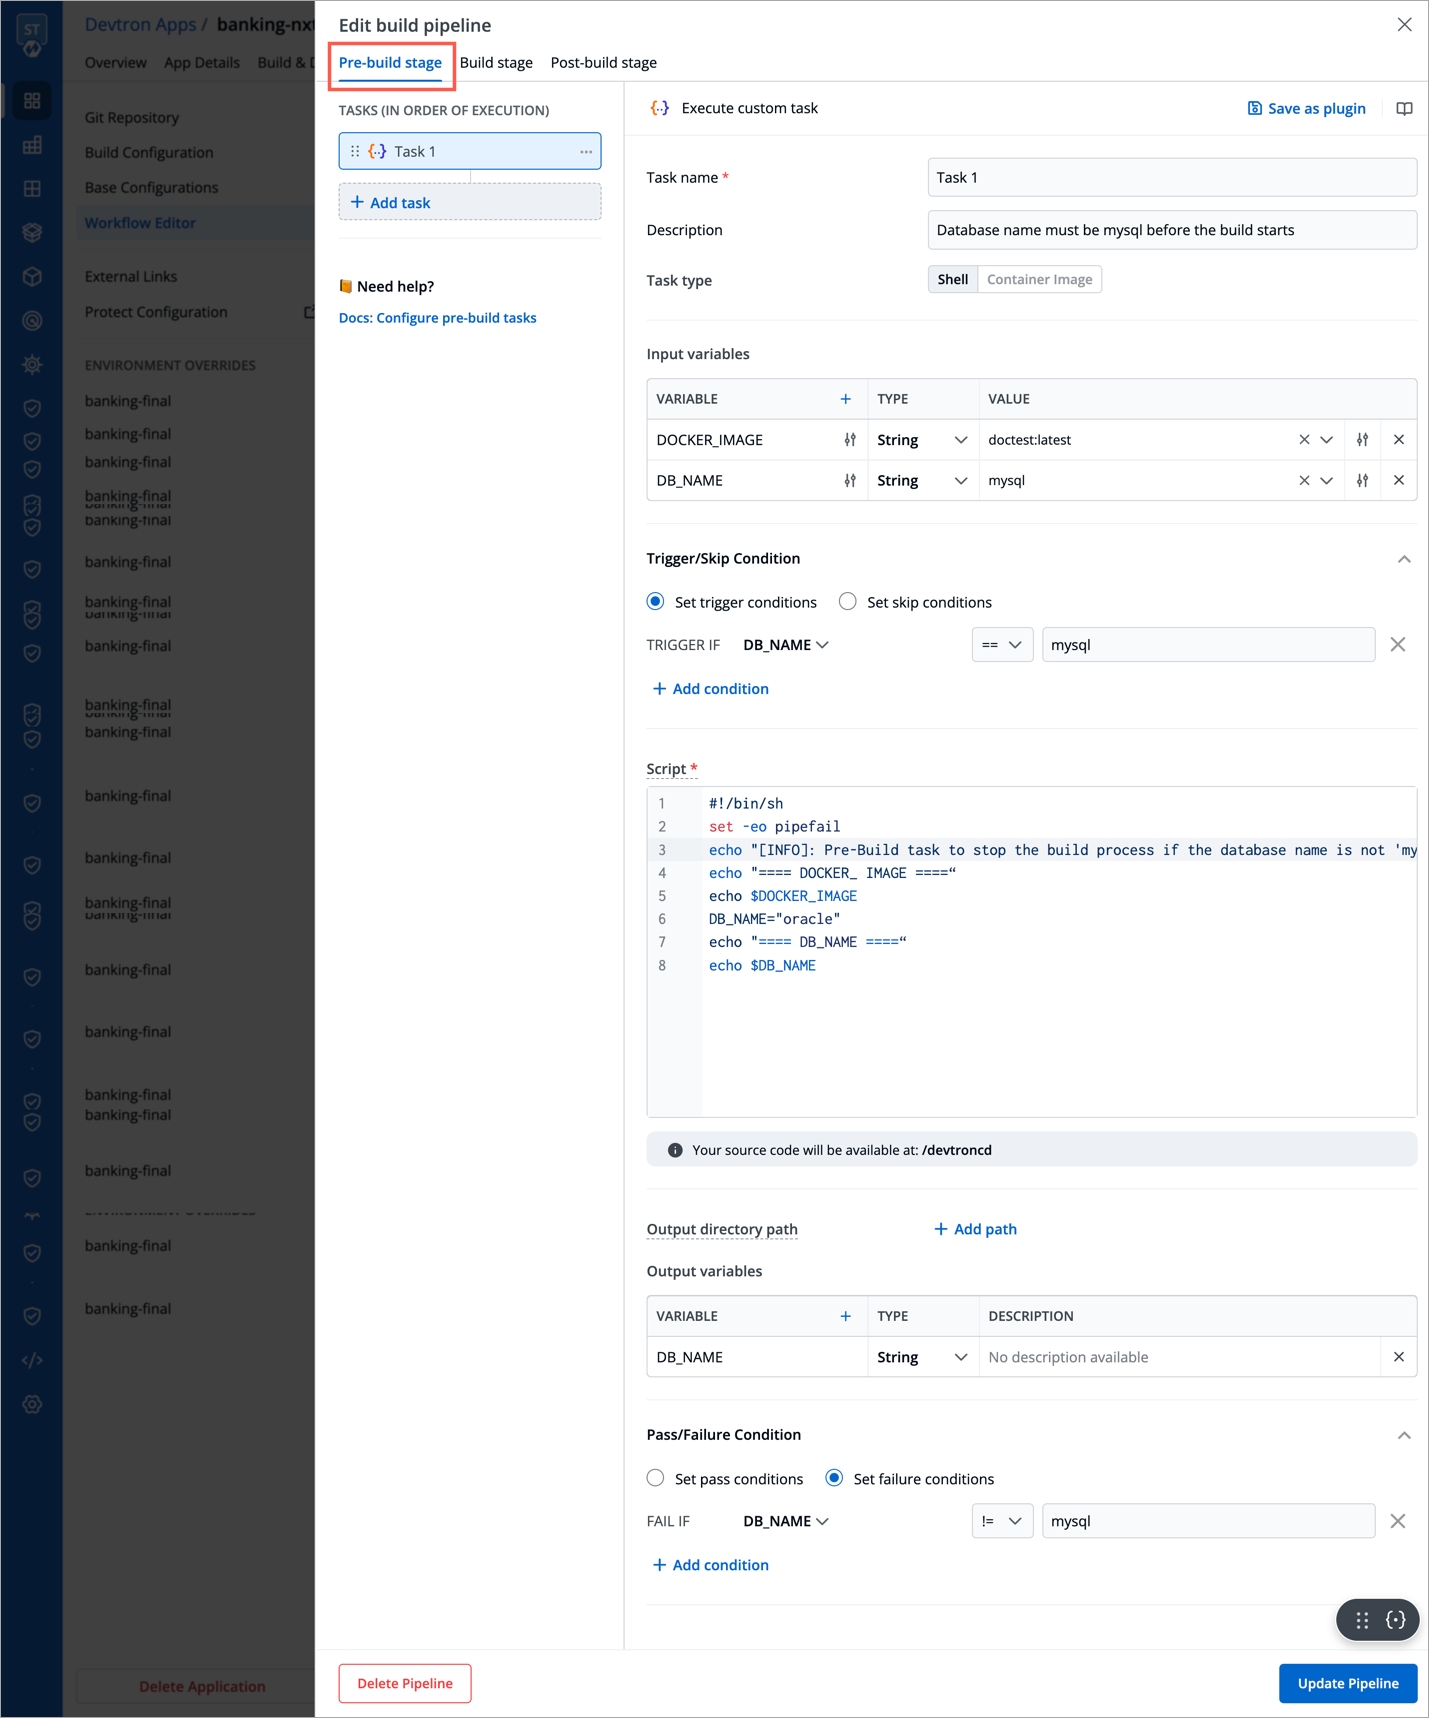
Consider an example that creates a Shell task to stop the build if the database name is not "mysql". The script takes 2 input variables, one is a global variable (DOCKER_IAMGE), and the other is a custom variable (DB_NAME) with a value "mysql". The task triggers only if the database name matches "mysql". If the trigger condition fails, this Pre-build task will be skipped and the build process will start. The variable DB_NAME is declared as an output variable that will be available as an input variable for the next task. The task fails if DB_NAME is not equal to "mysql".
Task name
Required
A relevant name for the task
Description
Optional
A descriptive message for the task
Task type
Optional
Shell: Custom shell script goes here
Input variables
Optional
Variable name: Alphanumeric chars and (_) only
Source or input value: The variable's value can be global, output from the previous task, or a custom value. Accepted data types include: STRING | BOOL | NUMBER | DATE
Description: Relevant message to describe the variable.
Trigger/Skip condition
Optional
A conditional statement to execute or skip the task
Script
Required
Custom script for the Pre/Post-build tasks
Output directory path
Optional
Output variables
Optional
Environment variables that are passed as input variables for the next task.
Pass/Failure Condition (Optional): Conditional statements to determine the success/failure of the task. A failed condition stops the execution of the next task and/or build process
Select Update Pipeline.
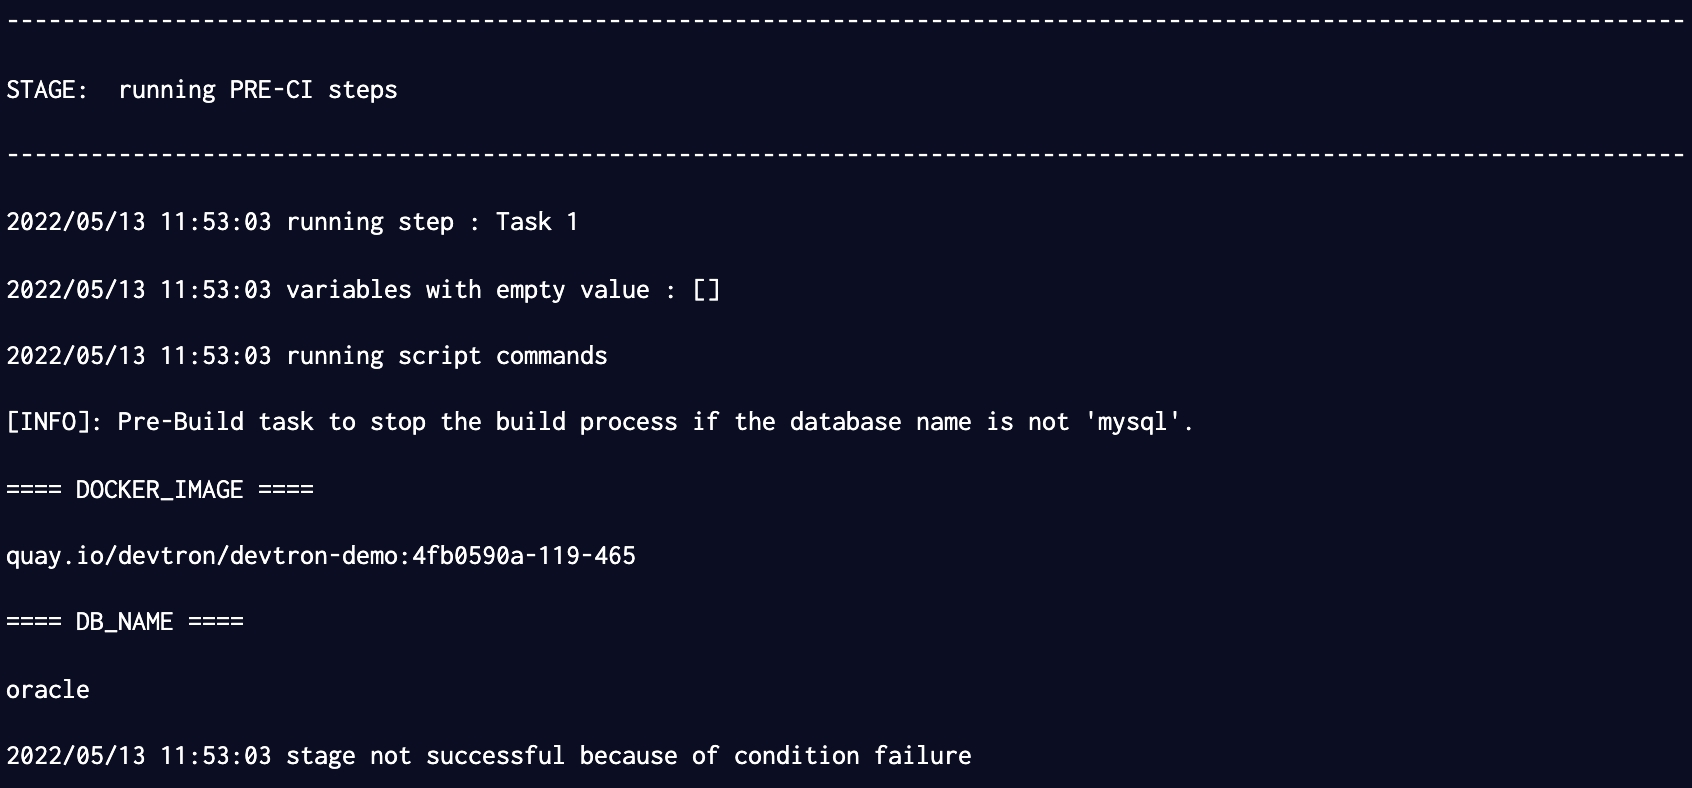
Here is a screenshot with the failure message from the task:
Select the Task type as Container image.
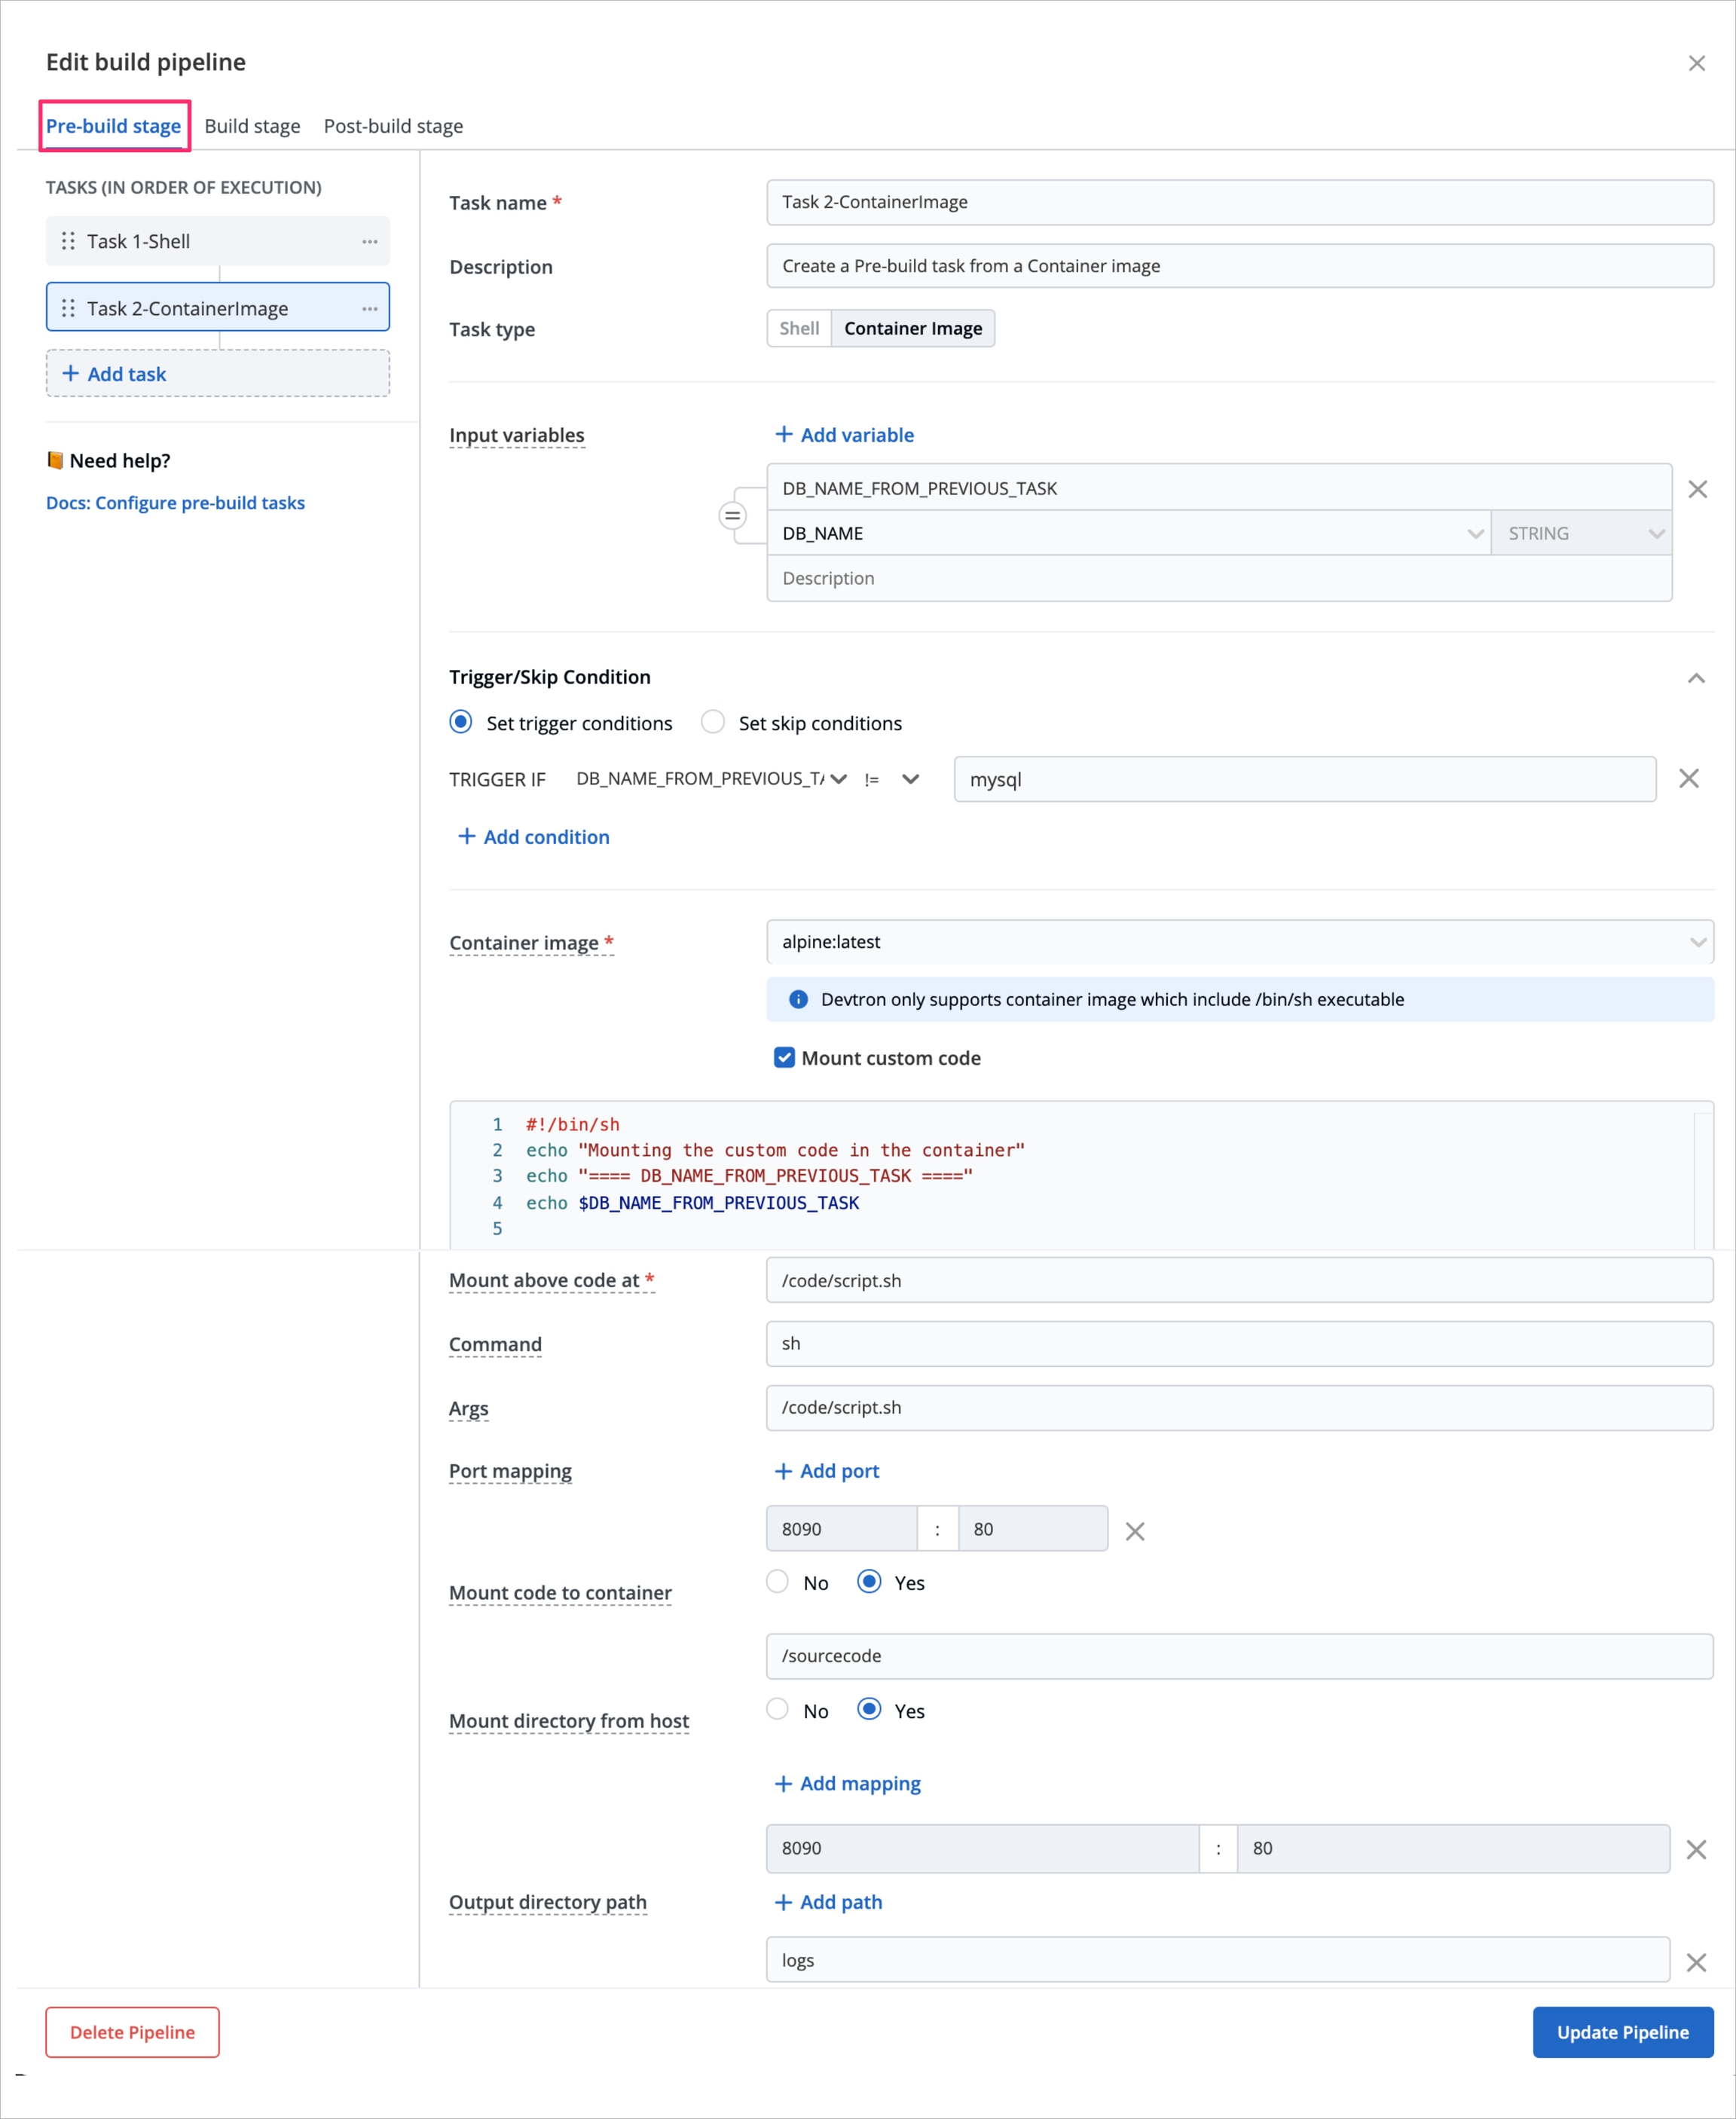
This example creates a Pre-build task from a container image. The output variable from the previous task is available as an input variable.
Task name
Required
A relevant name for the task
Description
Optional
A descriptive message for the task
Task type
Optional
Container image
Input variables
Optional
Variable name: Alphanumeric chars and (_) only
Source or input value: The variable's value can be global, output from the previous task, or a custom value Accepted data types include: STRING | BOOL | NUMBER | DATE
Description: Relevant message to describe the variable
Trigger/Skip condition
Optional
A conditional statement to execute or skip the task
Container image
Required
Select an image from the drop-down list or enter a custom value in the format <image>:<tag>
Mount custom code
Optional
Enable to mount the custom code in the container. Enter the script in the box below.
Mount above code at (required): Path where the code should be mounted
Command
Optional
The command to be executed inside the container
Args
Optional
The arguments to be passed to the command mentioned in the previous field
Port mapping
Optional
The port number on which the container listens. The port number exposes the container to outside services
Mount code to container
Optional
Mounts the source code inside the container. Default is "No". If set to "Yes", enter the path
Mount directory from host
Optional
Mount any directory from the host into the container. This can be used to mount code or even output directories
Output directory path
Optional
Directory path for the script output files such as logs, errors, etc.
Select Update Pipeline.
Trigger the CI pipeline
Create a task from -
Create a task from -

